Embed Size (px)
Citation preview
On Your Tabletop
Stand‐Alone Missions Please help us by playtesting these rules and messaging us on Facebook or at mastersoftheforge.gmail.com.
DISCLAIMER: This is a notforprofit supplement for Warhammer 40,000 by Games Workshop plc. None of the authors, distributors, contributors, editors, or commentators have participated in this project for money; they have done so purely for the love of the game. This ruleset demands that its users own and refer to the Warhammer 40,000 rulebook and relevant codices in the use of these rules. All content within these pages is usercreated and is derived, without permission, from Warhammer 40,000 intellectual property owned by Games Workshop Ltd. This ruleset is completely unofficial and is in no way endorsed by Games Workshop Ltd. Adepta Sororitas, Astartes, Battlefleet Gothic, Black Angels, Black Library, the Black Library logo, BL Publishing, Blood Angels, Bloodquest, Blood Bowl, the Blood Bowl logo, the Blood Bowl Spike Device, Cadian, Catachan, the Chaos device, Cityfight, the Chaos logo, Citadel, the Citadel device, City of the Damned, Codex, Daemonhunters, Dark Angels, Dark Eldar, Dark Future, the DoubleHeaded/Imperial Eagle device, ‘Eavy Metal, Eldar, Eldar symbol devices, Epic, Eye of Terror, Fanatic, the Fanatic logo, the Fanatic II logo, Fire Warrior, the Force Organization Slot logos (HQ, Elite, Troop, Fast Attack, Heavy Support, Formation, Lord of War, and others), Forge World, Games Workshop, Games Workshop logo, Genestealer, Golden Daemon, Gorkamorka, Grand Master Mordrak, Great Unclean One, Guardsman Sly Marbo, Gue’vesa, the Hammer of Sigmar logo, the Horned Rat logo, Inferno, Inquisitor, the Inquisitor logo, the Inquisitor device, Inquisitor: Conspiracies, Keeper of Secrets, Khemri, Khorne, Kroot, Lord of Change, Marauder, Mordheim, the Mordheim logo, Necromunda, Necromunda stencil logo, Necromunda plate logo, Necron, Nurgle, Ork, Ork skull devices, Sisters of Battle, Skaven, the Skaven symbol and devices, Slaanesh, Space Hulk, Space Marine, Space Marine chapters, Space Marine chapter logos, Talisman, Tau, the Tau caste designations, Tomb Kings, Trio of Warriors, the Twin Tailed Comet logo, Tyranid, Tzeentch, Ultramarines, Veteran Sergeant Lysander, Warhammer, Warhammer Historical, Warhammer Online, the Warhammer device, the Warhammer World logo, Warmaster, White Dwarf, the White Dwarf logo, and all associated marks, names, races, race insignia, characters, vehicles, locations, units, illustrations, and images from the Blood Bowl game, the Warhammer world, the Talisman world, and the Warhammer 40,000 Universe are either ®, TM and/or Copyright Games Workshop Ltd 20002010, variably registered in the UK and other countries around the world. Used without permission. No challenge to the status Games Workshop’s intellectual property is intended, and All Rights Reserved to the respective owners.
This is NOT a Games Workshop Product.
We do this to promote the hobby we love and nurture the community of people who engage in it.
Thanks!

Contents
At Your Service Beachhead Bulwark Against the Wave Charadon Burns Get to Da Arvus Lighta! The Martyrs of Eagle Gate Stop The Ritual
At Your Service
The Tau have been hopelessly outnumbered in their battle against a powerful foe which seems to have an endless supply of troops at their disposal. Their only hope is that their allies will come through for them.
The Armies
The Tau player is the Defender. Half of the Tau list must be of the actual Tau race without the use of any nonTau races such as Vespid or Kroot. The other half of the army should be filled with either a countsas force or utilize Tau alien forces. Note that these two halves do not need to be separate detachments. The Attacker should be any dangerous foe to the Tau such as the Tyranids or the Orks. They have no deployment restrictions. It is recommended this force have ample supply of infantry to fulfill the narrative conceit of the mission, such as Imperial Guardsmen, Ork Boyz, or Tyranid Termagants.
Game Play
Both players roll off to see who decides to deploy first. The player deploying first also goes first unless their opponent can seize the initiative. This game uses variable game length.
The Battlefield
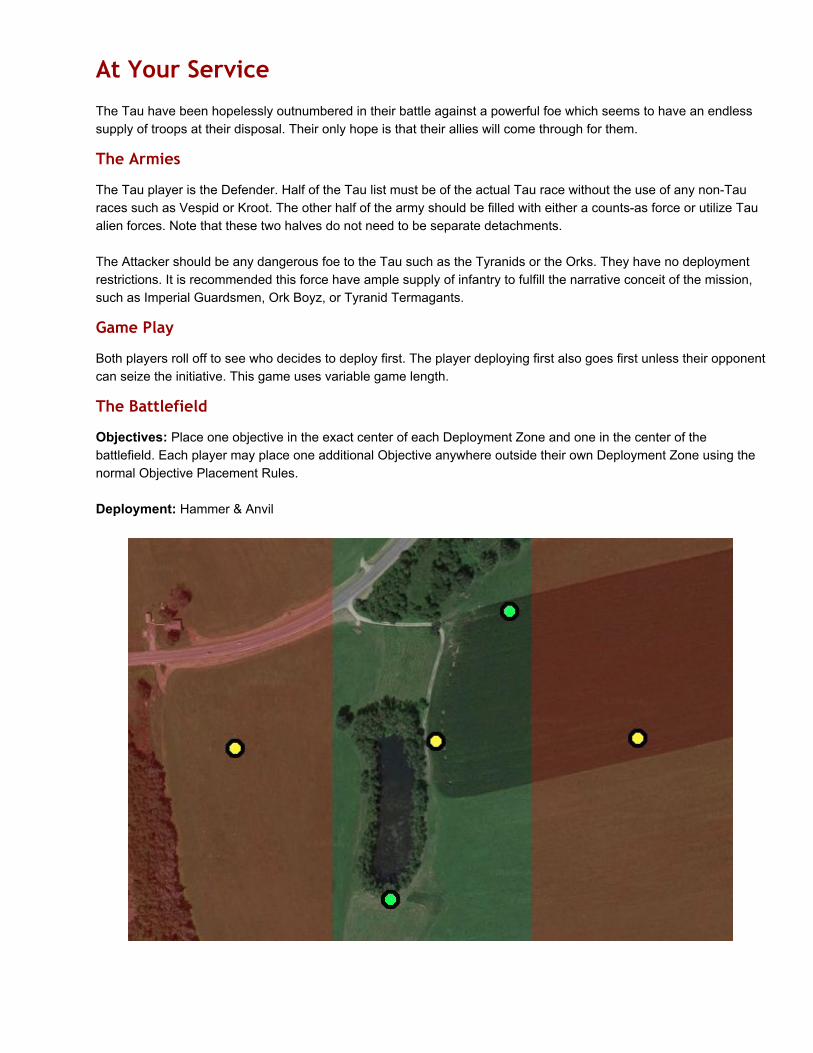
Objectives: Place one objective in the exact center of each Deployment Zone and one in the center of the battlefield. Each player may place one additional Objective anywhere outside their own Deployment Zone using the normal Objective Placement Rules. Deployment: Hammer & Anvil
Special Mission Rules
Night Fighting, Reserves, Tau Narrative Objectives The Narrative Objectives rules can be found in the On Your Tabletop: Narrative Objectives supplement on the Masters of the Forge website. Tau Lines: Any and all models representing members of the actual Tau species may not be placed in reserves. Tau Reinforcements: All of the defender’s units which are not of the Tau species must arrive via reserves of whatever variety their rules allow. Are We Too Late? Any of the Defender’s forces which arrive on turn 3 may reroll 1s to hit for the rest of the game. Any that arrive on turn 4 (or later) may reroll all failed tohit rolls for the rest of the game.
Scoring and Victory Conditions
The Objective in the player’s own Deployment Zone is worth 1 point if held at the end of the game. The Objective in the opponent’s Deployment Zone is worth 4 points if held at the end of the game. All other Objectives are worth 2 points if held at the end of the game. Slay the Warlord is worth 1 point, Linebreaker is worth 2 points, and Big Game Hunter is worth 1 point. Big Game hunter is awarded to the player who destroyed the most valuable of all the units which were destroyed during the game.
Beachhead
Your army has just landed on planet and is scattered to the four winds. Your goal is to form up and meet at a location painted on your tactical display. Unfortunately, some of the enemy forces are in your way, so your leaders have chosen a point of to break through where the defense is light.
The Armies
This game is played with an Attacker and a Defender and is best played with larger games of 1500 points or greater. The Defender may designate any one Fortification they purchase for 100 points or less as their Field Base. The Field Base must be a Building. In addition, the Defender may only place 25% of their army points in reserve. This also means that no more than 25% can be units which must arrive from reserve.
Game Play
The Attacker automatically goes first. The Defender may not Seize the Initiative as this is a surprise attack! This mission uses Variable Game Length. When the game ends, this represents a pivotal moment in the battle when the losing side is ordered to fall back and abandon the tenuous hold they have on what little territory they have gained.
Battlefield
Design a table which represents the Defenders’ garrison. Fortifications and picket lines should facilitate a narrative which demonstrates this force’s thinlystretched defensive positions. Objectives: Players take turns placing 6 Objectives in the usual way.
Deployment
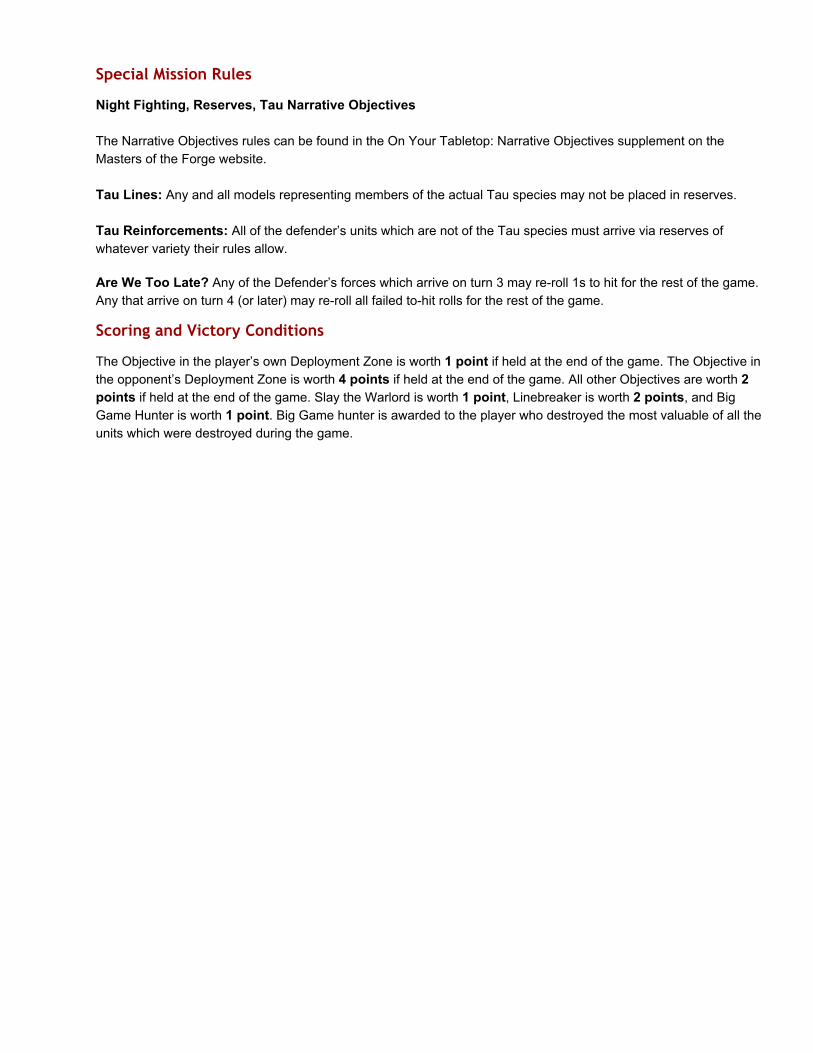
The Defender deploys first. They must deploy at least 75% of the points value of their force before Infiltrators are deployed. Deployed units may be placed anywhere on the board as long as they are not within 6” of a board edge or 6” of another unit. Models must be spaced in such a way that all 75% of the army can be deployed on the table; you can’t space out giant mobs of models in order to make it impossible to deploy the rest of your army. Any units in the 75% which cannot be deployed are immediately destroyed. Suffice to say, you should build your army with the flavor of this mission in mind.
The Attacker deploys no models other than Infiltrators, which are deployed in the normal fashion.
Special Mission Rules
Night Fighting, Mysterious Objectives, Reserves Threading the Needle: The attacking force has taken advantage of their enemy’s thin defenses and have found a way to beset them on all sides. All units in the Attacking force gain the Outflank special rule. Units which already have the Outflank special rule may, instead of rolling for their table side, arrive along any table edge, left, right, home, or enemy. Field Base: The Defender may designate one of their Fortifications of 100 points or less as a Field Base. This Fortification must be a Building. Defending units which Deepstrike within 12” of the Field Base do not scatter. Attacking units may not Deepstrike or Infiltrate within 12” of the Field Base and if the Attacking player’s Deepstriking unit scatters within 12” of the Field Base, they immediately suffer a Deepstrike Mishap. Orders to Hold Position: The Defender may not Infiltrate, Scout, or redeploy in any way within 6” of any table edge. Attack Waves: The Attacking player doesn’t automatically lose the game if they have no models on the battlefield. They will only lose automatically if all of their units have been destroyed.
Scoring and Victory Conditions
The goal of both sides is to hold territory and kill the enemy. The more units which remain on the table by the end of the game and the more terrain they hold the more successful they will be. For each held Objective, players earn 3 Victory Points. For each surviving unit in their army, they receive 1 Victory Point.
Bulwark Against the Wave In this mission, heroic forces have been gravely outnumbered by an implacable foe. Can the defenders hold out against their enemy, or will they falter before the wave of enemies?
The Armies
The Defenders are an elite group of heroes and their support staff. The defending army may contain only 1 model per 50 points used in your game. For example, the Defender’s army may only boast only 40 models in a 2000 point game The Attackers are an implacable horde. Instead of creating a proper list before the game begins, assign pregenerated units to cards in a normal deck of playing cards. You are encouraged to buy a pack of normal playing cards and just write the unit and its upgrades right on the cards. Each suit may have a different unit. For example, the unit on the Queen of Hearts may be different from the unit on the Queen of Spades. Unique units and unique wargear may appear only once in the deck. At the start of the game, the attacker draws 1 card for every 200 points (or fraction thereof) used in the game. Use the table below to determine the nature of the unit drawn from the deck. These units are deployed normally. Do not reshuffle the cards into the deck.
Ace: Elite: 180 points or less Deuce: Troop: 100 points or less, no heavy weapons except mounted on Transports. 37: Troop: 150 points or less, no heavy weapons except mounted on Transports. 89: Troop: 260 points or less, minimum 10 models, no heavy weapons except mounted on Transports. 10: Fast Attack: 150 points or less Jack: Surge! All of the Attacker’s unengaged units on the battlefield may immediately move d6”. This
movement does not count against any further movement, shooting, or assault. If this card is drawn before deployment, discard it and draw 2 additional cards.
Queen: HQ: 105 points or less King: HQ: 205 points or less. Joker: Into the fire! The Defender immediately takes an additional free shooting phase! If this card is drawn
before deployment, simply discard it. This can cause you to start the game with less units deployed. Note that using Tau or Space Marines as the Attacker in this mission isn’t really in the spirit of the game, though you could make it work with enough imagination. Use whatever narrative needs you have when preparing your horde. The first HQ drawn from the deck is the Attacker’s Warlord.
Game Play
Both players roll off to see who decides to deploy first. The player deploying first also goes first unless their opponent can seize the initiative. This game uses variable game length.
Battlefield
Terrain should be set up to allow for reasonable fields of fire against an oncoming foe. Very large lineofsight blocking terrain is discouraged in this mission, though smaller lineofsight blockers here and there would be good to allow elite units to move from cover to cover. Objectives: The Attacking Player first places 3 Objectives exactly 24” from their Table Edge. Then the Defending Player places 3 more Objectives. Objectives must be placed using the normal distance restrictions. Deployment: Dawn of War
Special Mission Rules
Night Fighting, Mysterious Objectives, Reserves Neverending horde: Starting on turn 2, the Attacker rolls a d3 at the start of their turn before Reserves arrive. When they do, they must draw a number of cards from their deck equal to the die roll result. Do not reshuffle the cards into the deck. The units on those cards immediately arrive as if from reserve. For each unit with the Deepstrike or Outflank special rules, you may roll a die. On a 4+, the Attacker may use their special rules to bring them into the fight. Otherwise, they march on from the Attacker’s table edge. You can’t take it with you: When the Defender reveals a Mysterious Objective, they may reroll the result. Pyrrhic Victory: The Defender does not automatically lose the game if they are wiped out. The game does, however, end at the end of a game turn in which the Defenders were wiped out. Count Victory points as normal. Hold the Line: When a Defender’s unit is within 6” of an objective, they either benefit from Feel No Pain or improve their Feel No Pain by 1. Attack Waves: The Attacking player doesn’t automatically lose the game if they have no models on the battlefield. They will only lose automatically if all of their units have been destroyed.
Scoring and Victory Conditions
Players get 1 Victory Point for each Objective they hold at the end of each of their game turns. Players also score 1 point for each enemy unit they kill. The Attacking player scores 3 additional Victory Points if they wipe out the enemy. The Defending player scores 3 additional Victory Points if any of their units are alive and not fleeing at the end of the game.
Charadon Burns
A Mentors vs Bieltan Campaign Seed A Bieltan scout vessel has advanced ahead of the Craftworld and found an ancient Maidenworld (called Charadon in the mongrel tongue of the monkeigh) overrun by Orks and, to some extent, Humanity. The vermin have filled every crevice of the planet with their filth, poisoning the air and defiling the seas. The Craftworld sent forth a host to take the world and cleanse it of the interlopers. While the Orks are proving a difficult foe to thwart without incredible losses, the Humans are a constant distraction. The Biel’tan have decided it’s too dangerous to fight a war on two fronts and have decided to, for now, focus their attention on the last vestiges of resistance Mankind has dug into the farthest corners of Charadon. Besides, nothing could be worse than the Imperium having some hope of gaining a new foothold here. A small contingent of Mentors have been bolstering the Ultramarines against WAAGH! Snagrod in Ultramar itself and with the Crimson Fists on Rynn’s World. The desperate nature of the situation has led to the arrival of the Lessons of the Vanquished, a Mentors Strike Cruiser, carrying additional Mentors reinforcements. The Mentors, then, take it upon themselves to delve brazenly into the ArchArsonist’s territory, bent on cutting the head off the snake and disrupting the entire WAAGH! from the insideout. The Mentors quickly make their way to the Charadon system in the hopes that they can bolster Imperial forces before it’s too late.
Scenario 1: Imperial Reinforcements Although foreign forces such as the Mordian Iron Guard have long since fallen back to Rynn’s World or have been vanquished, a few pockets of hidden PDF eek out a living where they can. In many cases, they roam listlessly in the hopes of finding other Guard remnants before the Orks find them. They didn’t think they’d encounter something far more terrifying… enraged Bieltan. Fortunately, help is on the way. When the Mentors arrive at Charadon, they find Imperial forces in full rout. Much of the world either still in flames or has been infested with Greenskins. The Lessons of the Vanquished easily dodges lazy Ork weapons fire, using the cloud of blackened space hulks for cover. The Mentors’ ultimate goal is to carve out a beachhead for further Imperial forces and establish a hardpoint which can be used as a base from which to plan incursions against the Orks. The Mentors’ plan in this battle is to drop into key positions and take control of the situation. They must bolster the ranks of the PDF, fight back, and hold their ground against the Xenos menace.
The Armies
Imperial Forces: The Imperium player should take up to 2500 points with at least half being Astra Militarum forces including at least two Infantry platoons. In a forceagnostic game, this should be represented by units which are numerous and not fearless. Astra Militarum forces may not include units which must arrive via Reserves of any kind. To represent the fragmented nature of the Astra Militarum, their units may not be comprised of more than 18 models each. Bieltan Forces: The Eldar side may take any organization up to 2000 points.
Game Play
Both players roll off to see who decides to deploy first. The player deploying first also goes first unless their opponent can seize the initiative. This game uses variable game length.
The Battlefield
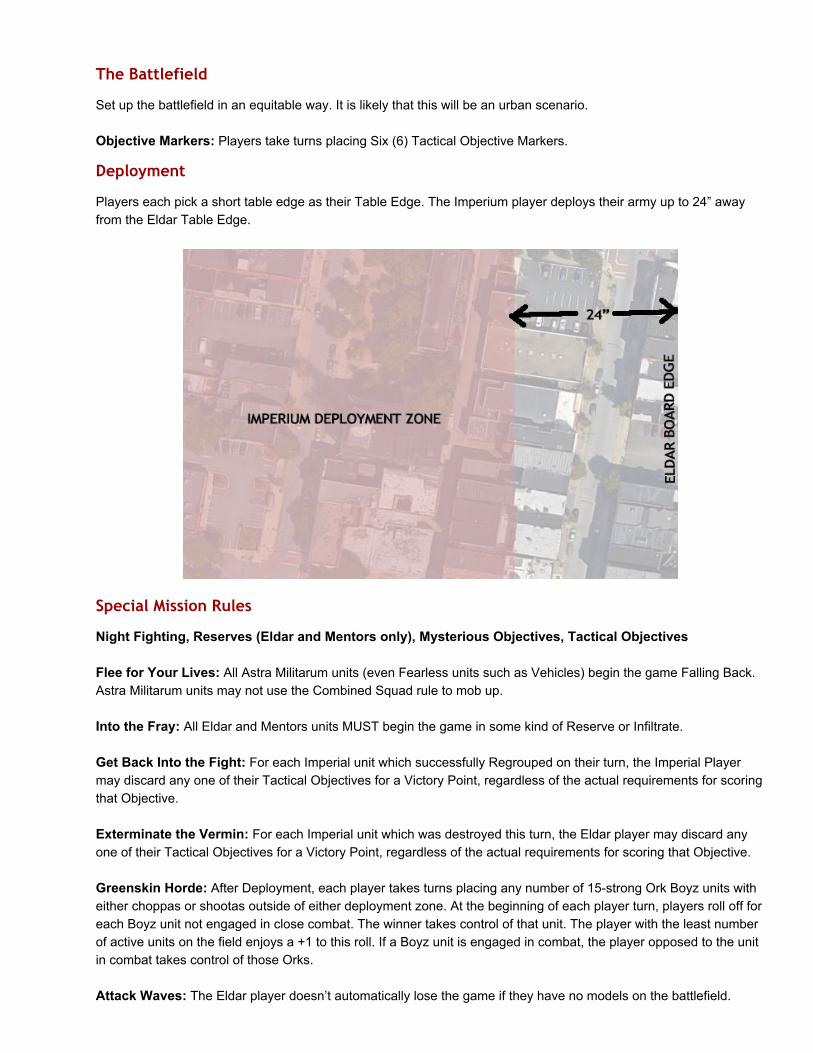
Set up the battlefield in an equitable way. It is likely that this will be an urban scenario. Objective Markers: Players take turns placing Six (6) Tactical Objective Markers.
Deployment
Players each pick a short table edge as their Table Edge. The Imperium player deploys their army up to 24” away from the Eldar Table Edge.
Special Mission Rules
Night Fighting, Reserves (Eldar and Mentors only), Mysterious Objectives, Tactical Objectives Flee for Your Lives: All Astra Militarum units (even Fearless units such as Vehicles) begin the game Falling Back. Astra Militarum units may not use the Combined Squad rule to mob up. Into the Fray: All Eldar and Mentors units MUST begin the game in some kind of Reserve or Infiltrate. Get Back Into the Fight: For each Imperial unit which successfully Regrouped on their turn, the Imperial Player may discard any one of their Tactical Objectives for a Victory Point, regardless of the actual requirements for scoring that Objective. Exterminate the Vermin: For each Imperial unit which was destroyed this turn, the Eldar player may discard any one of their Tactical Objectives for a Victory Point, regardless of the actual requirements for scoring that Objective. Greenskin Horde: After Deployment, each player takes turns placing any number of 15strong Ork Boyz units with either choppas or shootas outside of either deployment zone. At the beginning of each player turn, players roll off for each Boyz unit not engaged in close combat. The winner takes control of that unit. The player with the least number of active units on the field enjoys a +1 to this roll. If a Boyz unit is engaged in combat, the player opposed to the unit in combat takes control of those Orks. Attack Waves: The Eldar player doesn’t automatically lose the game if they have no models on the battlefield.

They will only lose automatically if all of their units have been destroyed.
Scoring and Victory Conditions
Achieve as many Tactical Objectives as possible. If, at the start of a player’s turn, they have fewer than 3 Active Tactical Objectives, they must generate a number of new Tactical Objectives until they have 3. First Blood, Linebreaker, and Slay the Warlord are all in play for 1 Victory Point each.
Get to Da Arvus Lighta!
Things have gone ill for your forces and it is time to dust off and nuke the place from orbit. It’s the only way to be sure.
The Armies
This game is played in increments of 500 points. One player is the Attacker and one player is the Defender.
Game Play
The Attacker automatically goes first unless the Defender successfully Seizes the Initiative.This game uses variable game length. This represents the Defending forces receiving reserves in force and the Attackers must either fall back or perish in glory.
The Battlefield
It is suggested that you use as much thematic terrain as possible for this scenario to represent fuel tanks, hangars, transport containers, conveyors, and other such scenery. We actually suggest looking to the Stronghold Assault book for inspiration during this scenario. Objectives: Before any other terrain is placed, the players take turns placing Space Transports are the Objectives in this game. The Defender places the first Space Transport. It is recommended that, if you do not have any terrain to reflect these Objectives, childrens toys work great, or simply use Warhammer 40,000 models as terrain instead of taking them as actual units in this scenario. Each Transport must be placed 9” away from any other Transport. If a Transport cannot be placed, then place it as far away as possible and nudge the other Transport(s) until a 9” gap is achieved. Deployment: Dawn of War
Special Mission Rules
Night Fighting, Reserves
Scoring and Victory Conditions
Starting in Game turn 2, if one of the Attacking Player’s units is holding an Objective (one of the Transports) at the end of their turn, they may remove the unit holding that objective from the table and the Transport for a total of 3 Victory Points. HQs are worth 1 point if removed in this manner and your Warlord is worth 4 points. For example, if a squad of 8 Space Marines, a Librarian, and a Space Marine Captain (your Warlord) escape on a Transport, that would be worth 3+1+4 points for a total of 8 points. If just the Librarian alone was successfully extracted by the Transport, it would only be worth 2 points. The Defender scores 2 Victory Points for each destroyed unit and 5 points for each remaining Transport at the end of the game. Units which left on a transport do not count as destroyed.

The Martyrs of Eagle Gate Even as the remains of the Imperial forces of Eydolim prepare to make a final, heroic stand, the prayers of the doomed are answered on pillars of flame from the heavens.
The Armies
Imperial Forces: For the Imperial forces, bring 3000 points of mixed Imperial Guard and 3000 points of Ultramarines, representing the 2nd Company and including Captain Sicarius. All Ultramarines units must be able to Deepstrike, preferably in Drop Pods. Chaos Forces: For the Chaos forces, you may bring up to 6000 points of Chaos Space Marines. You should bring the Sons of Damnation, Corpsemakers, Gladiator Group 138, and Foresworn Formations. The Chaos Forces may not contain units which are required to start the game in reserve.
Game Play
Roll randomly to determine who gets the first turn unless their opponent can successfully Seize the Initiative.The player who goes first also deploys first. This mission uses variable game length, but does not end until either Sicarius or Kor Megron are slain.
The Battlefield
For a big game like this, an 8foot table is recommended. If you have them, place walls blocking off the back corner of the Imperial deployment zone. Place a large gate in the center of this wall. Deployment: The Vanguard Strike Deployment is recommended for this scenario. Objectives: Players take turns placing 6 other Objective Markers on the battlefield.
Special Mission Rules
Adepta Sororitas Narrative Objectives, Reserves (Ultramarines Only), Night Fighting
The Narrative Objectives rules can be found in the On Your Tabletop: Narrative Objectives supplement on the Masters of the Forge website. Angels on Burning Wings: The Ultramarines must deploy via Deepstrike. When a Drop Pod arrives via Deepstrike, instead of placing the Drop Pod, place a Large Blast Marker and scatter it. Resolve the Blast as a Strength 6 AP 4 bomb with Strikedown. The Drop Pod then arrives at that location using the Tank Shock rule if there are any remaining enemies, though no Death or Glory attacks are allowed… the pods are just coming in too fast to react! If models would not normally be able to disembark due to other models being in the way, push them into close combat with any enemy units which are blocking them. This doesn’t constitute a charge and therefore the Ultramarines player doesn’t receive an extra attack for charging and the Chaos Space Marine player may not overwatch. Stuck in: The Imperial Guard and Chaos Space Marines forces may not deploy in Reserves of any kind.
Scoring and Victory Conditions
This is a mission of holding ground. The Eagle Gate is an Objective worth 6 points at the end of the game. The rest of the objectives are worth 3 points each at the end of the game. Additionally, if Captain Sicarius loses his last Wound, replace him with an Objective (Fallen Hero from the Narrative Objectives list), also worth 6 points at the end of the game.
Stop The Ritual
The Grey Knights have responded just in the nick of time to a grave threat to the region. A force of Chaos followers have found several relics which can be used to summon forth a great host of Daemons and throw the balance of power in disarray.
The Armies
The forces of Chaos (The Defender) are allowed to bring 25% more points than the Imperium player (The Attacker).
Game Play
Both players roll off to see who decides to deploy first. The player deploying first also goes first unless their opponent can seize the initiative. This game uses variable game length.
The Battlefield
The Chaos player places an ancient ruin directly in the center of the battlefield and three other pieces of ancient ruins terrain within 3” of that ruin. Woods and archaic ruins are recommended for the rest of the battlefield, but this is left to the players’ discretion.
Deployment
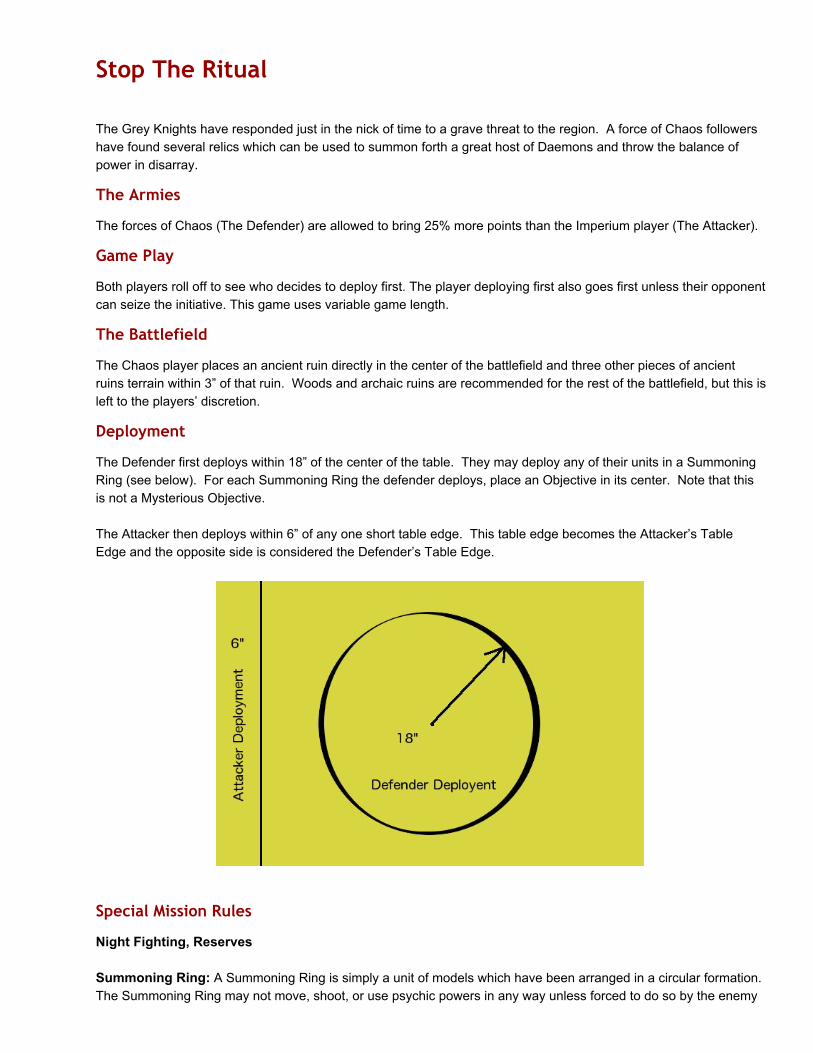
The Defender first deploys within 18” of the center of the table. They may deploy any of their units in a Summoning Ring (see below). For each Summoning Ring the defender deploys, place an Objective in its center. Note that this is not a Mysterious Objective. The Attacker then deploys within 6” of any one short table edge. This table edge becomes the Attacker’s Table Edge and the opposite side is considered the Defender’s Table Edge.
Special Mission Rules
Night Fighting, Reserves Summoning Ring: A Summoning Ring is simply a unit of models which have been arranged in a circular formation. The Summoning Ring may not move, shoot, or use psychic powers in any way unless forced to do so by the enemy
or the environment (morale, being assaulted, etc.). Note that Overwatch is an elected action and may not be taken by models in a Summoning Ring. No unit may join a Summoning Ring, nor may a unit create a Summoning Ring during the game. All Summoning Rings are obscured by the corsucating energies surrounding them, so they enjoy the Shrouded special rule. Units in a Summoning Ring do not generate Warp Charges and may not manifest Psychic Powers. A Summoning Ring which is reduced to less than 5 models is considered broken as is a Summoning Ring which is forced to move in any way (morale, etc.). A Summoning Ring which is broken may act normally as if they were not in a Summoning Ring.
Scoring and Victory Conditions
Summoning Rings: The defender receives 5 Victory Points for each nonbroken Summoning Ring at the end of the game. If a Summoning Ring contains psykers, score 7 Victory Points instead. The attacker receives 1 Victory Point for each slain enemy unit. Objectives: 1 Victory Point for each Objective held at the end of the game. Secondary Objectives: Slay the Warlord, First Blood, and Linebreaker are each worth 1 Victory Point