Embed Size (px)
Citation preview
BarCode Supported Billing System
with
STANDARD BUSINESS ACCOUNTING
Software TallyCumB7
Manual
Developed & Distributed by
Icon Soft Pvt. Ltd. Hetauda, Makawanpur
Tel/Fax: 057-527263
Email: [email protected]
Manual for Standard Business Accounting Software
TallyCumB7
Basic Accounting
Accounting Concepts
The common terms and touch upon the basic concept of accounting as that may help you to
understand the accounting system. "Accounting has been defined as the part of recording,
classifying, summarizing in a significant manner & in terms of money, transaction and events
which are of financial character.
If we know the four terms Assets, Liabilities, Income & Expenses and transaction rules Debit &
Credit we are able to prepare, maintain our accounts systematically & correctly. We are focusing
these terms & norms of accounting with practical basis.
Classification of Accounts
Personal Accounts:
Related to name of Persons, Firm, Company, Organization, Representatives or persons
(Outstanding/Prepaid Expenses) etc
(These accounts and their Balance appears in Balance Sheet)
Real Accounts: Properties Accounts like Fixed Assets (Land, Plant & Machinery, Vehicles) , Current Assets
(Cash/Bank Accounts), Inventories
(These accounts and their Balance appears in Balance Sheet)
Nominal Accounts:
Relating to Income & Expenses Losses & Gains
(Appears in Trading or P/L or IE Accounts)
General Rule of Debit & Credit
When a transaction occurs, both Debit & Credit element should be recorded in the book of
accounts. The methods of recording transactions, the rules of making Debit & Credit are
essentials. The rules goes with the classification of accounts.
Personal Accounts
Debit:The receiver.
Credit: The giver.
Real Accounts
Debit: What comes in.
Credit: What goes out.
Nominal Accounts
Debit: All Expenses & Losses
Credit: All Income & Gains
The Effect of Debit & Credit in these four terms may be summarized as follows
Accounts Debit Credit Balance Normally
Assets Increase Decrease Debit
Expenses Increase Decrease Debit
Capitals & Liabilities Decrease Increase Credit
Income Decrease Increase Credit
Computerized Accounting
When we apply computerized accounting system in our firm, organization for first time, we must
create Firm/Company/Organization Name, fiscal year. Then accounting to our official system &
decisions we should create Main Ledger, Sub ledger and Account Head for transaction after
global type control setting. Inserting Opening Balance (Closing Balance of earlier date related to
liabilities and assets) is initial phase of entering transaction. Next time these all systems can be
transferred easily by the computer. In computerized accounting, while creating Account heads
you are required to classify it suitable under relevant Account Group (Main Ledger, Ledger or
Sub Ledger) to tell us the nature of the account head and where it will appear and other related
options to categorize or further calculation.
Double Entry System
Both Cash Credit transactions are recognized (Accrual basis of accounting). All commercial as
well as non-commercial organizations follow this system. All transaction will have dual aspect
(Debit & Credit) and that is why it is called double entry system. In this system every transaction
Debit and Credit must be equal and in a practical way double entry system is the accepted way of
accounting.
Debit and Credit of each transaction always show equal balance and so the Assets and Liabilities
must be always equal. If one side gets heavier or lighter, the weight in the other side must also
increase or decrease to keep it balanced. In any accounting transaction, some assets or liabilities
are transformed from one form to another but total assets and liabilities are always equal.
Financial Statement (Final Accounts) After entering and Opening Balance & Transaction the software automatically will prepare Trial
Balance and from the Trial Report following statements (reports) are made:
1. Profit & Loss Account/IE Accounts (Income Statement) for specific period consisting of
Nominal Accounts.
2. Balance Sheet as on the Last Date of the period consisting of Real & Personal Accounts
Default Ledger/Accounts
Default Account Created: Primary Ledger like Assets, Capital & Liabilities, Income and Expenses will be automatically
created. No more Primary Ledger is required to create. Likewise, other default ledger, Sub
Ledger and some account head like VAT Provision, Cash Account P/L Account, Discount
Allowed, Discount Receipt are also automatically created. Any Ledger, Sub Ledger and Account
head which are automatically created can't be edited or deleted and same name in same root will
not be created.
Rules of Creating Ledger/Accounts
We should give the name ledger or sub ledger and account head with suffix to represent the
nature and transaction of accounts if necessary. If you are going to create House Rent income
account head we should name like House Rent_Inc. Same as the suffix for Ast for Assets, DBT
for Debtors, Exp for Expenses, Int for Interest, CRD for Creditors, Lns for Loans, STF for Staff
etc. This system will help you to recognize the account at the time of voucher entry and
summarized reports.
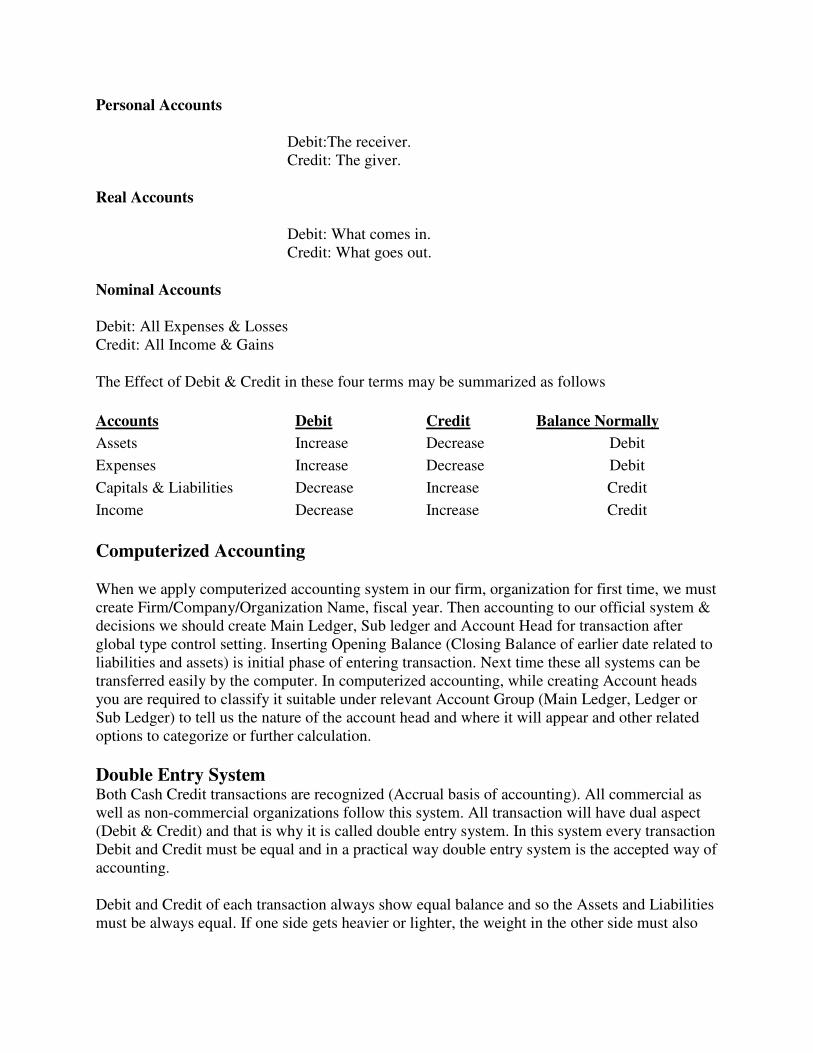
Creating New Ledger/Accounts
>> Double Click or Press Enter Key on 'Ledger/Accounts Info' to create general account
heads from main Window
>> Double Click or Press Enter Key on 'Inventory/Accounts Info' to create inventory
account heads from main Window
>> From Open Menu or From PopUp menu we can create new ledger/accounts as our
requirements.
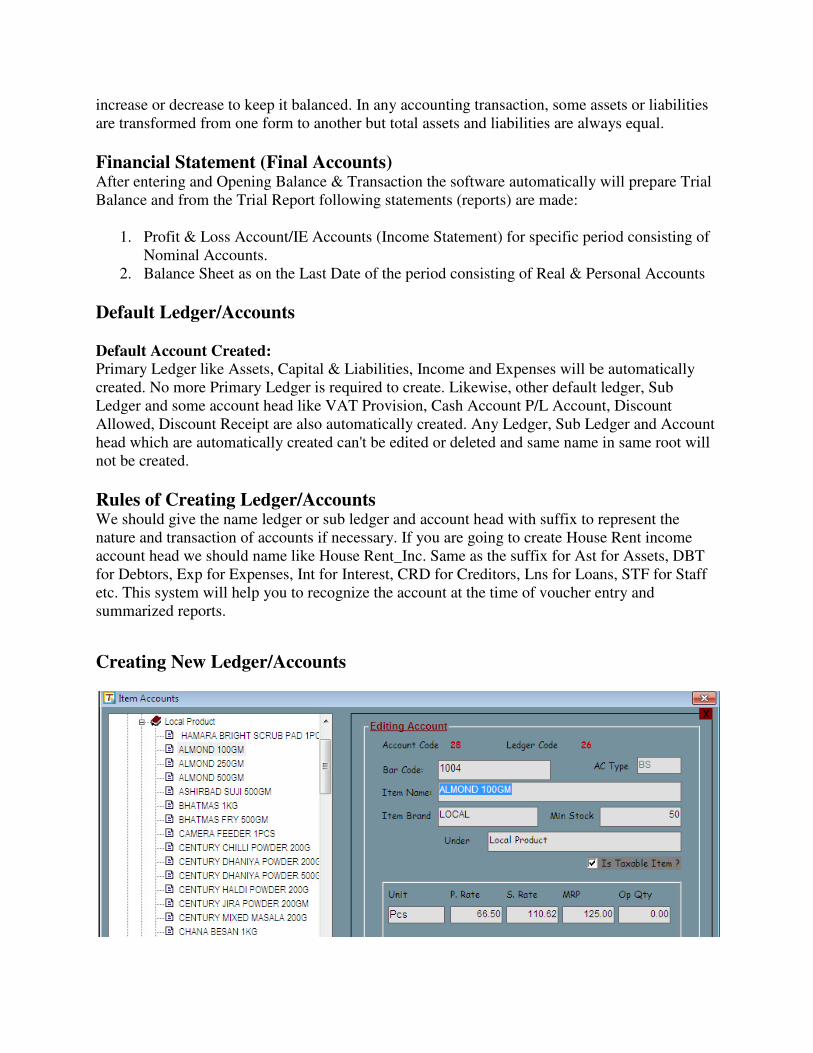
Select head (Click) and > Press CTRL+N on Main Ledger to create Ledger or (Right Click "Add")
> Press CTRL+N on Ledger to create Sub Ledger or (Right Click "Add")
> Press CTRL+N on Sub Ledger to create Account or (Right Click "Add")
> Follow the process given the window.
> Right click on the head and follow the instruction.
> A window will appear and for creation.
> Fill information as required .Any field should not be left blank.
> Click Save button
Editing Ledger/Accounts
>> Search Account Head (Press Ctrl+F to search text)
>> Select Account head (Click) and
>> Press F2 or Click right button of the mouse and click Edit from Popup menu
>> Change any information and click on Update to store it.
>> From this function we can change the account head under different sub Ledger. But default
created head will not be edited.
Deleting Ledger/Accounts
Search & Select head (Click) to be deleted and
>> Click right button of the mouse and click Delete menu from Popup menu
>> If subhead found in the selected head or transaction found in selected head, the head will not
be deleted.
Remember that: a) Any field should not be blank and option buttons are optional features in creating ledger
accounts.
b) Item Unit, Purchase Rate, Sales Rate & MRP are most essential in creating inventory
accounts.
c) If the created Accounts and Personal Account, Enter Personal Info like Address, Phone, PAN,
Bank Account etc.
d) Any Ledger/Account will not be deleted after transaction.
Purchase/Sales Invoice Entry
Open the Purchase & Sale Invoice from Main window
1. Select Transaction Type (Sales or Purchase)
2. Enter Date and select the party name for invoice bill
3. Select Item Name, remarks, rate, qty and amount the press Enter Key
4. If Item Name entry is finished then press CTRL+Enter Key to shift the cursor in Discount
place. Give Discount (enter any number after = sign in % from sales/purchase Amount (ie:
=10)
5. Select Party Name if you are entering the credit transaction otherwise select Cash/Bank
Accounts
6. If transaction is completed then Narration, Sales Person and Save the record.
Printing Invoice After Saving Sales Invoice TAX INVOICE will be automatically printed.
After Printing TAX INVOICE the transaction or record will not be deleted or edited.
Invoice design will be as per rules of IR Office.
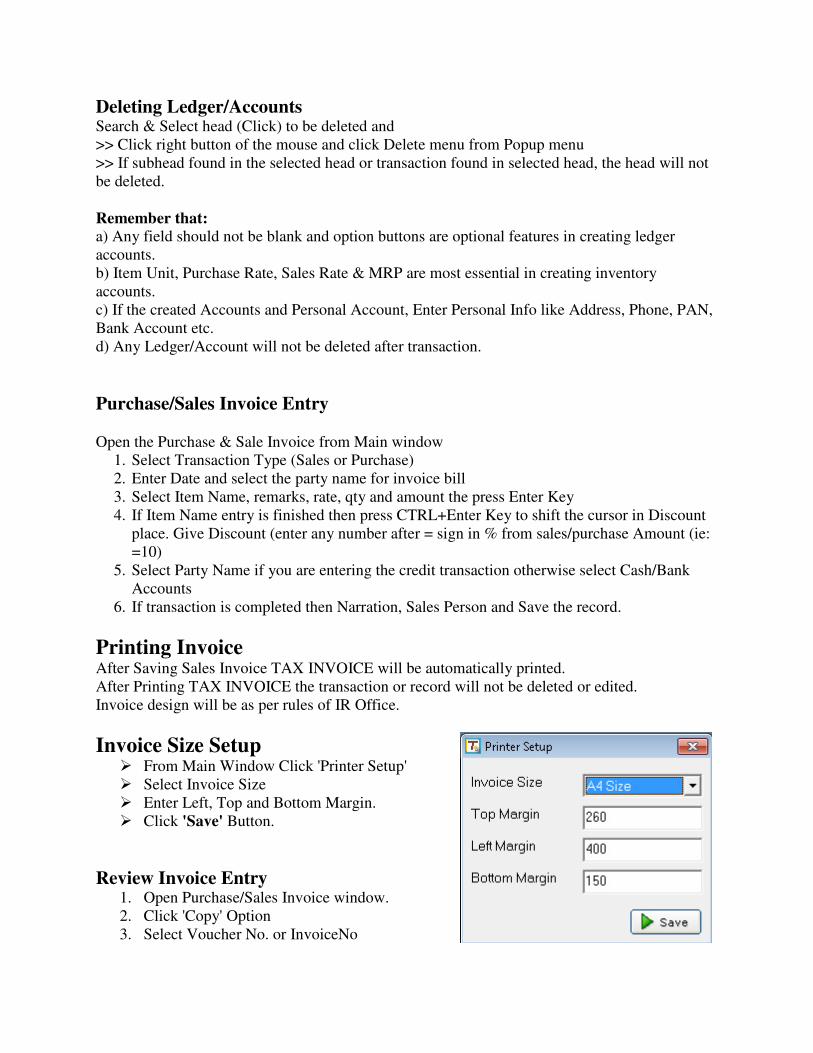
Invoice Size Setup � From Main Window Click 'Printer Setup'
� Select Invoice Size
� Enter Left, Top and Bottom Margin.
� Click 'Save' Button.
Review Invoice Entry 1. Open Purchase/Sales Invoice window.
2. Click 'Copy' Option
3. Select Voucher No. or InvoiceNo
4. Selected voucher/Invoice will be loaded.
5. Invoice once saved will not be deleted or edited.
6. If you want to cancel the voucher Click "Cancel voucher" from Voucher Menu or Press
CTRL+D Button.
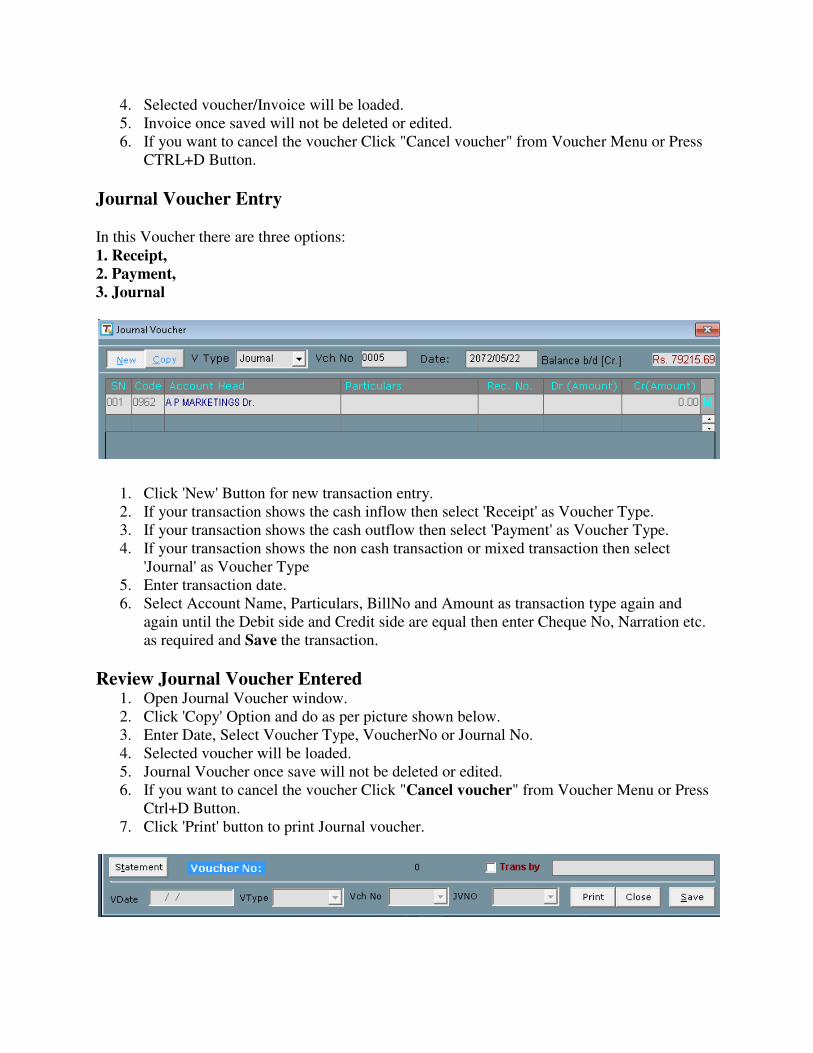
Journal Voucher Entry
In this Voucher there are three options:
1. Receipt,
2. Payment,
3. Journal
1. Click 'New' Button for new transaction entry.
2. If your transaction shows the cash inflow then select 'Receipt' as Voucher Type.
3. If your transaction shows the cash outflow then select 'Payment' as Voucher Type.
4. If your transaction shows the non cash transaction or mixed transaction then select
'Journal' as Voucher Type
5. Enter transaction date.
6. Select Account Name, Particulars, BillNo and Amount as transaction type again and
again until the Debit side and Credit side are equal then enter Cheque No, Narration etc.
as required and Save the transaction.
Review Journal Voucher Entered
1. Open Journal Voucher window.
2. Click 'Copy' Option and do as per picture shown below.
3. Enter Date, Select Voucher Type, VoucherNo or Journal No.
4. Selected voucher will be loaded.
5. Journal Voucher once save will not be deleted or edited.
6. If you want to cancel the voucher Click "Cancel voucher" from Voucher Menu or Press
Ctrl+D Button.
7. Click 'Print' button to print Journal voucher.
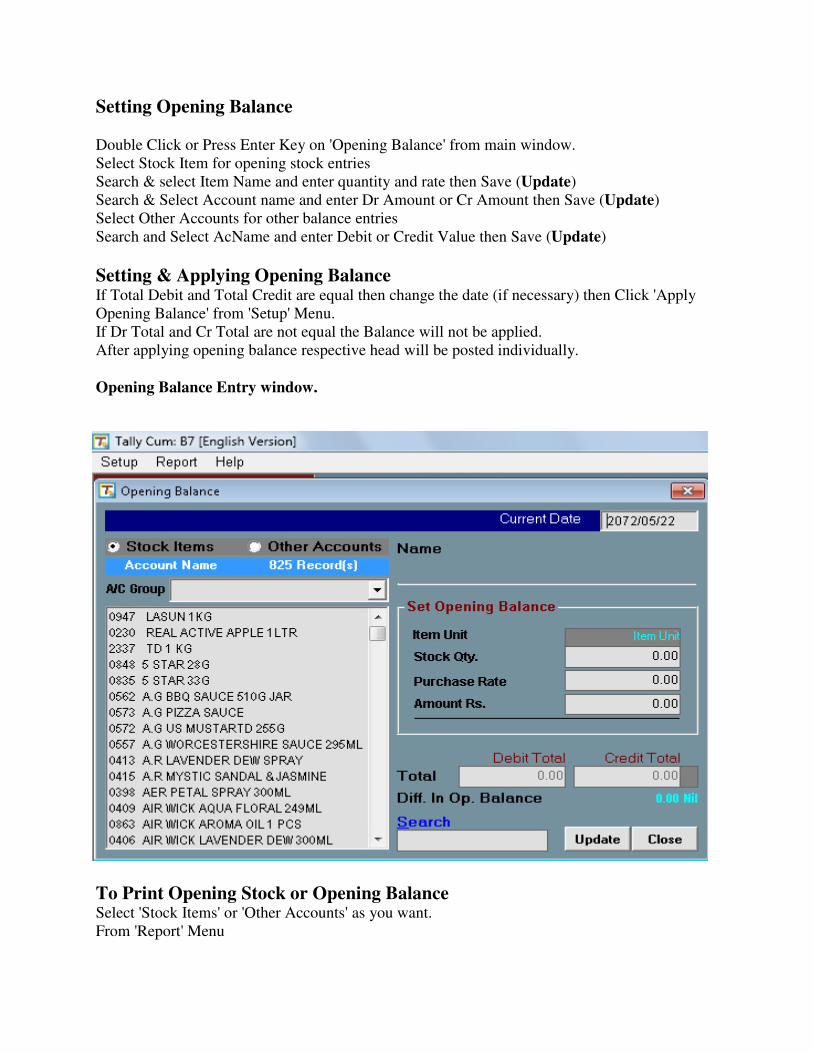
Setting Opening Balance
Double Click or Press Enter Key on 'Opening Balance' from main window.
Select Stock Item for opening stock entries
Search & select Item Name and enter quantity and rate then Save (Update)
Search & Select Account name and enter Dr Amount or Cr Amount then Save (Update)
Select Other Accounts for other balance entries
Search and Select AcName and enter Debit or Credit Value then Save (Update)
Setting & Applying Opening Balance
If Total Debit and Total Credit are equal then change the date (if necessary) then Click 'Apply
Opening Balance' from 'Setup' Menu.
If Dr Total and Cr Total are not equal the Balance will not be applied.
After applying opening balance respective head will be posted individually.
Opening Balance Entry window.
To Print Opening Stock or Opening Balance Select 'Stock Items' or 'Other Accounts' as you want.
From 'Report' Menu
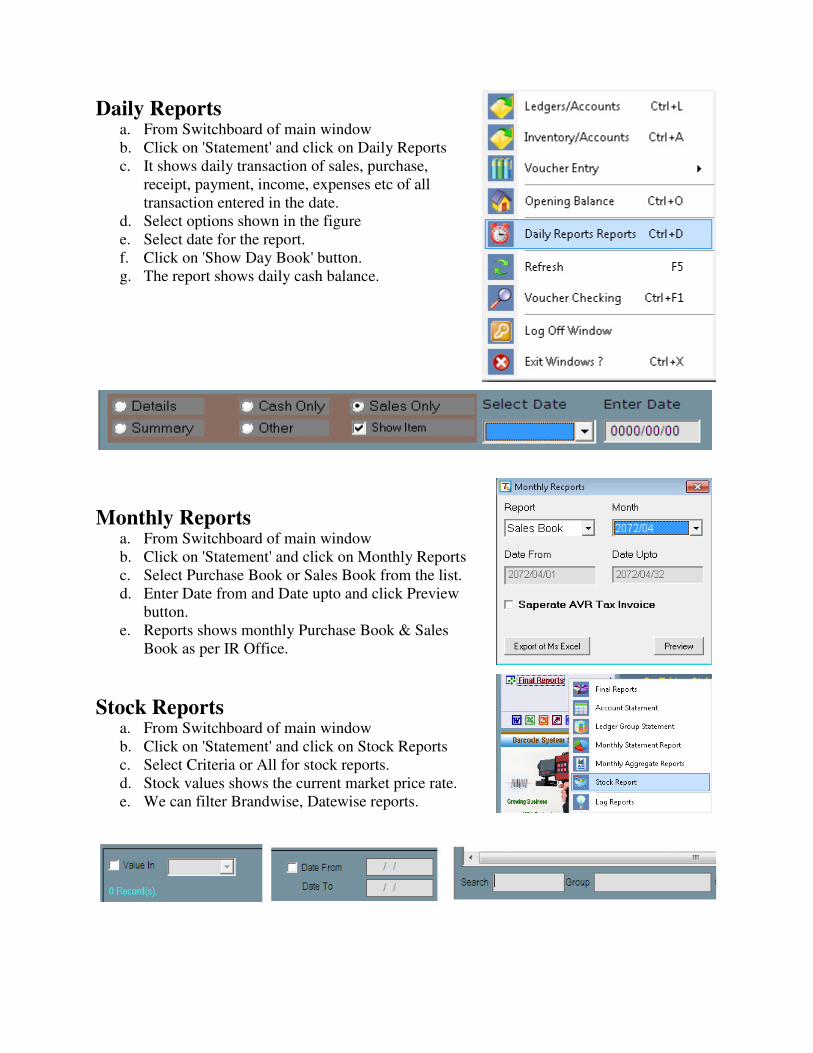
Daily Reports a. From Switchboard of main window
b. Click on 'Statement' and click on Daily Reports
c. It shows daily transaction of sales, purchase,
receipt, payment, income, expenses etc of all
transaction entered in the date.
d. Select options shown in the figure
e. Select date for the report.
f. Click on 'Show Day Book' button.
g. The report shows daily cash balance.
Monthly Reports a. From Switchboard of main window
b. Click on 'Statement' and click on Monthly Reports
c. Select Purchase Book or Sales Book from the list.
d. Enter Date from and Date upto and click Preview
button.
e. Reports shows monthly Purchase Book & Sales
Book as per IR Office.
Stock Reports a. From Switchboard of main window
b. Click on 'Statement' and click on Stock Reports
c. Select Criteria or All for stock reports.
d. Stock values shows the current market price rate.
e. We can filter Brandwise, Datewise reports.
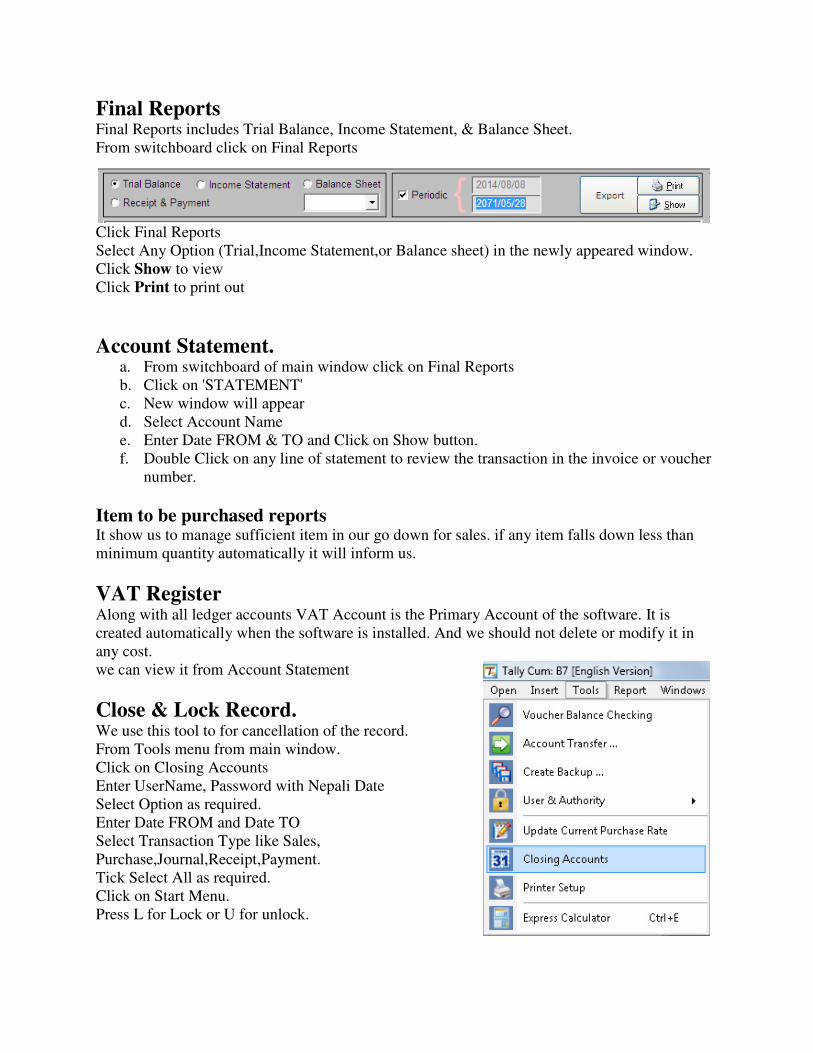
Final Reports Final Reports includes Trial Balance, Income Statement, & Balance Sheet.
From switchboard click on Final Reports
Click Final Reports
Select Any Option (Trial,Income Statement,or Balance sheet) in the newly appeared window.
Click Show to view
Click Print to print out
Account Statement. a. From switchboard of main window click on Final Reports
b. Click on 'STATEMENT'
c. New window will appear
d. Select Account Name
e. Enter Date FROM & TO and Click on Show button.
f. Double Click on any line of statement to review the transaction in the invoice or voucher
number.
Item to be purchased reports It show us to manage sufficient item in our go down for sales. if any item falls down less than
minimum quantity automatically it will inform us.
VAT Register Along with all ledger accounts VAT Account is the Primary Account of the software. It is
created automatically when the software is installed. And we should not delete or modify it in
any cost.
we can view it from Account Statement
Close & Lock Record. We use this tool to for cancellation of the record.
From Tools menu from main window.
Click on Closing Accounts
Enter UserName, Password with Nepali Date
Select Option as required.
Enter Date FROM and Date TO
Select Transaction Type like Sales,
Purchase,Journal,Receipt,Payment.
Tick Select All as required.
Click on Start Menu.
Press L for Lock or U for unlock.
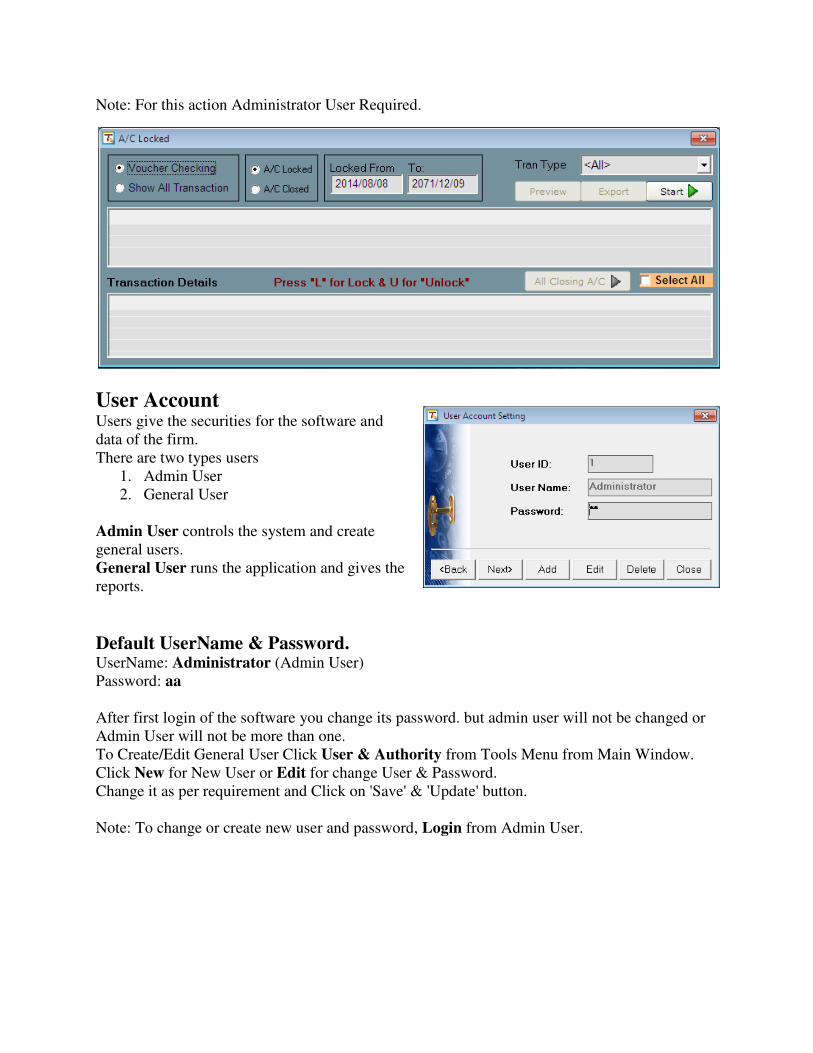
Note: For this action Administrator User Required.
User Account Users give the securities for the software and
data of the firm.
There are two types users
1. Admin User
2. General User
Admin User controls the system and create
general users.
General User runs the application and gives the
reports.
Default UserName & Password. UserName: Administrator (Admin User)
Password: aa
After first login of the software you change its password. but admin user will not be changed or
Admin User will not be more than one.
To Create/Edit General User Click User & Authority from Tools Menu from Main Window.
Click New for New User or Edit for change User & Password.
Change it as per requirement and Click on 'Save' & 'Update' button.
Note: To change or create new user and password, Login from Admin User.
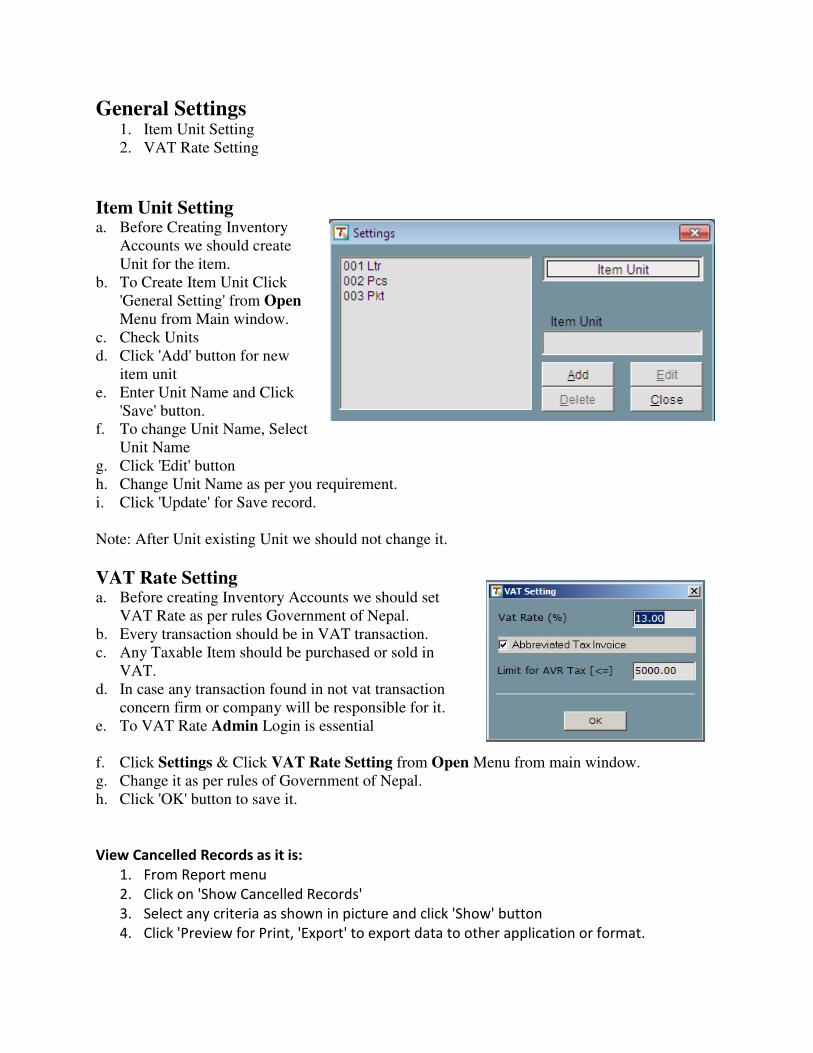
General Settings 1. Item Unit Setting
2. VAT Rate Setting
Item Unit Setting a. Before Creating Inventory
Accounts we should create
Unit for the item.
b. To Create Item Unit Click
'General Setting' from Open
Menu from Main window.
c. Check Units
d. Click 'Add' button for new
item unit
e. Enter Unit Name and Click
'Save' button.
f. To change Unit Name, Select
Unit Name
g. Click 'Edit' button
h. Change Unit Name as per you requirement.
i. Click 'Update' for Save record.
Note: After Unit existing Unit we should not change it.
VAT Rate Setting a. Before creating Inventory Accounts we should set
VAT Rate as per rules Government of Nepal.
b. Every transaction should be in VAT transaction.
c. Any Taxable Item should be purchased or sold in
VAT.
d. In case any transaction found in not vat transaction
concern firm or company will be responsible for it.
e. To VAT Rate Admin Login is essential
f. Click Settings & Click VAT Rate Setting from Open Menu from main window.
g. Change it as per rules of Government of Nepal.
h. Click 'OK' button to save it.
View Cancelled Records as it is:
1. From Report menu
2. Click on 'Show Cancelled Records'
3. Select any criteria as shown in picture and click 'Show' button
4. Click 'Preview for Print, 'Export' to export data to other application or format.
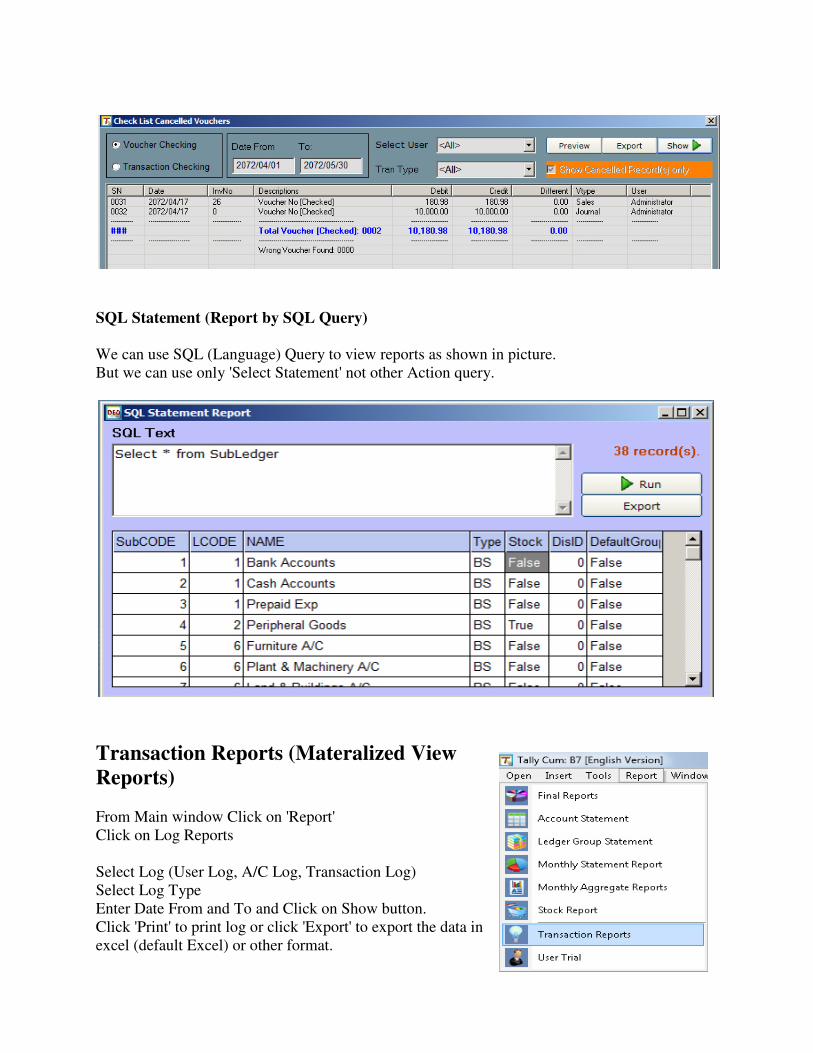
SQL Statement (Report by SQL Query)
We can use SQL (Language) Query to view reports as shown in picture.
But we can use only 'Select Statement' not other Action query.
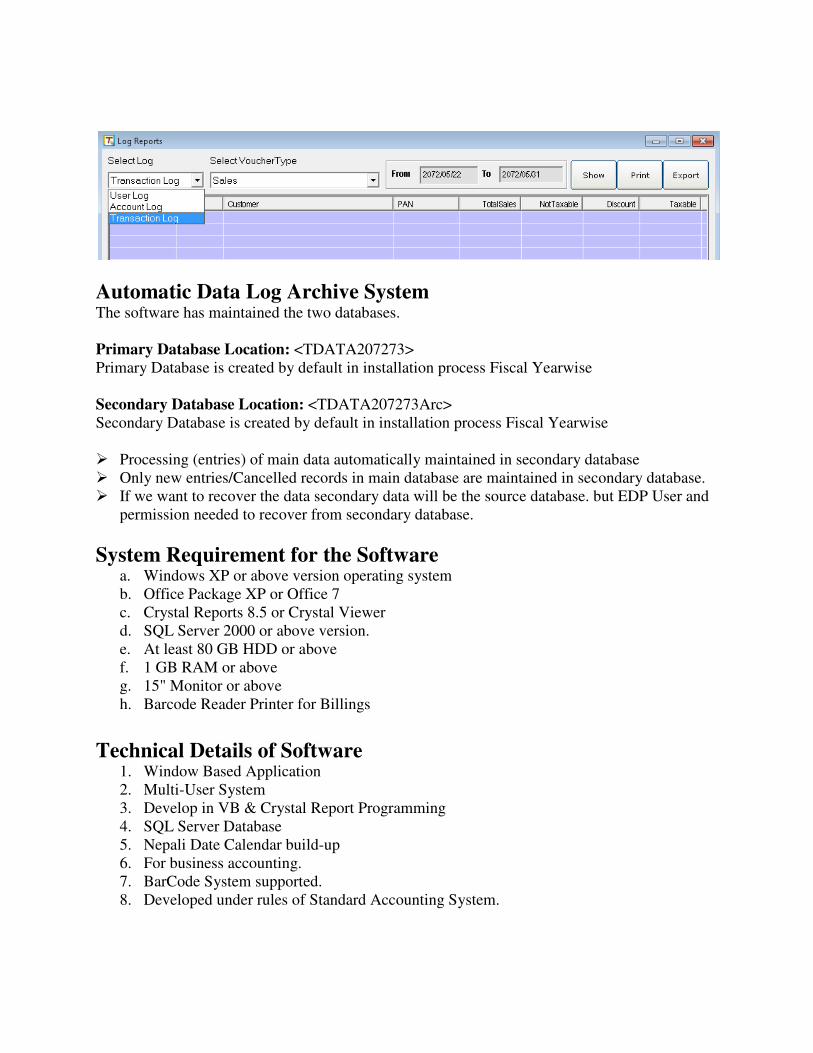
Transaction Reports (Materalized View
Reports)
From Main window Click on 'Report'
Click on Log Reports
Select Log (User Log, A/C Log, Transaction Log)
Select Log Type
Enter Date From and To and Click on Show button.
Click 'Print' to print log or click 'Export' to export the data in
excel (default Excel) or other format.
Automatic Data Log Archive System The software has maintained the two databases.
Primary Database Location: <TDATA207273>
Primary Database is created by default in installation process Fiscal Yearwise
Secondary Database Location: <TDATA207273Arc>
Secondary Database is created by default in installation process Fiscal Yearwise
� Processing (entries) of main data automatically maintained in secondary database
� Only new entries/Cancelled records in main database are maintained in secondary database.
� If we want to recover the data secondary data will be the source database. but EDP User and
permission needed to recover from secondary database.
System Requirement for the Software a. Windows XP or above version operating system
b. Office Package XP or Office 7
c. Crystal Reports 8.5 or Crystal Viewer
d. SQL Server 2000 or above version.
e. At least 80 GB HDD or above
f. 1 GB RAM or above
g. 15" Monitor or above
h. Barcode Reader Printer for Billings
Technical Details of Software 1. Window Based Application
2. Multi-User System
3. Develop in VB & Crystal Report Programming
4. SQL Server Database
5. Nepali Date Calendar build-up
6. For business accounting.
7. BarCode System supported.
8. Developed under rules of Standard Accounting System.
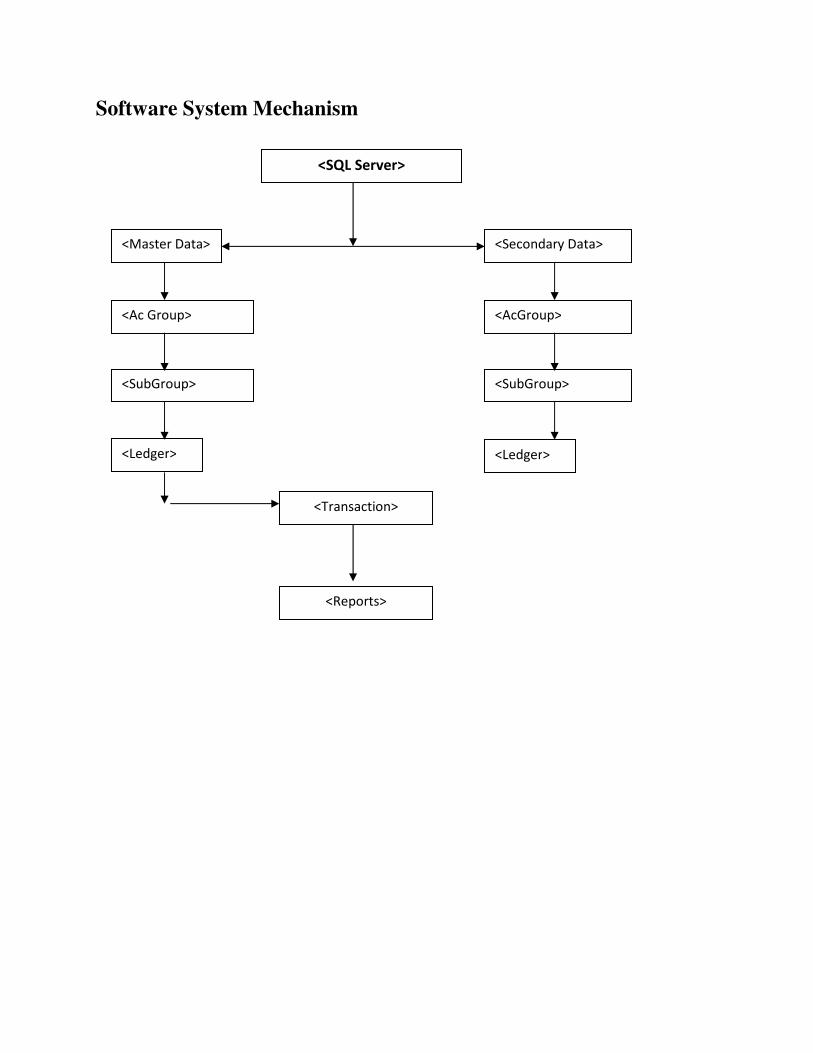
Software System Mechanism
<SQL Server>
<Master Data> <Secondary Data>
<Ac Group>
<SubGroup>
<AcGroup>
<SubGroup>
<Ledger> <Ledger>
<Transaction>
<Reports>
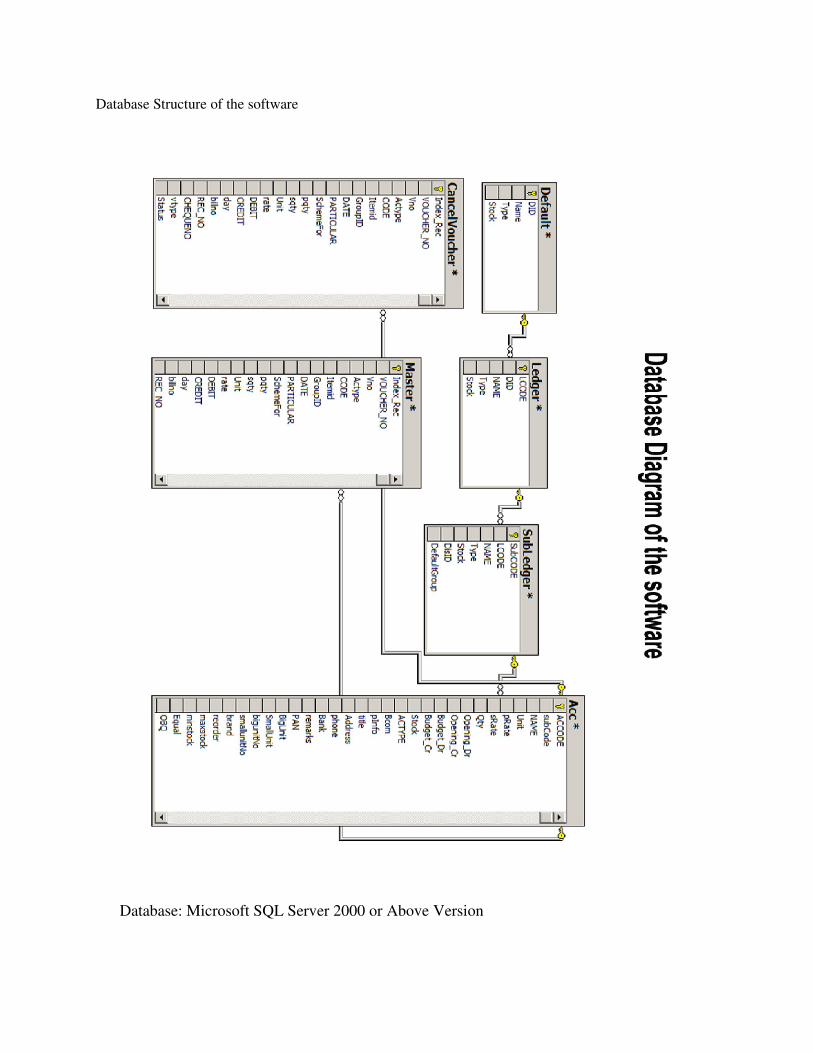
Database Structure of the software
Database: Microsoft SQL Server 2000 or Above Version
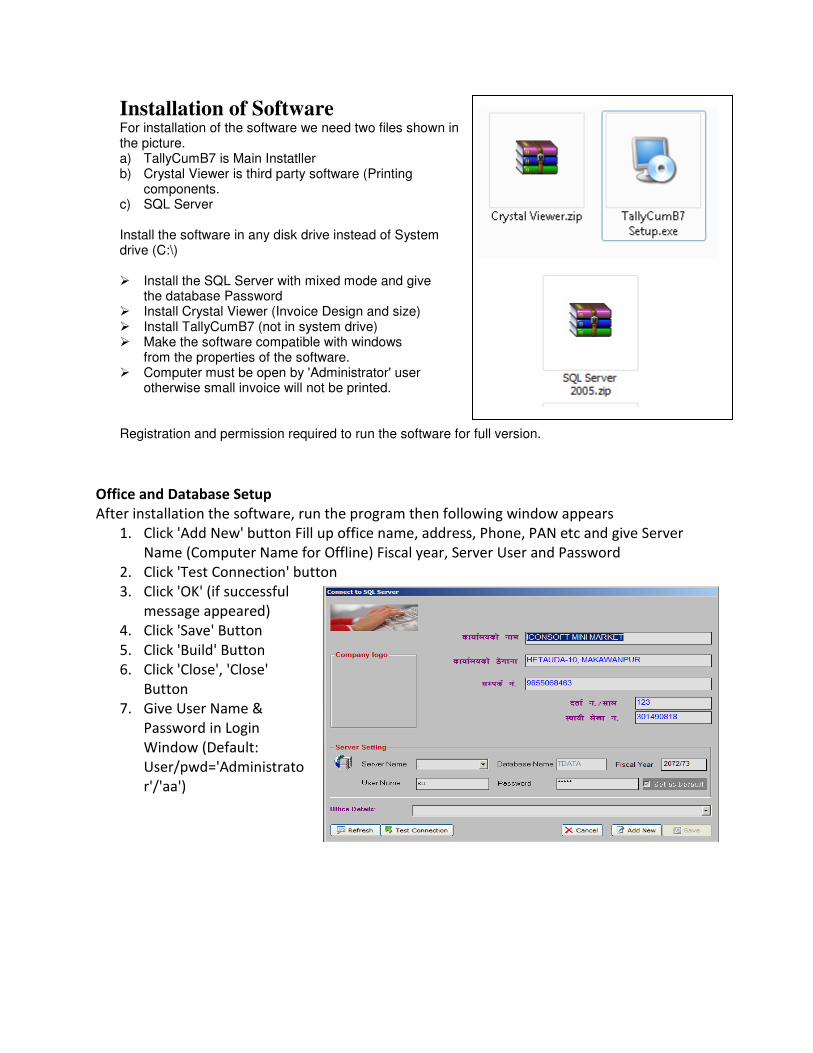
Installation of Software For installation of the software we need two files shown in the picture. a) TallyCumB7 is Main Instatller b) Crystal Viewer is third party software (Printing
components. c) SQL Server Install the software in any disk drive instead of System drive (C:\) � Install the SQL Server with mixed mode and give
the database Password � Install Crystal Viewer (Invoice Design and size) � Install TallyCumB7 (not in system drive) � Make the software compatible with windows
from the properties of the software. � Computer must be open by 'Administrator' user
otherwise small invoice will not be printed. Registration and permission required to run the software for full version.
Office and Database Setup
After installation the software, run the program then following window appears
1. Click 'Add New' button Fill up office name, address, Phone, PAN etc and give Server
Name (Computer Name for Offline) Fiscal year, Server User and Password
2. Click 'Test Connection' button
3. Click 'OK' (if successful
message appeared)
4. Click 'Save' Button
5. Click 'Build' Button
6. Click 'Close', 'Close'
Button
7. Give User Name &
Password in Login
Window (Default:
User/pwd='Administrato
r'/'aa')

Daily Backup Security a. After completion of daily transaction you must create backup file from the software.
b. Database backup file (BAK File) will be created in your software installed folder named
Data (Folder)
c. Any Loss without backup file concerned firm or company will be responsible.
d. Data Folder contains all Daily Database backup file of all fiscal year separately.
e. Every Day or every login time or logout time backup must be created.
f. The database back files must be kept in different computers and external device also. One
backup file must be kept out of office premises. This process will help you safe of any
losses/damages of computer system, databases.
Process:
From Tools menu
1. Click on 'Create Backup'
2. Click on 'Create Backup'
button. Backup file
automatically created in
software installed folder.
3. if you want to create backup file
in different location or in
different file name click on
Browse (…) button.
4. select Drive or Location and
Give FileName then Click 'Save' button.
5. Click on 'Create Backup'
Restore of Database This Feature is used to restore of database from backup files. If the original Database file is
damaged/ loss or suspect from any types of circumstances this feature or process is used.
Restoring databases will be done directly from front end application.
Warning!
1. Restoring database will replace all the previous data in the database. So confirmation need to
restore database from SQL Server Feature (SQL Server Management Studio or Enterprise
Manager) tools of server.
2. Before Restoring Database (if you have already) Create Backup first then restore the
database from original backup files.
3. Better to consult to Software vendor or Database Administrator or restore database to prevent
from losses of records.
4. If any losses/Damage or Records/Database from any circumstances you must contact IRD
Office Before Restoring Database.
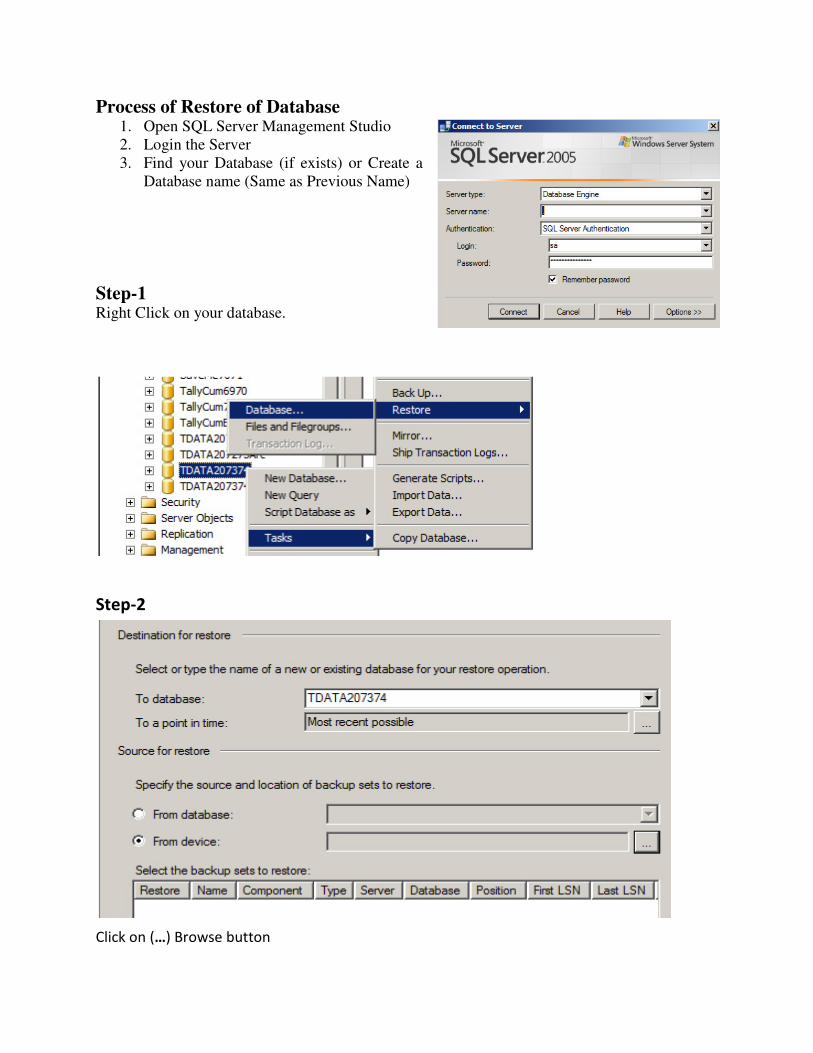
Process of Restore of Database 1. Open SQL Server Management Studio
2. Login the Server
3. Find your Database (if exists) or Create a
Database name (Same as Previous Name)
Step-1 Right Click on your database.
Step-2
Click on (…) Browse button
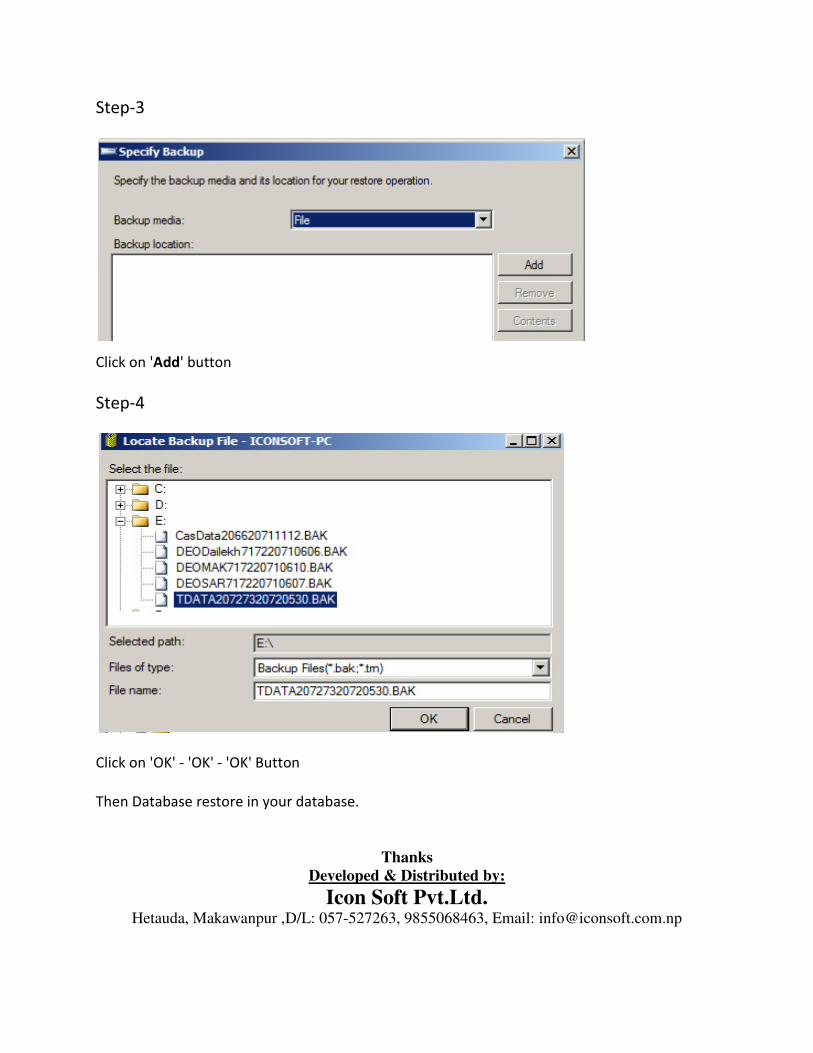
Step-3
Click on 'Add' button
Step-4
Click on 'OK' - 'OK' - 'OK' Button
Then Database restore in your database.
Thanks
Developed & Distributed by:
Icon Soft Pvt.Ltd. Hetauda, Makawanpur ,D/L: 057-527263, 9855068463, Email: [email protected]