Embed Size (px)
Citation preview

STANDARD OPERATING
PROCEDURES
IN
FORENSIC DIGITAL IMAGING
FOR THE
N.S.W. POLICE SERVICE
Forensic Imaging Section, CISB, FSG, NSW Police July 2002
Standard Operating Procedures in Forensic Digital Imaging – F.I.S., F.S.G., NSW Police July 2002 2
TABLE OF CONTENTS
1 NATIONAL GUIDELINES FOR DIGITAL IMAGING PROCESSES 5
2 SYNOPSIS 5
2.3 WORKFLOW PROCESS 8
3 GLOSSARY 8
4 DIGITAL IMAGE PROCESSES 12
5 IMAGE CAPTURE (A) 12
5.3 Digital cameras capable of high quality for all purpose forensic imaging 12
5.4 Digital cameras capable of medium quality for all purpose forensic imaging 13
6 ENHANCEMENT PROCESSES (B) 14
6.4 Image enhancement (a) 14
6.5 Subjective Image Processing to improve qualities of the image 14
6.6 Image Restoration (b) 14
6.7 Image Compression (c) 15
6.10 Image Analysis (d) 15
6.11 Image Synthesis (e) 16
7 ARCHIVING and IMAGE HANDLING PROCEDURES (C) 17
8 CD-Rs Write Once Compact Disks 17
9 OUTPUT (D) 19
10 TRANSMISSION (E) 19
11 INTEGRITY OF IMAGES 20
12 VERIFICATION OF IMAGES 21
12.3 Workflow for Digital Photography and integrity procedures 21
13 QUALITY OF IMAGES 24
14 QUALITY MANAGEMENT PROGRAMS 25
14.2 Equipment Maintenance 25
14.3 Personnel 25
14.4 Awareness Program 25
15 PROBLEMS INHERENT WITH DIGITAL PHOTOGRAPHY 27
15.1 Flash With Digital Photography 27
15.2 Degradation Of Digital Images When Enlarged 27
15.3 Disaster Victim identification and chemical biological response incidents 27
Standard Operating Procedures in Forensic Digital Imaging – F.I.S., F.S.G., NSW Police July 2002 3
15.4 High contrast and back lit subjects 28
15.5 Colour temperature 28
16 SCANNING FILM TO CD 29
16.1 Equipment required 29
16.9 Scanning Procedures 30
17. DIGITAL EQUIPMENT FOR FORENSIC USE 31
17.1 DIGITAL CAMERAS 31
17.2 SOFTWARE 31
17.5 POWER PROTECTION 32
18 SPECIFIC USES FOR FORENSIC DIGITAL PHOTOGRAPHY 33
18.2 Aerial photography 33
18.3 Assault Victim Photography (includes Domestic Violence Victim Injuries) 33
18.4 Chemical and Biological Response 33
18.5 Crime Scene Photography 33
18.6 Disaster Victim Identification 33
18.7 DNA Gathering 33
18.8 Exhibit Photography 33
18.9 Fingerprint Gathering 33
18.10 Incident Scene presentation 34
18.11 Internal Affairs Photography 34
18.12 surveillance photography 34
18.13 submissions and proposals 34
18.14 Training, lectures and operational/procedures manuals 34
19 PRESENTATION OF DIGITAL PHOTOGRAPHIC EVIDENCE 35
19.2 Why use Digital images 35
19.8 Photographing Scenes 37
19.9 General Photographs 37
19.15 Preparation 38
20 OCCUPATIONAL HEALTH AND SAFETY RELATING COMPUTERS 39
21 Computer Related Repetitive Strain Injury 39
21.3 Warning 39
21.4 What is RSI? 39
21.5 What are the Symptoms? 40
21.6 How Do I Prevent It? 40
Standard Operating Procedures in Forensic Digital Imaging – F.I.S., F.S.G., NSW Police July 2002 4
21.7 What If I Have Symptoms of RSI? 42
21.8 There are no quick fixes. 42
ADDENDUM (A) - METHODS MANUAL DIGITAL EXHIBIT PHOTOGRAPHY 44
1.1 Olympus C2500L – Using the camera 44
1.3 Photographing Exhibits 45
1.4 The Download Procedure 46
1.5 CD BACKUP PROCEDURES 48
1.6 HOW TO PHOTOGRAPH EXHIBITS 48
1.7 Safety Precautions 48
1.8 General Exhibit Photography 48
1.9 The shot list 49
1.10 Money Exhibits 49
1.11 Motor Vehicle Exhibits 50
1.12 Drug Exhibits 50
1.13 Jewellery Exhibits 51
ADDENDUM (B) – RECOMMENDED EQUIPMENT LIST 52
1. Digital Camera Capable Of High Quality 52
2. Digital Camera Capable Of Medium 52
3. The Software Program Currently Recommended For Image Management 52
4. The Software Program Currently Recommended For Image Editing 52
ADDENDUM (C) - DIGITAL IMAGING RECORD SHEETS 53
Standard Operating Procedures in Forensic Digital Imaging – F.I.S., F.S.G., NSW Police July 2002 5
1 NATIONAL GUIDELINES FOR DIGITAL IMAGING PROCESSES FOR FORENSIC USE
1.1 The National Guidelines for Digital Imaging Processes for forensic use have been structured under the National Institute of Forensic Science, Australia. The working party structuring these guidelines was represented by Queensland Police, NSW Police, South Australia Police, Victoria Police and the Royal Melbourne Institute of Technology.
1.2 The processes include capture, process, transmission, storage and output. Capture
can be by conventional or electronic means. 1.3 Police Services and other Forensic related Institutions will be expected to adhere as
close as possible to these guidelines. 1.4 The Author acknowledges assistance obtained from the working party, the National
Guidelines for Digital Imaging Processes document and the FBI Digital Imaging Guidelines.
1.5 Guarding integrity will permit a Police Witness to give testimony in court, which states
the image being shown in the court is the original image that was captured at the scene.
2 SYNOPSIS 2.1 Acknowledgments to:
• The NSW Police Forensic Imaging Section • The National Institute of Forensic Science - National Guidelines for Digital
Imaging Processes • Paul Marxhausen – Computer Related Repetitive Strain Injury-1996 • www.engr.unl.edu/ee/eeshop/rsi.htm • Digital Imaging Processing Principles and Applications, Gregory Baxes,
John Wiley and Sons, Canada 1994.
2.2 QUALITY AND INTEGRITY ARE OF PRIMARY IMPORTANCE Integrity, originality and quality will permit a Police Witness or other witness to give testimony in court, which states the image being shown in the court is an exact duplicate of the primary image that was captured at the scene.
2.2.1 At this time, Digital Imaging is still too expensive to completely replace conventional
photography. This includes both the running costs and the equipment set-up costs. This statement is based on practical experience with Digital Imaging since 1992 and not on the costs quoted by manufacturers, which like print times, are always under estimated.
2.2.2 The quality of digital photography, at this time, is still not acceptable as a
replacement for conventional photography. Forensic Photographers must always strive for the highest possible standard.
Standard Operating Procedures in Forensic Digital Imaging – F.I.S., F.S.G., NSW Police July 2002 6
2.2.3 There are, however, aspects of recording evidence that Digital Imaging can be used for eg. Disaster Victim Identification (DVI), Chemical Biological Response (CBR), Exhibit Photography under controlled circumstances, supplementary Crime Scene Photographs, Digital Photogrammetry, Virtual Reality Panoramas to supplement Crime Scene Photographs and 3D Animation Reconstructions.
2.2.4 Digital Photography allows immediate viewing and high speed transmission of
images, but there is no time savings in general digital photography. It’s use involves an additional set of standardised procedures that are more complex and time consuming than conventional means.
2.2.5 These standards must be extensive to allow Digital Imaging to be widely accepted by
the Judiciary. The digital Imaging process must be completely transparent and open to scrutiny. Original images must be maintained unchanged.
2.2.6 A new set of Occupational Health and Safety issues are involved with extended
computer use relating to Digital Imaging. These OH&S rules and standards must be established and complied with by all Officers responsible for digital photography and imaging.
2.2.7 Digital Imaging may benefit investigations and presentation of evidence:
• Allowing immediate viewing and briefing of the scene for investigators to prevent scene contamination
• Assist administrative proposals and reports • Centrally maintaining scene or image databanks • Images for comparison and identification comparisons. This includes
both digital photographs and scanned images. Such images should be backed up by originals or conventional film based photographs
• Image databases and database comparisons • Fingerprint images for immediate transmission and identification, (scene
fingerprints must also be captured on conventional photography at this time).
• Immediate images for transmission to emergency administration or command posts, Interpol for identification, other Police and agencies. E.g. DVI, CBR, Major incident scenes
• Investigative or operational briefings • Offender Photographs • Overlays and charts where images can be scanned and compared in
layers using software editing packages • Public Relations, desktop publishing, lecture material and presentation • Scanned images from conventional aerial photographs with grided
overlays or reconstruction overlays • Scientific processing for measurement and clarification eg, digital
microscopy, weapon comparisons – scientifically calibrated & methodical • Surveillance Images for immediate intelligence and briefing purposes,
(not for primary court presentation) at this time • To complement conventional crime scene photographs • Training images and areas not requiring quality or detail

Standard Operating Procedures in Forensic Digital Imaging – F.I.S., F.S.G., NSW Police July 2002 7
• Virtual Reality Interactive Presentations and 3D reconstructions
2.2.8 Costs, quality, integrity and archiving must be taken into account. 2.2.9 Regardless of the type of images used, the practices of forensic experts must be
methodical, consistent and totally impartial. Integrity and quality must be of the highest possible order. The practice of enhancing images must be clearly documented and repeatable. This can be achieved by setting and adhering to standard practices, and ensuring that staff are supervised to adhere to those practices.
2.2.10 An operator must be familiar with their tools of trade and the sciences behind them. 2.2.10 It should be noted that the very first image captured in a digital camera is actually the
image captured on the CCD. This image is then interpolated and recorded onto the cameras storage media as the Primary Image. During the download process the Primary Image is duplicated as the original image. Because this image is an exact mathematical duplicate of the primary image it is not necessary and indeed not recommended that the camera media is kept to archive the primary image. Not only would this be extremely expensive but because the downloaded image is an exact duplicate it is totally unnecessary.
Standard Operating Procedures in Forensic Digital Imaging – F.I.S., F.S.G., NSW Police July 2002 8
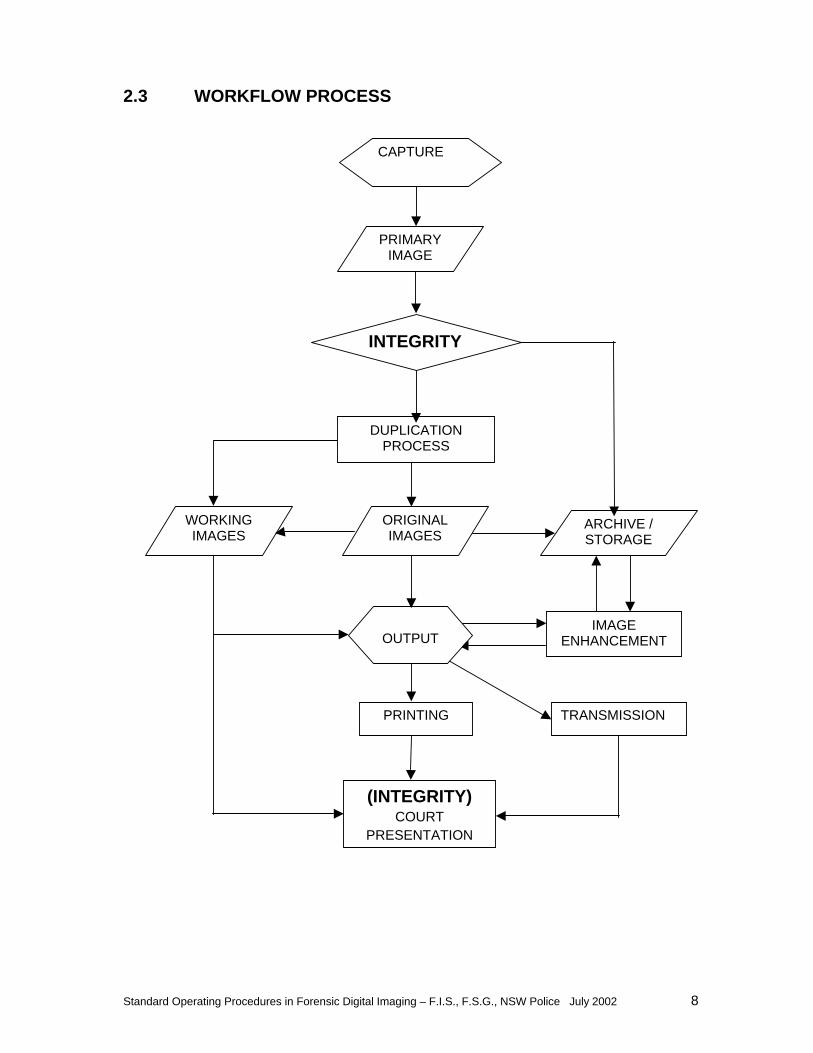
2.3 WORKFLOW PROCESS
CAPTURE
PRIMARY IMAGE
DUPLICATION PROCESS
IMAGE ENHANCEMENT
ARCHIVE / STORAGE
(INTEGRITY) COURT
PRESENTATION
TRANSMISSION
WORKING IMAGES
PRINTING
ORIGINAL IMAGES
OUTPUT
INTEGRITY
Standard Operating Procedures in Forensic Digital Imaging – F.I.S., F.S.G., NSW Police July 2002 9
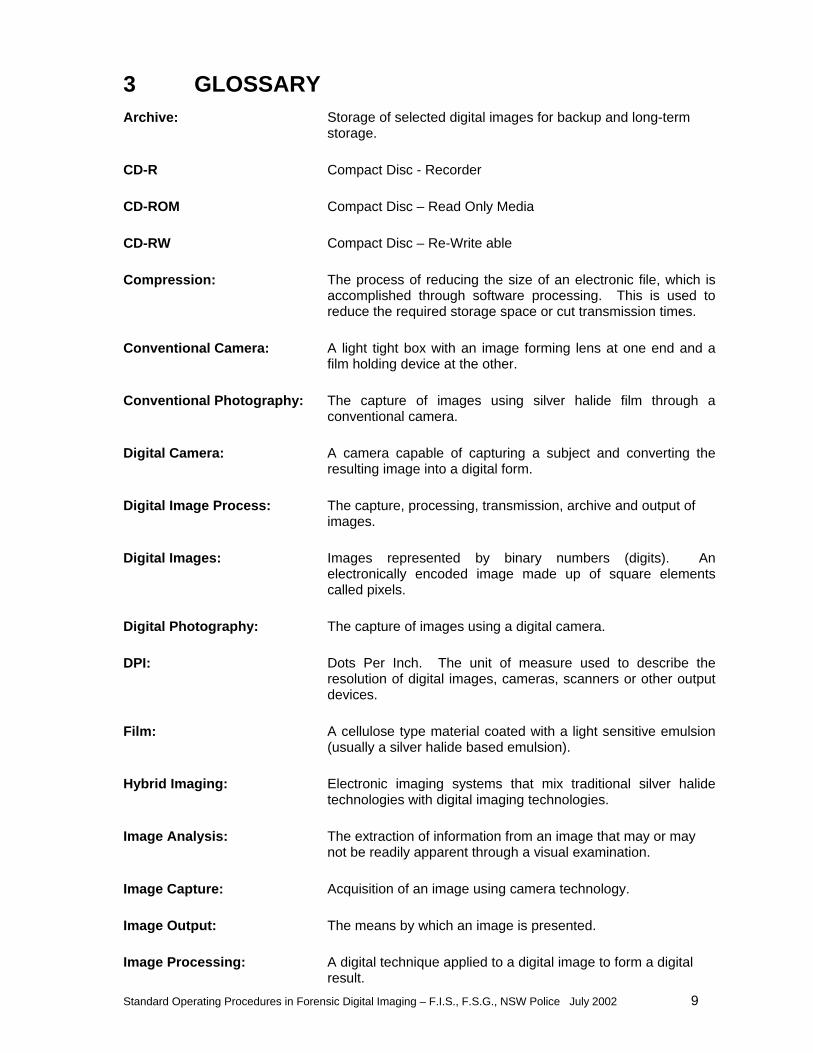
3 GLOSSARY Archive: Storage of selected digital images for backup and long-term
storage. CD-R Compact Disc - Recorder CD-ROM Compact Disc – Read Only Media CD-RW Compact Disc – Re-Write able Compression: The process of reducing the size of an electronic file, which is
accomplished through software processing. This is used to reduce the required storage space or cut transmission times.
Conventional Camera: A light tight box with an image forming lens at one end and a
film holding device at the other. Conventional Photography: The capture of images using silver halide film through a
conventional camera. Digital Camera: A camera capable of capturing a subject and converting the
resulting image into a digital form. Digital Image Process: The capture, processing, transmission, archive and output of
images. Digital Images: Images represented by binary numbers (digits). An
electronically encoded image made up of square elements called pixels.
Digital Photography: The capture of images using a digital camera. DPI: Dots Per Inch. The unit of measure used to describe the
resolution of digital images, cameras, scanners or other output devices.
Film: A cellulose type material coated with a light sensitive emulsion
(usually a silver halide based emulsion). Hybrid Imaging: Electronic imaging systems that mix traditional silver halide
technologies with digital imaging technologies. Image Analysis: The extraction of information from an image that may or may
not be readily apparent through a visual examination. Image Capture: Acquisition of an image using camera technology. Image Output: The means by which an image is presented. Image Processing: A digital technique applied to a digital image to form a digital
result.

Standard Operating Procedures in Forensic Digital Imaging – F.I.S., F.S.G., NSW Police July 2002 10
Image Transmission: The act of electronically sending images from one location to
another. Image Verification: A process by which an image is identified as being an accurate
representation of an object. Integrity: See the Police Code of Conduct. The soundness of moral
principle and character, undiminished, unimpaired.
Specifically, imaging whether photographic or digital refers to the maintenance of an image’s true and original condition and the ability to display it in a non-manipulated form. An enhanced image maintains its integrity if the enhancement is repeatable and transparent and is performed for the purposes of raising its value to all concerned.
By standardising practises for digital image processing we can safeguard our procedures from adverse legal criticism. If the integrity of any image capturing process is severely questioned in court, due to careless or deliberate practices of an operator, the result could affect the introduction of digital imaging technologies.
Interpolation: A sampling technique used to increase the size of an image file
by creating more pixels and increasing the apparent resolution of an image. Interpolation examines the existing pixel information and creates additional pixels through image processing.
Loss less Compression: Any compression technique wherein no loss in image data will
occur when the image is compressed. The image can be retrieved in its original form.
Native File Format: The original format of the Primary Image. Negative: See Film Optical Resolution: The maximum physical resolution of a device. Optical
resolution provides better resolution than interpolated resolution, which uses software to create additional information.
Original Image: A direct and unchanged duplicate of the Primary Image, eg.CD-
Rs burned from the Primary Image.
For film and analogue video, the Original Image is also the Primary Image.
Output: See Image output. Pixel: The smallest component of a digital image. Derived from
“Picture Element”.
Standard Operating Procedures in Forensic Digital Imaging – F.I.S., F.S.G., NSW Police July 2002 11
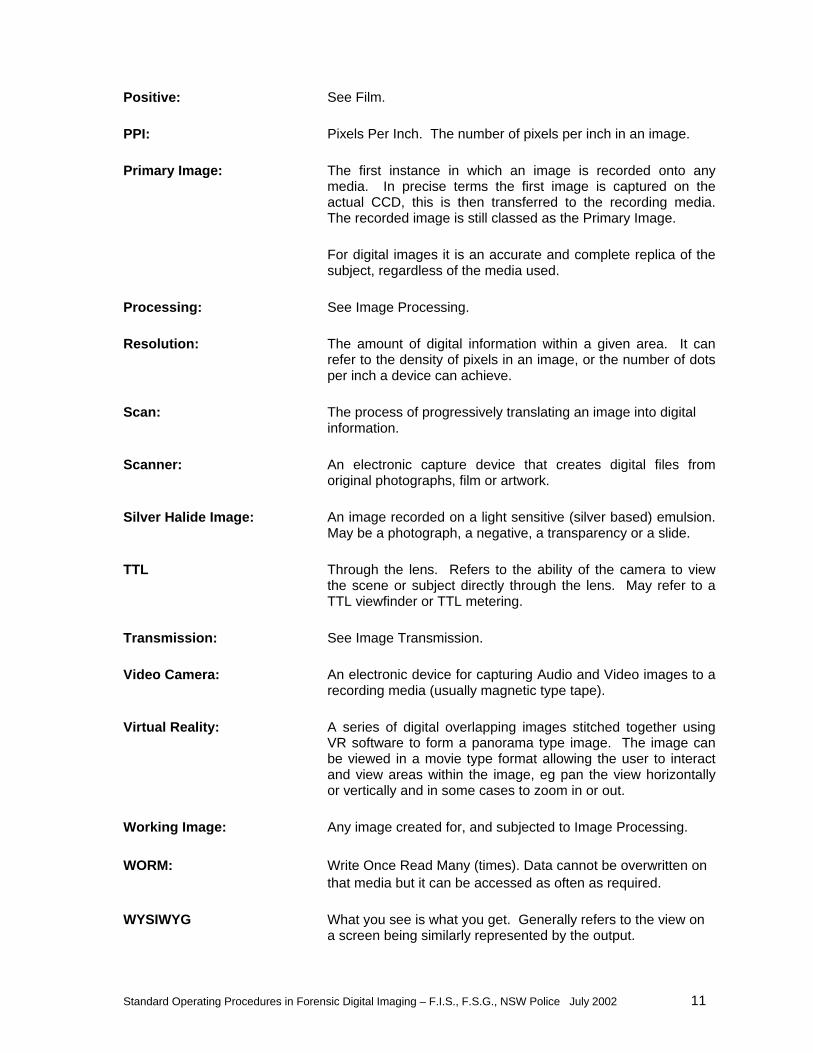
Positive: See Film. PPI: Pixels Per Inch. The number of pixels per inch in an image. Primary Image: The first instance in which an image is recorded onto any
media. In precise terms the first image is captured on the actual CCD, this is then transferred to the recording media. The recorded image is still classed as the Primary Image.
For digital images it is an accurate and complete replica of the
subject, regardless of the media used. Processing: See Image Processing. Resolution: The amount of digital information within a given area. It can
refer to the density of pixels in an image, or the number of dots per inch a device can achieve.
Scan: The process of progressively translating an image into digital
information. Scanner: An electronic capture device that creates digital files from
original photographs, film or artwork. Silver Halide Image: An image recorded on a light sensitive (silver based) emulsion.
May be a photograph, a negative, a transparency or a slide. TTL Through the lens. Refers to the ability of the camera to view
the scene or subject directly through the lens. May refer to a TTL viewfinder or TTL metering.
Transmission: See Image Transmission. Video Camera: An electronic device for capturing Audio and Video images to a
recording media (usually magnetic type tape). Virtual Reality: A series of digital overlapping images stitched together using
VR software to form a panorama type image. The image can be viewed in a movie type format allowing the user to interact and view areas within the image, eg pan the view horizontally or vertically and in some cases to zoom in or out.
Working Image: Any image created for, and subjected to Image Processing. WORM: Write Once Read Many (times). Data cannot be overwritten on
that media but it can be accessed as often as required. WYSIWYG What you see is what you get. Generally refers to the view on
a screen being similarly represented by the output.

Standard Operating Procedures in Forensic Digital Imaging – F.I.S., F.S.G., NSW Police July 2002 12
4 DIGITAL IMAGE PROCESSES 4.1 The categories are:
A. Image Capture B. Image Enhancement C. Archive or Storage D. Output E. Transmission.
4.2 Through all stages the image must be maintained as an accurate representation of
the evidence or subject that was originally captured.
5 IMAGE CAPTURE (A) 5.1 This is the production of an image accurately representing a subject. The image may
be captured using cameras, scanners or other electronic devices. 5.2 An image capture device must be capable of producing an accurate representation of
the subject. Consider the final use of the image, the time constraints, the accuracy of colour, lighting and contrast requiring reproduction
5.3 DIGITAL CAMERAS CAPABLE OF HIGH QUALITY FOR ALL PURPOSE FORENSIC IMAGING
5.3.1 Must have: • Image capture at high resolution for quality 10 x 8 inch photographic print
reproduction • A minimum of 6 mega pixel capacity • Synchronised external flash capability, using a synch plug • Interchangeable lenses. Utilising commercially available lenses of
various focal lengths. E.g. Macro at 1:1, extreme wide angle (up to 20mm), wide angle(up to 35mm), planar type (flat) lens, medium(35 – 105) and long lenses(105 to 600), extreme long length lenses(600 plus).
• A separate battery to the operating battery or a memory chip to ensure that times and dates remain correct if batteries and cards are changed over.
• Through the lens viewing (TTL) • Accurate exposures and white balance. • Robust construction and tolerance of the varied conditions experienced in
forensic use • A reasonable price • Ease of use by an operator familiar with conventional cameras, with
minimal additional training • Shutter, Aperture and Program metering modes • Manual metering and focus override capabilities • FOR THE CURRENT RECOMMENDED CAMERA REFER TO
ADDENDUM B – RECOMMENDED EQUIPMENT LIST

Standard Operating Procedures in Forensic Digital Imaging – F.I.S., F.S.G., NSW Police July 2002 13
5.4 DIGITAL CAMERAS CAPABLE OF MEDIUM QUALITY FOR ALL PURPOSE FORENSIC IMAGING
5.4.1 Must have: • Image capture at a reasonably high resolution for quality 5 x 7 inch
photographic print reproduction • A minimum of 4.5 mega pixel capacity • In built flash. It is preferable to have an additional synch plug for external
flash use • 1:1 macro mode. Sometimes called Super Macro Mode. • A separate battery to the operating battery to ensure that times and dates
remain correct if batteries and cards are changed over. • Through the lens viewing (TTL) • Accurate exposures and white balance. • Robust construction and tolerance of the varied conditions experienced in
forensic use • A reasonable price • Simple operations able to be used by an operator familiar with
conventional cameras with minimal additional training • Manual metering and focus override capabilities. The addition of +/-
exposure and a focus lock button would suffice. • FOR THE CURRENT RECOMMENDED CAMERA REFER TO
ADDENDUM B – RECOMMENDED EQUIPMENT LIST

Standard Operating Procedures in Forensic Digital Imaging – F.I.S., F.S.G., NSW Police July 2002 14
6 ENHANCEMENT PROCESSES (B) 6.1 Forensic digital imaging processes should be approached in a methodical and
structured manner. There are 5 basic broad categories of digital image processes: a. Image Enhancement b. Image Restoration c. Image Compression d. Image Analysis e. Image Synthesis
6.2 All digital imaging tasks should be documented in sufficient detail to allow
independent and repeated validation of the processes employed. 6.3 It is important when referring to such images to specify the type of process through
which the image has gone.
6.4 IMAGE ENHANCEMENT (a) 6.4.1 Only fully trained personnel are to enhance Images. 6.4.2 The principle of image enhancement is to make an image clearer for Forensic
Analysis or interpretation, to improve the qualities of an image. 6.4.3 The original image must be preserved at all times and must not be subjected to
processes that cause alteration. Use a precise duplicate of the image only, for enhancement – not the original.
6.4.4 All enhancements must be consistent and repeatable.
6.5 SUBJECTIVE IMAGE PROCESSING TO IMPROVE QUALITIES OF THE IMAGE
6.5.1 Dependant on skill and practice of the practitioner. Applied at the discretion of the operator to produce a desired detail.
6.5.2 Processes in this category would include: contrast, colour balance, burning or
dodging, spatial filtering, frequency domain filtering, edge enhancement, noise reduction, lightening and darkening.
6.6 IMAGE RESTORATION (b)
6.6.1 Objective Image Processing to improve the qualities of an image
6.6.2 Based on known, measured or accurately surmised degradation/improvement of the original image and cannot be used without concise electronic measurement to improve the original image.

Standard Operating Procedures in Forensic Digital Imaging – F.I.S., F.S.G., NSW Police July 2002 15
6.6.3 Processes involving image restoration would include: correcting for lens distortion, inverse filtering, photometric correction etc.
6.7 IMAGE COMPRESSION (c) 6.7.1 Reduces the data content necessary to describe an image. Generally used for the
transfer of digital files. 6.7.2 The file size of an image refers to the total amount of pixel information in the image.
To compress an image one value is assigned to clusters of pixels rather than to each individual pixel.
6.8 Loss less Image Compression 6.8.1 Preserves the exact data found in the original image. 6.8.2 One value is assigned to adjacent pixels with identical density and R.G.B.
information. 6.8.3 When the image is expanded clusters of pixels having the same value are only
formed if their original values were identical. 6.8.4 Eg: TIFF (.tif), TARGA (.tga), WINDOWS BITMAP (.bmp). 6.9 Lossy Image Compression 6.9.1 Do not exactly represent the data of the original image but strives only to maintain a
particular level of subjective image quality. 6.9.2 Lossy compression is used to reduce an image down in size using a formula that
looks at eliminating pixels (image dots) in clusters that are similar in colour and density to each other. When the image is saved a single value is used to identify the cluster of pixels rather than the individual pixel.
6.9.3 If a lossy compression is used, critical information or fine detail could be lost and
image artefacts such as muddy colours and incorrectly coloured pixels are introduced as a result of the compression process. Repeated saving of the end product using lossy compression results in a greater degradation of the image quality and integrity.
6.9.4 Eg: JPEG (.jpg), GIF (.gif), Fractal and Wavelet.
6.10 IMAGE ANALYSIS (d) 6.10.1 These generally do not produce pictorial results. They produce numerical or
graphical information based on the numerical characteristics of the original image. 6.10.2 Eg: Spatial measurements, statistics, image segmentation, feature extraction, object
classification, histogram analysis etc. 6.10.3 See INTEGRITY OF IMAGES, Verification of Images

Standard Operating Procedures in Forensic Digital Imaging – F.I.S., F.S.G., NSW Police July 2002 16
6.11 IMAGE SYNTHESIS (e) 6.11.1 Creates images from other images or non image data. These processes are used
when a desired image is either physically impossible or impractical to capture, or does not exist in a physical form.
6.11.2 Processes in this category are not limited to the qualities of the original image. 6.11.3 Eg: Composite images, Facial ID Composites, 3D animation reconstructions, Virtual
Reality Scenes etc.
Standard Operating Procedures in Forensic Digital Imaging – F.I.S., F.S.G., NSW Police July 2002 17
7 ARCHIVING AND IMAGE HANDLING PROCEDURES (C)
7.1 The archiving of Images is extremely important. To ensure integrity and long term storage use the following storage media: • Silver based film, with the exception of instant film • Write once read many CD ROM • Digital Versatile Disc – DVD • Server platforms
7.2 The following media are acceptable for holding original images, but care must be
taken to avoid loss of data and future compatibility, especially if the practitioner relies on these originals over an extended period of time: • Diskettes • Magnetic tape • Fixed hard drives • Removable magnetic media • Compact Flash Cards • Smart Media Cards • PC Cards • Removable magnetic optical drives • Write once magnetic optical drives
7.3 It is important to ensure that the original image is preserved in an unchanged state
and format. The image should not be subject to processes that cause permanent alteration, or deliberate or accidental tampering.
7.4 Continuity of the Primary and Original image must be maintained at all times. All
images should have some form of documentation whether electronic or analogue identifying the person whom had custody and control of the image from the point of capture to archive. Once archived, continuity must be maintained by documentation identifying the persons who had access to those archived images. An Image Register recording image movements must be kept.
7.5 In Digital Disaster Victim Identification and Chemical / Biological Scene Photography,
the first photograph is used to record a sheet identifying the job number, location, folder/card number, photographers name, time out and other relevant details. The sheet is then used as part of the audit / identification trail which goes right through to the final archival process. In addition, the Original Master CDs are titled, dated and signed off by the Officer down-loading and burning the Images.
8 CD-Rs WRITE ONCE COMPACT DISKS
8.1 It is important, both to save time and to ensure consistency that a high quality and high speed CD-Writer is used for archiving or backups. Remember also that your hard drive must be fast enough to keep up a continuous high speed data transfer rate or information may be corrupted.
Standard Operating Procedures in Forensic Digital Imaging – F.I.S., F.S.G., NSW Police July 2002 18
8.2 After downloading the Primary Images to a hard drive an original image is created
which is an exact duplicate of the Primary Image. A CD-R is to be burned from these images for archival purposes. This will produce original images on both the hard disk drive and on CD.
8.3 Because digital images are simply a mathematical representation of data, duplicates
of the original images made in the burning process are also original images. It is therefore essential that the integrity process is adhered to.
8.4 As part of a data recovery and management plan it is preferred that 2 CDs are
burned and stored at separate locations. This will reduce the risks from fire or building damage.
8.5 For image processing and analysis a duplicate of the original image is to be used.
This is called an Original Image working copy. If an image is enhanced to make an image clearer for the purpose of forensic analysis or interpretation the result is a new image, which must be named differently to the original and archived accordingly.
8.6 Warning: Data on a CD is stored optically on a dye based layer. Light,
moisture and heat can corrupt the data, rendering it unusable. A faulty hard drive can also corrupt the images. Any duplicates should therefore be checked prior to archiving.
8.7 All archived CDs must be stored in a clean dry environment at low humidity and
moderate temperature away from light. Anti Corruption Policies must be maintained and adhered to, to protect the original images.
8.8 It is recommended that a thumbnail catalogue of images is printed and stored with
the CDs to facilitate fast image viewing. Some image browsers also allow a database to be used to give image searching facilities.
8.9 FOR THE CURRENT RECOMMENDED IMAGE MANAGEMENT SOFTWARE
PROGRAM REFER TO ADDENDUM B – RECOMMENDED EQUIPMENT LIST
Standard Operating Procedures in Forensic Digital Imaging – F.I.S., F.S.G., NSW Police July 2002 19
9 OUTPUT (D) 9.1 An output device must be capable of producing an accurate representation of the
input image. The following should be considered in the selection of output devices: • Final use of image. • Time and weather constraints. • Longevity/permanence of output image. • Spatial resolution required. • Range of colours and brightness to be produced.
9.2 Output devices strongly recommended to display recorded evidence and the level to
which they can produce quality output are: 9.2.1 High level
• Conventional film chemical processes • High-end laser printers • Film recorders
9.2.2 Medium level
• Laser printers/copiers • Dye sublimation printers • Inkjet and bubble jet printers (photo-realistic) • Solid ink printers
9.2.3 Low level
• Ink Jet and bubble jet printers • Facsimile image transmission • Television / monitor
10 TRANSMISSION (E) 10.1 The following should be considered in the selection of transmission methods and
devices: • Final use of image • Time constraints • File size • Security of transmission • Integrity of transmission • Hardware and software compatibility of transmitters and receivers. • File format compatibility
10.2 PC Anywhere Software is currently the standard for transmitting images and data
between the Australian Bomb Data Centre and State Police Services and for NSW Police Forensic Imaging Section remote access.
Standard Operating Procedures in Forensic Digital Imaging – F.I.S., F.S.G., NSW Police July 2002 20
11 INTEGRITY OF IMAGES 11.1 With Forensic Photography and especially when related to digital, there is a need to
ensure integrity of the digital process. This permits Police and Experts to give testimony in court that the image shown is the image that was captured at the scene. “Images can be susceptible to abuse or human error resulting in images being improperly processed by the use of incorrect procedures regarding the preservation and archiving of digital images.” This in turn has the potential of discrediting legitimate use of digital imaging as an evidentiary tool.
11.2 By standardising practises of digital image processing we can safeguard our
procedures from adverse legal criticism. If the integrity of any image capturing process is severely questioned in court, due to careless or deliberate practices of an operator, the result could affect the use of digital imaging technologies in law enforcement.
11.3 Currently it is strongly recommended that conventional silver based film be the
primary media for recording Crime Scenes. Recording on conventional media may be supplemented by analogue or digital video or digital still imaging only if the procedures adhere to strict standard practices and aim for the highest possible quality end product.
11.4 Maintaining the integrity of the Primary Image is not such a problem, as some would
believe providing that Standard Operating Procedures, such as from this document, are adhered to.
11.5 The National Guidelines for Digital Imaging recommend personnel using digital
imaging technologies shall be trained and assessed for competency with regard to the particular organizations SOP. Further, that we document all training and maintain good practices in Digital Imaging processes, pursuing continuing educational courses in imaging, and being aware of legal developments relating to the use of imaging technologies.
11.6 Some companies have discussed the use of time stamping to maintain image
integrity. Other reports have also mentioned watermarking to ensure integrity of the original image. To a professional intent on changing images these are only a minor annoyance.
11.7 They can be altered. Time stamping therefore cannot be used to prove the
authenticity of the date an image was taken. It can be of assistance in a standardised system. Using strict standardised practices and procedures will have the greatest success contributing towards maintaining integrity.
11. REFER ALSO TO SECTION 7 - ARCHIVING AND IMAGE HANDLING
PROCEDURES AND SECTION 8 – CD-RS
Standard Operating Procedures in Forensic Digital Imaging – F.I.S., F.S.G., NSW Police July 2002 21
12 VERIFICATION OF IMAGES 12.1 Primary and Original Images
12.1.1 The person who captures the original image, or was present at the time the original image was captured, would make documentation and can then state that the image is a true and accurate representation of the scene of evidence.
12.1.2 After downloading the Primary Images to a hard drive an original image is created
which is an exact and unchanged duplicate of the Primary Image. Because digital images are simply a mathematical representation of data, duplicates of the original images made in the burning process are also original images. It is therefore essential that the integrity process is adhered to.
12.1.3 REFER TO SECTION 3 - GLOSSARY 12.2 Enhanced Images
12.2.1 Objective image processes are to be documented in detail. The documentation should record all steps performed and the levels applied. Another operator can then validate the original enhancement process if required.
12.2.2 Subjective image processes should be transparent and minimal documentation only
is required.
12.3 WORKFLOW FOR DIGITAL PHOTOGRAPHY AND INTEGRITY PROCEDURES
12.3.1 In order that the integrity of digital images is maintained the following must be strictly adhered to:
• All equipment must be well maintained and in good working order • All operators must be fully trained in the operation and procedures for
both the equipment and the job at hand • Ensure batteries are full charged • ALWAYS set the correct time and date in the camera • Load film card (ensure there are no other images on the card from
previous jobs. One job to one card. • Set record mode to highest useable resolution and minimum compression • Use non lossy compression for image capture where available and
practical, It should be noted that most cameras record the primary image as a JPEG (jpg) image. In such cases the minimum compression setting must be selected. Raw data or uncompressed TIF (tif) files may not be at all practical to use in cameras.
• A Digital Imaging Record sheet should be utilised for all Digital Photography jobs where images are to be presented to court. This sheet can be used to record the following: − Date − Folder number − Scene title or location
Standard Operating Procedures in Forensic Digital Imaging – F.I.S., F.S.G., NSW Police July 2002 22
− Job number if available − Camera number / kit number used (if at a major incident
involving multiple photographers) − Photographing Officer − Name of person setting up equipment if different from
photographer − Number of shots taken − Time commenced photographing − Time finished photographing − Additional names of persons handling camera or card
during the job − Times of handover if other persons handle camera or film
card during job − Name of person unloading the film card − Date and time of unloading and download − Name of person down loading and archiving images − Time film card is down loaded and archived
• Complete the Digital Imaging Record sheet with the data known prior to photographing the scene
• On the first frame, photograph the above Record Sheet • When the job is completed, enter any further details necessary on the
Record Sheet • On the last frame, photograph the updated Digital Imaging Record Sheet • Update the Record sheet throughout the archiving process • Retain the Record sheet with the brief or with the master Job CD • At the end of each job download the primary unchanged images in their
original format to a folder allocated to the job. If for some reason the images cannot be immediately downloaded the Compact Flash Cards or other recording media must be secured to maintain integrity. − Once the images are downloaded and backed up, the card is
to be cleared of all images, ready for reuse. • There should be at least one CD backup of original images in original
unchanged format. To adhere to risk management procedures and additional CD could be stored at a separate site.
• Additional working copies of CDs can be made for printing, viewing, enhancing etc. Do Not use the Original Master CDs. Ensure the integrity process is invoked for working copies.
• Label each CD using an indelible marker accordingly – Job no, Date and time. Include name and signature of person down loading and archiving images
• Store in CD Jewel Case, in easily identifiable sleeves or shelves. E.g. “FELLOWES” CD sleeves placed in 4 ring binders or CD storage racks. Store in cool, dry, dust free and darkened cabinet
• Ensure Anti Corruption procedures are in place for data and images • Record movement of CDs • Ensure that records are maintained to record any enhancements made to
images presented or likely to be presented to court 12.3.2 REFER TO SECTION 7 - ARCHIVING AND IMAGE HANDLING PROCEDURES 12.3.3 SEE ADDENDUM (C) at rear for an example of a Digital Imaging Record Sheet

Standard Operating Procedures in Forensic Digital Imaging – F.I.S., F.S.G., NSW Police July 2002 23
12.3.4 Keep a methods manual and Standard Operating Procedures (such as these) for specific / specialised Digital Photography tasks REFER TO ADDENDUM (A) at the rear these SOPs for the Exhibit Digital Photography Methods Manual.
Standard Operating Procedures in Forensic Digital Imaging – F.I.S., F.S.G., NSW Police July 2002 24
13 QUALITY OF IMAGES 13.1 When judging quality look for clear (not muddy) renditions in mid tones, consistent
and definite colour curves (not crossed curves), high quality and specific edge definition, true colour and contrast reproduction, non jaggy pixels (look specifically at diagonals), detail in shadows and highlights, sufficient resolution and high density value (3.6 plus is excellent)
13.2 The image capture device (includes both cameras and scanners) should be capable
of producing an accurate representation of the evidence being recorded. Output must be capable of producing an accurate representation of the input image. Consideration must be given to the Final Use of the Image.
13.3 Always be aware of interference from digital and electronic devices which can cause
additional noise in the image. Certain frequencies can create muddy areas in the image. For example if your mobile phone rings or is being used during the imaging process then the image may be affected
13.4 Inkjet prints, even so called “Photo Quality” Printers, while appearing very good do
not stand up to magnification very well. The dots are clearly visible and show undefined edge detail. In some cases this can be a problem if fine detail is required. For example fingerprint or individual characteristics in a shoe print.
13.6 Digital photographs of fingerprints will allow immediate transmission for
crosschecking with a central fingerprint database. However such digital photographs are to supplement film not replace it. This ensures that the best possible detail is recorded and archived. At magnification fine digital detail is lost. If fine detail from digital images is required, a printer capable of full colour Photographic output is required.
13.7 Costs must be taken into account to ensure effective use of resources.
Standard Operating Procedures in Forensic Digital Imaging – F.I.S., F.S.G., NSW Police July 2002 25
14 QUALITY MANAGEMENT PROGRAMS 14.1 All areas within Australian law enforcement and forensic agencies that utilise images
and imaging technology should implement quality management programs that safeguard images against accidental and illegal practices. The electronic process that is in place within the organisation should be able to validate the end results.
14.2 EQUIPMENT MAINTENANCE
14.2.1 All equipment is to be maintained in accordance with the manufacturers specifications and recommendations as per operating and warranty manuals.
14.2.2 All maintenance is to be documented. 14.2.3 Regular, end to end, checks on the system are to be carried out to ensure the
consistency of equipment within specific parameters. If repairs or modification are performed the equipment is re-checked. If equipment needs repair, or is not to standard, it must not be used.
14.3 PERSONNEL 14.3.1 All personnel utilising digital imaging technologies shall be trained and assessed for
competency with regard to the particular organization’s standard operating procedures, and the operation of the relevant imaging technologies.
14.3.2 All training and competency assessment programs need to be documented. Note:
Refer to NATA Accreditation Criteria for Forensic Science Laboratories, for guidance and details regarding the establishment and maintenance of accredited Quality Management Systems.
14.4 AWARENESS PROGRAM 14.4.1 Personnel and organizations within the law enforcement and forensic communities
that are using digital imaging technology, should be aware of the standards commonly followed within these disciplines and should strive to conform to, or exceed, these standards.
14.4.2 This can be done by:
• Maintaining good practices in digital imaging processes. • Pursuing continuing education courses in imaging. • Maintaining knowledge of current imaging technologies, equipment and
techniques. • Being aware of legal developments relating to the use of imaging
technologies. 14.4.3 The Australian legal system which is beginning to utilise digital’ imaging technology
needs to be made aware of the capabilities and the limitations of specific imaging technologies made available.

Standard Operating Procedures in Forensic Digital Imaging – F.I.S., F.S.G., NSW Police July 2002 26
14.4.4 The following stakeholders would benefit from an awareness program regarding the capabilities and limitations of emerging specific imaging technologies: • Managers • Law enforcement personnel • Judiciary • Personnel involved in the administration of justice
Standard Operating Procedures in Forensic Digital Imaging – F.I.S., F.S.G., NSW Police July 2002 27
15 PROBLEMS INHERENT WITH DIGITAL PHOTOGRAPHY
15.1 FLASH WITH DIGITAL PHOTOGRAPHY
15.1.1 Digital cameras suffer from a sharp increase in contrast when flash heads are used to light the subject. Film has a range of about 5-6 stops giving reasonable detail, whereas digital looses detail after just 4 stops. This is not something that can be corrected in editing software. If detail is not there no amount of filtering will put it back. When the subject is washed out in the highlights or blocked out in the shadows, the detail is gone.
15.1.2 As much as possible ensure that the flash does not reflect back directly into the lens
– angle the camera to the subject. Use external light sources for macro to avoid flash burn of the image.
15.2 DEGRADATION OF DIGITAL IMAGES WHEN ENLARGED 15.2.2 Digital images when enlarged show pixelation and jagged edges. It is important to
remember to fill the frame by zooming in or moving in to fully frame the subject. This is especially important when fine detail or printed / written text is required.
15.2.3 Ensure that the correct focus mode is selected for the image distance. Use Macro
mode or super macro mode if available for close up shots.
15.3 DISASTER VICTIM IDENTIFICATION AND CHEMICAL BIOLOGICAL RESPONSE INCIDENTS
15.3.1 Digital cameras are used at Chemical Biological Response incidents to record the scene, exhibits and trace evidence for court presentation and recording injured or deceased persons and personnel effects for identification purposes.
15.3.2 At such scenes digital cameras are placed in waterproof housings to allow them to
undergo chemical and biological decontamination procedures. The use of fully enclosed hazard suits means using the camera can be difficult. For this reason camera and housing selections is critical: • They must be simple (or only the necessary functions are to be enabled) • The LCD view screen must be bright and large enough to clearly
compose and focus the shots (you can not look though a viewfinder in CBR hazard suits)
• The housing must be solid enough to resist chemical and physical abrasion and tank and spray washing without damage
15.3.3 Care must be taken to ensure continuity and integrity through the loading, capture,
decontamination and downloading process. 15.3.4 Refer to the DVI /CBR Standard Operating Procedures
Standard Operating Procedures in Forensic Digital Imaging – F.I.S., F.S.G., NSW Police July 2002 28
15.4 HIGH CONTRAST AND BACK LIT SUBJECTS 15.4.1 One of the inherent challenges with digital photography is the cameras inability to
capture subjects that have a high contrast ratio. Conventional film can records 5-6 f stops, while digital cameras struggle to record detail with more than 4 stops between shadow and highlight detail.
15.4.2 To counter these problems:
• Do not photograph directly into a light source or an excessively light reflective surface
• Move to recompose the subject • Photograph the subject at a different time of day – if possible • Shield off the light source • Introduce a light a reflector or a flash into the subject in shadow
15.5 COLOUR TEMPERATURE 15.5.1 The advantage of digital photography is that the colour temperature of an introduced
light to illuminate the subject evenly is generally neutralised by the auto white balance within the camera. When changing light sources or locations the operator should ensure that a neutral colour balance is maintained. It may be necessary if auto white balance is not successful for the operator to recalibrate the white balance manually.
15.5.2 Auto white balance is dependant on the capabilities of the camera (choose carefully)
and on the evenness of the lighting. That is, if the colour temperature of lighting within a subject is extremely varied the automatic white balance will not produce a neutral image but will show variations of colour. As this is also inherent in conventional photography, it is acceptable.
Standard Operating Procedures in Forensic Digital Imaging – F.I.S., F.S.G., NSW Police July 2002 29
16 SCANNING FILM TO CD
16.1 EQUIPMENT REQUIRED
16.2 Batch process film scanner 16.3 A high resolution, fast, 35mm film scanner. Accessories must include a slide
cartridge, a cut film holder and a roll film holder. 16.4 Computer 16.4.1 Powerful, high end graphics system with a large disc storage capacity. Two large
disc drives, one of which can be used for short term back up. A high resolution video card capable of quick refresh rates and redraw rates for large graphic imaging. A minimum of 256 Mb RAM. 512 Mb RAM is the preferred option.
16.5 19” Monitor 16.5.1 Image comparison and enhancing requires a large high quality colour monitor with a
flat screen, high resolution, high refresh rate and small dot pitch. Managing images means a great deal of time will be spent closely focusing on specific areas of the screen. This means that there is a far greater OH&S risk from image processing than normal data entry or document handling.
16.6 High speed CD Burner or DVD burner 16.6.1 At this time there is still no industry standard for DVD burners. To avoid compatibility
problems and future technology redundancies it is recommended that these not be purchased, at this time. The new technology for DVD that is being jointly developed by major companies is “Blue Laser”. This will be worth waiting for.
16.7 Quality Colour Printer 16.7.1 Bubble Jet printers are relatively low in price to purchase, however their print costs
are high ($2 each A4 photo quality page).. Bubble Jet prints show clear dot patterns under magnification which may not be acceptable for some forms of identification, if presented to court.
16.7.2 Dye Sublimation printers produce prints which have a very smooth tonal range, but
are both expensive to buy and have extremely high print costs ($3 - $12 each A4 photo quality page).
16.7.3 Laser printers also tend to be expensive, but have low print costs (app 30 cents per
A4 page). The image is produced by a dot pattern which shows clearly under magnification which may not be acceptable for some forms of identification, if presented to court
16.7.4 The best quality prints are those produced by a photographic printer such as a mini
lab type system. Some of these systems can print both conventional photographs and digital photographs. An example of a quality professional lab system is the “Frontier System”.
Standard Operating Procedures in Forensic Digital Imaging – F.I.S., F.S.G., NSW Police July 2002 30
16.8 A WORKSTATION ADHERING TO OH&S WORK PRACTICES. REFER TO SECTION 19 OCCUPATIONAL HEALTH AND SAFETY.
16.9 SCANNING PROCEDURES 16.9.1 The Integrity Process must be in place regardless of whether the image is digitally
captured live by a digital camera or captured by scan from film. 16.9.2 Capture images at full frame on high resolution. Images can later be cropped or cut
down to working size for varying output and saved as separate files with numerical or character extensions to identify them as derivative files.
16.9.3 Archive the original scans in an unchanged state. 16.9.4 A centrally located large production batch scanning system would be the ideal set up
to handle all Forensic Services films shot at crime scenes from across the State. Eg the Fuji Frontier Print System, The Agfa Digital Print System, Konica Digital Print System.
16.9.5 OH&S procedures must be adhered to. 16.9.6 Images can be archived in the initial stages on a second large capacity hard drive. A
centrally stored server type system could archive a large quantity of images, storage for long term could become a critical issue and should be addressed in the set up stage. Long term medium could be tape, CD or blue laser DVD. When setting up such system keep in mind long term compatibility and off site storage.
16.9.7 Ensure that all stored image media is clearly labelled Refer to ARCHIVING for
additional storage information. 16.9.8 It is recommended that a thumbnail catalogue is printed and stored with the CDs to
facilitate fast image viewing. 16.9.9 Until technology completely removes the need for prints, the costs of digital image
printing must be taken into account. Prints will be required for some time yet. To transfer the cost of Photographic prints from the Forensic Services Group budget to other Police or Dept of Public Prosecution budgets may have short term effectiveness for our Group but will have greater negative consequences for the Services overall budget. High quality inkjet prints are at least twice the cost of standard photographic prints. Dye Sublimation prints are considerably more – refer to “Factors which must be taken into account when digital photography or capture is used”.
16.9.10 REFER TO SECTION 7 - ARCHIVING AND IMAGE HANDLING PROCEDURES.
Standard Operating Procedures in Forensic Digital Imaging – F.I.S., F.S.G., NSW Police July 2002 31
17. DIGITAL EQUIPMENT FOR FORENSIC USE
17.1 DIGITAL CAMERAS
17.1.1 REFER TO SECTION 5 – IMAGE CAPTURE 17.1.2 Not recommended to replace film at this time, however the preferred choice is a
Digital camera with interchangeable lens ability of a design similar to standard 35mm SLRs. Nikon lenses are currently used across the Forensic Services Group and being able to interchange lenses is a considerable advantage.
17.1.3 At the time of writing these SOPs the Nikon D1-X is the preferred choice for Forensic
Digital Imaging. 17.1.4 The aim in Forensic Digital Photography is to achieve the best possible quality image.
This means aiming for loss less high resolution images. 17.1.5 The cameras must be capable of full macro as well as standard and wide angle
formats. 17.1.6 Cameras must be set for highest useable resolution and minimum compression
capture. 17.1.7 REFER TO SECTION 11 - INTEGRITY OF IMAGES.
17.2 SOFTWARE
17.2.1 Image Editing: Use Industry Standard Software capable of allowing users to repeat enhancements if necessary. Must be capable of file conversions and basic adjustment filtering.
17.2.2 Image Browser: Capable of: viewing images as thumb nails and file
management. 17.2.3 The image browser must be capable of building a self running executeable type slide
show for presenting digital images. The file should be unchangeable. The presentation should be simple with the following minimum options: allowing files to be played manually or automatically, file names on or off, sizeable to the screen – full screen or smaller, playable by mouse or keypad.
17.2.4 It is better to play slideshows from the hard drive of a computer rather than from a CD. To avoid “CD lag” where the images take time to load, the executeable file should be copied to the computer desktop. Ensure that the actual file is copied and not just a shortcut created.
17.2.5 REFER TO ADDENDUM (B) - RECOMMENDED EQUIPMENT LIST

Standard Operating Procedures in Forensic Digital Imaging – F.I.S., F.S.G., NSW Police July 2002 32
17.5 POWER PROTECTION 17.5.1 Surge Protection power boards are essential. Back up Uninterrupted power supply is
desirable. 17.5.2 If the Power goes down data can be readily lost. 17.5.3 The hard drive head can also come crashing down on the hard drive disk causing
damage to the hard drive. (This is what happens when Windows is incorrectly shut down). This may not at first be noticed but it will eventually cause the drive to fail.
Standard Operating Procedures in Forensic Digital Imaging – F.I.S., F.S.G., NSW Police July 2002 33
18 SPECIFIC USES FOR FORENSIC DIGITAL PHOTOGRAPHY
18.1 At this time and in line with national guidelines Digital Photography should not be used to replace conventional photography for presentation of evidence at court. However if the Judicial System were to accept quality digital images and were to set up the means of presentation of electronic evidence throughout the State then Digital Photography could be used.
18.2 AERIAL PHOTOGRAPHY 18.2.1 Use a medium to high quality digital camera.
18.3 ASSAULT VICTIM PHOTOGRAPHY (INCLUDES DOMESTIC VIOLENCE VICTIM INJURIES)
18.3.1 Use a medium to high quality digital camera.
18.4 CHEMICAL AND BIOLOGICAL RESPONSE 18.4.1 Use a medium quality digital camera with waterproof housing.
18.5 CRIME SCENE PHOTOGRAPHY 18.5.1 Use a high quality digital camera. At this time use film.
18.6 DISASTER VICTIM IDENTIFICATION 18.6.1 Use a medium quality digital camera.
18.7 DNA GATHERING 18.7.1 Use a medium to high quality digital camera. At this time use film.
18.8 EXHIBIT PHOTOGRAPHY 18.8.1 Use a medium quality digital camera. 18.8.2 A Pilot program trailing Digital Photography of Exhibits in NSW Police Service has
was commenced in June 2001. The two Pilot Stations are Gosford and Penrith LAC.
18.9 FINGERPRINT GATHERING 18.9.1 Use a medium to high quality digital camera for transmission and immediate
crosschecking with the fingerprint database. At this time used to supplement film.
Standard Operating Procedures in Forensic Digital Imaging – F.I.S., F.S.G., NSW Police July 2002 34
18.10 INCIDENT SCENE PRESENTATION 18.10.1 Use a low to medium quality digital camera. This depends on the detail required to
view.
18.11 INTERNAL AFFAIRS PHOTOGRAPHY 18.11.1 Use a medium to high quality digital camera.
18.12 SURVEILLANCE PHOTOGRAPHY 18.12.1 Use a high quality digital camera with interchangeable lenses capable of high speed
operation and minimum time lag when capturing images. The recommended cameras are Nikon D1-H, Nikon D1-X and the Nikon D100. At this time use film.
18.13 SUBMISSIONS AND PROPOSALS 18.13.1 Use a medium quality digital camera.
18.14 TRAINING, LECTURES AND OPERATIONAL/PROCEDURES MANUALS
18.14.1 Use a medium to high quality digital camera.
Standard Operating Procedures in Forensic Digital Imaging – F.I.S., F.S.G., NSW Police July 2002 35
19 PRESENTATION OF DIGITAL PHOTOGRAPHIC EVIDENCE
19.1 THIS IS ONLY A VERY SHORT AND BASIC OVERVIEW 19.1.1 The role of the expert is to bring to the courtroom technical experience and
understanding regarding specific aspects of evidence, in areas of their expertise. 19.1.2 Medical Photographers, Forensic Medical Photographers, Medical Illustrators and
other Forensic Photographic Experts will be asked to give evidence in their areas of expertise in Digital Photography
19.1.3 Statements should contain the author’s full name, title, station or lab and
qualifications. 19.1.4 Statements should show the tasks carried out in chronological order:
• nature and extent of examinations • detailed description of specific features supplemented by photographs • unbiased, concise but complete • stay within your area of expertise
19.1.5 Digital Images are better presented in a digital rather than print form. The format
presented should be simple, clear and easy to use. The slide show should be a single “executable” type file allowing pause and scrolling forward and backward. The file should be unchangeable between courts. If amendments are required an additional file should be created.
19.1.6 A computer program capable of creating an slide show - executable file is Thumbs
Plus. 19.1.7 Consider that not all courts are capable of presenting digital files on computer.
19.2 WHY USE DIGITAL IMAGES 19.2.1 Photographs enable the court to familiarise themselves with the scenes of crime,
view important evidence in context, record evidence as found by the expert, make comparisons, record and explain specific details.
19.2.2 Helps the court understand the basis for conclusions. Best use of photographs is
when they enable the Magistrate, Judge or Jury to think the result is obvious. The opinions become theirs - this is a stronger force than if the opinions are yours alone.
19.2.3 Digital images allow immediate viewing of the images. These could be immediately
available in electronic form for: • Bail determination hearings or other court or tribunal hearings • Fingerprint examination and comparison • Viewing by witnesses • Viewing by experts unable to attend scene
Standard Operating Procedures in Forensic Digital Imaging – F.I.S., F.S.G., NSW Police July 2002 36
• Viewing by Investigators, Commanders, Coroners, etc unable to attend scene
19.2.4 May be transmitted to or from remote locations by land or satellite telephone. IE
ABDC in Canberra for bomb component identification.
19.3 When presenting photographs or digital images with your
statement: • Use a standard format to ensure professionalism, consistency and ease
of understanding by the court • Use your own words, copying someone else's words can be harder to
remember than your own • Use correct terminology - these may be accompanied by an explanation • Do not use descriptions or terms you cannot explain to a layman • Be prepared to explain or qualify your statement • The statement should also contain a detailed description of what each
photograph depicts • State whether the images are photographs or digital images
19.4.1 Digital Images are presented in much the same manner and reasons as photographs.
They may also be presented using software on computer screens or by projection. They may be single stills or stitched to be incorporated in 3D type virtual reality presentations. The back up of Standard Operating Procedures is essential to maintain credibility.
19.4.2 The most economic, most efficient and effective means of presenting digital images is
by using an executeable self running type file containing all the images in a slide show format. Such an executeable file, that has its own player inbuilt, maintains the integrity of the original images and allows for consistent presentation. An example of such a system is Thumbs Plus – refer to Section 18.
19.4.3 Yes! digital images can be altered. If images have been enhanced, this fact must be
acknowledged. For this reason our enhancement techniques must be consistent. Remember, we enhance images to more clearly show items of evidence. We never manipulate an image. This may be a technicality but it must remain a fact.
19.5 ENHANCE: To raise to a higher degree, intensify,
magnify, to raise the value of. 19.6 MANIPULATE: To manage or influence by artful skill, or
deviousness, to suit ones own purpose or advantage.
19.7 As Forensic experts we present facts. We do not manipulate to our advantage. We
always remain impartial. If our evidence shows facts that assist defence or prosecution we are obliged to indicate those facts. In the case of civil matters if our examinations or images show evidence of an advantage to a party other than the one who has hired us, we are also obliged to openly display that evidence.
Standard Operating Procedures in Forensic Digital Imaging – F.I.S., F.S.G., NSW Police July 2002 37
19.8 PHOTOGRAPHING SCENES 19.8.1 Digital Imaging at this time is to complement conventional photographs, not to
replace them. 19.8.2 All photographs must be comprehensive with items of interest identifiable and
accurately recorded in their original positions. The scene must be recorded in detail to show it as found by the examiner.
19.8.3 This section applies equally whether you’re photographing a scene, a specimen in a
lab, an autopsy or medical examination. 19.8.4 Never try to replace an item in its original position. Instead photograph it as found - a
second photograph could be taken with an item replaced only if it is clearly labelled or identified as being replaced, eg "view of knife placed in a position by James Smith".
19.9 GENERAL PHOTOGRAPHS
19.10 Location or long range: 19.10.1 Show the location of the scene in relation to an identifiable landmark, eg an aerial
view or long distance shot. 19.10.2 Not usually a specimen shot 19.11 Mid Range: 19.11.1 Exterior scene, may record the positions of closely related items of evidence. Interior
scene may record the relative positions and the layout of the rooms etc. 19.11.2 Specimens should be photographed to show the complete item, not just a partial
area. A second or additional shots may be used with an identifying reference or if necessary a scale.
19.12 Close up Photographs: 19.12.1 Close up record of specific features. Use scales but do not obscure detail. A shot
may be taken both with and without a scale. 19.13 Technical Photographs: 19.13.1 These may assist in identifying and processing evidence, eg use of scales for future
measurements or comparisons, filters, illumination techniques, macroscopic, microscopic, etc
19.13.2 The effects of colour casts, point of focus and depth of field are of extreme
importance in such images and care should be taken that as far as practicable these are avoided, utilised with care for specific reasons, or at least explainable.
19.13.3 Think of the courtroom when recording. Photographic the scene or object using
sufficient angles and views to cover everything, so that any area can be referenced at a later date. An item found to be unimportant now may prove vital later on.
Standard Operating Procedures in Forensic Digital Imaging – F.I.S., F.S.G., NSW Police July 2002 38
19.13.4 As with close up photographs - use scales if possible but do not obscure detail. A
shot may be taken both with and without a scale. 19.14 Opinion Evidence 19.14.1 Any opinions in a statement should be based on provable facts. Experts must
demonstrate to the court that the opinion is based on expertise on the area in which the opinion is being given.
19.14.2 Qualifications should be provided in the statement. 19.14.3 Unless you are an expert do not step into photographic analysis.
19.15 PREPARATION 19.15.1 Have you covered all the evidence thoroughly. Can you prove it, can you repeat it.
• When presenting photographic evidence it is imperative that you can show a familiarity with the tools of your trade. This should include your photographic equipment and the processes involved.
• You must be able to show the techniques used to record your evidence. • Side issues can and will be raised in areas or topics not immediately
relevant to the question on hand, i.e. knowledge of the effects of a macro lens may help to dispel a suggestion that a shoe print is not accurately represented in a photograph.
• It is important not just to know how to take photographs, but also to know the relevant capabilities and limitations of your equipment and of yourself
• A photograph can show immense detail, especially with techniques to show evidence not visible to the naked eye, eg; microscopic, macroscopic or substances fluorescing under various light sources.
19.15.2 For this reason the court may not allow digital images to stand alone as evidence. It
is therefore essential that your procedures regarding continuity, quality, integrity and archiving are strictly adhered to.
Standard Operating Procedures in Forensic Digital Imaging – F.I.S., F.S.G., NSW Police July 2002 39
20 OCCUPATIONAL HEALTH AND SAFETY RELATING TO THE EXTENDED USE OF COMPUTERS
20.1 All staff must be informed of: • The Facial Identification Workstation must be set up in accordance with
OH&S standards relating to Computer Use • Their legal obligations under the Occupational health and Safety Act 1993 • The employers obligations • How to report injuries • How to recognise symptoms of injury and what to do should injuries occur • How to correctly set up and monitor a computer workstation • The hazards associated with computer workstations • 50 minutes only hands on each hour • Break up time at the work station with other duties – away from
computers • Varying focal distances to exercise eyes • Use of stretching exercises before work and throughout the working day
21 COMPUTER RELATED REPETITIVE STRAIN INJURY
21.1 All Computer Graphic Arts involves the extend use of Computers. ComFit is no exception.
21.2 The following is an extract from a paper on OH&S involving the use of computers.
21.3 WARNING 21.3.1 As more and more work, education and recreation involves computers, everyone
needs to be aware of the hazard of Repetitive Strain Injury to the hands and arms resulting from the use of computer keyboards and mice. This can be a serious and very painful condition that is far easier to prevent than to cure once contracted, and can occur even in young physically fit individuals. It is not uncommon for people to have to leave computer-dependent careers as a result, or even to be permanently disabled and unable to perform tasks such as driving or dressing themselves.
21.4 WHAT IS RSI? 21.4.1 Repetitive Strain Injuries occur from repeated physical movements doing damage to
tendons, nerves, muscles, and other soft body tissues. The rise of computer use and flat, light-touch keyboards that permit high speed typing have resulted in an epidemic of injuries of the hands, arms, and shoulders. Use of pointing devices like mice and trackballs are as much a cause, if not more so. The thousands of repeated keystrokes and long periods of clutching and dragging with mice slowly accumulates damage to the body. Another name for the condition is Cumulative Trauma Disorder. This can happen even more quickly as a result of typing technique and body positions that place unnecessary stress on the tendons and nerves in the hand, wrist,

Standard Operating Procedures in Forensic Digital Imaging – F.I.S., F.S.G., NSW Police July 2002 40
arms, and even the shoulders and neck. Lack of adequate rest and breaks and using excessive force almost guarantee trouble.
21.4.2 You may have heard the term Carpal Tunnel Syndrome in connection with these
injuries, but in fact CTS is only a small and dangerous percentage of typing injuries. Tendonitis, Bursitis, Tenosynovitis, DeQuervain's Syndrome , Thoracic Outlet Syndrome, Trigger Finger/Thumb , Myofascial Pain Syndrome, and several other related conditions may also be to blame. All of these are serious and in advanced cases can cause great pain and permanent disability. In addition, patients injured by repetitive strain sometimes develop Reflex Sympathetic Dystrophy (RSD)
21.5 WHAT ARE THE SYMPTOMS? Tightness, discomfort, stiffness, soreness or burning in the hands, wrists, fingers, forearms, or elbows Tingling, coldness, or numbness in the hands Clumsiness or loss of strength and coordination in the hands Pain that wakes you up at night Feeling a need to massage your hands, wrists, and arms
21.6 HOW DO I PREVENT IT? 21.6.1 Correct typing technique and posture,
the right equipment set-up, and good work habits are much more important for prevention than ergonomic gadgets like split keyboards or wrist rests shows proper posture at the computer. Research suggests that a monitor position lower and farther away may be better. Note that the chair and keyboard are set so that the thighs and forearms are level (or sloping slightly down away from the body), and that the wrists are straight and level - not bent far down or way back. If the table is too high to permit this, you may do better to put the keyboard in your lap. Also note that the typist is sitting straight, not slouching, and does not have to stretch forward to reach the keys or read the screen. Anything that creates awkward reaches or angles in the body will create problems. Please note that even a "perfect" posture may result in problems if it is held rigidly for long periods of time: relax, MOVE and shift positions frequently. This isn't just about your hands and arms, either: the use or misuse of your shoulders, back and neck may be even more important than what's happening down at your wrists.
• While you are actually typing your wrists should not rest on
anything, and should not be bent up, down, or to the side. Your arms should move your hands around instead of resting your wrists and stretching to hit keys with the fingers. (Wrist rests give you a place to rest your hands only when pausing from typing, NOT while you are typing.) When you stop typing for a while, rest your hands in your lap and/or on their sides instead of leaving them on the keyboard.

Standard Operating Procedures in Forensic Digital Imaging – F.I.S., F.S.G., NSW Police July 2002 41
• Wrists also should not be bent to the side but instead your fingers should be in a straight line with your forearm as viewed from above.
• Research suggests that all of the above is easier to do if you tilt the back edge of your keyboard down, away from you. Put a prop an inch or two thick under the edge of the keyboard closest to you, but make sure the whole thing is still low enough so you aren't reaching up. This is a good argument for getting an adjustable keyboard tray that permits optimal positioning.
• INCREASE YOUR FONT SIZES. Even with ever-larger monitors, many people favour tiny little fonts in their desktop and applications. This encourages one to hunch forward into the monitor to read things, putting pressure on nerves and blood vessels in the neck and shoulders. Microsoft Windows and Macintosh desktops and applications can easily be configured to use larger, easier-to-read fonts. Do it! Also consider using colour schemes that are easier on the eyes, particularly shades of grey for text documents. (If you are using XWindows on Unix or Linux, make the fonts in your xterm windows bigger by hitting Control and the right mouse button over the window for a menu of font sizes.)
• DON'T POUND on the keys: use a light touch.
• Use two hands to perform double-key operations like Ctrl-C or Alt-
F, instead of twisting one hand to do it. Move your whole hand to hit function keys with your strong fingers instead of stretching to reach them.
• TAKE LOTS OF BREAKS TO STRETCH and RELAX. This
means both momentary breaks every few minutes and longer breaks every hour or so. Pace and plan your computer work. Fidget a lot. Every hour take a 10 minute break from computer work – do something else.
• Hold the mouse lightly, don't grip it hard or squeeze it. Place the
pointing device where you don't have to reach up or over very far to use it; close to the keyboard is best. Better yet: learn and use keyboard equivalent commands.
• Keep your arms & hands warm. Cold muscles & tendons are at
much greater risk for overuse injuries, and many offices are over-air-conditioned.
• Eliminate unnecessary computer usage. No amount of
ergonomic changes, fancy keyboards, or exercises are going to help if you are simply typing more than your body can handle. Don't try to be the fastest, most powerful hacker around - the cost is too high. Also: is there recreational computer use you can reduce? Can some of your electronic mail messages be replaced by telephone calls or conversations in person? And lose the computer/video games which often involve long, unbroken sessions of very tense keyboard or controller use. If nothing else, PAUSE the game every 3 - 4 minutes. Don't sacrifice your hands to a game!
Standard Operating Procedures in Forensic Digital Imaging – F.I.S., F.S.G., NSW Police July 2002 42
• Evaluate other activities. Problems may be caused or aggravated
by other things you do frequently. Sports, carrying children, hobbies requiring intense small work, and excess effort/tension in other daily things may have enormous impact too.
• DON'T TUCK THE TELEPHONE BETWEEN YOUR SHOULDER
AND EAR so that you can type and talk on the phone at the same time. This common procedure is very aggravating for your neck, shoulders, and arms.
• TAKE CARE OF YOUR EYES. "Computer Vision Syndrome" is
also a related, widespread problem that should be addressed at the same time you are setting up your computer for healthier use.
• PAY ATTENTION TO YOUR BODY. Pain is your body yelling that
it's in big trouble, but learning what is comfortable or awkward for your body before you're in pain may prevent injury.
• For those with children at home apply this to their studies as
well. KIDS ARE AT RISK TOO. With increasing hours in front of the computer at home and school, using equipment that rarely is set up correctly for people their size.
21.7 WHAT IF I HAVE SYMPTOMS OF RSI? 21.7.1 We all have occasional aches and pains that go away in a day or two, especially
when we overdo anything. But if you have the symptoms listed above regularly when you are using the computer, run, do not walk, to your doctor or health care provider RIGHT AWAY. Dealing with this early is critical to limit the damage, and to spare you a world of hurt, trouble, and frustration. You are not overreacting: by the time you have symptoms there has already been some damage done, and if you try to ignore the pain you may sustain a serious injury. If your doctor doesn't seem to know much about RSI, find one who does. When you find one, listen to them and check with them about any changes you intend to make or therapy you want to try.
21.7.2 Remember that "RSI" is a mechanism of injury, not a diagnosis. Where or how
seriously you are injured, and how best to treat it, varies immensely from person to person. Also, many systemic disorders such as diabetes can mimic or exacerbate RSI, and these can be ruled out by medical tests, so don't go chasing a treatment you may have heard about UNTIL YOU'VE SEEN A DOCTOR.
21.8 THERE ARE NO QUICK FIXES. No wrist splint, arm rest, split keyboard, spinal adjustment, etc. is going to let you go right back to work at full speed if you've been injured, and even carpal tunnel sufferers who undergo the release surgery on their wrists can be back in pain and trouble if they don't make the long term changes in technique and work habits that hurt them in the first place. Healing can happen but it takes months, sometimes years. Many RSI victims do regain the ability to work and substantial freedom from pain, but find that they remain vulnerable to re-injury and flare-ups. Prevention is still the best prescription. Acknowledgement for this OH&S section to:

Standard Operating Procedures in Forensic Digital Imaging – F.I.S., F.S.G., NSW Police July 2002 43
• Paul Marxhausen – Computer Related Repetitive Strain Injury-1996 • www.engr.unl.edu/ee/eeshop/rsi.htm

Standard Operating Procedures in Forensic Digital Imaging – F.I.S., F.S.G., NSW Police July 2002 44
ADDENDUM A 1 METHODS MANUAL DIGITAL EXHIBIT
PHOTOGRAPHY
1.1 OLYMPUS C2500L – USING THE CAMERA
1.2 Camera Set-up
1.2.1 When putting the camera down always ensure that it is placed on a soft surface 1.2.2 Always switch off the camera to load batteries. Make sure that the batteries have
sufficient charge and that spare batteries are available 1.2.3 Always switch the power off to load the compact flash card 1.2.4 Insert the card correctly into the CF slot. Hold the camera in the left hand, with the
card compartment cover fully opened, insert the compact flash card in the direction of the arrow on the label, with the label facing up, into the CF card slot.. Push all the way in until it clicks slightly and the eject button pops up. Close the card cover.
1.2.5 Turn the mode dial to “P” 1.2.6 Power on the camera by pushing the power button inside the mode dial 1.2.7 Access the menu by pushing the menu button on the left of the power button at the
rear of the camera. • Check the following settings in the menu set-up by scrolling/jogging
down using the “jog dial” in the downward motion: − Drive: Single − Q: SHQ − WB: Auto
(Must be checked regularly and adjusted to suit the particular photographic environment at that time)
− ISO: 200 − Exposure Compensation: Zero − Flash Synch: 1st curtain − QF set-up: 2.5m − Sharpness: Normal − Beep: On − Battery Set-up: Rec View – Auto Sleep – Off − Time/Date: Correctly Set − Disp Set-up: Rec Info – On m/ft – m − SHQ/SQ Set-up: 1280x1024 Jpeg − File Name: Name Reset
Standard Operating Procedures in Forensic Digital Imaging – F.I.S., F.S.G., NSW Police July 2002 45
• To adjust the date and time: − In the main menu - Jog down to the clock icon − Jog right to the day month year column, D M Y will
highlight in green − Jog right a second time to frame the DMY column and
highlight the year figures − Jog down or up to adjust the year setting, once the year
is set press OK, this will change to the month figures − Jog up or down to adjust the month figure, press ok, this
will change to the day figures − Jog up or down to adjust the day figures, press ok, this
will highlight the time − Jog up or down to set the hour figures, press ok, this will
highlight the minutes − Jog up or down to adjust the minutes, press ok, this will
set the clock and return to the left menu column − When all steps are completed press ok again to set and
complete menu settings. 1.2.8 Once all the menu settings are set look at the control panel at the top of the camera.
Ensure that the resolution mode reads SHQ, that CF is highlighted and that there are sufficient remaining images for the job at hand.
1.2.9 Remove the lens cap. Look into the viewfinder and adjust the diopter adjustment dial
to suit your eyesight. 1.2.10 Press the Flash pop up button to raise the flash
1.3 PHOTOGRAPHING EXHIBITS
1.3.1 Frame the image in the viewfinder by zooming into the subject using the zoom lever. When using the flash, in order to reduce hot spots, try to keep at least 1 metre from the subject. In macro mode this may not be possible.
1.3.2 Write up the Exhibit Photography Record Sheet and photograph as the first frame.
This record sheet will also be photographed as the last frame of that job. Use a medium size black marker to complete the details. One job represents one exhibit number.
1.3.3 Refer to the Section below on how to photograph exhibits. 1.3.4 The items relating to each Exhibit number are to be photographed in the following
order: a. Job Sheet to commence the job b. Group shot of all items c. Individual overall shot of each item followed by a close up shot of the
identifying features – eg macro shot of serial numbers, engravings etc. d. Job Sheet to close the job.

Standard Operating Procedures in Forensic Digital Imaging – F.I.S., F.S.G., NSW Police July 2002 46
1.4 THE DOWNLOAD PROCEDURE 1.4.1 At the end of each session photographing exhibits the camera is to be turned off by
pressing the on/off power button. Open the card compartment cover and press the eject button. Care must be taken to avoid ejecting the card too hard. Carefully remove the Compact flash card.
1.4.2 Use care when handling the compact flash card as follows:
a. Avoid magnetic fields b. Do not drop or otherwise mishandle the card c. Do not wet the card d. Place only on clean dry surfaces e. Use only in the Digital Exhibit Camera provided f. Do no leave in flash card readers for long periods
1.4.3 Each exhibit workstation will have folders and subfolders created in the following
format: a. C:\Exhibits\YearStation\Exhibit Number (YearStation will be 8 characters
with the year as a 4 char number followed by the first 4 characters of the Station)
Eg. C:\Exhibits\2001Penr\C73360
b. D:\A_Exh\A_YearStation\Exhibit Number (YearStation will be 8 characters with the year as a 2 char number followed by the first 4 characters of the Station)
Eg. D:\A_Exh\A_01Penr\C73360 1.4.4 The images are to be immediately downloaded into the Digital Exhibit Computer as
follows: a. Ensure the computer is turned on and the Compact flash card reader is
attached b. Insert the compact flash card in the direction of the arrow on the card
label with the label facing up c. Open Windows Explorer. In the left column under Drive C:\ double click
the card reader drive, double click the DCIM folder, double click the 100OLYMP folder. This will show the digital Photographic files, in the right side of the explorer window, which have been stored as a digital file on the compact flash card. ii. Create new sub folders, under the (Year/Station) sub folder,
corresponding to each of the newly photographed exhibit numbers
iii. Close or minimise Windows Explorer
1.4.5 Open up the Thumbs plus program 1.4.6 In Thumbs Plus double click the card reader drive, double click the 100OLYMP
folder. This will show an icon for the digital Photographs which have been stored as a digital file
1.4.7 Press the scan tree icon to make thumbnail images of the files stored on the card 1.4.8 View each of the images from the card reader drive by:

Standard Operating Procedures in Forensic Digital Imaging – F.I.S., F.S.G., NSW Police July 2002 47
a. Double click each image in turn to view in enlarged mode, checking each image for quality
b. Make a note on the record sheet for the appropriate exhibit number if items need to be rephotographed
c. Delete the images, from the card, that need to be rephotographed 1.4.9 Transfer the digital Photographs to their corresponding exhibit folders
a. Scroll up the folder list on the left side of the screen; press the + icon left of the C:\exhibits folder; press the + icon left of the C:\Exhibits\YearStation sub folder; this will display the exhibit sub folders
b. Whilst holding down the control button click to select each image related to the nominated exhibit number, including the before and after shot of the record sheet. Still holding the control key down drag and drop these files into the folder corresponding to the exhibit number
c. Repeat these steps for all exhibit images 1.4.10 Re shoot images where necessary 1.4.11 Repeat the downloading, viewing and quality control steps. Ensure that the Record
Sheet is completed accordingly. 1.4.12 Delete images that have been downloaded from the Compact flash card prior to
reusing the card. a. In Thumbs plus click to select the compact flash card drive b. Click to select the DCIM folder c. Click to select the 100OLYMP folder – this will display the images
contained on the card d. Press the control + A keys to select all images (they will be highlighted)
press the delete key to delete all files. 1.4.13 For backup purposes the D:\ drive is the primary backup drive. Refer to 13.(b.) for
the folder structure 1.4.14 At the end of each day backup the C:\ drive by copying all new images to the D:\
drive as follows: a. Open Windows Explorer b. Double click drive C:\ c. Double click the Exhibit sub folder d. Double click the YearStation sub folder e. Whilst holding down the ctrl key click to select the files that have not yet
been copied to the D:\ drive f. Press ctrl +C keys to copy the sub folders g. Scroll down the left Explorer Window and double click to the D:\ drive h. Double click the A_Exh sub folder i. Double click the A_YearStation sub folder j. Press ctrl+V keys to paste the sub folders k. Please note that the Windows explorer toolbar keys or the drag and drop
options may also be used to perform the copying function 1.4.15 File the Record Sheets
Standard Operating Procedures in Forensic Digital Imaging – F.I.S., F.S.G., NSW Police July 2002 48
1.5 CD BACKUP PROCEDURES 1.5.1 Each of the Digital Exhibit Photography Workstations must have a CD Rom Burner
installed to perform Secondary Backups. 1.5.2 Must be completed each time 600Mb of new images have been downloaded. 1.5.3 Only the highest quality Gold Coated CD-Rs are to be used for archival purposes 1.5.4 CD_R backup is primarily for offsite storage of data, however a second backup set
can be created for storage on site. This will be a necessity as the C:\ and D:\ drives come close to full capacity. In such a scenario it will be necessary to download to C:\ drive to store only the most recent images. Use D:\ drive as the primary backup for only the most recent images and archive 3 CD-Rs: a. 1 copy on hand for printing and viewing b. 1 copy on hand for archival purposes c. 1 copy stored off site for archival purposes
1.6 HOW TO PHOTOGRAPH EXHIBITS 1.6.1 Refer to the Police Handbook for Exhibit Handling Procedures.
1.7 SAFETY PRECAUTIONS 1.7.1 When handling syringes, broken glass and any other sharp fragments do so with
caution. Always wear protective gloves. 1.7.2 Protective gloves must be worn when handling paper or money exhibits that have been
treated with ninhydrin or other dyes. 1.7.3 When photographing drug exhibits, if it is necessary to remove the exhibit from its
packaging or security exhibit bag, it should be handled by another Officer and not the photographer. This Officer should wear protective gloves and if necessary a protective mask.
1.7.4 If it is necessary for the photographer to handle exposed drug exhibits, eg arranging
exhibit for photographing, the photographer must wear protective gloves and then must remove those gloves before handling camera or other equipment.
1.7.5 If human tissue, blood or body fluids are present on exhibits assume that the exhibit is a
Biological hazard and take all the appropriate precautions.
1.8 GENERAL EXHIBIT PHOTOGRAPHY 1.8.1 Exhibits form an important part of a brief of evidence. The security of such exhibits is
paramount. 1.8.2 Before handling the exhibit check whether it is to be 'preserved for fingerprints'
Standard Operating Procedures in Forensic Digital Imaging – F.I.S., F.S.G., NSW Police July 2002 49
1.8.3 Items to be photographed must be arranged to show the true nature, size and shape of the exhibit.
1.8.4 Items should be placed on a suitable 'neutral' background. 1.8.5 If the exhibit is not able to be moved, photograph from different angles to cover the
subject. 1.8.6 Where possible do not leave unrelated items in the background. 1.8.7 When photographing exhibits, there should be no identification linking it with an
offender, eg offenders name on exhibit tag. 1.8.8 When the job is completed and collected the 'item\specimen register' is to be endorsed. 1.8.9 Use scales if the size of an exhibit is important.
1.9 THE SHOT LIST 1.9.2 booking an exhibit in the Case Officer or attending Officer should be asked if there are
any specific identifying marks or other specific areas of the exhibits that need to be photographed.
1.9.2 Job Sheet to commence the job 1.9.3 Group shot of all items 1.9.4 Arrange items over an area large enough to view them all. Place the taller items at
the back of the arrangement. Frame the shot so that the maximum detail possible is visible. Use sufficient ambient lighting or external lighting if the flash will not adequately cover the subject. Be careful under low light situations with digital photography that the shutter speed selected by the camera does not cause blurring due to camera movement
1.9.5 Individual overall shot of each item 1.9.6 Close up shot of the identifying features – eg macro shot of serial numbers,
engravings etc. 1.9.7 Job Sheet to close the job.
1.10 MONEY EXHIBITS 1.10.1 Money Exhibits must be photographed in the presence of the accompanying officer.
This will ensure both integrity the correct type of images required for that particular job are taken. The accompanying Officer must handle and lay out the notes.
1.10.2 If serial numbers and identification marks are not required money exhibits can be
photographed in bundles.
Standard Operating Procedures in Forensic Digital Imaging – F.I.S., F.S.G., NSW Police July 2002 50
1.10.3 If serial numbers and identification marks are required the notes should be laid out by the Officer attending the Exhibit Office. In such circumstances overlay the notes in a tiled manner so that the serial numbers and denominations are visible. Each frame could include small groups of 10 notes of the same denominations.
1.10.4 Refer to the Police handbook instructions for additional information on money exhibits. 1.10.5 Signatures of Treasury Officials on currency notes are not to be included in
photographs. 1.10.6 Currency notes are not to be reproduced 1:1.
1.11 MOTOR VEHICLE EXHIBITS 1.11.1 Motor vehicles are to be photographed showing a front three quarter view and the
opposite rear three quarter view. 1.11.2 If number plates or registration label are obscured from the three quarter view,
photograph them individually. 1.11.3 If there are no registration plates or the plates are foreign to the vehicle, the engine
number or chassis number is to be photographed. 1.11.4 All damage to the vehicle and any specific requirements of requesting officer, are to be
photographed.
1.12 DRUG EXHIBITS 1.12.1 OH&S precautions must be adhered to. 1.12.2 Refer to the Police Handbook for handling procedures relating to Drug Exhibits. 1.12.3 Drug Exhibits that require opening should be photographed in the presence of the
accompanying officer. This will ensure both integrity the correct type of images required for that particular job are taken. The accompanying Officer must handle and lay out the drugs.
1.12.4 Exhibits contained in bags, packaging, etc (other than official exhibit bags) are to
photographed before opening. Make a record in the exhibit book if drugs are opened. 1.12.5 When photographing drug items an indication of scale, eg ruler, is to be included in one
of the photographs. 1.12.6 When photographing large cannabis plants an indication of the height should be
included eg measuring tape. 1.12.7 A comparison photograph between the smallest and largest plant should be taken. 1.12.8 A close-up photograph of the leaf structure is required.

Standard Operating Procedures in Forensic Digital Imaging – F.I.S., F.S.G., NSW Police July 2002 51
1.13 JEWELLERY EXHIBITS 1.13.1 Jewellery exhibits must be photographed to clearly show all vital aspects of
identification. 1.13.2 All engravings, jewellers marks, serial numbers, labels must be photographed. 1.13.3 An indication of scale is to be included in one of the photographs. 1.13.4 For further advice in Photographic and Imaging Procedures, contact the Forensic
Imaging Section, Level 5, Sydney Police Centre. Ph: 54554 Fax 54793 ***** END OF DIGITAL EXHIBIT PHOTOGRAPHY METHODS MANUAL
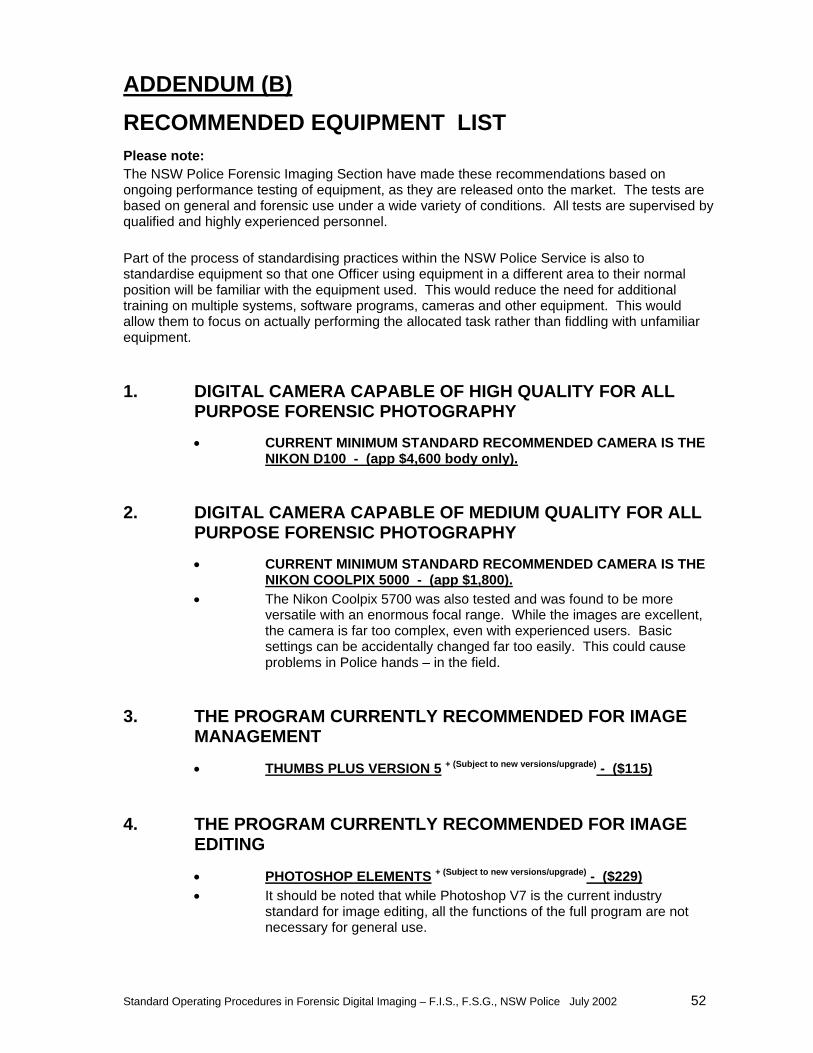
Standard Operating Procedures in Forensic Digital Imaging – F.I.S., F.S.G., NSW Police July 2002 52
ADDENDUM (B) RECOMMENDED EQUIPMENT LIST Please note: The NSW Police Forensic Imaging Section have made these recommendations based on ongoing performance testing of equipment, as they are released onto the market. The tests are based on general and forensic use under a wide variety of conditions. All tests are supervised by qualified and highly experienced personnel. Part of the process of standardising practices within the NSW Police Service is also to standardise equipment so that one Officer using equipment in a different area to their normal position will be familiar with the equipment used. This would reduce the need for additional training on multiple systems, software programs, cameras and other equipment. This would allow them to focus on actually performing the allocated task rather than fiddling with unfamiliar equipment.
1. DIGITAL CAMERA CAPABLE OF HIGH QUALITY FOR ALL PURPOSE FORENSIC PHOTOGRAPHY • CURRENT MINIMUM STANDARD RECOMMENDED CAMERA IS THE
NIKON D100 - (app $4,600 body only).
2. DIGITAL CAMERA CAPABLE OF MEDIUM QUALITY FOR ALL PURPOSE FORENSIC PHOTOGRAPHY • CURRENT MINIMUM STANDARD RECOMMENDED CAMERA IS THE
NIKON COOLPIX 5000 - (app $1,800). • The Nikon Coolpix 5700 was also tested and was found to be more
versatile with an enormous focal range. While the images are excellent, the camera is far too complex, even with experienced users. Basic settings can be accidentally changed far too easily. This could cause problems in Police hands – in the field.
3. THE PROGRAM CURRENTLY RECOMMENDED FOR IMAGE MANAGEMENT
• THUMBS PLUS VERSION 5 + (Subject to new versions/upgrade) - ($115)
4. THE PROGRAM CURRENTLY RECOMMENDED FOR IMAGE EDITING
• PHOTOSHOP ELEMENTS + (Subject to new versions/upgrade) - ($229) • It should be noted that while Photoshop V7 is the current industry
standard for image editing, all the functions of the full program are not necessary for general use.

Standard Operating Procedures in Forensic Digital Imaging – F.I.S., F.S.G., NSW Police July 2002 53
ADDENDUM (C) DIGITAL IMAGING RECORD SHEETS The following pages contain digital imaging record sheets which can be amended as required and photocopied for use.
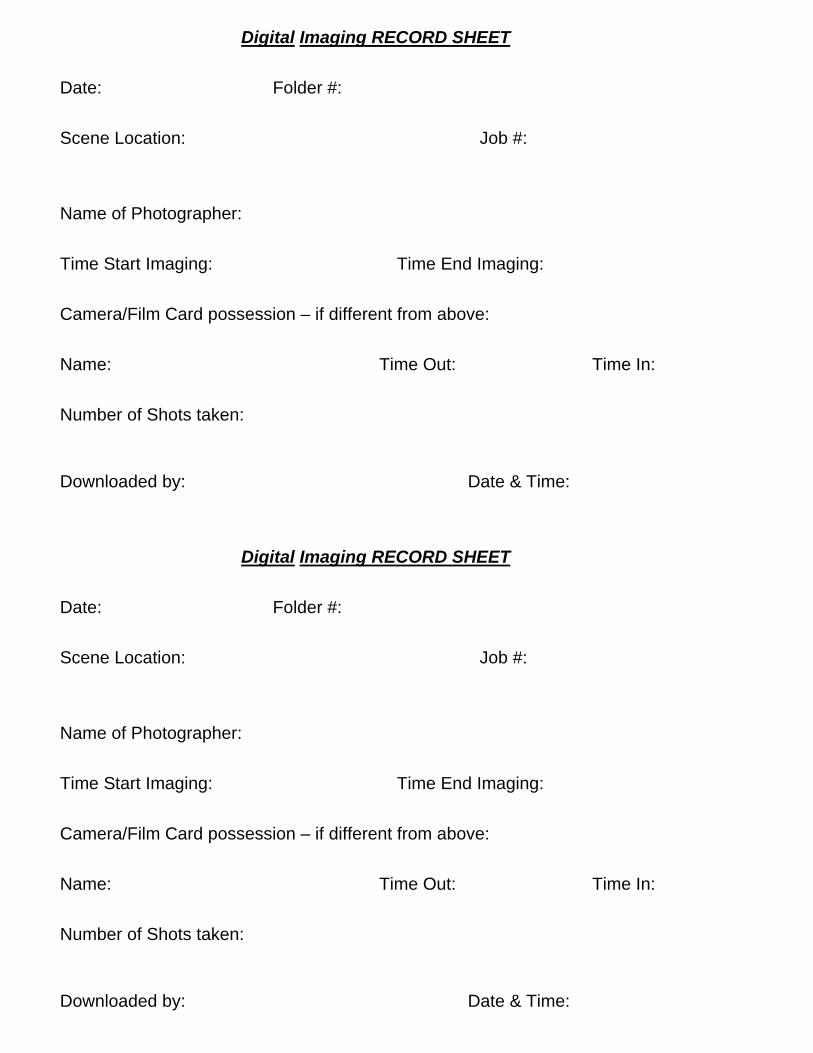
Standard Operating Procedures in Forensic Digital Imaging – F.I.S., F.S.G., NSW Police July 2002 54
Digital Imaging RECORD SHEET
Date: Folder #: Scene Location: Job #: Name of Photographer: Time Start Imaging: Time End Imaging: Camera/Film Card possession – if different from above: Name: Time Out: Time In: Number of Shots taken:
Downloaded by: Date & Time:
Digital Imaging RECORD SHEET
Date: Folder #: Scene Location: Job #: Name of Photographer: Time Start Imaging: Time End Imaging: Camera/Film Card possession – if different from above: Name: Time Out: Time In: Number of Shots taken:
Downloaded by: Date & Time:
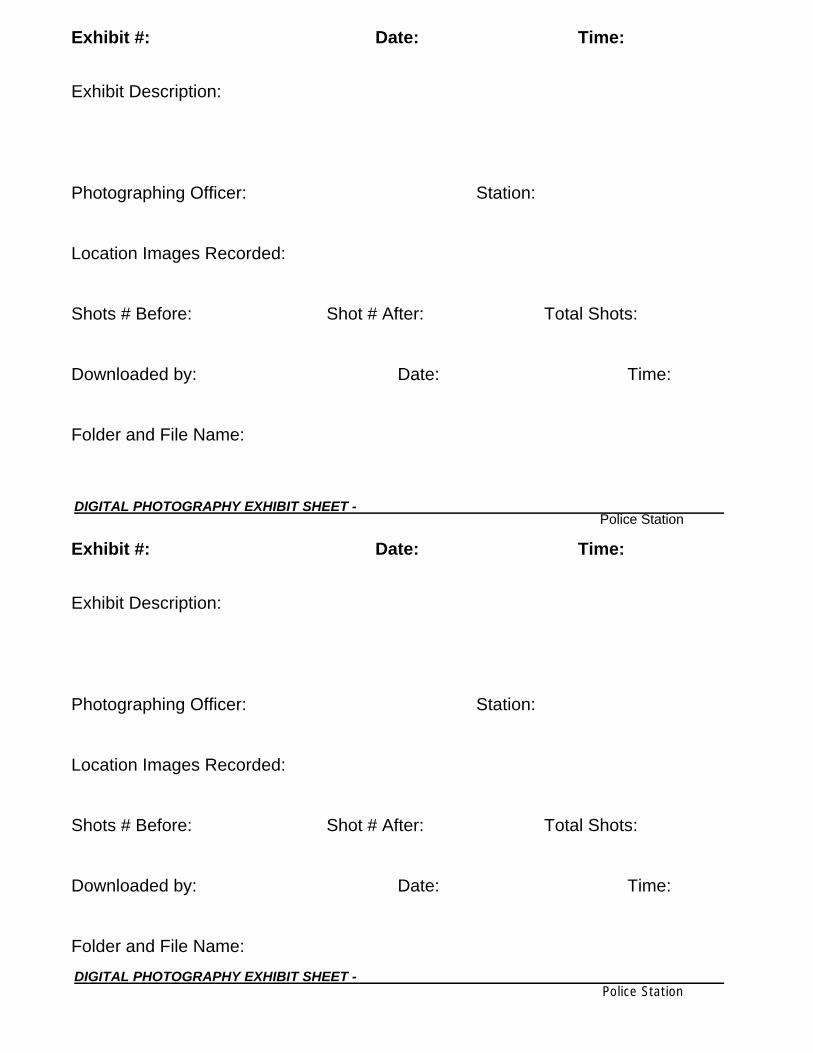
Standard Operating Procedures in Forensic Digital Imaging – F.I.S., F.S.G., NSW Police July 2002 55
Exhibit #: Date: Time:
Exhibit Description:
Photographing Officer: Station:
Location Images Recorded:
Shots # Before: Shot # After: Total Shots:
Downloaded by: Date: Time:
Folder and File Name:
DIGITAL PHOTOGRAPHY EXHIBIT SHEET -
Police Station
Exhibit #: Date: Time:
Exhibit Description:
Photographing Officer: Station:
Location Images Recorded:
Shots # Before: Shot # After: Total Shots:
Downloaded by: Date: Time:
Folder and File Name:
DIGITAL PHOTOGRAPHY EXHIBIT SHEET - Police Station

![Crimes (Forensic Procedures) Amendment Bill 2006 · Crimes (Forensic Procedures) Amendment Bill 2006 ... (Forensic Procedures) Amendment Bill 2006 ... Act 2000 Schedule 1 [22] Section](https://img.pdfslide.net/doc/110x75/5b84bfb97f8b9aec488cde46/crimes-forensic-procedures-amendment-bill-2006-crimes-forensic-procedures.jpg)