Embed Size (px)
Citation preview

1
AIRVO 2 High-‐Flow Standard Operating Procedure
Paediatric Intensive Care Unit (PICU)
Royal Hospital for Children Glasgow

2
Contents Page Contents: Page:
1. Introduction 3
2. Objectives 3
3. Scope 3
4. Guideline 1: Initiation 4
5. Guideline 2: Weaning 5
6. Guideline 3: Quick reference guide 6
7. Equipment Additional Stock Items Maintenance Information
7
8. Set-‐up 8-‐14
9. Audible and Visual Alarm Check 10. Further Support on Set-‐up or Usage 11. Monitoring
14
12. Nutritional input when on High-‐Flow Therapy 13. High-‐Flow with a Tracheostomy 14. Nebulised Therapy whilst receiving High-‐Flow 15. Transferring or Moving a Patient on High-‐Flow
15
16. Documentation whilst on AIRVO therapy 16
17. High Level Disinfection and Storage for Future Use 16-‐17
18. Disinfection procedure 19. Storage of AIRVO 2 following full cleaning process
17
20. Filter change 17-‐18
Appendixes 1. Appendix 1 – High-‐Flow Therapy and the Adult Patient 19
2. Appendix 2 – Error Messages 20
3. Appendix 3 – Using an Oxygen Cylinder 21
4. Appendix 4 – Oxygenation Flow-‐Ratio Chart 22
5. Appendix 5 – Contacts for Support and Training Within Critical Care (Ward 1D)
23
6. Appendix 6 – References 24
Version Control 25

3
1. Introduction The AIRVO 2 is a humidifier with an integrated flow generator that delivers high-‐flow warmed and humidified respiratory gases to spontaneously breathing patients through a variety of interfaces. Much of the literature and research looking at ‘High-‐Flow’ therapy agree that therapy is well tolerated and with less associated nasal trauma than nasal CPAP1-‐8 (nCPAP). The evidence indicates that the increase in Peek Expiratory End Pressure generated is similar to airway pressure achieved by nCPAP4-‐7, 9. From a safety perspective no convincing adverse effects have been documented, although, similarly to nCPAP ‘abdominal distension4, 6, 8 remains a risk and requires careful monitoring4, 6, 7, 9. The AIRVO 2 is for the treatment of spontaneously breathing patients who would benefit from receiving high flow warmed and humidified respiratory gases. The device may be set from 2 – 60 L/minute, depending on the interface, and delivers a flow of gas that has high levels of humidity which aids patient comfort1, 7, 9-‐11 and can enhance mucociliary clearance of secretions9, 11-‐14. The AIRVO is capable of delivering supplemental oxygen at any concentration between 21% and 95%. The device can be used on infant to adult sized patients (if using on a patient greater than 10 years old, please refer to Appendix 4/5 – High Flow and the adult patient (p. 18)), including those who have had their upper airway bypassed. With AIRVO 2, the aim is to meet or exceed the patient’s normal Peak Inspiratory Demand, which creates minimal air dilution, even when breathing orally13, 15. AIRVO 2 can more accurately deliver prescribed oxygen concentrations at high flows, providing both versatility and continuity of care. High Flow Nasal Cannula (HFNC) therapy has been shown in studies to reduce intubation rates in infants and children with acute respiratory failure13. The indications, initiation and weaning pathways are described in the appendixes. 2. Objectives The objective of this SOP is to provide a consistent approach to delivering High-‐Flow therapy via the AIRVO 2 to prevent any complications and detriment to patients’ condition. 3. Scope This guideline is intended for all healthcare professionals caring for patients requiring High-‐Flow via the AIRVO 2 within the Paediatric Intensive Care Unit (Ward 1D) Royal Hospital for Children, Glasgow, and as a guide for staff caring for these patients who are being nursed in other areas.

4
4. Guideline 1: HFNC Initiation Guide
Hi#Flo'Ini*a*on'Guide'Indica'ons*for*HiFlo:*
! Moderate(severe+bronchioli2s+! Cardiac+failure+–+mild+! Respiratory+failure++
o +Following+extuba2on+in+PICU+o +Pneumonia,+pulmonary+oedema,+atelectasis+
! Moderate+asthma+! Failure+to+thrive+“blow+&+grow”+strategy+
Monitoring*• Con2nuous+cardiac+and+satura2on+monitoring+• Hourly+PAWS/CEWS+(if+used+in+clinical+area)+• Hourly+Hi(Flo+recordings+• Minimum+4+hourly+blood+pressure+• Minimum+4+hourly+medical+review+
Contra5indica'ons*to*HiFlo:*" Mul2(organ+failure+" Trauma+/+Surgery+to+nasopharynx+&+base+of+skull+" Congenital+abnormality+of+nasopharynx+eg+choanal+atresia+
Hi5Flo*ini'a'on* Neonate*<3kg**
Neonate*>3kg* 1512*months* 154yrs* 5510yrs* 10yrs+*
HiFlo*device* MR850+ AIRVO+ AIRVO+ AIRVO+ AIRVO+ AIRVO+Cannula*Size**(<50%*nare)*(EST.)*
Neonate+(yellow)(
Infant+(Purple)(
Infant+(Purple)(
Paediatric+(Green)(
Paediatric+(Green)(
S+++/+++M+++/+++L+(Blue)(
Humidifier*Temp.** 34oC+ 34oC+ 34oC+ 34oC+ 34oC+ 37oC+
Ini'al*SeQngs* 8L/min++
FiO2+40%+(Unless+cardiac+with+balanced+circula2on)+
10L/min+&+adjust+O2+flow+to+
give+FiO2+40%+
(Unless+cardiac+with+balanced+circula2on)+
12L/min,+++&+adjust+O2+flow+
to+give+FiO2+40%+
(Unless+cardiac+with+balanced+circula2on)+
15L/min+&+adjust+O2+flow+to+
give+FiO2+40%+
(Unless+cardiac+with+balanced+circula2on)+
20L/min++&+adjust+O2+flow+
to+give+FiO2+40%+
(Unless+cardiac+with+balanced+circula2on)+
30L/min++&+adjust+O2+flow+
to+give+FiO2+40%+
(Unless+cardiac+with+balanced+circula2on)+
Max*Flow*Rate** 8L/min+ 20L/min+ 20L/min+ 25L/min+ 25L/min+ 50+/++60++/++60+Escala'on*criteria*• Oxygen*satura'ons*(SpO2)*<94%*(NB*in*cyano'c*congenital*heart*disease*this*may*not*apply)**• Tachypnoeic,*persistent*or*worsening*respiratory*effort*despite*HiFlo*+/5*increased*WOB*• Tachycardia,*persistant*or*worsening*despite*HiFlo*• Sustained*elevated*respiratory*component*of*PEWS*score*
1st*Escala'on* Titrate+FiO2+to+SpO2≥94%+
Unless+cardiac+with+balanced+circula2on+
Titrate+FiO2+to+SpO2≥94%+
Unless+cardiac+with+balanced+circula2on+
Titrate+FiO2+to+SpO2+≥94%+
Unless+cardiac+with+balanced+circula2on+
Titrate+FiO2+to+SpO2+≥94%+Unless+cardiac+with+balanced+circula2on+
Titrate+FiO2+to+SpO2+≥94%+Unless+cardiac+with+balanced+circula2on+
Titrate+FiO2+to+SpO2+≥94%+Unless+cardiac+with+balanced+circula2on+
2nd*Escala'on* Increase+flow+up+to+8+
&+urgent+PICU+review+
Increase+flow+up+to++20+
&+urgent+PICU+review+
Increase+flow+up+to++20+
&+urgent+PICU+review+
Increase+flow+up+to+25+
&+urgent+PICU+review+
Increase+flow+up+to+25+
&+urgent+PICU+review+
Increase+flow+up+to+max+
&+urgent+PICU+review+
3rd*Escala'on** nCPAP/Intubate+ nCPAP/Intubate+ NIV/Intubate+ NIV/Intubate+ NIV/Intubate+ NIV/Intubate+
*HiFlo*for*Apneoic*oxygena'on*peri5intuba'on*
Neonate**(up*to*1*month)*
1512*months* 154yrs* 5510yrs* 10yrs+*
Cannula*Size**(<50%*nare)* Infant+ Infant+ Paediatric+ Paediatric+ S+++/+++M+++/+++L+
Humidifier*Temp.*(oC)* 34+ 34+ 34+ 34+ 34+Set*Flow*Rate**(L/min)* 2L/kg/min+ 2L/kg/min+ 25+ 25+ 50+/++60++/++60+
FiO2*(%)*Unless(cardiac(with(balanced(circula9on(
100+ 100+ 100+ 100+ 100+

5
5. Guideline 2: HFNC weaning guide
YES$
Is#the#child#clinically#stable#for#nurse3led#weaning#of#Hi3Flo#therapy?#Ensure:#! Observa,ons$$stable$or$within$normal$limits:$$
o Heart$rate,$respiratory$rate,$satura,ons,$temperature$and$blood$pressure$! $No$evidence$of$increased$work$of$breathing:$$
o No$subcostal,$intercostal$or$sternal$recession$o No$tracheal$tug$o Absence$of$nasal$flaring,$head$bobbing$and$lethargy$
! $NonCcyano,c$cardiac$pa,ent$$! $Latest$blood$gas$stable$(if$taken)$! $Circula,on$stable$! $Agree$with$Medical$staff$pa,ent$is$suitable$for$nurseCled$HiCFlo$weaning$pathway$
Discuss$with$Medical$Staff$• Agree$escala,on$plan$
• nCPAP$or$Intuba,on$• Agree$Medical$weaning$plan$
Monitoring#• Con,nuous$cardiac$and$satura,on$
monitoring$• Hourly$PAWS/CEWS$(if$used$in$clinical$area)$• Hourly$HiCFlo$recordings$• Minimum$4$hourly$blood$pressure$• Minimum$4$hourly$medical$review$
Hi#Flo'Weaning'Guide'
NO$
Version$4.1$September$2017$
Remember:'With'any'deteriora8on'in'the'pa8ents'condi8on'reverse'previous'step,'re#evaluate'and'inform'medical'staff.'
Wean#Plan#(step#1#–#wean#oxygen#then#wean#flow#• Wean$Oxygen$concentra,on$by$5%$every$hour$to$40%$
• Review$pa,ent$clinically$&$evaluate$changes$with$each$wean$of$oxygen,$Target$SaO2$≥94%$
• Once$Oxygen$of$40%$achieved$wean$flow$by$2$Litres$per$minute$(LPM)$every$2$Hours$un,l$a$flow$of$4$LPM$is$achieved$
• Review$pa,ent$clinically$&$evaluate$changes$with$each$wean$of$flow,$Target$SaO2$≥94%$
Wean#Plan#(step#2#–#convert#to#nasal#cannula#oxygen)#• Once$oxygen$of$40%$and$Flow$of$4$LPM$is$achieved$and$
pa,ent$stable$for$2$hours$convert$to$nasal$cannula$oxygen$at$3$LPM,$Target$SaO2$≥94%$
• Review$pa,ent$clinically$&$evaluate$changes$with$each$wean$of$flow,$Target$SaO2$≥94%$

6
Guideline 3: Quick Reference Guide AIRVO 2 Suitable for babies over 3kg to adulthood for provision of humidified High-‐Flow Oxygen. Buttons Up ; Down ; Mode How to unlock the screen Hold the and buttons for 3 seconds until
padlock disappears. Junior mode Junior mode is a safety feature that limits the settings to
a maximum flow of 25L min-‐1 and a maximum temperature of 34°C. Junior mode must be activated when using the OPT316 and OPT318 paediatric nasal prongs or device will not function properly.
To switch modes (i.e. JUNIOR and ADULT)
Press and hold the button for 5 seconds (or until screen changes).
The and images present on the screen indicate that Junior mode is activated; they shall be absent in adult.
Adult interface Nasal cannula in sizes: -‐ Small, medium and large How much flow to use
Patients with ADULT interface Between 10L/min and 60L/min. See specialist initiation guide (appendix 4 & 5)
Patients with CHILD interface See specialist initiation guide (appendix 1) Setting adjusting parameters Press the button to scroll through each page. Use
the and buttons to adjust each setting (except O2 see below.)
Titration of O2 Use the flow meter on the pole to adjust oxygen concentration; the delivered FiO2 will be displayed on AIRVO screen.
Lock parameters on screen Hold the & for 3 seconds or Press the button to move onto next page.
Close monitoring of saturations, respiratory pattern and effort, and other vital signs required at all times, particularly on commencement and first four hours until stable or improvement noted. NOTE: Whichever sized interface is attached to the circuit (i.e. Adult or Junior), the AIRVO must also be in that more i.e. if an adult interface is present, adult mode must be activated and vice versa If the AIRVO is in ADULT mode with a JUNIOR nasal cannula, it will alarm “Check for Blockages” If the AIRVO in in JUNIOR mode with an ADULT nasal cannula, it will alarm “Check for Leaks”

7
4. Equipment Tube and Chamber Kits and Interfaces Tube and Chamber Kit Interfaces Junior
900PT561 -‐ Heated breathing tube with auto-‐fill chamber and adapter kit (Box of 10)
OPT316 Nasal Cannula – Infant OPT318 Nasal Cannula – Paediatric OPT012 Wigglepads (All packets of 20)
Adult OPT942 Nasal Cannula – Small OPT944 Nasal Cannula – Medium OPT946 Nasal Cannula – Large OPT970 Tracheostomy – Direct Connection (All boxes of 20)
Miscellaneous 900PT913 -‐ Air Filters (Packet of 2) 900PT600 -‐ Disinfection Kit (Packet of 1) 900PT601 -‐ Disinfection filter (Packet of 2) 900PT603 -‐ Clean Storage Cover (Packet of 20)
Kit 900PT contains: manual disinfection tube with disinfection filter/cap; two cleaning sponges; and three storage covers
Additional Stock /Equipment Items Green Oxygen tubing Water for Inhalation Carefusion 2D0735X 5. Maintenance Information Stock Action How often Rationale Nasal cannula/patient adaptor
Renew Every 7 days
As per manufacturer guidance; prevent cross infection
Heated breathing tube and chamber kit
Renew Every 14 days
Air Filters Renew Every 1,000 hours or every 3 months
Unit Cleaning Run Disinfection cycle After each patient
Unit Up-‐keep Fully Inspect and Damp dust
Prior to use and Daily when in use

8
6. Set-‐Up Action Rationale and Notes Where possible, patients and parents should be informed of the need for “high flow” and a full explanation of its use and benefits given. AIRVO 2 is NOT suitable for neonatal therapy or babies less than 3kgs; instead the MR850 humidifier set up should be used (available in PICU).
To gain verbal consent and cooperation (if patients not available this should not delay therapy).
Decontaminate hands as per local policy adhering to the 6-‐step technique and 5 moments of hand hygiene.
To reduce the risk of cross contamination.
Ensure the AIRVO 2 has been decontaminated and functionally checked. This should be evident as machine will be in a clean cover with a green “I am clean” label. The set-‐up screen will depict functionality.
To prevent the risk of cross infection.
Gather correct equipment for patient (circuit, O2 tubing, water). Select interface for size of patient and note max flow rates:
• Junior nasal cannula – max flow of 20L/min or Paediatric nasal cannula -‐ max flow of 25L/min
• Adult nasal cannula has 3 sizes: Small, max flow of 50L/min, Medium and large max flow of 60L/min
• Tracheostomy and Mask connectors -‐ max flow of 60L/min
To ensure correct fit and avoid trauma to nose or inappropriate administration. To promotes correct functionality of AIRVO 2. To promote efficient gathering and setting up of AIRVO 2.
To ensure correct interface for size of child’s and flow delivery. Need to ensure there is room for gas flow round the nasal cannula to allow expired gas to escape (The aim is NOT to have a tight seal like you need with CPAP).
Nares should NOT be completely occluded; there should always be a clear 50% gap around the nasal prongs (extra monitoring required if gap reduced in one nostril reduced due to Nasogastric or Nasojejunal feeding tubes in situ (Consideration to stepping down nasal cannula size should be given and discussed with consultant). The gap is essential to ensure exhalation and prevent hyper-‐distension of airways or gastric system. Choice of nasal cannula should be based on the size of the nostril diameter and not on size of the patient as a whole.

9
Pull blue ring from water chamber to remove the clear covers and unwind the tubing from the top, discarding the plastic ring and cover. Place humidifier ‘Chamber Adapter’ onto the chamber.
To prepare chamber for use. Note: Ensure the water tube is not trapped or kinked.
Push down on the blue lip on the AIRVO and slide the water chamber into place making sure it is fully lined up with the two blue outlets. A click is heard as the blue lip clicks the chamber in place.
To ensure air is appropriately heated and humidified and to prevent damage to AIRVO 2 when being fitted.
Check expiry date and label on Sterile water. Use the spike on the end of the tubing attached to the humidifier chamber to pierce bag and hang on the AIRVO stand. Water bag can be used for the duration of the therapy unless the bag is empty or is disconnected from the set. Be careful to prevent the humidifier becoming empty, as this will cause the unit to overheat.
To supply water for humidified therapy. To reduce the risk of cross infection. To prevent air in water delivery system and ensure drainage.

10
Plug in the white oxygen hose to the Schrader oxygen port on the pendant (or wall) to supply oxygen to the AIRVO 2. If there is a problem with the pendant gas supply, the Schrader valve on oxygen cylinder can be used.
To ensure Oxygen supply to AIRVO 2. Please see Appendix 7 for using an oxygen cylinder.
PINS
Note-‐ To avoid burns: -‐Do not modify the breathing tube or interface in any way -‐Do not use any patient interface not listed. To avoid breaking pins.
Attach circuit to AIRVO 2 machine. Pull back the blue cuff on the patient heated breathing circuit. Align the two pins in the circuit to the connection and push down. Push cuff into place to secure. Use only the BLUE (900PT561) tubing with the AIRVO 2
The AIRVO 2 does NOT have an internal battery and will NOT work unless plugged into an electricity supply.
Plug in the AIRVO 2 in to the mains electrical supply on the pendant. (There are some AIRVO 2 units set up with batteries (UPS) that are available within PICU for mobilising children between different areas (Please read SOP for AIRVO UPS before using these devices).

11
Press the on/off button to turn the AIRVO 2 on. Check the disinfection status -‐ a green light on the display means it is ready for use on a new patient. An amber or red light means it is not safe for use as the unit has not been cleaned and disinfected since last use. Select another unit for use and carry out full clean and disinfection of the original unit.
To allow the AIRVO 2 commence running checks and warm up when first turned on. To ensure safe application for patients. To ensure functioning correctly. To reduce the risk of cross infection.
Connect green oxygen tubing from the AIRVO 2 oxygen inlet to the flow meter on the pole. Use the flow meter to adjust the oxygen added to the AIRVO system, however, watch the display on the AIRVO 2 screen to determine delivered oxygen concentration.
To ensure oxygen flow delivered and set appropriately. Caution: there may be two flow meters on the pole. Ensure the correct flow meter is selected to supply sufficient oxygen concentration. Appendix 5 shows estimates of required oxygen flow to achieve certain oxygen concentrations at specific total flows.
As the system warms up, the summary screen appears and displays the current settings, they will flash, and a progress wheel turns until they reach their target, then they stop flashing and a tick replaces the wheel.
To ensure self-‐running checks are complete.
Mode Selection

12
The AIRVO 2 will default to its previous settings. To ensure the correct mode for the patient (size and interface) is selected to deliver treatment.
On Junior mode the butterfly and the bird will be displayed above the settings. These symbols will be absent on the Adult mode.
To change therapy ‘Mode’: -‐Press and hold the “play” button for 5 seconds or until you hear a beep (hold until the current page has faded out and new screen is loaded). The system will change to the other mode. If treatment to be in adult mode, please refer to the Appendix 4/5 – High-‐Flow and the adult patient (p18 & 19). The AIRVO mode needs to match the interface on the breathing circuit
If the AIRVO is in ADULT mode with a JUNIOR connection it shall alarm “Check for Blockages”
If the AIRVO is in JUNIOR mode with a ADULT connection it shall alarm “Check for Leaks”
Settings To unlock and change the settings for therapy: You need to be in the screen linked with the setting you wish to change. Use a short press of the mode ( play button) to scroll through each setting (Dew point temperature; Flow; FiO2) and follow the sequence below.
To unlock, press and hold the up and down buttons together for 3 seconds until padlock disappears, then use the up or down arrow to alter the setting to the desired target. To relock press the mode button (the padlock should appear). Then scroll to the next setting to be changed.
See appendix 3 for quick information on settings To ensure the correct therapy is delivered to the patient. Promoting optimal humidity appropriate oxygen concentration and sufficient flow.

13
Temperature setting Three target dew point temperatures are available. -‐ The Junior mode is restricted to 340C. -‐ The adult mode settings default to 370C, which is ideal for tracheostomy interface and adult nasal cannula (unless uncomfortable for the patient, then change the temperature setting to 340C). -‐ Only reduce water temperature to 310C for high-‐flow via a facemask or the patient complains of being too warm to tolerate with nasal cannula.
Safeguarding against injury and harm. Promoting optimal humidity. Promoting appropriate normothermia.
Flow rate setting The AIRVO 2 can have Flow set between 2 to 60 litres/minute, -‐ The Junior mode can deliver 2 – 25L/min. Suitable interfaces are infant (purple) and paediatric (green) nasal cannula (infant cannula limited to 20L/min). Flow can be incremented or weaned by 1L/min in Junior mode. -‐ The adult mode can deliver 10 – 60L/min with a selection of interfaces; small nasal cannula (max flow 50L/min), and medium/large nasal cannula, tracheostomy direct connection, tracheostomy collar mask and face mask (max flow of 60L/min). Adult flow can be incremented by 1L/min between 10 and 25L/min, and by 5L/min when flow between 25 and 60L/min. If in adult mode please refer to the Appendix 4 ‘High-‐Flow and the adult patient’ (p19).
To reach set flow interface must be attached.
Commence flow for AIRVO 2 using High-‐Flow Initiation Guide (Appendix 1)
Note-‐ Be aware the flow rate will alter the FiO2 concentration (due to dilution of the air). To ensure correct flow appropriate to interface and patient requirements. To ensure set appropriately and weaning of therapy as per guideline (Appendix 2). Note face/trachyostomy mask interfaces are rarely used on PICU
Oxygen setting Supplementary 95% oxygen up to 60L/min can be provided via the AIRVO 2, The oxygen concentration is set by altering the flow meter on the pole. Note – at higher flows high oxygen concentrations may not be achievable Remember the flow meter only increases or decreases the oxygen added to the system. The end oxygen concentration delivered to the patient is displayed on the AIRVO 2 monitor screen. It may take several minutes to settle.
The patient’s Peak Inspiratory Demand and any dilution from ambient air may affect the concentration of oxygen being delivered, as will a change in flow on the AIRVO 2; hence the FiO2 output from the AIRVO 2 may vary from what the patient is receiving.
Note-‐ Be aware altering the Flow of the AIRVO will alter the oxygen concentration (Appendix 8). Note-‐ Monitoring patient oxygen saturations is of the utmost importance.

14
8. Further support & information on set-‐up or usage Fisher & Paykel User Manual is available for further information or guidance on setting up and using the AIRVO 2 (in store room or online).
Refer to medical physics if fault codes appear.
See Appendix 9 for contact details for support and training with AIRVO 2.
To ensure training and guidance is available when required.
Attach correctly sized nasal cannula to the end of the circuit, ensuring they click into place.
To ensure correct fit and avoid trauma to nose. To ensure appropriate administration of therapy. Promote patient safety.
The AIRVO is ready to use when a ‘Tick’ appears in the summary box. Ensure flow by putting your hand below the interface. Review the settings on the summary display making any necessary adjustments to therapy.
Ensure unit ready and settings appropriate before applying to patient. Promoting patient safety.
7. Audible & Visual Alarm Check Prior to each use, ensure that the auditory alarm signal is audible by conducting the system alarm check: -‐ With the unit set up and ready to use, remove the heated breathing tube. You should see the “Check tube” visual signal and hear the speaker signal. If either signal is absent, DO NOT use the unit, contact medical physics and they will refer to manufacturer.
9. Monitoring Minimum required monitoring includes: continuous or hourly assessment of:
• Continuous oxygen saturation, • Continuous ECG monitoring, • Hourly assessment of work of breathing -‐ respiration rate, effort
and air entries unless on stable patient (blow & grow), • Blood pressure, • Colour and perfusion, • Temperature and pulse.
If patient is stable on High-‐Flow therapy, there is the possibility of reducing observation frequency to reflect clinical condition (Any de-‐escalation of monitoring should be agreed by consultant overseeing care). Patients should always receive at least 2 hourly respiratory assessments and 4 hourly full observations. Staff should always be prepared to support with bag-‐mask ventilation.
To promote patient safety by early recognition of clinical changes. To maintain continuity in care for all patients.

15
10. Nutritional Input While on High-‐Flow Therapy Many patients require “artificial feeding” (e.g. via NG/NJ/PEG) when on High Flow.
Careful monitoring and “de-‐venting” of stomach every 2-‐4 hours should be carried out in all patients. De-‐venting should always be carried out prior to bolus feeds, administration of large volume of drugs and if not receiving any enteral input. Close attention should be paid to the child’s work of breathing whilst feeds are being administered.
IV fluids may be required in some circumstances, e.g. unstable patients with escalating support. The need for IV fluids should be re-‐assessed regularly.
Children/infants who are stable on High-‐Flow therapy can take oral diet (breast or bottle feed), but only under instruction from consultant overseeing care and following a thorough risk assessment of patient condition and therapy (tolerance of potential reduced flow while feeding).
Prior to oral feeding, the nurse should discuss benefits and disadvantages of oral feeding the patient on AIRVO 2 with NIC and a member of medical staff.
To ensure fluid and nutritional requirements are being optimise for care. To minimise risk of aspiration or other complications relating to meeting dietary requirements while receiving High-‐Flow therapy.
11. High-‐Flow Therapy via Tracheostomy This can be delivered safely using the F&P tracheostomy adaptor. There is evidence showing that High-‐Flow is exceedingly useful to optimize humidification for tracheostomy patients. It is essential to ensure the expiration valve on the tracheostomy direct connector interface is always clear of obstruction. Also ensure the temperature is set to 370C unless uncomfortable for the patient. To be used in conjunction with tracheostomy interface and tracheostomy care guidance.
Promote patient safety and use of unit within manufacturers recommendations.
12. Nebulised Therapy whilst receiving High-‐Flow Nebulised medicines may need to be delivered during High-‐Flow therapy.
To use nebuliser systems, High-‐ Flow should be ceased whilst the nebulised medicines are given. This is undertaken by 2 options: 1. Removing the nasal cannula interface from the patients’ nostrils
during nebuliser, in which case the AIRVO 2 unit does not need to stop during nebulisation.
2. Turning off the AIRVO 2 and oxygen during the nebuliser administration, use wall oxygen as the driver for the nebuliser.
Using Aerogen adapter nebuliser kits: 3. Aerogen nebuliser kits may be fitted to the AIRVO by using the
humidification chamber adapter. The AEROGEN units can stay in place for up to 28 days.
To provide a safe efficient mode of delivering nebulised medications during therapy with AIRVO 2. NOTE: currently only saline nebulisers may be given via the Aerogen adaptor, further drugs may be added in the future
13. Transferring/Moving a Patient on High-‐flow Patients cannot be transferred on the ‘MR 850’ High-‐Flow machine or the standard AIRVO 2 device. There are some AIRVO UPS (Uninterrupted Power Supply) units available for transferring patients within and out with the critical care unit. Please refer to ‘AIRVO UPS Standard Operating Practice’ as there are serious safety issues due to limits of the battery pack (UPS) and limitations of cylinder oxygen.
Ensure uninterrupted therapy when required regardless of need to be moved to a different area.

16
14. Documentation whilst on AIRVO Therapy Patients who are receiving High-‐Flow therapy via an AIRVO device should have their respiratory support charted on MetaVision. Patients should have settings recorded hourly and observations as per ‘Section 9 -‐ Monitoring’ continuously, or at least 2-‐4 hourly.
Settings that are required every hour are: 1. M-‐FiO2, 2. Gas Flow L/min, 3. Airway temp.
Also required are: 1. Airway type, (AIRVO + Nasal Cannula/Tracheostomy) 2. Ventilation Mode (Spontaneous + Paediatric/Adult)
Note: when completing the Care Plan traffic light, all forms of HFNC count
as Spontaneous Ventilation! The CIS chart above represents a patient receiving AIRVO therapy with device settings documented: ADULT mode via Nasal Cannula with flow of 20L/min, FiO2 of 50% and humidifier is set to 37oC.
You should NOT choose a Humidifier Mode, as you do not set this!
When recording the delivered FiO2, record the actual number on the AIRVO screen, not the number you are aiming for (and adjust as necessary).
To ensure documentation of therapy and AIRVO 2 settings are accurate and can be reviewed in relation to any events or changes in patient condition in line with legal and professional frameworks.
15. High Level Disinfection and Storage for Future Use The AIRVO 2 must be both cleaned and disinfected between patients. This should take place as soon as possible after use.
The following steps must be carried out between patients: Cleaning Clean outlet elbow and all exterior surfaces of the
unit with 70% alcohol wipes. Then wipe away any residue with a clean cloth.
High-‐level disinfection
Carry out disinfection cycle with disinfection tube.
Safe storage Store AIRVO 2 appropriately.
The blue cleaning sponge can be used to clean the top and right chamber ports only.
To prevent cross-‐contamination and ensure cleaned prior to use with next patient. Note -‐ Important to clean inside the outlet on top of the unit as well as the right-‐hand side port above the warming plate. Do Not clean the left-‐hand side port. This is cleaned during the disinfection process.

17
16. Disinfection Procedure The machine performs disinfection when the red thermal disinfection tube is connected. It is particularly important that the outlet elbow at the heated breathing tube connection port is cleaned and disinfected properly. 1. Connect the blue end of the red disinfection tube to the top outlet
where the breathing tube usually goes (green section of picture below).
2. Connect the other end of the red disinfection tube to the left-‐hand port above the warming plate (as below).
3. Cover the right-‐hand port with the blue cap attached to the red tube. 4. Press the button. When the AIRVO 2 turns on it will run checks
and automatically commence a 55-‐minute thermal disinfection cycle. Do not interrupt this process as the effectiveness is from a heated process of 87oC (189oF) for at least 30 mins. A successful disinfection cycle is assured only when the countdown reaches zero.
Once the cycle has completed the unit must be turned off again.
To prevent risk of cross-‐contamination.
Note-‐ Red disinfection tubing is used only for the disinfection cycle of AIRVO 2.
Outlet Elbow
Disinfection Tube and Filter
Disinfection Kit on AIRVO 2 Unit
To prevent damage to the unit and ensure correct procedure used for cleaning.
17. Storage of AIRVO 2 following full cleaning process After the disinfection cycle it is imperative that the unit is stored appropriately to keep the outlet elbow free from contamination.
Prevent risk environmental cross-‐contamination.
Remove disinfection tube and blue filter from the
AIRVO 2. Push the cuff up to avoid damage to the
pins.
Wrap the AIRVO 2 in the clean storage cover with the identification label above the display
buttons.
Fill in details on the identification label
Ensure ready for use when required and consistency of storage.
Note-‐ If ‘AIRVO UPS unit’ ensure the logbook is fully completed.
18. Filter Change After the AIRVO 2 has been used for 1,000 hours, a prompt will appear at the start of the next disinfection cycle indicating the air filter change is due. 4 Steps to changing the air filter are: 1. Take the filter holder from the back of the unit, remove and replace with the new filter (900PT913) 2. Reattach the filter holder to the unit (clip the bottom on the filter holder in first, then rotate it upwards until the top clips into place). 3. Press the mode button to move onto ‘replace now’ screen. 4. Press the up button to select now and confirm by pressing the mode button; the hours counter will reset to zero.
To ensure continued safe use. Note-‐ If you choose the ‘later’ option the prompt will continue to appear at the start of all subsequent disinfection cycles.
18
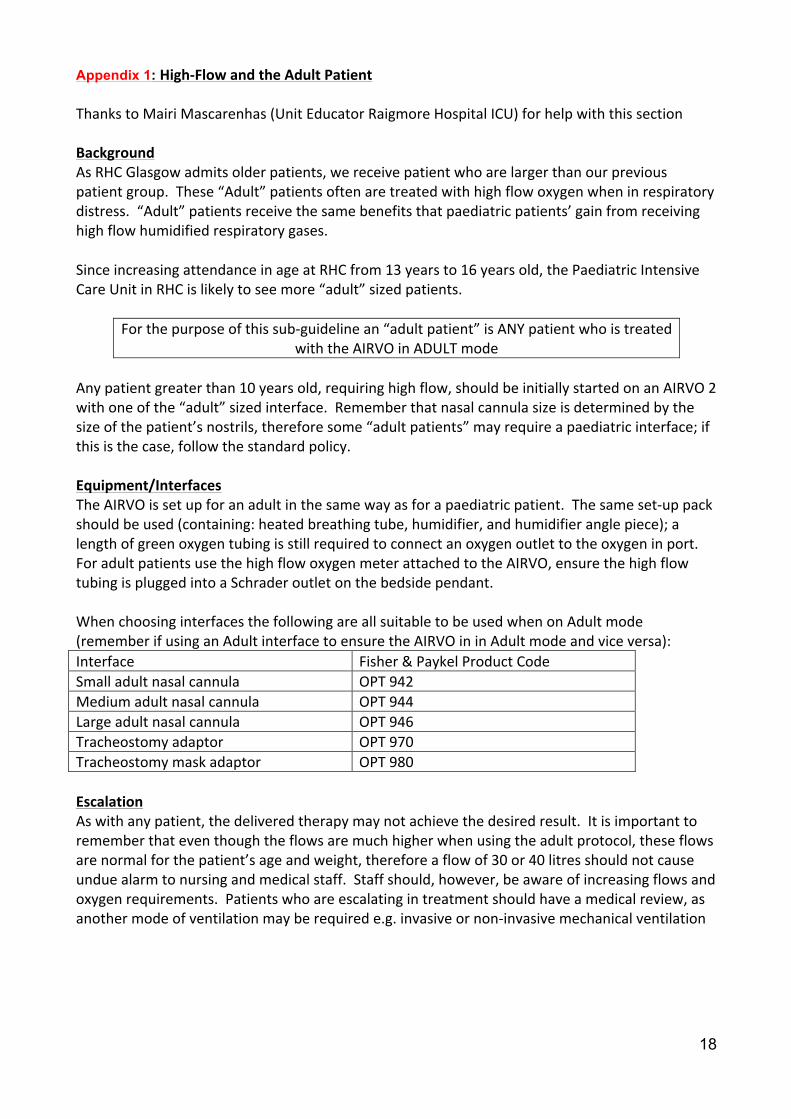
Appendix 1: High-‐Flow and the Adult Patient Thanks to Mairi Mascarenhas (Unit Educator Raigmore Hospital ICU) for help with this section Background As RHC Glasgow admits older patients, we receive patient who are larger than our previous patient group. These “Adult” patients often are treated with high flow oxygen when in respiratory distress. “Adult” patients receive the same benefits that paediatric patients’ gain from receiving high flow humidified respiratory gases. Since increasing attendance in age at RHC from 13 years to 16 years old, the Paediatric Intensive Care Unit in RHC is likely to see more “adult” sized patients.
For the purpose of this sub-‐guideline an “adult patient” is ANY patient who is treated with the AIRVO in ADULT mode
Any patient greater than 10 years old, requiring high flow, should be initially started on an AIRVO 2 with one of the “adult” sized interface. Remember that nasal cannula size is determined by the size of the patient’s nostrils, therefore some “adult patients” may require a paediatric interface; if this is the case, follow the standard policy. Equipment/Interfaces The AIRVO is set up for an adult in the same way as for a paediatric patient. The same set-‐up pack should be used (containing: heated breathing tube, humidifier, and humidifier angle piece); a length of green oxygen tubing is still required to connect an oxygen outlet to the oxygen in port. For adult patients use the high flow oxygen meter attached to the AIRVO, ensure the high flow tubing is plugged into a Schrader outlet on the bedside pendant. When choosing interfaces the following are all suitable to be used when on Adult mode (remember if using an Adult interface to ensure the AIRVO in in Adult mode and vice versa): Interface Fisher & Paykel Product Code Small adult nasal cannula OPT 942 Medium adult nasal cannula OPT 944 Large adult nasal cannula OPT 946 Tracheostomy adaptor OPT 970 Tracheostomy mask adaptor OPT 980 Escalation As with any patient, the delivered therapy may not achieve the desired result. It is important to remember that even though the flows are much higher when using the adult protocol, these flows are normal for the patient’s age and weight, therefore a flow of 30 or 40 litres should not cause undue alarm to nursing and medical staff. Staff should, however, be aware of increasing flows and oxygen requirements. Patients who are escalating in treatment should have a medical review, as another mode of ventilation may be required e.g. invasive or non-‐invasive mechanical ventilation

19
Appendix 2: Error Messages Message Meaning Affects
delivery of Delays
Fault (E###)
The unit has detected an internal fault and has shut itself down Switch the unit off and restart. If the problem persists, note the fault code and send to bioengineering.
Oxygen/ Humidity
<5 secs
Check tube The unit cannot detect the heated breathing tube Check that the heated breathing tube isn’t damaged and that it is plugged in correctly. If the problem persists, change the heated breathing tube.
Oxygen/ Humidity
<5 secs
Check for leaks
The unit has detected a leak in the system. The most likely cause is that the water chamber has been removed or has not been pushed into place correctly. Check that the heated breathing tube is not damaged and that it is plugged in correctly. Check that the nasal interface is fitted. Check that the filter is fitted.
Oxygen/ Humidity
<5 secs
Check for blockage
The unit has detected a blockage in the system. Check the heated breathing tube or interface for blockages. Check the air filter and filter holder for blockages. Check whether the unit should be in junior mode. If the patient will be using an Optiflow junior nasal cannula (OPT316/OPT318) you must activate junior mode.
Oxygen/ Humidity
<10 secs
O2 too low The measured oxygen level has fallen below the allowed limit. Check that the oxygen source is still connected. Adjust the level of oxygen from the oxygen source as necessary.
Oxygen <20 secs
O2 too high The measured oxygen level has exceeded the allowed limit. Adjust the level of oxygen from the oxygen source accordingly.
Oxygen
Cannot reach target
flow
The unit cannot reach the target flow setting. Check the heated breathing tube or patient interface for blockage. Check whether the target flow setting is too high for the patient interface being used. The unit will choose appropriate new target settings. You will be prompted for acknowledgement.
WARNING The oxygen concentration delivered to the patient can be affected by changes to the flow setting. Adjust the level of oxygen from the oxygen source as necessary.
Oxygen 10 +/-‐ 1 minute
Check Water The chamber has run out of water When a chamber runs dry, the chamber float may be damaged. Replace the chamber and water bag (20 secs after the chamber is removed the ‘check for leaks’ alarm is activated. When the chamber is replaced, the unit enters warm up mode and resumes normal operation. To ensure continual humidification, ensure that the water chamber and/or water bag are not allowed to run out of water.
Humidity Flows above 20 L/min <20 mins Flows below 20l/min <40 mins
Cannot reach target temperature
The unit cannot reach the target temperature The most likely cause for this is that the unit is running at a high flow rate in low ambient conditions. Consider decreasing the target flow settings.
WARNING The oxygen concentration delivered to the patient can be affected by changes to the flow setting. Adjust the level of oxygen from the oxygen source as necessary.
Humidity 30 +/-‐ 3 mins

20
Appendix 3: Using an Oxygen Cylinder There has been a Patient Safety alert due to a number of adverse events involving portable CD Oxygen cylinders. This is due to the assumption that the cylinder is already turned on and therefore when O2 tubing has been attached and a flow selected there has been no pressure or gas within the system.
PICTURE 1 PICTURE 2 PICTURE 3 Picture 1 The valve to activate the system is hidden behind a grey panel at the side of the cylinder.
Picture 2 To reveal the valve simply pull the looped tab and remove the cap.
Picture 3 When the main control valve is revealed the black wheel can be rotated in an anti-‐clockwise direction to allow flow
Attach oxygen tubing from the flow-‐meter on the pole to the Schrader Valve on the oxygen cylinder
Schrader valve
Not used
21
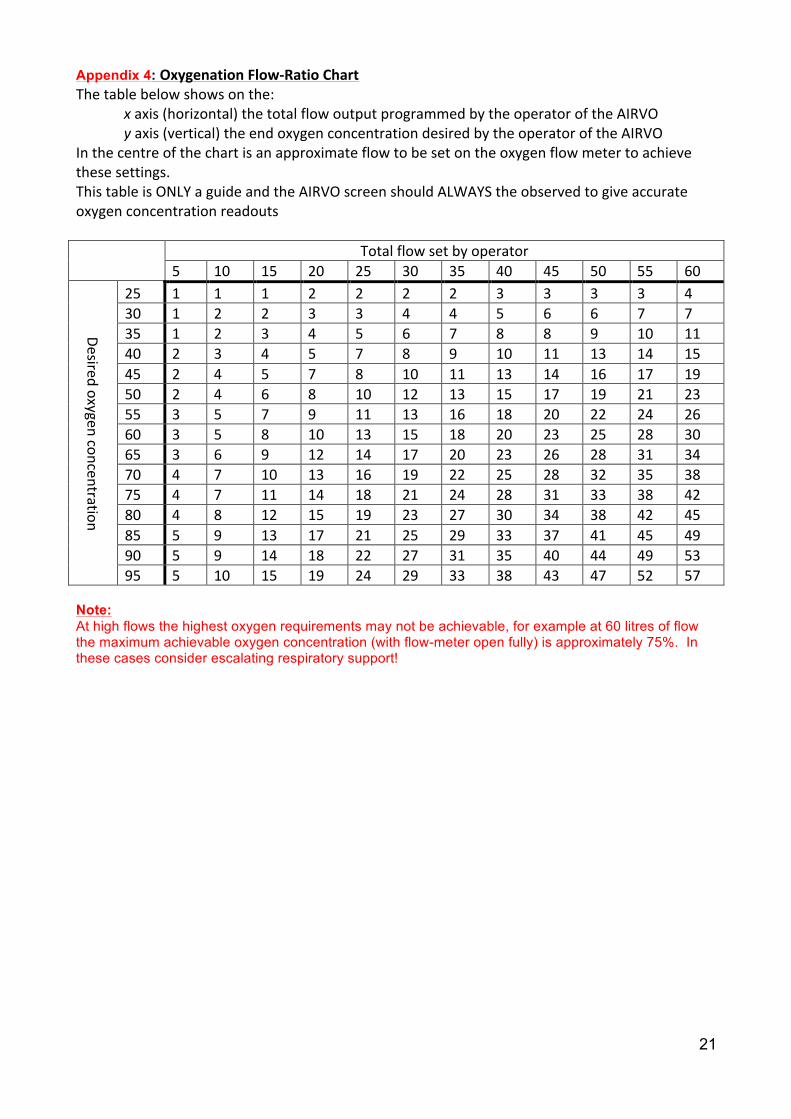
Appendix 4: Oxygenation Flow-‐Ratio Chart The table below shows on the:
x axis (horizontal) the total flow output programmed by the operator of the AIRVO y axis (vertical) the end oxygen concentration desired by the operator of the AIRVO
In the centre of the chart is an approximate flow to be set on the oxygen flow meter to achieve these settings. This table is ONLY a guide and the AIRVO screen should ALWAYS the observed to give accurate oxygen concentration readouts Total flow set by operator
5 10 15 20 25 30 35 40 45 50 55 60
Desired oxygen concentration
25 1 1 1 2 2 2 2 3 3 3 3 4 30 1 2 2 3 3 4 4 5 6 6 7 7 35 1 2 3 4 5 6 7 8 8 9 10 11 40 2 3 4 5 7 8 9 10 11 13 14 15 45 2 4 5 7 8 10 11 13 14 16 17 19 50 2 4 6 8 10 12 13 15 17 19 21 23 55 3 5 7 9 11 13 16 18 20 22 24 26 60 3 5 8 10 13 15 18 20 23 25 28 30 65 3 6 9 12 14 17 20 23 26 28 31 34 70 4 7 10 13 16 19 22 25 28 32 35 38 75 4 7 11 14 18 21 24 28 31 33 38 42 80 4 8 12 15 19 23 27 30 34 38 42 45 85 5 9 13 17 21 25 29 33 37 41 45 49 90 5 9 14 18 22 27 31 35 40 44 49 53 95 5 10 15 19 24 29 33 38 43 47 52 57
Note: At high flows the highest oxygen requirements may not be achievable, for example at 60 litres of flow the maximum achievable oxygen concentration (with flow-meter open fully) is approximately 75%. In these cases consider escalating respiratory support!

22
Appendix 5: Contacts for Support and Training Within Critical Care (Ward 1D) Dr Mark Davidson ([email protected]) (Medical Lead) SN John Thomson ([email protected]) (Nursing/Training Lead) SN Lorna Gillan ([email protected]) (Nursing/Training Lead) SCN Linda Brown ([email protected]) (Nursing Team Lead) Fisher & Paykel Rep is Darren Eskdale ([email protected])
The unit High-‐Flow trainers are: SN John Thomson SN Lorna Gillan SN SN SN SN SN SN

23
Appendix 6: References
1. Makdee, O., et al. 2017, “High-‐Flow Nasal Cannula Versus Conventional Oxygen Therapy in Emergency Department Patients With Cardiogenic Pulmonary Edema: A Randomized Controlled Trial”, Annals of Emergency Medicine, 70(4), pp. 465-‐472
2. Roberts, C.T., Manley, B.J., Dawson, J.A., et al. 2014, “Nursing Perceptions of High-‐Flow Nasal Cannulae Treatment for Very Preterm Infants”, Journal of Pediatric and Child Health, 50(10), pp. 806-‐810
3. Collins, C.L., Borfield, C., Horne, R.S., et al. 2014, “A comparison of Nasal Trauma in Preterm Infants Extubated to Either Heated Humidified High Flow Nasal Cannulae or Nasal Continuous Positive Airway Pressure”, European Journal of Pediatrics, 173(2), pp. 181-‐186
4. Collins, C.L., Holberton, J.R., Barfield, C. & Davis, P.G. 2013, “A randomized controlled trial to compare heated humidified high-‐flow nasal cannulae with nasal continuous positive airway pressure post-‐extubation in premature infants”, The Journal of Pediatrics, 162(5), 949-‐954
5. Franklin D., Dalziel S., Schlapbach L.J., et al. 2015, “Early high flow nasal cannula therapy in bronchiolitis, a prospective randomised control trial (protocol): A Paediatric Acute Respiratory Intervention Study (PARIS)”, BCM Pediatrics, [online] Available at: https://bmcpediatr.biomedcentral.com/articles/10.1186/s12887-‐015-‐0501-‐x [Accessed 16 June 2018]
6. Jeon G.W. 2016, “Respiratory support with heated humidified high flow nasal cannula in preterm infant”. Korean Journal of Paediatrics, 59(10), 389-‐394
7. Boel, L., Broad, K. & Chakraborty, M. 2018, “Non-‐invasive respiratory support in newborn infants”, Paediatrics and Child Health, 28(1), 6-‐12
8. Sarkar, M., Sinha, R., Roychowdhoury, R., et al. 2018, “Comparative Study between Noninvasive Continuous Positive Airway Pressure and Hot Humidified High-‐flow Nasal Cannulae as a Mode of Respiratory Support in Infants with Acute Bronchiolitis in Pediatric Intensive Care Unit of a Tertiary Care Hospital”, Indian Journal of Critical Care Medicine, 22(2), 85-‐90
9. Stéphan, F., Barrucand, B., Petit, P., et al. 2015, “High-‐Flow Nasal Oxygen vs Noninvasive Positive Airway Pressure in Hypoxemic Patients After Cardiothoracic Surgery. A Randomized Clinical Trial”, Journal of the American Medical Association, 313(23), 2331-‐2339
10. Mikalsen, I.B., Davis, P. & Øymar, K. 2016, “High Flow Nasal Cannula in Children: A Literature Review”, Scandinavian Journal of Trauma, Resuscitation and Emergency Medicine, 24(93)
11. Christophe, M., Sandrine, E., Robin, P., et al. 2016, “High flow nasal cannula (HFNC) versus nasal continuous positive airway pressure (nCPAP) for the initial respiratory management of acute viral bronchiolitis in young infants: a multicenter randomized controlled trial (TRAMONTANE study)”, Intensive Care Medicine, 43(2), 209-‐216
12. Zhand, J., Lin, L., Pan, K. 2016, “High-‐Flow Nasal Cannula Therapy in Adult Patients”, Journal of International Medical Research, 44(6), pp. 1200-‐1211
13. Slain, K.N., Shein, S.L. & Rotta, A.T. 2017, “The Use of High-‐Flow Nasal Cannula in the Pediatric Emergency Department”, Jornal de Pediatria, 93(sup. 1), pp. 36-‐45
14. Roca, O., Riera, J., Torres, F., et al. 2010, “High-‐flow oxygen therapy in acute respiratory failure”, Respiratory Care, 55(4), 408-‐413
15. Fisher & Paykel Healthcare, 2018. Mechanisms of Action [online] Available at: https://www.fp hcare.co.nz/hospital/adult-‐respiratory/optiflow/understand/mechanisms/ [Accessed 29 April 2018]

24
Version control
AIRVO 2 Standard Operating Procedure Date of publication: December 2018 Review date: December 2020 Lead Authors: John Thomson and Lorna Gillan Specialist advice Mairi Mascarenhas for input Approval Group: Local specialists Dr Mark Davidson; Dr Neil Spenceley; Jenna Hills; Stephen
McGloin; Danilo Cajilis; Janette Grady; Darren Eskdale. Changes to clinical content of this version:


![Isolation and Characterization of a Spontaneously ......(CANCER RESEARCH 50. 6075-6086. September 15. 1990] Isolation and Characterization of a Spontaneously Immortalized Human Breast](https://img.pdfslide.net/doc/110x75/5f01fa6b7e708231d401f907/isolation-and-characterization-of-a-spontaneously-cancer-research-50-6075-6086.jpg)