Embed Size (px)
Citation preview

Ecosystem infrastructure for smart and personalised inclusion and PROSPERITY for ALL stakeholders
Runtime Environment Final Prototype
ANNEX III: Runtime Environment Setup ManualProject Acronym Prosperity4All
Grant Agreement number FP7-610510
Deliverable number Work conducted for D203.1Work package number WP203
Work package title Collaborative development tools/EnvironmentsT203.3 Runtime Environment
Authors Marios Komodromos, Christos Mettouris, Lukas Smirek, Daniel Ziegler
Status FinalDissemination Level Public/Consortium

Delivery Date 29/07/2016Number of Pages 23
Keyword List
Setup manual, Integrated Runtime Environment, UCH, URC, ARE, AsTeRiCS, MyUI, Java
Version History
Revision Date Author Organisation Description
1 29/06/2016 Marios Komodromos UCY Initial authoring
2 06/07/2016 Daniel Zeigler FHG MyUI setup instructions
3 06/07/2016 Marios Komodromos UCY GPII instructions
4 29/07/2016 Christos Mettouris, Marios Komodromos
UCY Quickstart Guide, final improvements, Screenshots
Ecosystem infrastructure for smart and personalised inclusion and PROSPERITY for ALL stakeholderswww.prosperity4all.eu

Table of Contents
Executive Summary.............................................................................................................1
1 Introduction.............................................................................................................2
2 Prerequisites............................................................................................................3
Software installation..............................................................................................................3
3 Quickstart Guide.......................................................................................................4
4 Setup........................................................................................................................5
4.1 Install and configure AsTeRICS...................................................................................5
4.2 Install and configure URC...........................................................................................7
4.2.1 Installation of Philips Hue....................................................................................8
4.3 Install and configure MyUI..........................................................................................8
4.4 Install and configure GPII............................................................................................9
4.5 GPII & MyUI User Preferences..................................................................................14
5 Test the integrated system.....................................................................................15
5.1 ARE → MyUI → URC................................................................................................15
5.2 MyUI → ARE → URC................................................................................................17
List of Tables
No table of figures entries found.
List of Figures
Figure 1: Steps to change UCH component IP address in AsTeRICS..........................................6
Figure 2: Steps to test AsTeRICS installation.............................................................................7
Figure 3: The user interface presented by the MyUI Runtime..................................................9
Figure 4: NFC reader and NFC tag...........................................................................................11
Ecosystem infrastructure for smart and personalised inclusion and PROSPERITY for ALL stakeholderswww.prosperity4all.eu

Figure 5: NFC Setup.................................................................................................................12
Figure 6: NFC Setup.................................................................................................................12
Figure 7: NFC Setup.................................................................................................................13
Figure 8: NFC Setup.................................................................................................................13
Figure 9: NFC Setup.................................................................................................................14
Figure 10: Observe the light colour changes in the emulator.................................................16
Figure 11: Observe the electricity outlet WoehlkeWebsteckdose changes in the emulator. .16
Figure 12: Select the Head-ColouredLightBulb model (lower right corner)............................18
Figure 13: Simulation for the Philips HUE Light Bulb...............................................................18
Figure 14: Observe the changes in the emulator....................................................................19
Ecosystem infrastructure for smart and personalised inclusion and PROSPERITY for ALL stakeholderswww.prosperity4all.eu

Executive Summary
This document servers as the Integrated Runtime Environment Setup and Installation Manual (related to D203.1, Task 203.3, WP203). The manual describes thoroughly any prerequisites for installation, as well as the S/W and H/W installation steps needed to successfully install and configure the Integrated Runtime Environment. It also provides a few examples to ensure proper installation.
Ecosystem infrastructure for smart and personalised inclusion and PROSPERITY for ALL stakeholderswww.prosperity4all.eu
5

1 Introduction
The main goal of the task T203.3 Runtime Environment Prototype, is to achieve a scalable and extensible integration of the three platforms (AsTeRICS ARE, URC, MyUI) in order to produce a multiplatform environment which will "harvest“ the benefits of each platform. To fully understand the added value of the resulting solution, a basic knowledge of each platform is required. A brief description of AsTeRICS, URC and MyUI can be found below:
AsTeRICS : Assistive Technology Rapid Integration & Construction SetThe “Assistive Technology Rapid Integration and Construction Set” (AsTeRICS) offers a flexible framework for Assistive Technologies (AT), which can be adapted to the motor abilities of users.
URC : Universal Remote ConsoleThe overall purpose of the URC framework (standardized in ISO/IEC 24752) is to provide a mechanism, enabling users to control any target with any controller devices fitting best the user’s needs
MyUI : Framework for model-based adaptive user interfacesMyUI provides an environment to render and adapt a user interface to the user context during runtime.
Furthermore, the GPII framework was used as the basic infrastructure for better and centralized coordination of the three platforms through the identification of the users via NFC (Near Field Communication) technology and adaptation to their needs and preferences.
More detailed descriptions of the three platforms can be found in D203.1 Runtime Environment Final Prototype.
Ecosystem infrastructure for smart and personalised inclusion and PROSPERITY for ALL stakeholderswww.prosperity4all.eu
6
2 Prerequisites
1) Windows OS2) 32-bit Java SE Development Kit (8 or above)3) Web camera4) Web browser (Chrome Version 45 or above for MyUI)
Software installationTo test or use the complete solution, the following platforms should be installed and configured appropriately:
1) AsTeRICS2) URC3) MyUI4) GPII
Before going through the setup instructions, it is required to:
download the content from this link: https://github.com/mariokom/RuntimeEnvironment
extract the contents of the folder to a preferred location Important: let <REFolderPath> be this location, it may be needed later on
For a Quickstart Guide please see section 3.
Section 4 includes more detailed steps on how to setup and configure the Integrated Runtime Environment.
Ecosystem infrastructure for smart and personalised inclusion and PROSPERITY for ALL stakeholderswww.prosperity4all.eu
7

3 Quickstart Guide
Step 1: By default, AsTeRICS is configured to communicate with UCH on the same machine (localhost). If there is a need for UCH to run on a different machine, please see Section 4, otherwise no further actions are required: the AsTeRICS files are precompiled and preconfigured.
Step 2: Install GPII by using the installer to be found here: ‘<REFolderPath>/GPII/GPII.160119.044327.msi’
Step 3: Run (double click) the ‘<REFolderPath>/auto-conf.bat’ file with administrator privileges (right click on the file Run as administrator). The execution of this file will automatically clone MyUI in order to be hosted by the UCH server, as well as configure the GPII framework. The execution window will prompt the user to enter the GPII installation folder path (the default GPII installation folder path will be similar or identical to ‘C:\Program Files (x86)\GPII’). If any errors occur during the execution of the file, if you do not have administrator privileges or if you are running a windows version older than Windows 7 it is recommended to substitute this step (Step 3) by following the instructions in:
o 4.3, Installation sectiono 4.4, Configuration section
To test that everything was installed and configured correctly, you can do the following:
1) Start GPII by executing the file located at <GPIIRootFolder>/start.cmd.2) Notify GPII that a specific persona was logged in by visiting this URI in the browser:
‘localhost:8081/user/nicholas/login’3) The GPII will automatically start the three applications (AsTeRICS, MyUI, UCH).
AsTeRICS should take control of the mouse. MyUI should appear on your screen, in chrome browser. UCH should run on the background, ready to interact with AsTeRICS or MyUI
and control the targeted devices or applications.4) You may proceed by following Step 4 of the Head-ColouredLightBulb and
WoehlkeWebsteckdose electricity outlet demo described in Sections 5.1 and 5.25) Close the program by logging out the persona by visiting the URI:
‘localhost:8081/user/nicholas/logout’6) Close GPII.
Ecosystem infrastructure for smart and personalised inclusion and PROSPERITY for ALL stakeholderswww.prosperity4all.eu
8

4 Setup
4.1 Install and configure AsTeRICSInstallation & Configuration:
No further actions required. The AsTeRICS files are precompiled and preconfigured.
Configuration regarding AsTeRICS – UCH communication (to run on different machines)
By default, AsTeRICS is configured to communicate with UCH on the same machine (localhost). If there is a need for UCH to run on a different machine, please follow the next steps:
To run UCH on a different machine than AsTeRICS, we need to change the ‘Head-ColoredLightBulb.acs’ model via the AsTeRICS Configuration Suite (ACS) tool. To do so, we should navigate to ‘<REFolderPath>/AsTeRICS’ folder and run the ‘start_ARE.bat’ file. Then open the ACS folder and run the ‘ACS.exe’ file. Wait for both programs to start and follow the steps below:
1) Click the ‘Connect To ARE’ button in the ACS window.2) Click the ‘Download Component Collection’ button and wait until a
confirmation window appears which declares that a new component collection was installed.
3) Click the ‘Load Model from Storage’ button.4) In the window that will appear, locate and click the ‘Head-
ColoredLightBulb.acs’ model. Click the ‘ok’ button.5) You should now see the components contained in the model. Locate the UchCLB
component (it should be on the top-right corner) and select it.6) In the right panel, you should see the configurable parameters of this component.
Change the ‘ip’ parameter to the ip address of the machine where the URC will be running on.
7) Click on the ‘Store Model on ARE’ button. Click OK.8) Close ACS and ARE.
Ecosystem infrastructure for smart and personalised inclusion and PROSPERITY for ALL stakeholderswww.prosperity4all.eu
9

Figure 1: Steps to change UCH component IP address in AsTeRICS
Testing:
You can test that AsTeRICS was installed successfully using a web client. Follow the steps below to do so:
1) Run the ‘start_ARE.bat’ file located in the ‘<REFolderPath>/AsTeRICS’ folder.
2) Open a browser and visit: ‘http://localhost:8085/clientExample/client.html’.
3) In the ‘ARE Runtime Handling’ section, type ‘HeadSound.acs’ in the text field next to ‘Autorun’ button. Click the ‘Autorun’ button.
4) Now we should notice that the ARE GUI was changed and we are also able to produce sounds with head movements!
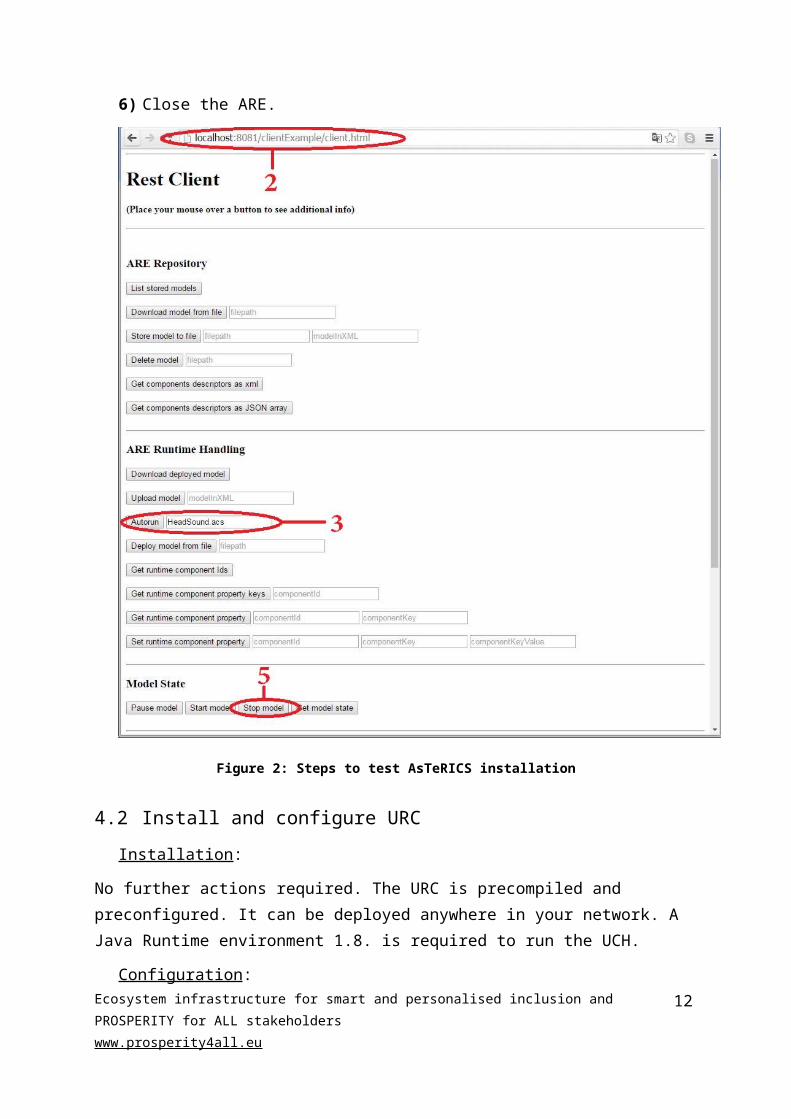
5) Stop the model by clicking on the ‘Stop model’ button, in the ‘Model State’ section
6) Close the ARE.
Ecosystem infrastructure for smart and personalised inclusion and PROSPERITY for ALL stakeholderswww.prosperity4all.eu
10

Figure 2: Steps to test AsTeRICS installation
4.2 Install and configure URCInstallation:
No further actions required. The URC is precompiled and preconfigured. It can be deployed anywhere in your network. A Java Runtime environment 1.8. is required to run the UCH.
Configuration:
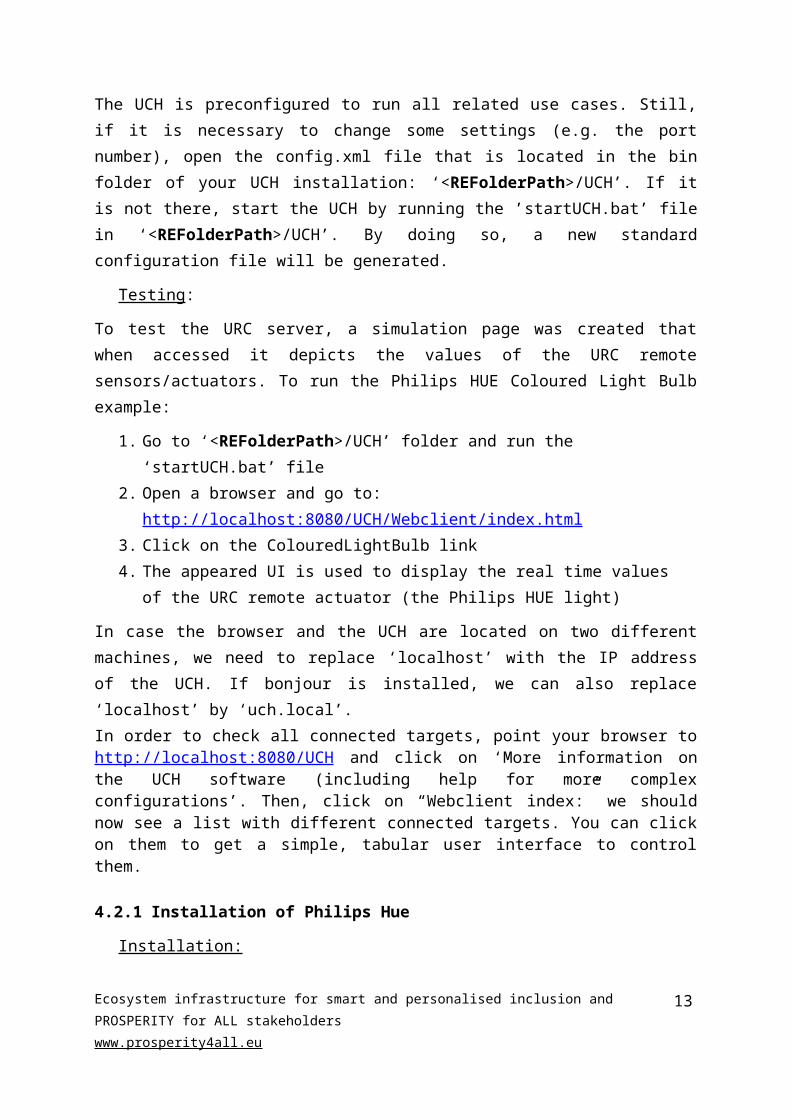
The UCH is preconfigured to run all related use cases. Still, if it is necessary to change some settings (e.g. the port number), open the config.xml file that is located in the bin folder of your UCH installation: ‘<REFolderPath>/UCH’. If it is not there, start the UCH by
Ecosystem infrastructure for smart and personalised inclusion and PROSPERITY for ALL stakeholderswww.prosperity4all.eu
11
running the ’startUCH.bat’ file in ‘<REFolderPath>/UCH’. By doing so, a new standard configuration file will be generated.
Testing:
To test the URC server, a simulation page was created that when accessed it depicts the values of the URC remote sensors/actuators. To run the Philips HUE Coloured Light Bulb example:
1. Go to ‘<REFolderPath>/UCH’ folder and run the ‘startUCH.bat’ file2. Open a browser and go to: http://localhost:8080/UCH/Webclient/index.html3. Click on the ColouredLightBulb link4. The appeared UI is used to display the real time values of the URC remote actuator
(the Philips HUE light)
In case the browser and the UCH are located on two different machines, we need to replace ‘localhost’ with the IP address of the UCH. If bonjour is installed, we can also replace ‘localhost’ by ‘uch.local’.In order to check all connected targets, point your browser to http://localhost:8080/UCH and click on ‘More information on the UCH software (including help for more complex configurations’. Then, click on “Webclient index:” we should now see a list with different connected targets. You can click on them to get a simple, tabular user interface to control them.
4.2.1 Installation of Philips HueInstallation:
UCH ships with all modules that are required to connect to a Philips Hue bridge:1. Connect the Philips Hue bridge to your network and switch it on2. Point your browser to
http://localhost:8080/UCH/Webclient/index.html and select ‘Philips Hue Configuration Manager’
3. Click on ‘Discover new Philips Hue Bridge: we need to confirm the discovery process at the Hue Bridge by pushing the button on the top
4. New Philips Hue bulbs get visible at the Webclient Index Page at http://localhost:8080/UCH/Webclient/index.html
Important: this process is to be executed only the first time a new bridge is connected to the network. UCH stores all information in order to automatically connect to it in the future.
4.3 Install and configure MyUINote: You can run (double click) the ‘<REFolderPath>/auto-conf.bat’ file to automatically clone MyUI, as well as configure the GPII (see section 3 – step 3). If ‘<REFolderPath>/auto-conf.bat’ file was executed, you can skip MyUI installation sub-section.Ecosystem infrastructure for smart and personalised inclusion and PROSPERITY for ALL stakeholderswww.prosperity4all.eu
12
Installation:
Copy the folder ‘<REFolderPath>/MyUI’ into a subdirectory served by your UCH installation: ‘<REFolderPath>/UCH/bin/Webclient/’.
Configuration:
If you did not change the configuration of AsTeRICS, MyUI is already configured to work with it. If your ARE is running at a URI different from ‘http://localhost:8085/’ you need to change the value of the areURI variable in line 7 of ‘<REFolderPath>/MyUI/src/myui-app.js’ accordingly.
Testing:
Important: To test MyUI, the URC system needs to be up and running (Section 2.2.2).
Open an instance of the Google Chrome web browser (Version 45 or above) to ‘http://localhost:8080/UCH/Webclient/myui/index.html’ or the appropriate location if you have used another target directory in the installation step. This should result in a user interface similar to the Figure 3.
Figure 3: The user interface presented by the MyUI Runtime
4.4 Install and configure GPIINote: You can run (double click) the ‘<REFolderPath>/auto-conf.bat’ file to automatically clone MyUI and configure GPII (see section 3 – step 3). If
Ecosystem infrastructure for smart and personalised inclusion and PROSPERITY for ALL stakeholderswww.prosperity4all.eu
13

‘<REFolderPath>/auto-conf.bat’ file was executed, you can skip GPII configuration sub-section.
Installation:
To install GPII use the installer to be found here: ‘<REFolderPath>/GPII/GPII.160119.044327.msi’
Configuration:
To configure the GPII framework for the T203.3 task, you need to change specific files in the location where the GPII was installed. Let <GPIIRootFolder> be the path of the root folder where GPII was installed (the default installation path should be ‘C:\Program Files (x86)\GPII’). See below for the required changes:
1) Before copying the file for this step, it is required to make some modification to its contents:
Copy the actual Runtime Environment root folder path to a document (eg notepad).
Replace single backslashes with double backslashes. For example: C:\path\to\folder C:\\path\\to\\folder
Go to <REFolderPath>/GPII/win32.json
Replace the ‘<rootFolderPath>’ occurrences in this file with the edited path.
After the modifications are done, replace the file located in:<GPIIRootFolder>/node_modules/universal/testData/solutions/win32.jsonwith the file located in:<REFolderPath>/GPII/win32.json
2) Replace the file located in:<GPIIRootFolder>/node_modules/universal/testData/deviceReporter/installedSolutions.jsonwith the file located in:<REFolderPath>/GPII/installedSolutions.json
3) Replace the file located in:<GPIIRootFolder>/node_modules/universal/testData/ontologies/ISO24751-flat.jsonwith the file located in:<REFolderPath>/GPII/ISO24751-flat.json
4) Copy these files:<REFolderPath>/GPII/nicholas.json<REFolderPath>/GPII/mr_moroz.json
Ecosystem infrastructure for smart and personalised inclusion and PROSPERITY for ALL stakeholderswww.prosperity4all.eu
14

<REFolderPath>/GPII/ms_moroz.jsonand paste them to the folder:<GPIIRootFolder>/node_modules/universal/testData/preferences
Testing:
To test that everything was installed and configured correctly, execute the following steps:
1) Start GPII by executing the file located at <GPIIRootFolder>/start.cmd.2) Notify GPII that a specific persona was logged in by visiting this URI in the browser:
‘localhost:8081/user/mary/login’3) The on screen keyboard program should appear on the screen.4) Close the program by logging out the persona, by visiting the URI:
‘localhost:8081/user/mary/logout’5) Close GPII.
NFC Configuration:
To use NFC identification for the personas of the scenario, an NFC reader and three NFC tags are required. For our purposes we have used and ACR122U NFC Reader for PC and NFC tags operating in the standard radio frequency of 13.56 MHz.
Ecosystem infrastructure for smart and personalised inclusion and PROSPERITY for ALL stakeholderswww.prosperity4all.eu
15

Figure 4: NFC reader and NFC tag
1) Download and install GoToTags windows application (Download link: https://gototags.com/products/windows-app/)Any other program capable of controlling an NFC reader and writing to an NFC tags will do.
2) Plug-in the NFC reader device. Give the operating system a few minutes to identify the device. In case the system is unable to automatically identify and download the drivers, please find them in: “<REFolderPath>/GPII/NFCDrivers”
3) Open GoToTags application.4) Select the NFC reader
Ecosystem infrastructure for smart and personalised inclusion and PROSPERITY for ALL stakeholderswww.prosperity4all.eu
16

Figure 5: NFC Setup
5) Click on the ‘Add new record’ button (top left corner) and select the ‘Plain Text’ type
Figure 6: NFC Setup
Ecosystem infrastructure for smart and personalised inclusion and PROSPERITY for ALL stakeholderswww.prosperity4all.eu
17

6) A new window should appear. In the ‘Text’ field, write the name ‘Nicholas’ (the name of one of the three personas we are going to use). Press the OK button.
Figure 7: NFC Setup
7) Click on the ‘Encode NFC tags’ button.
Figure 8: NFC Setup
Ecosystem infrastructure for smart and personalised inclusion and PROSPERITY for ALL stakeholderswww.prosperity4all.eu
18

8) The application is now waiting for an NFC tag to write on. Move an NFC tag near the NFC reader. Hold it there for some seconds until a sound is heard that indicates that the “write” process was completed.
Figure 9: NFC Setup
9) Repeat steps 5 to 9 two more times, replacing the name ‘Nicholas’ with the name ‘Mr_Moroz’ and ‘Ms_Moroz’.
10) Close GoToTags.
4.5 GPII & MyUI User PreferencesWe may change the user needs and preferences used by GPII and MyUI. Navigate to <GPIIRootFolder>/node_modules/universal/testData/preferences and open the json file of the persona you need to change, e.g. nicholas.json. You may change the maxElementsPerScreen that handles the number of elements the user sees on screen, as well as the bodyTextFontSize which corresponds to the desired font size.
Ecosystem infrastructure for smart and personalised inclusion and PROSPERITY for ALL stakeholderswww.prosperity4all.eu
19

5 Test the integrated system
To test the integrated runtime environment, follow the steps below:
1) Start GPII.2) If you have configured NFC :
o Connect the NFC reader device to the PCo Locate and run ‘Start RFID listener’ file (installed with GPII)o Move an NFC tag near the NFC reader
If you have not configured NFC:o Open a web browsero Visit the url http://localhost:8081/user/ms_moroz/login
3) The GPII will automatically start the three applications (AsTeRICS, MyUI, UCH). AsTeRICS should take control of the mouse via head movement. Keeping still
for four seconds over something selects it. MyUI should appear on your screen, in chrome browser. UCH should run on the background, ready to interact with AsTeRICS or MyUI
and control the targeted devices or applications.
Proceed with Sections 5.1 and 5.2
5.1 ARE → MyUI → URC4) a. To run the Philips HUE Lights example: Go to the browser (MyUI) and click on the
‘Lights Control’ button and then on the ‘ColouredLightBulb’. In the appeared interface there are multiple buttons which can change the colour of the lamp.
If you have connected the actual coloured light bulb (H/W), you should see the light changes in colour.
If not, you can observe the changes in the emulator by visiting the url: http://localhost:8080/UCH/Webclient/index.html and selecting the coloured light bulb from the list (see Figure 10).
b. To run the electricity outlet example: Go to the browser (MyUI) and click on the ‘Switched Outlets’ button and then on the ‘WoehlkeWebsteckdose’. In the appeared interface there are 3 buttons which can switch on and off the URC electricity outlet sensor.
If you have connected the actual WoehlkeWebsteckdose electricity outlet, you should see the outlet switching on and off.
If not, you can observe the changes in the emulator by visiting the url: http://localhost:8080/UCH/Webclient/index.html and selecting the WoehlkeWebsteckdose (See Figure 11).
Ecosystem infrastructure for smart and personalised inclusion and PROSPERITY for ALL stakeholderswww.prosperity4all.eu
20

Figure 10: Observe the light colour changes in the emulator
Figure 11: Observe the electricity outlet WoehlkeWebsteckdose changes in the emulator
Ecosystem infrastructure for smart and personalised inclusion and PROSPERITY for ALL stakeholderswww.prosperity4all.eu
21

5.2 MyUI → ARE → URC4) a. To run the Philips HUE Lights example: Go to the browser (MyUI), click on
’AsTeRICS’ button and select the Head-ColouredLightBulb model (Figure 12). The AsTeRICS ARE is expected to initiate the Head-ColouredLightBulb AsTeRICS model which continuously changes the colour of the lamp via head movement. By keeping still for four seconds this functionality stops and AsTeRICS ARE takes control of the mouse again via head movement. The colour of the lamp is then the last selected colour.
If you have connected the actual coloured light bulb (H/W), you should see the light changes in colour when moving your head.
If not, you can observe the changes in the emulator by visiting the url: http://localhost:8080/UCH/Webclient/index.html and selecting the coloured light bulb from the list. Then, open a new tab to an assistive client web page here http://localhost:8085/clientSmall/client.html and click on the Start monitoring colour button. Figure 13 shows the simulation demo where head movements change the colour shown within the assistive client web page to the left that simulates the Philips HUE light, while the webpage on the right depicts the URC remote server updates (important: webpage refresh from browser refresh-button is needed). The colour updates are initiated from the AsTeRICS Head-ColouredLightBulb model directly via head movements of the user.
b. To run the electricity outlet example: Go to the browser (MyUI), click on ’AsTeRICS’ button and select the Head-ElectricityOutlet model. The AsTeRICS ARE is expected to initiate the Head-ElectricityOutlet AsTeRICS model which can switch on and off the electricity outlet via mouth movement: mouth movement (opening) changes between “switch on” and “switch off”. Switch again to mouse control with head movements by turning your head to the right.
If you have connected the actual WoehlkeWebsteckdose electricity outlet, you should see the outlet switching on and off.
If not, you can observe the changes in the emulator by visiting the url: http://localhost:8080/UCH/Webclient/index.html and selecting the WoehlkeWebsteckdose (see Figure 14). Important: webpage refresh from browser refresh-button is needed to see changes.
Ecosystem infrastructure for smart and personalised inclusion and PROSPERITY for ALL stakeholderswww.prosperity4all.eu
22

Figure 12: Select the Head-ColouredLightBulb model (lower right corner)
Figure 13: Simulation for the Philips HUE Light Bulb
Ecosystem infrastructure for smart and personalised inclusion and PROSPERITY for ALL stakeholderswww.prosperity4all.eu
23

Figure 14: Observe the changes in the emulator
Ecosystem infrastructure for smart and personalised inclusion and PROSPERITY for ALL stakeholderswww.prosperity4all.eu
24