Embed Size (px)
Citation preview
STARLAB
Portable Planetarium System
— Part B —
K-6 Activities and Lessons for Use in the
STARLAB Portable Planetarium
©2008 by Science First/STARLAB, 95 Botsford Place, Buffalo, NY 14216. www.starlab.com. All rights reserved.
Compiled & revised by Joyce Kloncz, Gary D. Kratzer and Andrea Colby

• B–3 • K–6 Activities
Tips On Using STARLAB by Joyce Kloncz.........B-5
Pre- and Post-STARLAB ActivitiesOverview ........................................................... B-6Lessons for Grades K-3 ......................................... B-6Lessons for Grades 4-6 ......................................... B-6
Sample Scope and SequenceKindergarten ....................................................... B-7Grade One ......................................................... B-7Grade Two ......................................................... B-8Grade Three ....................................................... B-8Grade Four ......................................................... B-9Grade Five ......................................................... B-9
ActivitiesHorizon Lesson for Primary Grades ...................... B-10How to Make a Star Clock ................................. B-12How to Make a Moon Phaser ............................. B-13Constructing a Moon Calendar ........................... B-14Solar System Mobile .......................................... B-20How to Make Constellation Pictures ..................... B-21How to Remember Orion’s Stars .......................... B-22How to Use a Star Finder ................................... B-23How to Make a Do it Yourself Star Finder ............. B-25How to Use a Dipper Finder ............................... B-27Dipper Finder Pattern and Instructions ................. B-29Stars and Constellations .................................... B-30The Motion of Stars and Constellations ................. B-32Tell Me What You Know About Stars! ................... B-33A Comparison of Star and Planet Attributes .......... B-35People Search Activity ........................................ B-37People Search Worksheet ................................... B-38Our Universal Address ....................................... B-39
A Summary of Planetarium Activities for Student Success (PASS)
Vol 1: Planetarium Educator’s Workshop Guide ..... B-40Vol 2: Planetarium Activities for Schools ............... B-40
Vol 3: Resources for Teaching Astronomy and Space Science................................................... B-40Vol 4: A Manual for Using Portable Planetariums ... B-40Vol 5: Constellations Tonight ............................... B-40Vol 6: Red Planet Mars ....................................... B-40Vol 7: Moons of the Solar System ........................ B-40Vol 8: Colors from Space .................................... B-40Vol 9: How Big Is the Universe? ........................... B-41Vol 10: Who “Discovered” America? ................... B-41Vol 11: Astronomy of the Americas ...................... B-41Vol 12: Stonehenge ........................................... B-41Vol 13: Northern Lights ...................................... B-41
Evening Star MapsEvening Star Map for January - February .............. B-42Evening Star Map for March - April ..................... B-43Evening Star Map for May - June ......................... B-44Evening Star Map for July - August ....................... B-45Evening Star Map for September - October ........... B-46Evening Star Map for November - December ........ B-47
K-6 ResourcesFree and/or Inexpensive Materials to Teach Astronomy in the Classroom ................................ B-49Astronomy for Elementary Teachers Bibliography ... B-51
Stars & Skies, STARLAB Activities for Grades 4-6Elementary Grades 4-6 Objectives ...................... B-54Cardinal Directions, Activity 4-1 ......................... B-56Celestial Movement, Activity 4-2 .......................... B-57Apparent Motion, Activity 4-3 ............................. B-58Stars and Light Pollution, Activity 4-4 .................... B-59East-West Constellation Movement, Activity 4-5 ..... B-60Star Groupings, Activity 4-6 ................................ B-61Circumpolar Constellations, Activity 4-7 ............... B-62Early Astronomers, Activity 5-1 ............................ B-63Phases of the Moon, Activity 5-2.......................... B-64Constellation Location, Activity 5-3 ...................... B-65
Table of Contents Part B — K-6 Activities and Lessons
K–6 Activities • B–4 •
Nightly Position of Constellations, Activity 5-4 ....... B-66Seasonal Position of Constellations, Activity 5-5 .... B-67Position of the North Star, Activity 5 -6 .................. B-68The Ecliptic, Activity 5-7 ..................................... B-69Studying Early Astronomers, Activity 6-1............... B-70Sunrise and Sunset Position, Activity 6-2 ............... B-71Apparent Motion, Activity 6-3 ............................. B-72Seasonal Changes, Activity 6-4 ........................... B-73Stellar Position — Poles vs. Equator, Activity 6-5 .... B-74Stellar Reference Points, Activity 6-6 ..................... B-75Greek Mythological Constellations, Activity 6 -7 ..... B-76Native American and Greek Myths, Activity 6-8 .... B-77Using a Star Finder, Activity 6-9 .......................... B-78
Table of Contents (continued) Part B — K-6 Activities and Lessons
Stars & Skies, Supplemental Activites for Grades 4-6
Comparing the Size of the Planets ....................... B-80Drawing Words ................................................. B-81Jumbled Words ................................................. B-81Word Search .................................................... B-82Making Constellation Slides ................................ B-83Lost in Space ..................................................... B-83Lost on the Moon Worksheet ............................... B-84Lost on the Moon Answer Key ............................. B-85Fun Pictures for Your Classroom ........................... B-86
• B–5 • K–6 Activities
Tips On Using STARLAB by Joyce Kloncz
The first time you use STARLAB is an exciting event! If you are using it as a classroom teacher or as a planetarium director, you’ll want to make sure you are prepared be-fore you begin. Here are some ideas that have been used in the past for a successful STARLAB program.
1. Try to set up STARLAB a day ahead of time so you are ready and comfortable before the students come. After following the set-up directions in the first section of the book, take some time in STARLAB preparing for your first visitors.
2. Find some interesting planetarium music to play when your students arrive. (A favorite of mine is “Celestial Soda Pop” by Fresh Aire VI – Orpheus).
3. Plan some classroom management techniques for students. It is important that they know your expectations in advance. In a dark classroom like STARLAB, it’s important to be consistent, but caring! Here are some tried and true techniques:
• Makesuretherearetwoadultstomaintainsafety.
• WhenenteringSTARLAB,havetwochildrenholdthedoorflapsopen.
• Setasmallfluorescentlanterninthedoorway(availablefromRadioShack).
• Theteachershouldgoinfirst,turnontheprojectorsidelights,andhavethechildren follow in single file.
• HavethestudentssitcompletelyaroundtheinsideedgeoftheSTARLABfloor,butnotupagainsttheSTARLABwall.Thisistheirseatfortheduration(I suggest that teachers don’t allow seat-changing in STARLAB).
• Makesurethestudentsdon’tblocktheinflation/ventilationtube.
• Havearedflashlightavailablethatwillhelptospotanyproblems.
• Whenleaving,theteachershouldbethelastoneout.
4. Look through the cylinder information and decide in advance what you will do. If you are going to be taking children into STARLAB only once, plan a lesson that willbeeasytodo.Forinstance,showtheGreekMythologyCylinderandtellthestories about four easy-to-find constellations, such as Orion, Big Bear and Little Bear,andCassiopeia.(SeetheGreekMythologyCylindersection).Thenshowthe Constellation Cylinder and with an arrow pointer, show the students where those four constellations are on that cylinder. Next, show the Starfield Cylinder and point out the same four constellations. Have children look carefully at the night sky, then close their eyes and imagine what the constellations look like. Whentheyopentheireyes,seeiftheycanstillfindtheconstellations.Witholderstudents, have them use the star maps and arrow pointers with teams of students to find the constellations. If you can accomplish all of this, the students will have had a wonderful introduction to STARLAB.
5. Whenyoutakestudentsinagain,addsomeconstellationstoriestotheonesyou told the first time. If time allows, show the Earth Cylinder or other cylinders. Try some activities from your Planetarium Activities for Student Success (PASS) volumes. (Did you send in your Product Registration form? See Note.)
6. It’s important that the students realize that you are learning along with them. If they ask you questions that you can’t answer, simply tell them that you’ll find the answer together. You don't have to know all of the answers the first time in STARLAB. Your confidence will grow each time.
Note
One set of the 13-volume PASS series (referred to throughout this section) is sent to you free when you return your Prod-uct Registration form. If you haven’t already received a set with your system, make sure to send in your form!
Additional sets can be ordered through Science First/STARLAB, by calling 800-537-8703 or 716-874-0133 or by visiting our Web site at: www.starlab.com.
K–6 Activities • B–6 •
Pre- and Post-STARLAB Activities
Overview
Listed below are some activities that can be done by the classroom teacher either prior to or after being in STARLAB. Complete lessons follow in this K-6 section.
Lessons for Grades K-31. Do the “Horizon Lesson for Primary Grades” on page 10 to show young students
how the horizon goes all the way to the ground.
• Makeyourownconstellationsfrombleach-spottedtissuepaper.
2. Dothe“HowtoMakeConstellationsPictures”lessononpage21.
• Punchtheholesofoneconstellationthroughaluminumfoilandastarmap,thenputfoilonanoverheadprojectorandhavekidsguesswhichconstel-lation it is.
• Punchholesthroughastarmapinthebottomofafilmcan.Lookattheconstellation through light. (Film cans are free at film processing firms.)
3. UsetheseasonalStarMapstolearnconstellationsonpages42-47.
4. Do the “Circle Puzzle,” “Dots Puzzle,” and “Create a Constellation” lessons (from PASS Volume 5, Constellations Tonight*) to show students how ancient Greeks and Romans came up with the constellations.
Lessons for Grades 4-61. Dothe“Meteoroids&Craters”experimentsfromPASSVolume7,Moons of the
Solar System.
2. Do the Oobleck experiment (from Oobleck: What Do Scientists Do?intheGEMSseries — see resource list on page 45 for purchasing information).
3. MakeaStarClockusingthetemplateonpage12ofthissection(fromEarth, Moon and Stars—GEMS).
4. SendseasonalStarMapshomewithyourstudentssothattheycanpracticefind-ingconstellationsandplanetswiththeirparents.Seetemplatesonpages42-47.
5. Dothe“WhatAreYourIdeasAbouttheEarth?”worksheettofindoutaboutstu-dents’ misconceptions about our earth (from Earth, Moon and Stars—GEMS).
6. Makepolystyrene“moonballs”toshowthemoon’sphases.(SeePASSVolume7,Moons of the Solar System).
7. Encouragestudentstotrackthemoon’sphasesandlocationsforamonth.
8. MakeaMoonPhaser(seepage13).
Note
One set of the 13-volume PASS series (referred to throughout this section) is sent to you free when you return your Prod-uct Registration form. If you haven’t already received a set with your system, make sure to send in your form!
Additional sets can be ordered through Science First/STARLAB, by calling 800-537-8703 or 716-874-0133 or by visiting our Web site at: www.starlab.com.
• B–7 • K–6 Activities
Sample Scope and Sequence
The following scope and sequence for elementary grades has been used successfully for many years by classroom teachers. It allows a natural growth of concept-building from year to year, spiraling on skills learned in previous years.
Kindergarten1. In the classroom, discuss how the early Greeks and Romans saw constellations
inthesky.Do“MakingShapes”(PASSVolume2)and“CreateaConstellation”worksheets (PASS Volume 5). Tell the story of Cassiopeia, Cepheus, and An-dromeda. Show a large black tag board constellation picture of the Big Dipper, LittleDipper,the“LazyW,”OrionandCanisMajor.Explainhowtheirinterpreta-tionofthe“LazyW”isjustaseffectiveastheGreekmythologystory.
2. In STARLAB, ease the students’ excitement about being in STARLAB for the first time. Discuss proper seating procedures and behavior expectations. Using the GreekMythologyCylinder,tellthestoryofUrsaMajorandMinor,Orion,Cas-siopeia, Cepheus and Andromeda. Find the above constellations on the Constel-lation Cylinder. Put on the Starfield Cylinder and look for those constellations.
3. InSTARLAB,reviewtheabovewinterconstellations.UsetheGreekMythologyCylinder, Constellation Cylinder and Starfield Cylinder. Show the Earth Cylinder and the Celestial Coordinates Cylinder.
Grade One1. InSTARLAB,usetheGreekMythologyCylindertofindandtellthestoriesof
UrsaMajorandMinor,Orion,Cassiopeia,Cepheus,Andromeda,CanisMajorandMinor,GeminiandTaurus.PutontheConstellationCylinderandlocatethe above constellations. Tell the story of Orion’s four main stars: Betelgeuse, Bellatrix, Rigel, and Saiph. Try to locate the above constellations on the Starfield Cylinder. After leaving STARLAB, hand out winter star maps and give directions on how to use them by discussing the cardinal directions (north, south, east and west). Show the picture of Orion’s four main stars.
2. In the classroom, follow the Horizon Lesson (page 10 of this section) by making “bleach” constellations. Discuss day and night, the rising and setting of the sun and moon, and identify the cardinal directions of each. Using Post-it™ notes and fluorescentmarkers,makeapictureofsomethingyoucouldseeonthehorizon.Collectfornextweek.Dothe“MakeaDaytimeandNighttimeSky”worksheetand the “Day and Night” puzzle sheet (PASS Volume 2). Find or make up con-stellations on bleach sheets. Hang familiar constellations in classroom.
3. In STARLAB, place Post-it™ pictures of the horizon where students think the horizon will be in STARLAB. Use black lights to show ultraviolet light on Post-its™. Discussultravioletlightinthespectrum.ShowtheNativeAmericanMythologyCylinder and tell the legends of Long Sash, the possum, buzzard and spider, and Big Bear and the Three Indian Braves. Put the Starfield Cylinder on and show how constellations would look from various points on the earth. Demonstrate day and night. If time allows, show the Ancient Chinese Legends or Ancient Chinese Seasons Cylinders.
Kindergarten
Grade One
K–6 Activities • B–8 •
Grade Two1. InSTARLAB,usingtheGreekMythologyCylinder,reviewtheconstellations
introduced in Grade One section but add the stories of Leo the Lion, Auriga the Charioteer, Lepus the Hare, Draco, and the Pleiades. Look at these constella-tions using the Constellation Cylinder. Hand out arrow pointers and show their locations. Look at the Starfield Cylinder and try to locate the same constellations. After leaving STARLAB, hand out star maps, and show the proper way to use them discussing the cardinal directions.
2. In STARLAB, use the Earth Cylinder to discuss the global continents. Introduce the concept of longitude by tying it in with time zones (each is 15° of longitude wide on average). Introduce latitude and determine your location’s latitude. Use the Celestial Coordinates Cylinder and tie in latitude and longitude with declination and right ascension. Introduce the celestial equator. Show the moon phases on the Starfield Cylinder.
3. In STARLAB, show the Aurora Borealis slides. Using colored chalk and a piece of black construction paper, have students draw what they think the Northern Lights looklike.Iftimeallows,showtheNativeAmericanMythologyCylinderandreview and introduce new stories.
4. In the classroom, make aluminum foil constellations using current star maps. Do the “Circle Puzzle” (PASS Volume 5, Constellations Tonight) to recognize that the constellationswhichtheyinventcanbejustasusefulastheancientGreekandRoman constellations. Do the “Dots Puzzle” (also PASS Volume 5).
Grade Three1. InSTARLAB,reviewalloftheabovewinterconstellationsusingtheGreekMythol-
ogy Cylinder. Introduce the spring constellations of Bootes, Virgo, and Hydra. Run back to back winter and spring star maps. Using star maps, work in groups of four to identify the constellations on the Constellation Cylinder. Put the Starfield Cylinder on and try to locate the winter and spring constellations in the night sky.
2. Dothe“RedPlanetMars”lesson(PASSVolume6)inSTARLABinwhichchildrenfinda“star”muchlikeMars.SeeslidesofLowell’sstudyofMars,andusingExobiology,createacreaturethatcouldliveonMarswithitsconditionsofthinatmosphere, cold temperatures, and low gravity.
3. InSTARLAB,reviewtheNativeAmericanMythologyCylinderandlegendsaboutNative American constellations. Add the legend of the lizard, snake and but-terfly.ShowtheEarthCylinder.Findthecontinentsandcontinuethediscussionof latitude and longitude and how they relate to the celestial equator. View the AfricanMythologyCylinderandtellstoriesfromvariousgroupsfromAfrica.
4. In the classroom, make constellation viewers using film containers (page 21). Make“StarClocks”(page12).
Grade Two
Grade Three
• B–9 • K–6 Activities
Grade Four1. InSTARLAB,reviewwinterandspringconstellationsusingtheGreekMythology
Cylinder. Introduce summer constellations of Aquila, Lyra, Cygnus, Scorpius, Sagittarius,Ophiuchus,Hercules,andtheCoronaBorealis.WiththeConstel-lation Cylinder, work in groups of four to locate winter, spring, and summer constellations. Run star maps back to back with winter and summer constella-tions. Try to locate the above constellations using the Starfield Cylinder.
2. InSTARLAB,do“MoonsoftheSolarSystem,”program(PASSVolume7)whichsimulatestheprocessGalileousedtotrackthefourobjectsnearJupiter.Showslides of other moons in the solar system. Use moon balls to demonstrate phases and eclipses of the moon.
3. In STARLAB, review the Starfield Cylinder by finding winter, spring, and summer constellations. Help students to begin to understand the celestial equator, the zenith and the meridian. To show how stars would appear from the North Pole, settheprojectorfor90ºnorthlatitude.Toshowhowstarswouldappearfromtheequator,settheprojectorfor0ºlatitude.Discusstheapparentmagnitudeofstars and do the “Brightness of Stars” worksheet 1 and 2. Follow Activity 6 in Volume2ofthePASSseries—“HowDotheStarsAppeartoMove?”Introducethe Ancient Chinese Seasons and Ancient Chinese Legends Cylinders and tell stories about their people.
4. Intheclassroom,make“MoonPhasers”(page13).
5. In the classroom, do the “Oobleck” lesson (Oobleck: What Do Scientists Do? fromtheGEMSseries).
6. Intheclassroomoroutdoors,do“Meteors,Meteorites,andMeteoroids”lesson(PASSVolume7,Moons of the Solar System).
Grade Five1. In STARLAB, review the winter, spring, and summer constellations using the
GreekMythologyCylinder.IntroducethefallconstellationsofAries,Pegasus,Andromeda, Aquarius, Pisces, and Capricorn. Using the Constellation Cylinder, work in groups of four to find these constellations, plus winter, spring, and sum-mer constellations, using star maps and the arrow pointer. Try to locate as many constellations as possible.
2. In STARLAB, do the “Colors in Space” (PASS Volume 8) lesson, showing how reflectionandabsorptionofcolorsisusedbyscientiststodeterminethecompo-sition of stars. Use the “magic cloth” and “color analyzers” to model concepts used by astronomers. Using a prism and diffraction grating, study the spectrum.
3. In STARLAB, show the Aurora Borealis slides, and sketch how they see the Northern Lights over their school. Show the Earth Cylinder to review time zones. Show the Celestial Coordinates Cylinder to discuss right ascension and declina-tion.ReviewtheAfricanMythologyandAncientChineseCylinders.
4. Intheclassroom,do“WhatAreYourIdeasabouttheEarth?”(Earth, Moon and Stars—GEMS)toclearupstudents’misconceptionsaboutastronomy.MakeaStar Finder (page 25).
Grade Four
Grade Five
K–6 Activities • B–10 •
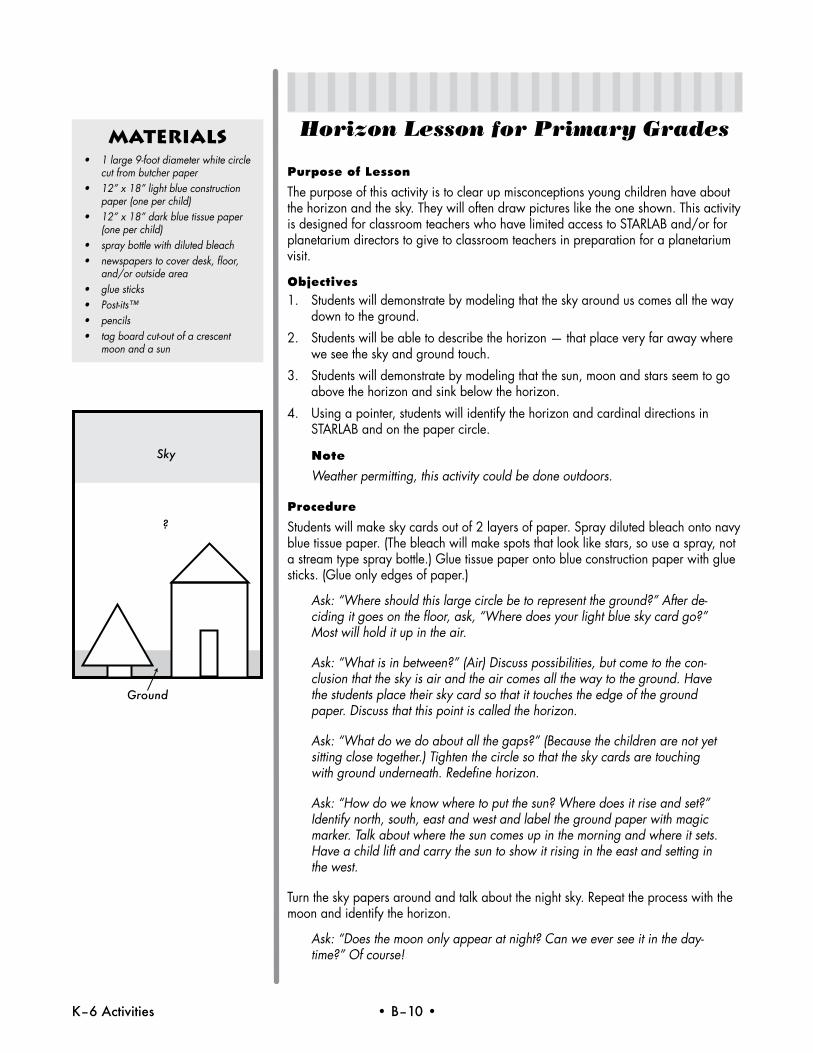
Horizon Lesson for Primary Grades
Purpose of Lesson
The purpose of this activity is to clear up misconceptions young children have about the horizon and the sky. They will often draw pictures like the one shown. This activity isdesignedforclassroomteacherswhohavelimitedaccesstoSTARLABand/orforplanetarium directors to give to classroom teachers in preparation for a planetarium visit.
Objectives1. Students will demonstrate by modeling that the sky around us comes all the way
down to the ground.
2. Students will be able to describe the horizon — that place very far away where we see the sky and ground touch.
3. Students will demonstrate by modeling that the sun, moon and stars seem to go above the horizon and sink below the horizon.
4. Using a pointer, students will identify the horizon and cardinal directions in STARLAB and on the paper circle.
Note
Weather permitting, this activity could be done outdoors.
Procedure
Students will make sky cards out of 2 layers of paper. Spray diluted bleach onto navy blue tissue paper. (The bleach will make spots that look like stars, so use a spray, not a stream type spray bottle.) Glue tissue paper onto blue construction paper with glue sticks. (Glue only edges of paper.)
Ask: “Where should this large circle be to represent the ground?” After de-ciding it goes on the floor, ask, “Where does your light blue sky card go?” Most will hold it up in the air.
Ask: “What is in between?” (Air) Discuss possibilities, but come to the con-clusion that the sky is air and the air comes all the way to the ground. Have the students place their sky card so that it touches the edge of the ground paper. Discuss that this point is called the horizon.
Ask: “What do we do about all the gaps?” (Because the children are not yet sitting close together.) Tighten the circle so that the sky cards are touching with ground underneath. Redefine horizon.
Ask: “How do we know where to put the sun? Where does it rise and set?” Identify north, south, east and west and label the ground paper with magic marker. Talk about where the sun comes up in the morning and where it sets. Have a child lift and carry the sun to show it rising in the east and setting in the west.
Turn the sky papers around and talk about the night sky. Repeat the process with the moon and identify the horizon.
Ask: “Does the moon only appear at night? Can we ever see it in the day-time?” Of course!
Materials • 1large9-footdiameterwhitecircle
cut from butcher paper• 12”x18”lightblueconstruction
paper (one per child)• 12”x18”darkbluetissuepaper
(one per child) • spraybottlewithdilutedbleach• newspaperstocoverdesk,floor,
and/or outside area • gluesticks• Post-its™• pencils• tagboardcut-outofacrescent
moon and a sun
Sky
?
Ground
• B–11 • K–6 Activities
• HandoutPost-its™,andhavethechildrendrawanobjectthattheywouldseeonthe horizon, such as buildings, trees, people, etc. Save these notes until the next time they go into STARLAB. Then distribute the notes and have the students place their Post-it™ on the STARLAB wall where they think the horizon is in STARLAB. Put on the Starfield Cylinder to check their answers. If incorrect, reposition their Post-it™.
• AfterleavingSTARLAB,comebacktothegroundcircleanddrawtheirobjectonthe horizon around the edge. Use the “Do It Yourself Star Finder” (see pages 25, 26) as a guide.
• Onthebluetissuepaperskycard,havestudentsfindfamiliarconstellationswithblack fine line markers. Label the constellation name, again using the Star Finder as a guide.
• Onthelightblueskycard,havestudentsdrawwhattheywouldseeintheday-time sky: birds, planes, the sun, the moon, etc.
Extension Activities
Writeastoryaboutwhatyouimaginethesundoesatnightforfun.Howdoesithide?Whatdoesthemoondoatnight?Teachperspectiveinartandidentifythehorizon. Draw landscapes. Start with an horizon line and add sky, ground, etc. Take photos of the horizon.

K–6 Activities • B–12 •
How to Make a Star Clock
Indoors — Making the Star Clock
1. Cut out the two circles with a pair of scissors.
2. Cut out the notch on the small circle.
3. Use a paper punch to make a hole in the center of the small circle.
4. Place the small circle on top of the large circle. Push a large paper fastener down through the center of both circles, and spread open the fastener on the back side of the Star Clock.
Outdoors — Using the Star Clock
1. Find the Big Dipper and the North Star, as shown on the face of your Star Clock.
2. Face the North Star, as shown on the front of the clock.
3. Find the current month around the outside circle of the Star Clock. Put your thumb over the current month. Hold your Star Clock so the current month, marked by your thumb, is AT THE TOP.
4. Holding the large disk firmly with the current date at the top, turn the smaller disk until its stars line up with those in the sky.
5. Read the time in the window.
6. If you are on Daylight Savings Time, add one hour.
From the GEMS Teacher’s Guide, Earth, Moon, and Stars. Reproduced with permission from Lawrence Hall of Science. Copyright © 1986 by The Regents of the University of California.
THE TIME ISCASSIOPEIA'SCHAIR
BIG DI
PPER
LITTLE DIPPER
North Star
MAR APRMAY
JUN
JUL
AUG
SEPOCTNOV
DEC
JAN
FEB
6543
21
1211
10
98 7 6 5 4
3
21
1211
10
987
PM PM PMPM
PMPM
PMPM
PM
PMPM
AM
AM
AMAM
AM AM AMAM
AM
AMA
Mnoonm
id-
nigh
t
• B–13 • K–6 Activities
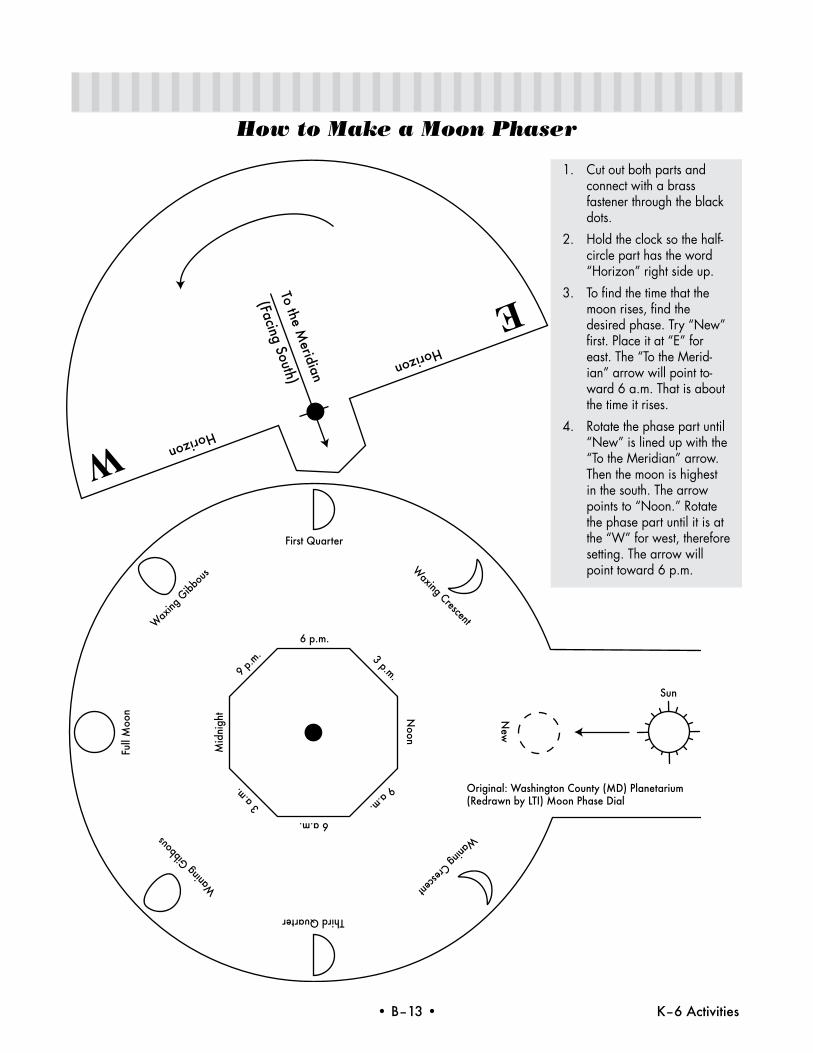
How to Make a Moon Phaser
1. Cut out both parts and connect with a brass fastener through the black dots.
2. Hold the clock so the half-circle part has the word “Horizon” right side up.
3. To find the time that the moon rises, find the desired phase. Try “New” first. Place it at “E” for east.The“TotheMerid-ian” arrow will point to-ward 6 a.m. That is about the time it rises.
4. Rotate the phase part until “New” is lined up with the “TotheMeridian”arrow.Then the moon is highest in the south. The arrow points to “Noon.” Rotate the phase part until it is at the“W”forwest,thereforesetting. The arrow will point toward 6 p.m.
K–6 Activities • B–14 •
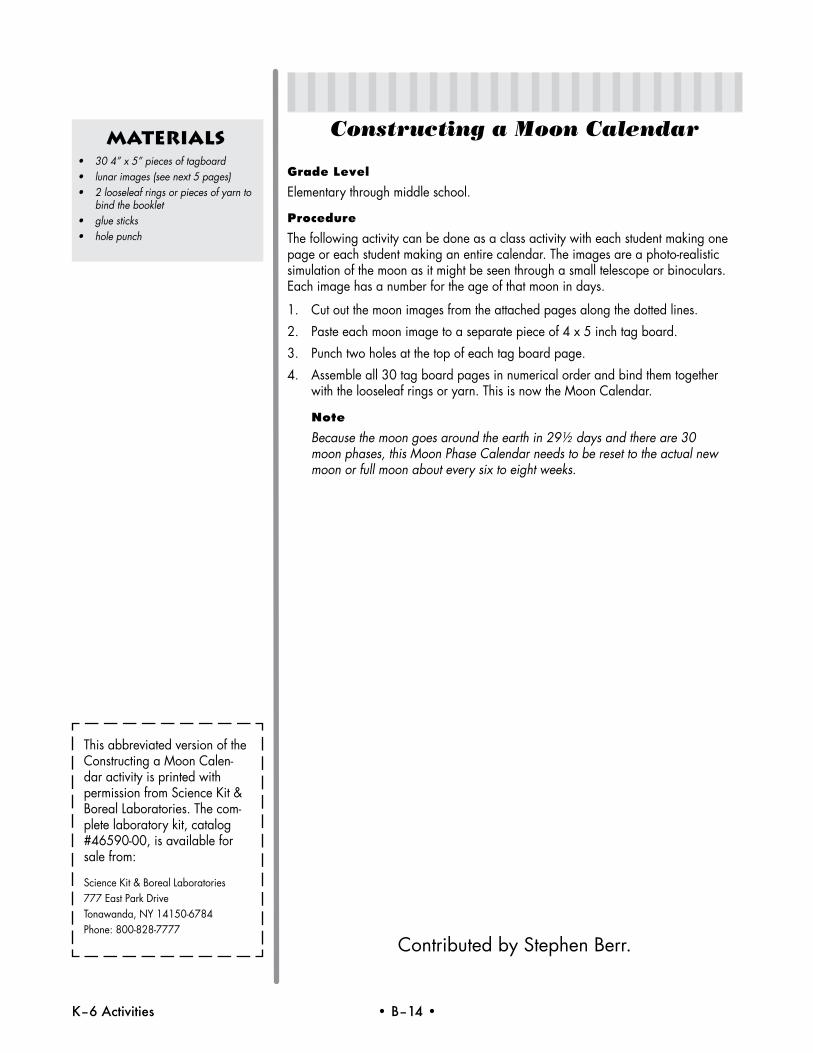
Constructing a Moon Calendar
Grade Level
Elementary through middle school.
Procedure
The following activity can be done as a class activity with each student making one page or each student making an entire calendar. The images are a photo-realistic simulation of the moon as it might be seen through a small telescope or binoculars. Each image has a number for the age of that moon in days.
1. Cut out the moon images from the attached pages along the dotted lines.
2. Paste each moon image to a separate piece of 4 x 5 inch tag board.
3. Punch two holes at the top of each tag board page.
4. Assemble all 30 tag board pages in numerical order and bind them together withthelooseleafringsoryarn.ThisisnowtheMoonCalendar.
Note
Because the moon goes around the earth in 291/2 days and there are 30 moon phases, this Moon Phase Calendar needs to be reset to the actual new moon or full moon about every six to eight weeks.
Materials• 304”x5”piecesoftagboard• lunarimages(seenext5pages)• 2looseleafringsorpiecesofyarnto
bind the booklet • gluesticks• holepunch
This abbreviated version of the ConstructingaMoonCalen-dar activity is printed with permissionfromScienceKit&Boreal Laboratories. The com-plete laboratory kit, catalog #46590-00,isavailableforsale from:
ScienceKit&BorealLaboratories777EastParkDriveTonawanda,NY14150-6784Phone:800-828-7777
Contributed by Stephen Berr.

• B–15 • K–6 Activities
1 2
3 4
5 6
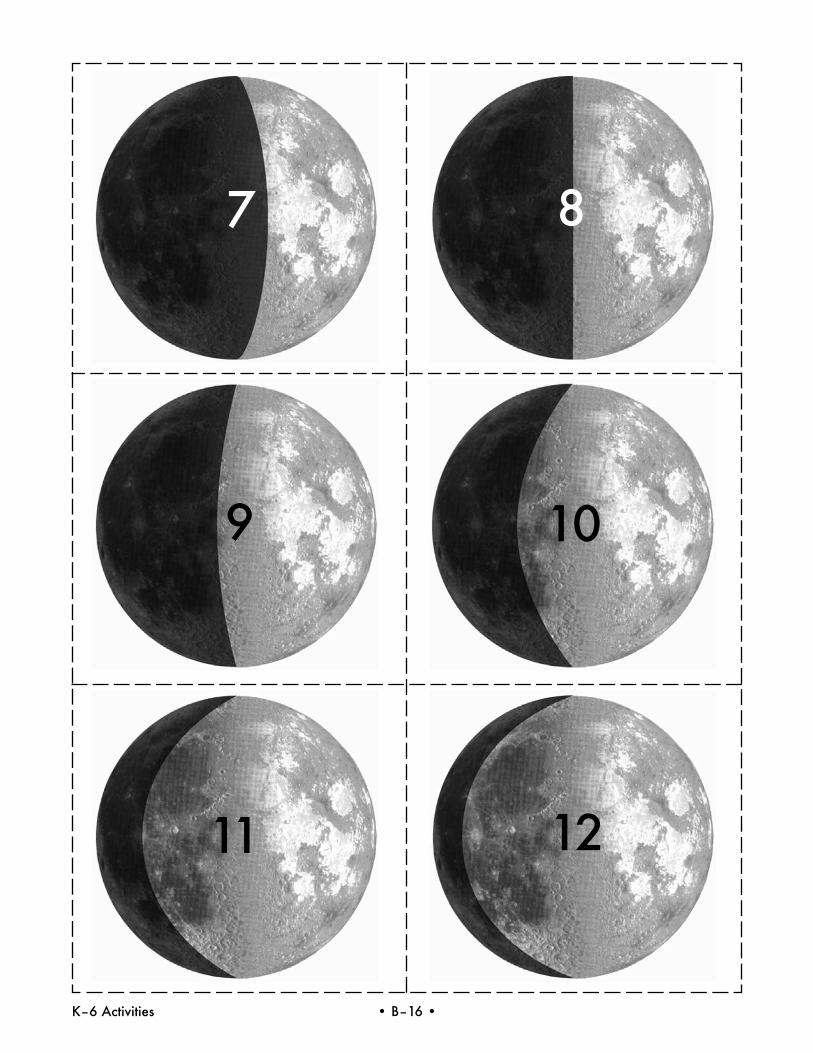
K–6 Activities • B–16 •
7 8
9 10
11 12
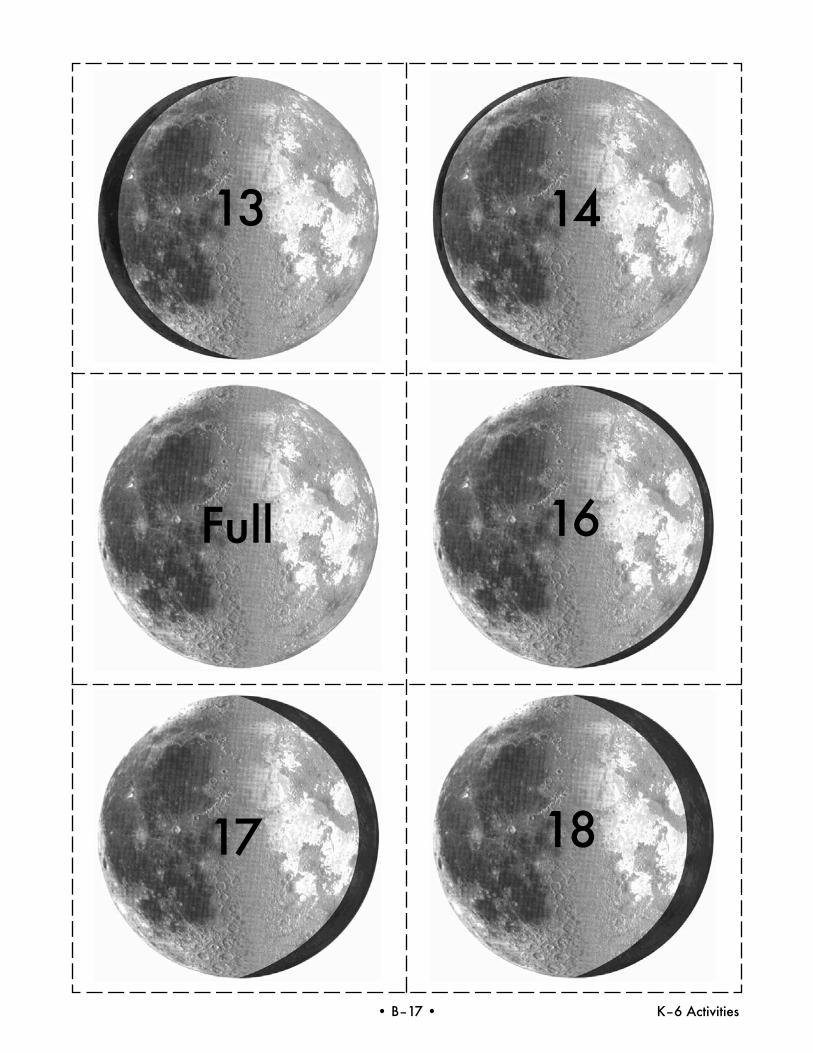
• B–17 • K–6 Activities
13 14
Full 16
17 18
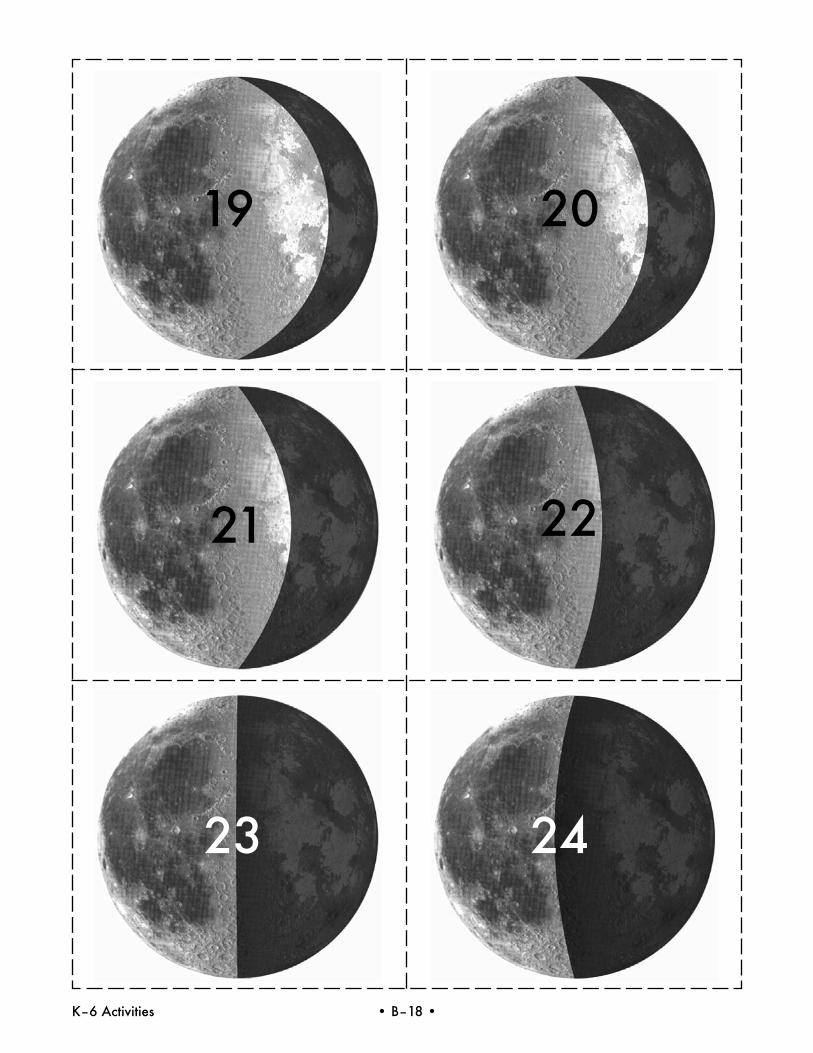
K–6 Activities • B–18 •
19 20
21 22
23 24
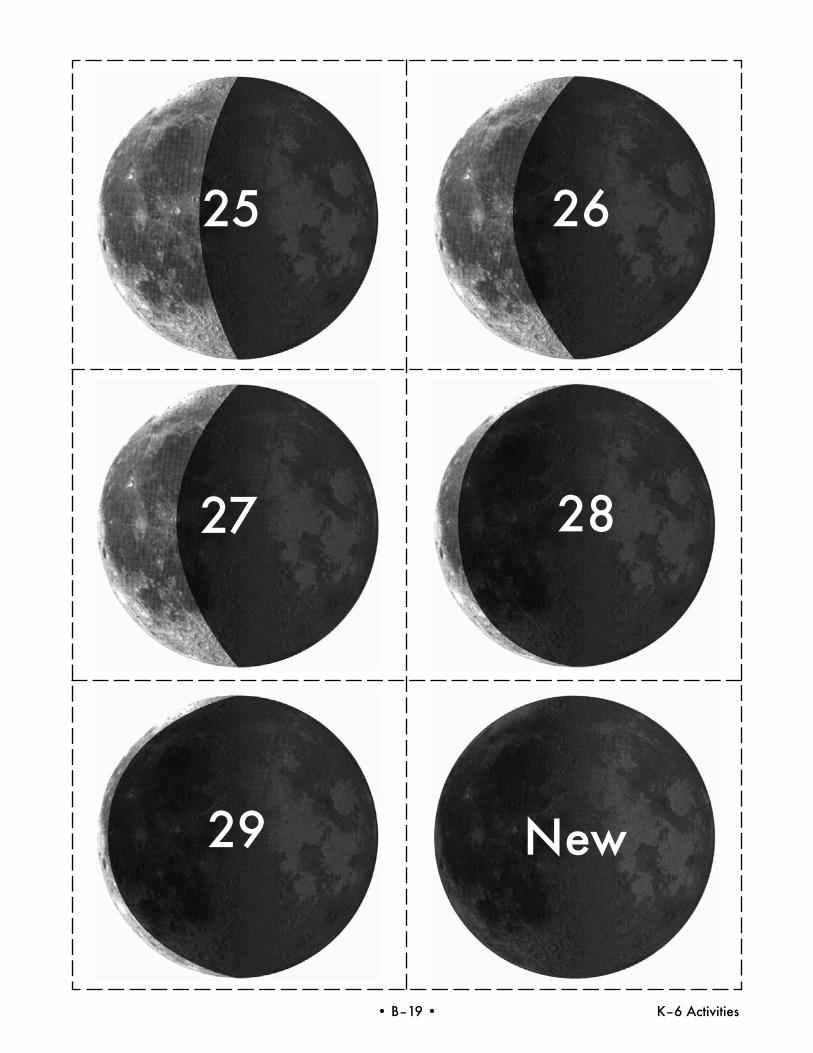
• B–19 • K–6 Activities
25 26
27 28
29 New
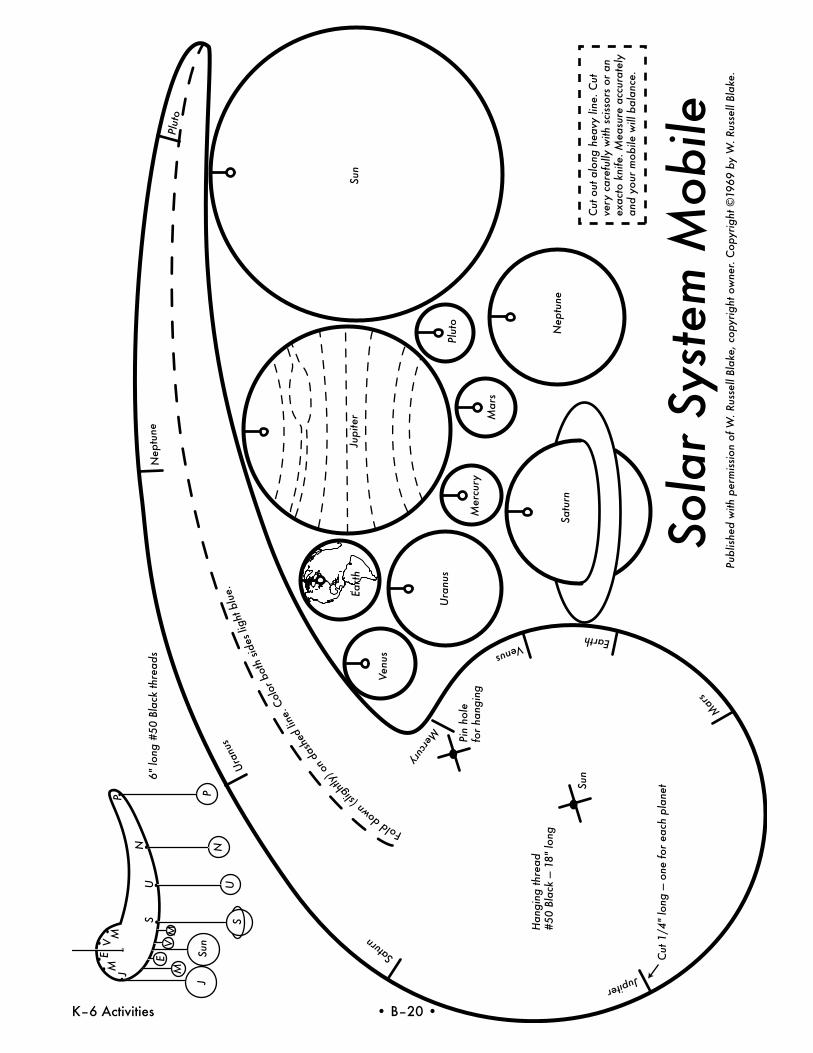
K–6 Activities • B–20 •
JSu
n
ME
V
S
M
UN
P
JME
V M
SU
N
P
Satu
rn
Ura
nus
Venu
s
Eart
h
Mer
cury
Mar
s
Plut
o
Nep
tune
Jupi
ter
Sun
VenusEarth
Mar
s
Satur
n
Jupiter
Mercury
Uran
us
Nep
tune
Plut
o
Fold down (
slightl
y) on
das
hed
line.
Col
or b
oth
sides
ligh
t blu
e.
Han
ging
thre
ad#5
0 Bl
ack
— 18
" lo
ng
Sun
Cut
1/4
" lo
ng —
one
for
each
pla
net
Pin
hole
fo
r ha
ngin
g
6" lo
ng #
50 B
lack
thre
ads
Sola
r Sy
stem
Mob
ile
Cut
out
alo
ng h
eavy
line
. Cut
ve
ry c
aref
ully
with
sci
ssor
s or
an
exac
to k
nife
. Mea
sure
acc
urat
ely
and
your
mob
ile w
ill b
alan
ce.
Publ
ished
with
per
miss
ion
of W
. Rus
sell
Blak
e, c
opyr
ight
ow
ner.
Cop
yrig
ht ©
1969
by
W. R
usse
ll Bl
ake.
• B–21 • K–6 Activities
How to Make Constellation Pictures
Aluminum Foil and Film Can Planetariums
Here are two lessons that can be done before or after STARLAB use — one uses aluminum foil, the other uses film can holders. The foil constellations can be used with all grade levels, but the film can constellations should be used with older elementary ages, such as grades 3, 4, or 5, due to the fact that push pins are used.
Objectives
Children, by making constellation pictures, will be able to distinguish eight seasonal constellations, learn the constellations by their Greek name, identify their classmates’ constellationpictureswhenviewedonanoverheadprojector,andtaketheconstella-tion pictures home to review.
Process Skills
Describing•observing•interpreting•communicating•workingcooperatively
Procedure• Havestudentsfoldtheirfoilinhalf,inhalfagain,andinhalfagain.Unfoldthe
foil and cut on the fold lines. They will now have 8 small rectangles. (If the foil is all wrinkled, roll a pencil over it to smooth it out). Choose one constellation to work on first.
• Placethestarmapoverthepieceoffoilandusingastickpin,pokethroughthestars on the star map. (Use newspaper, styrofoam or cardboard pieces to protect the table top). They may have to practice this a bit so that the pin hole is a hole, rather than a tear. Use a permanent marker to write the name of the Greek con-stellation on the foil. Complete all 8 pictures.
• Whendone,takeoneatatimeuptotheoverheadprojector,andhavestudentsguess which constellation they see. They can also take these pictures home and hang them in either their north, south, east or west window where they would see the constellations in the night sky. This is a good way to review the constellations they have learned in STARLAB.
• Thislessoncanbevariedbyhavingchildrenusefilmcanholders.(Theyareavailable through film processing stores, which will give them away to teachers, iftheyknowyouareusingthemforaschoolproject.)Havechildrencarefullycutout the constellation shape plus its name. Tape that small piece of paper UPSIDE DOWNonthebottomofthefilmcansowhentheylookthroughthefilmcan,the constellation will be right side up. Push carefully through the stars with a push pin.Whendone,tapethepicturewithitsnameontheside,sostudentsdon’tforget its name. They can be removed later when they have learned the names. Hold the film cans to their eyes and identify which constellation they have made. Do as many film can planetariums as you can.
Evaluation
Have students identify which constellations they have made by showing them and identifying them to the teacher. Take the pictures or film cans into STARLAB to identify them while viewing the Starfield Cylinder.
Materials• 9”x12”sheetsofaluminumfoil• scissors• Scotch™Tape• newspaper• Styrofoamorcardboardpieces• stickpinsorpushpins• discardedfilmcanholders• seasonalstarmaps• permanentmarkers

K–6 Activities • B–22 •
How to Remember Orion’s Stars
Betelgeuse, Bellatrix, Rigel and Saiph
Tellastoryaboutbeetlesdrinkingjuice,thendoing“bellytricks,”thentakingmedicinefortheirbellyache(“Di-Gel”soundslike Rigel), then playing baseball and the umpire calling the beetle “Saiph.”
Betelgeuse Bellatrix
RigelSaiph
• B–23 • K–6 Activities
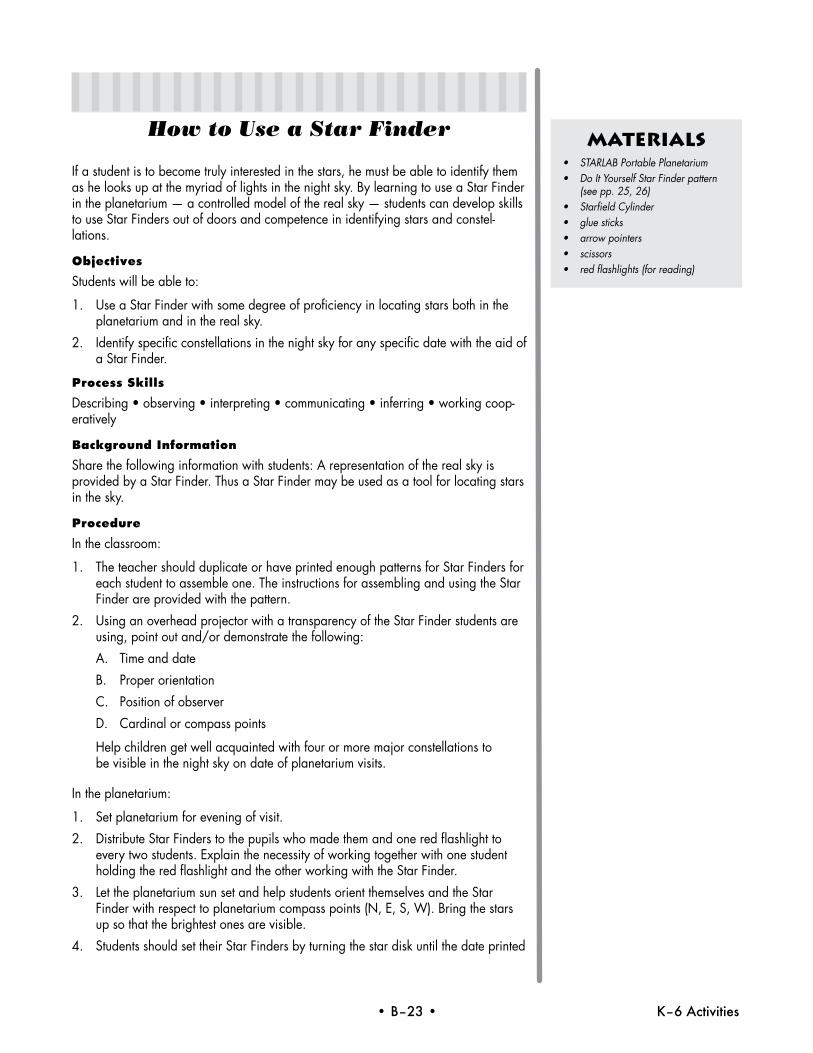
How to Use a Star Finder
If a student is to become truly interested in the stars, he must be able to identify them as he looks up at the myriad of lights in the night sky. By learning to use a Star Finder in the planetarium — a controlled model of the real sky — students can develop skills to use Star Finders out of doors and competence in identifying stars and constel-lations.
Objectives
Students will be able to:
1. Use a Star Finder with some degree of proficiency in locating stars both in the planetarium and in the real sky.
2. Identify specific constellations in the night sky for any specific date with the aid of a Star Finder.
Process Skills
Describing•observing•interpreting•communicating•inferring•workingcoop-eratively
Background Information
Share the following information with students: A representation of the real sky is provided by a Star Finder. Thus a Star Finder may be used as a tool for locating stars in the sky.
Procedure
In the classroom:
1. The teacher should duplicate or have printed enough patterns for Star Finders for each student to assemble one. The instructions for assembling and using the Star Finder are provided with the pattern.
2. UsinganoverheadprojectorwithatransparencyoftheStarFinderstudentsareusing,pointoutand/ordemonstratethefollowing:
A. Time and date
B. Proper orientation
C. Position of observer
D. Cardinal or compass points
Helpchildrengetwellacquaintedwithfourormoremajorconstellationstobe visible in the night sky on date of planetarium visits.
In the planetarium:
1. Set planetarium for evening of visit.
2. DistributeStarFinderstothepupilswhomadethemandoneredflashlighttoevery two students. Explain the necessity of working together with one student holdingtheredflashlightandtheotherworkingwiththeStarFinder.
3. Let the planetarium sun set and help students orient themselves and the Star Finderwithrespecttoplanetariumcompasspoints(N,E,S,W).Bringthestarsup so that the brightest ones are visible.
4. Students should set their Star Finders by turning the star disk until the date printed
Materials• STARLABPortablePlanetarium• DoItYourselfStarFinderpattern
(see pp. 25, 26)• StarfieldCylinder• gluesticks• arrowpointers• scissors• redflashlights(forreading)
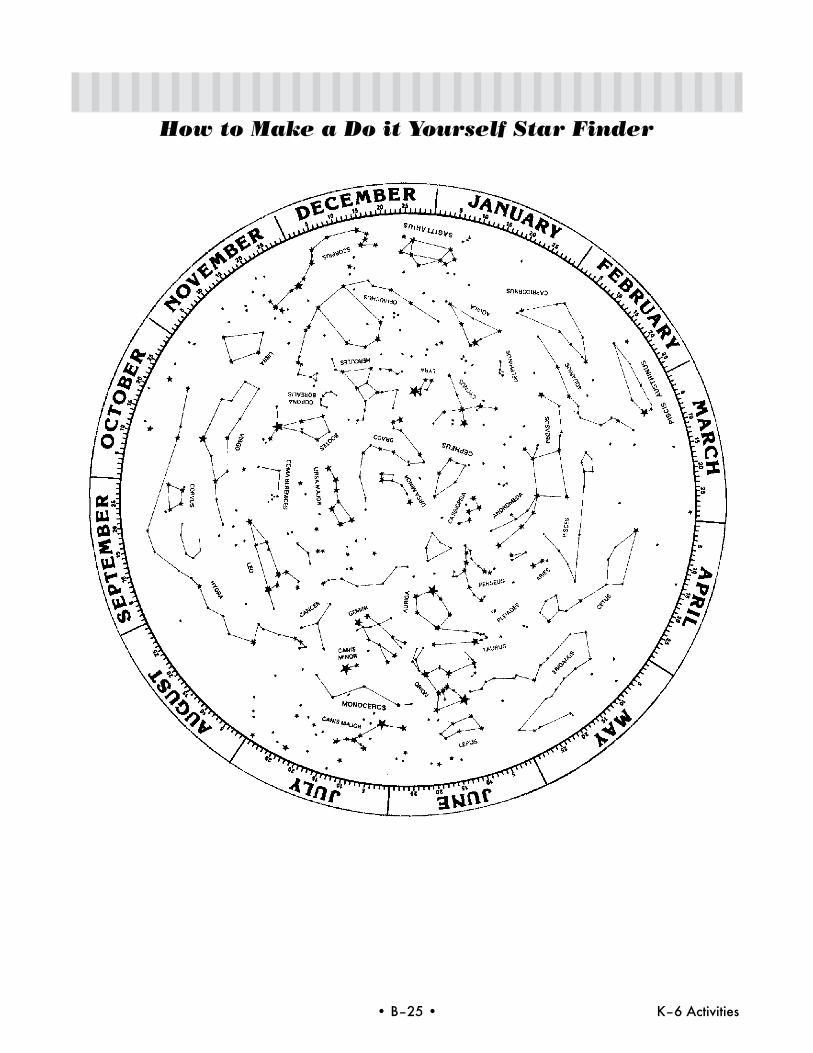
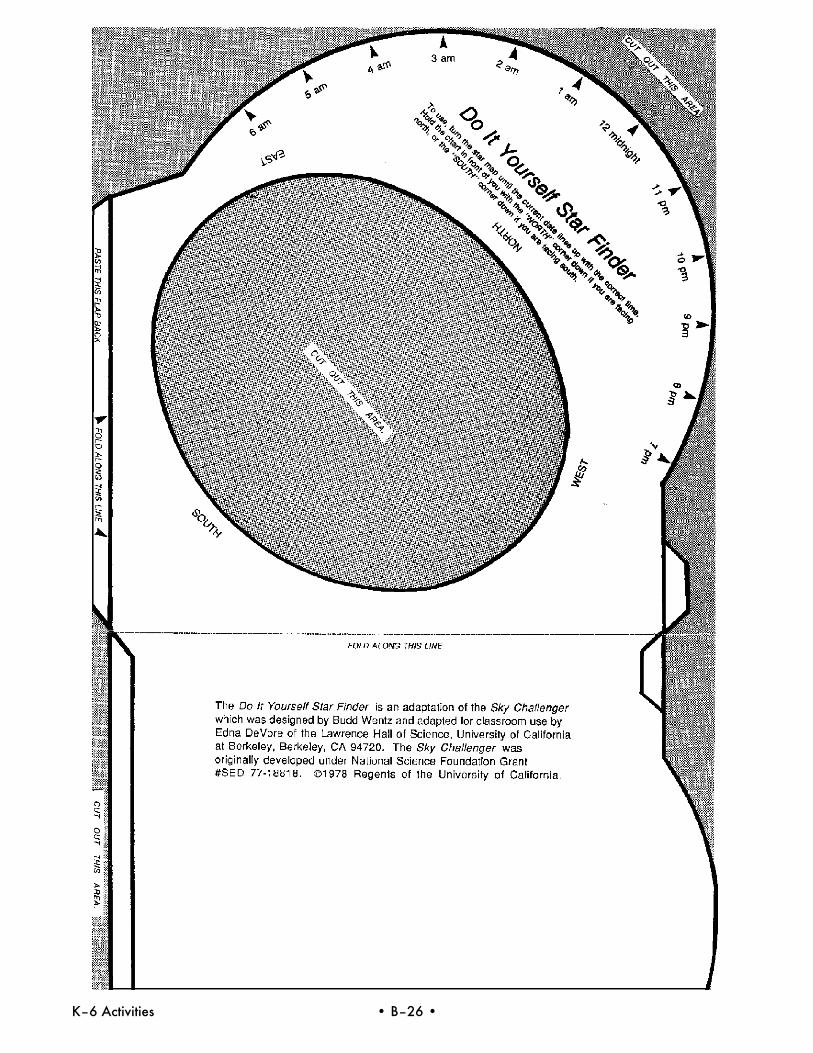
K–6 Activities • B–24 •
on the disk is set to correspond with the time of observing. Face south and hold the Star Finder in such a manner that the stars can be read and the south on the finder points towards the South Pole. Continue holding the finder in position and usetheflashlighttolocatethestarswhichmatchthoseinthesky.TheFinderisdesigned for latitudes 30° N through 50° N but is useful at any northern mid-latitude.
5. After dimming the side lights enough for more stars to be seen, ask the students tousetheirStarFindersasabovetoidentifyaconstellationand/orstarasyoupoint it out on the dome.
6. After the above step is accomplished to your satisfaction, turn the side lights down completely and let students observe the “real sky.” Let students use the ar-row pointer to outline constellations on the dome.
7. SumuptheplanetariumexperienceofthevalueofaStarFinder.
Follow-up Activities1. Eachstudentshouldtakehis/herStarFinderhomeanduseittolocatethesame
asterismsandconstellationsinthenighttimeskythathe/sheobservedintheplanetarium.
2. Plan a night observation session with students and use the Star Finder to locate objectsintherealsky.(Forastarparty,incorporateactivitiesforparents.)
3. Ask several students to make a comparative study of other types of star finders and to use one or more of them. They should report results to the class.
4. Assign charts of various types to other students, with the request that they locate five stars in the sky at night and later report on their stargazing experiences.
Evaluation
Point to a constellation or asterism (one or several) and ask students to locate it on their Star Finders, marking it with a circle. Evaluate each student on his performance in the post activities. List several stars and constellations by name and ask students to use their Star Finders to determine the month each star and constellation would be vis-ible at 10:00 p.m. and to name the general area of the sky in which the star would appear.
Note
For Do It Yourself Star Finder pattern used in the activity, see the next two pages. These Star Finders are also available from Learning Technologies on a heavy-duty cardboard. Call toll-free 1-800-537-8703 or visit www.starlab.com for more information.
• B–25 • K–6 Activities
How to Make a Do it Yourself Star Finder
K–6 Activities • B–26 •
• B–27 • K–6 Activities
How to Use a Dipper Finder
Children will start feeling at home with the stars and will become interested in observ-ing them further when they realize that they can easily find the Big Dipper on a clear night. The Big Dipper, in turn, will help them locate a very important star for finding their way, Polaris. The Dipper Finder to be made in this activity will tell them in what general region of the north sky to look for the Big Dipper at any hour of the night throughout the year. As they use it, they will see how the Dipper appears to move around the Pole Star.
Objectives
Students will be able to:
1. Use the Dipper Finder to locate the position of the Big Dipper at selected hours and months of the year.
2. Locate the North Star (Polaris).
Process Skills
Describing•observing•interpreting•communicating•inferring•workingcoop-eratively
Background Information
Share the following information with students.
The Big Dipper appears to move in the sky from hour to hour.
The Big Dipper appears to change its position from month to month.
The pointer stars in the Big Dipper point toward the North Star (Polaris).
Procedure
In the classroom:
1. Review rotation of the earth, shape of the Big Dipper, and the usefulness of this star configuration in finding the North Star and cardinal points.
2. Ask students to construct the Dipper Finder using the materials given them.
3. Let students practice setting and orienting the Dipper Finder for various dates and hours of night until they become familiar with its operation.
In the planetarium:
1. Preset the planetarium for the date of the visit and for one hour after sunset.
2. Withsidelightsup,askstudentstosettheirDipperFindersforthedateandtimeof the STARLAB setting and determine the approximate region of the north sky where the Big Dipper will be found.
3. Withthestudents,identifycardinalpoints,horizon,meridian,andzenith.
4. Activate the stars, lowering the side lights until the Big and Little Dippers are visible (but maintain as much room illumination as possible). Each student should verify his predicted orientation of the Big Dipper with its position in the plan-etarium sky. Ask students to observe the position of the North Star (ask them this again in connection with all later observations).
5. Using diurnal motion, advance the sky two or three hours at a time through a
Materials• STARLABPortablePlanetarium• DipperFinderpatternandinstruc-
tions (see p. 29)• StarfieldCylinder• paperfastener• arrowpointers• gluesticks• redflashlights(forreading)• scissors
K–6 Activities • B–28 •
24-hour period. Before each advancement, students should reset their Dipper Finders for the correct time and make a prediction on the Dipper’s location. Following each advancement they should observe the position of the Dipper in relation to their prediction as well as the horizon, zenith, and other stars.
6. Using annual motion and the ecliptic, and the same inquiry procedures as above, show the position of the sun by season and the position of the Dipper in the evening sky on the same date.
Follow-Up Activities1. Each student should take his Dipper Finder home and use it to locate the Dipper
and North Star in the night sky.
2. The Dipper Finder is large enough to include more stars. Ask students to plot the Little Dipper, Cassiopeia, and Draco on their Dipper Finders from the sky at night. On the next school day, they should check their success with a star chart.
3. At upper elementary levels, guide students in using their Dipper Finders and the Big Dipper to tell the time of night (see Engelbriktson, Greenleaf, Let’s Explore Outer Space, pp. 24-36 for directions for using the Big Dipper as a clock in the sky).
Evaluation
ShowtheBigDipperinfourdifferentpositionsat9p.m.ontheplanetariumdomeand ask students to use their Dipper Finders to discover the month in which each posi-tion would occur.
Note
For the Dipper Finder pattern used in the activity, see the next page.
• B–29 • K–6 Activities
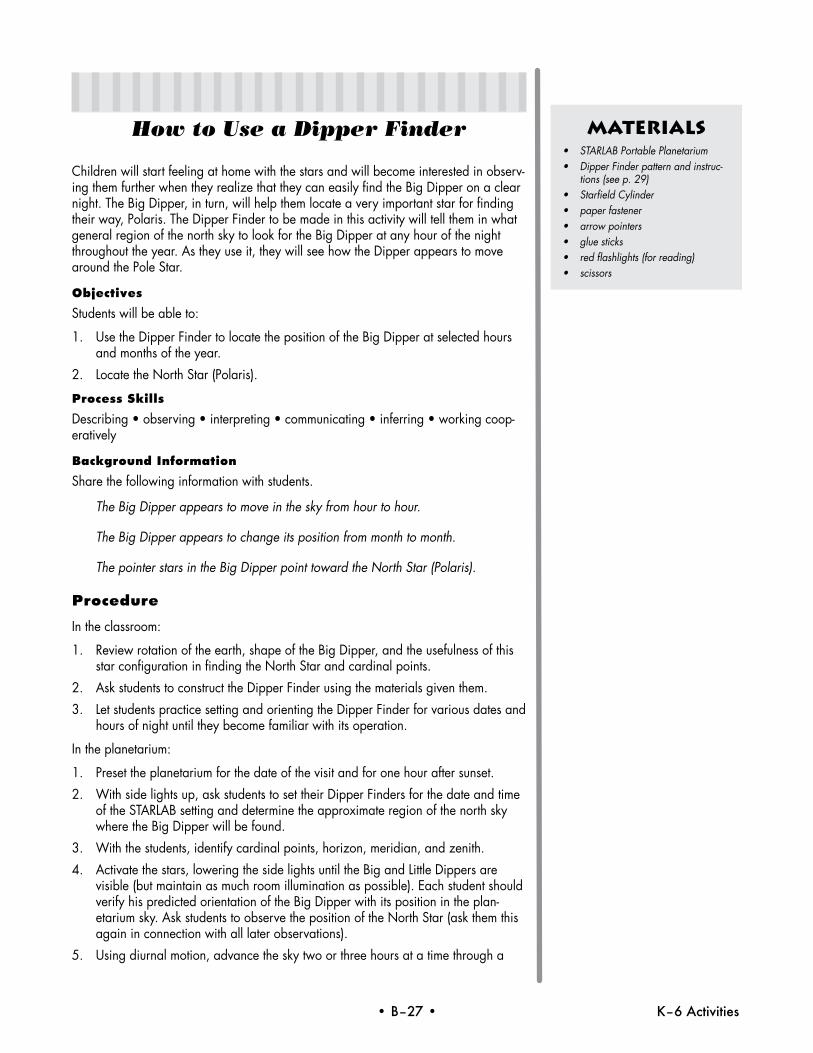
Dipper Finder Pattern and Instructions
March
AugustSept
Oct
Nov
Dec
Feb
Jan
Apr
ilM
ay
June
July
Polaris
9p
m8
7
6
10
11
12
Dip
pe
r F
ind
er
Hori
zon
Hori
zon
Nort
h
Construction1. Cut out the circle and
rectangle and glue-stick both onto tag board. Trim tag board to exact size of circle and square.
2. Fasten circle to rectangle by putting paper fastener through Polaris.
Use1. Line up the date of ob-
servation with the time of observation. For example, if it is 10 p.m. on April 11, turn the month wheel until a point about a third of the way into the space marked “April” is aligned with 10 p.m. on the square card.
2. Hold the card up so that the north horizon on the card corresponds with the north horizon in the planetarium or real sky.
K–6 Activities • B–30 •
Stars and Constellations
Objectives
Students will be able to:
1. Determine star colors.
2. Matchhotandcoolstarswithpropercolor.
3. Explain that the sun is the closest star; other stars are very far away.
4. Determine the magnitude of various stars in the winter sky.
5. Identify Rigel, Betelgeuse, Sirius, Procyon, Aldebaran, Pollux and Castor as bright stars and identify the constellations in which those stars are located in the winter sky.
6. Find the winter and summer triangle.
Process Skills
Describing•observing•interpreting•communicating•inferring•workingcoop-eratively
Background information
Share the following information with students.
1. Stars vary in color.
a. The color of a star is determined by its temperature.
b. Red stars are the coolest stars.
c. Blue-white stars are the hottest stars.
2. Stars vary greatly in size.
a. Our sun is a medium-sized star.
b. The red giants are the largest stars.
c. The white dwarfs are the smallest stars.
Procedure
Point out red stars (Betelgeuse in Orion, Antares in Scorpius) and blue-white stars (Ri-gelinOrionandSpicainVirgo).Withadimmerswitchandaclearglassbulb,showhowthecoolerfilamentisred,justbeforethebulbgoesout,andthehottestfilamentturned all the way up is white or bluish. Have students compare the hottest part of a bonfire(blueflame),thecoolestpart,(redflame),orthemostefficientcoloronagasstove (blue).
3. The magnitude of a star refers to its observed brightness.
a. The lower the magnitude, the brighter the star.
b. Stars fainter than the sixth magnitude cannot be seen with unaided eyes.
4. Stars vary greatly in distance from the earth.
a. The sun is our closest star.
b. The stars are so far away that we cannot easily measure the distance in miles.
c. If you travel 1000 miles an hour, it would take you 3 million years to reach the nearest star excluding the sun.
Materials• STARLABPortablePlanetarium• arrowpointers• StarfieldCylinder• redflashlights(forreading)
• B–31 • K–6 Activities
d. The distance to stars is measured in “light years.”
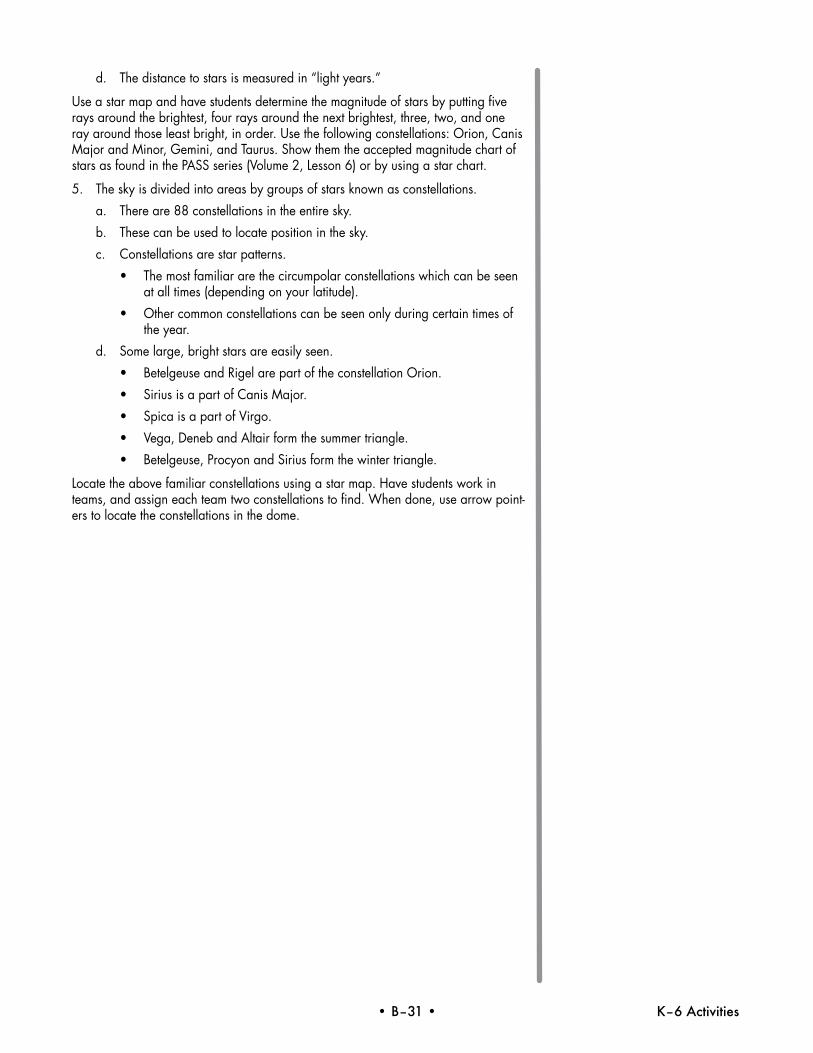
Use a star map and have students determine the magnitude of stars by putting five rays around the brightest, four rays around the next brightest, three, two, and one ray around those least bright, in order. Use the following constellations: Orion, Canis MajorandMinor,Gemini,andTaurus.Showthemtheacceptedmagnitudechartofstars as found in the PASS series (Volume 2, Lesson 6) or by using a star chart.
5. The sky is divided into areas by groups of stars known as constellations.
a. There are 88 constellations in the entire sky.
b. These can be used to locate position in the sky.
c. Constellations are star patterns.
• Themostfamiliararethecircumpolarconstellationswhichcanbeseen at all times (depending on your latitude).
• Othercommonconstellationscanbeseenonlyduringcertaintimesof the year.
d. Some large, bright stars are easily seen.
• BetelgeuseandRigelarepartoftheconstellationOrion.
• SiriusisapartofCanisMajor.
• SpicaisapartofVirgo.
• Vega,DenebandAltairformthesummertriangle.
• Betelgeuse,ProcyonandSiriusformthewintertriangle.
Locate the above familiar constellations using a star map. Have students work in teams,andassigneachteamtwoconstellationstofind.Whendone,usearrowpoint-ers to locate the constellations in the dome.
K–6 Activities • B–32 •
The Motion of Stars and Constellations
Objectives
Students will be able to:
1. Observe that during rotation, Polaris stands still.
2. Explain why seasonal stars rise and set and circumpolar stars do not.
3. Tell which direction circumpolar stars appear to move around Polaris.
Process Skills
Describing•observing•interpreting•communicating•inferring•workingcoop-eratively
Background Information
Share the following information with students.
1. Northern circumpolar stars are located in the northern sky.
a. The North Star is always above the North Pole.
• TheNorthStardoesnotappeartomoveinthesky.
• ItcanbefoundbyusingtheguardianstarsoftheBigDipper.
b. The circumpolar stars do not rise and set, but are always visible and revolve around the North Star.
2. Stars appear to move rapidly in the night sky due to the rotation of the earth.
a. Circumpolar stars revolve counterclockwise around Polaris.
• Thepositionofthestarschangesabout15ºeachhour.
• Theymakeacompleterevolutioninalittlelessthan24hours.
b. In the southern sky, the stars move from east to west.
• Thestarsthatriseintheeasternpartofthesky,setinthewesternpartofthe sky.
• Thismovementintheskyissimilartothatofthesun.
3. The reason the stars do not come back to exactly the same place each night is due to the earth’s orbit of the sun.
a. This motion is very slow.
• Theearthrevolvesaroundthesunin365and1/4days.
• Thestar’sapparentmotiontothewestisabout1degreeeachday.
b. Constellations move to the west when observed at the same time each night.
• Orionisseeninthesoutheastskyat8p.m.onJanuary1.
• Orionisinthesouthernskyat8p.m.inthemiddleofFebruary.
• LateinMarch,Orionisinthewesternpartoftheskyat8p.m.
Procedure
Turn on diurnal motion to see how the stars appear to rise and set. Use the informa-tionabovetoprovideastronomyconceptstostudents.Watchthecircumpolarstarstosee how they revolve around the North Star. Use the two “guardian stars” of the Big DippertogototheNorthStar,Polaris.Watchthestarsinthesouthernskymovefromeast to west. Demonstrate night sky with daily motion.
Materials• STARLABPortablePlanetarium• arrowpointers• StarfieldCylinder• redflashlights(forreading)
• B–33 • K–6 Activities
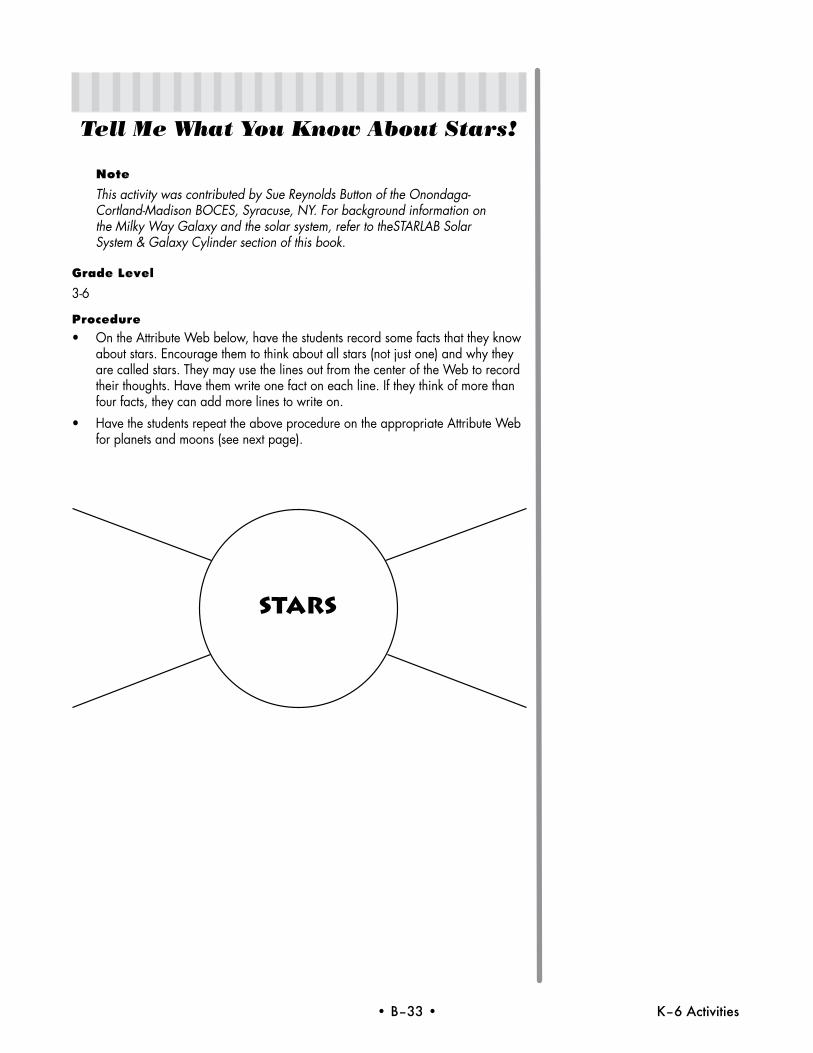
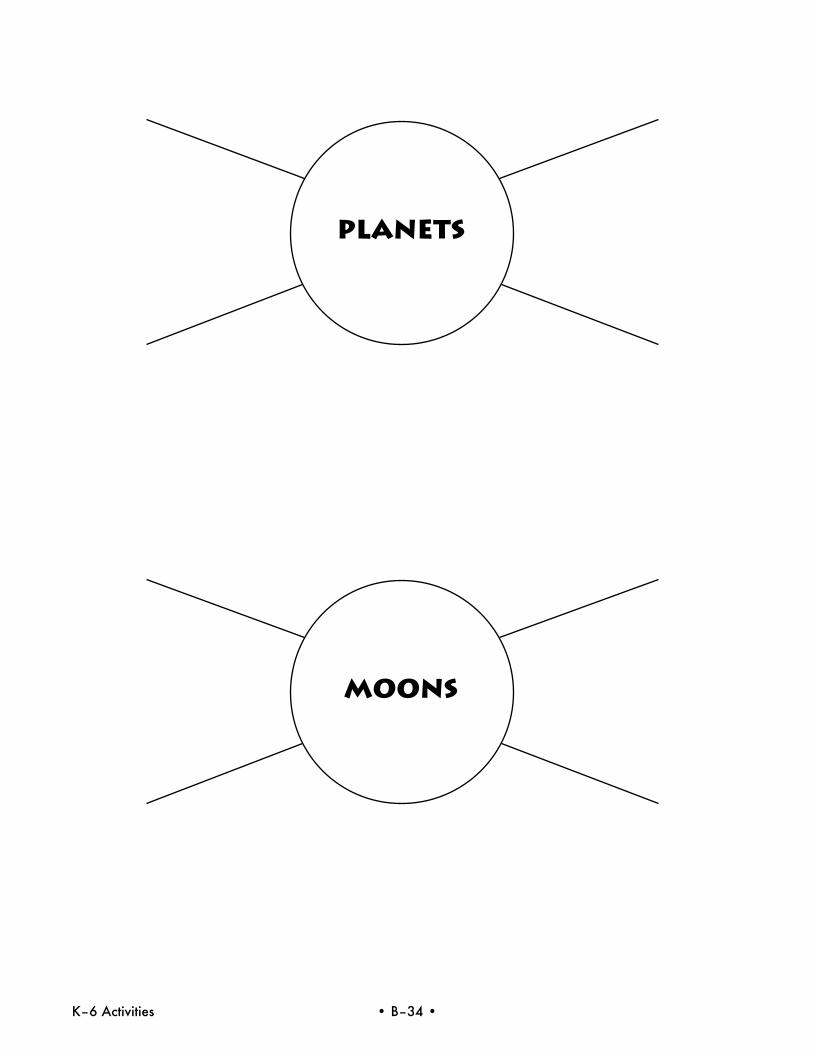
Tell Me What You Know About Stars!
Note
This activity was contributed by Sue Reynolds Button of the Onondaga- Cortland-Madison BOCES, Syracuse, NY. For background information on the Milky Way Galaxy and the solar system, refer to theSTARLAB Solar System & Galaxy Cylinder section of this book.
Grade Level
3-6
Procedure• OntheAttributeWebbelow,havethestudentsrecordsomefactsthattheyknow
aboutstars.Encouragethemtothinkaboutallstars(notjustone)andwhytheyarecalledstars.TheymayusethelinesoutfromthecenteroftheWebtorecordtheir thoughts. Have them write one fact on each line. If they think of more than four facts, they can add more lines to write on.
• HavethestudentsrepeattheaboveprocedureontheappropriateAttributeWebfor planets and moons (see next page).
Stars
K–6 Activities • B–34 •
Planets
Moons
• B–35 • K–6 Activities
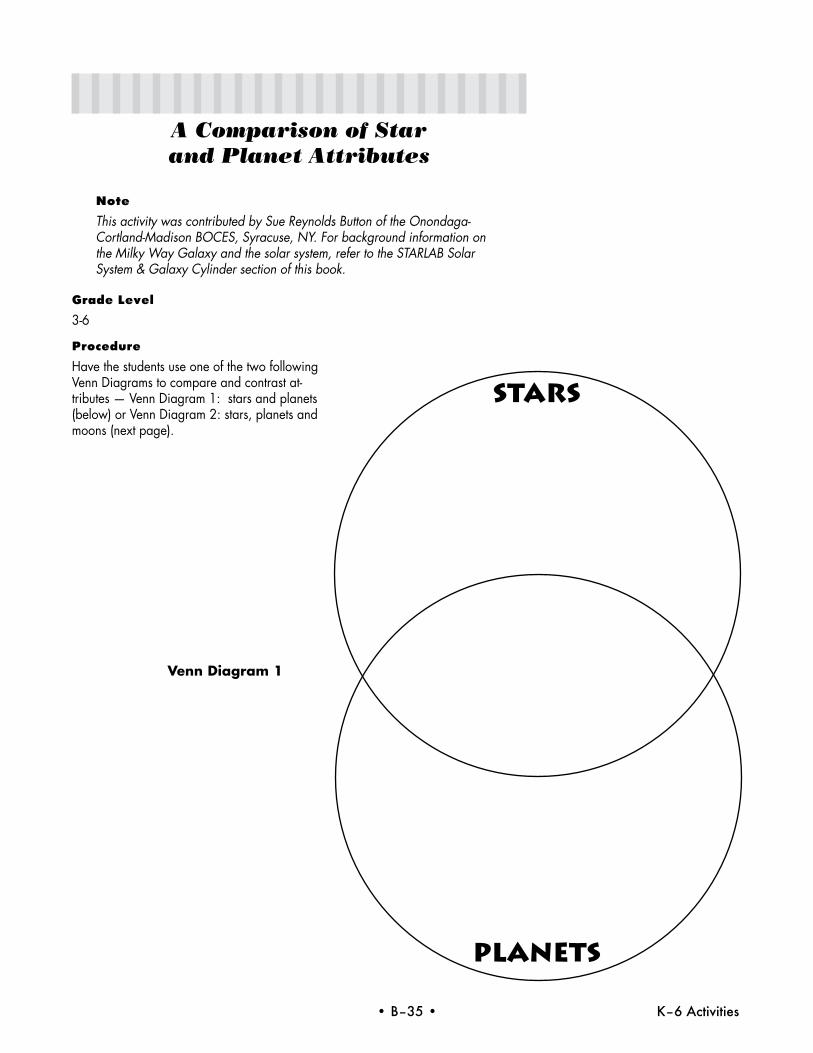
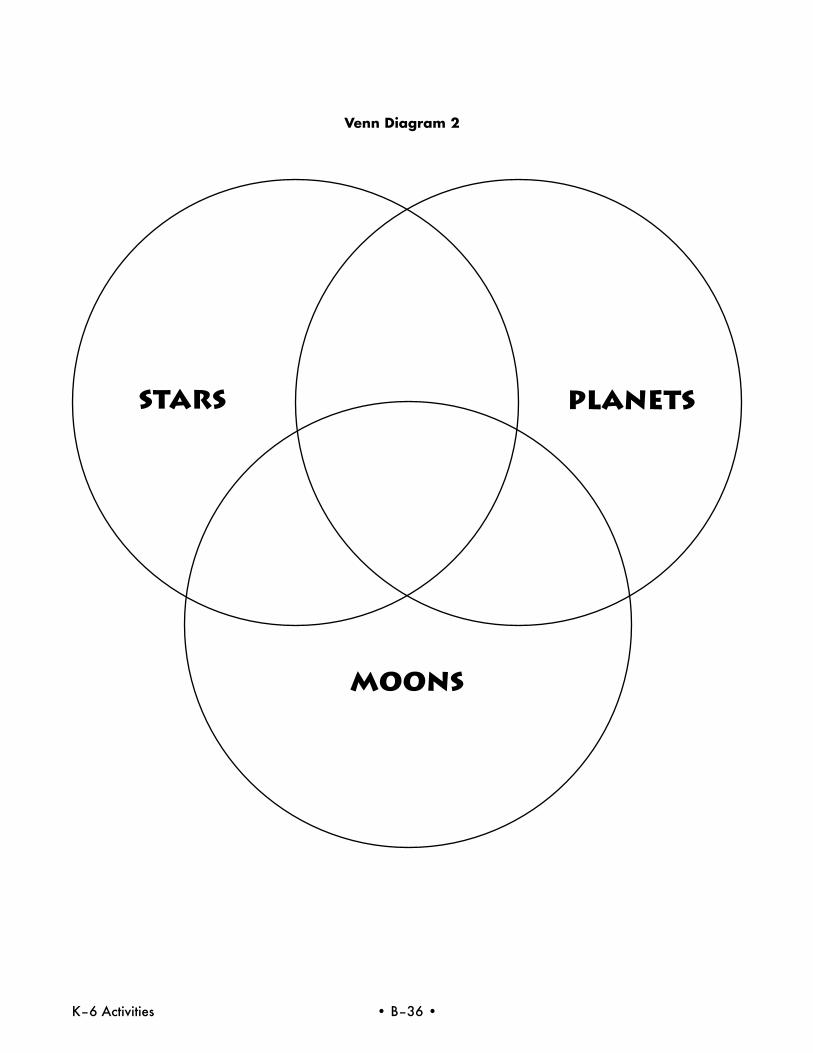
A Comparison of Star and Planet Attributes
Note
This activity was contributed by Sue Reynolds Button of the Onondaga- Cortland-Madison BOCES, Syracuse, NY. For background information on the Milky Way Galaxy and the solar system, refer to the STARLAB Solar System & Galaxy Cylinder section of this book.
Grade Level
3-6
Procedure
Have the students use one of the two following Venn Diagrams to compare and contrast at-tributes — Venn Diagram 1: stars and planets (below) or Venn Diagram 2: stars, planets and moons (next page).
STARS
planets
Venn Diagram 1
K–6 Activities • B–36 •
Venn Diagram 2
stars Planets
moons
• B–37 • K–6 Activities
People Search Activity
Objective
Content review
Grade Level
5-6
Procedure
Explain the activity to your students. Using the People Search sheet (on the next page), each person is asked to move around the room until they find a person who can help them fill in the answer for one of the items in the boxes. The person who helped must sign their name once in the one box. The search continues as the student writes answers received from other students and gets their signatures in the other boxes. As a culiminating activity, the teacher asks for volunteers to restate answers they collected.
Note
This activity was contributed by Sue Reynolds Button of the Onondaga- Cortland-Madison BOCES, Syracuse, NY. For background information on the Milky Way Galaxy and the solar system, refer to the STARLAB Solar System & Galaxy Cylinder section of this book.
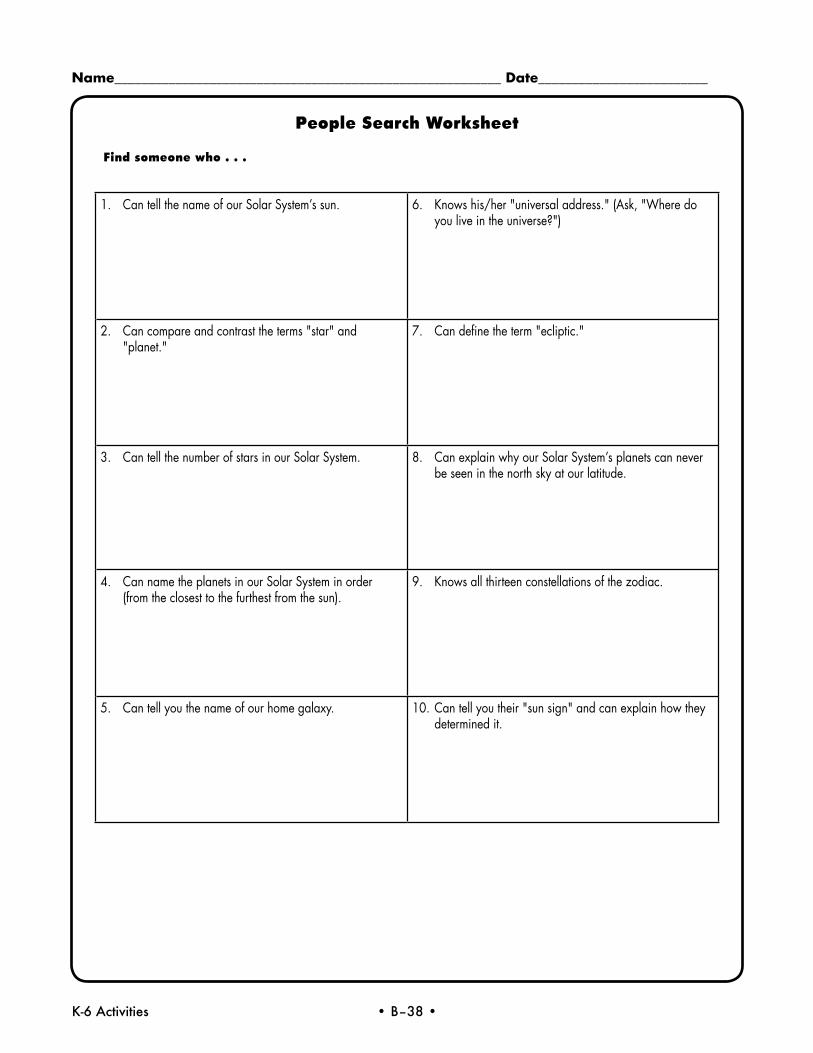
Name_________________________________________________________ Date_________________________
K-6 Activities • B–38 •
People Search Worksheet
Find someone who . . .
1. Can tell the name of our Solar System’s sun. 6. Knowshis/her"universaladdress."(Ask,"Wheredoyouliveintheuniverse?")
2. Cancompareandcontrasttheterms"star"and "planet."
7. Candefinetheterm"ecliptic."
3. Can tell the number of stars in our Solar System. 8. Can explain why our Solar System’s planets can never be seen in the north sky at our latitude.
4. Can name the planets in our Solar System in order (from the closest to the furthest from the sun).
9. Knowsallthirteenconstellationsofthezodiac.
5. Can tell you the name of our home galaxy. 10.Cantellyoutheir"sunsign"andcanexplainhowtheydetermined it.
• B–39 • K–6 Activities
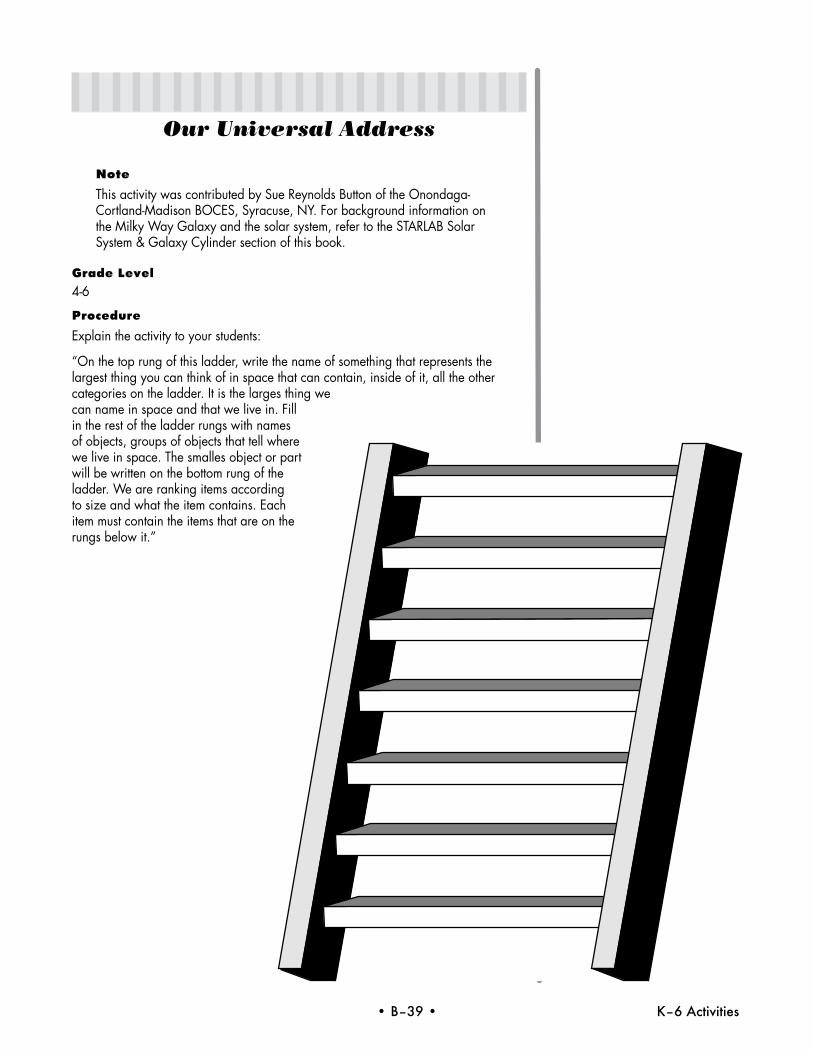
Our Universal Address
Note
This activity was contributed by Sue Reynolds Button of the Onondaga- Cortland-MadisonBOCES,Syracuse,NY.ForbackgroundinformationontheMilkyWayGalaxyandthesolarsystem,refertotheSTARLABSolarSystem&GalaxyCylindersectionofthisbook.
Grade Level4-6
Procedure
Explain the activity to your students:
“On the top rung of this ladder, write the name of something that represents the largest thing you can think of in space that can contain, inside of it, all the other categories on the ladder. It is the larges thing we can name in space and that we live in. Fill in the rest of the ladder rungs with names ofobjects,groupsofobjectsthattellwhereweliveinspace.Thesmallesobjectorpartwill be written on the bottom rung of the ladder.Wearerankingitemsaccordingto size and what the item contains. Each item must contain the items that are on the rungs below it.”
K–6 Activities • B–40 •
A Summary of Planetarium Activities for Student Success (PASS)
Vol 1: Planetarium Educator’s Workshop Guide
Participatory planetarium programs involve students actively in the planetarium environment. The most effective programs are both entertaining and educational. This guide introduces the theory and practice of developing effective planetarium pro-grams through a series of thought-provoking activities and discussions.
Vol 2: Planetarium Activities for Schools
This volume provides a wealth of effective planetarium activities for elementary and middle school students, as well as ideas for developing new activities for students of any age.
Vol 3: Resources for Teaching Astronomy and Space Science
There is a wide spectrum of resources for teaching astronomy and space science in elementary and middle schools. This annotated resource guide has the best resources that we have found, including school curricula, books, periodicals, films, videos, slides, professional organizations, planetariums, and telescopes.
Vol 4: A Manual for Using Portable Planetariums
Primarily a “how-to” manual for setting up and using a portable planetarium, this guide has many suggestions useful for teaching school programs in any planetarium.
Vol 5: Constellations Tonight
In this participatory version of a classic night sky planetarium program, students receive star maps and have an opportunity to use them to find constellations in the planetarium sky. Classroom activities include creating constellations and using star maps.
Vol 6: Red Planet Mars
StudentsdiscoverMarsthreedifferentwaysduringthisplanetariumprogram.Theyfind the red planet by observing it over a period of several nights as it moves against the background stars. Then they view it through a telescope and try to map its sur-face.FinallytheyseeMarsviaspaceprobes.Classroomactivitiesinvolvestudentsinmodeling the solar system, and creating creatures that could survive under different planetary conditions.
Vol 7: Moons of the Solar System
This program begins with observations of the earth’s moon and a modeling activity that shows why the moon goes through phases and eclipses. Then the students look atJupiter’sfourmajormoonsonaseriesofnightsandfigureouthowlongittakesonetocircleJupiter.Finally,thestudentsjourneythroughthesolarsystemtoseemanymoons through the “eyes” of modern spacecraft. Classroom activities involve students in performing experiments in crater formation, using moon maps, and designing lunar settlements.
Vol 8: Colors from Space
Whatcanwelearnaboutthestarsandplanetsfromtheircolors?Answeringthisquestion requires a fundamental understanding of why we see color. During this pro-gram, students deepen their understanding through a series of activities in which they “travel” to an imaginary planet circling a red sun, and experiment with color filters
Series Editors: Cary Sneider, Alan Friedman, and Alan Gould
Series Introduction
If you have access to a plan-etarium for teaching about astronomy, space science, and othersubjects,thisseriesofbooks is for you. Designed for both experienced planetarium professionals and teachers who will be using a planetarium for the first time, these volumes provide a wealth of field-tested strategies and practical sugges-tions for presenting entertaining and educationally effective programs for students.
The first four books provide a general orientation to as-tronomy and space science education with applications for both the planetarium and classroom settings. Each of the remaining volumes presents a complete planetarium program and related classroom activi-ties.Wehopeyouwillfindthematerials useful in your work with students and teachers, as well as springboards for your imagination and creativity.
• B–41 • K–6 Activities
and diffraction gratings. Related classroom activities include making secret messages that can only be decoded with color filters, and then using the same filters to view nebulae and planets.
Vol 9: How Big Is the Universe?
Based partly on ideas from the short film Powers of Ten, this program surveys distances and sizes of things in the universe. Starting with ordinary things on earth that students are familiar with, they move to progressively more distant astronomical objects:themoon,thesun,thesolarsystem,nearbystars,theMilkyWaygalaxy,andclusters of galaxies. Students use various methods to determine distance: parallax, “radar,”andcomparingbrightnessofobjects.Classroomactivitiesincludestudentswriting their complete galactic address, making a parallax distance finder, finding the distance to the moon, and activities about the expanding universe.
Vol 10: Who “Discovered” America?
Students ponder the meaning of the word discover in this program. Can one “discov-er” a land where people are already living? Students learn the reasons and methods bywhichColumbusnavigatedtothe“NewWorld,”andsomeoftheimpactsofhisvoyages on Native Americans. They also find that certain myths about Columbus are untrue. He was not, for example, alone in believing that the earth is round. Students also learn about other explorers who “discovered” America long before Columbus’s time. Classroom activities include determining the shape and size of the earth, using quadrants to determine latitude, and modeling lunar eclipses.
Vol 11: Astronomy of the Americas
There are hundreds of Native American cultures, each with distinctive views of the heavens. There are also common threads in many of those cultures. In this program students visit five cultures: the Hupa people of Northern California, plains and moun-taintribesthathaveusedMedicineWheelinNorthernWyoming,theAnasaziofChacoCanyoninNewMexico,theMayanpeopleinMexicoandCentralAmerica,and the Incan people in Peru. Students observe moon cycles and changes in the sun-rise and sunset positions on the horizon and learn how solar observations help Na-tive Americans stay in tune with the harmonies of nature. Classroom activities include theMayanandAztecnumbersystems,observingchangesinrealsunsetpositions,andlearninghowVenuscanappearaseitherthe“MorningStar”or“EveningStar.”
Vol 12: Stonehenge
In this program, students learn what Stonehenge is and how it could have been used by its builders as a gigantic astronomical calendar. They also learn how astronomer Gerald Hawkins discovered one of Stonehenge’s probable functions, by actively formulating and testing their own hypotheses in the planetarium. Along the way, they learn a lot about apparent solar motion, and the creation of the research field of “archaeoastronomy.”ClassroomactivitiesincludeconstructingaspecialSolarMotionDemonstrator to represent the entire yearly cycle of the solar motion.
Vol 13: Northern Lights
Aurora borealis and aurora australis (northern and southern lights) are beautiful displays of moving luminous colored patterns in the night sky. Students identify what areas of Earth are best suited for aurora viewing. They model the different seasonal patterns of the Sun's apparent daily motion in various latitudes, including places wherethereisthephenomenonof"midnightSun."Theyobserveandsketchaurorae,learn about the causes of aurorae, and find out about NASA missions that are study-ing aurorae. Classroom activities include selecting ideal locales on Earth for aurora watching, determining the altitudes of simulated aurora, predicting aurora on other planets, spectrum studies, and aurora mythology.
Note
One set of this 13-volume series is sent to you free when you return your Product Regis-tration form. If you haven’t al-ready received a set with your system, make sure to send in your form! Additional sets can be ordered through Science First/STARLAB, by calling 800-537-8703 or 716-874-0133
K–6 Activities • B–42 •
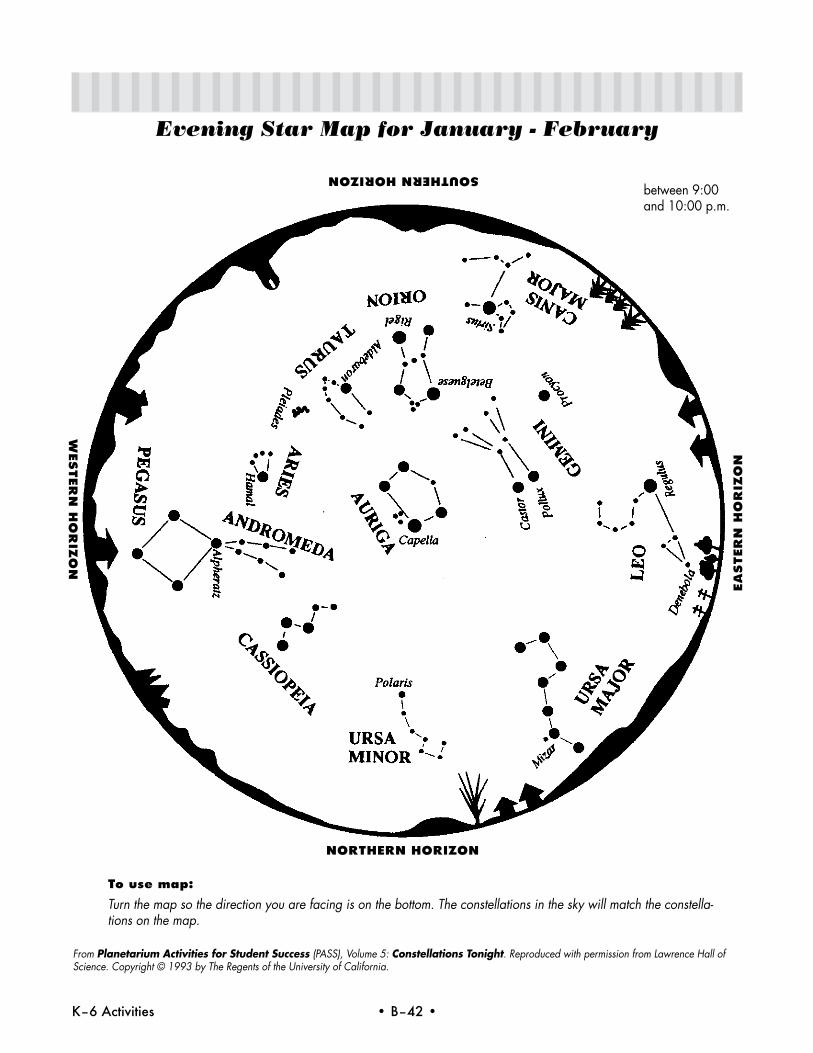
Evening Star Map for January - February
SOUTHERN HORIZON
EA
STER
N H
OR
IZO
NW
ESTER
N H
OR
IZO
N
NORTHERN HORIZON
To use map:
Turn the map so the direction you are facing is on the bottom. The constellations in the sky will match the constella-tions on the map.
between9:00and 10:00 p.m.
From Planetarium Activities for Student Success (PASS), Volume 5: Constellations Tonight. Reproduced with permission from Lawrence Hall of Science. Copyright © 1993 by The Regents of the University of California.
• B–43 • K–6 Activities
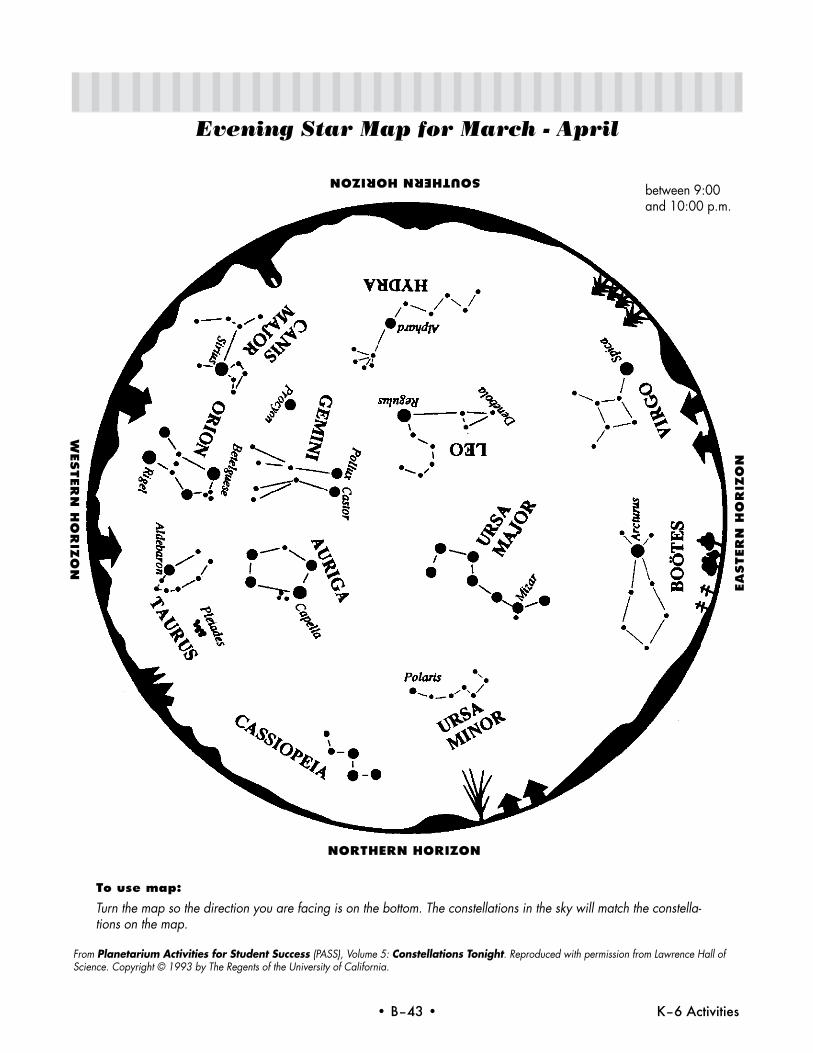
Evening Star Map for March - April
SOUTHERN HORIZON
EA
STER
N H
OR
IZO
NW
ESTER
N H
OR
IZO
N
NORTHERN HORIZON
between9:00and 10:00 p.m.
From Planetarium Activities for Student Success (PASS), Volume 5: Constellations Tonight. Reproduced with permission from Lawrence Hall of Science. Copyright © 1993 by The Regents of the University of California.
To use map:
Turn the map so the direction you are facing is on the bottom. The constellations in the sky will match the constella-tions on the map.
K–6 Activities • B–44 •
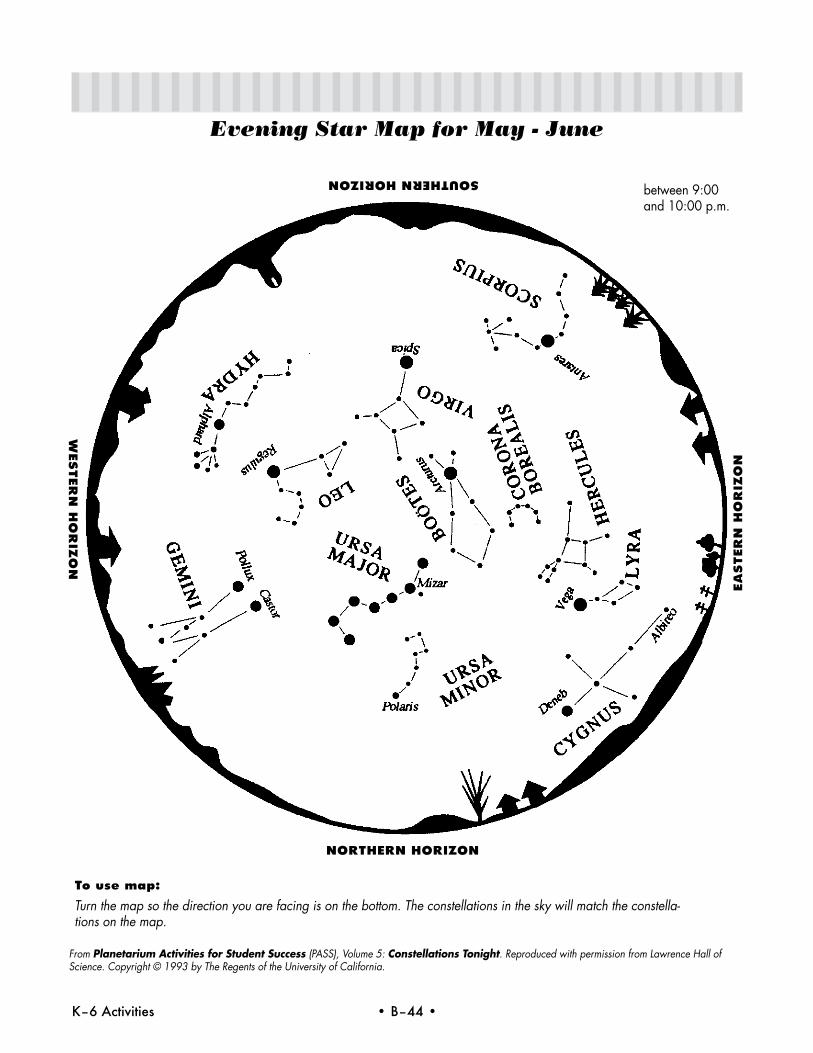
Evening Star Map for May - June
SOUTHERN HORIZON
EA
STER
N H
OR
IZO
NW
ESTER
N H
OR
IZO
N
NORTHERN HORIZON
To use map:
Turn the map so the direction you are facing is on the bottom. The constellations in the sky will match the constella-tions on the map.
between9:00and 10:00 p.m.
From Planetarium Activities for Student Success (PASS), Volume 5: Constellations Tonight. Reproduced with permission from Lawrence Hall of Science. Copyright © 1993 by The Regents of the University of California.
• B–45 • K–6 Activities
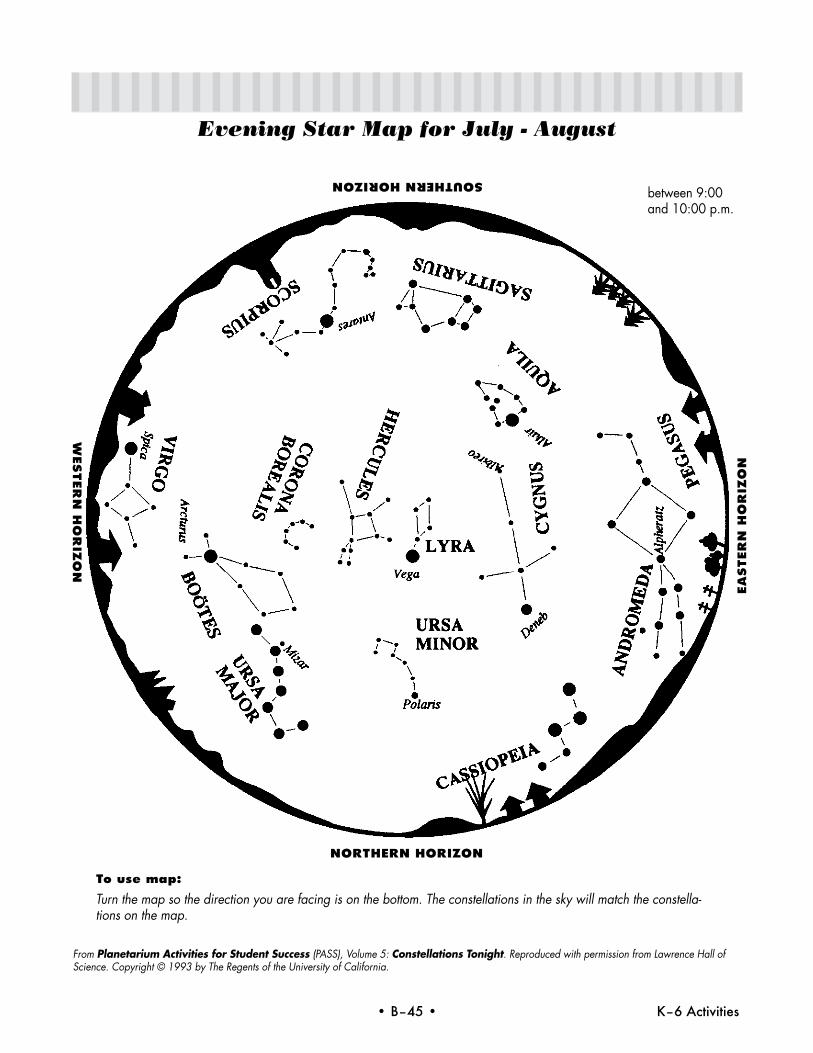
Evening Star Map for July - August
SOUTHERN HORIZON
EA
STER
N H
OR
IZO
NW
ESTER
N H
OR
IZO
N
NORTHERN HORIZON
To use map:
Turn the map so the direction you are facing is on the bottom. The constellations in the sky will match the constella-tions on the map.
between9:00and 10:00 p.m.
From Planetarium Activities for Student Success (PASS), Volume 5: Constellations Tonight. Reproduced with permission from Lawrence Hall of Science. Copyright © 1993 by The Regents of the University of California.
K–6 Activities • B–46 •
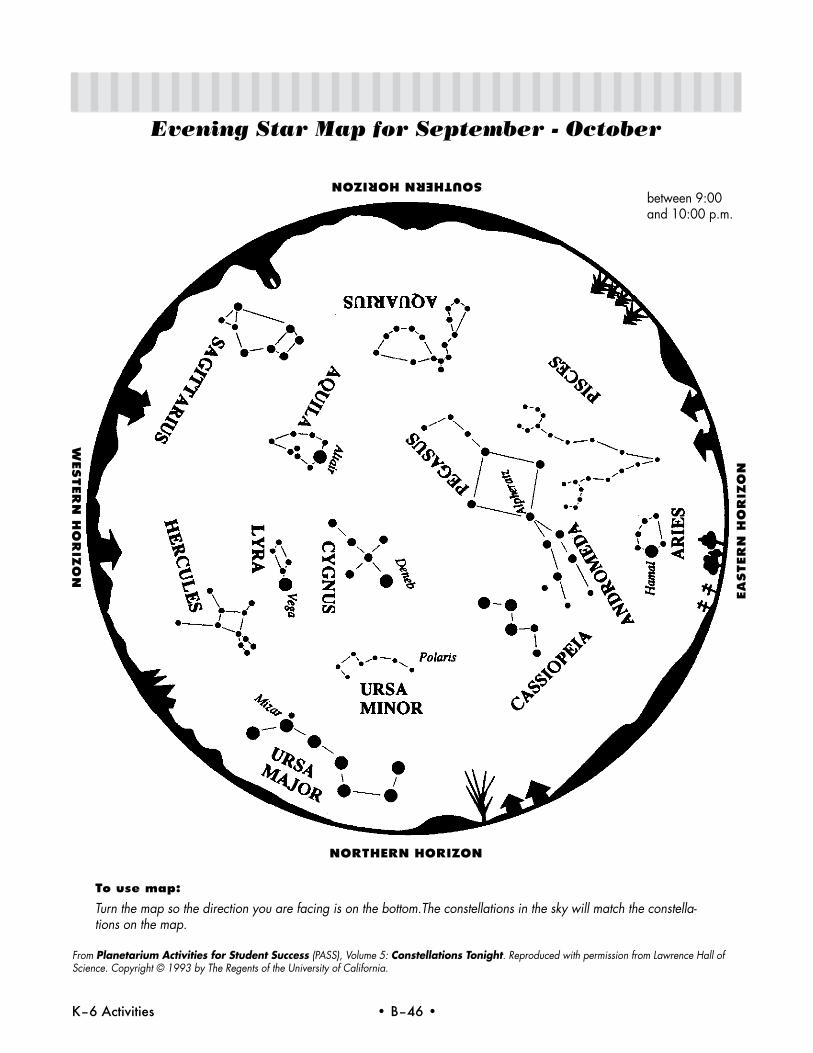
Evening Star Map for September - October
SOUTHERN HORIZON
EA
STER
N H
OR
IZO
NW
ESTER
N H
OR
IZO
N
NORTHERN HORIZON
To use map:
Turn the map so the direction you are facing is on the bottom.The constellations in the sky will match the constella-tions on the map.
between9:00and 10:00 p.m.
From Planetarium Activities for Student Success (PASS), Volume 5: Constellations Tonight. Reproduced with permission from Lawrence Hall of Science. Copyright © 1993 by The Regents of the University of California.
• B–47 • K–6 Activities
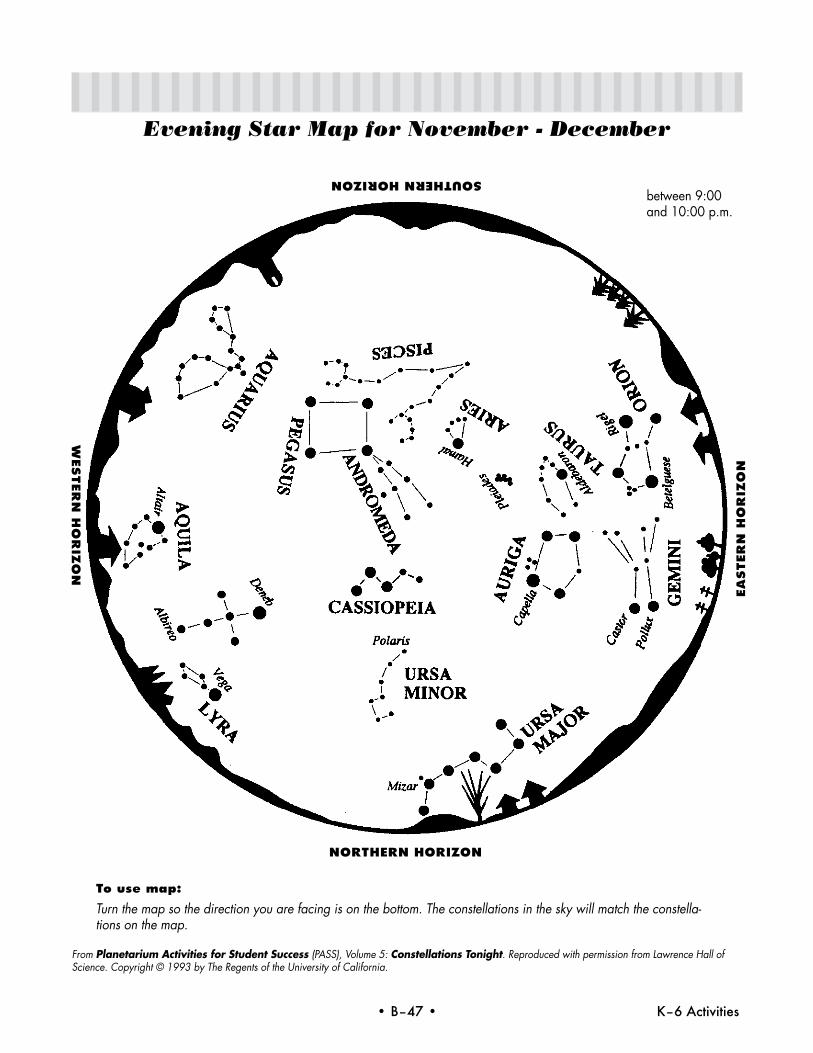
Evening Star Map for November - December
SOUTHERN HORIZON
EA
STER
N H
OR
IZO
NW
ESTER
N H
OR
IZO
N
NORTHERN HORIZON
To use map:
Turn the map so the direction you are facing is on the bottom. The constellations in the sky will match the constella-tions on the map.
between9:00and 10:00 p.m.
From Planetarium Activities for Student Success (PASS), Volume 5: Constellations Tonight. Reproduced with permission from Lawrence Hall of Science. Copyright © 1993 by The Regents of the University of California.

K–6 Activities • B–48 •
K-6 Resources
• B–49 • K–6 Activities
Free and/or Inexpensive Materials to Teach Astronomy in the Classroom
The Universe in the Classroom: A Newsletter on Teaching Astronomy
To be put on the mailing list for future issues, teachers should write on school sta-tionery and identify the grade level they teach. This is a free, excellent classroom resource for grades 3-12.
Astronomical Society of the Pacific, Teachers’ Newsletter, Dept. N, 390 Ashton Ave., San Francisco, CA 94112, Telephone: 1-800-335-2624
Also order their catalog. It is a plethora of astronomy materials.
Abrams Planetarium Sky Calendars
Forabout$7.50ayear,askycalendarwillbemailedquarterly,threeissuespermailing. This single sheet contains a wealth of easily observed astronomical events, presented in a clear, understandable format with daily information given on a monthly calendar with a star map on the back. Contact Abrams Planetarium at the address below for current pricing.
Abrams Planetarium, Michigan State University, East Lansing, MI 48823
Science Education News
This newsletter is free of charge and covers science education news, opportunities for fellowships, institutes, forums, and meetings, and reviews resources and reports on science education. Use school stationery.
Office of Science and Technology Education, American Assoc. for the Ad-vancement of Science, 1333 H St. NW, Washington, DC 2000
NASA photographs, updates, and information sheets
Awonderfulwealthofup-to-dateNASAinformation,includingtheVoyager2flybys.This material is free. Use school stationery.
NASA Jet Propulsion Laboratory, Attn: Teacher Resource Center, JPL Educa-tional Outreach, 4800 Oak Grove Dr., Mail Stop CS-530, Pasadena, CA 91109
Free astronomy catalogs
(Makerequestsonschoolstationery.)
Project STAR Hands-on Science Materials, Science First/STARLAB, 95 Botsfors Place, Buffalo, NY 14216. Phone: 1-800-537-8703. www.starlab.com
Edmund Scientific, 101 E. Glouster Pike, Barrington, NJ 08007-1380
Sargent-Welch, 7300 N. Linder Ave., PO Box 1026, Skokie, IL 60077
Frey Scientific Co., 905 Hickory Lane, Mansfield, OH 44095
Optica, 4100 MacArthur Blvd., Oakland, CA 94619
K–6 Activities • B–50 •
Additional Materials
Great Explorations in Math and Science (GEMS) Series
Created by the Lawrence Hall of Science, University of California, Berkeley. Includ-ing:
1. Color Analyzers, Grades 5-8.
2. Earth, Moon and Stars,Grades5-9.
3. Moons of Jupiter,Grades4-9.
4. Oobleck: What Do Scientists Do?, Grades 4-8.
Available from Learning Technologies, 40 Cameron Avenue, Somerville, MA02144.Phone:1-800-537-8703or1-617-628-1459.Fax1-617-628-8606. www.starlab.com
Planetarium Activities for Student Success (PASS)
A 13-volume set created by the Lawrence Hall of Science, University of California, Berkeley.
AvailablefromScienceFirst/STARLAB,95BotsfordPlace,Buffalo,NY14216.Phone:1-800-537-8703or1-716-874-0133.Fax1-716-874-9853.www.starlab.com
• B–51 • K–6 Activities
Astronomy for Elementary Teachers Bibliography
Books
Allison, Linda, The Reasons for Seasons, a Brown Paper Book Series, Little, Brown,andCo.,Boston/Toronto/London.
Beyer, S. L., The Star Guide — A Unique System for Identifying the Brightest Stars in the Night Sky,Little,Brown.&Co.
Blum,JamesK.,The Stargazer’s Companion,MallardPress,6665thAve.,NY, NY 10103.
DeBruin,Jerry,andMurad,Don,Look to the Sky, Good Apple, Cartage, IL.
Dickinson, Terence, Exploring the Night Sky, Camden House.
Jobb,Jamie,The Night Sky Book, a Brown Paper Book series, Little, Brown andCo.,Boston/Toronto/London.
Krupp, E.C., The Big Dipper and You,MorrowJuniorBooks.
Krupp, E.C., The Moon and You,MorrowJuniorBooks.
Levy, David H., The Sky — A User’s Guide, Cambridge University Press.
Mayer,Ben,Starwatch, Perigee Books, Putnam Publishing Group.
Menzel,D.H.andPasachoff,J.M.,A Field Guide to the Stars and Planets, NationalAudubonSocietyandNationalWildlifeFederation.
Moeschl,Richard,Exploring the Sky, Chicago Review Press.
Moore,Patrick,Astronomers’ Stars,W.W.Norton&Co.,NY/London.
Moore,Patrick,The Pocket Guide to Astronomy,Simon&Schuster,NY.
Porcellino,Michael,Young Astronomer’s Guide to the Night Sky, TAB Books, Blue Ridge Summit, PA.
Raymo, Chet, 365 Starry Nights, Prentice Hall Press.
Rey, H. A., The Stars — A New Way to See Them,HoughtonMifflin,Bos-ton.
Rey, H. A., Find the Constellations,HoughtonMifflinCompany,Boston.
Schaaf, Fred, Seeing the Sky, 100 Projects Activities & Explorations in Astronomy,JohnWiley&Sons,NY.
Whitney,CharlesA.,Whitney’s Star Finder, Alfred A. Knopf, NY.
K–6 Activities • B–52 •
Tapes — Video and Cassette
Tours of the Night Sky, Astronomical Society of the Pacific. Available from LearningTechnologies,40CameronAve.,Somerville,MA02144.19min-utes,1-800-537-8703or1-617-628-1459.www.starlab.com
Voyager—theGrandTour,(video)19min.,YoungAstronauts.
Magazines/Booklets
Astronomymagazine,KalmbachPublishingCo.,1027N.7thSt.,Milwau-kee,WI53233
“BackyardAstronomy,”byAlanMacRobert,Sky and Telescope magazine. SkyPublishingCorp.,POBox9111,Belmont,MA02178
Daytime Astronomy,Teachers’GuideforESS,Webster/McGrawHill,Co.
Earth, Moon, and Stars: An Astronomy Activity Guide,GEMSGuides,byCarySneider,LawrenceHallofScience,Berkeley,CA,94720.
The Edmund Sky Guide, T. Dickinson and S. Brown, Edmund Scientific, Bar-rington,NJ08007.
A Look at the Planets, NASA, Supt. of Documents, US Gov. Printing Office, Washington,DC20402.
Odyssey Magazine,amagazineforchildren,21027CrossroadsCircle,POBox1612,Waukesha,WI53187-1612.
Science and Children, (contains sky chart and calendar), comes with mem-bershipintheNationalScienceTeachersAssoc.,1742ConnecticutAve.NW,WashingtonDC20009-1171(202-328-5800)$52peryearfor8issues.
• B–53 • K–6 Activities
Stars & Skies
An E.S.E.A. Title IV Project, 1979.
TheStars&Skiesprojectwasoriginallydevelopedin1979.Theactivitiesinthissec-tion have been culled from the original document and updated by Gary D. Kratzer. These activities should be especially useful to the beginning STARLAB user. The elementary section is divided according to grade level. Each section contains sug-gestedstudentobjectives,backgroundinformation,andplanetariumactivities.Thissection also contains supplemental activities to be used as pre- or post-planetarium visits.RefertotheAppendix(locatedattheendoftheGrades7-9section)includesscripts and directions for construction of support equipment.
Revised by Gary D. Kratzer, 1997
STARLABPlanetarium
Learning Technologies Inc., Somerville, MA
©2008 by Science First/STARLAB, 95 Botsford Place, Buffalo, NY 14216. All rights reserved.
STARLAB Activities for Grades 4 to 6
K–6 Activities • B–54 •
Elementary Grades 4-6 Objectives
Objectives — Grade 4
The student should be able to:
1. Identify the cardinal directions and locate the North Star in the planetarium.
2. Describe the general east to west movement of the sun, stars, and moon.
3. Observe and describe the apparent motion of the Big Dipper in relation to the North Star over a period of several hours.
4. Observe and discuss the concept that stars continually shine but may not be seen by the naked eye due to other stronger light sources.
5. Observe and describe the movement of constellations.
6. Demonstrate that constellations are merely imaginary star groupings that are not connected in any physical way.
7. Identifythecircumpolarconstellations,usingtheConstellationCylinderinSTARLAB.
Objectives — Grade 5
The student should be able to:
1. Compare and discuss the work of early astronomers Copernicus, Galileo, Ptol-emy.
2. Describe the phases of the moon in 5 stages (new to full).
3. Observeanddiscussthemajorconstellationsnotcoveredatpreviouslevels,us-ing the Constellation Cylinder within the STARLAB.
4. Describe the comparative positions of the circumpolar stars in a given 24-hour period.
5. Describe the relative positions of the circumpolar stars during different seasons.
6. Demonstrate why the North Star does not appear to change its relative position in the sky.
7. Demonstrateanunderstandingthatcelestialbodiesappeartomoveinaregularpath through the universe “dome.”
Objectives — Grade 6
The student should be able to:
1. Compare and discuss the work of some early astronomers. Review 5th level astronomers and add Tycho Brahe, Kepler, and Eratosthenes.
2. Describe the relative changes in the sunrise and sunset times over one year.
3. Demonstrate an understanding of the reasons for the apparent motion of the stars.
4. Demonstrate an understanding of the seasonal changes in stellar locations due to the revolution of the earth around the sun.
5. Demonstrate an understanding of the differences in stellar motion as observed from the equator versus the polar regions.
6. Identifyfourmajorstellarreferencepointsusedinlocatinganddescribingposi-tions of other stellar bodies.

• B–55 • K–6 Activities
7. IdentifythelocationandexplaintheGreekmythologicaloriginofthezodiacalconstellations.
8. Discuss and compare legends of the Native American with those of the Greek legendsofUrsaMajor,UrsaMinor,Cassiopeia,andOrion.
9. DemonstratetheuseofastarfindermapbylocatingconstellationsintheSTARLAB sky.
K–6 Activities • B–56 •
Cardinal Directions, Activity 4-1
Objective
The student should be able to identify the North Star and cardinal directions within the planetarium.
Procedure• Settheprojectorforaparticulardate,timeandlatitude.
• HavethestudentlocatetheBigDipper(UrsaMajor).Locatethetwostarsattheend of the cup. These are the pointer stars. (See diagram.)
Note
If you are observing from a latitude near 30°, the Big Dipper will actually appear to dip below the northern horizon within a 24-hour period as it revolves around Polaris.
• Followanimaginarylineconnectingthesetwostarsapproximately5timesthelength between the two pointer stars. Polaris (North Star) will be the moderately bright star nearest to that line.
• Havethestudentsestablishthatquadrantasnorth.Havethestudentsfacenorth.Now explain that south will be behind them, east to the right and west to the left.
Materials• STARLABPortablePlanetarium• Projector• StarfieldCylinder
• B–57 • K–6 Activities
Celestial Movement, Activity 4-2
Objective
The student should be able to describe the general east to west movement of the sun, the moon and other stars.
Procedure 1• SettheStarfieldCylinderfor12:00a.m.inthemonthofDecemberatyourhome
latitude. Have the students observe the constellation, Orion.
• Advancethecylinderonehour,observingthesameconstellation.
• RotatethecylinderplatformuntilOriondisappearsbelowthewesternhorizonand continue until it reappears on the eastern horizon. Have the students discuss the observed directional movement of the constellation. Point out that the move-ment is an east to west movement.
• Demonstratetheeasttowestmovementofthesunandmoon.
Procedure 2• Usethesameprocedureasabove,substitutingmonthsforthehourlysettings.
Specify that the monthly observation needs to be made at the same time of night each month.
• Discussthesimilarityineast-westmovement.
Extension Activity
Setupaslideprojectorontheeclipticslideprojectormount.Setthemountatthe30°setting. Use the moon slide set and demonstrate the motion of the moon by turning the swivel base from east to west. Discuss east to west movement of the moon.
Materials• STARLABPortablePlanetarium• Projector• StarfieldCylinder• eclipticslideprojectormount• moonslideset• 35mmslideprojector
K–6 Activities • B–58 •
Apparent Motion, Activity 4-3
Objective
The student should be able to observe and describe the apparent motion of the Big Dipper(UrsaMajor)inrelationtotheNorthStaroveraperiodofseveralhours.
Procedure• HavethestudentsidentifythepositionoftheBigDipperataparticulartime.Us-
ing the pointer stars, locate and identify the North Star.
• Settheprojectorfor8:00p.m.ObservethelocationoftheBigDipper.
• Turntheprojectortothe9:00p.m.setting.DiscussthechangeinpositionoftheDipper, especially noting the “handle.”
• Makeseveralotherone-hourchanges.Discussthemovement.
Extension Activity
For an additional activity, select times at random and have students predict the time. Also discuss the similarities of the movement to a clock, noting that the Dipper will make one complete rotation in 24 hours.
Materials• STARLABPortablePlanetarium• Projector• ConstellationCylinder
• B–59 • K–6 Activities
Stars and Light Pollution, Activity 4-4
Objective
The student should be able to observe and discuss the concept that stars continually shine but may not be seen with the naked eye due to a phenomenon known as light pollution.
Procedure• Turndownthesidelampsontheprojector.Adjusttheprojectortoitslowestset-
ting. No star should be seen. Ask the students to describe what they see.
• Slowlyincreasethebrightnessoftheprojector(withtheStarfieldCylinderinplace). Ask students to tell you when they see the first star. Continue to turn knob until the entire starfield is lighted. Discuss the concept that stars are of different brightness (called magnitude).
• Turnthedimmerknobonprojectordownfromfullbrightnessabout1/2turn.Slowly turn on the variable light source. Discuss the comparison of this light to the rising sun with the children.
• AstheVariableLightSourcereachesfullstrength,askthestudentsthedifferencethey see in the starfield in the planetarium sky. Emphasize the concept that stars make their own light and are constantly emitting light, but our eyes will only reg-ister that light if there is no other stronger light source interfering. In this case, the Variable Light Source (sun simulator) is stronger than many of the stars of lower magnitude, thereby rendering them invisible to our eye.
• Discussreallifesituationswherethissamethinghappens.
Extension Activity
Have students observe the sky from various locations such as: urban, rural, and isolated places away from lights.
Materials• STARLABPortablePlanetarium• Projector• StarfieldCylinder• VariableLightSource(seeAppen-
dix in 7-9 section)
K–6 Activities • B–60 •
East-West Constellation Movement, Activity 4-5
Objective
The student should be able to observe and discuss the general east to west movement of constellations.
Background
Constellation configurations do not actually move above us, but only appear to move due to the rotation of the earth and the gradual revolution of our planet around the sun.
Procedure• Settheprojectorfor7p.m.onaspecifieddateandlatitude.Identifyanyoneof
theconstellationsvisibleonthatdate.Withthestudents,makenoteoftheloca-tion of the constellation.
• Nowmovetheprojectortothe8p.m.settingandobservethechanges.Continuetheprocessforeachhour(ex.9:00p.m.,10p.m.,etc.).Studentsshouldnotethe general east to west movement.
• Selectaspecifictimetoobserve.Settheprojectorforthefirstdayofthemonthyou are observing. Note the location of a selected constellation.
• Nextmovetheprojectortothefirstofthefollowingmonth,sametimeofnight.Note location of the constellation. Continue this date movement for each of the 12 months. Discuss the yearly motion and compare it to the nightly motion.
Materials• STARLABPortablePlanetarium• Projector• ConstellationCylinder
• B–61 • K–6 Activities
Star Groupings, Activity 4-6
Objective
The student should be able to demonstrate the concept that constellations are merely imaginary star groupings that are not connected in any physical way.
Procedure 1• Asthestudentssitintheplanetariumaskthemtoobservethestarfieldandseeif
they can connect the stars to make any shapes. Have them work in pairs. Share their findings. Pass around arrow pointers, if available.
• PutontheConstellationCylinderandintroducetheword“constellation.”Pointout a couple of the common constellations (Big Dipper, Cepheus). Ask students to suggest ways they think these constellations got their names.
• Turnuptheplanetariumsidelights.Dividethestudentsinto4or5groups.Askeach group to put a series of dots on their sheet of white paper which has been provided (do not connect yet), using the felt tip markers. Give each group a number. That number should be put on their sheet. The group should make up a name for their constellation. The number will serve to identify the group’s work.
• Haveeachgroupdisplaytheirconstellation.Haveeachstudentorgroupdecidewhat each constellation might be. Share the ideas. Discuss the variety of answers and emphasize the concept that constellations are arbitrary configurations made up by man.
Procedure 2• Havethestudentsconnectthestarsinanypatterntoformafigureofsometype.
This will be their “self-discovered” constellation.
• Havethestudentsnametheirconstellations.Youmaywantthemtocomposeamythical story to go with the figure.
• Asaclassyoumaywanttodevelopanentireskymap,puttingeachstudent’sconstellation in the sky, and use a bulletin board as your universe.
Materials• STARLABPortablePlanetarium• Projector• ConstellationCylinder• StarfieldCylinder• whitepaper• markers• arrowpointers• clipboards(optional)
K–6 Activities • B–62 •
Circumpolar Constellations, Activity 4-7
Objective
The student should be able to identify the circumpolar constellations on the constella-tion starfield in the portable planetarium.
Procedure• UsingtheDoitYourselfStarFinder,familiarizeyourselfwiththefollowingcon-
stellations:UrsaMajor(BigDipper),UrsaMinor(LittleDipper),Draco,Cepheus,Cassiopeia.
• InSTARLAB,askstudentstoidentifytheBigDipper.DiscusstheideathattheBigDipperispartoftheconstellationUrsaMajor,theBigBear.Itcanbeseenallyear in the northern sky.
• UsethepointerstarsattheedgeoftheBigDippercuptolocatePolaris.SincePolaris (North Star) is at the tip of the handle of the Little Dipper, the constellation UrsaMinor,theLittleBear,isfound.Itcanalsobeseenallyearinthenorthernsky.
• CassiopeiaislocatedontheoppositesideoftheNorthStarfromtheBigDipper.Draw a line through the pointer stars to the North Star and continue that line twicethatdistancetofindtheconstellation.NicknamedtheLazyW,Cassiopeiais found high in the autumn evening sky. In summer it is found in the northeastern sky and in winter in the northwestern sky.
• Next,movetoCepheus,whoislocatednearhisqueen,Cassiopeia.ThetopsideoftheLazyWwillpointtoCepheus.Cepheusismadeupofratherdim(lowmagnitude) stars. Its shape is basically a triangle on top of a box. Cepheus is upside down in the northeastern summer evening sky. He can be found high in the autumn evening sky and low in the spring sky.
• Finally,Draco,theDragon,appearsnexttoCepheus.HewrapshistailaroundUrsaMinor(LittleDipper).ThestarsbetweentheBigandLittleDippersaretheend of the dragon’s tail. The main body of the dragon begins and stretches to the diamond-shaped head. The legs are very low magnitude stars, so look closely. Draco is high in the summer evening sky and low in the winter northern sky.
Extension Activity
Go outside at night with your students and use the Do it Yourself Star Finder to locate these same constellations in the real night sky.
Materials• STARLABPortablePlanetarium• Projector• ConstellationCylinder• DoitYourselfStarFinder(seepp
25, 26)• ConstellationLocatorScript(see
Appendix)
• B–63 • K–6 Activities
Early Astronomers, Activity 5-1
Objective
The student should be able to compare and discuss the work of early astronomers: Ptolemy, Copernicus, and Galileo.
Background
Ptolemy, in his book, The Alamagest, explained the geocentric (earth-centered) theory of the planetary motions. The planets were thought to rotate in circles (epicycles), the centers of which described orbits around the earth. The sun and moon, also consid-ered planets, were believed to orbit the earth without epicyclical rotation.
Not until the year 1543 did anyone seriously challenge the idea that Earth was the center of the universe. A Polish astronomer, Nicolaus Copernicus, argued that the earth and the moon, along with the other five planets then known, all moved around the sun in circles. He also said that the earth rotates and this makes the sun and stars appear to move across the sky. Like most ideas that upset comfortable old beliefs, the idea that earth was in motion was hard to accept. It was up to other scientists later on, to prove that Copernicus was right.
Galileo advanced the idea that before explaining what happens, you must carefully observe how it happens. He used a set of lenses, developed by a Dutch spectacle maker,HansLippershey,toinventatelescopethatmadeobjectsappearabout36times larger. Observations with his telescope, especially the discovery of the phases of Venus, supported the ideas of Copernicus.
Procedure• Classdiscussionintheplanetariumorclassroomsettingshouldcenteraround
each of the men.
• Studentreportscanbeassigned.Havestudentswritenewsarticles,inthepresenttense, about the findings of these men.
Extension Activities
Students could role play and dress according to the times.
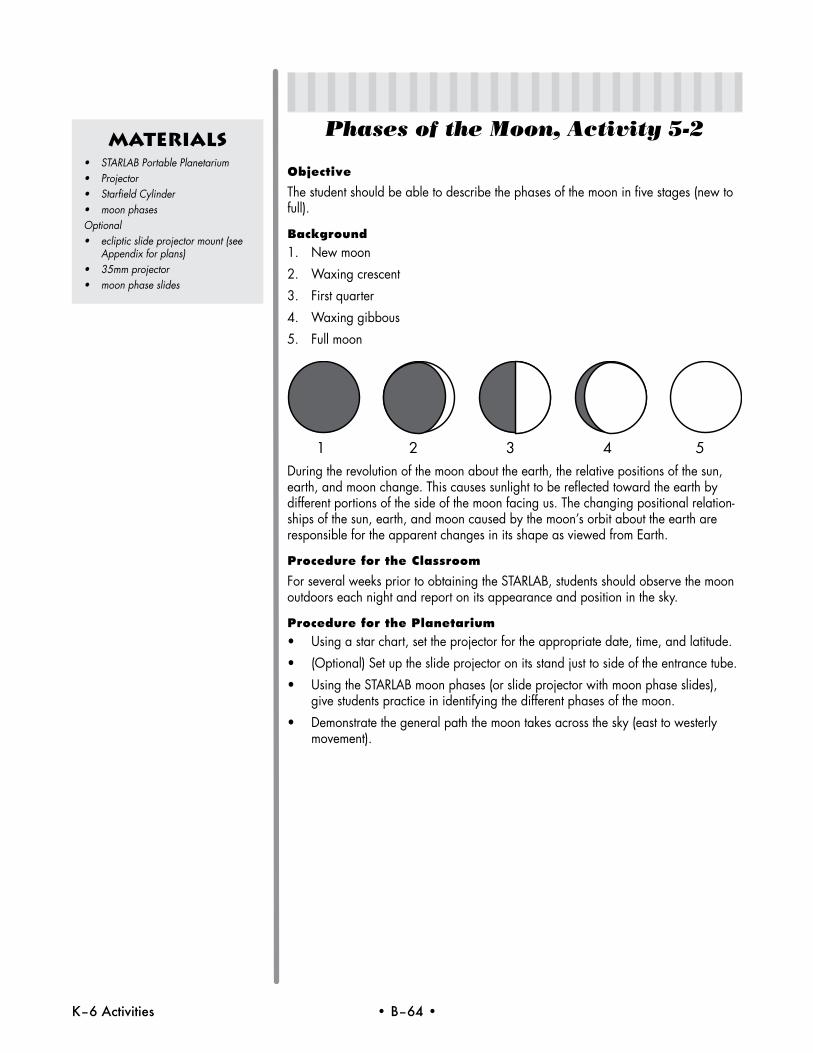
K–6 Activities • B–64 •
Phases of the Moon, Activity 5-2
Objective
The student should be able to describe the phases of the moon in five stages (new to full).
Background1. New moon
2. Waxingcrescent
3. First quarter
4. Waxinggibbous
5. Full moon
During the revolution of the moon about the earth, the relative positions of the sun, earth,andmoonchange.Thiscausessunlighttobereflectedtowardtheearthbydifferent portions of the side of the moon facing us. The changing positional relation-ships of the sun, earth, and moon caused by the moon’s orbit about the earth are responsible for the apparent changes in its shape as viewed from Earth.
Procedure for the Classroom
For several weeks prior to obtaining the STARLAB, students should observe the moon outdoors each night and report on its appearance and position in the sky.
Procedure for the Planetarium• Usingastarchart,settheprojectorfortheappropriatedate,time,andlatitude.
• (Optional)Setuptheslideprojectoronitsstandjusttosideoftheentrancetube.
• UsingtheSTARLABmoonphases(orslideprojectorwithmoonphaseslides),give students practice in identifying the different phases of the moon.
• Demonstratethegeneralpaththemoontakesacrossthesky(easttowesterlymovement).
Materials• STARLABPortablePlanetarium• Projector• StarfieldCylinder• moonphasesOptional• eclipticslideprojectormount(see
Appendix for plans) • 35mmprojector• moonphaseslides
1 2 3 4 5
• B–65 • K–6 Activities
Constellation Location, Activity 5-3
Objective
The student should be able to locate the following constellations using the Constella-tionCylinder:UrsaMajor,UrsaMinor,Cassiopeia,Cepheus,Draco,Orion,CanisMajor,LeoandPegasus.
Procedure
Review the concept of what a constellation is. Read the Constellation Locator Script while displaying the Constellation Cylinder giving ample time for students to locate the stars in the dome as you read. Use the arrow pointer to review each of the constellations.Ifyoufeelthatthestudentsarecapable,youmayprojecttheentirestarfield using the Starfield Cylinder and review those constellations covered.
Materials• STARLABPortablePlanetarium• Projector• ConstellationCylinder• ConstellationLocatorScript(see
Appendix)• arrowpointer
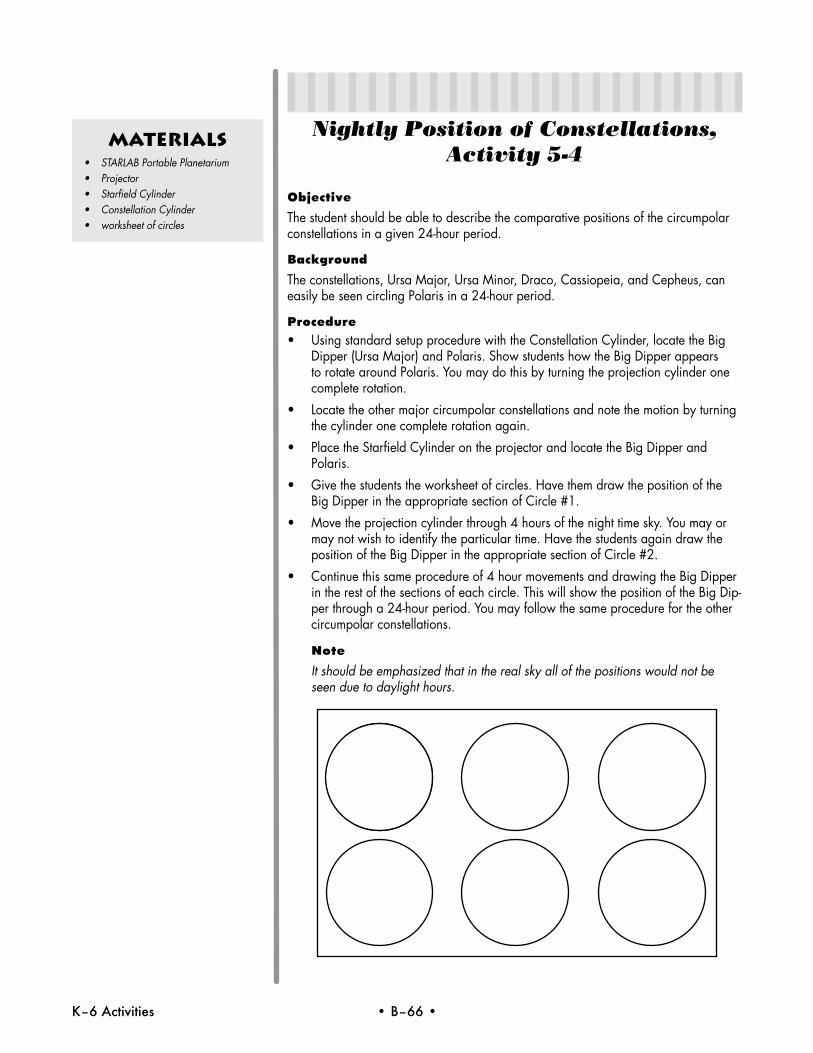
K–6 Activities • B–66 •
Nightly Position of Constellations, Activity 5-4
Objective
The student should be able to describe the comparative positions of the circumpolar constellations in a given 24-hour period.
Background
Theconstellations,UrsaMajor,UrsaMinor,Draco,Cassiopeia,andCepheus,caneasily be seen circling Polaris in a 24-hour period.
Procedure• UsingstandardsetupprocedurewiththeConstellationCylinder,locatetheBig
Dipper(UrsaMajor)andPolaris.ShowstudentshowtheBigDipperappearstorotatearoundPolaris.Youmaydothisbyturningtheprojectioncylinderonecomplete rotation.
• Locatetheothermajorcircumpolarconstellationsandnotethemotionbyturningthe cylinder one complete rotation again.
• PlacetheStarfieldCylinderontheprojectorandlocatetheBigDipperandPolaris.
• Givethestudentstheworksheetofcircles.HavethemdrawthepositionoftheBig Dipper in the appropriate section of Circle #1.
• Movetheprojectioncylinderthrough4hoursofthenighttimesky.Youmayormay not wish to identify the particular time. Have the students again draw the position of the Big Dipper in the appropriate section of Circle #2.
• Continuethissameprocedureof4hourmovementsanddrawingtheBigDipperin the rest of the sections of each circle. This will show the position of the Big Dip-per through a 24-hour period. You may follow the same procedure for the other circumpolar constellations.
Note
It should be emphasized that in the real sky all of the positions would not be seen due to daylight hours.
Materials• STARLABPortablePlanetarium• Projector• StarfieldCylinder• ConstellationCylinder• worksheetofcircles
• B–67 • K–6 Activities
Seasonal Position of Constellations, Activity 5-5
Objective
The student should be able to describe the relative positions of the circumpolar stars in different seasons of the year.
Background
If the circumpolar constellations are observed at the same time each night throughout the year, they will appear to make a complete rotation around Polaris (North Star).
Procedure• UsetheDoitYourselfStarfindertobecomefamiliarwiththepositionofthe
circumpolar constellations in various months of the year.
• HavetheStarfieldCylindersetforoneofthefallmonths.Makeyourobservationtimeabout9:00p.m.foryourlatitude.
• Toshowstudentsthedifferentpositionsofthecircumpolarconstellationsthrough-outtheyear,simplyrotatetheprojectormonth-by-monthpastthe 9:00p.m.observingtimeasindicatedonthehouranddatescale.
Materials• STARLABPortablePlanetarium• Projector• StarfieldCylinder• DoitYourselfStarfinder
K–6 Activities • B–68 •
Position of the North Star, Activity 5 -6
Objective
The student should be able to demonstrate why the North Star does not appear to change relative position in the sky.
Procedure• UsingtheConstellationCylinder,havethestudentsusethe“pointer”starsofthe
BigDippertolocatePolaris(NorthStar).PointouttherestofUrsaMinor(LittleDipper).
• HavethestudentsfollowthemovementofUrsaMinorwhiletheprojectorplat-form is turned slowly by hand one complete rotation. The students should observe PolarisasthepivotpointforthemovementofUrsaMinor.
• Havesomestudentsfollowthemotionofothercircumpolarconstellationswhileobserving the North Star.
• ThesameactivitiesmayberepeatedusingtheStarfieldCylinder.
Materials• STARLABPortablePlanetarium• Projector• StarfieldCylinder• ConstellationCylinder

• B–69 • K–6 Activities
The Ecliptic, Activity 5-7
Objective
The students should be able to demonstrate an understanding that celestial bodies appear to move in a regular path against the background of space.
Background
The ecliptic is the path which the sun and planets seem to follow in the night sky or celestial sphere. It is the midpoint of a band 16° wide between which the twelve constellations of the zodiac are found, as well as the sun, moon and planets.
Procedure• UsingtheConstellationCylinder,pointoutthelocationoftheecliptic.
• Whilemovingthecylinderinaslowcircle,havethestudentsobserveandfollowcertain constellations located close to the ecliptic.
• Usingaplanetslideintheprojectormountedontheeclipticslideprojectormount, move the planet along the ecliptic. Discuss the movement. Point out that the ecliptic path will not always be in the same place in the sky. Relate this path to the changing daily path of the sun across the sky during the seasons.
Materials• STARLABPortablePlanetarium• Projector• ConstellationCylinderOptional• 35mmslideprojector• eclipticslideprojectormount(see
Appendix)• planetslides
K–6 Activities • B–70 •
Studying Early Astronomers, Activity 6-1
Objective
The student should be able to compare and discuss the work of Ptolemy, Copernicus, Galileo, Brahe, and Kepler.
Background
Refer to background information from Activity 5-1.
Tycho Brahe made careful observations of the sky for twenty-seven years. He kept accurate nightly records of the positions of the planets that could be seen with the nakedeye—Mercury,Venus,Mars,Jupiter,andSaturn.Brahemappedtheposi-tions of about a thousand stars. Even though he believed that the sun revolves around the earth and that the other planets revolve around the sun, the accurate data he obtained was later useful to many astronomers. It was especially useful to Brahe’s assistant,JohannesKepler.
JohannesKeplerbecameanassistanttoBraheonlyayearandahalfbeforeBrahedied. Through study of the thousands of pages of notes Brahe left, Kepler discovered patterns and relationships. His discoveries are called Kepler’s laws. They give the mathematical explanation for calculating:
1. The shape of a planet’s orbit.
2. The speed of a planet at each part of its orbit.
3. The period of revolution of each planet.
Procedure• Conductaclassdiscussionintheplanetariumorclassroomcoveringeachofthe
astronomers covered.
• Assignwrittenreports.Havestudentswritenewsarticles,inthepresenttense,about the findings of these astronomers.
Extension Activity
Students could role play and dress according to the times.
• B–71 • K–6 Activities
Sunrise and Sunset Position, Activity 6-2
Objective
The student should be able to describe the relative changes in the sunrise and sunset positions and times over a one year period.
Background
If you got up early enough to watch the sunrise one morning each week for a whole year, you would notice an interesting pattern. On September 22 (autumnal equinox) the sun would rise due east; on December 21 (winter solstice) the sun risesfromitssouthern-mostposition;onMarch20(vernalequinox)thesunagainrisesdueeast;andonJune21(summersolstice)thesunrisesfromitsnorthern-most position. If you made accurate observations from the time the sun rose due east, then moved southward, then northward, then back due east, you would find that 365 days had passed.
The yearly changes in the stars which are visible are sometimes difficult for children to understand. Remember that it is night when we are on the side of earth away from the sun, and we can only see those stars which are above us at night. Consider two timesoftheyear;sixmonthsapart—forexample,December21andJune21.Theearthisonoppositesidesofitsorbitonthesetwodates.Whenyoulookintotheskyon these two nights you are looking in opposite directions and see a different part of the sky. Therefore, the stars seen in the southern sky will change throughout the year. For the same reason, the stars which are near the North Star will appear to make a complete circle around it each year.
Procedure• UsingtheStarfieldCylinderandoptionaleclipticslideprojectormount,setup
for approximately September 22 by removing the plug covering the September sun position on the Starfield Cylinder. Repeat the procedure when observing inDecember,MarchandJune.Projectthesundueeastjustabovethehorizon.Rotate the cylinder to about December 22 and show the sun rising from its south-ern-mostpositionalongtheecliptic.AgainrotatethecylindertoaboutMarch20andshowthesunrisingdueeast.RotatethecylindertoaboutJune21andshow the sun rising at its most northern position. Finish the activity by moving the cylinder once more to September 22 and show the sun rising due east.
• ReviewtheprocedureforlocatingtheNorthStar(Polaris)andhavethestudentsfollow the apparent motion of the circumpolar constellations as they move around Polaris. Be sure to relate the movement to the rotation of the earth (one complete turn of the cylinder equals 24 hours).
• Havethestudentsfacetheeasternhorizonandlocateastarorconstellation.Usea star and planet finder to help. For example: if you observe the night sky on No-vember15at9:00p.m.,theconstellation,Orion,willbeintheeasternsky.Thestudents should follow the constellation as it rises and sets. This motion should be related to the rotation of the earth.
Extension Activities
Have the students plot the path of the sun rising throughout a year’s time on a work-sheet that has the horizon drawn on it. Use the sunrise-sunset time schedule to relate the days getting shorter and shorter and then longer and longer to the above activity showing the different positions of the sun rising at different times of the year.
Materials• STARLABPortablePlanetarium• Projector• StarfieldCylinder• horizonworksheet(paperwith
horizon drawn on it)Optional• eclipticslideprojectormount
K–6 Activities • B–72 •
Apparent Motion, Activity 6-3
Objective
The student should be able to demonstrate an understanding of the reasons for the apparent motion of the stars.
Procedure
Demonstrate these concepts as you explain this in STARLAB.
The earth has two principal motions. Rotation is the turning of the earth on its axis. Revolution is the motion of the earth in its orbit around the sun. (Care should be taken not to confuse these terms when working with children). The earth rotates on its axis oncein24hours(roundedoff).WhenviewedfromabovetheNorthPole,theearthturns in a counterclockwise direction. It might be less confusing to children if the earth isthoughtofasturningfromwesttoeast.Thesunappearstoriseintheeast.Weknow that the earth is moving and the sun is “standing still.” Therefore, we must be moving toward the sun at sunrise or toward the east. It is important to see that sun time varies from east to west because of the earth’s rotation. For example, sunrise occurs in New York long before it does in California.
WhentheearthisobservedfromabovetheNorthPole,itappearsasacircle.Allcirclescontain360°;thereforeitis360°aroundtheearth.Weknowthattheearthturns once in 24 hours. By dividing the distance around the earth (360°) by the time it takes for the earth to rotate once on its axis (24 hours) we find that the earth turns 15° per hour. It is extremely important for children to realize that the apparent night motion of the stars is due to the earth’s rotation, and not movement of the stars! Think ofthestarsasbeingstationaryinspace.Whatwillastarontheeasternhorizonap-pear to do as the earth turns toward the east? Obviously it will appear to rise. Follow-ing the same logic, it is apparent that the North Star will not appear to move since it is over the axis of the earth. The stars which are near the North Star will appear to circle the earth. The stars which are near the North Star will appear to circle it since they are seen too far above the horizon to rise and set.
The movement of the earth around the sun is called revolution. The earth revolves aboutthesuninapproximately365and1/4daysoronecalendaryear.Whiletheearth is revolving around the sun, its axis points toward the North Star (Polaris). Since the axis angle never changes, the angle between the earth’s axis and the sun is constantly changing; giving us our seasons and causing changes in the stars which are visible.
Materials• STARLABPortablePlanetarium• Projector• StarfieldCylinder
• B–73 • K–6 Activities
Seasonal Changes, Activity 6-4
Objective
The student should be able to demonstrate an understanding of the seasonal changes in stellar locations due to the revolution of the earth around the sun.
Background
Manyconstellationsappeartochangepositionsintheskyastheseasonschange.If you know your constellations well, you can use them as a calendar to help tell the month of the year.
Procedure• LocatetheBigDipperandCassiopeiainthenorthernsky.Whichoneseems
tobeontop?(CassiopeiawillbeontopiftheprojectorissetforobservinginMay).Turntheprojectioncylindermonth-by-monthandhavethestudentsobserveor chart the location of these two constellations throughout the different seasons.
• Havetheprojector(witheithercylinder)setforobservinginAugustat9:00p.m.Locate the constellations Sagittarius, Scorpius, and Libra in the southern and western sky close to the horizon or the ecliptic. Turn the cylinder so the students will see these constellations pass from view in the west. In early November at 9:00p.m.theconstellationsCapricornus,Aquarius,andPisceswillappearinthesouth and west along the ecliptic. Again, turn the cylinder stopping on another month and locating the constellations seen in the southern sky. In this manner, the students will observe a general east to west movement of constellations through-out different seasons of the year.
Materials• STARLABPortablePlanetarium• Projector• ConstellationCylinder• StarfieldCylinder
K–6 Activities • B–74 •
Materials• STARLABPortablePlanetarium• Projector• StarfieldCylinder
Stellar Position — Poles vs. Equator, Activity 6-5
Objective
The student should be able to demonstrate an understanding of the differences in stel-lar position at the equator versus the polar region.
Procedure• DemonstratetheskyasseenfromtheNorthPole.Tilttheprojectortoalatitude
of90°North.LocatetheBigDipperandPolaris.Turnonthedailymotionswitchand slowly rotate the cylinder in a complete circle. Show the students what stellar motion is like as viewed from the North Pole.
• Showtheskyasseenfromtheequator.Changethelatitudeofthecylinderto0°or the equator. If the change is made slowly, the students will see familiar stars disappear to the north while new stars appear to the south. Turn on the daily mo-tion to move the cylinder slowly in a complete circle. This will demonstrate stellar motion as seen from the equator. The North Star is due north on the horizon. The South Pole of the sky is due south on the horizon. The South Pole is hard to locate because no conspicuous stars mark it. Both points (the North and South Poles of the sky) will not appear to move.
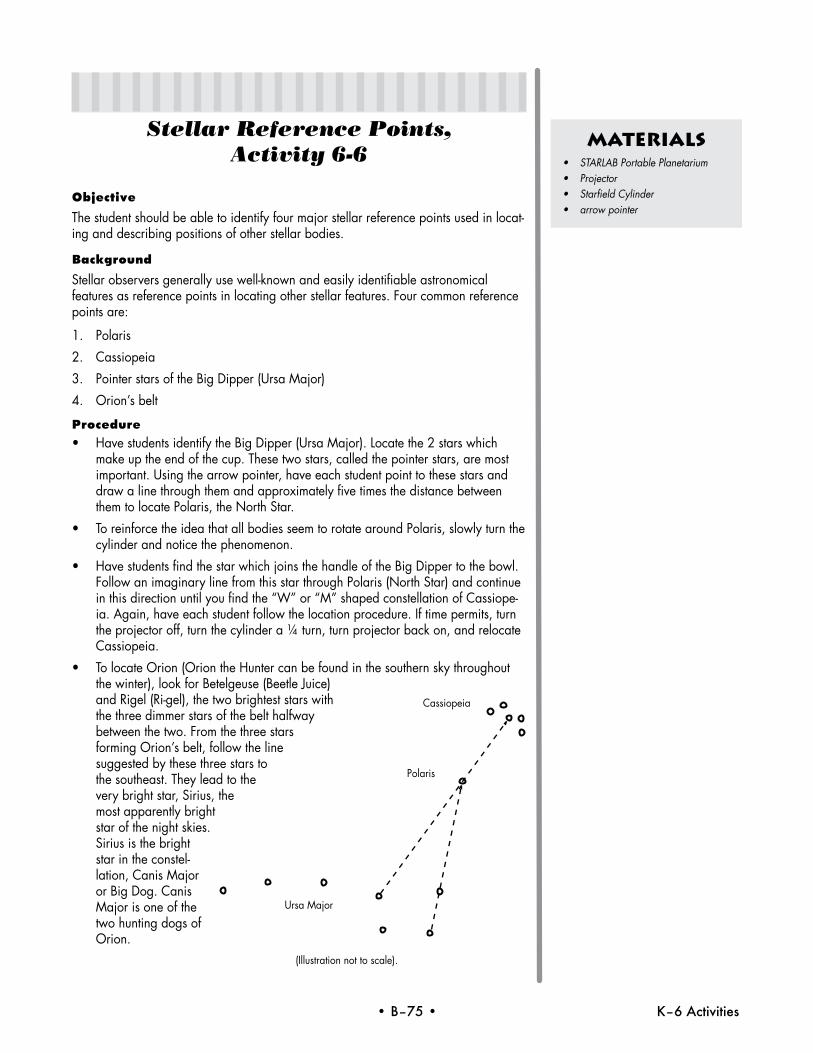
• B–75 • K–6 Activities
Cassiopeia
Polaris
UrsaMajor
(Illustration not to scale).
Stellar Reference Points, Activity 6-6
Objective
Thestudentshouldbeabletoidentifyfourmajorstellarreferencepointsusedinlocat-ing and describing positions of other stellar bodies.
Background
Stellar observers generally use well-known and easily identifiable astronomical features as reference points in locating other stellar features. Four common reference points are:
1. Polaris
2. Cassiopeia
3. PointerstarsoftheBigDipper(UrsaMajor)
4. Orion’s belt
Procedure• HavestudentsidentifytheBigDipper(UrsaMajor).Locatethe2starswhich
make up the end of the cup. These two stars, called the pointer stars, are most important. Using the arrow pointer, have each student point to these stars and draw a line through them and approximately five times the distance between them to locate Polaris, the North Star.
• ToreinforcetheideathatallbodiesseemtorotatearoundPolaris,slowlyturnthecylinder and notice the phenomenon.
• HavestudentsfindthestarwhichjoinsthehandleoftheBigDippertothebowl.Follow an imaginary line from this star through Polaris (North Star) and continue inthisdirectionuntilyoufindthe“W”or“M”shapedconstellationofCassiope-ia. Again, have each student follow the location procedure. If time permits, turn theprojectoroff,turnthecylindera1/4turn,turnprojectorbackon,andrelocateCassiopeia.
• TolocateOrion(OriontheHuntercanbefoundinthesouthernskythroughoutthewinter),lookforBetelgeuse(BeetleJuice)and Rigel (Ri-gel), the two brightest stars with the three dimmer stars of the belt halfway between the two. From the three stars forming Orion’s belt, follow the line suggested by these three stars to the southeast. They lead to the very bright star, Sirius, the most apparently bright star of the night skies. Sirius is the bright star in the constel-lation,CanisMajoror Big Dog. Canis Majorisoneofthetwo hunting dogs of Orion.
Materials• STARLABPortablePlanetarium• Projector• StarfieldCylinder• arrowpointer
K–6 Activities • B–76 •
Greek Mythological Constellations, Activity 6 -7
Objective
The student should be able to observe the location and discuss the Greek mytho-logical origin of the zodiacal constellation.
Background
The twelve zodiacal constellations are:
• Aries,theRam
• Taurus,theBull
• Gemini,theTwins
• Cancer,theCrab
• Leo,theLion
• Virgo,theVirgin
• Libra,theScales
• Scorpius,theScorpion
• Sagittarius,theArcher
• Capricornus,theSeaGoat
• Aquarius,theWaterBearer
• Pisces,theFishes
Procedure• Locatethe12zodiacalconstellationsusingtheConstellationCylinderorGreek
MythologyCylinder.(TheDoitYourselfStarFinderwillalsohelp).
• Thenlocatethe12zodiacalconstellationsontheStarfieldCylinder.
• Optional:refertotheConstellationLocatorScript.
Materials• STARLABPortablePlanetarium• Projector• StarfieldCylinder• ConstellationsCylinder• GreekMythologyCylinder• DoitYourselfStarFinder
• B–77 • K–6 Activities
Native American and Greek Myths, Activity 6-8
Objective
Thestudentshouldbeabletodiscussandcompare/contrastthelegendsoftheNa-tiveAmericanandtheGreeklegendsofUrsaMajor,UrsaMinor,Cassiopeia,andOrion.
Procedure• DiscussandcompareNativeAmericanMythologywithGreekmythological
origins of selected constellations.
• Studentsmaybedividedintogroupsforresearchandpresentationofconstel-lation origin: Native American and Greek. Presentations can be given in the STARLAB.
Materials• STARLABPortablePlanetarium• Projector• StarfieldCylinderOptional• NativeAmericanMythologyCylin-
der• GreekMythologyCylinder
K–6 Activities • B–78 •
Using a Star Finder, Activity 6-9
Objective
The student should be able to demonstrate the use of a Do it Yourself Star Finder by locating a given constellation within the portable planetarium.
Background
Follow the specific directions for the Do it Yourself Star Finder.
Procedure
WiththeStarfieldCylinderinplaceandlatitudeset,handouttheDoitYourselfStarFinders. Beginning with easy-to-find constellations, have students locate them for a particular day and time of the year.
Materials• STARLABPortablePlanetarium• Projector• StarfieldCylinder• DoitYourselfStarFinder
• B–79 • K–6 Activities
Stars & Skies Supplemen-tal Activities for Grades 4-6
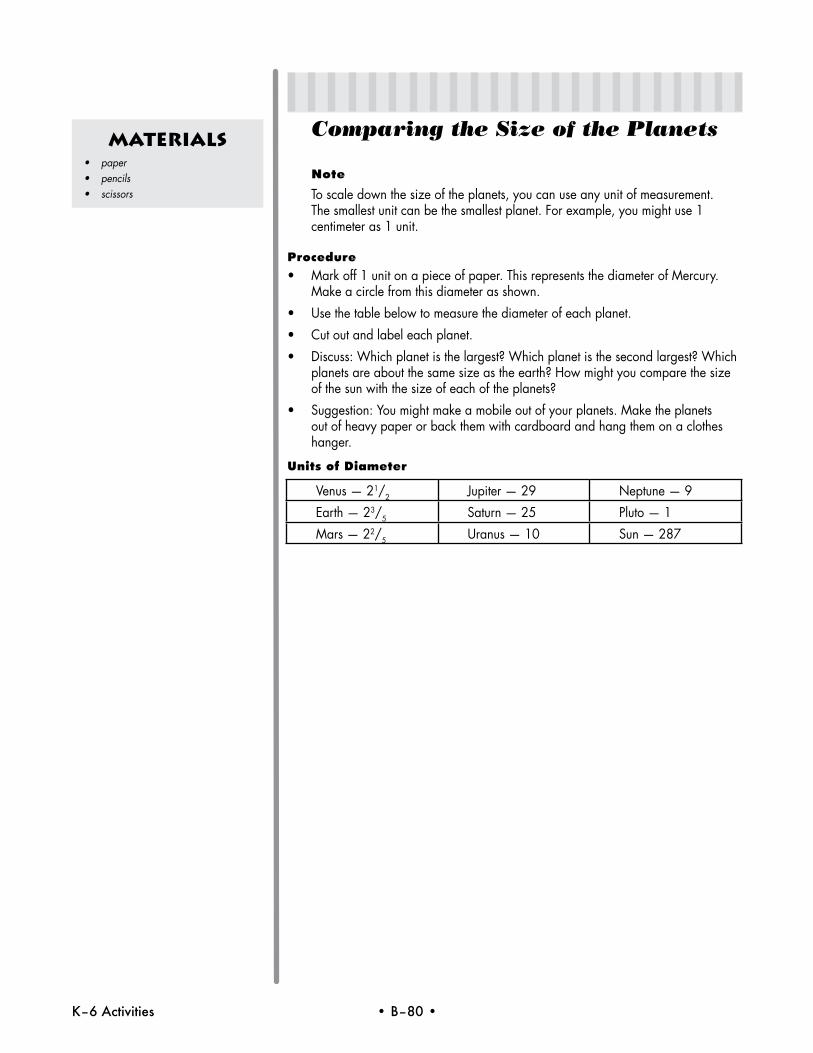
K–6 Activities • B–80 •
Comparing the Size of the Planets
Note
To scale down the size of the planets, you can use any unit of measurement. The smallest unit can be the smallest planet. For example, you might use 1 centimeter as 1 unit.
Procedure• Markoff1unitonapieceofpaper.ThisrepresentsthediameterofMercury.
Makeacirclefromthisdiameterasshown.
• Usethetablebelowtomeasurethediameterofeachplanet.
• Cutoutandlabeleachplanet.
• Discuss:Whichplanetisthelargest?Whichplanetisthesecondlargest?Whichplanets are about the same size as the earth? How might you compare the size of the sun with the size of each of the planets?
• Suggestion:Youmightmakeamobileoutofyourplanets.Maketheplanetsout of heavy paper or back them with cardboard and hang them on a clothes hanger.
Units of Diameter
Venus — 21/2 Jupiter—29 Neptune—9
Earth — 23/5 Saturn — 25 Pluto — 1
Mars—22/5 Uranus — 10 Sun—287
Materials• paper• pencils• scissors
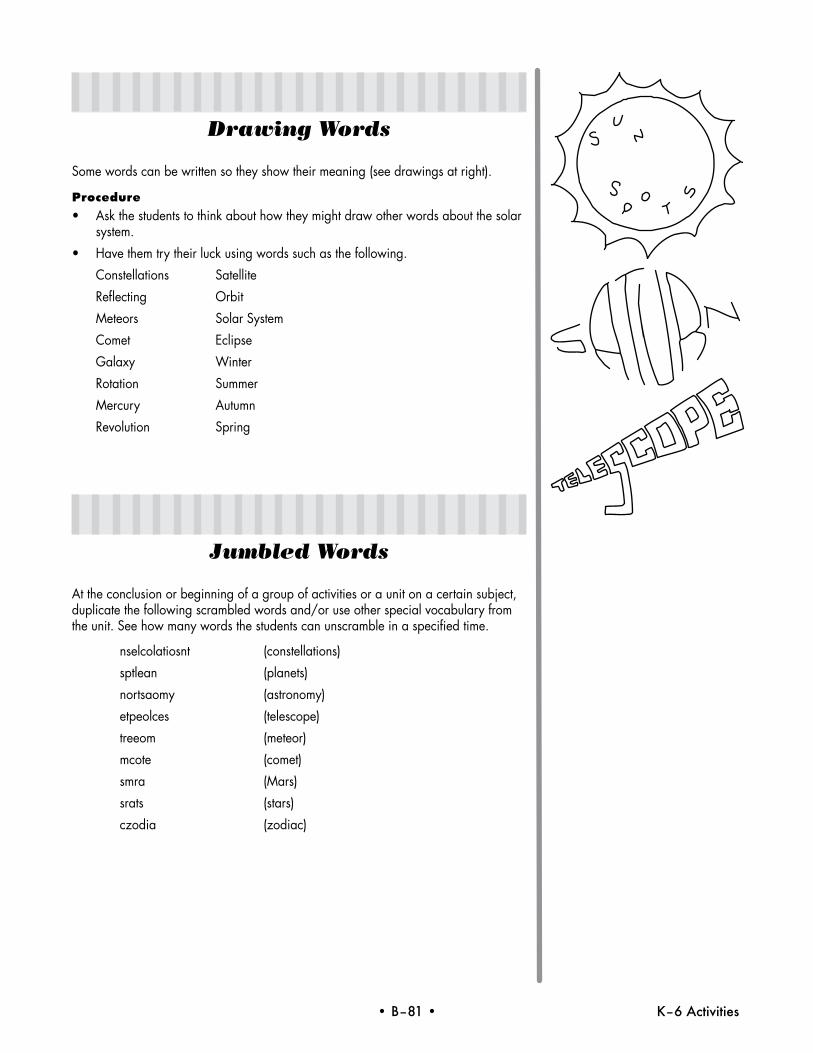
• B–81 • K–6 Activities
Drawing Words
Some words can be written so they show their meaning (see drawings at right).
Procedure• Askthestudentstothinkabouthowtheymightdrawotherwordsaboutthesolar
system.
• Havethemtrytheirluckusingwordssuchasthefollowing.
Constellations Satellite
Reflecting Orbit
Meteors SolarSystem
Comet Eclipse
Galaxy Winter
Rotation Summer
Mercury Autumn
Revolution Spring
Jumbled Words
Attheconclusionorbeginningofagroupofactivitiesoraunitonacertainsubject,duplicatethefollowingscrambledwordsand/oruseotherspecialvocabularyfromthe unit. See how many words the students can unscramble in a specified time.
nselcolatiosnt (constellations)
sptlean (planets)
nortsaomy (astronomy)
etpeolces (telescope)
treeom (meteor)
mcote (comet)
smra (Mars)
srats (stars)
czodia (zodiac)
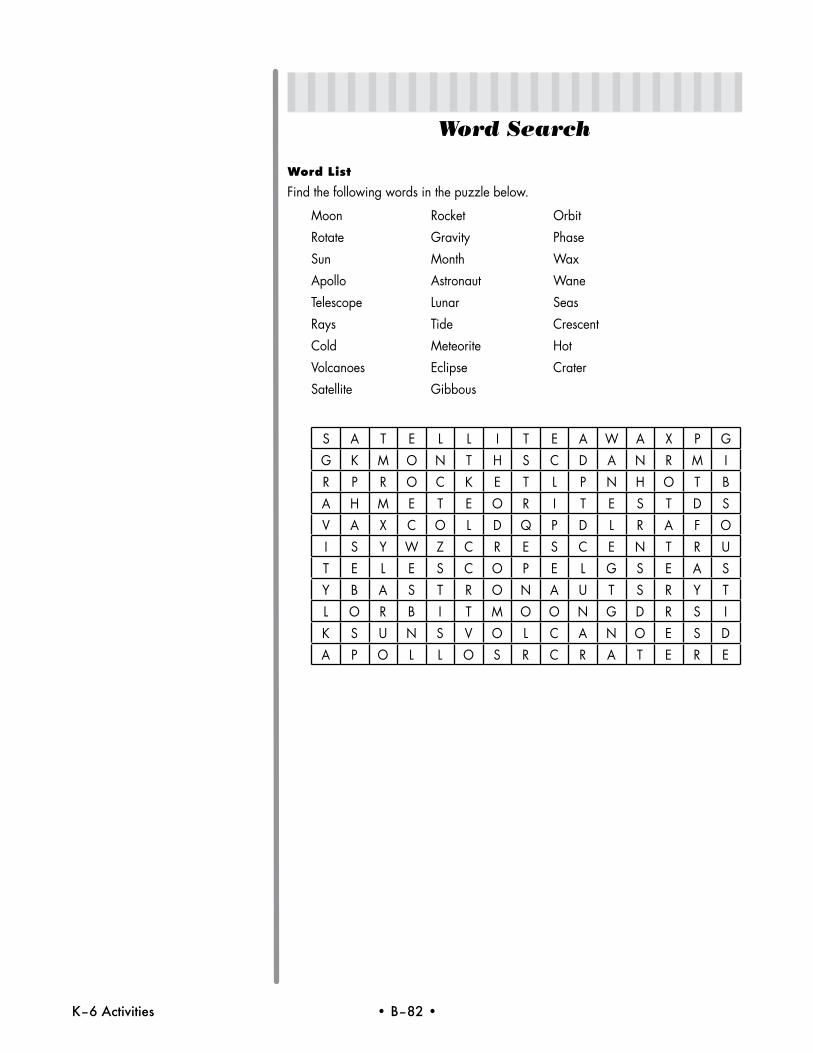
K–6 Activities • B–82 •
Word Search
Word List
Find the following words in the puzzle below.
Moon Rocket Orbit
Rotate Gravity Phase
Sun Month Wax
Apollo Astronaut Wane
Telescope Lunar Seas
Rays Tide Crescent
Cold Meteorite Hot
Volcanoes Eclipse Crater
Satellite Gibbous
S A T E L L I T E A W A X P G
G K M O N T H S C D A N R M I
R P R O C K E T L P N H O T B
A H M E T E O R I T E S T D S
V A X C O L D Q P D L R A F O
I S Y W Z C R E S C E N T R U
T E L E S C O P E L G S E A S
Y B A S T R O N A U T S R Y T
L O R B I T M O O N G D R S I
K S U N S V O L C A N O E S D
A P O L L O S R C R A T E R E
• B–83 • K–6 Activities
Making Constellation Slides
Procedure• Useprocessedblack35mmslides(orslidesyoutookwhenyouthoughtthere
was enough light) to make constellation slides. Place the black slides on a soft surface such as a magazine. Using a needle, poke small holes in the slide at locations corresponding to star positions in the constellations.
• Ashoeboxmakesagoodprojectorforconstellationslidesmadeoutofblackconstructionpaper.Ifeachstudentmadeaprojectorandaslideyouwouldhavesome good material for a quiz. Cut the end out of a shoe box and two slots on each side to allow a piece of black construction paper, with pin holes in the form ofaconstellation,toslidethrough.Placeaflashlightontheinsideoftheboxorcut out the other end of the box to allow light to pass through the pin holes.
• Cleartransparencieswiththeconstellationsdrawnonthemisasimplewaytoprojectthestars.
• Haveseveralstudentsdrawstars(smalldotsforsmallcircles)hitormissonthechalkboard so that the board is quite full of “stars” in the “sky.” The students may use a piece of plain white paper and fill their “sky” full of “stars” and then exchange their paper with another student. Ask the children to see if they could joinsometogetherwithalineandtellwhatthispictureremindsthemof.
Lost in Space
Note
The purpose of this activity is to become familiar with the facts about the universe.
Procedure• Theclassistobedividedintotwoteamsofequalability.
• Eachteamelectsacaptainwhowillberesponsibleforgivingtheteamanswer.The first player on Team A gives a one-sentence description of where he is; for example: “I am on a planet that has four moons.” The players on Team B have up to three team guesses to guess where player on Team A is. If they guess cor-rectly, the player from Team A is captured and becomes a member of Team B. If they do not guess correctly, the first player from Team B describes where he is and the players from Team A do the guessing. The team with the most players at the end of the allotted time is declared the winner.
• Itwouldbehelpfultothestudentstogivethemalittletimetodosomeresearchon their own location. To avoid errors, the pupil who gives the description might be requested to write the correct answer to where he is lost and allow the teacher to check it, to insure that his clue description is correct.
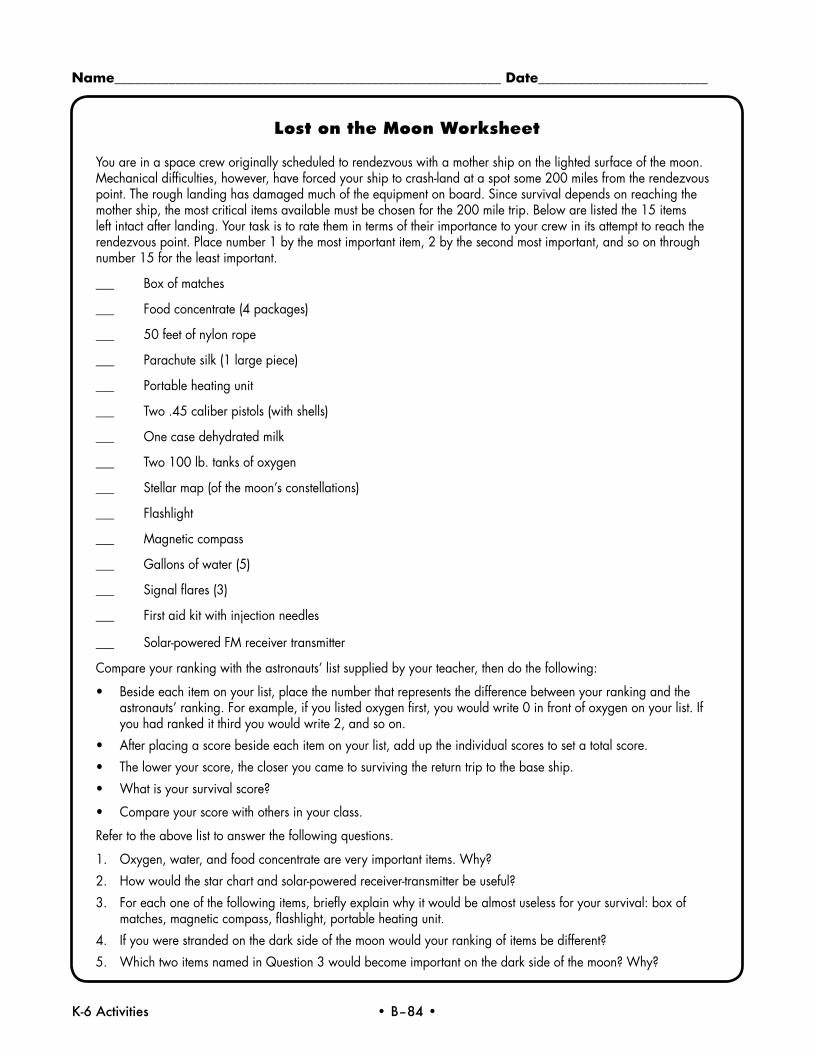
Name_________________________________________________________ Date_________________________
K-6 Activities • B–84 •
Lost on the Moon Worksheet
You are in a space crew originally scheduled to rendezvous with a mother ship on the lighted surface of the moon. Mechanicaldifficulties,however,haveforcedyourshiptocrash-landataspotsome200milesfromtherendezvouspoint. The rough landing has damaged much of the equipment on board. Since survival depends on reaching the mother ship, the most critical items available must be chosen for the 200 mile trip. Below are listed the 15 items left intact after landing. Your task is to rate them in terms of their importance to your crew in its attempt to reach the rendezvous point. Place number 1 by the most important item, 2 by the second most important, and so on through number 15 for the least important.
___ Box of matches
___ Food concentrate (4 packages)
___ 50 feet of nylon rope
___ Parachute silk (1 large piece)
___ Portable heating unit
___ Two .45 caliber pistols (with shells)
___ One case dehydrated milk
___ Two 100 lb. tanks of oxygen
___ Stellar map (of the moon’s constellations)
___ Flashlight
___ Magneticcompass
___ Gallons of water (5)
___ Signalflares(3)
___ Firstaidkitwithinjectionneedles
___ Solar-poweredFMreceivertransmitter
Compare your ranking with the astronauts’ list supplied by your teacher, then do the following:
• Besideeachitemonyourlist,placethenumberthatrepresentsthedifferencebetweenyourrankingandtheastronauts’ ranking. For example, if you listed oxygen first, you would write 0 in front of oxygen on your list. If you had ranked it third you would write 2, and so on.
• Afterplacingascorebesideeachitemonyourlist,adduptheindividualscorestosetatotalscore.
• Theloweryourscore,thecloseryoucametosurvivingthereturntriptothebaseship.
• Whatisyoursurvivalscore?
• Compareyourscorewithothersinyourclass.
Refer to the above list to answer the following questions.
1. Oxygen,water,andfoodconcentrateareveryimportantitems.Why?
2. How would the star chart and solar-powered receiver-transmitter be useful?
3. Foreachoneofthefollowingitems,brieflyexplainwhyitwouldbealmostuselessforyoursurvival:boxofmatches,magneticcompass,flashlight,portableheatingunit.
4. If you were stranded on the dark side of the moon would your ranking of items be different?
5. WhichtwoitemsnamedinQuestion3wouldbecomeimportantonthedarksideofthemoon?Why?
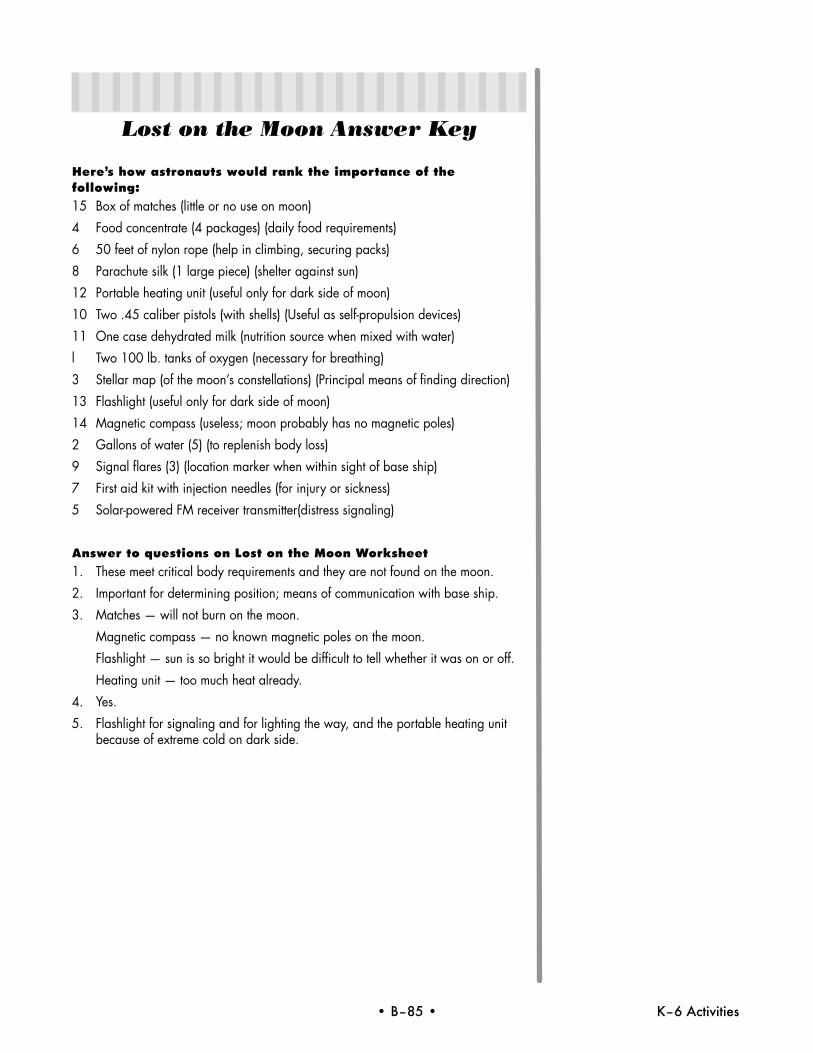
• B–85 • K–6 Activities
Lost on the Moon Answer Key
Here’s how astronauts would rank the importance of the following:15 Box of matches (little or no use on moon)
4 Food concentrate (4 packages) (daily food requirements)
6 50 feet of nylon rope (help in climbing, securing packs)
8 Parachute silk (1 large piece) (shelter against sun)
12 Portable heating unit (useful only for dark side of moon)
10 Two .45 caliber pistols (with shells) (Useful as self-propulsion devices)
11 One case dehydrated milk (nutrition source when mixed with water)
l Two 100 lb. tanks of oxygen (necessary for breathing)
3 Stellar map (of the moon’s constellations) (Principal means of finding direction)
13 Flashlight (useful only for dark side of moon)
14 Magneticcompass(useless;moonprobablyhasnomagneticpoles)
2 Gallons of water (5) (to replenish body loss)
9 Signalflares(3)(locationmarkerwhenwithinsightofbaseship)
7 Firstaidkitwithinjectionneedles(forinjuryorsickness)
5 Solar-poweredFMreceivertransmitter(distresssignaling)
Answer to questions on Lost on the Moon Worksheet1. These meet critical body requirements and they are not found on the moon.
2. Important for determining position; means of communication with base ship.
3. Matches—willnotburnonthemoon.
Magneticcompass—noknownmagneticpolesonthemoon.
Flashlight — sun is so bright it would be difficult to tell whether it was on or off.
Heating unit — too much heat already.
4. Yes.
5. Flashlight for signaling and for lighting the way, and the portable heating unit because of extreme cold on dark side.
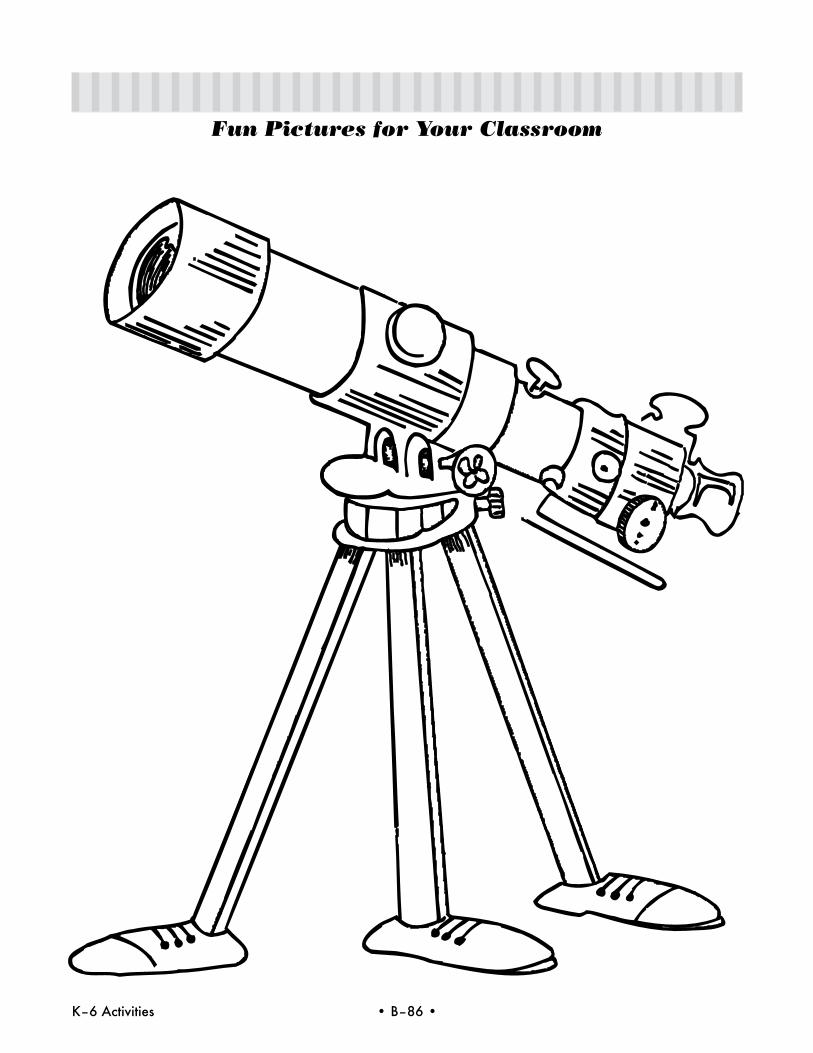
K–6 Activities • B–86 •
Fun Pictures for Your Classroom

• B–87 • K–6 Activities
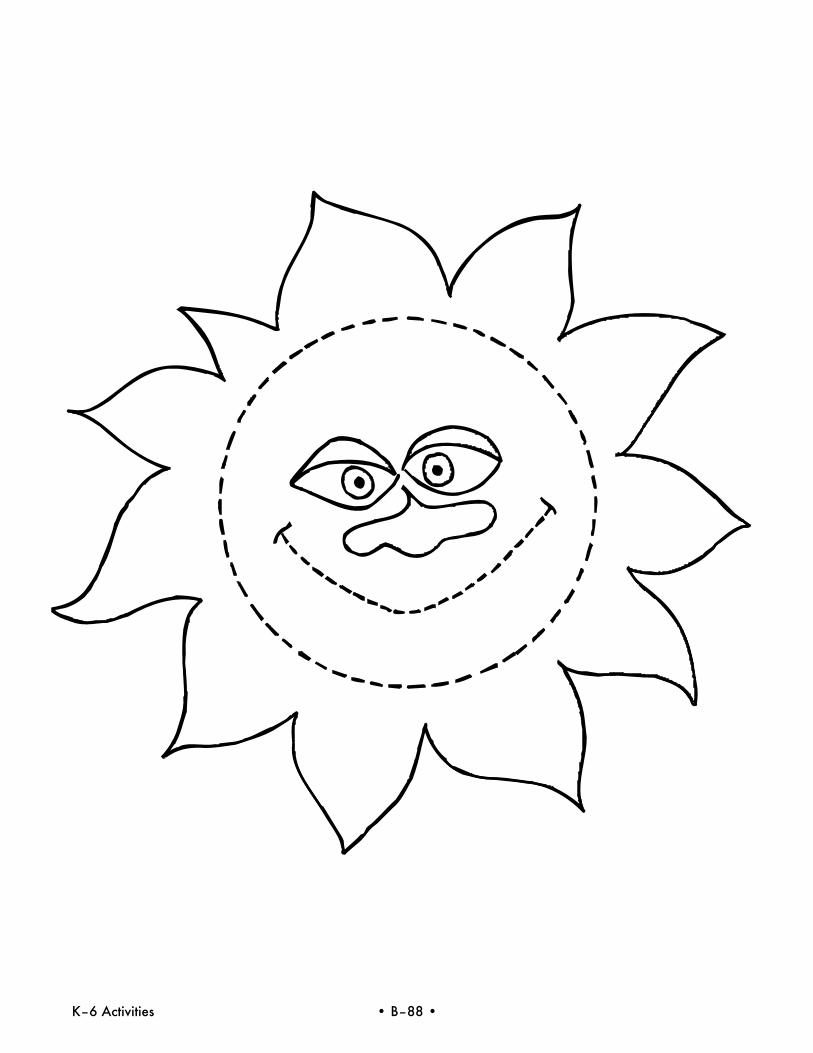
K–6 Activities • B–88 •