Embed Size (px)
Citation preview

WorkInTexas.com –
State Agency Desk
Aid
2019
STATE AGENCY ACCOUNTS – CREATING JOB ORDERS
TEXAS WORKFORCE COMMISSION

1
Table of Contents Overview ............................................................................................. 3
Background ......................................................................................... 3
Privileges Required to Create Job Orders for an Employer ....................... 3
Creating Job Orders .............................................................................. 4
Setting Up Job Order Templates .......................................................... 4
Step 1: Valid WorkInTexas.com Login Credentials ............................... 4
Step 2: Navigate to Job Order Plan.................................................... 5
Step 3: Job Order Plan options ......................................................... 6
Step 3a: Application Questions ......................................................... 6
Step 3b: Create Job Skill Sets......................................................... 16
Step 3c: Add a Tools and Technology Set ......................................... 30
Step 4: Create Job Order Templates ................................................ 36
Step 4a: Job Order Template Wizard – Job Title and Occupation ......... 37
Step 4b: Job Order Template Wizard – Location and Contact Person .... 43
Step 4c: Job Order Template Wizard – Job Details ............................. 44
Step 4d: Job Order Template Wizard – Job Description ...................... 47
Step 4e: Job Order Template Wizard – Skills and Other Skill Sets ....... 48
Step 4f: Job Order Template Wizard – Hiring Requirements ................ 50
Step 4g: Job Order Template Wizard – Compensation and Benefits ..... 55
Step 4h: Job Order Template Wizard – Job Application Methods .......... 58
Step 4i: Job Order Template Wizard: Job Upload Options ................... 63
Creating Job Orders: From Templates ................................................ 66
Create Job Order from Job Order Templates ..................................... 66
Create Job Order from Add Job Order Page – Use Job Order Template . 70
Creating Job Orders: Without a Template............................................ 77
Approach 1: Create a New Job—Basic Job Order ............................... 77
Approach 2: Create a New Job—Custom Job Order ............................ 86

2
Approach 3: Create a Job Order using the Copy Job Order Method ...... 96

3
WorkInTexas.com State Agencies – Creating Job Orders
Overview
This document is intended to be a desk aid to assist State Agencies using
WorkInTexas.com to successfully create and manage job orders for their
agency.
NOTE: To create and manage job orders in WorkInTexas.com, an employer
contact must be granted appropriate privileges.
Background
In WorkInTexas.com, job orders can be created using several methods, all of
which are explained in this document.
Privileges Required to Create Job Orders for
an Employer
To create job orders, employer contacts must have appropriate privileges.
To review the privileges associated with an employer contact, select the
Contacts/Users link in the Corporate Profile. Select the User Privileges tab
and review the Recruiting Privileges section. For more information about
these privileges, see Step 4d (section two) of the training module on
Managing Employer Contacts.

4
Creating Job Orders
This section of the document provides information to preset data that will be
used to create job orders.
Setting Up Job Order Templates
To provide efficiency and standardization for your agency’s employer
account, WorkInTexas.com provides tools to create reusable data for
sections of job orders that are likely to be repeated on similar job orders. For
example: skill sets, tools and technology, and applicant screening questions.
Additionally, standardized job order templates can be set up in advance and
used to quickly add new job orders.
Step 1: Valid WorkInTexas.com Login Credentials
To login to WorkInTexas.com as an employer, you must have a username
and password. Except for the primary user who registered the Employer
Master Account, employer contacts (users) cannot register or create their
own login credentials. Contact accounts must be created by another
employer contact with appropriate privileges, or by TWC staff directly
supporting WorkInTexas.com.
Once a login-capable employer contact account (user) has been created, the
contact will login to WorkInTexas.com using the provided username and
temporary password.

5
Figure 1: WorkInTexas.com Sign In page
Step 2: Navigate to Job Order Plan
Once logged into WorkInTexas.com, the employer contact will be able to
view all job orders associated with the Employer account. To create a new
job order, navigate to the Job Orders tab using one of the following paths:
• Quick Menu >> Manage Jobs
• Quick Menu >> Employer Portfolio >> Human Resources Plan >> Job
Order Plan
• Using the menu tree, click the plus sign to open the Human Resource
Plan, click the plus sign to open the Job Order Plan, and select the Job
Orders link

6
Figure 2: Job Order Templates - Job Orders Tab
Step 3: Job Order Plan options
Before creating job orders, use the following links in the menu tree under
Job Order Plan to access frequently used sections. This will simplify the
process of creating job orders.
• Job Order Templates
• Application Questions
• Job Skill Sets
• Tools and Technologies
Step 3a: Application Questions
To create new application questions or verify existing application questions
(applicant screening questions) select the Application Questions link in the
Job Order Plan menu tree.
The Application Questions page will display any existing applications
question sets. Filters help employer contacts view current, deleted, or all
application question sets. Deleted question sets can be restored and made
active again.

7
Figure 3: View existing Application Question Sets page
To add new Application Questions, select the Create Application Questions
button at the bottom of the Application Questions page.
Figure 4: Create Application Questions button
The Create Application Questions page contains two sections: Question Set
Information and Add a Question.

8
Section: Question Set Information
The Question Set Information section applies to all questions that are
created for a specific question set and includes two required fields:
• Question Set Name
• Question Set Instructions
The Question Set Name should be descriptive and relate to the type(s) of job
order it will be applied to so that employer contacts can quickly identify
appropriate application question sets for new job orders.
The Question Set Instructions field allows up to 2000 characters of free text.
The instructions will display to individuals (job seekers) and help them
understand the application question when applying for the agency’s open job
order(s).
Figure 5: Application Questions - Question Set Information
Section: Add a Question
The Add a Question section of the form provides a method for adding a new
question to the question set. To create a new question, the following fields
are provided:
• Question

9
• Response Type
➢ Numeric
➢ Yes / No
➢ Text
➢ Yes / No / Maybe
➢ Multiple Choice
➢ Date
➢ Phone Number
➢ Currency
• Do you require a response to this question? (Yes/No) Certain selections
from this dropdown menu will prompt the display of two additional
questions, as follows.
➢ Do you have a preferred response for this question? (Yes/No)
➢ What is that preference? (depends upon the question type and
responses selected in the fields above)
Figure 6: Application Questions - Add a Question – Response Types
10
Response Types: When Yes/No, Yes/No/Maybe, or Multiple Choice are
selected, additional questions will automatically display. The additional
questions about preferred responses are optional but can be useful when
there is a preferred response being sought for a specific application question.
Figure 7: Application Questions - Add a Question – Preferred Response
Once all fields are completed, select the Save button to add the new
question to the question set. Saving the new question prompts
WorkInTexas.com to display the full list of application questions in the
question set for review. Additional questions can be added to this question
set by selecting the Add a Question link. Other options on the Question Set
Information page allow an employer contact to Preview Question Set
(individual’s view of the question set), Add a Question, or Return to Question
Set List (which finishes and saves the question set).

11
Figure 8: Application Questions - Review Question Set
Existing Application Questions can be previewed or edited by selecting the
appropriate link from the Action column on the Application Questions page.
The Preview link displays the questions as they will appear when an
individual is applying for the agency’s open job order. To return to the
Application Questions page, select the Return to Previous page button.

12
Figure 9: Application Questions - Edit Question Set
The Edit link allows the employer contact to edit a question set. Near the top
of the Edit Question Set page, the Number of candidate responses field
displays. The number associated with this field indicates the number of
individuals that have already answered the current version of the application
questions when applying for the open job order.
NOTE: Editing or changing the application question set after individuals have
already answered the questions could offset the responses. Individual
responses that were correct for the initial questions may not be correct after
the questions are edited. To be fair to individual applicants, questions should
not be edited after individuals have already answered the questions and
submitted their applications.

13
Figure 10: Application Questions - Number of Candidate Responses
In the Questions to be Asked section, the Response Type column displays
the selected response type for each question in the application question set.
The Response Required column indicates what type of response type is
expected for each application question.
Figure 11: Application Questions - Review Questions - Response Type
To edit a specific question, select the Edit link in the Action column. To
remove a specific question from the question set, select the Delete link. To

14
copy an existing question and modify it to create a new question, select the
Copy link.
Figure 12: Application Questions - Available Actions
To review and edit the preferred responses for the application questions,
select the Enter Response Preferences link under the Action column at the
bottom of the page.

15
Figure 13: Application Questions - Enter Response Preferences
The Enter Response Preferences link displays all questions that have
preferred responses (Yes/No, Yes/No/Maybe, or Multiple Choice). Answers
can be selected that correspond to the employers preferred response to each
question. Click the Save button to keep all changes to the preferred
responses. Preferred response settings are optional and can be left blank if a
preferred response is not desired. To unselect a field and set it back to
blank, select the Reset All Answers link above the Save button at the bottom
of the page and then reselect the preferred responses for the questions that
should have them.

16
Figure 14: Application Questions - Preferred Responses - Save
If no changes are needed to the question set, or once all changes have been
made, select the Return to Question Set List button at the bottom of the Edit
Questions page.
Figure 15: Application Questions - Return to Question Set List
Step 3b: Create Job Skill Sets
Setting up skill sets is a key step in creating quality job orders in
WorkInTexas.com. Skill sets also increase the probability of finding qualified
individuals that meet the requirements of your job orders. WorkInTexas.com
utilizes an automated matching process that looks at an individual’s skill set

17
and compares it to a job order’s skill set to determine how well they match.
A job order with a well-defined skill set has a higher probability of finding
qualified individuals interested in applying for the job.
To navigate to the Job Skill Sets page, return to the Job Order Plan menu by
selecting Employer Portfolio from the Quick Menu >> Human Resources Plan
>> Job Order Plan. The Job Skill Sets tab is on the Job Orders Plan page.
Figure 16: Job Skill Sets – Navigate to Job Skill Sets Page
The Job Skill Sets page displays all existing job skill sets that have been
saved for the agency’s account and allows employer contacts to define new
Job Skill Sets.
To create a new job skill set, select the Add Skill Set button at the bottom of
the Job Skill Sets page.

18
Figure 17: Job Skill Sets - Add Skill Set
The Add Skill Set page provides two options or links for defining a new job
skill set:
• Analyze Skills
• Skill Matching
Approach 1: Analyze Skills
The Analyze Skills page guides the employer contact through groupings of
skills and allows selection of any skills within these groupings. These skill
groupings include:
• General Skills
• Computers & Mathematics
• Construction
• Education & Social Services
• Entertainment & Media
• Financial Services
• Agriculture & Wildlife
• Healthcare
• Legal & Protective Services

19
• Management & Office Services
• Science & Engineering
• Service & Sales
• Skilled Trades
• Transportation
Figure 18: Add Skill Set - Analyze Skills
To set up a skill set grouping using this process, review each job skill
category tab and select appropriate skills from each tab or page. To select all
skills displayed on a selected skills tab, select the Check All Skills in This
Category link below the Job Skills Categories section of the page.

20
Figure 19: Add Skill Set - Analyze Skills - Select All Skills
To unselect all skills listed on a selected skills tab, select the Uncheck All
Skills in This Category link.
Figure 20: Add Skill Set - Analyze Skills - Unselect All Skills
Each skill listed on a Skills tab can also be manually selected or unselected.
After reviewing the skills for all skills tabs and selecting appropriate skills for
the new job skill set, a summary of the number of skills selected for each
category will display in parenthesis next to each tab’s job skill category at
the top of the page.

21
Figure 21: Add Skill Set - Analyze Skills - Review Number of Skills Selected
by Category
When all skills have been selected from the Job Skill Categories, select the
Save Skills and Continue button to move to the next step of the job skills set
creation process.
Figure 22: Add Skill Set - Analyze Skills - Save Selected Skills
WorkInTexas.com displays a summary of all skills selected for the new job
skill set for review. If modifications are needed, select the Modify Skills link
at the bottom of the page to return to the skills selection page.

22
Figure 23: Add Skill Set - Analyze Skills - Modify Skills
If no changes are needed for the displayed skills, select the Continue button.
Figure 24: Add Skill Set - Analyze Skills
Enter a Skill Set Description on the next page. The description for the job
skill set should be meaningful to any employer contact so they can quickly
identify the desired job skill set and add it to the job order. Click the Save
button to continue.
Figure 25: Add Skill Set - Analyze Skills - Skill Set Description

23
After saving the Skill Set Description, the wizard will return the employer
contact to the Job Skill Set page where the new job skill set is displayed.
Approach 2: Skills Matching
The second approach to creating a job order skill set is to use the Skills
Matching path. To create a job skill set using this approach, select the Add
Skill Set button at the bottom of the Job Skill Sets page.
Figure 26: Skill Sets - Skills Matching - Add Skill Set
To use the second option, select the Skills Matching link.
Figure 27: Skill Sets - Skills Matching - Select Approach

24
The Skills Matching approach closely aligns the job skill set to a specific
occupation and the recommended skills for the closest matching O*NET
occupation. The Skills Matching page will provide several search options for
finding a set of skills for a specific occupation, which include the following:
• Occupations by Keyword
• Occupations by Group
• Occupation Listing
• Occupations by Education Program
• Occupations by Military Specialty
• Occupations by Occupation Code
• Occupations by License
Figure 28: Skill Sets - Skills Matching - Occupation Search Options
Select a method to search for the occupation that most closely represents
the new job skill set and submit the search. Results will display a list of
matching occupations that match the search criteria.
25
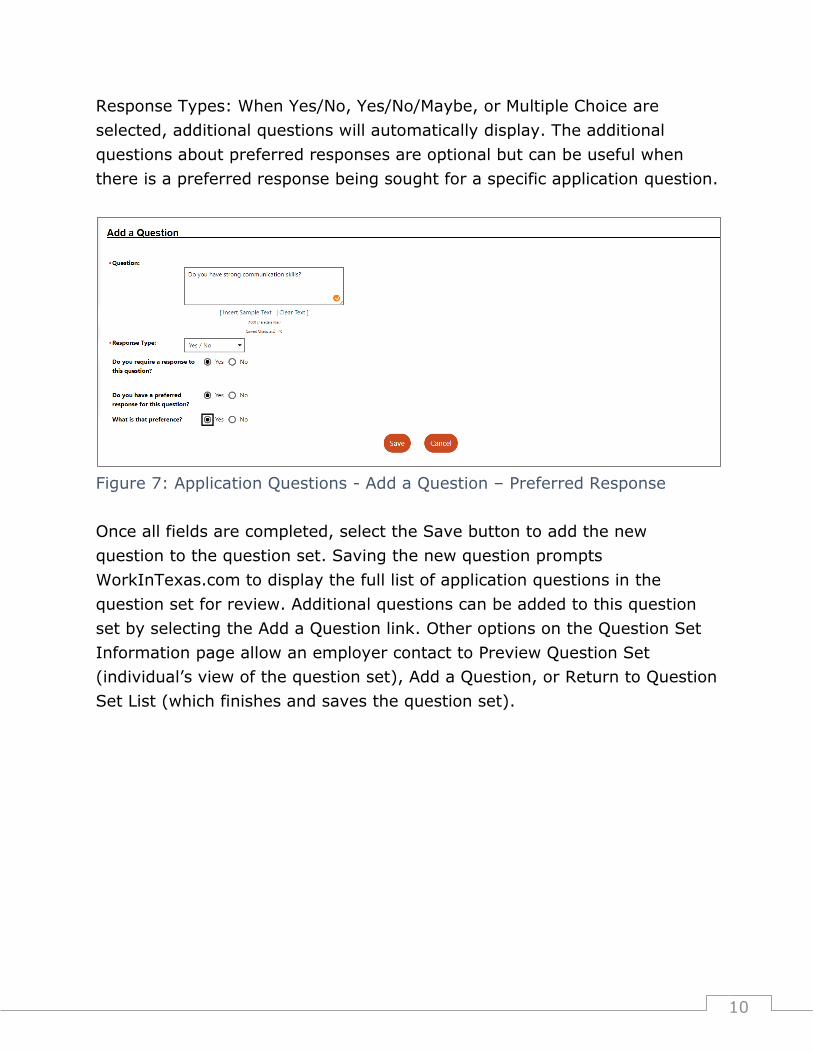
Figure 29: Skill Sets - Skills Matching - Occupation Search Results
Select a single occupation by clicking the Occupation name link from the
Occupation column of the results.
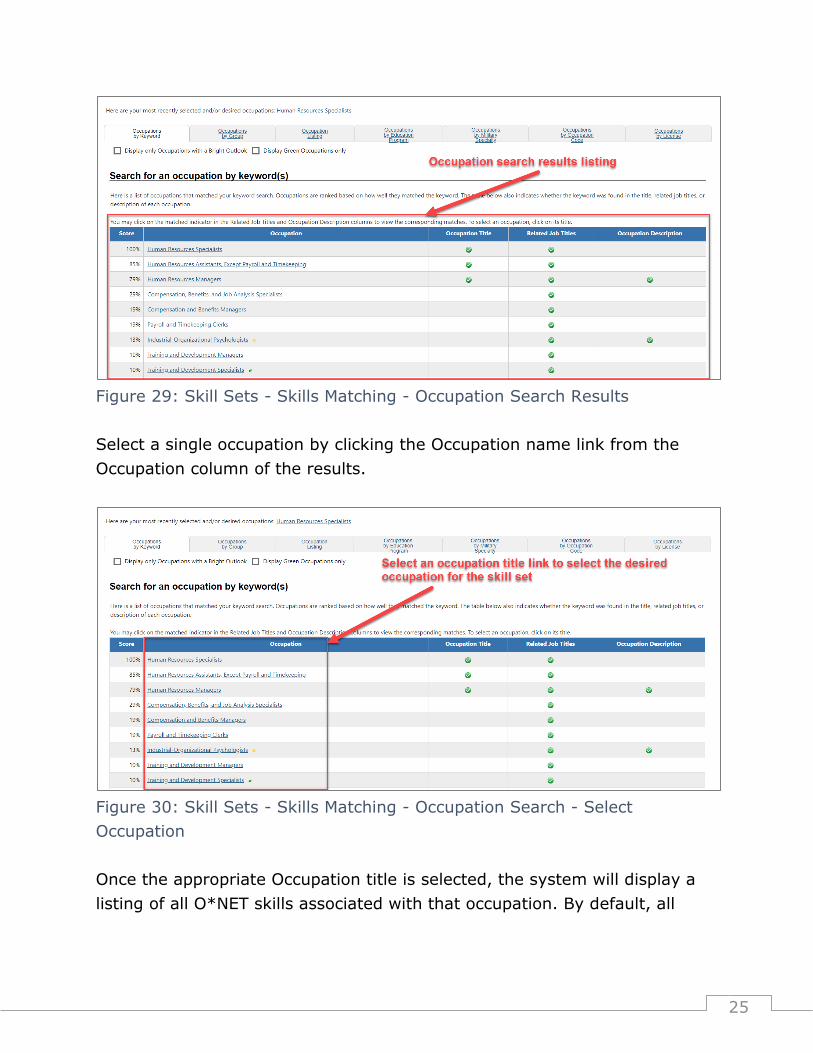
Figure 30: Skill Sets - Skills Matching - Occupation Search - Select
Occupation
Once the appropriate Occupation title is selected, the system will display a
listing of all O*NET skills associated with that occupation. By default, all

26
skills in the listing will be selected. The employer contact can unselect any
that don’t apply to the skill set group being created.
Figure 1: Skill Sets - Skills Matching - Review and Update Selected Skills
If the skills displayed do not match the skills needed for the job skill set that
is being created, select the Choose Another Occupation link at the bottom of
the page or go back to the Job Skill Sets page and use the Create Job Skill
Set button to use the Browse Skills approach to create job skill sets.

27
Figure 32: Skill Sets - Skills Matching - Choose Different Occupation
If the skills displayed are accurate for the skill set being created, make any
undesired changes to the selected skills listed, and select the Continue
button.
Figure 33: Skill Sets - Skills Matching - Finish Occupation Skills Selection
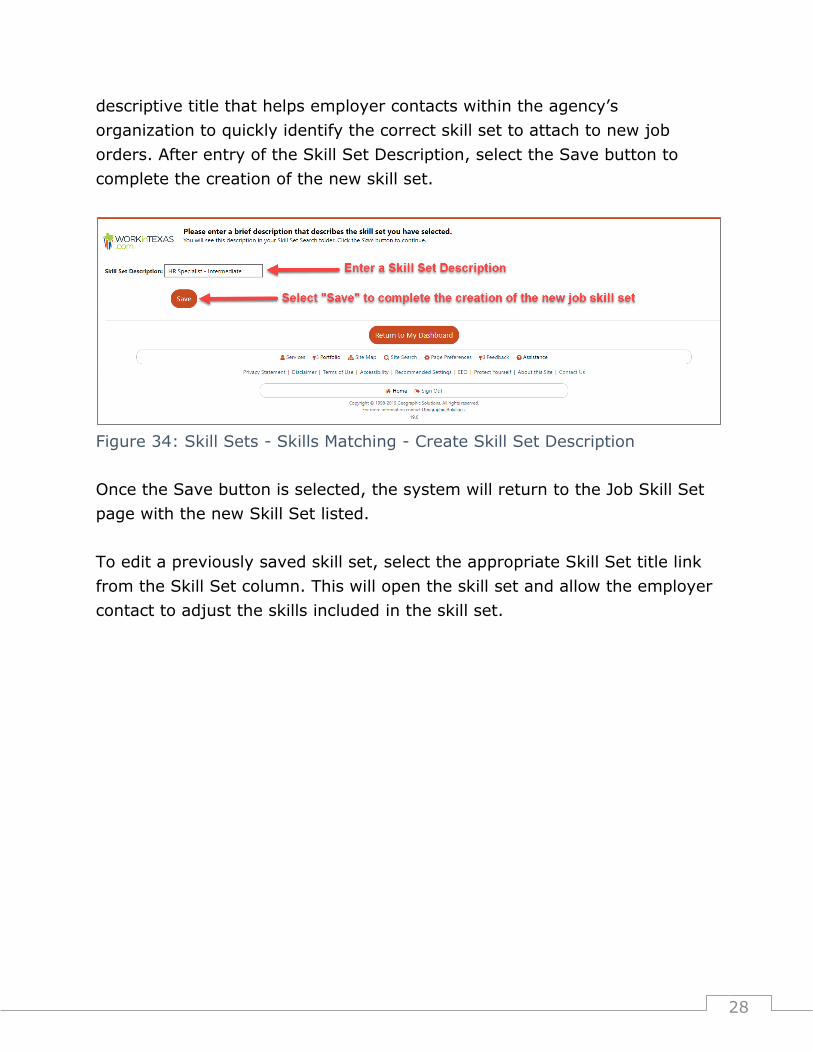
After the Continue button is selected, the system will display a page to
provide the Skill Set Description for the new job skill set. This should be a
28
descriptive title that helps employer contacts within the agency’s
organization to quickly identify the correct skill set to attach to new job
orders. After entry of the Skill Set Description, select the Save button to
complete the creation of the new skill set.
Figure 34: Skill Sets - Skills Matching - Create Skill Set Description
Once the Save button is selected, the system will return to the Job Skill Set
page with the new Skill Set listed.
To edit a previously saved skill set, select the appropriate Skill Set title link
from the Skill Set column. This will open the skill set and allow the employer
contact to adjust the skills included in the skill set.
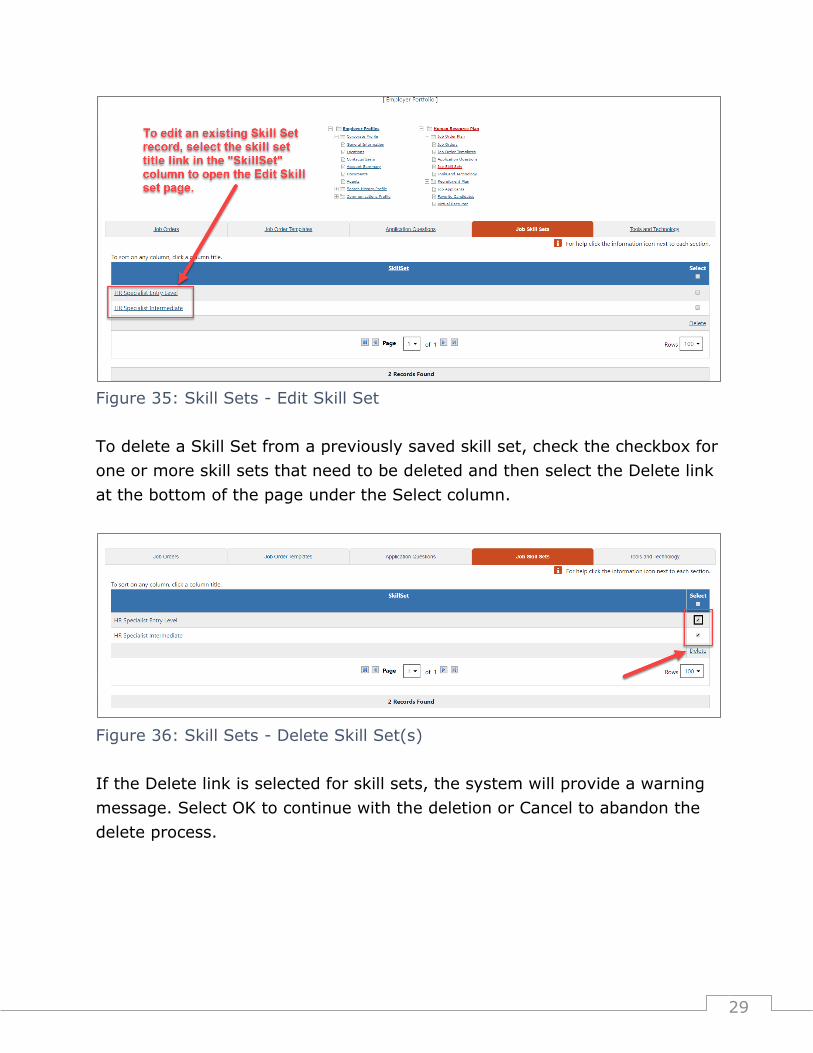
29
Figure 35: Skill Sets - Edit Skill Set
To delete a Skill Set from a previously saved skill set, check the checkbox for
one or more skill sets that need to be deleted and then select the Delete link
at the bottom of the page under the Select column.
Figure 36: Skill Sets - Delete Skill Set(s)
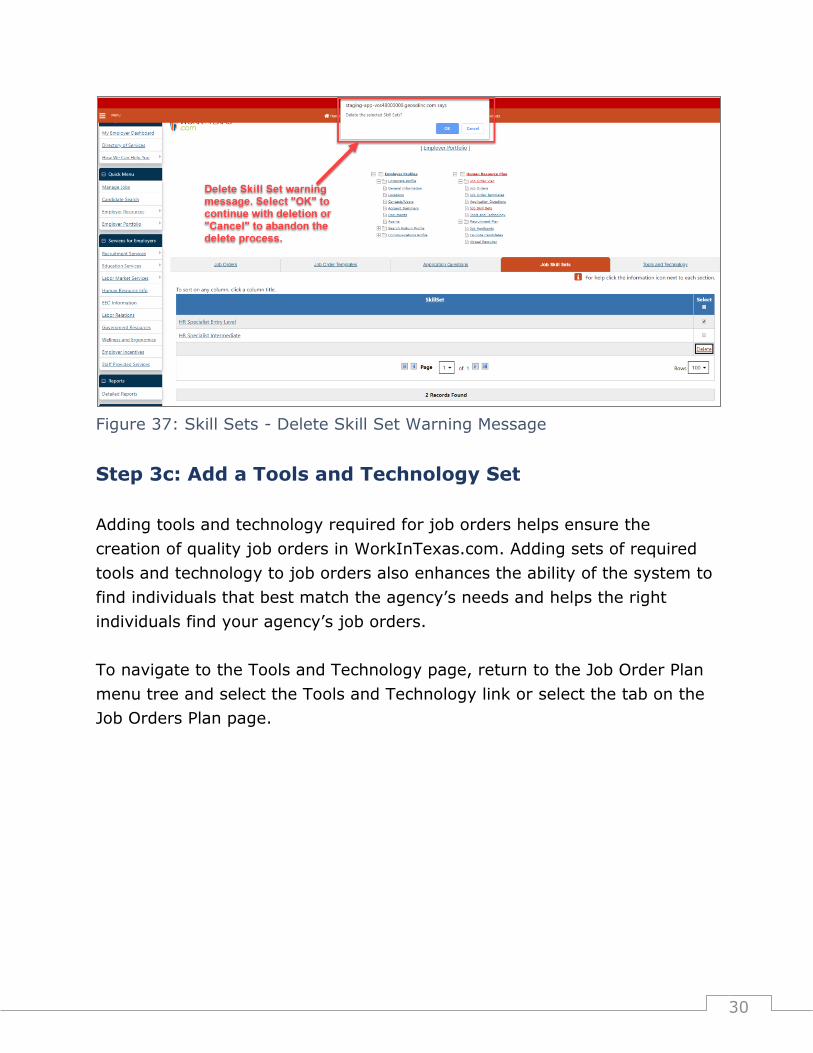
If the Delete link is selected for skill sets, the system will provide a warning
message. Select OK to continue with the deletion or Cancel to abandon the
delete process.
30
Figure 37: Skill Sets - Delete Skill Set Warning Message
Step 3c: Add a Tools and Technology Set
Adding tools and technology required for job orders helps ensure the
creation of quality job orders in WorkInTexas.com. Adding sets of required
tools and technology to job orders also enhances the ability of the system to
find individuals that best match the agency’s needs and helps the right
individuals find your agency’s job orders.
To navigate to the Tools and Technology page, return to the Job Order Plan
menu tree and select the Tools and Technology link or select the tab on the
Job Orders Plan page.

31
Figure 38: Tools and Technology - Navigate to Tools and Technology Page
On the Tools and Technology page, any previously created Tools and
Technology sets will be displayed for editing and the Add Tools and
Technology button will be available to create new sets.
To create a new Tools and Technology set, select the Add Tools and
Technology button at the bottom of the page.
Figure 39: Tools and Technology - Add Tools and Technology Button

32
Selecting the Add Tools and Technology button will display the Search for an
occupation page. This page allows the employer contact to search the O*NET
lists of occupations. Use one or more of the occupation search tabs on this
page to search for an occupation.
Figure 40: Tools and Technology - Occupation Search Options
Enter an occupational keyword and click the Search button. The system will
display a list of occupations that match the search criteria. Select the desired
occupation to create a new tools and technology set by clicking the
Occupation title in the Occupation column of the search results. If only one
occupation matched the search criteria, the system will go straight to the
tools and technology selection page.
Figure 41: Tools and Technology - Occupation Search Results

33
Selecting an occupation will display a list of tools and technology associated
with the specified O*NET occupation. The results will display in two tables.
Technology for the selected occupation will display at the top of the page
and Tools for the selected occupation will display in the section that follows
(below).
Figure 42: Tools and Technology - Select Tools and Technology
Use the checkboxes to the right of the page, in the Select column, to select
all appropriate technology and/or tools from each of the tables and click the
Continue button at the bottom of the page.
Figure 43: Tools and Technology - Complete Tools and Technology Skills Set
Selection
The next page allows the employer contact to create a title (description) for
the tools and technology set. The Set Description should be descriptive
enough to allow employer contacts to quickly identify the correct tools and

34
technology set to associate with new job orders. Add the Set Description and
click the Save button at the bottom of the page to complete the creation of
the tools and technology set.
Figure 44: Tools and Technology - Tools and Technology Set Description
Once the new Tools and Technology Set is saved, the Tools and Technology
page will display with the new set displayed.
On the Tools and Technology page, existing tools and technology sets can be
edited or deleted. To edit an existing tools and technology set, click the title
link from the Skill Set column.
Figure 2: Tools and Technology - Edit Record
When a tools and technology set is selected, the tools and technology
associated with the selected set will display. Currently, the only way to add
new tools or technology to the set is to click the Choose another Occupation
link at the bottom of the page and start over by searching for an occupation.

35
Figure 46: Tools and Technology - Edit Tools and Technology Skills - Change
Occupation
If you want to remove a tool or a technology from the existing set, uncheck
the appropriate checkbox and click the Save button. Clicking Save return’s
the employer contact to the Tools and Technology page.
Figure 47: Tools and Technology - Edit Tools and Technology

36
Step 4: Create Job Order Templates
The Job Order Templates link allows employer contacts to set up new
templates and review existing templates that can be used to quickly create
new job orders.
Any application question set, job skills set, and/or tools and technology set
can be added to any job order template associated with an employer
account.
Figure 48: Job Order Templates page
The Job Order Templates page displays any previously created job order
templates and allows employer contacts to create new job order templates.

37
Figure 49: Job Order Templates - Create New Job Order Template
To add a new job order template using the wizard, click the Create New Job
Order Template button. The Job Order Template wizard consists of nine
pages.
Step 4a: Job Order Template Wizard – Job Title and
Occupation
The first page of the Job Order Template wizard includes the following
sections or fields:
• Template Name
• Job Title
• State Job Classification (optional method for selecting an occupation)
• Job Occupation (optional method for selecting an occupation)
• Agency Job ID (optional field)
Note: An occupation must be selected; however, either method of selecting
an occupation can be used. If an occupation is selected using the State Job
Classification dropdown list, the Job Occupation section will no longer
display. If an occupation is selected using the Search for an occupation link,
the Job Occupation section will display the selected occupation while the
State Job Classification section will continue to display with no occupation
selected.

38
Figure 50: Job Order Template Wizard - Page One – Basic Information
The Template Name field should be descriptive enough that employer
contacts can find and select the most appropriate template for the new job
order being created.
Figure 51: Job Order Template Wizard - Page One - Template Name
The Job Title field should be generic enough to cover the range of job titles
the template may be used for. For example: a job order template with a
template name of Human Resources Specialist can be used to create new job
orders for more specific job titles, such as Human Resources Specialist I.
Figure 52: Job Order Template Wizard - Page One - Job Title
39
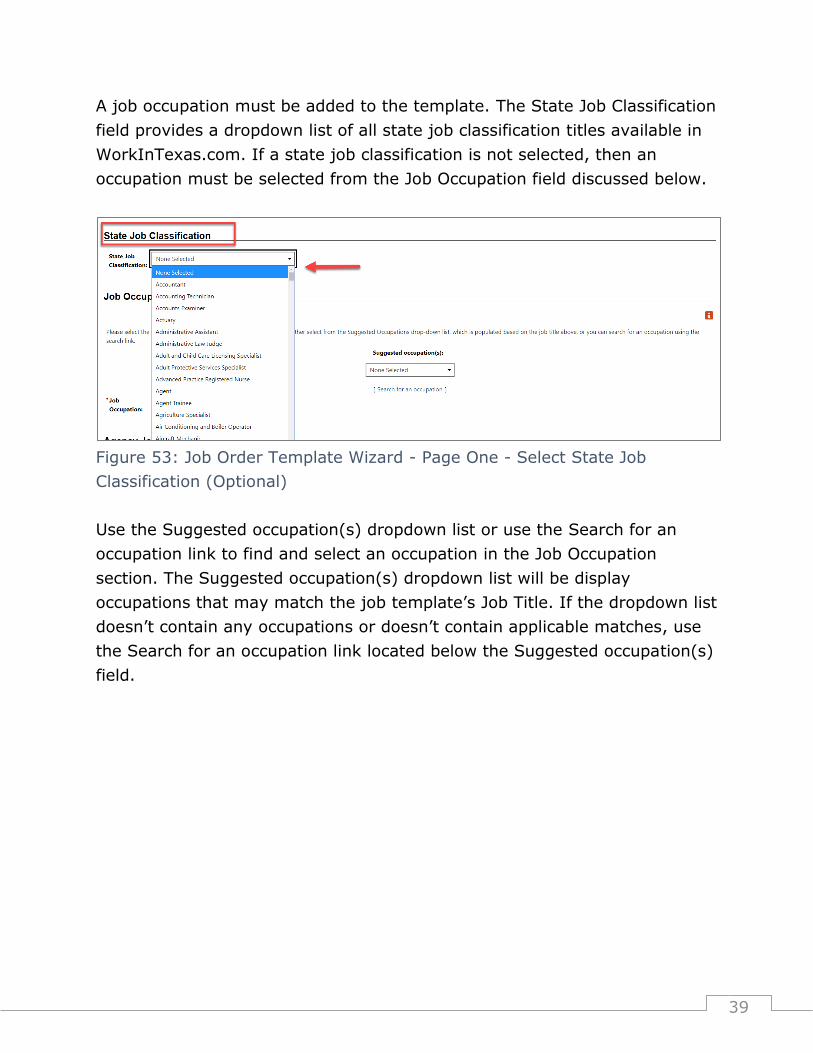
A job occupation must be added to the template. The State Job Classification
field provides a dropdown list of all state job classification titles available in
WorkInTexas.com. If a state job classification is not selected, then an
occupation must be selected from the Job Occupation field discussed below.
Figure 53: Job Order Template Wizard - Page One - Select State Job
Classification (Optional)
Use the Suggested occupation(s) dropdown list or use the Search for an
occupation link to find and select an occupation in the Job Occupation
section. The Suggested occupation(s) dropdown list will be display
occupations that may match the job template’s Job Title. If the dropdown list
doesn’t contain any occupations or doesn’t contain applicable matches, use
the Search for an occupation link located below the Suggested occupation(s)
field.

40
Figure 54: Job Order Template Wizard - Page One - Job Occupation
Select the Search for an occupation link in the Job Occupation section to
search for an O*NET occupation.
Figure 55: Job Order Template Wizard - Page One - Search for an occupation
A popup window displays when the Search for an occupation link is selected.

41
Figure 56: Job Order Template Wizard - Page One - Search for Occupation
Popup Screen
Selecting search criteria and clicking the Search button will prompt the
display of potential occupations matching the search criteria. To select an
occupation from the list, select the occupation title from the Occupation
column in the search results.
Figure 57: Job Order Template Wizard - Page One - Select Occupation
Search Result

42
Once an occupation is selected, the system will close the popup window and
return to the job order template wizard. The selected occupation that was
added to the template displays in the Job Occupation field.
Figure 58: Job Order Template Wizard - Page One - Occupation Selection
Complete
The Agency Job ID is an optional field. Since a template is being created,
and not a new job order, this field should be left blank. The Agency Job ID
can be added to the new job order when it is created from the template.
Adding an Agency Job ID to a template could cause multiple job orders to
have the same Agency Job ID, which is confusing for employer contacts
tracking internal job order numbers.
Figure 59: Job Order Template Wizard - Page One - Agency Job ID
Select the Next button to continue once all required fields on the first page
of the job order template wizard are complete.
Figure 60: Job Order Template Wizard - Page One - Continue to Next Page

43
Step 4b: Job Order Template Wizard – Location and
Contact Person
Page two of the job order template wizard allows the employer contact to
select the employer location and a contact person for the new job order.
Figure 61: Job Order Template Wizard - Page Two - Select Location and
Contact Person
Both the Location and Contact fields are mandatory and allow only one
selection for each field. A job order cannot be assigned to multiple locations
and cannot have multiple contacts attached. Select one of the locations
using the radio button to the left of the desired location. When the location is
selected, the Contact Person for this Job section will refresh and display all
active contacts that are assigned to the selected location.
After selecting a location and a contact person, click the Next button to
move to the next page of the wizard.

44
Figure 62: Job Order Template Wizard - Page Two - Continue to Next Page
Step 4c: Job Order Template Wizard – Job Details
Page three of the job order template wizard asks for job information specific
to the job order template and the information that will be displayed online to
individuals.
Figure 63: Job Order Template Wizard - Page Three – Additional Job Order
Information

45
Section: Job Order Information to be Displayed Online
The Job Order Information to be Displayed Online section includes the
following fields:
• Display your company name (defaults to YES)
• Display worksite full address (defaults to YES)
• Display worksite street address (defaults to YES)
• Have a local workforce staff member screen your applicants (Defaults to
NO)
Unless the default values in the Job Order Information to be Displayed
Online section are changed, the job order template and all new job orders
created using this template will display the full company name, the full
worksite address, and the full worksite street address.
If the last field is changed to YES, individuals will not be able to apply for
any job orders using this template. Instead, individuals will be instructed to
contact Workforce Solutions staff to apply. This option should be used
sparingly since it could to reduce the number of applicants that apply for
your job orders.
Figure 64: Job Order Template Wizard - Page Three - Job Order Information
to be Displayed Online
Section: Job Details
The Job Details section includes numerous fields that define specific details
for the job order template being created:

46
• Positions (required field)
• Type of Job (required field)
➢ Regular
➢ Temporary
➢ Seasonal
➢ Contract
➢ Volunteer
➢ Internship
➢ Apprenticeship
➢ On the Job Training
➢ High School Internship
➢ Community College Internship
➢ University Internship
• Full-Time or Part-Time:
➢ Full Time (30 Hours or More)
➢ Part Time (Less than 30 Hours)
➢ Full and Part Time Positions
➢ PRN (as the situation demands)
➢ Information Not Provided
• Work at Home:
➢ Yes
➢ No
➢ Not Specified
• Anticipated Job Duration:
➢ Over 150 Days
➢ 4 – 150 Days
➢ 1 – 3 Days
• Does this job fall within any of the following special categories?
➢ Summer Youth Program
➢ Internship
➢ Apprenticeship
➢ On the Job Training
➢ Seasonal
➢ Alien Labor Certification (Foreign Labor Certification)
➢ Hurricane Harvey

47
➢ H-2A
➢ H-2B
• Maximum number of applicants you would like to consider at this time:
(max value for this field is 9999)
Figure 65: Job Order Template Wizard - Page Three - Job Details
Select all appropriate job details for the job order template being created
and click the Next button to continue to the next page of the wizard.
Figure 66: Job Order Template Wizard - Page Three - Continue to Next Page
Step 4d: Job Order Template Wizard – Job Description
Page four of the job order template wizard displays the mandatory Job Order
Description field. This field does not have a character limit. The field will
accept large job descriptions, including formatting such as hyperlinks,
bullets, different fonts, and tables.

48
Figure 67: Job Order Template Wizard - Page Four - Job Description
After adding the job order description, click the Next button to continue.
Figure 68: Job Order Template Wizard - Page Four - Continue to Next Page
Step 4e: Job Order Template Wizard – Skills and Other Skill
Sets
Page five of the job order template wizard allows skill sets to be added to
the job order template and includes the following sections and fields:

49
Section: Skill Set Select Method
• Use the default skills for the occupation
• Use one of your employer’s saved skill sets for this job order
• Copy the skills for an existing job order to the new job order
• Do not define any skills for this job
Section: Tools and Technology Skills
• Include Tools and Technology skills with this job
Section: Other Skills
• Special Software/Hardware skills needed (Yes/No)
• Enter other specific skills required (e.g. degrees, certification, software,
etc.) (formatted text entry box)
Figure 69: Job Order Template Wizard - Page Five - Select Skill Set, Tools
and Technology Skills, and Other Skills

50
If skill sets have not been created yet, they can be added to job orders
created from this template later. However, adding them to the template is
likely to save significant editing of job orders created from this template.
Click Next once all required fields have been addressed.
Figure 70: Job Order Template Wizard - Page Five - Continue to Next Page
Step 4f: Job Order Template Wizard – Hiring Requirements
Page six of the job order template wizard covers hiring requirements and
displays the following sections and fields:
Section: Hiring Requirements
• Check any hiring requirements for this job:
➢ Drug Testing/Screening
➢ Background Checks
➢ Credit Checks
➢ Reference Checks
➢ Motor Vehicle Record Check
➢ Other (specify)
• Hiring Requirements Other (2500-character max). Only displays if Other
is selected from the Check any hiring requirements for this job field
above.
• Test Requirement (dropdown list includes the following selections)
➢ Employer will perform testing

51
➢ Job Center will perform testing
➢ Other source will perform testing
➢ No test required
Figure 71: Job Order Template Wizard - Page Six - Hiring Requirements
Section: Minimum Education, Experience, & Age
Requirements
• If you have a minimum age requirement for this job, what is that
requirement?
• Reason for age requirement (if applicable)
➢ Alcohol
➢ Hazardous
➢ Hours of Work
➢ Insurance
➢ Other – Specify in Job Details
➢ Special Program/Category
➢ Bonding
• Minimum Education Required
➢ No Minimum Education Requirement
➢ High School Diploma

52
➢ 1 Year at College or a Technical or Vocational School
➢ 2 Years at College or a Technical or Vocational School
➢ 3 Years at College or a Technical or Vocational School
➢ Vocational School Certificate
➢ Associates Degree
➢ Bachelor’s Degree
➢ Master’s Degree
➢ Doctorate Degree
➢ Specialized Degree (e.g. MD, DDS)
• Minimum Months of Experience in Selected Occupation
• Does this job require a License/Certification? (Yes/No)
• License/Certification description (only displays if Yes is selected for the
Does this job require a License/Certification field above)
Figure 72: Job Order Template Wizard - Page Six - Minimum Education,
Experience, & Age Requirements
Section: Transportation Requirements
• Is this job accessible by public transportation (Yes/No)?
• Is a driver’s license required for this position?
➢ No
➢ Yes, Commercial License
➢ Yes, Operator License

53
Figure 73: Job Order Template Wizard - Page Six - Transportation
Requirements
Figure 74: Job Order Templates - Wizard Page Six – Transportation
Requirements – Commercial License
If Yes, Operator License is selected, a new set of driver’s license
classification options displays. One or more of the following classifications
may be checked.
• Class A - Any combination of vehicles with a gross vehicle weight rating of
26,001 or more pounds provided the gross vehicle weight rating of the
vehicle(s) being towed is in excess of 10,000 pounds.
• Class B - Any single vehicle with a gross vehicle weight rating of 26,001
or more pounds, or any such vehicle towing a vehicle not in excess of
10,000 pounds gross vehicle weight rating.

54
• Class C - Any single vehicle, or combination of vehicles, that does not
meet the definition of Class A or Class B, but is either designed to
transport 16 or more passengers, including the driver, or is placarded for
hazardous materials.
• Private Vehicle class
• Motorcycle class (Class M)
Figure 75: Job Order Templates - Wizard Page Six – Transportation
Requirements – Operator’s License
Section: Specialized Requirements
• Minimum Typing Speed (optional, selections shown below)
➢ Less than 20 WPM
➢ 20 + WPM
➢ 40 + WPM
➢ 60 + WPM
➢ 80 + WPM
• Please select the level of security clearance required (optional)
➢ No Clearance
➢ Active Confidential
➢ Active Secret
➢ Active Top Secret
➢ Active Top-Secret SCI
• Language (list of languages, including English)
• Proficiency (in language selected above)

55
➢ Very Well
➢ Well
➢ No Well
➢ Not at All
Figure 76: Job Order Template Wizard - Page Six - Specialized Requirements
Select the Next button once all required fields are addressed on page six of
the job orders template wizard.
Figure 77: Job Order Template Wizard - Page Six - Continue to Next Page
Step 4g: Job Order Template Wizard – Compensation and
Benefits
Page seven of the job order template wizard covers compensation and hours
using the following sections and fields.
Section: Compensation and Hours
• Do no display salary requirements to job seekers (checkbox)

56
• Minimum Salary (in dollars and cents)
• Maximum Salary (in dollars and cents)
• Basis for unit of salary/pay (this response should match the Minimum
Salary and/or Maximum Salary values entered in the fields above)
➢ Hour
➢ Day
➢ Week
➢ Month
➢ Year
➢ Quarter
➢ Other
➢ Biweekly
➢ Semi Month
• Pay Comments
➢ DOE (Depends on Experience)
➢ Will discuss with applicant
➢ Commission only
➢ Salary + commission
➢ Not Applicable
➢ Piece Rate
➢ Salary + Tips
➢ Salary + Bonus
➢ Per Diem Only
• Is Supplemental Compensation offered? (Yes/No)
• Type of Compensation (only displays if Supplemental Compensation
above is set to YES)
➢ Use of Car
➢ Expense Allowance
➢ Pager and/or Cell Phone
➢ Other
➢ Not Applicable
• Hours Per Week
➢ Hours not Specified
➢ Hours Vary
➢ Hours are Specific

57
• Hours (only displays if Hours are Specific above is selected)
• Shift (dropdown–only one value can be selected)
➢ Day
➢ Evening/Swing
➢ Night/Graveyard
➢ Rotating
➢ Split
➢ Other, see job description
➢ Not Applicable
➢ Flexible
Figure 78: Job Order Template Wizard - Page Seven – Compensation and
Hours
Section: Benefits Offered
• Use benefits specified by employer

58
• No benefits selected
Benefits are set at the employer account level. They can be included in the
job order or excluded, depending upon the relevancy of the benefits to the
specific job order being created.
Figure 79: Job Order Template Wizard - Page Seven - Benefits Offered
Click Next once all Compensation and Hours fields have been completed on
page seven of the job order template wizard.
Figure 80: Job Order Template Wizard - Page Seven - Continue to Next Page
Step 4h: Job Order Template Wizard – Job Application
Methods
Page eight of the job order template wizard covers the following job
application sections and fields:

59
Section: Job application methods accepted
• Provide a State of Texas Application (selection automatically
displays for State Agencies)
• Provide a WorkInTexas.com Résumé Online (this option is NOT
recommended for State Agencies)
• Provide a WorkInTexas.com Application Online (this is not a State of
Texas Application and this option is NOT recommended for State
Agencies)
• Via Email (company email address)
• By Mail (company address)
• By Fax (fax number for the company) (If no fax number is in the
company profile, this option will be disabled)
• By Phone (company phone number)
• In Person (company address)
• At the Nearest One-Stop
• Via Company Website (address provided below)
• Company URL (required if Via Company URL is selected above)
Note: A Company URL must be a fully qualified URL, starting with either
HTTPS:// or HTTP:// as appropriate. If the URL is not fully qualified, when
an individual clicks the link, the individual will get a page not found error.

60
Figure 81: Job Order Template Wizard - Page Eight - Job Application
Methods Accepted
Section: Description of the Application Process
This text field allows 2500 characters in which the preferred application
process can be explained to the individual.
Figure 82: Job Order Template Wizard - Page Eight - Description of the
Application Process

61
Section: Job Applicant Information Needed
The Job Applicant Information Needed section provides multi-select
checkboxes. The employer contact can choose to select all, some, or none of
the options as mandatory fields when individuals apply. Because many State
Agencies require individuals to apply with a State of Texas Application, the
following fields will always be present on the individual’s application.
• Contact Information
• Employment History
➢ Allow individuals who have never had a job to apply (e.g. college
graduates) – checkbox
• Education History
• Certifications (if any)
• Desired Job Type (Employment type, work hours, travel percent, etc.)
Figure 83: Job Order Template Wizard - Page Eight - Job Application
Information Needed
Section: Application Question Set
The Application Question Set field displays a dropdown list from which a set
of saved application questions (as described earlier in this training
document) can be selected. If no Application Question Sets have been
created, this dropdown list will be empty. This is not a required field.

62
Figure 84: Job Order Template Wizard - Page Eight - Application Question
Set
Section: Applicant Notification Method
The Applicant Notification Method section contains only one question: Would
you like to be notified when an individual applies for this job? If Yes is
selected, notifications will be sent using the employer contact’s preferred
notification method. Values for this field are Yes or No.
Figure 85: Job Order Template Wizard - Page Eight - Applicant Notification
Method
Click Next once all required fields are complete.
Figure 86: Job Order Template Wizard: Page Eight: Continue to Next Page
63
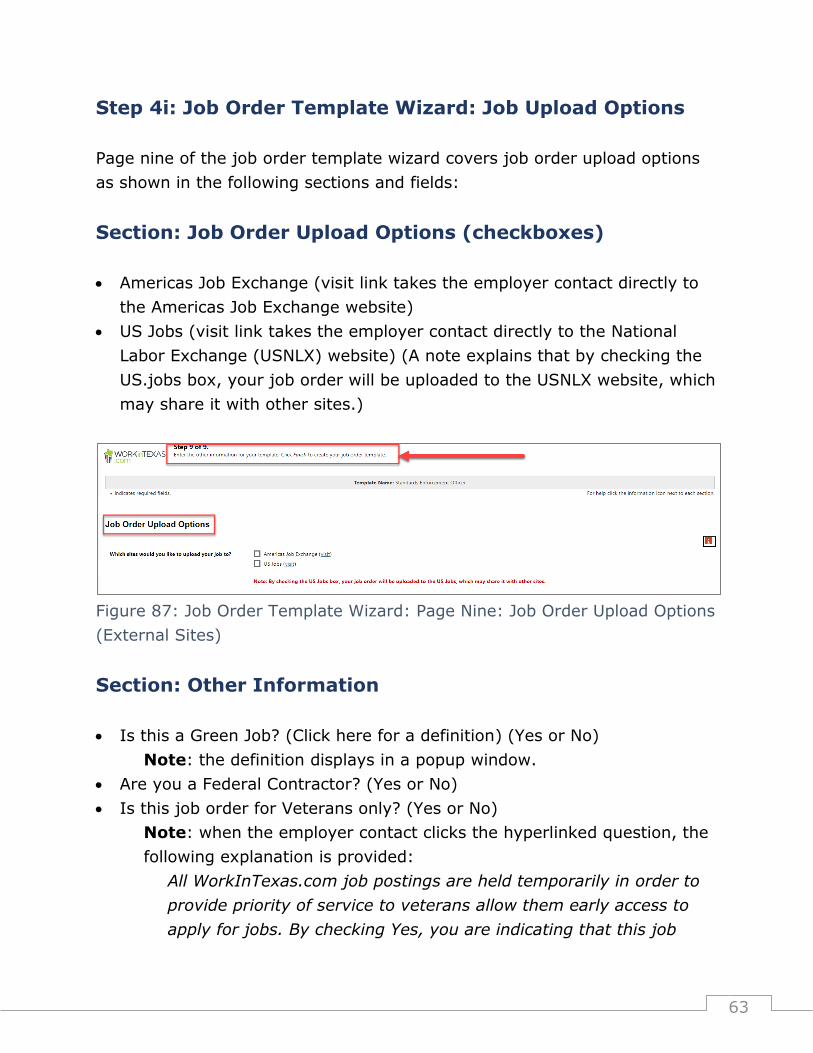
Step 4i: Job Order Template Wizard: Job Upload Options
Page nine of the job order template wizard covers job order upload options
as shown in the following sections and fields:
Section: Job Order Upload Options (checkboxes)
• Americas Job Exchange (visit link takes the employer contact directly to
the Americas Job Exchange website)
• US Jobs (visit link takes the employer contact directly to the National
Labor Exchange (USNLX) website) (A note explains that by checking the
US.jobs box, your job order will be uploaded to the USNLX website, which
may share it with other sites.)
Figure 87: Job Order Template Wizard: Page Nine: Job Order Upload Options
(External Sites)
Section: Other Information
• Is this a Green Job? (Click here for a definition) (Yes or No)
Note: the definition displays in a popup window.
• Are you a Federal Contractor? (Yes or No)
• Is this job order for Veterans only? (Yes or No)
Note: when the employer contact clicks the hyperlinked question, the
following explanation is provided:
All WorkInTexas.com job postings are held temporarily in order to
provide priority of service to veterans allow them early access to
apply for jobs. By checking Yes, you are indicating that this job

64
posting will continue to only be matched with Veterans, and non-
veteran job seekers will not be able to view or match to the job
posting until after the temporary hold expires.
• Does a court ordered affirmative action plan require posting this job
order? (Yes or No)
• Is this job order for an Enterprise Zone? (Yes or No)
Figure 88: Job Order Template Wizard: Page Nine: Other Information
Once all required fields have been addressed, click the Finish button to
complete the creation of the new Job Order Template.
Figure 89: Job Order Templates: Wizard Page Nine: Finish Template
The next page will display a summary of the entire job order template with
all sections displayed on a single page. To change the job order template,
click the edit link in the specific section that needs to be edited. Otherwise,
review each section of the job order template to verify all content.

65
Figure 90: Review and Edit Completed Job Order Template
When the employer contact is satisfied with the job order template, click the
Return to List of Templates button.
Figure 91: Job Order Templates: Return to List of Templates

66
Creating Job Orders: From Templates
Create Job Order from Job Order Templates
This process allows the employer contact to create a new job order by
starting from an existing job order template. The steps below describe this
process.
Step 1: Navigate to the Job Order Templates Page
Navigate to the Job Order Templates page by selecting Manage Jobs from
the Quick Menu. Use the navigation trees to select the Job Order Templates
link under the Human Resources Plan >> Job Order Plan menu tree.
Figure 92: Create Job from Template: Navigate to the Job Order Templates
Page
Step 2: Select Create Job from Template Button
Review existing job order templates and choose the template that most
closely meets the requirements of the new job order and select the Create
Job from Template link for the desired template.
67
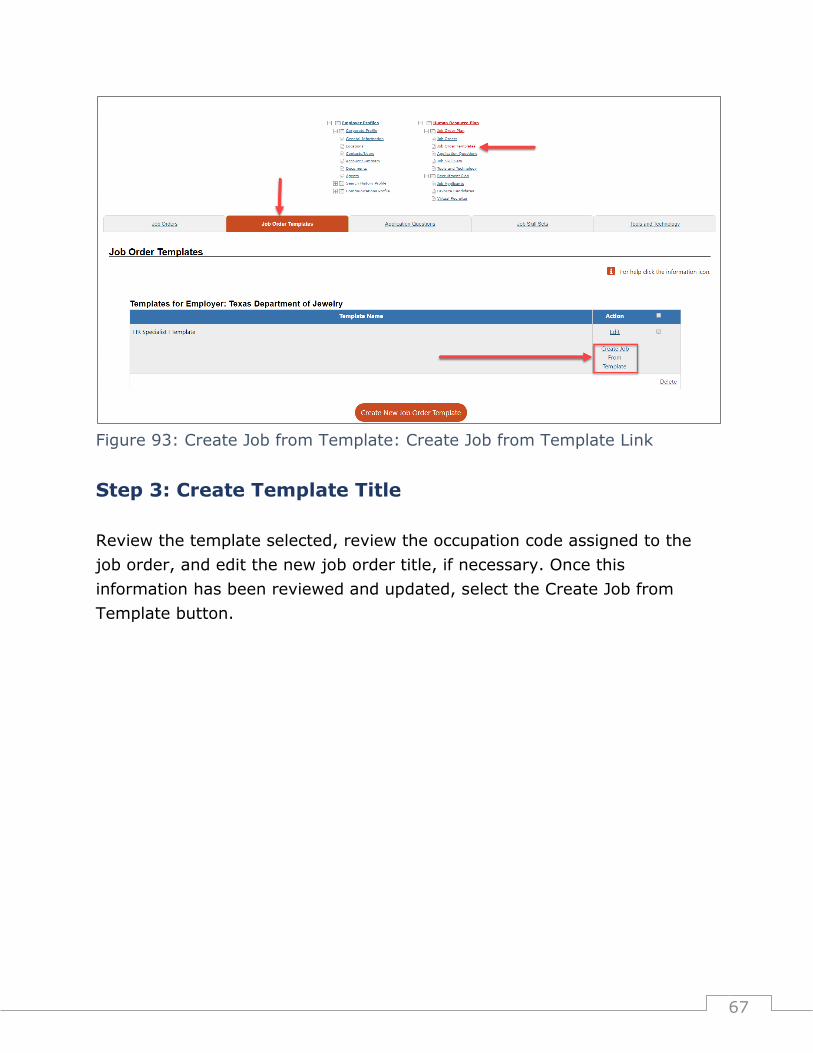
Figure 93: Create Job from Template: Create Job from Template Link
Step 3: Create Template Title
Review the template selected, review the occupation code assigned to the
job order, and edit the new job order title, if necessary. Once this
information has been reviewed and updated, select the Create Job from
Template button.

68
Figure 94: Create Job from Template - Template Name
Step 4: Review Job Order Template
Once the employer contact selects the Create Job from Template button, the
job order is created and displayed on the Edit Job Order page, which allows
further review and edits, if necessary.
Figure 95: Create Job from Template - Review and Edit New Job Order

69
The new job order is now open and available. The employer contact can
navigate back to the Job Orders tab, using the Return to Job Orders button,
to view the new Job Order in the list of open and available job orders.
Figure 96: Review and Edit Job Order Template - Return to Job Orders page
Because new job orders are automatically put on Veteran Hold for 48 hours,
the System Status field will display the Veteran Hold status. The job order is
open and available and veterans or staff assisting veterans can apply for the
job. The new job order will be released for all individuals to view and apply
after the Veteran Hold period expires.

70
Figure 97: Review Newly Created Job Order from Job Orders Page
Create Job Order from Add Job Order Page – Use
Job Order Template
The second method to create a job order from a Job Order Template is to
navigate to the job orders tab and select the Create Job Order from
Template button.
Step 1: Navigate to the Job Orders Page
Using the Quick Menu in the left navigation menus, navigate Employer
Portfolio >> Human Resources Plan >> Job Order Plan >> Job Orders to
display the Job Orders page.

71
Figure 98: Create Job Order from Template - Navigate to Job Orders Page
Step 2: Select Add New Job Order button
On the Job Orders tab, scroll to the bottom of the page, and select the Add
New Job Order button.
Figure 99: Job Orders Page - Add New Job Order Button
Step 3: Select Job Order Creation Method – Create from
Template
On the first page of the add job order wizard, select the option to Create Job
from Template. Select a previously saved Job Order Template from the
Select a Template dropdown list and click Next to continue. If no job order

72
templates have been created for the employer, this dropdown list will be
empty and this method to create a job order will not work.
Figure 30: Create Job Order from Template - Job Creation Method and Select
a Template
Step 4: Create Job Order Title
On the Job Order Template page, the employer contact is asked to verify the
selected template, the occupation, and the Job Title. The Job Title field may
be edited to reflect the specific title for new job order being created from
this template. Once the information has been validated and updated as
necessary, select the Create Job from Template button to create the new job
order.

73
Figure 41: Create Job Order from Template - Create Job Title
Step 5: Review and Edit Job Order
Once the template has been selected and verified, a new job order is created
and displayed on a single page for review and editing, as needed.
Figure 52: Review and Edit Completed Job Order
Areas of that need attention on the Edit Job Order page:

74
Carefully review the job order and update any fields that may have defaulted
values that are not appropriate for the new job order. Some sections of the
new job order that should be reviewed include:
Job Details:
• Earliest date to display this job order on the system (defaults to the day
the job order is created)
• Last date this job order will be displayed on the system (defaults to 30
days after the job order is created)
Benefits Offered: The job order template will either inherit the benefits from
the main employer account or it will not include any benefits. Benefits can
be edited on the Edit Job Order page to display the appropriate benefits for
the new job order and the job order’s location.
Optional Step: Preview Job Order (Individual’s View of
Job)
To preview the job order from the individual’s perspective, select the
Preview Job link at the bottom of the Edit Job Order page.
Figure 63: Review and Edit Job Order - Preview Job Order (Job Seeker View)

75
The Preview Job Order page displays the job order as the individual looking
for a job will see it, which includes additional information about the agency
and labor market information related to the job order and selected
occupation.
Figure 74: Job Seeker View of Job Order
After previewing the job order, select the Return to Job Order button at the
bottom of the page to return to the Edit Job Order page. The job order can
still be edited, if necessary.

76
Figure 805: Job Seeker Review of Job Order - Return to Job Order Button
To return to the Job Orders tab from the Edit Job Orders page, scroll to the
bottom of the page and select the Return to Job Orders button.
Figure 106: Review and Edit Job Order - Return to Job Orders Button

77
Creating Job Orders: Without a Template
It is not necessary to create job orders from templates. There are several
other methods available to create job orders. Those methods include:
• Manual Entry Basic Job Order
➢ Requires minimal data entry.
➢ Will use some default settings.
➢ Careful review of job orders is required when using manual entry for
creating new job orders, especially the job application methods. This
section may default to RÉSUMÉ instead of State of Texas Application,
which would cause significant problems for state agencies that require
individuals to apply with a State of Texas Application.
• Manual Entry Custom Job Order: this is the preferred method is because
the process allows the employer contact to verify important sections and
fields associated with the job order during the creation process.
• Copy Existing Job Order
➢ Creates an exact copy of an existing job order and allows
modification of the fields after the job order is created.
➢ Very similar to creating a job order from a job order template
described earlier in this training module.
Approach 1: Create a New Job—Basic Job Order
To create a new job order without using an existing job order template,
select the basic job order creation method. This approach to creating a new
job order requires thorough review of the job order after it has been created,
because the process uses more default values. The employer contact should
review all sections and responses in the new job order to ensure the default
values are acceptable.

78
Step 1: Navigate to Job Orders Page
To begin, navigate to the Job Orders tab: Quick Menu >> Employer Portfolio
>> Human Resources Plan >> Job Order Plan.
Figure 107: Create Job Order - Navigate to Job Orders Page
Step 2: Select Add New Job Order Button
On the Job Orders page, scroll to the bottom of the page, and select the Add
New Job Order button.
Figure 108: Create Job Order - Add New Job Order Button

79
Step 3: Select Job Creation Method – Manual Entry Basic
Job Order
Clicking the Add New Job Order button puts the employer contact into the
Add Job Order wizard page flow. Page one of the Add Job Order wizard
displays Job Creation Methods. Select the Manual Entry Basic Job Order
radio button and then click Next to continue to the next page.
Figure 109: Create Job Order - Job Creation Method - Manual Entry Basic Job
Order
The page displays the additional fields shown below, which must be
completed before continuing.
• Job Title (required field)
• State Job Classification (either this field or Job Occupation is required)
• Job Occupation (either this field or State Job Classification is required)
• Agency Job ID (internal job order number)
These fields perform the same way as described in the Create Job Order
Templates section (see Step 4a: Job Order Template wizard-page one in this
document).

80
Figure 110: Create Job Order - Job Title, Occupation Code, and Agency Job
ID
Once all required fields have been completed, click Next to continue to the
next page.
Figure 111: Create Job Order - Wizard Page One - Continue to Next Page
Page two of the wizard contains the following sections and fields.
Section: Job Order
• Job Title (required field)
• Occupation (read only, defined on the previous page)

81
Figure 112: Create Job Order - Basic Job Order - Job Order Title
Section: Job Description
• Add the job description for this job order. Allowable formatting includes
hyperlinks, bullets, and other text and font options.
• There is no character limit for this field.
Figure 113: Create Job Order - Basic Job Order - Job Description
Section: Compensation and Hours
See Step 4g on pages 54-57 above for details on adding Compensation and
Hours information.
Section: Select from All Available Skills (expandable
categories)
• General Skills
• Computers & Mathematics
• Construction
• Education & Social Services
• Entertainment & Media

82
• Financial Services
• Agriculture & Wildlife
• Healthcare
• Legal & Protective Services
• Management & Office Services
• Science & Engineering
• Service & Sales
• Skilled Trades
• Transportation
To change the selected skills for this job order, expand each of the
categories listed above and check or uncheck the skills in that category.
Figure 114: Create Job Order – Basic Job Order – Select Skills from All
Available Skills
Section: Minimum Education, Experience, & Age
Requirements
See Step 4f on pages 50-51 above for details on adding Minimum Education,
Experience, & Age Requirements.
Section: Transportation Requirements
• Is this job accessible by public transportation (Yes/No)?

83
• Is a driver’s license required for this position? (No/Yes, Commercial
License/Yes, Operator License)
Figure 915: Create Job Order - Basic Job Order - Transportation
Requirements
Section: Captcha Validation
Once all required fields for the Add New Basic Job Order wizard have been
completed, select the checkbox in the captcha box.
Figure 1016 Create Job Order - Basic Job Order - Captcha Validation - Before
Validation
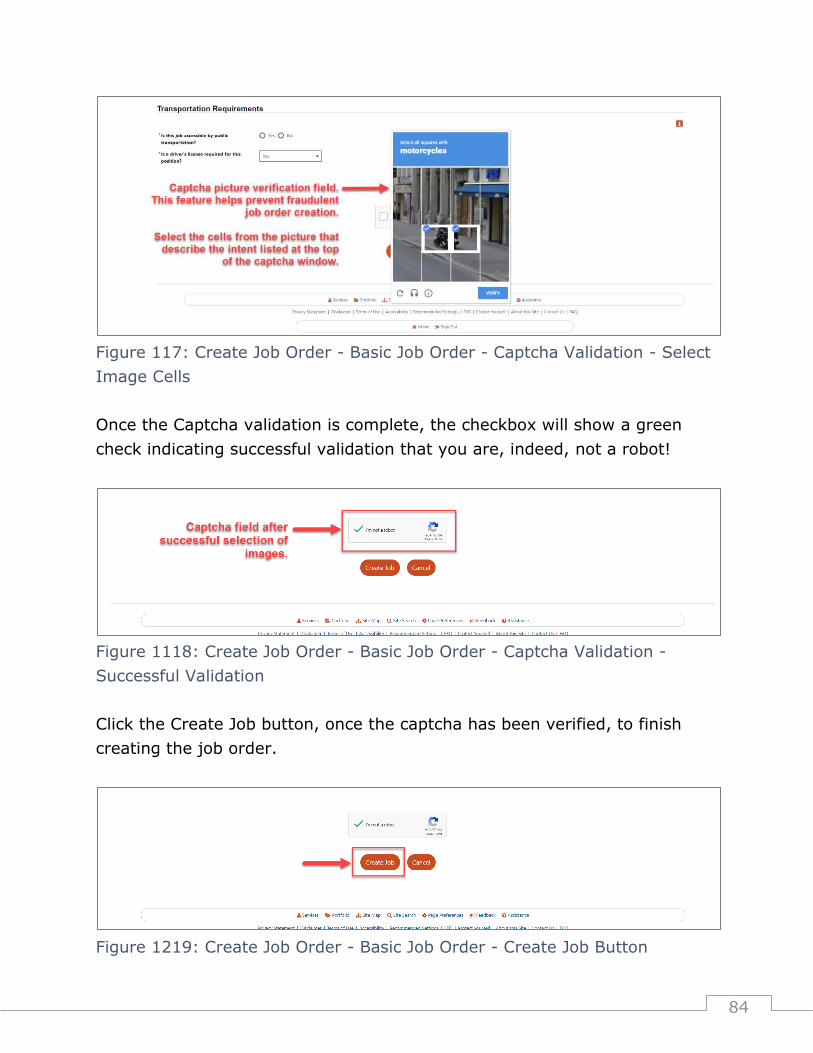
Checking the I’m not a robot checkbox will prompt the display of a visual
verification box that requires the contact to select all cells in the picture that
contain the specified image. Select the appropriate cells and then select the
Verify button at the bottom of the Captcha popup.
84
Figure 117: Create Job Order - Basic Job Order - Captcha Validation - Select
Image Cells
Once the Captcha validation is complete, the checkbox will show a green
check indicating successful validation that you are, indeed, not a robot!
Figure 1118: Create Job Order - Basic Job Order - Captcha Validation -
Successful Validation
Click the Create Job button, once the captcha has been verified, to finish
creating the job order.
Figure 1219: Create Job Order - Basic Job Order - Create Job Button

85
Step 4: Review and Edit Job Order
WorkInTexas.com will display the job order that was just created and allow
the employer contact to edit, if desired. Review the job order details
carefully. Because this job order was created using the Basic approach,
several values on this form may have been defaulted by the system and may
not be acceptable requirements for your state agency.
Examples of fields that may require review and possible edits:
• Location/Work Site for this Job
• Contact Person for this Job
• Job Order Information to be Displayed Online
• Job Details (review all fields, paying specific attention to the following)
➢ Earliest date to display this job order on the system (defaults to the
date the job order is created)
➢ Last date this job order will be displayed on the system (defaults to 30
days after the date the job order is created)
➢ Maximum number of applicants you would like to consider at this time
• Hiring Requirements
• Specialized Requirements
• Benefits Offered
Once the job order has been reviewed and updated as necessary, select the
Preview Job link to see the job order from the individual’s view or select the
Return to Job Orders button to return to the Job Orders page.
Figure 1320: Create Job Order - Basic Job Order - Review and Edit
Completed Job Order - Return to Job Orders

86
Clicking the Return to Job Orders button will display the Job Orders page and
the new job order will be available in the job orders list.
Approach 2: Create a New Job—Custom Job Order
To create a new job order without using an existing job order template,
select the manual entry custom job order creation method. This process
uses fewer default values and allows the employer contact to directly set
most fields prior to creating the job order.
Steps 1 and 2: Navigate to the Job Orders page/Select Add
New Job Order button
Follow Steps 1 and 2 as described in the Approach 1 section of this
document.
Step 3: Select Job Order Creation Method – Custom Job
Order
On the Add Job Order page, select Manual Entry Custom Job Order from the
Job Order Creation Method section of the form.
Figure 121: Create Job Order - Custom Job Order - Wizard Page One - Job
Creation Method

87
Step 4: Enter Job Order Information – Wizard Page One
After the Manual Entry Custom Job Order value is selected, the page will
refresh and display additional fields that can be added to the new job order.
This process uses a wizard approach that contains ten wizard pages. The
first page of the wizard displays the following sections and fields:
• Job Title (required field)
• State Job Classification (optional method to select an occupation)
• Job Occupation (optional method to select an occupation; however, either
of the occupation selection methods may be used to complete this field
and save the information)
• Agency Job ID (optional field)
The Job Title field should be specific to this individual job order. For more
details on how to add the above values, see Step 4a: Job Order Template
wizard-page one in this document.
Once all fields on the first page of the Add Job Order wizard have been
completed, click Next to continue.
Figure 14: Create Job Order - Custom Job Order - Wizard Page One -
Continue to Next Page
Step 5: Enter Location and Contact Information – Wizard
Page Two
Page two of the add job order wizard prompts the employer contact to select
the employer location that will be associated with the job order and the

88
contact person for the job order. For information on completing this page,
see Step 4b: Job Order Location and Contact Information in this document.
Step 6: Enter Information to be Displayed Online – Wizard
Page Three
Page three of the add job order wizard is explained in Step 4c: Job Order
Information to be Displayed Online in this document.
The Job Details section of the page is described in Step 4c: Job Details in
this document.
Once all required fields for page three of the add job orders wizard are
complete, click Next to continue to the next step of the process.
Step 7: Enter Job Description – Wizard Page Four
Page four of the add job order wizard displays the required Job Description
field. This field does not have a character limit. The field will accept large job
descriptions, including formatting such as hyperlinks, bullets, different fonts,
and tables. See Step 4d: Job Order Description in this document.
Step 8: Enter Skill Sets, Tools and Technology, and Other
Skills – Wizard Page Five
Page five of the add job order wizard allows the employer contact to select
individual skill sets, tools and technology sets, and other skills required for
the position. This page contains the following sections and fields.
Section: Skill Set Select Method
The Skill Set Select Method section contains a single field titled Please select
the method which you would like to get a list of skills for. Only one option
may be selected from the following list:

89
• Use the default skills for the occupation
• Use one of your employer’s saved skill sets for this job order
• Copy the skills from an existing job order to this new job order
• Select skills for this job from a list of all available skills
• Do no define any skills for this job
Selecting the first option, Use the default skills for the occupation, requires
no additional actions. WorkInTexas.com will automatically apply all standard
skills that are associated with the O*NET code for the occupation attached to
the new job order.
Selecting the second option, use one of your employer’s saved skill sets for
this job order, will result in a page refresh that displays a dropdown list of
previously saved skill sets created for the employer account. If none have
been created, there will be no values in the dropdown box and a different
method of selecting skills for the job order must be used. If skill sets have
been created for the employer, select the appropriate skill set title from the
dropdown list. WorkInTexas.com will automatically add the selected skill set
to the new job order.
Selecting the third option, Copy the skills from an existing job order to this
new job order, will result in a page refresh and a dropdown list will display
with all available job order titles associated with the employer account. If no
job orders have been created, there will be no values in the dropdown box
and a different method of selecting skills for the job order must be used. If
job orders have been created for the employer, select the appropriate job
order title from the dropdown list. WorkInTexas.com will automatically add
the selected skill set to the new job order.
Selecting the fourth option, select skills for this job from a list of all available
skills, will not cause a page refresh. The employer contact will be prompted
to select skills from a list in a later step in the process.

90
Selecting the fifth option, do not define any skills for this job, will leave the
skills area of the job order blank and no other action is required for the skills
section of the new job order.
Figure 15: Create Job Order - Custom Job Order - Wizard Page Five - Skill
Set Select Method
Section: Tools and Technology Skills
The Tools and Technology Skills section displays a single question asking
whether the employer contact wants to Include Tools and Technology skills
with this job. Only a Yes/No response is required. Selecting Yes will not
refresh the page. The employer contact will be prompted to select a set of
tools and technology skills in a later step in the process.
Figure 1624: Create Job Order - Custom Job Order - Wizard Page Five -
Tools and Technology Skills
Section: Other Skills
The Other Skills section contains two fields. If Yes is selected for Special
Software/Hardware skills needed, then the specific skills needed must be
described in the free text field. Use the text field to describe all special

91
software or hardware skills needed for the new job order and then click Next
to continue.
Figure 125: Create Job Order - Custom Job Order - Wizard Page Five - Other
Skills
Step 9: Make Additional Selections for Skill Sets and/or
Tools and Technology Skills – Wizard Page Six
Page six of the add job order wizard displays the selected values for the
skills sets and tools and technology skill sets selected on the previous page.
Values on this page can be reviewed and modified as needed to meet the
needs of the new job order.

92
Figure 1726: Create Job Order - Custom Job Order - Wizard Page Six –
Select Skills for Job Order
Figure 1827: Create Job Order - Custom Job Order - Wizard Page Six –
Select Technology and Tool Skills
Complete the review of desired skills and/or tools and technology for the
new job order and click Next to continue.

93
Step 10: Enter Additional Requirements for Individuals –
Wizard Page Seven
Page seven of the add job order wizard contains the following sections and
fields. See Step 4f: Hiring Requirements in this document for details on
completing this page of the wizard.
Section: Captcha Validation
See Captcha Validation as explained earlier in this document.
Once the captcha has been verified, click Next at the bottom of the wizard
page to continue.
Step 11: Enter Compensation and Benefits – Wizard Page
Eight
Page eight of the add job order wizard displays a Compensation and Hours
section and a Benefits Offered section as described in Step 4g in this
document.
Step 12: Enter Job Application Methods Accepted – Wizard
Page Nine
Page nine of the add job order wizard allows the employer contact to select
the method(s) that the individual will use to apply for the new job order. See
Step 4h: Job Applications Methods, Job Application Information Needed,
Application Questions Set, and Applicant Notification Method as described
earlier in this document.

94
Step 13: Enter Job Order Upload Options and Other
Information – Wizard Page Ten
Section: Job Order Upload Options
See Step 4i: Job Order Upload Options and Other Information as described
earlier in this document.
Step 14: Review Completed Job Order and Edit if
Necessary
After steps 1-13 of the add job order wizard are completed, and the
employer user clicks the Finish button, a summary of the job order will
display all sections on a single page and allow the employer contact to edit
the job order, if necessary. All sections of the new job order should be
reviewed to verify accuracy and any necessary adjustments should be made
to the job order.
Figure 1928: Create Job Order - Custom Job Order - Review and Edit Job
Order
95
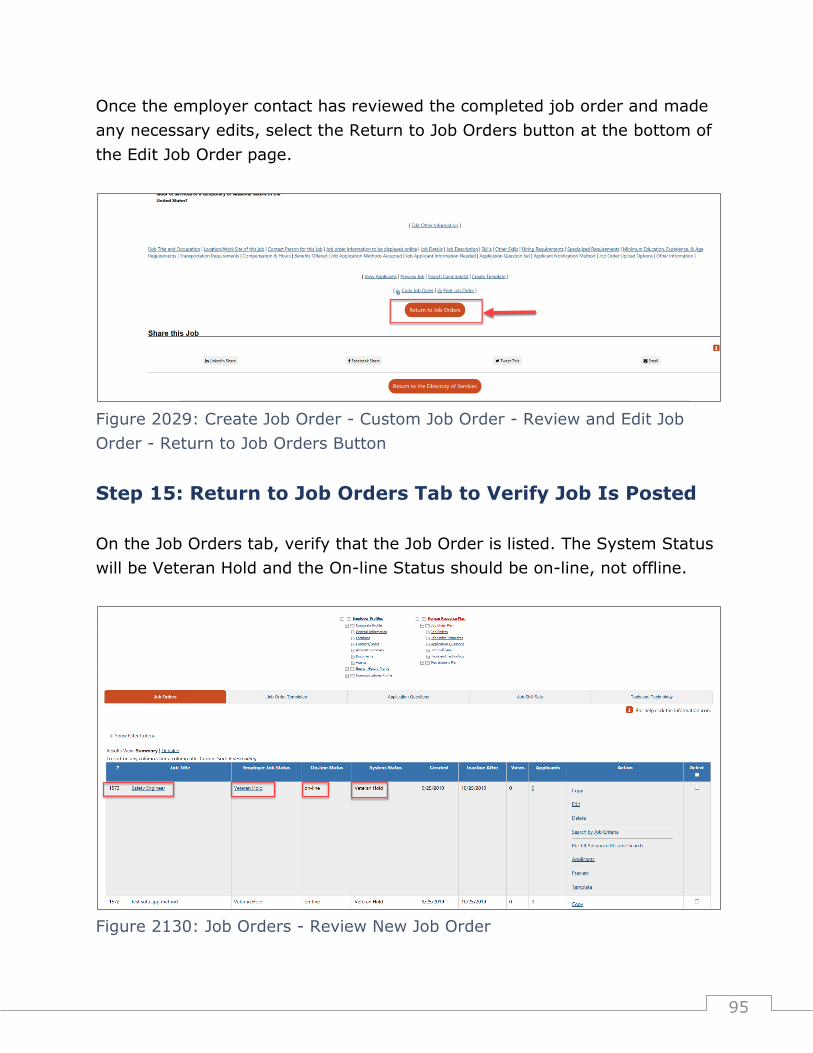
Once the employer contact has reviewed the completed job order and made
any necessary edits, select the Return to Job Orders button at the bottom of
the Edit Job Order page.
Figure 2029: Create Job Order - Custom Job Order - Review and Edit Job
Order - Return to Job Orders Button
Step 15: Return to Job Orders Tab to Verify Job Is Posted
On the Job Orders tab, verify that the Job Order is listed. The System Status
will be Veteran Hold and the On-line Status should be on-line, not offline.
Figure 2130: Job Orders - Review New Job Order

96
Approach 3: Create a Job Order using the Copy Job
Order Method
The third method to create a job order without an existing job order
template is the Copy Existing Job Order process, which makes an exact copy
of an existing job order and provides the employer contact the opportunity
to edit the job order to adjust any values, as needed.
Steps 1 and 2: Navigate to the Job Orders page/Add New
Job Order button
Follow Steps 1 and 2 as described in the Approach 1 section of this
document.
Step 3: Select Job Order Creation Method – Copy from
Existing Job Order
On the first page of the Copy from Existing Job Order wizard, select the
option to Copy from Existing Job Order. Select an existing Job Order from
the “Select an existing job order from the pull down below” dropdown list. If
no job orders have been created for the employer account, this dropdown
list will be empty and this method of creating a new job order will not work.

97
Figure 2231: Create Job Order - Copy from Existing Job Order - Job Creation
Method - Copy Existing Job Order
Once the copy method has been selected, find an existing job order in the
Select an existing job order from the pull down below dropdown list and
select it to copy its job order information.
Figure 2332: Create Job Order - Copy from Existing Job Order - Select Job
Order to Copy

98
After the job order to be copied has been selected, see Step 4a: Job Order
Title, State Job Classification, Job Occupation, and Agency Job ID as
described earlier in this document.
Step 4: Review and Edit Selected Fields from Original Job
Order
Before the new job order is created, the copy method allows the employer
contact to review several settings from the existing job order and make
changes, if necessary, before the job order is created.
Section: Copy Job Options
The first section at the top of the page requires the employer contact to
decide whether to copy the job order immediately without reviewing or
review a few key fields before the job order is created. If the job order is
copied immediately, any edits will have to be made online to the open and
available job order. Copying with advanced options gives the employer
contact time for review and edits, if necessary, to the job order before it is
open and available.
• Please select the method for copying your job
➢ Copy job as is (exact copy)
➢ Copy job with advanced options
If the employer contact selects the option to Copy job as is (exact copy), the
Captcha verification is the only section left to complete on this page.
Figure 133: Create Job Order - Copy from Existing Job Order - Copy Job
Options

99
If the employer contact selects the option to Copy job with advanced
options, there will be additional sections and fields displayed on the page,
which have been explained in Step 4a: Create Job Order of this document.
Please refer to Step 4a for more details.
Figure 134: Create Job Order - Copy from Existing Job Order - Copy Job
Options - Copy Job with Advanced Options
Section: Job Title
The job title from the previous page will be brought over to this page for
review and validation.
Section: State Job Classification
The state job classification from the previous page will be brought over to
this page for review and validation.
Section: Job Occupation
The job occupation from the previous page will be brought over to this page
for review and validation.

100
Section: Agency Job ID
The agency job ID (internal job number) from the previous page should be
brought over to this page for review and validation. If it isn’t, or if there is a
new agency job ID, the number can be added or edited on this page.
Section: Job Duties
The job duties section allows the employer contact to decide whether to use
the job description from the existing job order or use the standardized job
duties from an O*NET occupation that is based on the job occupation
associated with the copied job order.
• Please select a job duties source
➢ User current job duties
➢ Use O*NET description
Figure 135: Create Job Order - Copy from Existing Job Order - Copy Job with
Advanced Options - Job Duties
Section: Skills
The skills section allows the employer contact to decide whether to use the
skills information from the copied job order, use the standardized skills from
an O*NET occupation that is based on the occupation associated with the
copied job order, or add no skills at all to the job order. See options
available for this section below:
• Please select a skills source
➢ User current skills
➢ Use O*NET skills
➢ No skills

101
Figure 136: Create Job Order - Copy from Existing Job Order - Copy Job with
Advanced Options – Skills
Section: Tools and Technology Skills
The tools and technology skill section gives the employer contact the ability
to decide whether to include tools and technology skills on the copied job
order. Listed below is the field and selection values available for this section.
• Include Tools and Technology skills with this job: Yes/No
Figure 137: Create Job Order - Copy from Existing Job Order - Copy Job with
Advanced Options - Tools and Technologies
Section: Captcha Validation
Once all sections of the copy job order wizard have been completed, click
the captcha checkbox. Refer to the section on Captcha Validation in this
document for more details.
Figure 138: Create Job Order - Copy from Existing Job Order - Copy Job with
Advanced Options - Captcha Validation - Before Validation

102
Once the captcha has been verified, there are two paths the employer
contact can take. If the Copy Job Now button is selected, the wizard will
create the job order based on the sections of the job order that have been
reviewed up to this point. If the Next button is selected, the employer
contact will have an opportunity to review the settings for additional fields.
For the purposes of this training document, the Next button will be selected.
Figure 139: Create Job Order - Copy from Existing Job Order - Copy Job with
Advanced Options - Continue to Next Page
Step 5: Review Additional Fields Prior to Copying a Job
Order
If the Next button is selected, an additional page will be displayed so the
employer contact can review sections for Location/Worksite of the job,
contact person for the job, application methods, and application notification
methods and edit if necessary. If the Copy Job Now button was selected,
skip to step 6 below.
Section: Location/Worksite of this job
This section allows the employer contact to see the current location
associated with the job order and change, if needed. A new location can be
created for this job order if none of the locations currently available for the
job order match the actual worksite of the job; however, the employer
contact will not be able to add a location if they do not have appropriate
privileges for this function.

103
NOTE: The job order will show a worksite location that matches the location
selected here. If the job location is El Paso, it would be incorrect to assign it
to a location in Austin. While the HR center may be in Austin, the job order
location must match the location where the work will be performed. If the
location is incorrect, individuals, or staff on behalf of individuals, will not find
the job when searching for jobs by location.
Figure 140: Create Job Order - Copy from Existing Job Order - Copy Job with
Advanced Options - Review Location/Worksite of this Job
Section: Contact Person for this Job
This section of the wizard page allows the employer contact to see the
current contact person associated with the job order and change, if needed.
A new contact can be created for this job order if none of the contacts linked
to the location for this the job order match the actual worksite of the job.
Additional details related to this process are provided in Step 4a: Location
and Contact Person described earlier in this document. The employer contact
copying the job order will not be able to add a new contact if they do not
have appropriate privileges.
NOTE: It’s important to avoid creating duplicate contacts. If a contact exists
for the employer account but doesn’t display in the list of contacts for the
new job order, it could be that the contact is not assigned to the job order’s
location. An employer contact with appropriate privileges will have to add

104
this location to the locations that the desired contact is assigned. Only then
will the contact display in this list for selection.
Figure 141: Create Job Order - Copy from Existing Job Order - Copy Job with
Advanced Options - Contact Person for this Job - Add New Contact
Section: Job Application Methods Accepted
Please review the information provided in step 4h: Job Application Methods
earlier in this document.
Section: Applicant Notification Method
Please review the information provided earlier in this document in Step 4h:
Applicant Notification Method.
Step 6: Review and Edit Job Order
For more information on the steps to review and edit a new job order and
preview a job order from the Individual’s viewpoint, please refer to Step 5:
Review and Edit Job Order described earlier in this document.
Once all reviews are completed, click the Return to Job Orders button at the
bottom of the Edit Job Orders page to return to the Job Orders tab.