Embed Size (px)
Citation preview

1
State of Connecticut Core-CT
Continuing Education Initiative
Introduction to eProcurement
2
Handout
The handout has the same screen shots as the in-class presentation, but has been designed as a Step by Step guide for later use. The handout includes references to Job Aids and information that can be used later.

3
eProcurement

4
Course Goals
To give students a greater understanding of their place in Core-CT, an integrated
financial system.
To instruct students in the Core-CT recommended approach to eProcurement.
To help students maximize the capabilities
of eProcurement and use their work time efficiently.

5
Overview
• Core-CT Overview
• eProcurement Overview
• eProcurement Roles
Creating Requisitions
• Core-10 Requisition Types
• Using the Catalog
• Favorites
• Templates
• Special Requests
• Copy Requisitions
Managing Requisitions
• Cancel Requisitions
• Copy Requisitions
• Edit Requisitions
• View Approvals
• View Printable Version
Agenda

6
Approving Requisitions
• requisition Amount Approval
• requisition ChartField Approval
• requisition Purchasing Approval
• ITD-10 Approvals
• DAS Approvals
• PSU Approvals
Resolving Budget Check Exceptions
Sourcing
Receiving
Agenda

7
Purchasing
General Ledger
Project
Costing
Payables
Catalog
Management
eProcurement
Commitment
Control
Assets
Inventory
Billing
Receivables
Contracts
Financial Modules Integrated with eProcurement

8
Requisition Life Span
Requisition Submitted for Approval:
Statu s: “ Pending ” Result: “Approved”
Amount: ChartField:
requisition Amt 1 (<2500 ) requisitionBudget Approver
requisition Amt 2 (<$10,000) requisitionPurchasing
requisition Amt 3 (<$1,000,000) Approver
requisition Amt 4 (>$1,000,000)
PO Dispatched to the
Vendor:
Status: “PO(s) Dispatched”
Batch Frequency: 4 times
each day
Payment Issued to
the Vendor:
The vouchers are
“Matched”, the Pay
Cycle Runs and
payments are
issued to the
vendor.
Status : “Complete”
Requisition:
Requisition
created in
eProcurement
Status: “Open”
Requisition Sourced Into a
PO:
AutoSelect Process
PO Staging Table
PO Calculations Process
PO Create Process
Batch Frequency: 4 times
each day
Status: “PO(s) Created”
Order delivered by
vendor and received in
Core - CT:
Status: “Received”
Both Goods and Services
are received in Core - CT.
Invoice Processed by
Accounts Payable:
Vouchers created and
invoices posted for
payment.

9
eProcurement Roles
Requester: This role is responsible for creating and maintaining regular requisitions. MultiRequester: This role is responsible for creating and maintaining regular requisitions, ITD-10s, DAS-BIDs and PSUs. Requisition Amount Approver 1, 2, 3, 4: This role is responsible for approving requisitions up to the authorized amounts. While the eProcurement requisition is in pending approval status, these roles are allowed to change any field within their authorization on the requisition, including quantity and price, without restarting the approval process. Amount Approver 1 up to $2,500 Amount Approver 2 up to $10,000 Amount Approver 3 up to $1,000,000 Amount Approver 4 over $1,000,000 Requisition Budget Approver: This role is responsible for approving the chartfields and ensuring that funds are available. While the Procurement requisition is in pending approval status, this role is allowed to change any field on the requisition distribution without restarting the approval process. Requisition Purchasing Approver: This role is responsible for verifying that all procurement rules and regulations are being followed and that the requisition is ready to be sourced to a Purchase Order. While the eProcurement requisition is in pending approval status, the Requisition Purchasing Approver is allowed to change any field on the requisition line and schedule, except the quantity and price without restarting the approval process. If the quantity and price changed is lower than the original amount(s) previously approved by the Requisition Approvers, the approval process will not reinitiate. ITD Approver 1: This DAS role is responsible for approving requisitions for all IT requests, ensuring that the purchase conforms to current IT standards. This role also approves Product Schedule Updates (PSU) for compliance. ITD Approver 2: This DAS role is responsible for approving requisitions for all IT requests =/> $10,000, ensuring that the purchase conforms to current IT standards. This role also approves Product Schedule Updates (PSU) for compliance. PSU Approver: This DAS role is responsible for approving Product Schedule Updates (PSU) for compliance.

eProcurement Roles Continued
10
DAS Approver 1: This DAS role approves requests for BIDs/RFPs/RFIs/Standardizations Transactions. This person also assigns/adhocs a contracting person to the workflow. CT_F_A_ADHOC Approver: This DAS role is assigned Contract Staff who can be added to an existing workflow for any origin for DAS-BID approvals. Req/Bid Cntrc Creator: This DAS role converts approved requisitions that are subject to DAS-BID approval into contracts. They will create contracts through the Bid to Contract link (CT_RUNCTL_14168). ePro Catalog Viewer: This role allows Requisition Amount Approvers and Chartfield Approvers view-only access to the state catalog. Casual Receiver: This role is responsible for receiving goods only on requisitions they created. General Receiver: This role has access to receive on all ePro and PO transactions in their business unit including inspection functionality, penalty assessment and ChartField information.
11
Requisitions
When to use an ePro Requisition • When choosing items from the State Catalog
• When ordering Catalog items that will be put away into the Core-CT Inventory module
• When entering an ITD10, DAS-BID or PSU Requisition Type
• To eliminate paper requisitioning
Advantages of Using ePro Requisitions • ePro eliminates paper requisition processes and/or using
alternative requisition systems outside of Core-CT.
• ePro has more robust search capabilities than Purchasing.
• ePro Requisitions are sourced to POs in an approved status and dispatched to the vendor in a streamlined 3 step process.
• ePro pricing and other item attributes on templates automatically update when the catalog is revised.
• ePro offers the ability to Create, Save & Share templates.
• ePro “Point & Click” functionality offers catalog item purchasing with accurate pricing & contract details. Less need for costly change orders.

12
eProcurement Regular Requisition Workflow
• A Regular Requisition is created for all Items & Services that are not IT related. This requisition type will be approved by the requisition Amount Approver(s), requisition Budget Approver and the requisition Purchasing Approver. All approvals will be internal to each BU.
• The end result will be an approved Purchase Order.
Requisition Req
Amount
Approval
Req
Budget
Approval
Req
Purchasing
Approval
Purchase
Order
2,500
10,000
1 Mil.
Over 1 Mil.
Budget
Check
Exceptions
Budget
Check Sourcing
Push
Back Sourcing
Workbench
OSC over
1 Mil. +

13
CORE-10
• The DAS-BID Core-10 value is chosen to initiate BIDs/RFPs/RFIs & Standardization Transactions.
• It is created at the Agency or Central Office level by a Multi-requester and routes to a requisition Amount Approver(s), requisition Budget Approver, requisition Purchasing Approver, DAS Approver 1 and a DAS Contract Specialist for approvals.
• The end result for the BID/RFP or Standardization Transaction (ST) is a contract.
• If a ST >$50,000 - DAS will convert the DAS-BID into a contract. • If a ST <$50,000 - the agency should log a ticket in Footprints
and the Help Desk will convert the DAS-BID into a contract.
• If the DAS-BID is for an RFI the agency will need to log a ticket with Footprints to have the requisition closed when it is no longer needed.

14
ITD-10 Workflow
• The ITD-10 requisition is required for All IT Purchases for Items & Services that are not pre-approved. DAS will communicate a list of contracts where the item/services are pre-approved and will not require the ITD-10 Approvals. A Regular requisition should be used in those cases.
• The ITD-10 is routed from Agency Multi-Requester to the Agency Amount Approver(s), the Agency requisition Budget Approver, DAS-BEST for their internal approval.
• It is then routed to the Agency Purchasing Approver’s Worklist for approval. The requisition is Budget Checked & Sourced to a Purchase Order.
CORE-10

15
• Product Schedule Update (PSU) – Initiates a Product Schedule Update for Contracts and Master Agreements.
• A PSU is routed from the Agency Multi-Requester to the requisition Amt., requisition Budget and requisition Purchasing Approvers. It is then routed to DAS/BEST and the PSU Approval at DAS.
• The end result is a Purchase Order.
CORE-10

16
Create Requisition
Navigation: eProcurement > Create Requisition

17
Define Requisition
• Creating requisitions is a 3 Step process: Define Requisition, Add Items and Services, and Review and Submit.
• Business Unit and Requester should default based on the User ID.
• Requisition Name is not a required (but recommended) field. It will default to the Requisition ID (number) when saved if nothing is entered.
• Core-10 is a drop down box where requisition Type Values can be chosen. It is defaulted to requisition
• The Override option ensures that when a requester modifies a predefined value, such as Ship To, the new value moves forward to the requisition lines overriding the defaulted values. The Override option defaults and should not be changed.
• The Pct (percentage) field allows requesters to have multiple distributions that apply to all of the lines.

18
• When creating a requisition follow the “One Vendor, One Buyer, One Purchase order” Rule. Choosing multiple vendors will result in multiple purchase orders dispatching. More than one Buyer on a requisition will result in the requisition sourcing to an “Open” status in Purchasing.
• The Req Obligation field captures the State of Connecticut's expected financial obligation for a requisition over a given period of time. When a requisition is approved and sourced, the obligation information automatically carries forward to the Purchase Order as the PO Obligation.
• Req Obligation: Depending on the requisition Type that is chosen, the Requester will either have the option to enter information manually or let Core-CT default values when the requisition is saved. The defaults are set to current date in the Start Date, the fiscal year end date in the End Date, and the total amount of the requisition in the Total Obligation Amount. The Req Obligation does not update when the Req amount is updated on a saved requisition.
Define Requisition

19
• CORE-10 is Core-CT customized workflows which will create specific routing for DAS or DAS-BEST approvals.
• Employees involved in this process have the Multirequester role to access the dropdown menu.
• When creating a requisition the first thing a user should determine is what CORE-10 requisition type to choose. Once a user selects a value for the CORE-10 and saves the requisition, the value cannot be changed.
• If an incorrect value is chosen, the requisition should be cancelled and a new one can be copied from the canceled requisition. A warning message will display asking to confirm that it is the correct value prior to saving the requisition.
CORE-10
Requisition Types

20
1. Enter any information for Line Defaults, Shipping Defaults, and Accounting Defaults at this time. This information will apply to all of the lines added to the requisition.
2. When requesting items from the Catalog, do not enter the Vendor, Category, Unit of Measure, and Account. They will come in automatically when selecting the catalog item.
3. Enter the Category before entering an Account code or the Category associated default Account code will override the entered Account code. See the Category and Associated (Default) Account Code job aid on the Core-CT web site.
4. The Ship To and Dept fields default to the Requester’s preconfigured profile.
Define Requisition

21
Accounting Defaults Chartfields2 and Chartfields3 Tabs
5. Enter chartfield information that will apply to all of the lines on the requisition on the Chartfields2 and Chartfields3 tabs.
6. Use the Show All Columns icon to display all of the fields in the Accounting Defaults on the same page.

22
7. Enter the Agency Inventory Business Unit on the Details tab ONLY when requesting items to be purchased and put away in the Inventory module. All Inventory items must have a Catalog Management number.
8. If all of the lines on the requisition are assets, enter the AM Business Unit and Profile ID on the Asset Information tab.
Accounting Defaults Details and Asset Information Tabs

23
Add Items and Services – Search Catalog
• Click the Catalog tab if it does not default. Use this tab to add items from the catalog.
• Use the Search Catalog group box to search for catalog items. Enter as much information available to narrow the search results and find the exact items to order. The screen shot above contains a description of the search fields.
• The lower Search button is recommended because it allows for additional search criteria. Do not use the Select a catalog drop down, there is only one choice.

24
Add Items and Services – Search Catalog
Use asterisks around key words or numbers for wild card searching.
25
Search Catalog - Results
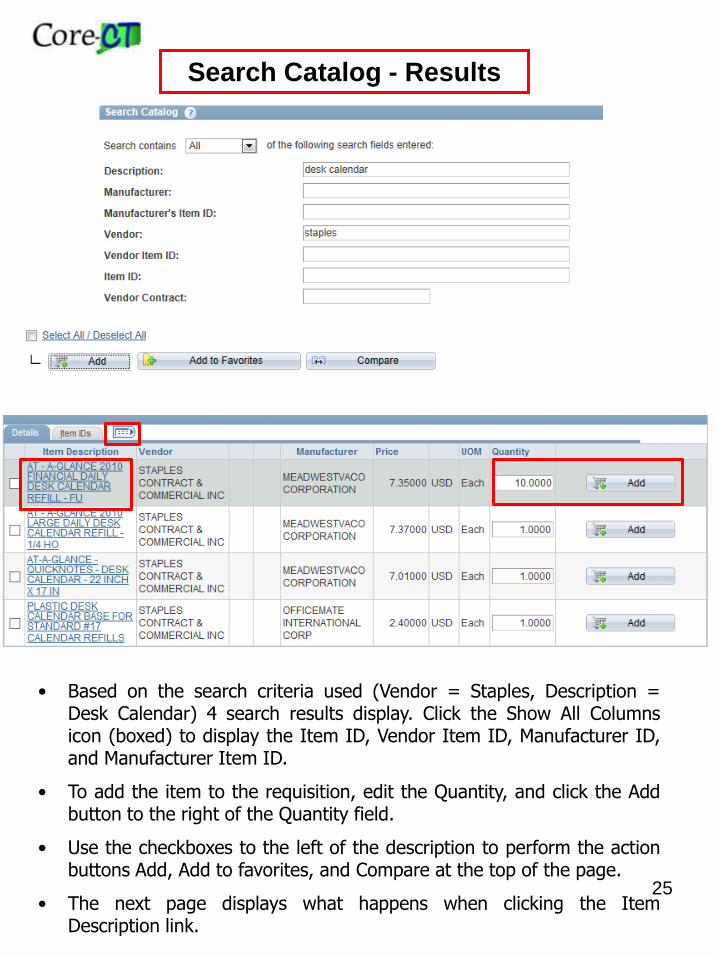
• Based on the search criteria used (Vendor = Staples, Description = Desk Calendar) 4 search results display. Click the Show All Columns icon (boxed) to display the Item ID, Vendor Item ID, Manufacturer ID, and Manufacturer Item ID.
• To add the item to the requisition, edit the Quantity, and click the Add button to the right of the Quantity field.
• Use the checkboxes to the left of the description to perform the action buttons Add, Add to favorites, and Compare at the top of the page.
• The next page displays what happens when clicking the Item Description link.

26
Search Catalog – Item Description
• The Item Description page includes the Long Description of the item which can help with deciding if it is the correct item to request.
• The Item ID is the Catalog Management number.
• Questions regarding contract pricing in the catalog must be directed to a Contract Specialist at DAS Procurement.
• Clicking the Return to Previous Page link at the bottom of the screen returns to the Search Results page.

27
• Go to the 3. Review and Submit page at any time to see the lines of the requisition that have been added.
• The Requisition Summary will update when adding lines to the requisition.
Catalog – Adding Items Summary

28
• When creating a new requisition frequently purchased items can be added to the Favorites tab to eliminate searching for the item every time.
• To add a Favorite, select the checkbox to the left of the item description of the item(s). Click the Add to Favorites button.
• A new window will display with a message that the item(s) have been added as Favorites. Click the Close button.
Add Items and Services – Favorites

29
Add Items and Services – Favorites
• Manage favorites from the Add Items and Services, Favorites tab.
• To add an item from the Favorites tab to a requisition: edit the Quantity field and click the Add button. The item(s) will appear as a line on the requisition when navigating to the 3. Review and Submit page.
• To delete a Favorite: select the checkbox to the left of the Description, click the Delete from Favorites button.

30
• Favorite items can be grouped to be separated from other favorites. Select the checkboxes to the left of the item description of the items to be grouped. Click the Add to Favorites Group(s) button.
• A dialog box will display. Enter the Favorite Group Name and Description. Click OK.
Favorites Groups

31
• The Favorite group will display above the ungrouped favorite items. Click the arrow to the left of the Group Name to access the group items. Add the items as necessary.
• To manage Favorites groups go to eProcurement >My Profile and click the Manage Favorites Groups link.
Favorites Groups

32
Favorites – Inactive Items
• Inactive catalog items will display automatically and will not be able to be added to the requisition. Delete from Favorites as necessary.
• The pricing on Favorites is automatically updated when new pricing is loaded to the Catalog.
33
Templates
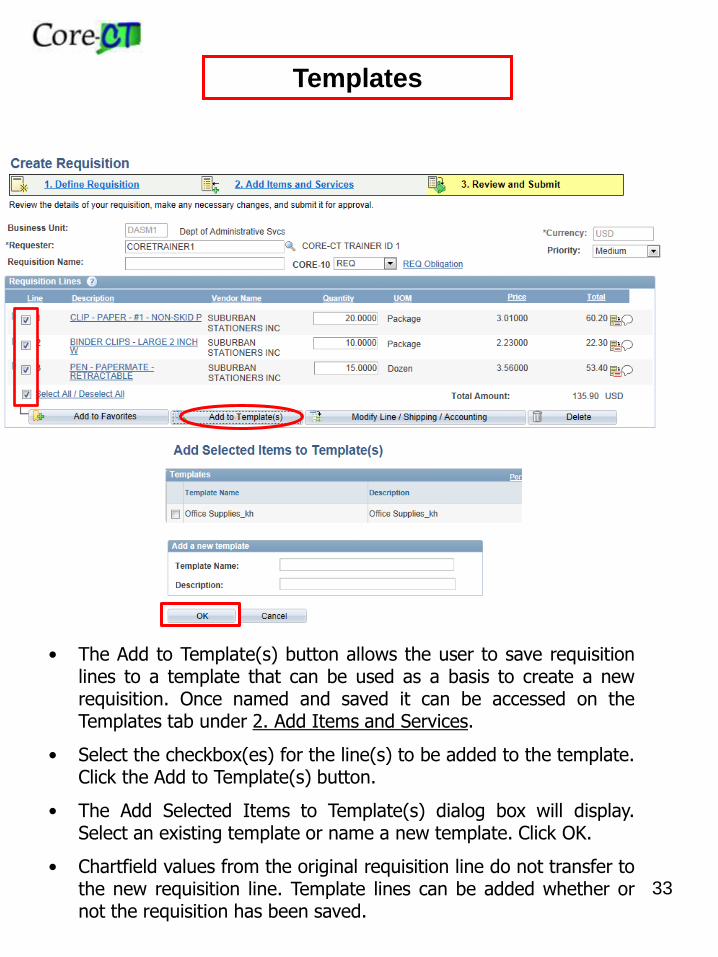
• The Add to Template(s) button allows the user to save requisition lines to a template that can be used as a basis to create a new requisition. Once named and saved it can be accessed on the Templates tab under 2. Add Items and Services.
• Select the checkbox(es) for the line(s) to be added to the template. Click the Add to Template(s) button.
• The Add Selected Items to Template(s) dialog box will display. Select an existing template or name a new template. Click OK.
• Chartfield values from the original requisition line do not transfer to the new requisition line. Template lines can be added whether or not the requisition has been saved.

34
Add Items and Services – Templates
• Clicking the arrow to the left of the Template name will display the line information of the template.
• Clicking the Add button will add the original quantities of the template to the requisition. Line quantities can be edited on the 3.Review and Submit page.
• The pricing on Templates is automatically updated when new pricing is loaded to the Catalog.

35
• Inactive catalog items will display automatically and will not be able to be added to the requisition.
Add Items and Services – Templates

36
• To delete templates no longer needed, go to eProcurement >My Profile and click the Manage Personal Templates link. Click the Delete Template button. Click the Save button.
• Templates can be shared with other requesters and can be copied by selecting the appropriate links.
• Do not use other functions on the My Profile page.
Add Items and Services – Templates
37
Add Items and Services
Special Request
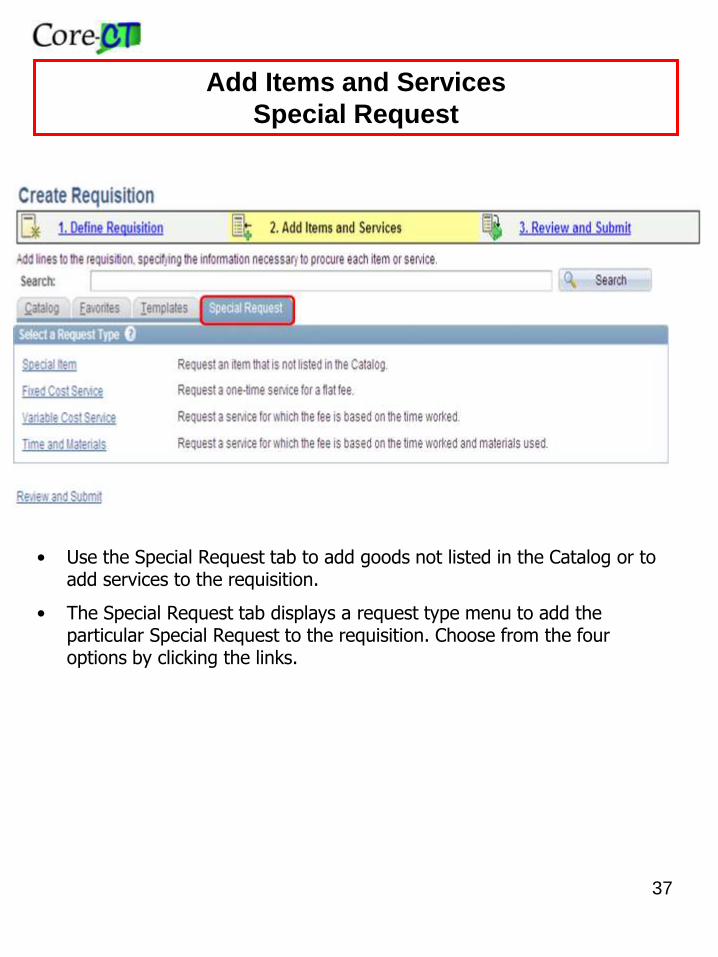
• Use the Special Request tab to add goods not listed in the Catalog or to add services to the requisition.
• The Special Request tab displays a request type menu to add the particular Special Request to the requisition. Choose from the four options by clicking the links.

38
Add Items and Services – Special Item
• Use the Special Item page to add goods to the requisition by description when it is not listed in the Catalog.
• The asterisked fields are required fields. Vendor ID is a required field though it does not have an asterisk. Saving the requisition without entering a Vendor ID will send the line to the Sourcing Workbench and will not source it as a PO.
• Enter the Vendor Item ID, Mfg. ID, Manufacturer, Mfg. Item ID to ensure proper items will be shipped.
• Send Additional Information to the vendor and displayed on the purchase order or shown on the receipt or voucher pages. Click the appropriate checkbox(es).
• Remember to add the Contract ID on the Line Details for Special Items or change the Purchasing Authority.
• Special Item Example: A certain type of printer is on State contract, but not in Catalog Management. Use a Special Request and enter the Contract ID on the Line Details page.

39
Special Request: Fixed Cost Service
• Use the Fixed Cost Service page to request a one time service for a flat fee.
• Fixed Cost Service Example: A contractor is hired to provide training to an agency. The contractor will complete all necessary training for the price of $15,000.

40
Special Request: Variable Cost Service
• Use the Variable Cost Service page to request a service for
which the fee is based on the time worked.
• Variable Cost service Example: A plumber is hired to repair a
broken water fountain at an agency. The plumber will
complete the repair at the rate of $50 per hour. The job is
expected to take 4 hours. The Unit of Work is HR, the # of
Units of work is 4, the Rate is $50.

41
Special Request – Time and Materials (1 of 2)
• Use the Time and Materials pages to request a service for which the fee is based on time worked and materials used. There are two pages for this Special Request. The first is for the time (services), the second is for the materials (goods).
• Time and Materials Example: A mechanic is hired to repair the transmission of an agency vehicle. The mechanic will complete the necessary repairs and invoice the agency for parts and labor as separate line items.

42
• This is the second page of the Time and Materials special request.
• The Category field is a required field for all types of requisitions. Categories numerically identify products and services. The Category will default for items added to the requisition from the Catalog.
• The State creates reports using category code information and the use of the Category Code “00000000” has never been acceptable. Click the category lookup to search for the category code.
Special Request – Time and Materials (2 of 2)

43
Summary Box
• The Requisition Summary box remains active and updates when lines are added to the requisition.

44
• The third step of the requisition process is Review and Submit. This step allows the opportunity to review and edit the requisition lines before saving.
• The lines that were added to the requisition display in the Requisition Lines group box.
• Clicking the highlighted arrow will expand that line for review and editing.
Review and Submit

45
• The expanded line displays. Edit the Accounting lines here for this line only. This is useful when charging this particular line item to a different coding string.
• To split the funding for this line, click the + sign to add another distribution row. Enter the additional chartfield information, remembering to change the percent field to reflect the correct value for each line.
• Click the Line Details icon to go to the Line Details page.
Review and Submit

Line Details
• This screen shot displays the line details for a catalog item. All of this information defaults automatically.
• Each requisition should have one Buyer. If the requisition has more than one buyer, Core-CT will default CamaraN as the Buyer. The Sourced PO will not dispatch, and will be in an “Open” status.
• Purchasing Authority defaults to Contracts.
• The Physical Nature field is not required, but recommended. It defaults to Goods.
• The Contract ID will default on Catalog items, but must be entered for Special Requests that have a purchasing authority of Contracts. The requisition cannot be saved without a Contract ID.
46

47
Modify Line/Shipping/Accounting
Override line information on the Modify Line/Shipping/Accounting page. Select the line(s) to edit on the 3. Review and Submit page and click the Modify Line/Shipping/Accounting button..

48
• On the Modify Line/Shipping/Accounting page, click the Load Values From Defaults link to populate the fields with the values entered from the Line Defaults group box on the 1. Define Requisition page.
• Edit the fields as necessary. Click the Apply button when editing is complete. The Distribution Change Options page will display. Select the All Distributions Lines radio button and click OK. The 3. Review and Submit page will display with the changes applied.
• Pre-defined fields that are changed on the 1. Define Requisition page will carry forward as long as the default “Override” radio button is deployed.
Modify Line/Shipping/Accounting

49
Line Comments
• Click the Line Comments icon to add comments for a particular line.
• The line comments can be directed to the vendor and display on the purchase order; display on the Receiving pages; or display on the Voucher pages. Select the appropriate checkbox(es).
• Click the Add Attachments button to add supporting documentation to the requisition.

50
Line Comments
• Requisition attachments enable requesters to communicate supplemental information and requirements to vendors, approvers, and other Core-CT users. Attachments are always tied to the requisition.
• After clicking the Add Attachments button the File Attachment page displays. Enter the file path/name or click the Browse button.
• Navigate to the desired file to attach, highlight it, click the Open button.

51
Line Comments
• Click the Upload button after the file path populates.
• Click the Add Attachments button to add additional attachments or click the OK button.
• Comments must be entered if adding an attachment.
• Attachments are permanently associated with requisitions and once they are sourced the attachments carry over to the POs. Attachments are sent to the vendor when the “Send to Vendor box” is checked and a PO is dispatched via email. Attachments are not included for POs dispatched via Print, Fax, and Electronic Data Exchange (EDX).

52
Review and Submit
• Use the Comments field to enter header comments that will display on POs, attach packing slips and invoices; or enter delivery instructions. Use the More Comments link to add header attachments.
• The requester can select to have comments display on the Requisition Approval page by selecting the Approval Justification checkbox. Approvers can view comments without having to open the requisition.
• The Save & submit button saves the requisition and initiates workflow. The requisition will be ready for Requisition Amount Approval and will appear on the Requisition Amount Approver’s worklist.
• The Save & preview approvals button will save the requisition without initiating the workflow process.
• Clicking either button will display the Confirmation page.

53
Confirmation Page
• The Confirmation page displays summary requisition information including the Requisition ID generated when saving the requisition
• The page also displays the approval status path with the approvers in the workflow.
• Edit the requisition by clicking the Edit Requisition button.
• If the Save and preview approvals button on the 3. Review and Submit page was selected, the Submit button would be active and not grayed out.
• Click the View printable version link.

54
A dialog box displays asking if the distribution details want to be included on the printable version. Click Yes or No.
Review and Submit – View Printable Version

55
3 step requisitioning process:
• Define Requisition
• Add Items and Services
• Review and Submit
You can add more than one item to Favorites at the same time. You can group favorites.
Comments can be routed to the vendor with the PO, display on the receipt, or display on the voucher. Attachments can be added.
The Confirmation page provides summarized information and lets you know the requisition has been saved successfully.
You can save requisition lines as templates to create new requisitions.
Creating Requisitions – Key Points

56
Managing Requisitions
Navigation: eProcurement> Manage Requisitions
Use the Manage Requisitions page once a requisition has been saved to edit, cancel, and copy requisitions. You can also view the Request Lifespan, Approvals, and a Printable Version.
57
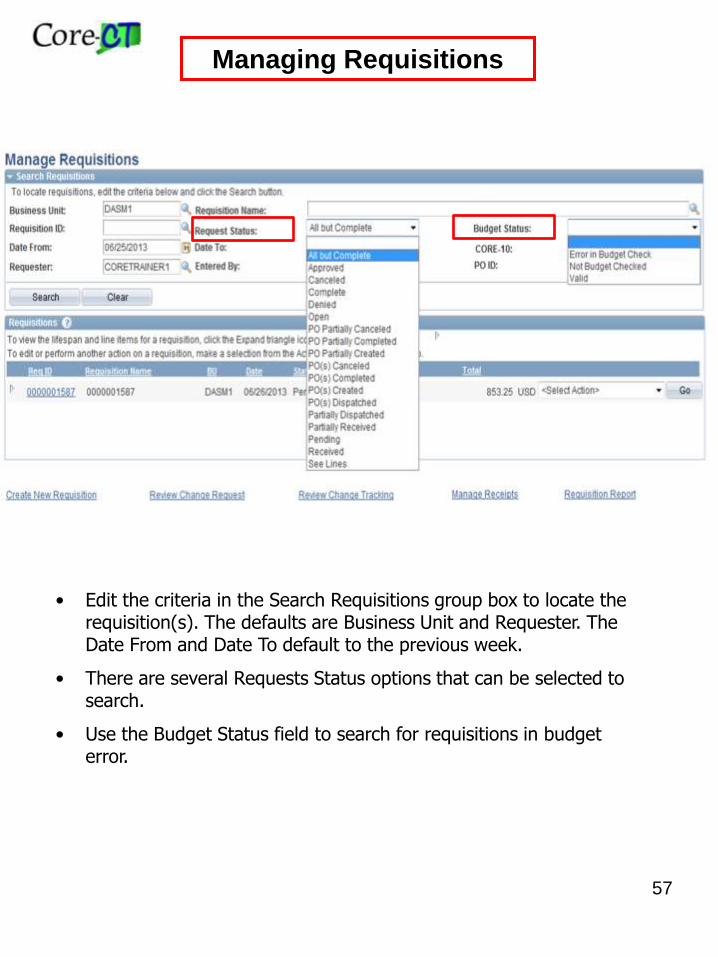
• Edit the criteria in the Search Requisitions group box to locate the requisition(s). The defaults are Business Unit and Requester. The Date From and Date To default to the previous week.
• There are several Requests Status options that can be selected to search.
• Use the Budget Status field to search for requisitions in budget error.
Managing Requisitions

58
• Click the Select Action drop down list to see the available options for a particular requisition.
• Other options are Cancel Requisition, Copy Requisition, Edit Requisition, View Approvals, to see the current approval workflow and View Printable Version depending on the roles that are assigned to your user id by Security.
• Edit Requisition can be selected, keeping in mind that editing the requisition may affect the approval process if amounts or quantities are added.
Managing Requisitions
Cancel Requisitions

59
• Choose Copy Requisition to create a new requisition with all the same attributes as the existing requisition The accounting, requisition lines, and contract information will all default on the new requisition.
• The Requisition Type (CORE-10 value) will always default to requisition therefore a user must update that field if necessary.
• The Req Obligation will also need to be revised.
Managing Requisitions
Copy Requisitions

60
• Selecting Cancel Requisition will display the Requisition Details for the requisition along with the Cancel Requisition button.
• Once the Cancel Requisition button is selected, the requisition status will change to Canceled on the Manage Requisitions page.
Managing Requisitions

61
• Clicking the arrow next to the requisition ID opens the group box to display the Requisition life span. A quick way to determine the status of the requisition is by looking at the active icons.
• Icons that are active can be clicked to get more information. In this example clicking the Purchase Order icon opens the Purchase Order Inquiry page. On this page the Requester can learn the PO ID for the sourced requisition.
• Requisition lines can be canceled here by clicking the appropriate red X.
Managing Requisitions

62
Manage Requisitions – Key Points

63
Push
back
Requisition Req
Amount
Approval
Req
Budget
Approval
Req
Purchasing
Approval
Purchase
Order
2,500
10,000
1 Mil.
Over 1 Mil.
Budget
Check
Exceptions
Budget
Check Sourcing
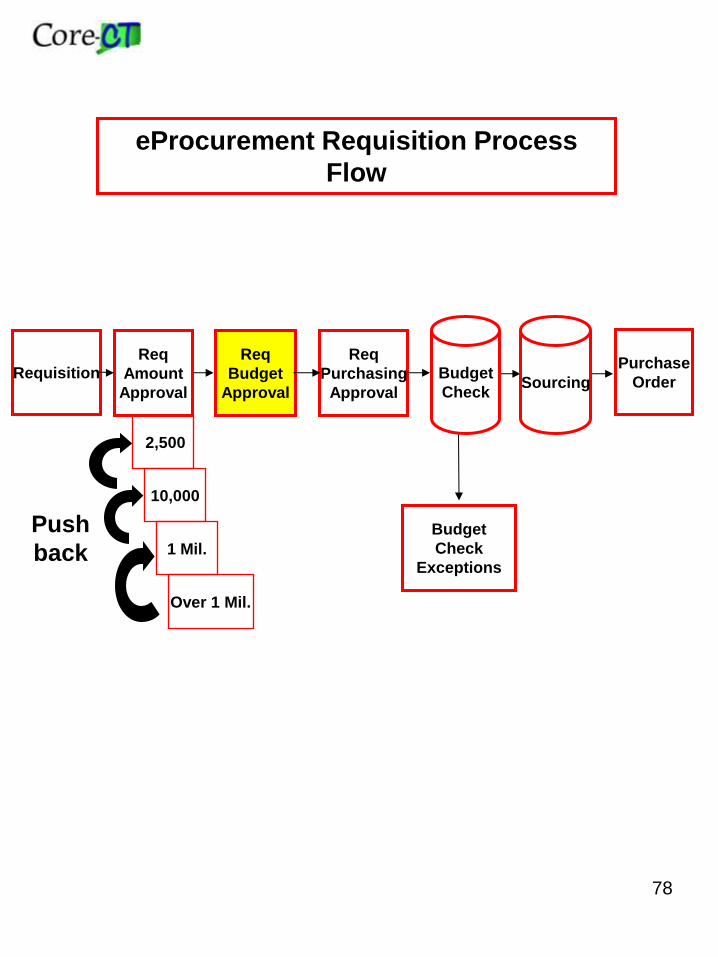
eProcurement Requisition Process
Flow

64
Approving Requisitions
The correct way to approve requisitions is through the Worklist.

65
• If the user has more than one approval role use the Work List Filter to find all of the requisitions pending approval.
• Amount Approvers are responsible for approving the requisition. Any requisition within the approvers monetary authority can be edited without reinitiating the workflow process.
Approving Requisitions

66
Approving Requisitions
• The top half of the Requisition Approval page displays requisition summary and line information.
• The Requisition Amount Approver can edit the requisition by clicking the Edit Requisition button.
• Click the View Line Details button to view requisition line details.
• The Requisition Amount Approver can Approve, Deny, or Pushback a requisition.
Top half of approval screen

67
Approving Requisitions
• The Line Details open in a new window and can be closed after reviewing.
• The Requisition Amount Approver can view detailed line information including the chartfield distribution.

68
Bottom half of page
Approving Requisitions
The Requisition Amount Approver can Approve, Deny, or Pushback a requisition. In this example the Requisition Amount Approver is going to approve the requisition.

69
• In this example the requisition has been amount approved. The Confirmation page displays with a message that the requisition has been routed to the next approval stage.
• The Review/Edit Approvers group box is updated to display that amount approval is complete and Requisition Budget Approval is now pending.
Amount Approval - Confirmation

70
Amount Approval - Deny
• Comments must be entered before denying a requisition.
• Denying puts the requisition link back into the requester's Worklist and creates an audit trail that can be seen in Approvals History.

71
Amount Approval - Deny
An email is sent to the Requester notifying them of the denial. The Requester can cancel or edit the requisition.

72
• Placing a requisition on Hold removes it from the worklists of other approvers when there are multiple approvers at an approval level.
• It puts the requisition link back into the requester's Worklist. The Requester will not receive email notification.
• Comments are required for the Hold option.
Amount Approval - Hold

73
• A warning message will display if comments are not entered when placing a requisition on hold.
• Marks the requisition as Hold preventing it from sourcing. It remains on Hold until the approver approves or denies the requisition
Amount Approval - Hold

74
• The Requisition Approval Confirmation confirms that the requisition has been put on hold.
• The Review/Edit Approvers stage boxes displays “Information Request”.
• The requisition is returned to the Requester’s Worklist. The Work Item displays “Approval Request Information”.
Requester’s
Worklist NO!
Amount Approval - Hold

75
Amount Approval - Pushback
• Selecting the Pushback button returns an approved requisition back one stage to the previous Amount Approver.
• Requisition Amount Approvers 2, 3, and 4 are the only Approvers to have the Pushback option.

76
Using the Pushback button requires the Requisition Amount Approver to enter comments in the Enter Approver Comments field.
Amount Approval - Pushback

77
• The Confirmation page confirms that the requisition has been pushed back and updates the Review/Edit Approvers stages.
• The previous Amount Approver will receive e-mail notification of the pushback.
• The pushed back requisition will reappear on the worklist for the previous approver though it will not appear any different from other requisitions on the worklist. A Requisition Alert will appear when they go to the Requisition Approval page.
Amount Approval - Pushback
78
Push
back
Requisition Req
Amount
Approval
Req
Budget
Approval
Req
Purchasing
Approval
Purchase
Order
2,500
10,000
1 Mil.
Over 1 Mil.
Budget
Check
Exceptions
Budget
Check Sourcing
eProcurement Requisition Process
Flow

79
Approving Requisitions
Requisition Budget Approval
The Requisition Budget Approver is responsible for approving chartfield values and ensuring that funds are available in the budget. Chartfields can be edited without reinitiating the workflow process.

80
• The Confirmation page confirms that Budget Approval for the requisition has been completed and the requisition has been routed for the next approval stage.
• The Review/Edit Approvers group box updates to display that budget approval is completed and Requisition Purchasing Approval is now pending.
Approving Requisitions
Requisition Budget Approval

81
Push
back
Requisition Req
Amount
Approval
Req
Budget
Approval
Req
Purchasing
Approval
Purchase
Order
2,500
10,000
1 Mil.
Over 1 Mil.
Budget
Check
Exceptions
Budget
Check Sourcing
eProcurement Requisition Process
Flow

82
Approving Requisitions
Purchasing Approval
• Requisition Purchasing Approvers are responsible for reviewing the line(s) and contract information on the requisition. They can edit line(s) and contract information without reinitiating the workflow process as long as they do not increase the quantity and price of the requisition. An edit by the Purchasing Approver that increases the value of the requisition will reinitiate the entire workflow approval process.
• Requisition Purchasing Approvers should make sure that any Asset or Inventory coding has been entered on the requisition if required.

83 Users with multiple approval roles only have to approve the requisition once. They should check all fields they are authorized to approve.
Approving Requisitions
Purchasing Approval

84
In this example, the Confirmation page confirms that the Purchasing Approver approved the requisition. The requisition approval process has now been completed and the requisition is ready for the system budget check.
Approving Requisitions
Purchasing Approval

85
Approving Requisitions
Ad Hoc Approvers
• Click the Plus sign to add an Ad-Hoc Approver. Select the User ID from the new window. The Ad-Hoc Approver will be added to the approval path for this one requisition, but will not be able to edit the requisition.
• Ad-Hoc Approvers/Reviewers must have an Approver Role and proper security to access and perform the approval. Once the user has been inserted into the approval workflow, the PO displays on the worklist.
• Click the Apply Approval Changes button to apply the change without performing an approval action.

86
Approving Requisitions
Multiple Approvers
If an approval stage has Multiple Approvers displayed, click the link to open a new window with a list of approvers that have authority to approve the requisition. This is useful if the person that usually approves the requisitions is not available.

87
Approving Requisitions
Key Points
Requisition Approvers can edit
requisitions from the Approval page.
The Hold button returns the requisition to
the Requester’s worklist with comments.
E-mail messages are automatically sent
when a Requisition is denied or pushed
back
88
Push
back
Requisition Req
Amount
Approval
Req
Budget
Approval
Req
Purchasing
Approval
Purchase
Order
2,500
10,000
1 Mil.
Over 1 Mil.
Budget
Check
Exceptions
Budget
Check Sourcing
eProcurement Requisition Process
Flow

89
Navigation: Commitment Control > Review Budget Check
Exceptions > Purchasing and Cost Management > Requisition
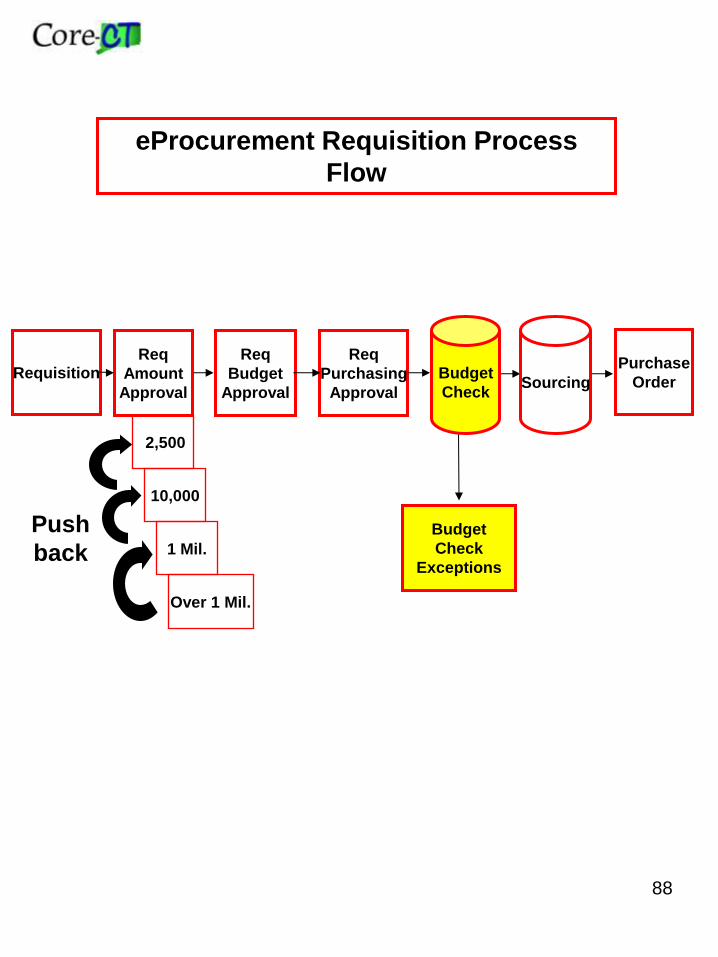
• Once the requisition goes through all three levels of approval, it is ready for the system budget check. Requisitions that pass budget check are then ready to be sourced as purchase orders.
• If a requisition fails budget check, it will not source to a PO. The requisition has to be fixed and pass budget check or it can not proceed any further in the process.
• The reason the requisitions failed budget check can be found in the Commitment Control module.
Budget Check Exceptions

90
• Search for requisitions that failed budget check by selecting “errors exist” in the Process Status search criteria.
• Click anywhere on the link of the requisition to get to the next screen.
90
Budget Check Exceptions

91
• The Requisition Exception page, Budget Override tab displays the exception: the reason the requisition failed budget check. The most common budget exceptions are: “No Budget Exists”, which most often means the wrong Bud Ref was entered; and “Budget Exceeds Tolerance”, which means that there isn’t enough funding in the chartfields entered.
• Click the Go To icon to see related links like the Budget Inquiry page to view the available budget and ledger amounts.
• Click the Requisition Line Drill Down icon to display the chartfields for the line.
Budget Check Exceptions

92
Use the Requisition Line Drill Down page to see the chartfield information to try and determine why the error occurred on the line then edit the requisition and resubmit it for budget check.
Budget Check Exceptions

93
Push
back
Requisition Req
Amount
Approval
Req
Budget
Approval
Req
Purchasing
Approval
Purchase
Order
2,500
10,000
1 Mil.
Over 1 Mil.
Budget
Check
Exceptions
Budget
Check Sourcing
eProcurement Requisition Process
Flow
Sourcing
Workbench

94
Correcting Sourcing Errors
Navigation: Purchasing> Purchase Orders> Stage/Source
Requests> Sourcing Workbench
• Requisitions without errors source to Purchase Orders without further processing. Occasionally, errors in this process prevent all or some of the requisition lines from sourcing to POs. If there are more lines on the requisition than the PO, lines will be stuck in the Sourcing Workbench. Find the requisition lines that did not properly source to POs in the Sourcing Workbench.
• Navigate to this page to discover the error and take steps to resolve it.

95
• Some sourcing errors can be corrected from the Sourcing Workbench pages. It is important to understand that the correct lines on a requisition will source to a purchase order excluding the incorrect line(s) in the Sourcing Workbench.
• Either correct the line and have it source to a new purchase order, or cancel the line on the Manage Requisitions page and add the line on the existing PO as a Change Order.
• In the Search Criteria group box enter the Business Unit and select “Error” from the Stage Status field drop down list. Click the Search button.
Correcting Sourcing Errors

96
• The Search results display under the Search button.
• The Selected Items tab displays the requisition information including the Requisition ID and the Buyer.
• Click the Stage Info tab.
Correcting Sourcing Errors

97
• The Error Message tab displays the message text. In this example go to the Sourcing Workbench and change the requisition status from Error to Reset requisition and Purge (As long as the requisition is in error, the contracting agency will not be able to access the contract to put on the additional funds). Click Save. Immediately contact the agency that created the contract associated with the requisition to add additional funds (DAS or a specific Agency Contract Division).
• Once the funds have been added to the contract the requisition will source to a PO as expected without any changes to the requisition.
• For all other Error messages change the Status from Error to Purge requisition and Reset and click Save.
• Click the Stage Info tab.
Correcting Sourcing Errors

98
• The Stage Info tab displays the Requisition Line number that is in error.
• Click the Sourcing Details icon.
Correcting Sourcing Errors
99
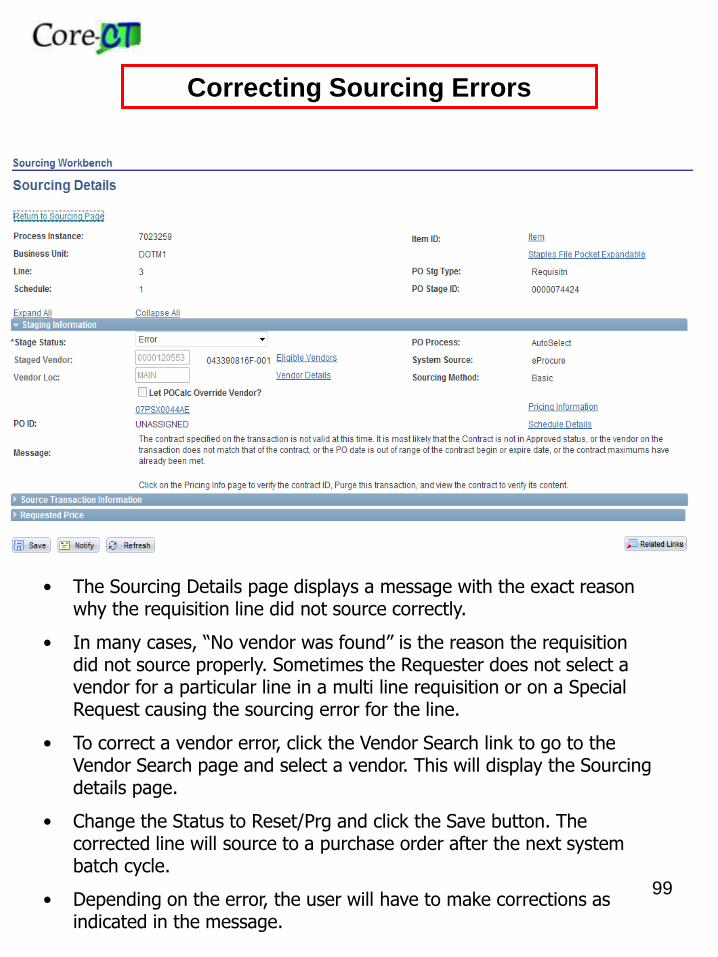
• The Sourcing Details page displays a message with the exact reason why the requisition line did not source correctly.
• In many cases, “No vendor was found” is the reason the requisition did not source properly. Sometimes the Requester does not select a vendor for a particular line in a multi line requisition or on a Special Request causing the sourcing error for the line.
• To correct a vendor error, click the Vendor Search link to go to the Vendor Search page and select a vendor. This will display the Sourcing details page.
• Change the Status to Reset/Prg and click the Save button. The corrected line will source to a purchase order after the next system batch cycle.
• Depending on the error, the user will have to make corrections as indicated in the message.
Correcting Sourcing Errors
100
Correcting Sourcing Errors
Key Points
The Sourcing Workbench should be
monitored to identify and resolve any
requisition line sourcing errors.
Resolve some sourcing errors from the
Sourcing Workbench.
To cancel a requisition line stuck in the
Sourcing Workbench go to Manage
Requisitions

101
Receiving
Navigation: Purchasing > Receipts > Add/Update Receipts
• Receiving is required for all Requisitions. • To receive in the Purchasing module, the PO must be dispatched and the user
needs the General Receiver role to receive item(s) or services.
• To receive in the eProcurement module, the user must have created the requisition and the associated PO must be dispatched. The Casual Receiver role is required to receive in the eProcurement module.
• A receipt is created to accept item(s) or services received. Optional information for the receipt of items, such as comments and penalty information can be entered. The receipt is then saved and the vendor payment process continues in the Accounts Payable module.

102
Select Purchase Order to Receive
• Enter the search criteria (PO ID) and click the Search button. Delete the defaulted Ship to value before searching.
• The PO lines display under the Search button. Select the check box of the PO line(s) to receive against and click the OK button.
• The remaining quantity on a PO will display after a partial receipt has been created if the PO Remaining Qty radio button is selected in the Receipt Qty Options group box.

103
Maintain Receipts
• On the Receipt Lines tab of the Receiving page edit or accept the line Receipt Quantity. If this was an Amount Only PO, the Receipt Price field will be open and can be edited.
• Create partial receipts by editing the receipt quantity and clicking the Save button. A receipt will be created for that amount and a new receipt will have to be created for the remaining quantity. The next time this page displays the remaining quantity will populate. It can be edited or accepted.
• Cancel the entire receipt by clicking the red X in the top right hand corner of the page, or cancel a receipt line by clicking the red X on the line.
• If the final receipt quantity will not match the PO quantity, do not create a receipt. Create a change order on the purchase order to match the receipt.

104
Maintain Receipts - Assets
• If the item purchased was identified as an asset on the PO by inclusion of the AM Business Unit, the AM Status field Pending link will display on the Receipt Lines tab.
• Click the Pending link in the AM Status field to add asset information to the receipt.
• Select the Serial checkbox to assign multiple Tag Numbers or Serial IDs on the Asset Management Information page.

105
Maintain Receipts
• Receiving is an important component in the integration of asset information into the Asset Management module. There should be communication between those working with assets and the Receivers or procurement staff.
• If the Distributed Quantity is 1 the Tag Number can be assigned here. Core-CT recommends letting the system assign the Asset ID.
• If the Quantity is more than one, multiple Tag Numbers and Serial IDs can be assigned using the fields in the Apply to Details group box.

106
Click the Header Details link on the Maintain Receipts page.
Maintain Receipts

107
Header Details
• The Receipt Date is the date the item(s) were actually received. It is not the date the receipt is created in Core-CT. Edit the Receipt Date field, if appropriate.
• The Receiver can enter Shipping Information such as the Invoice and Packing slip numbers on the Header Details page. This information can also be entered under the Optional Input tab on the Maintain Receipts page.
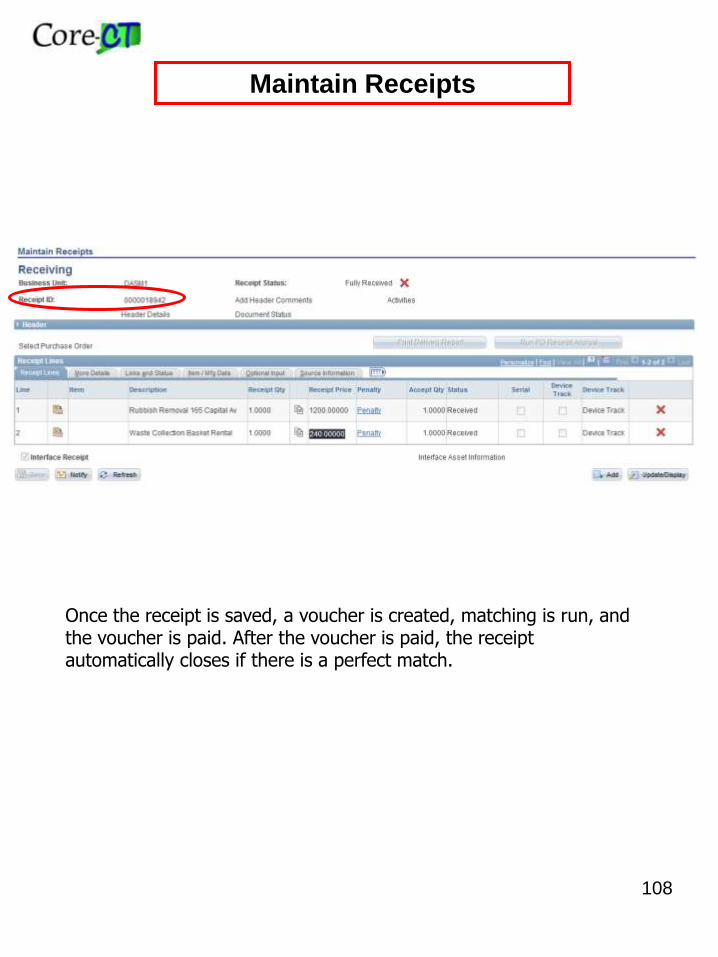
108
Once the receipt is saved, a voucher is created, matching is run, and the voucher is paid. After the voucher is paid, the receipt automatically closes if there is a perfect match.
Maintain Receipts