Embed Size (px)
Citation preview
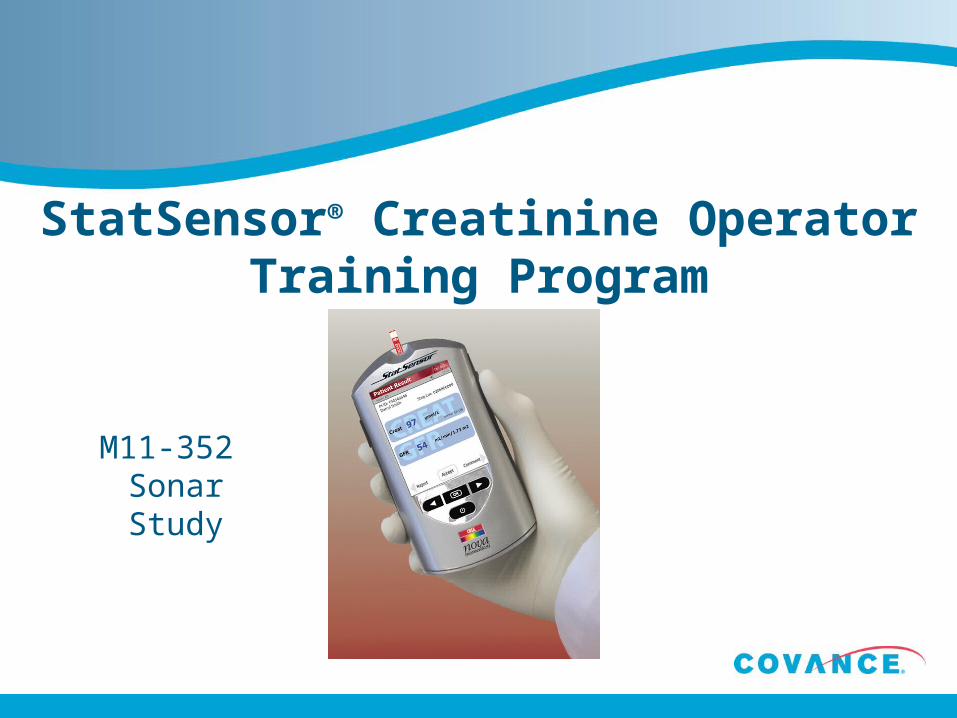
StatSensor® Creatinine Operator Training Program
M11-352 Sonar Study
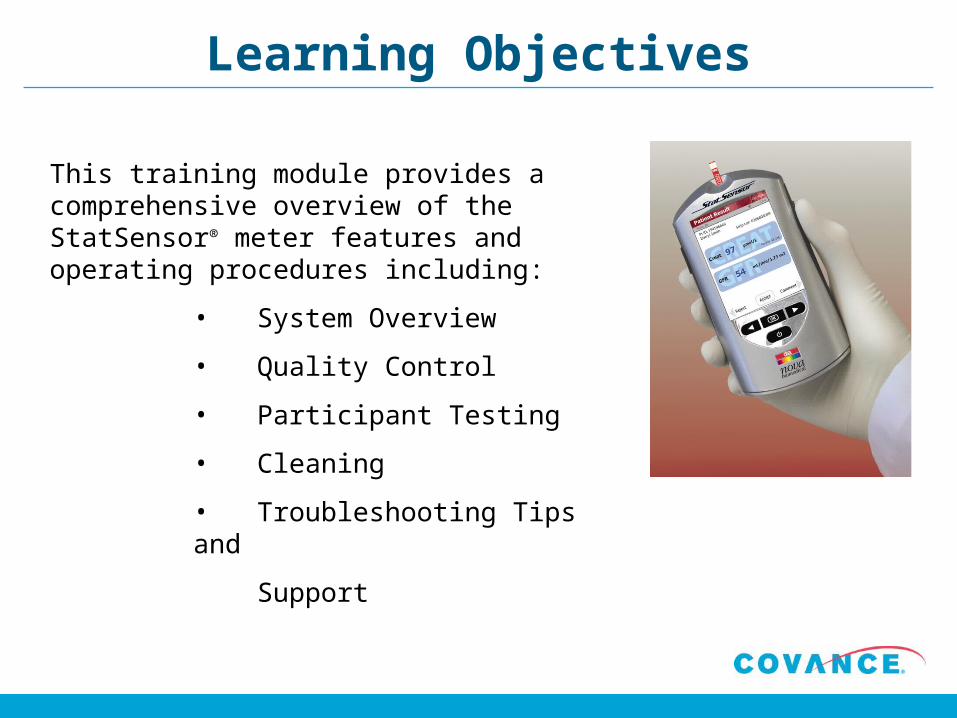
Learning Objectives
This training module provides a comprehensive overview of the StatSensor® meter features and operating procedures including:
• System Overview
• Quality Control
• Participant Testing
• Cleaning
• Troubleshooting Tips and
Support
System Overview
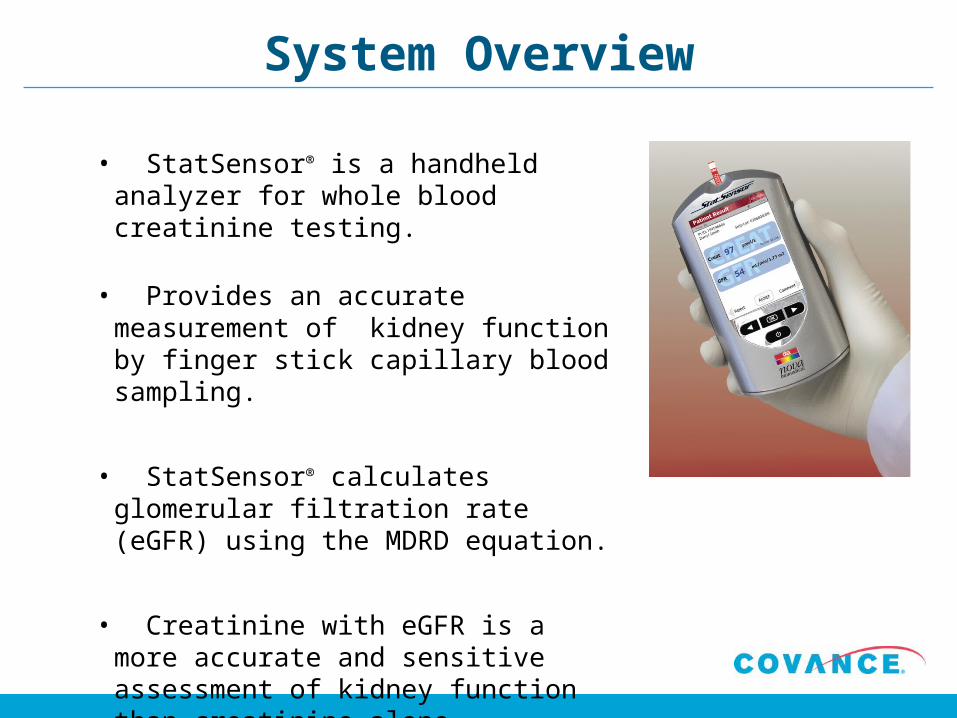
• StatSensor® is a handheld analyzer for whole blood creatinine testing.
• Provides an accurate measurement of kidney function by finger stick capillary blood sampling.
• StatSensor® calculates glomerular filtration rate (eGFR) using the MDRD equation.
• Creatinine with eGFR is a more accurate and sensitive assessment of kidney function than creatinine alone.
System Overview
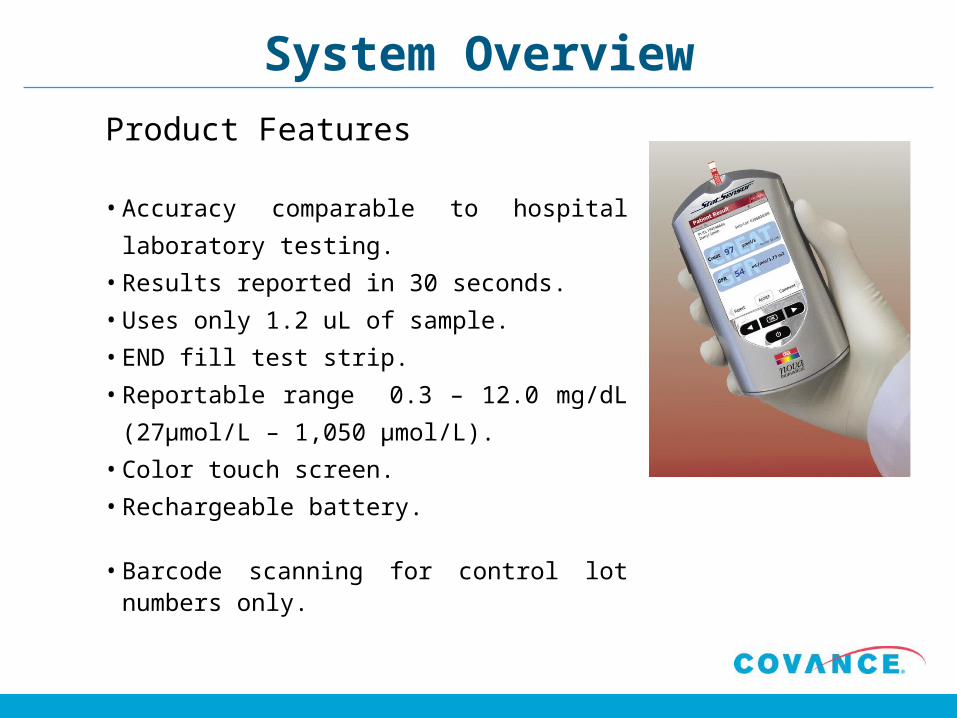
Product Features
• Accuracy comparable to hospital laboratory
testing.
• Results reported in 30 seconds.
• Uses only 1.2 uL of sample.
• END fill test strip.
• Reportable range 0.3 – 12.0 mg/dL (27µmol/L
– 1,050 µmol/L).
• Color touch screen.
• Rechargeable battery.
• Barcode scanning for control lot numbers only.

System Overview
Strip port
Screen title
Touch screen Keypad
Forward Button
Back Button
OK/Enter buttondefault action
Sleep Mode Button
Laser Barcode Scanner
The StatSensor® Device
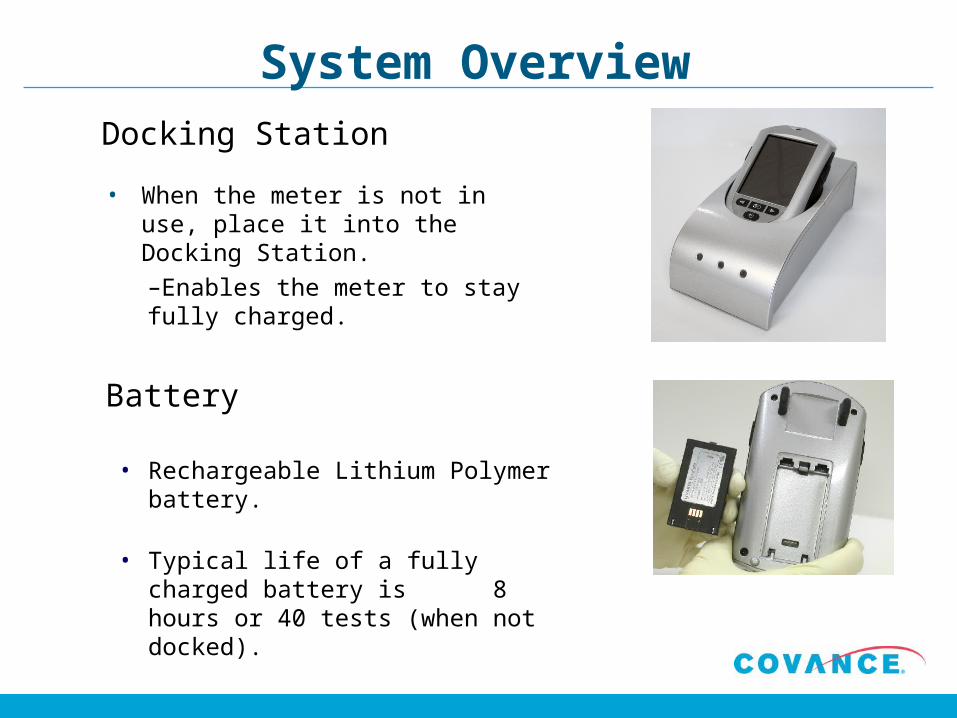
System Overview
• When the meter is not in use, place it into the Docking Station.
–Enables the meter to stay fully charged.
Docking Station
Battery
• Rechargeable Lithium Polymer battery.
• Typical life of a fully charged battery is 8 hours or 40 tests (when not docked).
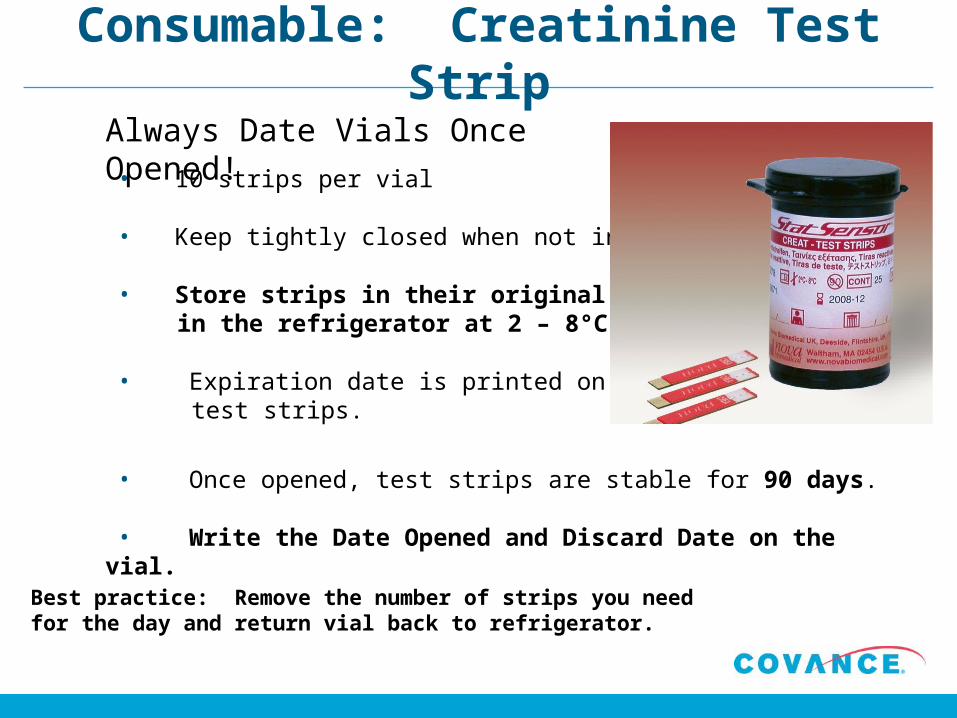
Consumable: Creatinine Test Strip
• 10 strips per vial
• Keep tightly closed when not in use.
• Store strips in their original vial in the refrigerator at 2 – 8°C (36° – 46°F).
• Expiration date is printed on the vial of test strips.
• Once opened, test strips are stable for 90 days.
• Write the Date Opened and Discard Date on the vial.
Always Date Vials Once Opened!
Best practice: Remove the number of strips you need for the day and return vial back to refrigerator.

Consumable: Quality Control Solutions
•IMPORTANT: Daily routine when conducting patient testing:
1. Conduct two levels of Quality Control testing (requires 2 strips) once the patient visit is confirmed for that day.
2. Patient testing is valid for 24 hours following Quality Control.
3. Repeat Quality Control on next confirmed patient visit day.•Store controls refrigerated at 2° – 8°C (36° – 46°F).
•Keep the vials tightly closed when not in use.
•Expiration date is printed on the control vials.
•Once opened, Quality Control is stable for 90 days.
•Write the Discard Date on the vial.
Always Date Vials Once Opened!
Lot number
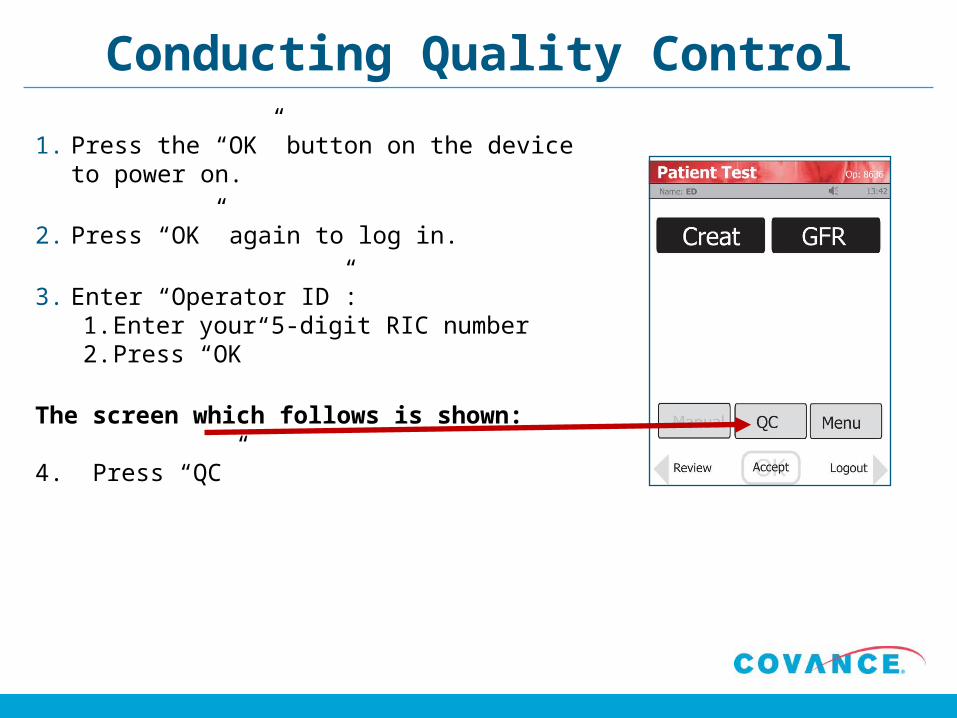
Conducting Quality Control
1. Press the “OK” button on the device to power on.
2. Press “OK” again to log in.
3. Enter “Operator ID”:1. Enter your 5-digit RIC number2. Press “OK”
The screen which follows is shown:
4. Press “QC”
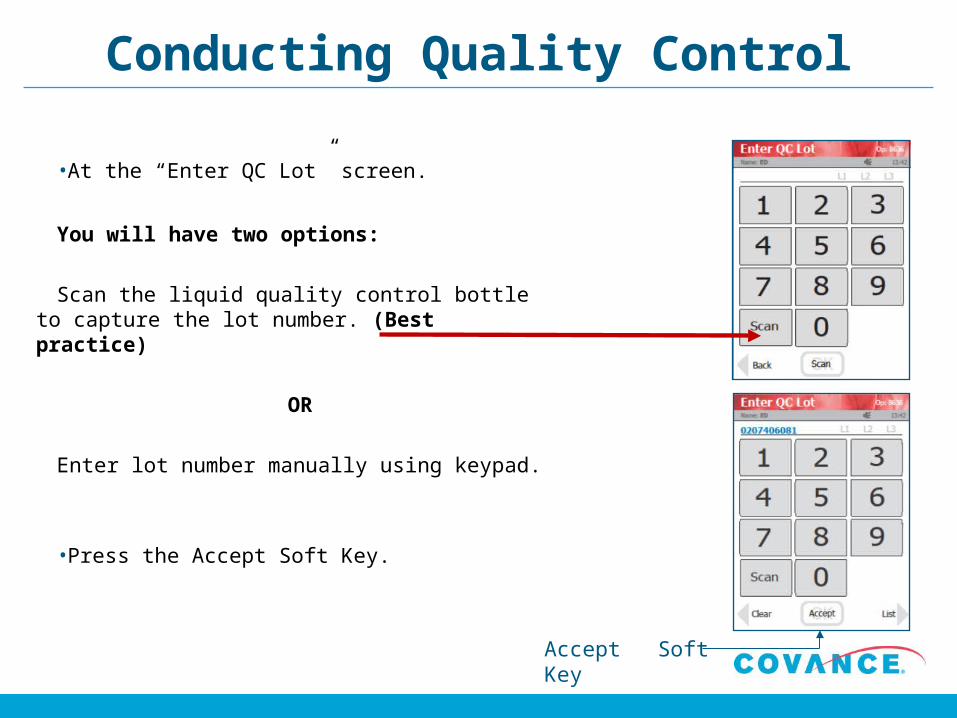
Conducting Quality Control
•At the “Enter QC Lot” screen.
You will have two options:
Scan the liquid quality control bottle to capture the lot number. (Best practice)
OR
Enter lot number manually using keypad.
•Press the Accept Soft Key.
Accept Soft Key
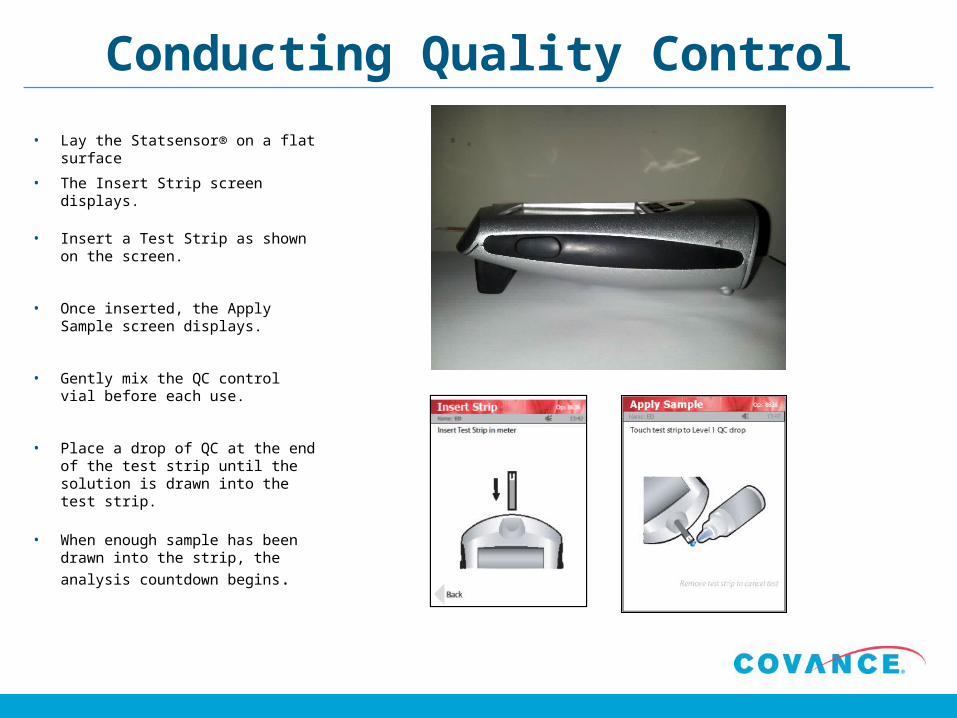
Conducting Quality Control
• Lay the Statsensor® on a flat surface
• The Insert Strip screen displays.
• Insert a Test Strip as shown on the screen.
• Once inserted, the Apply Sample screen displays.
• Gently mix the QC control vial before each use.
• Place a drop of QC at the end of the test strip until the solution is drawn into the test strip.
• When enough sample has been drawn into the strip, the analysis
countdown begins.
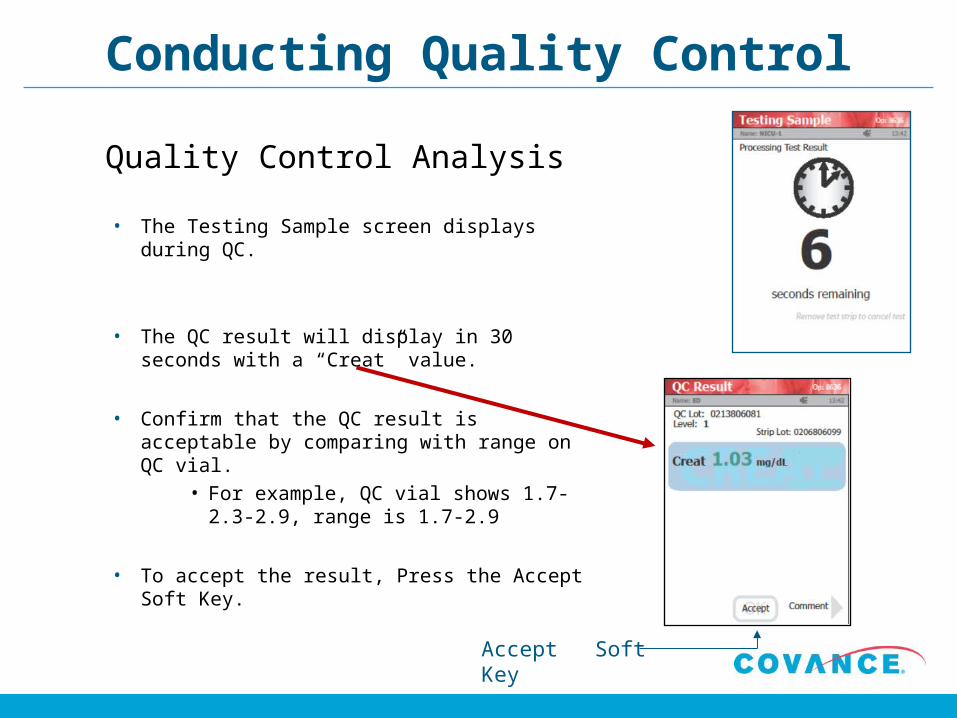
Conducting Quality Control
• The Testing Sample screen displays during QC.
• The QC result will display in 30 seconds with a “Creat” value.
• Confirm that the QC result is acceptable by comparing with range on QC vial.
• For example, QC vial shows 1.7-2.3-2.9, range is 1.7-2.9
• To accept the result, Press the Accept Soft Key.
Quality Control Analysis
Accept Soft Key
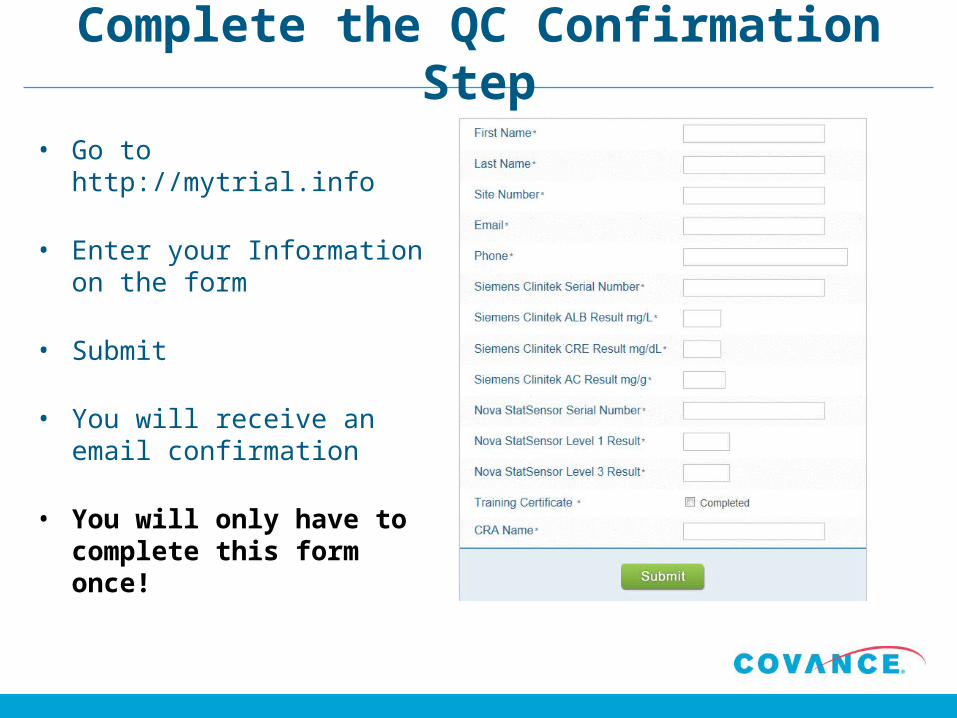
Complete the QC Confirmation Step
• Go to http://mytrial.info
• Enter your Information on the form
• Submit
• You will receive an email confirmation
• You will only have to complete this form once!
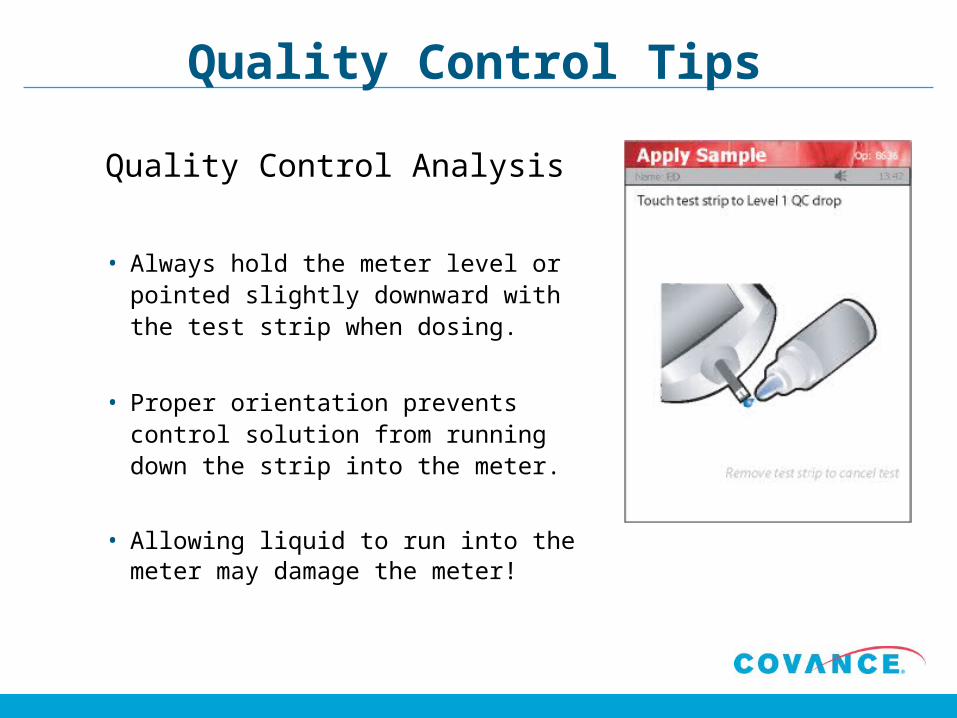
Quality Control Tips
• Always hold the meter level or pointed slightly downward with the test strip when dosing.
• Proper orientation prevents control solution from running down the strip into the meter.
• Allowing liquid to run into the meter may damage the meter!
Quality Control Analysis
Video
Insert Conducting Quality Control Video
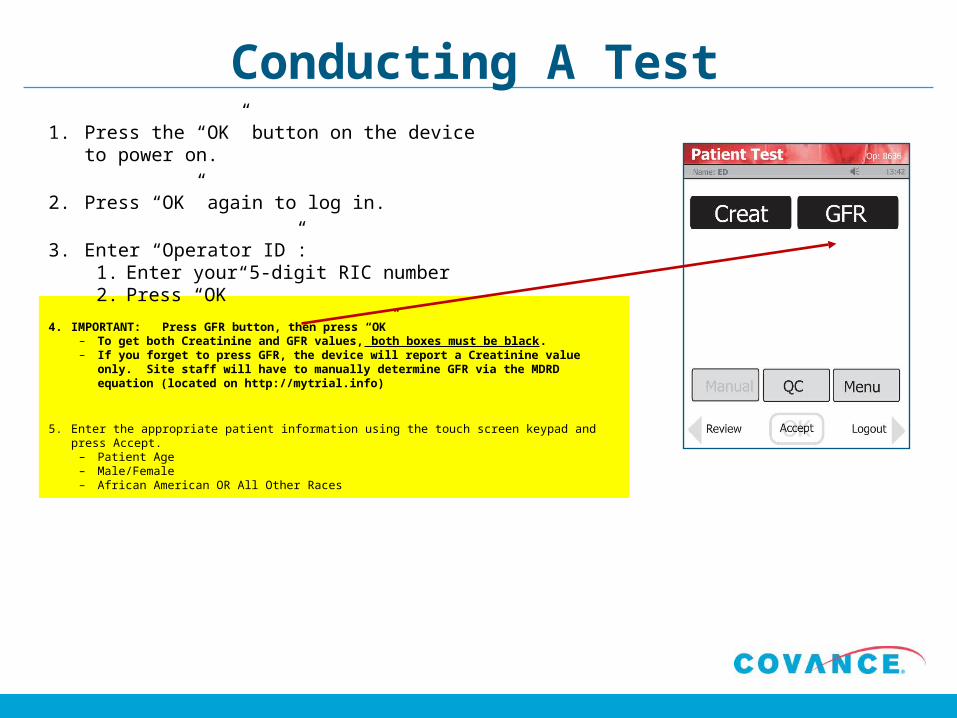
Conducting A Test
4. IMPORTANT: Press GFR button, then press “OK”– To get both Creatinine and GFR values, both boxes must be black.– If you forget to press GFR, the device will report a Creatinine value only. Site
staff will have to manually determine GFR via the MDRD equation (located on http://mytrial.info)
5. Enter the appropriate patient information using the touch screen keypad and press Accept.– Patient Age– Male/Female– African American OR All Other Races
1. Press the “OK” button on the device to power on.
2. Press “OK” again to log in.
3. Enter “Operator ID”:1. Enter your 5-digit RIC number2. Press “OK”
Conducting A Test
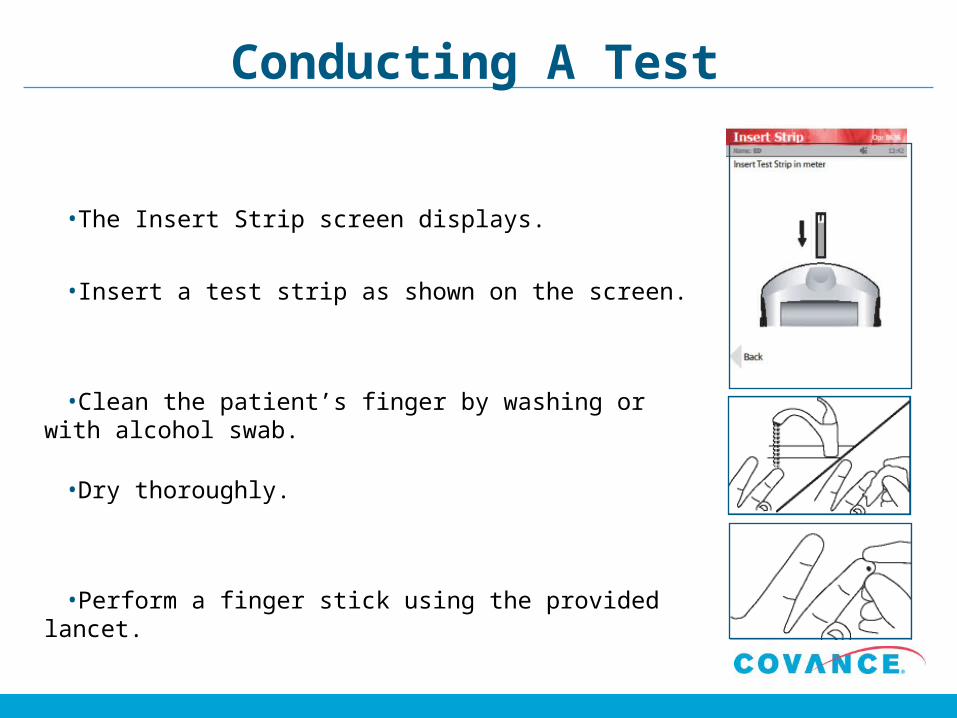
•The Insert Strip screen displays.
•Insert a test strip as shown on the screen.
•Clean the patient’s finger by washing or with alcohol swab.
•Dry thoroughly.
•Perform a finger stick using the provided lancet.
Conducting A Test
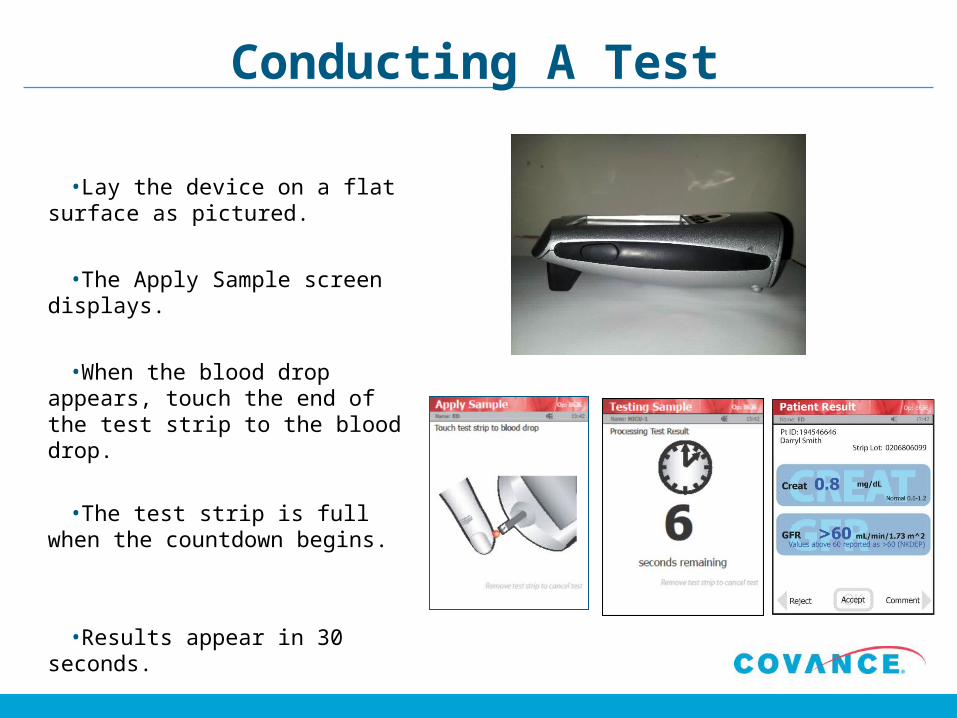
•Lay the device on a flat surface as pictured.
•The Apply Sample screen displays.
•When the blood drop appears, touch the end of the test strip to the blood drop.
•The test strip is full when the countdown begins.
•Results appear in 30 seconds.
Conducting A Test
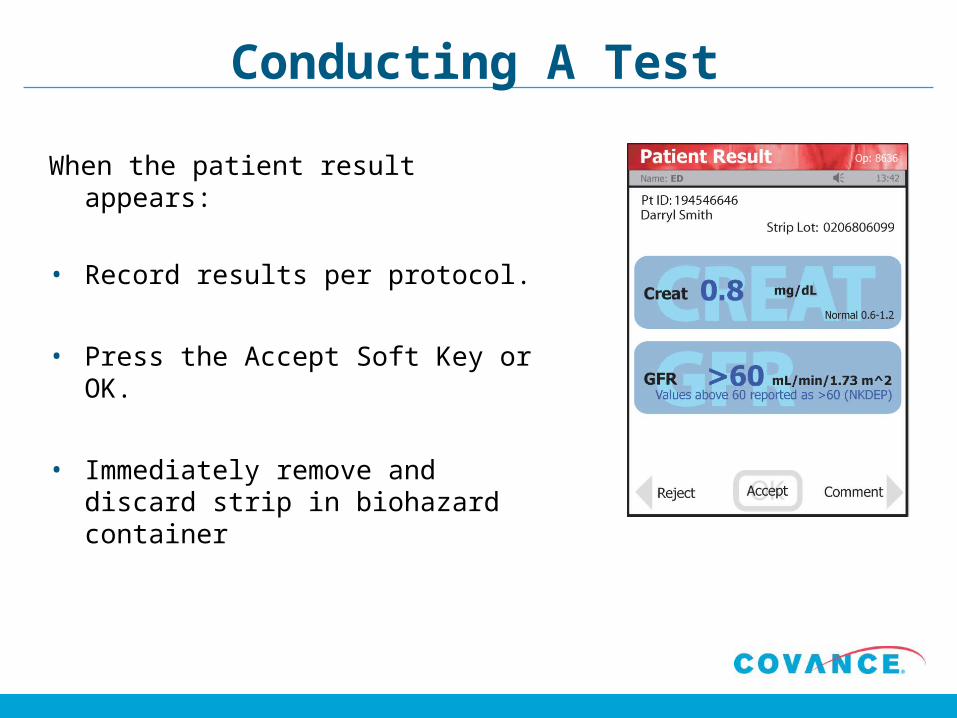
When the patient result appears:
• Record results per protocol.
• Press the Accept Soft Key or OK.
• Immediately remove and discard strip in biohazard container
Testing Tips
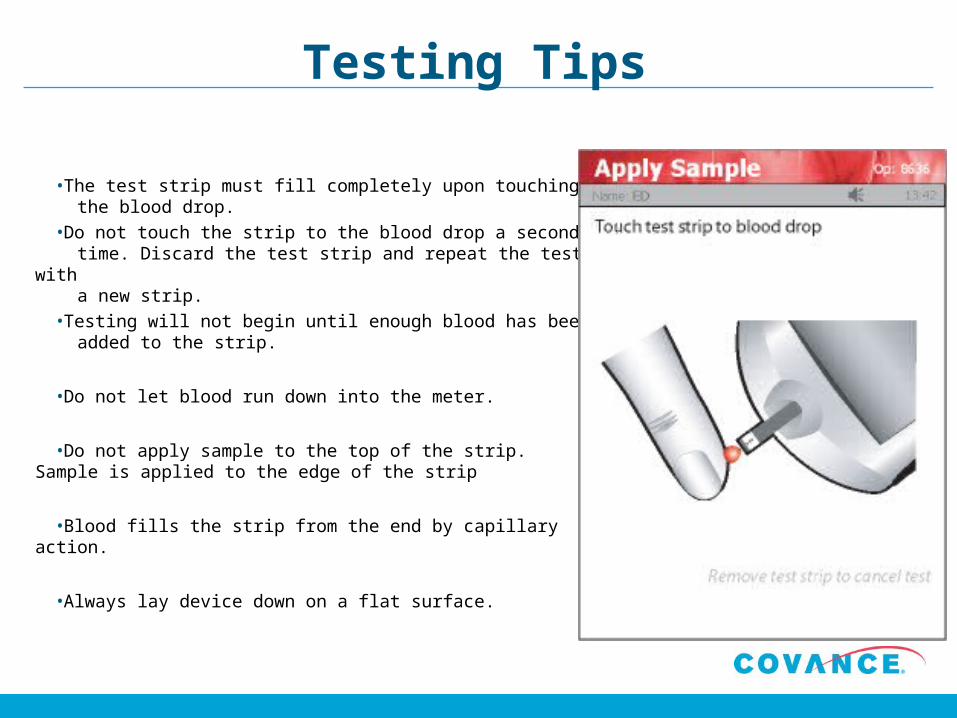
•The test strip must fill completely upon touching the blood drop.
•Do not touch the strip to the blood drop a second time. Discard the test strip and repeat the test with a new strip.
•Testing will not begin until enough blood has been added to the strip.
•Do not let blood run down into the meter.
•Do not apply sample to the top of the strip. Sample is applied to the edge of the strip
•Blood fills the strip from the end by capillary action.
•Always lay device down on a flat surface.
Video
Insert Conducting A Test Video
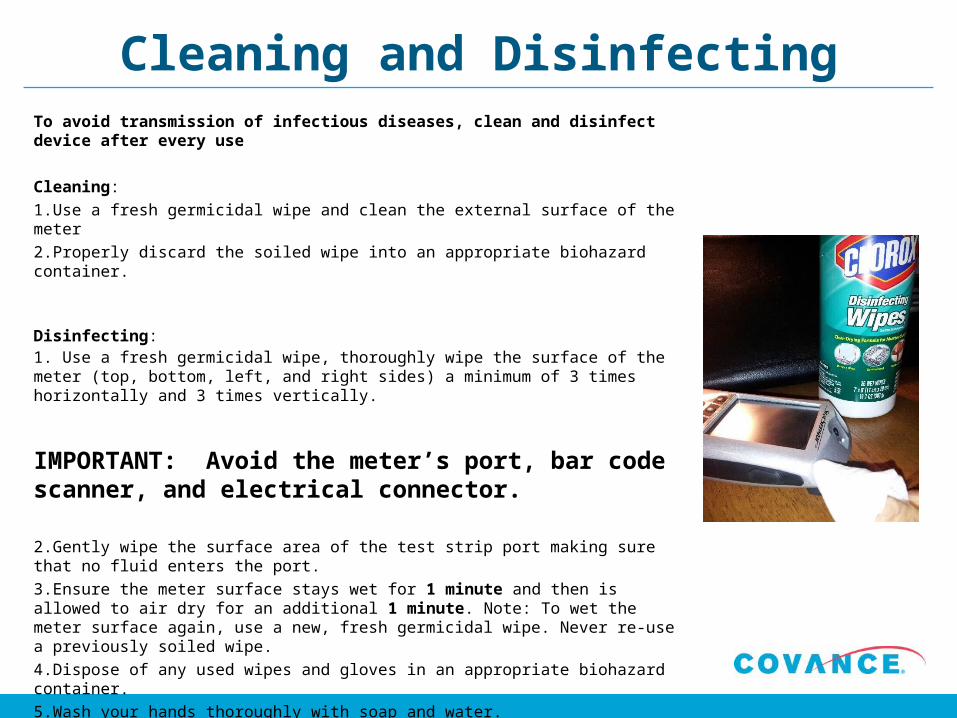
Cleaning and DisinfectingTo avoid transmission of infectious diseases, clean and disinfect device after every use
Cleaning:
1.Use a fresh germicidal wipe and clean the external surface of the meter
2.Properly discard the soiled wipe into an appropriate biohazard container.
Disinfecting:1. Use a fresh germicidal wipe, thoroughly wipe the surface of the meter (top, bottom, left, and right sides) a minimum of 3 times horizontally and 3 times vertically.
IMPORTANT: Avoid the meter’s port, bar code scanner, and electrical connector.
2.Gently wipe the surface area of the test strip port making sure that no fluid enters the port.
3.Ensure the meter surface stays wet for 1 minute and then is allowed to air dry for an additional 1 minute. Note: To wet the meter surface again, use a new, fresh germicidal wipe. Never re-use a previously soiled wipe.
4.Dispose of any used wipes and gloves in an appropriate biohazard container.
5.Wash your hands thoroughly with soap and water.
For further cleaning and disinfecting directions, please go to http://mytrial.info

•The test strip was removed or lost electrical contact with the meter before completing the test.
• Insert a new test strip and repeat the test.
Troubleshooting
Analysis Errors
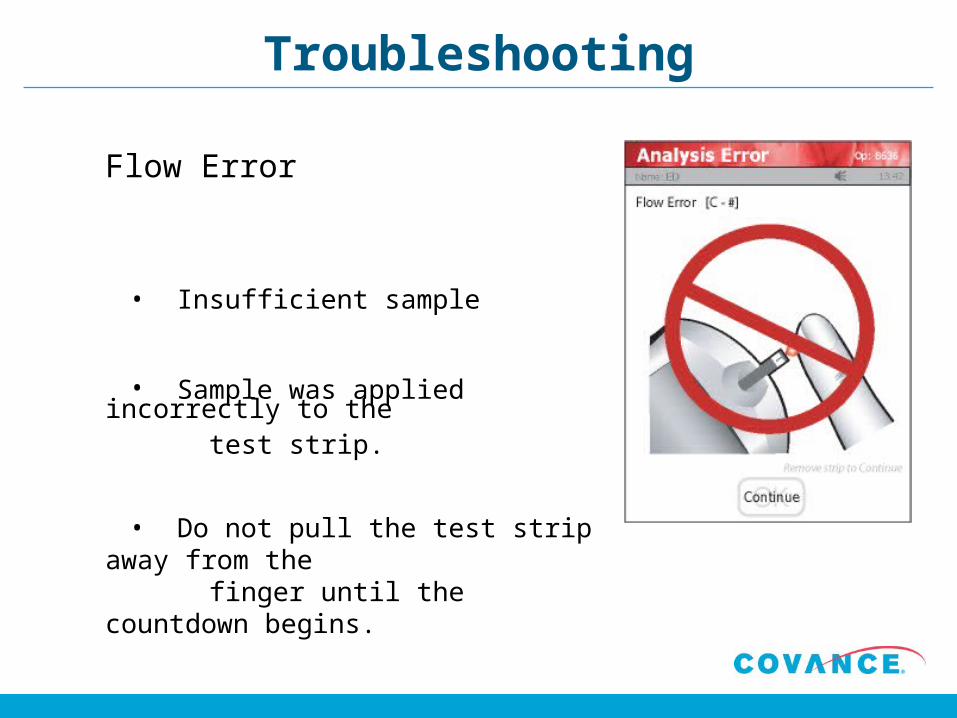
Troubleshooting
Flow Error
• Insufficient sample
• Sample was applied incorrectly to the test strip.
• Do not pull the test strip away from the
finger until the countdown begins.
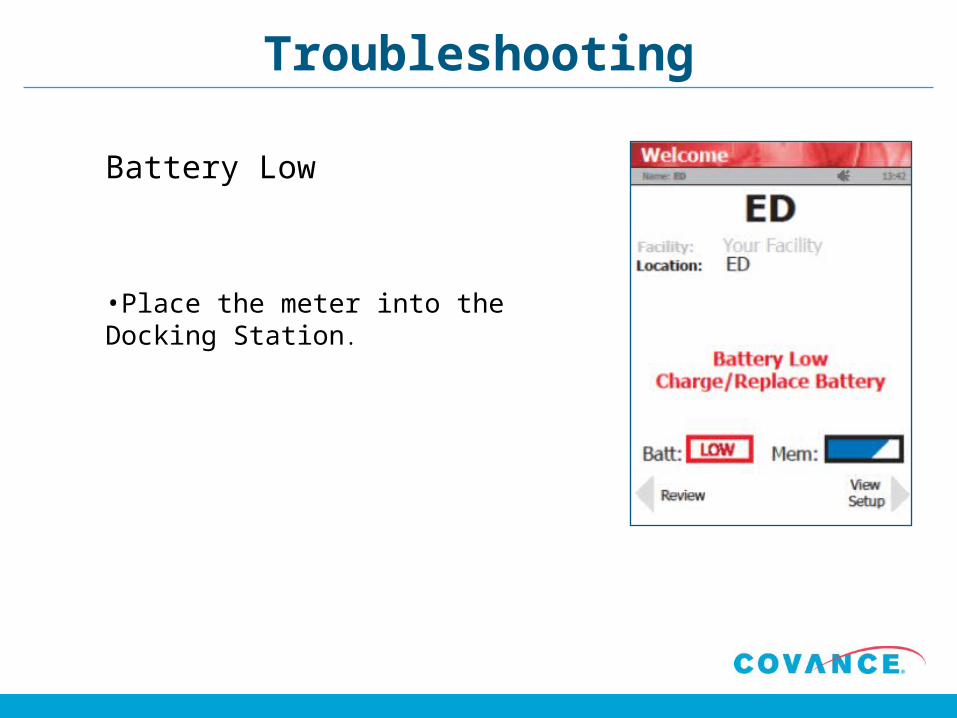
Troubleshooting
Battery Low
•Place the meter into the Docking Station.
Questions?
Thank You for Your Participation!