Embed Size (px)
Citation preview

User Manual
Step-by-StepCommunicator75
an
Product
TM

Step-by-Step Communicator75
This user manual will introduce you to the Step-by-Step Communicator75 and provide quick reference for its operation. Please read it completely and keep it for future reference. We welcome your comments and suggestions regarding this and any other AbleNet products, literature or services.
Battery Installation1. Remove the mounting base (if attached) by gently pulling the quick release tab, then
sliding the base toward the back of the device. See Figure 1, below.2. Remove the battery door and insert a 9-volt battery.3. Put battery back into compartment.4. Replace the battery door (and mounting base if desired).
2
Figure 1: Attaching the mounting base
Post
AbleLink ConnectablesMounting Base
Quick Release
Tab
Step-by-Step Communicator75
Battery Compartment
Top Surface
Recording a MessageThe Step-by-Step Communicator75 has 75 seconds of recording time. Please note that all messages must be recorded at one time. It is not possible to re-record or change just one message in the sequence of recorded messages without erasing all of the messages. It is recommended that you write down the messages and use a script during recording.
1. Turn on the Step-by-Step Communicator 75 by moving the volume control to the right until you hear a click.
2. Press the Repeat/Rec button twice (within one second) and release.3. Press and hold the top surface and record your first message. Hold the device
8-10" away from your mouth, with the speaker grille facing you.4. Release the activation area briefly.5. Press and hold the top surface and record your next message.6. Repeat steps 4 and 5 until you have recorded all your messages.7. Press the Repeat/Rec button twice to end recording.
For a convenient reference, use the “Quick Instructions” on the bottom of the Step-by-Step, when the manual is not available.
Playing the Message1. Press the top surface of the Step-by-Step to play each message.2. Messages will be played in the order they were recorded each time the activation area is
pressed.3. The message sequence loops back to the beginning after the last message has been
played. Messages can also be played using an external switch (see page 5).
Repeating a MessageThe “Repeat” function allows the user to replay any message in the sequence. For example, ifthe user is giving directions for a recipe, use the “Repeat” function to continue to play the mes-sage, “measure one cup of flour,” until that step has been completed.
1. Play the messages until the message you want to repeat has been played.2. Press the Repeat/Rec button once.3. Each time the top surface is pressed, the message will repeat.4. Press the Repeat/Rec button once to stop the repeat function and continue to play the
rest of the recorded messages.
The “Repeat” function allows for storing pre-recorded single messages for one or more users.Locate desired message by pressing the activation area, use the “Repeat” function for the user toreplay that specific message.
3

Toy/Appliance JackThe Toy/Appl. jack enables the user to communicate a message and control a battery or electrically-operated toy or appliance. This allows voice output to be paired with an activity. The Toy/Appl. function can be paired with as many messages as desired within a sequence.
Activating Battery-Operated DevicesA battery-operated toy or appliance may be attached directly to Step-by-Step using a batterydevice adapter and cable, or the cable may be plugged directly into a toy or appliance that hasbeen pre-adapted.
Note: Using this direct connection, the toy or appliance will be activated when the message isplayed. If you wish the toy or appliance to run for a longer period of time, simply connect thecable from the Toy/Appl. jack to a Switch Latch and Timer and choose the Latch or Timed modeof control.
Activating Electrical Devices via PowerLink® control unitUse a Step-by-Step to activate an electrically-operated appliance, toy or game by connecting it toa PowerLink® control unit. Plug the cable into the Step-by-Step Toy/Appl. jack and the other endinto the switch input jack on the PowerLink® control unit and choose the Latch or Timed mode ofcontrol.
Using the Toy/Appl. Feature1. Turn on the Step-by-Step Communicator75 by moving the volume control to the right
until you hear a click. 2. Press the Repeat/Rec button twice (within one second) and release.3. Press and hold the top surface of the Step-by-Step to record the message.4. While you are recording the message you want to pair with the toy/appliance, continue to
hold the activation area and press/release the Repeat/Rec button once.5. Release the activation area. Note: Additional messages may be added to complete the
sequence.6. Repeat steps 4-5 for each message you want to pair with the Toy/Appl. feature.
Note: When recording a message that you do not want to pair with a reinforcer, simply do not press the Repeat/Rec. button while the activation area is depressed.
7. When all of the messages have been recorded, and top surface is released, press the Repeat/Rec button twice to end recording.
8. Plug one end of the cable into the “Toy/Appl.” jack of the Step-by-Step.9. Plug the other end of the cable into the battery device adapter or pre-adapted toy or
appliance if using a battery-operated device, or into the switch jack of the PowerLink®
control unit if using an electrically-operated device.
4

Changing the Step-by-Step from activating a device for the length of a message (durationmode) to activating a device for a few seconds (pulse mode).
1. Make sure the device has been turned off for at least five minutes. Continue Steps 2-3 with the device turned off.
2. Press the top surface and continue to hold down.
3. Press the repeat/record button on the back of the device and continue to hold.
4. Turn on the device and then release the top surface and the repeat/record button at the same time.
To switch the device back to the duration mode, repeat the steps above.
On/Off SwitchWhen transporting Step-by-Step or when it is not in use, we recommend turning the volume knobcompletely down until it “clicks” into the off position to prevent accidental activation of the message and to extend battery life.
Using External SwitchesAny commercially-available switch with a 1/8 inch (3.5 mm) plug or 1/8 inch mono plug adaptercan be used to activate your Step-by-Step by plugging it into the external switch jack on theback of the device. The user will then be able to activate the Step-by-Step with either the external switch or the top surface.
Mounting OptionsThere are several different mounting/positioning options for the Step-by-Step using the AbleLink™
Connectables mounting base. For more information about these mounting options see page 8.
Care and StorageYour Step-by-Step will provide years of trouble-free service with a minimum of care. Recordedmessages will be retained until new messages are recorded. A good quality battery can beexpected to provide power to play back several hundred messages depending on their length.Wipe your Step-by-Step clean with a damp cloth or one with a little soap and water. Use watersparingly around the speaker grille and controls. DO NOT IMMERSE IN WATER.
5

Troubleshooting If your Step-by-Step fails to operate properly, follow these suggestions. If the problem persists,call AbleNet at 1-800-322-0956 for assistance.
6
Problem Solution
Step-by-Step fails to 1. Make sure the battery is fresh and is making contact. play message. 2. Be sure a message is recorded; record one if in doubt.
3. Turn the volume control up to the highest volume duringplayback.
4. If using an external switch, check to make sure it worksindependently of Step-by-Step.
5. If using an external switch, make sure it is plugged intothe correct jack on the Step-by-Step (SWITCH jack).
Only part of the message The message, or messages, were longer than 75 seconds. was recorded. Re-record a shorter message(s), making sure to press the
top surface firmly when recording.
Voice output gets distorted. 1. The person recording may have been too close to themicrophone while recording message. Either adjust thevolume or re-record from 8 - 10 inches away.
2. The battery may be getting low: replace battery.
A toy fails to operate Check the toy to make sure it operates independently of thewhen a message is played. Toy/Appliance jack. Insure the 1/8" cable is securely connected
to your Step-by-Step’s Toy/Appl. jack. (Follow the steps for usingthe Toy/Appl. feature on page 4).
Speech slows down. Replace battery.

Ideas for Using the Step-by-Step Communicator75
• Present Spelling words one at a time.• Take attendance (“Is John here?,” “Is Nancy here?”, “Is...?”).• Read lines in a play.• Conduct an interview, one question at a time.• Announce the starting line up at a sporting event.• Sell items at your school store, “Candy is 75¢, pencils are...”• Announce campaign slogans for school elections.• Follow the sequence of steps to finish a job.• Present the steps to follow a recipe.• Order food (“I want a hamburger,” “I want onion rings,” “I want coffee with sugar.”).• Greet people in a variety of ways (“Hi,” “TGIF,” “How are you doing?”...).
Ideas for using the Step-by-Step with other AbleNet products
NOTE: When recording messages for the activities described below, remember to press andrelease the Repeat/Rec. button while recording your messages. Follow the instructions for usingthe Toy/Appl. feature on page 4.
The All-Turn-It® spinner... a switch-activated random spinning device.
• Who’s Next? Write students’ names on a blank spinner overlay and record the instructions to agame on the Step-by-Step (“It’s your turn to...,” “Now you get to...”). Connect the Step-by-Step tothe spinner. One activation of the Step-by-Step will both give the instruction and spin the arrow toselect who will take the next turn.
• Words, Words, Words. Use a spinner overlay with the alphabet written on it and record ques-tions from an English lesson on the Step-by-Step (“Name a noun that starts with...,” “Name a verbthat starts with...,” “Name an adjective that starts with...”). Connect the Step-by-Step to the spinner. One activation of the Step-by-Step will both ask the question and spin the arrow to selectthe letter for the activity.
AbleLink Connectables TV & VCR Remote... controls a TV and VCR with a simple switch activation.
• Hollywood. Put a video cassette in the VCR and record messages into the Step-by-Step (“I’mgoing to start the movie now,” “Everyone please sit down,” “Now, let’s be quiet,” “I love this part!”,“Can we have popcorn?”).
Connect the Step-by-Step to the TV & VCR Remote. One switch activation will both say a message and start the movie.
7

AbleLink™ ConnectablesAbleLink Connectables is an innovative product design by AbleNet offering maximum mountingflexibility with every unit. The design includes a detachable base for quick and easy attachmentto walls, tables, mounting systems, etc., and a plastic connector called “Snap Track” for quick andeasy connection of multiple units. This package contains one mounting base and one SnapTrack connector.
You may find it convenient to dedicate separate AbleLink Connectables mounting bases for various uses. For example, you may want one base to always be set up for use with a mountingsystem, while another base may be mounted to the wall. Dedicating mounting bases to specificuses and/or locations takes advantage of the quick and easy way AbleLink Connectables attachand detach from their mounting bases. Additional AbleLink connectables mounting bases may bepurchased from AbleNet.
Attaching the AbleLink Connectables Mounting Base1. Position the four posts on the AbleLink Connectables mounting base into the
corresponding holes on the bottom of the AbleLink Connectables product, as shown in Figure 2.
2. Slide the base forward until it clicks into place.
8
Figure 2: Attaching the mounting base
Post
Mounting Base
Quick Release
Tab
Any AbleLink Connectables Product
Detaching the AbleLink Connectables Mounting Base1. Gently press the mounting base’s quick release tab, as shown in Figure 2.2. Slide the base towards the back of the device.
Mounting Options
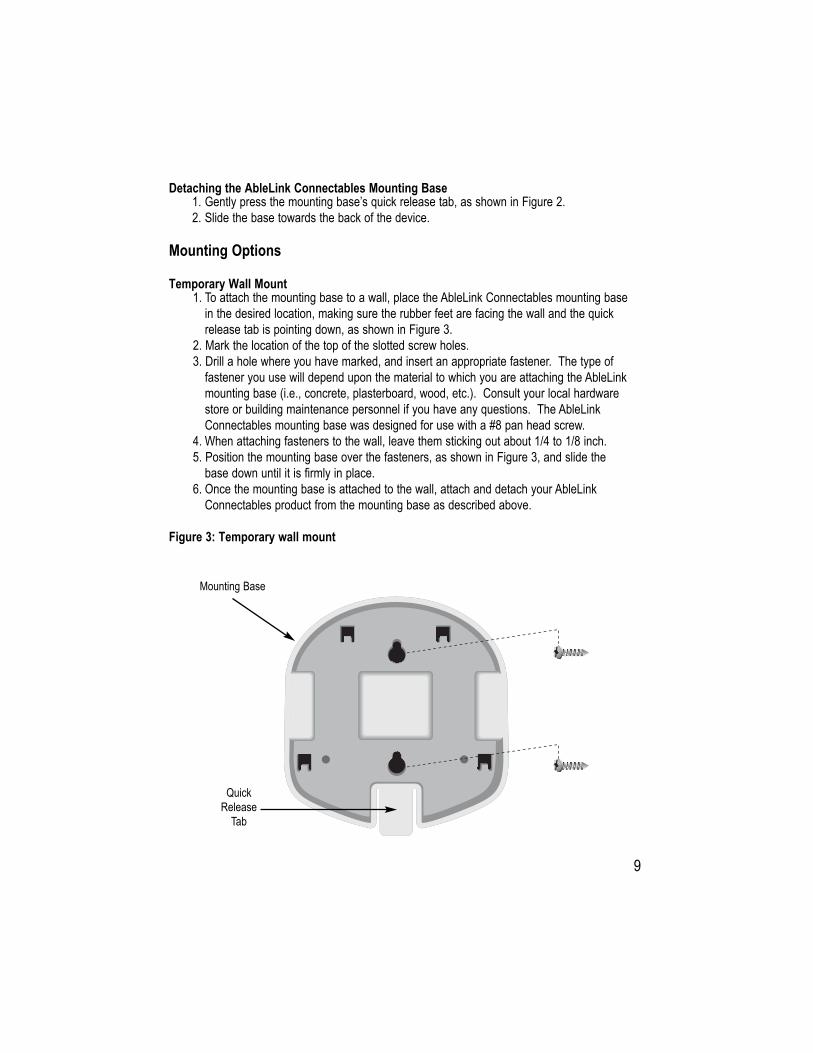
Temporary Wall Mount1. To attach the mounting base to a wall, place the AbleLink Connectables mounting base
in the desired location, making sure the rubber feet are facing the wall and the quick release tab is pointing down, as shown in Figure 3.
2. Mark the location of the top of the slotted screw holes.3. Drill a hole where you have marked, and insert an appropriate fastener. The type of
fastener you use will depend upon the material to which you are attaching the AbleLink mounting base (i.e., concrete, plasterboard, wood, etc.). Consult your local hardware store or building maintenance personnel if you have any questions. The AbleLink Connectables mounting base was designed for use with a #8 pan head screw.
4. When attaching fasteners to the wall, leave them sticking out about 1/4 to 1/8 inch.5. Position the mounting base over the fasteners, as shown in Figure 3, and slide the
base down until it is firmly in place.6. Once the mounting base is attached to the wall, attach and detach your AbleLink
Connectables product from the mounting base as described above.
9
Figure 3: Temporary wall mount
Quick Release
Tab
Mounting Base

Permanent Wall MountFor a permanent mount, screw the plate directly into the wall, as shown in Figure 4. NOTE: You will use three screws, two of which are in different locations than when temporarilymounting your base. When using the permanent wall mount, your AbleLink Connectables productattaches and detaches from the mounting base on the wall.
Linking Multiple AbleLink ConnectablesLink two or more units together using the Snap Track. The Snap Track connector, shown inFigure 5, slides into the slot on the side of the AbleLink Connectables mounting base and snapsinto place. NOTE: The logo on the Snap Track must be facing up.
Figure 5: Connecting the Snap Track.
MountingBase
Snap Track
Figure 4: Permanent wall mount
10

Using the AbleLink Connectables Mounting Base with Existing Mounting SystemsThe AbleLink Connectables mounting base is compatible with all mounting systems sold byAbleNet, and attaches to the mounting systems using the small triangular mounting plate.
When using the AbleLink Connectables mounting base with an existing mounting system, attachthe mounting base to the small triangular plate using the screws and wing nuts provided with thesmall triangular mounting plate, as shown in Figure 6. This enables you to quickly connect anddisconnect your AbleLink Connectables product from a mounting system.
Travel StrapA 48” strap that attaches through the mounting base allows the user to wear an AbleLinkConnectables product around the waist or over the shoulder. The strap can also be fastenedaround a lap tray, headrest, armrest and variety of other surfaces. The travel strap (sold separately) is available from AbleNet.
Figure 6: Connecting the mounting base to the small triangular plate
Small Triangular Mounting Plate
11

WarrantyAll AbleNet communication aids carry a one-year warranty. Warranty in full text is available uponrequest. Please call (800) 322-0956 for details.
GuaranteeAbleNet offers a 30-day money back guarantee if our products do not meet your needs or expectations. Products must be in new condition to honor this service. Please call (800) 322-0956 for details.
Please follow our repair/return policy when sending products back under our guarantee.
AbleNet Repair/Return InformationAll products under warranty are repaired free of charge. If documentation identifying the date ofpurchase is not supplied, the warranty period will be determined as one year from the manufac-ture date stamped inside the product. Products no longer covered by warranty may be repairedfor a nominal fee. All repairs are warranted for 90 days. Before returning a product for repair,please contact an AbleNet customer service representative for a Return Authorization Number(RA#) and repair charge, if applicable.
To return a product for refund or repair, please indicate the following with your product(s):• Name and phone number• RA#• Return shipping address• Brief description of problem (what the product is or isn’t doing along with what has already been done to correct the problem) or reason for return
• Documentation that shows the purchase date (i.e., copy of packing slip, purchase order, or invoice)
• Check, money order, or purchase order for the amount of the repair
Send the above to:AbleNet, Inc.Attention: (your RA#)1081 Tenth Avenue SEMinneapolis, MN 55414-1312USA
12

To contact AbleNet:Toll Free: 1-800-322-0956(US and Canada only)Telephone: 612-379-0956Fax: 612-379-9143eMail: [email protected]: www.ablenetinc.com
AbleNet Tools for IndependenceAbleNet designs and markets tools for independence. The company’s mission is to provide services and simple technology that enable people with disabilities to achieve the most they canat home, school, work and in the community.
AbleNet’s full line of innovative products help children and adults communicate and control electrical and battery-operated appliances, toys and devices. AbleNet also provides workshops,written materials, and information that support and assist families, teachers, therapists and careproviders worldwide.
For information about AbleNet products and services, contact:
AbleNet, Inc.1081 Tenth Avenue SEMinneapolis, MN 55414-1312USA
Toll Free: 1-800-322-0956(US and Canada only)Telephone: 612-379-0956Fax: 612-379-9143email: [email protected]
To buy or get additional product information 24 hours a day 7 days a weekgo to: www.ablenetinc.com
13

© 2002 AbleNet, Inc., All Rights ReservedPN900-8034 Rev. E (5/02)