Embed Size (px)
Citation preview

front panels ▪ enclosures ▪ milling parts
Step by Step DXF import guiDe
www.frontpanelexpress.com

Need help? Call (206) 768-0602 or Email at [email protected]
DXF Import GuIDe
This is a step by step guide showing how to import a DXF panel shape and how to import DXF cutouts onto the panel. When importing DXF files you must use two separate files; one for the panel shape and one for the cu-touts/engravings. Below is the end result panel that we will be showing an import for:
1) Start by clicking the Create ‚New Front Panel‘ button in the top left corner of the screen:

Need help? Call (206) 768-0602 or Email at [email protected]
DXF Import GuIDe
2) The following screen will appear:
3) Under ‚Basic Shape‘ select ‚Free Shape From DXF File‘:

Need help? Call (206) 768-0602 or Email at [email protected]
DXF Import GuIDe
4) Click ‚Import DXF File‘ button
5) Select the desired DXF File and click ‚Open‘:
Need help? Call (206) 768-0602 or Email at [email protected]
DXF Import GuIDe
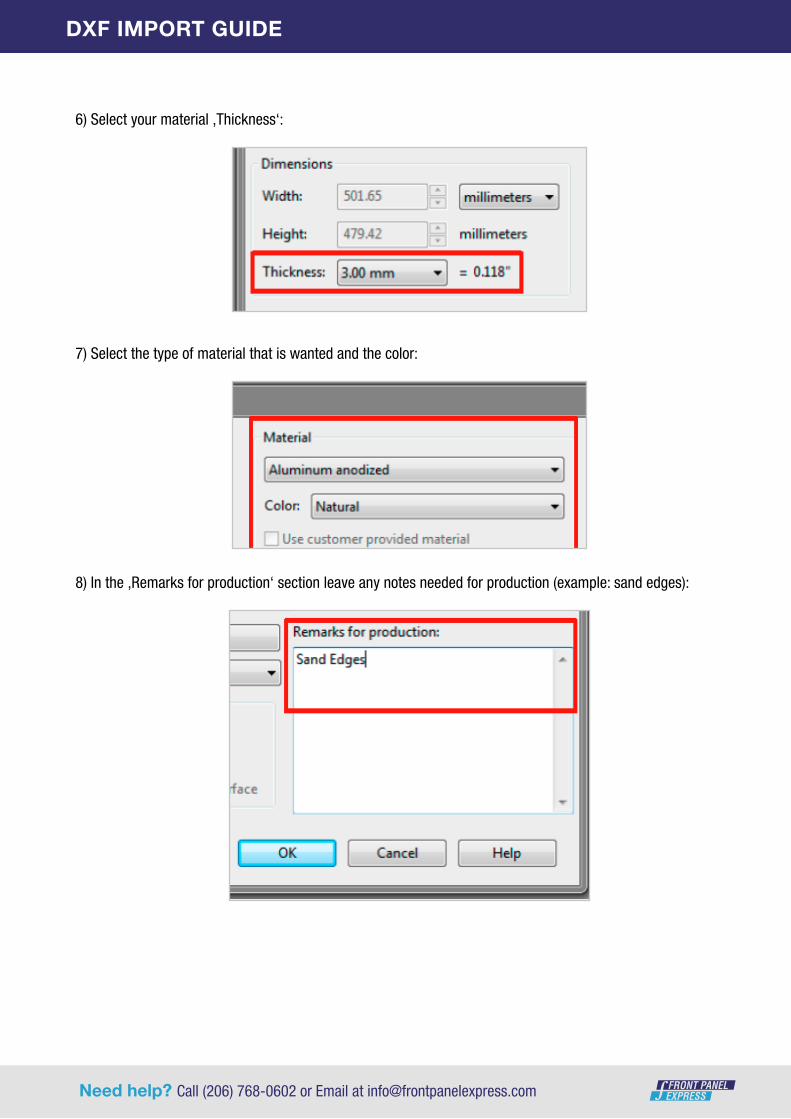
6) Select your material ‚Thickness‘:
7) Select the type of material that is wanted and the color:
8) In the ‚Remarks for production‘ section leave any notes needed for production (example: sand edges):

Need help? Call (206) 768-0602 or Email at [email protected]
DXF Import GuIDe
9) Click ok and the panel will appear on the screen:
10) To add cutouts select the ‚Insert Free contour‘ button at the top of the screen:

Need help? Call (206) 768-0602 or Email at [email protected]
DXF Import GuIDe
11) Once selected click on the panel and the following screen will appear:
12) Click ‚Import‘

Need help? Call (206) 768-0602 or Email at [email protected]
DXF Import GuIDe
13) Select the desired DXF cutouts file and click ‚Open‘
14) Select the largest tool possible to mill the largest cutout. (Example: 3.8mm cutouts require the 3.0 mm cutter tool to be used). System will automatically select the proper tool size for all smaller cutouts after they have been imported.

Need help? Call (206) 768-0602 or Email at [email protected]
DXF Import GuIDe
Example: Below you can see the cutouts in red that are not able to be milled by the 3.0mm tool. By choosing the 3.0mm tool and selecting ‚OK‘ the system will automatically assign the proper tool for those cutouts.

Need help? Call (206) 768-0602 or Email at [email protected]
DXF Import GuIDe
15) Click ‚ok‘ and cutouts will be on the panel:

Need help? Call (206) 768-0602 or Email at [email protected]
DXF Import GuIDe
16) To center the cutouts on the panel select all cutouts

Need help? Call (206) 768-0602 or Email at [email protected]
DXF Import GuIDe
17) Right click on the cutouts and click ‚Align and Distributing‘
18) Under ‚Horizontal‘ check the box ‚Center‘ and under ‚Vertical‘ check the box ‚Center‘ then click ‚ok‘

Need help? Call (206) 768-0602 or Email at [email protected]
DXF Import GuIDe
19) Cutouts will be centered on the panel:
20) The DXFs have now been imported onto the panel. Complete the panel as needed and save.