Embed Size (px)
Citation preview
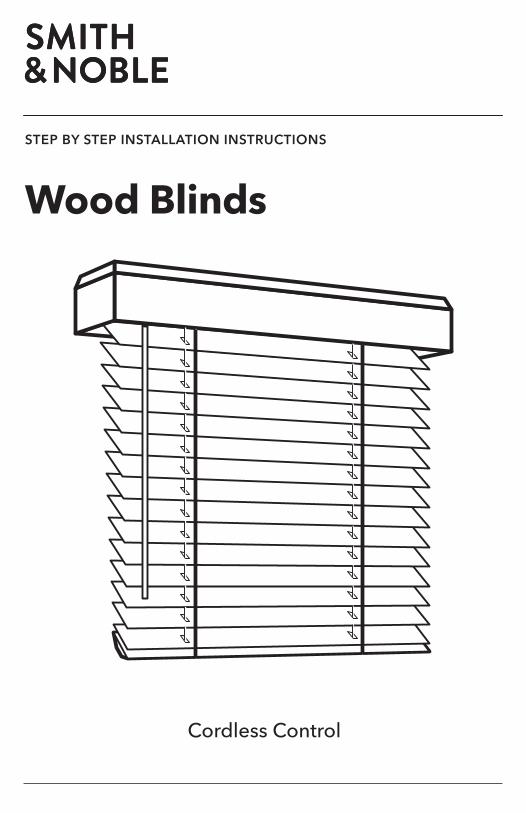
Wood BlindsSTEP BY STEP INSTALLATION INSTRUCTIONS
Cordless Control
2800.248.8888
Table of Contents
Step 1 - Getting Started . . . . . . . . . . . . . . . . . . . . . . . . . . . . . . . . . . 3
Overview - Standard Control Wood Blinds . . . . . . . . . . . . . . . . . . . . . 4
Step 2 - Mounting the Brackets . . . . . . . . . . . . . . . . . . . . . . . . 5 - 6
Step 3 - Inserting the Headrail . . . . . . . . . . . . . . . . . . . . . . . . . . . . 7
Step 4 - Attaching the Wand . . . . . . . . . . . . . . . . . . . . . . . . . . . . . . 7
Step 5 - Attaching the Valance . . . . . . . . . . . . . . . . . . . . . . . . . . . . 8
Step 6 - Battery Pack (Optional) . . . . . . . . . . . . . . . . . . . . . . . . . . . 8
Step 7 - Attaching the Power Source . . . . . . . . . . . . . . . . . . . . . . . 9
Step 8 - Attaching optional Hold Down Clips . . . . . . . . . . . . . . 10
Operating your Blinds . . . . . . . . . . . . . . . . . . . . . . . . . . . . . . . . . . . . . . . 11
Programming the Remote (Optional) . . . . . . . . . . . . . . . . . . . . . . . 12-13
Troubleshooting . . . . . . . . . . . . . . . . . . . . . . . . . . . . . . . . . . . . . . . . . 14-15
Care & Cleaning . . . . . . . . . . . . . . . . . . . . . . . . . . . . . . . . . . . . . . . . . . . 16
Safety . . . . . . . . . . . . . . . . . . . . . . . . . . . . . . . . . . . . . . . . . . . . . . . . . . . . . 17
Warranty . . . . . . . . . . . . . . . . . . . . . . . . . . . . . . . . . . . . . . . . . . Back Cover
1 smithandnoble .com
A Smooth Set-UpWe want you to love your new blinds and that includes having
a smooth installation experience . We recommend saving
this guide. If you encounter any difficulties or questions,
please reach out to us for help . It’s why we’re here . Call us at
800 .248 .8888 for more info on installation .
We recommend you hold on to all packaging until your blinds
are fully installed . Should something go wrong (we strongly
doubt it), we want any potential returns to be a painless
as possible .
Customer Service Hours Monday — Friday: 6am — 6pm PT Saturday — Sunday: 7am — 4pm PTsmithandnoble .com
EverythingYou Need
3 4smithandnoble.com 800.248.8888
REMOTE FOR MOTIVIA MOTORIZATION ONLY (OPTIONAL)
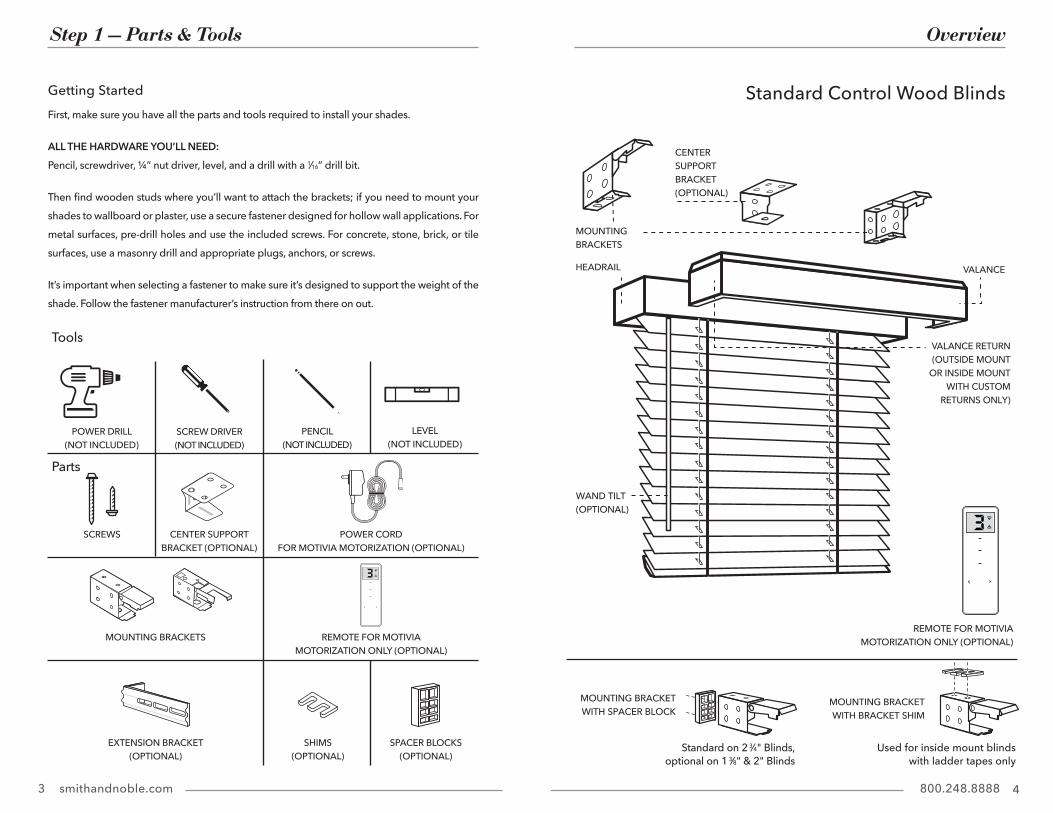
OverviewStep 1 — Parts & Tools
Standard Control Wood BlindsFirst, make sure you have all the parts and tools required to install your shades.
ALL THE HARDWARE YOU’LL NEED: Pencil, screwdriver, ¼” nut driver, level, and a drill with a 1⁄16” drill bit.
Then find wooden studs where you’ll want to attach the brackets; if you need to mount your shades to wallboard or plaster, use a secure fastener designed for hollow wall applications. For metal surfaces, pre-drill holes and use the included screws. For concrete, stone, brick, or tile surfaces, use a masonry drill and appropriate plugs, anchors, or screws.
It’s important when selecting a fastener to make sure it’s designed to support the weight of the shade . Follow the fastener manufacturer’s instruction from there on out .
Getting Started
PENCIL(NOT INCLUDED)
POWER DRILL(NOT INCLUDED)
CENTER SUPPORT BRACKET (OPTIONAL)
SCREWS
MOUNTING BRACKETS
EXTENSION BRACKET(OPTIONAL)
POWER CORDFOR MOTIVIA MOTORIZATION (OPTIONAL)
SPACER BLOCKS(OPTIONAL)
SHIMS(OPTIONAL)
LEVEL(NOT INCLUDED)
VALANCE RETURN(OUTSIDE MOUNT
OR INSIDE MOUNT WITH CUSTOM
RETURNS ONLY)
HEADRAIL
WAND TILT(OPTIONAL)
REMOTE FOR MOTIVIA MOTORIZATION ONLY (OPTIONAL)
MOUNTING BRACKETS
CENTER SUPPORTBRACKET(OPTIONAL)
SCREW DRIVER (NOT INCLUDED)
Standard on 2 3⁄4" Blinds, optional on 1 3⁄8" & 2" Blinds
MOUNTING BRACKETWITH SPACER BLOCK
MOUNTING BRACKETWITH BRACKET SHIM
Used for inside mount blinds with ladder tapes only
VALANCE
Tools
Parts
5 6smithandnoble.com 800.248.8888
CENTER SUPPORT BRACKETCENTER SUPPORT BRACKETMOUNTING BRACKET
MOUNTING BRACKET
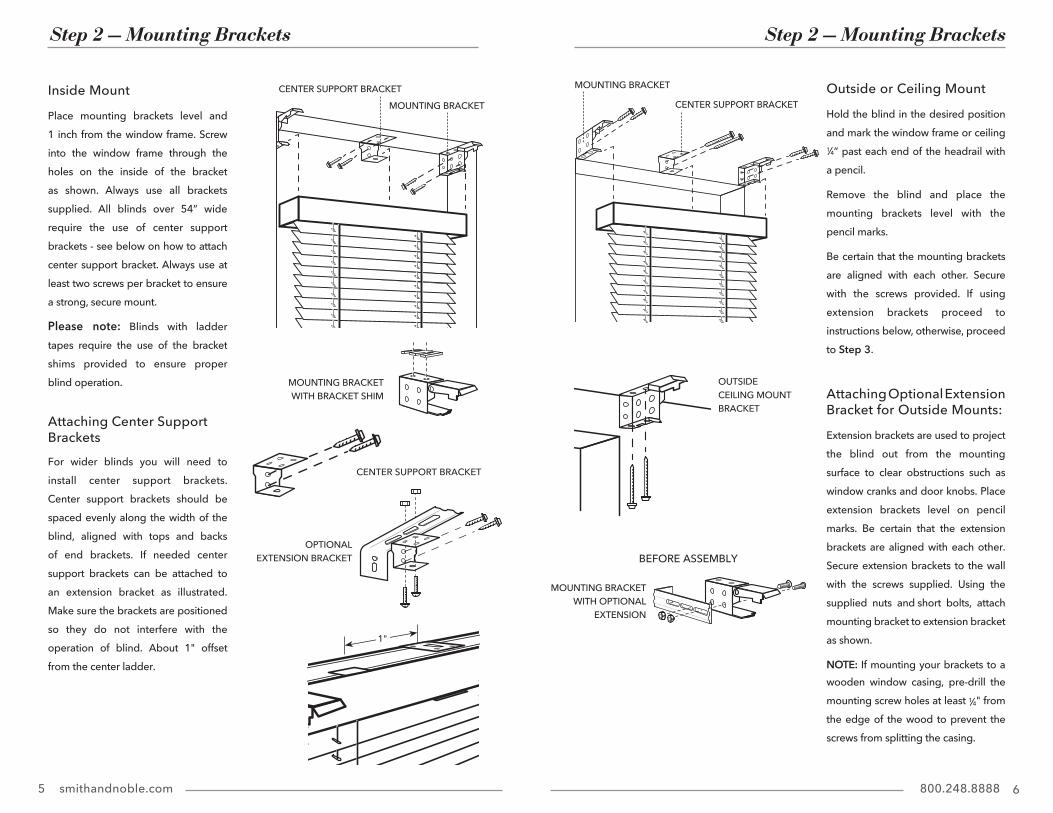
Step 2 — Mounting BracketsStep 2 — Mounting Brackets
Inside Mount
Place mounting brackets level and 1 inch from the window frame . Screw into the window frame through the holes on the inside of the bracket as shown . Always use all brackets supplied. All blinds over 54” wide require the use of center support brackets - see below on how to attach center support bracket . Always use at least two screws per bracket to ensure a strong, secure mount.
Please note: Blinds with ladder tapes require the use of the bracket shims provided to ensure proper blind operation .
Attaching Center Support BracketsFor wider blinds you will need to install center support brackets . Center support brackets should be spaced evenly along the width of the blind, aligned with tops and backs of end brackets . If needed center support brackets can be attached to an extension bracket as illustrated . Make sure the brackets are positioned so they do not interfere with the operation of blind . About 1" offset from the center ladder .
Outside or Ceiling Mount
Hold the blind in the desired position and mark the window frame or ceiling 1⁄4” past each end of the headrail with a pencil .
Remove the blind and place the mounting brackets level with the pencil marks .
Be certain that the mounting brackets are aligned with each other . Secure with the screws provided . If using extension brackets proceed to instructions below, otherwise, proceed to Step 3 .
Attaching Optional Extension Bracket for Outside Mounts:
Extension brackets are used to project the blind out from the mounting surface to clear obstructions such as window cranks and door knobs . Place extension brackets level on pencil marks . Be certain that the extension brackets are aligned with each other . Secure extension brackets to the wall with the screws supplied . Using the supplied nuts and short bolts, attach mounting bracket to extension bracket as shown .
NOTE: If mounting your brackets to a wooden window casing, pre-drill the mounting screw holes at least 1⁄4" from the edge of the wood to prevent the screws from splitting the casing .
CENTER SUPPORT BRACKET
OPTIONAL EXTENSION BRACKET BEFORE ASSEMBLY
OUTSIDE CEILING MOUNT BRACKET
1"
MOUNTING BRACKETWITH BRACKET SHIM
MOUNTING BRACKETWITH OPTIONAL
EXTENSION
7 8smithandnoble.com 800.248.8888
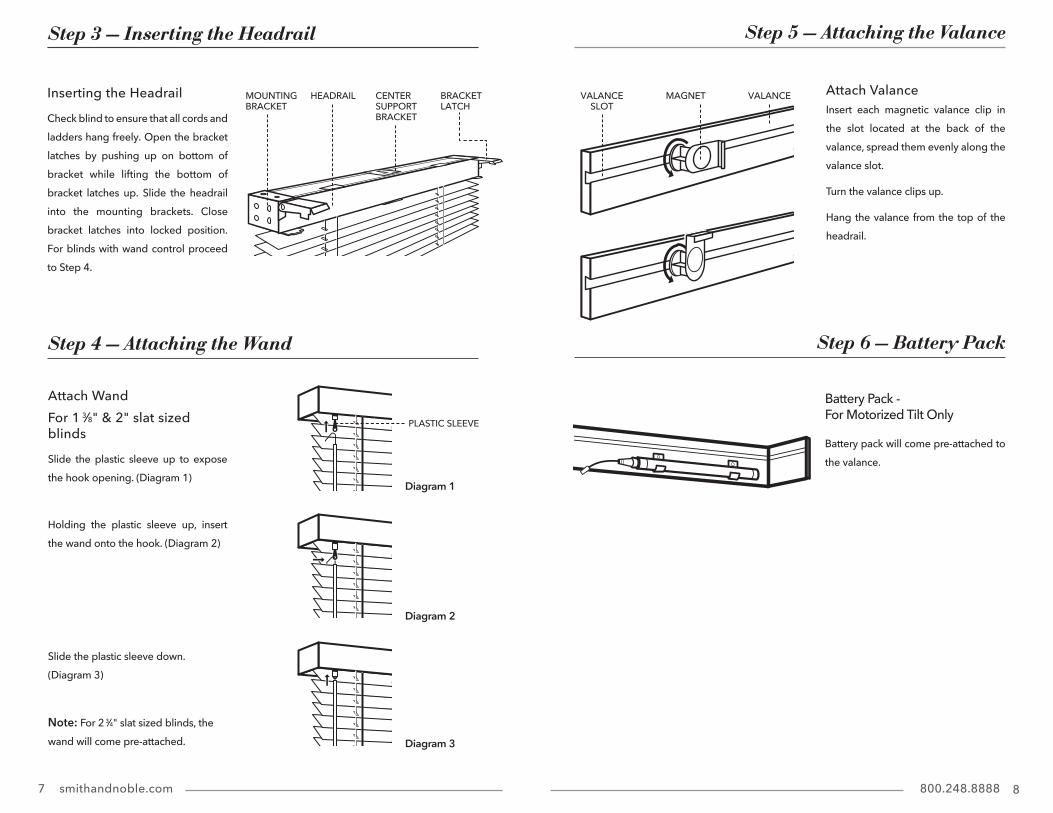
Step 3 — Inserting the Headrail
Inserting the Headrail
Check blind to ensure that all cords and ladders hang freely . Open the bracket latches by pushing up on bottom of bracket while lifting the bottom of bracket latches up . Slide the headrail into the mounting brackets . Close bracket latches into locked position . For blinds with wand control proceed to Step 4 .
HEADRAIL BRACKET LATCH
MOUNTING BRACKET
CENTER SUPPORT BRACKET
Step 4 — Attaching the Wand
Attach WandFor 1 3⁄8" & 2" slat sized blinds
Slide the plastic sleeve up to expose the hook opening . (Diagram 1)
Diagram 1
Diagram 2
Diagram 3
Step 5 — Attaching the Valance
Attach ValanceInsert each magnetic valance clip in the slot located at the back of the valance, spread them evenly along the valance slot .
Turn the valance clips up .
Hang the valance from the top of the headrail .
MAGNET VALANCE
Step 6 — Battery Pack
VALANCESLOT
PLASTIC SLEEVE
Slide the plastic sleeve down . (Diagram 3)
Note: For 2 3⁄4" slat sized blinds, the wand will come pre-attached .
Holding the plastic sleeve up, insert the wand onto the hook . (Diagram 2)
Battery Pack - For Motorized Tilt Only
Battery pack will come pre-attached to the valance .
9 10smithandnoble.com 800.248.8888
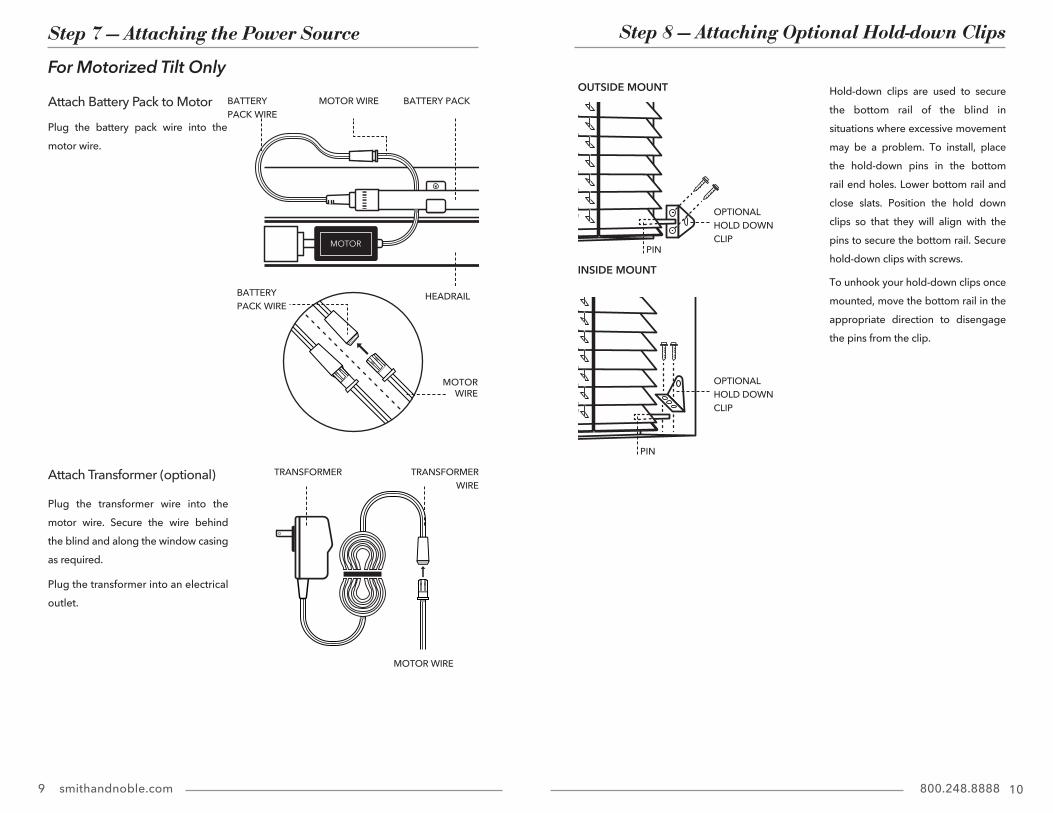
Step 7 — Attaching the Power Source
For Motorized Tilt Only
Step 8 — Attaching Optional Hold-down Clips
Attach Battery Pack to Motor
Plug the battery pack wire into the motor wire .
Attach Transformer (optional)
Plug the transformer wire into the motor wire . Secure the wire behind the blind and along the window casing as required.
Plug the transformer into an electrical outlet .
INSIDE MOUNT
OUTSIDE MOUNT
PIN
PIN
OPTIONAL HOLD DOWN CLIP
OPTIONAL HOLD DOWN CLIP
Hold-down clips are used to secure the bottom rail of the blind in situations where excessive movement may be a problem. To install, place the hold-down pins in the bottom rail end holes . Lower bottom rail and close slats . Position the hold down clips so that they will align with the pins to secure the bottom rail . Secure hold-down clips with screws .
To unhook your hold-down clips once mounted, move the bottom rail in the appropriate direction to disengage the pins from the clip .
BATTERY PACK
HEADRAIL
BATTERY PACK WIRE
MOTOR WIRE
TRANSFORMER
MOTOR WIRE
TRANSFORMER WIRE
BATTERY PACK WIRE
MOTOR WIRE
11 12smithandnoble.com 800.248.8888
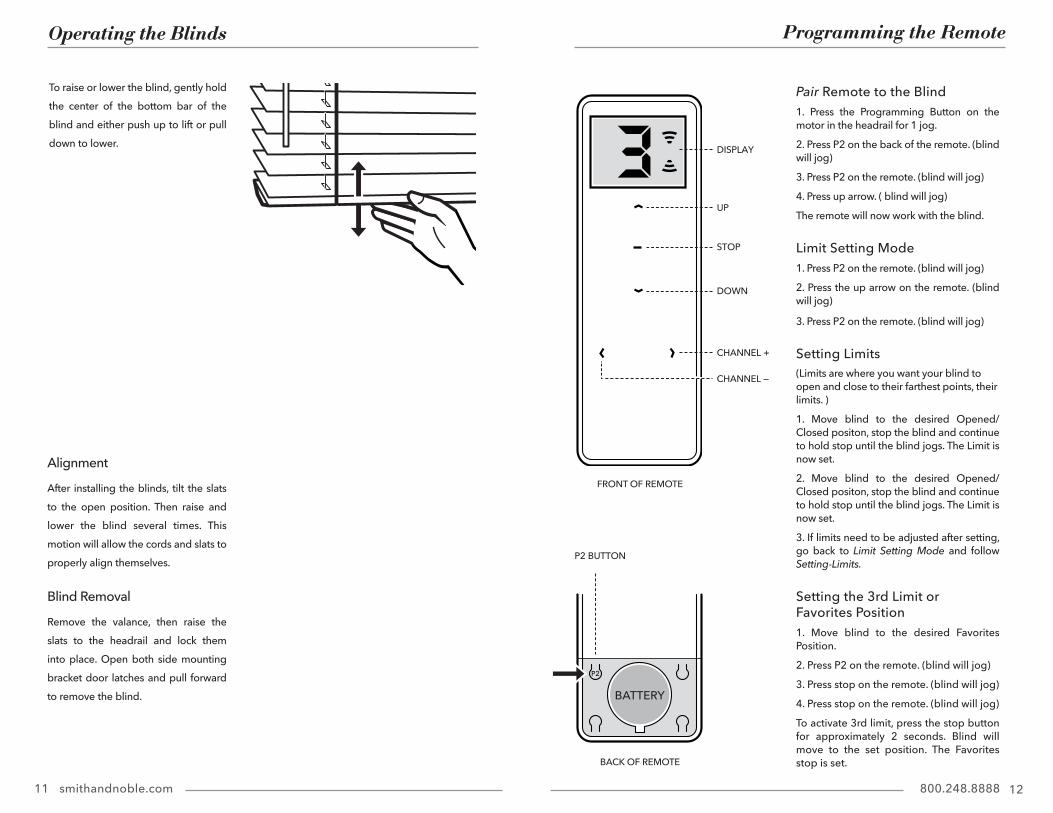
Alignment
After installing the blinds, tilt the slats to the open position . Then raise and lower the blind several times . This motion will allow the cords and slats to properly align themselves .
Blind Removal
Remove the valance, then raise the slats to the headrail and lock them into place . Open both side mounting bracket door latches and pull forward to remove the blind .
To raise or lower the blind, gently hold the center of the bottom bar of the blind and either push up to lift or pull down to lower .
Operating the Blinds Programming the Remote
BATTERY
P2
Pair Remote to the Blind 1 . Press the Programming Button on the motor in the headrail for 1 jog .
2 . Press P2 on the back of the remote . (blind will jog)
3 . Press P2 on the remote . (blind will jog)
4 . Press up arrow . ( blind will jog)
The remote will now work with the blind .
Limit Setting Mode1 . Press P2 on the remote . (blind will jog)
2 . Press the up arrow on the remote . (blind will jog)
3 . Press P2 on the remote . (blind will jog)
Setting Limits (Limits are where you want your blind to open and close to their farthest points, their limits . )
1 . Move blind to the desired Opened/Closed positon, stop the blind and continue to hold stop until the blind jogs . The Limit is now set .
2 . Move blind to the desired Opened/Closed positon, stop the blind and continue to hold stop until the blind jogs . The Limit is now set .
3. If limits need to be adjusted after setting, go back to Limit Setting Mode and follow Setting-Limits.
Setting the 3rd Limit or Favorites Position1 . Move blind to the desired Favorites Position .
2 . Press P2 on the remote . (blind will jog)
3 . Press stop on the remote . (blind will jog)
4 . Press stop on the remote . (blind will jog)
To activate 3rd limit, press the stop button for approximately 2 seconds . Blind will move to the set position . The Favorites stop is set .
FRONT OF REMOTE
BACK OF REMOTE
DISPLAY
UP
STOP
DOWN
CHANNEL +
CHANNEL —
P2 BUTTON

13 14smithandnoble.com 800.248.8888
Programming the Remote Troubleshooting
Activate the Tilt Function
1 . Press P2 on the remote . (blind will jog)
2 . Press the up arrow on the remote . (blind will jog)
3 . Press the down arrow on the remote . (blind will jog)
Now the slats on the blind will tilt by tapping the arrows on the remote . Holding the arrows longer will make the blind operate in regular mode . To remove the tilting function, use same process as activating .
Refer to our Motivia® Motorization Guide for Wood Blinds online for additional details.
1 - QUICK, SHORT DOWN MOVEMENT2 - QUICK, SHORT UP MOVEMENT
What does jog mean?
The blind jogs by making a short but quick down and up movement .
This signifies that the blind has received the programming that you have just set up .
Jogging takes place in programming mode only . If your blind is jogging when you are not programming, you will need to do some troubleshooting or call a representative, also refer to our Motivia® Motorization Guide for Wood Blinds online.
BATTERY
P2
BACK OF REMOTE
BATTERY COVER
My blind doesn’t lift.Check to make sure cord is not caught in headrail. If hold down clips were used, make sure they have been released.
My blind will raise and lower but will not tilt.
Your brackets may be mounted too close to the top of the window casement, causing the tilt mechanism to bind. If your blind has decorative cloth tapes, use the shims provided to move the blind away from the casement. Or Check inside the headrail for obstructions. Make sure all of the slats are laying properly on the ladders.
My blind raises unevenly.Raise blind to the “up” position, open the tassel, untie the knots on the cords, even out the cords, then re-tie the knots and reassemble the tassel.
My slats are hanging out of alignment.Lower the blind completely. While firmly holding the bottom rail, gently tug on the lift cords until the slats are even.
My inside mounted blind slides back and forth between the brackets when operated.
Using a screwdriver, bend out the adjustable end tabs on the sides of the headrail.
The cords are hanging out of the bottom rail.
The bottom rail buttons may be broken or missing. If broken, you can remove the broken pieces with needle nose pliers; call customer service for replacement buttons.
One side of the blind does not raise.
Make sure the lift cords are still fastened to the bottom rail. If they are not please call customer service for assistance.
OrLook inside the headrail to make sure that cords are not caught on or under something.
15 16smithandnoble.com 800.248.8888
Child Safety
Troubleshooting Care & Cleaning
Safety
Care & Cleaning
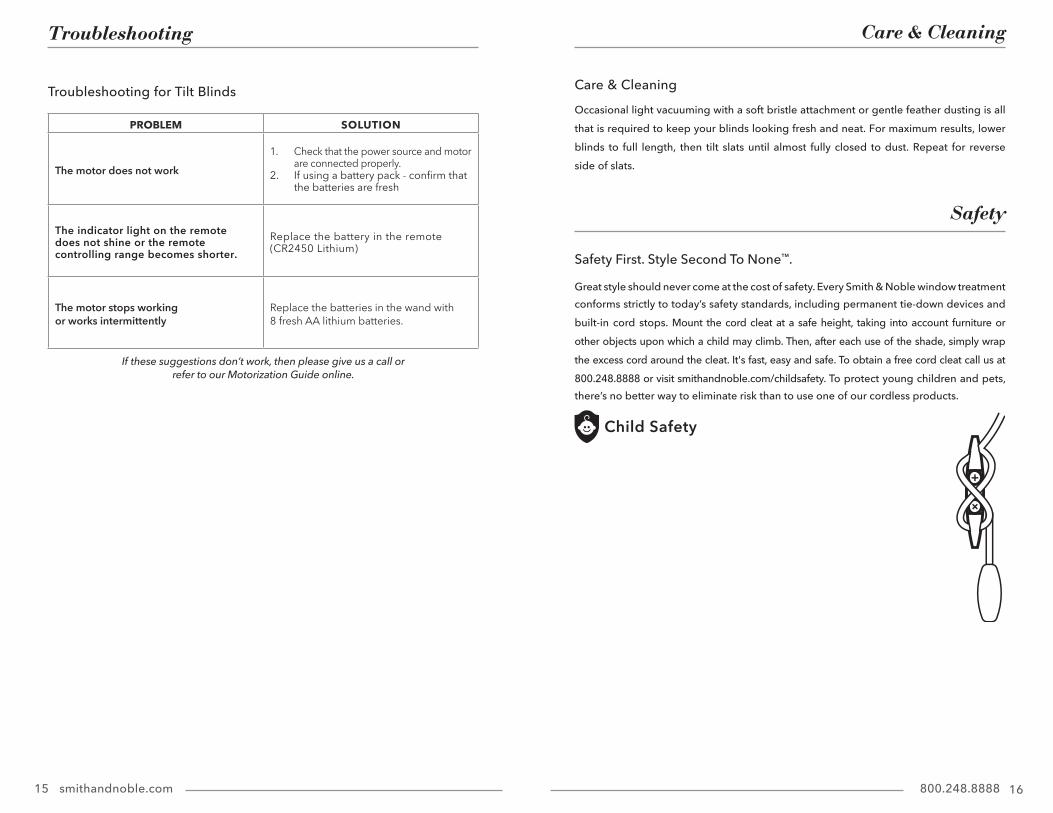
Occasional light vacuuming with a soft bristle attachment or gentle feather dusting is all that is required to keep your blinds looking fresh and neat. For maximum results, lower blinds to full length, then tilt slats until almost fully closed to dust. Repeat for reverse side of slats .
Safety First . Style Second To None™ .
Great style should never come at the cost of safety . Every Smith & Noble window treatment conforms strictly to today’s safety standards, including permanent tie-down devices and built-in cord stops . Mount the cord cleat at a safe height, taking into account furniture or other objects upon which a child may climb. Then, after each use of the shade, simply wrap the excess cord around the cleat. It's fast, easy and safe. To obtain a free cord cleat call us at 800 .248 .8888 or visit smithandnoble .com/childsafety . To protect young children and pets, there’s no better way to eliminate risk than to use one of our cordless products .
PROBLEM SOLUTION
The motor does not work
1. Check that the power source and motor are connected properly.
2. If using a battery pack - confirm that the batteries are fresh
The indicator light on the remote does not shine or the remote controlling range becomes shorter.
Replace the battery in the remote (CR2450 Lithium)
The motor stops working or works intermittently
Replace the batteries in the wand with 8 fresh AA lithium batteries.
If these suggestions don’t work, then please give us a call or refer to our Motorization Guide online.
Troubleshooting for Tilt Blinds

17 18smithandnoble.com 800.248.8888

© 2017 Smith & Noble Home, Inc. All Rights Reserved SN10/17
Warranty Service
The enjoyment of your window covering should be everlasting, which is why our products come with a limited lifetime warranty . The warranty applies to the original owner, requires a proof of purchase (hang on to your receipt!) and covers defects in material or craftsmanship . Hardware must have been properly installed . We reserve the right to determine if your hardware warrants a repair or a replacement . Visit smithandnoble.com/guarantee to see full details . In need of warranty service? Call us at 800.248.8888 and we’ll arrange for a repair or replacement ASAP .