Embed Size (px)
Citation preview

Interactive Notebook (IN)
Step by
Step Instructions

Notebook Setup
This is a long power point. The intention is
that you use it as a guide to set up your
interactive notebook. The first part explains how to laminate your
IN. The last part explains how to set up
the pages.
Follow these instructions
carefully while you setup your
IN. Have fun, make
it your own!

Part 1- How to laminate your IN
“Your Name” Social Studies
Mrs. Escobedo
Room 200
“Your Name”
Social Studies
Mrs. Escobedo
Room 200
“Your Name”Social Studies
Mrs. Escobedo Room 200
“Your Name”
Social Studies
Mrs E
scobedo
Room 200
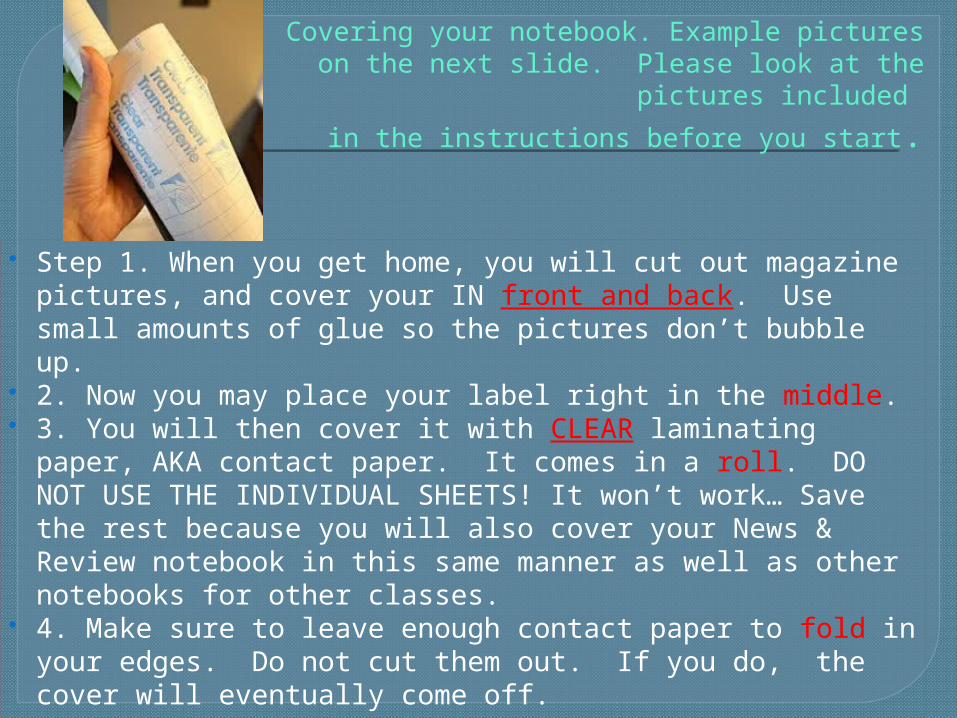
Covering your notebook. Example pictures on the next slide. Please look at the pictures
included
in the instructions before you start.
Step 1. When you get home, you will cut out magazine pictures, and cover your IN front and back. Use small amounts of glue so the pictures don’t bubble up.
2. Now you may place your label right in the middle. 3. You will then cover it with CLEAR laminating paper,
AKA contact paper. It comes in a roll. DO NOT USE THE INDIVIDUAL SHEETS! It won’t work… Save the rest because you will also cover your News & Review notebook in this same manner as well as other notebooks for other classes.
4. Make sure to leave enough contact paper to fold in your edges. Do not cut them out. If you do, the cover will eventually come off.

Follow these steps at home using the
instructions on the previous slide.Step #1
Front Back

Step #2
Front
Since this is my notebook it looks a little different than yours.
Your notebook will have a labelthat looks like this:
You may type it or write it in print with a black marker.
Glue it to the center top of the coverpage. It’s okay if it covers some of the pictures.
Click on the “enter” key of your keyboard to see how it goes.
“Your Name”Social Studies
Mrs. Escobedo Room 200
“Your Name”Social Studies
Mrs. Escobedo Room 200

Step #3
Pretend this bookis your notebook
Lay it down like you see in in the picture making sure you leave enough paper on ALL sides. At least 2”.
Do not peel the paperyet. Let’s measure it first.

Step #3-continued
Lay your IN right in the middle so that the spine is laying on the sticky sideright in the middle.
Now remove the notebook and peel the paperleaving the sticky side UP. Pretend this is it.

Step #3-continued
Cut the two corners
Drop the notebook to the left so that the front of the notebook sticks.

Step #3-continued
Drop the notebook to the right side this time so that the back of the notebook sticks. Don’t forget to cut those corners as well.
Your notebook should be inside!

Step #3-continued
Cut this part in shape of a “V” at the top and a “^” on the bottom.
Open your notebook right in the middle. It might have gotten stuck on the laststep but this sticky paper is easy to separate.

Step #3-continued
Hopefully this picture of my notebook helps you visualize the folds.
You are now ready to start folding in the edges. You can start with the front cover then move on with the back.

You have successfully completed the lamination. You may now COVER your News
& Review notebook the same way.
“Your Name”News & Review
Mrs. Escobedo
Room 200
The only difference between the lamination of the two notebooks isthe label.
THE TWO NOTEBOOKS NEED TO BE COVERED WITH CLEAR CONTACT PAPER. THEY WILL BE GRADED.

Part 2- How to set up the pages
How Exciting!

The Title PageYou will glue a picture of yourself on this page or draw one. Draw a frame around it. (No stick people please) Underneath your picture you will write3 characteristics that best defines you as a student.
1. Responsible2. Punctual3. I love to read!

The Table of Contents
The Table of ContentsIs divided by sections.
Without skipping any linesWrite the letters “A” - “L”
Left Page

The Table of Contents
The right page is the same except you will write the letters “M” - “XYZ”.
Note: the last line has “XYZ” all in one.