Embed Size (px)
Citation preview

STEP BY STEP TUTORIAL
FROM
AUTODESK MAYA
TO
D’FUSION –TOTAL IMMERSION
OR
How to create an augmented reality application from a simple animated
object like a flying atome
Georges Segura Mikko Liukkonen
2
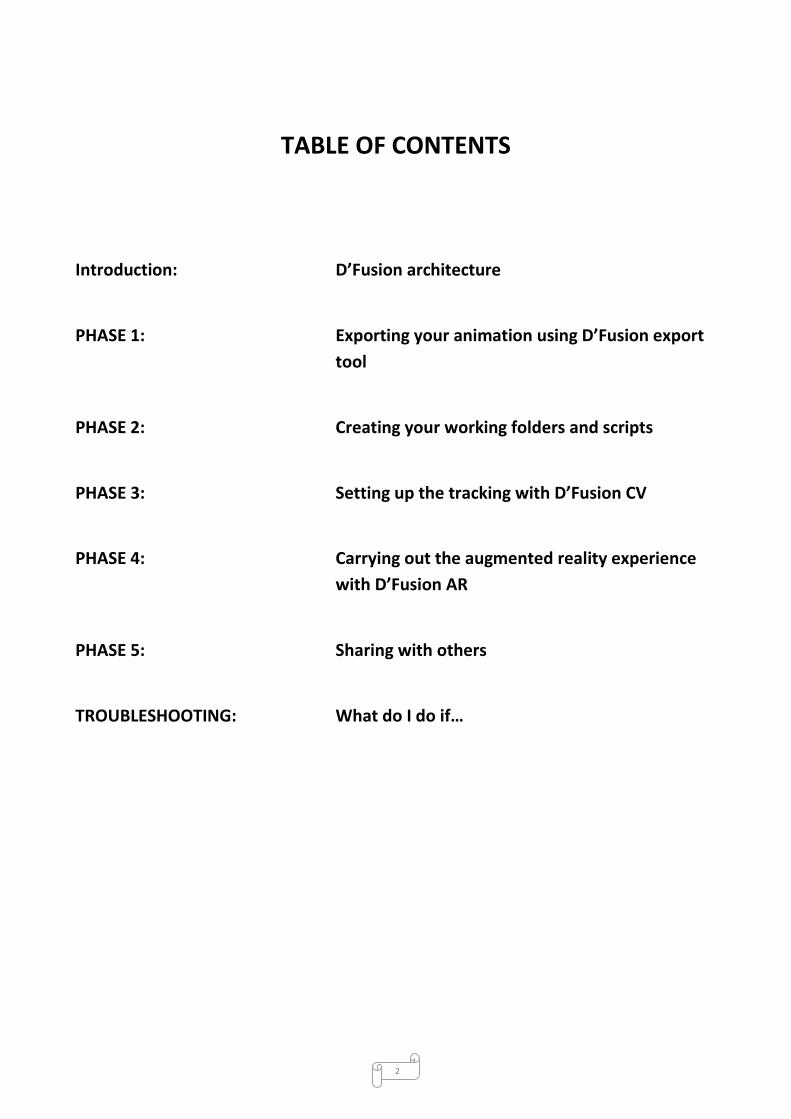
TABLE OF CONTENTS
Introduction: D’Fusion architecture
PHASE 1: Exporting your animation using D’Fusion export
tool
PHASE 2: Creating your working folders and scripts
PHASE 3: Setting up the tracking with D’Fusion CV
PHASE 4: Carrying out the augmented reality experience
with D’Fusion AR
PHASE 5: Sharing with others
TROUBLESHOOTING: What do I do if…

3
Introduction: D’Fusion architecture

4
PHASE 1: Exporting your animation using D’Fusion export tool Important: First Check that your D’Fusion HASP is plugged into your computer so as your web camera!
1.1 Create an empty folder for instance on your desktop: atome_scenario Go to MAYA Create an animated object, in my case, an atome Good Maya tutorials can be found at: http://www.swinburne.edu.au/design/tutorials/maya-video-tutorials.php
When the atome is built, save it as atome.mb under atome_scenario folder 1.2 Open D’Fusion Exporter (If Maya is corrected installed under your username, DFusion Export tab should appear besides the Help tab)
Click on D’Fusion and choose Export No need to change the timeline name if it is only one animated object Click on Add hierarchy to select the object Choose the export folder you have just created (atome_scenario) Give a name, for instance atome_animation Click on Export, no need to click on Save! It creates a folder atome_animation
containing three files xxx.mesh, xxx.material and atome_animation.scene
1.3 OPTIONAL BUT STRONGLY RECOMMENDED Go to the folder atome_scenario, look for atome_scenario.scene and double click to see if it works in D’Fusion Viewer D’Fusion Viewer will automatically open after double-
clicking Open the Windows tab in D’Fusion Viewer and check Animation. Then you probably need to zoom out to see the object (with the scroll button of your
mouse) Choose timeline (see pic 3) Click on Play That will create a file ogre.log in atome_animation folder. There is a problem if you do not see the animation working. If so, go back to Maya and check again if the animation works there then export it again.
pic 1
pic 2
pic 3
pic 4
pic 5

5
PHASE 2: Creating your working folders and scripts
2.1 Create 3 folders under atome_scenario folder Names: tracking, medias and script 2.1.1. tracking 2.1.2. medias Drag the whole atome_animation folder ( 4 files: mesh, material, scene, and log) from the atome_scenario folder under the medias subfolder Drag also : atome.mb under medias You should have now 5 files under medias folder 2.1.3. script Go to cube_scenario. This folder had been created by Total Immersion’s trainer during the training (May 2010). Copy and paste global, tracking and cube_animation.lua files under atome_scenario/script folder Change the name of cube_animation into atome_animation Make the following changes in the file atome_animation.lua (Open it with Notepad for instance)
********************************************* myAtome = Scenette(g_Scene:getObjectByName("atome")) myAnimation = myAtome:getAnimation("timeline") myAnimation:setLoop(true) myAnimation:play(0) --my comment
********************************************* and save it Open the file tracking.lua (using Notepad) change the line ********************************************* local VideoCapture = VideoCapture(g_Scene:getObjectByName("videoCapture")) ********************************************* INTO ********************************************* local VideoCapture = VideoCapture(g_Scene:getObjectByName("videocapture"))
********************************************* and Save it So that the letter C in the third word videoCapture becomes a small c videocapture
pic 6
pic 7

6
PHASE 3: Setting up the tracking with D’Fusion CV
3.1 CV studio
Open CV studio
Change the video parameters if needed
Choose 640-480, RGB24 for a web camera
Choose interlaced
Choose Horizontal-Vertical
Click on Apply
Your web camera should start running
pic 8
pic 9
3.2 Scenario Manager
Choose carefully the picture that will be tracked (remember, you need a picture with contrast)
Click on Scenario manager tab
Create object
Choose Plane Autoinit
Define the size of the picture you wish to track precisely for instance Plane Size default: 10 x 10
pic 10
pic11

7
3.3 Keyframe
Press Keyframe
Place the picture in front of your web camera
Choose Freeze (pic 13)
pic 12
pic 13
3.4 Reset Pose
You need to adjust the Wireframe.
To do that, you can easily use the Reset Pose button (pic 14a) to have a perfect plane surface. So basically
you do not have to adjust the wireframe using the mouse buttons (pic 14b). mouse left button: rotate the keyframe
mouse middle button: zoom in or out
mouse right button: pan the keyframe
When the size of the object is well parametred, neither you have to use the mouse buttons to validate the
corners (yellow and blue coloured buttons).
pic 14a
pic 14b
Click on Create
Check Autoinit Keyframe, the software will process the tracking, it takes few seconds. pic 15

8
3.5 Tracking Manager
OPTIONAL BUT INTERESTING TO SEE WHAT POINTS ARE BEING TRACKED
Open Tracking Manager, you should be able to see the track by showing the picture in front of the web
camera.
You can also:
Click on Interest Points tab and check Display Keyframe, you should be able to see the tracking points
displayed.
pic 16
pic 17
3.6 Save your work
Save in atome_scenario/tracking
Do NOT change the names of the 3 files suggested to you
tracker.xml
CameraCalib.xml
CameraConfig.xml
TIP:
The tracker.xml refers to the picture that has to be tracked.
You may already have done this tracking process with some other pictures. The tracker.xml files are saved somewhere in your
computer.
It you may quickly want to change the picture that has to be tracked without going through the whole D’Fusion Studio CV process
but just replacing the tracking xml by the one created with a previous process.

9
PHASE 4: Carrying out the augmented reality experience with D’Fusion AR
4.1 Open studio AR Create a new project Save next to other folders medias, tracking and script folders. Call it atome.dpd Save
pic 18
4.2 Open the tab Add Choose 2D elements videocapture name: videocapture Location: tracking folder/cameraconfig file OK
pic 19
4.3 Open the tab Add Choose 2D elements videotexture OK Go to OUTLINER Right click and Edit properties videotexture Select videocapture Set initial values
pic 20
4.4 Viewport in OUTLINER Select viewport Edit properties Scroll down, in background texture, Select videotexture Set initial values
pic 21

10
4.5 Save your work Save as atome.dpd Same as the one already created by you at the beginning of the phase IV. In other words, replace the existing one. The computer should warn you, do you want to replace… answer YES
4.6 Open the tab Add Choose 3D elements Choose scenette Call it atome Location: look for atome_animation.scene file in medias folder OK Set initial values
pic 22
4.7 Add the scripts In OUTLINER 4.7.1 Add script name: global Location: look for the file global.lua in atome_scenario/script folder The one you have copied from CUBE_SCENARIO 4.7.2 Add script name: tracking Location: look for the file tracking.lua in atome_scenario script folder The one you have copied from CUBE_SCENARIO 4.7.3 Open the Outliner Drag tracking and global under scene_00 Go to scene_00 and edit properties Set initial values 4.7.4 Fly over the Global file with your mouse cursor Edit properties Choose priority to 1 Set initial values 4.7.5 Open the tab Add Choose 3D elements Choose Empty 3 object Name : Tracking_Position (No other possibilities, the name must be: Tracking_Position (mind the capital letters) OK
pic 23
pic 24

11
4.7.6 Go to Hierarchy manager Drag atome under the folder Tracking Position Edit properties Set initial values The values must be 0 for atome (check again is atome is well under Tracking Position) Set initial values 4.7.7 Open the tab Add 2D elements and choose text2D The name should be "Debug_tracking_info" (mind the capital letter in Debug) 4.7.8 Add script Name: atome_animation Location: look for the file atome_animation.lua in atome_scenario/script folder The one you have copied from CUBE_SCENARIO and renamed atome_animation in PHASE 2 Make sure you have changed the lines in atome_animation.lua as described in PHASE 2 ************************************ myAtome = Scenette(g_Scene:getObjectByName("atome")) myAnimation = myAtome:getAnimation("timeline") myAnimation:setLoop(true) myAnimation:play(0) --my comment
************************************ OK Drag atome_animation under scene_00 Edit properties Set initial values 4.7.9 LAST STEP! Go to File Save Check if the AR works by clicking on Play Place your picture in front of the web camera (see Troubleshooting if the tracking does not work)
pic 25
pic 26
pic 27
pic 28

12
PHASE 5: Sharing with others
5.1 Go to Total immersion folder located on your C disk /Program Files
Open the folder Dfusion Ar 2
Open the Deployement folder
Copy the whole folder Player Test and paste it in atome_scenario folder
Create a launcher.bat
(if you do not know how to create a bat file, see Troubleshooting at the end of this tutorial)
Command line
********************************
DFusion@HomePlayerTest\DFusionHomePlayerTest.exe -f atome.dpd
********************************
IMPORTANT
Launch bat. file at least once
That should create a license file .lic, this is very important!
Picture to be tracked
If you have the picture in MS Word format, place the file in the atome_scenario, for instance tracker.docx
If you do not have it digitally, scan the picture and place the digital file into the atome_scenario folder
Zip the whole folder to send it to your partners or clients or give the address when your partners can find
the zip file to download from.
Your folder should contain
pic 29
As the license has been created once, your partners or clients will not have to have the HASP plugged into
their computer but they will not be able to change anything in the files otherwise the augmented reality
will not work anymore.

13
TROUBLESHOOTING: What do I do if…
1. Bat files How do I create a bat file?
Open Notepad
Copy the command line
pic 30
2. Two Tracking problems
2.1 First possible tracking problem
The tracking works if you start seeing the coordinates of the tracking in the tracking window.
If you do not see the animated object, click on Pause then go back to Hierarchy Manager.
Check again if atome is under Tracking_Position
Right click on atome, check if the values in local and Orientation are set to 0.
If atome is not under Tracking_Position, drag it, check again if the values in local and Orientation are set to
0 then set initial values on.
Reload and Play it again
If it works, Save your work.

14
2.2 Second possible tracking problem
You see the object but without animation
Open D’Fusion AR Studio if not already opened.
Load the file atome.dpd
Go to Outliner
Under Scene_00, choose atome_animation (pic 31)
Right click and edit properties
Verify if Enabled and Trigger are checked (pic 32)
If they are not checked or only one of them, check them.
Set initial values
Reload
Play
and if it works, Save your work.
pic 31
pic 32

15
Questions can be directed to Georges Segura or Mikko Liukkonen
Product of Vireaali project for internal use only
Copyright: Koulutuskeskus Salpaus 2010
all rights reserved