Embed Size (px)
Citation preview

Rigging Half-Life 2 Bones
You have the bone in position with your model but of course the bone is not properly
fits with your model size. In order to fix it:
• Resize or Move your model until its fits the bone composition
• Edit your model so its fits the bone composition, take extra care on fingers
bone
• DO NOT edit and resize the bone! You can rotate the bone to fits some space
such fingers bone to fits your fingers model and Leg. Editing the bones will
make the model have undesired result at the end.
In order to continue, we need to put dummy at the end of the important bone. This
dummy becomes helper for our rigging later.
Hint for viewport this time is pressing “F3” at keyboard! This will make your viewport
become wireframe. Press again and it will back to normal shaded view. You need to
use this well because it will become handy.
First Hide your model by select your model and right click at it and “Hide selection”

Then create the dummy refer this below picture:
Next is put those “Dummy” in this location:
• Head
• Both Hand
• Both Toes
The “Dummy” is in Green Colour. Click + Drag at viewport will resize the dummy.

Now you need “Link” the dummies into the last bone.

Click at this icon (it’s at top left):
Then try clicking at green dummy then drag it to last bone, for example:
HEAD (drag dummy to last head bone “ValveBiped.Bip01_Head1”)
2 HANDS (Drag to “ValveBiped.Bip01_R_Hand” & “ValveBiped.Bip01_L_Hand”)

2 TOES (Drag to “ValveBiped.Bip01_R_Toe0” & “ValveBiped.Bip01_L_Toe0”)
If goes into detail, we also need to put dummies into each fingers of hand! In this
tutorial, we only do basic rigging. When you know this basic, you can proceed to
more detail one.
Next you will need to apply Skin Modifier OR Physique Modifier to rig your model
since source support those 2 types of rigging.
You can add extra bone and link to the existing such bone for hair, skirt and even
breast (for girl) but make sure you put the “Dummy” at end of each bone
Let’s start with select “UNHIDE” your model back by right click at viewport “Unhide All”
then select your model, go use “Physique Modifier” for rigging. I only comfort using
this for rigging

Then click “attach to node” icon
After that click at Root of the bone! This bone is source connection of all bones. If this
bone moves, others will move as well. So the bone name here is
“ValveBiped.Bip01_Pelvis”. Remember to use Wireframe view to see the bone inside
the model.
After clicking at the bone, the new “Physique Initialization” window appear

Check “Rigid” under Vertex – Link Assignment
Use “3 Links” in dropdown of Blending Between Links
And Click “Initialize”
You will see lines in orange colour which its resemble the link connection between
bones

Now is the hardest part! You will need to assign all vertexes to its designated place of
bones.
So we start to clear all default assigned vertex, follow the picture instruction:
Click at “vertex” dropdown. Make sure “vertex type” all 3 colours is clicked. Then click
at “Select” under Vertex Operations

Select all vertexes in the Viewport. It will highlight green vertex and some blue.
Select “Remove from Link” and click only green at vertex type.

After that, select all (Ctrl + A) or select all bones. This will turn all vertexes into blue
which is mean no vertex assign to any bones.
Please click at “Lock Assignment” to lock all vertexes. This will prevent wrongly
assign vertex into wrong bone.

Now we start with Assigned head to our bone first! We start with hair. If your model
has hair, it’s better to assign the hair to head bone first. Please press F3 to change
view to default.
To make the assign easy, please select at “Element” from “editable poly / mesh”
dropdown
Then click at any hair. This will auto highlight the parts of any selection of hair poly

Select Back the “Vertex” and you will see 2 kind of vertex on screen. If you click at
anywhere in the viewport, this will release the blue selection of vertex and it turn back
to white.
Now we have White and Grey kind of vertex
White resemble the vertex which you can assign to bone while Grey is cannot. So in
this matter, whatever polygon you select at the model, that poly will allowed to be
assigning to bone. These prove to where only the polygons highlighted by red color
have the white vertex on it.
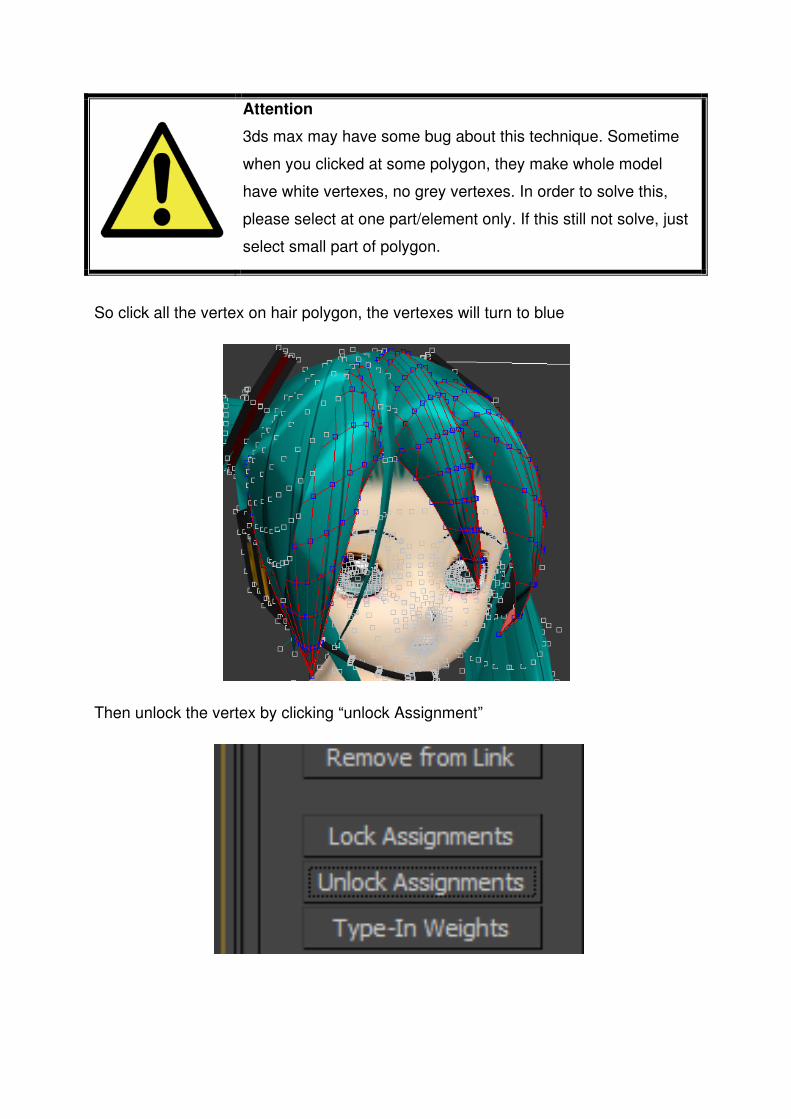
Attention
3ds max may have some bug about this technique. Sometime
when you clicked at some polygon, they make whole model
have white vertexes, no grey vertexes. In order to solve this,
please select at one part/element only. If this still not solve, just
select small part of polygon.
So click all the vertex on hair polygon, the vertexes will turn to blue
Then unlock the vertex by clicking “unlock Assignment”

Please change your viewport to wireframe by press F3 at keyboard. Then click at
“Assign to Link” and make sure only “Green Vertex Type” is selected
After that click at Head Bone! “ValveBiped.Bip01_Head1”. You may need to zoom in
a bit, there’s a Yellow link at the bone, click at it. When you click, it will turn to red!

Zoom out and back to shaded view, you will see your vertex turn to green! Please
lock it by click at “Lock Assignments”
You can try rotate your bone to see result! Release all selection then Click at you
Head Bone.

Rotate it facing any direction! You will see only the hair part which we assigned will
move as we rotate the bone. That’s mean the hair is successfully assigned to the
bone.
Now Please “UNDO” with what you doing or pressing at keyboard “ctrl + z”
All right! Repeat the vertex assignment for other hair and head! Make sure Hair is all
covered and assigned to head bone!
The Result will appear where the head part is on bright Green.

Now in case of connection between Head (ValveBiped.Bip01_Head1) and Neck
(ValveBiped.Bip01_Neck1), you may need to know the right border of vertex to
choose and to link. Example:

Please look at your left viewport
The green highlighted is the border between Neck and Head so we select these
vertexes and link to both Head and Neck.

The result of 2 bones link will turn the bright green vertexes to dark green. Almost
unseen. Make sure you “lock assignment” after any “assign to link”
You can see the result by rotate the head bone once again:

Please continue to the rest of neck and other part of body. This may taking a longer
time due to its complexity but the result will be satisfying.
Arm & Hand
Leg & Foot:

When it’s complete, the result should be no “Blue Vertexes” appear at the screen!
You may check if there’s a wrong assigned rig to your bone by make your character
do some pose. You can download example of finished Miku model rig at here:
http://xenoaisam.com/2011/01/12/free-miku-model/