Embed Size (px)
Citation preview

Getting Started Guide Here we aim to get you acquainted with the whole procedure of converting
Zimbra files. Those three steps below are crucial to the whole procedure. In this
page, every step has been elaborated with the relevant details:
Step 1 ‐ Export .TGZ File from Desktop
Step 2 ‐ Unzip and Extract .Meta files from the .TGZ file
Step 3 ‐ Run Zimbra Converter for further conversion
Steps to Export .TGZ file from Zimbra Desktop
Step 1 - Open Zimbra Desktop
Start the Zimbra Desktop program either from Windows Start menu or from
shortcut icon from Desktop. Go to Start menu » Programs »Zimbra
Desktop » Zimbra Desktop . Then you will see a screen as shown here →

Step 2 - Locate and click on "Preferences" Tab on the Menu Bar.
From Zimbra Desktop application, look for "preferences" option to export all items
like emails, contacts, calendars etc to .tgz file. You will find the "Preferences" tab on
the menu bar.

Step 3 - Select Import/Export option
Once you have selected Preferences tab within the Zimbra Desktop, select
"import/export" option from the respective account which appears on the left side
of the screen. When clicked, two sections would appear on the screen, one for
"import" and the other for "export" on the right side.
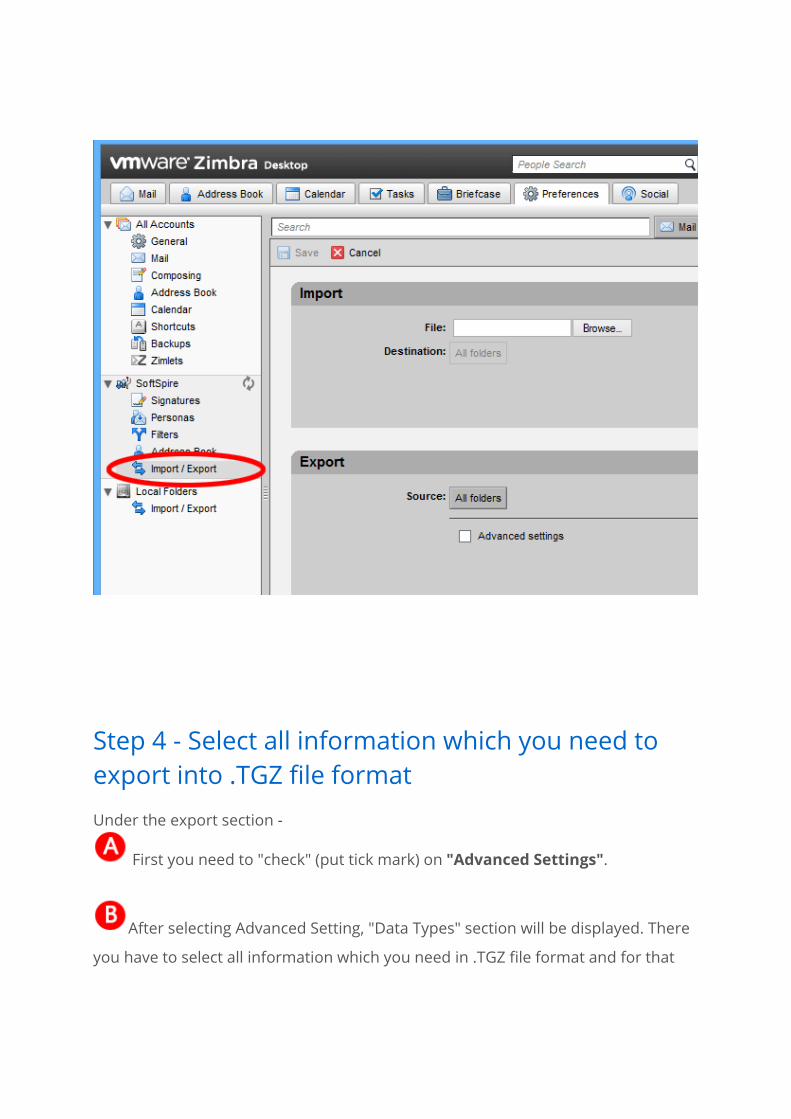
Step 4 - Select all information which you need to export into .TGZ file format
Under the export section -
First you need to "check" (put tick mark) on "Advanced Settings".
After selecting Advanced Setting, "Data Types" section will be displayed. There
you have to select all information which you need in .TGZ file format and for that

you need to "check" (put tick mark) on the options i.e - mail, address book,
calendar, tasks, briefcase, etc.
Note: If you only want to convert mail and address book, then check on those two
options only and uncheck (remove tick mark) the other options (calendar, tasks,
briefcase, etc).
Step 5 - Finish Exporting .TGZ File
After selecting the options in the "Data Types" section, click on the "Export" button
on the right hand side of the Export section.
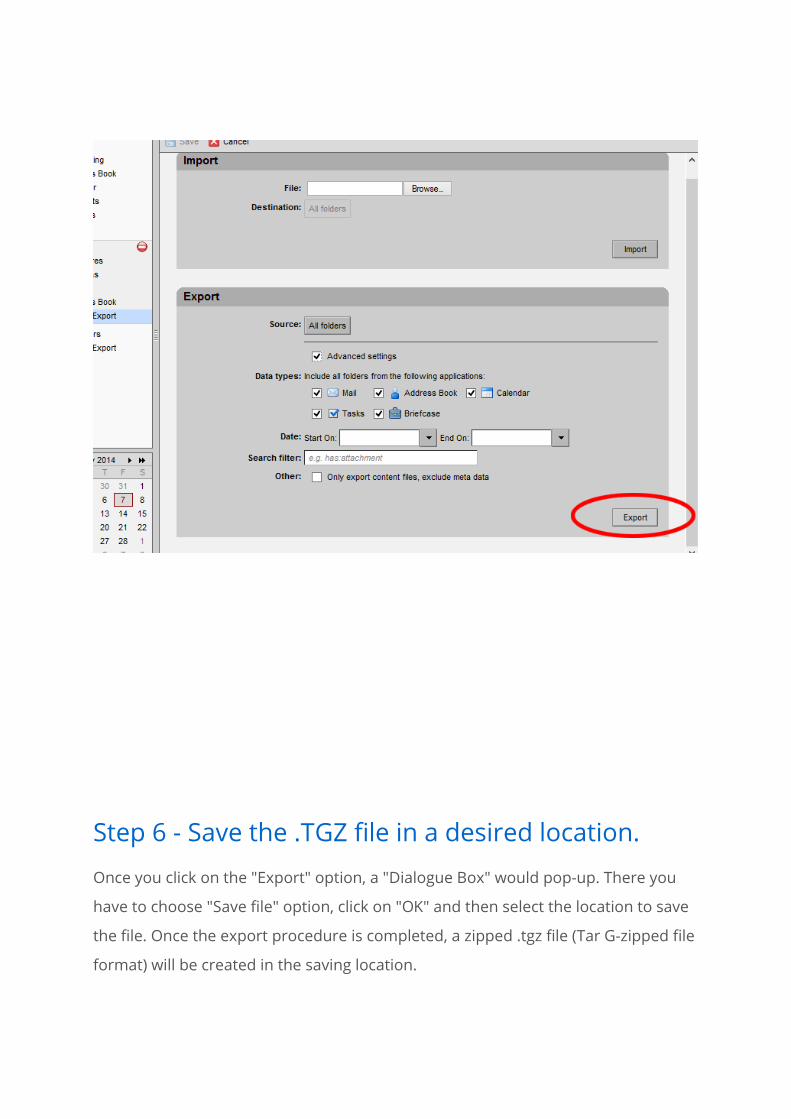
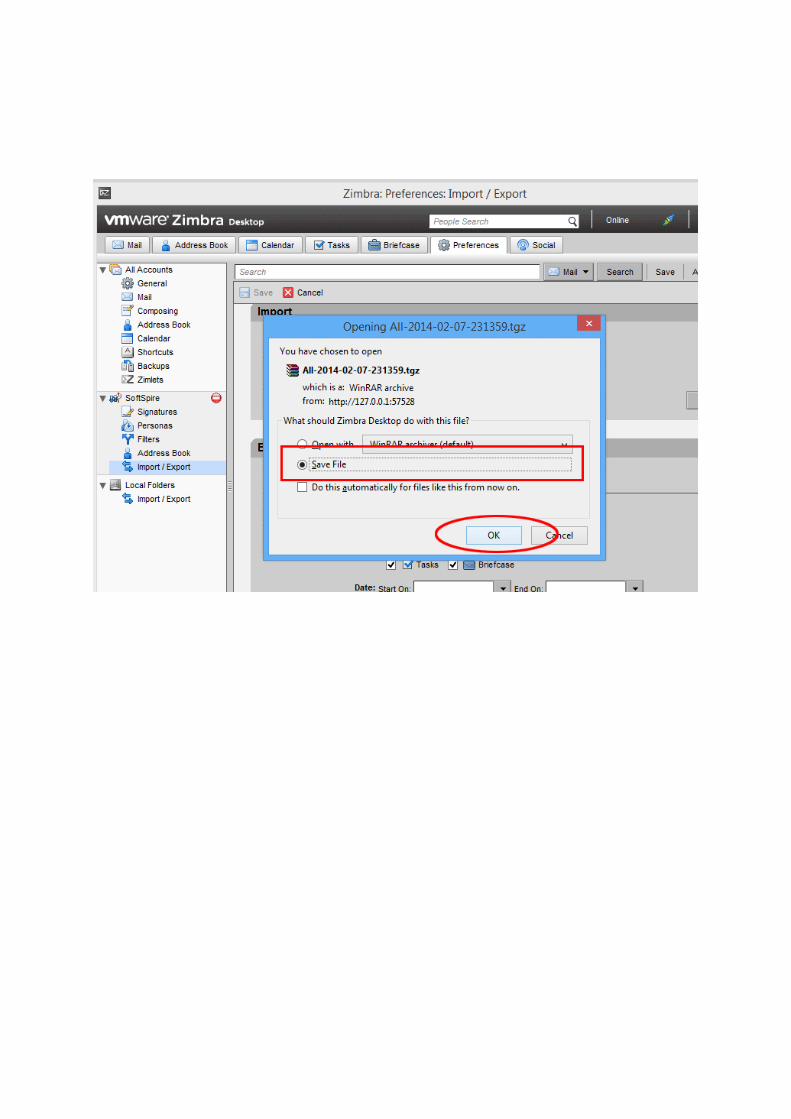
Step 6 - Save the .TGZ file in a desired location.
Once you click on the "Export" option, a "Dialogue Box" would pop-up. There you
have to choose "Save file" option, click on "OK" and then select the location to save
the file. Once the export procedure is completed, a zipped .tgz file (Tar G-zipped file
format) will be created in the saving location.

Below is the exported TGZ file.
After exporting .TGZ file, next step is to extract .meta files from .TGZ file.
Unzip .TGZ File and Extract .META Files
Unzip the .TGZ file for further migration from Zimbra to MS Outlook
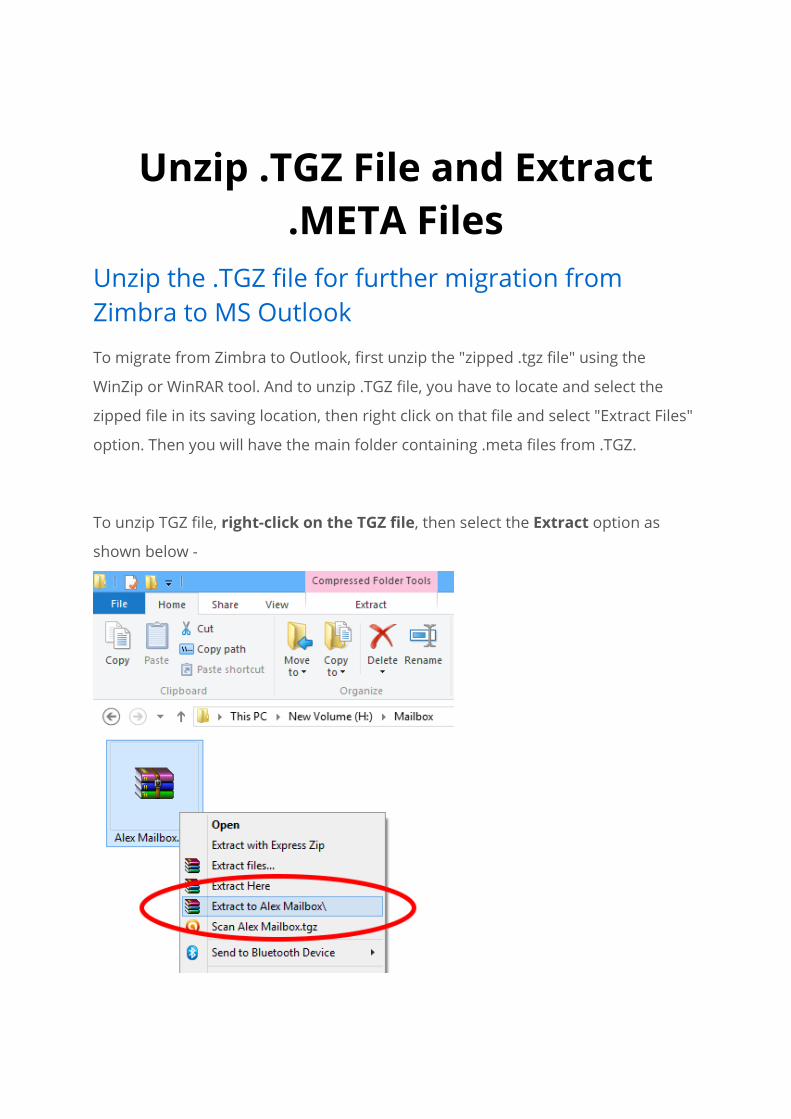
To migrate from Zimbra to Outlook, first unzip the "zipped .tgz file" using the
WinZip or WinRAR tool. And to unzip .TGZ file, you have to locate and select the
zipped file in its saving location, then right click on that file and select "Extract Files"
option. Then you will have the main folder containing .meta files from .TGZ.
To unzip TGZ file, right-click on the TGZ file, then select the Extract option as
shown below -

Once you unzip the .tgz file you will have a folder with same filename as shown below –
Once you unzipped .TGZ file, you can proceed to convert Zimbra to Outlook.
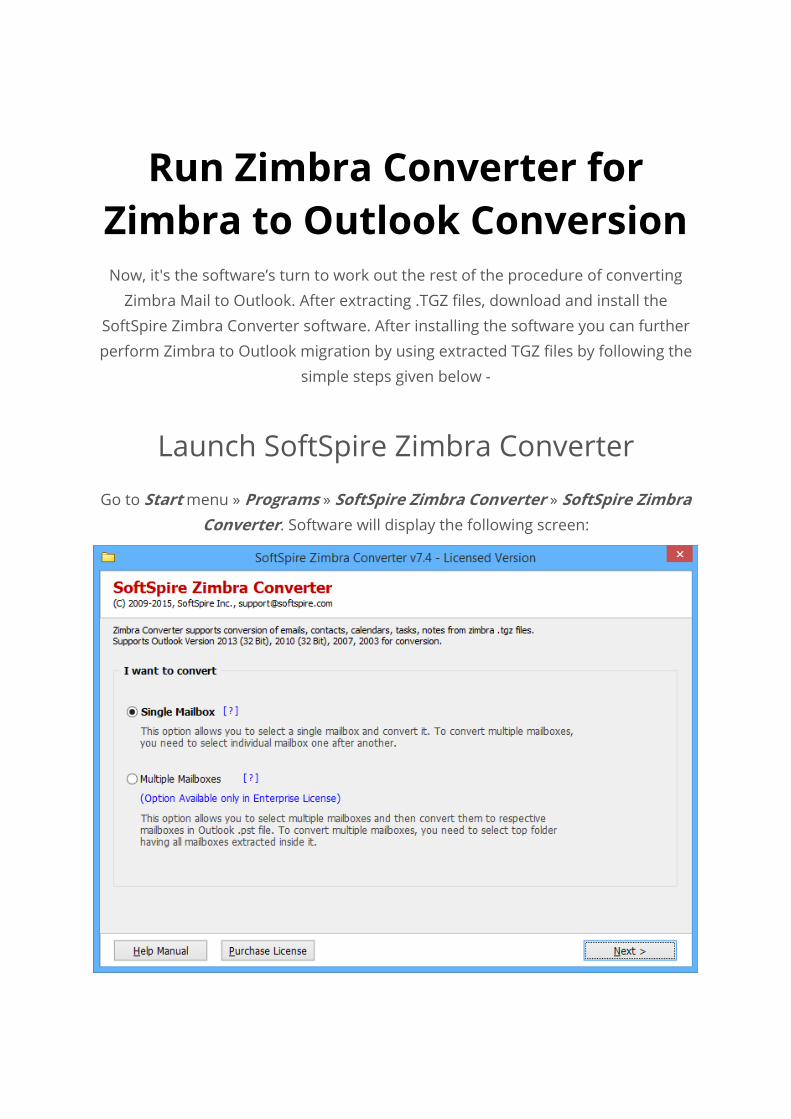
Run Zimbra Converter for Zimbra to Outlook Conversion Now, it's the software’s turn to work out the rest of the procedure of converting
Zimbra Mail to Outlook. After extracting .TGZ files, download and install the SoftSpire Zimbra Converter software. After installing the software you can further perform Zimbra to Outlook migration by using extracted TGZ files by following the
simple steps given below -
Launch SoftSpire Zimbra Converter
Go to Start menu » Programs » SoftSpire Zimbra Converter » SoftSpire Zimbra Converter. Software will display the following screen:
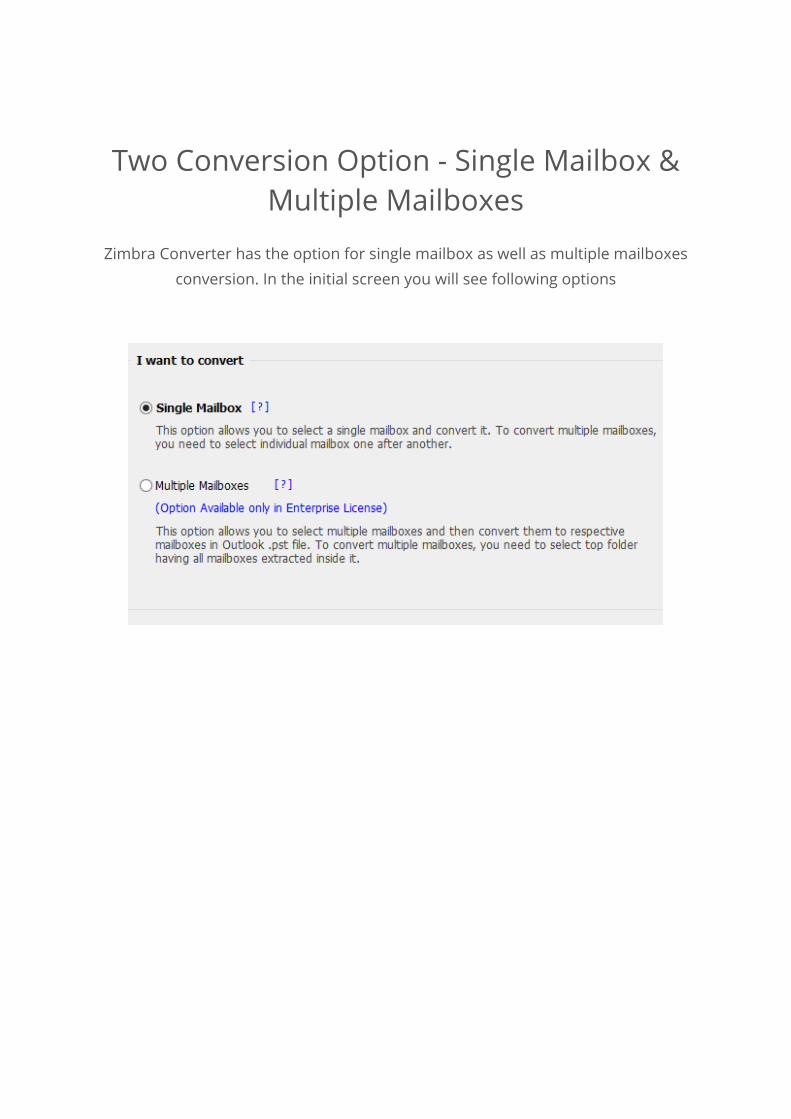
Two Conversion Option - Single Mailbox & Multiple Mailboxes
Zimbra Converter has the option for single mailbox as well as multiple mailboxes conversion. In the initial screen you will see following options
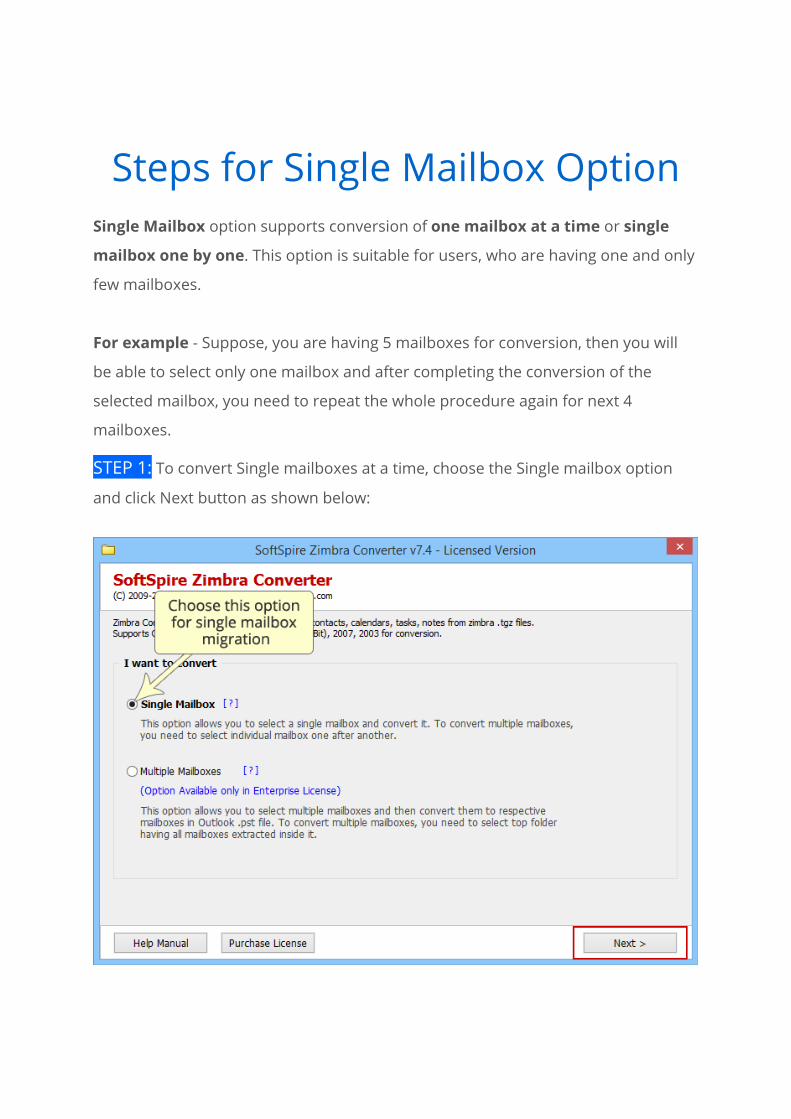
Steps for Single Mailbox Option Single Mailbox option supports conversion of one mailbox at a time or single
mailbox one by one. This option is suitable for users, who are having one and only
few mailboxes.
For example - Suppose, you are having 5 mailboxes for conversion, then you will
be able to select only one mailbox and after completing the conversion of the
selected mailbox, you need to repeat the whole procedure again for next 4
mailboxes.
STEP 1: To convert Single mailboxes at a time, choose the Single mailbox option
and click Next button as shown below:
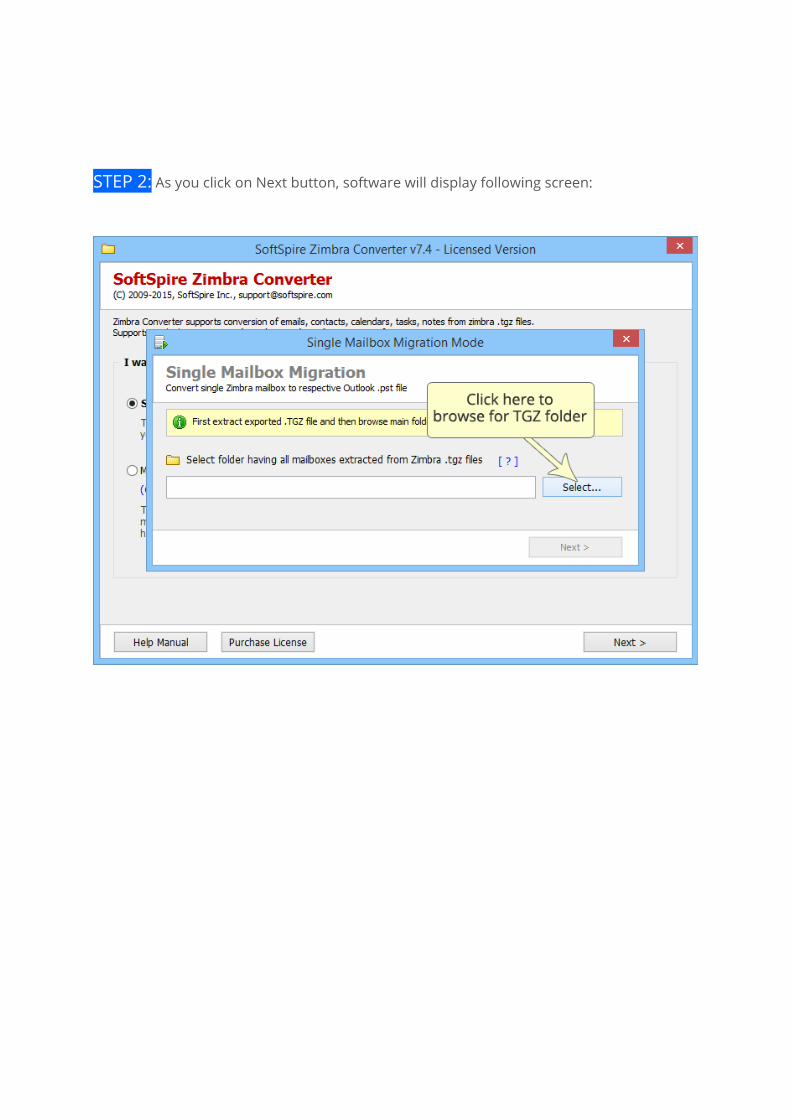
STEP 2: As you click on Next button, software will display following screen:
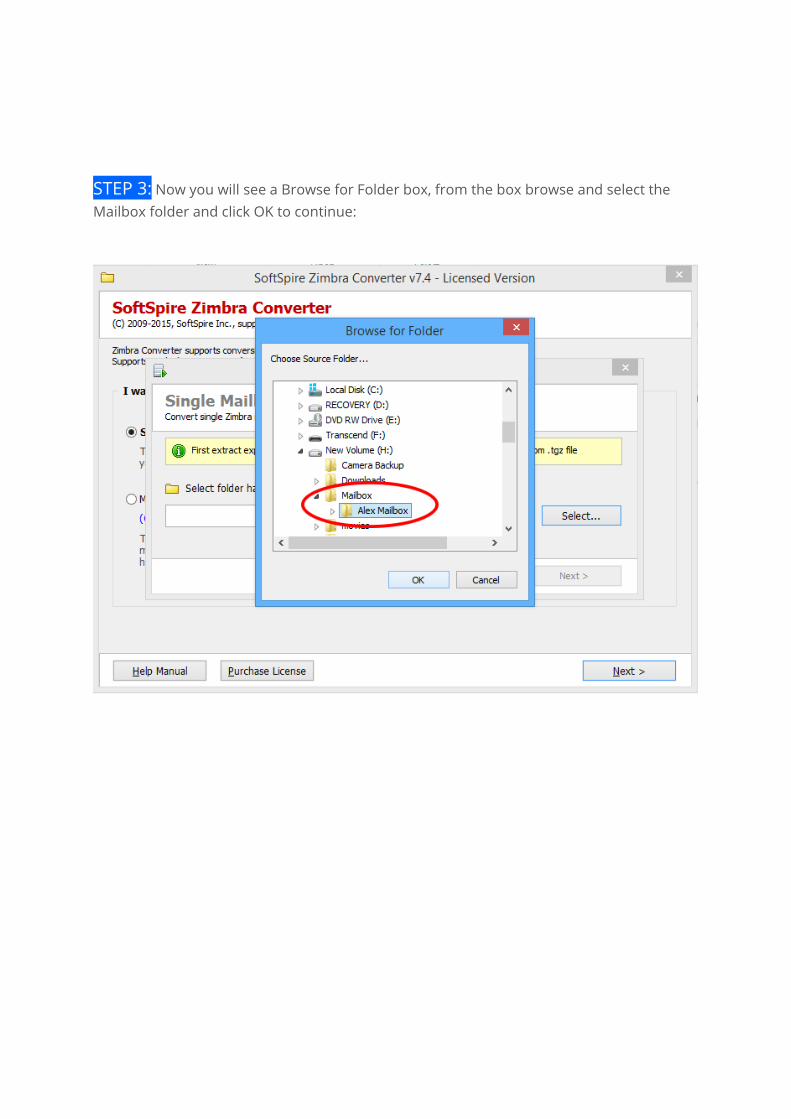
STEP 3: Now you will see a Browse for Folder box, from the box browse and select the Mailbox folder and click OK to continue:
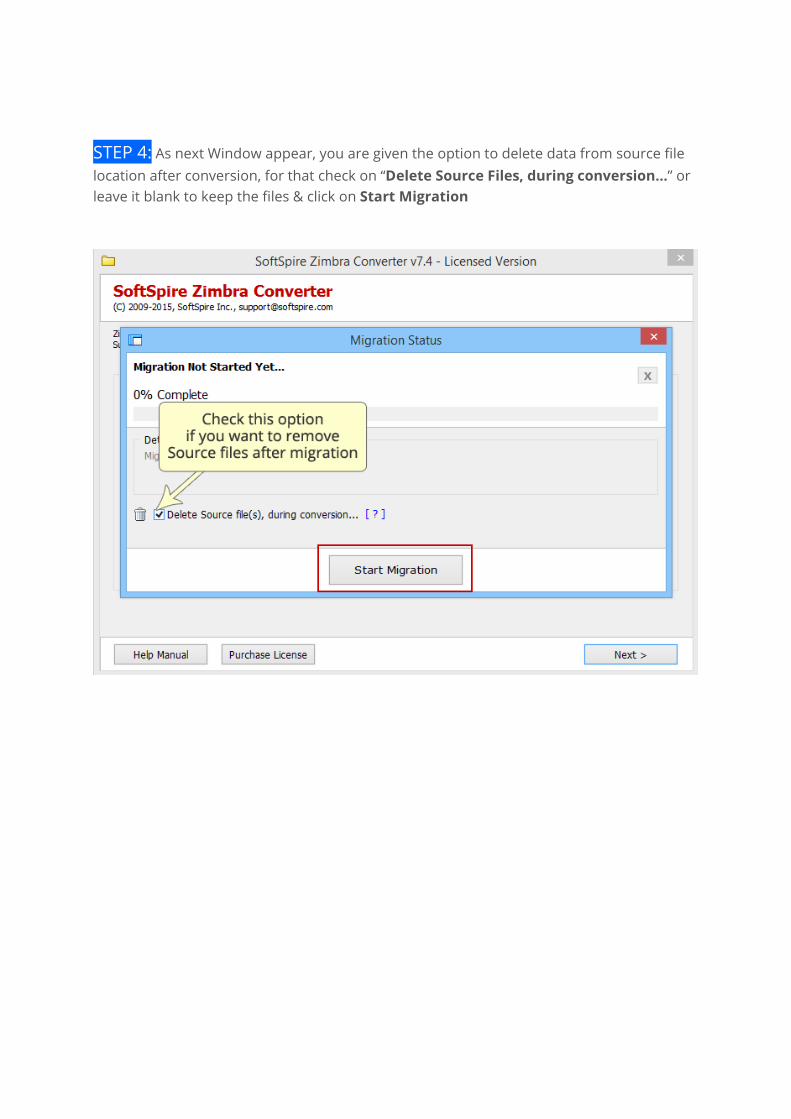
STEP 4: As next Window appear, you are given the option to delete data from source file location after conversion, for that check on “Delete Source Files, during conversion…” or leave it blank to keep the files & click on Start Migration

STEP 5: Next is to choose the saving location of the Outlook PST file. From the Save As box, navigate to the desired saving location and click on Save button as shown below
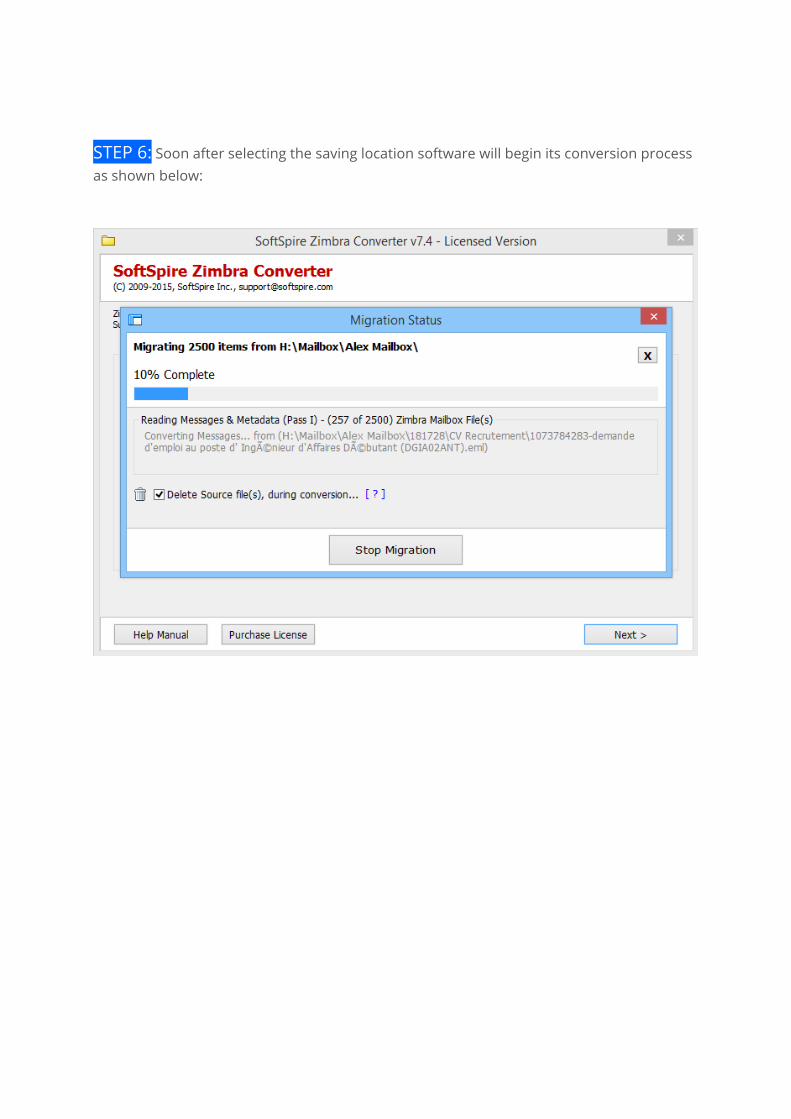
STEP 6: Soon after selecting the saving location software will begin its conversion process as shown below:

STEP 7: Migration Done! Software shows "100% Complete" when its done with the conversion as shown below:

Steps for Single Mailbox Option STEP 1: Choose Multiple Mailboxes option & click on Next

STEP 2: Click on Select button to choose the folder having all mailboxes, extracted from Zimbra TGZ files
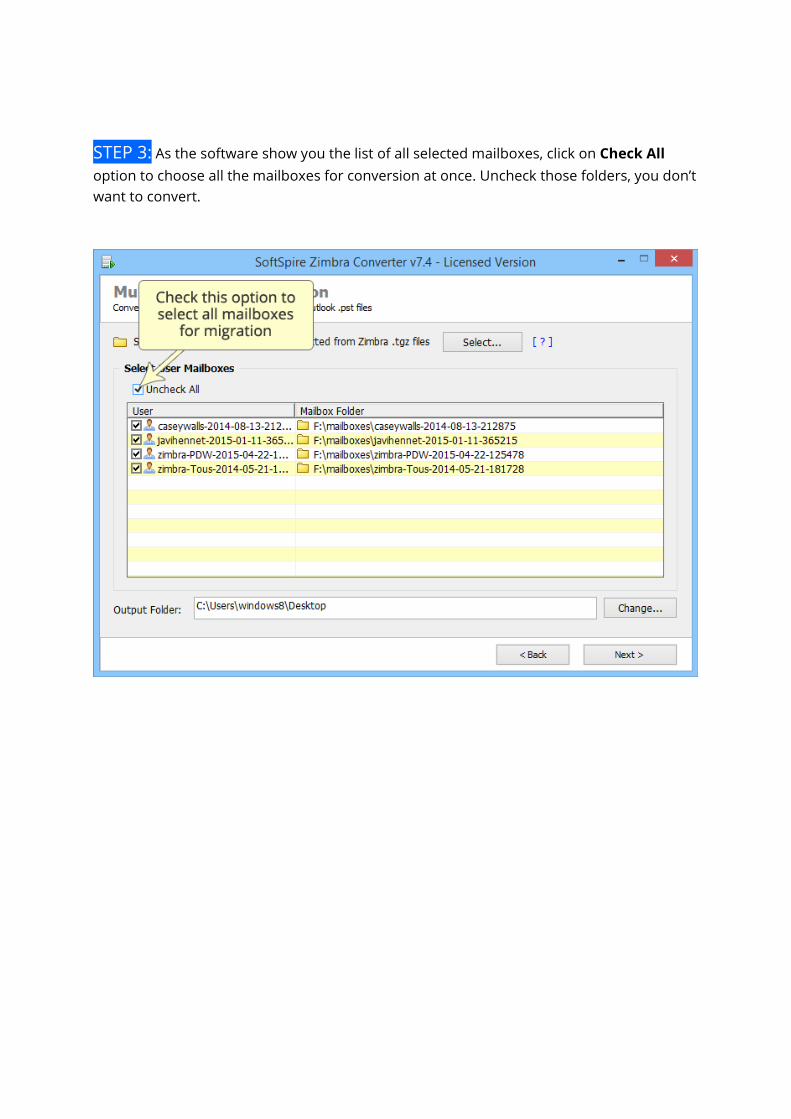
STEP 3: As the software show you the list of all selected mailboxes, click on Check All option to choose all the mailboxes for conversion at once. Uncheck those folders, you don’t want to convert.

STEP 4: Click on Change button to choose location to save the converted files

STEP 5: As next Window appear, you are given the option to deleted data from source file location after conversion, for that check on “Delete Source Files, during conversion…” or leave it blank to keep the files & click on Start Migration
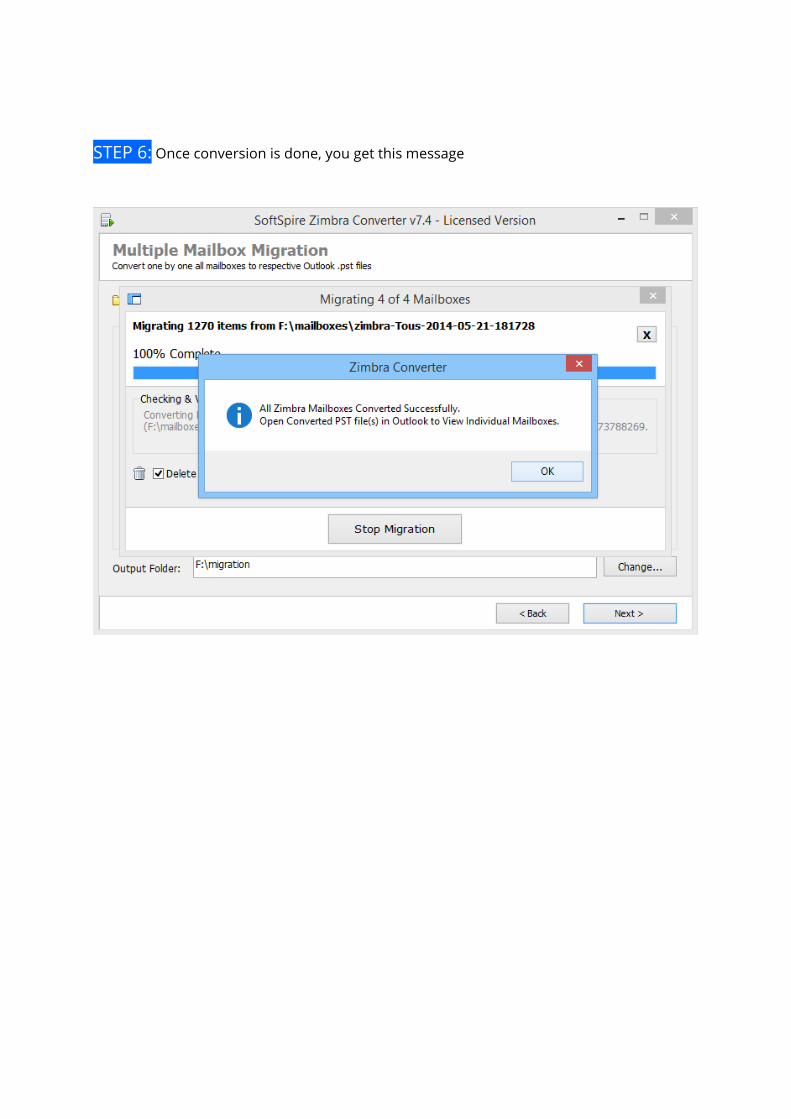
STEP 6: Once conversion is done, you get this message

Open New PST File STEP 1: Next is to view the converted PST file. Open MS Outlook (2013, 2011,
2010, 2007 & 2003) go to File » Open » Open Data file

STEP 2: Now browse for the converted PST file saved in a selected location in your
machine

STEP 3: Click on All folder option, there you will see the Zimbra Mailbox


![[SOLVED] Zimbra on DRBD - Zimbra __ Forums](https://img.pdfslide.net/doc/110x75/54f9cdde4a795956048b45f6/solved-zimbra-on-drbd-zimbra-forums.jpg)