Embed Size (px)
Citation preview

1
Sticks and Tissue No 112 – March 2016
If you can contribute any articles, wish to make your point of view known etc please send to or phone
01202 625825 [email protected] The content does not follow any logical order or set out,
it’s “as I put it in and receive”.
Thanks to Mark Venter back issues are available for download from http://sticksandtissue.yolasite.com/
Writings and opinions expressed are the opinion of the writer but not necessarily the compiler/publisher of
Sticks and Tissue.
Dave Platt launching his Judy

2
From Dave Platt
This year’s Top Gun event will feature the return of the rubber-powered freeflight shindig of Polo Ground
days. Inspired, I designed a Yokosuka D4Y Judy, seen here undergoing its trimming trials.
By the way it was nice to see the smiling face of my pal Neil Tidey in your last S&T.
3
Sad News
I heard that John Bezing passed away recently. Whilst he had a long aeromodelling career as far as I know
control line was his main activity he being a control line aerobatic competitor and organiser in CLAPA.
His interest were not just aeromodelling I recall discussing theatres and cinema architecture another passion
of his.
The start of 2016 has been sad as regards friends who are no more one of the DMFG passed away
David Ward which was extremely upsetting may they both R.I.P.
James Parry

4
McCoy .049 Model Aircraft January 1954
The McCoy .049 diesel is the first new American compression
ignition engine to appear for more than five years. During
1946/48, several U.S.- built diesels appeared on the market, in
response to the interest which this then new type had aroused,
resulting from its wide acceptance in Europe, but, in general,
were unable to compete with the highly developed spark ignition
engines available in the U.S. Then, with the advent of glowplug
ignition in mid-1947 and its rapidly gained popularity during the
following twelve months, the American diesel faded further into
the background and its production virtually ceased.
In Europe, however, the superiority of the new glowplug motors
served to encourage many ci. engine manufacturers to modernise
the design of their diesels and much development work has since
taken place. Thus, combined with the world wide tendency
toward smaller cylinder sizes (which favour the model c.i.
cngine combustion process) the diesel has re-emerged as a
worthy contender in the competition field with particular
advantages in regard to specific power output in the under 1 c.c.
sizes.
The .049 cu. in. (o.8 c.c.) “half-A” class having become the most popular capacity category in the U.S.A., it
has been frequently prophesied in MODEL AIRCRAFT during the past two years or so that the Americans
would eventually re-admit the compression-ignition motor and bring out a .049 Cu. in. diesel and the
McCoy is the first confirmation of this.
The unit now featured in this month’s test has been in our possession for the past six months, during which
time it has been used in a team-racer and a PAA-load model and entered in
competition; which activities have aided us in our overall assessment of its
qualities.
This particular engine was first described in “Accent on Power” in the
August 1953 issue, and we will not, therefore, repeat earlier comments on its
design except to remind readers of two unusual construction features—the
use of a plastic compression-ring instead of a close fitting lapped surface, on
the contra piston and the useful fibre insert in which the compression screw
is fitted.
Specifietion
Type: Single-cylinder, air-cooled, two-stroke cycle, compression ignition. Crankshaft type rotary valve
induction. Circumferential exhaust and transfer porting with sub-piston supplementary air induction.
Domed piston crown.
Swept Volume: 0.0497 cu. in. (0.814 c.c.).
Bore. 0.405 in. Stroke: 0.386 in.
Stroke/Bore Ratio: (0.953 : 1.
Compression Ratio: Variable.
Weight: 1.5 oz.
General Structural Data: Pressure diecast aluminium alloy crankcase with integral main bearing and
detachable rear cover. Heat treated steel cylinder screwed intœ crankcase and seating on Vellumoid gasket.
Two transfer passages formed in crankcase sides and opening into annular chamber feeding three cylinder
ports. Hardened steel piston with bronze gudgeon pin and duralumin connecting-rod. One piece
counterbalanced crankshaft. Steel contra-piston with heat-resistant plastic compression-ring. Red anodised
duralumin finned cylinder barrel with fibre friction insert on compression screw threads. Spray-bar type
needle-valve. Two point bulk head type mounting.
Test Engine Data
Total running time prior to test: 1.5 hours.

5
Fuel used: 40 per cent. ether, 30 per cent. Shell “Royal Standard” kerosene,
30 per cent. Castrol “R” plus 2 per cent. iso-amyl-nitrite.
Performance
We have heard very conflicting reports of the “startabiity” of the McCoy
diesel. When we first reported on this engine, we compared its starting
qualities with those of existing British 1c.c. diesels— neither foolproof nor instantaneous but not difficult.
In three published reports from other sources, however, the McCoy was considered very easy to start,
whereas, from two others (unpublished) it was thought to be “tricky,” in one case, and “an absolute XYZ ! “
in the other.
Testing our own example again after a period of some weeks, we came to the conclusion that our original
assessment was still right and this was confirmed by a well-known team-racing enthusiast to whom we had
loaned the motor during this period and who had entered it in the Cambridge Team Race Rally. In this event,
the McCoy powered racer had lapped at 50-51 m.p.h. on 30-ft. lines using a 6 x 6 Stant propeller. This was
the highest speed of any “half-A” class model present and the McCoy was overhauling its slower
competitors every fourth lap, but more frequent refuelling stops and slightly reluctant starting robbed it of a
place.
The McCoy seems to like to be fairly wet for starting and we found that, even when hot, priming through the
ports was the best method of obtaining a sure start. Actually, the engine is not critical to the actual starting
drill adopted and does not flood easily, but the “suck in and one flick” type of start is not one of its
attributes.
Modern American “half-A” class engines are noted for their ability to rev at really high speeds and to deliver
useful power at such r.p.m. This means that these engines are designed to maintain an even torque at the
expense of low speed pulling power and the result is that the .049 engine is in variably operated at five
figure r.p.m. and as high as 15,000 for competition purposes. The McCoy, although a diesel, maintains these
traditions and is, quite definitely, a lot happier above 10,000 r.p.m. than below it. In fact, our own test
engine fluctuated a good deal at lower r.p.m., making accurate test readings difficult and necessitating some
“smoothing” of the performance curves.
Thus, the McCoy’s maximum b.h.p. was realised at close to 14,000 r.p.m. The makers have
claimed that the engine’s output is 50 per Cent. up on an equivalent glowplug engine and
this is borne out by our test. The average conventional “ half-A “ glowplug model gives
around 0.050 b.h.p., and the McCoy recorded just over 0.076 b.h.p. This is, of course,
entirely due to the higher b.m.e.p. realised with the c.i. motor. Incidentally, with this engine
there is not a great deal of difference in starting qualities with light or heavy loads, whereas
most diesels’ starting qualities deteriorate badly
when fitted with light, high-speed props.
The general running qualities of the McCoy diesel are good. At
low speeds, after some 1 hours running time, there was still an
appreciable power loss between initial cold starting and reaching
normal running temperature but this was not applicable at peak
speed. The engine remained remarkably free from vibration except
when 15,000 r.p.m. were exceeded on one occasion and some
difficulty was then experienced in holding compression settings
despite the fibre compression screw thread insert fitted.
On our particular McCoy, there was a good deal of liberty in the
main bearing and this resulted in considerable quantities of oil
being sprayed Out behind the prop. This would, of course, partly
account for a seemingly high fuel consumption.
In conclusion, it should be mentioned that, although the makers
strongly recommend the sole use of the McCoy fuel especially
blended for this engine (and not available for our test) no
deterioration of the plastic contra-piston ring sufficient to affect its
excellent compression sealing properties, occurred during our tests using standard British fuels.
Power/Weight Ratio: (as tested): 0.081 b.h.p./lb. Specific Output: (as tested) 93.8 b.h.p. / litre.

6
From Adam Chambers
Here's one to tease the old folks, but what is it?
7
Answer is : its an entirely homespun creation. Wings off a record breaker with reduced dihedral, fuselage is
a Jasco Flamingo with added lightness . Rest is my ideas, inc removable u/c.
Power is 3 cell lipos, a 3548 900kv motor on 14/7 prop.
AUW 4.4.llbs giving 8 oz/sqft.
I‘ve yet to name it .

8
Dual Function E-Zee Timer for i/c Powered Free Flight by Mike Edwards
Back in October 2015 I was considering building a free flight Junior 60, to home my newly acquired ED
Comp Special. I wanted to incorporate a timer to reliably cut the engine, so that I could avoid my normal
method of guessing the amount of fuel in the tank at the time of release (I have been known to be a poor
judge at times!). I wanted to utilise the original tank and cut off mechanism on the Comp Special.
I was looking into using a mechanical timer to release a sprung line to pull the cut off, when my father
showed me an E-Zee DT Timer he had bought from Den’s Models (www.densmodelsupplies.co.uk). The
electronic timer unit was an appealing solution for the fuel cut off timer, as it provided a simple mechanical
element using a servo to pull the fuel cut out. I was planning to use two separate timers one for the engine
cut off and one for the DT.
I contacted Den Saxcoburg via email to ask if it is possible to get units with extended LED’s and push
buttons, so that I could place both timer boards inside the fuselage. Having explained to Den why I wanted
the two units he advised me that although at present he did not have a dual function timer suitable for i/c
power he thought he could modify one of the dual function electric free flight units he currently sells, by
replacing the ESC function with an i/c throttle control function instead.
Den kindly went away and with the designer Alan Bond produced a modified unit. He promptly sent me
the modified unit which fitted my requirement perfectly.
The modified unit was also supplied with the extended LED and push switches. The timer unit is designed
to operate on a supply voltage up to a maximum of 5.5V and so lends itself to operation on a single Lipo
cell. I initially trialled the system on the bench using two standard servos purchased from the local model
shop. These operated ok, but I was concerned that their recommended operating voltage window of 4.8-
6.0V may cause a problem. I looked around for a servo designed to operate off a single cell. After some
hunting I found a servo sold by Hobby King, deigned to operate at 3.7V but for simplicity were also
supplied with standard JR connectors. When tested on a crude work bench rig up these servos seemed to
pull the fuel cut off piston with ease (Once they had arrived on a rather slow boat from somewhere). They
also have the added advantage of being slightly lighter than the original ones selected at 5.6g each (servo
type: Turnigy™ TGY-D56LV Coreless Low Voltage DS/MG Servo - part number 9399000024-0).
Following an extended build period, (mostly due to my novice status) I have now built the Junior 60 with the
Comp Special and prototype two function timer installed. Ground testing was carried out in January 2016
whilst waiting for suitable trimming weather. During the ground testing, the system operated repeatedly
without fail. I incorporated the LED, push switch and main on/off switch with a 300mAhr Lipo into a
compartment at the front of the fuselage, allowing the board to be installed into the cabin area safe from
diesel contamination.
The final installed weight of the timer, battery switch and servos was just under 45g. The system is easy to
use and quick to reset. It can be adjusted via the single push button for engine runs up to 30 seconds (at 1
second intervals settings) and a maximum DT time of 300 seconds (at 10 second intervals settings). The
board also contains a potentiometer which allows the travel on the engine cut servo to be adjusted between 0
to 90 degrees. This feature is especially useful as it allows the system to be setup, such that the servo does
not stall by trying to pull beyond the cut out stop point.
Simple pull rod connects to the original Comp Special Cut off – Note Lego men not
necessary for correct operation

9
Timer board mounted inside the fuselage with LED and push switch extended to a plywood panel
Finally, in mid-March a day of suitable weather allowed me to test the system for real. During an outing at
Salisbury plain which was blessed, with almost perfect flying conditions. I managed to complete around a
dozen short trimming flights. On all occasions the engine cut off and DT system operated correctly.
From Keith
Hello Peter. It’s been a hard decision but I have finally decided to reduce as much of my model aircraft stuff
as possible. So here goes with my list of IC engines that I am prepared to sell.
SC25 – New in box un-run
SC40 – In good condition
Irvine 40 Sport – With new Piston and liner, un-run since fitted.
OS Max 40 SF – With new Piston and liner, un-run since fitted.
OS Max LA40 – New in box un-run.
Irvine 61 Sport – Has had little use.
These are all in good or new condition and have not been abused.
I also have a very old Enya 29 racing engine that is a bit battered, it goes like stink but it is a bit noisy. Only
just made the limit on the meter when I flew at Reading. Then there is an Old “Vintage” ED Mk 11
unfortunately before it came into my possession it had the exhaust stacks removed but would be great in a
vintage model.
Kits- Un-Made
Flair SE5a complete with wheels and machine gun extras.
Precedent Fun Fly.
An FVK Mini Spitfire – An early moulded model originally meant for a speed 400 electric motor.
There is also a sport model for a 40 engine similar to a “Space Walker” in design.
Then there is my collection of RCME’s and Radio Modellers going back nearly 40 years which I would be
happy to give away to a good home.
Well you did ask! If you know anybody that might be interested in purchasing any of the above let me
know.
Peter Wallis [email protected]

10

11
Ward’s Wagon by Ron Ward Bowden Trophy P.A.A. – Load winner from Model Aircraft September
1951
When the rules for the
Bowden Trophy P.A.A.-
load contest were
announced the writer
decided to design a model
to conform to the
specification. As this
seemed hardly worth
while for one contest, it
was decided to make the
model suitable for (a)
P.A.A.-loacl, (b) duration
contests, and (c) radio
control.
That the Wagon fulfils (a) has proved by its success in winning the Bowden Trophy. Flown without the
dummy pilot it has a good contest performance, but so far it has not been fitted with R/C.
Fuselage
Cut sides from medium-hard sheet. Cement formers A, B and C into position and join sides at the rear,
inserting piece of scrap in between. Insert 3/16in. x 3/4in. pillars and wing platform. Sheet the top of
fuselage and cabin fairing. Cement in 1/4in. sq. bottom spacers.
The undercarriage is sewn and cemented between pieces of 1/16in. ply, backed by 1/4 in. sheet balsa. Now
cement undercarriage and fuel tank into fuselage.
Sheet cover bottom up to door, which is attached to fuselage with a nylon or linen hinge.
Cement diagonal cabin struts, Former D, and celluloid wmdshield in place. Glue nylon round nose for added
strength. Cover with heavyweight “Modelspan” and give two coats of dope.
Wing and Tailpiane
No dihedral bracing is incorporated in the wing— the writer having found from contest experience that in
the event of a crash it is better for the outer wing panel to be knocked off as a whole, than to be broken into
pieces—making quick repair difficult. Cover with Jap tissue, or lightweight “Modelspan.” Give one coat of
dope and one coat of a mixture of 2 parts dope, 1 part banana oil, adding 6 drops of castor oil to 4 oz. of this
mixture.
Engine Mounting
An Elfin 2.49 engine was fitted to the original. Four 6 BA cheese-headed bolts are inserted in the lug holes
and the heads of these locate into recesses in the front former. The engine is held in place with elastic bands.
The nose can be easily modified to suit other engines.
The timer and cut-off valve have been omitted from the plan for
clarity.
The d/t parachute is 12 in. diameter, with a 1 1/2 in. hole in the
centre and is attached by 3 ft. of line.
Flying
If flying th Wagon as a P.A.A.-load model, make all test flights
with the load in position. Use 5 secs. engine run at low revs, for
first tests under power. The climb should he to the right. If the
model turns left on the glide, power may be increased, but stick
to 5 sec. run. Should the model climb and glide to the right be
careful about increasing the power. Use side-thrust if turn under
power is too tight. Adjust turn on glide by means of trim tab.

12
Photos from Peter Renggli, Urs Brand and Urs Rindisbacher
Markus Thalmann
Paul Salvisberg
13
Peter Däppen
Peter Fässler

14

15

16

17

18

19

20

21
Engine photos from Bill Wells

22
Millich .030 ci FI TBR 0.49cc Bore 7.7mm Millich .020 ci SP TBR 0.375cc Bore 7.5mm Stroke
Stroke 11.3mm RPM 8000-12000 Wt 1.7 oz 8.5mm RPM 5000-18000 Wt 1.6 oz The crankcase
is marked on the left side as 030 for economical
reasons the 020 uses the same crankcase as the 030
AM 10 Wt. 3.25 ozs ,bought at the Gildings Auction last November for less than £13

23
From John Mellor
Hi James I enjoyed this month’s Sticks and Tissues as usual and you implied that you are a little
short of content at present so I thought a couple of pics and details of my two little winter build projects
might be of interest. The first is of my Buttercup which I scaled up from the 27” span Fred Reese plan on
Outerzone. I had seen one to the original size flying very prettily at Cocklebarrow last summer and decided
I would give it a go as I needed an “easy fly” hack that would go in the car in one piece – for cold weather
use. Accordingly I had the plans scaled to 52” span by my friendly printer and I got balsa bashing. With a
parallel chord wing and flat sheet tail surfaces it went together pretty quickly and was complete in around a
month. To be honest I nearly abandoned it half way through the build as it looked so ugly with that huge
deep fuselage. However I persevered and when I got the fablon window stickers on it entirely changed the
looks and I got a second wind. From memory ( I’m writing this in my warm office and it’s out in my
freezing model room ) it has a 170 watt motor running via a 40 amp speed controller and total weight is a
little under 2 lbs with 1600 2S cell pack. It is rudder and elevator controlled and originally David
Lovegrove and I were going to install a galloping ghost system in it but we could not get it to work as a push
pull system so I abandoned that and used 9gm servos.
I took it up to my local Cricket Ground to test fly it expecting a real pussycat but I got anything but!! As no
c.g. was shown on the plan I balanced it on the mainspar which is where I start off with most models –
wrong! It staggered off the deck and lurched all over the sky nearly wiping itself out on a post protecting
the wicket. Not promising. It appeared underpowered and the c.g. was obviously too rearward. The answer
was obvious – stick one of my favourite 2200 3S batteries in for both more power and further forward c.g..
This time it flew beautifully and it looks cute in the air. I have now had some 15 flights and I’m amazed
how well it copes with wind. I could have done with the U/C a little further forward as it will ROG but
usually tips over on landing – may be better when the grass is shorter in summer. It certainly looks a bit
different and gets admiring comments from friends at Maidenhead R.M. club.
By the way I have built some spats which make it look even better – should have fitted them for the picture
– but they are not a particularly good fit on the U/C and I am waiting for shorter grass to try them.
Me again James. This is my second winter build project undertaken mostly while my wife was
having a month “down under”. It is a modified Wagtail which is a pretty little model designed back in about
1963 by John Ralph for Galloping Ghost controlling rudder and elevator. I well remember seeing John fly
the original at Grove aerodrome and a very reliable and smooth performer it was on an O.S. Max 15. I built

24
my first one in 2005 for aileron, elevator and rudder as usual using brushless electric and it was a great little
flyer until the speed controller gave out after about 100 flights. The fuselage was a bag of bits but the wing
was unmarked so that went into the loft.
I had kept looking at the wing when I was up there checking my fleet and eventually got it down in January.
I still had the plans I built the model off so I spent 3 weeks of odd moments knocking up a new fuselage and
I am very pleased with the result. I will be testing it within the next few days but hopefully it will fly as well
as my original one. The main differences between John’s original and mine is that I added a panel either
side on the wing to make it 45” span ( to help carry the extra servos etc. ) and lowered the dihedral and
installed strip ailerons but other than that it is essentially similar to the original. I am using a motor of
around 300 w ( I’ve used it in a control line machine some years ago ) with 40 amp speed controller and
2200 3S Lipo and the total weight is 34 ounces. I will probably wait to test fly it before adding final trim.
From John Ralph
Hi James's !! . thanks for your interest in the " Build and Show " Guillows Catalina . I plan to write an
article for Tony Dowdeswell to appear in his magazine " Flying Scale Models " and have already started to
sort out photos which I took when I was doing the conversion.
I have already indicated the main parameters in the recent " STICK AND TISSUE " ( NO 110 ) but more
details will be given in my article for Tony. Meanwhile I have attached a few photos( print copies ) showing
the model frame etc . The kit ribs were used as were the fuselage formers . However the fuselage was fully
sheeted and the wing LE also. Ailerons were fitted so the structure had to be moded to take them.
I spent a long time perfecting the wing tip float retraction and although it works well it is debatable if
anyone would make the sort of mini winch I did to wind it up.!! The ailerons are operated by a single servo
in the centre of the wing but I will suggest that a better modern solution is to put a mini (4gm ) servo in front
of each aileron.

25
I last flew the model on 8 -850 Ma hr- Nimh 's mounted well up in the nose under the cockpit . I planned to
upgrade to a 3S Li Po of similar weight ( probably a 1500 Ma hr. ) but house moves etc. in the last few years
have slowed me down a bit!!
I am becoming what I used to sarcastically call a " Cheque Book Modeller " !! . I was ,I believe , the first
down here to fly a scale sea plane when I electrified a " CANADAIR CL215 " ( SEE RADIO MODELLER
AUGUST 1995 ) to take advantage of a small lake near our home a couple of miles from Lands End . That
was seen by my close friend , Geoff Andriesson who soon followed suit and has subsequently designed and
built several innovative scale sea planes and flying boats . The latter includes a 6FT SR. PRINCESS and
very recently a SUNDERLAND of similar size.
My " Decent " !! into " Cheque Book Modelling " was partly triggered by the death of my wife in 2011 and
my move from our idyllic location at Porthgwarra where I could develop and fly my own creations , plus
building a trimming vintage free flight models to fly " Up Country " at THE SAM 1066 " events at Middle
Wallop . Sadly the latter seem to be winding down and I rarely fly a FF model except indoors . Outdoors I
still fly my old Canadair but ,and here is The "Cheque Book " connection , I have a DYNAM CATALINA "
which needed very little to do before I was able to fly it off and on the water . It is made from MPO but is
well thought out and is very nice to fly . The tip floats are fixed on this one though! I also have a similar E-
FLITE Mosquito and several mini RC scale models.
As usual I have " Gone on " a bit but that's what comes of spending over seventy years as an aeromodeller . I
have a lot to remember !!

26

27
From Mike Spencer - Blue Pants
Decent windy weather today for outside sanding of leading edge and other blockwork. Latest creation is a
new build CL Blue Pants for Alan Bond, now nearly finished as you see, attached. As well as Alan's
commission in exchange for some electronics wizardry he is doing for me, I undertook this build as a test
piece for a potential RC conversion that now looks quite feasible at the original CL size for about 180W and
a 3S 1300 LiPo. Havingndertook this build as a test piece for a potential RC conversion that now looks
quite feasible at the original CL size for about 180W and a 3S 1300 LiPo. Having now flown my own
Vintage IC to ECL conversion using about 200W (very lively with that and up to 250W available) I am
satisfied that the power is suitable. The CL Elevator is huge so it would be sensible to reduce that a bit for
RC !

28
Loads of space inside and the removable top hatch will go all the way back to middle of wing. I have
madefuz slightly wider than the plan and with (removable) torque-tube undercarriage to maximise the inside
storage space. I could easily get a LiPo larger than the 1300 in there.
All parts except rectangular formers (adjust to taste according to fuz width required) are CAD drawn, cut
and validated so, if anyone else wants a set of ribs/fin/stab/fuz sides/fuz doublers, you know where to come.

29
30
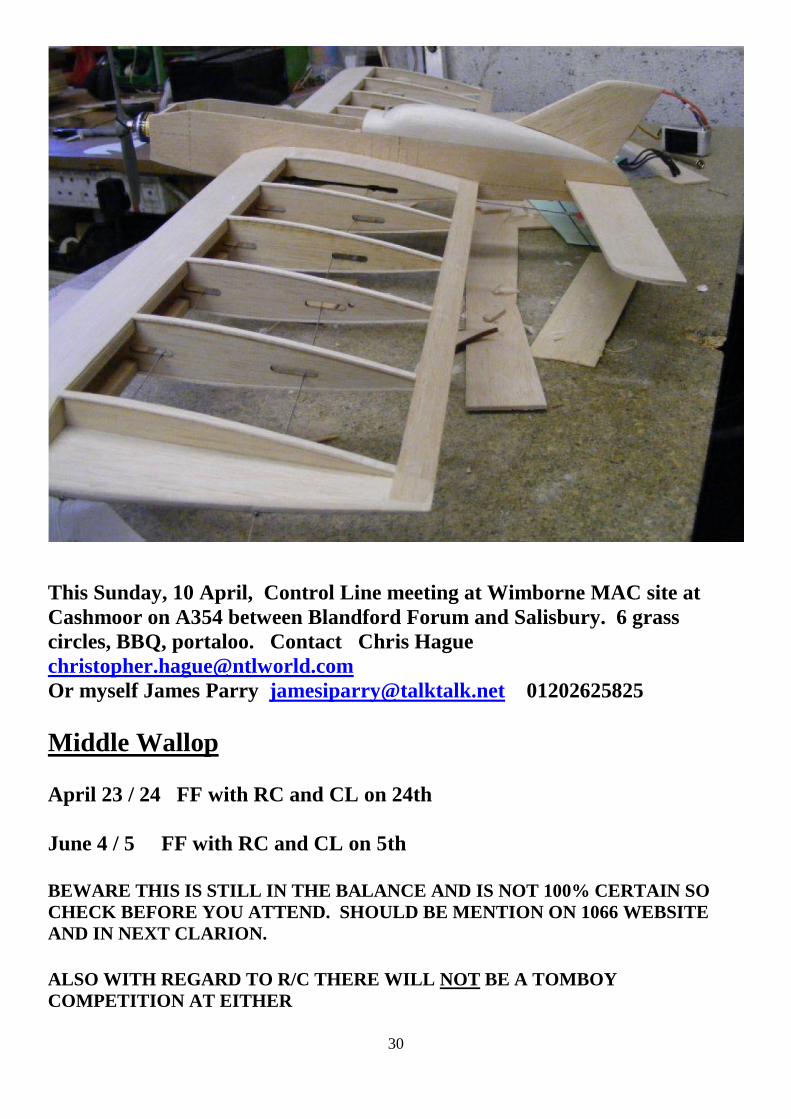
This Sunday, 10 April, Control Line meeting at Wimborne MAC site at
Cashmoor on A354 between Blandford Forum and Salisbury. 6 grass
circles, BBQ, portaloo. Contact Chris Hague
Or myself James Parry [email protected] 01202625825
Middle Wallop
April 23 / 24 FF with RC and CL on 24th
June 4 / 5 FF with RC and CL on 5th
BEWARE THIS IS STILL IN THE BALANCE AND IS NOT 100% CERTAIN SO
CHECK BEFORE YOU ATTEND. SHOULD BE MENTION ON 1066 WEBSITE
AND IN NEXT CLARION.
ALSO WITH REGARD TO R/C THERE WILL NOT BE A TOMBOY
COMPETITION AT EITHER

31

32
Pipi by P C Koorn a tandem wing glider from Model Aircraft January 1952
Early in 1948, just three days
before the first national meeting
in Holland for unorthodox
gliders, I decided to build a
tandem wing glider. I already
had a pair of suitable wings and
designed Pipi round them, the
model being completed within
two days.
The purpose of the meeting was
to select the Dutch team to
compete in the tailless contest
at Lyons in France, and I had a busy day flying my two tailless models into 1st and 3rd places, while in the
tandem event my brand new model was placed second. A few weeks later Pipi established a Dutch hand-
launch record, with a flight of 1 min. 30 sec.
The model performed very well during 1949, eventually setting up a new Dutch tandem-wing record with a
distance of 15 km. (6 min. o.o.s.), and nearly beating the tandem towlaunch record which was 8 min.
Pipi disappeared this year, and I have had no time to build another as I am in the Royal Dutch Navy and
there is plenty of work to do.
Building
Building is very easy and even a beginner will be able to make a good simple tandem, capable of flights of
1 1/2 min. or more from a 150 ft. towline, without thermals.
Begin by making the wing and tailplane ribs and the fuselage formers. As the fuselage sides are parallel for
their whole length, all formers will be 1 9/16 in. wide. Place the bottom longerons on the building board and
cement the formen in place. When they are dry install the wing tongue and noseblock. Steam the top
longerons to shape and cement to the formers. Be very careful with the construction of the tailplane rests
(R), and do not forget the anchoring dowels. The towhooks are cut out and cemented to the 1/16in. ply
which forms the bottom of the fuselage. To complete the fuselage construction, build up the fin and fit it into
the 1/8 in. sheet rear fuselage decking.
Wing
Build up the tips from three layers of 1/8 in. balsa, cutting the sections as on the plan, so that the layers
overlap at the joints. Take care when cementing the wing boxes in position for, like the tailpiane rests, the
incidence depends on their accurate placing. Reinforce the wing roots and boxes, and sheet in the wing
between ribs 1 and 2 with the thinnest ply obtainable. When the structure is complete and dry, sand the
leading edge and tips to a smooth contour.
Tailplane
Build the tailplane in one unit for strength, taking care with the reinforcing of the centre section. The fixing
dowels of the underfins must be a tight fit in the paper tubes. Form the tips from soft balsa blocks, sanded to
shape.
Covering
Cover the whole snodel with Modelspan and give it three coats of dope. The colour scheme of the prototype
was bright red with black trimmings.
Flying
Choose a calm day for test flights. Add lead shot to the ballast box until the e.g. is in the right place. The
model ffies fairly fast, and, if on launching it dives, launch again with a faster throw. If it still dives, pack up
the tailplane T.E. until correct trim is obtained. Should the model stall, add more ballast in the nose. For
circling install a small trim-tab on the upper surface of the wing, 1/3 in. From the T.E. and 3 in. from the tip.
Swinging on the line can be cured by moving the towhook rearwards.

33
From George Stringwell
Herewith some photos of the latest build , this really IS "sticks and tissue" being a one and a half times scale
up of the Earl Stahl rubber scale Interstate Cadet, which makes it 42 inches span and a surprisingly hefty
model. Power is a 60 watt out runner on a 2S 850 watt lipo, radio is rudder and elevator plus throttle of
course. It weighs in at just under 16 ounces and is covered in tissue (Esaki Liteflite green on the fuselage
and (hoarded) heavyweight Modelspan white on the wing and tail) over 38 micron document laminating
film. In one of the photos you can see it covered in the doculam before applying the tissue. The
combination of the doculam and heavyweight tissue, plus three coats of nitrate dope, produces a finish
which could truly be described as "bullet proof"!
My aim was to produce a model which retained the "ethos" of a rubber scale model but would be a practical
park flyer. I reduced the tail surfaces to the alternative scale outlines shown on the original Earl Stahl plan
and then spent a lot of time looking at them and worrying that they might be too small! However, the CG
has come out well forward (27%) and looking at it on the graph it would seem to have an acceptable static
margin, so hopefully it won't turn out to be too much of a handful when the weather decides to play ball and
produce a calm evening for test flying.

34

35
From Dan Mellor
Hello! Someone asked about the Bonnacon plan on S&T a while ago. I did reply, or at least meant to, saying
I had the plan. I've since seen it's still available from the current owners of the APS plans archive. This is my
recently completed example. It's a design I've wanted to build since it was published 20-odd years ago, but
only just got round to. Irvine Mills powered and I'm not looking forward to starting. I think the port fin may
be an early casualty...

36

37
Red Swan by Henry Tubbs from Model Aircraft Janaury 1952
The most important factor in
the design and construction
of a successful Wakefield
model is the obtaining of a
very favourable weight-ratio
of airframe to motor. In the
prototype of Red Swan the
all-up weight came to no
more than 8 ½ oz., of which
43/4 oz. was rubber (16
strands of 1/4 X 1/24 in.
Pirelli). This 3 3/4oz.
airframe was only achieved
by very careful selection of
materials, and attention to
small points, such as lightly
sanding all wood before use.
The fuselage is conventional in construction, but take care to select four matched longerons. Small 1/16 sq.
braces are cemented across the angles between the spacers to increase rigidity. Cotton bracing is also used,
but care should be taken that this does not twist the fuselage out of alignment. Start at the rear end with one
thread at each corner, and work towards the nose. It is important to note that the Cotton should be just taut
so that it will tighten slightly when doped.
The wing ribs are made in the usual way for a straight-tapered wing. Cut root and tip templates from ply,
sandwich the appropriate number of rib blanks between them and sand the bundle down to shape. Care
should be taken in tapering the L. and T.E. and spars in order that pairs are identical.
The wings were made in halves for ease of transport. but there would be a small saving in weight if a one-
piece wing was used.
Fin and tailplane ribs are made as the wing ribs. The spars are fitted after the ribs have been assembled with
the leading and trailing edges. Cut the tailplane tip fins from 1/16in. sheet and when cemented in place,
sand them until they line up with the fuselage underfin, thus relieving the tailplane of any weight carrying.
The fin is located in position by a hole in the centre of the tailpiane and a guide at the rear. The hole is
slightly off-centre to give some turn, a trim tab being fitted for fine adjustment. A normal tip-tail D/T is
used.
If two-piece wings are used, strips of Sellotape over the join will keep them together and take some strain
off the dowels.
A rubber retainer is fitted over the protruding end of the fin
dowel, to prevent it coming out in flight.
The monowheel undercart should be such that there is 13/4 in
clearance between the prop. tip and ground, in the R.O.G.
position.
Red Swan should be trimmed to fly in fairly tight R H circles
under power. the circles opening out slightly on the glide Side-
thrust will have to be adjusted to suit different power. Down-
thrust is built in.

38
By Dave Bishop of DB Sound.
The first show for this 2016 year was held at the historic Battle of Britain RAF Kenley airfield in Surrey on
Saturday March 19. The event was organised by the Kenley Friends Association with help given by some
exact scale radio controlled model aeroplanes being demonstrated by the Caterham, Croydon and Sevenoaks
clubs from 12midday until 4pm. The Portcullis club was open for hospitality and form there conducted
tours were available all day long at that place for visitors to be shown what happened some 75 years ago
before, during and after the war.
We, model flyers, all arrived there and set up what was to be needed for the 12midday start to the
accompaniment of a bitter cold overcast day with a strongish wind blowing in the "right" direction as far as
crowd safety was concerned. One good thing was that some excellent toilets had been supplied and despite
the (not at all) good flying conditions, there was a goodly crowd that came to see what was going on.
Another thing that was good for me as the presenter, was that the chaps had brought along a nice lot of
aeroplanes for the static and flying displays throughout the afternoon. The standard of radio controlled
piloting nowadays is so good that any crowd can see a model in the sky, no matter what the weather seems
to throw at us. National and European star Mike Williams opened the show with his Extra 300 and amazed
the watchers with his "normal" gifted set of aerobatics and he was followed by the main host James Gordon
flying the DH60 Gypsy Moth scratch built by the well known Brian Rice. The Moth was powered by a
Laser 150. Don Coe flew his Old Warden winner DH Moth as only maestro Don Coe does, which is so
scale in every detail that all judges have a hard time judging this beauty. There was some cracking flying
done by an Acro Wot with 4 cells doing the pulling work by Neil Wallis. There is a new young gifted
designer and kit manufacturer, Gavin Barden, who flew his doubled up Junior 60 with a 103" wingspan that
just poodles it's way around the skies for seemingly endless hours of relaxed flying on rudder/elevator
controls and a Saito 65 popping away up front. A superb massive Super Cub was also beautifully flown by
Neil Wallis powered by a big ASP twin cylinder motor which both looked and sounded, just perfect. There
was a very nice Thunder Tiger powered Ripmax Jive flown by a Caterham club member Shaun Dale in his
first public show after gaining his B certificate. That was followed by a Outlaw delta powered by a Irvine 36
that went flew like a rocket by Mike Williams. It belonged to Rod Hunt the treasurer of the Croydon club.
Other aeroplanes were a Bowers Fly-Baby that has been flown publically at Old Warden many times by
James Gordon, a vampire foamy by Gavin Barden another O.W. performer and a Wot4 flown by Gavin's
son Mathew aged 8. One of the cheapest kitted aeroplanes by Mr Barden is named the Equaliser and this
latest design of his is priced at just £45 did a flying display. Presently it is a "special" as a fun flyer and your
scribe was given the job of judging the best built one out of a whole number of these models in various
stages of undress at a Caterham Club night. These will be on sale at Old Warden and other shows and I am
sure that there isn't a cheaper R/C model to beat it for value for money. The Croydon club's chairman Peter
Royalle, flew both a Spitfire and a Hurricane in a good display which was just right for that event. There
was a number of static models on display including a very nice B17g Fortress, a BE2 by James Gordon, a
Texan and a Flair Magnatilla in German markings which is the "norm" with this particular aeroplane.
Another high speed flying job was flown by Mike Williams named Super Zoom. The 4 hours simply flew by
(if you can excuse the pun) and considering the conditions, the team did a great job in a very nice
atmosphere and well done James Gordon and those who helped him make it all run so smoothly. Most of
the attached pictures were taken by the very nice son of the famous air show arranger Rod Dene, named
Ben, and many of his pictures were put onto the Internet for all to see.
Coming up Shows that are a "must go to" are
The first 2016 Modelair event at Old Warden is on May 14-15 which is the annual Mayfly and it features the
Ron Moulton memorial trophy along with a SAM35 and Ebenezer events being held there over that
weekend. The three annual Modelair Old Warden events are run by the hard working team of Ken and
Sheila Sheppard. Mike and Joan Reynolds both ran the trade line for years which started when they ran the
original largest (reputed) model display show in Europe for many years at RAF Halton, which made an
awful lot of money for the RAFA funds. Nowadays Old Warden modelling events are not "shows" but it is
the place to meet and catch-up chat with everyone that you might have known in past aeromodelling years.
The main thing is to bring along a model of basically any sort to fly where there are areas arranged for free
flight, control line, carrier deck landing, vintage, speed, aerobatics and scale. There is a lot more of radio

39
assist being done around that "free flight" area as well and its quite amazing how many Keil Kraft rubber
powered designs have been modernised with small electric motors controlled by and micro radio receivers
servos. Another "different" thing there is the tethered car racing pits area with IC motors sounding great as
they whiz around a mini Brooklands. And there is the radio controlled area which has nonstop flying under
the auspices of the nicest line up of flight line helpers (with no more embarrassing shouting at pilots) you
could ever wish to meet. There is still a Tx Control tent (again manned with the friendliest helpers) because
Old Warden encourages the use of 35 MHz and pegboard and you'd be surprised just how many of them
there are who are perfectly satisfied and happy with clipping on a peg to their transmitter aerials. There is a
special fun time at Old Warden which is an annual aim to get another record total of modellers with their
Ebenezer models, which is a hoot. The youngsters also have a building and flying a model competition,
which is great for encouraging newcomers into our sport. To top it all there is the line-up of traders and its
worth putting a few quid away (if you can afford it), because not only are there some super bargains to buy
but a lot of boot sellers who I promise you will have just that particular scoop you might have been looking
after for years going at "silly money". In particular I enjoy seeing most of the attending traders taking time
out from their stalls, to fly their different sorts of modellers there and just a look at their faces proves to
everyone just how much they enjoy and love their hobby. (I am sure that is exactly what Ken Sheppard has
in mind when staging Old Warden's model flying nowadays.) Electric flying is permitted for campers at the
end of the normal days flying at 5pm after the full size aeroplanes have come back home to their hangers. If
you do happen to arrive early in the morning before 10am you will see (and possibly photograph) some of
the most beautiful full size aeroplanes taking off to appear elsewhere at different shows in the country.
There are some 40 plus full size aeroplanes hangered and stored there of which some are the only ones in the
whole world. Also there are some very old and interesting vehicles as well, so take along your cameras to
record them for your own album. The best full English breakfast is there in the restaurant as well as one of
the best bookshops on aeroplanes I have ever seen. There are some very nice walks as well as a good
children's play area. As I have said, Old Warden gives me special "vibes" and has done for over 70 years,
that I just cannot explain. But one thing is for sure, and that is, it's a "must go to" place, with full camping
available for the whole weekend.
More events for you diaries.
June 4 - 5 at Long Marsdon a Traplet Publications sponsored event with some of the best show pilots from
around the world demonstrating the latest and greatest aeroplanes ever. Bring a fisherman's folding chair
with you , sit back along the long flight line with your sandwiches and drink and be thoroughly entertained
each day. There are plenty of excellent toilets and stacks of friendly traders and I will do my best to keep
everyone informed through my microphone as to what is going each day.
June 17 - 18 -19. Weston Park annual show at Telford where everyone meets everyone. Bring along a model
as there is flying in the evening.
June 25 - 26 Wings & Wheels at North Weald aerodrome and I'll be there with my microphone to say
goodbye to Jane Stephenson after so many years of her organising excellence but we have been assured that
the show will go on which is very good news. Sadly there is no flying after the day show at this event but
there is very good entertainment laid on for everyone during the evenings. There is the biggest market to see
on the Saturday which sells almost everything you could wish to buy.
July 23-24 Old Warden Scale weekend .
September 24-25 and the last Old Warden's Modelair event with the Festival of Flight and the special "Vic
Smeed" memorial day plus anything and everything Vintage. Belair will be at Old Warden and he will have
all of the Vic Smeed models that will fit the bill for you to build before the third and final for 2016,
Modelair event.
October 1-2 Ragley Hall this event replaces "Weston Park in the Dark" show and will be run by Steve
Bishop and his team.

40
Tiger Moth that was flown at RAF Kenley on March 19 -2016 by Roger Godley
Don Coe's, "Tiger Moth" with unbelievable scale details.

41
Mike William's, "Extra" show stopping performance always.
Kit designer newcomer young Gavin Barden with his kitted "Fusion" at £80 balloon bursting.

42
Neil Wallis's "Acro Wot" powered by 4 electric cells.
Gordon Faithfull's "Edge" gave a knockout performance.

43
The doubled up "Junior 60" of Gavin Barden's is kitted at 103" wingspan Saito 65.
This "Super Cub" of Neil Wallis sounded great and flew beautifully with its ASP 160 twin.

44
This very old "Bower's Fly-Baby" belongs to James Gordon and is powered by an OS91
Another shot of Gavin Barden's Doubled up "Junior 60".

45
This "Lancaster" is a massive electric powered job and did static engine runs that sounded great.
One of the prettiest "Jason's" "Gypsy Moth" ever, by genius designer Brian Rice and flown by Jams
Gordon. A Laser150 supplies the power.

46
This very quick "Outlaw" delta powered by an Irvine 36 belongs to the Croydon club's treasurer Rod
Hunt and demonstrated by Mike Williams.
This "Vampire" is an electric fan powered foamy by Gavin Barden. Very quick in the air.
A new "club build" model is be designer Gavin Barden called the "Equaliser" and possibly one of the
cheapest aeroplane kits to buy, ever.

47
James Gordon and his "BE2" at 75" wingspan and powered by an RCV 91 pictured at Old Warden.
All of the team of flyers who "made the day" at RAF Kenley on Saturday March 13.

48
I nearly forgot again!
25 February I had a chance to have a fly at Epsom Downs so here are the photos, the weather was grey and
bloomin cold so the three of us that is me, Tony Tomlin and Derek Foxwell only spent an hour and half up
there. No one else truned up. I meant to include last month but me brain did not respond at the right time.
Derek’s Coquette
The glider is Tony’s L‘ibelle the foam Fun Cub in the foreground was flown really well by

49
That was close, very very close, Derek’s Chatterbox
Derek’s Chatterbox contact him if you want a kit at [email protected]
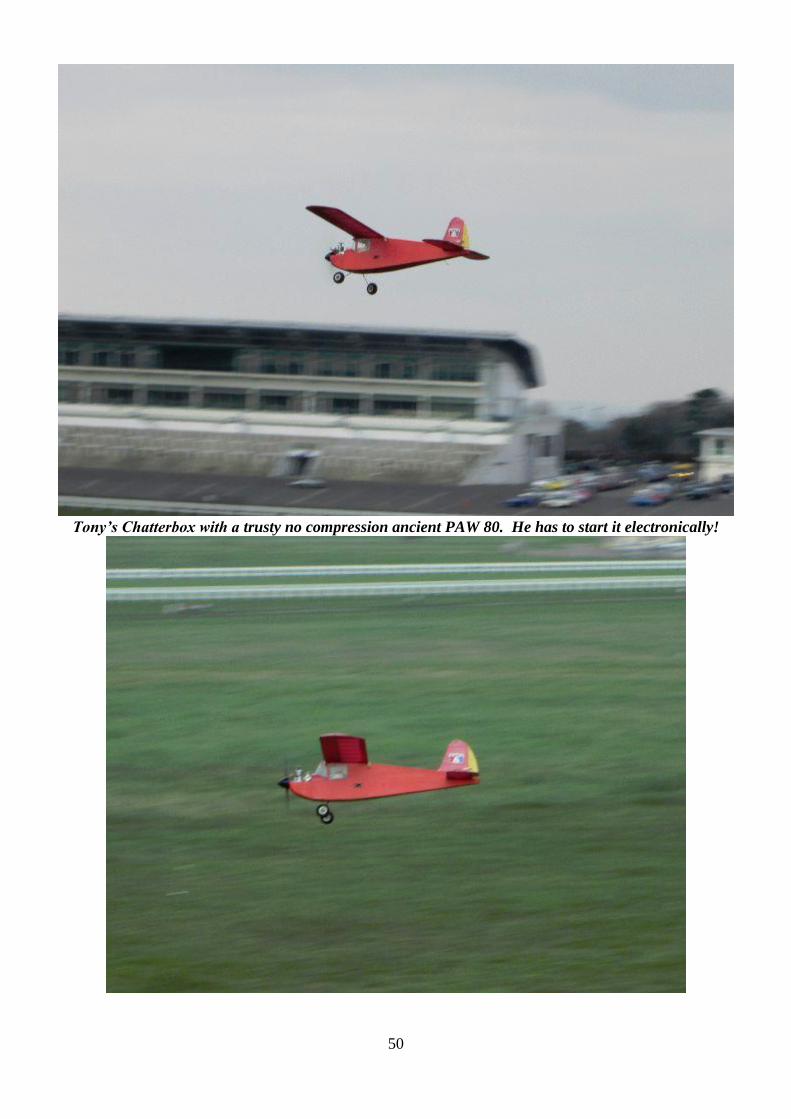
50
Tony’s Chatterbox with a trusty no compression ancient PAW 80. He has to start it electronically!
51
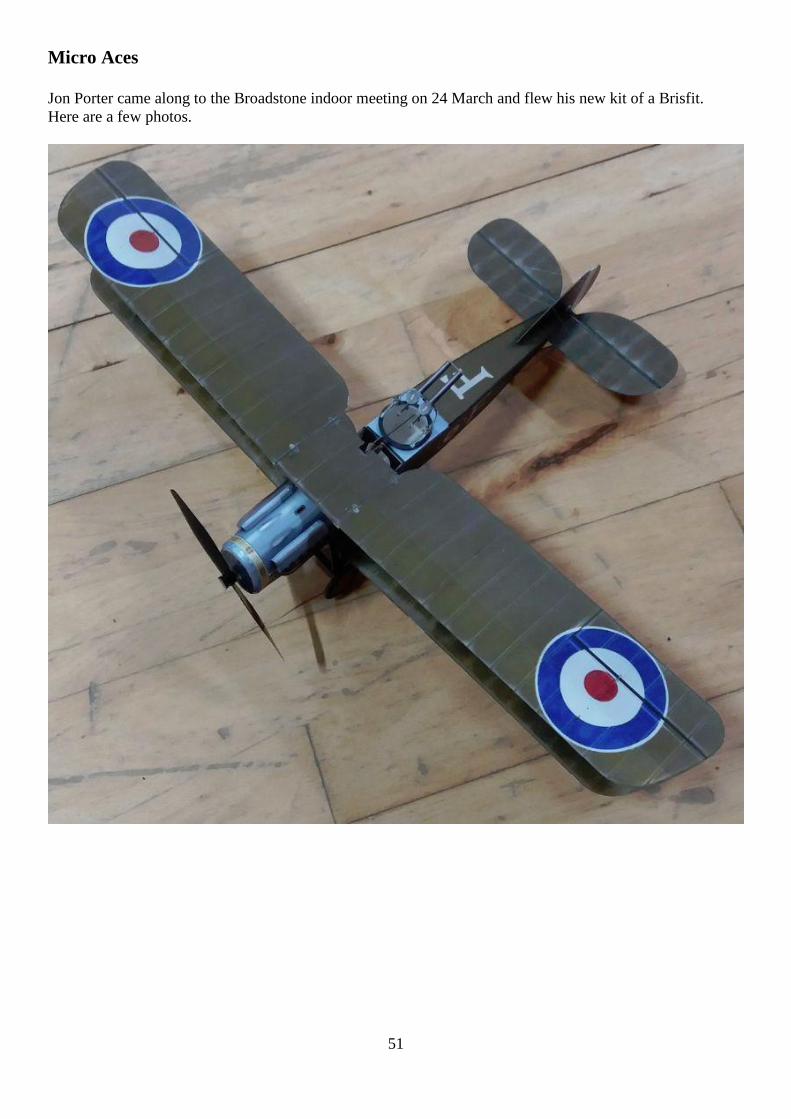
Micro Aces
Jon Porter came along to the Broadstone indoor meeting on 24 March and flew his new kit of a Brisfit.
Here are a few photos.

52
Jon Porter displaying his model. The kit should be available
soon.
http://microaces.com/
53
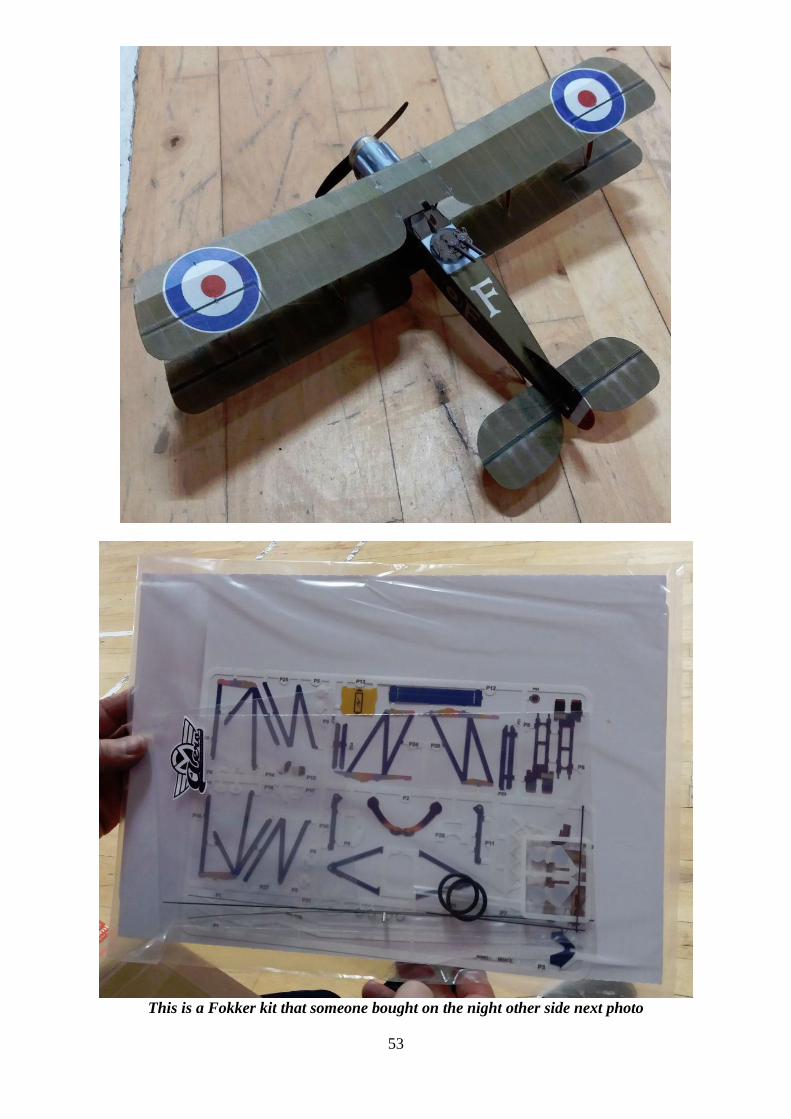
This is a Fokker kit that someone bought on the night other side next photo

54
Control line at Wimborne MAC
10 April Sunday
9 October Sunday
Eastbourne vintage RC
Sunday 18th September
Cockelebarrow
The dates for Cocklebarrow have been confirmed as 10th
July; 21st August and 2
nd October.

55
SHILTON
VINTAGE (FLY IN)
BLACKWELL FARM
Saturday 28th and Sunday 29th May 2016
Details and directions for the Shilton Vintage meet on 28th
and 29th
May 2016.
Flying all day Saturday and Sunday.
Caravans and camping available, water on site and port-a-loo.
BMFA members only. Proof of Insurance required.
The Bar-be-cue will be running on Saturday evening from 7 p.m. Bring your sausages and burgers and
enjoy an evening with like-minded people.
ARRIVALS FOR CARAVAN AND CAMPING AFTER 2 P.M. FRIDAY.
You will need to pre-book your pitch as we are limited to 10 caravans only. The site will be well sign
posted with SAM35. Post code OX18 4AP
Caravans/Camping £10.00 for weekend
Flying £5 per pilot.
Local facilities are available in Carterton 3 miles away.
CONTACT: Nick Blackwell Tel: 01285 657610 (evening only)
Email: [email protected]
OR Derek Foxwell Tel: 0208 647 1033
Email: [email protected]
OR Boycote Beale Tel 01993 846690
Email: [email protected]
Directions:
By road from the north:
Follow the A40 to Burford, at roundabout take the A361 toward Swindon, at junction for Cotswold Wildlife
Park turn left onto Hen and Chick Lane. Follow lane until it bears left, here turn hard right and take the
track until it ends, this is the airfield.
By road from the south
From Swindon take the A361 to Lechlade and Burford. 3 miles before reaching Burford at junction for
Cotswold Wildlife Park turn right onto Hen and Chick Lane, then as above.
(When you visit Blackwell Farm – you must try their honey – it’s bloody marvellous )

56
DMFG near Blandford Forum RC vintage
1 May Sunday Vintage RC
Contact James Parry [email protected] 01202625825
Peter Wallis
Hi James – if you need a ‘filler’ I have written 3 articles on the build on this 1945 Adamcraft – will send you
the first missive plus photos .
The Adamcraft
For as long as I can remember I’ve always wanted to build an Adamcraft 18” dinghy .
Dare I say I was first given an Adamcraft kit in 1948 but that fell by the wayside as it really was beyond my
capabilities at the time and building one now I can easily see why – cutting 24 planks out from printed 1mm
ply was beyond me however things have changed .
I am a member of the ‘Vintage Model Yacht Group’ and happened to read in the club magazine ‘Turning
Pole’ that a certain Graham Potts had a kit that was available so a deal was struck and the kit in its original
spiral wound tube dated 1945 found its way to my workshop .
Once again I was confronted with those 1mm printed ply sheets but a certain Peter Mitchell another builder
within the Frensham Model Yacht Group has a band saw and he was able to help me out with those planks
thankfully .
The other big change that has effected all hobbies is the availability of really advanced adhesives which I
have been using in my other hobby building vintage model aircraft so a quick look at
www.deluxematerials.com website gave me just what I wanted with a curing time of under 10sec’ . This
would make positioning those planks so much easier although I have to say each plank was a fight and I
could only manage three at a time and had to be in the right frame of mind.........................
The build of the Adamcraft is identical to building a clinker dinghy starting with a jig which once all the
planks are in position can be discarded .
I would be delighted to hear from other owners of these little craft and perhaps we could exchange our
experience and possibly meet my email is [email protected] .
The Adamcraft will have r/c and I will keep you updated as the build continues...................................... .

57

58
INDOOR MODEL FLYING 7pm to 10pm
FREE FLIGHT ONLY
ALLENDALE CENTRE,
HANHAM RD. WIMBORNE BH21 1AS
FREE CAR PARKING IN PUBLIC CAR PARK
IN ALLENDALE RD
COMPETITIONS incl GYMINNIE CRICKET & SERENE LEAGUES
ALL FLYERS MUST HAVE BMFA INSURANCE FLITEHOOK NORMALLY IN ATTENDANCE
Adult Flyers £5 Spectators £1.50
CONTACTS: JOHN TAYLOR 01202 232206
All dates are Tuesdays
26 April 2016
24 May
28 June
26 July
23August
27 September
25 October
22 November

59

60
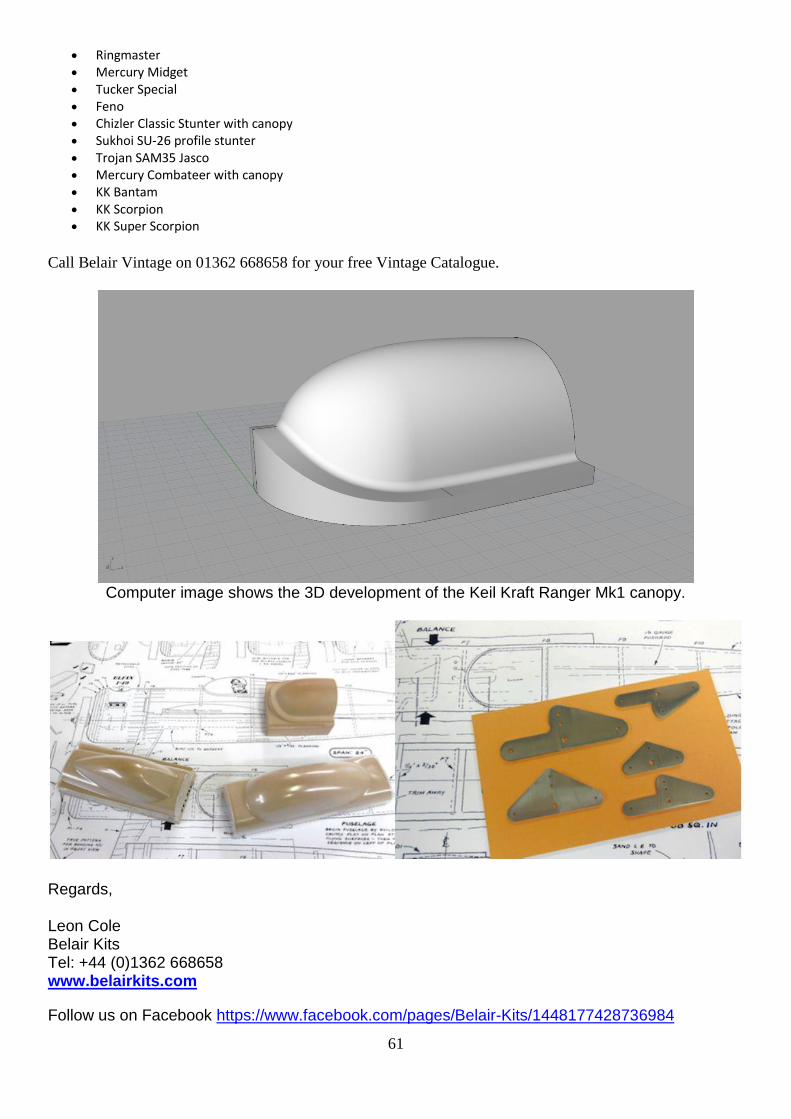
Belair Vintage is pleased to offer canopies for many of your favourite Keil Kraft, Mercury and vintage
designs. Our moulds are designed in Rhino 3d using the plan’s original outlines and profiles, then machined
on a 4 axis Roland CNC mill, then vac-formed in house. No longer will you spoil the look of your KK Pacer
or Ranger with a generic canopy, when you can use the original canopy.
To complement the canopies, we are also producing original style bellcranks for many vintage Control line
models.
Our latest list of Vintage designs has also grown and now includes -
All American Stunter - De Bolt inc plan KK Phantom - later version KK Phantom - early version KK Phantom Mite - 16” Princess Blue Pants FW-190 Focke Wulf CL 33” span Veron Veron Panther 41” span Veron CL Stunter MkII 30” span Mercury Team Racer MK1 Philibuster 28” span Boogie Woogie AM Icarus - Coasby AM Peacemaker 46” inc plan Ringmaster Profile 42” inc plan Rascal Senior Monitor Supermarine Spitfire Mk XII Parts Set for AM1688 Taurus - Coasby Thunderbolt - Morley Veron Nipper Vickers Viscount scale model Voetsak 1946 - Ron Moulton Weatherman - Cyril Shaw Speed CL original Weatherman - Clubman profile inc hardwood Skiffler - D Platt with canopy MiniBuster Philbuster Veron Combateer Peacemaker - Profile and built up with canopy Spectre KK Chizler Time Traveller KK Ranger Mk1 & 2 with canopy KK Pacer with canopy Spitfire 45” Pentland design CL776 Humongous Mercury Mac with canopy
61
Ringmaster Mercury Midget Tucker Special Feno Chizler Classic Stunter with canopy Sukhoi SU-26 profile stunter Trojan SAM35 Jasco Mercury Combateer with canopy KK Bantam KK Scorpion KK Super Scorpion
Call Belair Vintage on 01362 668658 for your free Vintage Catalogue.
Computer image shows the 3D development of the Keil Kraft Ranger Mk1 canopy.
Regards, Leon Cole Belair Kits Tel: +44 (0)1362 668658 www.belairkits.com
Follow us on Facebook https://www.facebook.com/pages/Belair-Kits/1448177428736984

62

63
From Martin Dilly
Crowd On & Risk It is the story of one of Britain’s oldest and most successful model flying clubs, Croydon
& District Model Aeronautical Club, founded in 1936 and not to be confused with Croydon Airport MFC,
established some forty years later in the mid-1970s. Different club, different name.
Some years ago the late Keith Miller compiled a history of the club from 1936-1960, and now Martin Dilly
has produced an extended 73 page edition, covering the Chobham Common and Bassingbourn years and
bringing the story more up-to-date. As well as Keith’s photographs there are many additional ones that
convey the atmosphere of free-flight when entries of well over a hundred were common in club-run contests,
along with the memories of many of Croydon’s past and present members.
24 Croydon members have represented Britain in all the free-flight classes plus a few CL and RC ones, a
unique record, and they have had no less than 52 plans published in the magazines over the years. The club
has also launched a number of people into some pretty serious aerospace careers, ranging from movie stunt
flying and commanding the Battle of Britain Memorial Flight to pioneering supersonic wind tunnel
techniques that led to Concorde and the Tornado.
Crowd On & Risk It is available from Martin Dilly ([email protected]) or phone/fax at +44 (0)208
777 5533 or 20, Links Road, West Wickham, Kent BR4 0QW at just £8.00, UK cheques or PayPal