Embed Size (px)
Citation preview

STREET SMART
by Mike Brown
22 GEARS January/February 2007
Hard Hitting: How to Deal with
Shifts
Figure1
22-mike_brown.indd 2222-mike_brown.indd 22 12/27/06 11:26:10 AM12/27/06 11:26:10 AM

GEARS January/February 2007 23
WWow! Is this transmission ever shifting hard! This is how we all wanted our
transmissions to shift when we were cruising Main Street on Friday and Saturday nights, back when we were in high school. We’d actually have paid to make our transmission smack into gear like this: The harder it shifted, the better!
But most customers don’t see things the same way we did back then. For some strange reason, they’re happi-est when they can’t feel the transmis-sion shift at all. The first thing that goes through their minds when they feel that crisp, harsh, snap-your-neck-back, hard-hitting shift is that their transmis-sion must have a problem. Weird.
We get a lot of calls on the HelpLine about harsh shifts, on all dif-ferent make and model transmissions. In most cases it all boils down to high pressures. And the reason for those high pressures can vary from trans-mission to transmission. But there are a few basic checks you can perform that are common to all of these units,
regardless of make or model.For our example diagnosis, we’re
going to use a 1992 Ford F-250, with a 7.4L engine and an E4OD transmis-sion.
Check for CodesThe first thing we need to do is
check for codes, both transmission and engine. A lot of the time engine codes are overlooked; a mistake, because some of those engine codes can indicate problems that show up as transmission problems.
Whenever you have engine codes, fix them first. You might not even have a transmission problem. Once you’ve repaired all the codes, drive the car again; if the harsh shift is gone, you’re
done. If the harsh shift is still there, or if there weren’t any codes in the first place, you’re ready to move on to checking the transmission.
Check the PressuresIf there are no codes in memory, or
you corrected any codes and the shifts are still harsh, the next step is to check the pressures:1. Connect a 0-300 psi pressure gauge
to the line pressure tap. On the E4OD, that’s on the left side of case just in front of the manual lever (figure 1).
2. Apply the parking brakes.3. Start the engine, and bring it to
normal operating temperature.4. Check line pressure in all ranges,
Selector Lever Position Idle psi WOT Stall psiPark / Neutral 50-65 (Not Applicable)Reverse 70-100 245-290Overdrive / 2nd 50-65 165-185Manual 1 70-100 175-210
Line Pressure Specification
Figure 2
22-mike_brown.indd 2322-mike_brown.indd 23 12/29/06 1:31:42 PM12/29/06 1:31:42 PM
24 GEARS January/February 2007
and compare those pressures to the factory specs (figure 2). One important consideration when
checking pressures is whether the trans-mission had a shift modification kit installed. If someone made changes to the valve body, the transmission might have a different pressure regula-tor spring than the one that came from the factory; that’ll change the pressures across the board.
Assuming the valve body hasn’t been altered, you can usually expect line pressure to be about 60-80 psi at idle. With that in mind, let’s look at the pressure readings on this transmission:
We had 125 psi at idle in Drive, and over 240 psi at WOT. According to the factory chart (figure 2), that’s high. There’s a good chance those high pres-sures are what’s causing the harsh shifts. Now we need to determine whether these high pressures are being caused by a computer command or an internal transmission problem.
Checking the EPC SignalIMPORTANT — There are many
procedures for checking EPC electri-cal control signals. It’s important that you follow this procedure precisely for checking this solenoid; otherwise, your readings may not correspond to the specifications listed. For more details on the different procedures and why one may be more useful than another, check out this issue’s Pushing Electrons.
To check the control signal to the EPC solenoid, we’re going to go right
to the source:• Unplug the connector at the sole-
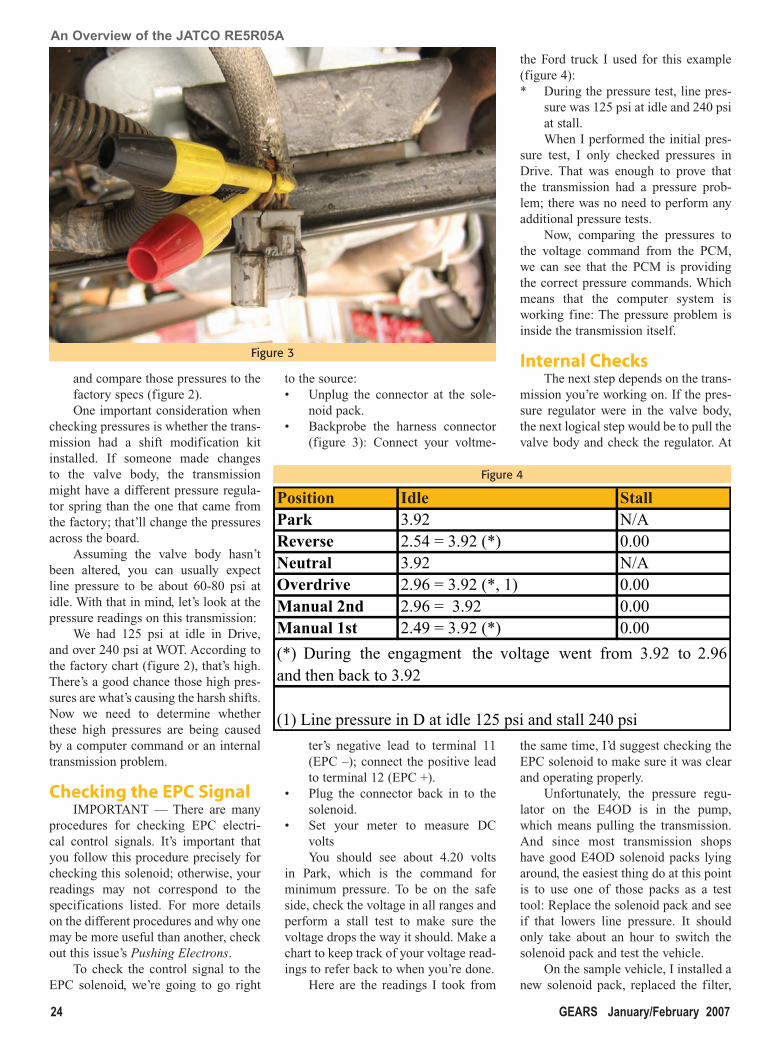
noid pack.• Backprobe the harness connector
(figure 3): Connect your voltme-
ter’s negative lead to terminal 11 (EPC –); connect the positive lead to terminal 12 (EPC +).
• Plug the connector back in to the solenoid.
• Set your meter to measure DC voltsYou should see about 4.20 volts
in Park, which is the command for minimum pressure. To be on the safe side, check the voltage in all ranges and perform a stall test to make sure the voltage drops the way it should. Make a chart to keep track of your voltage read-ings to refer back to when you’re done.
Here are the readings I took from
the Ford truck I used for this example (figure 4):* During the pressure test, line pres-
sure was 125 psi at idle and 240 psi at stall.When I performed the initial pres-
sure test, I only checked pressures in Drive. That was enough to prove that the transmission had a pressure prob-lem; there was no need to perform any additional pressure tests.
Now, comparing the pressures to the voltage command from the PCM, we can see that the PCM is providing the correct pressure commands. Which means that the computer system is working fine: The pressure problem is inside the transmission itself.
Internal ChecksThe next step depends on the trans-
mission you’re working on. If the pres-sure regulator were in the valve body, the next logical step would be to pull the valve body and check the regulator. At
the same time, I’d suggest checking the EPC solenoid to make sure it was clear and operating properly.
Unfortunately, the pressure regu-lator on the E4OD is in the pump, which means pulling the transmission. And since most transmission shops have good E4OD solenoid packs lying around, the easiest thing do at this point is to use one of those packs as a test tool: Replace the solenoid pack and see if that lowers line pressure. It should only take about an hour to switch the solenoid pack and test the vehicle.
On the sample vehicle, I installed a new solenoid pack, replaced the filter,
An Overview of the JATCO RE5R05A
Figure 3
Position Idle StallPark 3.92 N/AReverse 2.54 = 3.92 (*) 0.00Neutral 3.92 N/AOverdrive 2.96 = 3.92 (*, 1) 0.00Manual 2nd 2.96 = 3.92 0.00Manual 1st 2.49 = 3.92 (*) 0.00
(*) During the engagment the voltage went from 3.92 to 2.96and then back to 3.92
(1) Line pressure in D at idle 125 psi and stall 240 psi
Figure 4
22-mike_brown.indd 2422-mike_brown.indd 24 12/27/06 11:26:58 AM12/27/06 11:26:58 AM

GEARS January/February 2007 25
and filled the transmission. A pressure check shows line pressure is still high. In this case, the only choice you’d have left is to pull the transmission, put it on the bench and pull the pump out. Then perform some basic checks on the pump:
Check the pump halves with a straight-edge and inspect the pressure regulator valve and bore for wear. Make sure to check the pres-sure regulator spring; a stock spring will deliver about 9½ lbs of force at working height.
After removing the pressure regulator valve and springs, seat and boost valve. I laid them out just the way they came out of the bore (figure 5). Do you see the problem? Look at the spring seat: It’s upside down. With the spring seat inverted, it shortens the spring travel, to where the spring will deliver 11½ lbs at working height.
That’s a big difference! That’s prob-ably the problem, although we won’t know for sure till the transmission’s together and back in the truck.
Verifying the RepairNow it’s time for the moment of
truth, with everything in place and tight. Don’t forget to install the little shield that protects the solenoid pack con-nector from the exhaust pipes. I don’t understand why so many are left off.
Here are the pressure readings after the repair (Figure 6):
WHOOOYA! Look at those pres-sure readings! Compare them to the line pressure specifications in figure 2. They’re right on the money. A final road test proves the shifts are smooth; just what the customer wanted… though I still can’t understand why.
Let’s recap: The truck came in with
harsh shifts. We started by checking for codes; there were none. Next, we checked line pressure; it was high. We checked the voltage across the EPC solenoid; it was correct, which indi-cated an internal transmission problem. Replacing the solenoid pack didn’t help,
so the next step was to pull the trans-mission out of the truck and inspect the pump. We discovered the pressure regulator spring seat was upside down, causing the pressure problem. Installing the seat correctly repaired the pressure problem, and smoothed out the shifts.
This was a simple mistake that caused a big headache. To make sure it never happens to you, always put the spring seat on the pressure regulator valve before installing it into the pump.
And that’s not just smart… that’s Street Smart!
Figure 5
Selector Lever Position Idle psi WOT Stall psiPark / Neutral 50-65 (Not Applicable)Reverse 70-100 245-290Overdrive / 2nd 50-65 165-185Manual 1 70-100 175-210
Line Pressure Specification
Position Idle StallPark 3.92 N/AReverse 2.54 = 3.92 (*) 0.00Neutral 3.92 N/AOverdrive 2.96 = 3.92 (*, 1) 0.00Manual 2nd 2.96 = 3.92 0.00Manual 1st 2.49 = 3.92 (*) 0.00
(*) During the engagment the voltage went from 3.92 to 2.96and then back to 3.92
(1) Line pressure in D at idle 125 psi and stall 240 psi
Position IDLE psi WOT /Stall psiPark 62 N/AReverse 84 280Neutral 62 N/AOverdrive 62 175Manual 2nd 62 175Manual 1st 84 200
Figure 6
Figure 4
Figure 2
Figure 6
6747 Whitestone Road • Baltimore, MD 21207877-298-5003 • Fax: 410-298-3579© 2006 ATI Performance Products, Inc.
ATI’S CW3 CONVERTER WELDING & OVERHAUL SYSTEM
www.atiauto.com
Improve the performance and reliability of your rebuilds with a customized torque converter rebuilding system from ATI! The CW3 makes converter rebuilding easier and more profitable for you!
• CW3 Converter Welder• Accu-Balance Converter Balancer• Accu-Bonder• Quick Test Converter Leak Tester• Cut-Open & Engine Lathes• Pass-Through Converter Washer• Welding Fixtures & Tools
Call today
for more
information!