Embed Size (px)
Citation preview
StreetPilot® c320owner’s manual
© Copyright 2005 Garmin Ltd. or its subsidiariesGarmin International, Inc.
1200 East 151st Street, Olathe, Kansas 66062, U.S.A.
Tel. 913/397.8200 or 800/800.1020 Fax 913/397.8282
Garmin (Europe) Ltd. Unit 5, The Quadrangle, Abbey Park Industrial
Estate, Romsey, SO51 9DL, U.K. Tel. 44/0870.8501241 Fax 44/0870.8501251
Garmin Corporation No. 68, Jangshu 2nd Road,
Shijr, Taipei County, Taiwan Tel. 886/2.2642.9199 Fax 886/2.2642.9099
All rights reserved. Except as expressly provided herein, no part of this manual may be reproduced, copied, transmitted, disseminated, downloaded or stored in any storage medium, for any purpose without the express prior written consent of Garmin. Garmin hereby grants permission to download a single copy of this manual onto a hard drive or other electronic storage medium to be viewed and to print one copy of this manual or of any revision hereto, provided that such electronic or printed copy of this manual must contain the complete text of this copyright notice and provided further that any unauthorized commercial distribution of this manual or any revision hereto is strictly prohibited.Information in this document is subject to change without notice. Garmin reserves the right to change or improve its products and to make changes in the content without obligation to notify any person or organization of such changes or improvements. Visit the Garmin Web site (www.garmin.com) for current updates and supplemental information concerning the use and operation of this and other Garmin products.Garmin®, StreetPilot®, and MapSource® are registered trademarks of Garmin Ltd. or its subsidiaries and may not be used without the express permission of Garmin.
March 2005 Part Number 190-00435-00 Rev. B Printed in Taiwan
c320 Owner’s Manual i
PREFACE
Congratulations on purchasing the Garmin® StreetPilot® c320.
To get the most out of your new navigation system, take the time to go through this Owner’s Manual and learn the operating procedures for your unit.
Quick Tips• To find an address, see page 3.• To understand information on the Map page, see pages 12–13.• To adjust the backlight brightness on your c320, see page 23.• To clean and store your c320, see page 25.• To use the c320 in “practice” mode, see page 20.• To understand “Safe Mode,” see page 20.• To learn more about GPS, see page 24.• To learn safety information, see pages 32–33.
Keep Your c320’s Serial NumberRecord the serial number (8-digit number located on the back of the unit) in case your c320 is lost, stolen, or needs service.
Serial Number: ___ ___ ___ ___ ___ ___ ___ ___
Contact GarminIf you should encounter any difficulty while using your StreetPilot c320, or if you have any questions, in the U.S.A. contact Garmin Product Support by phone: 913/397.8200 or 800/800.1020, Monday–Friday, 8 AM–5 PM Central Time; or by e-mail at [email protected]. In Europe, contact Garmin (Europe) Ltd. at 44/0870.8501241.The Garmin c320 has no user-serviceable parts. Should you ever encounter a problem with your unit, take it to an authorized Garmin dealer for repairs.
The c320 is fastened shut with screws. Any attempt to open the case to change or modify the unit in any way voids your warranty and may result in permanent damage to the equipment.
ii c320 Owner’s Manual
TABLE OF CONTENTS
Preface ......................................................... iQuick Tips ..................................................................... iKeep Your c320’s Serial Number .................................. iContact Garmin ............................................................. i
Finding Places and Routing to Them ....... 1Where To? ....................................................................1Finding Places by Selecting Icons ...............................2Finding Places by Spelling the Name .........................2Finding an Address .....................................................3Finding an Intersection ...............................................4My Locations ................................................................5
Saving Places You Find ...........................................5Finding Places You Save .........................................5Editing Places You Save ..........................................6Deleting Saved Places .............................................6Setting a Home Location ..........................................7
Finding Recently-Found Places ...................................8Deleting Recently-Found Places ..............................8
Finding Places by Browsing the Map ...........................9Advanced Find Features ............................................10
Other Options for Finding Places ...........................10Narrowing Your Search ..........................................11
Viewing Places on the Map ....................................11
Viewing Map Pages .................................. 12Viewing the Map Page while Driving ..........................12Viewing Pages while Navigating ................................13Following Your Route .................................................14
Current Route Page ...............................................14Next Turn Page and Voice Directions ....................15Trip Information Page .............................................16Adding a Detour to a Route ....................................17Stopping Routes .....................................................17
Customizing the c320............................... 18Do You Want to Customize the c320? .......................18Customizing the Map Page ........................................19Customizing the Color Mode .....................................19Customizing the System Setup ..................................20Customizing Navigation .............................................21Customizing Time ......................................................22Customizing Language ..............................................22Mounting Your c320 ..................................................23Adjusting the Backlight Brightness ............................23
Appendix ................................................... 23
What is GPS? ............................................................24What is WAAS? ......................................................24
Cleaning the Unit .......................................................25Cleaning the Touchscreen .........................................25Storing your c320 .......................................................25Your c320 is not Waterproof .......................................25Calibrating the Touchscreen ......................................25Using the c320 Responsibly ......................................26Using the c320 in Practice Mode ...............................26Avoiding Theft ............................................................26If Your c320 Stops Responding .................................26Problems Maintaining a GPS Fix ...............................27Battery Temperature Warning, Disposal ....................27Updating Map Software .............................................27Removing, Inserting the SD card ...............................27Technical Specifications .............................................28Changing the Fuse ....................................................28FCC Compliance .......................................................29Software License Agreement .....................................30Limited Warranty ........................................................30Safety Information ......................................................32
Index .......................................................... 34
c320 Owner’s Manual 1
FINDING PLACES AND ROUTING TO THEM
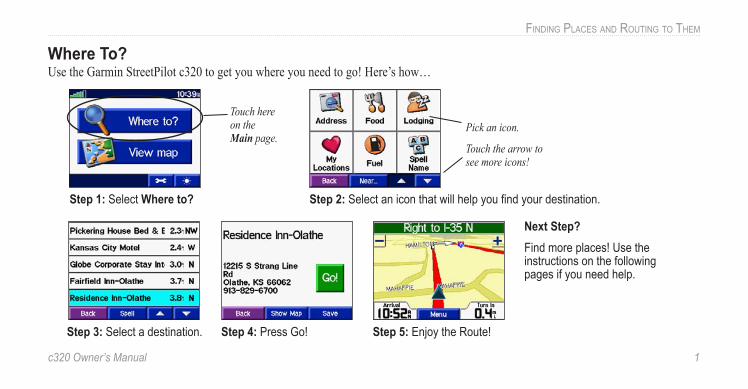
Where To?Use the Garmin StreetPilot c320 to get you where you need to go! Here’s how…
Step 3: Select a destination. Step 5: Enjoy the Route! Step 4: Press Go!
Next Step? Find more places! Use the instructions on the following pages if you need help.
Touch here on the Main page.
Step 1: Select Where to? Step 2: Select an icon that will help you find your destination.
Pick an icon.
Touch the arrow to see more icons!
2 c320 Owner’s Manual
FINDING PLACES AND ROUTING TO THEM
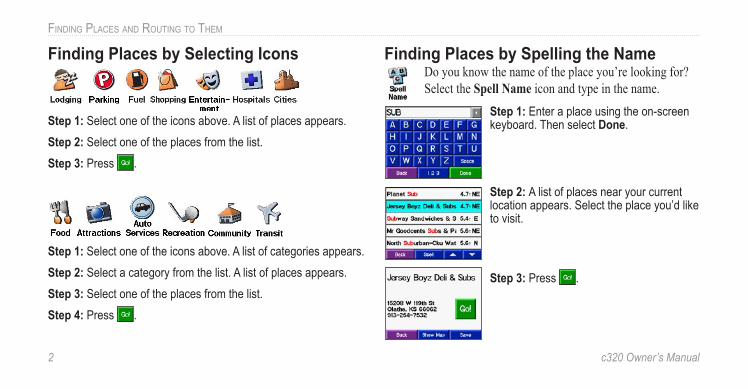
Finding Places by Selecting Icons
Step 1: Select one of the icons above. A list of places appears.
Step 2: Select one of the places from the list.
Step 3: Press .
Step 1: Select one of the icons above. A list of categories appears.
Step 2: Select a category from the list. A list of places appears.
Step 3: Select one of the places from the list.
Step 4: Press .
Finding Places by Spelling the Name Do you know the name of the place you’re looking for?
Select the Spell Name icon and type in the name.Step 1: Enter a place using the on-screen keyboard. Then select Done.
Step 2: A list of places near your current location appears. Select the place you’d like to visit.
Step 3: Press .
c320 Owner’s Manual 3
FINDING PLACES AND ROUTING TO THEM
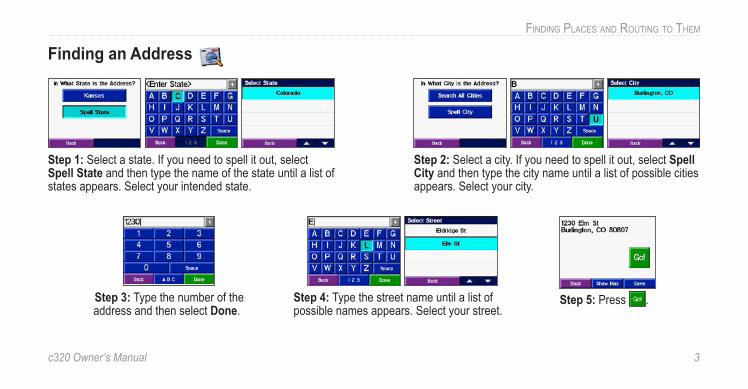
Finding an Address
Step 1: Select a state. If you need to spell it out, select Spell State and then type the name of the state until a list of states appears. Select your intended state.
Step 2: Select a city. If you need to spell it out, select Spell City and then type the city name until a list of possible cities appears. Select your city.
Step 3: Type the number of the address and then select Done.
Step 4: Type the street name until a list of possible names appears. Select your street.
Step 5: Press .
4 c320 Owner’s Manual
FINDING PLACES AND ROUTING TO THEM
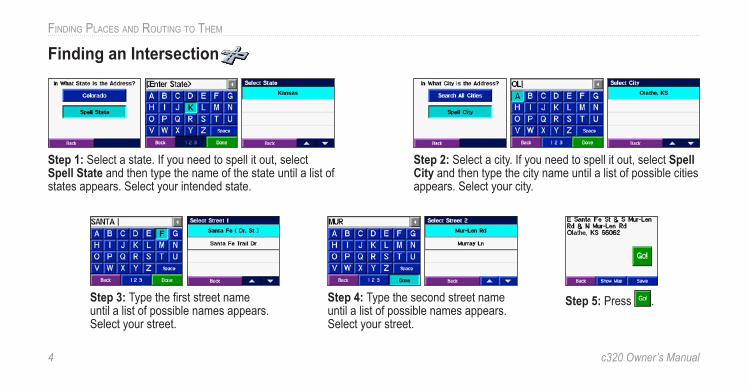
Finding an Intersection
Step 2: Select a city. If you need to spell it out, select Spell City and then type the city name until a list of possible cities appears. Select your city.
Step 1: Select a state. If you need to spell it out, select Spell State and then type the name of the state until a list of states appears. Select your intended state.
Step 3: Type the first street name until a list of possible names appears. Select your street.
Step 5: Press .Step 4: Type the second street name until a list of possible names appears. Select your street.
c320 Owner’s Manual 5
FINDING PLACES AND ROUTING TO THEM
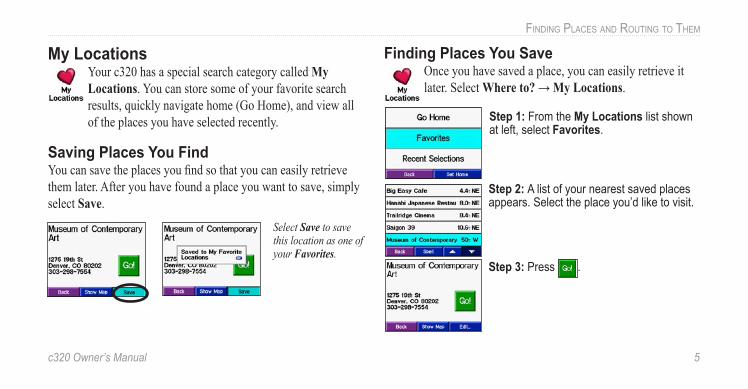
My Locations Your c320 has a special search category called My Locations. You can store some of your favorite search results, quickly navigate home (Go Home), and view all of the places you have selected recently.
Saving Places You FindYou can save the places you find so that you can easily retrieve them later. After you have found a place you want to save, simply select Save.
Select Save to save this location as one of your Favorites.
Finding Places You Save Once you have saved a place, you can easily retrieve it later. Select Where to? → My Locations.
Step 1: From the My Locations list shown at left, select Favorites.
Step 2: A list of your nearest saved places appears. Select the place you’d like to visit.
Step 3: Press .
6 c320 Owner’s Manual
FINDING PLACES AND ROUTING TO THEM
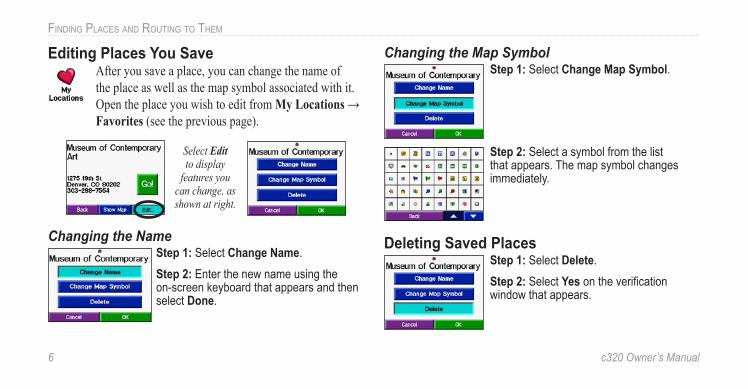
Editing Places You Save After you save a place, you can change the name of
the place as well as the map symbol associated with it. Open the place you wish to edit from My Locations → Favorites (see the previous page).
Select Edit to display
features you can change, as shown at right.
Changing the NameStep 1: Select Change Name.
Step 2: Enter the new name using the on-screen keyboard that appears and then select Done.
Changing the Map SymbolStep 1: Select Change Map Symbol.
Step 2: Select a symbol from the list that appears. The map symbol changes immediately.
Deleting Saved PlacesStep 1: Select Delete.
Step 2: Select Yes on the verification window that appears.

c320 Owner’s Manual 7
FINDING PLACES AND ROUTING TO THEM
Setting a Home Location Your c320 includes a special feature that allows you to set a “Home” location that can be your home, office, or any place to which you return most often. Once set, you can then easily Go Home, no matter where you are.
Step 1: Select My Locations and then select Go Home.
Or, select My Locations and then select Set Home.
Step 2: Select Yes, enter my Address and enter an address on the on-screen keyboard that appears. Then, select Save.
Or, select Yes, use my current location.
Going HomeOnce your Home location is set, you can route to it at any time by selecting My Locations and then Go Home.
Changing your Home LocationChange your Home location by repeating the steps you took for setting it.
Step 2: Select Yes, enter my Address and enter an address on the on-screen keyboard that appears. Select Save.
Or, select Yes, use my current location.
Step 1: Select Favorites, and then select Set Home.
8 c320 Owner’s Manual
FINDING PLACES AND ROUTING TO THEM
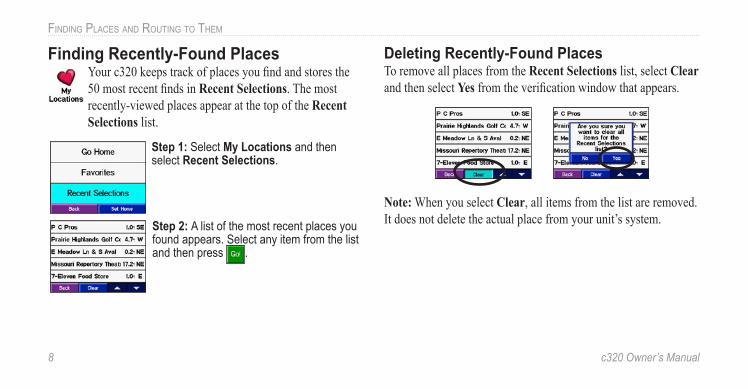
Finding Recently-Found Places Your c320 keeps track of places you find and stores the 50 most recent finds in Recent Selections. The most recently-viewed places appear at the top of the Recent Selections list.
Step 1: Select My Locations and then select Recent Selections.
Step 2: A list of the most recent places you found appears. Select any item from the list and then press .
Deleting Recently-Found PlacesTo remove all places from the Recent Selections list, select Clear and then select Yes from the verification window that appears.
Note: When you select Clear, all items from the list are removed. It does not delete the actual place from your unit’s system.

c320 Owner’s Manual 9
FINDING PLACES AND ROUTING TO THEM
Finding Places by Browsing the Map You can look for places outside your current location by “moving” the viewing area on the Browse Map page. Select
Where to? → Browse Map and then simply touch the directional arrows.
Step 2: Touch any existing map object on the Browse Map page such as a business, school, highway, park, lake, or other interesting place. Select Info.
Step 3: Press .Step 1: A map pointer (white arrow) serves as a target marker. Touch the directional arrows to move the Browse Map page shown above.
TIP: Touch the and icons in the upper corners of the Browse Map page to zoom in to or out of the immediate area of the map.
Zoom icon

10 c320 Owner’s Manual
FINDING PLACES AND ROUTING TO THEM
Advanced Find FeaturesYour c320 includes additional features for enhancing your search. You can search for and find places far away from your current location, narrow your search results, or view search items on the Map page.
Other Options for Finding PlacesYou can search for places that are beyond your current physical location. Press Near on the icon page shown below and then select one of the search options that appears.
Where I Am Now—your c320 searches for places near its current physical location. Your unit automatically uses this option.
A Different City—your c320 searches for places near the city you enter using the on-screen keyboard. Use this option when you are planning a trip. For example, if you live in Phoenix and you plan to visit Denver, type “Denver” on the on-screen keyboard. Then, your search results (Lodging, Food, Browse Map, etc.) will be in the Denver area.
My Current Route—your c320 searches for places along the route you are currently navigating. The results include many of the same places listed from the Where I Am Now option, as well as places further down your route.
My Destination—your c320 searches for places that are near the end of the route you are currently navigating. If you are driving from Phoenix to Denver, you can search for places in Denver by choosing My Destination.
c320 Owner’s Manual 11
FINDING PLACES AND ROUTING TO THEM
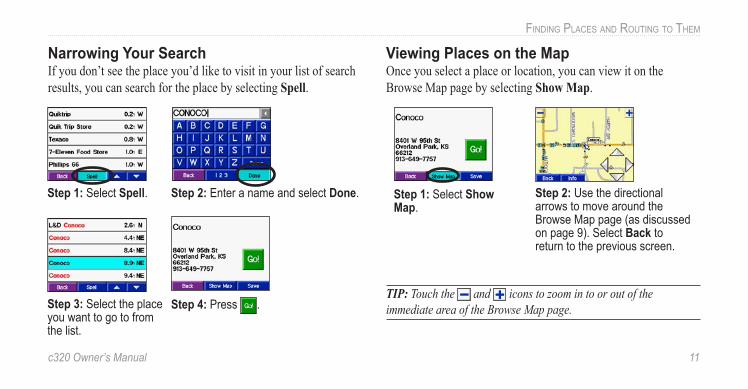
Narrowing Your SearchIf you don’t see the place you’d like to visit in your list of search results, you can search for the place by selecting Spell.
Step 2: Enter a name and select Done.Step 1: Select Spell.
Step 3: Select the place you want to go to from the list.
Step 4: Press .
Viewing Places on the MapOnce you select a place or location, you can view it on the Browse Map page by selecting Show Map.
Step 2: Use the directional arrows to move around the Browse Map page (as discussed on page 9). Select Back to return to the previous screen.
Step 1: Select Show Map.
TIP: Touch the and icons to zoom in to or out of the immediate area of the Browse Map page.
12 c320 Owner’s Manual
VIEWING THE MAP PAGES
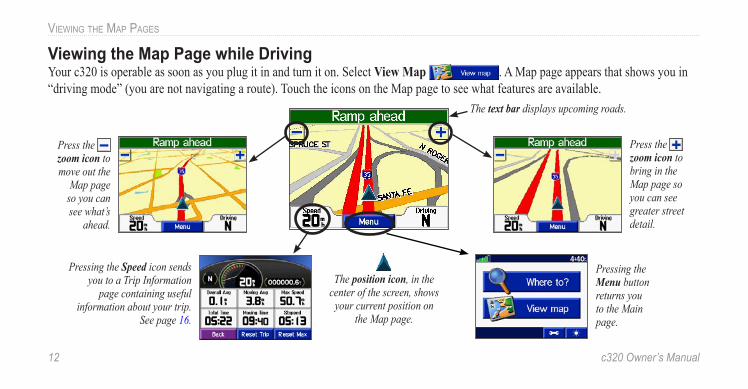
Viewing the Map Page while DrivingYour c320 is operable as soon as you plug it in and turn it on. Select View Map . A Map page appears that shows you in “driving mode” (you are not navigating a route). Touch the icons on the Map page to see what features are available.
Press the zoom icon to move out the
Map page so you can see what’s
ahead.
Press the zoom icon to bring in the Map page so you can see greater street detail.
Pressing the Speed icon sends you to a Trip Information
page containing useful information about your trip.
See page 16.
Pressing the Menu button returns you to the Main page.
The text bar displays upcoming roads.
The position icon, in the center of the screen, shows
your current position on the Map page.
c320 Owner’s Manual 13
VIEWING THE MAP PAGES
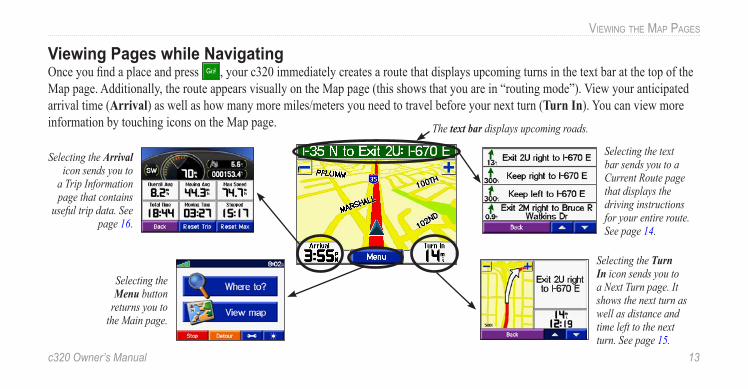
Viewing Pages while NavigatingOnce you find a place and press , your c320 immediately creates a route that displays upcoming turns in the text bar at the top of the Map page. Additionally, the route appears visually on the Map page (this shows that you are in “routing mode”). View your anticipated arrival time (Arrival) as well as how many more miles/meters you need to travel before your next turn (Turn In). You can view more information by touching icons on the Map page.
Selecting the Arrival icon sends you to
a Trip Information page that contains
useful trip data. See page 16.
Selecting the Menu button
returns you to the Main page.
Selecting the Turn In icon sends you to a Next Turn page. It shows the next turn as well as distance and time left to the next turn. See page 15.
Selecting the text bar sends you to a Current Route page that displays the driving instructions for your entire route. See page 14.
The text bar displays upcoming roads.
14 c320 Owner’s Manual
VIEWING THE MAP PAGES
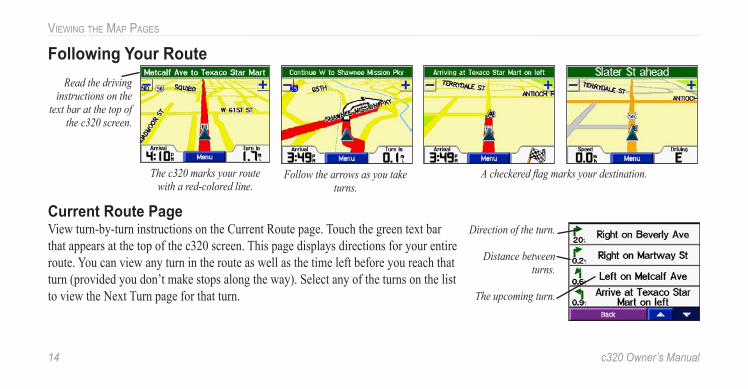
Following Your Route
Current Route PageView turn-by-turn instructions on the Current Route page. Touch the green text bar that appears at the top of the c320 screen. This page displays directions for your entire route. You can view any turn in the route as well as the time left before you reach that turn (provided you don’t make stops along the way). Select any of the turns on the list to view the Next Turn page for that turn.
The c320 marks your route with a red-colored line.
Follow the arrows as you take turns.
A checkered flag marks your destination.
Read the driving instructions on the
text bar at the top of the c320 screen.
Direction of the turn.
Distance between turns.
The upcoming turn.
c320 Owner’s Manual 15
VIEWING THE MAP PAGES
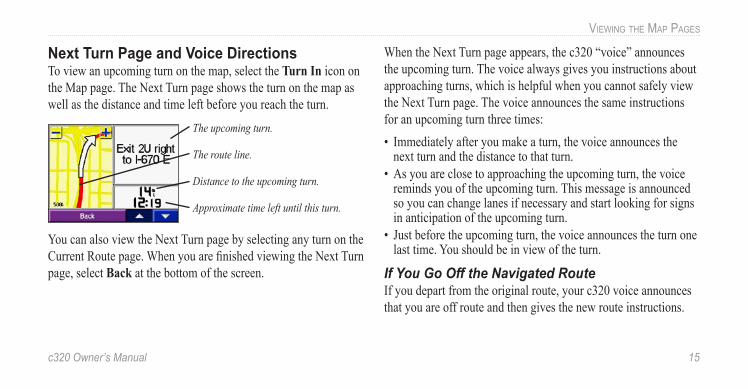
Next Turn Page and Voice DirectionsTo view an upcoming turn on the map, select the Turn In icon on the Map page. The Next Turn page shows the turn on the map as well as the distance and time left before you reach the turn.
The upcoming turn.
The route line.
Distance to the upcoming turn.
Approximate time left until this turn.
You can also view the Next Turn page by selecting any turn on the Current Route page. When you are finished viewing the Next Turn page, select Back at the bottom of the screen.
When the Next Turn page appears, the c320 “voice” announces the upcoming turn. The voice always gives you instructions about approaching turns, which is helpful when you cannot safely view the Next Turn page. The voice announces the same instructions for an upcoming turn three times:• Immediately after you make a turn, the voice announces the
next turn and the distance to that turn. • As you are close to approaching the upcoming turn, the voice
reminds you of the upcoming turn. This message is announced so you can change lanes if necessary and start looking for signs in anticipation of the upcoming turn.
• Just before the upcoming turn, the voice announces the turn one last time. You should be in view of the turn.
If You Go Off the Navigated RouteIf you depart from the original route, your c320 voice announces that you are off route and then gives the new route instructions.
16 c320 Owner’s Manual
VIEWING THE MAP PAGES
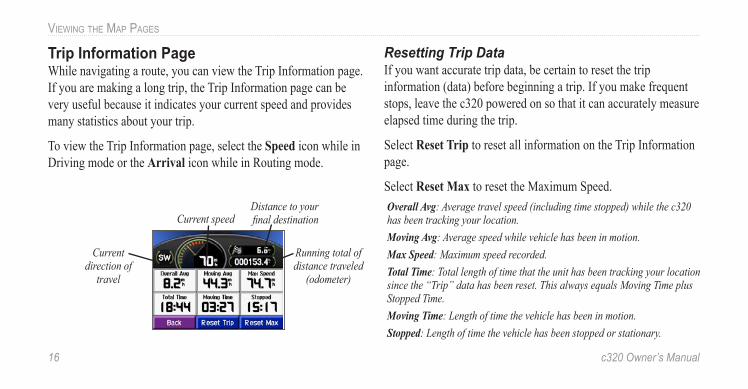
Trip Information PageWhile navigating a route, you can view the Trip Information page. If you are making a long trip, the Trip Information page can be very useful because it indicates your current speed and provides many statistics about your trip.
To view the Trip Information page, select the Speed icon while in Driving mode or the Arrival icon while in Routing mode.
Resetting Trip DataIf you want accurate trip data, be certain to reset the trip information (data) before beginning a trip. If you make frequent stops, leave the c320 powered on so that it can accurately measure elapsed time during the trip.
Select Reset Trip to reset all information on the Trip Information page.
Select Reset Max to reset the Maximum Speed.
Running total of distance traveled
(odometer)
Current direction of
travel
Current speedOverall Avg: Average travel speed (including time stopped) while the c320 has been tracking your location.Moving Avg: Average speed while vehicle has been in motion.Max Speed: Maximum speed recorded.Total Time: Total length of time that the unit has been tracking your location since the “Trip” data has been reset. This always equals Moving Time plus Stopped Time.Moving Time: Length of time the vehicle has been in motion.Stopped: Length of time the vehicle has been stopped or stationary.
Distance to your final destination
c320 Owner’s Manual 17
VIEWING THE MAP PAGES
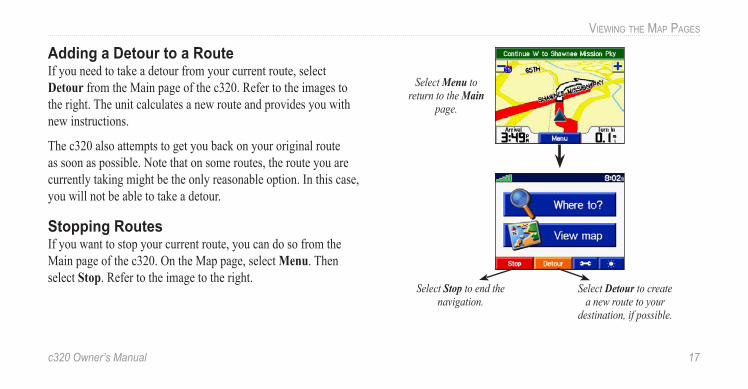
Adding a Detour to a RouteIf you need to take a detour from your current route, select Detour from the Main page of the c320. Refer to the images to the right. The unit calculates a new route and provides you with new instructions.
The c320 also attempts to get you back on your original route as soon as possible. Note that on some routes, the route you are currently taking might be the only reasonable option. In this case, you will not be able to take a detour.
Stopping RoutesIf you want to stop your current route, you can do so from the Main page of the c320. On the Map page, select Menu. Then select Stop. Refer to the image to the right.
Select Menu to return to the Main
page.
Select Stop to end the navigation.
Select Detour to create a new route to your
destination, if possible.
18 c320 Owner’s Manual
CUSTOMIZING THE C320
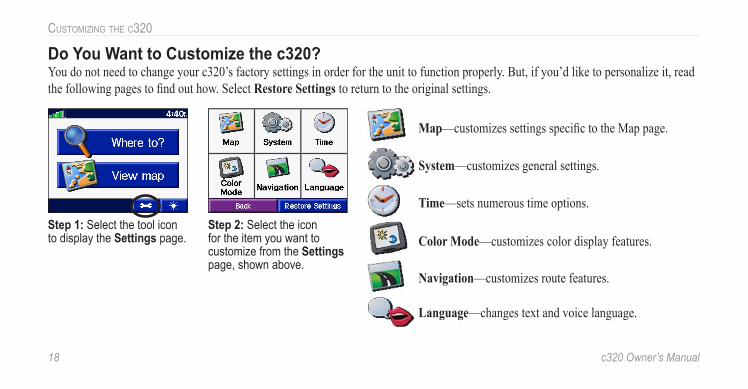
Do You Want to Customize the c320?You do not need to change your c320’s factory settings in order for the unit to function properly. But, if you’d like to personalize it, read the following pages to find out how. Select Restore Settings to return to the original settings.
Map—customizes settings specific to the Map page.
System—customizes general settings.
Time—sets numerous time options.
Color Mode—customizes color display features.
Navigation—customizes route features.
Language—changes text and voice language.
Step 1: Select the tool icon to display the Settings page.
Step 2: Select the icon for the item you want to customize from the Settings page, shown above.

c320 Owner’s Manual 19
CUSTOMIZING THE C320
Customizing the Map Page
Map Detail—adjusts the amount of detail that displays on the Map page. Most shows maximum detail while Least shows minimum detail. A higher detail level causes the map to redraw more slowly.
Map View—changes the perspective of the display on the Map page. • 3 Dimensional—displays the default map view. 3-D view
appears only in “Track Up” orientation.• Track Up—orients the Map page with your direction of travel
at the top. The map view is set to 2 Dimensional (like a paper map) when you select this option.
• North Up—orients the Map page with North at the top. The map view is set to 2 Dimensional when you select this option.
Map Info—shows which maps you have loaded to your c320. Refer to this page when you are ready to update your map data.
Restore—restores the original map settings.
Customizing the Color Mode
Color Mode—choose Daytime for a bright and lighter background. Select Nighttime to switch to a black background for easier viewing while driving at night. Select Auto to automatically switch between the two at sunrise and sunset.

20 c320 Owner’s Manual
CUSTOMIZING THE C320
Customizing the System Setup
GPS Mode—set to Normal for normal GPS operation. Select WAAS to enable the WAAS system of GPS signal corrections. See page 24 for more information on GPS and WAAS. You can also turn the GPS Off if you want to simulate routes indoors (“practice mode”) with your c320.
Units—select to measure distance in miles (Statute) or kilometers (Metric). If you select Statute, speed is shown in miles per hour. Metric shows speed in kilometers per hour.
Safe Mode—enable or disable the Safe Mode feature to improve driver safety. By default, this feature is enabled, but it can be turned off to allow a passenger to operate the unit. When your vehicle is moving, Safe Mode disables all unit functions that require significant operator attention and that could become a distraction while driving, such as all Where to? functions. When you come to a complete stop, these features are automatically enabled. If you select Where to? while in Safe Mode, the c320 asks you if you want to turn off Safe Mode.
Restore—restores the original system settings.
About—displays your c320’s software version number, Unit ID number, and Audio version number.
c320 Owner’s Manual 21
CUSTOMIZING THE C320
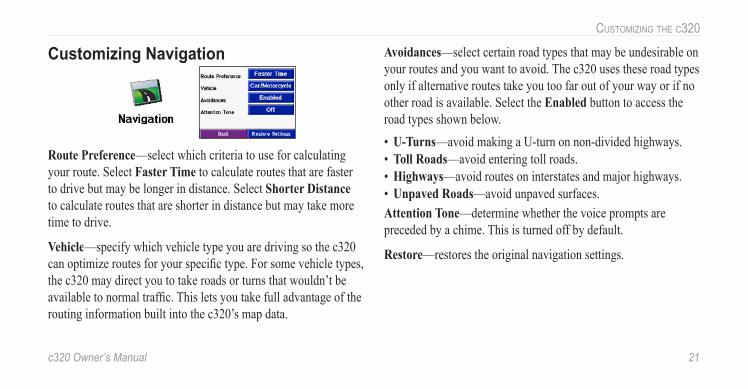
Customizing Navigation
Route Preference—select which criteria to use for calculating your route. Select Faster Time to calculate routes that are faster to drive but may be longer in distance. Select Shorter Distance to calculate routes that are shorter in distance but may take more time to drive.
Vehicle—specify which vehicle type you are driving so the c320 can optimize routes for your specific type. For some vehicle types, the c320 may direct you to take roads or turns that wouldn’t be available to normal traffic. This lets you take full advantage of the routing information built into the c320’s map data.
Avoidances—select certain road types that may be undesirable on your routes and you want to avoid. The c320 uses these road types only if alternative routes take you too far out of your way or if no other road is available. Select the Enabled button to access the road types shown below.• U-Turns—avoid making a U-turn on non-divided highways.• Toll Roads—avoid entering toll roads.• Highways—avoid routes on interstates and major highways.• Unpaved Roads—avoid unpaved surfaces.Attention Tone—determine whether the voice prompts are preceded by a chime. This is turned off by default.
Restore—restores the original navigation settings.

22 c320 Owner’s Manual
CUSTOMIZING THE C320
Customizing Time
Time Format—choose either a 12- or 24-hour time format or UTC time.
Time Zone—set the c320 to one of the U.S. time zones or choose from a list of cities all over the world.
Daylight Savings—can be turned on (Yes), off (No), or set to Automatic (Auto) if it is available.
Restore—restores the original time settings.
Customizing Language
Text Language—change all on-screen text on all pages and menus to the selected language. Changing the Text Language setting does not affect the display of map data or user-entered data. Map data such as city, street, and point of interest names is always displayed in the language in which it is stored in the map.
Voice Language—change the language for all voice prompts and messages to the selected language.
Restore—restores the original language settings.
c320 Owner’s Manual 23
APPENDIX
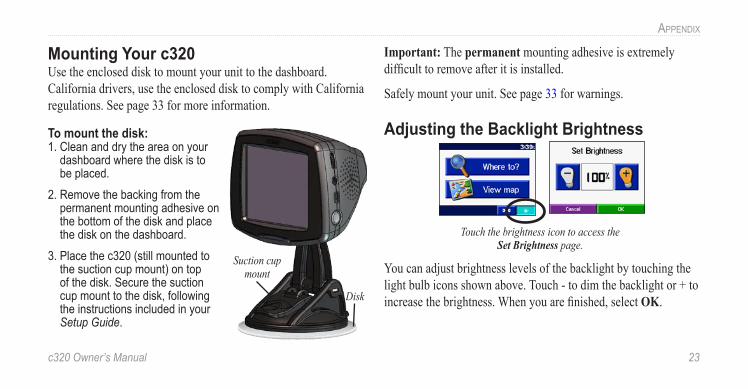
Mounting Your c320 Use the enclosed disk to mount your unit to the dashboard. California drivers, use the enclosed disk to comply with California regulations. See page 33 for more information.
To mount the disk:1. Clean and dry the area on your
dashboard where the disk is to be placed.
2. Remove the backing from the permanent mounting adhesive on the bottom of the disk and place the disk on the dashboard.
3. Place the c320 (still mounted to the suction cup mount) on top of the disk. Secure the suction cup mount to the disk, following the instructions included in your Setup Guide.
Important: The permanent mounting adhesive is extremely difficult to remove after it is installed.
Safely mount your unit. See page 33 for warnings.
Adjusting the Backlight Brightness
Touch the brightness icon to access the Set Brightness page.
You can adjust brightness levels of the backlight by touching the light bulb icons shown above. Touch - to dim the backlight or + to increase the brightness. When you are finished, select OK.Disk
Suction cup mount
24 c320 Owner’s Manual
APPENDIX
What is GPS?The Global Positioning System (GPS) is a satellite-based navigation system made up of a network of 24 satellites placed into orbit by the U.S. Department of Defense. GPS was originally intended for military applications, but the government made the system available for civilian use in the 1980s. GPS works in any weather condition, anywhere in the world, 24 hours a day. There are no subscription fees or setup charges to use GPS.A GPS receiver must be locked on to the signal of at least three GPS satellites to calculate a 2D position (latitude and longitude) and track movement. With four or more satellites in view, the receiver can determine your 3D position (latitude, longitude, and altitude). Once your position has been determined, the receiver can display it on the c320’s Map page and calculate other information, such as speed and bearing.
What is WAAS?The Wide Area Augmentation System (WAAS) is an FAA-funded project to improve the overall integrity of the GPS signal and increase position accuracy for users in North America. The system is made up of satellites
and approximately 25 ground reference stations positioned across the United States that monitor GPS satellite data. Two master stations, located on either coast, collect data from the reference stations and create a GPS data correction message. According to the FAA’s Web site, testing in September 2002 of WAAS confirmed an accuracy performance of 1–2 meters horizontal and 2–3 meters vertical throughout the majority of the continental United States and portions of Alaska. For more information, go to http://gps.faa .gov/Programs/WAAS/waas.htm. WAAS is just one service provider that adheres to the MOPS (Minimum Operational Performance Standard) for global Satellite Based Augmentation Systems (SBAS). Eventually, there will be several services of worldwide geostationary communication satellites and ground reference stations. Currently, enabling WAAS on your c320 in regions that are not supported can degrade accuracy. For this reason, when you enable WAAS on your c320, the receiver automatically uses the method that achieves the best accuracy. To enable WAAS, refer to page 20.
c320 Owner’s Manual 25
APPENDIX
Cleaning the UnitThe c320 is constructed of high quality materials and does not require user maintenance other than cleaning. Clean the unit’s outer casing (except for the touchscreen) using a cloth dampened with a mild detergent solution and then wipe dry. Avoid chemical cleaners and solvents that may damage plastic components.
Cleaning the TouchscreenThe touchscreen is intended primarily for finger operation. Although a PDA stylus may also be used to operate the touchscreen, never attempt this while operating a vehicle. Never use a hard or sharp object to operate the touchscreen or damage may result. Clean the touchscreen using a soft, clean, lint-free cloth. Water, isopropyl alcohol, or eyeglass cleaner can be used if needed. If these are used, apply the liquid to the cloth and then gently wipe the touchscreen with the moistened cloth.
Storing your c320Do not store the c320 where prolonged exposure to temperature extremes may occur (such as in the trunk of a car), as permanent damage may result.
Your c320 is not WaterproofDo not position the c320 in places where it may be exposed to water. Contact with water can cause this unit to malfunction.
Calibrating the TouchscreenIn the rare event you sense that the touchscreen is not responding properly to touch commands, you can calibrate it. Press and hold the Power button until the Calibration screen appears. Follow the on-screen instructions.
26 c320 Owner’s Manual
APPENDIX
Using the c320 ResponsiblyYour unit is equipped with a “Safe Mode” feature to improve driver safety. Safe Mode disables certain functions that may become a distraction to use while driving. By default, this feature is enabled, but it can be turned off to allow a passenger to operate the unit. See page 20 for more information.
Using the c320 in Practice ModeYou can set your c320 to indoor use, which stops satellite reception. Use this operation mode when you are practicing basic functions and features with the unit. To turn off satellite reception, set the unit to GPS Off. See page 20 for more information.
Avoiding TheftTo avoid theft, take your c320 with you or remove it from view when you leave your vehicle.
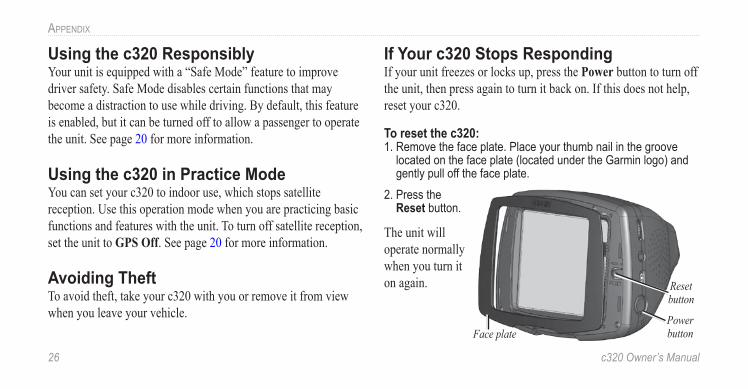
If Your c320 Stops RespondingIf your unit freezes or locks up, press the Power button to turn off the unit, then press again to turn it back on. If this does not help, reset your c320.
To reset the c320:1. Remove the face plate. Place your thumb nail in the groove
located on the face plate (located under the Garmin logo) and gently pull off the face plate.
2. Press the Reset button.
The unit will operate normally when you turn it on again. Reset
button
Power buttonFace plate
c320 Owner’s Manual 27
APPENDIX
Problems Maintaining a GPS FixAn optional external remote antenna (Garmin GA 27C) may be needed when operating the unit in a vehicle with a coated windshield or an in-screen heating system, which can block the GPS signals. Connect the antenna to the connector located on the back of the c320. To purchase, go the Garmin Web site at http://www.garmin.com/products/sp320 and select the “Accessories” link.
Battery Temperature Warning, DisposalYour unit contains an internal lithium-ion battery, which allows you to store more energy than standard batteries. All batteries slowly lose the amount of energy they can hold over time. To maximize battery life, limit your c320’s prolonged exposure to excessive heat and direct sunlight. Contact your local waste disposal department for information on properly disposing of the lithium-ion battery.
Updating Map SoftwareGarmin periodically updates its maps so that you can enjoy the most accurate route information. If you registered your unit, you will receive notification of map updates. Otherwise, check the Garmin Web site at http://www.garmin.com/unlock/update.jsp to see if an update for your map software is available.
See “Customizing the Map Page” on page 19, for instructions on how to find your current MapSource software and version number.
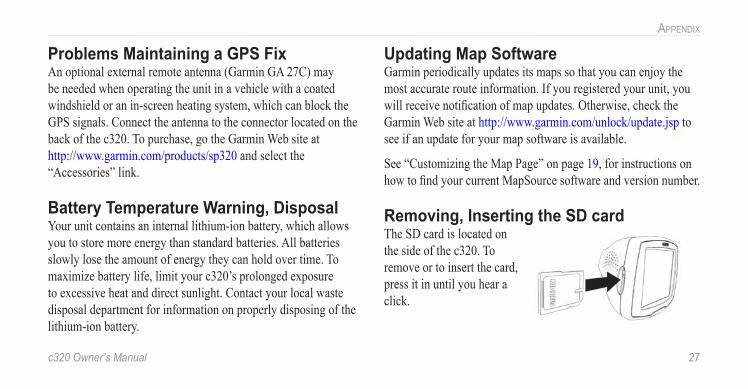
Removing, Inserting the SD cardThe SD card is located on the side of the c320. To remove or to insert the card, press it in until you hear a click.

28 c320 Owner’s Manual
APPENDIX
Technical SpecificationsSize and weight: 4.4” W x 3.2” H x 2.8” D; 9.45 ounces
Display: QVGA transflective TFT; 64K colors; bright white LED backlight, and touchscreen
Map Storage: Removable SD memory card
Temperature: 32°F to 122°F (0°C to 50°C)
Power Supply: 12/24 VDC; AGC/3AG 2 Amp fuse
For a complete list of specifications, visit the Garmin Web site at http://www.garmin.com/products/sp320/spec.html.
Changing the FusePeriodically, you may need to change the fuse that is located at the tip of the power adapter on your suction cup mount. Simply unscrew the black, round end piece and remove/replace the fuse.
An AGC/3AG 2 Amp, High breaking capacity, 1500 A rated fuse is located at the tip of the vehicle adapter.
c320 Owner’s Manual 29
APPENDIX
FCC ComplianceThe c320 complies with Part 15 of the FCC interference limits for Class B digital devices FOR HOME OR OFFICE USE. These limits are designed to provide more reasonable protection against harmful interference in a residential installation, and are more stringent than “outdoor” requirements.Operation of this device is subject to the following conditions: (1) This device may not cause harmful interference, and (2) this device must accept any interference received, including interference that may cause undesired operation.This equipment generates, uses, and can radiate radio frequency energy and, if not installed and used in accordance with the instructions, may cause harmful interference to radio communications. However, there is no guarantee that interference will not occur in a particular installation. If this equipment does cause harmful interference to radio or television reception, which can be determined by turning the equipment off and on, you are encouraged to try to correct the interference by one of the following measures:
• Reorient or relocate the receiving antenna.• Increase the separation between the equipment and the receiver.• Connect the equipment into an outlet on a circuit different from that
to which the receiver is connected.• Consult an experienced radio/TV technician for help.The C320 does not contain any user-serviceable parts. Repairs should only be made by an authorized Garmin service center. Unauthorized repairs or modifications could result in permanent damage to the equipment, and void your warranty and your authority to operated this device under Part 15 regulations.
30 c320 Owner’s Manual
APPENDIX
Software License AgreementBY USING THE c320, YOU AGREE TO BE BOUND BY THE TERMS AND CONDITIONS OF THE FOLLOWING SOFTWARE LICENSE AGREEMENT. PLEASE READ THIS AGREEMENT CAREFULLY.Garmin grants you a limited license to use the software embedded in this device (the “Software”) in binary executable form in the normal operation of the product. Title, ownership rights, and intellectual property rights in and to the Software remain in Garmin.You acknowledge that the Software is the property of Garmin and is protected under the United States of America copyright laws and international copyright treaties. You further acknowledge that the structure, organization, and code of the Software are valuable trade secrets of Garmin and that the Software in source code form remains a valuable trade secret of Garmin. You agree not to decompile, disassemble, modify, reverse assemble, reverse engineer, or reduce to human readable form the Software or any part thereof or create any derivative works based on the Software. You agree not to export or re-export the Software to any country in violation of the export control laws of the United States of America.
Limited WarrantyThis Garmin product is warranted to be free from defects in materials or workmanship for one year from the date of purchase. Within this period, Garmin will at its sole option repair or replace any components that fail in normal use. Such repairs or replacement will be made at no charge to the customer for parts or labor, provided that the customer shall be responsible for any transportation cost. This warranty does not cover failures due to abuse, misuse, accident or unauthorized alteration or repairs.THE WARRANTIES AND REMEDIES CONTAINED HEREIN ARE EXCLUSIVE AND IN LIEU OF ALL OTHER WARRANTIES EXPRESS OR IMPLIED OR STATUTORY, INCLUDING ANY LIABILITY ARISING UNDER ANY WARRANTY OF MERCHANTABILITY OR FITNESS FOR A PARTICULAR PURPOSE, STATUTORY OR OTHERWISE. THIS WARRANTY GIVES YOU SPECIFIC LEGAL RIGHTS, WHICH MAY VARY FROM STATE TO STATE.
c320 Owner’s Manual 31
APPENDIX
IN NO EVENT SHALL GARMIN BE LIABLE FOR ANY INCIDENTAL, SPECIAL, INDIRECT OR CONSEQUENTIAL DAMAGES, WHETHER RESULTING FROM THE USE, MISUSE, OR INABILITY TO USE THIS PRODUCT OR FROM DEFECTS IN THE PRODUCT. Some states do not allow the exclusion of incidental or consequential damages, so the above limitations may not apply to you.Garmin retains the exclusive right to repair or replace the unit or software or offer a full refund of the purchase price at its sole discretion. SUCH REMEDY SHALL BE YOUR SOLE AND EXCLUSIVE REMEDY FOR ANY BREACH OF WARRANTY.To obtain warranty service, contact your local Garmin authorized dealer or call Garmin Product Support for shipping instructions and an RMA tracking number. The unit should be securely packed with the tracking number clearly written on the outside of the package. The unit should then be sent, freight charges prepaid, to any Garmin warranty service station. A copy of the original sales receipt is required as the proof of purchase for warranty repairs.
Garmin International, Inc. Tel. 913/397.8200 Fax. 913/397.8282Garmin (Europe) Ltd. Tel. 44/0870.8501241 Fax 44/0870.8501251 Online Auction Purchases: Products sold through online auctions are not eligible for rebates or other special offers from Garmin. Online auction confirmations are not accepted for warranty verification. To obtain warranty service, an original or copy of the sales receipt from the original retailer is required. Garmin will not replace missing components from any package purchased through an online auction.International Purchases: A separate warranty is provided by international distributors for units purchased outside the United States. This warranty is provided by the local in-country distributor and this distributor provides local service for your unit. Distributor warranties are only valid in the area of intended distribution. Units purchased in the United States or Canada must be returned to the Garmin service center in the United Kingdom, the United States, Canada, or Taiwan for service.
32 c320 Owner’s Manual
APPENDIX
Safety InformationCAUTION: Use the c320 at your own risk. To reduce the risk of unsafe operation, carefully review and understand all aspects of this Owner’s Manual. When in use, carefully compare indications from the c320 to all available navigation sources, including information from other NAVAIDs, visual sightings, charts, etc. For safety, always resolve any discrepancies before continuing navigation.CAUTION: IT IS THE USER’S RESPONSIBILITY TO USE THIS PRODUCT PRUDENTLY. THIS PRODUCT IS INTENDED TO BE USED ONLY AS A NAVIGATIONAL AID AND MUST NOT BE USED FOR ANY PURPOSE REQUIRING PRECISE MEASUREMENT OF DIRECTION, DISTANCE, LOCATION OR TOPOGRAPHY. THIS PRODUCT SHOULD NOT BE USED TO DETERMINE GROUND PROXIMITY FOR AIRCRAFT NAVIGATION.CAUTION: The electronic chart is an aid to navigation and is designed to facilitate the use of authorized government charts, not replace them. Only official government charts and notices to mariners contain all information needed for safe navigation—and, as always, the user is
responsible for their prudent use. MAP DATA INFORMATION: One of the goals of Garmin is to provide customers with the most complete and accurate cartography that is available to us at a reasonable cost. We use a combination of governmental and private data sources, which we identify as required in product literature and copyright messages displayed to the consumer. Virtually all data sources contain inaccurate or incomplete data to some degree. This is particularly true outside the United States, where complete and accurate digital data is either not available or prohibitively expensive. WARNING: The Global Positioning System (GPS) is operated by the United States government, which is solely responsible for its accuracy and maintenance. The system is subject to changes which could affect the accuracy and performance of all GPS equipment. Although the Garmin c320 is a precision electronic NAVigation AID (NAVAID), any NAVAID can be misused or misinterpreted, and therefore become unsafe.
c320 Owner’s Manual 33
APPENDIX
WARNING: This product, its packaging, and its components contain chemicals known to the State of California to cause cancer, birth defects, or reproductive harm. This Notice is being provided in accordance with California’s Proposition 65. If you have any questions or would like additional information, please refer to our Web site at http://www.garmin.com/prop65.NOTICE TO STATE OF CALIFORNIA DRIVERS: California Vehicle Code Section 26708 (a) (1) provides that “No person shall drive any motor vehicle with any object or material placed, displayed, installed, affixed, or applied upon the windshield or side or rear windows.” Drivers in California should not use the suction mount on their windshield or side or rear windows. Garmin does not take any responsibility for any fines, penalties, or damages that may be incurred as a result of disregarding this notice. Disks for attaching the suction mount to a vehicle’s dashboard are included with certain Garmin products or are available for purchase from Garmin (part number 010-10646-00).
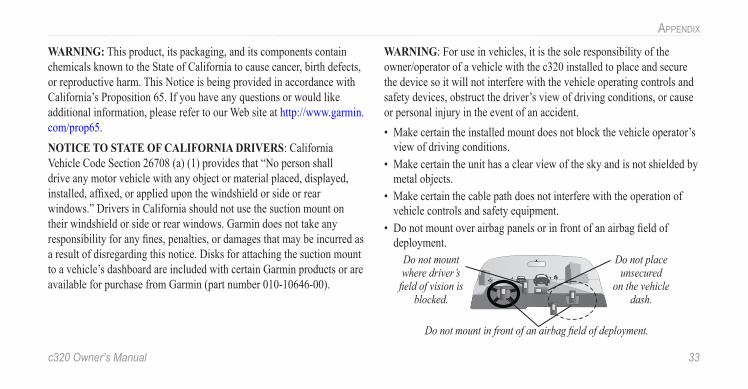
WARNING: For use in vehicles, it is the sole responsibility of the owner/operator of a vehicle with the c320 installed to place and secure the device so it will not interfere with the vehicle operating controls and safety devices, obstruct the driver’s view of driving conditions, or cause or personal injury in the event of an accident.• Make certain the installed mount does not block the vehicle operator’s
view of driving conditions. • Make certain the unit has a clear view of the sky and is not shielded by
metal objects. • Make certain the cable path does not interfere with the operation of
vehicle controls and safety equipment.• Do not mount over airbag panels or in front of an airbag field of
deployment.Do not mount where driver’s
field of vision is blocked.
Do not place unsecured
on the vehicle dash.
Do not mount in front of an airbag field of deployment.
34 c320 Owner’s Manual
INDEX
Symbols2 Dimensional 193 Dimensional 19
AAbout Button 20Arrival 13Avoid Items 21
BBacklight Brightness 23Battery Temp/Disposal Warning 27Browse Map Page 9
CCalibrating the Touchscreen 25Changing the Fuse 28Changing the Name 6Cleaning
Touchscreen 25Unit 25
Color Mode 19Contact Garmin i
Current Route Page 14Customizing the c320 18
Color Mode 19Language 22Map Page 19Navigation 21System Setup 20Time 22
DDaylight Savings 22Deleting Saved Places 6Detail on Map 19Detour, Adding 17Driving Directions 14Driving Mode 12
EEditing Saved Places (My Locations) 6
FFavorites 5, 6FCC Compliance 29
Finding PlacesAddress 3Browsing the Map 9Intersection 4My Locations 5Places away from your Location 10Recent Selections 8Saved Locations 5Selecting the Icons 2Spelling the Name 2
Following your Route 14Fuse, Changing 28
GGo Home 7GPS
Mode 20Off 26Overview 24Problems Maintaining your Fix 27
HHome Location 7
Changing 7Going Home 7Setting 7
IInfo Button 9Items to Avoid 21
KKeyboard 2
LLanguage 22License Agreement 30
MMap Detail 19Map Info Button 19Map Page 11, 12
Browse 9Customizing 19Zoom 9, 12
Map Software

c320 Owner’s Manual 35
INDEX
Updating 27Version 19
Map Symbol 6Map View 19Metric Units 20Mounting the c320 23My Locations
Go Home 7My Favorites 5Recent Selections 8
NNarrowing Your Search 11Navigation Preferences and Settings 21Near Option 10Next Turn Page 15North Up 19
OOdometer 16On-screen Keyboard 2
PPosition Icon 12
RRecently-Found Places
Deleting 8Finding 8
Resetting the c320 26Reset Max Speed 16Reset Trip 16Routing Mode 13Routing Preferences 21
SSafety Information 32Safe Mode 20, 26Saved Places
Changing the Map Symbol 6Changing the Name 6Deleting 6Editing 6Finding 5
Saving Places You Find 5
Serial Number iShow Map 11Software License Agreement 30Software Version Number 20Speed/Speedometer 16Spell Name 2Stopping Route Navigation 17Storing 25Storing the c320 25System Setup 20
TTechnical Specs 28Text Bar 13Theft, Avoiding 26Time 22Time, Customizing 22Touchscreen
Calibrating 25Cleaning 25
Track Up 19Trip Information Page 16Turn-by-Turn Directions 14
Turn In 13
UUnits 20Unit ID Number 20Using in Practice Mode 26Using Responsibly 26
VVehicle Type 21Viewing Places on the Map 11Viewing the Map
While Driving 12While Navigating 13
Voice Directions 15
WWAAS 24Warranty 30Waterproof, c320 is Not 25
ZZoom 9, 11


For the latest free software updates (excluding map data) throughout the life of your Garmin products, visit the Garmin Web site at www.garmin.com.
© Copyright 2005 Garmin Ltd. or its subsidiaries
Garmin International, Inc. 1200 East 151st Street, Olathe, Kansas 66062, U.S.A.
Garmin (Europe) Ltd. Unit 5, The Quadrangle, Abbey Park Industrial Estate, Romsey, SO51 9DL, U.K.
Garmin Corporation No. 68, Jangshu 2nd Road, Shijr, Taipei County, Taiwan
www.garmin.com
Part Number 190-00435-00 Rev. B