Embed Size (px)
Citation preview
LEGEND
k Knit
yo Yarn over
kfb Knit front and back - Knit into the front loop but do not remove the stitch from the left needle, then knit into the back loop of the same stitch and pull that stitch off the needle
PM Place marker
SM Slip marker
M1L Make 1 left by lifting the bar between the stitches with the left needle from front to back and knitting through the back leg
M1R Make 1 right by lifting the bar between the stitches with the left needle from back to front and
knitting through the front leg
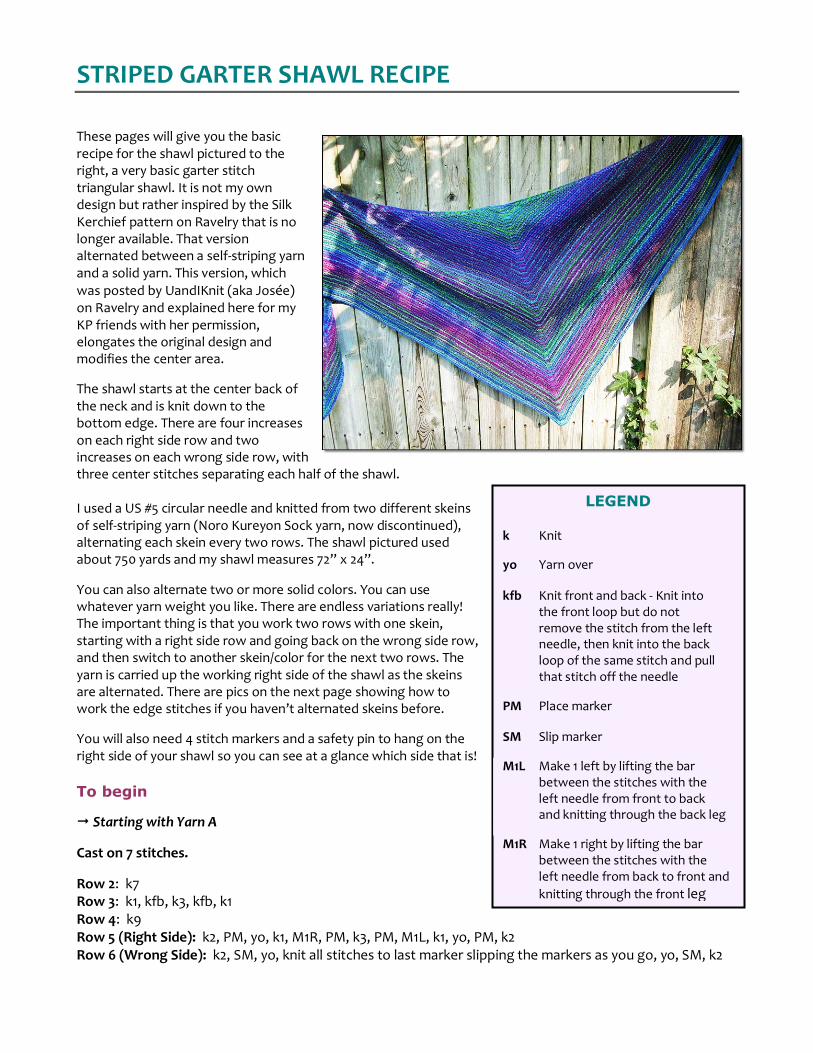
STRIPED GARTER SHAWL RECIPE These pages will give you the basic recipe for the shawl pictured to the right, a very basic garter stitch triangular shawl. It is not my own design but rather inspired by the Silk Kerchief pattern on Ravelry that is no longer available. That version alternated between a self-striping yarn and a solid yarn. This version, which
was posted by UandIKnit (aka Josée) on Ravelry and explained here for my KP friends with her permission, elongates the original design and modifies the center area.
The shawl starts at the center back of the neck and is knit down to the bottom edge. There are four increases on each right side row and two increases on each wrong side row, with three center stitches separating each half of the shawl. I used a US #5 circular needle and knitted from two different skeins of self-striping yarn (Noro Kureyon Sock yarn, now discontinued), alternating each skein every two rows. The shawl pictured used about 750 yards and my shawl measures 72” x 24”.
You can also alternate two or more solid colors. You can use whatever yarn weight you like. There are endless variations really! The important thing is that you work two rows with one skein, starting with a right side row and going back on the wrong side row, and then switch to another skein/color for the next two rows. The yarn is carried up the working right side of the shawl as the skeins are alternated. There are pics on the next page showing how to work the edge stitches if you haven’t alternated skeins before.
You will also need 4 stitch markers and a safety pin to hang on the right side of your shawl so you can see at a glance which side that is!
To begin
� Starting with Yarn A
Cast on 7 stitches.
Row 2: k7 Row 3: k1, kfb, k3, kfb, k1 Row 4: k9 Row 5 (Right Side): k2, PM, yo, k1, M1R, PM, k3, PM, M1L, k1, yo, PM, k2 Row 6 (Wrong Side): k2, SM, yo, knit all stitches to last marker slipping the markers as you go, yo, SM, k2
STRIPED GARTER SHAWL RECIPE
How to work the rest of the shawl � The first time you work these next 2 rows, you will switch to Yarn B and then:
Row 1 and all Right Side Rows: k2, SM, yo, knit all stitches to next marker, M1R, SM, k3, SM, M1L, knit all stitches to last marker, yo, SM, k2 Row 2 and all Wrong Side Rows: k2, SM, yo, knit all stitches to last marker slipping the markers as you go, yo, SM, k2 � then drop working yarn and pick up the other color to start new stripe
Continue as established, alternating between rows 1 and 2 above, switching between Yarn A and B every two rows, until your shawl is big enough. Bind off loosely with either a standard bind off using needles a few sizes larger or a naturally stretchy bind off on the same needle size. (I used the Russian bind off which is:
Knit the first two stitches together through the back loop, slip the resulting stitch back onto the left hand
needle purlwise and repeat steps 1 and 2 until you have one stitch left. Pull the yarn through that last stitch.) To get the results pictured, I highly recommend wet blocking your shawl if using natural fibers or steam blocking if using acrylic. Then enjoy the squishy garter goodness of your new shawl!
Recipe written up by Dee O’Keefe, feel freRecipe written up by Dee O’Keefe, feel freRecipe written up by Dee O’Keefe, feel freRecipe written up by Dee O’Keefe, feel free to do with it what you will!e to do with it what you will!e to do with it what you will!e to do with it what you will!
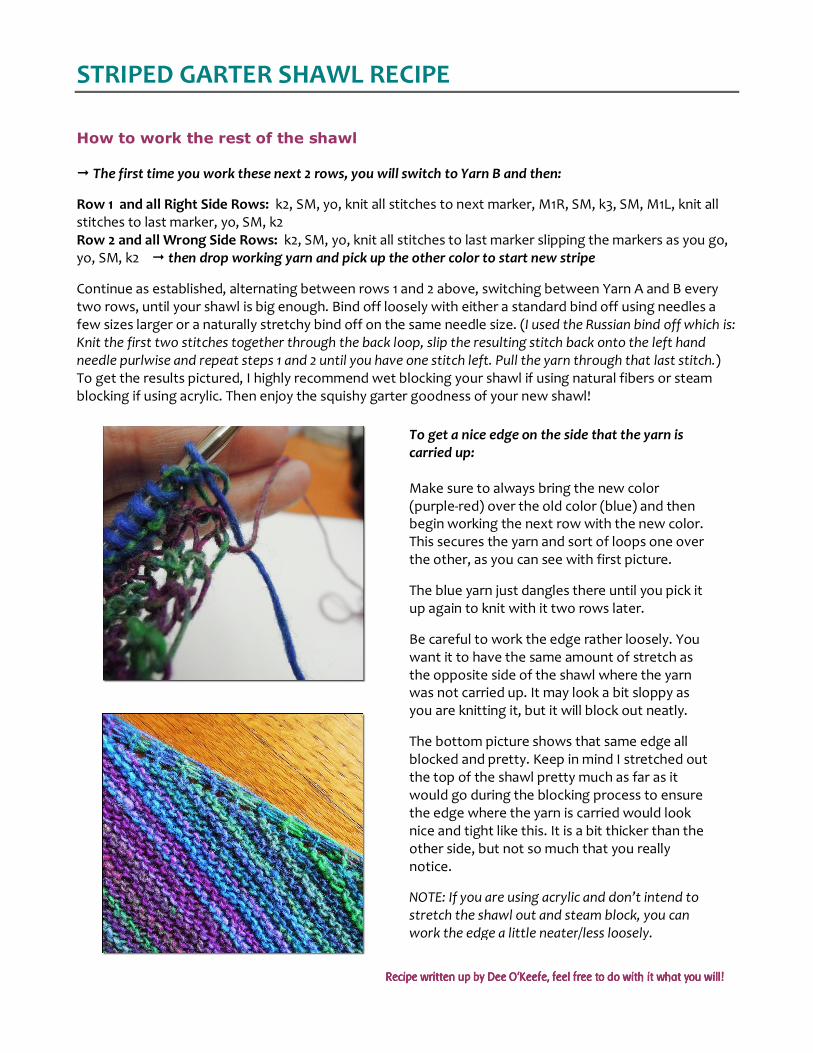
To get a nice edge on the side that the yarn is
carried up:
Make sure to always bring the new color (purple-red) over the old color (blue) and then begin working the next row with the new color. This secures the yarn and sort of loops one over the other, as you can see with first picture.
The blue yarn just dangles there until you pick it up again to knit with it two rows later.
Be careful to work the edge rather loosely. You want it to have the same amount of stretch as the opposite side of the shawl where the yarn was not carried up. It may look a bit sloppy as you are knitting it, but it will block out neatly.
The bottom picture shows that same edge all blocked and pretty. Keep in mind I stretched out the top of the shawl pretty much as far as it would go during the blocking process to ensure the edge where the yarn is carried would look nice and tight like this. It is a bit thicker than the other side, but not so much that you really notice.
NOTE: If you are using acrylic and don’t intend to
stretch the shawl out and steam block, you can
work the edge a little neater/less loosely.