Embed Size (px)
Citation preview

Student Growth Portfolio Model Physical Education (K-5)
Teacher Guidebook 2016-17

Table of Contents Physical Education Portfolio Overview General Assessment Protocols Helpful Technology Hints Second Grade: A. Locomotor Skills Second Grade: B. Underhand Throw Second Grade: C. Underhand Catch Second Grade: B. & C. Combined Underhand Throw and Catch Second Grade: D. Kicking with a Running Approach Second Grade: E. Dribbling with Hands Second Grade: F. Balance Skills Second Grade: G. Jump Rope Skills Fifth Grade: A. Overhand Throw Fifth Grade: B. Overhead Volley Fifth Grade: C. Forehand Striking Fifth Grade: D. Invasion Game Task Fifth Grade: E. Educational Gymnastics Routine Appendix A: Portfolio Planning Guide Appendix B: Sample Scoring Sheets Appendix C: Physical Education Scoring Guides
1
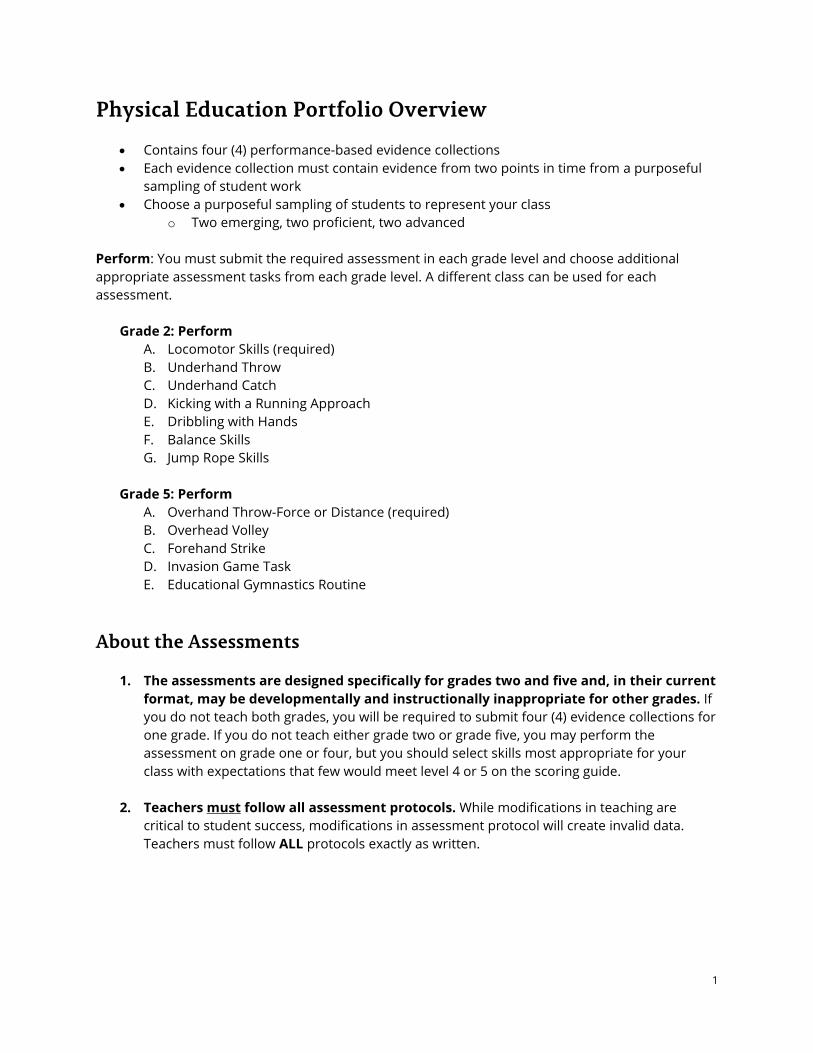
Physical Education Portfolio Overview
Contains four (4) performance-based evidence collections Each evidence collection must contain evidence from two points in time from a purposeful
sampling of student work Choose a purposeful sampling of students to represent your class
o Two emerging, two proficient, two advanced Perform: You must submit the required assessment in each grade level and choose additional appropriate assessment tasks from each grade level. A different class can be used for each assessment.
Grade 2: Perform A. Locomotor Skills (required) B. Underhand Throw C. Underhand Catch D. Kicking with a Running Approach E. Dribbling with Hands F. Balance Skills G. Jump Rope Skills
Grade 5: Perform
A. Overhand Throw-Force or Distance (required) B. Overhead Volley C. Forehand Strike D. Invasion Game Task E. Educational Gymnastics Routine
About the Assessments
1. The assessments are designed specifically for grades two and five and, in their current format, may be developmentally and instructionally inappropriate for other grades. If you do not teach both grades, you will be required to submit four (4) evidence collections for one grade. If you do not teach either grade two or grade five, you may perform the assessment on grade one or four, but you should select skills most appropriate for your class with expectations that few would meet level 4 or 5 on the scoring guide.
2. Teachers must follow all assessment protocols. While modifications in teaching are
critical to student success, modifications in assessment protocol will create invalid data. Teachers must follow ALL protocols exactly as written.

2
General Assessment Protocols Prior to Assessment
o Organize each class used for assessment into four perform assessment groups and label each as group A, B, C, or D.
o The assessment score sheets should be completed with student name, letter group, and pinnie (jersey) number. This is for your records only. No student names will be reported.
o The same groups should be used for both point A to point B. The only exception is if a student is absent, moved, or a new student is added to a class after point A.
Teach before, direct during, and evaluate after.
o Prior to the point A assessment, teachers should only instruct the students about exactly how the assessment is conducted. A practice round may be conducted to check for student understanding of protocols.
o After the point A assessment and before the point B assessment, teachers should teach their curriculum, assuring they are teaching the assessed content. Whenever possible, practice tasks similar to the assessment protocol are recommended.
o Prior to the post-assessment, teachers should review and practice the assessment protocols. The teacher may inform students of their pre-assessment scores as a means to motivate improvement.
o On the day of the assessment, the teacher takes on the role of director of the assessment. No skill/performance instruction or hints are allowed. Once the assessment starts, students can receive no further instruction from the teacher on how to do the activity.
o Later, through watching digital recordings of the perform assessments, the teacher becomes an evaluator and should score the growth seen.
Safety
o Students should wear safe shoes for activity (no boots, sandals, or other unsafe shoes). o Assessments should be organized so no equipment or obstacles can potentially harm
the student.
What do other students do while one group is being assessed? o When one group is being assessed, members of the other three groups should be
participating in other physical education class activities such as: Station work Instruction by a co-teacher Practicing the assessment task
o If possible, request a teaching aid or parent volunteer to monitor other students while you administer the assessment. Or, train a volunteer to conduct the assessments while you teach the other students.
o Other than the students in the small assessment groups, students should not be sitting/watching the group being assessed.
o Best practices for assessment in physical education should be designed so that students are still physically active during the class period. Additionally, students being assessed should not be placed on display in front of the entire class.
3
Recording student assessments: Quality recording is critical for your evaluation of the
students and for the peer review process. o Use of numbered pinnies (jerseys):
All digital recordings must clearly show student numbers. All students on camera should wear pinnies with large white numbers (8–10
inches high and 1½ to 2 inches wide) placed on both the front and back of the pinnie. If possible, use dark colored pinnies (e.g., black, navy blue, kelly green). This will allow the light numbers to show up better on the camera.
You will need enough different numbered pinnies for each student in the assessment group (4–8 depending on class size).
o Identification of students: Student names should not be used on the recording to protect student privacy. Immediately before a student performs, he or she should stand approximately
five feet from the camera and the teacher or assistant should state the letter and number of the student (e.g., Group A-Student 1, Group A-Student 2, Group A-Student 3, Group A-Student 4, etc.).
o Recording: The camera should remain on record after the student number is announced
and until that group of students completes the assessment. Stop the recording as the next group prepares for assessment and then repeat the above with Groups B, C, and D. This will ensure that the videos remain a manageable size and are easy to upload without condensing.
Check recording immediately. If a recording is not clear, the assessment should be repeated at another time.
Recording practice rounds prior to assessment may prevent the need for repeats. This can be done with other classes or grade levels.
Evaluation of students and score sheets:
o Teachers should watch the digital recordings and evaluate the students using the scoring guide as soon as possible following the pre-assessment. Students must appear on the score sheet in the exact order and in the correct group as they appear on the digital recording. Teachers should then determine their emerging, proficient, and advanced students. Ideally, this information should be used to structure your teaching so that you are effectively able to differentiate for all students.

4
Helpful PE Technology Hints
1. Video Length: Generally, teachers report success when limiting video recordings in HD to 1–3 minutes per file. Recording longer than the recommended time frame could result in videos that are too large to be uploaded or take an extremely long time to upload. Additionally, you really want to hone in on the specific skill being assessed, which should not take longer than a few minutes.
2. GLADiS Video Requirements: Each teacher is limited to 500MB of online storage in GLADiS. In addition, no single upload to GLADiS can be larger than 150MB in size. This may impose limitations on how you will build your portfolio, but it is intended to help keep the overall system running smoothly. Although you will notice little difference in the sound quality from the conversion of your files, the video/image quality will be noticeably lowered. Any text or numbers that need to be seen or read by the reviewer should be fairly large in size, or they may not be viewable in the converted file.
a. Staying within the 150MB per upload limit can seem difficult, especially if you have an extended scene you wish to show. A longer clip should be:
i. Broken up into several shorter clips (e.g., film the whole, then edit it into smaller pieces).
ii. Appropriately named in a sequence (e.g., FifthGrade_Perform_OverhandThrow_GroupA_Pre.mp4, FifthGrade_Perform_OverhandThrow_GroupB_Pre.mp4, etc.).
iii. Uploaded in sequence to make sure they are presented to the reviewer in the right order.
b. If your older computer is having difficulty viewing some of these newer type files, try using another open source, freeware program called VLC (www.videolan.org) that is available for both Mac and PC. It is not a video editor, but it can help you see everything you have recorded.
5
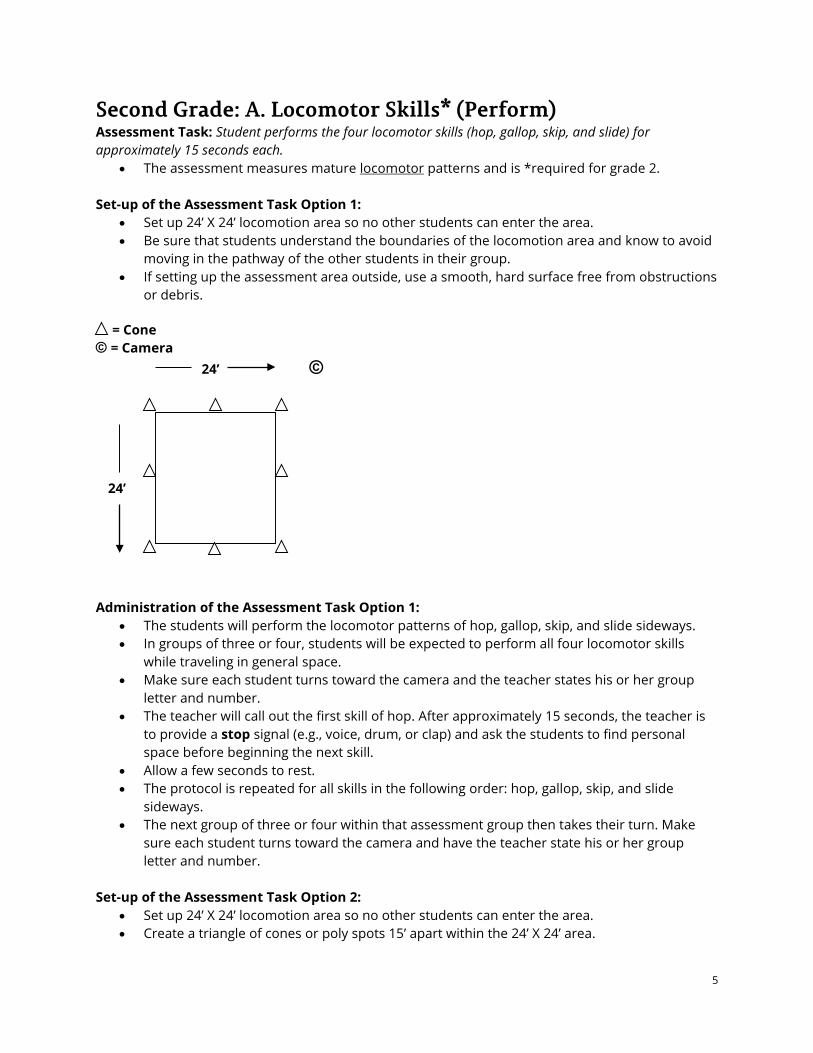
Second Grade: A. Locomotor Skills* (Perform) Assessment Task: Student performs the four locomotor skills (hop, gallop, skip, and slide) for approximately 15 seconds each.
The assessment measures mature locomotor patterns and is *required for grade 2. Set-up of the Assessment Task Option 1:
Set up 24’ X 24’ locomotion area so no other students can enter the area. Be sure that students understand the boundaries of the locomotion area and know to avoid
moving in the pathway of the other students in their group. If setting up the assessment area outside, use a smooth, hard surface free from obstructions
or debris. = Cone © = Camera 24’ © 24’ Administration of the Assessment Task Option 1:
The students will perform the locomotor patterns of hop, gallop, skip, and slide sideways. In groups of three or four, students will be expected to perform all four locomotor skills
while traveling in general space. Make sure each student turns toward the camera and the teacher states his or her group
letter and number. The teacher will call out the first skill of hop. After approximately 15 seconds, the teacher is
to provide a stop signal (e.g., voice, drum, or clap) and ask the students to find personal space before beginning the next skill.
Allow a few seconds to rest. The protocol is repeated for all skills in the following order: hop, gallop, skip, and slide
sideways. The next group of three or four within that assessment group then takes their turn. Make
sure each student turns toward the camera and have the teacher state his or her group letter and number.
Set-up of the Assessment Task Option 2:
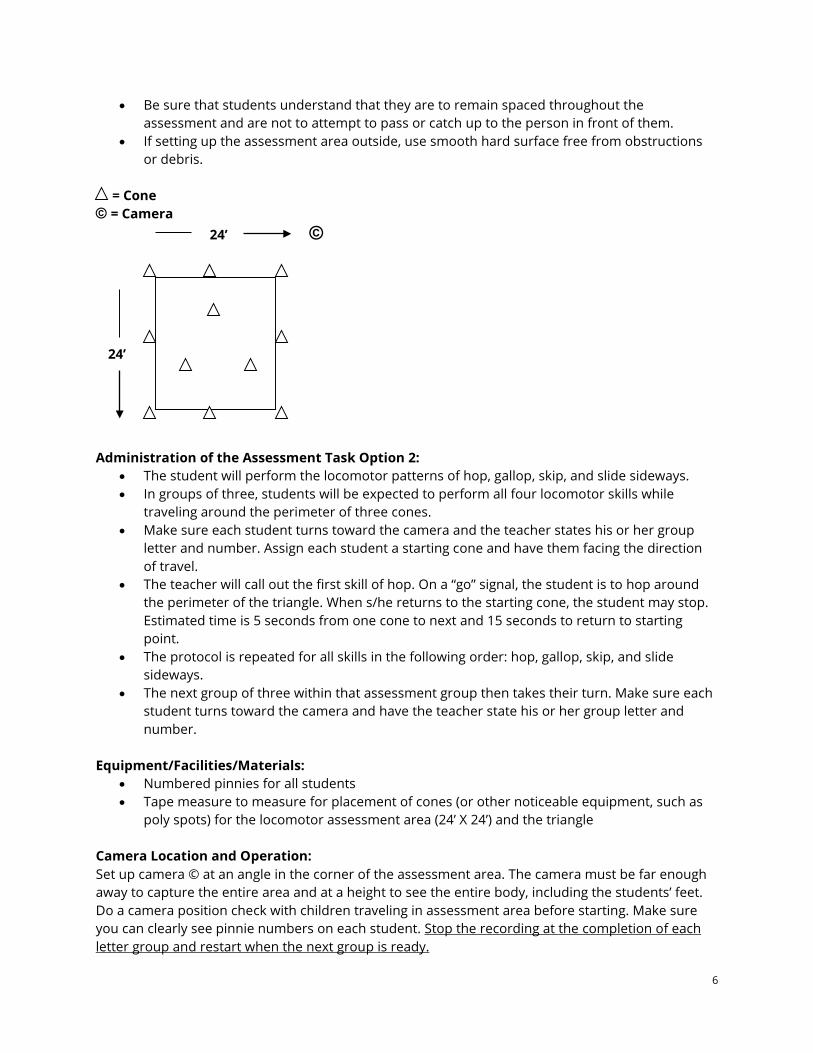
Set up 24’ X 24’ locomotion area so no other students can enter the area. Create a triangle of cones or poly spots 15’ apart within the 24’ X 24’ area.
6
Be sure that students understand that they are to remain spaced throughout the assessment and are not to attempt to pass or catch up to the person in front of them.
If setting up the assessment area outside, use smooth hard surface free from obstructions or debris.
= Cone © = Camera 24’ © 24’ Administration of the Assessment Task Option 2:
The student will perform the locomotor patterns of hop, gallop, skip, and slide sideways. In groups of three, students will be expected to perform all four locomotor skills while
traveling around the perimeter of three cones. Make sure each student turns toward the camera and the teacher states his or her group
letter and number. Assign each student a starting cone and have them facing the direction of travel.
The teacher will call out the first skill of hop. On a “go” signal, the student is to hop around the perimeter of the triangle. When s/he returns to the starting cone, the student may stop. Estimated time is 5 seconds from one cone to next and 15 seconds to return to starting point.
The protocol is repeated for all skills in the following order: hop, gallop, skip, and slide sideways.
The next group of three within that assessment group then takes their turn. Make sure each student turns toward the camera and have the teacher state his or her group letter and number.
Equipment/Facilities/Materials:
Numbered pinnies for all students Tape measure to measure for placement of cones (or other noticeable equipment, such as
poly spots) for the locomotor assessment area (24’ X 24’) and the triangle Camera Location and Operation: Set up camera © at an angle in the corner of the assessment area. The camera must be far enough away to capture the entire area and at a height to see the entire body, including the students’ feet. Do a camera position check with children traveling in assessment area before starting. Make sure you can clearly see pinnie numbers on each student. Stop the recording at the completion of each letter group and restart when the next group is ready.

7
Critical Elements for Locomotor Patterns: Mature Pattern for Hop: 1) Travels in a forward direction 2) Takes off on one foot and land on the same foot 3) Knee of non-landing leg is bent 4) Momentarily airborne Mature Pattern for Gallop: 1) Travels in a forward direction with smooth, rhythmical action on the balls of the feet 2) Demonstrates lead leg step-close action without crossover 3) Hips (torso) facing forward in direction of travel 4) Momentarily airborne (no foot drag) Mature Pattern for Skip: 1) Travels in a forward direction with a smooth, rhythmical action 2) Step taken followed by a short hop with a knee lift 3) Alternates feet 4) Momentarily airborne Mature Pattern for Slide: 1) Travels in a sideways direction with a smooth, rhythmical action on the balls of the feet 2) Demonstrates lead leg step-close action without crossover 3) Hips (torso) facing forward while side clearly faces direction of travel 4) Momentarily airborne (no foot drag) Helpful hints for student growth: Pre-assessment in August or September and post-assessment late March Practice locomotor skills daily
o Allow students to use skills in a warm-up. o Allow students to use the skills as they enter class. o Allow students to use the skills as they exit class. o Use music to help with rhythmical movements.
Hop: Explain the difference between hopping (one foot to one foot) and jumping Gallop: Emphasize not dragging or sliding foot and hips facing forward Slide: Emphasize not dragging or sliding feet; hips facing forward while side clearly faces
direction of travel Skip: You could teach students to “step, hop, step, hop”. Have a proficient or advanced student
hold hands and skip with an emerging student. 5+: 1) Connect the locomotor patterns into a sequence where the student transitions from hop to skip to gallop, and to slide without stopping. The sequence should last about 40 seconds with smooth transitions between skills. 2) Challenge students to hop and skip backwards; to gallop and slide changing lead foot without stopping. 3) Perform locomotor patterns to the beat of music.
8
Second Grade: B. Underhand Throw (Perform) Assessment Task: Student performs four underhand throws of 15 feet.
Throw a hand-sized ball or beanbag using an underhand throwing pattern to or past a target line. The assessment measures mature underhand throwing pattern for distance.
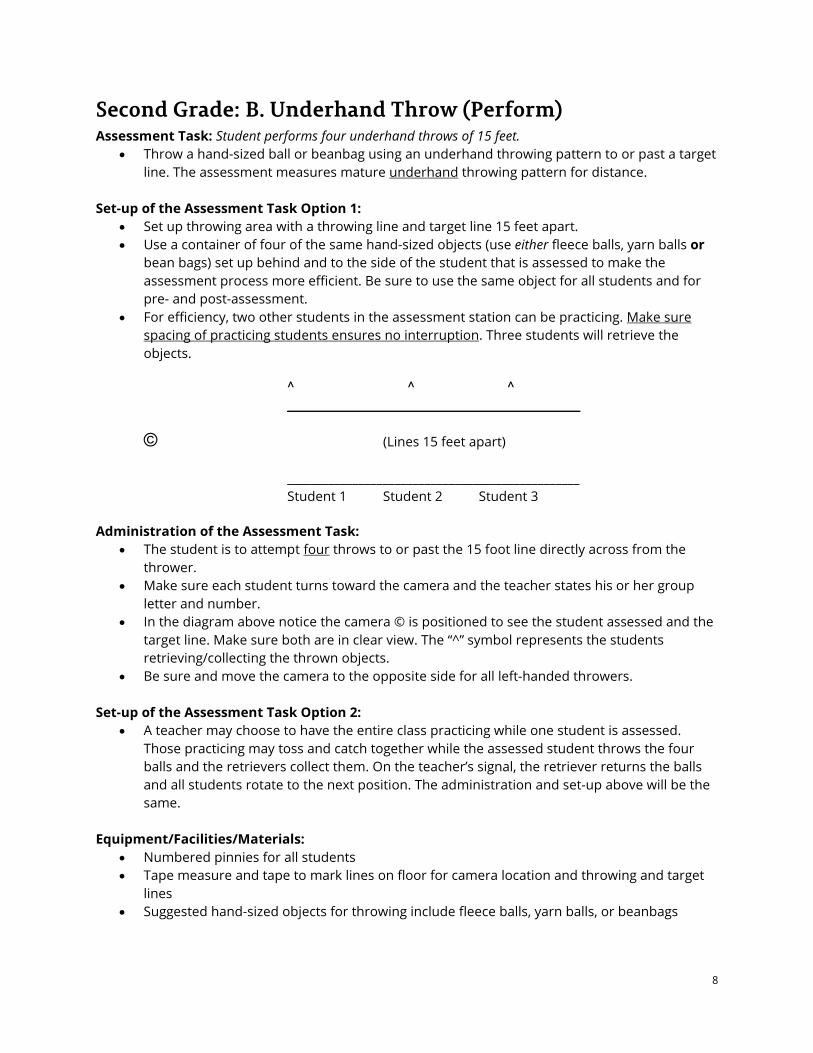
Set-up of the Assessment Task Option 1:
Set up throwing area with a throwing line and target line 15 feet apart. Use a container of four of the same hand-sized objects (use either fleece balls, yarn balls or
bean bags) set up behind and to the side of the student that is assessed to make the assessment process more efficient. Be sure to use the same object for all students and for pre- and post-assessment.
For efficiency, two other students in the assessment station can be practicing. Make sure spacing of practicing students ensures no interruption. Three students will retrieve the objects. ^ ^ ^
____________________________________ © (Lines 15 feet apart) _________________________________________________ Student 1 Student 2 Student 3 Administration of the Assessment Task:
The student is to attempt four throws to or past the 15 foot line directly across from the thrower.
Make sure each student turns toward the camera and the teacher states his or her group letter and number.
In the diagram above notice the camera © is positioned to see the student assessed and the target line. Make sure both are in clear view. The “^” symbol represents the students retrieving/collecting the thrown objects.
Be sure and move the camera to the opposite side for all left-handed throwers. Set-up of the Assessment Task Option 2:
A teacher may choose to have the entire class practicing while one student is assessed. Those practicing may toss and catch together while the assessed student throws the four balls and the retrievers collect them. On the teacher’s signal, the retriever returns the balls and all students rotate to the next position. The administration and set-up above will be the same.
Equipment/Facilities/Materials:
Numbered pinnies for all students Tape measure and tape to mark lines on floor for camera location and throwing and target
lines Suggested hand-sized objects for throwing include fleece balls, yarn balls, or beanbags

9
Camera Location and Operation: Set up camera © where both the throwing and target lines are in view. The student’s entire body, including the feet, must be in camera view and close enough to assess throwing form. Position camera so the target line can be seen to evaluate distance. Do a trial run on camera position before starting the assessment. Stop the recording at the completion of each letter group and restart when the next group is ready. Critical Elements for the Underhand Throw for Distance: 1) Faces the target in preparation for the throwing action 2) Arm back past the hip to start the throwing action 3) Steps with opposition at the same time the throwing arm moves forward 4) Follows through toward intended direction of travel Helpful hints for student growth:
Teach preparation movement into execution by having students face target and concentrate on hand swings behind leg when preparing to throw. This can be done without and with a ball.
Teach timing and weight transfer by making sure students step with opposite foot as arm moves forward for release. This will help with distance.
Have students practice throwing underhand to each other, to a wall, or to objects. Make sure practice opportunities include distance of 15 feet or further to encourage the
mature throwing pattern.
5+: 1) Throw four beanbags the 15 foot distance with at least three landing in a hoop. Allow two
attempts at success. 2) Place targets on a wall and have students hit target with 75 percent success rate. 3) Repeat the same assessment with non/dominant hand.
l l l - - - - - - - - - - - -15’- - - - - - - - - - - - - - l Student l l
©
10
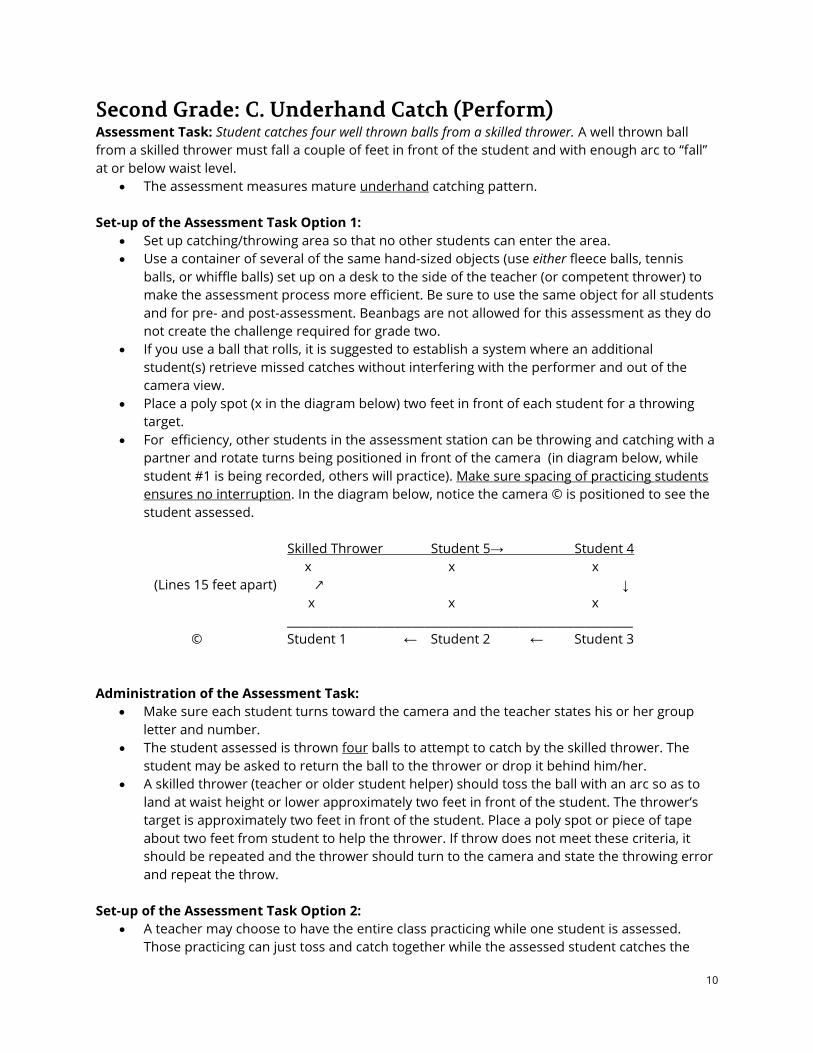
Second Grade: C. Underhand Catch (Perform) Assessment Task: Student catches four well thrown balls from a skilled thrower. A well thrown ball from a skilled thrower must fall a couple of feet in front of the student and with enough arc to “fall” at or below waist level.
The assessment measures mature underhand catching pattern. Set-up of the Assessment Task Option 1:
Set up catching/throwing area so that no other students can enter the area. Use a container of several of the same hand-sized objects (use either fleece balls, tennis
balls, or whiffle balls) set up on a desk to the side of the teacher (or competent thrower) to make the assessment process more efficient. Be sure to use the same object for all students and for pre- and post-assessment. Beanbags are not allowed for this assessment as they do not create the challenge required for grade two.
If you use a ball that rolls, it is suggested to establish a system where an additional student(s) retrieve missed catches without interfering with the performer and out of the camera view.
Place a poly spot (x in the diagram below) two feet in front of each student for a throwing target.
For efficiency, other students in the assessment station can be throwing and catching with a partner and rotate turns being positioned in front of the camera (in diagram below, while student #1 is being recorded, others will practice). Make sure spacing of practicing students ensures no interruption. In the diagram below, notice the camera © is positioned to see the student assessed.
Skilled Thrower Student 5 Student 4 x x x (Lines 15 feet apart) x x x __________________________________________________________ © Student 1 Student 2 Student 3 Administration of the Assessment Task:
Make sure each student turns toward the camera and the teacher states his or her group letter and number.
The student assessed is thrown four balls to attempt to catch by the skilled thrower. The student may be asked to return the ball to the thrower or drop it behind him/her.
A skilled thrower (teacher or older student helper) should toss the ball with an arc so as to land at waist height or lower approximately two feet in front of the student. The thrower’s target is approximately two feet in front of the student. Place a poly spot or piece of tape about two feet from student to help the thrower. If throw does not meet these criteria, it should be repeated and the thrower should turn to the camera and state the throwing error and repeat the throw.
Set-up of the Assessment Task Option 2:
A teacher may choose to have the entire class practicing while one student is assessed. Those practicing can just toss and catch together while the assessed student catches the
11
four balls thrown by the teacher or skilled thrower. On the teacher’s signal, all students rotate to the next position. The administration and set-up above will be the same.
Equipment/Facilities/Materials:
Numbered pinnies for all students Tape measure and tape to mark lines on floor for camera location and starting points
o It is recommended that you use tape to show the area for both the student and the skilled thrower to stand.
o Poly spots or tape mark to serve as targets for the throwers. Suggested hand-sized objects for catching include heavy fleece, tennis, or whiffle balls
(beanbags are not an acceptable challenge for grade 2 and therefore are not allowed)
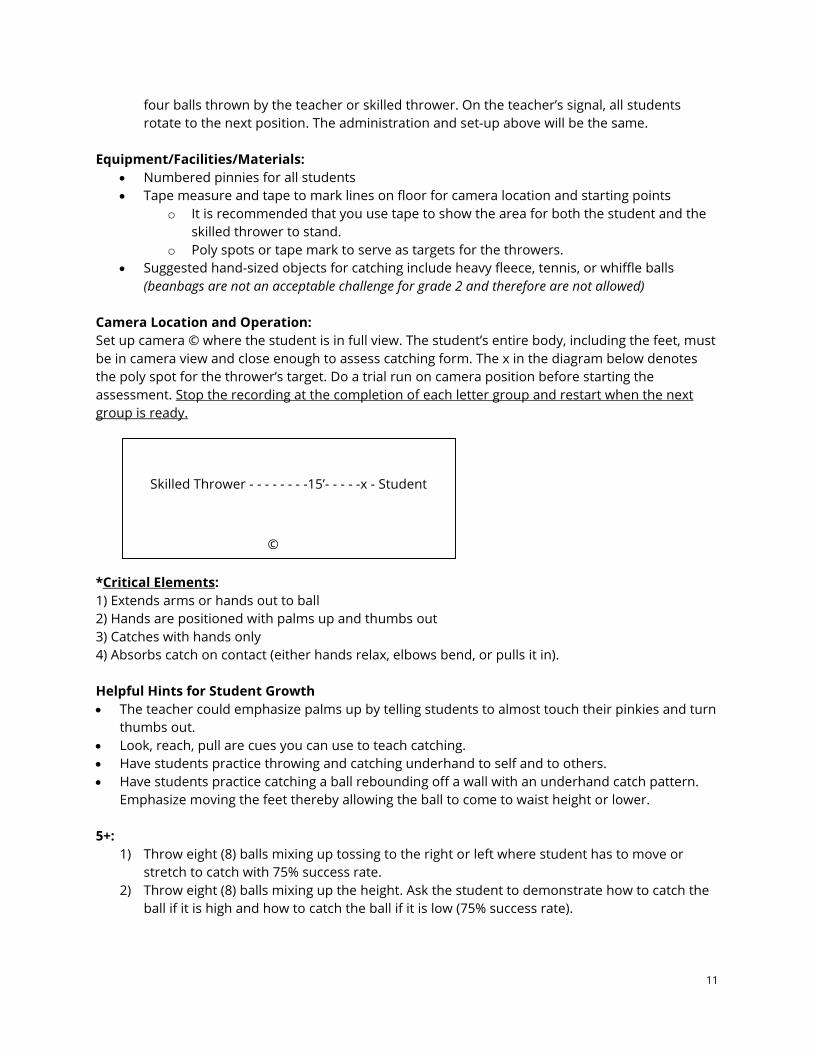
Camera Location and Operation: Set up camera © where the student is in full view. The student’s entire body, including the feet, must be in camera view and close enough to assess catching form. The x in the diagram below denotes the poly spot for the thrower’s target. Do a trial run on camera position before starting the assessment. Stop the recording at the completion of each letter group and restart when the next group is ready.
*Critical Elements: 1) Extends arms or hands out to ball 2) Hands are positioned with palms up and thumbs out 3) Catches with hands only 4) Absorbs catch on contact (either hands relax, elbows bend, or pulls it in). Helpful Hints for Student Growth The teacher could emphasize palms up by telling students to almost touch their pinkies and turn
thumbs out. Look, reach, pull are cues you can use to teach catching. Have students practice throwing and catching underhand to self and to others. Have students practice catching a ball rebounding off a wall with an underhand catch pattern.
Emphasize moving the feet thereby allowing the ball to come to waist height or lower. 5+:
1) Throw eight (8) balls mixing up tossing to the right or left where student has to move or stretch to catch with 75% success rate.
2) Throw eight (8) balls mixing up the height. Ask the student to demonstrate how to catch the ball if it is high and how to catch the ball if it is low (75% success rate).
Skilled Thrower - - - - - - - -15’- - - - -x - Student
©

12
Second Grade: B. & C. Combined Underhand Throw and Catch (Perform) A teacher who does not teach grade 5 must submit four perform evidence collections for grade 2. Should a teacher select to assess both underhand throwing and underhand catching, the two skills may be assessed at the same time with these simple changes.
1. Use the set-up for underhand catching including the options for balls. Beanbags are not an option.
2. The teacher or skilled thrower now becomes the target. The teacher should stand two steps behind the line. The student has thrown the adequate distance if the teacher or skilled thrower does not have to take two steps beyond the line to catch the ball.
3. It is imperative that the camera is positioned to see both the teacher (or skilled thrower) and the student being assessed.
4. Be sure and move the camera to the opposite side for all left-handed throwers.
13
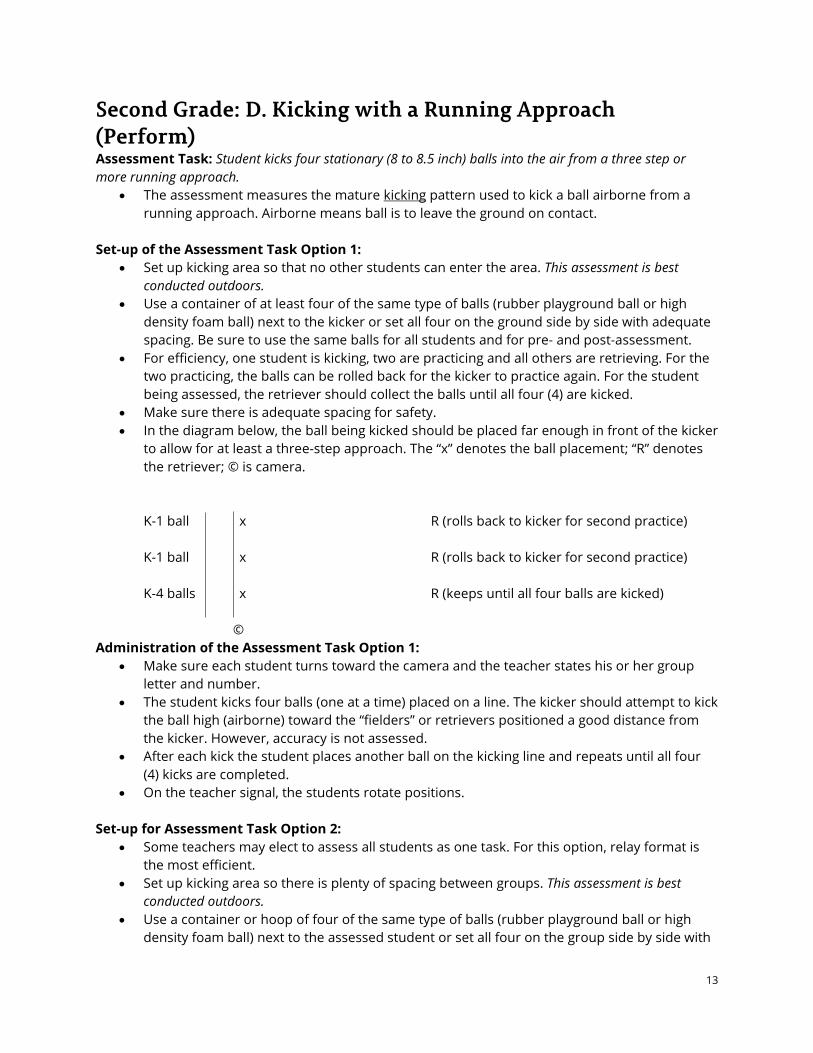
Second Grade: D. Kicking with a Running Approach (Perform) Assessment Task: Student kicks four stationary (8 to 8.5 inch) balls into the air from a three step or more running approach.
The assessment measures the mature kicking pattern used to kick a ball airborne from a running approach. Airborne means ball is to leave the ground on contact.
Set-up of the Assessment Task Option 1:
Set up kicking area so that no other students can enter the area. This assessment is best conducted outdoors.
Use a container of at least four of the same type of balls (rubber playground ball or high density foam ball) next to the kicker or set all four on the ground side by side with adequate spacing. Be sure to use the same balls for all students and for pre- and post-assessment.
For efficiency, one student is kicking, two are practicing and all others are retrieving. For the two practicing, the balls can be rolled back for the kicker to practice again. For the student being assessed, the retriever should collect the balls until all four (4) are kicked.
Make sure there is adequate spacing for safety. In the diagram below, the ball being kicked should be placed far enough in front of the kicker
to allow for at least a three-step approach. The “x” denotes the ball placement; “R” denotes the retriever; © is camera.
K-1 ball x R (rolls back to kicker for second practice) K-1 ball x R (rolls back to kicker for second practice) K-4 balls x R (keeps until all four balls are kicked)
© Administration of the Assessment Task Option 1:
Make sure each student turns toward the camera and the teacher states his or her group letter and number.
The student kicks four balls (one at a time) placed on a line. The kicker should attempt to kick the ball high (airborne) toward the “fielders” or retrievers positioned a good distance from the kicker. However, accuracy is not assessed.
After each kick the student places another ball on the kicking line and repeats until all four (4) kicks are completed.
On the teacher signal, the students rotate positions. Set-up for Assessment Task Option 2:
Some teachers may elect to assess all students as one task. For this option, relay format is the most efficient.
Set up kicking area so there is plenty of spacing between groups. This assessment is best conducted outdoors.
Use a container or hoop of four of the same type of balls (rubber playground ball or high density foam ball) next to the assessed student or set all four on the group side by side with

14
adequate spacing. Be sure to use the same balls for all students and for pre- and post-assessment.
For efficiency, half of the students are retrievers (groups C & D below). In the practice groups, each student kicks a ball and then goes to the end of the line. The retrievers collect the ball and roll it to the next kicker who collects it and places it on the line to kick. For the student being assessed, the retrievers should collect the balls until all four (4) are kicked.
Make sure there is adequate spacing for safety. In the diagram below, the ball being kicked should be placed far enough in front of the kicker
to allow for at least a three-step approach. The “x” denotes the ball placement; “R” denotes the retrievers; © is camera.
Group B x R from group D (rolls back to next kicker) Group B x R from group D (rolls back to next kicker) Group A x R from group C (rolls back to next kicker)
Group A x R from group C (keeps until all 4 are kicked) © Administration of the Assessment Task Option 2:
Make sure each student turns toward the camera and the teacher states his or her group letter and number.
The student kicks four balls (one at a time) placed on a line. The kicker should attempt to kick the ball high (airborne) toward the “fielders” or retrievers positioned a good distance from the kicker. However, accuracy is not assessed.
After each kick the student places another ball on the kicking line and repeats until all 4 kicks are completed.
After the first half of group A students have been assessed, the teacher signals and the kicking students rotate positions. After all students in group A have completed their turns, stop the recording. Start again when group B is ready to state group letter and number.
Be sure and move the camera to the opposite side for all left-handed kickers.
Equipment/Facilities/Materials: Numbered pinnies for all students Tape or poly spots to mark running line and kicking line At least seven balls (playground balls or high density foam balls 8 to 8.5 inches in diameter)
Camera Location and Operation: Set up camera © on the same side as the student’s kicking foot and where the student is in full view when kicking. The student’s entire body, including the feet, must be in camera view and close enough to assess kicking form. The x in the diagram below denotes the ball. Do a trial run on camera position before starting the assessment. Stop the recording at the completion of each letter group and restart when the next group is ready.

15
**Suggestion: Place all left-footed kickers in same group to save time on moving camera.
*Critical Elements: 1) Contacts ball with top of foot (shoelaces) 2) Contact with ball is made directly below center of ball 3) Slight backward lean of trunk on follow through 4) Follows through toward target and extended upward Helpful Hints for Student Growth:
Contact ball with top of foot o Kick with shoelaces o Toe down o Contact with ball is made directly below center of ball
Toe down with shoelaces o Follow through toward target and extended upward
Foot follows the ball o Slight backward lean of trunk on follow through
Full follow through o Kick to the sky
Practice hop step to make sure plant foot lands beside ball (do not kick ball) Kick to wall with force stationary Kick to wall with strong force with running approach Kick to wall with strong force, running approach, intent to kick high Kick to partner positioned far away
5+:
1) Create a 24 X 24 foot area for a target and repeat the required task requiring accuracy at a 75% success rate.
2) Roll the four (4) balls to the students requiring them to kick a rolled ball with 75% success rate.
Kicker X R
© (for right-footed kicker)
16
Second Grade: E. Dribbling with Hands (Perform) Assessment Task: Student dribbles in self-space with preferred hand for 20 consecutive seconds.
This assessment measures the mature pattern of dribbling with hand while remaining in self-space.
Set-up of the Assessment Task:
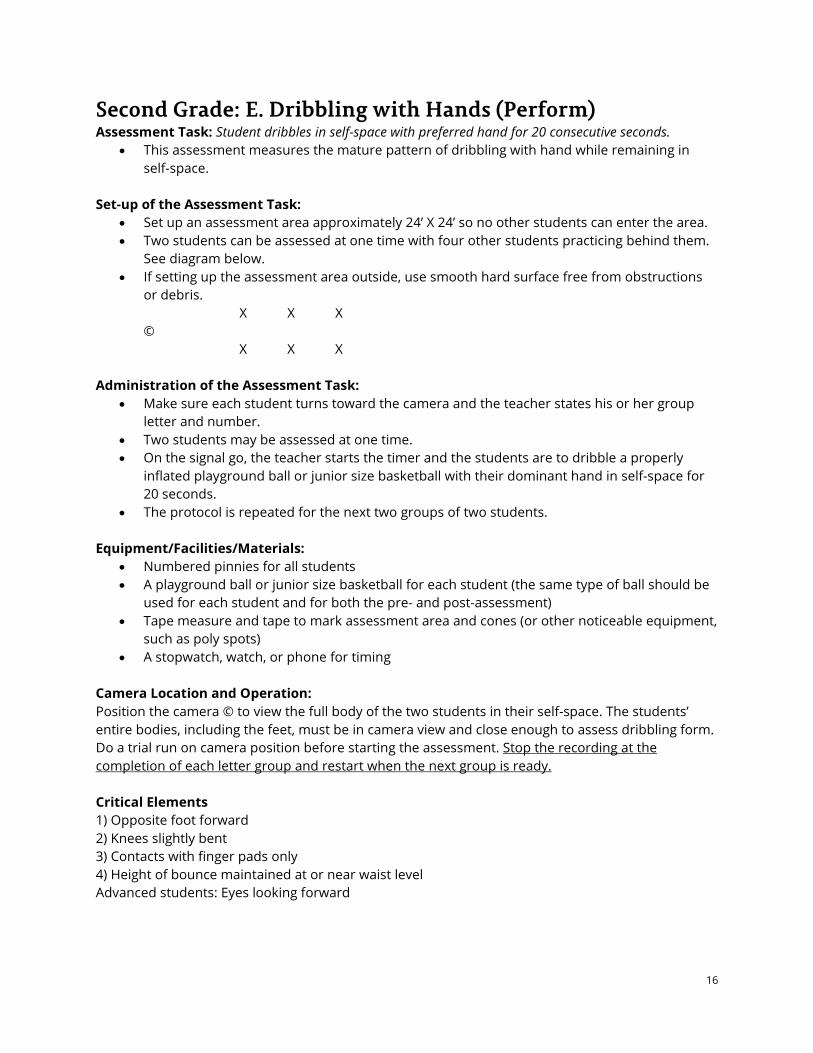
Set up an assessment area approximately 24’ X 24’ so no other students can enter the area. Two students can be assessed at one time with four other students practicing behind them.
See diagram below. If setting up the assessment area outside, use smooth hard surface free from obstructions
or debris. X X X
© X X X Administration of the Assessment Task:
Make sure each student turns toward the camera and the teacher states his or her group letter and number.
Two students may be assessed at one time. On the signal go, the teacher starts the timer and the students are to dribble a properly
inflated playground ball or junior size basketball with their dominant hand in self-space for 20 seconds.
The protocol is repeated for the next two groups of two students. Equipment/Facilities/Materials:
Numbered pinnies for all students A playground ball or junior size basketball for each student (the same type of ball should be
used for each student and for both the pre- and post-assessment) Tape measure and tape to mark assessment area and cones (or other noticeable equipment,
such as poly spots) A stopwatch, watch, or phone for timing
Camera Location and Operation: Position the camera © to view the full body of the two students in their self-space. The students’ entire bodies, including the feet, must be in camera view and close enough to assess dribbling form. Do a trial run on camera position before starting the assessment. Stop the recording at the completion of each letter group and restart when the next group is ready. Critical Elements 1) Opposite foot forward 2) Knees slightly bent 3) Contacts with finger pads only 4) Height of bounce maintained at or near waist level Advanced students: Eyes looking forward

17
Helpful Hints for Student Growth: Remember to emphasize starting position of opposite foot forward with knees bent Contact with finger pads only
o Explain finger pads, not finger tips o Push the ball
Height of bounce maintained at or near waist level o Stay over the ball o Push hard enough for the ball to meet your hand o Rhythm activity
Eyes are looking forward and not at the ball o Staring contest with your partner
5+: 1) Walk in general space dribbling with dominant hand for 30 seconds demonstrating all five of
the critical elements below. Assess three (3) students at one time to allow for adequate challenge of watching out for others.
a. Contact with finger pads only b. Hand contact slightly back on the ball c. Height of ball maintained at or near waist level d. Eyes looking forward while only occasionally glancing at the ball e. Makes good use of space; not interfering with others

18
Second Grade: F. Balance Skills (Perform) Assessment Task: Student performs four teacher or student created balances on four different bases of support.
This assessment measures the student’s ability to demonstrate stillness for at least three seconds. Each balance should be on a different base of support and there should be a change of level (low and medium).
Set-up of the Assessment Task:
Set up an assessment area approximately 24’ X 24’ so no other students can enter the area. The assessment can be performed on the floor, a mat, or a grassy area outdoors. Two students can be assessed at one time with four other students practicing behind them.
Allow ample space between the students for safety. See diagram below.
X X X © X X X Administration of the Assessment Task:
Make sure each student turns toward the camera and the teacher states his or her group letter and number.
Two students may be assessed at one time. On the signal start, the first two students perform 4 previously designed balances. The
student determines when three seconds are completed before performing the next balance in the sequence.
The protocol is repeated for the next two groups of two students. Equipment/Facilities/Materials:
Numbered pinnies for all students Mats (optional) Tape measure and tape to mark assessment area and cones (or other noticeable equipment,
such as poly spots) Camera Location and Operation: Position the camera to view the full body of the two students in their self-space. The students’ entire bodies must be in camera view and close enough to assess base of support. Do a trial run on camera position before starting the assessment. Stop the recording at the completion of each letter group and restart when the next group is ready. Criteria for Balances:
Each balance is on a different base of support (e.g., 1 hand, 2 feet; 1 foot; 2 hands, 2 feet; 2 hands, head, and one foot)
There is at least one change of level (medium and low) Stillness: balance is held completely still for at least three consecutive seconds

19
Helpful Hints for Student Growth: Teach stillness (tight muscles help you to be still)
o At least three (3) seconds (practice counting full seconds such as 1 Hippopotamus, 2 Hippopotamus, 3 Hippopotamus ); need tight muscles to help hold
Safe body parts or bases of support to balance on o E.g., no head only balances
Base of support: part of the body touching the floor o Number of body parts, opposition, encourage variety of what you can do with free
body parts and give example of variety of ways to balance on one foot Practice balances by calling out various body part combinations for base of support
o E.g., 2 elbows and 2 feet; 2 hands and 1 foot; bottom; bottom and 2 hands Practice balances by calling out number of bases of support
o E.g., 3 bases of support; 1 base of support; 5 bases of support Let students choose bases of support and teacher guess the number of body parts used for
base of support Let students select four (4) favorite balances using different bases of support Teach about changing levels (medium and low) Safety: no head/hand stands in grade 2; good spacing; no spotting; mats are not necessary
5+:
1) Perform a student- or teacher-created sequence with four balances meeting all of the above criteria plus smooth transitions from one balance to the next. Require a change of level between each balance.
20
Second Grade: G. Jump Rope Skills (Perform) Assessment Task: Student performs four different individual (self-turned) jump rope skills for eight (8) consecutive jumps each in two attempts. The student is to stop or pause between each skill.
This assessment measures the student’s ability to demonstrate four different skills for eight (8) consecutive jumps each.
Set-up of the Assessment Task:
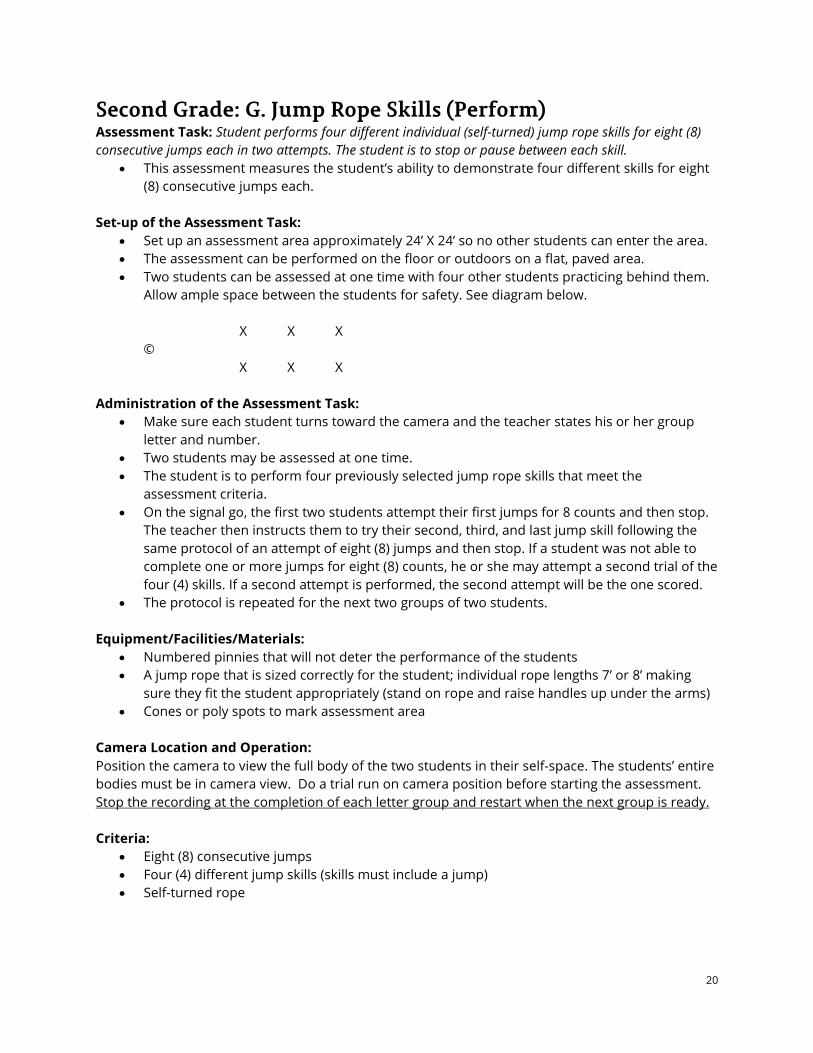
Set up an assessment area approximately 24’ X 24’ so no other students can enter the area. The assessment can be performed on the floor or outdoors on a flat, paved area. Two students can be assessed at one time with four other students practicing behind them.
Allow ample space between the students for safety. See diagram below.
X X X © X X X Administration of the Assessment Task:
Make sure each student turns toward the camera and the teacher states his or her group letter and number.
Two students may be assessed at one time. The student is to perform four previously selected jump rope skills that meet the
assessment criteria. On the signal go, the first two students attempt their first jumps for 8 counts and then stop.
The teacher then instructs them to try their second, third, and last jump skill following the same protocol of an attempt of eight (8) jumps and then stop. If a student was not able to complete one or more jumps for eight (8) counts, he or she may attempt a second trial of the four (4) skills. If a second attempt is performed, the second attempt will be the one scored.
The protocol is repeated for the next two groups of two students. Equipment/Facilities/Materials:
Numbered pinnies that will not deter the performance of the students A jump rope that is sized correctly for the student; individual rope lengths 7’ or 8’ making
sure they fit the student appropriately (stand on rope and raise handles up under the arms) Cones or poly spots to mark assessment area
Camera Location and Operation: Position the camera to view the full body of the two students in their self-space. The students’ entire bodies must be in camera view. Do a trial run on camera position before starting the assessment. Stop the recording at the completion of each letter group and restart when the next group is ready. Criteria:
Eight (8) consecutive jumps Four (4) different jump skills (skills must include a jump) Self-turned rope

21
Suggested basic skill options: Basic Jump forward, basic jump backward, skier, bell, straddle, scissors, double side swing with jump, single side swing with jump, or other comparable skills as identified by the American Heart Association Helpful Hints for Student Growth:
Teach long rope, jumping with low consecutive bounces on balls of the feet Teach individual rope jumping
o Start by practicing jumping without ropes or over lines Continuous small jumps in place, erect body, and eyes looking forward Teach soft low quick jumps Watch and wait for the rope to come in front of the body and then jump as it goes under the
feet Let rope slide quietly on the floor Arms at waist height, elbows bent, and hands draw circle Elbows in close to the waist and thumbs out Turn two ropes, holding handles of one rope in each hand and jump when the ropes touch
the floor (ropes are to the side of the jump and do not go under the jumper’s feet) Practice four (4) consecutive jumps and work up to 8 consecutive jumps without a miss Practice jump rope skills as a warm up Teacher determine order of jumps or allow students to design Individual rope lengths 7’ or 8’ making sure they fit the student appropriately (stand on rope
and raise handles up under the arms) 5+:
1) Perform a student or teacher created sequence with a basic jump and three additional skills meeting all of the above criteria plus smooth transitions from one jump to the next. Do not allow stops or pauses between jumps.

22
Fifth Grade: A. Overhand Throw* (Perform) Assessment Task: Student faces the direction of throw, tosses a ball above his/her head and catches it. Following the catch, the student moves right into an overhand throw for distance or force without pause. One attempt is all that is required. A teacher may request a second attempt. If used, the second attempt is scored.
This assessment measures a student’s ability to demonstrate a mature overhand throwing pattern for distance or force, and is *required for grade 5.
Set-up of the Assessment Task Option 1: Throwing to an open field (outdoors)-recommended A marked throwing line Cones marked at 50’, 70’, 90’, 110’, and 130’ for incentives to throw the ball far Students rotate in number order. Students in other five rows will take turn practicing one
throw each. Suggestion: run a practice round for warm-up before starting the recording
Order of Students (S) 50’ 70’ 90’ 110’ 130’ S: B-6 S: B-5 S: B-4 S: B-3 S: B-2 S: B-1 S: A-6 S: A-5 S: A-4 S: A-3 S: A-2 S: A-1 Camera © (for right handed thrower) **Suggestion: Place all left-hand throwers in same group to save time on moving camera.
Set-up of the Assessment Task Option 2: Throwing for distance and force the length of the gym
A marked throwing line Students are in relay formation taking turns practicing or assessing. Suggestion: run a
practice round for warm-up before starting the recording. Group C practice Group B practice Group A assessed Camera © (for right handed thrower) (All members of group A need a ball) ** Suggestion: Place all left-hand throwers in same group to save time on moving camera.
Students from group C &D can be scattered in the field and collect thrown balls. Groups A & B will then change places with groups C & D.
Group D students can be scattered to retrieve balls. The balls should be rolled back to practice students. For efficiency, they should keep balls thrown by those assessed. After a group is assessed, they come to the field to retrieve.
23
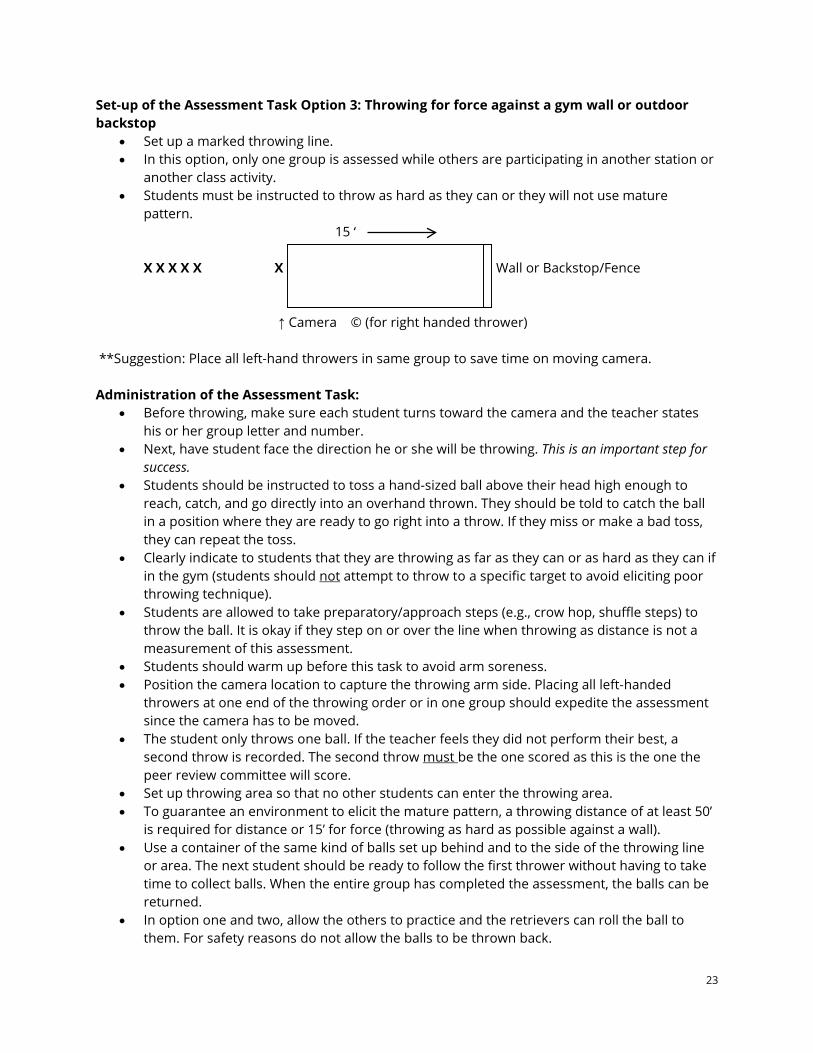
Set-up of the Assessment Task Option 3: Throwing for force against a gym wall or outdoor backstop
Set up a marked throwing line. In this option, only one group is assessed while others are participating in another station or
another class activity. Students must be instructed to throw as hard as they can or they will not use mature
pattern. 15 ‘
X X X X X X Wall or Backstop/Fence Camera © (for right handed thrower) **Suggestion: Place all left-hand throwers in same group to save time on moving camera. Administration of the Assessment Task:
Before throwing, make sure each student turns toward the camera and the teacher states his or her group letter and number.
Next, have student face the direction he or she will be throwing. This is an important step for success.
Students should be instructed to toss a hand-sized ball above their head high enough to reach, catch, and go directly into an overhand thrown. They should be told to catch the ball in a position where they are ready to go right into a throw. If they miss or make a bad toss, they can repeat the toss.
Clearly indicate to students that they are throwing as far as they can or as hard as they can if in the gym (students should not attempt to throw to a specific target to avoid eliciting poor throwing technique).
Students are allowed to take preparatory/approach steps (e.g., crow hop, shuffle steps) to throw the ball. It is okay if they step on or over the line when throwing as distance is not a measurement of this assessment.
Students should warm up before this task to avoid arm soreness. Position the camera location to capture the throwing arm side. Placing all left-handed
throwers at one end of the throwing order or in one group should expedite the assessment since the camera has to be moved.
The student only throws one ball. If the teacher feels they did not perform their best, a second throw is recorded. The second throw must be the one scored as this is the one the peer review committee will score.
Set up throwing area so that no other students can enter the throwing area. To guarantee an environment to elicit the mature pattern, a throwing distance of at least 50’
is required for distance or 15’ for force (throwing as hard as possible against a wall). Use a container of the same kind of balls set up behind and to the side of the throwing line
or area. The next student should be ready to follow the first thrower without having to take time to collect balls. When the entire group has completed the assessment, the balls can be returned.
In option one and two, allow the others to practice and the retrievers can roll the ball to them. For safety reasons do not allow the balls to be thrown back.

24
Be sure and move the camera to the opposite side for all left-handed throwers. Equipment/Facilities/Materials: You will need:
1. Numbered pinnies for all students 2. Tape measure and items (tape, rope, cones, poly spots, spray paint, lime, etc.) to mark lines
on floor/ground to indicate camera location and the 50 foot throwing lines 3. At least six to eight hand-sized balls for throwing (Incrediballs®, rag balls, softballs, or
baseballs); lightweight balls such as whiffle, yarn, fleece, or tennis balls should not be used as they often affect the release point
*This assessment is best conducted outdoors in an open field space. However, depending upon availability of adequate outdoor space, two additional assessment conditions have been described above. Camera Location and Operation: The camera angle should be at a 90-degree angle to the thrower (a side view). Position the camera on the throwing-arm side so the camera will be focused on the entire body of the student. You should be able to clearly see the student’s entire body, including the feet, in the viewfinder. Make sure the pinnie number is visible to the camera. The wall or field space does not need to be in the camera view as distance is not measured. Keep the camera stationary and focused on the thrower. Stop the recording at the completion of each letter group and restart when the next group is ready. Critical Elements: 1) Hip and spine rotate as throwing action is executed (front of body faces camera) resulting in side to target 2) Arm back and extended with elbow at shoulder height or slightly below 3) Steps with opposition as throwing arm moves forward 4) Elbow leads forward progression of throw 5) Follows through toward target and across body Helpful Hints for Student Growth: Make sure practice is for distance and/or force as often accuracy does not require a mature pattern. Make sure student is facing the direction of the throw to catch; thus allowing the student to go into the throwing action. Hip and spine rotate as throwing action is executed (front of body faces camera) resulting in side to target
The toss and catch move immediately into the throw will help begin the rotation Early practice of starting in T position shows where rotation should go to Have students pretend to catch and then rotate into T position
Arm back and extended with elbow at shoulder height or slightly below Palm away (as if showing the ball to someone behind you)
Steps with opposition as throwing arm moves forward The opposite foot steps forward (non-throwing side foot) Emphasize throw and step at same time to produce transfer of weight
Elbow leads forward progression of throw It’s not a punch! Dart throw (lead with elbow close to trunk using big muscles)

25
Follows through toward target and across body Do not need to freeze in the follow through pose
5+: 1) Create a target on the wall, backstop, or in the field at least 15’ away. Throw four (4) balls and
require 75% accuracy. 2) Create a throw to “catcher” situation from an outfielder at least 30’away. Throw four (4) balls
and require 75% accuracy (within two steps of the catcher).
26
Fifth Grade: B. Overhead Volley (Perform) Assessment Task: Student uses a two-hand overhead volley to strike/volley the ball over the net and to the target thrower in four attempts. The attempts begin from a toss made from a skilled thrower on the opposite side of the net.
This assessment measures the student’s ability to execute the overhead volley pattern (overhead pass or volleyball set) with accuracy.
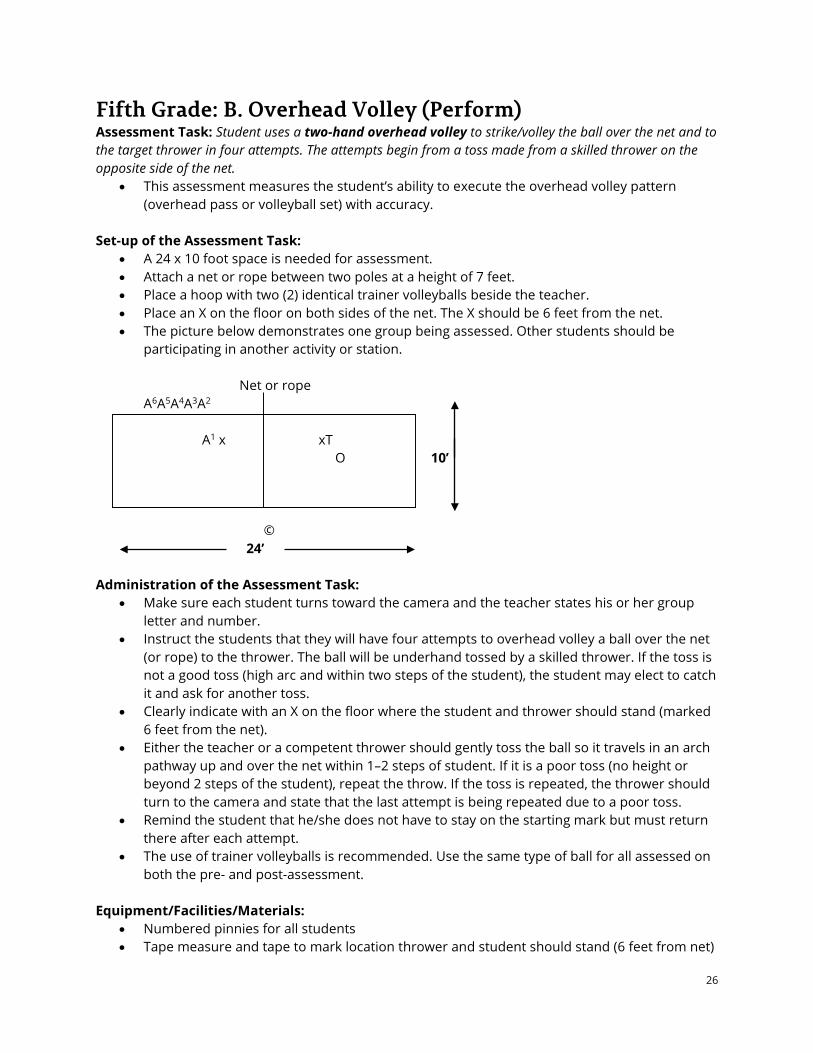
Set-up of the Assessment Task:
A 24 x 10 foot space is needed for assessment. Attach a net or rope between two poles at a height of 7 feet. Place a hoop with two (2) identical trainer volleyballs beside the teacher. Place an X on the floor on both sides of the net. The X should be 6 feet from the net. The picture below demonstrates one group being assessed. Other students should be
participating in another activity or station.
Net or rope A6A5A4A3A2
A1 x xT O 10’
© 24’ Administration of the Assessment Task:
Make sure each student turns toward the camera and the teacher states his or her group letter and number.
Instruct the students that they will have four attempts to overhead volley a ball over the net (or rope) to the thrower. The ball will be underhand tossed by a skilled thrower. If the toss is not a good toss (high arc and within two steps of the student), the student may elect to catch it and ask for another toss.
Clearly indicate with an X on the floor where the student and thrower should stand (marked 6 feet from the net).
Either the teacher or a competent thrower should gently toss the ball so it travels in an arch pathway up and over the net within 1–2 steps of student. If it is a poor toss (no height or beyond 2 steps of the student), repeat the throw. If the toss is repeated, the thrower should turn to the camera and state that the last attempt is being repeated due to a poor toss.
Remind the student that he/she does not have to stay on the starting mark but must return there after each attempt.
The use of trainer volleyballs is recommended. Use the same type of ball for all assessed on both the pre- and post-assessment.
Equipment/Facilities/Materials: Numbered pinnies for all students Tape measure and tape to mark location thrower and student should stand (6 feet from net)

27
2 volleyball trainers (both the same size) A 7’ net or suspended rope between two poles
Camera Location and Operation: It is critical that the camera is placed in position to view both the thrower (T) and the student assessed (S). Accuracy of volley is determined by return volley to thrower. Keep the camera stationary and recording once play has started. Stop the recording at the completion of each letter group and restart when the next group is ready. Critical Elements: 1) Body aligned and positioned under the ball 2) Knees and elbows bent in preparation for the volley 3) Hands rounded; thumbs and pointer finger make triangle (without touching). 4) Ball contacts only the finger pads 5) Extends arms upward on contact; follow through up and toward target resulting in an upward arc pathway over the net/rope. Helpful Hints for Student Growth:
Toss and catch with hands in volley position and nose directly under ball Repeat above but volley to self Partner tossing and setting (practice the toss) Volley against the wall Teacher toss to students in a station Have volley competitions Set-up volley stations after above has been taught Review the overhead volley throughout your volley (or volleyball) unit
5+:
1) Throw 8 balls mixing up tossing to the right, left, or forward where student has to move to volley the ball returning the ball to the tosser with 75% success rate. 2) Allow student to volley the ball back and forth over the net with another skilled player or teacher for 8 consecutive volleys (including those of the skilled player or teacher). Allow two attempts.
28
Fifth Grade: C. Forehand Striking (Perform) Assessment Task: Using a forehand striking pattern, the student uses a paddle or appropriately sized tennis racket to strike a hand-sized ball against a wall for four consecutive hits.
This assessment measures the student’s ability to use the mature pattern of the forehand stroke.
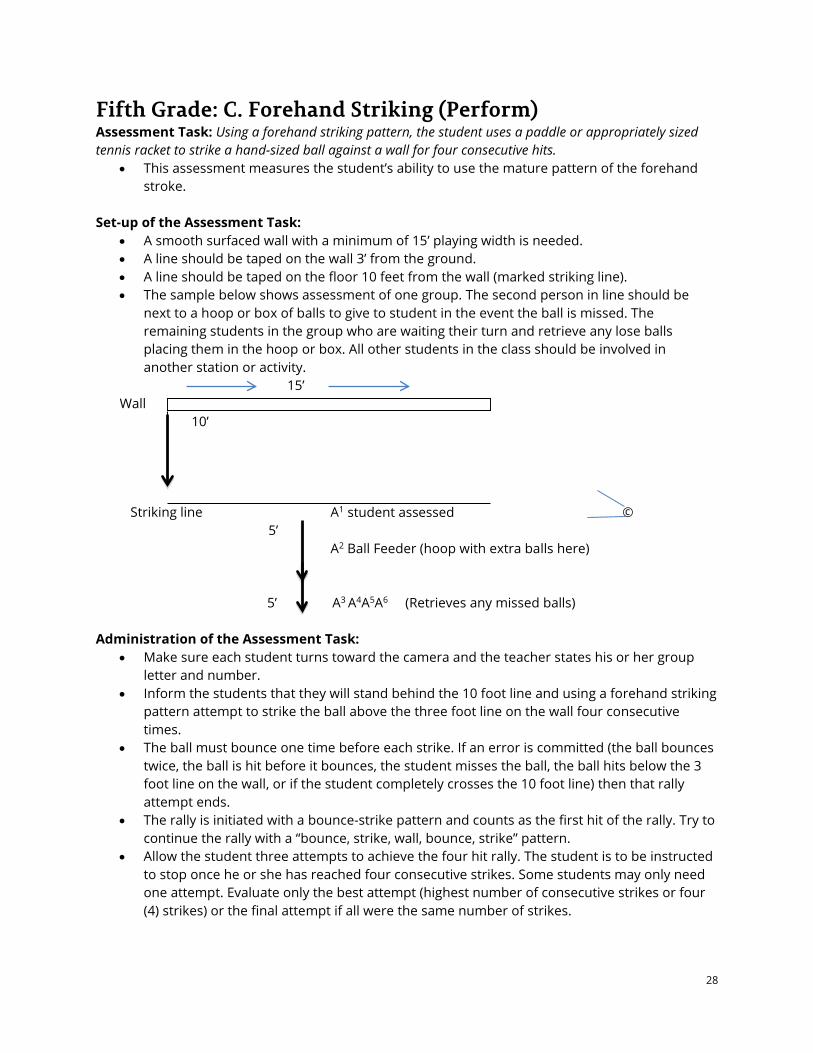
Set-up of the Assessment Task:
A smooth surfaced wall with a minimum of 15’ playing width is needed. A line should be taped on the wall 3’ from the ground. A line should be taped on the floor 10 feet from the wall (marked striking line). The sample below shows assessment of one group. The second person in line should be
next to a hoop or box of balls to give to student in the event the ball is missed. The remaining students in the group who are waiting their turn and retrieve any lose balls placing them in the hoop or box. All other students in the class should be involved in another station or activity.
15’ Wall 10’
Striking line A1 student assessed ©
5’ A2 Ball Feeder (hoop with extra balls here)
5’ A3 A4A5A6 (Retrieves any missed balls)
Administration of the Assessment Task:
Make sure each student turns toward the camera and the teacher states his or her group letter and number.
Inform the students that they will stand behind the 10 foot line and using a forehand striking pattern attempt to strike the ball above the three foot line on the wall four consecutive times.
The ball must bounce one time before each strike. If an error is committed (the ball bounces twice, the ball is hit before it bounces, the student misses the ball, the ball hits below the 3 foot line on the wall, or if the student completely crosses the 10 foot line) then that rally attempt ends.
The rally is initiated with a bounce-strike pattern and counts as the first hit of the rally. Try to continue the rally with a “bounce, strike, wall, bounce, strike” pattern.
Allow the student three attempts to achieve the four hit rally. The student is to be instructed to stop once he or she has reached four consecutive strikes. Some students may only need one attempt. Evaluate only the best attempt (highest number of consecutive strikes or four (4) strikes) or the final attempt if all were the same number of strikes.

29
Clearly indicate to the student that the ball must hit above the 3 foot line on the wall and at least one foot must stay behind the 10 foot line. If either of these errors occurs, it ends the rally.
To expedite the assessment process, use students to “feed” and retrieve balls to the person being assessed. See the set-up above.
It is suggested that a high bouncing whiffle ball (e.g., pickleball) or a high density foam ball be used. It is important to use the same type of ball and striking implement (paddle or junior size racquet) for both pre- and post-assessment.
Be sure and move the camera to the opposite side for all left-handed hitters.
Equipment/Facilities/Materials: Numbered pinnies for all students Tape measure and tape to mark areas on floor for camera position, three foot line on wall,
and 10 foot distance line Three (3) high-bounce foam balls or whiffle balls (all of same size); tennis balls are acceptable
if using racquets. Make sure they bounce a reasonable height for success One paddle (solid wooden or plastic) or a junior size racquet
Camera Location and Operation: The camera © should be placed on the forehand side of the student and slightly behind the striking line so that the striking line, wall, and student can be seen at the side edge of the viewing screen. The camera should be far enough away to be able to view the entire playing area. Keep the camera stationary and recording once play has started. Place all left handed students at the end of the group rotation to allow for moving the camera. Stop the recording at the completion of each letter group and restart when the next group is ready. *Critical Elements: 1) Racket back and side to target in preparation for striking 2) Ball is contacted at or just below waist level 3) Maintains adequate swing distance between body and ball (elbow away from body) 4) Steps into the swing OR shifts weight onto opposite foot 5) Swings low to high Helpful Hints for Student Growth:
Equipment plays into distance: Foam balls need to have quality bounce (high density), pickle balls (high density small whiffle balls). Practice and see where your kids need to stand. 10 feet is good for high density foam and pickle balls. Some soft foam balls or tennis balls may need to be farther back. Adjust camera to your equipment.
Teach proper grip and firm wrist to help with control of paddle or racket. Drop of ball instead of toss is very important and needs to be practiced. Practice the swing without a ball to help with low to high and step into swing Practice basic racket skills first such as ups and downs. Practice drop, hit, bounce, and catch off of wall before continuous hits. Use taped large square shapes on the wall for targets to help with direction.

30
5+: 1) Place a 4 X 4 square on the wall and have the student repeat the above task. Allow three attempts to reach 75% accuracy. 2) Allow student to strike the ball back and forth over a net or rope with another skilled player or teacher for eight (8) consecutive strikes (including those of the skilled player or teacher). Allow two attempts.
31
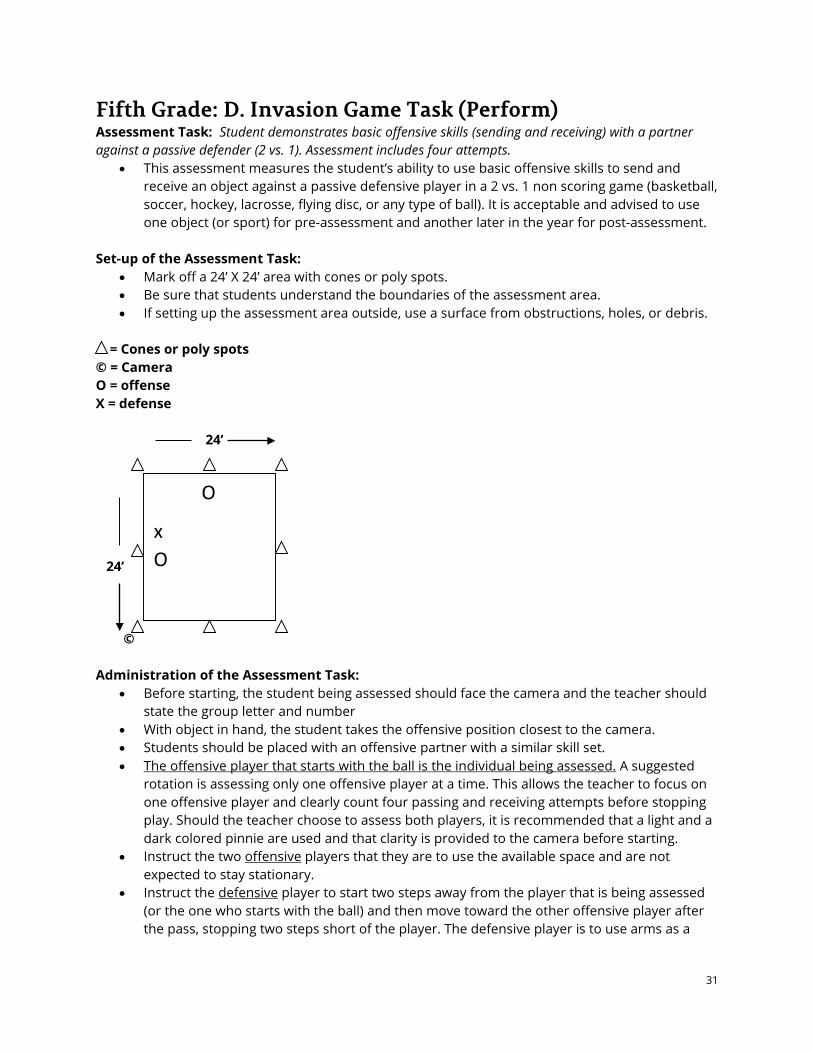
Fifth Grade: D. Invasion Game Task (Perform) Assessment Task: Student demonstrates basic offensive skills (sending and receiving) with a partner against a passive defender (2 vs. 1). Assessment includes four attempts.
This assessment measures the student’s ability to use basic offensive skills to send and receive an object against a passive defensive player in a 2 vs. 1 non scoring game (basketball, soccer, hockey, lacrosse, flying disc, or any type of ball). It is acceptable and advised to use one object (or sport) for pre-assessment and another later in the year for post-assessment.
Set-up of the Assessment Task:
Mark off a 24’ X 24’ area with cones or poly spots. Be sure that students understand the boundaries of the assessment area. If setting up the assessment area outside, use a surface from obstructions, holes, or debris.
= Cones or poly spots © = Camera O = offense X = defense 24’ 24’ © Administration of the Assessment Task:
Before starting, the student being assessed should face the camera and the teacher should state the group letter and number
With object in hand, the student takes the offensive position closest to the camera. Students should be placed with an offensive partner with a similar skill set. The offensive player that starts with the ball is the individual being assessed. A suggested
rotation is assessing only one offensive player at a time. This allows the teacher to focus on one offensive player and clearly count four passing and receiving attempts before stopping play. Should the teacher choose to assess both players, it is recommended that a light and a dark colored pinnie are used and that clarity is provided to the camera before starting.
Instruct the two offensive players that they are to use the available space and are not expected to stay stationary.
Instruct the defensive player to start two steps away from the player that is being assessed (or the one who starts with the ball) and then move toward the other offensive player after the pass, stopping two steps short of the player. The defensive player is to use arms as a
O
x
O
32
distractor but is not allowed to touch the offensive players or the game object. This is referred to as passive defensive.
The play begins by the offensive player with the ball “slapping” the ball or stating “go” cuing the offensive player without the ball to move and get “open.”
After the offensive player being assessed has had four passing attempts and has had an opportunity to receive four quality passes, the game will be stopped. If the object passed is within one step of the receiver, it is considered quality. If one pass was deemed not receivable by the teacher, an additional pass should be requested. If at the end of the four passes if the teacher wants to allow the student assessed to shoot for the “goal” that is acceptable but not evaluated.
It is suggested to have extra equipment readily available to expedite completion of the assessment. If possible, have extra students with object in hand on each sideline. If the object gets away, the sideline helper can throw or roll in a new one and retrieve the loose one. A group of 6–8 students of similar skill would work best for the assessment station. During each rotation, two individuals are on offense, one on defense, and three or four on the sidelines. Rotate students where all individuals are assessed on offense.
Equipment/Facilities/Materials: Numbered pinnies for all students Tape measure and items (floor tape, cones, poly spots, etc.) to mark lines on floor/ground to
indicate camera location and the playing area Four or five of the same objects for passing plus properly sized implements if lacrosse or
hockey is chosen Camera Location and Operation: Camera view should encompass entire assessment area. Students being assessed should be visible on camera for the entire assessment task. Keep the camera stationary and recording once play has started. Stop the recording at the completion of each letter group and restart when the next group is ready. Critical Elements 1) Sends a receivable pass 2) Leads the receiver 3) Moves to successfully create an open space for receiving the pass 4) Maintains adequate spacing in relation to teammate 5) Receives the pass and maintains control of the object and body Helpful Hints for Student Growth:
Pre- and post-assessment can be different invasion sports/equipment allowing for practice all year.
Instruct the students that they will be assessed on their ability to move to create open space and passing lanes; make receivable passes to their teammate; and control both the object and their body when receivable passes are made to them from their teammate. Motivate them to be a successful team member.
The idea is for the person with the ball to make a lead pass to the receiver and then moves to get open for a pass. The students should be instructed to throw to the receiver while he

33
or she is on the move. The receiver should be instructed to continue to move until reception of the pass.
Teach passing and receiving in all sports and help students to see transfer of skills Teach triple threat position Teach passing to where teammate is moving; where they will be Teach creating an open space: change directions, change speeds, fake, read the defense. Use poly spots to create designated places to move to get open. Teach balance when receiving objects. Start with watching object all the way to you (look it
in).
5+: 1) Allow the defensive player to be semi-passive. Use arms and feet for defense but allow no
contact. 2) Place up to 5 advanced students in a 2 v 1 or 3 v 2 situation where they are to progress down
the full length of the court without losing possession of the ball. No dribble is allowed and there must be at least three (3) passes. Require four (4) attempts and a 75% success rate.

34
Fifth Grade: E. Educational Gymnastics Routine (Perform) Assessment Task: Student performs a teacher or student created educational gymnastics floor routine one time.
This assessment measures a student’s ability to perform basic educational gymnastics skills in a simple routine. The routine can be teacher or student created and on the floor or a mat. The routine must start with a clear beginning balance and end with a clear ending balance. The routine must include two locomotor skills, four different balances, and two weight transfers.
Set-up of the Assessment Task: Mark off an area approximately 24’ X 24’ with cones or poly spots. The assessment can be performed on a mat, on the floor, or a grassy outdoor area. If setting up the assessment area outside, use a grassy surface free from obstructions, holes,
or debris. Be sure that students understand the boundaries of the performance area and others know
not to enter the assessment area. = Cones or poly spots © = Camera 24’ © 24’ Administration of the Assessment Task:
Make sure each student turns toward the camera and the teacher states his or her group letter and number.
Only one student is assessed at a time (approximately one minute each). The next student should be standing ready to go. All others in a group may be practicing if space allows.
Either the teacher or the student may design the routine. The student is to perform the routine as designed one time.
Equipment/Facilities/Materials: Numbered pinnies that will not deter the performance of the students Mats (optional) Cones or poly spots to mark assessment area keeping other students from entering during
the assessment
S

35
Camera Location and Operation: Position the camera close enough to clearly view the student throughout the routine and the space required. Do a camera position check before starting. Make sure you can clearly see pinnie numbers before the routine starts. Stop the recording at the completion of each letter group and restart when the next group is ready. Criteria: 1) Includes a total of four (4) different balances inclusive of a beginning and ending balance. 2) All balances must demonstrate stillness for three (3) seconds. 3) All balances must be on a different base of support. 4) Includes two different locomotor skills. 5) Includes two different weight transfer skills. Suggested Skill Options: Locomotor – skip, gallop, jump, leap, hop, slide, jog Balances – various bases of support Weight transfer – log roll (pencil roll); side roll; quarter, half, and full jump turns; mule (donkey) kick; round off; cartwheel Helpful Hints for Student Growth:
Prior teaching of locomotor skills, balances, rolls, jump turns, mule (donkey kick), round off, and cartwheels before the educational gymnastics floor routine is introduced.
Practice various locomotor skills during lesson transitions and warm-ups. Practice holding balances on different body parts and number of bases of support with tight
muscles showing stillness. Practice jump turns landing on two feet with a balanced and still landing and combine with a
balance or move into a locomotor skill. Start combining skills together teacher directed or student created.
Pencil rolls and side rolls can be done safely with or without mats for limited rolling time and distance.
Mule (donkey) kick, round off, and cartwheel should only be taught if students have adequate upper body strength to hold their own body weight. These can be taught with or without mats. For safety reasons, students should land from all skills in this section on their feet.
Teachers can include other rolls or weight transfer skills based on teaching ability, students’ abilities, and safe environment.
Teachers can create the sequence for all students to perform or let students design their own sequence as long as all requirements are met.
For proficient students, practice fluid motion between skills by trying to do elements of the routine without extra body movements, loss of balance or stopping during the routine.
5+
1) Require a higher level of performance for balances and weight transfers. Require smooth transitions between skills. Be able to describe your “higher” expectations.

1
Appendix A Physical Education Planning Guide
Domain Grade Level Skill Assessed Date of Point A Date of Point B
Evidence Collection 1
Perform Circle One 5th Grade 2nd Grade
Evidence Collection 2
Perform Circle One 5th Grade 2nd Grade
Evidence Collection 3
Perform Circle One 5th Grade 2nd Grade
Evidence Collection 4
Perform Circle One 5th Grade 2nd Grade
2
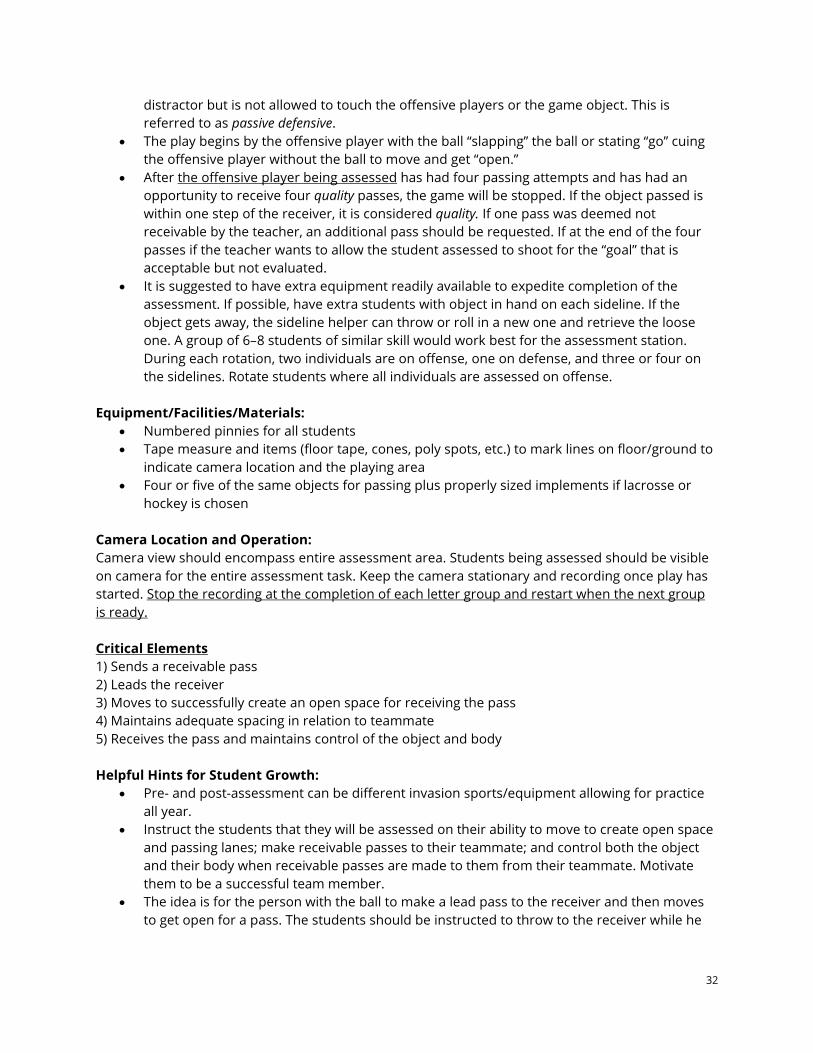
Appendix B Sample Score Sheets Sample Score Sheet: Second Grade, Perform, Locomotor Skills
Point A Assessment Point B Assessment Student Name
Gro
up
Num
ber HOP
*Forward *One foot *Leg Bent *Airborne
GALLOP *Forward & rhythmical *Lead leg *Hips Forward *Momentarily airborne
SKIP *Forward & rhythmical *Step/hop *Alternates feet *Momentarily airborne
SLIDE *Sideways & rhythmical *Lead leg close *Hips forward *Faces direction of travel *Momentarily airborne
Ove
rall HOP
*Forward *One foot *Leg Bent *Airborne
GALLOP *Forward & rhythmical *Lead leg *Hips Forward *Momentarily airborne
SKIP *Forward & rhythmical *Step/hop *Alternates feet *Momentarily airborne
SLIDE *Sideways & rhythmical *Lead leg close *Hips forward *Faces direction of travel *Momentarily airborne
Ove
rall
Gro
wth
5: Mature pattern of all four skills with fluid motion
4: Mature pattern of all four skills
3: Mature pattern of three skills 2: Mature pattern of two skills 1: Mature pattern of one or fewer skills
3
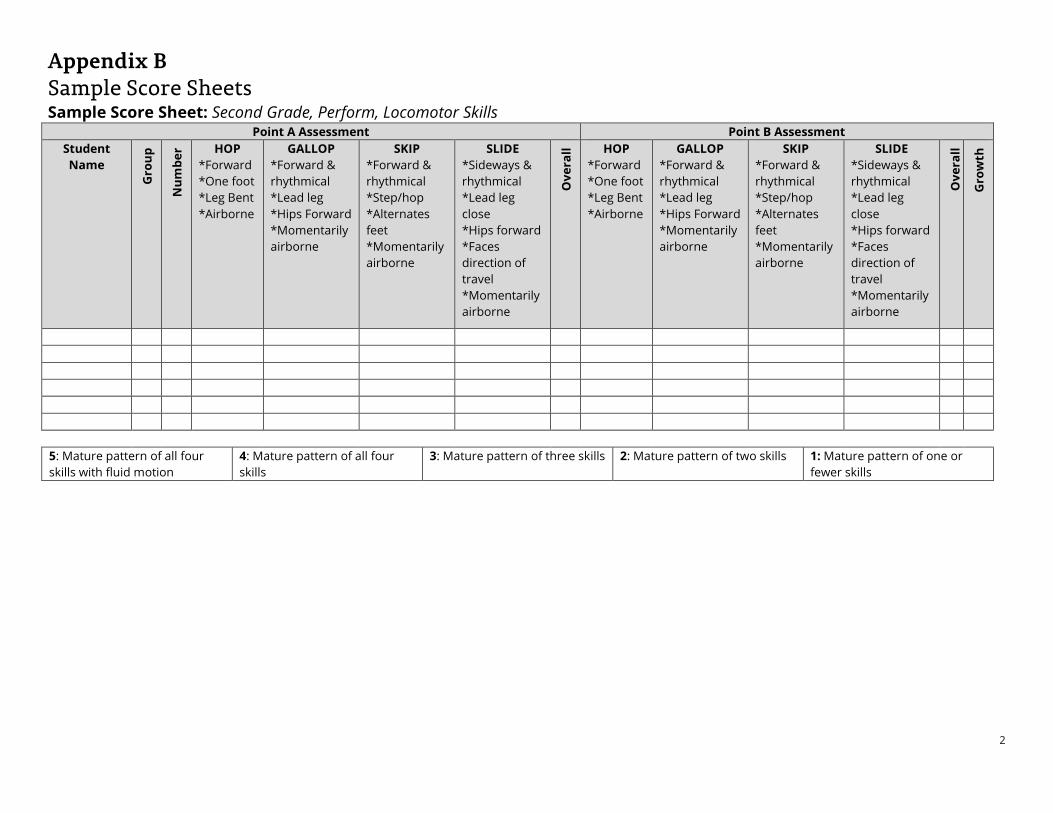
Sample Score Sheet: Second Grade, Perform, Underhand Throw Point A Assessment Point B Assessment
Student Name
Gro
up
Num
ber 3 of 4 did
not reach target
OR underhand
throw pattern not
used
Faces the
target in prep for throwing
action
Arm back
past the hip to
start the throwing
action
Steps with opposition
at the same time
the throwing
arm moves forward
Follows through toward
intended target
Ove
rall 3 of 4 did
not reach target
OR underhand
throw pattern not
used
Faces the
target in prep for throwing
action
Arm back
past the hip to
start the throwing
action
Steps with opposition
at the same time
the throwing
arm moves forward
Follows through toward
intended target
Ove
rall
Gro
wth
5: ALL 4 throws reached target, ALL 4 throws used ALL 4 critical elements
4: ALL 4 throws reached target, 3 of 4 throws used ALL 4 critical elements
3: 3 of 4 throws reached target, 3 of 4 throws used three critical elements
2: 3 of 4 throws reached target, 3 of 4 throws used two critical elements
1: 3 of 4 throws did not reach target and underhand throw pattern was not used

4
Sample Score Sheet: Fifth Grade, Perform, Overhand Throw
Point A Assessment Point B Assessment Student Name
Gro
up
Num
ber
Did
not
use
ove
rhan
d th
row
pat
tern
Hip
/spi
ne r
otat
ion
resu
lting
in s
ide
to ta
rget
Arm
bac
k, e
lbow
at
shou
lder
hei
ght
Step
s w
ith o
ppos
ition
as
thro
win
g
Elbo
w le
ads
Follo
ws
thro
ugh
Ove
rall
Did
not
use
ove
rhan
d
thr
ow p
atte
rn
Hip
/spi
ne r
otat
ion
r
esul
ting
in s
ide
to ta
rget
Arm
bac
k, e
lbow
at
sho
ulde
r he
ight
Ste
ps w
ith o
ppos
ition
as
t
hrow
ing
Elb
ow le
ads
Fol
low
s th
roug
h
Ove
rall
Gro
wth
5: Catches self-thrown ball, uses overhand throw, AND uses all five critical elements
4: Catches self-thrown ball, uses overhand throw, AND uses four critical elements
3: Catches self-thrown ball, uses overhand throw, AND uses three critical elements
2: Catches self-thrown ball, uses overhand throw, AND uses two critical elements
1: Does not use overhand throw

5
Sample Score Sheet: Fifth Grade, Perform, Forehand Striking Point A Assessment Point B Assessment
Student Name
Gro
up
Num
ber
Doe
s no
t ral
ly 4
x O
R do
es
not u
se fo
reha
nd 3
of 4
Rack
et b
ack,
sid
e to
targ
et
Ball
cont
act a
t/be
low
wai
st
Mai
ntai
ns a
dequ
ate
swin
g di
stan
ce
Step
s in
to s
win
g O
R sh
ifts
wei
ght
Swin
gs lo
w to
hig
h
Ove
rall
Doe
s no
t ral
ly 4
x O
R do
es
not u
se fo
reha
nd 3
of 4
Rack
et b
ack,
sid
e to
targ
et
Ball
cont
act a
t/be
low
wai
st
Mai
ntai
ns a
dequ
ate
swin
g di
stan
ce
Step
s in
to s
win
g O
R sh
ifts
wei
ght
Swin
gs lo
w to
hig
h
Ove
rall
Gro
wth
5: Uses forehand stroke and rally for four consecutive hits AND demonstrates all five critical elements on all four attempts
4: Uses forehand stroke and rally for four consecutive hits AND demonstrates all five critical elements on three of the four attempts
3: Uses forehand stroke and rally for four consecutive hits AND demonstrates three or four of the five critical elements on three of the four attempts
2: Uses forehand stroke and rally for four consecutive hits AND demonstrates one or two of the five critical elements on three of the four attempts
1: Does not rally for four consecutive hits OR does not use the forehand striking pattern on three or more of the attempts

6
Appendix C Physical Education Scoring Guide – Elementary K-2 Physical Education Scoring Guide – Elementary K-2 (Perform)
5 4 3 2 1 A. Locomotor Skills Student performs the four locomotor skills (hop, gallop, skip, and slide) for approximately 15 seconds. Demonstrates mature pattern* of all four skills for 15 seconds with fluid motion (graceful and flowing).
Demonstrates mature pattern* of all four skills for 10 of the 15 seconds.
Demonstrates mature pattern* of three skills for 10 of the 15 seconds.
Demonstrates mature pattern* of two skills for 10 of the 15 seconds.
Demonstrates mature pattern* of one or fewer skills for 10 of the 15 seconds.
*Mature Patterns: Locomotor Skills Hop: 1) Travels in a forward direction 2) Takes off on one foot and land on the same foot 3) Knee of non-landing leg is bent 4) Momentarily airborne
Gallop: 1) Travels in a forward direction with smooth, rhythmical action on the balls of the feet 2) Demonstrates lead leg step-close action without crossover 3) Hips (torso) facing forward in direction of travel 4) Momentarily airborne (no foot drag)
Skip: 1) Travels in a forward direction with a smooth, rhythmical action 2) Step taken followed by a short hop with a knee lift 3) Alternates feet 4) Momentarily airborne
Slide: 1) Travels in a sideways direction with a smooth, rhythmical action on the balls of the feet 2) Demonstrates lead leg step-close action without crossover 3) Hips (torso) facing forward while side clearly faces direction of travel 4) Momentarily airborne (no foot drag)
B. Underhand Throw Student performs four underhand throws of 15 feet. All four underhand throws are thrown with adequate force to reach the distance
AND All four underhand throws demonstrate all four critical elements* of a mature pattern.
All four underhand throws are thrown with adequate force to reach the distance
AND At least three of the four underhand throws demonstrate all four critical elements* of a mature pattern.
At least three of the four underhand throws are thrown with adequate force to reach the distance
AND At least three of the four underhand throws demonstrate three of the four critical elements* of a mature pattern.
At least three of the four underhand throws are thrown with adequate force to reach the distance
AND At least three of the four underhand throws demonstrate two of the four critical elements* of a mature pattern.
Three or four of the four throws are not thrown with adequate force to travel the distance
OR An underhand throw pattern is not used.
*Critical Elements: Underhand Throw 1) Faces the target in preparation for the throwing action 2) Arm back past the hip to start the throwing action
3) Steps with opposition at the same time the throwing arm moves forward 4) Follows through toward intended direction of travel
7
Physical Education Scoring Guide – Elementary K-2 (Perform) 5 4 3 2 1
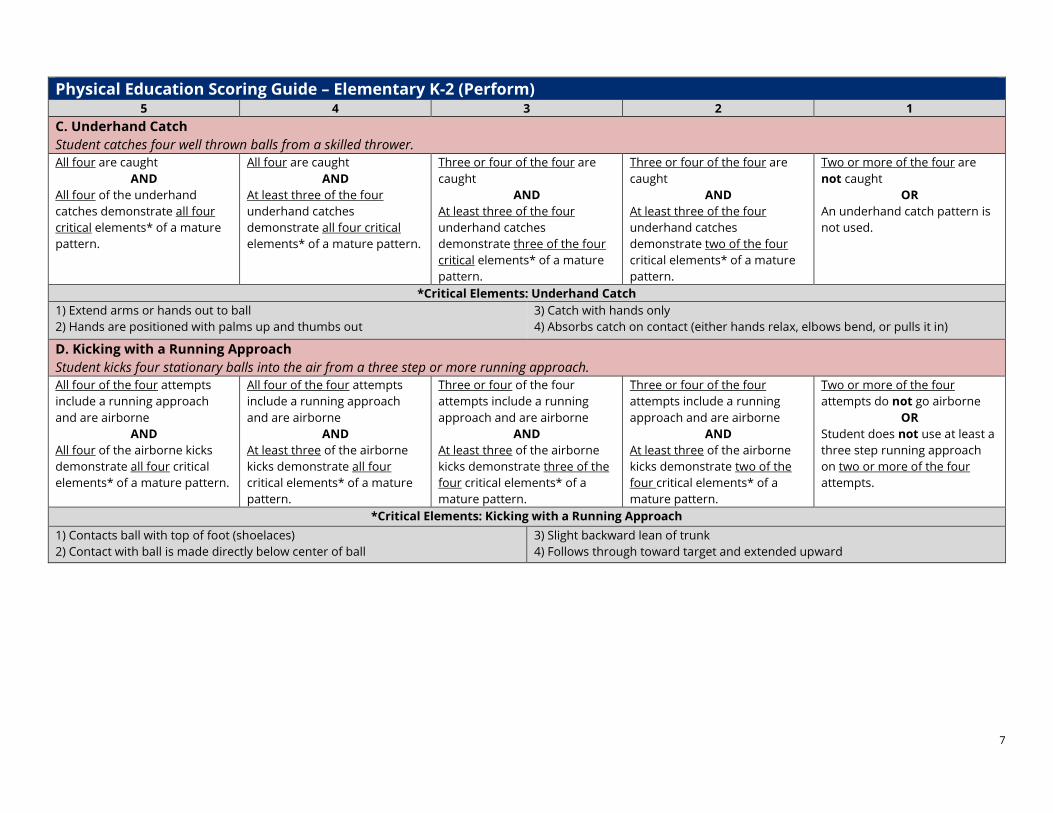
C. Underhand Catch Student catches four well thrown balls from a skilled thrower. All four are caught
AND All four of the underhand catches demonstrate all four critical elements* of a mature pattern.
All four are caught AND
At least three of the four underhand catches demonstrate all four critical elements* of a mature pattern.
Three or four of the four are caught
AND At least three of the four underhand catches demonstrate three of the four critical elements* of a mature pattern.
Three or four of the four are caught
AND At least three of the four underhand catches demonstrate two of the four critical elements* of a mature pattern.
Two or more of the four are not caught
OR An underhand catch pattern is not used.
*Critical Elements: Underhand Catch 1) Extend arms or hands out to ball 2) Hands are positioned with palms up and thumbs out
3) Catch with hands only 4) Absorbs catch on contact (either hands relax, elbows bend, or pulls it in)
D. Kicking with a Running Approach Student kicks four stationary balls into the air from a three step or more running approach. All four of the four attempts include a running approach and are airborne
AND All four of the airborne kicks demonstrate all four critical elements* of a mature pattern.
All four of the four attempts include a running approach and are airborne
AND At least three of the airborne kicks demonstrate all four critical elements* of a mature pattern.
Three or four of the four attempts include a running approach and are airborne
AND At least three of the airborne kicks demonstrate three of the four critical elements* of a mature pattern.
Three or four of the four attempts include a running approach and are airborne
AND At least three of the airborne kicks demonstrate two of the four critical elements* of a mature pattern.
Two or more of the four attempts do not go airborne
OR Student does not use at least a three step running approach on two or more of the four attempts.
*Critical Elements: Kicking with a Running Approach 1) Contacts ball with top of foot (shoelaces) 2) Contact with ball is made directly below center of ball
3) Slight backward lean of trunk 4) Follows through toward target and extended upward
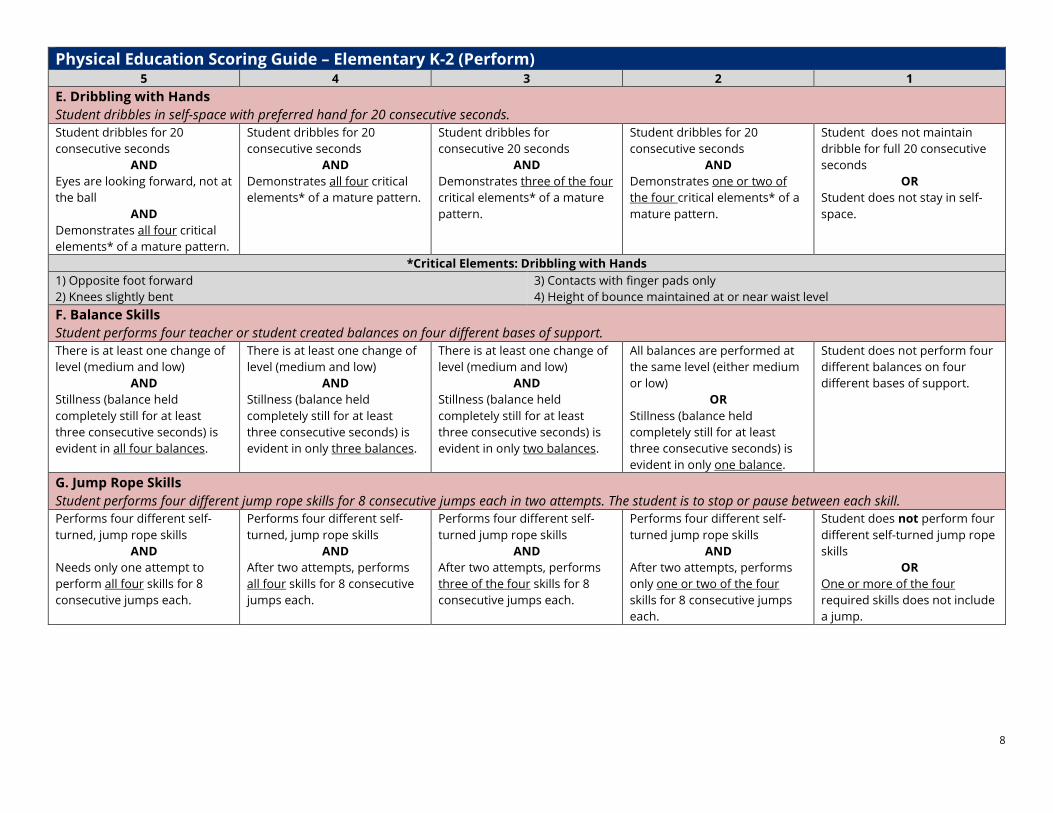
8
Physical Education Scoring Guide – Elementary K-2 (Perform) 5 4 3 2 1
E. Dribbling with Hands Student dribbles in self-space with preferred hand for 20 consecutive seconds. Student dribbles for 20 consecutive seconds
AND Eyes are looking forward, not at the ball
AND Demonstrates all four critical elements* of a mature pattern.
Student dribbles for 20 consecutive seconds
AND Demonstrates all four critical elements* of a mature pattern.
Student dribbles for consecutive 20 seconds
AND Demonstrates three of the four critical elements* of a mature pattern.
Student dribbles for 20 consecutive seconds
AND Demonstrates one or two of the four critical elements* of a mature pattern.
Student does not maintain dribble for full 20 consecutive seconds
OR Student does not stay in self-space.
*Critical Elements: Dribbling with Hands 1) Opposite foot forward 2) Knees slightly bent
3) Contacts with finger pads only 4) Height of bounce maintained at or near waist level
F. Balance Skills Student performs four teacher or student created balances on four different bases of support. There is at least one change of level (medium and low)
AND Stillness (balance held completely still for at least three consecutive seconds) is evident in all four balances.
There is at least one change of level (medium and low)
AND Stillness (balance held completely still for at least three consecutive seconds) is evident in only three balances.
There is at least one change of level (medium and low)
AND Stillness (balance held completely still for at least three consecutive seconds) is evident in only two balances.
All balances are performed at the same level (either medium or low)
OR Stillness (balance held completely still for at least three consecutive seconds) is evident in only one balance.
Student does not perform four different balances on four different bases of support.
G. Jump Rope Skills Student performs four different jump rope skills for 8 consecutive jumps each in two attempts. The student is to stop or pause between each skill. Performs four different self-turned, jump rope skills
AND Needs only one attempt to perform all four skills for 8 consecutive jumps each.
Performs four different self-turned, jump rope skills
AND After two attempts, performs all four skills for 8 consecutive jumps each.
Performs four different self-turned jump rope skills
AND After two attempts, performs three of the four skills for 8 consecutive jumps each.
Performs four different self-turned jump rope skills
AND After two attempts, performs only one or two of the four skills for 8 consecutive jumps each.
Student does not perform four different self-turned jump rope skills
OR One or more of the four required skills does not include a jump.

9
Physical Education Scoring Guide – Elementary 3-5 Physical Education Scoring Guide – Elementary 3-5 (Perform)
5 4 3 2 1 A. Overhand Throw Student faces the direction of throw, tosses a ball above his/her head and catches it. Following the catch, the student moves right into an overhand throw for distance or force without pause. One attempt is all that is required. A teacher may request a second attempt. If used, the second attempt is scored. Student catches a self-tossed ball and uses an overhand throw pattern (for distance or force)
AND Demonstrates all five of the critical elements* of a mature pattern.
Student catchesa self-tossed ball and uses an overhand throw pattern (for distance or force)
AND Demonstrates four of the five critical elements* of a mature pattern.
Student catches a self-tossed ball and uses an overhand throw pattern (for distance or force)
AND Demonstrates three of the five critical elements* of a mature pattern.
Student catches a self-tossed ball and uses an overhand throw pattern (for distance or force)
AND Demonstrates one or two of the five critical elements* of a mature pattern.
Student does not use an overhand throw pattern (for distance or force).
*Critical Elements: Overhand Throw 1) Hip and spine rotate as throwing action is executed (front of body faces camera) resulting in side to target 2) Arm back and extended with elbow at shoulder height or slightly below
3) Steps with opposition as throwing arm moves forward 4) Elbow leads forward progression of throw 5) Follows through toward target and across body
B. Overhead Volley Student uses a two-hand overhead volley to strike/volley the ball over the net and to the target thrower in four attempts. The attempts begin from a toss made from a skilled thrower on the opposite side of the net. The two-hand overhead pattern is used to strike/volley the ball, and all four attempts cross the net/rope and are sent directly to the target
AND Demonstrates all five critical elements* of a mature pattern on all four attempts.
The two-hand overhead pattern is used to strike/volley the ball, and all four attempts cross the net/rope and are within one step of the target
AND Demonstrates all five critical elements* of a mature pattern on three of the four attempts.
The two-hand overhead pattern is used to strike/volley the ball, and at least three attempts cross the net/rope and are within one step of the target
AND Demonstrates three or four of the five critical elements* of a mature pattern on three of the four attempts.
The two-hand overhead pattern is used to strike/volley the ball, and at least three attempts cross the net/rope and are within one step of the target
AND Demonstrates one or two of the five critical elements* of a mature pattern on three of the four attempts.
Student does not use the two-hand overhead pattern on at least three of the four attempts
OR Three or four of the four strikes/volleys do not cross the net
OR Three or four of the four strikes/volleys are not within one step of the thrower.
*Critical Elements: Overhead Volley 1) Body aligned and positioned under the ball 2) Knees and elbows bent in preparation for the volley 3) Hands rounded; thumbs and pointer finger make triangle (without touching)
4) Ball contacts only the finger pads 5) Extends arms upward on contact, follow through up and toward target resulting in an upward arc pathway over the net/rope
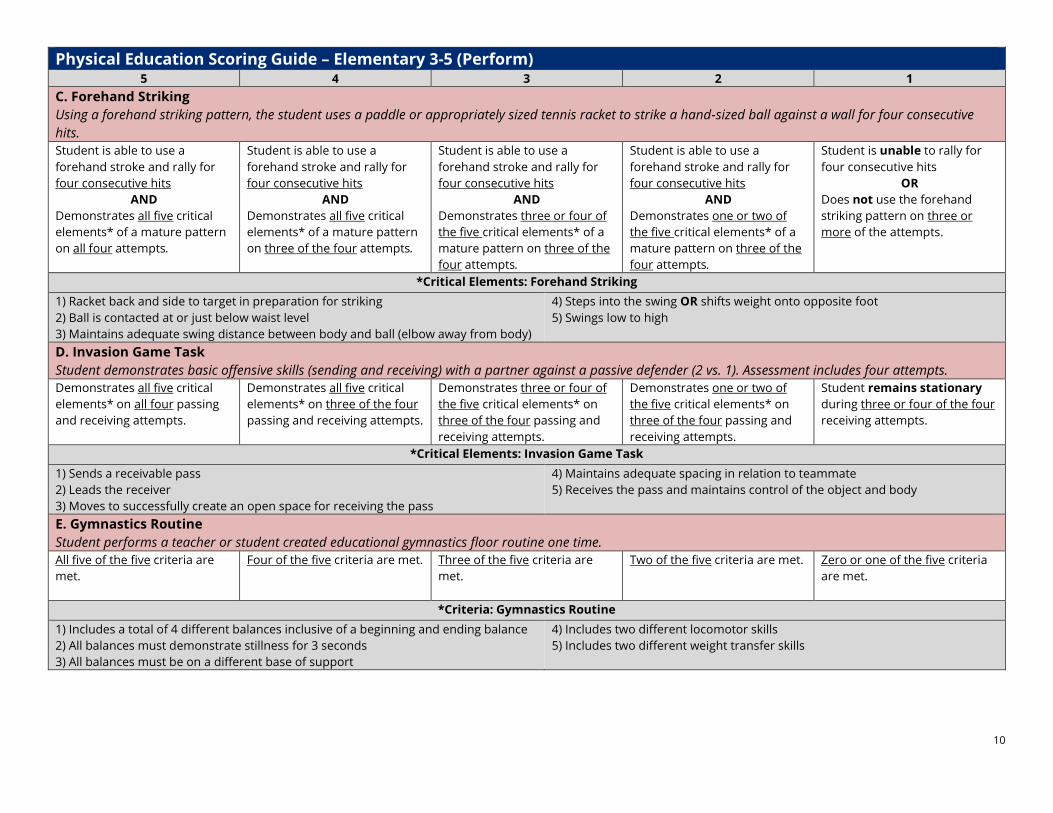
10
Physical Education Scoring Guide – Elementary 3-5 (Perform) 5 4 3 2 1
C. Forehand Striking Using a forehand striking pattern, the student uses a paddle or appropriately sized tennis racket to strike a hand-sized ball against a wall for four consecutive hits. Student is able to use a forehand stroke and rally for four consecutive hits
AND Demonstrates all five critical elements* of a mature pattern on all four attempts.
Student is able to use a forehand stroke and rally for four consecutive hits
AND Demonstrates all five critical elements* of a mature pattern on three of the four attempts.
Student is able to use a forehand stroke and rally for four consecutive hits
AND Demonstrates three or four of the five critical elements* of a mature pattern on three of the four attempts.
Student is able to use a forehand stroke and rally for four consecutive hits
AND Demonstrates one or two of the five critical elements* of a mature pattern on three of the four attempts.
Student is unable to rally for four consecutive hits
OR Does not use the forehand striking pattern on three or more of the attempts.
*Critical Elements: Forehand Striking 1) Racket back and side to target in preparation for striking 2) Ball is contacted at or just below waist level 3) Maintains adequate swing distance between body and ball (elbow away from body)
4) Steps into the swing OR shifts weight onto opposite foot 5) Swings low to high
D. Invasion Game Task Student demonstrates basic offensive skills (sending and receiving) with a partner against a passive defender (2 vs. 1). Assessment includes four attempts. Demonstrates all five critical elements* on all four passing and receiving attempts.
Demonstrates all five critical elements* on three of the four passing and receiving attempts.
Demonstrates three or four of the five critical elements* on three of the four passing and receiving attempts.
Demonstrates one or two of the five critical elements* on three of the four passing and receiving attempts.
Student remains stationary during three or four of the four receiving attempts.
*Critical Elements: Invasion Game Task 1) Sends a receivable pass 2) Leads the receiver 3) Moves to successfully create an open space for receiving the pass
4) Maintains adequate spacing in relation to teammate 5) Receives the pass and maintains control of the object and body
E. Gymnastics Routine Student performs a teacher or student created educational gymnastics floor routine one time. All five of the five criteria are met.
Four of the five criteria are met. Three of the five criteria are met.
Two of the five criteria are met.
Zero or one of the five criteria are met.
*Criteria: Gymnastics Routine 1) Includes a total of 4 different balances inclusive of a beginning and ending balance 2) All balances must demonstrate stillness for 3 seconds 3) All balances must be on a different base of support
4) Includes two different locomotor skills 5) Includes two different weight transfer skills