Embed Size (px)
Citation preview
Student ManualStudent Information System

Edgenuity Student Manual | 3
ContentsIntroduction ............................................................................................................................................5
Technical Requirements ............................................................................................................................5
Logging In ...............................................................................................................................................5
My Dashboard Tools and Features ...............................................................................................................6
Communicating With Your Teachers ............................................................................................................8
Student Lobby ..........................................................................................................................................9
The Course Map ........................................................................................................................................10
Edgenuity Lessons ....................................................................................................................................10
Instruction .................................................................................................................................................... 10
Assignments ................................................................................................................................................ 11
Assessment .................................................................................................................................................. 12
Powerspeak World Language Courses ........................................................................................................... 13
Student Learning Tools ..............................................................................................................................14
The Lesson Support Pane ..........................................................................................................................14
eNotes ......................................................................................................................................................... 15
Glossary ....................................................................................................................................................... 16
Video Captions ............................................................................................................................................. 16
Video Transcripts .......................................................................................................................................... 17
General Tools and References ....................................................................................................................17
Highlight Text ............................................................................................................................................... 17
Read Aloud and Translation .......................................................................................................................... 18
Course-Specific Tools and References .........................................................................................................19
Standard Calculator ...................................................................................................................................... 19
Graphing Calculator ...................................................................................................................................... 19
Other Specialized Calculators........................................................................................................................ 20
References ................................................................................................................................................... 21
The CloseReader™ ...................................................................................................................................22
Look Up a Word ........................................................................................................................................... 22
Digital Sticky Notes ....................................................................................................................................... 22
Additional CloseReader Tools ........................................................................................................................ 22
The Organizer ...........................................................................................................................................23
Reports ........................................................................................................................................................ 23
Resources .................................................................................................................................................... 25

4 | Edgenuity Student Manual
Edgenuity Student Manual | 5
Introduction Welcome to Edgenuity’s Student Manual! We are so pleased that you’ve allowed Edgenuity to be a part of your educational
journey with online learning. With lessons designed to provide you with instructional content and show you how that
content correlates to your real world, we hope that you will not only thrive with Edgenuity, but flourish.
The Student Information System is where you’ll find helpful information about your courses, communicate with your teachers,
and access the Virtual Classroom. The Virtual Classroom is the portal to your lessons; it is also where you can find your
Progress Report, Assignment Calendar, and other features designed to keep you informed and in control of your own education.
This document is intended to help you become comfortable navigating your online educational environment and guide you
through everything you need to know to be happy and successful with your Edgenuity courses.
Technical RequirementsTo ensure that you can login and begin working, first verify that your computer meets the technical requirements of the program.
http://www.edgenuity.com/it-support/
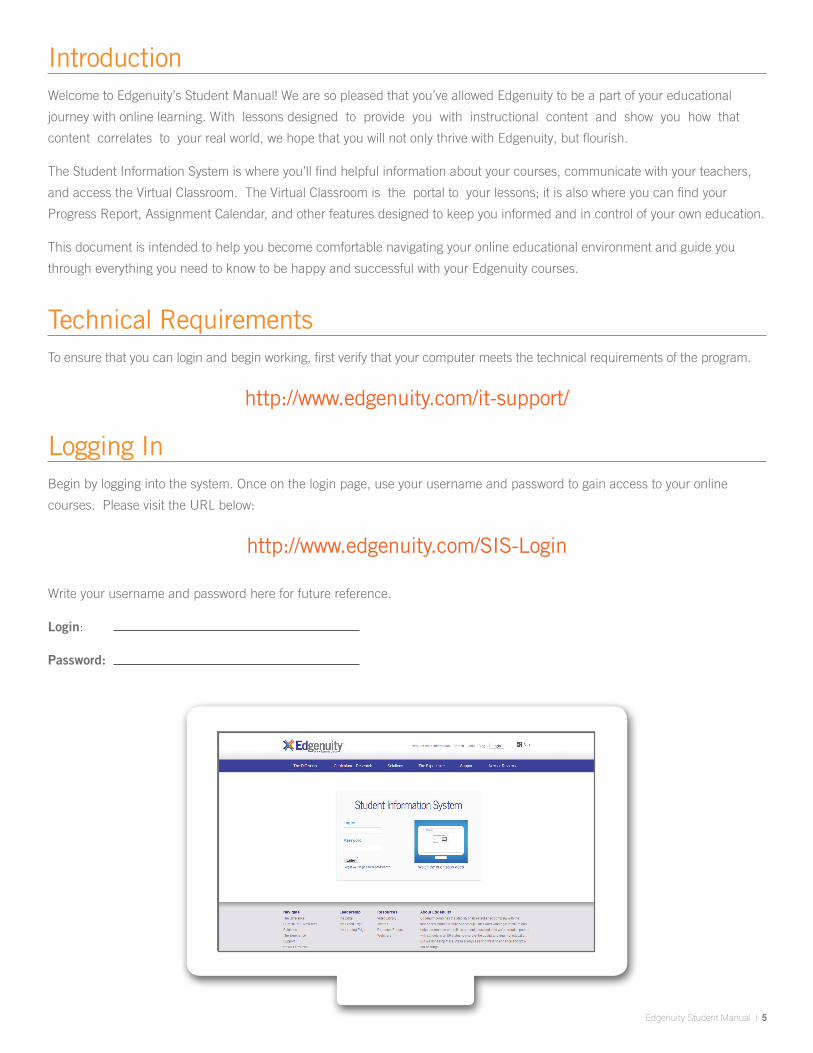
Logging In Begin by logging into the system. Once on the login page, use your username and password to gain access to your online
courses. Please visit the URL below:
http://www.edgenuity.com/SIS-Login
Write your username and password here for future reference.
Login:
Password:
6 | Edgenuity Student Manual
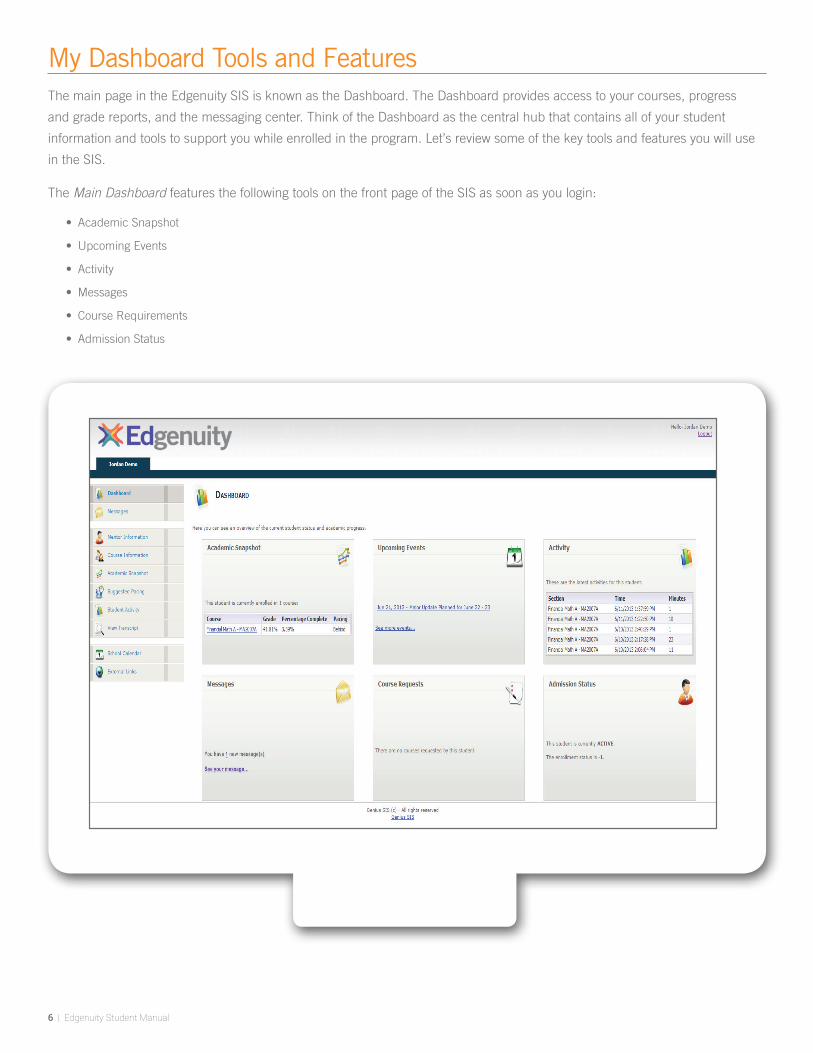
My Dashboard Tools and FeaturesThe main page in the Edgenuity SIS is known as the Dashboard. The Dashboard provides access to your courses, progress
and grade reports, and the messaging center. Think of the Dashboard as the central hub that contains all of your student
information and tools to support you while enrolled in the program. Let’s review some of the key tools and features you will use
in the SIS.
The Main Dashboard features the following tools on the front page of the SIS as soon as you login:
• Academic Snapshot
• Upcoming Events
• Activity
• Messages
• Course Requirements
• Admission Status
Edgenuity Student Manual | 7
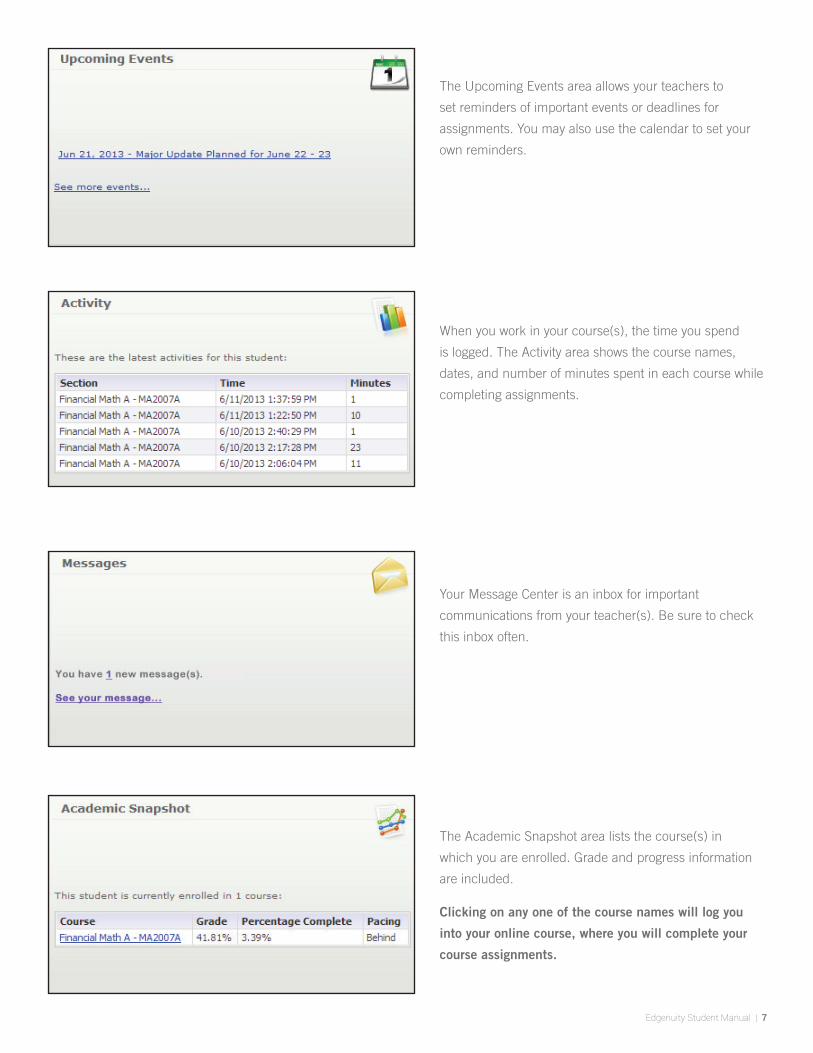
The Upcoming Events area allows your teachers to
set reminders of important events or deadlines for
assignments. You may also use the calendar to set your
own reminders.
When you work in your course(s), the time you spend
is logged. The Activity area shows the course names,
dates, and number of minutes spent in each course while
completing assignments.
Your Message Center is an inbox for important
communications from your teacher(s). Be sure to check
this inbox often.
The Academic Snapshot area lists the course(s) in
which you are enrolled. Grade and progress information
are included.
Clicking on any one of the course names will log you
into your online course, where you will complete your
course assignments.
8 | Edgenuity Student Manual
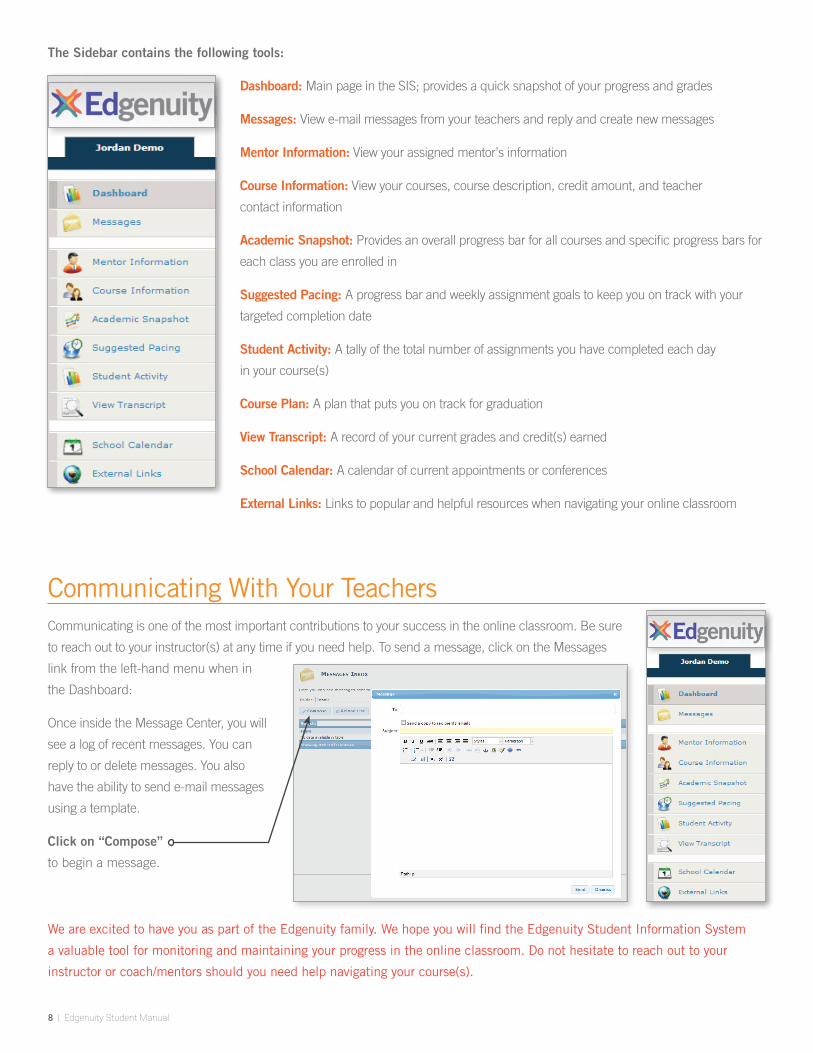
The Sidebar contains the following tools:
Dashboard: Main page in the SIS; provides a quick snapshot of your progress and grades
Messages: View e-mail messages from your teachers and reply and create new messages
Mentor Information: View your assigned mentor’s information
Course Information: View your courses, course description, credit amount, and teacher
contact information
Academic Snapshot: Provides an overall progress bar for all courses and specific progress bars for
each class you are enrolled in
Suggested Pacing: A progress bar and weekly assignment goals to keep you on track with your
targeted completion date
Student Activity: A tally of the total number of assignments you have completed each day
in your course(s)
Course Plan: A plan that puts you on track for graduation
View Transcript: A record of your current grades and credit(s) earned
School Calendar: A calendar of current appointments or conferences
External Links: Links to popular and helpful resources when navigating your online classroom
Communicating With Your TeachersCommunicating is one of the most important contributions to your success in the online classroom. Be sure
to reach out to your instructor(s) at any time if you need help. To send a message, click on the Messages
link from the left-hand menu when in
the Dashboard:
Once inside the Message Center, you will
see a log of recent messages. You can
reply to or delete messages. You also
have the ability to send e-mail messages
using a template.
Click on “Compose”
to begin a message.
We are excited to have you as part of the Edgenuity family. We hope you will find the Edgenuity Student Information System
a valuable tool for monitoring and maintaining your progress in the online classroom. Do not hesitate to reach out to your
instructor or coach/mentors should you need help navigating your course(s).
Edgenuity Student Manual | 9
Copyright © Edgenuity Inc.
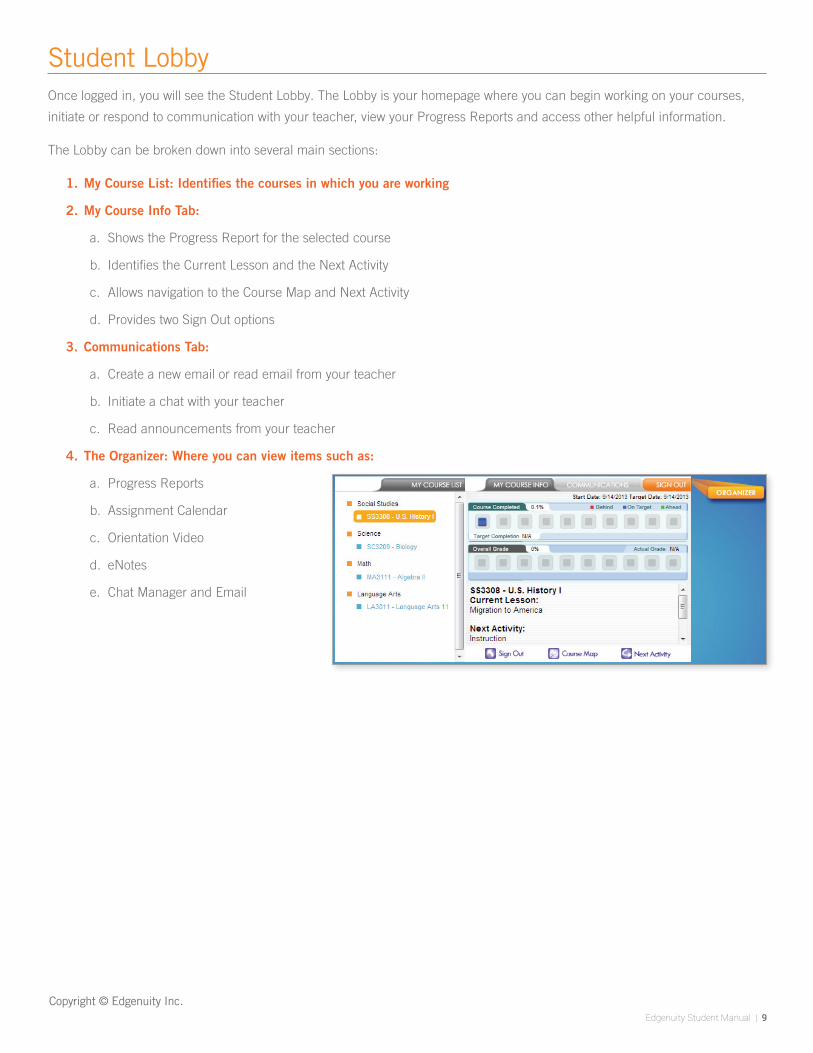
Student LobbyOnce logged in, you will see the Student Lobby. The Lobby is your homepage where you can begin working on your courses,
initiate or respond to communication with your teacher, view your Progress Reports and access other helpful information.
The Lobby can be broken down into several main sections:
1. My Course List: Identifies the courses in which you are working
2. My Course Info Tab:
a. Shows the Progress Report for the selected course
b. Identifies the Current Lesson and the Next Activity
c. Allows navigation to the Course Map and Next Activity
d. Provides two Sign Out options
3. Communications Tab:
a. Create a new email or read email from your teacher
b. Initiate a chat with your teacher
c. Read announcements from your teacher
4. The Organizer: Where you can view items such as:
a. Progress Reports
b. Assignment Calendar
c. Orientation Video
d. eNotes
e. Chat Manager and Email
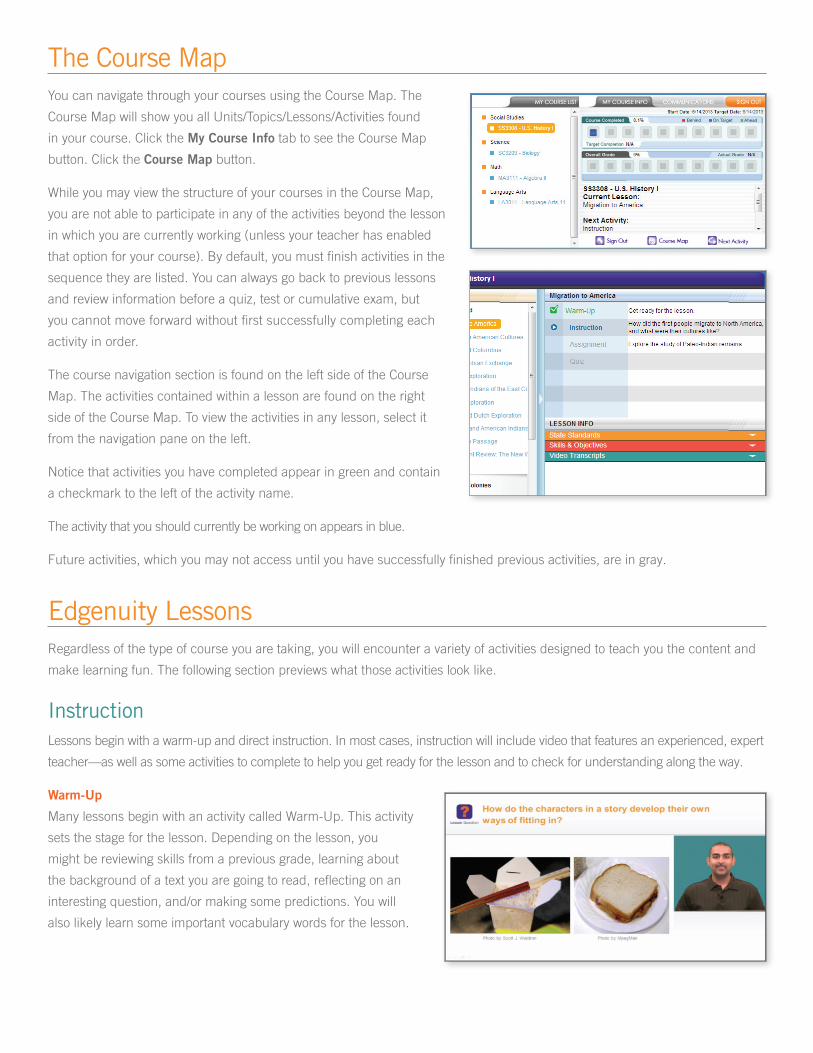
The Course MapYou can navigate through your courses using the Course Map. The
Course Map will show you all Units/Topics/Lessons/Activities found
in your course. Click the My Course Info tab to see the Course Map
button. Click the Course Map button.
While you may view the structure of your courses in the Course Map,
you are not able to participate in any of the activities beyond the lesson
in which you are currently working (unless your teacher has enabled
that option for your course). By default, you must finish activities in the
sequence they are listed. You can always go back to previous lessons
and review information before a quiz, test or cumulative exam, but
you cannot move forward without first successfully completing each
activity in order.
The course navigation section is found on the left side of the Course
Map. The activities contained within a lesson are found on the right
side of the Course Map. To view the activities in any lesson, select it
from the navigation pane on the left.
Notice that activities you have completed appear in green and contain
a checkmark to the left of the activity name.
The activity that you should currently be working on appears in blue.
Future activities, which you may not access until you have successfully finished previous activities, are in gray.
Edgenuity LessonsRegardless of the type of course you are taking, you will encounter a variety of activities designed to teach you the content and
make learning fun. The following section previews what those activities look like.
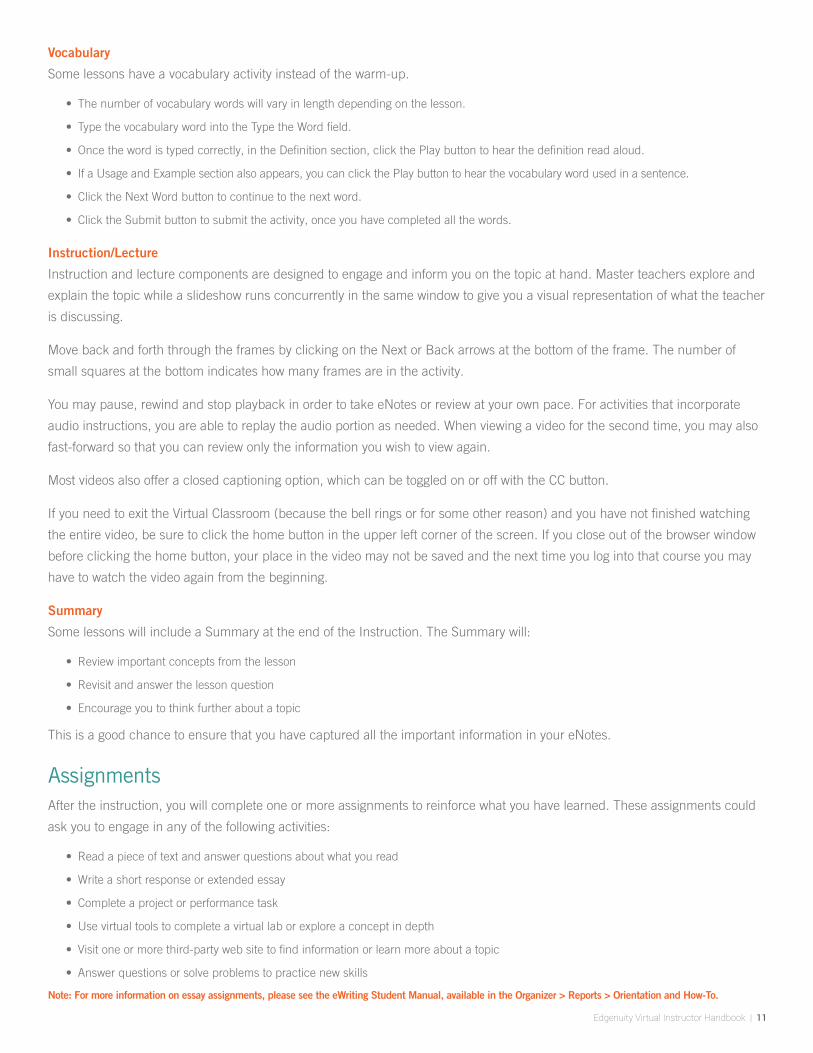
InstructionLessons begin with a warm-up and direct instruction. In most cases, instruction will include video that features an experienced, expert
teacher—as well as some activities to complete to help you get ready for the lesson and to check for understanding along the way.
Warm-Up
Many lessons begin with an activity called Warm-Up. This activity
sets the stage for the lesson. Depending on the lesson, you
might be reviewing skills from a previous grade, learning about
the background of a text you are going to read, reflecting on an
interesting question, and/or making some predictions. You will
also likely learn some important vocabulary words for the lesson.
Edgenuity Virtual Instructor Handbook | 11
Vocabulary
Some lessons have a vocabulary activity instead of the warm-up.
• The number of vocabulary words will vary in length depending on the lesson.
• Type the vocabulary word into the Type the Word field.
• Once the word is typed correctly, in the Definition section, click the Play button to hear the definition read aloud.
• If a Usage and Example section also appears, you can click the Play button to hear the vocabulary word used in a sentence.
• Click the Next Word button to continue to the next word.
• Click the Submit button to submit the activity, once you have completed all the words.
Instruction/Lecture
Instruction and lecture components are designed to engage and inform you on the topic at hand. Master teachers explore and
explain the topic while a slideshow runs concurrently in the same window to give you a visual representation of what the teacher
is discussing.
Move back and forth through the frames by clicking on the Next or Back arrows at the bottom of the frame. The number of
small squares at the bottom indicates how many frames are in the activity.
You may pause, rewind and stop playback in order to take eNotes or review at your own pace. For activities that incorporate
audio instructions, you are able to replay the audio portion as needed. When viewing a video for the second time, you may also
fast-forward so that you can review only the information you wish to view again.
Most videos also offer a closed captioning option, which can be toggled on or off with the CC button.
If you need to exit the Virtual Classroom (because the bell rings or for some other reason) and you have not finished watching
the entire video, be sure to click the home button in the upper left corner of the screen. If you close out of the browser window
before clicking the home button, your place in the video may not be saved and the next time you log into that course you may
have to watch the video again from the beginning.
Summary
Some lessons will include a Summary at the end of the Instruction. The Summary will:
• Review important concepts from the lesson
• Revisit and answer the lesson question
• Encourage you to think further about a topic
This is a good chance to ensure that you have captured all the important information in your eNotes.
AssignmentsAfter the instruction, you will complete one or more assignments to reinforce what you have learned. These assignments could
ask you to engage in any of the following activities:
• Read a piece of text and answer questions about what you read
• Write a short response or extended essay
• Complete a project or performance task
• Use virtual tools to complete a virtual lab or explore a concept in depth
• Visit one or more third-party web site to find information or learn more about a topic
• Answer questions or solve problems to practice new skills
Note: For more information on essay assignments, please see the eWriting Student Manual, available in the Organizer > Reports > Orientation and How-To.
12 | Edgenuity Student Manual
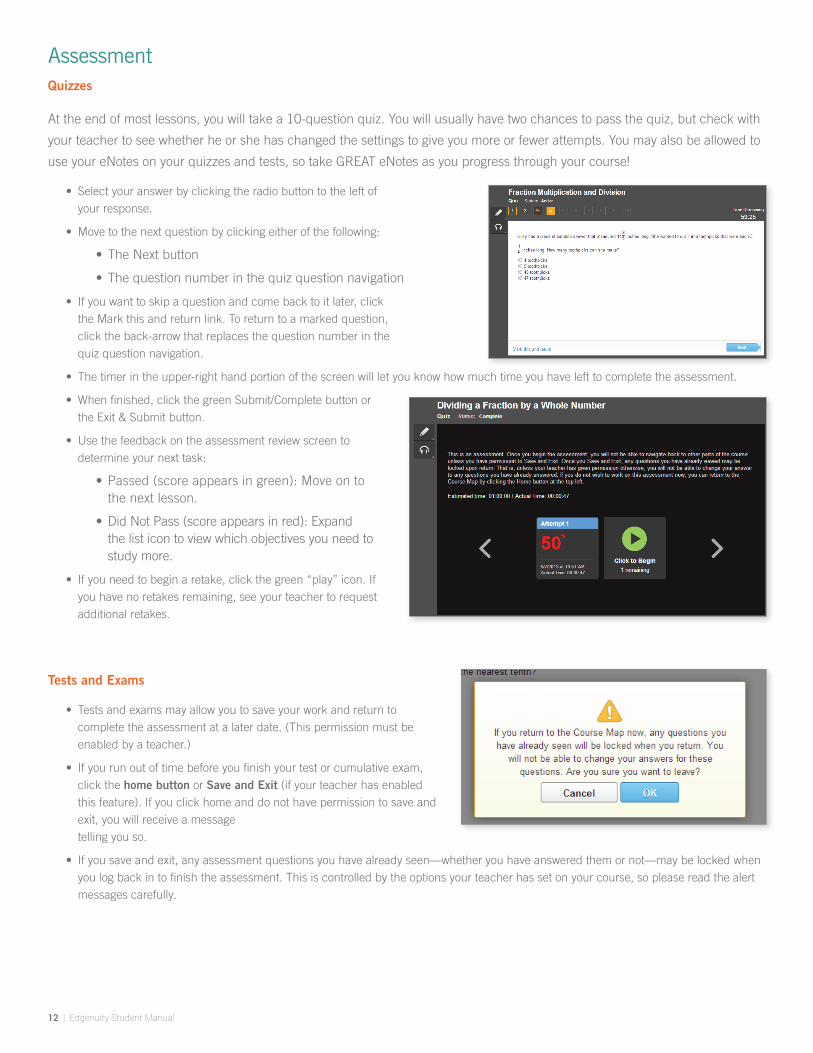
AssessmentQuizzes
At the end of most lessons, you will take a 10-question quiz. You will usually have two chances to pass the quiz, but check with
your teacher to see whether he or she has changed the settings to give you more or fewer attempts. You may also be allowed to
use your eNotes on your quizzes and tests, so take GREAT eNotes as you progress through your course!
• Select your answer by clicking the radio button to the left of your response.
• Move to the next question by clicking either of the following:
• The Next button
• The question number in the quiz question navigation
• If you want to skip a question and come back to it later, click the Mark this and return link. To return to a marked question, click the back-arrow that replaces the question number in the quiz question navigation.
• The timer in the upper-right hand portion of the screen will let you know how much time you have left to complete the assessment.
• When finished, click the green Submit/Complete button or the Exit & Submit button.
• Use the feedback on the assessment review screen to determine your next task:
• Passed (score appears in green): Move on to the next lesson.
• Did Not Pass (score appears in red): Expand the list icon to view which objectives you need to study more.
• If you need to begin a retake, click the green “play” icon. If you have no retakes remaining, see your teacher to request additional retakes.
Tests and Exams
• Tests and exams may allow you to save your work and return to complete the assessment at a later date. (This permission must be enabled by a teacher.)
• If you run out of time before you finish your test or cumulative exam, click the home button or Save and Exit (if your teacher has enabled this feature). If you click home and do not have permission to save and exit, you will receive a message telling you so.
• If you save and exit, any assessment questions you have already seen—whether you have answered them or not—may be locked when you log back in to finish the assessment. This is controlled by the options your teacher has set on your course, so please read the alert messages carefully.
Edgenuity Student Manual | 13
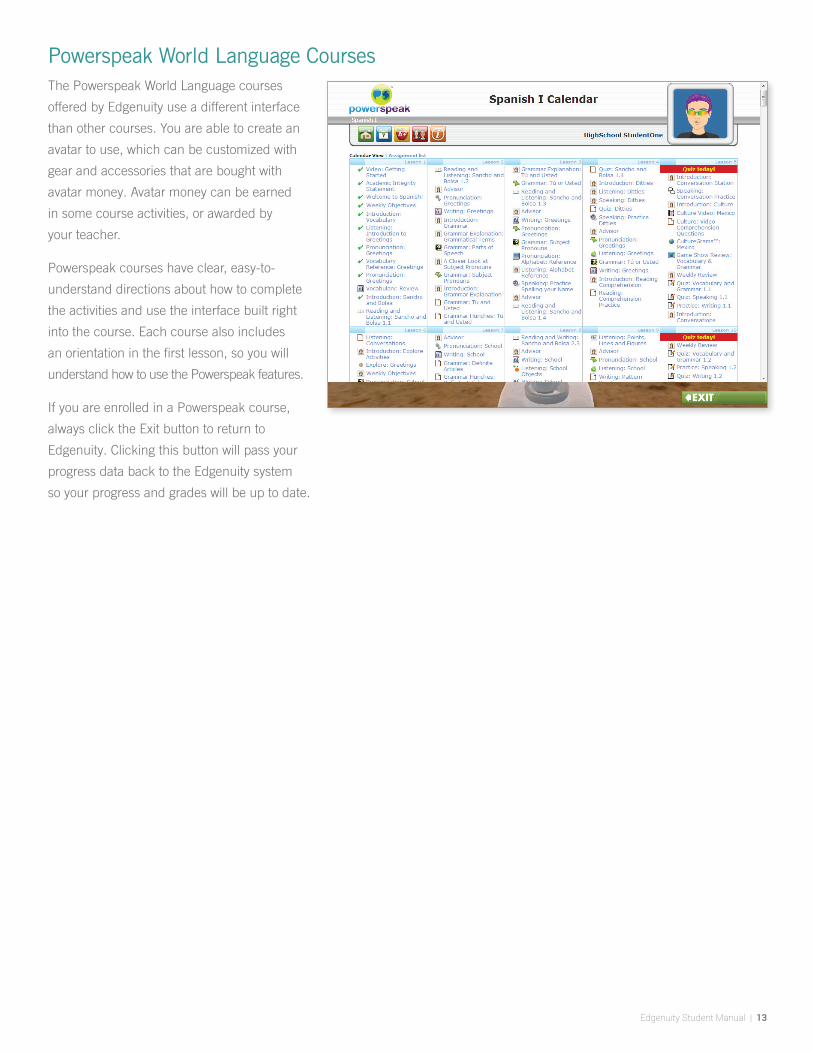
Powerspeak World Language CoursesThe Powerspeak World Language courses
offered by Edgenuity use a different interface
than other courses. You are able to create an
avatar to use, which can be customized with
gear and accessories that are bought with
avatar money. Avatar money can be earned
in some course activities, or awarded by
your teacher.
Powerspeak courses have clear, easy-to-
understand directions about how to complete
the activities and use the interface built right
into the course. Each course also includes
an orientation in the first lesson, so you will
understand how to use the Powerspeak features.
If you are enrolled in a Powerspeak course,
always click the Exit button to return to
Edgenuity. Clicking this button will pass your
progress data back to the Edgenuity system
so your progress and grades will be up to date.
14 | Edgenuity Student Manual
Student Learning ToolsEdgenuity’s student online environment includes a number of tools to support learning. Students can take notes, look up words,
access video captions and transcripts, highlight text, annotate text, access a standard calculator and graphing calculator (in
math courses), and access an interactive periodic table (in chemistry courses). Educators can also enable language translation
and text-to-speech read-aloud functionality for students if desired.
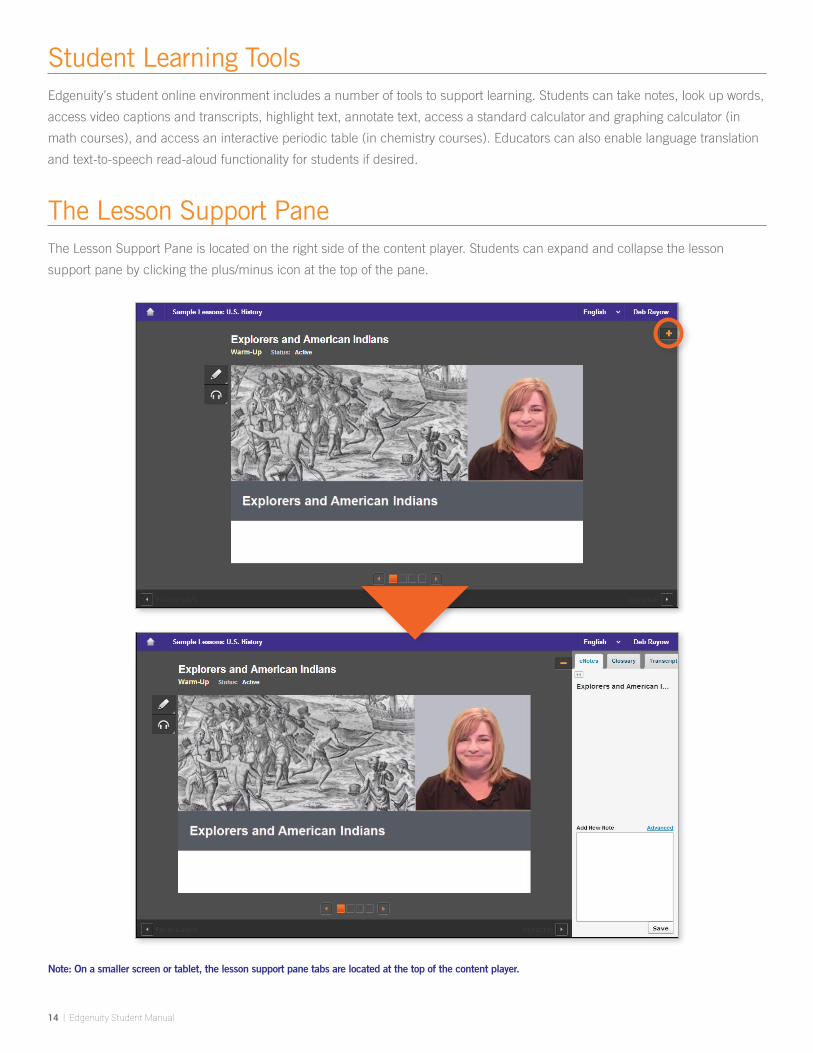
The Lesson Support PaneThe Lesson Support Pane is located on the right side of the content player. Students can expand and collapse the lesson
support pane by clicking the plus/minus icon at the top of the pane.
Note: On a smaller screen or tablet, the lesson support pane tabs are located at the top of the content player.
Edgenuity Student Manual | 15
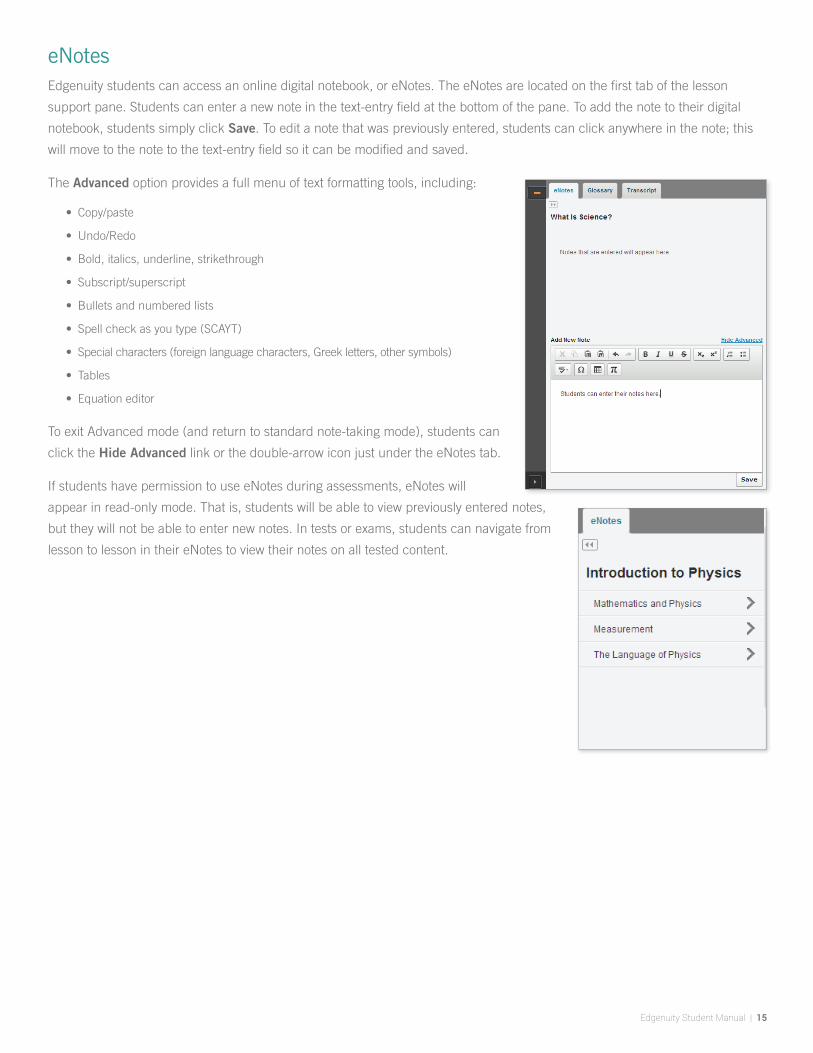
eNotesEdgenuity students can access an online digital notebook, or eNotes. The eNotes are located on the first tab of the lesson
support pane. Students can enter a new note in the text-entry field at the bottom of the pane. To add the note to their digital
notebook, students simply click Save. To edit a note that was previously entered, students can click anywhere in the note; this
will move to the note to the text-entry field so it can be modified and saved.
The Advanced option provides a full menu of text formatting tools, including:
• Copy/paste
• Undo/Redo
• Bold, italics, underline, strikethrough
• Subscript/superscript
• Bullets and numbered lists
• Spell check as you type (SCAYT)
• Special characters (foreign language characters, Greek letters, other symbols)
• Tables
• Equation editor
To exit Advanced mode (and return to standard note-taking mode), students can
click the Hide Advanced link or the double-arrow icon just under the eNotes tab.
If students have permission to use eNotes during assessments, eNotes will
appear in read-only mode. That is, students will be able to view previously entered notes,
but they will not be able to enter new notes. In tests or exams, students can navigate from
lesson to lesson in their eNotes to view their notes on all tested content.
16 | Edgenuity Student Manual
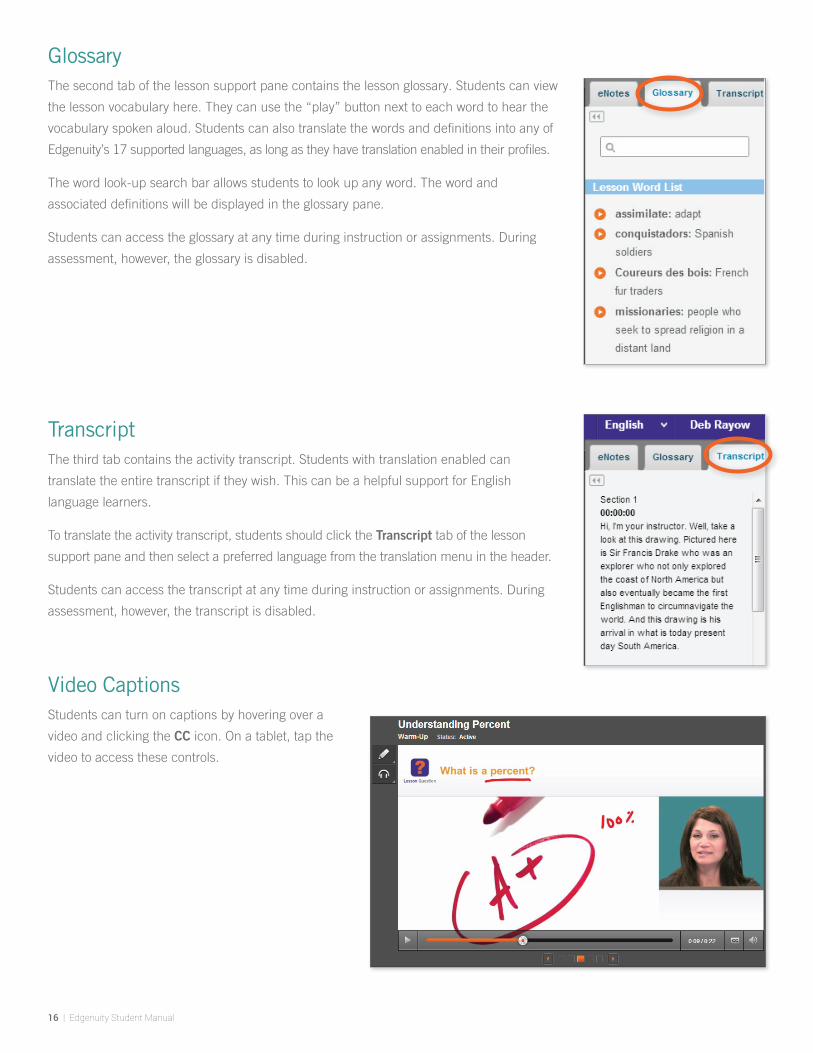
GlossaryThe second tab of the lesson support pane contains the lesson glossary. Students can view
the lesson vocabulary here. They can use the “play” button next to each word to hear the
vocabulary spoken aloud. Students can also translate the words and definitions into any of
Edgenuity’s 17 supported languages, as long as they have translation enabled in their profiles.
The word look-up search bar allows students to look up any word. The word and
associated definitions will be displayed in the glossary pane.
Students can access the glossary at any time during instruction or assignments. During
assessment, however, the glossary is disabled.
TranscriptThe third tab contains the activity transcript. Students with translation enabled can
translate the entire transcript if they wish. This can be a helpful support for English
language learners.
To translate the activity transcript, students should click the Transcript tab of the lesson
support pane and then select a preferred language from the translation menu in the header.
Students can access the transcript at any time during instruction or assignments. During
assessment, however, the transcript is disabled.
Video CaptionsStudents can turn on captions by hovering over a
video and clicking the CC icon. On a tablet, tap the
video to access these controls.
Edgenuity Student Manual | 17
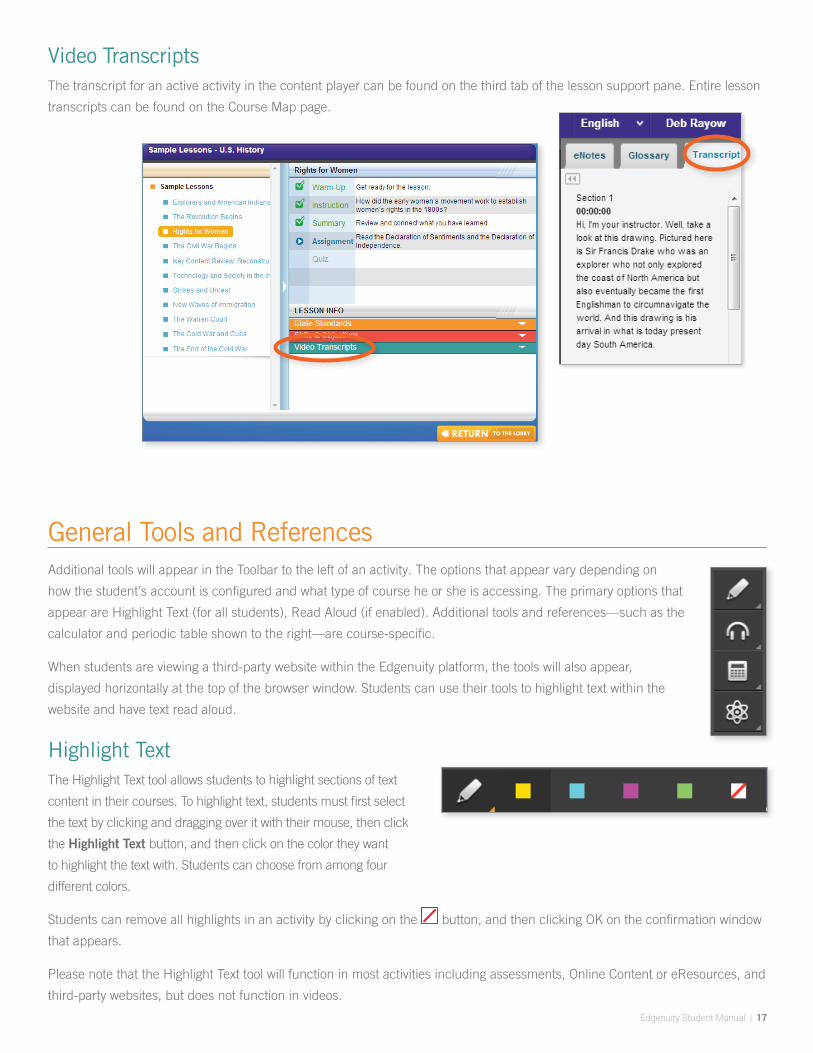
Video TranscriptsThe transcript for an active activity in the content player can be found on the third tab of the lesson support pane. Entire lesson
transcripts can be found on the Course Map page.
General Tools and ReferencesAdditional tools will appear in the Toolbar to the left of an activity. The options that appear vary depending on
how the student’s account is configured and what type of course he or she is accessing. The primary options that
appear are Highlight Text (for all students), Read Aloud (if enabled). Additional tools and references—such as the
calculator and periodic table shown to the right—are course-specific.
When students are viewing a third-party website within the Edgenuity platform, the tools will also appear,
displayed horizontally at the top of the browser window. Students can use their tools to highlight text within the
website and have text read aloud.
Highlight TextThe Highlight Text tool allows students to highlight sections of text
content in their courses. To highlight text, students must first select
the text by clicking and dragging over it with their mouse, then click
the Highlight Text button, and then click on the color they want
to highlight the text with. Students can choose from among four
different colors.
Students can remove all highlights in an activity by clicking on the button, and then clicking OK on the confirmation window
that appears.
Please note that the Highlight Text tool will function in most activities including assessments, Online Content or eResources, and
third-party websites, but does not function in videos.
18 | Edgenuity Student Manual
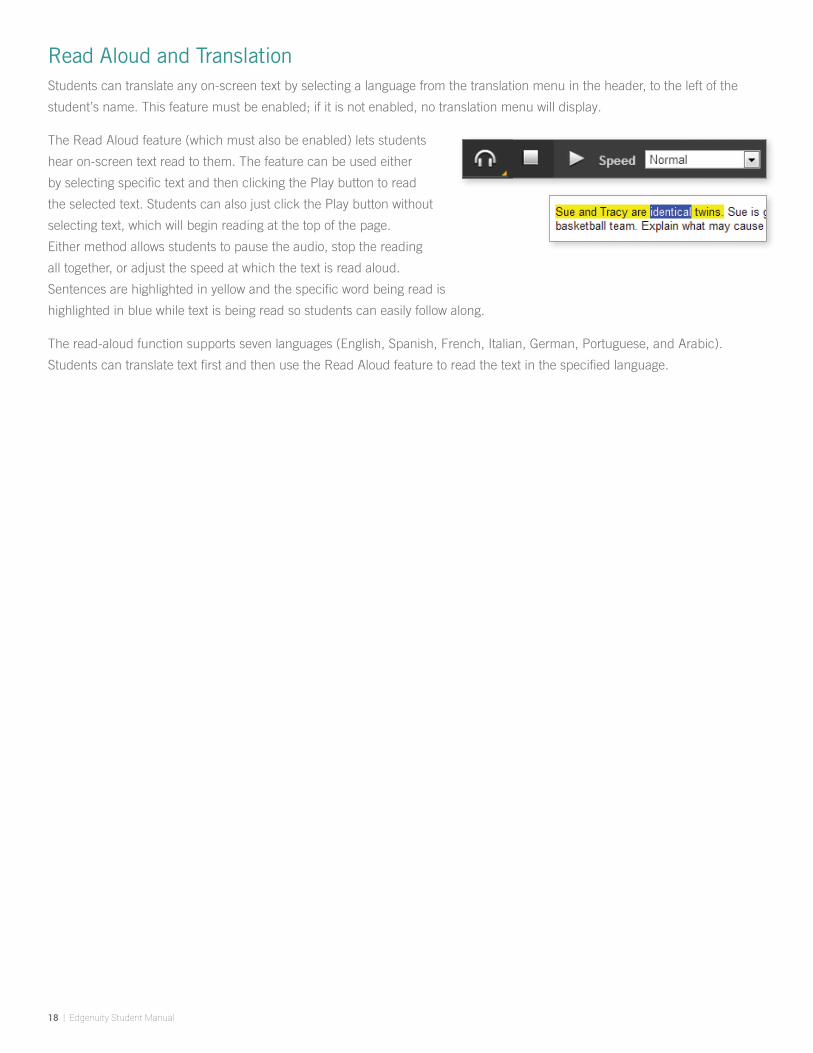
Read Aloud and TranslationStudents can translate any on-screen text by selecting a language from the translation menu in the header, to the left of the
student’s name. This feature must be enabled; if it is not enabled, no translation menu will display.
The Read Aloud feature (which must also be enabled) lets students
hear on-screen text read to them. The feature can be used either
by selecting specific text and then clicking the Play button to read
the selected text. Students can also just click the Play button without
selecting text, which will begin reading at the top of the page.
Either method allows students to pause the audio, stop the reading
all together, or adjust the speed at which the text is read aloud.
Sentences are highlighted in yellow and the specific word being read is
highlighted in blue while text is being read so students can easily follow along.
The read-aloud function supports seven languages (English, Spanish, French, Italian, German, Portuguese, and Arabic).
Students can translate text first and then use the Read Aloud feature to read the text in the specified language.
Edgenuity Student Manual | 19
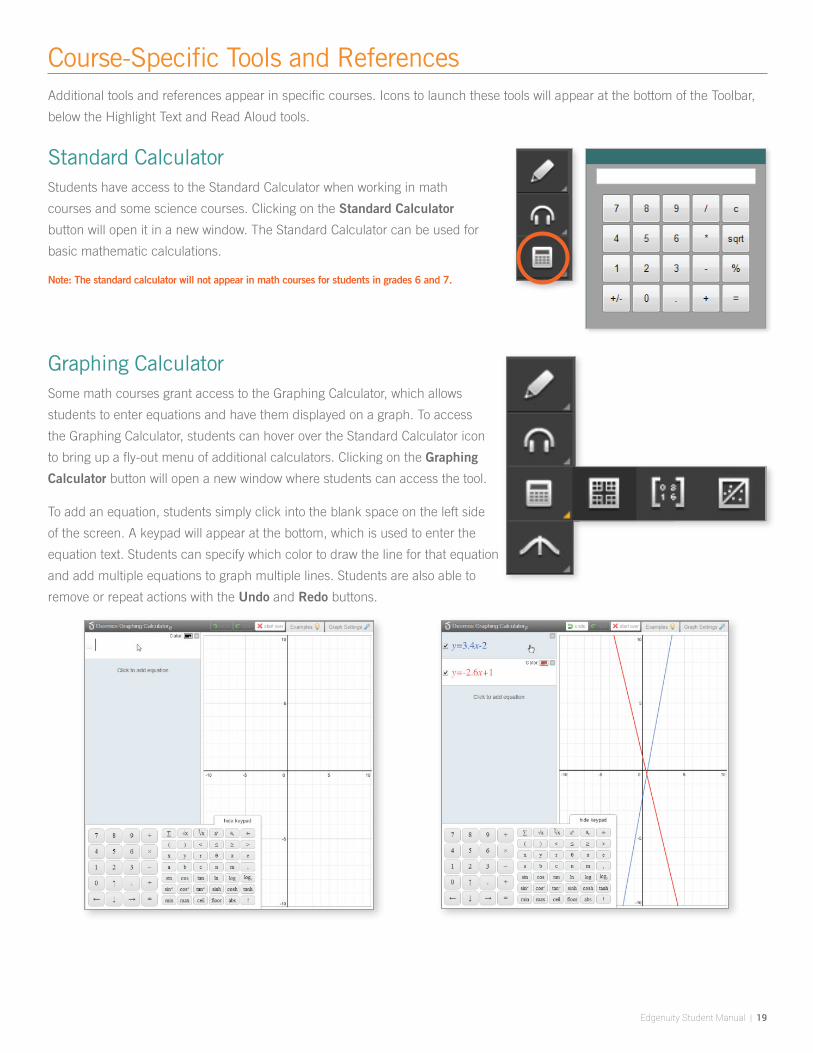
Course-Specific Tools and ReferencesAdditional tools and references appear in specific courses. Icons to launch these tools will appear at the bottom of the Toolbar,
below the Highlight Text and Read Aloud tools.
Standard CalculatorStudents have access to the Standard Calculator when working in math
courses and some science courses. Clicking on the Standard Calculator
button will open it in a new window. The Standard Calculator can be used for
basic mathematic calculations.
Note: The standard calculator will not appear in math courses for students in grades 6 and 7.
Graphing CalculatorSome math courses grant access to the Graphing Calculator, which allows
students to enter equations and have them displayed on a graph. To access
the Graphing Calculator, students can hover over the Standard Calculator icon
to bring up a fly-out menu of additional calculators. Clicking on the Graphing
Calculator button will open a new window where students can access the tool.
To add an equation, students simply click into the blank space on the left side
of the screen. A keypad will appear at the bottom, which is used to enter the
equation text. Students can specify which color to draw the line for that equation
and add multiple equations to graph multiple lines. Students are also able to
remove or repeat actions with the Undo and Redo buttons.
20 | Edgenuity Student Manual
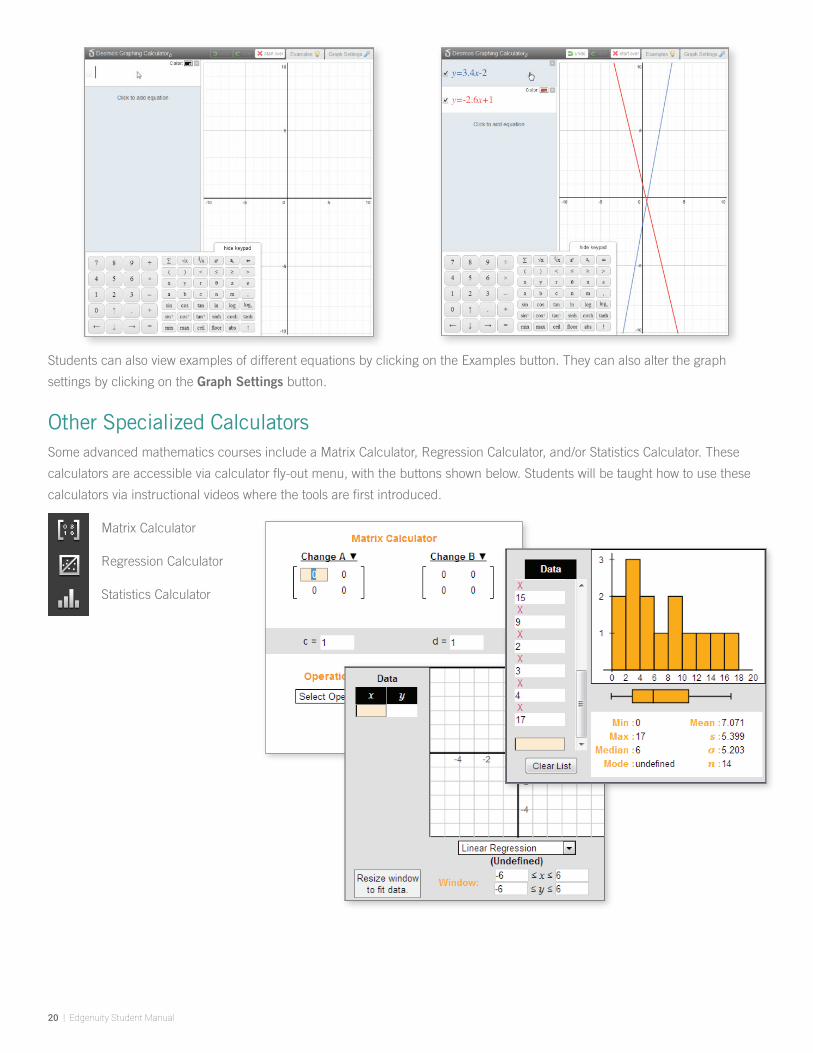
Students can also view examples of different equations by clicking on the Examples button. They can also alter the graph
settings by clicking on the Graph Settings button.
Other Specialized CalculatorsSome advanced mathematics courses include a Matrix Calculator, Regression Calculator, and/or Statistics Calculator. These
calculators are accessible via calculator fly-out menu, with the buttons shown below. Students will be taught how to use these
calculators via instructional videos where the tools are first introduced.
Matrix Calculator
Regression Calculator
Statistics Calculator
Edgenuity Student Manual | 21
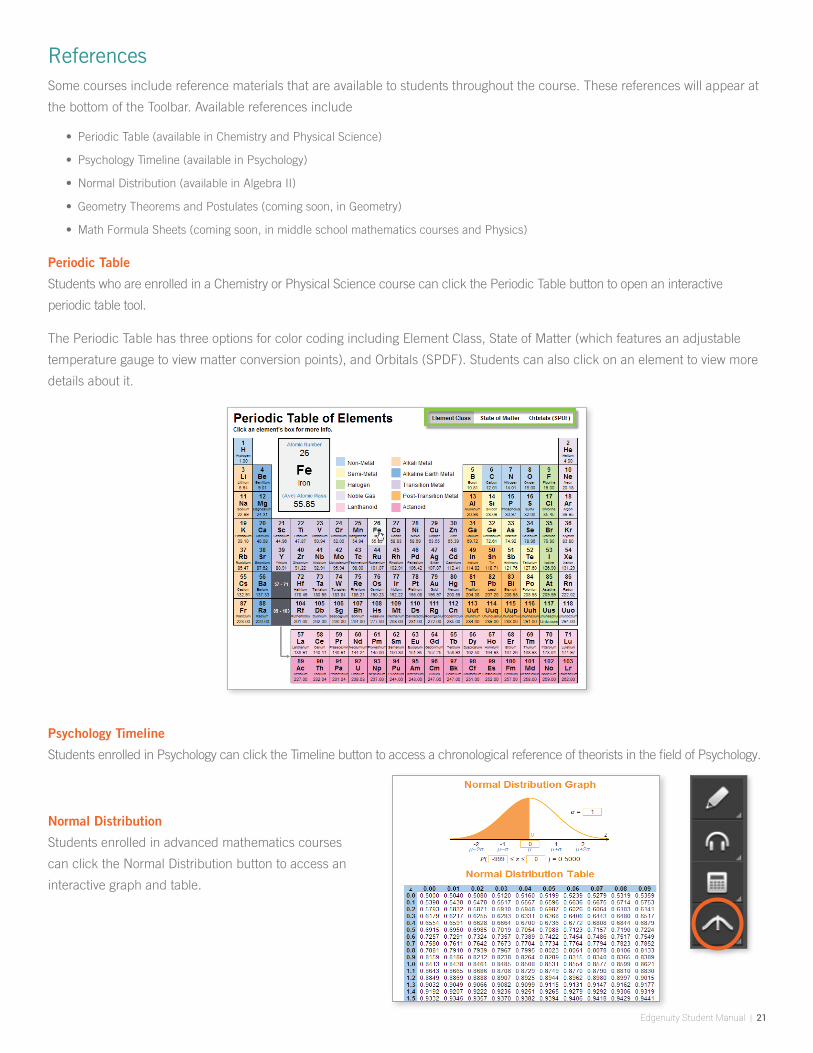
ReferencesSome courses include reference materials that are available to students throughout the course. These references will appear at
the bottom of the Toolbar. Available references include
• Periodic Table (available in Chemistry and Physical Science)
• Psychology Timeline (available in Psychology)
• Normal Distribution (available in Algebra II)
• Geometry Theorems and Postulates (coming soon, in Geometry)
• Math Formula Sheets (coming soon, in middle school mathematics courses and Physics)
Periodic Table
Students who are enrolled in a Chemistry or Physical Science course can click the Periodic Table button to open an interactive
periodic table tool.
The Periodic Table has three options for color coding including Element Class, State of Matter (which features an adjustable
temperature gauge to view matter conversion points), and Orbitals (SPDF). Students can also click on an element to view more
details about it.
Psychology Timeline
Students enrolled in Psychology can click the Timeline button to access a chronological reference of theorists in the field of Psychology.
Normal Distribution
Students enrolled in advanced mathematics courses
can click the Normal Distribution button to access an
interactive graph and table.
22 | Edgenuity Student Manual
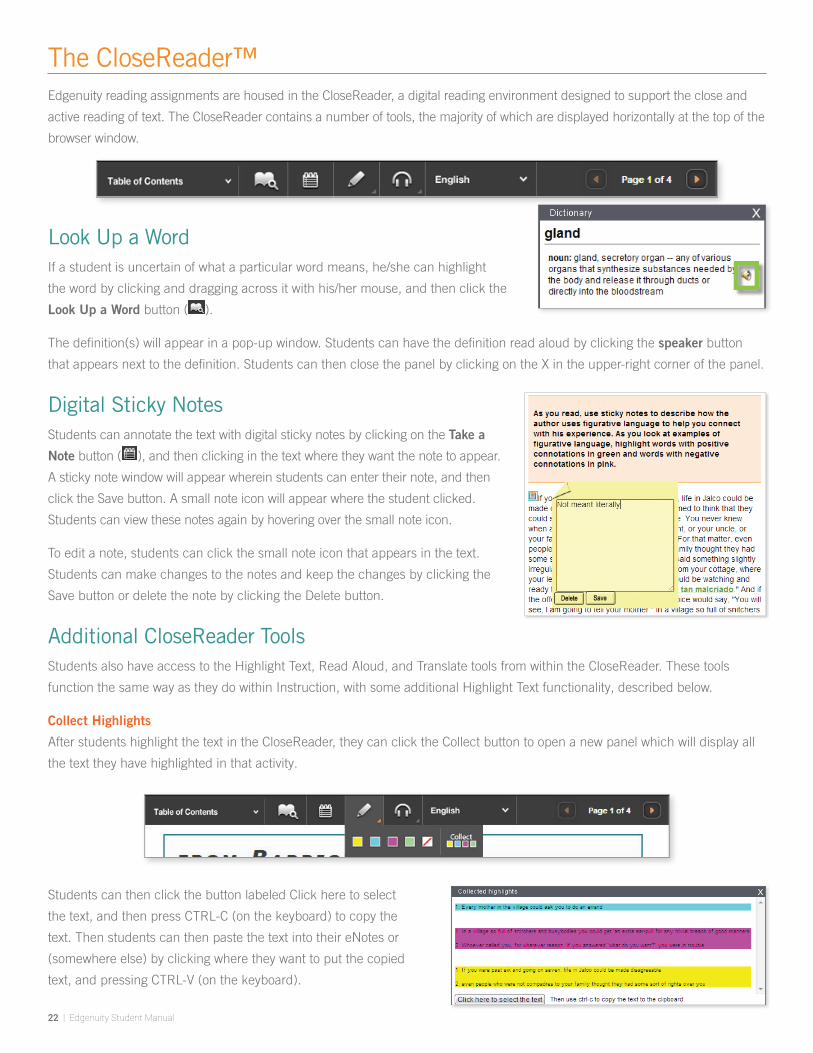
The CloseReader™Edgenuity reading assignments are housed in the CloseReader, a digital reading environment designed to support the close and
active reading of text. The CloseReader contains a number of tools, the majority of which are displayed horizontally at the top of the
browser window.
Look Up a WordIf a student is uncertain of what a particular word means, he/she can highlight
the word by clicking and dragging across it with his/her mouse, and then click the
Look Up a Word button ( ).
The definition(s) will appear in a pop-up window. Students can have the definition read aloud by clicking the speaker button
that appears next to the definition. Students can then close the panel by clicking on the X in the upper-right corner of the panel.
Digital Sticky NotesStudents can annotate the text with digital sticky notes by clicking on the Take a
Note button ( ), and then clicking in the text where they want the note to appear.
A sticky note window will appear wherein students can enter their note, and then
click the Save button. A small note icon will appear where the student clicked.
Students can view these notes again by hovering over the small note icon.
To edit a note, students can click the small note icon that appears in the text.
Students can make changes to the notes and keep the changes by clicking the
Save button or delete the note by clicking the Delete button.
Additional CloseReader ToolsStudents also have access to the Highlight Text, Read Aloud, and Translate tools from within the CloseReader. These tools
function the same way as they do within Instruction, with some additional Highlight Text functionality, described below.
Collect Highlights
After students highlight the text in the CloseReader, they can click the Collect button to open a new panel which will display all
the text they have highlighted in that activity.
Students can then click the button labeled Click here to select
the text, and then press CTRL-C (on the keyboard) to copy the
text. Then students can then paste the text into their eNotes or
(somewhere else) by clicking where they want to put the copied
text, and pressing CTRL-V (on the keyboard).
Edgenuity Student Manual | 23
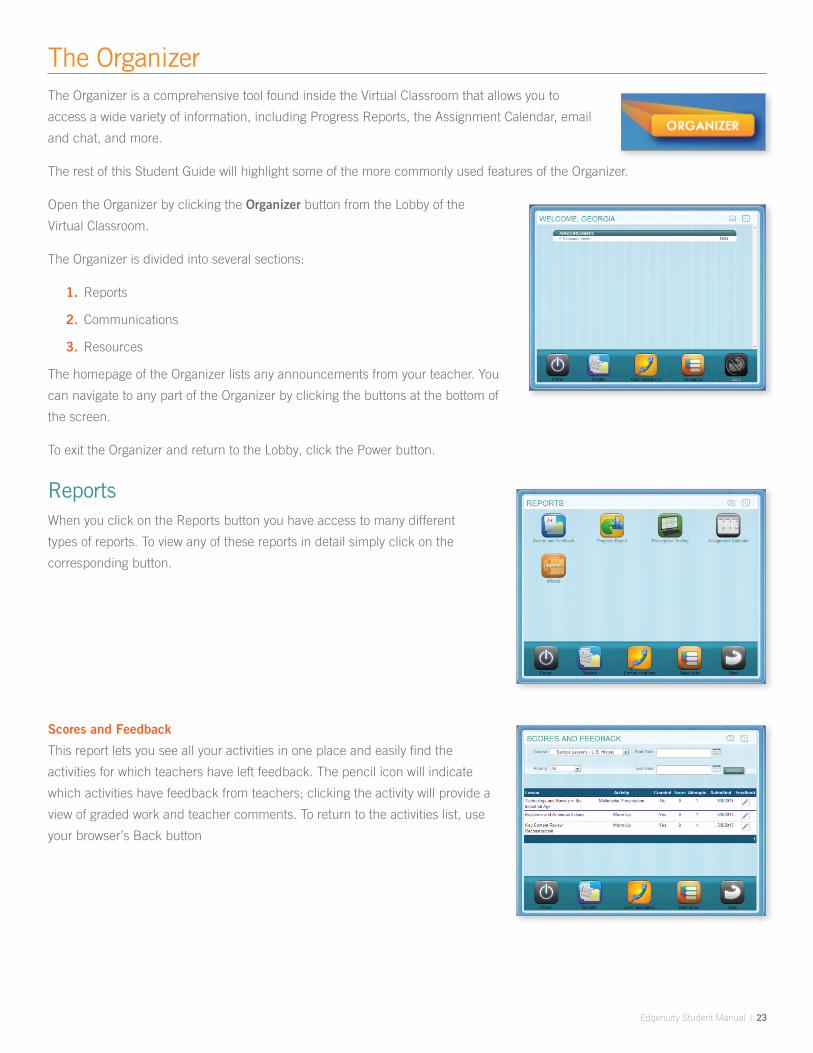
The OrganizerThe Organizer is a comprehensive tool found inside the Virtual Classroom that allows you to
access a wide variety of information, including Progress Reports, the Assignment Calendar, email
and chat, and more.
The rest of this Student Guide will highlight some of the more commonly used features of the Organizer.
Open the Organizer by clicking the Organizer button from the Lobby of the
Virtual Classroom.
The Organizer is divided into several sections:
1. Reports
2. Communications
3. Resources
The homepage of the Organizer lists any announcements from your teacher. You
can navigate to any part of the Organizer by clicking the buttons at the bottom of
the screen.
To exit the Organizer and return to the Lobby, click the Power button.
ReportsWhen you click on the Reports button you have access to many different
types of reports. To view any of these reports in detail simply click on the
corresponding button.
Scores and Feedback
This report lets you see all your activities in one place and easily find the
activities for which teachers have left feedback. The pencil icon will indicate
which activities have feedback from teachers; clicking the activity will provide a
view of graded work and teacher comments. To return to the activities list, use
your browser’s Back button
24 | Edgenuity Student Manual
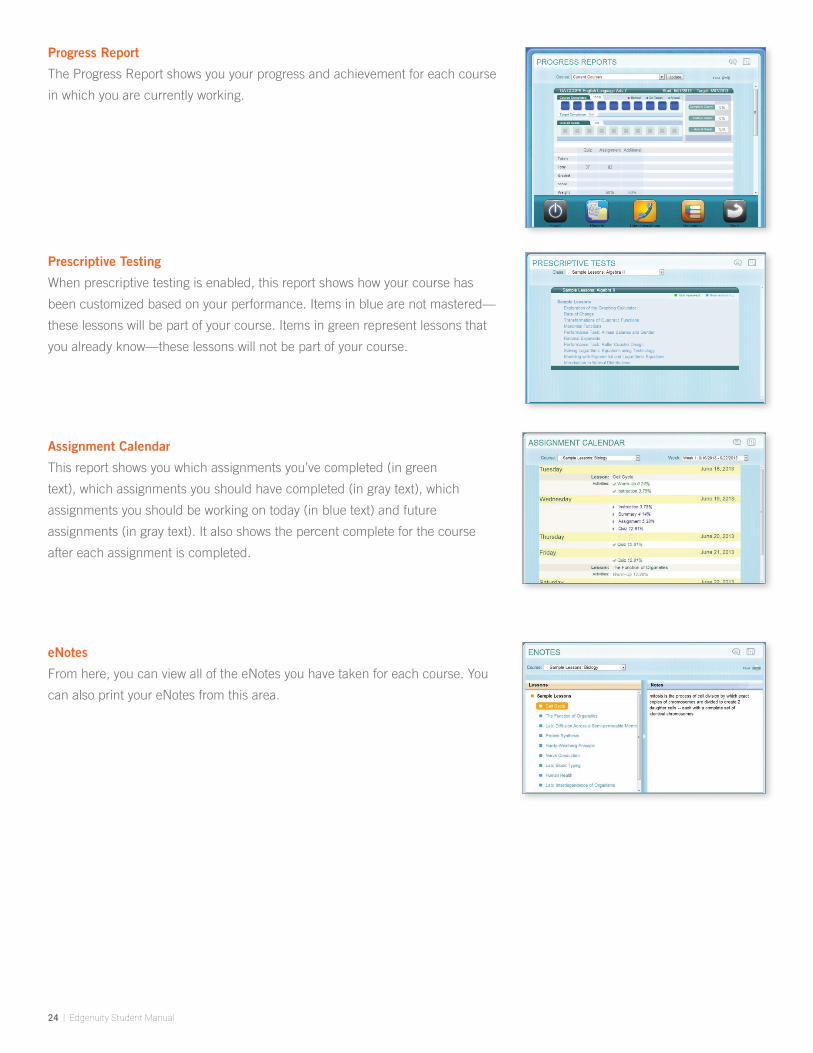
Progress Report
The Progress Report shows you your progress and achievement for each course
in which you are currently working.
Prescriptive Testing
When prescriptive testing is enabled, this report shows how your course has
been customized based on your performance. Items in blue are not mastered—
these lessons will be part of your course. Items in green represent lessons that
you already know—these lessons will not be part of your course.
Assignment Calendar
This report shows you which assignments you’ve completed (in green
text), which assignments you should have completed (in gray text), which
assignments you should be working on today (in blue text) and future
assignments (in gray text). It also shows the percent complete for the course
after each assignment is completed.
eNotes
From here, you can view all of the eNotes you have taken for each course. You
can also print your eNotes from this area.
Edgenuity Student Manual | 25
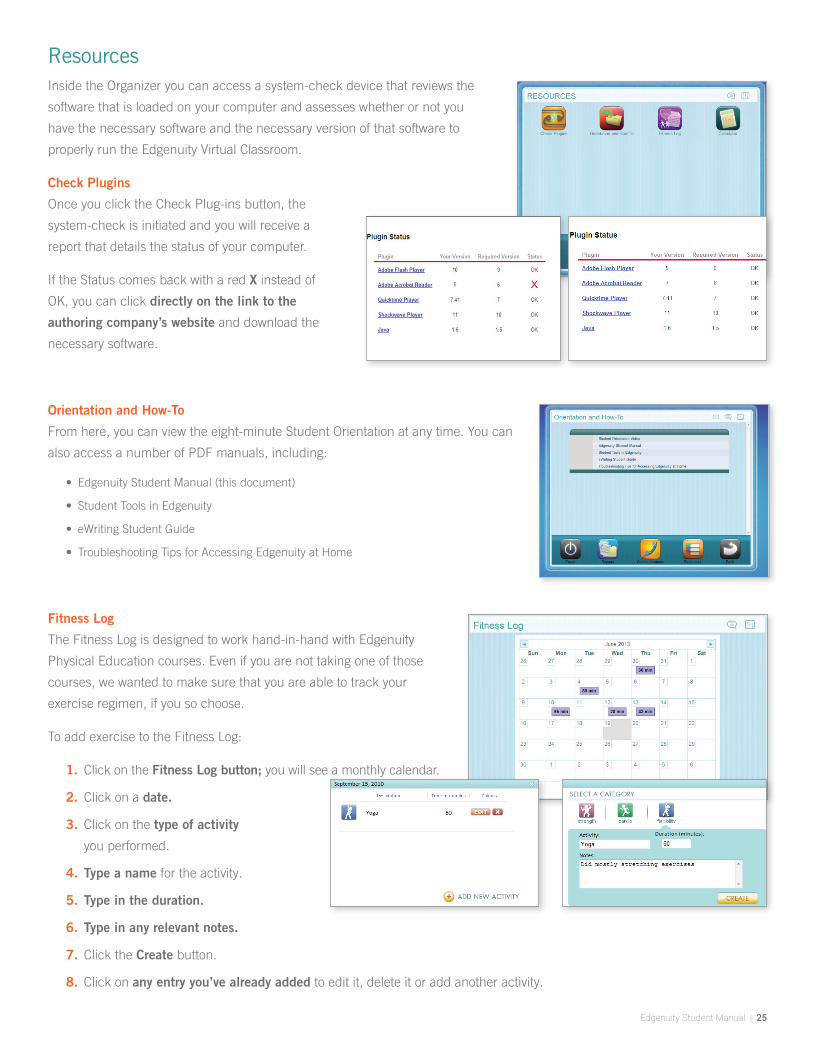
ResourcesInside the Organizer you can access a system-check device that reviews the
software that is loaded on your computer and assesses whether or not you
have the necessary software and the necessary version of that software to
properly run the Edgenuity Virtual Classroom.
Check Plugins
Once you click the Check Plug-ins button, the
system-check is initiated and you will receive a
report that details the status of your computer.
If the Status comes back with a red X instead of
OK, you can click directly on the link to the
authoring company’s website and download the
necessary software.
Orientation and How-To
From here, you can view the eight-minute Student Orientation at any time. You can
also access a number of PDF manuals, including:
• Edgenuity Student Manual (this document)
• Student Tools in Edgenuity
• eWriting Student Guide
• Troubleshooting Tips for Accessing Edgenuity at Home
Fitness Log
The Fitness Log is designed to work hand-in-hand with Edgenuity
Physical Education courses. Even if you are not taking one of those
courses, we wanted to make sure that you are able to track your
exercise regimen, if you so choose.
To add exercise to the Fitness Log:
1. Click on the Fitness Log button; you will see a monthly calendar.
2. Click on a date.
3. Click on the type of activity
you performed.
4. Type a name for the activity.
5. Type in the duration.
6. Type in any relevant notes.
7. Click the Create button.
8. Click on any entry you’ve already added to edit it, delete it or add another activity.
26 | Edgenuity Student Manual
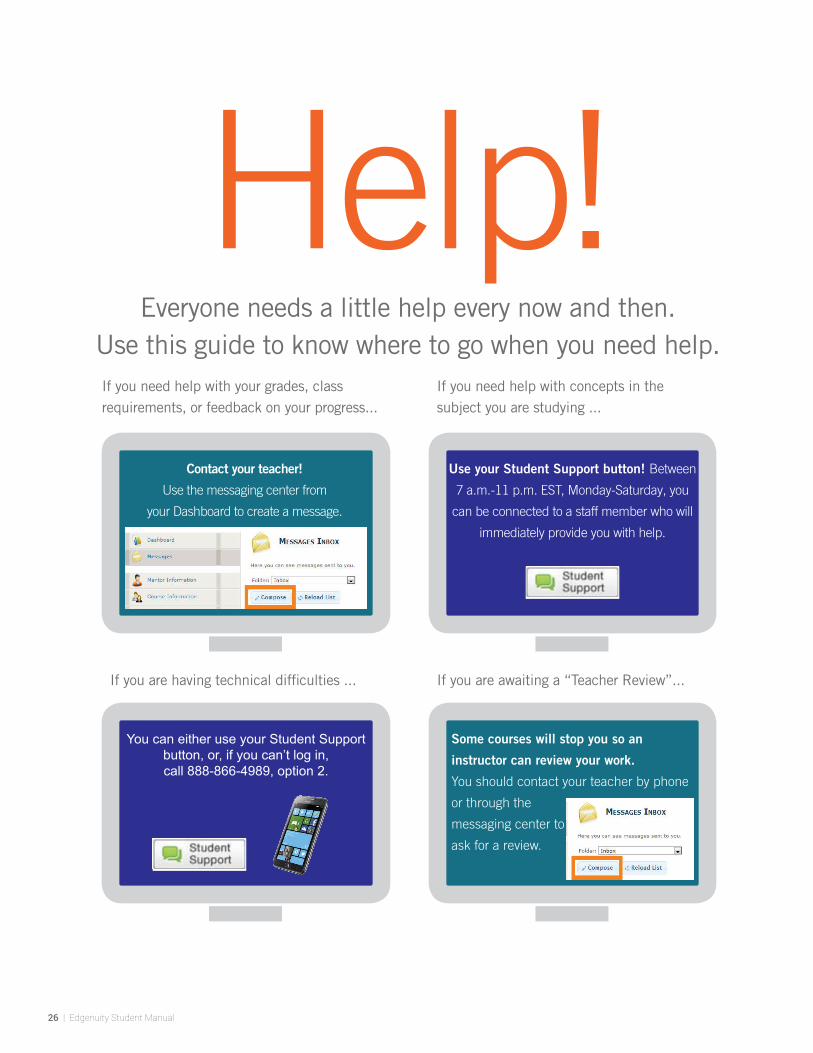
If you need help with your grades, class requirements, or feedback on your progress...
If you are having technical difficulties ...
If you need help with concepts in the subject you are studying ...
If you are awaiting a “Teacher Review”...
Contact your teacher!
Use the messaging center from
your Dashboard to create a message.
You can either use your Student Support button, or, if you can’t log in, call 888-866-4989, option 2.
Use your Student Support button! Between
7 a.m.-11 p.m. EST, Monday-Saturday, you
can be connected to a staff member who will
immediately provide you with help.
Some courses will stop you so an
instructor can review your work.
You should contact your teacher by phone
or through the
messaging center to
ask for a review.
Help!Everyone needs a little help every now and then.
Use this guide to know where to go when you need help.