Embed Size (px)
Citation preview

Stylize Your Door. It’s Simple.
A beautifully designed entry sets the stage for the rest of your home.
With the Your Door Stylizer, you'll find doorglass styles that suit your home perfectly.
It's a wise investment that improves the look and value of your home and adds beauty to everyday living.
ODL® Doorglass is simple to install. No mess. No caulking. No delays in ordering.
JUST MEASURE, SELECT A STYLE, REMOVE THE OLD GLASS AND INSTALL THE NEW.
The toughest task you’ll face is choosing a new doorglass style.
PAGE 1
Replace GlassIn Your Door
Add GlassIn Your Door OR
INSTALLATION INSTRUCTIONS
Create Your Dream Entryway
REPLACEWITH NEW DOORGLASS
MEASUREFITS STANDARD SIZE DOORS
REMOVETHE EXISTING DOORGLASS

STATEMENT OF INTENDED USE
ODL® Doorglass panels are for use in 1-3/4" thick residential steel and fiberglass doors.
THEY ARE NOT DESIGNED FOR USE IN WOOD DOORS, doors that do not have rigid steel frames, or as windows in a wall.
ANY MISUSE OR INSTALLATION OTHER THAN STATED WILL VOID THE WARRANTY.
TOOLS FIND A HELPER • Safety Gloves
• Safety Glasses
• Dry Wall Screw (size optional)
• Power Screw Driver with Phillips Head Bit
• Putty Knife
• Window Cleaner
• Tape Measure
• Pencil
• Painter's Tape
• Drop Cloth
CAUTIONWhen working with glass and frames, care should be taken. ODL Doorglass is made
of tempered safety glass but should be carefully supported at all times. The smaller sized glass can be installed vertically, but we recommend that the 22"x 64"
glass be installed with the door off the hinges and lying down.
Because the frames and glass are heavy and of an awkward size, two installers may be required to remove the old glass from the opening and lift the ODL Doorglass.
SAFETYFIRST!
PAGE 2
IF YOU NEED TO CUT AN OPENING…Additional tools will be needed.
• 2 Saw-horses
• Drill with 3/8" or 1/2" bit
• Jigsaw with a short-stroke blade
• Ear Protection
FOR 1-3/4" THICK DOORS
INSTALLATION INSTRUCTIONS
TOOLS YOU WILL NEED
MEASURE TWICE FOR ACCURACY

ODL Doorglass is intended to be used as a replacement product. Existing doorglass must be removed prior to installing this product. Removal may make the existing doorglass or sidelight unusable. If you have questions or concerns, consult with an ODL Customer Service Representative at 800.253.3900 for help.
IF YOU ARE ADDING GLASS MOVE TO STEP 1 ON PAGE 9. FOR REPLACING GLASS CONTINUE READING.
REPLACE GLASS INSTALLATION INSTRUCTIONS
DOORGLASS CONSTRUCTION ODL Doorglass is made up of two different sections:
OUTSIDE FRAME & DOORGLASS
The outside frame section contains the glass.
MEASURE THE EXISTING OPENING1
PAGE 3
FOR 1-3/4" THICK DOORS
MEASURE THE THICKNESS of the existing door. ODL Doorglass is designed to FIT DOORS THAT ARE 1-3/4" ± 1/16" THICK.
MEASURE THE WIDTH AND HEIGHT of the existing doorglass. If the measurements correspond to the chart, ODL Doorglass will fit your door.
INSIDE FRAMEThe inside frame section with
holes for the attachment screws.
OUTSIDE GLASS & FRAME
INSIDE FRAME WITH SCREWS
The attachment screws are placed
into the doorglass from the inside
of the home for added security.
BEFORE REMOVING EXISTING GLASS, REFER TO PAGE 4 AND 5 TO QUALIFY YOUR DOOR'S GLASS SHAPE, SIZE, AND MEASUREMENTS.
SCREWS & SCREW PLUGS
WIDTH X HEIGHT

PAGE 4
To qualify your door's glass shape, size, and measurements refer to the pictures on this and the following page.
Find the frame around your glass, and measure outside of frame to outside of frame for both the width
and height. Find the shape of glass that corresponds to what you have in your door. Use your measurements to
compare to the measurements below the pictures. If your measurements are within (+/-) .5" you qualify for ODL
replacement glass.
These options are the most common sizes you will find in the marketplace. If you don't find a corresponding
shape or matching dimensions, your door may still qualify. Please contact a Customer Service Representative
at 1.800.253.3900 to discuss your measurements and/or shape of glass with frame to determine if your door
qualifies.
22"x 38" 24"x 38" 24"x 40"24"x 38" (2) 10"x 38" 10"x 38"
24"x 50" 17.514"x 41.389" (2) 10"x 50" 10"x 50"
HALF GLASS OPTIONS
3/4 GLASS OPTIONS
8"x 38"
CRAFTSMAN GLASS SIZES
23.313"x 17.938" 24"x 17.25" 27"x 17.25"
COMMON SIZES FOR DOORGLASS WITH FRAME
MEASUREMENTS ARE OUTSIDE FRAME TO OUTSIDE FRAME

PAGE 5
24"x 82"
8 FOOT GLASS OPTIONS
(2) 10"x 8" 9.5"x 20.5"18"x 18"
MISC GLASS SIZES
10"x 8" 12"x 12" 24"x 12"24"x 8"
23.797"x 11.813" 23.8125"x 11.375" 24"x 12" 22"x 82" 16"x 82" 10"x 82"
MISC GLASS SIZES
22"x 66" 22.5"x 58.35"24"x 66" 15.748"x 55.5" 16"x 66" 10"x 66" 8"x 66"9"x 66"
FULL GLASS OPTIONS
COMMON SIZES FOR DOORGLASS WITH FRAME
HAVE A HELPER SUPPORT THE GLASS
PAGE 6
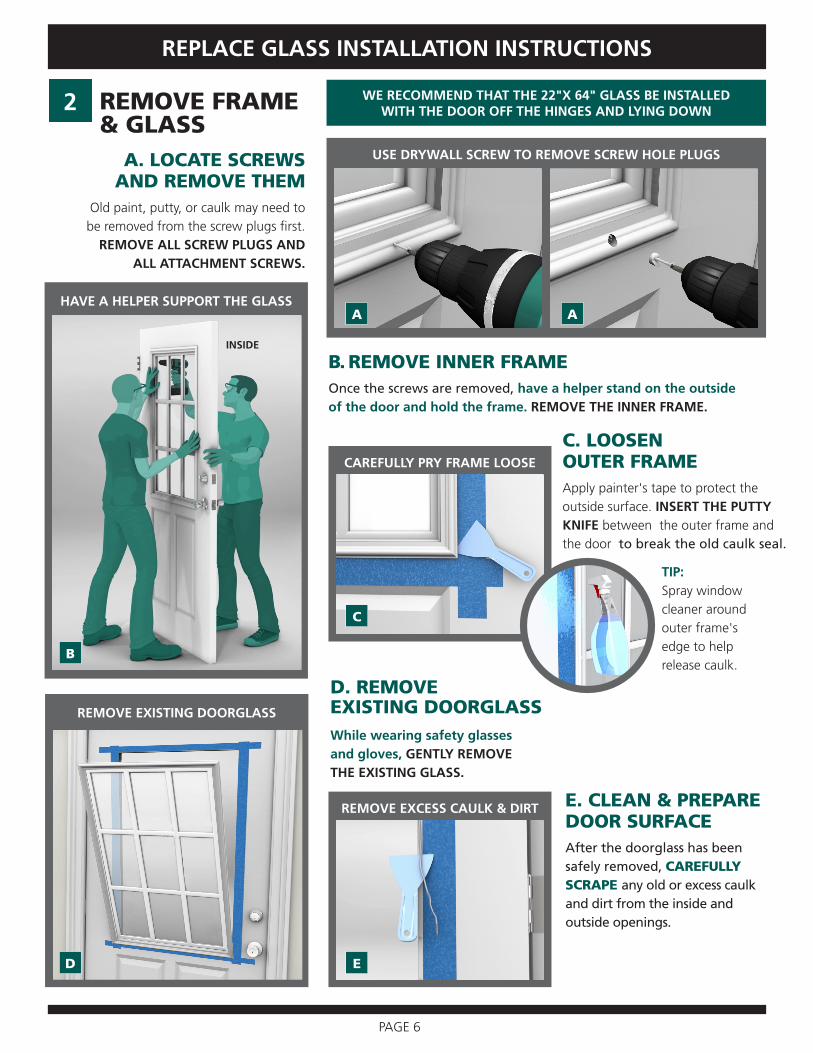
C. LOOSEN OUTER FRAME Apply painter's tape to protect the outside surface. INSERT THE PUTTY KNIFE between the outer frame and the door to break the old caulk seal.
B. REMOVE INNER FRAME Once the screws are removed, have a helper stand on the outside of the door and hold the frame. REMOVE THE INNER FRAME.
CAREFULLY PRY FRAME LOOSE
E. CLEAN & PREPARE DOOR SURFACE After the doorglass has been safely removed, CAREFULLY SCRAPE any old or excess caulk and dirt from the inside and outside openings.
While wearing safety glasses and gloves, GENTLY REMOVE THE EXISTING GLASS.
REPLACE GLASS INSTALLATION INSTRUCTIONS
REMOVE EXCESS CAULK & DIRT
USE DRYWALL SCREW TO REMOVE SCREW HOLE PLUGS
INSIDE
TIP: Spray window cleaner around outer frame's edge to help release caulk.
D. REMOVE EXISTING DOORGLASS
B
C
E
A A
REMOVE EXISTING DOORGLASS
D
REMOVE FRAME & GLASS
A. LOCATE SCREWS AND REMOVE THEM
Old paint, putty, or caulk may need to be removed from the screw plugs first.
REMOVE ALL SCREW PLUGS AND ALL ATTACHMENT SCREWS.
2 WE RECOMMEND THAT THE 22"X 64" GLASS BE INSTALLED WITH THE DOOR OFF THE HINGES AND LYING DOWN

PAGE 7
REPLACE GLASS INSTALLATION INSTRUCTIONS
INSTALLING NEW DOORGLASS3
LIFT NEW FRAME INTO POSITION A. Lift the new frame with glass into position from the outside. To ensure that the weight of the glass is distribut-ed correctly, place the bottom edge of the doorglass snugly against the door. Then tilt the top into position against the door.
A
TIP: The new doorglass should be installed with the temper stamp at the bottom of the door.
HOLD GLASS FIRMLY AGAINST DOOR
ALIGN THE FRAMES
B. Have a helper hold the glass firmly against the door on the outside. The screw hole side of your frame should be installed on the inside of the door.
C. Align the frames by matching the screw hole guides.
B
C

PAGE 8
REPLACE GLASS INSTALLATION INSTRUCTIONS
INSTALLING NEW DOORGLASS CONTINUED
INSERT SCREWS
PLACE DOOR BACK ON HINGES
D. Insert each screw working from side to side. Tighten firmly so that the frame fits snugly against the door and the seal is compressed. AVOID OVER TIGHTENING THE SCREWS to allow the window to expand and contract.
F. If you removed your door from its hinges, place the door back on its hinges. Use standard window cleaner to make your new doorglass shine.
D
F
E. Align the screw plugs with the frame profile. Insert and tap each one into place.
E
SEE PAGE 18 FOR FRAME FINISHING CONSIDERATIONS.
3

IF DOORGLASS IS NOT CURRENTLY PRESENT OR A LARGER SIZE DOORGLASS IS BEING INSTALLED, FOLLOW THESE STEPS:
ADD GLASS INSTALLATION INSTRUCTIONS
PREPARE DOOR1
2
CUTTING A STEEL OR FIBERGLASS DOOR A. REMOVE DOOR FROM HINGES
B. LAY DOOR ACROSS SAWHORSES
MEASURE, MARK, AND CUT
A & B
PAGE 9
A. Refer to "DOORGLASS CUT OUT GUIDE" drawings on pages 19-27 for correct size, MEASURE AND MARK CUTTING AREA of front side of door. If your door is flush (no embossments), measure corner to corner of the cutout marking to make sure opening is square.
B. APPLY PAINTER’S TAPE around cutting area to prevent damage while cutting.
C. DRILL 3/8" OR 1/2" STARTER HOLE in all 4 corners of the measurement.
A
MEASURE AND MARK
B
APPLY PAINTER'S TAPE
C
DRILL STARTER HOLES

PAGE 10
ADD GLASS INSTALLATION INSTRUCTIONS
D. Do not attempt to cut all the way through the door. The up-stroke should not leave the door and the down-stroke should not exceed 1" into the door.
E. Using starter hole, INSERT JIG SAW with a short-stroke blade into the inner core of the door and CUT ALONG MARKED GUIDELINES, corner to corner.
F. You will be cutting through material of a different density near the lock, you will feel slightly more resistance.
G. FLIP DOOR OVER AND REPEAT STEPS A TO E for the back side of door.
H. REMOVE TAPE AND DEBRIS
MEASURE, MARK, AND CUT CONTINUED
DON'T CUT THROUGH DOOR
E
CUT ALONG GUIDE
DIFFERENT DENSITY NEAR LOCK
G
FLIP DOOR OVER AND REPEAT
H
REMOVE TAPE AND DEBRIS
D
F
2

PAGE 11
ADD GLASS INSTALLATION INSTRUCTIONS
INSTALLING NEW DOORGLASS
LAY DOWN OUTSIDE DOORGLASS
LAY DOOR OVER DOORGLASS
PLACE INTERIOR FRAME
A. Lift the door off of the sawhorses and lay down the outside doorglass, frame out over the sawhorses.
B. Carefully lay the door over the doorglass. To properly distribute the weight of the doorglass place the bottom edge of the door opening snugly to bottom of the doorglass.
C. Place interior frame with exposed screw holes over the inside of your door.
A
B
C
TIP: To ensure that the glass is correctly installed the temper stamp should appear on the bottom of the door.
3

PAGE 12
ADD GLASS INSTALLATION INSTRUCTIONS
INSTALLING NEW DOORGLASS CONTINUED
ALIGN THE FRAMES
INSERT SCREWS
PLACE DOOR BACK ON HINGES
D. Align the frames by matching the screw hole guides.
E. Insert each screw working from side to side. Tighten firmly so that the frame fits snugly against the door and the seal is compressed. AVOID OVER TIGHTENING THE SCREWS.
G. Place the door back on its hinges. Use standard window cleaner to make your new doorglass shine.
D
E
G
F. Align the screw plugs with the frame profile. Insert and tap each one into place.
F
SEE PAGE 18 FOR FRAME FINISHING CONSIDERATIONS.
3

PAGE 13
REMOVE FRAME & GLASS
A. LOCATE SCREWS AND REMOVE THEM
Old paint, putty, or caulk may need to be removed from the screw plugs first.
REMOVE ALL SCREW PLUGS AND ALL ATTACHMENT SCREWS.
C. LOOSEN OUTER FRAME Apply painter's tape to protect the outside surface. INSERT THE PUTTY KNIFE between the outer frame and the door to break the old caulk seal.
B. REMOVE INNER FRAME Once the screws are removed, have a helper stand on the outside of the door and hold the frame. REMOVE THE INNER FRAME.
CAREFULLY PRY FRAME LOOSE
E. CLEAN & PREPARE DOOR SURFACE After the doorglass has been safely removed, CAREFULLY SCRAPE any old or excess caulk and dirt from the inside and outside openings.
While wearing safety glasses and gloves, GENTLY REMOVE THE EXISTING GLASS.
ADD/INCREASE GLASS INSTALLATION INSTRUCTIONS
REMOVE EXCESS CAULK & DIRT
USE DRYWALL SCREW TO REMOVE SCREW HOLE PLUGS
TIP: Spray window cleaner around outer frame's edge to help release caulk.
D. REMOVE EXISTING DOORGLASS
C
E
A A
HAVE A HELPER SUPPORT THE GLASS
INSIDE
B
REMOVE EXISTING DOORGLASS
D
1 WE RECOMMEND THAT THE 22"X 64" GLASS BE INSTALLED WITH THE DOOR OFF THE HINGES AND LYING DOWN

PAGE 14
ADD/INCREASE GLASS INSTALLATION INSTRUCTIONS
PREPARE DOOR
3
REMOVE ALL DOOR ACCESSORIES A. Remove door knob or handle and any
locksets and carefully set them aside until after the doorglass is installed.
B. Remove door from hinges. Lay door across sawhorses.
MEASURE, MARK, AND CUT
A. Extend your existing vertical and horizontal dimensions down to the bottom of your embossments. Make sure your cutting area is centered.
B. APPLY PAINTER’S TAPE around cutting area to prevent damage while cutting.
C. DRILL 3/8" OR 1/2" STARTER HOLE in all remaining corners to be cut out.
A
EXTEND EXISTING DIMENSIONS
B
APPLY PAINTER'S TAPE
C
DRILL STARTER HOLES
A B
2

PAGE 15
ADD/INCREASE GLASS INSTALLATION INSTRUCTIONS
D. Do not attempt to cut all the way through the door. The up-stroke should not leave the door and the down-stroke should not exceed 1" into the door.
E. Using starter hole, INSERT JIG SAW with a short-stroke blade into the inner core of the door and CUT ALONG MARKED GUIDELINES, corner to corner.
F. You will be cutting through material of a different density near the lock, you will feel slightly more resistance.
G. FLIP DOOR OVER AND REPEAT STEPS A TO E for the back side of door.
H. REMOVE TAPE AND DEBRIS
MEASURE, MARK, AND CUT CONTINUED
DON'T CUT THROUGH DOOR
E
CUT ALONG GUIDE
DIFFERENT DENSITY NEAR LOCK
G
FLIP DOOR OVER AND REPEAT
H
REMOVE TAPE AND DEBRIS
D
F
3

PAGE 16
ADD/INCREASE GLASS INSTALLATION INSTRUCTIONS
INSTALLING NEW DOORGLASS
LAY DOWN OUTSIDE DOORGLASS
LAY DOOR OVER DOORGLASS
PLACE INTERIOR FRAME
A. Lift the door off of the sawhorses and lay down the outside doorglass, frame out over the sawhorses.
B. Carefully lay the door over the doorglass. To properly distribute the weight of the doorglass place the bottom edge of the door opening snugly to bottom of the doorglass.
C. Place interior frame with exposed screw holes over the inside of your door.
A
B
C
TIP: To ensure that the glass is correctly installed the temper stamp should appear on the bottom of the door.
4

PAGE 17
ADD/INCREASE GLASS INSTALLATION INSTRUCTIONS
INSTALLING NEW DOORGLASS CONTINUED
ALIGN THE FRAMES
INSERT SCREWS
PLACE DOOR BACK ON HINGES
D. Align the frames by matching the screw hole guides.
E. Insert each screw working from side to side. Tighten firmly so that the frame fits snugly against the door and the seal is compressed. AVOID OVER TIGHTENING THE SCREWS.
G. Place the door back on its hinges. Use standard window cleaner to make your new doorglass shine.
D
E
G
F. Align the screw plugs with the frame profile. Insert and tap each one into place.
F
SEE PAGE 18 FOR FRAME FINISHING CONSIDERATIONS.
4

The frames of ODL doorglass products can be left unpainted, painted, or stained to match your home's decor, depending on the frame material. SURFACE PREPARATION AND FINISHING INSTRUCTIONS VARY DEPENDING ON FRAME TYPE. Product labels will list specific frame materials. Contact ODL Customer Service if you need assistance identifying your frame material.
PAGE 18
FINISHING THE FRAME
CONSIDER PAINTING OR STAINING THE DOORGLASS FRAME TO COORDINATE WITH YOUR DOOR FINISH.
INSTALLATION INSTRUCTIONS

PAGE 19
DOORGLASS CUTOUT GUIDE
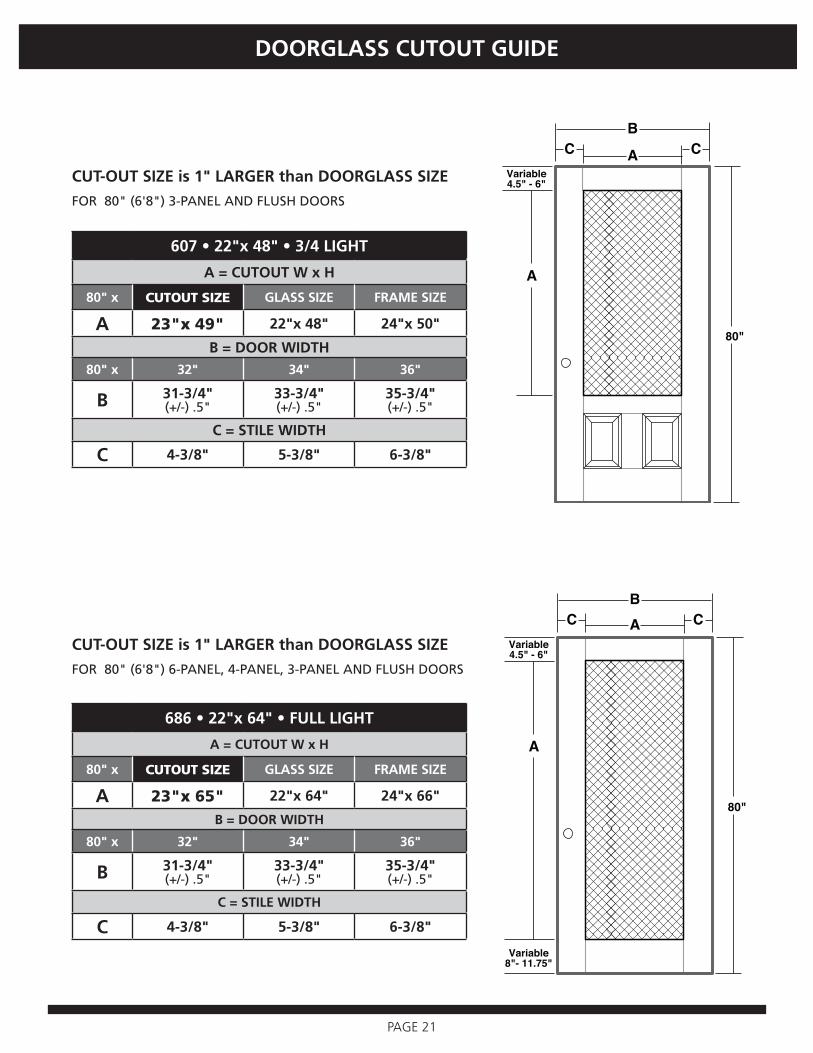
To find the correct size, and measurements for your glass cut out use pages 20-27. Find the drawing that matches your door configuration, and the cut out you are creating. Use the chart to find the correct door width (B) and the corresponding cut out size (A). The cut out will be 1" larger than the doorglass size. The drawing will help you determine the correct placement on your door using the stile width (C).
These drawings are the most common door configurations you will find in the marketplace. If you don't find a corresponding cut out or matching door dimensions your door may still qualify. Please contact a Customer Service Representative at 1.800.253.3900 to discuss your measurements and/or shape of glass to determine if your door qualifies.
SAMPLE DRAWING AND CHART
80"
A
Variable4.5" - 6"
BCAC
607 • 22"x 48" • 3/4 LIGHT
A = CUTOUT W x H
80" x CUTOUT SIZE GLASS SIZE FRAME SIZE
A 23"x 49" 22"x 48" 24"x 50"
B = DOOR WIDTH80" x 32" 34" 36"
B 31-3/4"(+/-) .5"
33-3/4"(+/-) .5"
35-3/4"(+/-) .5"
C = STILE WIDTH
C 4-3/8" 5-3/8" 6-3/8"
CUT-OUT SIZE is 1" LARGER than DOORGLASS SIZE
FOR 80" (6'8") 3-PANEL AND FLUSH DOORS

PAGE 20
DOORGLASS CUTOUT GUIDE
80"
A
Variable4.5" - 6"
BCAC
CUT-OUT SIZE is 1" LARGER than DOORGLASS SIZE
FOR 80" (6'8") 6-PANEL, 4-PANEL AND FLUSH DOORS
80"
A
Variable4.5" - 6"
BCAC
684 • 22"x 36" • 1/2 LIGHT
A = CUTOUT W x H
80" x CUTOUT SIZE GLASS SIZE FRAME SIZE
A 23"x 37" 22"x 36" 24"x 38"
B = DOOR WIDTH
80" x 32" 34" 36"
B 31-3/4"(+/-) .5"
33-3/4"(+/-) .5"
35-3/4"(+/-) .5"
C = STILE WIDTH
C 4-3/8" 5-3/8" 6-3/8"
672 • 20"x 36" • 1/2 LIGHT
A = CUTOUT W x H
80" x CUTOUT SIZE GLASS SIZE FRAME SIZE
A 21"x 37" 20"x 36" 22"x 38"
B = DOOR WIDTH
80" x 30"
B 29-3/4"(+/-) .5"
C = STILE WIDTH
C 4-5/16"
CUT-OUT SIZE is 1" LARGER than DOORGLASS SIZE
FOR 80" (6'8") 6-PANEL, 4-PANEL AND FLUSH DOORS
PAGE 21
80"
A
Variable4.5" - 6"
BCAC
607 • 22"x 48" • 3/4 LIGHT
A = CUTOUT W x H
80" x CUTOUT SIZE GLASS SIZE FRAME SIZE
A 23"x 49" 22"x 48" 24"x 50"
B = DOOR WIDTH80" x 32" 34" 36"
B 31-3/4"(+/-) .5"
33-3/4"(+/-) .5"
35-3/4"(+/-) .5"
C = STILE WIDTH
C 4-3/8" 5-3/8" 6-3/8"
DOORGLASS CUTOUT GUIDE
80"
A
Variable4.5" - 6"
BCAC
Variable8"- 11.75"
CUT-OUT SIZE is 1" LARGER than DOORGLASS SIZE
FOR 80" (6'8") 6-PANEL, 4-PANEL, 3-PANEL AND FLUSH DOORS
CUT-OUT SIZE is 1" LARGER than DOORGLASS SIZE
FOR 80" (6'8") 3-PANEL AND FLUSH DOORS
686 • 22"x 64" • FULL LIGHT
A = CUTOUT W x H
80" x CUTOUT SIZE GLASS SIZE FRAME SIZE
A 23"x 65" 22"x 64" 24"x 66"
B = DOOR WIDTH
80" x 32" 34" 36"
B 31-3/4"(+/-) .5"
33-3/4"(+/-) .5"
35-3/4"(+/-) .5"
C = STILE WIDTH
C 4-3/8" 5-3/8" 6-3/8"

PAGE 22
687 • 20"x 64" • FULL LIGHT
A = CUTOUT W x H
80" x CUTOUT SIZE GLASS SIZE FRAME SIZE
A 21"x 65" 20"x 64" 22"x 66"
B = DOOR WIDTH80" x 30"
B 29-3/4"(+/-) .5"
C = STILE WIDTH
C 4-5/16"
80"
BCAC
A
Variable4.5" - 6"
Variable8"- 11.75"
CUT-OUT SIZE is 1" LARGER than DOORGLASS SIZE
FOR 80" (6'8") FLUSH DOORS
CUT-OUT SIZE is 1" LARGER than DOORGLASS SIZE
FOR 80" (6'8") 6-PANEL AND FLUSH DOORS
624 • 14"x 64" • FULL LIGHT
A = CUTOUT W x H
80" x CUTOUT SIZE GLASS SIZE FRAME SIZE
A 15"x 65" 14"x 64" 16"x 66"
B = DOOR WIDTH
80" x 24" 28"
B 25-3/4"(+/-) .5"
27-3/4"(+/-) .5"
C = STILE WIDTH
C 4-5/16" 5-5/16"
80"
BCAC
A
Variable4.5" - 6"
Variable8"- 11.75"
DOORGLASS CUTOUT GUIDE

PAGE 23
96" (8'0") • DOORGLASS CUTOUT GUIDE
CUT-OUT SIZE is 1" LARGER than DOORGLASS SIZE
FOR 96" (8'0") DOORS
96"
A
Variable4.5" - 6"
BCAC
Variable10"- 13"
607 • 22"x 48" • 1/2 LIGHT
A = CUTOUT W x H
96" x CUTOUT SIZE GLASS SIZE FRAME SIZE
A 23"x 49" 22"x 48" 24"x 50"
B = DOOR WIDTH
96" x 32" 34" 36"
B 31-3/4"(+/-) .5"
33-3/4"(+/-) .5"
35-3/4"(+/-) .5"
C = STILE WIDTH
C 4-3/8" 5-3/8" 6-3/8"
CUT-OUT SIZE is 1" LARGER than DOORGLASS SIZE
FOR 96" (8'0") DOORS
96"A
Variable4.5" - 6"
BCAC
Variable10"- 13"
686 • 22"x 64" • 3/4 LIGHT
A = CUTOUT W x H
96" x CUTOUT SIZE GLASS SIZE FRAME SIZE
A 23"x 65" 22"x 64" 24"x 66"
B = DOOR WIDTH
96" x 32" 34" 36"
B 31-3/4"(+/-) .5"
33-3/4"(+/-) .5"
35-3/4"(+/-) .5"
C = STILE WIDTH
C 4-3/8" 5-3/8" 6-3/8"

PAGE 24
96" (8'0") • DOORGLASS CUTOUT GUIDE
CUT-OUT SIZE is 1" LARGER than DOORGLASS SIZE
FOR 96" (8'0") DOORS
96"A
Variable4.5" - 6"
BCAC
Variable10"- 13"
612 • 22"x 80" • FULL LIGHT
A = CUTOUT W x H
96" x CUTOUT SIZE GLASS SIZE FRAME SIZE
A 23"x 81" 22"x 80" 24"x 82"
B = DOOR WIDTH
96" x 32" 34" 36"
B 31-3/4"(+/-) .5"
33-3/4"(+/-) .5"
35-3/4"(+/-) .5"
C = STILE WIDTH
C 4-3/8" 5-3/8" 6-3/8"
496 • 20"x 80" • FULL LIGHT
A = CUTOUT W x H
80" x CUTOUT SIZE GLASS SIZE FRAME SIZE
A 21"x 81" 20"x 80" 22"x 82"
B = DOOR WIDTH80" x 30"
B 29-3/4"(+/-) .5"
C = STILE WIDTH
C 4-5/16"
CUT-OUT SIZE is 1" LARGER than DOORGLASS SIZE
FOR 96" (8'0") DOORS
96"A
Variable4.5" - 6"
Variable10"- 13"
BCAC

PAGE 25
96" (8'0") • DOORGLASS CUTOUT GUIDE
96"A
Variable4.5" - 6"
BCAC
Variable10"- 13"
CUT-OUT SIZE is 1" LARGER than DOORGLASS SIZE
FOR 96" (8'0") DOORS
487 • 14"x 80" • FULL LIGHT
A = CUTOUT W x H
96" x CUTOUT SIZE GLASS SIZE FRAME SIZE
A 15"x 65" 14"x 64" 16"x 66"
B = DOOR WIDTH
96" x 24" 28"
B 25-3/4"(+/-) .5"
27-3/4"(+/-) .5"
C = STILE WIDTH
C 4-5/16" 5-5/16"
80" (6'8") • MISC DOORGLASS CUTOUT GUIDE
80"
A
BCAC
CUT-OUT SIZE is 1" LARGER than DOORGLASS SIZE
FOR 80" (6'8") 6-PANEL, 4-PANEL, 3-PANEL AND FLUSH DOORS
640 • 7.5"x 18.5" • FULL LIGHT
A = CUTOUT W x H
80" x CUTOUT SIZE GLASS SIZE FRAME SIZE
A 8.5"x 19.5" 7.5"x 18.5" 9.5"x 20.5"
B = DOOR WIDTH
80" x 32" 34" 36"
B 31-3/4"(+/-) .5"
33-3/4"(+/-) .5"
35-3/4"(+/-) .5"
C = STILE WIDTH
C 4-3/8" 5-3/8" 6-3/8"
PAGE 26
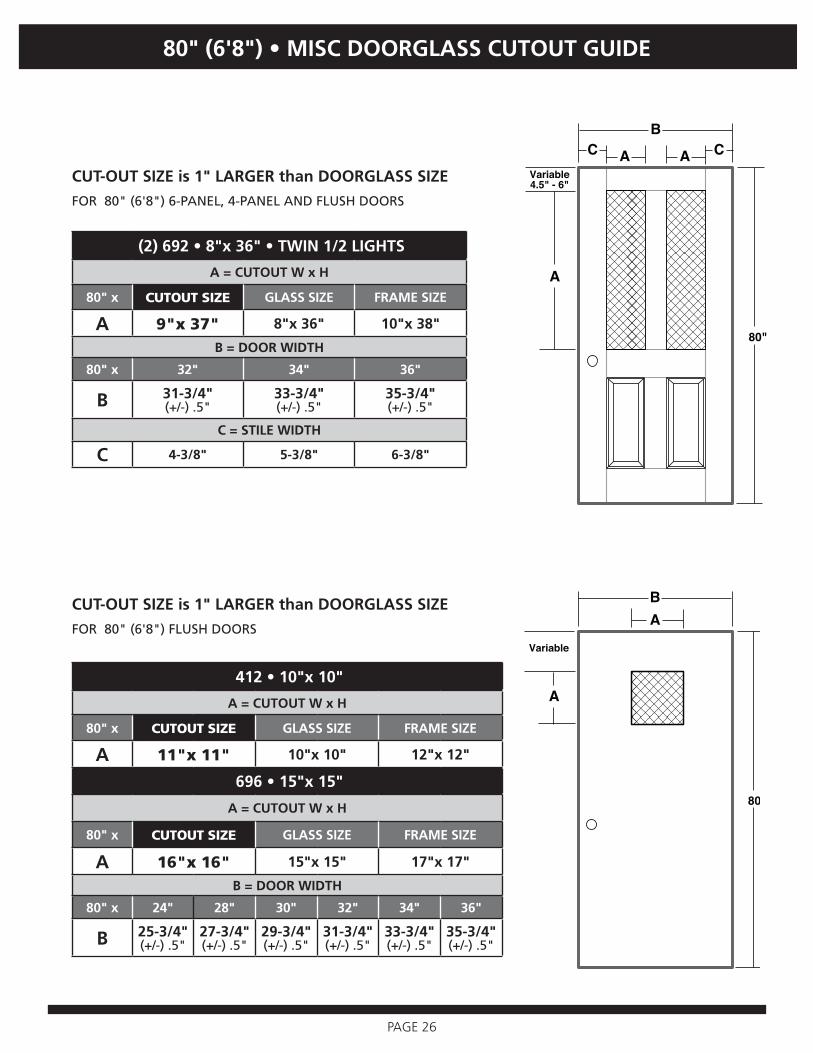
80"
A
Variable4.5" - 6"
BCAC A
CUT-OUT SIZE is 1" LARGER than DOORGLASS SIZE
FOR 80" (6'8") 6-PANEL, 4-PANEL AND FLUSH DOORS
80"
A
Variable
BA
(2) 692 • 8"x 36" • TWIN 1/2 LIGHTS
A = CUTOUT W x H
80" x CUTOUT SIZE GLASS SIZE FRAME SIZE
A 9"x 37" 8"x 36" 10"x 38"
B = DOOR WIDTH
80" x 32" 34" 36"
B 31-3/4"(+/-) .5"
33-3/4"(+/-) .5"
35-3/4"(+/-) .5"
C = STILE WIDTH
C 4-3/8" 5-3/8" 6-3/8"
CUT-OUT SIZE is 1" LARGER than DOORGLASS SIZE
FOR 80" (6'8") FLUSH DOORS
80" (6'8") • MISC DOORGLASS CUTOUT GUIDE
412 • 10"x 10"
A = CUTOUT W x H
80" x CUTOUT SIZE GLASS SIZE FRAME SIZE
A 11"x 11" 10"x 10" 12"x 12"
696 • 15"x 15"
A = CUTOUT W x H
80" x CUTOUT SIZE GLASS SIZE FRAME SIZE
A 16"x 16" 15"x 15" 17"x 17"
B = DOOR WIDTH
80" x 24" 28" 30" 32" 34" 36"
B 25-3/4"(+/-) .5"
27-3/4"(+/-) .5"
29-3/4"(+/-) .5"
31-3/4"(+/-) .5"
33-3/4"(+/-) .5"
35-3/4"(+/-) .5"

80"
A
Variable4.5" - 6"
BCAC
CUT-OUT SIZE is 1" LARGER than DOORGLASS SIZE
FOR 80" (6'8") 6-PANEL DOORS
80" (6'8") • MISC DOORGLASS CUTOUT GUIDE
662 • 22"x 6" • TOP LIGHTA = CUTOUT W x H
80" x CUTOUT SIZE GLASS SIZE FRAME SIZE
A 23"x 7" 22"x 6" 24"x 8"
A = CUTOUT W x H
626 • 22"x 10" • TOP LIGHT
80" x CUTOUT SIZE GLASS SIZE FRAME SIZE
A 23"x 11" 22"x 10" 24"x 12"
B = DOOR WIDTH
80" x 32" 34" 36"
B 31-3/4"(+/-) .5"
33-3/4"(+/-) .5"
35-3/4"(+/-) .5"
C = STILE WIDTH
C 4-3/8" 5-3/8" 6-3/8"
80"
A
Variable4.5" - 6"
BCAC A
CUT-OUT SIZE is 1" LARGER than DOORGLASS SIZE
FOR 80" (6'8") 6-PANEL DOORS
680 • 6"x 8" • TWIN 1-LIGHTS
A = CUTOUT W x H
80" x CUTOUT SIZE GLASS SIZE FRAME SIZE
A 7"x 9" 6"x 8" 8"x 10"
B = DOOR WIDTH
80" x 32" 34" 36"
B 31-3/4"(+/-) .5"
33-3/4"(+/-) .5"
35-3/4"(+/-) .5"
C = STILE WIDTH
C 4-3/8" 5-3/8" 6-3/8"
PAGE 27

214037 • (04/14)
ODL Doorglass Warranty Information
ODL Doorglass is covered by a limited warranty. The warranty does not apply to damage from shipping, handling, installation, storage, environmental conditions, or unusual service conditions or usage.
For warranty information contact: ODL Customer Service, 215 East Roosevelt Ave., Zeeland, MI 49464.
www.odl.com1.800.253.3900
WARRANTY INFORMATION


![To Stylize or not to Stylize? The Effect of Shape and …...2012], the possible adaptation of the society to cartoon faces [Chen et al. 2010], the viewers’ level of expertise in](https://img.pdfslide.net/doc/110x75/5f88c7097ff7845efe2eecf4/to-stylize-or-not-to-stylize-the-effect-of-shape-and-2012-the-possible-adaptation.jpg)