Embed Size (px)
Citation preview

Subaru EPC User Guide
Last Updated 4/25/2016

2
Table of Contents
Launching the EPC………………………………………………………………………………………………………………3
Selecting a Vehicle…………………………………………………………………………….………………………………..3
Looking Up Parts by VIN………………………………………………………………………………………………………5
Cart Page…………………………………………………………………………………………………………………………...13
Part Detail Page………………………………………………………………………………………………………………….14
Chemicals, Maintenance, and Other Items………………………………………………………………………….22
Searching…………………………………………………………………………………………………………………………...25
View Data………………………………………………………………………………………………………………..…………29
Abbreviation……………………………………………………….………………………………………………………….….30
Color Code………………………………………..………………………………………………………….…………………….31
Other Catalog Menu Items………………………………………………………………………………………………..…32
Remanufactured and Other Substitute Parts…………………………………………………………………..……33

3
Launching the EPC
The Subaru Electronic Parts Catalog (EPC) is located within Subarunet and can be found under the “Parts
Operations”.
Selecting a Vehicle
You can begin the process of looking up parts by selecting your vehicle. This can be done by clicking the
Select vehicle button on the top right of the screen:
This will bring up the vehicle selection box. This will let you select your vehicle by VIN (last 8 or all 17
digits), by Model Group, or by selecting a specific Year, Model, and Trim level:
4
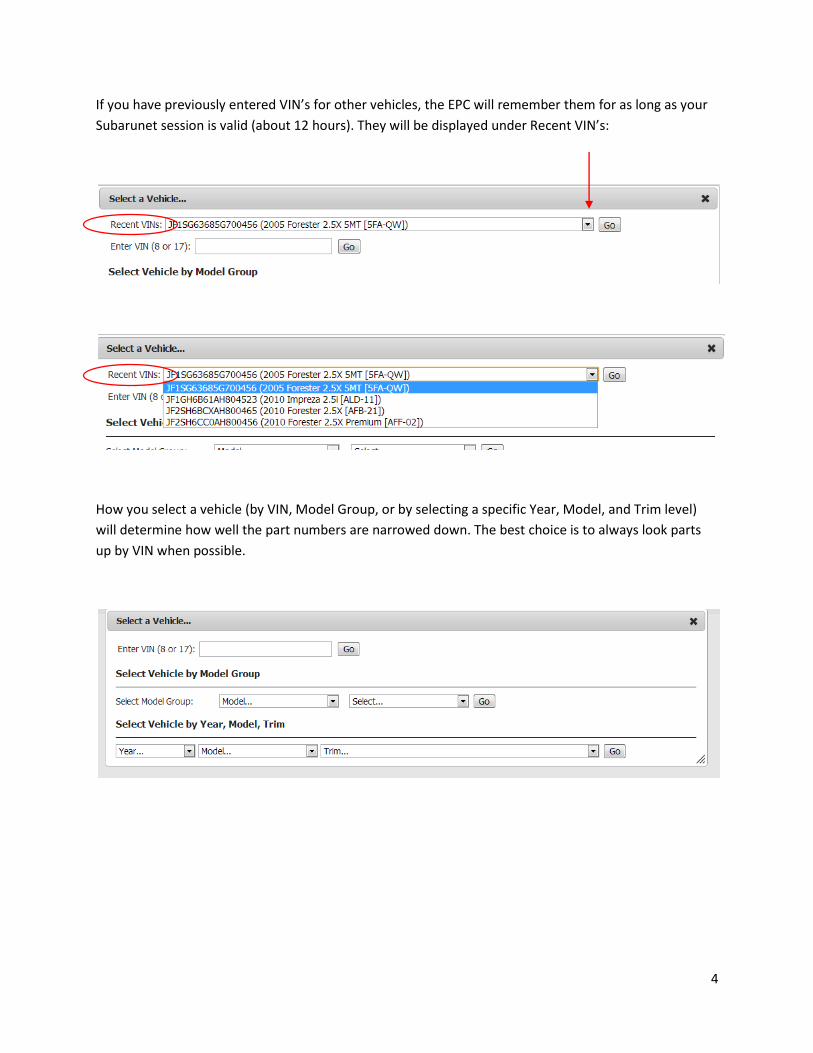
If you have previously entered VIN’s for other vehicles, the EPC will remember them for as long as your
Subarunet session is valid (about 12 hours). They will be displayed under Recent VIN’s:
How you select a vehicle (by VIN, Model Group, or by selecting a specific Year, Model, and Trim level)
will determine how well the part numbers are narrowed down. The best choice is to always look parts
up by VIN when possible.

5
Looking up Parts by VIN
Once a VIN is entered it will bring you to the main catalog page:
Vehicle Information Select a new vehicle or clear
the current one. Catalog Menu
Catalog Categories

6
Vehicle Information
A brief description of the vehicle entered in the system will be displayed the top right of the page. This is
also a link to more specific details about the vehicle, like production date and color codes. This
information is available at any point while looking up parts.

7
Catalog Categories and Figures
The catalog consists of 10 categories which are displayed on the left hand side of the page.
Clicking on any of the categories will expand them and display the appropriate figure text and figure
illustrations:
8
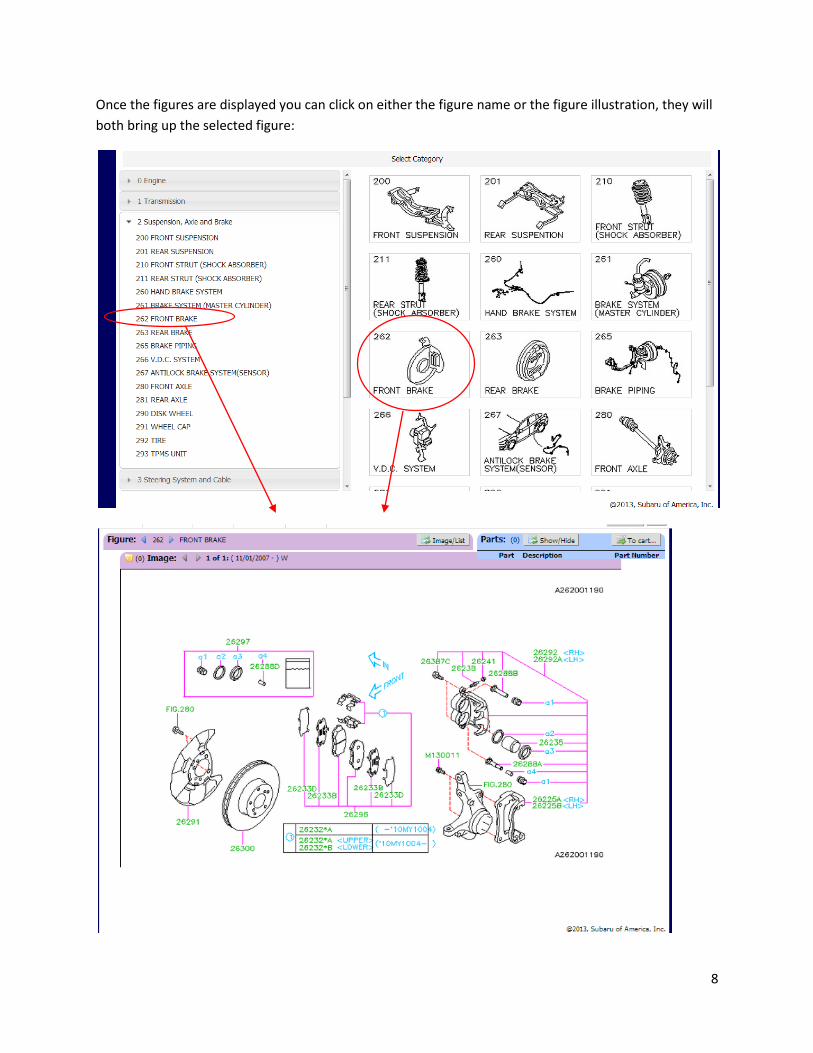
Once the figures are displayed you can click on either the figure name or the figure illustration, they will
both bring up the selected figure:

9
These are some of the main components in the Figure:
Figure Number.
From here you can
flip through the
different Figures.
Image. There can be multiple
images for a given figure. If there
are you can flip through them using
these buttons.
Image/List Button. This lets
you flip back and forth
between the figure image
and the part details.
Show/Hide Button.
This will display or
hide the parts you
are adding to your
parts list. The “To Cart”
Button. This will
send the parts
selected on your
parts list to your
cart.
Part Codes. These are what are
selected in the image when choosing
a part. Clicking on the part code will
add the part number to the parts list
on the top right.

10
Selecting a Part
When hovering your mouse over the
part code, it will display the
description of that part.
When you click on the part code in
the image it will be added to your
parts list. This is where the part
number will be displayed. If you click
on the part code a second time, the
part will be removed from this list.
Clicking the “-“ sign will also remove
the part from this list.

11
The Show/Hide button will collapse
the list of parts when needed. Click it
again and they will reappear.

12
As you go through the different figures selecting the parts you need they will accumulate on the parts
list until you have added them to your cart.
When you click on the Image/List
button, the image will disappear and
reveal all the part codes and part
numbers for that figure.
If you click on the part number or
description in this list it will add it to
your parts list. When you do, the part
code, description, and part number
will turn red indicating it has been
selected. If you click on it a second
time it will be removed from the list
and turn black.
Click the “To Cart” button to send the
items on your parts list to your cart.

13
Cart Page
As soon as you send parts to your cart you will be brought your cart page. Each time you add parts to
your cart they will build up here until you clear your cart.
This will
remove a
single item
from your
cart.
Add Item to Cart. This will let
you manually add single parts
to your cart.
Clear Cart. This
will clear all the
contents in your
cart.
Add Chemicals This will
bring up a list of certain
chemical types applicable
to your car and let you add
them directly to your cart.
Maintenance This will
bring up a list a fast
moving or maintenance
parts applicable to your
car and let you add
them directly to your
cart.
This button
will enable
you to change
the quantity
needed for
the given part.
Available (WH)
This will display
the quantity
available of each
given part at the
retailer’s facing
warehouse.
On Hold If a
part in your
cart is on hold
for any reason
in the parts
ordering
system, it will
be indicated
here.
Price This
is the
current
real time
MSRP.
Bulletin If there is
a parts bulletin
attached to a part
in your cart it will
be indicated here.
Supersession
If there is a
supersession
on the part it
will be
indicated
with an “S”

14
Part Detail Page
When the image is turned off in the figure you will see the details of off the part numbers of that figure.
Here are some specifics on what is displayed:
Quantity This is the
quantity of the
given part that is
required on the
vehicle.
Note If there is a
note on the part
number there will
be a number
indicating how
many notes are
present.
Bulletin If there is a
parts bulletin that is
associated with the
part number there will
be a number
indicating how many
bulletins there are.
Override If there has
been an override of
the data done by SOA,
there will be an
indicator of “!” in this
column.
Supersession If there is a
supersession in the
system for a part there
will an indicator of “S” in
this column.
Other Info This column
will display miscellaneous
part information if there is
any available.
15
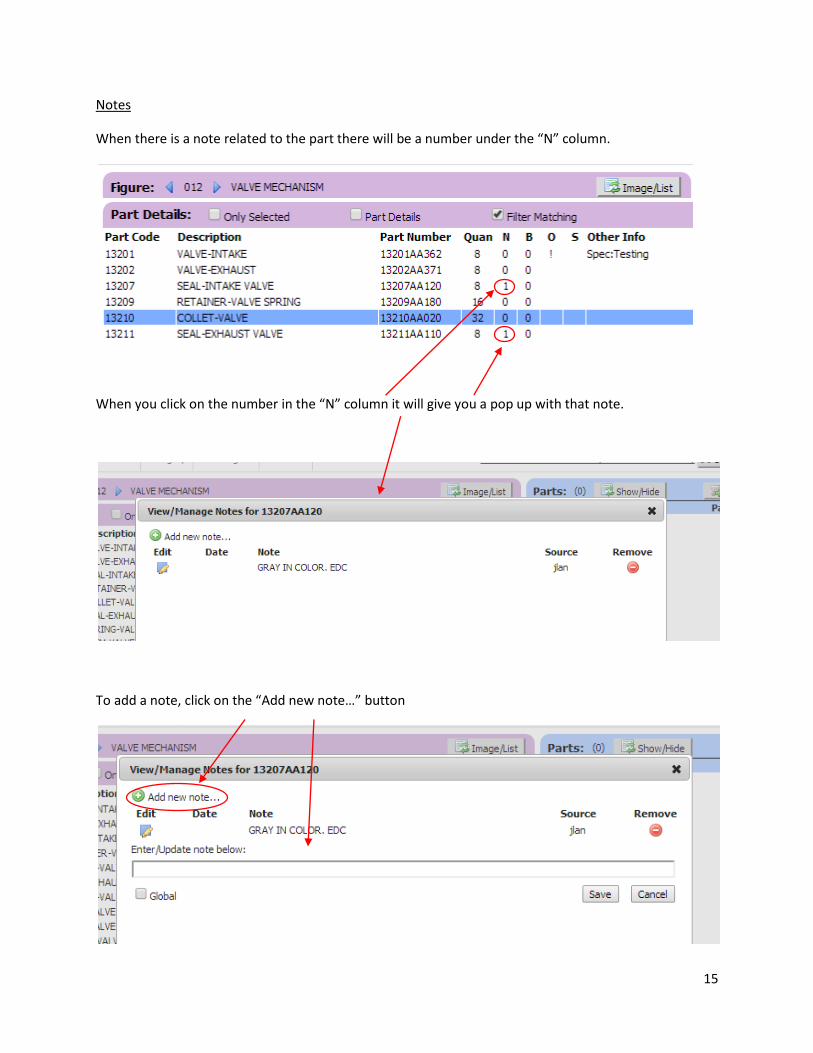
Notes
When there is a note related to the part there will be a number under the “N” column.
When you click on the number in the “N” column it will give you a pop up with that note.
To add a note, click on the “Add new note…” button

16
Parts Bulletins
When there is a Parts Bulletin associated with the part there will be a number under the “B” column.
When you click on the number in the “B” column it will give you a pop up listing the Bulletin number.
When you click on the
actual bulletin number,
the information will be
displayed beneath it.

17
Supersession
When there is a Supersession associated with a part there will be an “S” under the “S” column.
When you click on the “S” it will give you a pop up displaying the supersession.
18
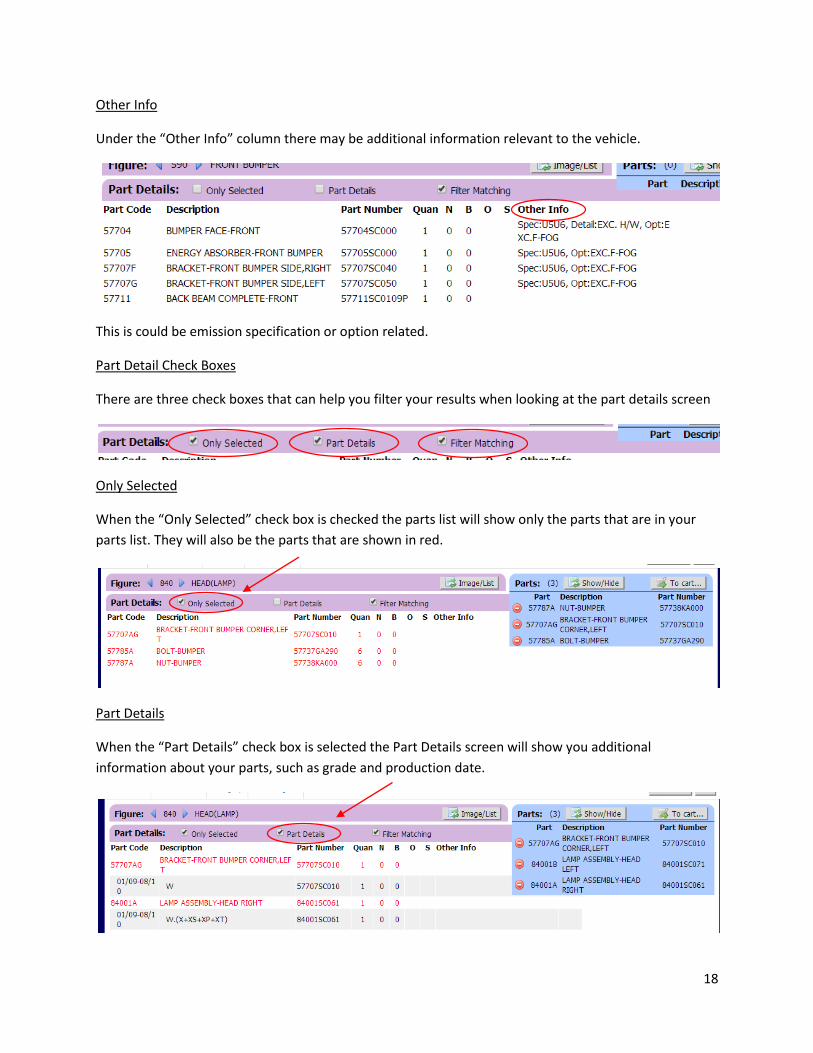
Other Info
Under the “Other Info” column there may be additional information relevant to the vehicle.
This is could be emission specification or option related.
Part Detail Check Boxes
There are three check boxes that can help you filter your results when looking at the part details screen
Only Selected
When the “Only Selected” check box is checked the parts list will show only the parts that are in your
parts list. They will also be the parts that are shown in red.
Part Details
When the “Part Details” check box is selected the Part Details screen will show you additional
information about your parts, such as grade and production date.

19
Filter Matching
By default, the “Filter Matching” check box is checked. This ensures that filters are applied that limits
the parts selection to what’s applicable to your vehicle. When you uncheck this box it will display all part
numbers for each part code although, you will not be able to add them to your parts list. The applicable
part will appear darker on the list than all the others.
No Matches
When selecting parts and you see the words “no matches” in place of a part number, this means this
part code is not applicable to your vehicle.

20
Multiple
When selecting parts and you see the word “multiple” in place of a part number, this means there are
multiple choices of part numbers for this part code.
When you click on the “To cart” button, the EPC will make you select one of those parts before you can
proceed to the cart.
Checking the “Part Details” check box will also show you the available options:

21
Image Note
There are also notes attached to images. These are found in the top left hand corner of each image.
The number inside the parentheses indicates how many separate image notes are attached to this
image:
When you click on the note itself, the notes will be displayed in a pop up, similar to the part number
note:

22
Chemicals, Maintenance, and Other Items
In the Cart screen retailers will have access to additional parts.
Chemicals
At the top of the Cart screen there is a button called “Add Chemicals”
When this button is clicked is will bring up a selection of available chemicals specific to the vehicle
entered:
Just check the
box next to the
chemical type
and size desired.
Click “Add” to
add to your
cart
23
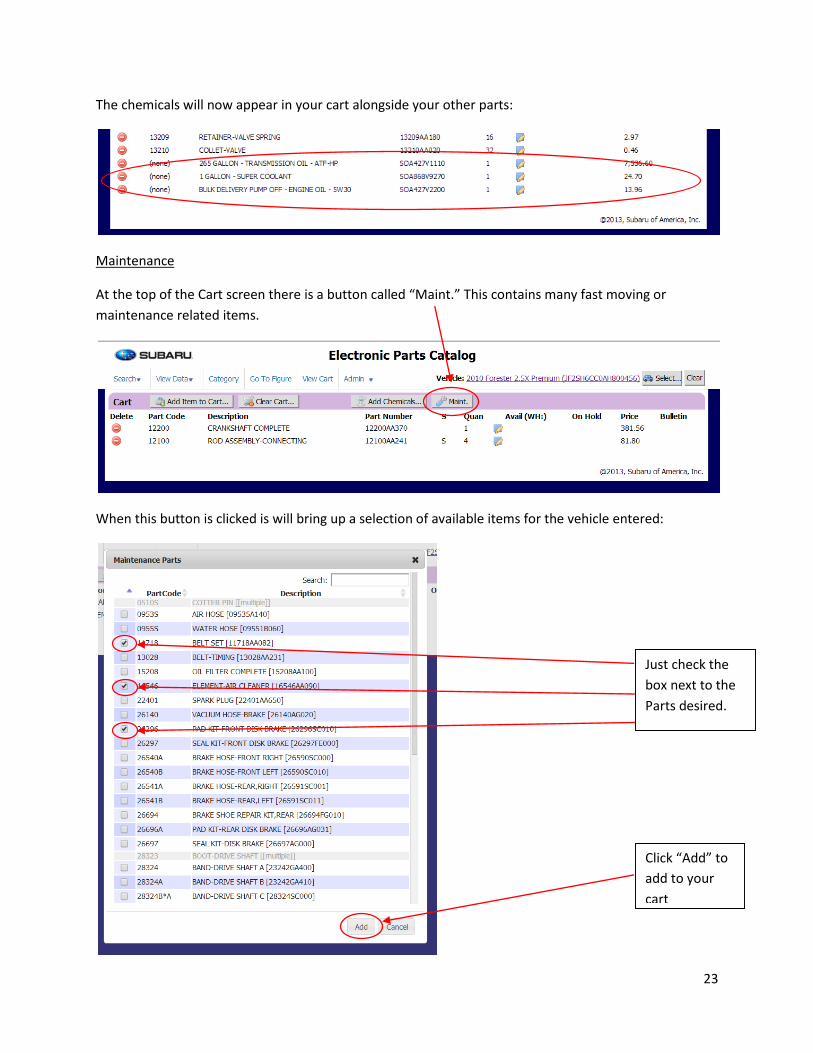
The chemicals will now appear in your cart alongside your other parts:
Maintenance
At the top of the Cart screen there is a button called “Maint.” This contains many fast moving or
maintenance related items.
When this button is clicked is will bring up a selection of available items for the vehicle entered:
Just check the
box next to the
Parts desired.
Click “Add” to
add to your
cart

24
The Items will now appear in your cart alongside your other parts:
Adding Items Manually to the Cart
From the cart screen there is the ability to add parts to the cart manually:
When this is clicked the item number and quantity can be entered. This can be a Subaru item or an
internal item that is not in our system:

25
Searching
The search screen is located on the top left of the catalog. There are two ways of searching in the
Subaru EPC, by part number or by part name/description.
Part Number Search
When part number search is selected there will be a pop up to enter the part number. Click search to
bring up the results.
This will show what figure the part is located in and well as applicable model years. If you click on one of
the records in the results it will take you directly to that figure.
Important – If you have a vehicle loaded in the EPC, the search results will be limited to that vehicle. To
search all models the vehicle must be cleared.
26
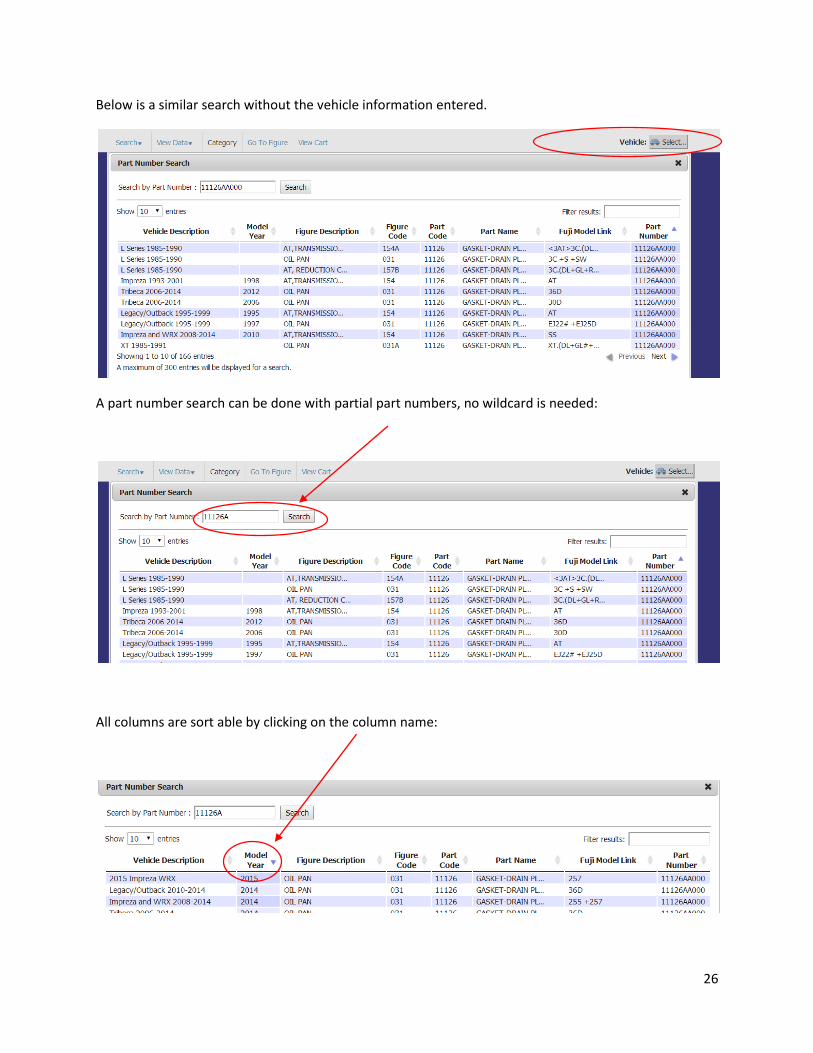
Below is a similar search without the vehicle information entered.
A part number search can be done with partial part numbers, no wildcard is needed:
All columns are sort able by clicking on the column name:
27
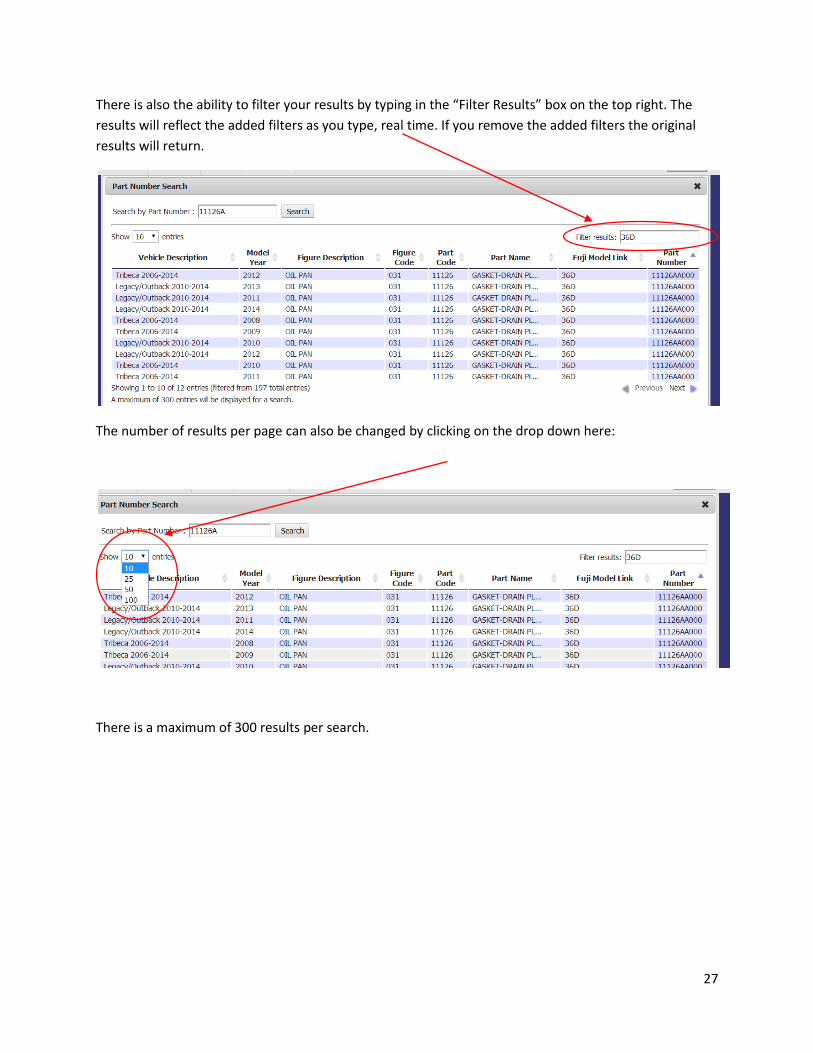
There is also the ability to filter your results by typing in the “Filter Results” box on the top right. The
results will reflect the added filters as you type, real time. If you remove the added filters the original
results will return.
The number of results per page can also be changed by clicking on the drop down here:
There is a maximum of 300 results per search.

28
Part Name/Description Search
When Part Name/Description search is selected there will be a pop up to enter the description. Click
search to bring up the results.
This will also show what figure the part is located in and well as applicable model years. If you click on
one of the records in the results it will take you directly to that figure.
The same rules and features of the part number search apply to the part name/description search:
The vehicle must be cleared in the EPC to search all applicable vehicles.
Partial names can be used for searches such as “Gask” instead of “Gasket.”
Columns are sort able.
The results can be filtered by typing in the “Filter Results” box.

29
Under the Part Name/Description search there is also the ability to search by Part Code. This must be
entered exactly; partial Part Codes will not work. All other search functionality is the same.
View Data
Under the View Data category at the top of the catalog, there are two areas where additional part
information is kept, Abbreviation and Color Code.

30
Abbreviations
When abbreviation is selected the EPC will show a pop up box. All abbreviations from all catalogs have
been combined in this one location.
To search for a specific abbreviation, type what you are looking for in the “Filter Results” box at the top
right. As you type the results will be filtered. All of these abbreviations are available at anytime, whether
you have a vehicle in the system or not, the results will be the same.
31
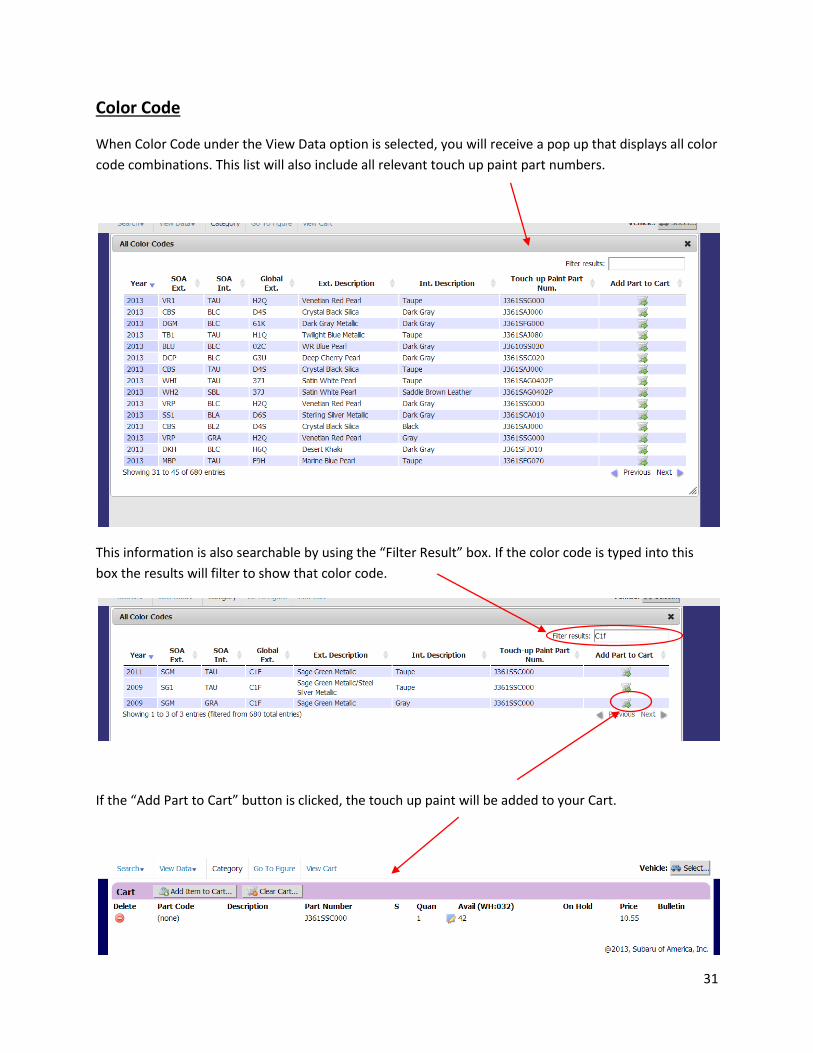
Color Code
When Color Code under the View Data option is selected, you will receive a pop up that displays all color
code combinations. This list will also include all relevant touch up paint part numbers.
This information is also searchable by using the “Filter Result” box. If the color code is typed into this
box the results will filter to show that color code.
If the “Add Part to Cart” button is clicked, the touch up paint will be added to your Cart.

32
Other Catalog Menu Items
Category
When a vehicle is selected in the EPC, this button will take you to the main catalog page where you can
select a category:
Go to Figure
If the exact figure that is needed is known, clicking on this menu item will bring up a pop up box where
the figure can be entered. Clicking search will bring the figure right up. This is accessible from any part of
the catalog.
View Cart
The View Cart button will take you directly to the EPC cart from any point in the catalog.
Catalog Categories

33
Remanufactured and other Substitute Parts
The Subaru EPC has incorporated additional substitute parts in the catalog that are shown alongside the
original parts. This includes remanufactured items, batteries, and wiper blades.