Embed Size (px)
Citation preview

To remove, place the mat face down onto a parchment sheet. Pinch mat tightly with thumb and forefinger against table-top, rolling mat back firmly to release decoration. Wedge the Confectioners’ Spreader between the SugarVeil and the mat to pin down lightly to the table as you peel the mat back a few inches and advance the spreader. Repeat until the entire mat is peeled from the SugarVeil piece.
If you begin to remove the mat and find the decoration is not yet set in the center, slightly peel back the border areas of all four sides and simply allow mat to remain at room temp until center has had a bit more time to set, then finish removing mat.
Pieces may be airbrushed, or painted with gold dust/colored luster powder mixed with grain alcohol. Lace will stick to any icing surface. If surface is dry, use a scant amount of water on a fingertip to lightly moisten the SugarVeil decoration.
When placed upon a contoured surface, SugarVeil decorations may be pinched, then snipped to precisely follow the shape of the irregular surface.
Excess mixture may be covered with plastic wrap and refrigerated a week or more. Allow to come to room temperature, then beat for a minute just prior to spreading. If necessary, a few drops of water may be added to improve spreadability.
Completed decorations can be stored flat, rolled, or gently folded between sheets of parchment paper placed into zipped plastic bags and stored out of sunlight. The unused decorations will remain flexible anywhere from a few days to months, depending upon thickness and the storage condi-tions.
Because SugarVeil decorations last indefinitely, you may elect to allow them to dry completely and store them in their ‘dry’ form on a rigid surface. When ready to use, handle gently and either (1) run thru a path of steam, or (2) place briefly onto a damp towel, patting gently to al-low decoration to absorb moisture from the towel. After a minute or so, flexibility is restored and decoration may be placed onto cake.
©SugarVeil Products Corporation 2009-14 18220 Waldron Drive • P.O. Box 18
Waldron, MO 64092 Tel. (816) 891-7774 • (800) 563-0074
Email [email protected]
Helpful tips:
Remove the mat from SugarVeil, not vice-versa.
If SugarVeil is set but you desire peeling it from the mat later, turn mat face down onto a tabletop, or place into a zipped bag.
While working with fine decorations in dry or oven-heated conditions, place rolled, wet towels around borders of work area to increase humidity and lengthen working time. Keep unused SugarVeil decorations under a silicone mat or in a zipped plastic bag to retain flexibility.
In areas of high humidity, dust fingertips with a bit of corn or potato starch for ease in handling ‘set’ SugarVeil decorations.
SugarVeil’s color is natural and without artificial colorants. If you’ve mixed but not used it for several hours, rebeat it for a minute or so. White SugarVeil will be restored to its natural white-white color.
To ensure the ‘loft’ of bows or any other 3D decorations, place a finger swipe of candy melts (or ‘Almond Bark’ coating) on the inside of the bows, particulary at the gathered areas.
To clean mat, soak and use water pressure only. Do not use metal tools on mat. Although mat will withstand temperatures of 350F/180C, do not allow direct contact with interior oven parts (place mat on a baking sheet).
Watch SugarVeil in action at: YouTube.com/SugarVeil Join the SugarVeil community to see SugarVeil cakes and photos from around the world at Facebook.com/sugarveilicing. The ‘Notes’ section offers further tips, and see the Photo albums section for mini-tutorials.
The peeled result.
Adding color within lines before removing from mat
Create delectable details effortlessly with
SUGARVEIL®
CONFECTIONERS’ MATS
Patented
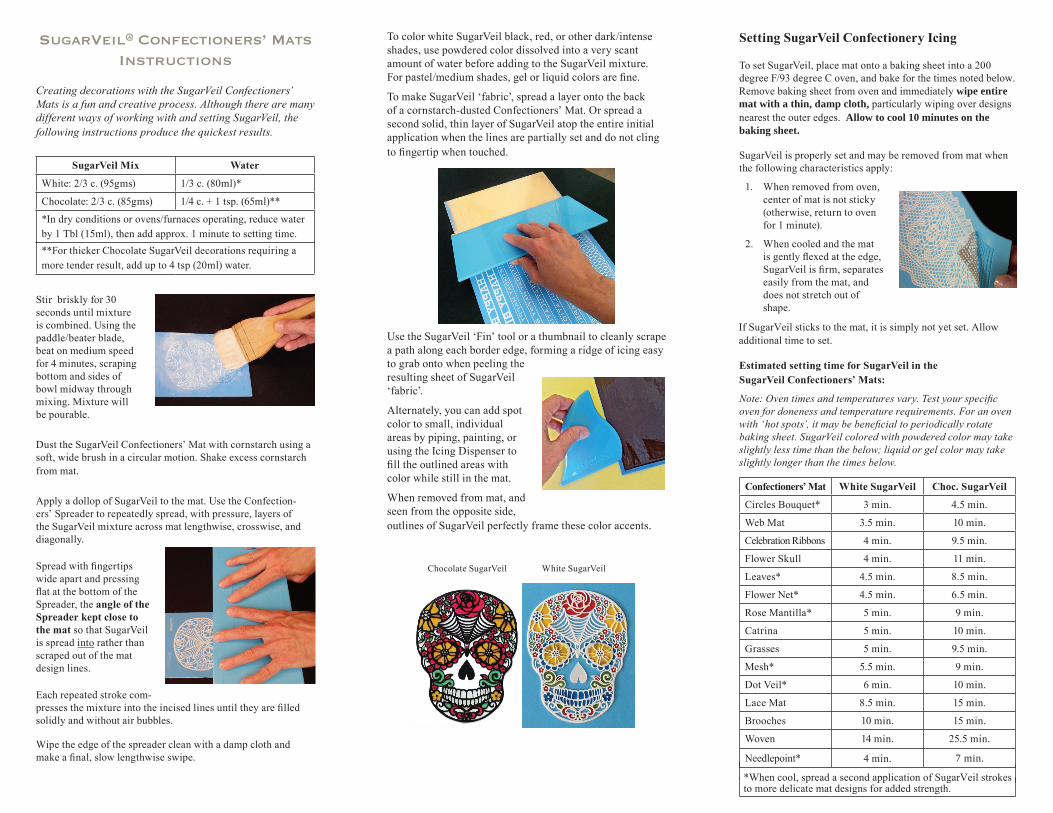
To color white SugarVeil black, red, or other dark/intense shades, use powdered color dissolved into a very scant amount of water before adding to the SugarVeil mixture. For pastel/medium shades, gel or liquid colors are fine.
To make SugarVeil ‘fabric’, spread a layer onto the back of a cornstarch-dusted Confectioners’ Mat. Or spread a second solid, thin layer of SugarVeil atop the entire initial application when the lines are partially set and do not cling to fingertip when touched.
Use the SugarVeil ‘Fin’ tool or a thumbnail to cleanly scrape a path along each border edge, forming a ridge of icing easy to grab onto when peeling the resulting sheet of SugarVeil ‘fabric’.
Alternately, you can add spot color to small, individual areas by piping, painting, or using the Icing Dispenser to fill the outlined areas with color while still in the mat.
When removed from mat, and seen from the opposite side, outlines of SugarVeil perfectly frame these color accents.
Chocolate SugarVeil White SugarVeil
Setting SugarVeil Confectionery Icing
To set SugarVeil, place mat onto a baking sheet into a 200 degree F/93 degree C oven, and bake for the times noted below.
SugarVeil is properly set and may be removed from mat when the following characteristics apply:
When removed from oven, 1. center of mat is not sticky (otherwise, return to oven for 1 minute).
When cooled and the mat 2. is gently flexed at the edge, SugarVeil is firm, separates easily from the mat, and does not stretch out of shape.
Estimated setting time for SugarVeil in the SugarVeil Confectioners’ Mats:
Note: Oven times and temperatures vary. Test your specific oven for doneness and temperature requirements. For an oven with ‘hot spots’, it may be beneficial to periodically rotate baking sheet. SugarVeil colored with powdered color may take slightly less time than the below; liquid or gel color may take slightly longer than the times below.
Confectioners’ Mat White SugarVeil Choc. SugarVeil
Circles Bouquet* 3 min. 4.5 min.
Web Mat 3.5 min. 10 min.
Celebration Ribbons 4 min. 9.5 min.
Flower Skull 4 min. 11 min.
Leaves* 4.5 min. 8.5 min.
Flower Net* 4.5 min. 6.5 min.
Rose Mantilla* 5 min. 9 min.
Catrina 5 min. 10 min.
Grasses 5 min. 9.5 min.
Mesh* 5.5 min. 9 min.
Dot Veil* 6 min. 10 min.
Lace Mat 8.5 min. 15 min.
Brooches 10 min. 15 min.
Woven 14 min. 25.5 min.
SugarVeil@ Confectioners’ MatsInstructions
Creating decorations with the SugarVeil Confectioners’ Mats is a fun and creative process. Although there are many different ways of working with and setting SugarVeil, the following instructions produce the quickest results.
SugarVeil Mix Water
White: 2/3 c. (95gms) 1/3 c. (80ml)*
Chocolate: 2/3 c. (85gms) 1/4 c. + 1 tsp. (65ml)**
**For thicker Chocolate SugarVeil decorations requiring a more tender result, add up to 4 tsp (20ml) water.
Stir briskly for 30 seconds until mixture is combined. Using the paddle/beater blade, beat on medium speed for 4 minutes, scraping bottom and sides of bowl midway through mixing. Mixture will be pourable.
Dust the SugarVeil Confectioners’ Mat with cornstarch using a soft, wide brush in a circular motion. Shake excess cornstarch from mat.
Apply a dollop of SugarVeil to the mat. Use the Confection-ers’ Spreader to repeatedly spread, with pressure, layers of the SugarVeil mixture across mat lengthwise, crosswise, and diagonally.
Spread with fingertips wide apart and pressing flat at the bottom of the Spreader, the angle of the Spreader kept close to the mat so that SugarVeil is spread into rather than scraped out of the mat design lines.
Each repeated stroke com-presses the mixture into the incised lines until they are filled solidly and without air bubbles. Wipe the edge of the spreader clean with a damp cloth and make a final, slow lengthwise swipe.
*In dry conditions or ovens/furnaces operating, reduce water by 1 Tbl (15ml), then add approx. 1 minute to setting time.
Remove baking sheet from oven and immediately wipe entire mat with a thin, damp cloth, particularly wiping over designsnearest the outer edges. Allow to cool 10 minutes on the
If SugarVeil sticks to the mat, it is simply not yet set. Allow additional time to set.
Needlepoint* 4 min. 7 min.
baking sheet.
*When cool, spread a second application of SugarVeil strokes to more delicate mat designs for added strength.