Embed Size (px)
DESCRIPTION
Citation preview
Prepared By Sujith Reddy… [email protected]
Cross Applications
1) Cross applications is the concept to exchange the data among the systems. 2) ALE (Applications link enabling) is an SAP technology to support the cross-applications. 3) ALE uses IDOC (Intermediate Document) to support the cross applications. 4) IDOC is the carrier to carry the data from one system to another system.
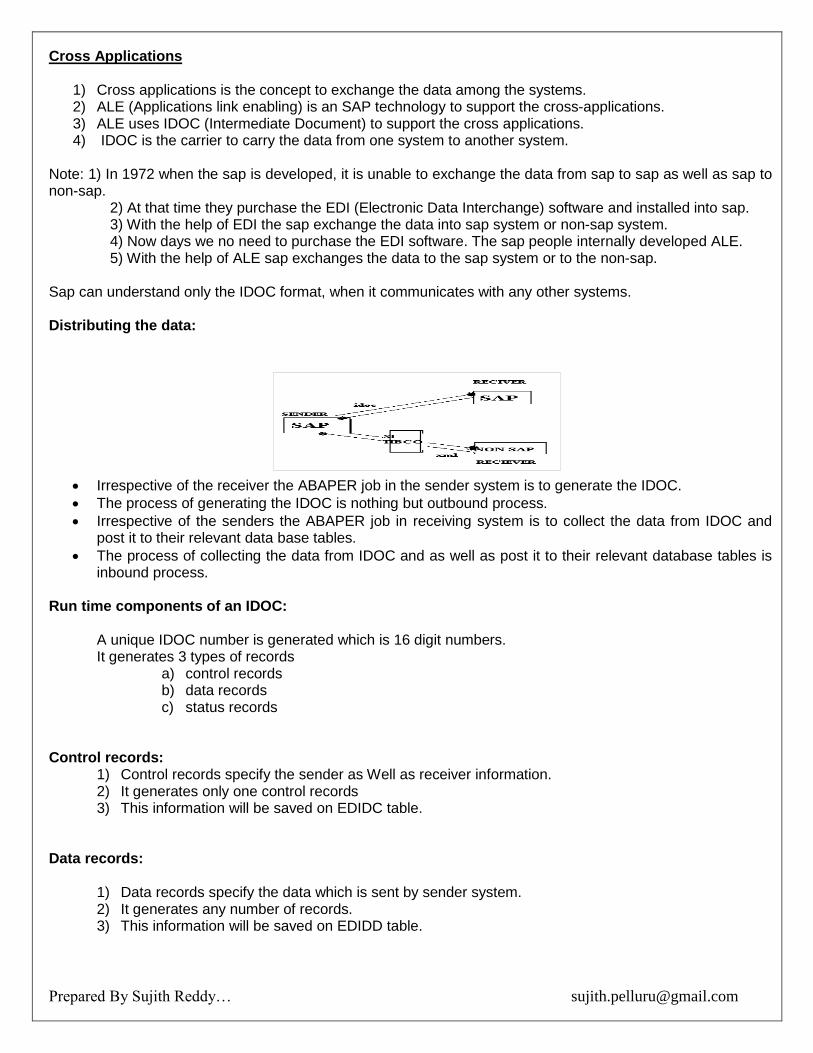
Note: 1) In 1972 when the sap is developed, it is unable to exchange the data from sap to sap as well as sap to non-sap. 2) At that time they purchase the EDI (Electronic Data Interchange) software and installed into sap. 3) With the help of EDI the sap exchange the data into sap system or non-sap system. 4) Now days we no need to purchase the EDI software. The sap people internally developed ALE. 5) With the help of ALE sap exchanges the data to the sap system or to the non-sap. Sap can understand only the IDOC format, when it communicates with any other systems. Distributing the data:
Irrespective of the receiver the ABAPER job in the sender system is to generate the IDOC.
The process of generating the IDOC is nothing but outbound process.
Irrespective of the senders the ABAPER job in receiving system is to collect the data from IDOC and post it to their relevant data base tables.
The process of collecting the data from IDOC and as well as post it to their relevant database tables is inbound process.
Run time components of an IDOC: A unique IDOC number is generated which is 16 digit numbers. It generates 3 types of records
a) control records b) data records c) status records
Control records:
1) Control records specify the sender as Well as receiver information. 2) It generates only one control records 3) This information will be saved on EDIDC table.
Data records:
1) Data records specify the data which is sent by sender system. 2) It generates any number of records. 3) This information will be saved on EDIDD table.
Prepared By Sujith Reddy… [email protected]
Status records:
1) It generates the status code for each and every stage of transferring the data 2) It generates any number of status records. 3) Most of the times it generates four records. 4) This information is stored on EDIDS table.
There are two types of status codes. 1) Inbound status 2) outbound status. Code code
(0.49) (50-76) Note: the linking between EDIDC, EDIDD, and EDIDS Is the IDOC number. Structure of an IDOC: Control record Data record 1 status records 1 Data record 2 status records 2 Data record 3 status records 3 Data record 4 status records 4 | | Data record N status record N Types of an IDOC:
1) Basic type: a) standard IDOC or b) Custom IDOC 2) Extension type: standard IDOC + Custom IDOC.
Note: WE30 is the standard transaction code to Create, Change and to Display the IDOC. If WE are working with standard database table information then WE go for standard IDOC. If WE are working with custom database table information then WE go for custom IDOC. If WE are working with standard database table along with some additional information then WE go for Extended IDOC.
1) IDOC is the collection of segments. 2) Each segment is the collection of fields.
Characteristics of an IDOC:
1) Name of the IDOC. 2) List of segment. 3) Hierarchy of the segment. 4) Optional versus mandatory for the segment. 5) Provide parent and child relation ship for the segments. 6) Each segment can carry up to 1000 bytes. 7) Provide minimum and maximum number of repetitions of the segment.
Note: WE31 is the transaction code to create, change and display the segments. ALE configuration settings:
1) communication settings 2) message type specific settings
Prepared By Sujith Reddy… [email protected]
Communication settings: Sender-----Receiver
1) To build the bridge between two participated. 2) One time job 3) One way job
Communication between one system to another system is nothing but, communication betWEen one client of sender system to another client of receiving system. Each participated system is called one logical system. Steps to establish the communication settings:
1) Define logical systems. 2) Assign client to logical systems 3) Maintain RFC (remote function call) destination details.
The receiver is in the 810 client, he wants Q7850 vendor details, and you provide the following information.
Client : 810 User : sapuser Password : ********* Logical system : Q7850
Object: If the sender is in 800 client and he wants to send the Q7850 vendor details. Before sending
the data WE need to establish the communication setting betWEen 800 to 810 clients. Steps to define logical system:
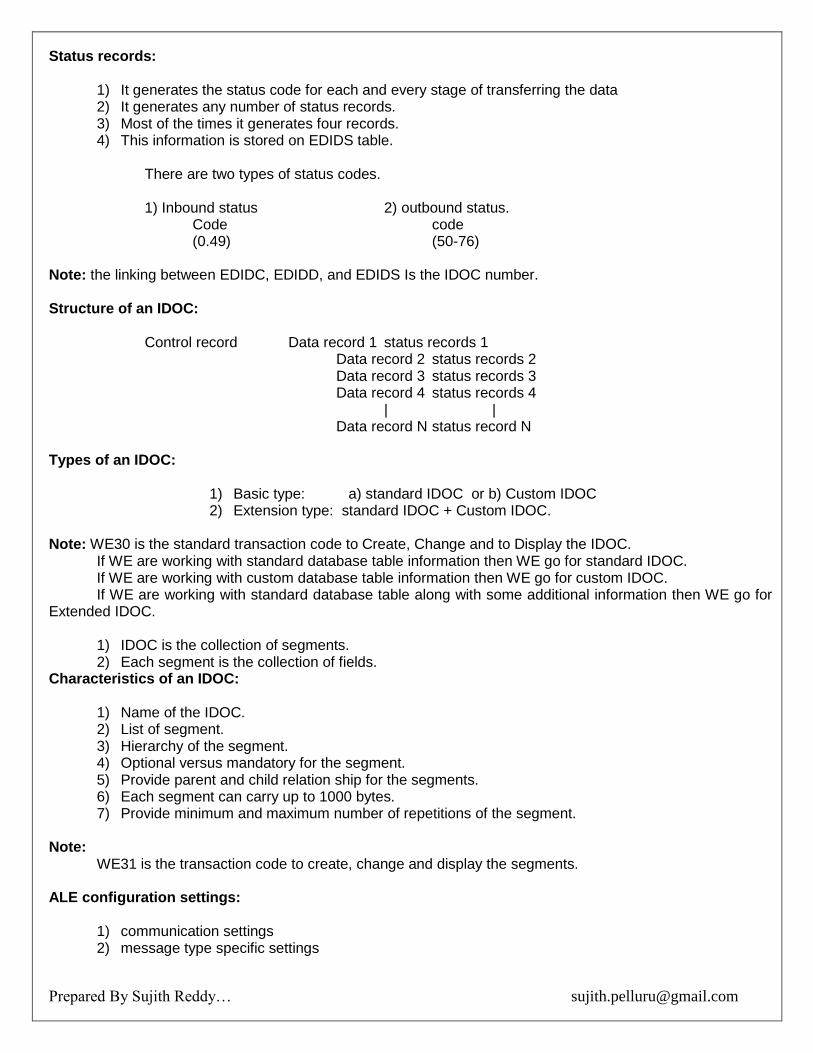
1) Execute SALE. 2) Click on basic settings. 3) Again click on logical systems 4) Execute define logical system
5) Click on NEW ENTRIES in App Tool bar
Prepared By Sujith Reddy… [email protected]
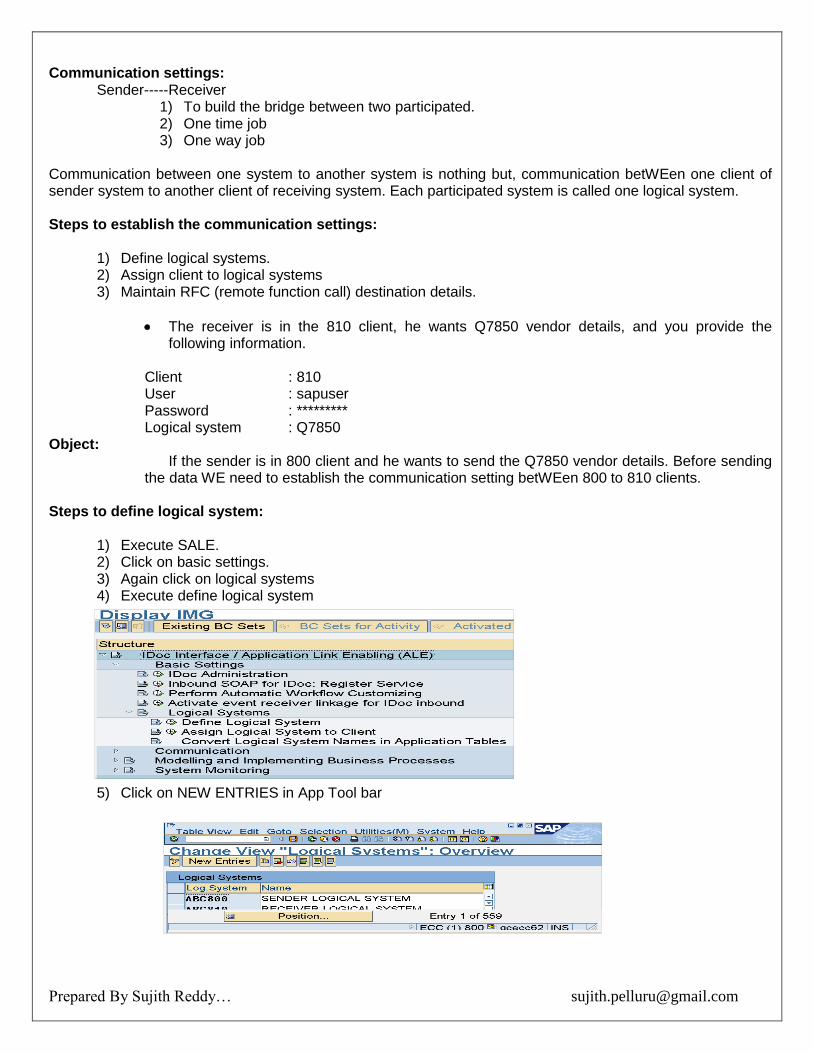
6) Provide log. System name
7) Click on Save Steps to assign my client to receiver logical system:
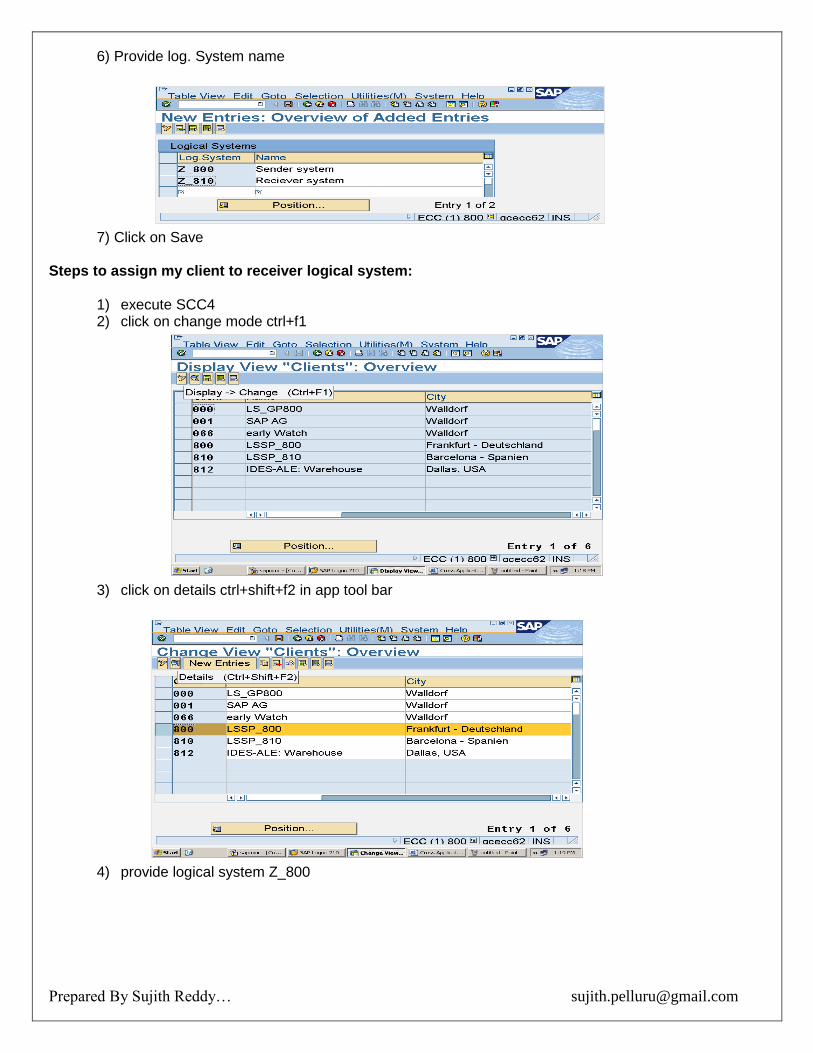
1) execute SCC4 2) click on change mode ctrl+f1
3) click on details ctrl+shift+f2 in app tool bar
4) provide logical system Z_800
Prepared By Sujith Reddy… [email protected]
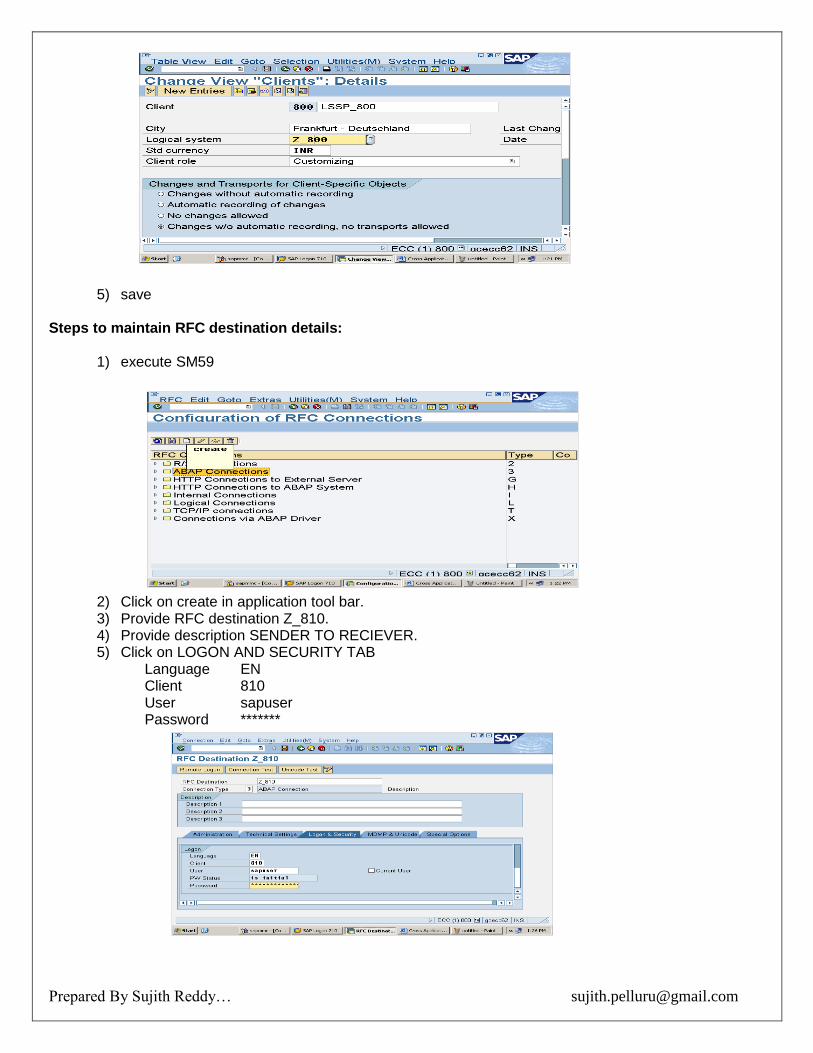
5) save
Steps to maintain RFC destination details:
1) execute SM59
2) Click on create in application tool bar. 3) Provide RFC destination Z_810. 4) Provide description SENDER TO RECIEVER. 5) Click on LOGON AND SECURITY TAB
Language EN Client 810 User sapuser Password *******
Prepared By Sujith Reddy… [email protected]
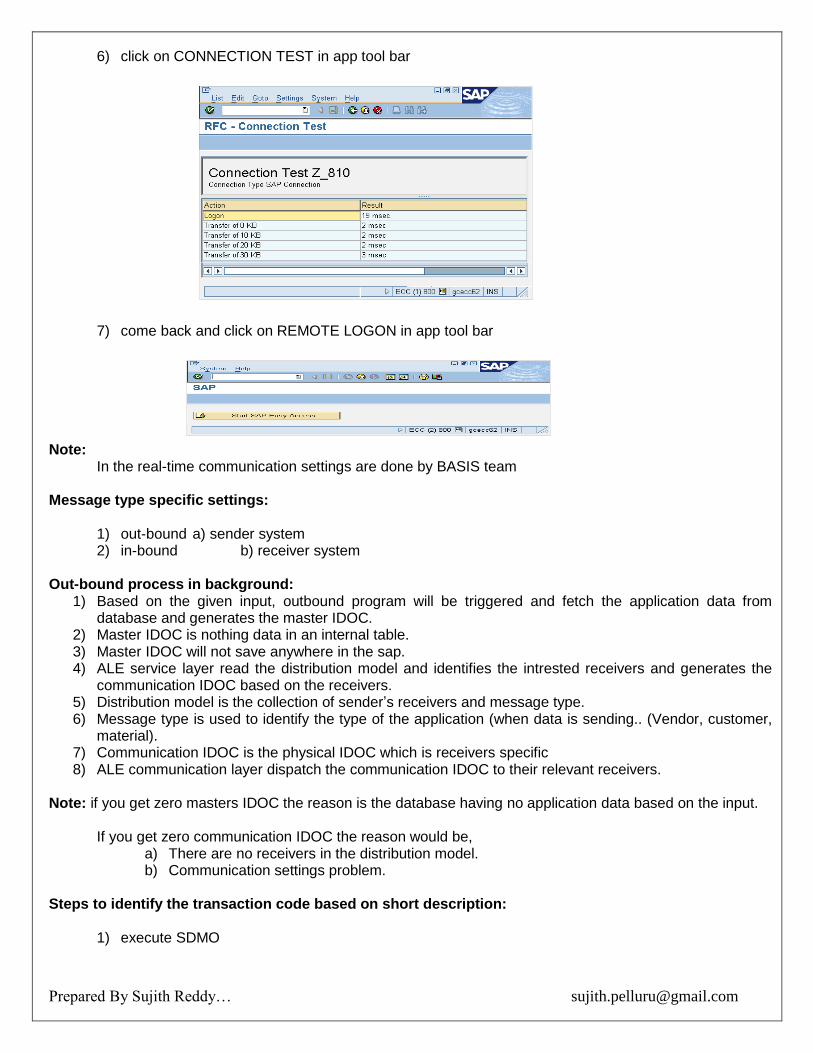
6) click on CONNECTION TEST in app tool bar
7) come back and click on REMOTE LOGON in app tool bar
Note: In the real-time communication settings are done by BASIS team Message type specific settings:
1) out-bound a) sender system 2) in-bound b) receiver system
Out-bound process in background:
1) Based on the given input, outbound program will be triggered and fetch the application data from database and generates the master IDOC.
2) Master IDOC is nothing data in an internal table. 3) Master IDOC will not save anywhere in the sap. 4) ALE service layer read the distribution model and identifies the intrested receivers and generates the
communication IDOC based on the receivers. 5) Distribution model is the collection of sender’s receivers and message type. 6) Message type is used to identify the type of the application (when data is sending.. (Vendor, customer,
material). 7) Communication IDOC is the physical IDOC which is receivers specific 8) ALE communication layer dispatch the communication IDOC to their relevant receivers.
Note: if you get zero masters IDOC the reason is the database having no application data based on the input. If you get zero communication IDOC the reason would be,
a) There are no receivers in the distribution model. b) Communication settings problem.
Steps to identify the transaction code based on short description:
1) execute SDMO

Prepared By Sujith Reddy… [email protected]
2) provide short text---send vendor
3) execute it 4) Identify the transaction code.
OUTBOUND SETTINGS:
1) create distribution model (BD64) 2) create outbound partner profile (WE20)
a) message type b) partner number (WE21) c) mode of dispatch
i. immediate ii. collect
Some of the standard message type and IDOC type: T. code message type IDOC type short text BD10 MATMAS MATMAS 01-05 SEND MATERIAL BD11 MATMAS MATMAS 01-05 GET MATERIAL BD12 DEBMAS DEBMAS 01-06 SEND CUSTOMER BD13 DEBMAS DEBMAS 01-06 GET CUSTOMER BD14 CREMAS CREMAS 01-05 SEND VENDOR BD15 CREMAS CREMAS 01-05 GET VENDOR Note: EDIMSG is the standard database table which contains all the message types and IDOC types. STEPS TO CREATE DISTRIBUTION MODEL:
1) execute BD64 2) click on change mode
Prepared By Sujith Reddy… [email protected]
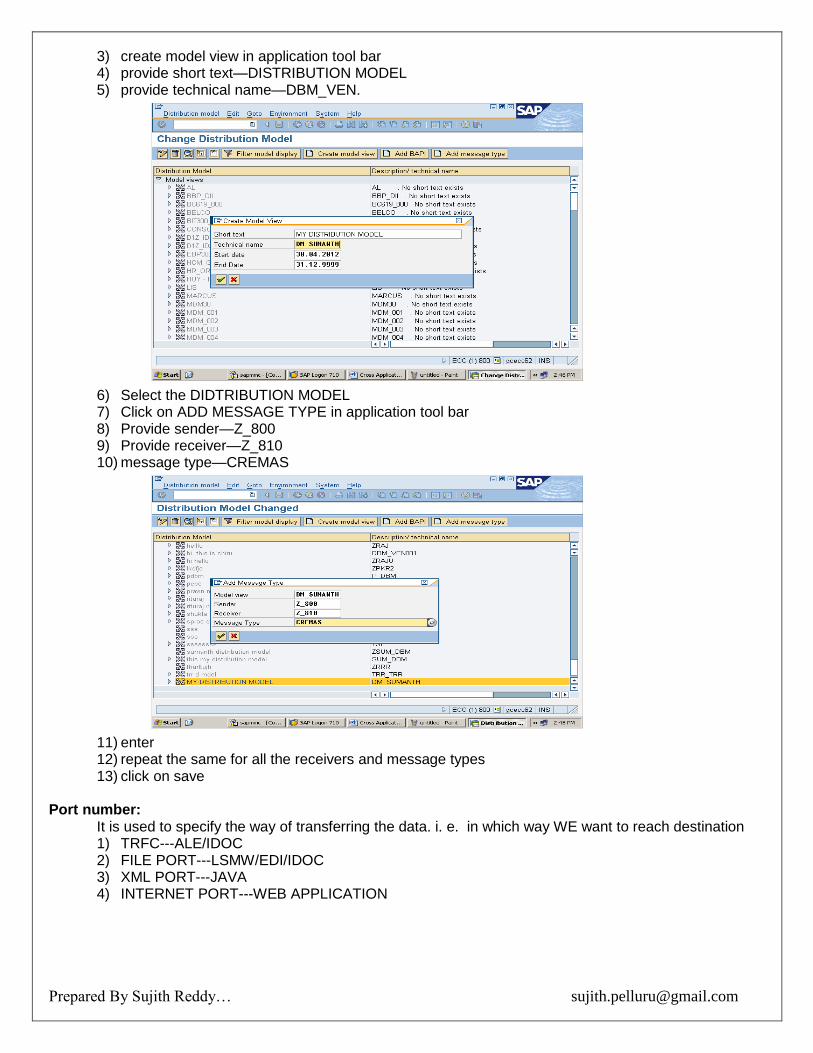
3) create model view in application tool bar 4) provide short text—DISTRIBUTION MODEL 5) provide technical name—DBM_VEN.
6) Select the DIDTRIBUTION MODEL 7) Click on ADD MESSAGE TYPE in application tool bar 8) Provide sender—Z_800 9) Provide receiver—Z_810 10) message type—CREMAS
11) enter 12) repeat the same for all the receivers and message types 13) click on save
Port number: It is used to specify the way of transferring the data. i. e. in which way WE want to reach destination
1) TRFC---ALE/IDOC 2) FILE PORT---LSMW/EDI/IDOC 3) XML PORT---JAVA 4) INTERNET PORT---WEB APPLICATION
Prepared By Sujith Reddy… [email protected]
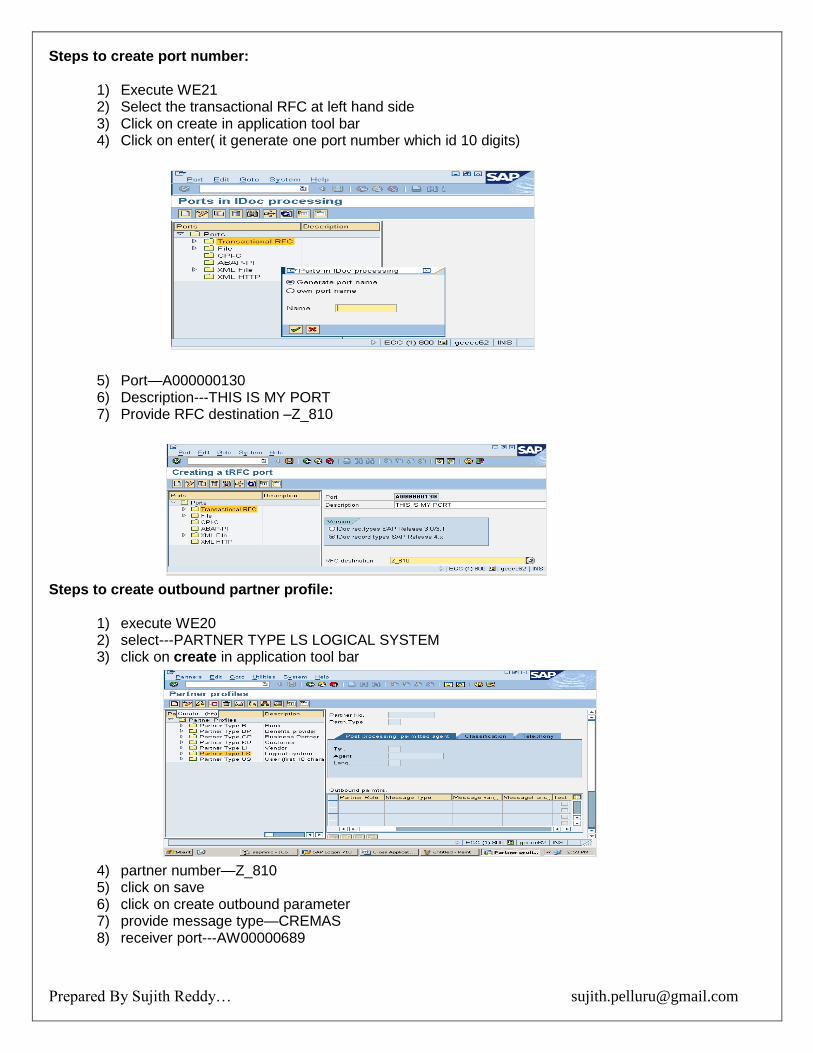
Steps to create port number:
1) Execute WE21 2) Select the transactional RFC at left hand side 3) Click on create in application tool bar 4) Click on enter( it generate one port number which id 10 digits)
5) Port—A000000130 6) Description---THIS IS MY PORT 7) Provide RFC destination –Z_810
Steps to create outbound partner profile:
1) execute WE20 2) select---PARTNER TYPE LS LOGICAL SYSTEM 3) click on create in application tool bar
4) partner number—Z_810 5) click on save 6) click on create outbound parameter 7) provide message type—CREMAS 8) receiver port---AW00000689
Prepared By Sujith Reddy… [email protected]
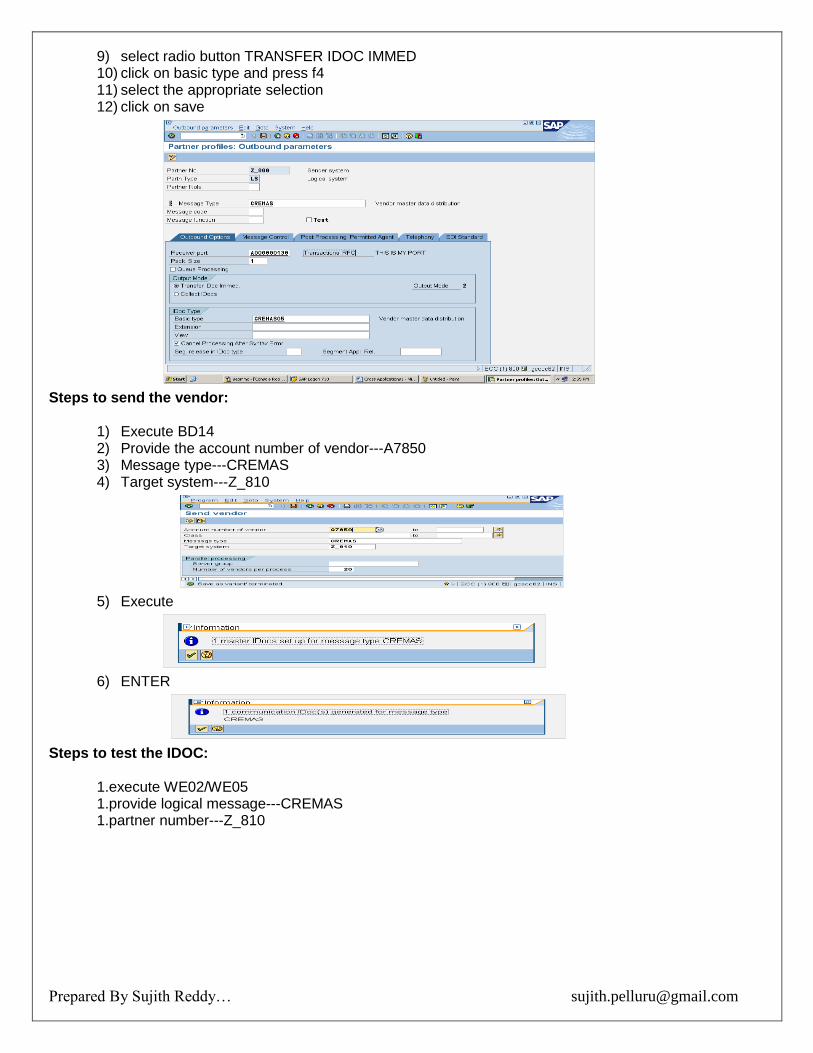
9) select radio button TRANSFER IDOC IMMED 10) click on basic type and press f4 11) select the appropriate selection 12) click on save
Steps to send the vendor:
1) Execute BD14 2) Provide the account number of vendor---A7850 3) Message type---CREMAS 4) Target system---Z_810
5) Execute
6) ENTER
Steps to test the IDOC:
1.execute WE02/WE05 1.provide logical message---CREMAS 1.partner number---Z_810
Prepared By Sujith Reddy… [email protected]
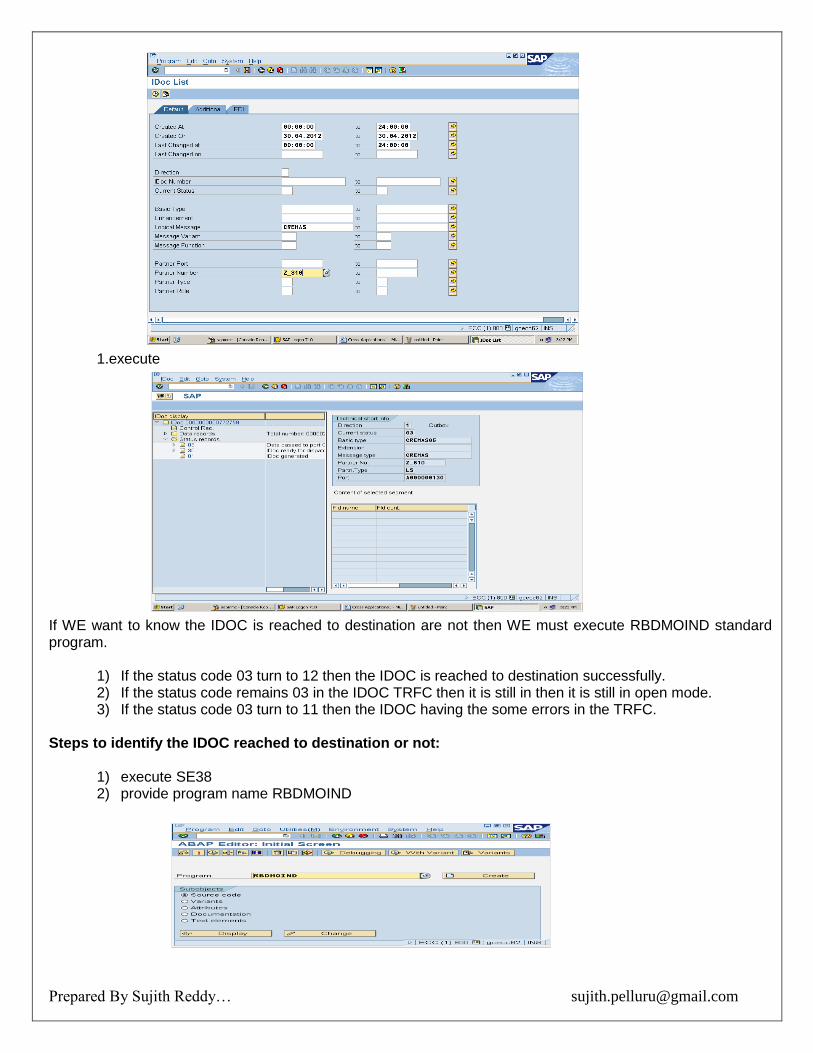
1.execute
If WE want to know the IDOC is reached to destination are not then WE must execute RBDMOIND standard program.
1) If the status code 03 turn to 12 then the IDOC is reached to destination successfully. 2) If the status code remains 03 in the IDOC TRFC then it is still in then it is still in open mode. 3) If the status code 03 turn to 11 then the IDOC having the some errors in the TRFC.
Steps to identify the IDOC reached to destination or not:
1) execute SE38 2) provide program name RBDMOIND
Prepared By Sujith Reddy… [email protected]
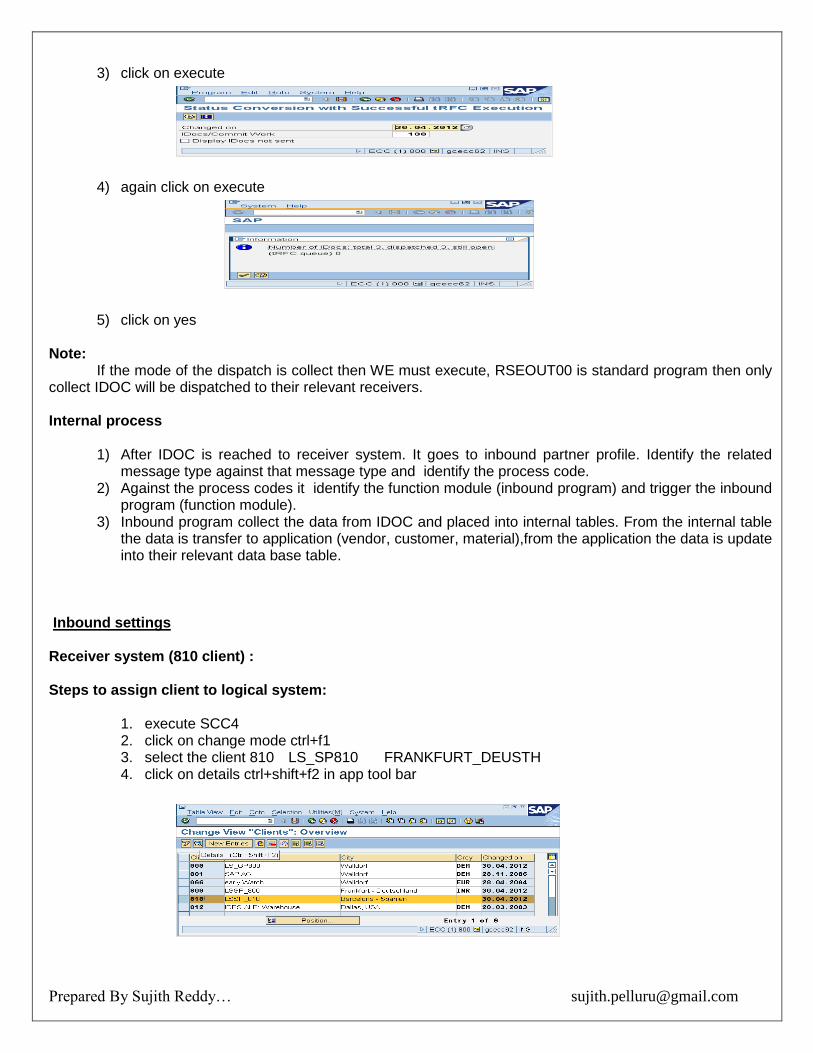
3) click on execute
4) again click on execute
5) click on yes Note: If the mode of the dispatch is collect then WE must execute, RSEOUT00 is standard program then only collect IDOC will be dispatched to their relevant receivers. Internal process
1) After IDOC is reached to receiver system. It goes to inbound partner profile. Identify the related message type against that message type and identify the process code.
2) Against the process codes it identify the function module (inbound program) and trigger the inbound program (function module).
3) Inbound program collect the data from IDOC and placed into internal tables. From the internal table the data is transfer to application (vendor, customer, material),from the application the data is update into their relevant data base table.
Inbound settings Receiver system (810 client) : Steps to assign client to logical system:
1. execute SCC4 2. click on change mode ctrl+f1 3. select the client 810 LS_SP810 FRANKFURT_DEUSTH 4. click on details ctrl+shift+f2 in app tool bar
Prepared By Sujith Reddy… [email protected]
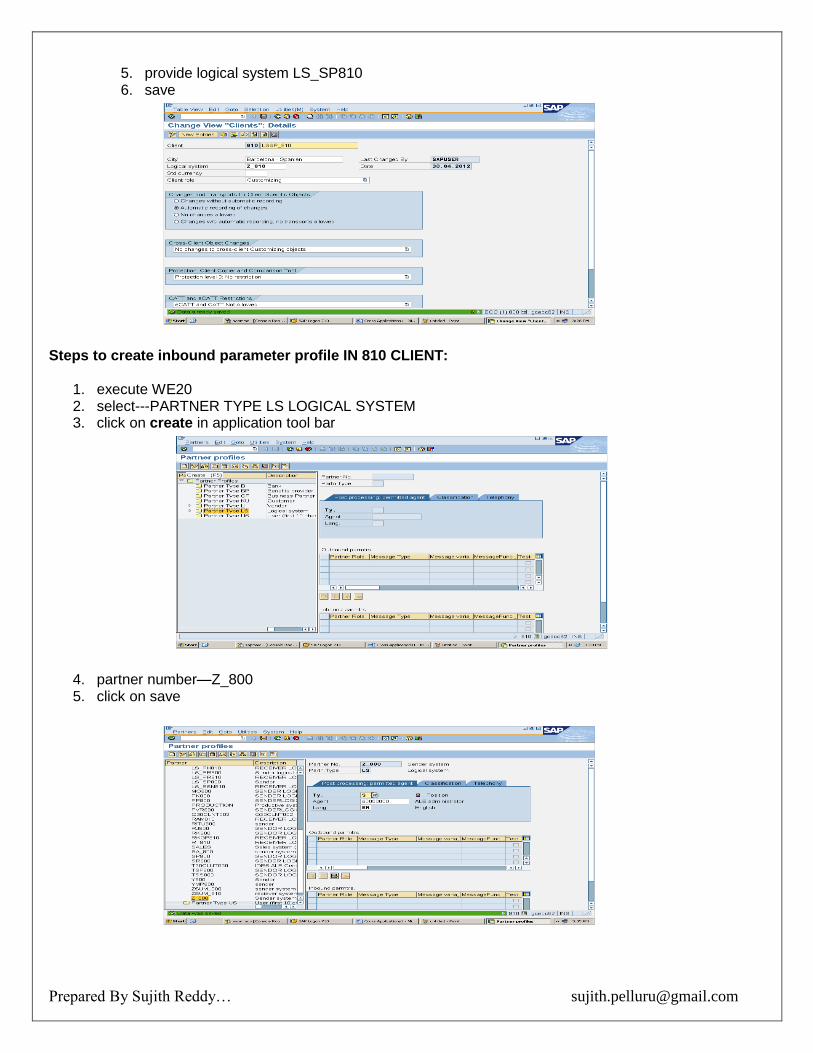
5. provide logical system LS_SP810 6. save
Steps to create inbound parameter profile IN 810 CLIENT:
1. execute WE20 2. select---PARTNER TYPE LS LOGICAL SYSTEM 3. click on create in application tool bar
4. partner number—Z_800 5. click on save
Prepared By Sujith Reddy… [email protected]
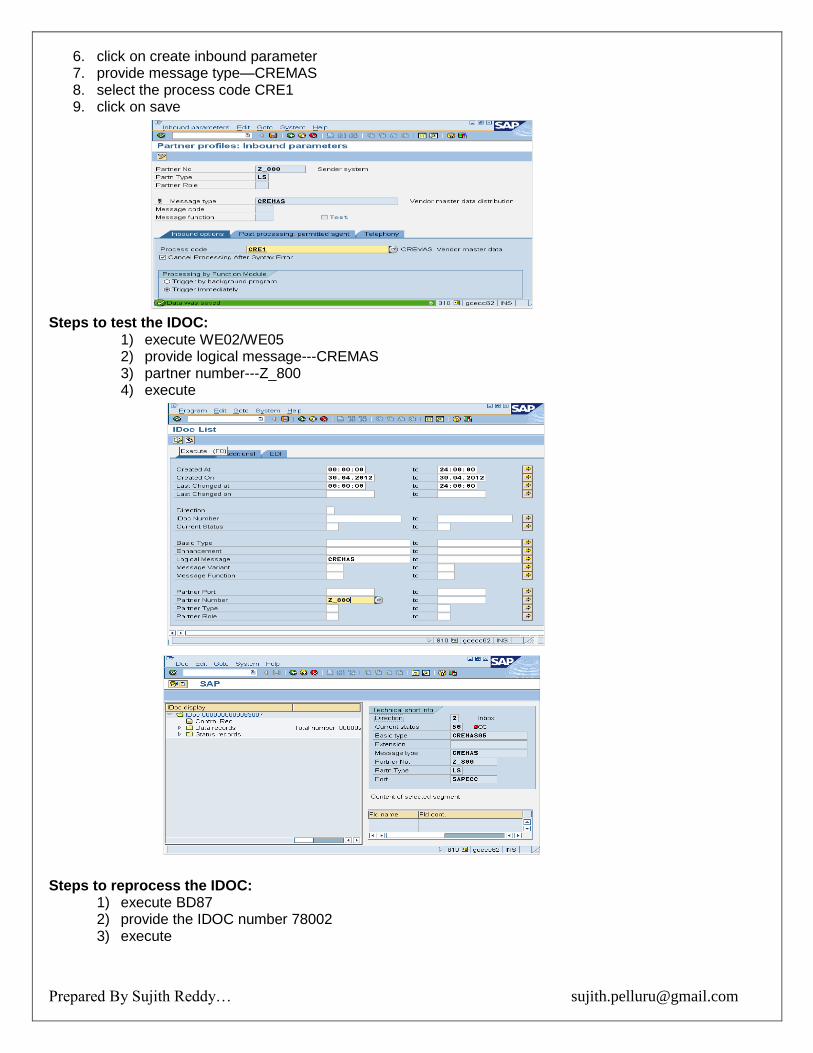
6. click on create inbound parameter 7. provide message type—CREMAS 8. select the process code CRE1 9. click on save
Steps to test the IDOC:
1) execute WE02/WE05 2) provide logical message---CREMAS 3) partner number---Z_800 4) execute
Steps to reprocess the IDOC:
1) execute BD87 2) provide the IDOC number 78002 3) execute
Prepared By Sujith Reddy… [email protected]
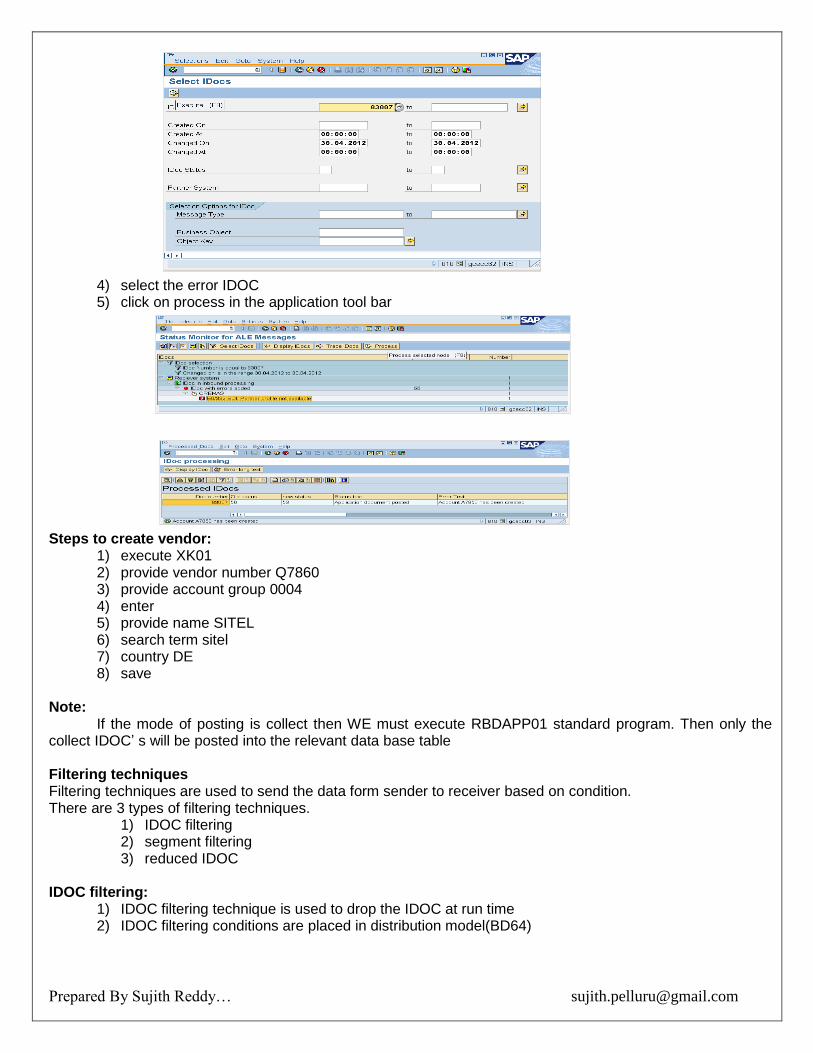
4) select the error IDOC 5) click on process in the application tool bar
Steps to create vendor:
1) execute XK01 2) provide vendor number Q7860 3) provide account group 0004 4) enter 5) provide name SITEL 6) search term sitel 7) country DE 8) save
Note: If the mode of posting is collect then WE must execute RBDAPP01 standard program. Then only the collect IDOC’ s will be posted into the relevant data base table Filtering techniques Filtering techniques are used to send the data form sender to receiver based on condition. There are 3 types of filtering techniques.
1) IDOC filtering 2) segment filtering 3) reduced IDOC
IDOC filtering:
1) IDOC filtering technique is used to drop the IDOC at run time 2) IDOC filtering conditions are placed in distribution model(BD64)
Prepared By Sujith Reddy… [email protected]
3) Before generating the communication IDOC, ale service layer reads the distribution model and identifies for the interested receivers, if any receiver is available then it checks for the filtering conditions.
4) If the given input satisfies the condition then only it generates the communication IDOC other wise it won’t generate any communication IDOC.
Object: Develop the interface program to send the only raw material information from sender to receiver by using filtering conditions. Steps to work with IDOC filtering in distribution model:
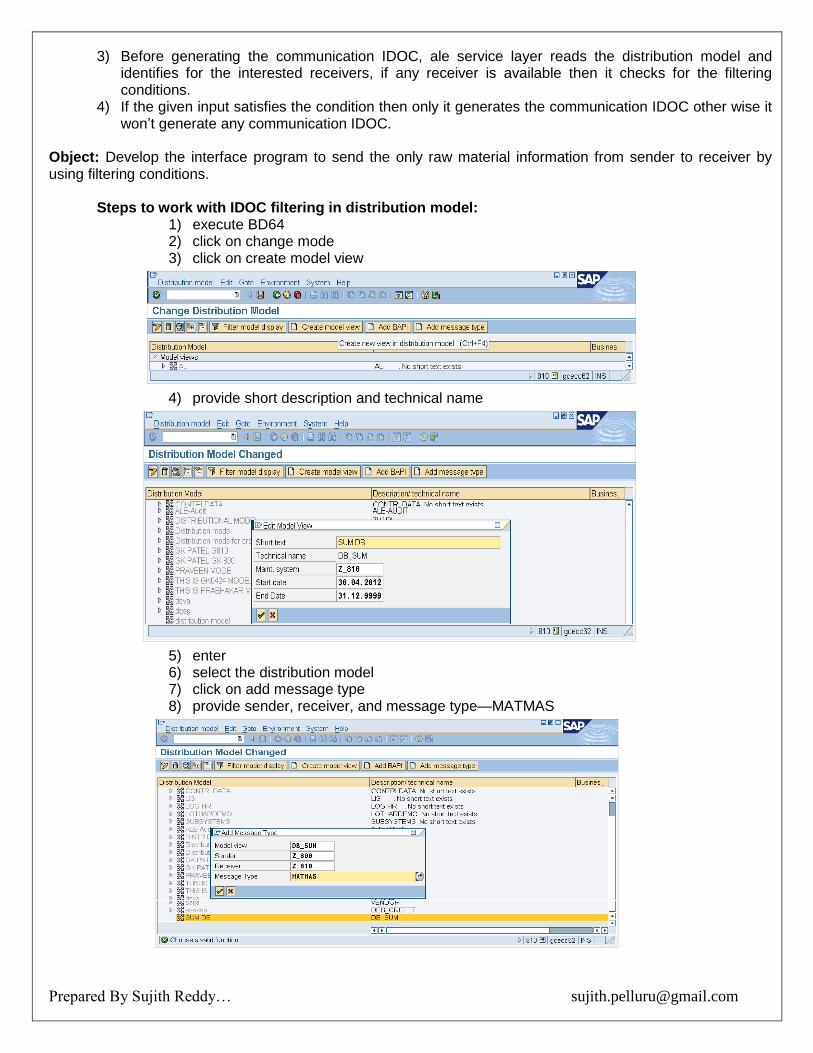
1) execute BD64 2) click on change mode 3) click on create model view
4) provide short description and technical name
5) enter 6) select the distribution model 7) click on add message type 8) provide sender, receiver, and message type—MATMAS
Prepared By Sujith Reddy… [email protected]
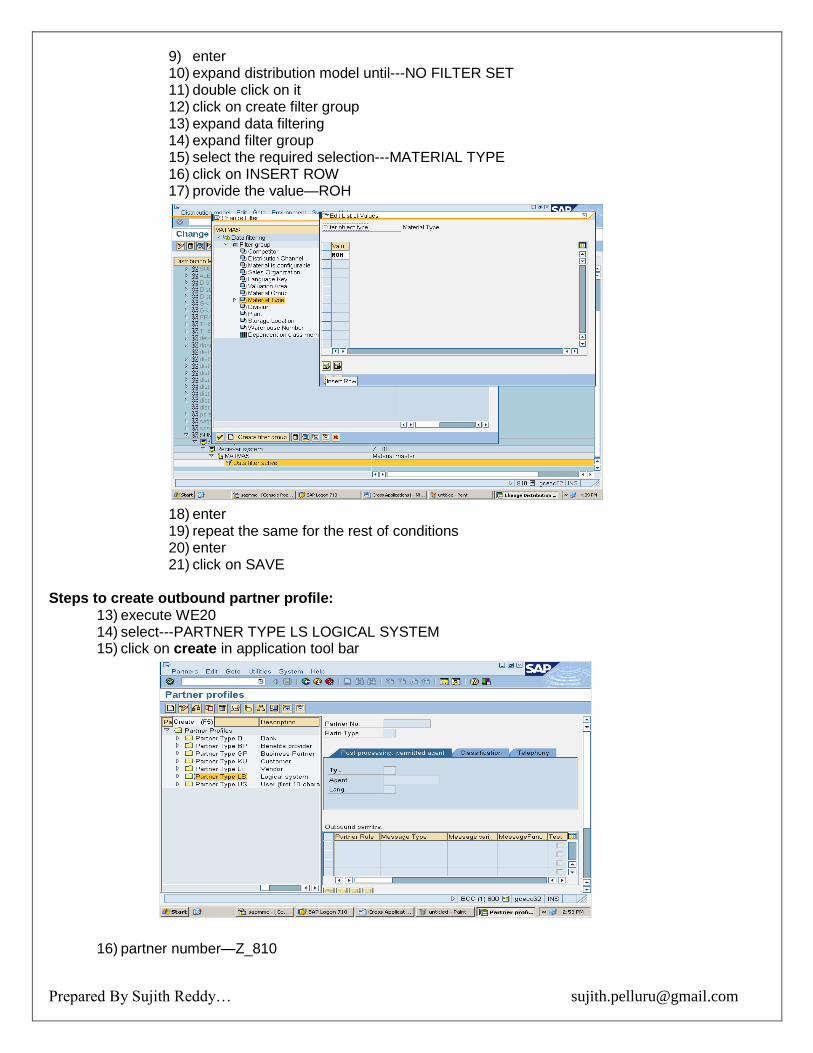
9) enter 10) expand distribution model until---NO FILTER SET 11) double click on it 12) click on create filter group 13) expand data filtering 14) expand filter group 15) select the required selection---MATERIAL TYPE 16) click on INSERT ROW 17) provide the value—ROH
18) enter 19) repeat the same for the rest of conditions 20) enter 21) click on SAVE
Steps to create outbound partner profile:
13) execute WE20 14) select---PARTNER TYPE LS LOGICAL SYSTEM 15) click on create in application tool bar
16) partner number—Z_810
Prepared By Sujith Reddy… [email protected]
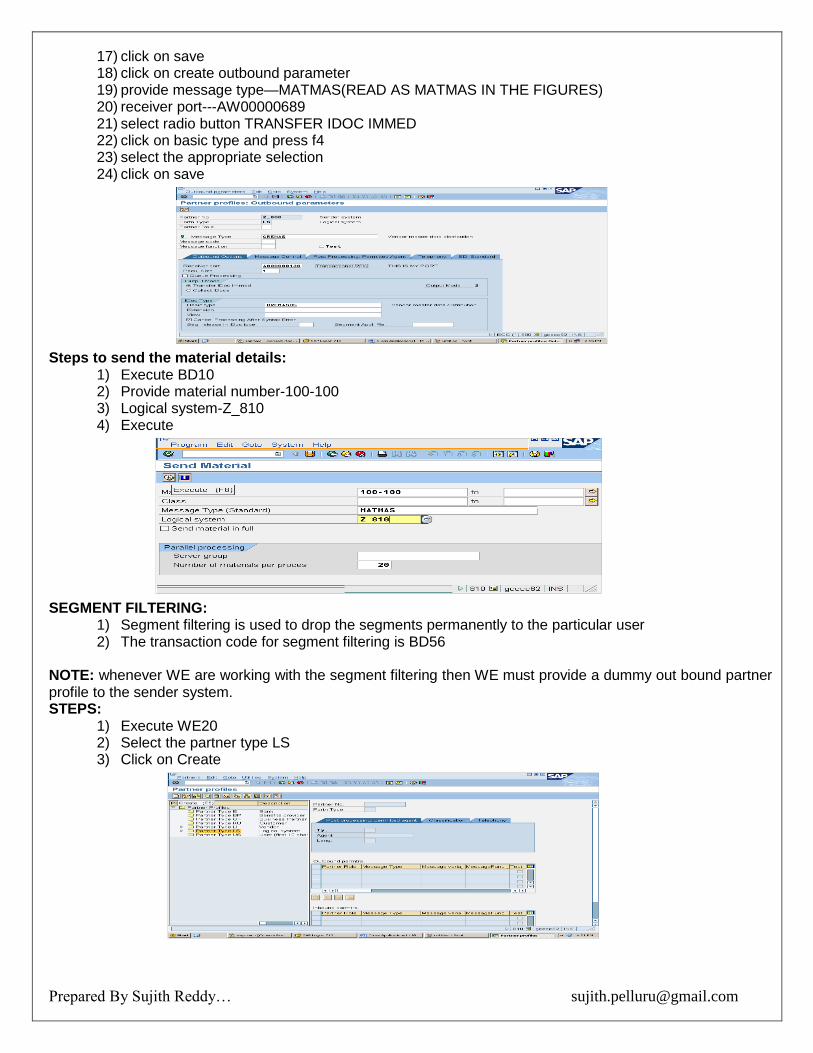
17) click on save 18) click on create outbound parameter 19) provide message type—MATMAS(READ AS MATMAS IN THE FIGURES) 20) receiver port---AW00000689 21) select radio button TRANSFER IDOC IMMED 22) click on basic type and press f4 23) select the appropriate selection 24) click on save
Steps to send the material details:
1) Execute BD10 2) Provide material number-100-100 3) Logical system-Z_810 4) Execute
SEGMENT FILTERING:
1) Segment filtering is used to drop the segments permanently to the particular user 2) The transaction code for segment filtering is BD56
NOTE: whenever WE are working with the segment filtering then WE must provide a dummy out bound partner profile to the sender system. STEPS:
1) Execute WE20 2) Select the partner type LS 3) Click on Create
Prepared By Sujith Reddy… [email protected]
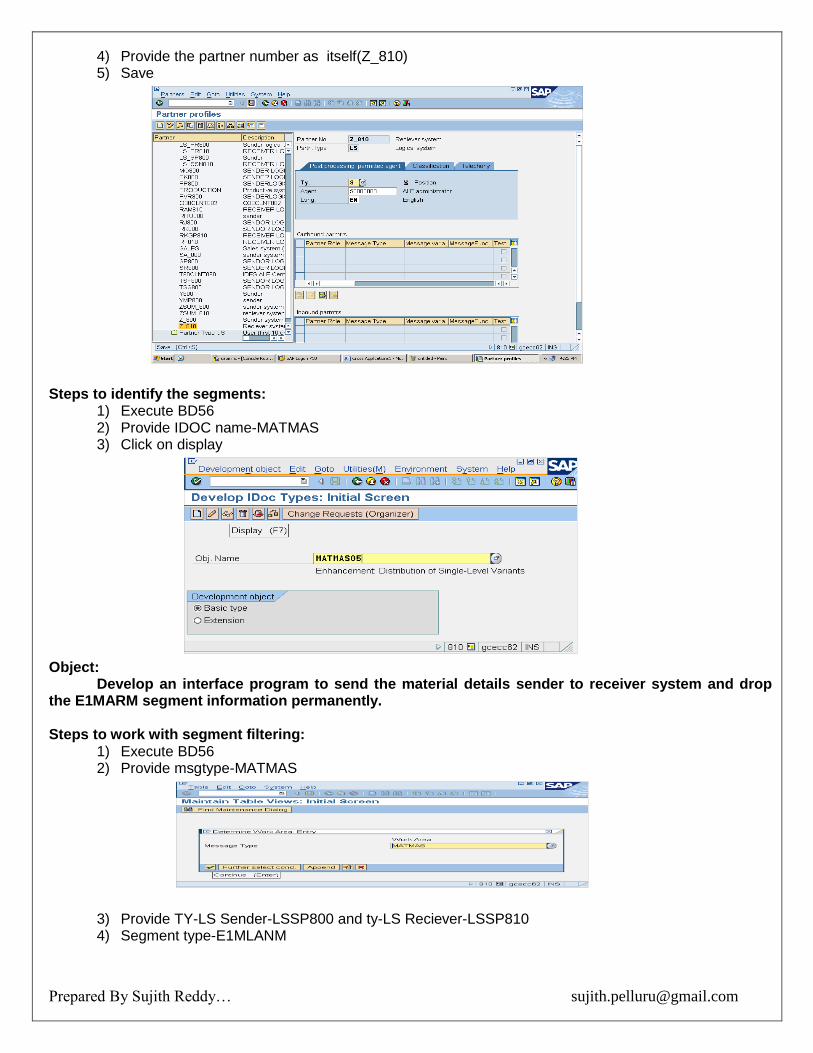
4) Provide the partner number as itself(Z_810) 5) Save
Steps to identify the segments:
1) Execute BD56 2) Provide IDOC name-MATMAS 3) Click on display
Object: Develop an interface program to send the material details sender to receiver system and drop the E1MARM segment information permanently. Steps to work with segment filtering:
1) Execute BD56 2) Provide msgtype-MATMAS
3) Provide TY-LS Sender-LSSP800 and ty-LS Reciever-LSSP810 4) Segment type-E1MLANM
Prepared By Sujith Reddy… [email protected]
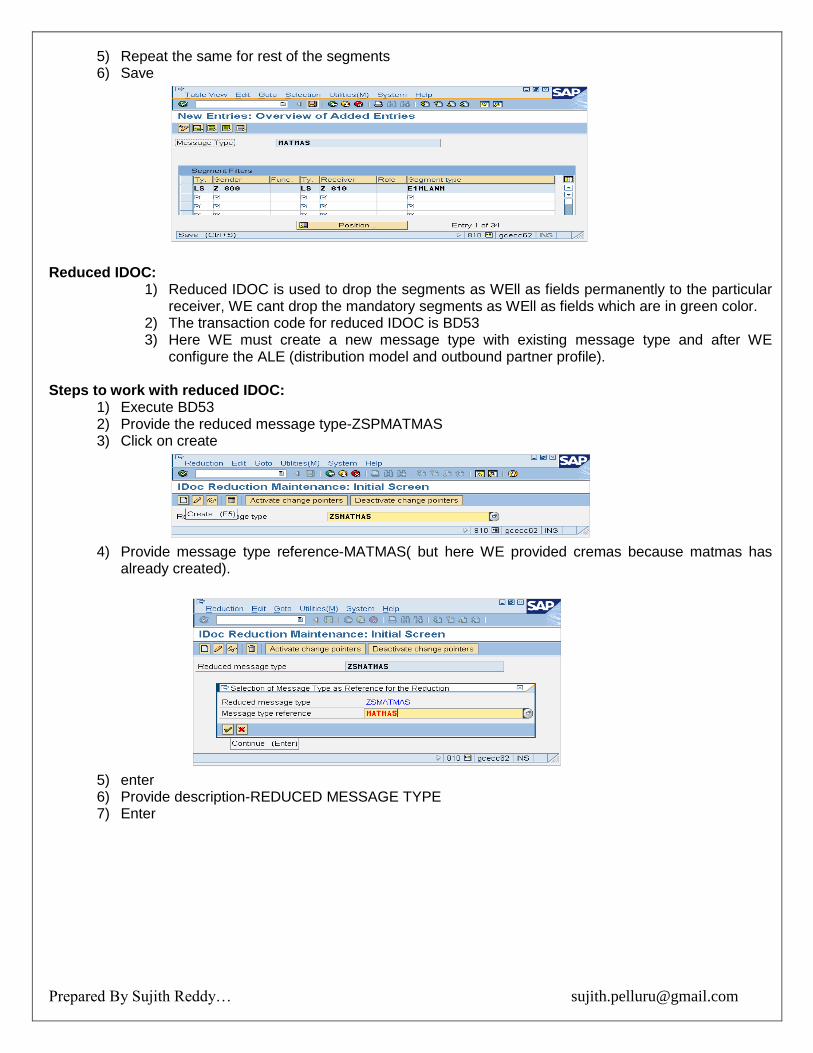
5) Repeat the same for rest of the segments 6) Save
Reduced IDOC:
1) Reduced IDOC is used to drop the segments as WEll as fields permanently to the particular receiver, WE cant drop the mandatory segments as WEll as fields which are in green color.
2) The transaction code for reduced IDOC is BD53 3) Here WE must create a new message type with existing message type and after WE
configure the ALE (distribution model and outbound partner profile). Steps to work with reduced IDOC:
1) Execute BD53 2) Provide the reduced message type-ZSPMATMAS 3) Click on create
4) Provide message type reference-MATMAS( but here WE provided cremas because matmas has
already created).
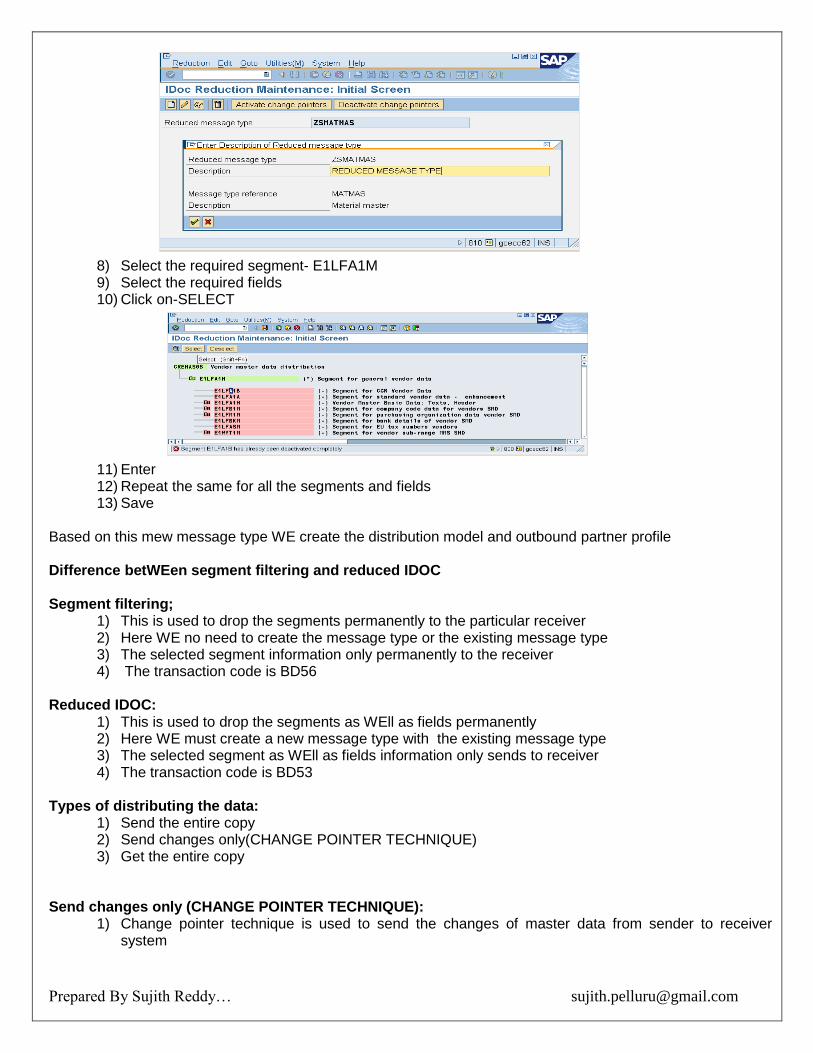
5) enter 6) Provide description-REDUCED MESSAGE TYPE 7) Enter
Prepared By Sujith Reddy… [email protected]
8) Select the required segment- E1LFA1M 9) Select the required fields 10) Click on-SELECT
11) Enter 12) Repeat the same for all the segments and fields 13) Save
Based on this mew message type WE create the distribution model and outbound partner profile Difference betWEen segment filtering and reduced IDOC Segment filtering;
1) This is used to drop the segments permanently to the particular receiver 2) Here WE no need to create the message type or the existing message type 3) The selected segment information only permanently to the receiver 4) The transaction code is BD56
Reduced IDOC:
1) This is used to drop the segments as WEll as fields permanently 2) Here WE must create a new message type with the existing message type 3) The selected segment as WEll as fields information only sends to receiver 4) The transaction code is BD53
Types of distributing the data:
1) Send the entire copy 2) Send changes only(CHANGE POINTER TECHNIQUE) 3) Get the entire copy
Send changes only (CHANGE POINTER TECHNIQUE):
1) Change pointer technique is used to send the changes of master data from sender to receiver system
Prepared By Sujith Reddy… [email protected]
2) Change pointer technique reads the change pointers and generate as WEll as dispatch 3) whenever the changes occurred in the master data the standard SAP itself prepare one
document(change document) and this information is maintained in CDHR and CDPOS table. 4) SMD(shared master data) is a tool which reads the distribution model and identifies the interested
receivers if any receiver is available then it generate the change pointers based on the change document
5) Change pointer technique reads the change pointers and generate as WEll as dispatch the IDOC to a relevant receiver
Note: change pointer technique is always at sender system and it always work with standard IDOC ALE configuration steps for change pointer technique:
1) ALE configuration steps for standard IDOC outbound a. Create distribution model-BD64 b. Create outbound partner profile-WE20
2) Activate the change pointer technique-BD61 3) Activate the message type-BD50 4) Generates as WEll as dispatches the changed IDOC( RBDMIDOC standard program)
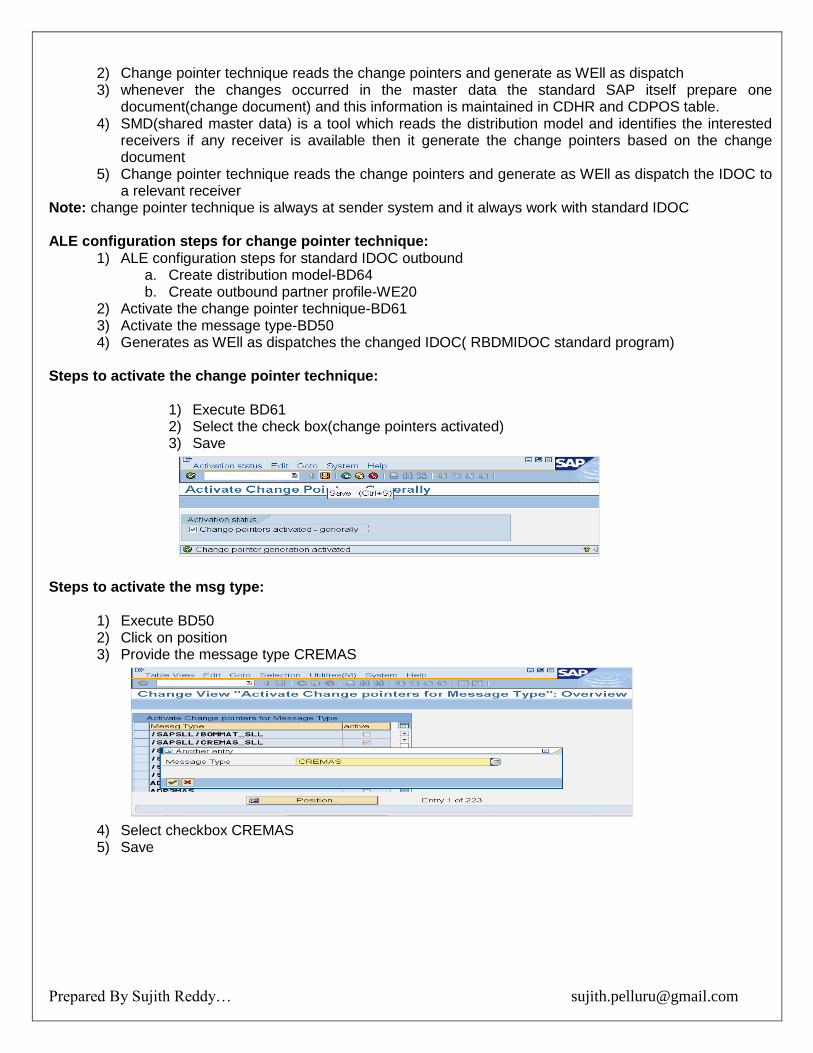
Steps to activate the change pointer technique:
1) Execute BD61 2) Select the check box(change pointers activated) 3) Save
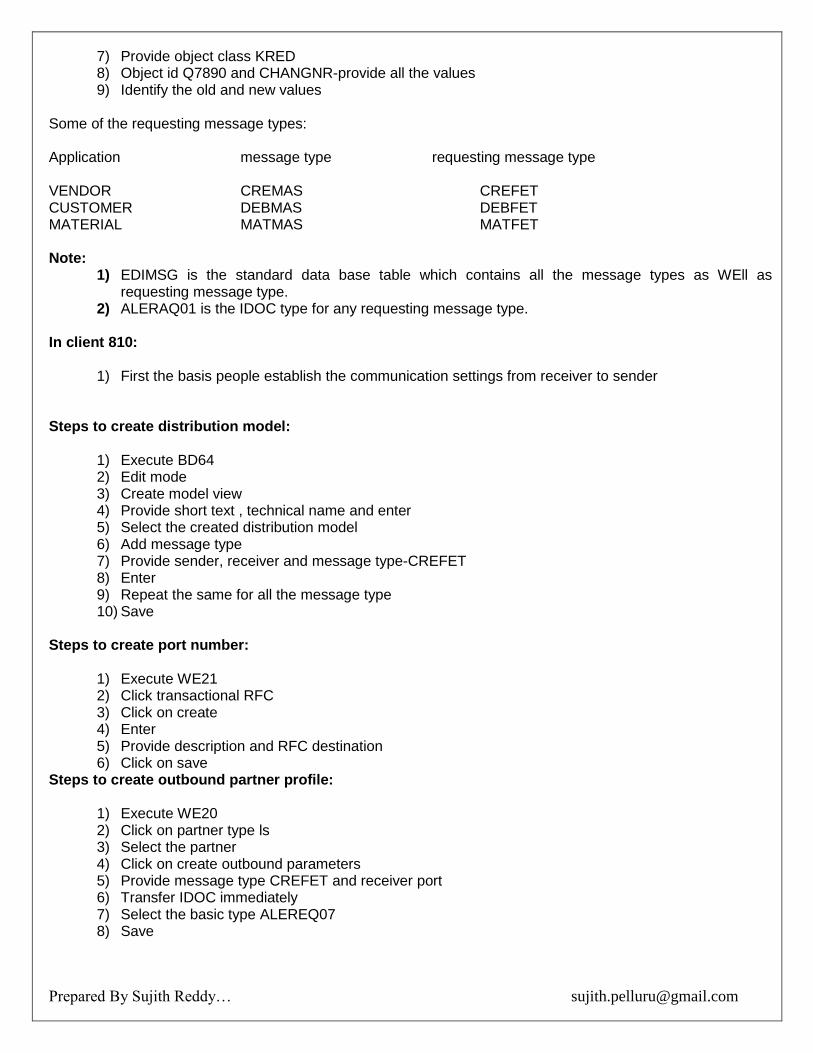
4) Steps to activate the msg type:
1) Execute BD50 2) Click on position 3) Provide the message type CREMAS
4) Select checkbox CREMAS 5) Save
Prepared By Sujith Reddy… [email protected]
Steps to change the vendor details:
1) Execute xk02 2) Provide the vendor number select the checkbox –ADDRESS 3) Enter 4) Provide the changes 5) Save
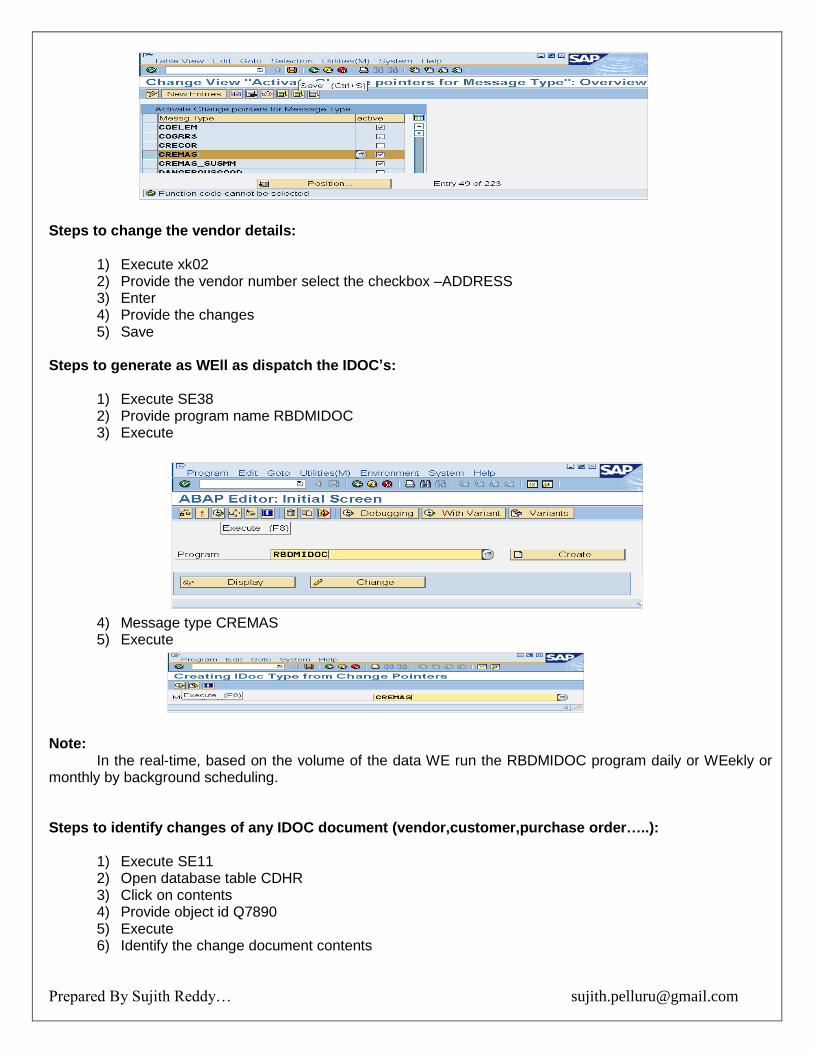
Steps to generate as WEll as dispatch the IDOC’s:
1) Execute SE38 2) Provide program name RBDMIDOC 3) Execute
4) Message type CREMAS 5) Execute
Note: In the real-time, based on the volume of the data WE run the RBDMIDOC program daily or WEekly or monthly by background scheduling. Steps to identify changes of any IDOC document (vendor,customer,purchase order…..):
1) Execute SE11 2) Open database table CDHR 3) Click on contents 4) Provide object id Q7890 5) Execute 6) Identify the change document contents
Prepared By Sujith Reddy… [email protected]
7) Provide object class KRED 8) Object id Q7890 and CHANGNR-provide all the values 9) Identify the old and new values
Some of the requesting message types: Application message type requesting message type VENDOR CREMAS CREFET CUSTOMER DEBMAS DEBFET MATERIAL MATMAS MATFET Note:
1) EDIMSG is the standard data base table which contains all the message types as WEll as requesting message type.
2) ALERAQ01 is the IDOC type for any requesting message type. In client 810:
1) First the basis people establish the communication settings from receiver to sender Steps to create distribution model:
1) Execute BD64 2) Edit mode 3) Create model view 4) Provide short text , technical name and enter 5) Select the created distribution model 6) Add message type 7) Provide sender, receiver and message type-CREFET 8) Enter 9) Repeat the same for all the message type 10) Save
Steps to create port number:
1) Execute WE21 2) Click transactional RFC 3) Click on create 4) Enter 5) Provide description and RFC destination 6) Click on save
Steps to create outbound partner profile:
1) Execute WE20 2) Click on partner type ls 3) Select the partner 4) Click on create outbound parameters 5) Provide message type CREFET and receiver port 6) Transfer IDOC immediately 7) Select the basic type ALEREQ07 8) Save

Prepared By Sujith Reddy… [email protected]
Steps to get the vendor: 1) Execute BD15 2) Provide vendor number 3) Provide message type-CREMAS 4) Execute
Client 800: Steps to create inbound partner profile:
1) Execute WE20 2) Select partner type ls 3) Select the partner 4) Click on create inbound parameter 5) Provide message type CREFET 6) Process code CREF 7) Save
Custom IDOC
1) Against the goods supplied by the vendor our inventory team prepares the GR with MIGO transaction
2) Against GR finance people physically verify the stock and prepares the invoice verification 3) Against IR document our finance people prepares the payment document and pay the amount to the
vendor with deduction amount TDS(tax deduction amount) 4) After 4 to 5 months the vendor asks the form 5) If our commercial department generate the form 16 and given to vendor for this they need the
following information a. LR number b. Vehicle number c. Transporter name
6) This information is not maintained in entire p2p life cycle ( procure to pay) 7) Here WE design one additional screen with the above fields and attaches to MIGO transaction
through BADI implementation 8) This information is maintained in a ztable
9) If you want to send or receive this information then WE go for custom IDOC Note: In this scenario first WE need to create the ztable with the following fields. Here WE provide the name for this table as ZSUMGRAI
FIELD KEY
Data element Domain
Data type
Length Short description
Mandt Ok As per standard Sap
GRNO Ok As per standard Sap
LRNO ZSPLRNO YSPLRNO CHAR 15 LORRY RECIEPT NUMBER
VNO ZSPVNO YSPVNO CHAR 15 VEHICLE NUMBER
TNAME ZSPTNAME YSPTNAME CHAT 25 TRANSPORTER NUMBER
Prepared By Sujith Reddy… [email protected]
Ale Configuration steps for the custom IDOC OUT BOUND:
1) Create the segments WE31 2) Create the IDOC WE30 3) Create the message type WE81 4) Link the message type to IDOC type WE82 5) Create the port number WE21 6) Create the outbound partner profile WE20 7) Distribution model is not required if WE pass the control record information
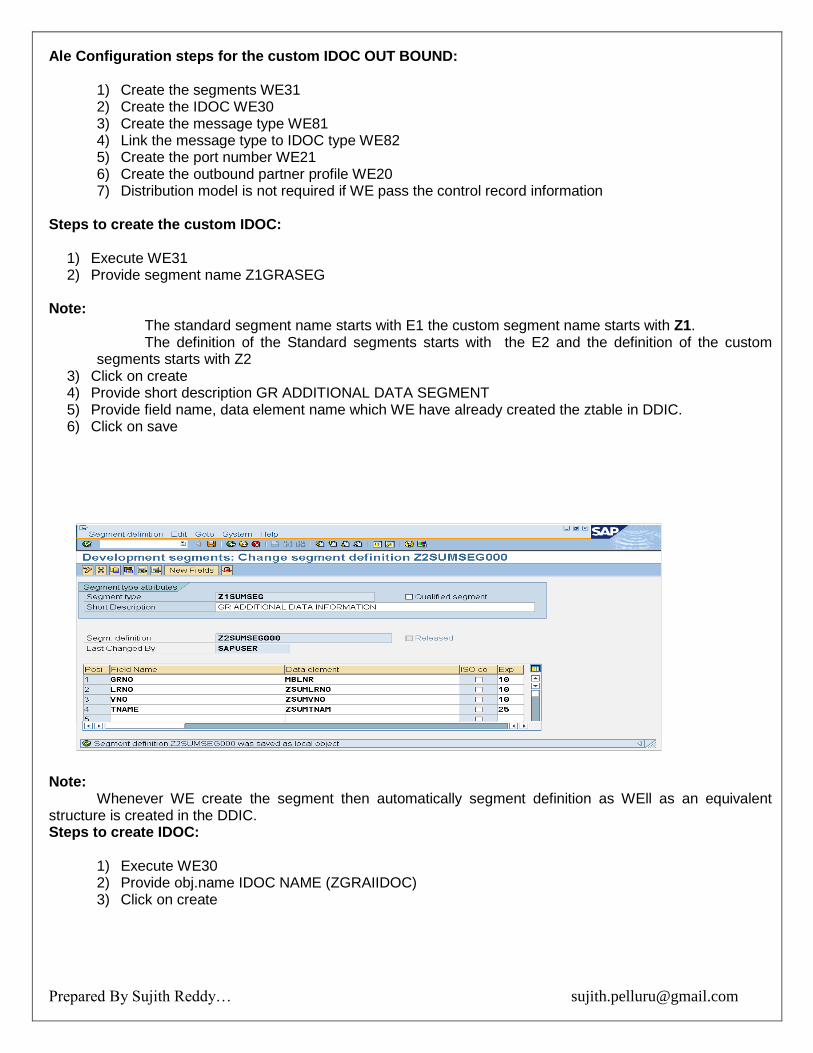
Steps to create the custom IDOC:
1) Execute WE31 2) Provide segment name Z1GRASEG
Note:
The standard segment name starts with E1 the custom segment name starts with Z1. The definition of the Standard segments starts with the E2 and the definition of the custom
segments starts with Z2 3) Click on create 4) Provide short description GR ADDITIONAL DATA SEGMENT 5) Provide field name, data element name which WE have already created the ztable in DDIC. 6) Click on save
Note: Whenever WE create the segment then automatically segment definition as WEll as an equivalent structure is created in the DDIC. Steps to create IDOC:
1) Execute WE30 2) Provide obj.name IDOC NAME (ZGRAIIDOC) 3) Click on create
Prepared By Sujith Reddy… [email protected]
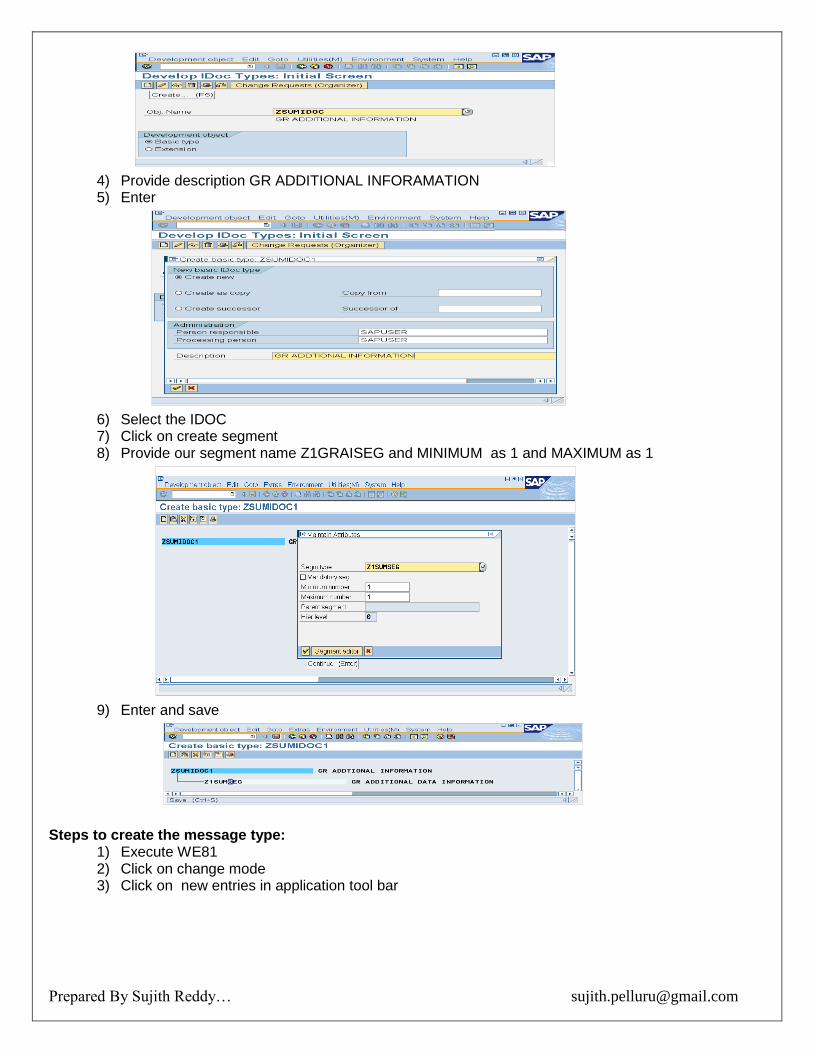
4) Provide description GR ADDITIONAL INFORAMATION 5) Enter
6) Select the IDOC 7) Click on create segment 8) Provide our segment name Z1GRAISEG and MINIMUM as 1 and MAXIMUM as 1
9) Enter and save
Steps to create the message type:
1) Execute WE81 2) Click on change mode 3) Click on new entries in application tool bar
Prepared By Sujith Reddy… [email protected]
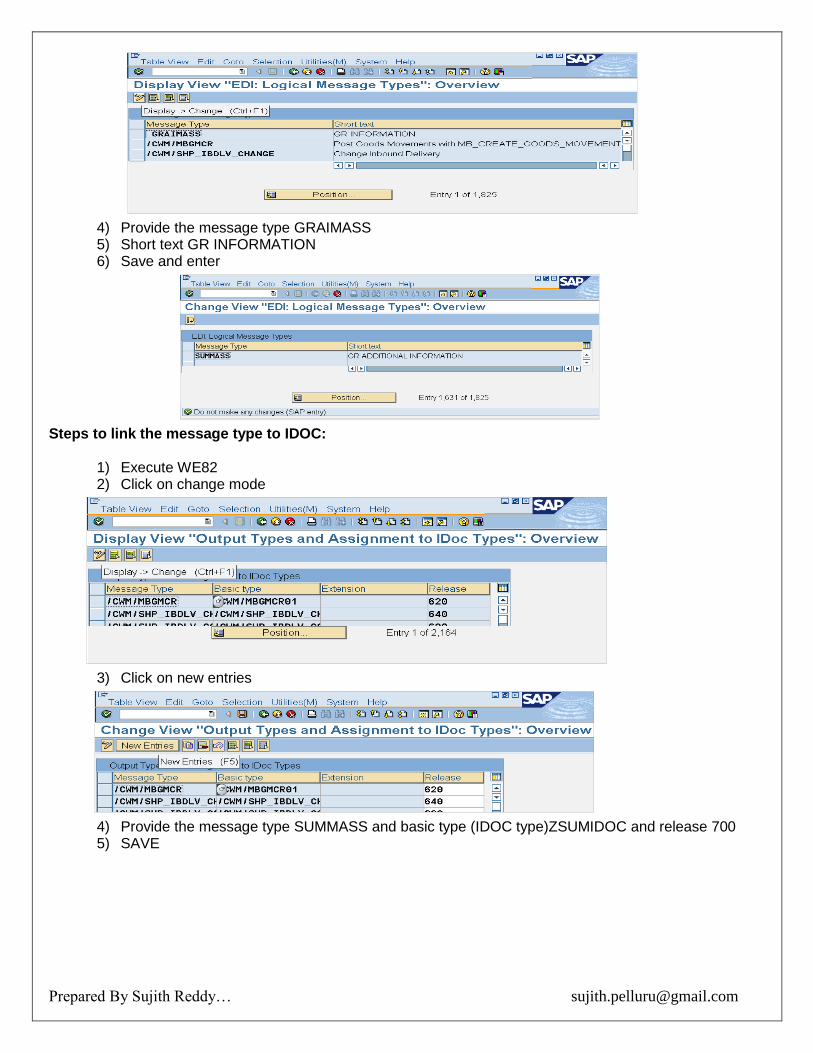
4) Provide the message type GRAIMASS 5) Short text GR INFORMATION 6) Save and enter
Steps to link the message type to IDOC:
1) Execute WE82 2) Click on change mode
3) Click on new entries
4) Provide the message type SUMMASS and basic type (IDOC type)ZSUMIDOC and release 700 5) SAVE

Prepared By Sujith Reddy… [email protected]
Steps to identify the release:
1) Execute SE11 2) Open the table EDIMSG
3) Click on contents
4) Execute
5) Select the released field 6) Click on short descending in application tool bar and identify the released latest one.
Prepared By Sujith Reddy… [email protected]
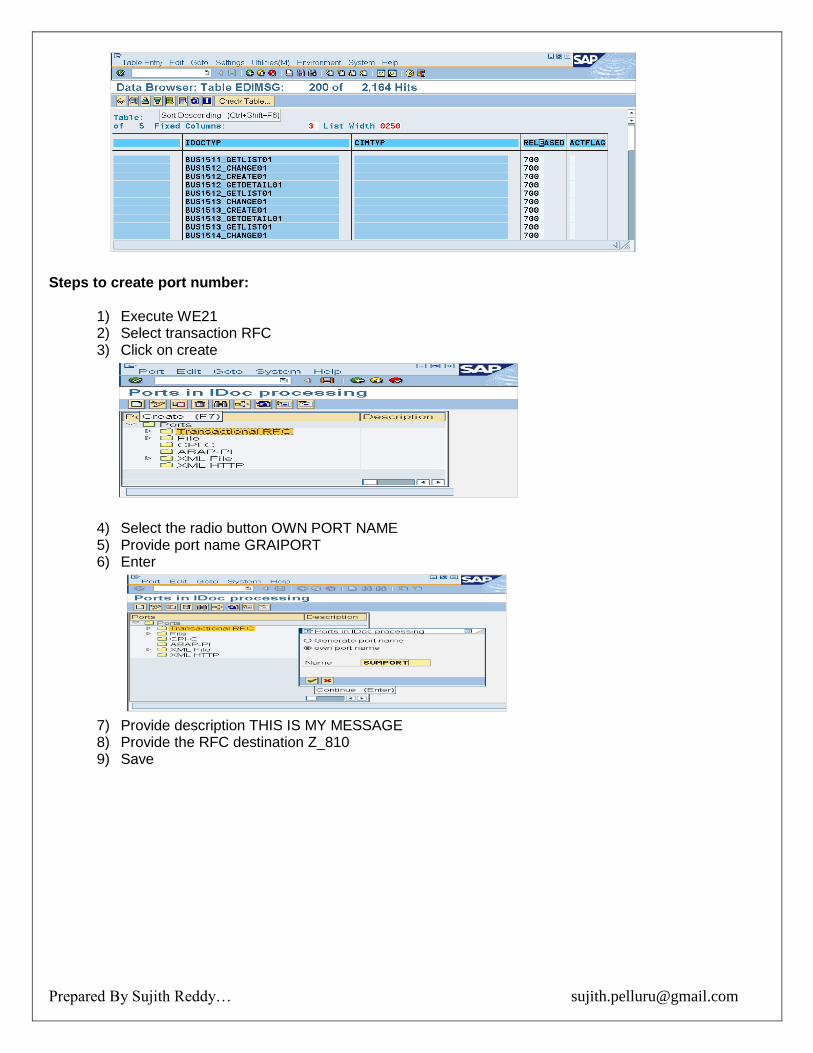
Steps to create port number:
1) Execute WE21 2) Select transaction RFC 3) Click on create
4) Select the radio button OWN PORT NAME 5) Provide port name GRAIPORT 6) Enter
7) Provide description THIS IS MY MESSAGE 8) Provide the RFC destination Z_810 9) Save
Prepared By Sujith Reddy… [email protected]
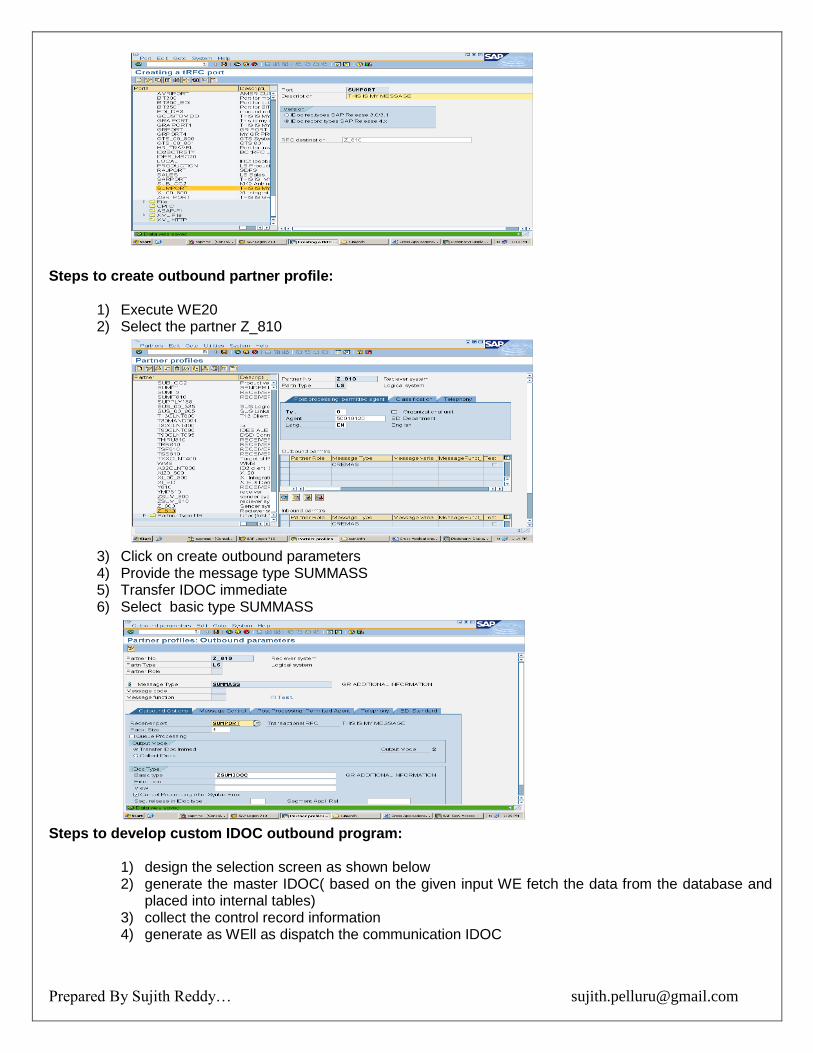
Steps to create outbound partner profile:
1) Execute WE20 2) Select the partner Z_810
3) Click on create outbound parameters 4) Provide the message type SUMMASS 5) Transfer IDOC immediate 6) Select basic type SUMMASS
Steps to develop custom IDOC outbound program:
1) design the selection screen as shown below 2) generate the master IDOC( based on the given input WE fetch the data from the database and
placed into internal tables) 3) collect the control record information 4) generate as WEll as dispatch the communication IDOC
Prepared By Sujith Reddy… [email protected]
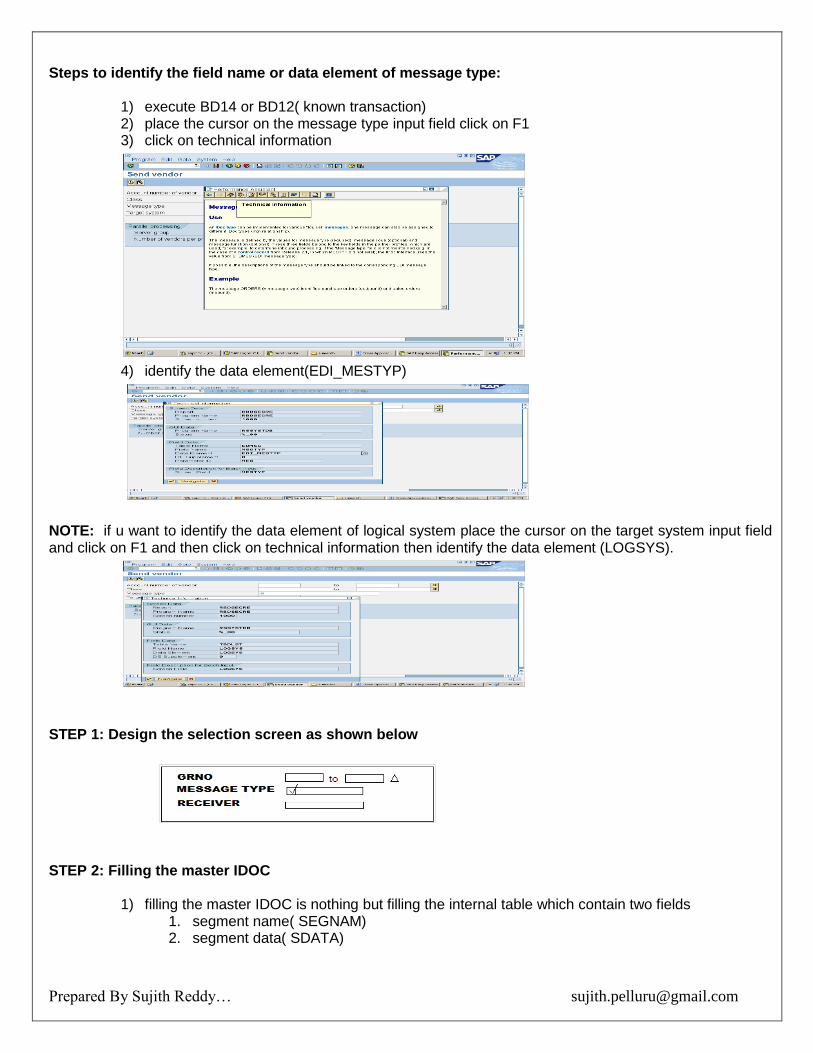
Steps to identify the field name or data element of message type:
1) execute BD14 or BD12( known transaction) 2) place the cursor on the message type input field click on F1 3) click on technical information
4) identify the data element(EDI_MESTYP)
NOTE: if u want to identify the data element of logical system place the cursor on the target system input field and click on F1 and then click on technical information then identify the data element (LOGSYS).
STEP 1: Design the selection screen as shown below
STEP 2: Filling the master IDOC
1) filling the master IDOC is nothing but filling the internal table which contain two fields 1. segment name( SEGNAM) 2. segment data( SDATA)
Prepared By Sujith Reddy… [email protected]
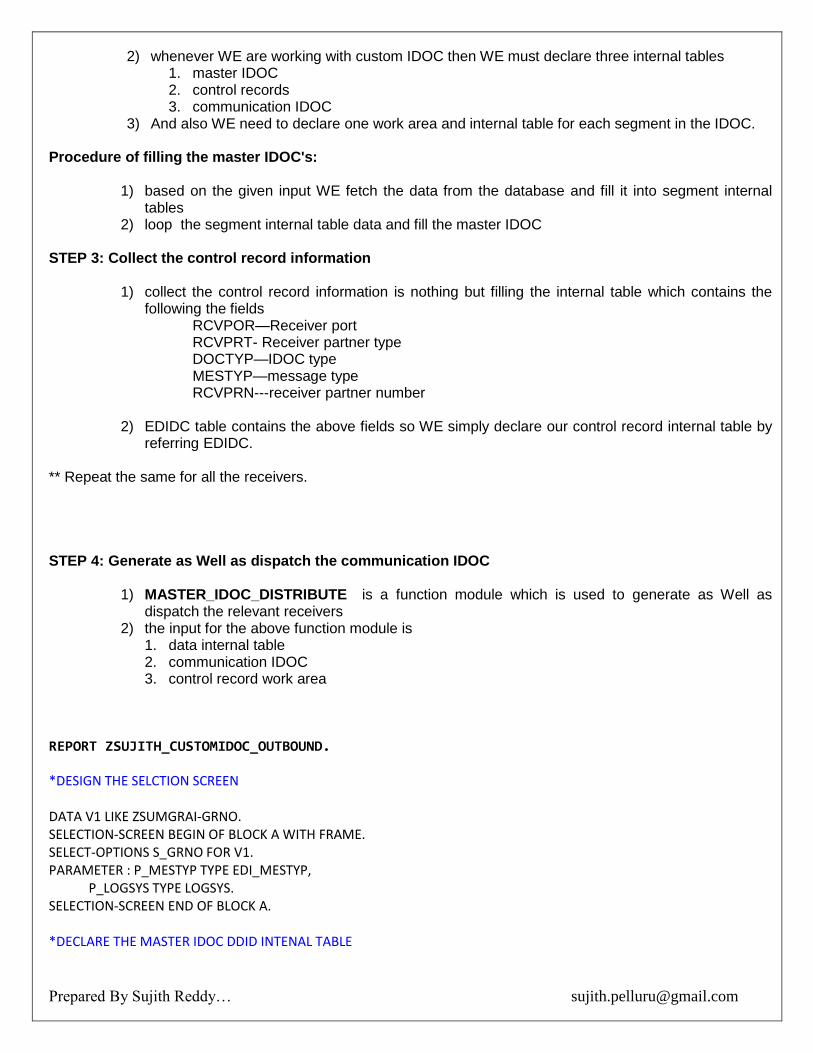
2) whenever WE are working with custom IDOC then WE must declare three internal tables 1. master IDOC 2. control records 3. communication IDOC
3) And also WE need to declare one work area and internal table for each segment in the IDOC. Procedure of filling the master IDOC's:
1) based on the given input WE fetch the data from the database and fill it into segment internal tables
2) loop the segment internal table data and fill the master IDOC STEP 3: Collect the control record information
1) collect the control record information is nothing but filling the internal table which contains the following the fields
RCVPOR—Receiver port RCVPRT- Receiver partner type DOCTYP—IDOC type MESTYP—message type RCVPRN---receiver partner number
2) EDIDC table contains the above fields so WE simply declare our control record internal table by referring EDIDC.
** Repeat the same for all the receivers. STEP 4: Generate as Well as dispatch the communication IDOC
1) MASTER_IDOC_DISTRIBUTE is a function module which is used to generate as Well as dispatch the relevant receivers
2) the input for the above function module is 1. data internal table 2. communication IDOC 3. control record work area
REPORT ZSUJITH_CUSTOMIDOC_OUTBOUND. *DESIGN THE SELCTION SCREEN DATA V1 LIKE ZSUMGRAI-GRNO. SELECTION-SCREEN BEGIN OF BLOCK A WITH FRAME. SELECT-OPTIONS S_GRNO FOR V1. PARAMETER : P_MESTYP TYPE EDI_MESTYP, P_LOGSYS TYPE LOGSYS. SELECTION-SCREEN END OF BLOCK A. *DECLARE THE MASTER IDOC DDID INTENAL TABLE
Prepared By Sujith Reddy… [email protected]
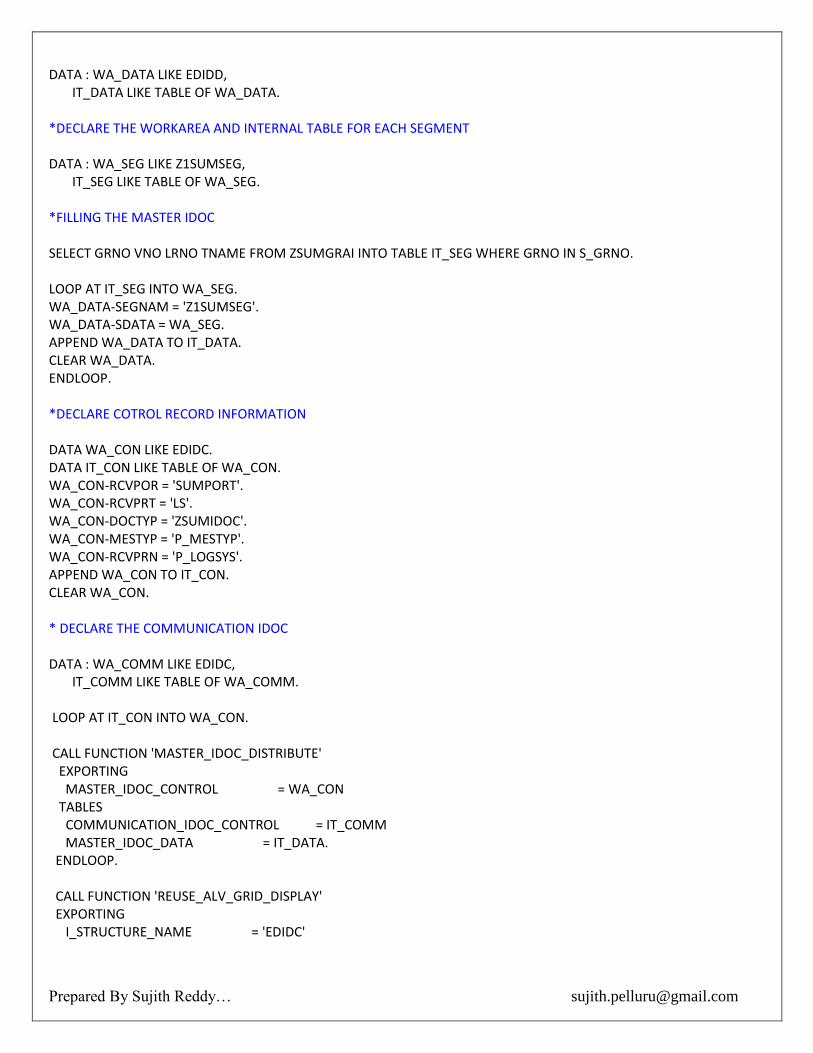
DATA : WA_DATA LIKE EDIDD, IT_DATA LIKE TABLE OF WA_DATA. *DECLARE THE WORKAREA AND INTERNAL TABLE FOR EACH SEGMENT DATA : WA_SEG LIKE Z1SUMSEG, IT_SEG LIKE TABLE OF WA_SEG. *FILLING THE MASTER IDOC SELECT GRNO VNO LRNO TNAME FROM ZSUMGRAI INTO TABLE IT_SEG WHERE GRNO IN S_GRNO. LOOP AT IT_SEG INTO WA_SEG. WA_DATA-SEGNAM = 'Z1SUMSEG'. WA_DATA-SDATA = WA_SEG. APPEND WA_DATA TO IT_DATA. CLEAR WA_DATA. ENDLOOP. *DECLARE COTROL RECORD INFORMATION DATA WA_CON LIKE EDIDC. DATA IT_CON LIKE TABLE OF WA_CON. WA_CON-RCVPOR = 'SUMPORT'. WA_CON-RCVPRT = 'LS'. WA_CON-DOCTYP = 'ZSUMIDOC'. WA_CON-MESTYP = 'P_MESTYP'. WA_CON-RCVPRN = 'P_LOGSYS'. APPEND WA_CON TO IT_CON. CLEAR WA_CON. * DECLARE THE COMMUNICATION IDOC DATA : WA_COMM LIKE EDIDC, IT_COMM LIKE TABLE OF WA_COMM. LOOP AT IT_CON INTO WA_CON. CALL FUNCTION 'MASTER_IDOC_DISTRIBUTE' EXPORTING MASTER_IDOC_CONTROL = WA_CON TABLES COMMUNICATION_IDOC_CONTROL = IT_COMM MASTER_IDOC_DATA = IT_DATA. ENDLOOP. CALL FUNCTION 'REUSE_ALV_GRID_DISPLAY' EXPORTING I_STRUCTURE_NAME = 'EDIDC'

Prepared By Sujith Reddy… [email protected]
TABLES T_OUTTAB = IT_COMM.
ALE CONFIGURATION STEPS FOR CUSTOM IDOC PROGRAM (inbound) Note: out bound program can be implemented either through executable program or through function module Whereas inbound program must be implemented through function modules only because the interface parameters are same (import, export, change parameters) Note: the process code is used to identify the function model. Steps:
1) create the segment(WE31) 2) create the IDOC(WE30) 3) create the message type(WE81) 4) link message type to IDOC type(WE80) 5) create the function module(WE37) 6) link the message type to function module(WE57) 7) create the mode of posting (BD51) 8) create the process code(WE42) 9) link the process code to function module (WE42) 10) create the inbound partner profile(WE20)
Note: step1 to step4 is not required when WE are working in a same server Steps to create function module (WE37)
1) in the real time WE never create the function module WE always copy the existing function module
Steps to identify the existing function module:
1) execute WE42 2) click on position 3) provide known process code ( CRE1)
4) double click on the process code( CRE1)
Prepared By Sujith Reddy… [email protected]
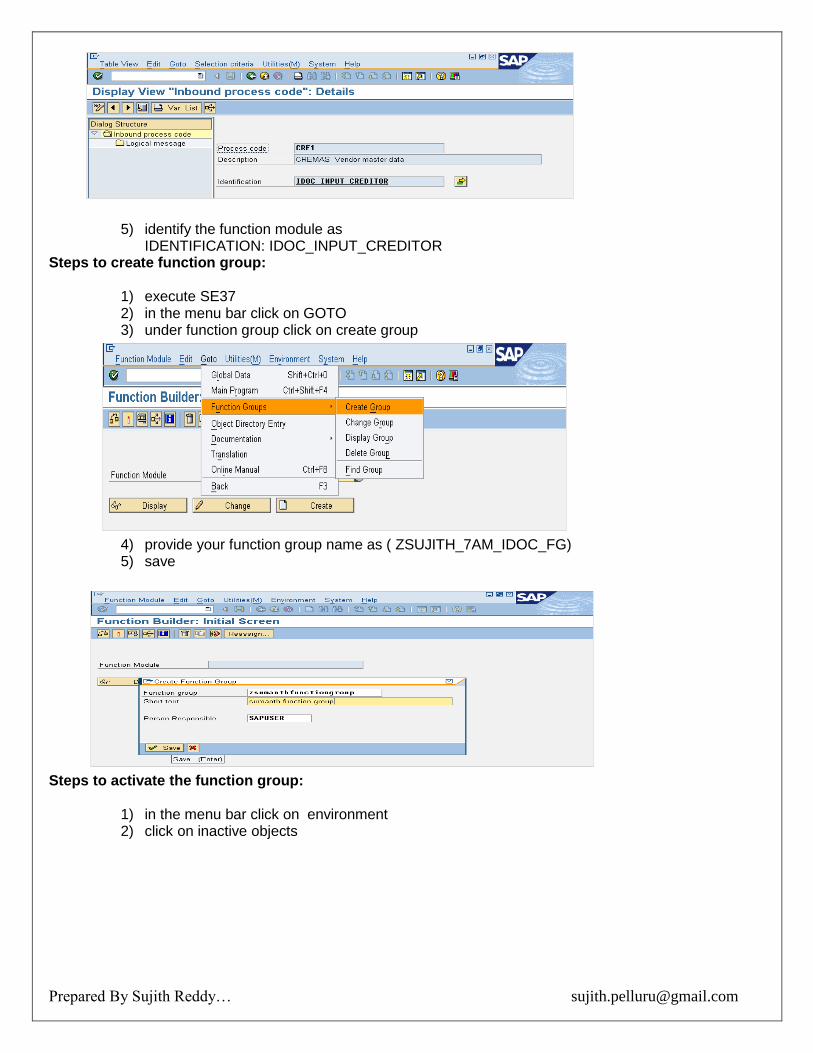
5) identify the function module as IDENTIFICATION: IDOC_INPUT_CREDITOR Steps to create function group:
1) execute SE37 2) in the menu bar click on GOTO 3) under function group click on create group
4) provide your function group name as ( ZSUJITH_7AM_IDOC_FG) 5) save
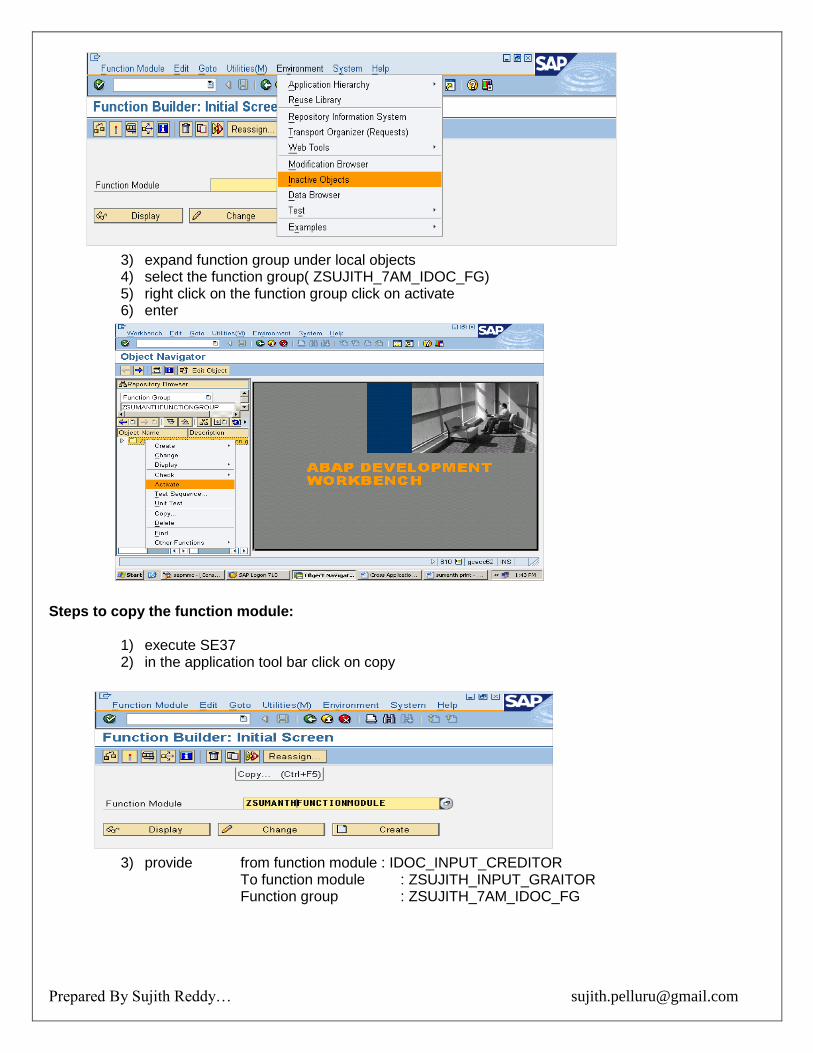
Steps to activate the function group:
1) in the menu bar click on environment 2) click on inactive objects
Prepared By Sujith Reddy… [email protected]
3) expand function group under local objects 4) select the function group( ZSUJITH_7AM_IDOC_FG) 5) right click on the function group click on activate 6) enter
Steps to copy the function module:
1) execute SE37 2) in the application tool bar click on copy
3) provide from function module : IDOC_INPUT_CREDITOR
To function module : ZSUJITH_INPUT_GRAITOR Function group : ZSUJITH_7AM_IDOC_FG
Prepared By Sujith Reddy… [email protected]
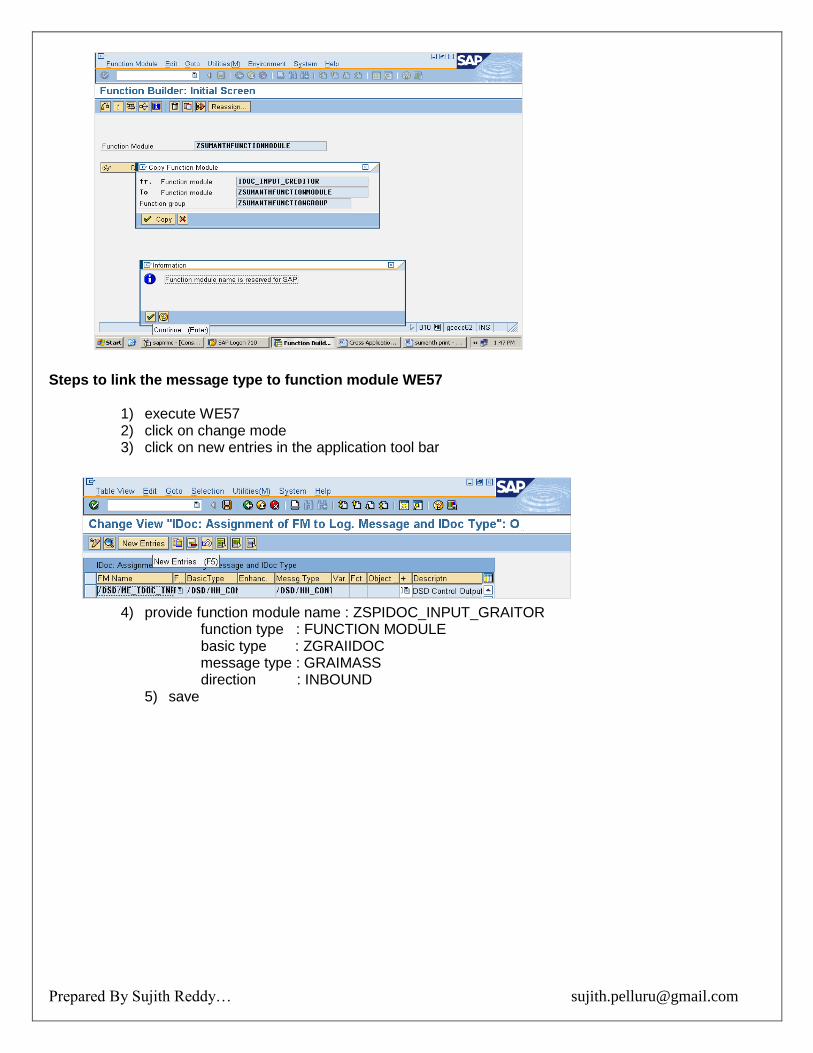
Steps to link the message type to function module WE57
1) execute WE57 2) click on change mode 3) click on new entries in the application tool bar
4) provide function module name : ZSPIDOC_INPUT_GRAITOR
function type : FUNCTION MODULE basic type : ZGRAIIDOC message type : GRAIMASS direction : INBOUND
5) save
Prepared By Sujith Reddy… [email protected]
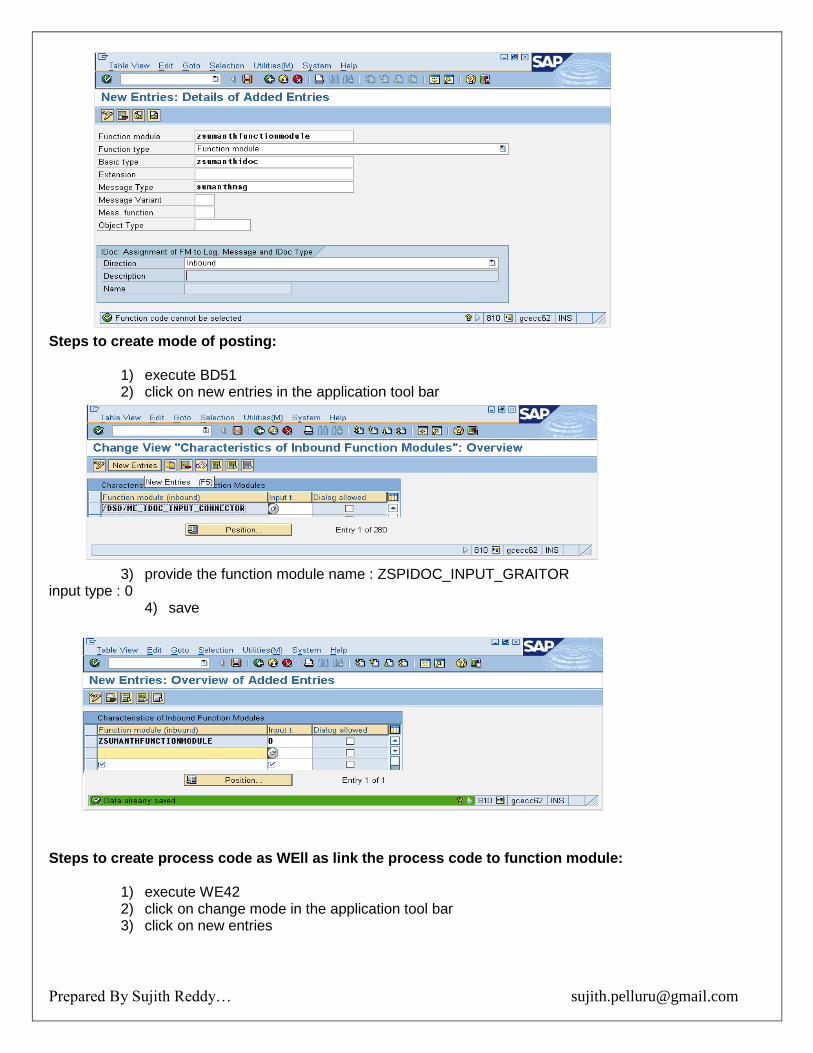
Steps to create mode of posting:
1) execute BD51 2) click on new entries in the application tool bar
3) provide the function module name : ZSPIDOC_INPUT_GRAITOR
input type : 0 4) save
Steps to create process code as WEll as link the process code to function module:
1) execute WE42 2) click on change mode in the application tool bar 3) click on new entries
Prepared By Sujith Reddy… [email protected]
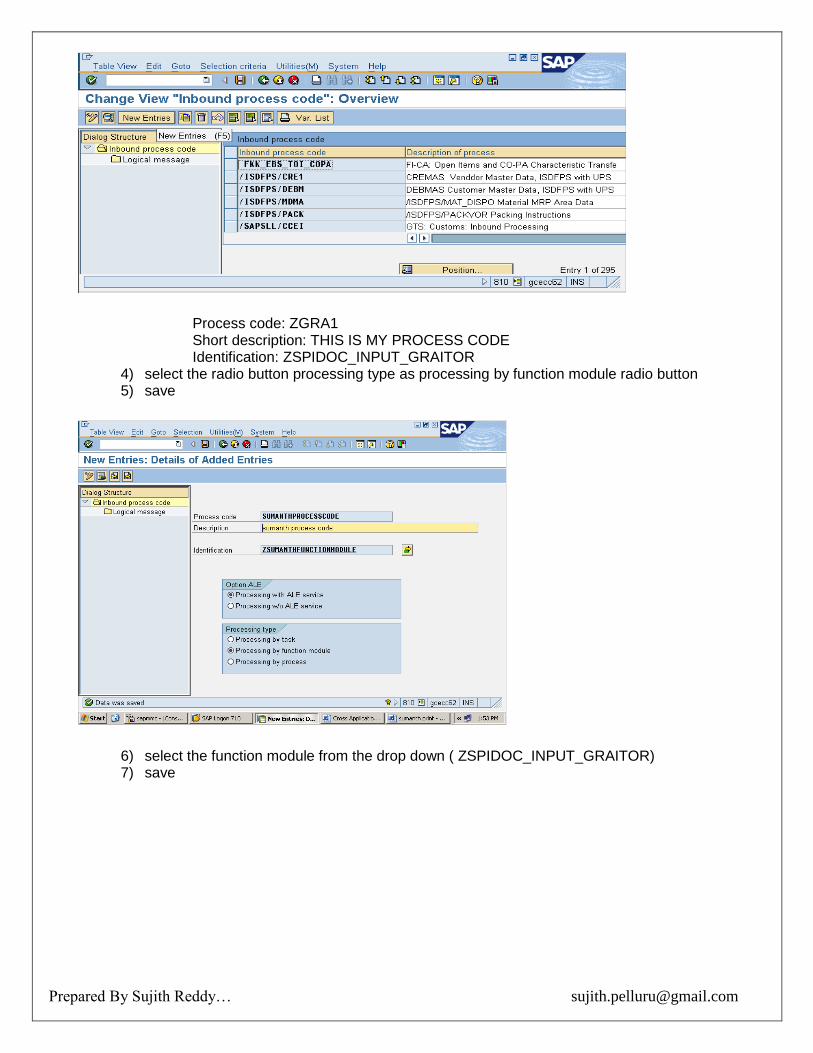
Process code: ZGRA1 Short description: THIS IS MY PROCESS CODE Identification: ZSPIDOC_INPUT_GRAITOR
4) select the radio button processing type as processing by function module radio button 5) save
6) select the function module from the drop down ( ZSPIDOC_INPUT_GRAITOR) 7) save
Prepared By Sujith Reddy… [email protected]
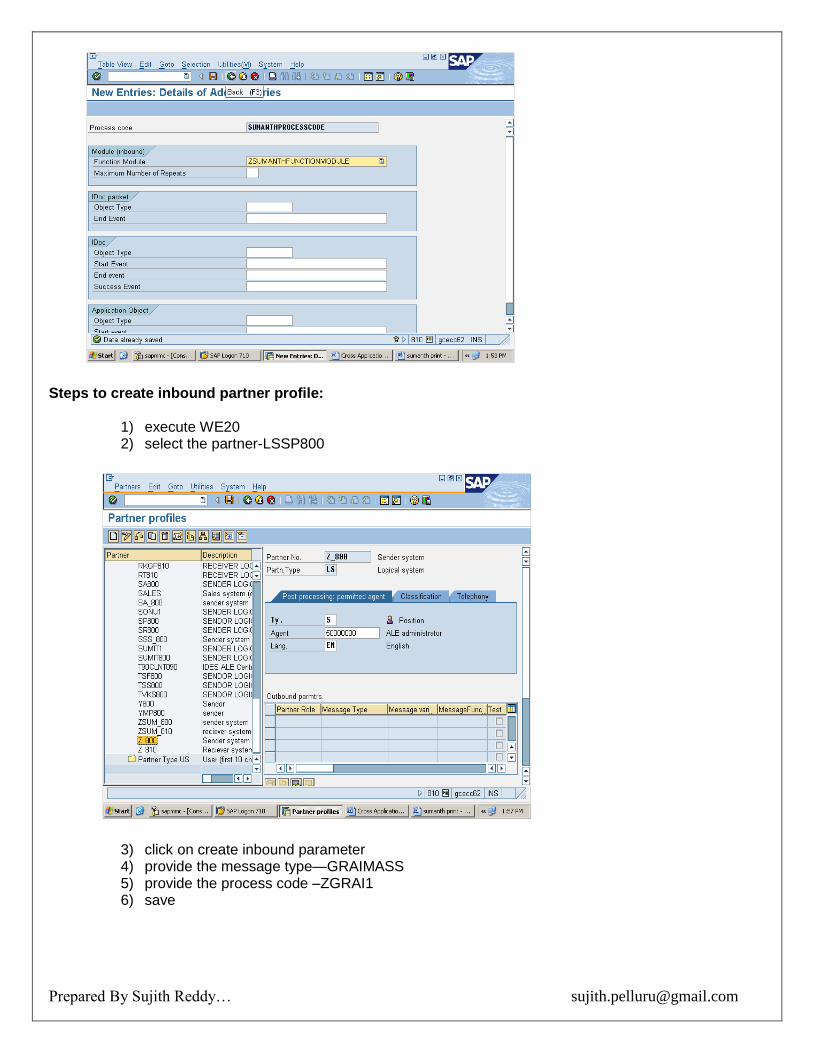
Steps to create inbound partner profile:
1) execute WE20 2) select the partner-LSSP800
3) click on create inbound parameter 4) provide the message type—GRAIMASS 5) provide the process code –ZGRAI1 6) save
Prepared By Sujith Reddy… [email protected]
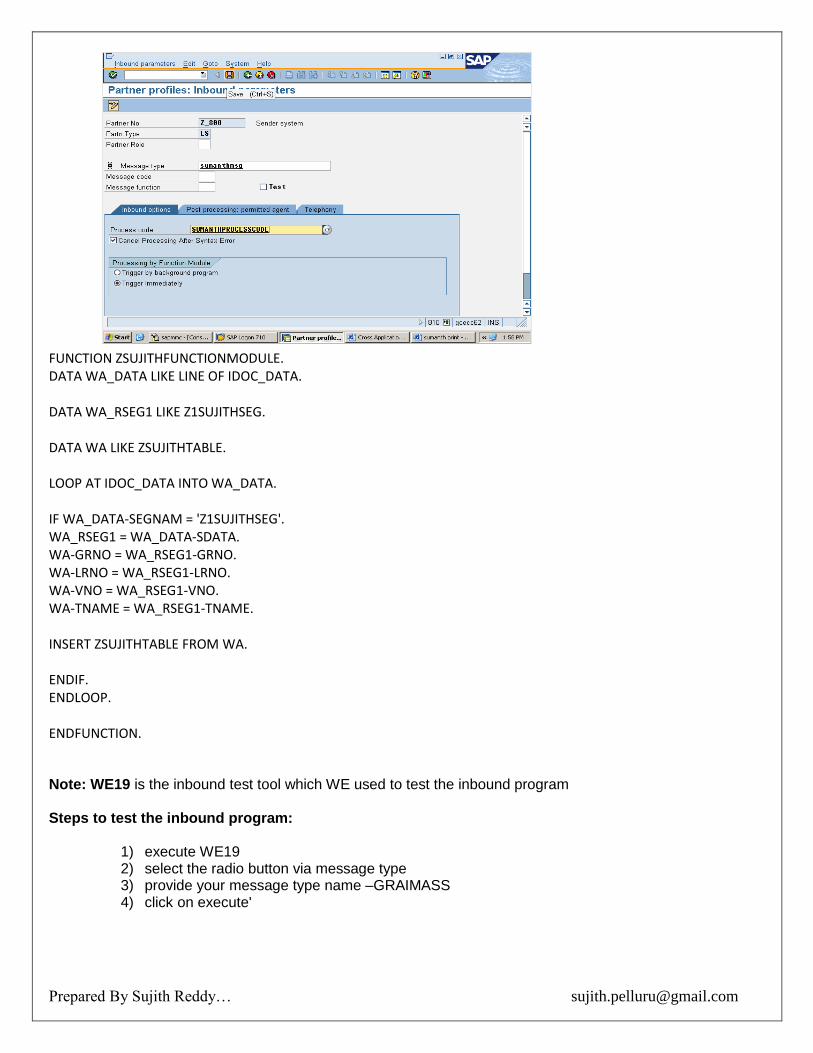
FUNCTION ZSUJITHFUNCTIONMODULE. DATA WA_DATA LIKE LINE OF IDOC_DATA. DATA WA_RSEG1 LIKE Z1SUJITHSEG. DATA WA LIKE ZSUJITHTABLE. LOOP AT IDOC_DATA INTO WA_DATA. IF WA_DATA-SEGNAM = 'Z1SUJITHSEG'. WA_RSEG1 = WA_DATA-SDATA. WA-GRNO = WA_RSEG1-GRNO. WA-LRNO = WA_RSEG1-LRNO. WA-VNO = WA_RSEG1-VNO. WA-TNAME = WA_RSEG1-TNAME. INSERT ZSUJITHTABLE FROM WA. ENDIF. ENDLOOP. ENDFUNCTION.
Note: WE19 is the inbound test tool which WE used to test the inbound program Steps to test the inbound program:
1) execute WE19 2) select the radio button via message type 3) provide your message type name –GRAIMASS 4) click on execute'
Prepared By Sujith Reddy… [email protected]
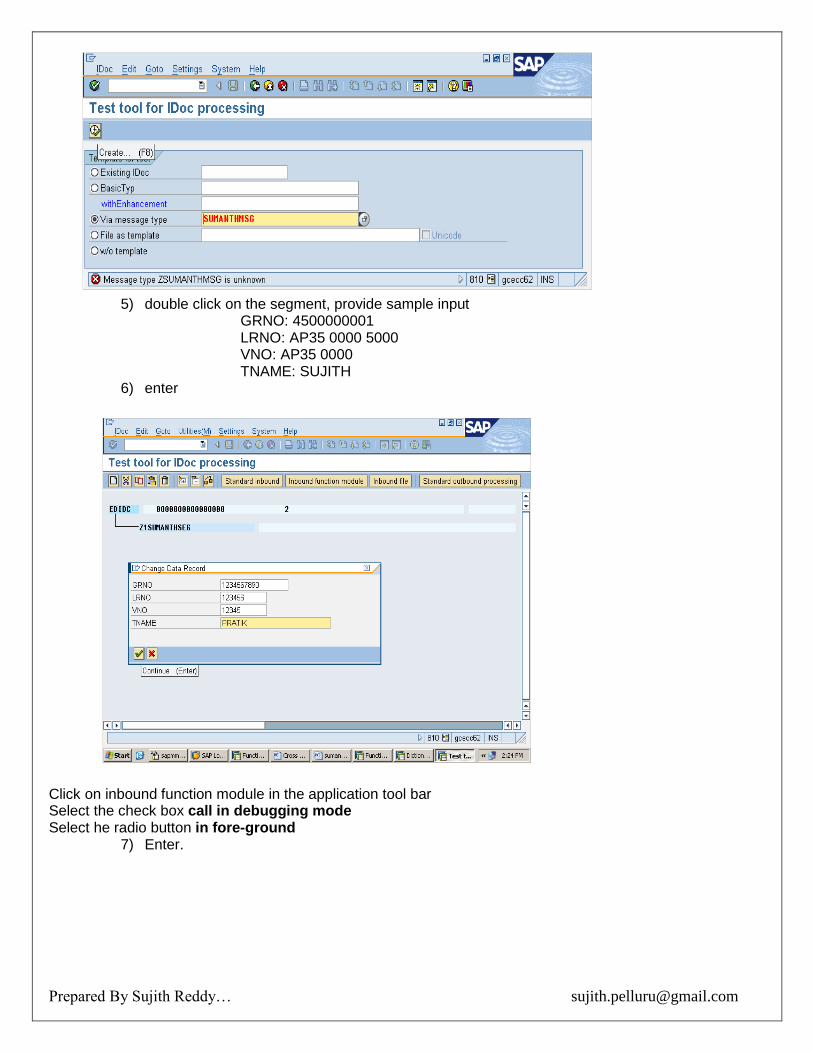
5) double click on the segment, provide sample input
GRNO: 4500000001 LRNO: AP35 0000 5000 VNO: AP35 0000 TNAME: SUJITH
6) enter
Click on inbound function module in the application tool bar Select the check box call in debugging mode Select he radio button in fore-ground
7) Enter.
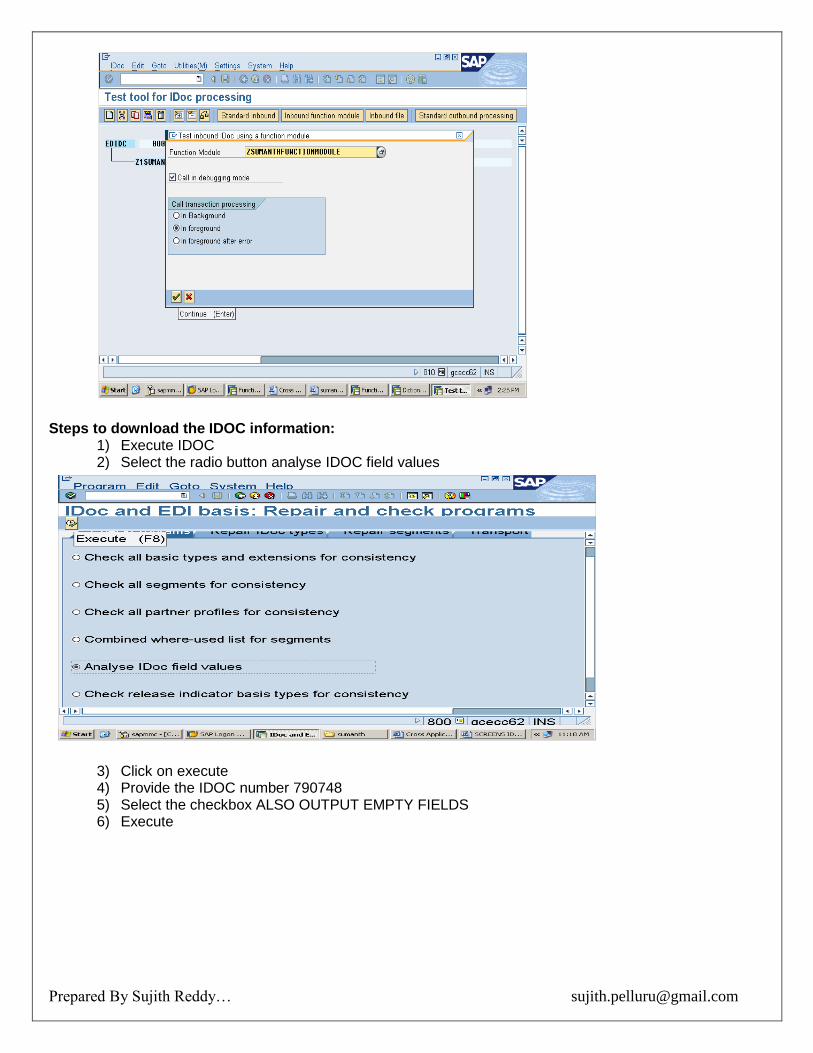
Prepared By Sujith Reddy… [email protected]
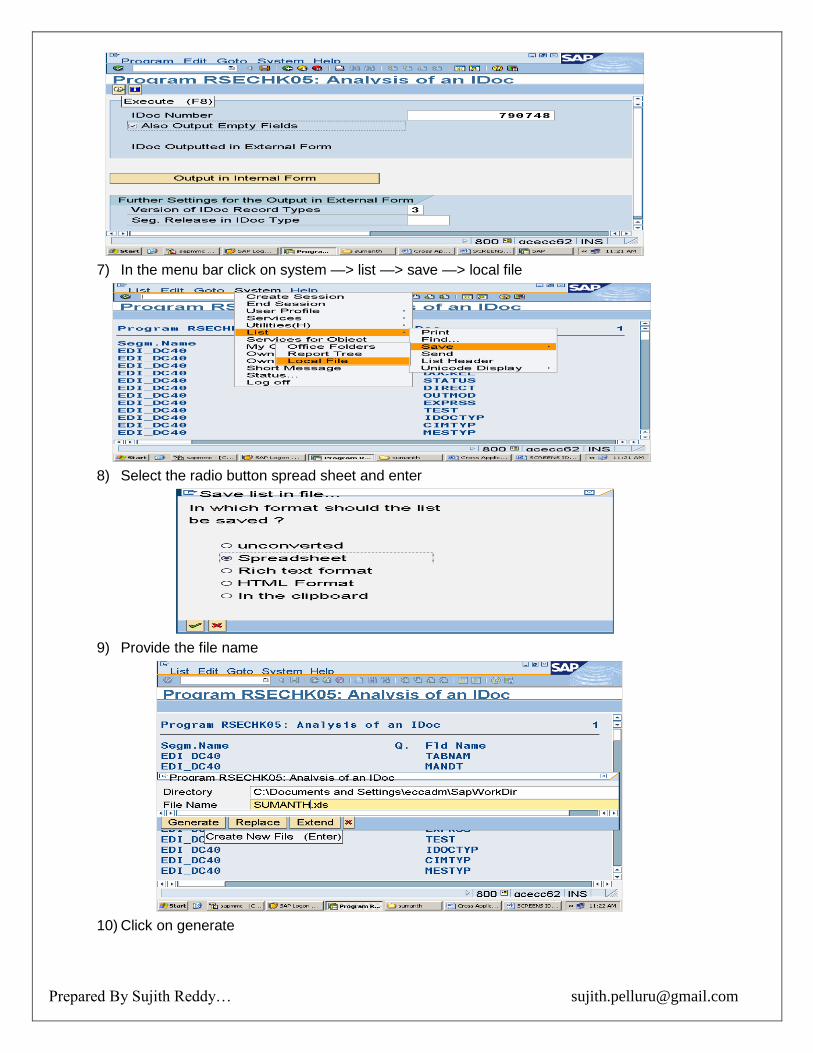
Steps to download the IDOC information: 1) Execute IDOC 2) Select the radio button analyse IDOC field values
3) Click on execute 4) Provide the IDOC number 790748 5) Select the checkbox ALSO OUTPUT EMPTY FIELDS 6) Execute
Prepared By Sujith Reddy… [email protected]
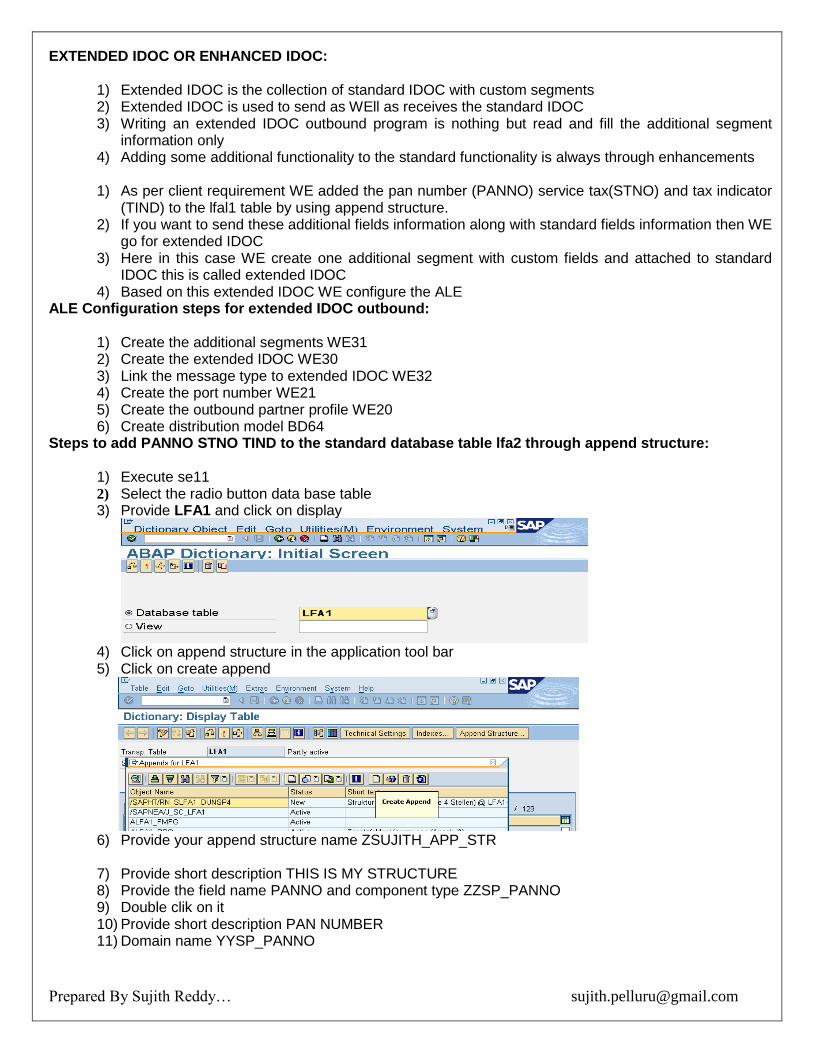
7) In the menu bar click on system —> list —> save —> local file
8) Select the radio button spread sheet and enter
9) Provide the file name
10) Click on generate
Prepared By Sujith Reddy… [email protected]
EXTENDED IDOC OR ENHANCED IDOC:
1) Extended IDOC is the collection of standard IDOC with custom segments 2) Extended IDOC is used to send as WEll as receives the standard IDOC 3) Writing an extended IDOC outbound program is nothing but read and fill the additional segment
information only 4) Adding some additional functionality to the standard functionality is always through enhancements
1) As per client requirement WE added the pan number (PANNO) service tax(STNO) and tax indicator
(TIND) to the lfal1 table by using append structure. 2) If you want to send these additional fields information along with standard fields information then WE
go for extended IDOC 3) Here in this case WE create one additional segment with custom fields and attached to standard
IDOC this is called extended IDOC 4) Based on this extended IDOC WE configure the ALE
ALE Configuration steps for extended IDOC outbound:
1) Create the additional segments WE31 2) Create the extended IDOC WE30 3) Link the message type to extended IDOC WE32 4) Create the port number WE21 5) Create the outbound partner profile WE20 6) Create distribution model BD64
Steps to add PANNO STNO TIND to the standard database table lfa2 through append structure:
1) Execute se11 2) Select the radio button data base table
3) Provide LFA1 and click on display
4) Click on append structure in the application tool bar 5) Click on create append
6) Provide your append structure name ZSUJITH_APP_STR
7) Provide short description THIS IS MY STRUCTURE 8) Provide the field name PANNO and component type ZZSP_PANNO 9) Double clik on it 10) Provide short description PAN NUMBER 11) Domain name YYSP_PANNO
Prepared By Sujith Reddy… [email protected]
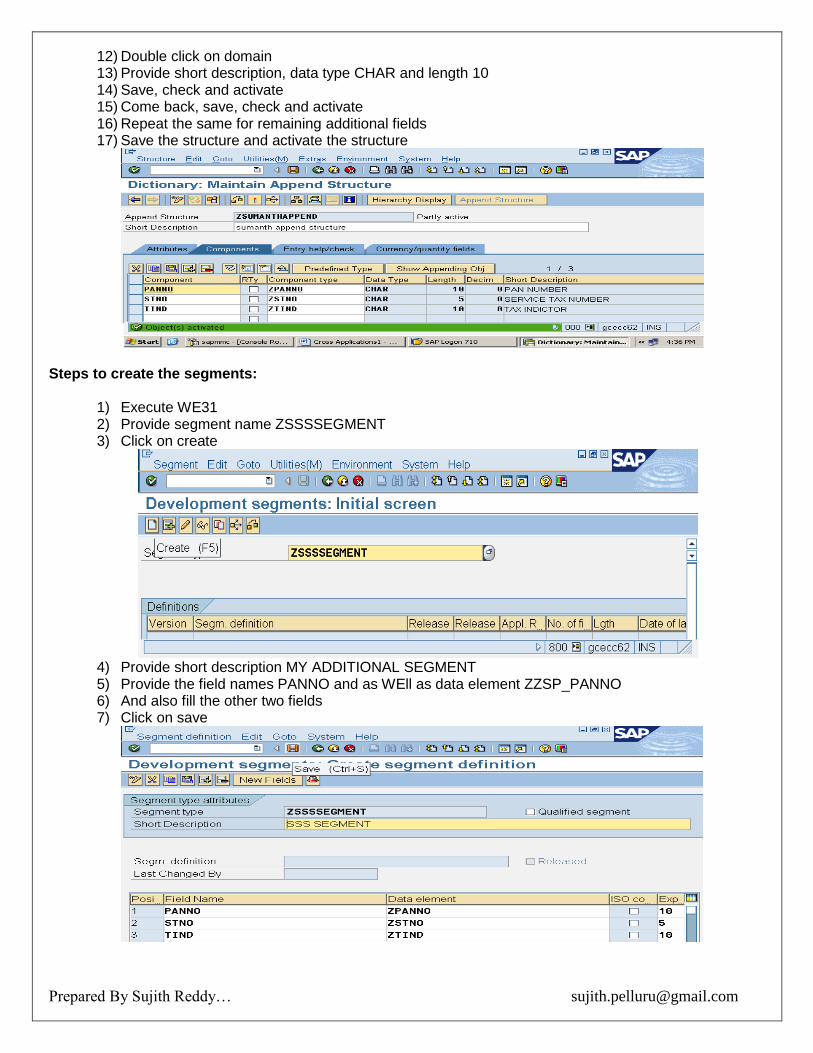
12) Double click on domain 13) Provide short description, data type CHAR and length 10 14) Save, check and activate 15) Come back, save, check and activate 16) Repeat the same for remaining additional fields 17) Save the structure and activate the structure
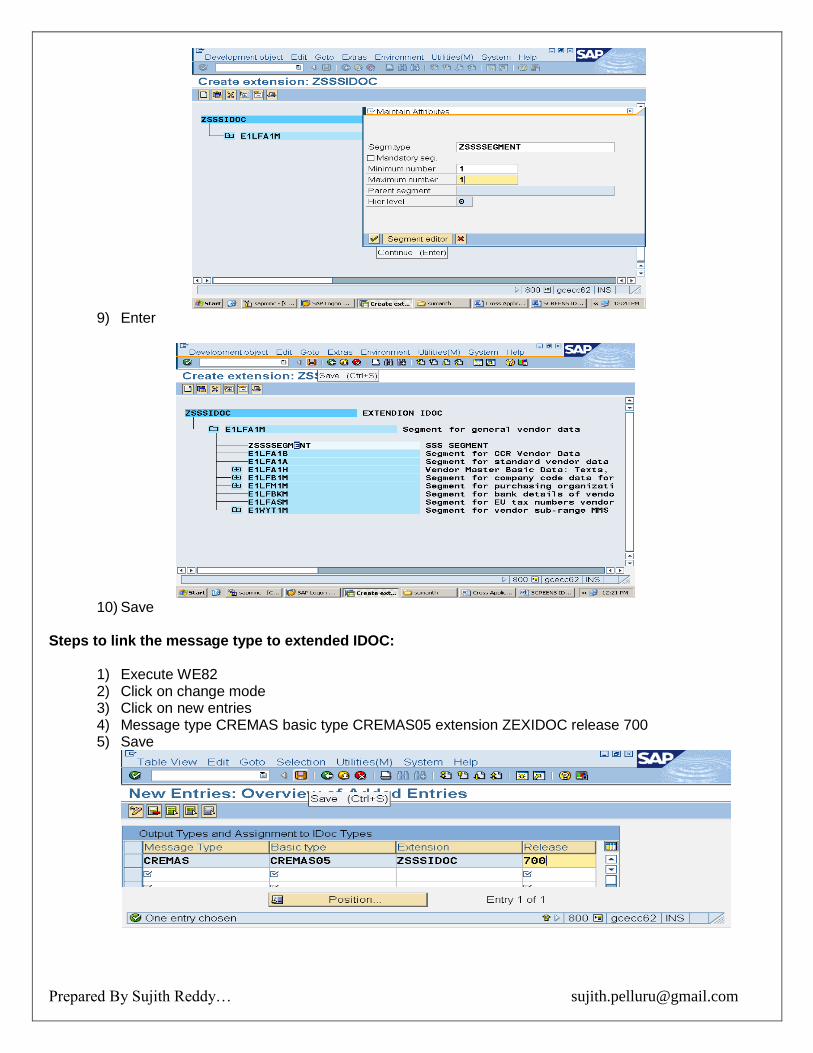
Steps to create the segments:
1) Execute WE31 2) Provide segment name ZSSSSEGMENT 3) Click on create
4) Provide short description MY ADDITIONAL SEGMENT 5) Provide the field names PANNO and as WEll as data element ZZSP_PANNO 6) And also fill the other two fields 7) Click on save
Prepared By Sujith Reddy… [email protected]
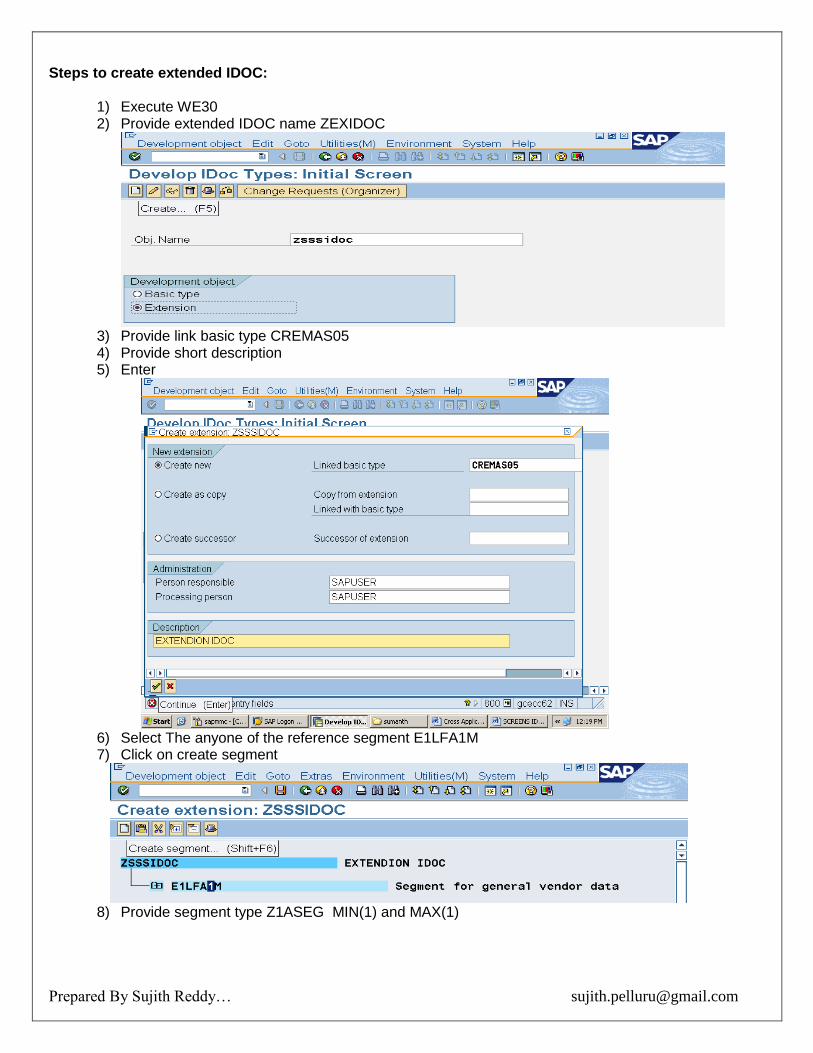
Steps to create extended IDOC:
1) Execute WE30 2) Provide extended IDOC name ZEXIDOC
3) Provide link basic type CREMAS05 4) Provide short description 5) Enter
6) Select The anyone of the reference segment E1LFA1M 7) Click on create segment
8) Provide segment type Z1ASEG MIN(1) and MAX(1)
Prepared By Sujith Reddy… [email protected]
9) Enter
10) Save
Steps to link the message type to extended IDOC:
1) Execute WE82 2) Click on change mode 3) Click on new entries 4) Message type CREMAS basic type CREMAS05 extension ZEXIDOC release 700 5) Save
Prepared By Sujith Reddy… [email protected]
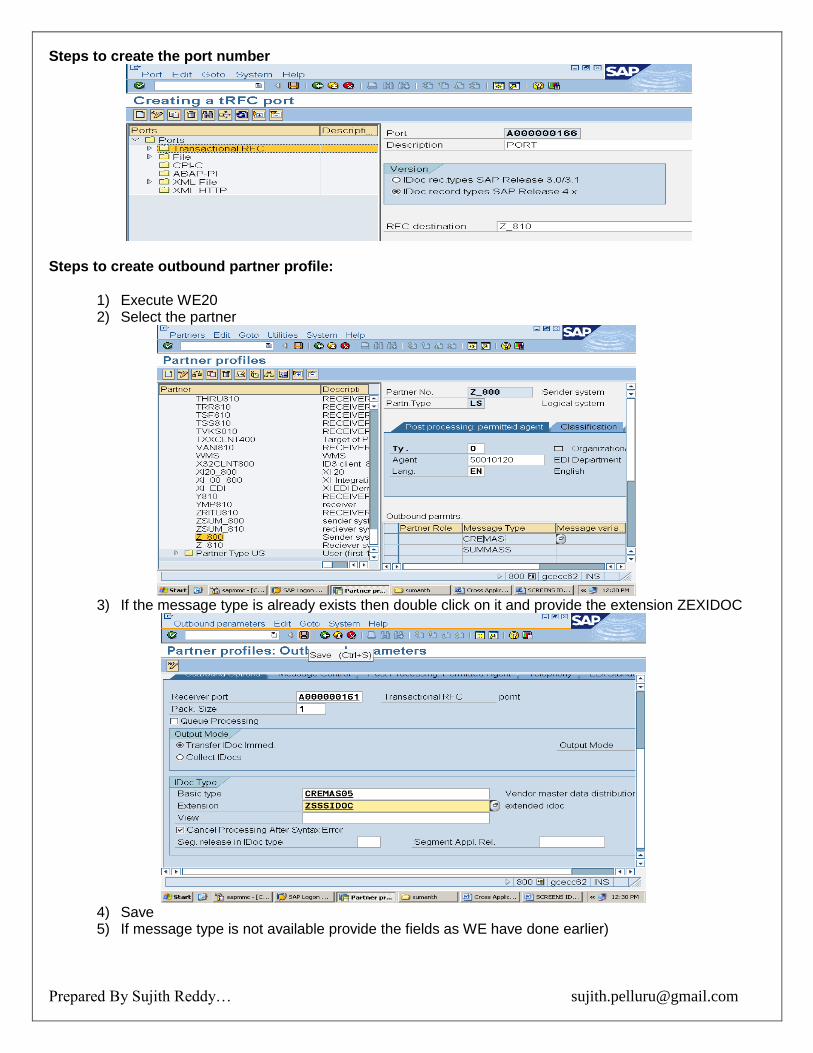
Steps to create the port number
Steps to create outbound partner profile:
1) Execute WE20 2) Select the partner
3) If the message type is already exists then double click on it and provide the extension ZEXIDOC
4) Save 5) If message type is not available provide the fields as WE have done earlier)
Prepared By Sujith Reddy… [email protected]
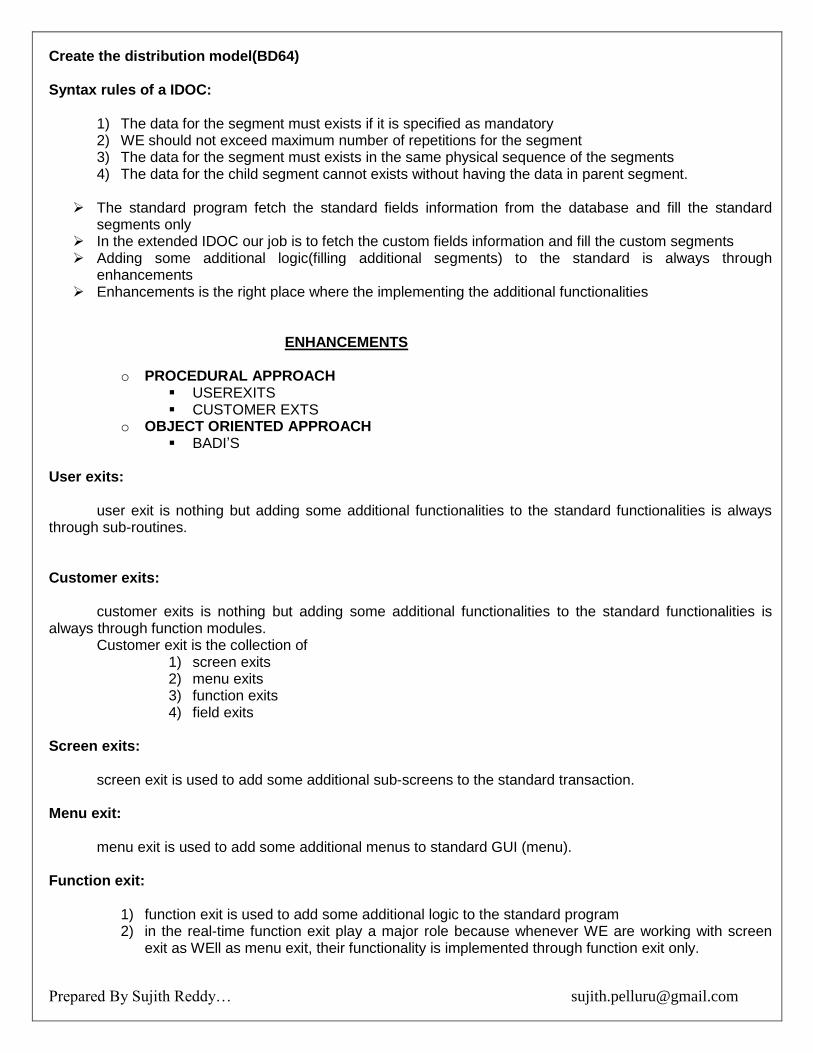
Create the distribution model(BD64) Syntax rules of a IDOC:
1) The data for the segment must exists if it is specified as mandatory 2) WE should not exceed maximum number of repetitions for the segment 3) The data for the segment must exists in the same physical sequence of the segments 4) The data for the child segment cannot exists without having the data in parent segment.
The standard program fetch the standard fields information from the database and fill the standard
segments only In the extended IDOC our job is to fetch the custom fields information and fill the custom segments Adding some additional logic(filling additional segments) to the standard is always through
enhancements Enhancements is the right place where the implementing the additional functionalities
ENHANCEMENTS
o PROCEDURAL APPROACH USEREXITS CUSTOMER EXTS
o OBJECT ORIENTED APPROACH BADI’S
User exits: user exit is nothing but adding some additional functionalities to the standard functionalities is always through sub-routines. Customer exits: customer exits is nothing but adding some additional functionalities to the standard functionalities is always through function modules. Customer exit is the collection of
1) screen exits 2) menu exits 3) function exits 4) field exits
Screen exits: screen exit is used to add some additional sub-screens to the standard transaction. Menu exit: menu exit is used to add some additional menus to standard GUI (menu). Function exit:
1) function exit is used to add some additional logic to the standard program 2) in the real-time function exit play a major role because whenever WE are working with screen
exit as WEll as menu exit, their functionality is implemented through function exit only.

Prepared By Sujith Reddy… [email protected]
Field exit: field exit is used to change the description of the input field as WEll as provide the additional validation to the field. Some of the scenarios related to user exits: 1st scenario:
1) in the real-time the sales document number ranges are provided by functional people 2) based on the sales organization and distribution channel , WE split it into smaller ranges by
using user exits. Steps to identify the user exit:
1) execute SPRO 2) click on SAP REFERENCE IMG in the application tool bar
3) expand SALES AND DISTRIBUTION and expand SYSTEM MODIFICATION and expand USER EXIT and expand USER EXITS IN SALES
4) click on documentation icon of USER EXITS IN SALES PROCESSING ( IMG ACTIVITY
DOCUMENT) 5) identify the right based on short description
Prepared By Sujith Reddy… [email protected]
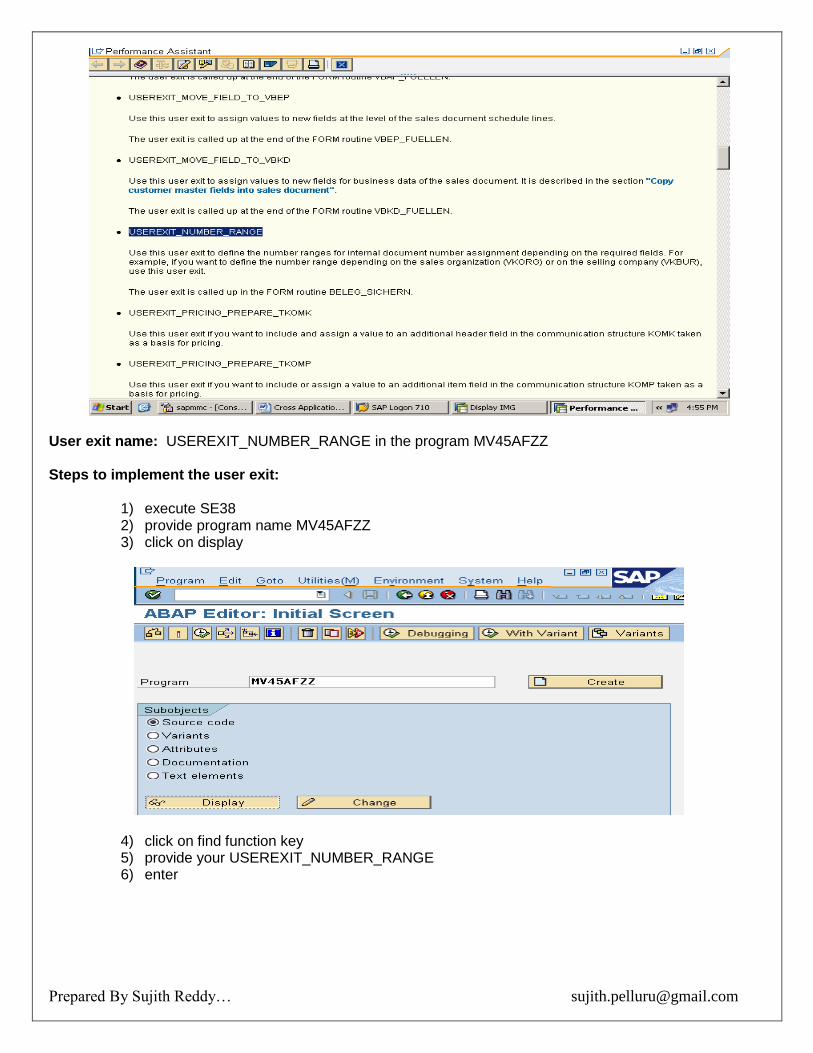
User exit name: USEREXIT_NUMBER_RANGE in the program MV45AFZZ Steps to implement the user exit:
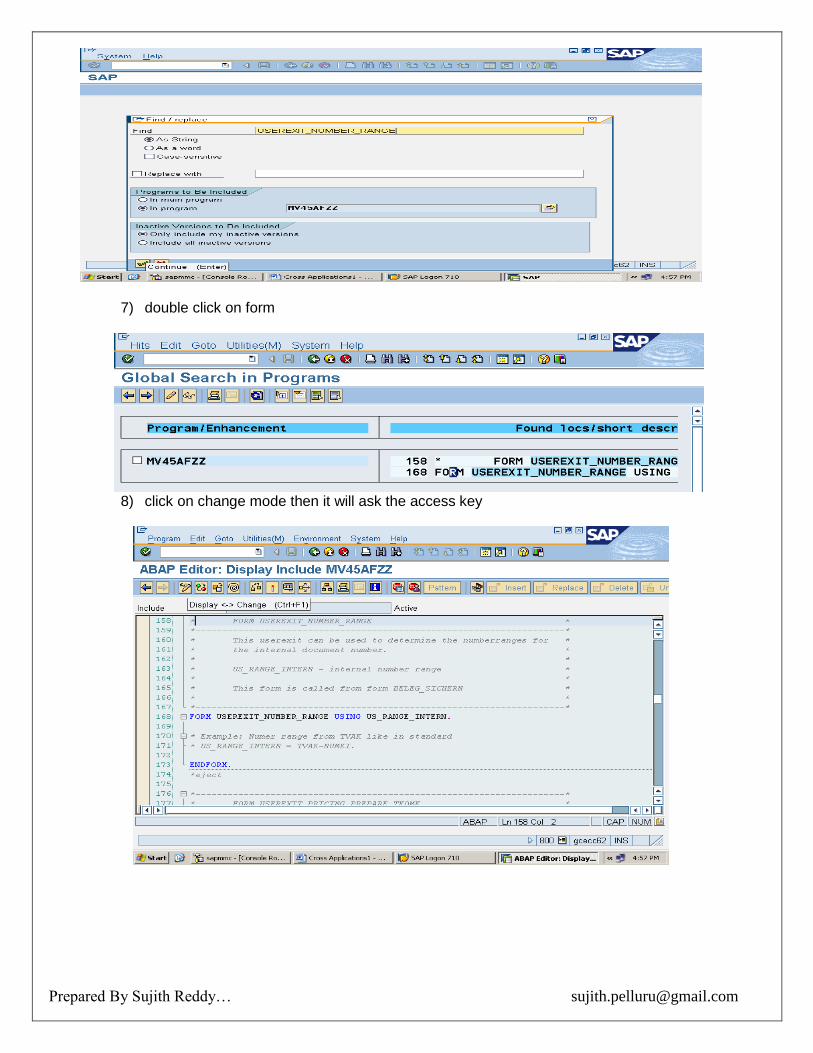
1) execute SE38 2) provide program name MV45AFZZ 3) click on display
4) click on find function key 5) provide your USEREXIT_NUMBER_RANGE 6) enter
Prepared By Sujith Reddy… [email protected]
7) double click on form
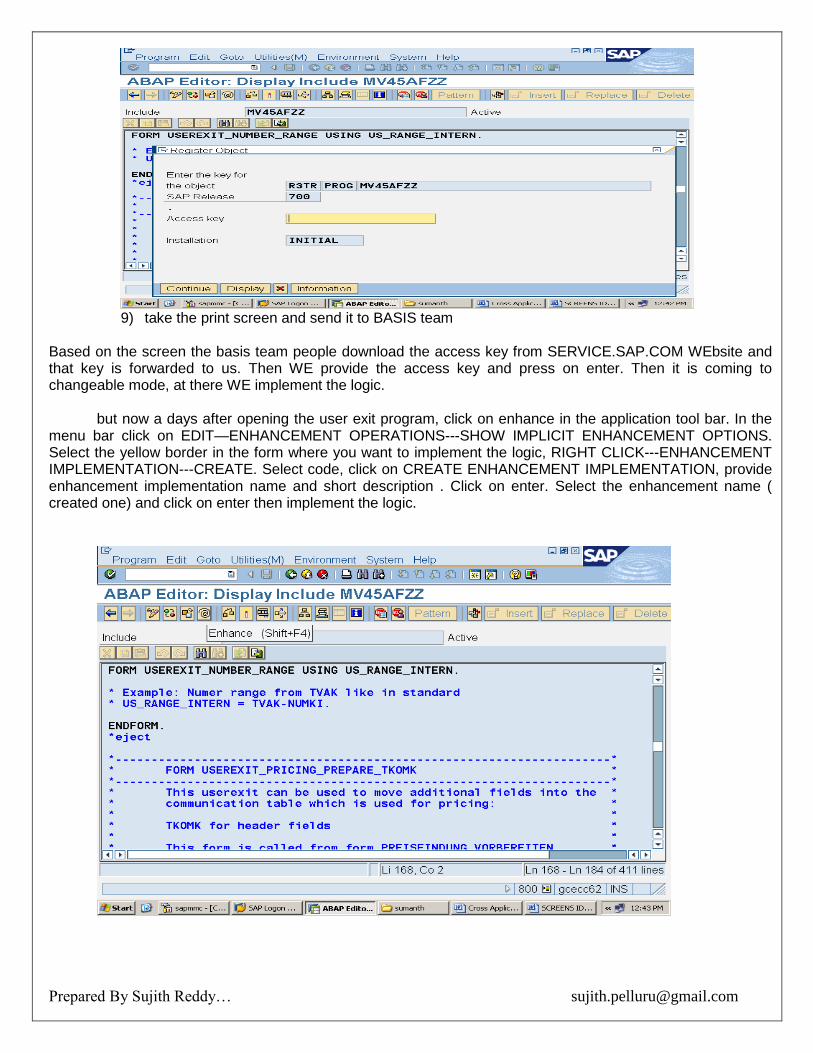
8) click on change mode then it will ask the access key
Prepared By Sujith Reddy… [email protected]
9) take the print screen and send it to BASIS team
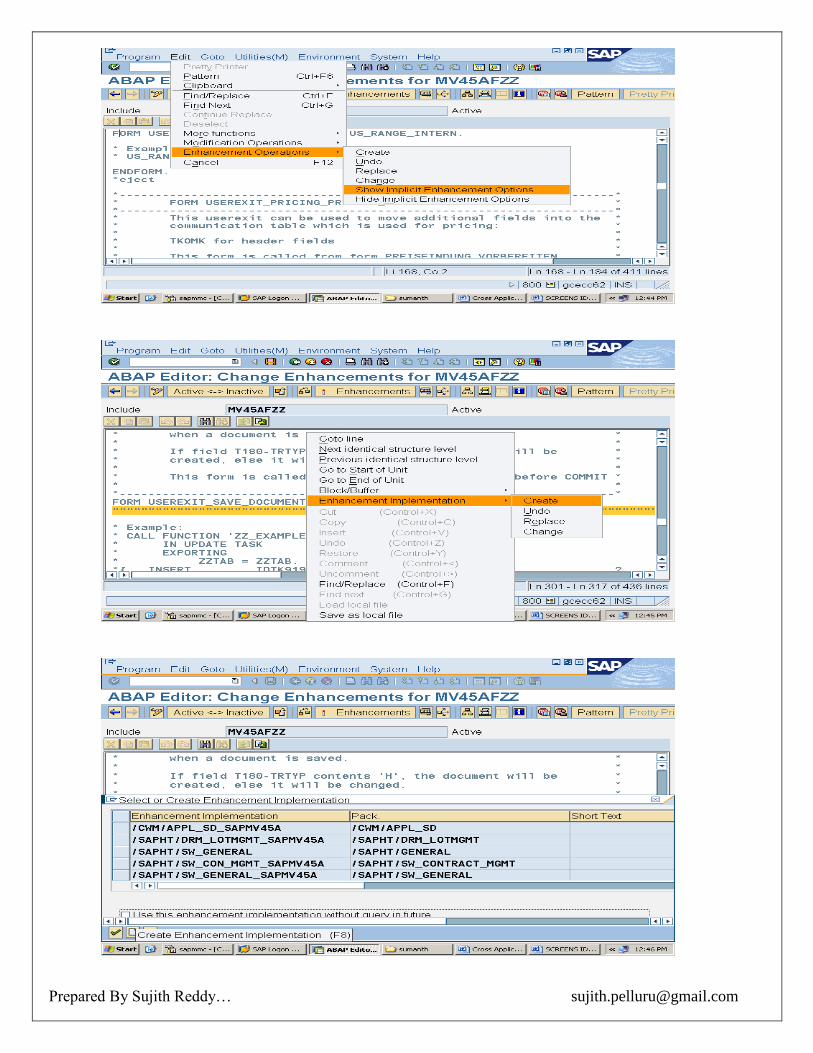
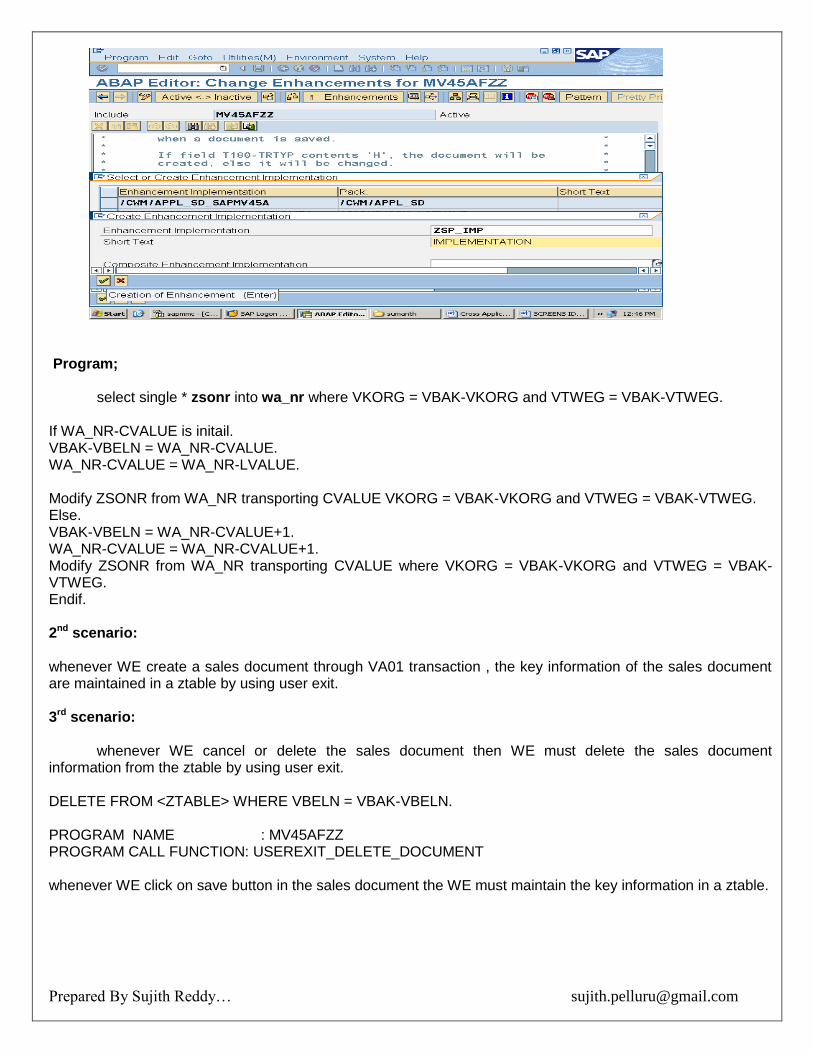
Based on the screen the basis team people download the access key from SERVICE.SAP.COM WEbsite and that key is forwarded to us. Then WE provide the access key and press on enter. Then it is coming to changeable mode, at there WE implement the logic. but now a days after opening the user exit program, click on enhance in the application tool bar. In the menu bar click on EDIT—ENHANCEMENT OPERATIONS---SHOW IMPLICIT ENHANCEMENT OPTIONS. Select the yellow border in the form where you want to implement the logic, RIGHT CLICK---ENHANCEMENT IMPLEMENTATION---CREATE. Select code, click on CREATE ENHANCEMENT IMPLEMENTATION, provide enhancement implementation name and short description . Click on enter. Select the enhancement name ( created one) and click on enter then implement the logic.
Prepared By Sujith Reddy… [email protected]
Prepared By Sujith Reddy… [email protected]
Program; select single * zsonr into wa_nr where VKORG = VBAK-VKORG and VTWEG = VBAK-VTWEG. If WA_NR-CVALUE is initail. VBAK-VBELN = WA_NR-CVALUE. WA_NR-CVALUE = WA_NR-LVALUE. Modify ZSONR from WA_NR transporting CVALUE VKORG = VBAK-VKORG and VTWEG = VBAK-VTWEG. Else. VBAK-VBELN = WA_NR-CVALUE+1. WA_NR-CVALUE = WA_NR-CVALUE+1. Modify ZSONR from WA_NR transporting CVALUE where VKORG = VBAK-VKORG and VTWEG = VBAK-VTWEG. Endif. 2nd scenario: whenever WE create a sales document through VA01 transaction , the key information of the sales document are maintained in a ztable by using user exit. 3rd scenario: whenever WE cancel or delete the sales document then WE must delete the sales document information from the ztable by using user exit. DELETE FROM <ZTABLE> WHERE VBELN = VBAK-VBELN. PROGRAM NAME : MV45AFZZ PROGRAM CALL FUNCTION: USEREXIT_DELETE_DOCUMENT whenever WE click on save button in the sales document the WE must maintain the key information in a ztable.
Prepared By Sujith Reddy… [email protected]
Program: DATA WA LIKE ZSOI, WA_VBELN = VBAK-VBELN, WA_VKORG = VBAK-VKORG, WA_KUNNR = VBAK-KUNNR, WA_USER = SY-UNAME, WA_DATA = SY-DATUM. INSERT ZSOI FROM WA. 4th scenario: if the user creates sales order per 100kg of material and sends to customer, if the customer returns 10 kg of same material, then the sales person creates the return sales order for 10 kg of material. Then the system check WEather the return quantity is less than or equal to actual quantity is 100 kg so it will accept the returns. At the next time the customer returns the same 100kg of material then the sales person creates the return sales order for the 100 kg, here the system check return order quantity is less than are equal to actual quantity or not , here return order quantity is 100kg and actual quantity is 100kg so it accept. In the above scenario sales order quantity is 100kg return order quantity is 110kg this is totally an error. To avoid this type of situations WE implement the user exit. Program: VBAK-AUART = 'RE'. DATA WA LIKE VBAP. SELECT SINGLE * FROM VBAP INTO WA WHERE VBELN = VBAP=VBELN AND POSNR = VBAP-POSNR. WA-KWMENG = WA-KWMENG – VBAP-POSNR. MODIFY VBAP FROM WA TRANSPORTING KWMENG WHERE VBELN = VBAP-VBELN AND POSNR = VBAP-POSNR. 5th scenario: whenever the end user create create the sales document and click on save then WE validate the tax conditions by using USEREXIT ( if any tax condition repeated then WE simply through an error message) Note:
1) in the real time WE also work with billing document number ranges as WEll as delivery document number ranges by using USEREXIT.
Call function: USEEXIT_FIELD_MODIFICATION CUSTOMER EXIT: customer exit is used to add some additional functionality to the standard functionality it is always through function modules modules,' Note: customer exits is always identified through package the right exit (menu exit, function exit...........) under the customer exit is identified through short description or breaking points.

Prepared By Sujith Reddy… [email protected]
Customer exit is always implemented through the project one customer exit or enhancement is always through attached to only one project. Note: writing an extended idoc outbound program is nothing but fill the additional segment information only that means WE add some additional logic to the standard program through right function exit. Note: outbound exit will be triggered after filling of each and every standard segment. Steps to identify the package: 1)execute SE93 2) provide your transaction code BD14 3)click on display
4)identify the package CGV Steps to identify the enhancement based on the package: 1)execute SMOD 2)click on find function key
3)provide your package name
Prepared By Sujith Reddy… [email protected]
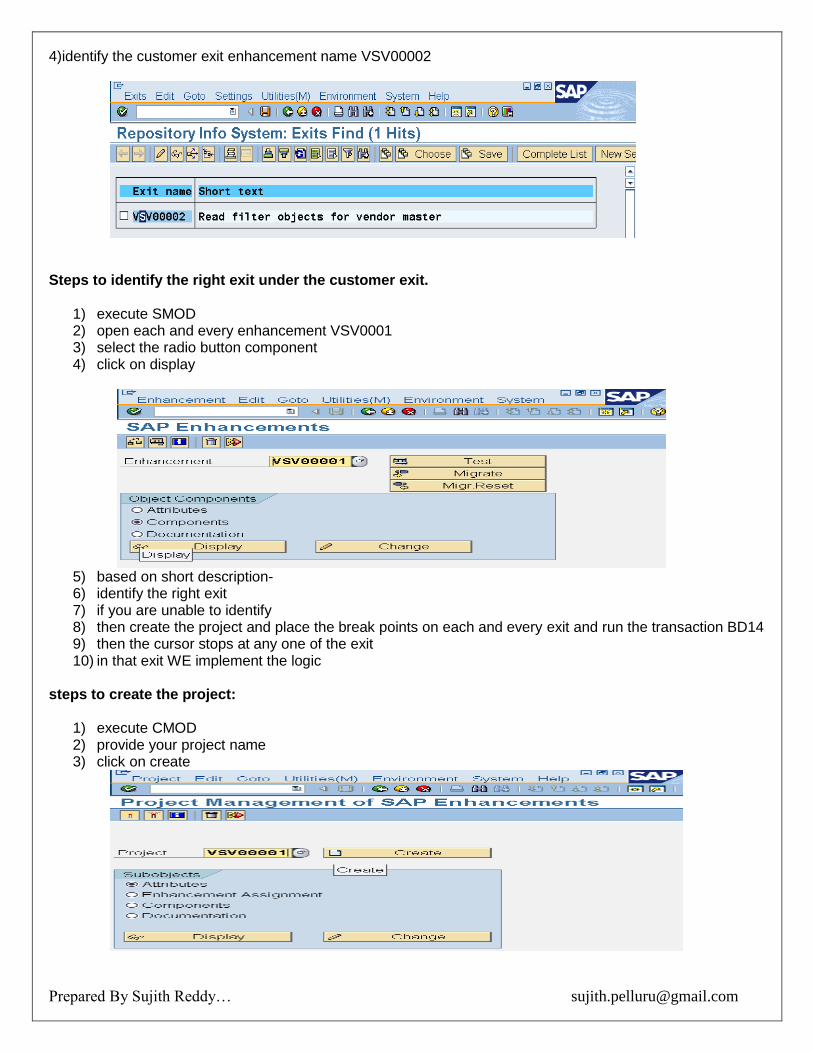
4)identify the customer exit enhancement name VSV00002
Steps to identify the right exit under the customer exit.
1) execute SMOD 2) open each and every enhancement VSV0001 3) select the radio button component 4) click on display
5) based on short description- 6) identify the right exit 7) if you are unable to identify 8) then create the project and place the break points on each and every exit and run the transaction BD14 9) then the cursor stops at any one of the exit 10) in that exit WE implement the logic
steps to create the project:
1) execute CMOD 2) provide your project name 3) click on create
Prepared By Sujith Reddy… [email protected]
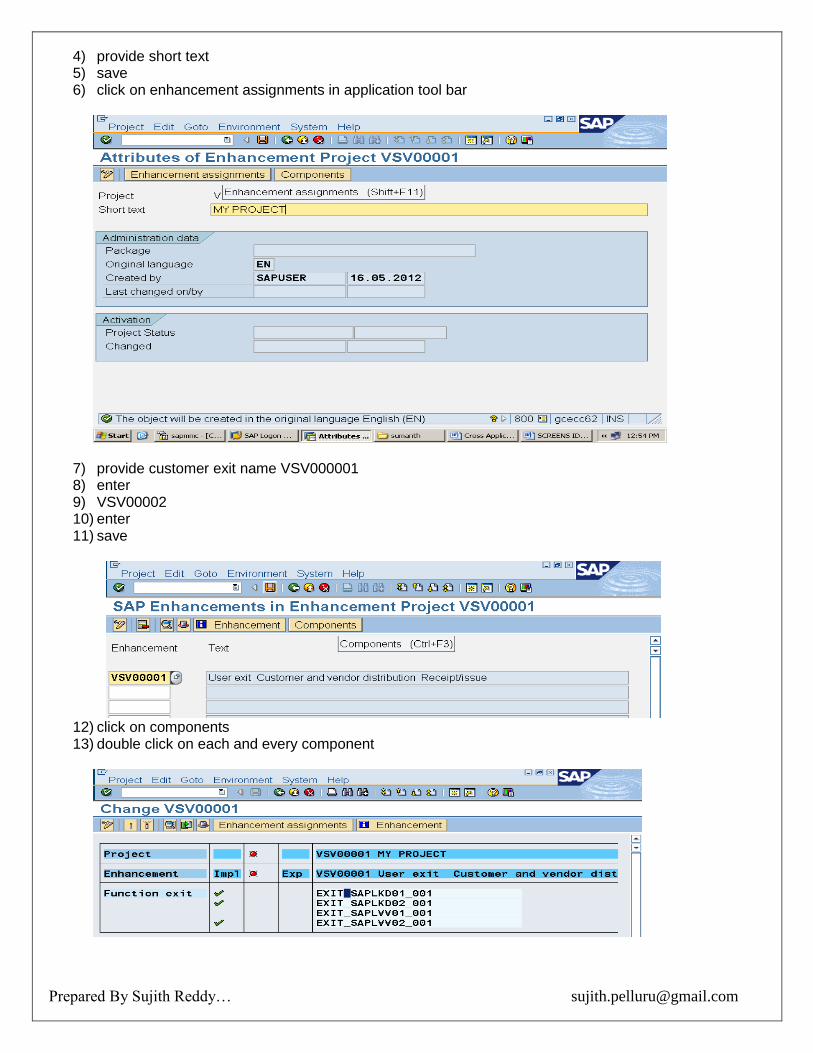
4) provide short text 5) save 6) click on enhancement assignments in application tool bar
7) provide customer exit name VSV000001 8) enter 9) VSV00002 10) enter 11) save
12) click on components 13) double click on each and every component
Prepared By Sujith Reddy… [email protected]
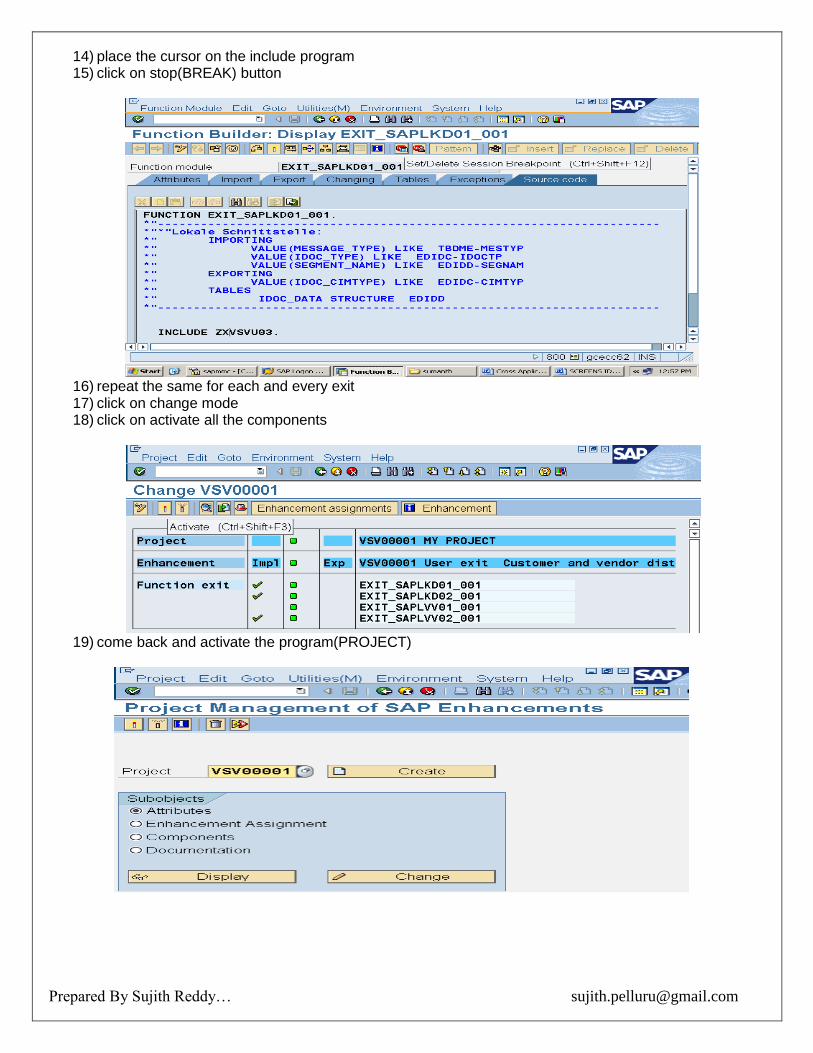
14) place the cursor on the include program 15) click on stop(BREAK) button
16) repeat the same for each and every exit 17) click on change mode 18) click on activate all the components
19) come back and activate the program(PROJECT)
Prepared By Sujith Reddy… [email protected]
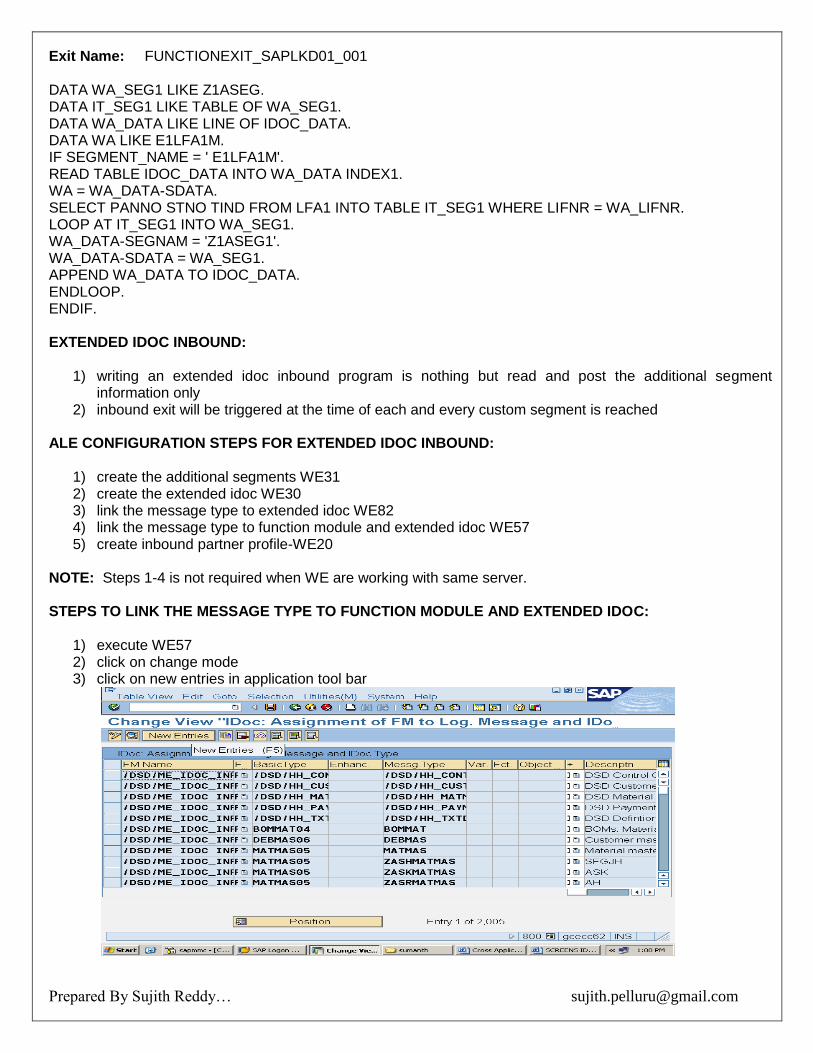
Exit Name: FUNCTIONEXIT_SAPLKD01_001 DATA WA_SEG1 LIKE Z1ASEG. DATA IT_SEG1 LIKE TABLE OF WA_SEG1. DATA WA_DATA LIKE LINE OF IDOC_DATA. DATA WA LIKE E1LFA1M. IF SEGMENT_NAME = ' E1LFA1M'. READ TABLE IDOC_DATA INTO WA_DATA INDEX1. WA = WA_DATA-SDATA. SELECT PANNO STNO TIND FROM LFA1 INTO TABLE IT_SEG1 WHERE LIFNR = WA_LIFNR. LOOP AT IT_SEG1 INTO WA_SEG1. WA_DATA-SEGNAM = 'Z1ASEG1'. WA_DATA-SDATA = WA_SEG1. APPEND WA_DATA TO IDOC_DATA. ENDLOOP. ENDIF. EXTENDED IDOC INBOUND:
1) writing an extended idoc inbound program is nothing but read and post the additional segment information only
2) inbound exit will be triggered at the time of each and every custom segment is reached ALE CONFIGURATION STEPS FOR EXTENDED IDOC INBOUND:
1) create the additional segments WE31 2) create the extended idoc WE30 3) link the message type to extended idoc WE82 4) link the message type to function module and extended idoc WE57 5) create inbound partner profile-WE20
NOTE: Steps 1-4 is not required when WE are working with same server. STEPS TO LINK THE MESSAGE TYPE TO FUNCTION MODULE AND EXTENDED IDOC:
1) execute WE57 2) click on change mode 3) click on new entries in application tool bar
Prepared By Sujith Reddy… [email protected]
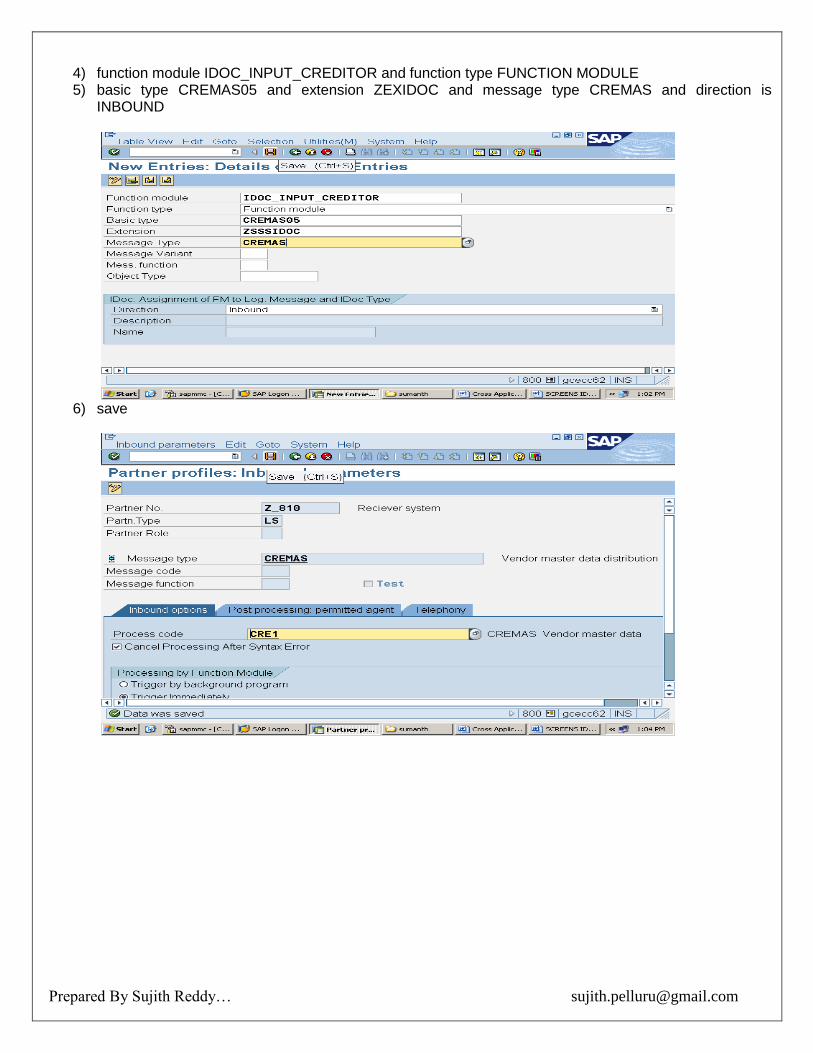
4) function module IDOC_INPUT_CREDITOR and function type FUNCTION MODULE 5) basic type CREMAS05 and extension ZEXIDOC and message type CREMAS and direction is
INBOUND
6) save
Prepared By Sujith Reddy… [email protected]
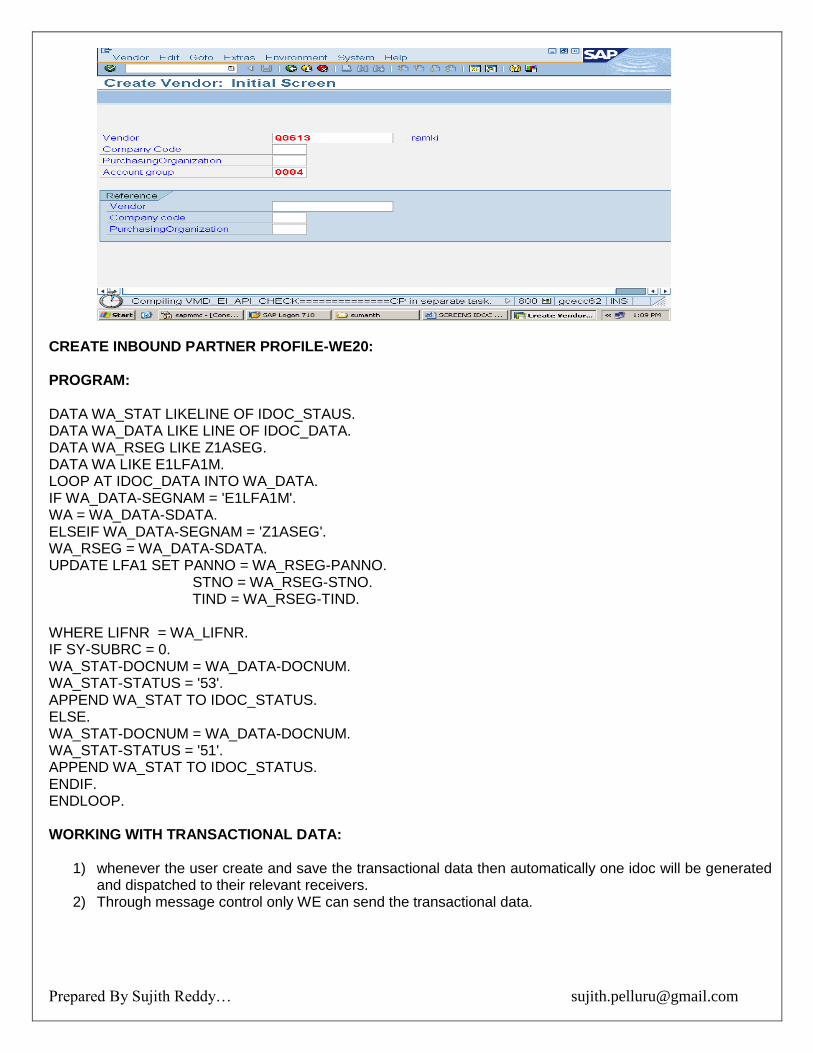
CREATE INBOUND PARTNER PROFILE-WE20: PROGRAM: DATA WA_STAT LIKELINE OF IDOC_STAUS. DATA WA_DATA LIKE LINE OF IDOC_DATA. DATA WA_RSEG LIKE Z1ASEG. DATA WA LIKE E1LFA1M. LOOP AT IDOC_DATA INTO WA_DATA. IF WA_DATA-SEGNAM = 'E1LFA1M'. WA = WA_DATA-SDATA. ELSEIF WA_DATA-SEGNAM = 'Z1ASEG'. WA_RSEG = WA_DATA-SDATA. UPDATE LFA1 SET PANNO = WA_RSEG-PANNO. STNO = WA_RSEG-STNO. TIND = WA_RSEG-TIND. WHERE LIFNR = WA_LIFNR. IF SY-SUBRC = 0. WA_STAT-DOCNUM = WA_DATA-DOCNUM. WA_STAT-STATUS = '53'. APPEND WA_STAT TO IDOC_STATUS. ELSE. WA_STAT-DOCNUM = WA_DATA-DOCNUM. WA_STAT-STATUS = '51'. APPEND WA_STAT TO IDOC_STATUS. ENDIF. ENDLOOP. WORKING WITH TRANSACTIONAL DATA:
1) whenever the user create and save the transactional data then automatically one idoc will be generated and dispatched to their relevant receivers.
2) Through message control only WE can send the transactional data.
Prepared By Sujith Reddy… [email protected]
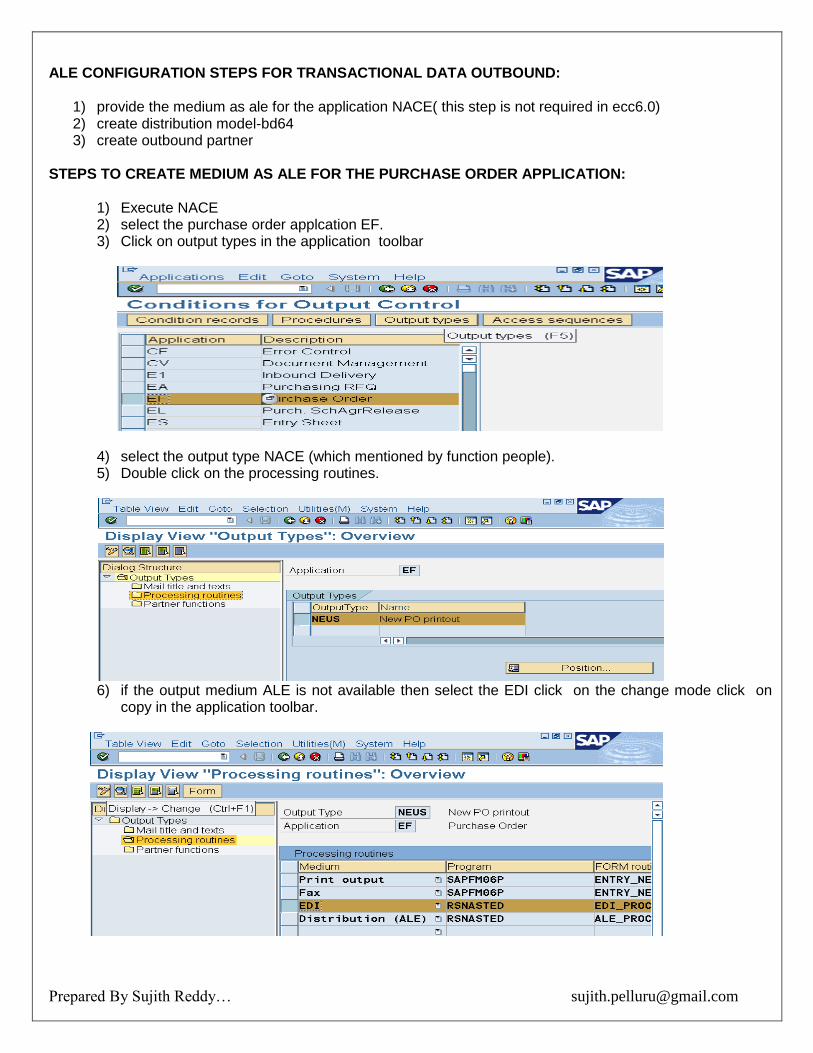
ALE CONFIGURATION STEPS FOR TRANSACTIONAL DATA OUTBOUND:
1) provide the medium as ale for the application NACE( this step is not required in ecc6.0) 2) create distribution model-bd64 3) create outbound partner
STEPS TO CREATE MEDIUM AS ALE FOR THE PURCHASE ORDER APPLICATION:
1) Execute NACE 2) select the purchase order applcation EF. 3) Click on output types in the application toolbar
4) select the output type NACE (which mentioned by function people). 5) Double click on the processing routines.
6) if the output medium ALE is not available then select the EDI click on the change mode click on
copy in the application toolbar.
Prepared By Sujith Reddy… [email protected]
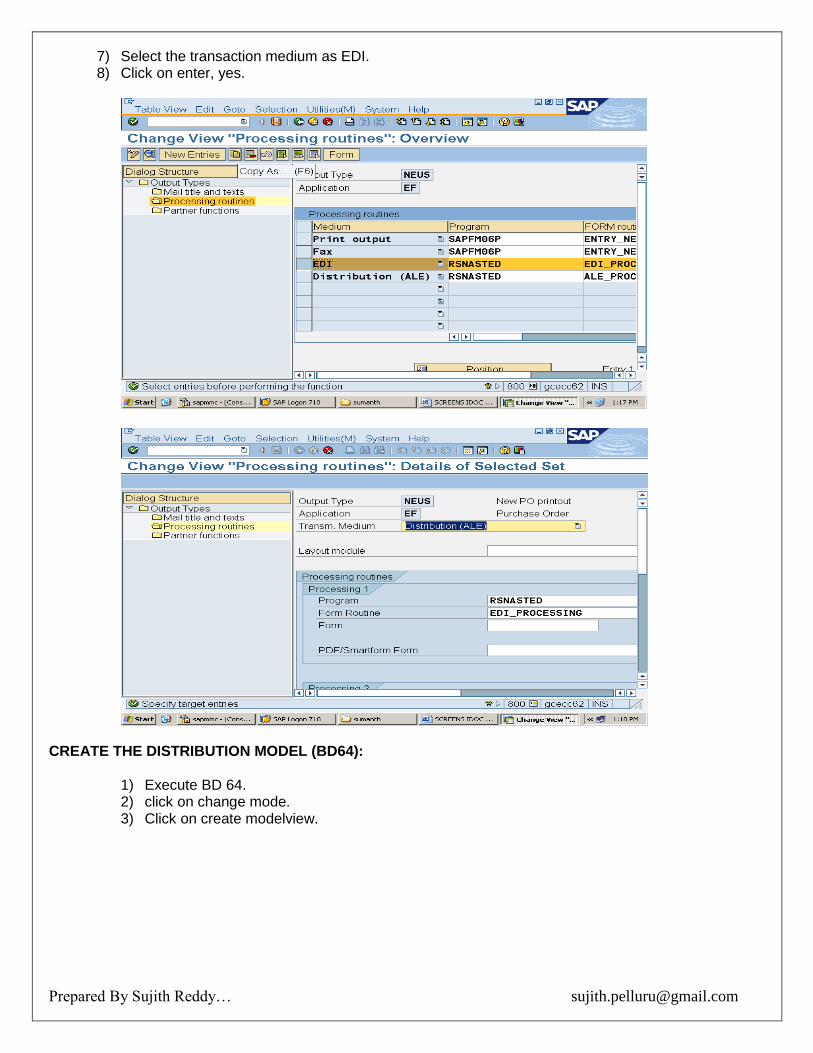
7) Select the transaction medium as EDI. 8) Click on enter, yes.
CREATE THE DISTRIBUTION MODEL (BD64):
1) Execute BD 64. 2) click on change mode. 3) Click on create modelview.
Prepared By Sujith Reddy… [email protected]
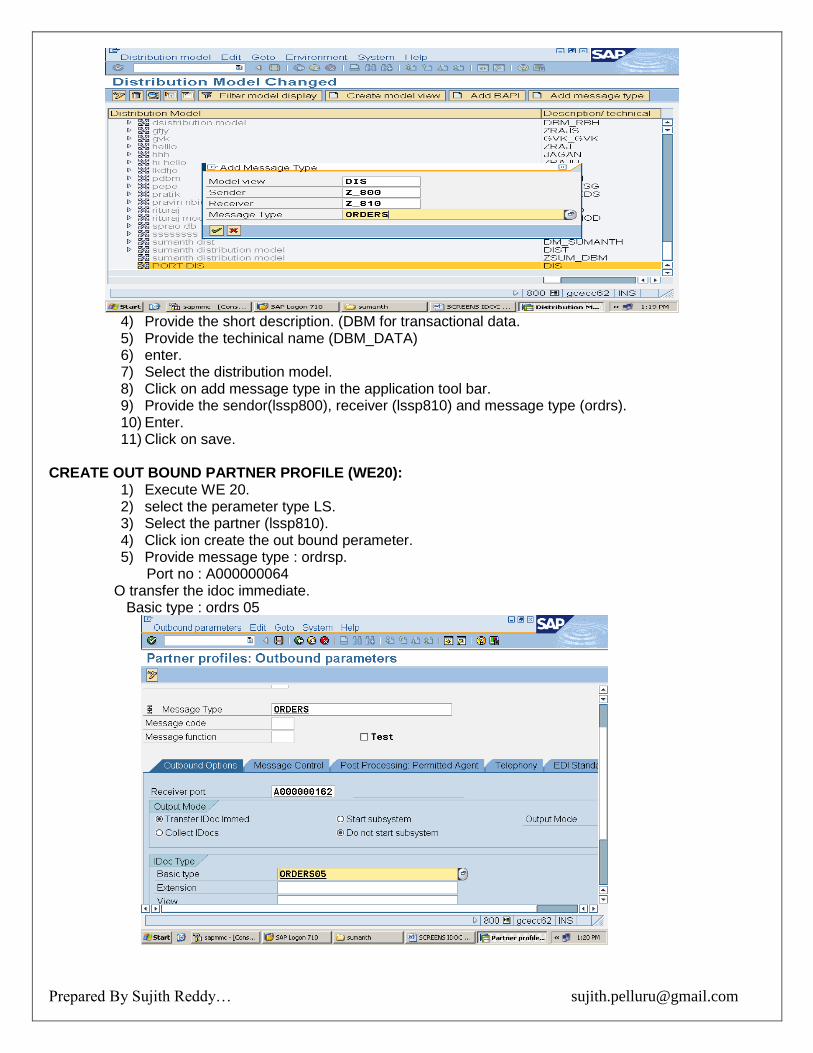
4) Provide the short description. (DBM for transactional data. 5) Provide the techinical name (DBM_DATA) 6) enter. 7) Select the distribution model. 8) Click on add message type in the application tool bar. 9) Provide the sendor(lssp800), receiver (lssp810) and message type (ordrs). 10) Enter. 11) Click on save.
CREATE OUT BOUND PARTNER PROFILE (WE20):
1) Execute WE 20. 2) select the perameter type LS. 3) Select the partner (lssp810). 4) Click ion create the out bound perameter. 5) Provide message type : ordrsp.
Port no : A000000064 O transfer the idoc immediate. Basic type : ordrs 05

Prepared By Sujith Reddy… [email protected]
6) click on message control tab. 7) click on insert row 8) provide application EF. 9) Select the message type NEU. 10) Select the Process code ME10. 11) click on insert rows to send the changes information.
12) provide the application : EF 13) provide the message type : NEU 14) provide the process code : ME10 15) select the check box change message. 16) click on save.

Prepared By Sujith Reddy… [email protected]
NOTE:
1) when ever the end user create the purchase odrer then automatically one idoc is generated as WEll as dispatch to their relavant receiver.
2) If you want to send the purchase order inforamation to the vendor then WE must create the outbound partner profile in “partner type LI”.
3) If you want to send the sales order information to the customer then WE must create outbound partner profile in the “partner type KU”.
4) If you want to send the information to the bank or payment information to the banj then WE must create the uoybound partner profile under “ partner type B”.
NOTE: In the real time the port number is created by basis team. ALE CONFIGARATION STEPS FOR TRANSACTION DATA INBOUND:
1) Create the inbound partner profile WE20. CREATE IN BOUND PARTNER PROFILE (WE20):
1) Execute WE20. 2) Select the partner (lssp 800). 3) click on create inbound perameter.
Message type :ordrsp process code : ordr
4) Click on save
SERIALIZATION OF IDOC'S SERIALIZATION: Serialization is used to send as WEll as receive the releted message type in a sequence.
Prepared By Sujith Reddy… [email protected]
ALE CONFIGARATION STEPS FOR SERIALIZATION OUTBOUND:
1) Define the serialization group (sale). 2) Create the distribution model with the related message type and sredat message type (BD64) 3) create the out bound partner profile with the related message type and sredat message type (WE
20) STEPS TO CREATE THE SERIALIZATION GROUP:
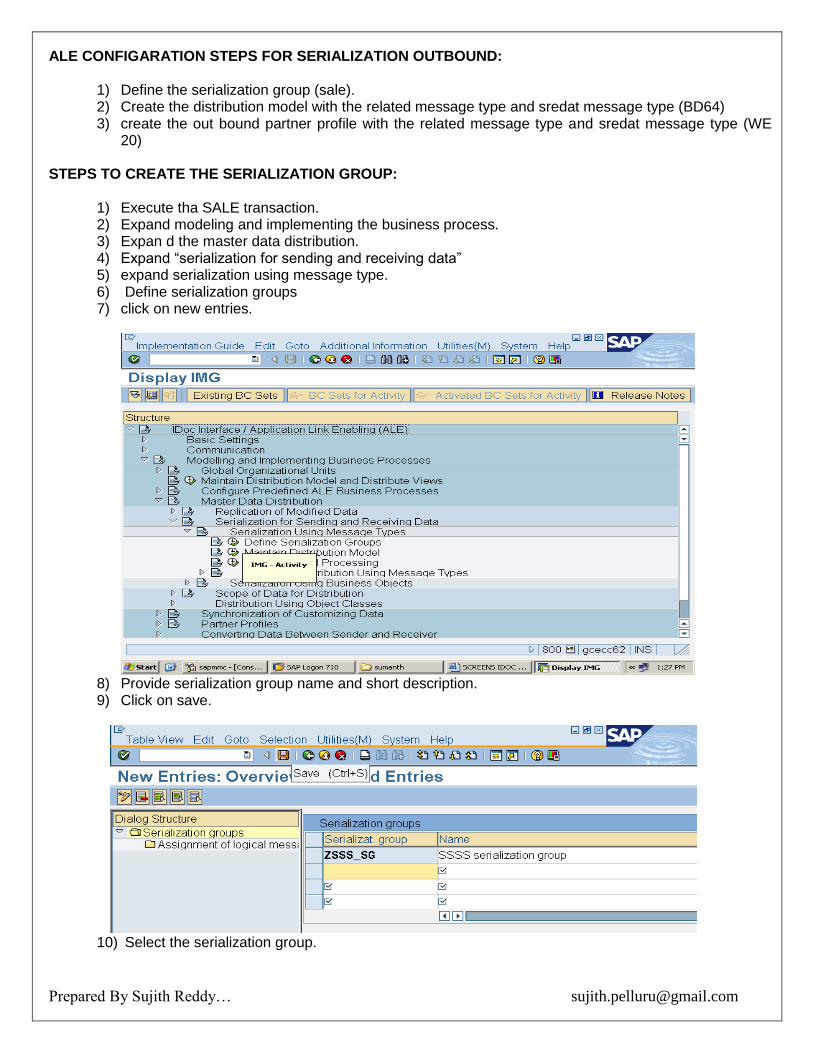
1) Execute tha SALE transaction. 2) Expand modeling and implementing the business process. 3) Expan d the master data distribution. 4) Expand “serialization for sending and receiving data” 5) expand serialization using message type. 6) Define serialization groups 7) click on new entries.
8) Provide serialization group name and short description. 9) Click on save.
10) Select the serialization group.
Prepared By Sujith Reddy… [email protected]
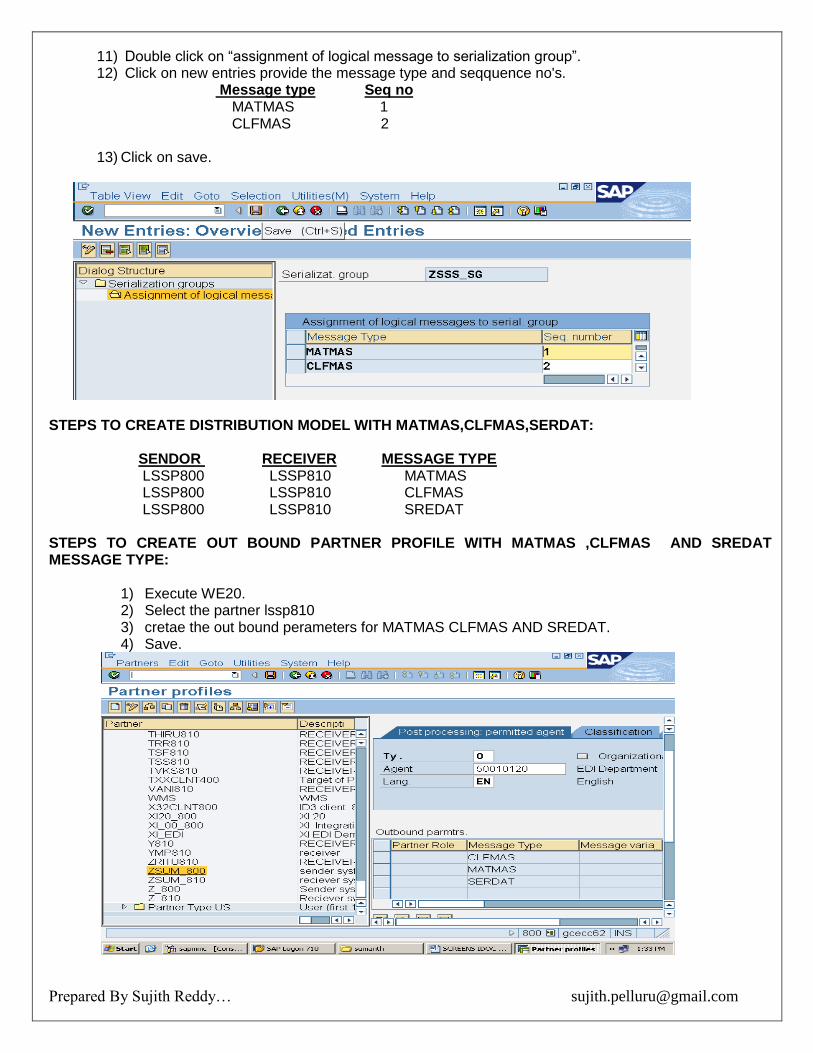
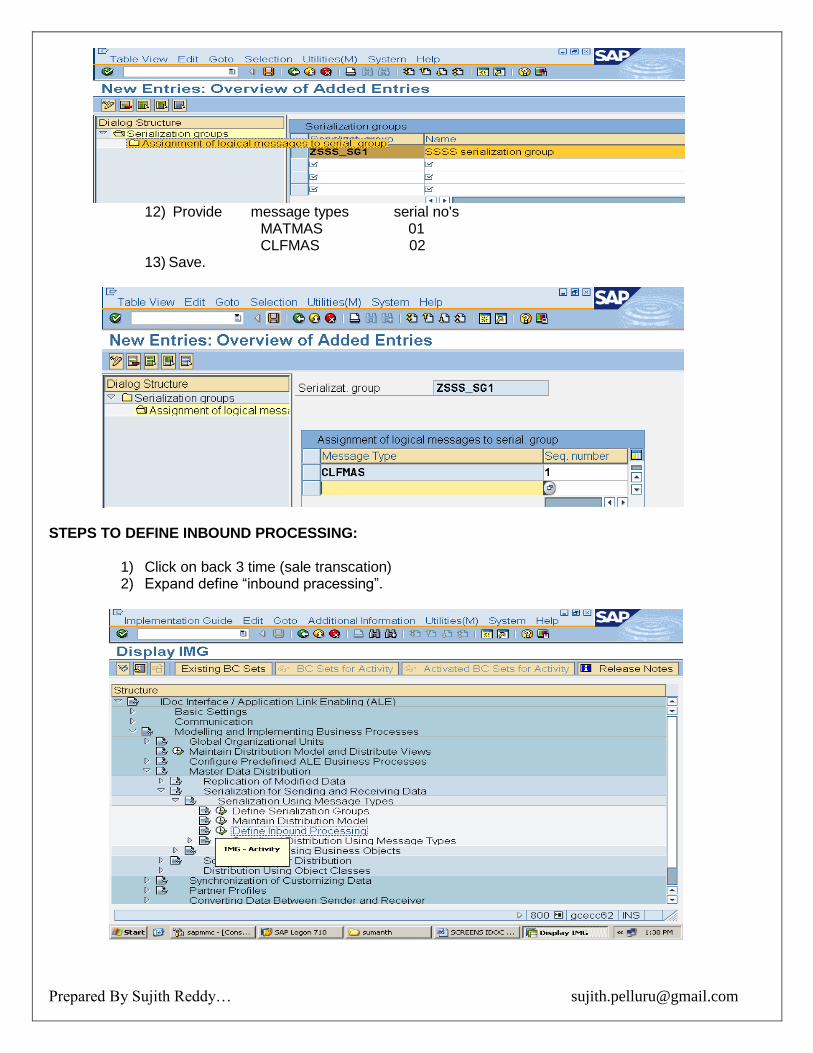
11) Double click on “assignment of logical message to serialization group”. 12) Click on new entries provide the message type and seqquence no's.
Message type Seq no MATMAS 1 CLFMAS 2
13) Click on save.
STEPS TO CREATE DISTRIBUTION MODEL WITH MATMAS,CLFMAS,SERDAT: SENDOR RECEIVER MESSAGE TYPE LSSP800 LSSP810 MATMAS LSSP800 LSSP810 CLFMAS LSSP800 LSSP810 SREDAT STEPS TO CREATE OUT BOUND PARTNER PROFILE WITH MATMAS ,CLFMAS AND SREDAT MESSAGE TYPE:
1) Execute WE20. 2) Select the partner lssp810 3) cretae the out bound perameters for MATMAS CLFMAS AND SREDAT. 4) Save.

Prepared By Sujith Reddy… [email protected]
ALE CONFIGARATION STEPS FOR SERIALIZATION IN BOUND:
1) Define serialization group. 2) Define inbound processing. 3) Create inbound partner profile with related message types and SREDAT.
STEPA TO DEFINE SERIALIZATION GROUP:
1) Execute SALE transaction. 2) Expand “modelling and implement business process” 3) Expand “master data distribution”. 4) Expand “serialization for sending and receiving data”. 5) Expand “serialization using message types”. 6) Expand “define serialization group”. 7) Click on new entries.
8) Provide serialization group name and short dezscription 9) click on serialization group. 10) Click on assignment logical message to serialization group (ZSUJITH_SG). 11) Click on new entries.
Prepared By Sujith Reddy… [email protected]
12) Provide message types serial no's
MATMAS 01 CLFMAS 02
13) Save.
STEPS TO DEFINE INBOUND PROCESSING:
1) Click on back 3 time (sale transcation) 2) Expand define “inbound pracessing”.
Prepared By Sujith Reddy… [email protected]
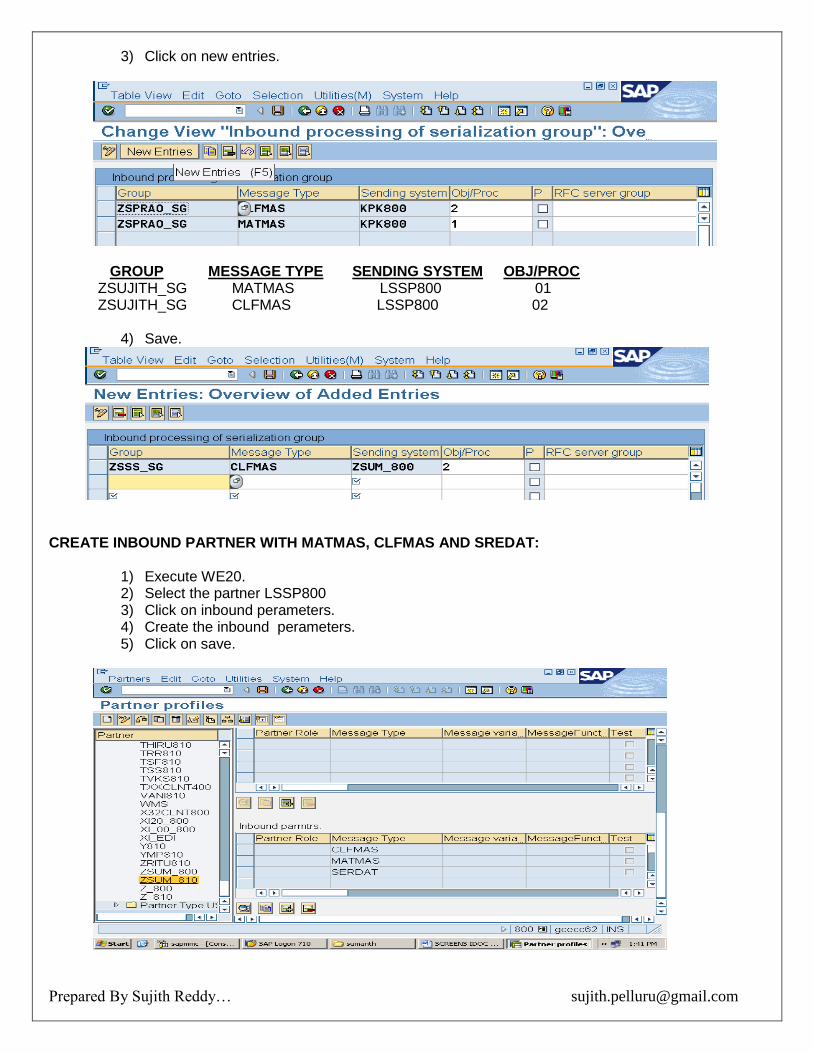
3) Click on new entries.
GROUP MESSAGE TYPE SENDING SYSTEM OBJ/PROC ZSUJITH_SG MATMAS LSSP800 01 ZSUJITH_SG CLFMAS LSSP800 02
4) Save.
CREATE INBOUND PARTNER WITH MATMAS, CLFMAS AND SREDAT:
1) Execute WE20. 2) Select the partner LSSP800 3) Click on inbound perameters. 4) Create the inbound perameters. 5) Click on save.
Prepared By Sujith Reddy… [email protected]
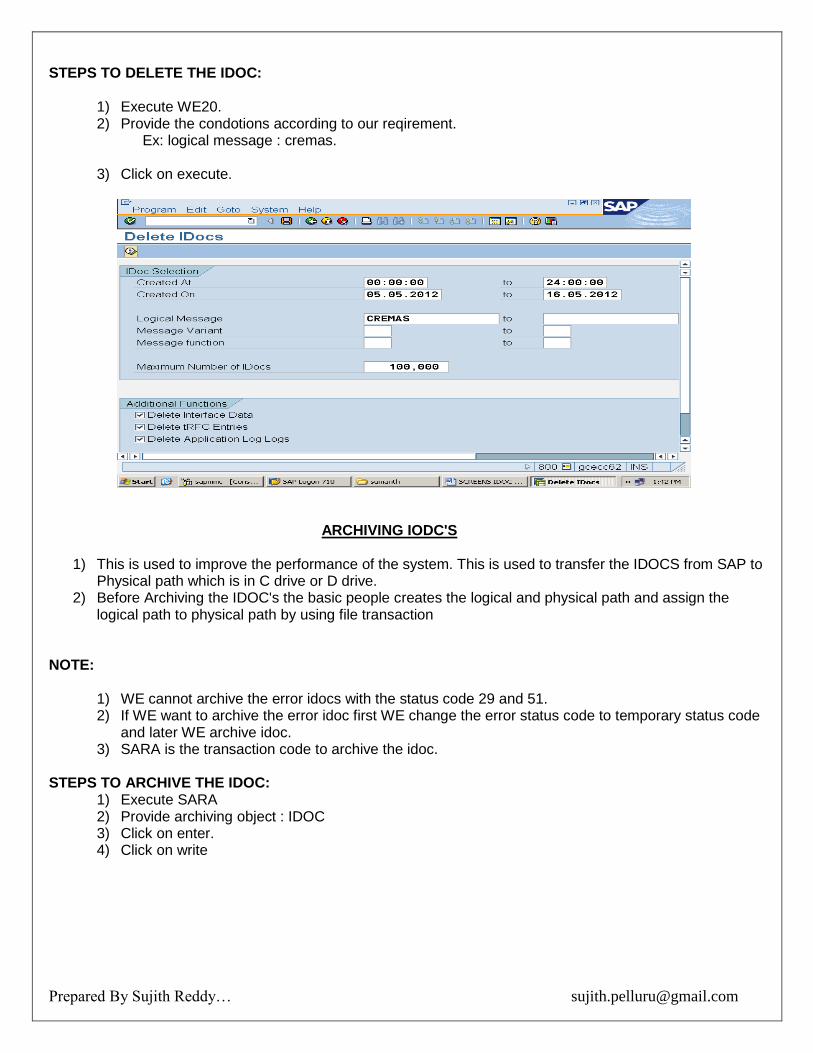
STEPS TO DELETE THE IDOC:
1) Execute WE20. 2) Provide the condotions according to our reqirement.
Ex: logical message : cremas.
3) Click on execute.
ARCHIVING IODC'S
1) This is used to improve the performance of the system. This is used to transfer the IDOCS from SAP to Physical path which is in C drive or D drive.
2) Before Archiving the IDOC's the basic people creates the logical and physical path and assign the logical path to physical path by using file transaction
NOTE:
1) WE cannot archive the error idocs with the status code 29 and 51. 2) If WE want to archive the error idoc first WE change the error status code to temporary status code
and later WE archive idoc. 3) SARA is the transaction code to archive the idoc.
STEPS TO ARCHIVE THE IDOC:
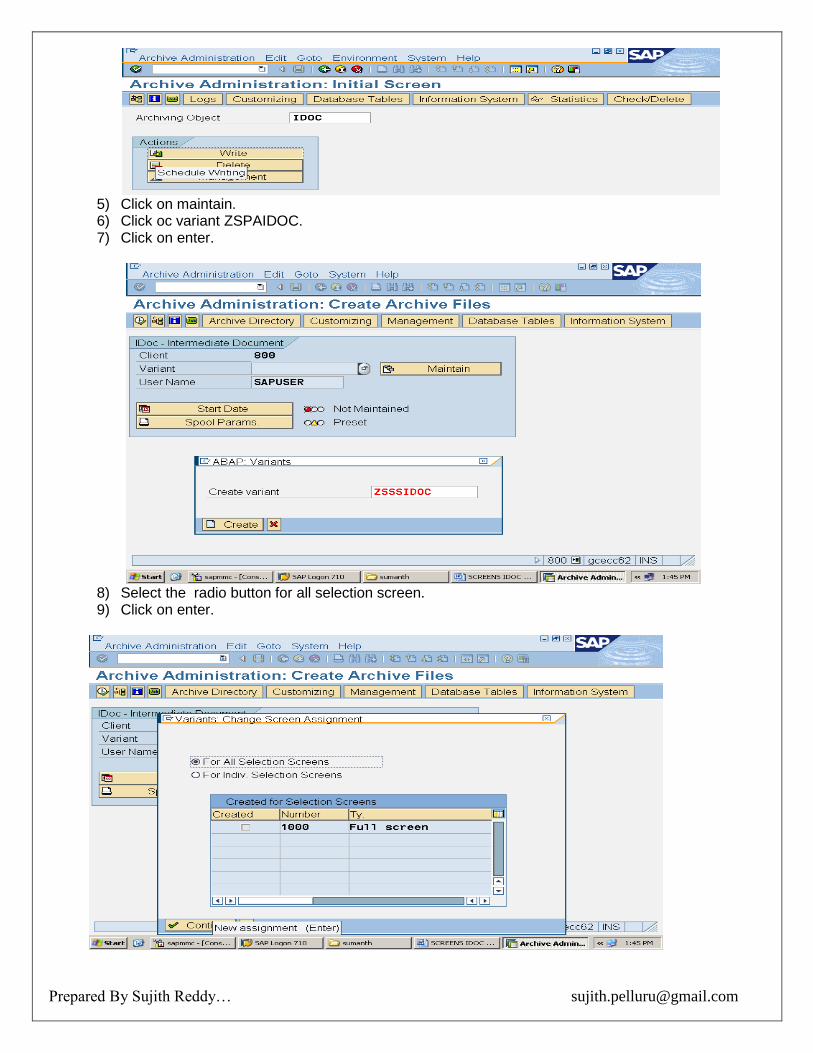
1) Execute SARA 2) Provide archiving object : IDOC 3) Click on enter. 4) Click on write
Prepared By Sujith Reddy… [email protected]
5) Click on maintain. 6) Click oc variant ZSPAIDOC. 7) Click on enter.
8) Select the radio button for all selection screen. 9) Click on enter.
Prepared By Sujith Reddy… [email protected]
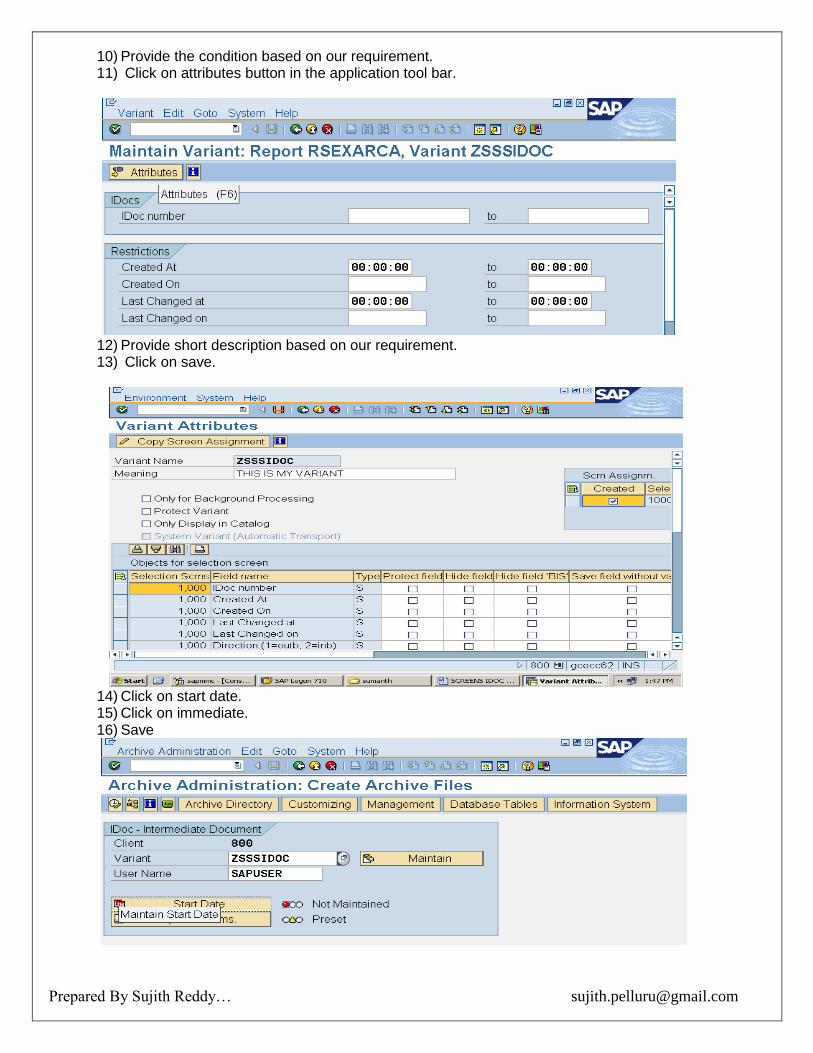
10) Provide the condition based on our requirement. 11) Click on attributes button in the application tool bar.
12) Provide short description based on our requirement. 13) Click on save.
14) Click on start date. 15) Click on immediate. 16) Save

Prepared By Sujith Reddy… [email protected]
17) Other wise click on date/time 18) Click on execute.
NOTE:
1) RSEXARCA is the standard program which is used to archiving the idoc's. 2) RSEXARCL is the standard program which is used to RELOAD archiving the idoc's. 3) RSEXARCD is the standard program which is used to DELETE archiving the idoc's.
NOTE: RCI_SET_STATUS is the standard program which is used to change idoc original status code to temporary status code this is required to archive the error idoc STATUS CODES:
1) OUT BOUND STATUS CODES ( 1-49) 2) INBOUND STATUS CODES (50-76)
NOTE: WE47 is the tcode ehich is used to display all the status codes and their short description. OUT BOUND STATUS CODES: STATUS CODE 03 ( data passed to port ok) :
1) after getingb the stauts code 03 WE execute the RBDMOIND standard program 2) if the satus code 03 turned to 12 then the idoc is reached to the destination. 3) If the status code 03 turned ton 11 error occur during dispatch. 4) If the stautus code remains 03 the idoc is in the TRFC queue.
STATUS CODE 30 (idoc ready for dispatch)
1) if the satuts code remains the 30 then WE must check the mode of dispatch in the outbound partner profile.
2) If the most of dispatch is collect then WE must execute the RSEOUT00 standard program then only coolect idoc will be dispatched to relavent receivers.
3) If the mode of dispatch is immediate that is due tlo traffic.
Prepared By Sujith Reddy… [email protected]
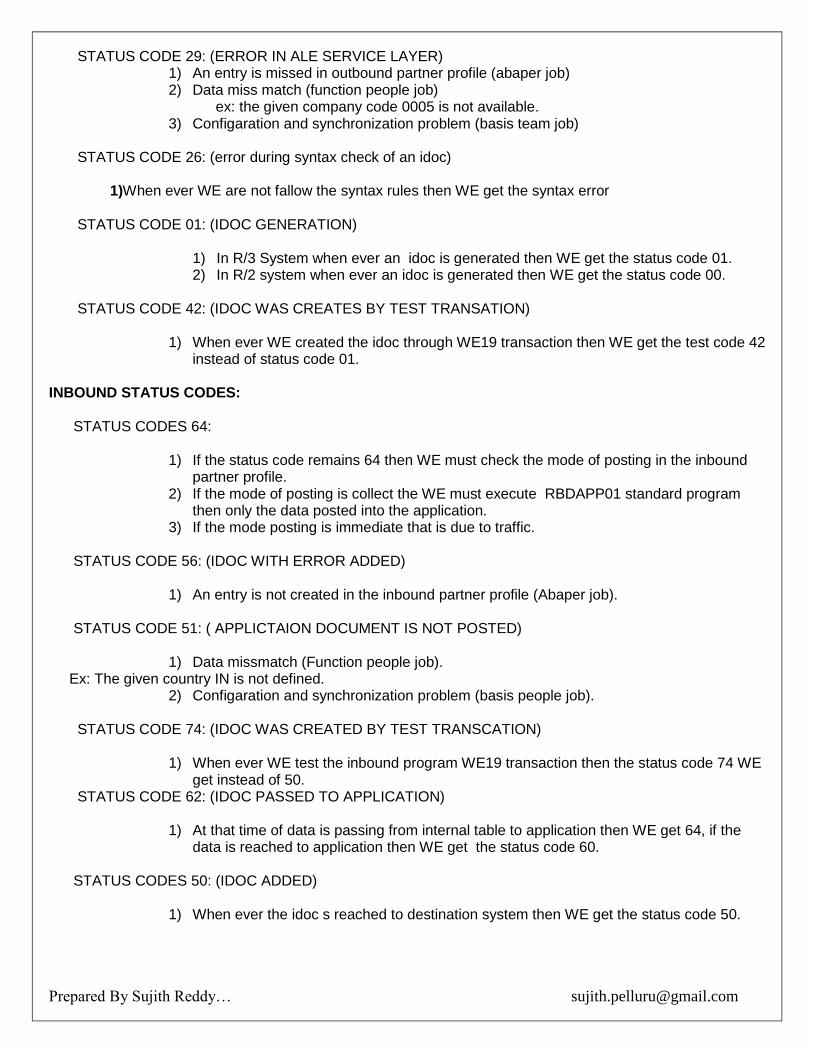
STATUS CODE 29: (ERROR IN ALE SERVICE LAYER) 1) An entry is missed in outbound partner profile (abaper job) 2) Data miss match (function people job)
ex: the given company code 0005 is not available. 3) Configaration and synchronization problem (basis team job)
STATUS CODE 26: (error during syntax check of an idoc) 1)When ever WE are not fallow the syntax rules then WE get the syntax error STATUS CODE 01: (IDOC GENERATION)
1) In R/3 System when ever an idoc is generated then WE get the status code 01. 2) In R/2 system when ever an idoc is generated then WE get the status code 00.
STATUS CODE 42: (IDOC WAS CREATES BY TEST TRANSATION)
1) When ever WE created the idoc through WE19 transaction then WE get the test code 42 instead of status code 01.
INBOUND STATUS CODES: STATUS CODES 64:
1) If the status code remains 64 then WE must check the mode of posting in the inbound partner profile.
2) If the mode of posting is collect the WE must execute RBDAPP01 standard program then only the data posted into the application.
3) If the mode posting is immediate that is due to traffic. STATUS CODE 56: (IDOC WITH ERROR ADDED)
1) An entry is not created in the inbound partner profile (Abaper job). STATUS CODE 51: ( APPLICTAION DOCUMENT IS NOT POSTED)
1) Data missmatch (Function people job). Ex: The given country IN is not defined.
2) Configaration and synchronization problem (basis people job). STATUS CODE 74: (IDOC WAS CREATED BY TEST TRANSCATION)
1) When ever WE test the inbound program WE19 transaction then the status code 74 WE get instead of 50.
STATUS CODE 62: (IDOC PASSED TO APPLICATION)
1) At that time of data is passing from internal table to application then WE get 64, if the data is reached to application then WE get the status code 60.
STATUS CODES 50: (IDOC ADDED)
1) When ever the idoc s reached to destination system then WE get the status code 50.


![Sujith cv[1][1][1](2)1](https://img.pdfslide.net/doc/110x75/54539f95af795940458b77a4/sujith-cv11121.jpg)