Embed Size (px)
Citation preview
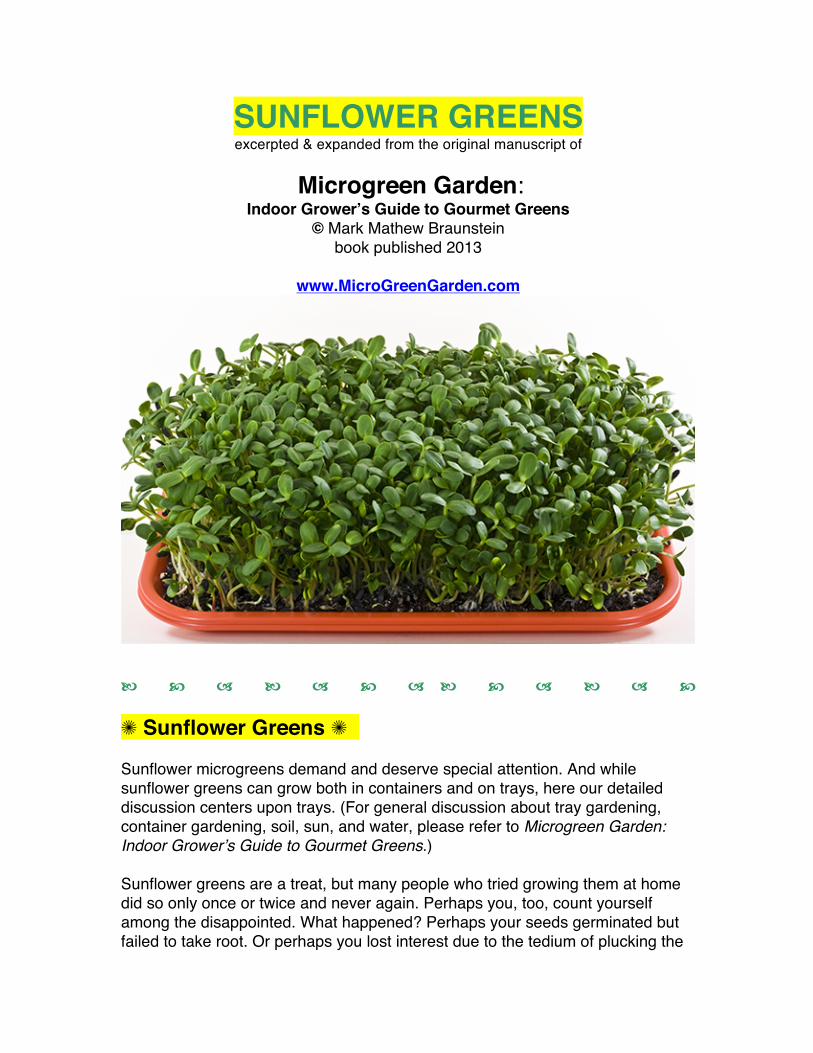
SUNFLOWER GREENS excerpted & expanded from the original manuscript of
Microgreen Garden: Indoor Grower’s Guide to Gourmet Greens
© Mark Mathew Braunstein book published 2013
www.MicroGreenGarden.com
b c a b a c a b c a b a c ✺ Sunflower Greens ✺ Sunflower microgreens demand and deserve special attention. And while sunflower greens can grow both in containers and on trays, here our detailed discussion centers upon trays. (For general discussion about tray gardening, container gardening, soil, sun, and water, please refer to Microgreen Garden: Indoor Grower’s Guide to Gourmet Greens.) Sunflower greens are a treat, but many people who tried growing them at home did so only once or twice and never again. Perhaps you, too, count yourself among the disappointed. What happened? Perhaps your seeds germinated but failed to take root. Or perhaps you lost interest due to the tedium of plucking the

Sunflower Greens adapted from Microgreen Garden by Mark Mathew Braunstein 2
shells off the leaves. Observe the guidelines offered here, and you will be assured both vigorous rooting and a bountiful shell-free harvest.
MINI-GUIDE: Warm season and hot season crop. Easy to grow, but difficult to germinate and nurture to take root. Soaking: 8 hours (or 4-12 hours) hastens germination by 1 day and softens the shells. Sowing: Sprouting for 1 day before sowing is recommended to further soften the shells. Germination: 2 days if soaked for 8 hours, otherwise 3 days. Sunlight: The sun shines within its very name both in English and in its Greek binomial Helios, which means Sun. Provide direct sunlight throughout its cycle and throughout daytime; anything less produces wimpy Sunflower Greens. Harvest: Best at seed leaf stage. If the true leaves begin to emerge, harvest immediately. Flavor: Unique flavor that appeals to most people, yet even those who do not relish the flavor do find appealing the mere act of eating an entire sunflower plant. Loses succulence and flavor when grown in cool temperatures. Cultivar and Color: Black Oil Sunflower, not Striped Sunflower, is the much preferred cultivar. The black refers to the color of the seed’s shell, not of its microgreens. Sunflower Greens grown under the sun have deep green leaves and very short stems. The sure sign of Sunflower Greens grown in ample sunlight are stems that display deep green with red, yes red, streaks, rather than pale yellow-green.
1) SELECT the SEEDS You might wager that you can win this shell game by starting with sunflower seeds that already are hulled. Sure, freshly hulled seeds suitable for growing sprouts also should be suitable for growing sunflower greens. But viable hulled seeds are a rarity in the marketplace. Once hulled, they quickly lose viability unless kept refrigerated. Yet neither distributors nor stores refrigerate them. For every batch that you might sample from six or seven local or mail order sources, you are fortunate if just one batch germinates at a rate greater than ninety percent. Many batches do not germinate at all. If you do find a viable batch, still you are advised against growing them into greens. You must remove the many chipped seeds, else they start to rot on your trays of soil. Even if you are willing to be picky, a more compelling reason exists for not using hulled seeds. Sunflower sprouts are such a rare delicacy that no friend or restaurant has ever served me them, and no store has ever sold them. So do not deprive yourself of sunflower sprouts for the sake of growing sunflower greens. Anyhow you can more effectively grow greens from unhulled seeds than from hulled seeds. Unhulled sunflower seeds intended for wild bird feed are an option, especially if you are poor or just plain old cheap (“Cheap! Cheap!”), as bird feed sunflower seeds cost one-tenth the price of human feed sunflower seeds. Bird feed seeds usually sprout well but come with all sorts of bits and pieces of stalk or other
Sunflower Greens adapted from Microgreen Garden by Mark Mathew Braunstein 3
chaff, and sometimes insect eggs that “sprout” into larvae. Seeds intended for human consumption are more carefully sifted and culled. You pay more precisely so that you can get less, including less infestation, less debris, and less time separating the seed from the chaff. Two types of unhulled seeds predominate in the marketplace: black (all black) and striped (mostly grayish black with thin white stripes). Sunflowers kernels that we eat as snacks are mechanically shelled from striped seeds. Striped seeds are far larger than black seeds, and so are their greens. Those of us deluded by the Western conceit that bigger means better might aspire to grow sunflower greens from striped seeds. Big No No. The striped hulls are denser and thicker and cling to the leaves of the greens more firmly than do black hulls. Compelled to pluck off nearly all of the striped shells yourself, you are sure to lose patience with growing sunflower greens. Sunflower oil is made from black seeds, also called Black Oil Sunflower Seeds, and hailed as BOSS by backyard birders. Regardless of their own size, birds prefer black oil seeds for their higher oil content and their greater ease in shelling. Likewise you, too, will prefer black oil seeds for their greens’ ease of shedding the shells. For our purposes, black seeds offer a distinct advantage over striped, and thus a clear black and white issue with no shades of gray. When sprouting and gardening suppliers sell seeds specifically for growing sunflower greens, those are black oil. Sometimes when black oil seeds are in short supply, online retailers offer larger black seeds with slightly white stripes with the assurances that cross-pollination produced the stripes, but that theirs still are black oil seeds. In 2014 and 2015, for instance, two retailers listed black oil seeds, yet both sent me what truly were grey striped. The proof was in the growing, as the seedlings hardly shed their shells. Fortunately I ordered a small quantity, as this was a test run. Rather than hassle with complaining or returning their defective merchandise, I simply fed the seeds to the birds. The birds did not so much as make one peep of complaint. Often suppliers secure a source of black oil sunflower seeds that have been bred for the specific trait of shedding most of the shells. Generally, such seeds are very small and their shells very dark black and very shiny. If you strike it rich and find a source of such black gold, you might consider immediately reordering a large supply. If so, refrigerate them. Even in their shells, though they long retain their viability, they quickly lose their vigor. (More about their vigor, later.) To sum up: seek black oil sunflower seeds in their shells, especially those bred and sold specifically for growing sunflower greens. 2) MEASURE the SEEDS
Sunflower Greens adapted from Microgreen Garden by Mark Mathew Braunstein 4
To soak the seeds, you first must match a quantity to the size of your trays of soil. As there is no standard size of cafeteria trays, neither can there be a single measurement for seeds. While never more than 1 inch (2.5cm) deep, trays vary greatly in length and width. Even the bevel and width of their lips differ. So measure only the surface area of the soil, not of the tray, and certainly not of its lip. Here is a potential starting point: For every 100 square inches (645 square cm) of soil, measure no more than 4.5 tablespoons (66 mL) of sunflower seeds. Yet among black oil sunflower seeds, sizes vary too. The smaller the seeds, the more will fit into a given volume, and so the less volume needed. Thus applying any standard measurement can be tricky. Better to create your own calculations. Make precise measurements and keep accurate notes. Your first time, start with 1/2 C (4 fluid ounces, or 120 mL) of seeds, a suitable amount of average size seeds atop an average size tray (whatever the heck average size means). If upon sowing you find that you have measured and soaked too few seeds, you can fill the remaining bare soil with some other microgreen seed that does not need soaking and yet germinates and grows at the same rate as sunflower. Such a seed is the Napa type of Chinese cabbage, which just happens to be my second favorite microgreen, second only to sunflower. These two just might prove to be your favorites too. Or if you have soaked too many seeds, you can sow the excess onto a pint (500 mL) container or two. Or just feed them to the birds. They will appreciate the free lunch, and especially the softened shells. But wait! You can ignore all the preceding complicated calculations. Instead spread dry seeds onto an empty tray, meaning empty of soil. Allow enough room between seeds so that none touch each other. Next gather again the seeds, measure them, record that measurement, and apply it not just to this crop, but to all future crops from these same seeds atop these same size trays. To sum up: spread seeds onto an empty tray, gather the seeds, measure them, record that measurement, and use that both for this crop and for future crops. 3) HOURS 0 to 8: SOAK the SEEDS Place the seeds that you measured into a wide-mouthed jar, quart-size (1 liter) or larger. A glass canning jar is easily adapted into a sprouting jar, but any container will do.
Sunflower Greens adapted from Microgreen Garden by Mark Mathew Braunstein 5
optional: Sunflower kernels when hulled sink in water. Unhulled sunflower seeds float to the top. Afloat, the seeds on top rise slightly above the water line, like the tip of an iceberg. Left afloat so not soaking, the seeds on top will not germinate uniformly with the others. So take a piece of stiff nylon screen or a lid from a plastic container. Trim it to the size and shape of the inside of the jar. Call this the plunger. Insert the plunger atop the seeds, and push down. Trimmed to a snug fit, it will keep all seeds fully and uniformly submerged. If the plunger is slightly loose, seeds can shove it aside and float to the top of the water. To prevent this, weigh down the plunger with a spoon or some other utensil. Alternatively, fill the jar to the top with water, and if you have a sprouting lid affix that to the top of the jar. A conventional jar lid will suffice if you poke holes into the lid, as not to prevent air from circulating with the water. Fill the jar with water and soak the seeds for 8 hours. Anything between 4 hours and 12 hours is okay too. Even only 1 or 2 hours is more helpful than none. Sunflower seeds soon will cloud the water as the inherent dye that colors their shells dissolves. Your goal is to keep that water clear. To change the sullied water, screw a commercially produced sprouting top to the jar top. Pliable nylon screen or cheesecloth affixed with a rubber band can serve the same purpose. Or pour the water through a strainer or colander to catch any seeds. By whatever means, drain the sullied water. Refill the jar with fresh water, stir or swish the seeds around in the jar, then let it stand. If the shells continue to stain the water, repeat this procedure as often as convenient. But if you are able to freshen the water only once midway in the soak cycle, that is sufficient. This 8 hours of soaking can accelerate growth by 24 hours. If this were a game, you already are ahead in it. HOUR 8: Drain the water, refill the jar with fresh water, and drain that water too. Allow the jar to continue to drain. You can hasten growth by several more hours by proceeding to Step 4. Or you can call it a day and skip ahead to Step 5. To sum up: soak the seeds for 8 hours. 4) HOURS 8 to 32: GERMINATE the SEEDS Before SOWING upon SOIL Begin to germinate (sprout) the seeds in the jar, or in any sprouting container of your choice. Keep the seeds warm, at least room temperature. Sunflowers are summer crops, so the warmer the better. They thrive in summer heat or in warmly heated homes, but germination and growth slacken in cool temperatures.

Sunflower Greens adapted from Microgreen Garden by Mark Mathew Braunstein 6
During the chronicle that follows, the season was early summer when noontime temperatures averaged 80 degrees F (27 degrees C). Generally, seeds for microgreens will germinate just as well in nighttime darkness as in ambient light. Sunflower is no exception. Light hardly matters. Warmth and water matter. Rinse at least twice daily, and more frequently if convenient. After each rinsing, assure air flow into the jar by tapping the screen to dislodge any droplets of water. Set the jar on its side but angled slightly downward so that remaining water drains. Leaning the jar inside a bowl often provides the desired angle, plus the bowl catches the drainage. HOUR 32 (ONE DAY since removed from soaking): After 8 hours soaking and 24 hours draining, a white rootlet called the radicle begins to poke through the tip of the shell. Happy Birthday! The miracle of birth unfolding in front of you is the same as for any other microgreen. In the sunflower, however, its large size and its high contrast between white rootlet and black shell display this miracle more visibly. Sprouting before sowing brings to the table four advantages. First, the more often you rinse, the more the shells will soften; and the more fully the greens later will shuck off their shells; and so the fewer you will need to pluck off yourself; and so the greater will grow your enthusiasm for growing sunflower greens. Second, you can more efficiently incubate a jar than a large tray of soil. Third, the added warmth and extra rinsing will accelerate further growth. And fourth, especially useful for a new batch of seeds, you can verify a promising germination rate before sowing. Otherwise, if the germination rate is low, in addition to the already wasted seeds, you will waste soil. If needs be, you can postpone sowing sunflower for one more day, but no longer. Wait too long, and the rootlets will begin to bend in an effort to orient themselves downward relative to gravity. Tumbled around with each rinsing, they will point in many different directions. This will delay rooting if upon transfer to soil the rootlets point helter-skelter, and totally prevent rooting of rootlets pointing upwards. Rinse the sprouted seeds one last time before transferring them from the jar to the awaiting soil. To sum up: Before sowing, germinate sunflower seeds for 1 day in warm temperatures (or 2 days in cool) and sow the seeds upon emergence of the rootlets. 5) DAY 1 plus 8 HOURS: SOW the SEEDS upon the TRAY of SOIL

Sunflower Greens adapted from Microgreen Garden by Mark Mathew Braunstein 7
Spread the seeds evenly upon the tray of moistened soil. Do not allow any to rest atop others, else the top seeds not take root but instead rot. Press the seeds deeply into the soil, but do not cover them with soil. Incredibly, covering sunflower seeds with soil only makes their shells later cling to leaves more tenaciously, maybe because dried soil acts like mortar and cements the hulls to the leaves. Spray the seeds with water, using a spray bottle or mister, not a kitchen sink spray nozzle which might disturb or move the seeds. No puddles! 6) DAY 1 plus 8 HOURS: COVER the TRAY with another TRAY Place an empty cafeteria tray atop the seeds. If you can provide a top tray that is larger than the one on bottom, all the better, but a same size tray will suffice. Ignore your intuition, and place this top tray with its container side UP not down, so that its bottom rests directly atop the seeds. Now press down on the top tray. Hard! Harder! If your top tray is larger than the bottom tray and therefore overlaps it, leave the tray top there as is with its container side down and bottom side up. As long as the soil is not overly saturated, enough air still will reach the seeds to promote further growth. If your top tray is the same size as your bottom tray, invert it so that its bottom side is up and its container side is down, in which case it will fit perfectly aligned atop the bottom tray. Even though protected by their shells, sunflower seeds quickly lose their vigor. They send forth their rootlets, but the rootlets may lack energy to take root. Failing to burrow into the soil, instead the rootlets wander aimlessly upon it as though they were drunken. This top tray nudges them toward sobriety and sets them straight. To assure a bountiful harvest, you may need to put on some weight, not on you, but on the top tray. Place atop it that spray bottle probably kept near at hand, or that sprout jar now empty, or several more empty trays, or another tray filled with soil and sunflower seeds, a double decker. This added resistance straightens and strengthens both the stems and the roots, the stems upward and the roots downward. If the sunflower seeds have strong vigor, the added weight is not as much needed. But such resistance can neither hurt nor hinder them, so you might as well add some weight
Sunflower Greens adapted from Microgreen Garden by Mark Mathew Braunstein 8
But (and this is a BIG BUT) for batches of seeds that have lost their vigor, sometimes the top tray even with added weight atop it is not enough to assure the seeds to burrow downward into the soil. For such batches of seeds, apply a very thin layer of soil atop them. So long as the layer is very thin, the seedlings will cast aside the soil without any of soil clinging to the seedlings, and you will not need to wash the greens after harvest. My experience has proven that potting soils, not peat-based seedling mixes, are more thoroughly cast off by the seedlings. But you should experiment with the mixes and soils you have available to you, which are not the same as those available to me. 7) DAYS 2 to 3: KEEP the SEEDS COVERED, CHECK DAILY, and SPRAY if NEEDED Once a day, gently remove the top tray to take a peek. If the seeds and soil appear parched, spray away. You can take a well deserved vacation day on Day 2, as the seeds will not likely need watering until Day 3. On Day 3, the rootlets begin to anchor themselves into the soil, taking root. Soon after, the seedlings will begin to lift the top tray. Though only slight, the gap that is widening between the two trays provides a clear sign that your plans for a bountiful harvest, too, have taken root. 8) DAYS 3 to 4: PUT ON SOME WEIGHT and SPRAY if NEEDED Once a day, remove the top tray and spray as needed. 9) DAY 4 or 5: REMOVE the TOP TRAY and MISGUIDED SEEDLINGS Remove the top tray and its weight before the gap between the two trays widens to 1 inch (2.5 cm). Your present viewing of the seedlings just might arouse your awe, in which case removing the top tray becomes a truly uplifting experience. Remove misguided seedlings. If despite all your best intentions you sowed seeds beyond the capacity of the tray, you may already have seen the consequences. You certainly see them now. The seedlings blocked by other seedlings from contact with the soil will have failed to anchor their roots, and might misdirect their errant roots elsewhere than down. You must remove the misguided seedlings, else they die and begin to rot and then contaminate the living seedlings. But be very picky. Avoid uprooting anchored seedlings whose roots might be entangled with those unanchored. Use fine tweezers, not your fingers.
Sunflower Greens adapted from Microgreen Garden by Mark Mathew Braunstein 9
10) DAY 4 or 5: EXPOSE the SEEDLINGS to LIGHT Grown in continuous darkness, the sunflower seedlings now await the intermittent light of day. Until now, they directed their growth to their roots to burrow into the soil. Now, if still kept in the dark, they will begin to lengthen their stems in a vain attempt to reach for light. Yet many large scale microgreen farmers do continue to keep their seedlings in the dark, which yields long stems and paltry leaves. Some farmers expose them to light only on the final day, which explains why their hardly green sunflower greens taste like iceberg lettuce. The competition of the marketplace dictates that quantity trumps quality. Sold by weight, short sunflower greens would cost twice the price as long. If Farmer A grows sunflower greens with elongated stems, then Farmer B has no choice but to do the same. You, however, do have a choice. Anything homemade or homegrown can transcend the constraints of commerce. Our mantra deserves chanting over and over: Grow Lush Leaves, Not Long Stems. So expose your sunflower greens to light if possible on DAY 4, otherwise surely by DAY 5. And when possible, expose them not just to any light, but to sunlight. You have not been cultivating fluorescent flower greens or incandescent flower greens. Yours are SUNflower greens. While observing the guidelines in the Sunlight section of the chapter Light and Growth, be especially attentive to providing direct sunlight. During warm weather, you might consider setting the tray outdoors, so sunlight is not filtered by glass or even window screen. Direct sunlight broadens and thickens and energizes the leaves so significantly that they pop off nearly all the shells after merely one day. Just beware of roving squirrels and skydiving blue jays who, attracted to the shells, seek a tasty treat even when the seeds all have grown into greens. To sum up: to grow lush leaves rather than long stems, provide the greens with as much direct sunlight as the daytime allows. 11) DAYS 5 to 7: TOP WATER DAILY Watering from above is surely the easiest method of hydration. When you water your outdoor garden or lawn with a garden hose, you are top watering. When you water germinating microgeens with a spray bottle or mister, you are top watering. Time now to give your trigger finger a much deserved rest. The roots that previously might have been dislodged now are securely anchored. In addition, the canopy of leaves reduces the full impact of the cascade of water. So now you can shower your sunflowers with a kitchen sink spray hose or a watering can.

Sunflower Greens adapted from Microgreen Garden by Mark Mathew Braunstein 10
If your sink is large and your tray is small, place the tray flat on the bottom of the sink. If your tray will not fit, lean one end to rest along the top edge of the sink. Spray away. Especially aim water directly onto any remaining clinging shells to fully moisten them, as they are your reason for top watering. Of course avoid watering too much. Allow a half minute for the soil to soak up the water. If you need to drain off excess water and the tray is not already leaning into the sink, lift an end and rest it along the sink’s top edge. Allow it to drain. If needed, turn the tray around and allow it to drain from the other end too. Eventually you will learn to gauge how much water is enough and what is too much, so little or no excess will exist for you to need to drain. To sum up: top water daily and drain daily too, just enough water and just often enough. In short, just enough (worthy advice for all of life). 12) DAY 5 or 6 or 7: The HARVEST During summer, the days are especially hot and daytime hours especially long and sunlight especially intense. As long as you are especially attentive to providing sufficient water, leaves can cast off all their shells as soon as the evening of DAY 4. So you could harvest the greens this evening. But to provide them the darkness to metabolize their sugars and starches from photosynthesis, better to harvest on the early morning of DAY 5. During the rest of the year, you more realistically can expect to harvest on the morning of DAY 6 or DAY 7. Sunflower Greens grown with ample direct sunlight have deep green leaves and very short stems. The sure sign of ample sunlight are deep green stems with streaks of red, yes red, rather than pale yellow-green stems. If you anticipate a harvest the next day and you plan to refrigerate your harvest, do not top water during this time. If you must water, in order to assure the greens are dry upon harvest, water from the side. See Chapter [XX], Step [X]: Side Watering. If you are only human and therefore humanly fallible, some shells still might cling to the leaves. If so, see Chapter [XX], Step 2: Husk the Hulls. It is easier removing them while your both hands are free before harvest, rather than after harvest when you must hold the green in hand. Your optimal time for harvest begins when most or all of the hulls are shed, and ends with the first sign of the second set of leaves, the true leaves. Keep a sharp

Sunflower Greens adapted from Microgreen Garden by Mark Mathew Braunstein 11
eye for the emergence of those two tiny leaves in the center of the large cotyledon leaves (seedling leaves). If they spoke in human language and if that language were English, those two tiny leaves would say to you, “Right now I am nice and sweet and tender, but watch out, I soon am turning tough and fibrous.” In plain English, if you delay your harvest, your crop will be larger and taller, but will turn tough and tart. To sum up: harvest before emergence of the second pair of leaves. 13) DAYS 5 to 14: The SECOND WAVE (and Third and Fourth and Fifth) What, merely a second wave? Sunflowers produce even third and fourth and fifth waves, though each sparser than the wave before. Despite your being attentive to soaking all the seeds, including the floaters on the top, slacker seeds still produce a postponed crop, which upon the second wave can total more than one-third of the amount of the first. They should taste just as good. The third wave will be still fewer, and by now the nutrients in the soil will be depleted, so the crop far less palatable. On the fourth wave growth is stunted, as though grown on no soil at all. Upon the tiny fifth wave, the stunted few that emerge will taste vile. The diminishing growth and decreasing tastiness of multiple wave sunflower greens provide ample evidence that even seedling mix provides essential nutrients for growth, and prove the folly of trying to grow microgreens by hydroponics without any supplementation. Thus, in order to fully harvest all the waves of sunflower greens, you should add fertilizer to the seedling mix or potting soil for your next crop of greens. Or just apply more mix or more soil. To accommodate more soil, you must switch from shallow cafeteria trays to either pint (half liter) size containers or to deeper seedling trays, again, for your next crop. For this crop at hand, simply harvest only the first and second waves, then place the remaining mat of greens into your compost heap. Among the diurnal birds and nocturnal mammals who will savor the remaining waves of sunflower greens, none will register a complaint with the gardener. b c a b a c a b c a b a c Acknowledgment: The very idea of growing and eating sunflower greens began in the early 1970’s with one person, Viktoras Kulvinskas, co-founder of Hippocrates Health Institute, and the author of books on raw foods, sprouting, and natural living. One scant human generation after Viktoras harvested his first crop, most North American have heard about sunflower greens, many have eaten them, and some even have grown them. On behalf of sprout growers and microgreen gardeners
Sunflower Greens adapted from Microgreen Garden by Mark Mathew Braunstein 12
worldwide, and on my own behalf as one of Viktor’s inspired readers and honored friends, I bestow upon him my heartfelt thanks. Thank you, Viktor! b c a b a c a b c a b a c
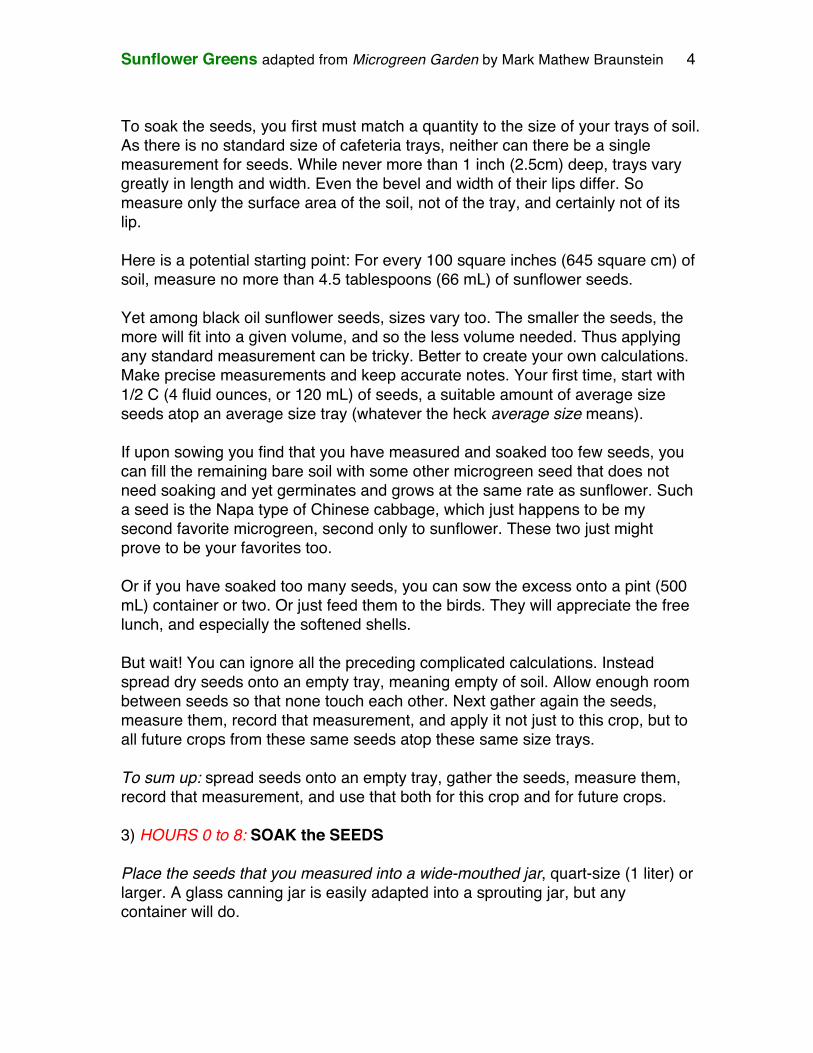
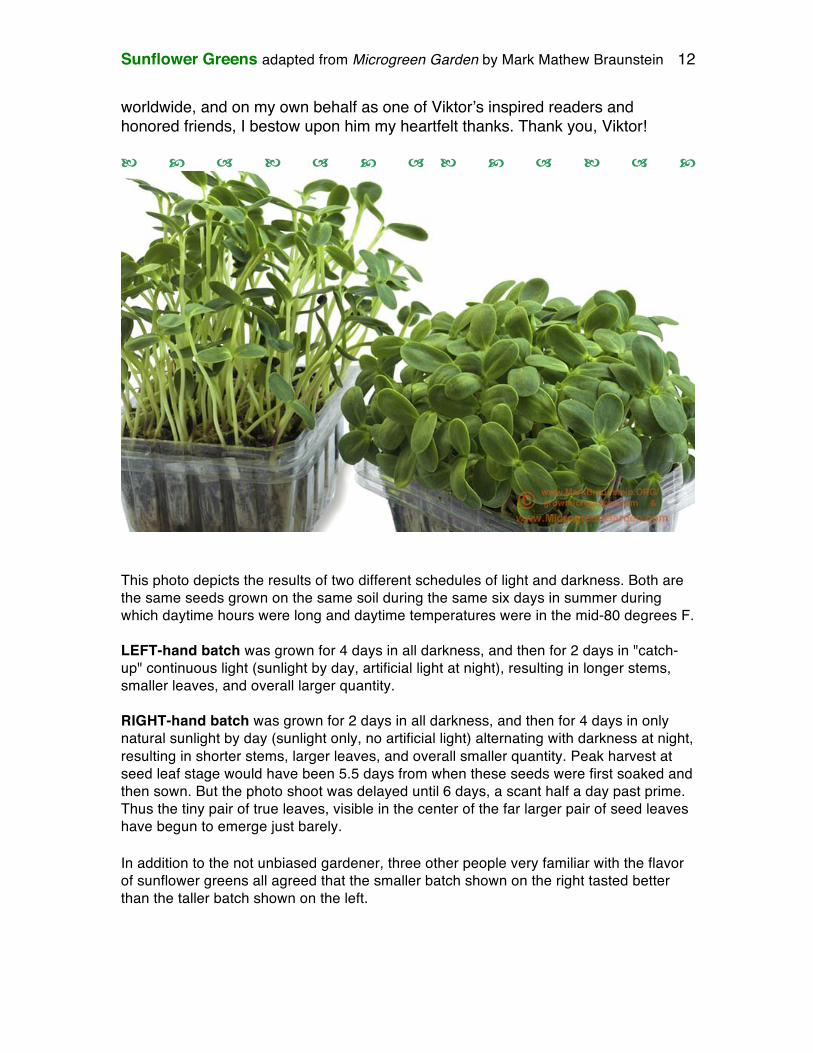
This photo depicts the results of two different schedules of light and darkness. Both are the same seeds grown on the same soil during the same six days in summer during which daytime hours were long and daytime temperatures were in the mid-80 degrees F. LEFT-hand batch was grown for 4 days in all darkness, and then for 2 days in "catch-up" continuous light (sunlight by day, artificial light at night), resulting in longer stems, smaller leaves, and overall larger quantity. RIGHT-hand batch was grown for 2 days in all darkness, and then for 4 days in only natural sunlight by day (sunlight only, no artificial light) alternating with darkness at night, resulting in shorter stems, larger leaves, and overall smaller quantity. Peak harvest at seed leaf stage would have been 5.5 days from when these seeds were first soaked and then sown. But the photo shoot was delayed until 6 days, a scant half a day past prime. Thus the tiny pair of true leaves, visible in the center of the far larger pair of seed leaves have begun to emerge just barely. In addition to the not unbiased gardener, three other people very familiar with the flavor of sunflower greens all agreed that the smaller batch shown on the right tasted better than the taller batch shown on the left.

Sunflower Greens adapted from Microgreen Garden by Mark Mathew Braunstein 13
Nevertheless (that great “nevertheless”) many home growers do like their sunflower greens with tall lanky stems, nor are they attentive to providing intense light. Mine is not the final word on growing sunflower greens, and mine certainly was not the first one. For two other sets of instructions different than here, I recommend the webpages generously provided by two reputable suppliers of black oil sunflower seeds. Sproutpeople: https://sproutpeople.org/growing-sunflower-greens/ Wheatgrass Greenhouse: http://www.wheatgrassgreenhouse.com/how-to-grow-sunflower-greens.html b c a b a c a b c a b a c
excerpted & expanded from the original manuscript of
MICROGREEN GARDEN Indoor Grower’s Guide to Gourmet Greens
© Mark Mathew Braunstein book published 2013
www.MicroGreenGarden.com