Embed Size (px)
Citation preview

Status Web Evaluator’s Guide
©2018 Software Pursuits, Inc.
Software Pursuits, Inc. www.SoftwarePursuits.com
1
Table of Contents
Introduction ....................................................................................................................... 2 System Requirements ....................................................................................................... 2 Contact Information ........................................................................................................... 2 Installing Microsoft IIS ....................................................................................................... 2 Verifying Microsoft IIS Features ........................................................................................ 9 Installing the Web Platform Installer & Web Deploy ........................................................ 10
Step 1: Install the Web Platform Installer .................................................................... 10 Step 2: Install Web Deploy .......................................................................................... 10
Run the SureSync Status Web Installer .......................................................................... 12 Website Configuration via IIS Manager (UI) .................................................................... 13
Step 1: Create a Folder to Store the Website Files ..................................................... 13 Step 2: Create the Website in IIS ................................................................................ 13 Step 3: Enable Windows Authentication for the Website ............................................ 14 Step 4: Confirm Application Pool Settings .................................................................. 15 Step 5: Install Website Files using Web Deploy .......................................................... 16
Website Configuration via the Command Line ................................................................ 20 Controlling Access to Status Web ................................................................................... 20
IIS Windows Authentication ........................................................................................ 20 SureSync Group Folders ............................................................................................. 21
Configuring Connection to the Scheduler(s) ................................................................... 22 Configure the Scheduler Connection .......................................................................... 22 Allow the Display of Standalone Jobs (optional) ......................................................... 24 Recycle the IIS Application Pool ................................................................................. 25
Using Status Web ........................................................................................................... 26 Start / Stop .................................................................................................................. 27 View Status ................................................................................................................. 28

Software Pursuits, Inc. www.SoftwarePursuits.com
2
Introduction
SureSync is a powerful file replication & synchronization application that provides critical services to your network. As with any critical application, the status of SureSync should be monitored. Before the introduction of Status Web, these tasks were accomplished via status applications installed on the machine(s) that needed to view status. Status Web is an innovative browser based status application for SureSync. Access is controlled via Internet Information Services (IIS) Windows authentication and SureSync’s Group Folder security. With Status Web, an administrator can easily allow a user to:
Stop and start Real-Time Monitors, Schedules and standalone Jobs. View statistics such as warnings, exceptions and files added/deleted.
This guide will assist you in deploying Status Web and understanding the capabilities of the program.
System Requirements
SureSync Status Web system requirements are:
Operating System: Windows 2008 or newer Internet Information Services (IIS): 7.0 or newer with WebDeploy installed Microsoft .NET Framework: 4.5.2
Contact Information
If you need further information about SureSync or need clarification on anything within this guide, please contact our support group and they will be happy to assist you with your evaluation. Software Pursuits, Inc. 1900 South Norfolk Street, Suite 330 San Mateo, CA 94403 Phone: +1-650-372-0900 Fax: +1-650-372-2912 Sales e-mail: [email protected] Support e-mail: [email protected] Technical support is available between 7:00AM and 4:00PM PST Monday through Friday.
Installing Microsoft IIS
SureSync Status Web must be installed on a Windows server running Microsoft Internet Information Services (IIS). If you’re installing IIS on a machine specifically for Status Web, this section will provide details on installing Microsoft IIS. If you’re adding Status Web to an existing IIS server, skip to the next section titled “Verifying Microsoft IIS features.”

Software Pursuits, Inc. www.SoftwarePursuits.com
3
Detailed documentation for installing IIS 7 on 2008/2008 R2 can be found at http://www.iis.net/learn/install/installing-iis-7/installing-iis-7-and-above-on-windows-server-2008-or-windows-server-2008-r2. Instructions on installing IIS 8.5 on 2012 R2 can be found at http://www.iis.net/learn/install/installing-iis-85/installing-iis-85-on-windows-server-2012-r2. This guide will walk through the basics of installing IIS on a sample Windows 2012 R2 machine. The procedure is similar for older operating systems. The Server Manager is where you will install IIS and can be launched by clicking on the Server Manager icon in the Task Bar (if present) or by entering Server Manager into Search. Click on “Local Server” on the left to display information about the server.
Scroll down until you see “Roles and Features.” Click on the “Tasks” button to the right and select “Add Roles and Features” from the drop-down menu.

Software Pursuits, Inc. www.SoftwarePursuits.com
4
The “Add Roles and Features Wizard” will be displayed. Click “Next” on the first panel.
On the next panel, you will generally select “Role-based or feature-based installation.” Click the “Next” button to continue.

Software Pursuits, Inc. www.SoftwarePursuits.com
5
On the next panel, you will select the destination server to install to. Once the machine is selected, click the “Next” button to continue.
On the “Select server roles” panel, scroll down and check the option for “Web Server (IIS).”

Software Pursuits, Inc. www.SoftwarePursuits.com
6
When you click on the option, you could receive a message indicating that additional required features need to be added. Click the “Add Features” button.
Click the “Next” button to continue. On the “Select Features” panel, no options need to be selected. Click the “Next” button to continue.

Software Pursuits, Inc. www.SoftwarePursuits.com
7
On the “Web Server Role (IIS)” wizard panel, click “Next” to continue.
On the “Select role services” panel, some options need to be selected. Scroll down and check “Windows Authentication.” Expand “Application Development” and select and check “ASP.NET 4.5.” When you do this, you will be presented with a pop-up to add additioanl features, click the “Add Features” button. Finally, check “Management Service.”

Software Pursuits, Inc. www.SoftwarePursuits.com
8
Click the “Next” button to continue. On the final panel, you have the option to automatically restart the system if needed. Check the box for that option if you would like to use it. The decision on if a reboot is needed is made by Windows.
Click the “Install” button to start the installation process.

Software Pursuits, Inc. www.SoftwarePursuits.com
9
When the installation is complete, reboot the system if necessary. Otherwise, click the “Close” button to exit the wizard. To continue the installation of Status Web, go to the “Installing the Web Platform Installer & Web Deploy” section of this document.
Verifying Microsoft IIS Features
If you are installing SureSync Status Web on an existing Microsoft IIS server, you will want to verify that the required IIS features are installed on the system. Start by launching the Server Manager. This can be done by clicking on the Server Manager icon in the Task Bar (if present) or by entering Server Manager into Search. Click on “Local Server” on the left to display information about the server. Scroll down until you see “Roles and Features.” Scroll down the list and look for “Management Service,” “ASP.NET 4.5” and “Windows Authentication” for Web Server (IIS). The “Management Service” is shown in the screenshot below. You can use the search filter in the upper right hand corner of “Roles and Features” to search for the names as well.

Software Pursuits, Inc. www.SoftwarePursuits.com
10
If both are present, move to the “Installing the Web Platform and Web Deploy”section of this document. If either are missing, they will need to be installed. To do so, click on the “Tasks” button and select “Add Roles and Features” from the drop-down. If you need further guidance on adding the Management Service and Windows Authentication features to IIS, please follow the steps outlined in the “Installing Microsoft IIS” section found earlier in this document.
Installing the Web Platform Installer & Web Deploy
This section will outline the procedure for installation the remaining required Microsoft components.
Step 1: Install the Web Platform Installer
Web Deploy is required on the IIS server that Status Web will be installed on. To easily install Web Deploy, the Web Platform Installer must be installed first. If the Web Platform Installer is installed on the system, you will find “Microsoft Web Platform Installer 5.0” listed in Add/Remove Programs. If not installed, you can download the installer from http://go.microsoft.com/fwlink/?LinkID=145505 and run it on the IIS server.
Step 2: Install Web Deploy
Launch the Internet Information Services (IIS) Manager application. Click on the server’s name in the left-hand tree view and then double-click on the Web Platform Installer icon to launch the installer.

Software Pursuits, Inc. www.SoftwarePursuits.com
11
Search for “Web Deploy” in the search box of the Web Platform Installer.
For our purposes, the “Web Deploy 3.6 without bundled SQL support (latest)” version of Web Deploy is adequate. You can also install “Web Deploy 3.6” if you plan to use Web Deploy for other purposes.

Software Pursuits, Inc. www.SoftwarePursuits.com
12
Click the “Add” button. The “Install” button will then enable. Click on the “Install” button and accept the Microsoft agreement to complete the installation. Close and relaunch the Internet Information Services (IIS) Manager to ensure that the Web Deploy options will show in the interface.
Run the SureSync Status Web Installer
On the server running IIS that will host the Status Web website, run the SureSyncStatusWeb.exe setup file. This setup will install a configuration utility used to define connections to your SureSync Scheduler(s) and a Web Deploy zip file containing the Status Web website files.

Software Pursuits, Inc. www.SoftwarePursuits.com
13
By default, the installation folder is C:\Program Files (x86)\Software Pursuits\SureSync Status Web). In this folder you will find a WebDeploy subfolder containing the files necessary to install the website on the system.
Website Configuration via IIS Manager (UI)
The Status Web website must be created and configured in IIS to allow users access to it.
Step 1: Create a Folder to Store the Website Files
Open Windows Explorer on the IIS server and create a folder to be used to store the website files. For this example, we will use C:\StatusWeb. Right click on the folder and select Properties. On the Security tab, you will want to grant Read permission to any user account who will be using Status Web.
Step 2: Create the Website in IIS
Launch the Internet Information Services (IIS) Manager. Click on Sites in the left-hand tree view and then click on “Add Website”
The following panel will be displayed:

Software Pursuits, Inc. www.SoftwarePursuits.com
14
To create the website, define the following:
Site Name: Give the website a name of your choice. In this example, we will use SureSync Status Web. By default, an Application Pool of the same name is created.
Physical Path: Either type the path you created in Step 1 into this field or click “Browse” and browse to it.
Binding: The binding defines the web address used to access the Status Web website. If the site is to be accessed from the Internet, you must use a public domain name and have an A record in your DNS that points to the web server.
Click the “OK” button to create the website.
Step 3: Enable Windows Authentication for the Website
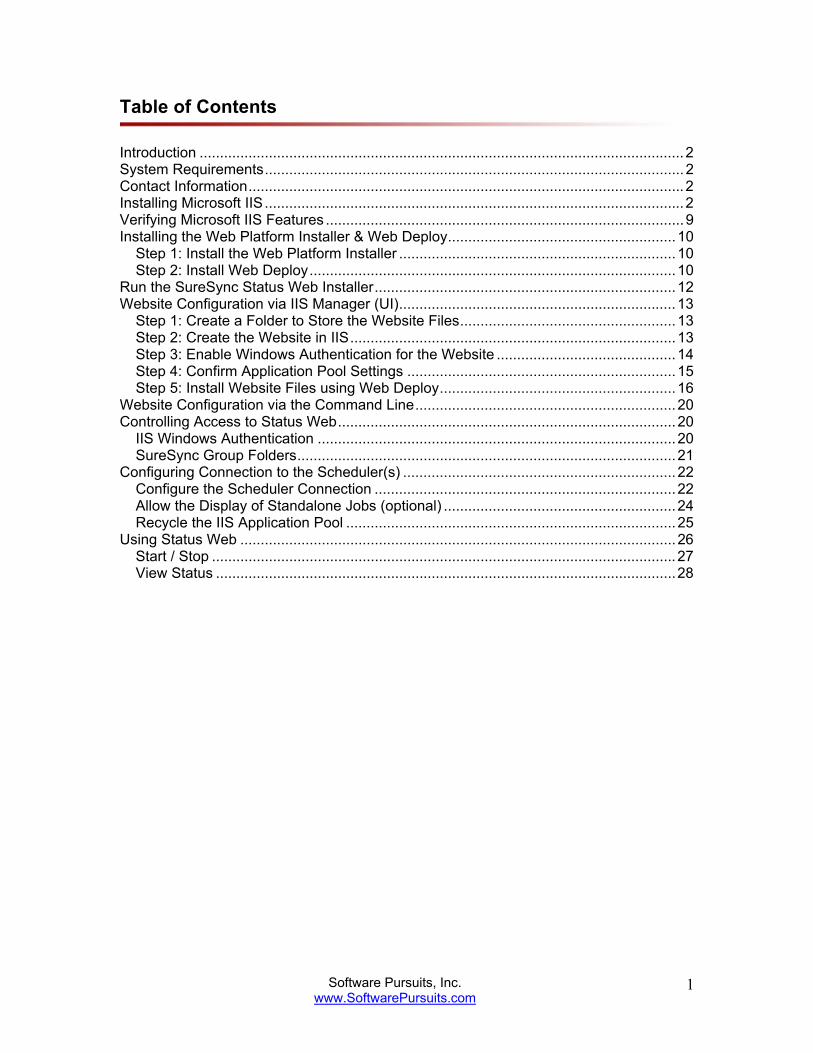
Click on the newly created website and then click on the “Authentication” button
Software Pursuits, Inc. www.SoftwarePursuits.com
15
Click on “Windows Authentication” and then click on “Enable” in the “Actions” menu.
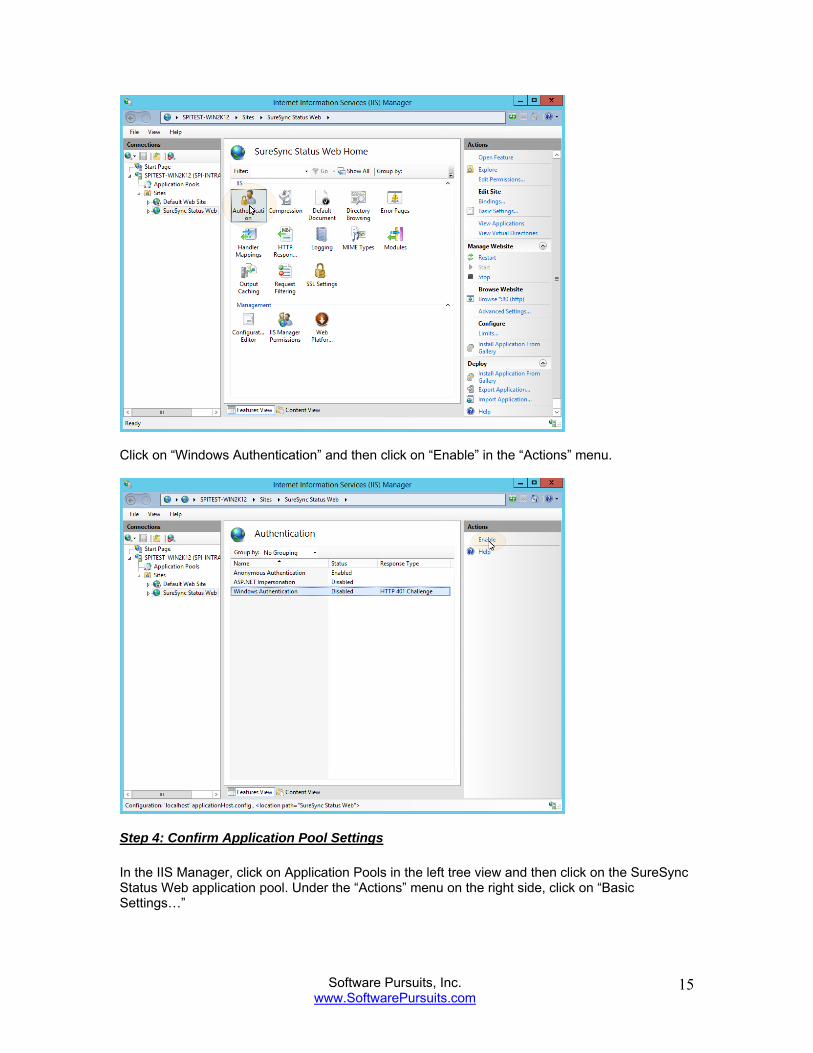
Step 4: Confirm Application Pool Settings
In the IIS Manager, click on Application Pools in the left tree view and then click on the SureSync Status Web application pool. Under the “Actions” menu on the right side, click on “Basic Settings…”
Software Pursuits, Inc. www.SoftwarePursuits.com
16
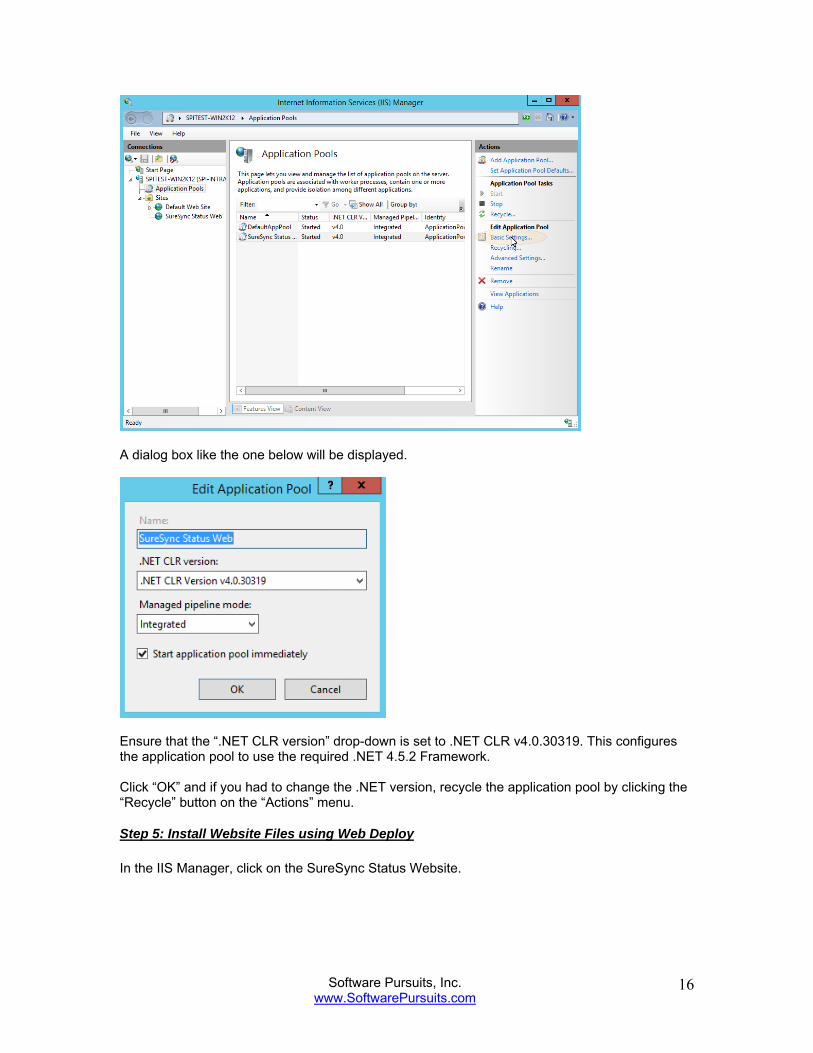
A dialog box like the one below will be displayed.
Ensure that the “.NET CLR version” drop-down is set to .NET CLR v4.0.30319. This configures the application pool to use the required .NET 4.5.2 Framework. Click “OK” and if you had to change the .NET version, recycle the application pool by clicking the “Recycle” button on the “Actions” menu.
Step 5: Install Website Files using Web Deploy
In the IIS Manager, click on the SureSync Status Website.

Software Pursuits, Inc. www.SoftwarePursuits.com
17
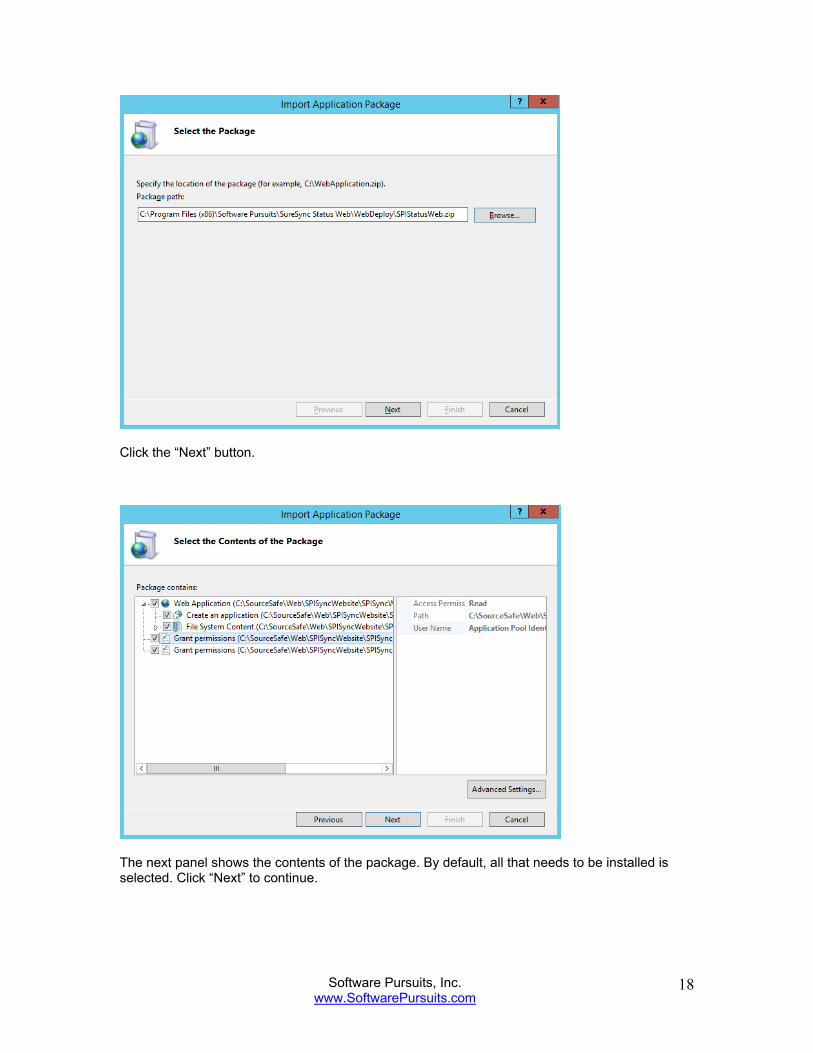
On the “Actions” menu, under “Deploy” click on “Import Application.” The following dialog will be displayed:
Click on the “Browse” button and browse to C:\Program Files (x86)\Software Pursuits\SureSync Status Web\WebDeploy. Select the SPIStatusWeb.zip and click the “Open” button.
Software Pursuits, Inc. www.SoftwarePursuits.com
18
Click the “Next” button.
The next panel shows the contents of the package. By default, all that needs to be installed is selected. Click “Next” to continue.

Software Pursuits, Inc. www.SoftwarePursuits.com
19
The next panel defines the name of the application. What you enter here is critical to what the URL will be for accessing the site. Assume you are using http://status.domain.com for your URL. The default of SPIStatusWeb would install the Status Web website where it is accessible at http://status.domain.com/SPIStatusWeb. If you want the Status Web website accessible from http://status.domain.com, you should clear the field so it looks like this:

Software Pursuits, Inc. www.SoftwarePursuits.com
20
Define the Application Path as appropriate for your environment. Click “Next” to continue. If you have cleared the application path definition, you will receive the following prompt:
In that case, click “OK” to continue with the setting or click “Cancel” to go back and define an application name. The Status Web website will now be installed. You will receive a prompt indicating that the package was installed succesfully. Click the “Finish” button to exit the wizard.
Website Configuration via the Command Line
WebDeploy provides a method of installation via the command line. To install via the command line, launch an elevated command prompt and change directory to the location of the SPIStatusWeb.zip file. By default, this folder is C:\Program Files (x86)\Software Pursuits\SureSync Status Web\WebDeploy. In this directory, you will see a file named SPIStatusWeb.deploy.cmd. This is a generated script to be used to deploy the website. The SPIStatusWeb.SetParameters.xml file contains deployment parameters. A detailed guide on Web Deploy from Microsoft’s ASP.net website can be found at http://weblogs.asp.net/scottgu/automating-deployment-with-microsoft-web-deploy. The section on “Deploying a Package from the Command-Line” provides further details.
Controlling Access to Status Web
Access to the Status Web website is controlled by Windows authentication within IIS and SureSync’s Group Folder security.
IIS Windows Authentication
Using Windows Authentication with IIS for the Status Web website will allow users to log in using the same credential used to access their computer. This authentication method must be used because SureSync database security is also done with Windows accounts. When configuring a website in IIS to use Windows Authentication, a user account must have Read NTFS permissions granted to the folder containing the website. Users without read permission will not be able to log into the website.

Software Pursuits, Inc. www.SoftwarePursuits.com
21
Software Pursuits recommends the purchase of an SSL certificate if you will be having users access Status Web via the Internet. This will encrypt the credentials provided by the users. An example process for configuring SSL for an IIS website can be found at http://www.iis.net/learn/manage/configuring-security/how-to-set-up-ssl-on-iis.
SureSync Group Folders
SureSync’s Group Folders feature allows you to define the user accounts that should have access to perform various operations within SureSync. By default, when SureSync is installed on a computer in a domain the accounts with access will be the user creating the database, the local administrators group and the domain administrators group. You will need to modify Group Folder security if the users you want to use Status Web are not included in the defaults. To do so, launch the SureSync Desktop and click on the Group Folder you wish to modify.
On the “Security” tab, you can click “Add” and add the appropriate accounts. The required permissions are:
Start Job: Required to start Jobs, Schedules and Real-Time Monitors in Status Web. Stop Job and Process Alerts: Required to stop Jobs, Schedules and Real-Time
Monitors in Status Web View Job Status: Required to view status in Status Web

Software Pursuits, Inc. www.SoftwarePursuits.com
22
You can also define security on individual Jobs, Schedules or Real-Time Monitors. This is not recommended because it results in more configuration work. As with Windows NTFS security, setting security on the Group Folder and allowing it to be inherited to the Jobs, Schedules and Real-Time Monitors is easier. Additional details on Group Folder Security can be found in the SureSync help file by pressing F1 while on the Security tab in the SureSync Desktop.
Configuring Connection to the Scheduler(s)
The Status Web website uses a configuration file to locate the SureSync Scheduler(s) that it should connect to for retrieving status.
Configure the Scheduler Connection
To access this utility, go to Start | All Programs | SureSync Status Web and launch the SureSync Status Web Configuration Utility. The following utility will launch:
To begin the configuration, click on the drop-down menu and select “SureSync v8”
Click on the “Outbound Connections” tab. Click on the “Add New Machine” button.

Software Pursuits, Inc. www.SoftwarePursuits.com
23
On the “Add Communications Agent” dialog box, enter the NetBIOS computer name of the machine running the SureSync Scheduler. This must be the NetBIOS computer name and not an IP address or fully qualified domain name (FQDN). If you need to access the Scheduler machine via one of these methods, this will be configured later in the wizard.
Click the “Save New Computer” button. This will generate the default configuration. Changes only need to be made to this panel if you need to access the Scheduler via IP address or FQDN or your environment is using a non-default port. To define an IP address or FQDN enter it in the Access Name field if needed.

Software Pursuits, Inc. www.SoftwarePursuits.com
24
Click the “Save” button if you have made changes. The “Test this Connection” button can be used to confirm connectivity to the Scheduler machine.
Allow the Display of Standalone Jobs (optional)
By default, standalone Jobs do not appear in Enterprise Status or Status Web. To configure them to appear, you must enable the “Allow stand-alone jobs to display in Enterprise Status” option on the General tab of the Group Folder.

Software Pursuits, Inc. www.SoftwarePursuits.com
25
As a best practice, it is best to create standalone Jobs that you want to have appear in Status Web in a separate Group Folder. If you enable this option for all of your Group Folders, you can have a large number of standalone Jobs showing in the website. This can be hard to navigate.
In addition, you must modify the connection defined for Status Web to enable the display of standalone Jobs. Go to Start | All Programs | SureSync Status Web and launch the SureSync Status Web Configuration Utility if you closed it. Click on the “Outbound Connections” tab and check the “Display Stand-alone jobs from group folders marked to be displayed” option. If you have multiple Schedulers, select the appropriate Scheduler from the drop-down menu.
Recycle the IIS Application Pool
Upon completing the configuration, you must recycle the IIS Application Pool used by the Status Web website to allow the changes to take effect. To recycle the Application Pool, launch the Internet Information Services (IIS) Manager and click on Application Pools in the left tree view.

Software Pursuits, Inc. www.SoftwarePursuits.com
26
Click on the Application Pool name in the middle of the panel. The correct Application Pool name will depend on what you configured when installing the website files. Click on the “Recycle” button in the Actions menu.
You can confirm the Application Pool name by expanding Sites, clicking on the Status Web website and then clicking on Basic Settings in the right hand “Actions” menu.
Using Status Web
To use Status web, open a web browser and enter the URL you defined earlier. For example http://syncstatus.domain.com. If you have properly configured Windows authentication for the IIS website, you will receive a prompt asking for a username and password. This dialog box will look different depending on browser.

Software Pursuits, Inc. www.SoftwarePursuits.com
27
Enter the credential and click on the “Log In” button. The Status Web page will load and look something like the screenshot below.
The Status Web application has two primary goals:
Allow you to start and stop Jobs, Schedules and Real-Time Monitors Review status information and statistics for each Job, Schedule and Real-Time Monitor
Start / Stop
To start or stop a Job, Schedule or Real-Time Monitor click on the item and then click the corresponding button on the left.

Software Pursuits, Inc. www.SoftwarePursuits.com
28
View Status
To view status, review the columns to the right of the Job name. Statistics provided include alerts, warnings, exceptions, copied and more. In addition, you can spin down an item to get additional detail. This is accomplished by clicking on the triangle to the left of the start/stop button.