Embed Size (px)
Citation preview
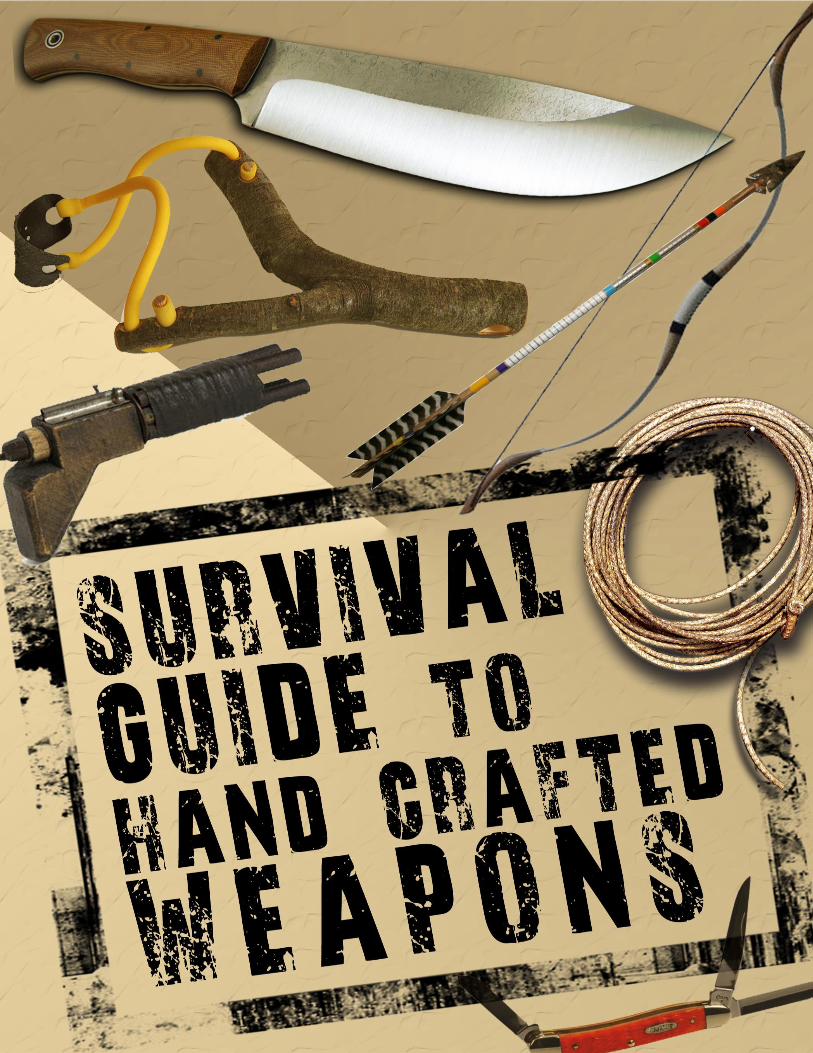
Survival Guide to Handcrafted Weapons
Page 1
Survival Guide to Handcrafted Weapons
Page 2
T A B LE O F C O N T ENT S
Introduction
Safety Guidelines
The Crouching Tiger Catapult
Carpini’s Crossbow
The Smoke Bomb
The High-Tech Backpack Shield
Creating Wooden Obstacles
Survival Guide to Handcrafted Weapons
Page 3
I N T R O DUC T I O N
Just imagine a group of armed thugs on your
doorstep. All of them look threatening, angry,
desperate, and violent. The manner in which they
behave leaves no room for doubt. They are up to no
good.
You realize that some of them may be armed.
The situation seems frightful if not downright
terrifying. It does not matter how these people got
here: maybe it’s because an EMP destroyed modern
society as we know it and they are out scavenging
for supplies or maybe a natural disaster so
horrendous hit that life as we know it came to an
end.
You know why they are here: they are out for
your supplies… or even worse… they want to have a
little “fun” with you or your loved ones. What is clear
is that the police or any other state authority is not
going to come to help.
Survival Guide to Handcrafted Weapons
Page 4
What really matters in a situation like this is
what you are going to do next. That is why what you
are about to learn are proven defense methods to
defend your home and turn away modern-day thugs,
brutes, hooligans, and other contemporary threats.
These blueprints have been carefully designed
and researched. Just keep in mind that in this
situation the ends justify the means. And your
primary goal is to keep yourself and your loved ones
alive and well.
There are a couple of ways to accomplish this
and you are about to discover some of the best:
whether is creating obstacles in the path od the
intruder or using weapons against them.
You will learn how to build a crossbow or
catapult. These weapons do not need ammunition
that is hard to come by and they have been proven
efficient in home defense through out history.
You are about to learn the secrets to both
offensive and defensive devices. Make no mistake:
what you are about to find out both in terms of
Survival Guide to Handcrafted Weapons
Page 5
defensive emplacements and weapons is dangerous
maybe even lethal. Do not utilize these devices
unless you absolutely have to.
G EN ER A L S A F ET Y G UI DE L I N ES
Read the following disclaimers carefully:
1. The most blueprints contained inside are for
devices that are dangerous. Take utmost caution
during the building and testing phases. Please follow
the exact designs. If you don’t accidents may
happen.
2. Read the entire blueprint before starting the
project. It will give you an understanding of what
you are building. Read until you fully understand
what you are doing.
3. Use power tools according only according to the
manufacturer’s recommendations.
Survival Guide to Handcrafted Weapons
Page 6
4. Please understand that therse are not toys. Treat
them with respect. Do not leave these in the reach of
children.
5. During building, wear appropriate protective gear.
6. Read the individual safety precautions for each
project.
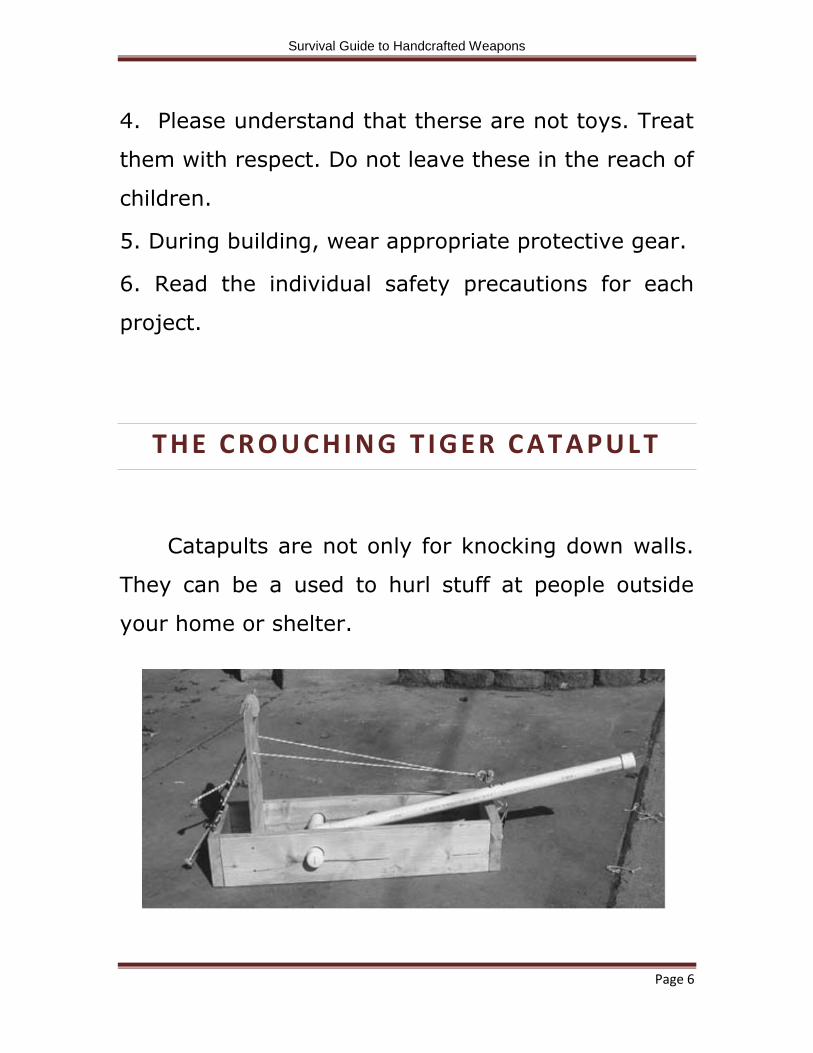
T HE C R O U C HI N G T I GER C A T A PULT
Catapults are not only for knocking down walls.
They can be a used to hurl stuff at people outside
your home or shelter.
Survival Guide to Handcrafted Weapons
Page 7
The advantages of this design of catapult are
that, it is one of the simplest catapults that you can
make, and despite it’s size, it’s powerful and
accurate.
Be careful: the throwing arm rotates on a
vertical plane smacks hard against the machine
frame at the end of the swing.
Therefore you will need a solid frame to handle
all the force. This model can be scaled up or down as
you wish. The blueprints below are for a device that
can throw small sized projectiles across and even
beyond the typical backyard.
To build a larger catapult, you can use larger
chunks of wood and substitute the elastic cords with
large steel springs.
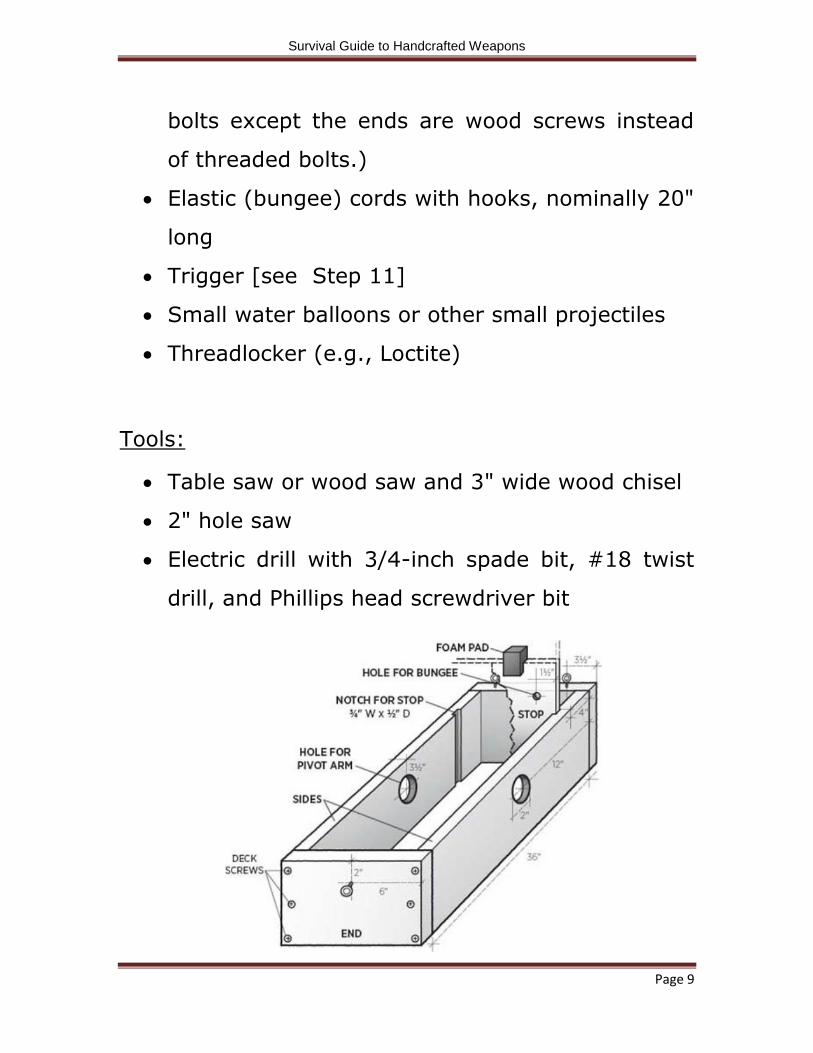
Materials:
Safety Glasses
(2) 2" × 8" boards, 36" long (These are for the
sides of the catapult)
Survival Guide to Handcrafted Weapons
Page 8
3/4" -thick plywood board, 10"× 24" (This is for
the stop)
Wood glue or staples
6" × 6" foam pad
1½" diameter PVC pipe, 43" long (This is the
lever arm)
Steel eye bolts 14" diameter, 2" long shaft (Eye
bolts are threaded bolts that have an eye at the
end for attaching a hook.)
Nuts and washers
1½" diameter PVC pipes, 6" long: (These are
the pivot arms)
1½" diameter PVC tee fitting
PVC cement and primer
(6) 2½" long deck screws
2" × 8" boards, 12" long (These are the ends of
the catapult)
1½" diameter PVC end cap fittings
#8 machine screw, 1½" long
Nut & Washer
Steel screw eyes, ¼" diameter, approximately
2" long shaft (Screw eyes are similar to eye
Survival Guide to Handcrafted Weapons
Page 9
bolts except the ends are wood screws instead
of threaded bolts.)
Elastic (bungee) cords with hooks, nominally 20"
long
Trigger [see Step 11]
Small water balloons or other small projectiles
Threadlocker (e.g., Loctite)
Tools:
Table saw or wood saw and 3" wide wood chisel
2" hole saw
Electric drill with 3/4-inch spade bit, #18 twist
drill, and Phillips head screwdriver bit
Survival Guide to Handcrafted Weapons
Page 10
Directions:
1. Before you begin, be sure to put on your safety
glasses.
2. Take the 36-inch, long boards; measure and
mark on the face of each board, 4-inches from
the one end.
3. Use the table or wood saw and wood chisel to
cut a 3/4-inch wide by 1/2-inch deep, straight
groove where you marked the board. These
boards will make up the sides of your catapult
frame.
4. In the face of both side boards, cut a 2"
diameter hole, approximately 12" from the end
and 8" from the grooves, using the hole saw.
See diagram.
5. In the board that is for the stop, drill two (2)
3/4-inch holes, 2-inches from the top and 1 1/2-
inches from the sides. See diagram.
Note: The bungee cords will pass through these
holes in a later step. Make sure the ends of the
cords will fit through the holes. If they don't,
use a larger drill bit)
Survival Guide to Handcrafted Weapons
Page 11
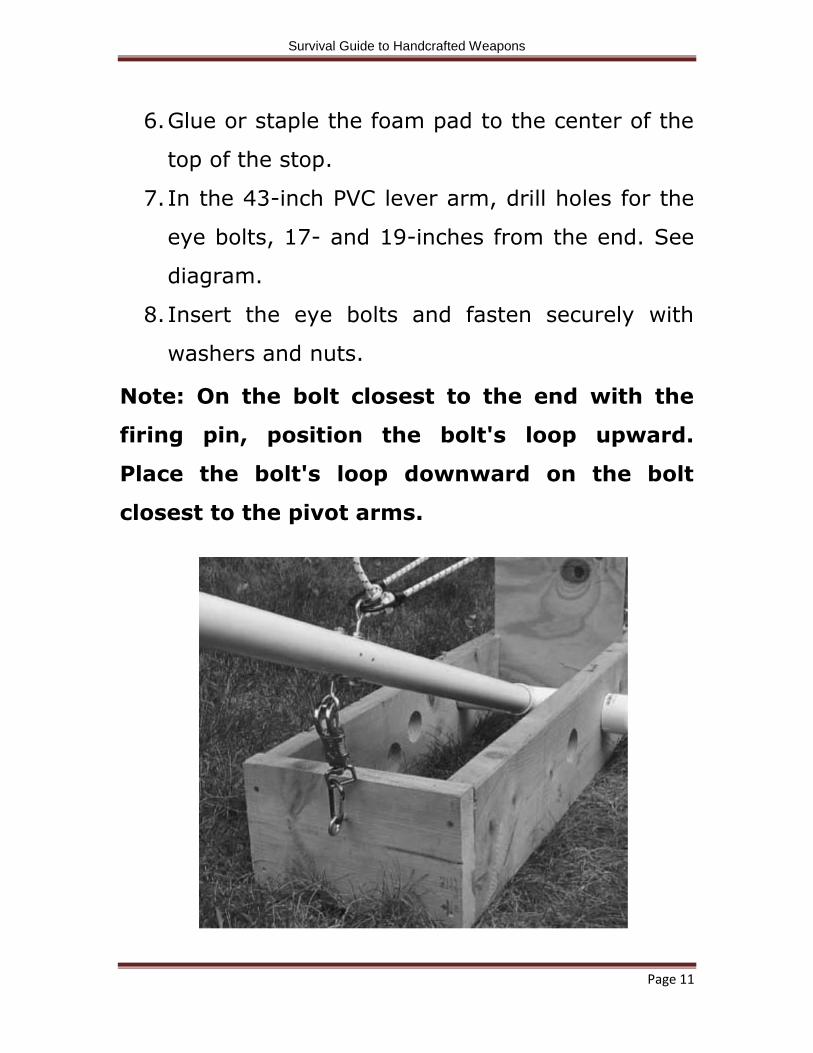
6. Glue or staple the foam pad to the center of the
top of the stop.
7. In the 43-inch PVC lever arm, drill holes for the
eye bolts, 17- and 19-inches from the end. See
diagram.
8. Insert the eye bolts and fasten securely with
washers and nuts.
Note: On the bolt closest to the end with the
firing pin, position the bolt's loop upward.
Place the bolt's loop downward on the bolt
closest to the pivot arms.
Survival Guide to Handcrafted Weapons
Page 12
9. Connect the lever arm, the pivot arms, and
the tee fitting using the PVC primer and cement.
See diagram. Don't attach the end caps at this
time.
10. Insert the pivot arms into the 2-inch holes
on the two side boards. Make sure the grooves
of the side boards face inward.
11. Insert the plywood board into the grooves.
See diagram.
12. Place the 12-inch boards at either end to
create a box. Use the deck screws to fasten the
wood pieces together.
13. Have someone hold the pieces so you can
use the electric drill with the Philips head screw
bit to make the box.
14. Place the end caps on the pivot arms. DO
NOT use cement or primer to hold the end caps
in place.
15. In the center of the remaining PVC end cap,
drill a #18 sized hole in the center.
Survival Guide to Handcrafted Weapons
Page 13
16. With the screw head on the inside of the
cap, insert the #8 machine screw through the
hole.
17. Using the threadlocker, fasten the screw
securely with nuts and washers.
18. Attach the cap to the end of the lever arm
using PVC primer and cement.
OPERATING THE CROUCHING TIGER CATAPULT
1. Carefully pull the throwing arm back. Remove or
add bungee cords if the tension on the arm is
too great or too little.
Use caution! Too much stress could break the
catapult.
2. Latch the lever arm to the archery release,
pelican hook, or panic snap.
Note: You may need to attach the trigger
release to the trigger screw eye with a short
loop of rope or carabiner, depending on the
size and shape of the trigger selected.
Survival Guide to Handcrafted Weapons
Page 14
3. Release the arm and watch your projectile fly.
Safety Notes
1. Don't skimp on the padding as the lever arm can
strike the stop with great force, depending on
the strength and number of bungee cords used.
To prevent the arm from breaking when it hits,
make sure there is sufficient padding on the
stop. Don't use too many bungee cords or
stretch them excessively.
2. Be careful of the rotating lever arm! Keep well
away from the plane of rotation of the lever
arm, especially when the catapult is cocked and
ready to fire.
3. Don't stand in front or behind the lever arm's
plane of rotation.
4. Only use the catapult outside, in areas where
the projectile can't do any harm.
5. Always wear safety glasses when working on
projects of this nature and don't forget your
common sense.
Survival Guide to Handcrafted Weapons
Page 15
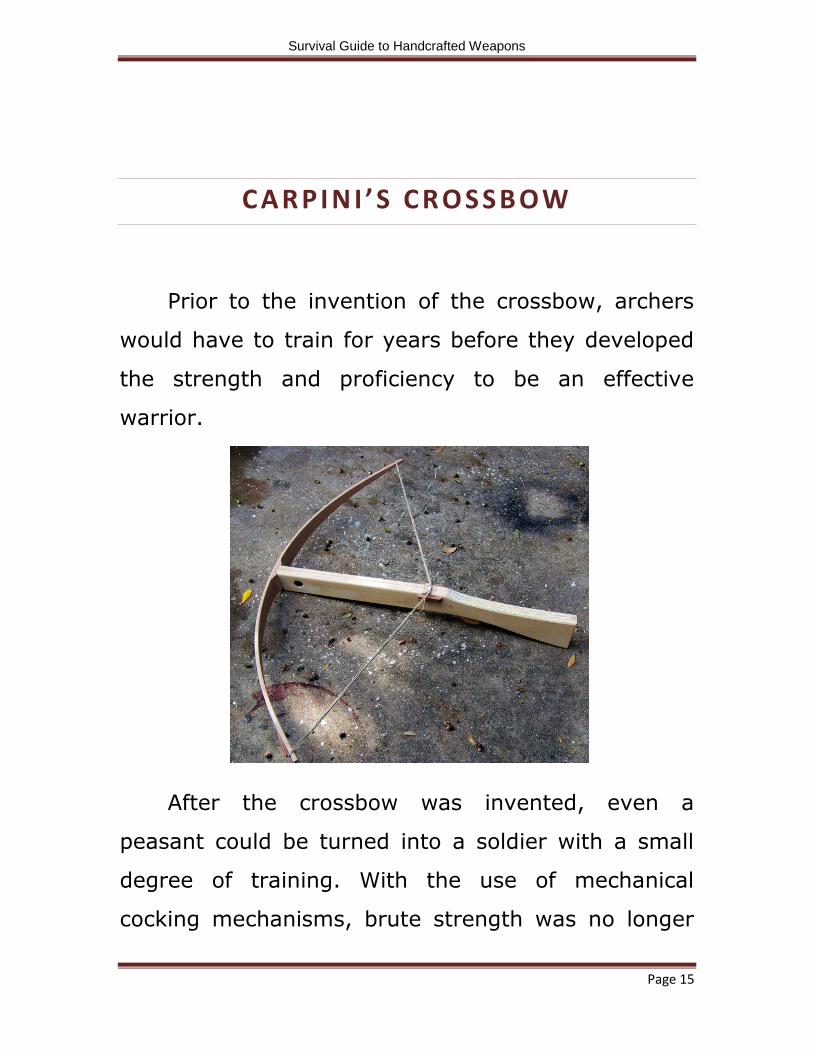
CARPINI ’S C R O S SB OW
Prior to the invention of the crossbow, archers
would have to train for years before they developed
the strength and proficiency to be an effective
warrior.
After the crossbow was invented, even a
peasant could be turned into a soldier with a small
degree of training. With the use of mechanical
cocking mechanisms, brute strength was no longer

Survival Guide to Handcrafted Weapons
Page 16
necessary. The invention of the crossbow changed
history.
STEP ONE: BUILDING THE PROD, OR BOW
1. When creating the prod, or bow you want to
make sure that the thickness is 7/16-inch. The
overall length of the piece will reach 50-inches
with a total width of 2 1/2-inches at the center
and tapering to 1/2-inch at both ends.
2. Rather than tying the nocks on the ends of the
bow, you will want to use hardwood pins to keep
them in place.
Note: You will need to keep
one edge of the bow
straight.

Survival Guide to Handcrafted Weapons
Page 17
3. You have the option of backing the bow with
denim. To do this, coat the back of the bow with
a coat of Titebond then roll a piece of denim
down into the glue with a dowel.
STEP TWO: BUILDING THE STOCK
1. The stock consists of two rectangles, the first
one measuring 3- by 20-inches and the second
measuring 5 1/2 - by 14 1/2ch-inches, which is
offset and joined with a spline.
2. Using the dimensions from the picture, cut two
stocks from 3/4-inch plywood.
3. Screw the two pieces together with wood
screws.
Survival Guide to Handcrafted Weapons
Page 18
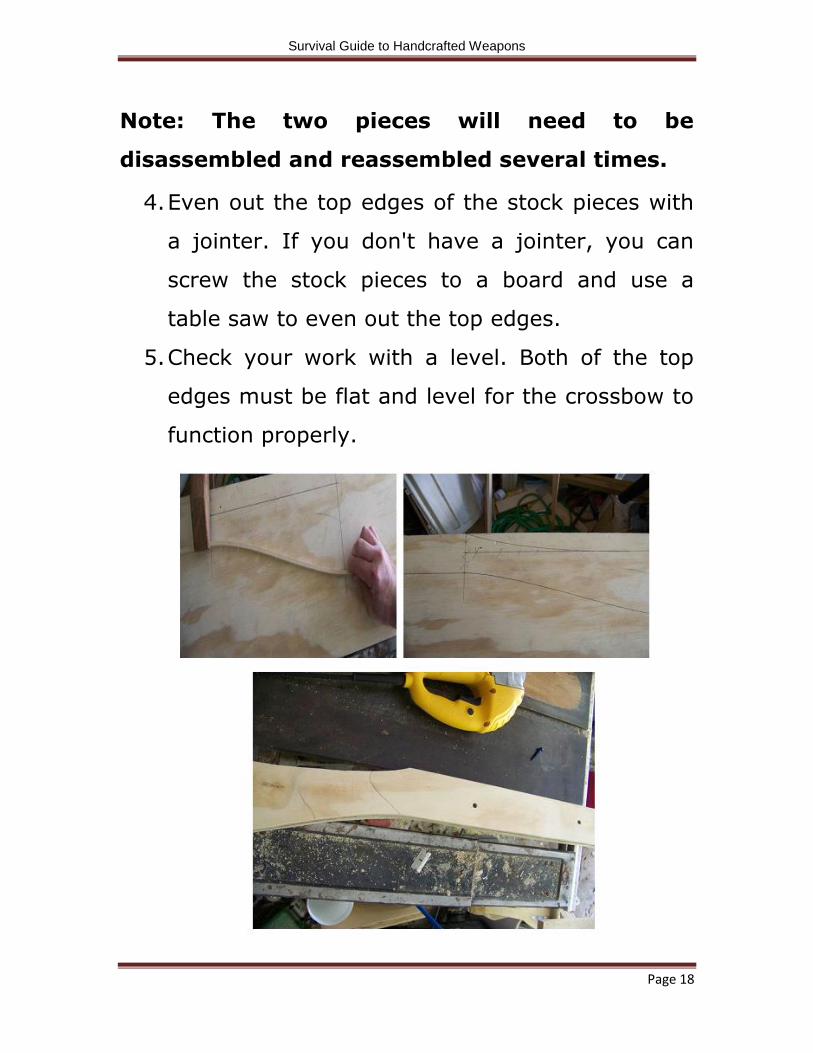
Note: The two pieces will need to be
disassembled and reassembled several times.
4. Even out the top edges of the stock pieces with
a jointer. If you don't have a jointer, you can
screw the stock pieces to a board and use a
table saw to even out the top edges.
5. Check your work with a level. Both of the top
edges must be flat and level for the crossbow to
function properly.
Survival Guide to Handcrafted Weapons
Page 19
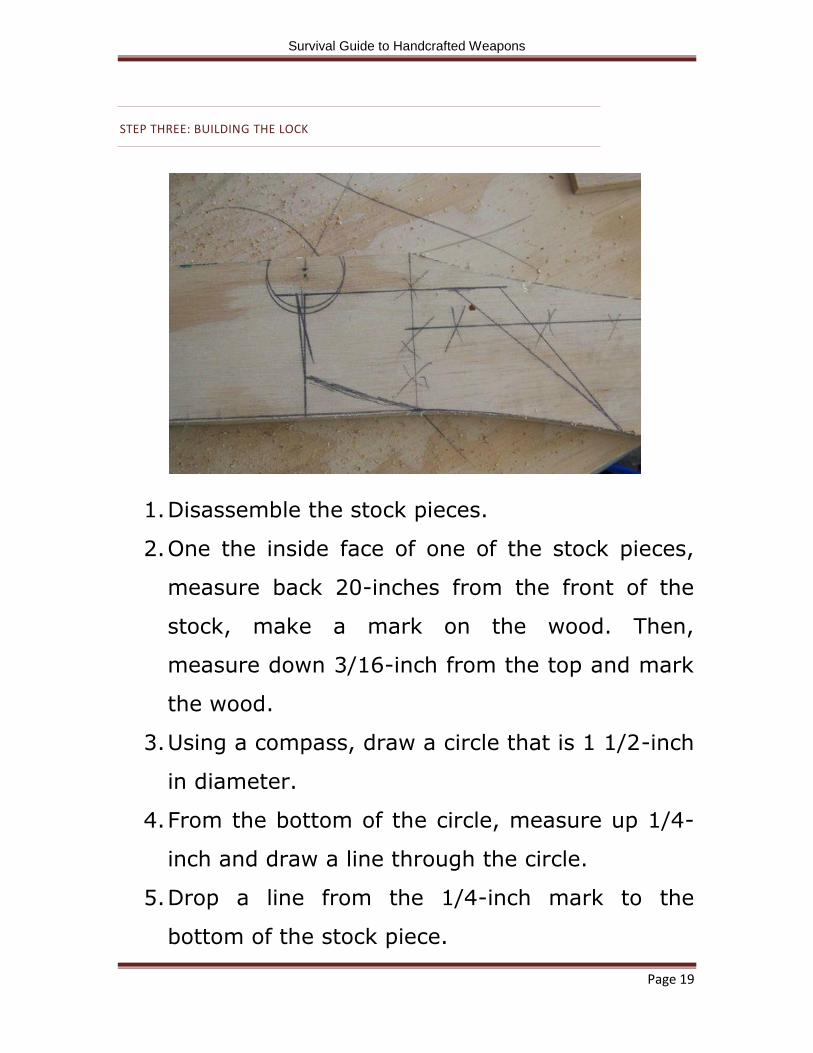
STEP THREE: BUILDING THE LOCK
1. Disassemble the stock pieces.
2. One the inside face of one of the stock pieces,
measure back 20-inches from the front of the
stock, make a mark on the wood. Then,
measure down 3/16-inch from the top and mark
the wood.
3. Using a compass, draw a circle that is 1 1/2-inch
in diameter.
4. From the bottom of the circle, measure up 1/4-
inch and draw a line through the circle.
5. Drop a line from the 1/4-inch mark to the
bottom of the stock piece.
Survival Guide to Handcrafted Weapons
Page 20
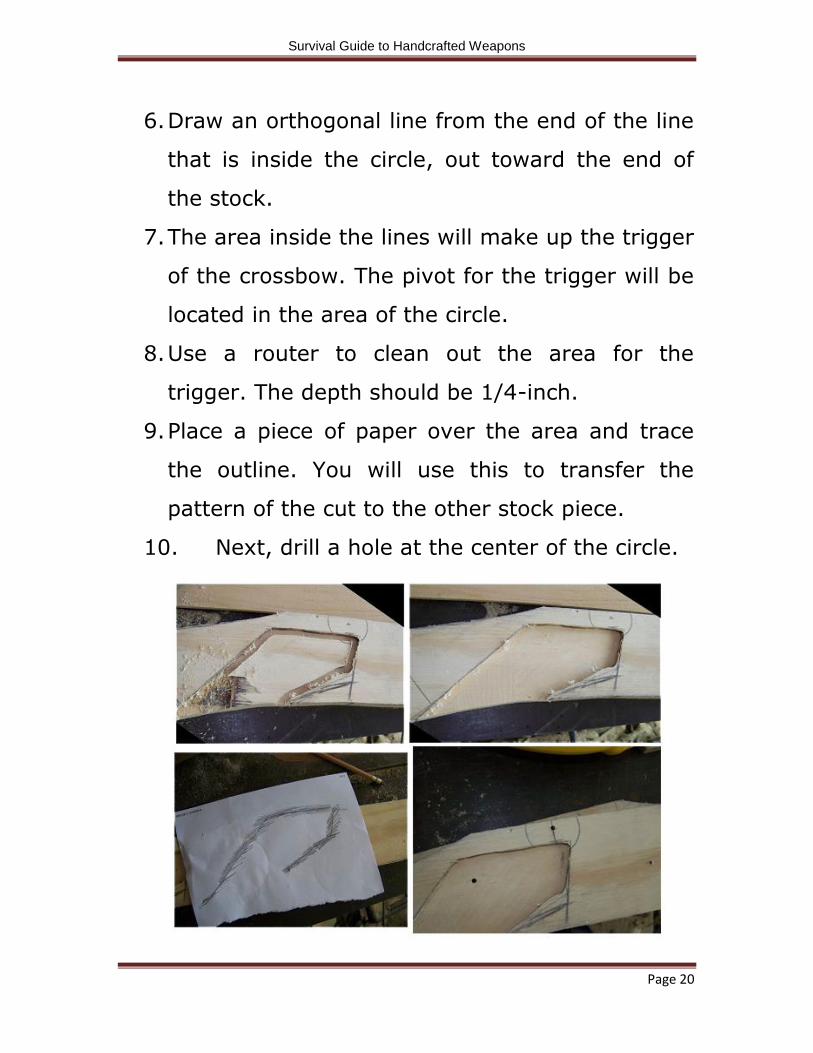
6. Draw an orthogonal line from the end of the line
that is inside the circle, out toward the end of
the stock.
7. The area inside the lines will make up the trigger
of the crossbow. The pivot for the trigger will be
located in the area of the circle.
8. Use a router to clean out the area for the
trigger. The depth should be 1/4-inch.
9. Place a piece of paper over the area and trace
the outline. You will use this to transfer the
pattern of the cut to the other stock piece.
10. Next, drill a hole at the center of the circle.
Survival Guide to Handcrafted Weapons
Page 21
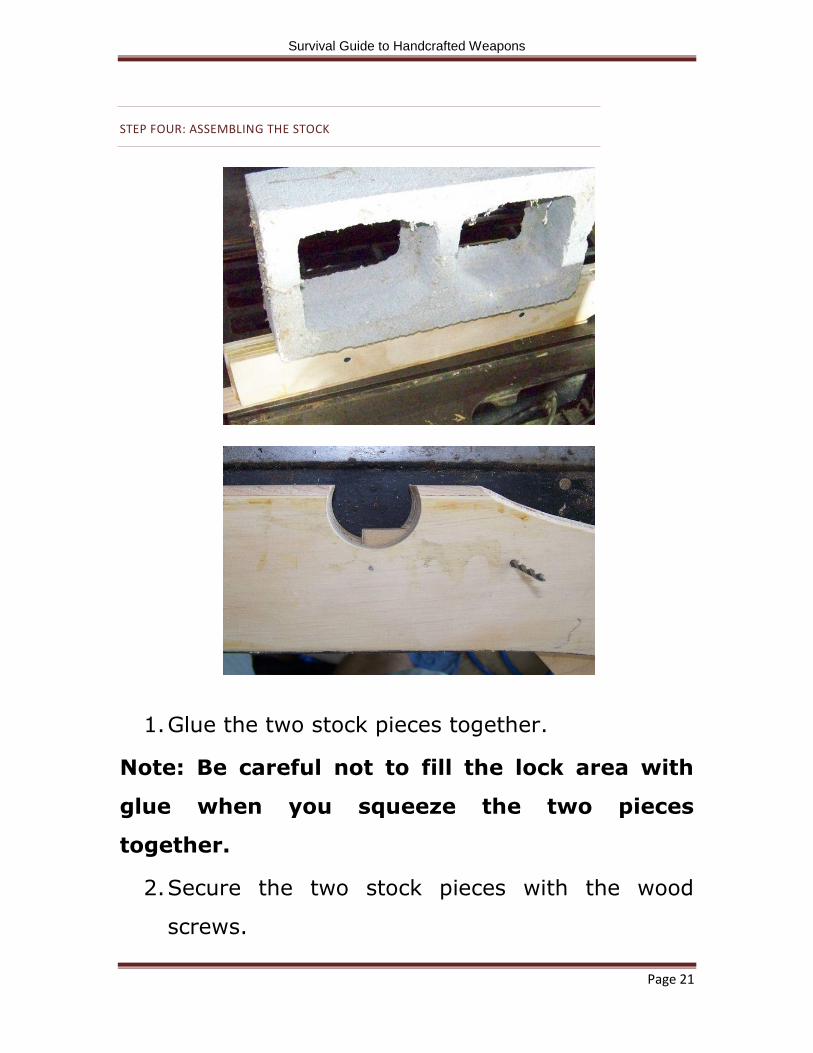
STEP FOUR: ASSEMBLING THE STOCK
1. Glue the two stock pieces together.
Note: Be careful not to fill the lock area with
glue when you squeeze the two pieces
together.
2. Secure the two stock pieces with the wood
screws.
Survival Guide to Handcrafted Weapons
Page 22
3. Attach a piece of 3/16-inch hardwood to the top
of the stock.
4. When the glue has dried, drill a 1 1/2-inch hole
where the lock position is going.
Hint: The center of the lock position is where
you drilled the hole at the end of Step Three:
Building the Lock.
5. Sand, the stock piece, using a router with a
round over bit and belt sand to clean the piece
up.
STEP FIVE: BUILDING THE NUT
1. The nut is the piece that holds the string when
the crossbow is cocked.
It needs to strong and be able to resist splitting.
2. Assembly a plywood and epoxy the pieces
together. To make the piece stronger, try
interspacing each layer with glass cloth.
3. When the block for the nut has cured, it needs
to be turned until it is a slightly loose fit for the
matching hole in the stock.
Survival Guide to Handcrafted Weapons
Page 23
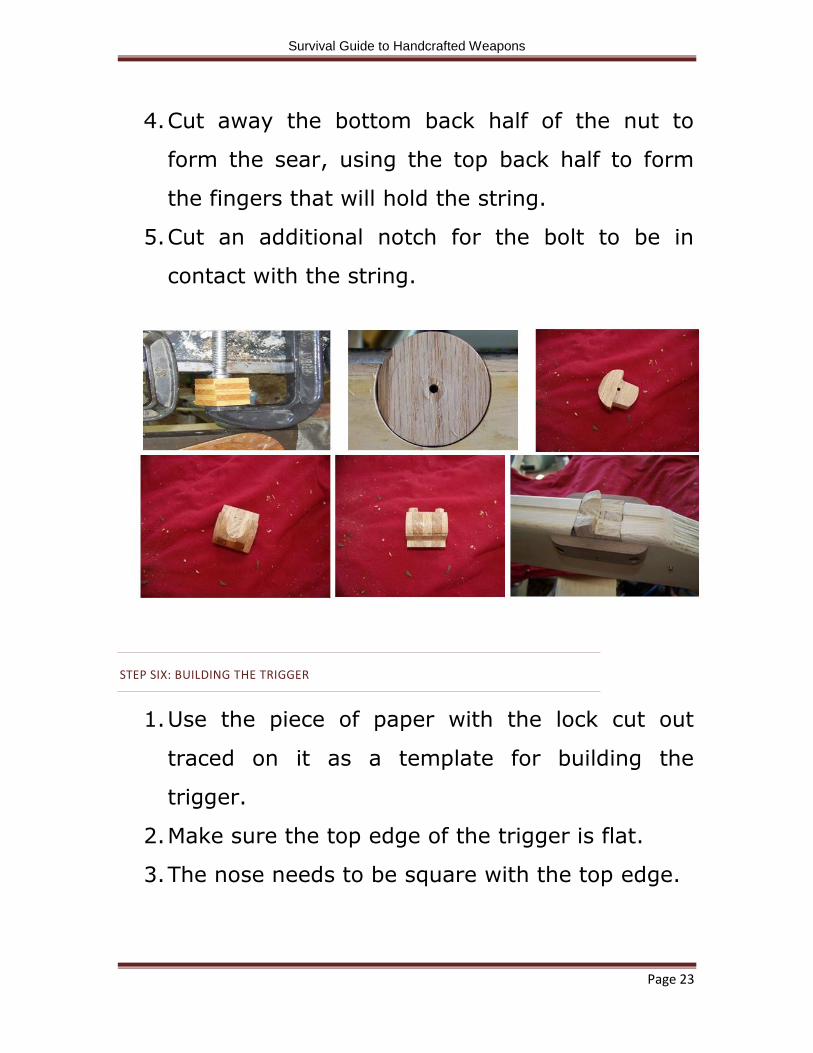
4. Cut away the bottom back half of the nut to
form the sear, using the top back half to form
the fingers that will hold the string.
5. Cut an additional notch for the bolt to be in
contact with the string.
STEP SIX: BUILDING THE TRIGGER
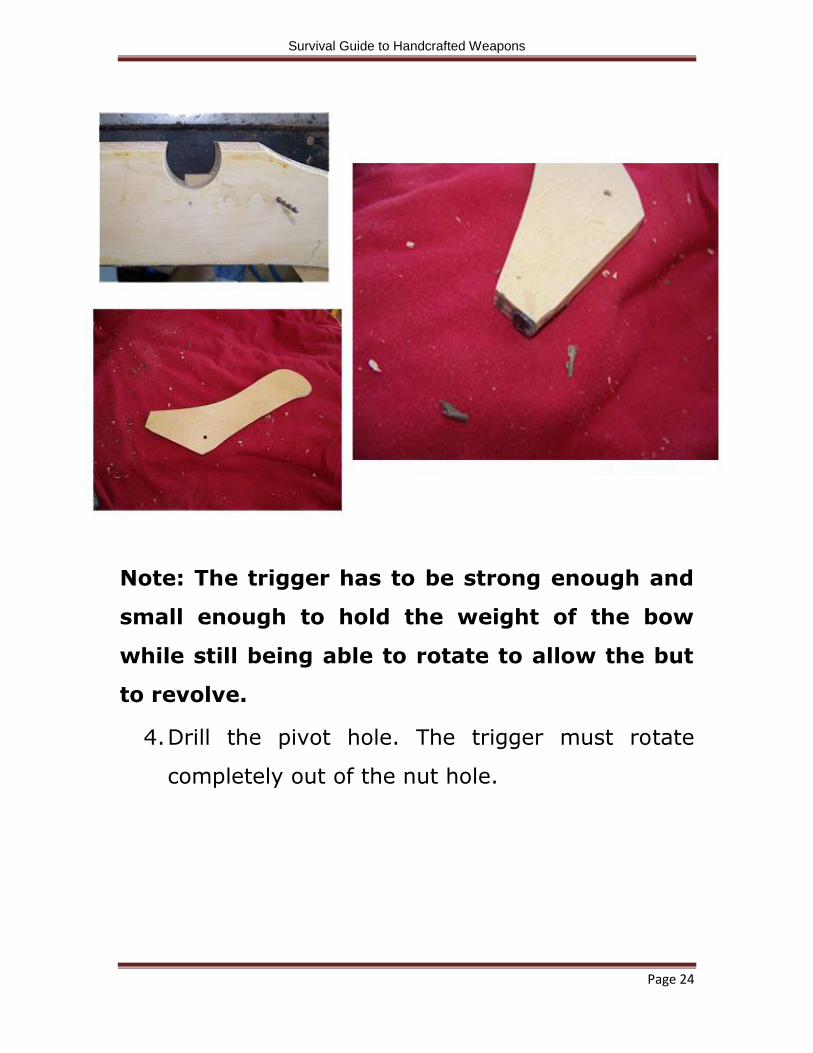
1. Use the piece of paper with the lock cut out
traced on it as a template for building the
trigger.
2. Make sure the top edge of the trigger is flat.
3. The nose needs to be square with the top edge.
Survival Guide to Handcrafted Weapons
Page 24
Note: The trigger has to be strong enough and
small enough to hold the weight of the bow
while still being able to rotate to allow the but
to revolve.
4. Drill the pivot hole. The trigger must rotate
completely out of the nut hole.
Survival Guide to Handcrafted Weapons
Page 25
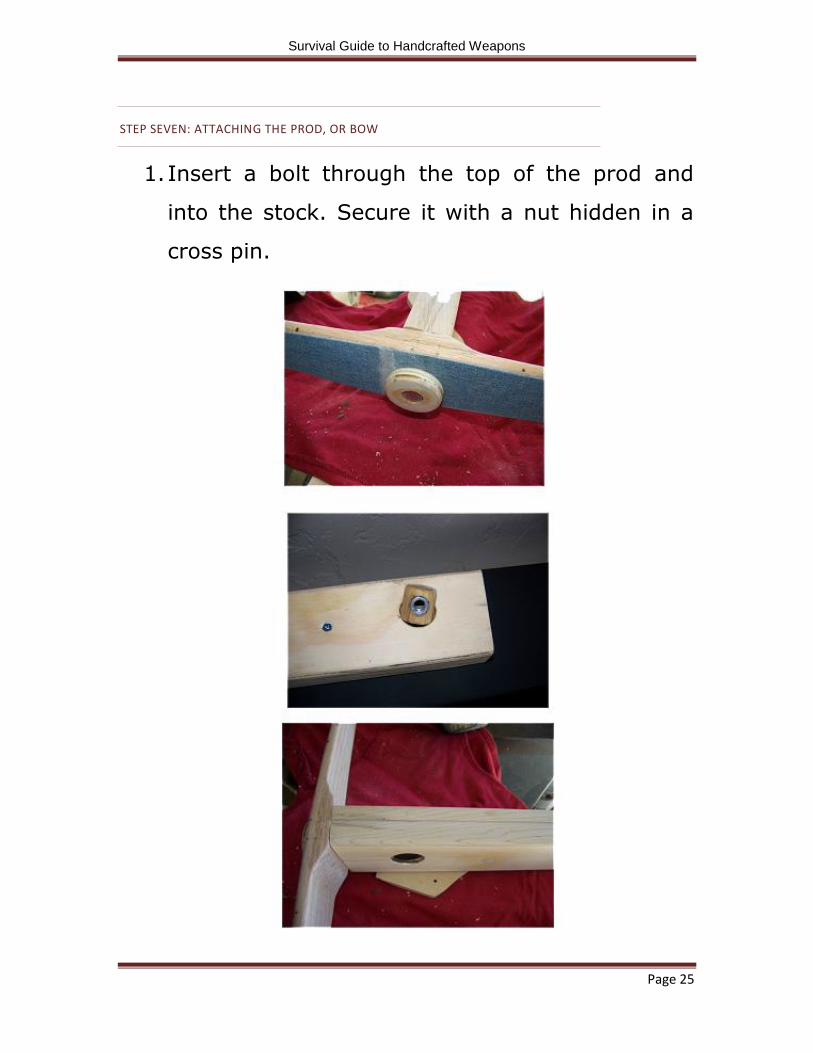
STEP SEVEN: ATTACHING THE PROD, OR BOW
1. Insert a bolt through the top of the prod and
into the stock. Secure it with a nut hidden in a
cross pin.
Survival Guide to Handcrafted Weapons
Page 26
STEP EIGHT: THE STRING
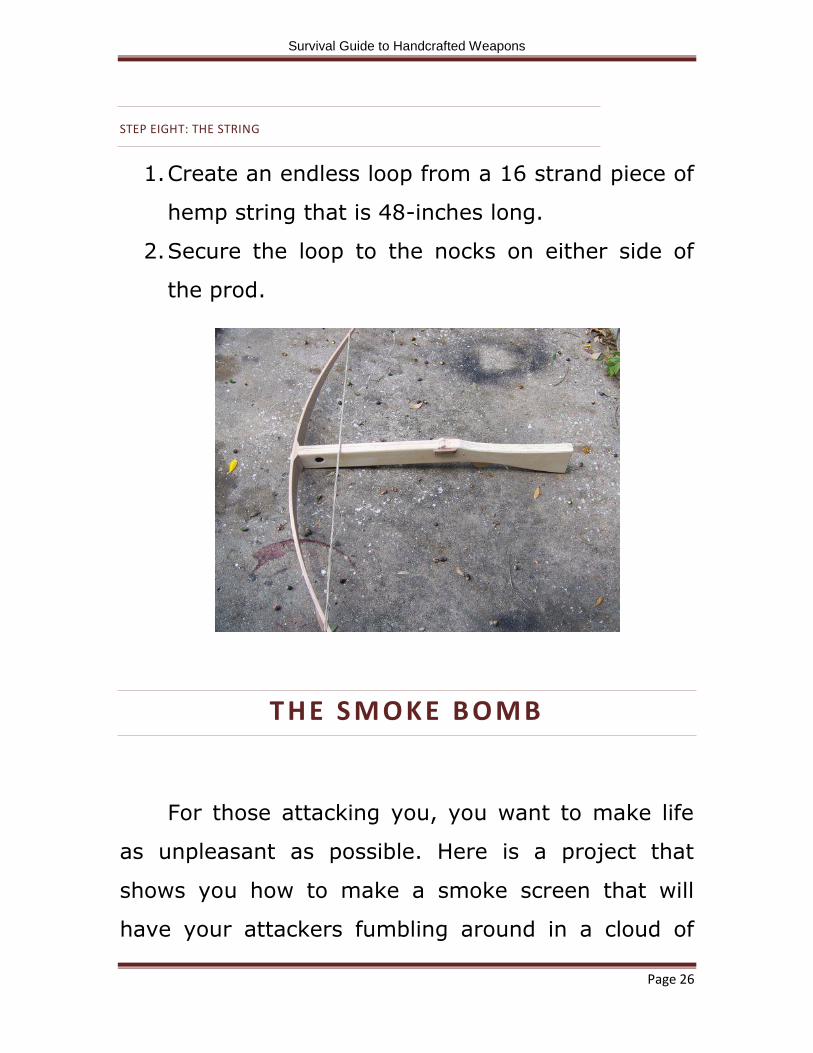
1. Create an endless loop from a 16 strand piece of
hemp string that is 48-inches long.
2. Secure the loop to the nocks on either side of
the prod.
T HE S M O KE B O M B
For those attacking you, you want to make life
as unpleasant as possible. Here is a project that
shows you how to make a smoke screen that will
have your attackers fumbling around in a cloud of

Survival Guide to Handcrafted Weapons
Page 27
fog. The amount of smoke that is produced by these
little bombs can be increased if you should happen to
run into a larger and more menacing threat.
MATERIALS
Safety glasses
Electronic scale
7 grams potassium nitrate (KNO3) Potassium
nitrate is readily available on the Internet and is
relatively inexpensive.
Coffee grinder or mortar and pestle
4 grams powdered sugar
5 grams sodium bicarbonate (baking soda)
TOOLS
Plastic container with tight-fitting lid
Electric skillet or pot (you can also use a heat-
proof bowl and electric hot plate)
Heat proof plastic spatula
Waxed paper
Candy mold (optional)
Spoon

Survival Guide to Handcrafted Weapons
Page 28
Homemade blackmatch or commercially
manufactured Visco fuse (fuses can easily be
found on the Internet by doing a search for
"Visco fuse")
Match or lighter
DIRECTIONS
1. Grind a small amount of the potassium nitrate
(KNO3) into a fine powder using the coffee
grinder or mortar and pestle.
Note: The coffee grinder that you use for
grinding chemicals should NEVER be used for

Survival Guide to Handcrafted Weapons
Page 29
grinding food. Only use it for grinding
individual chemicals.
2. Measure the following materials using an
accurate electronic scale:
7 grams of potassium nitrate
4 grams of powdered sugar
5 grams of sodium bicarbonate (baking soda)
3. Place the ingredients in a container and close
the lid, making sure it is tightly sealed.
4. Shake the container until all of the ingredients
are thoroughly mixed.
5. Put your safety glasses on and take the rest of
the materials outside.
6. Heat the electric hot plate to 285 degrees
Fahrenheit.
Note: Do not use an open gas flame for any of
the next steps.
7. Place the pot on the electric hot plate.
8. Add the all of the potassium nitrate, powdered
sugar, and sodium bicarbonate mixture, stirring
continuously with the spatula.
Survival Guide to Handcrafted Weapons
Page 30
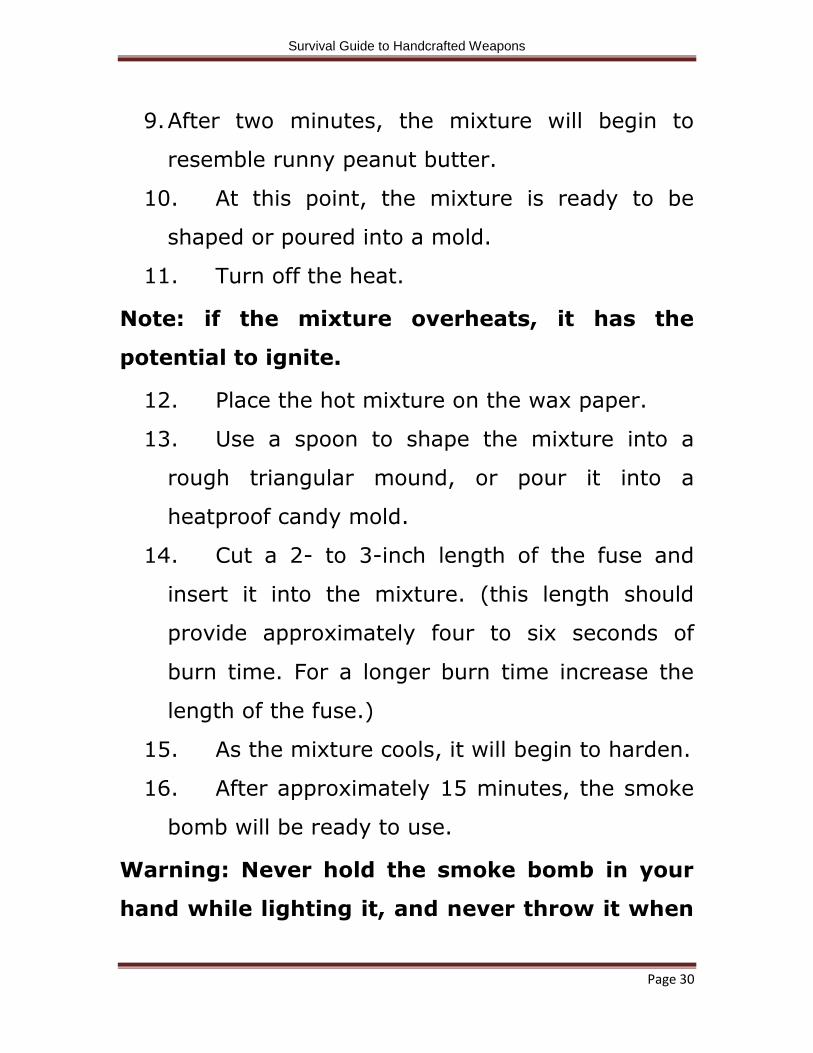
9. After two minutes, the mixture will begin to
resemble runny peanut butter.
10. At this point, the mixture is ready to be
shaped or poured into a mold.
11. Turn off the heat.
Note: if the mixture overheats, it has the
potential to ignite.
12. Place the hot mixture on the wax paper.
13. Use a spoon to shape the mixture into a
rough triangular mound, or pour it into a
heatproof candy mold.
14. Cut a 2- to 3-inch length of the fuse and
insert it into the mixture. (this length should
provide approximately four to six seconds of
burn time. For a longer burn time increase the
length of the fuse.)
15. As the mixture cools, it will begin to harden.
16. After approximately 15 minutes, the smoke
bomb will be ready to use.
Warning: Never hold the smoke bomb in your
hand while lighting it, and never throw it when
Survival Guide to Handcrafted Weapons
Page 31
it is burning. Don't leave a lit smoke bomb in a
closed container and don't carry any in your
clothing.
T HE HO M E M A DE B A C KPA C K S HI ELD
For thousands of years, warriors depended on
their shields, made of heavy, impenetrable steel, to
protect them from the onslaught of their enemies.
The nearly impermeable material kept them safe
from arrows and swords. As the years wore on, the
shield gave way to the ballistic armor and flak
jackets.
Survival Guide to Handcrafted Weapons
Page 32
In 1965, DuPont developed a high-strength
material that is five times stronger that steel, based
on an equal-weight basis. In the 1970s, Lester
Shubin and Nicolas Montanerelli, a pair of civilian US
Army scientist, first recognized the potential of
Kevlar as a bulletproof material. The two set out to
test the idea, covering a telephone book with several
layers of Kevlar and fired a shot from a .38-caliber
handgun into the book. To their amazement, the
bullet bounces off. The pair developed additional
tests to determine exactly what they were dealing
with. Kevlar passed all the tests.
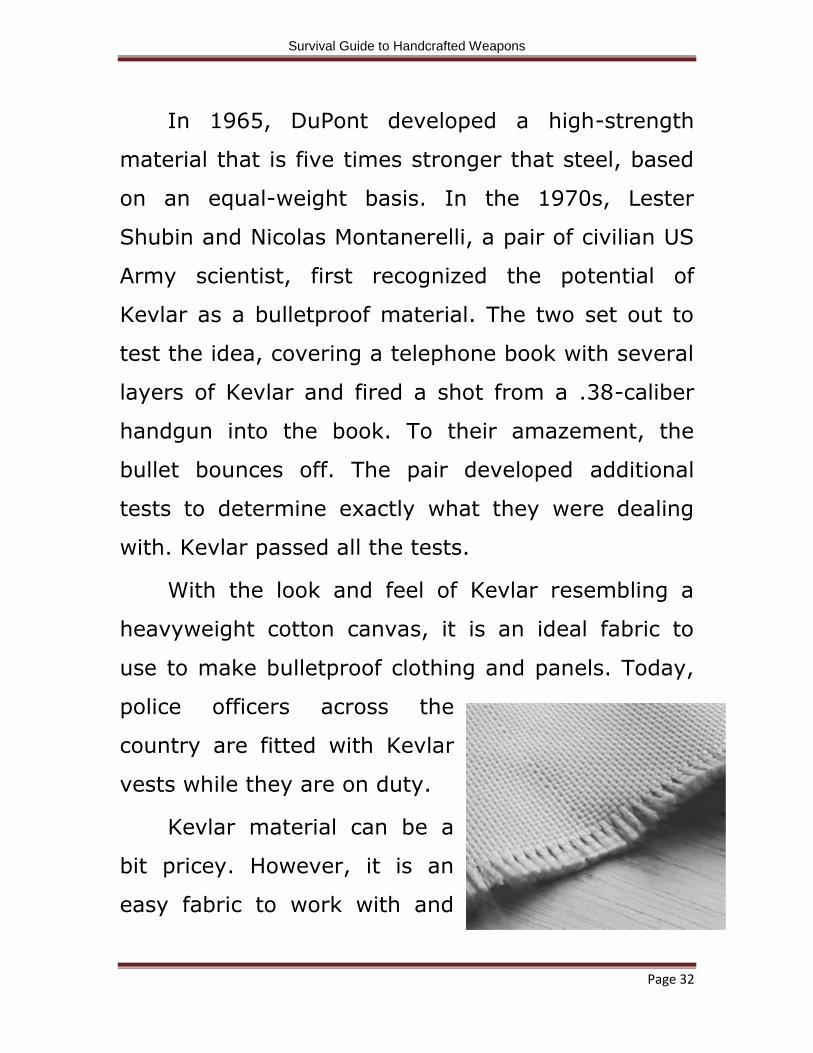
With the look and feel of Kevlar resembling a
heavyweight cotton canvas, it is an ideal fabric to
use to make bulletproof clothing and panels. Today,
police officers across the
country are fitted with Kevlar
vests while they are on duty.
Kevlar material can be a
bit pricey. However, it is an
easy fabric to work with and
Survival Guide to Handcrafted Weapons
Page 33
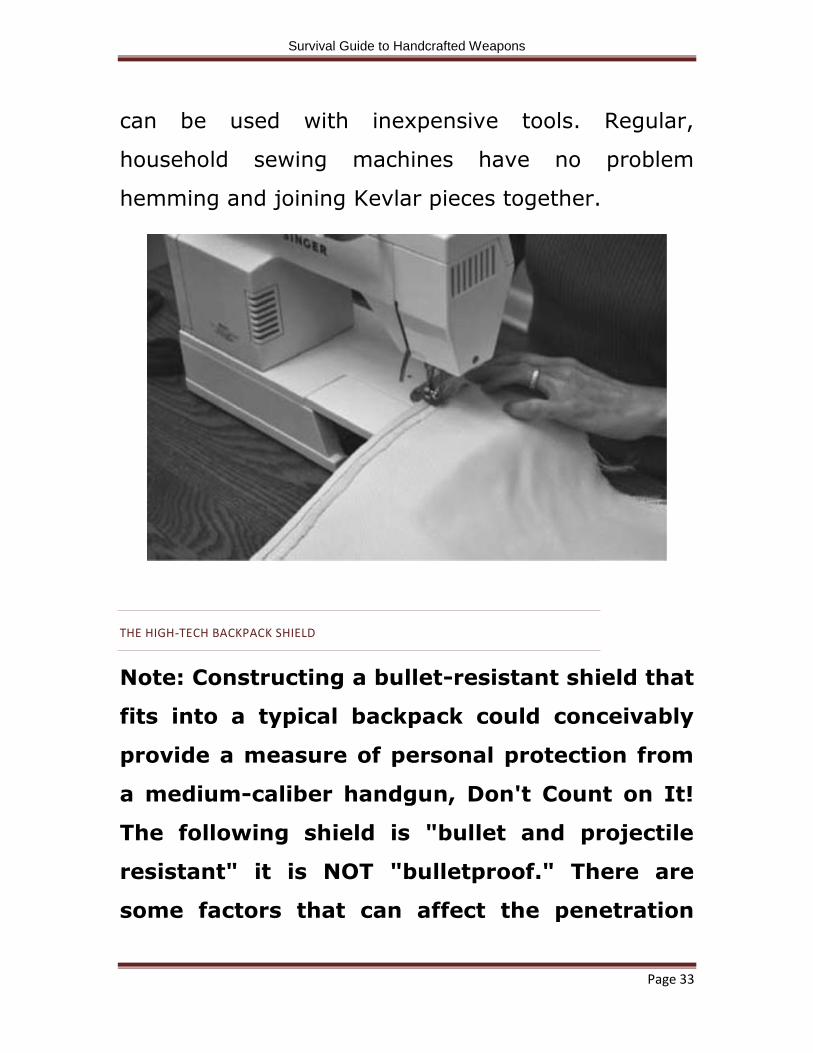
can be used with inexpensive tools. Regular,
household sewing machines have no problem
hemming and joining Kevlar pieces together.
THE HIGH-TECH BACKPACK SHIELD
Note: Constructing a bullet-resistant shield that
fits into a typical backpack could conceivably
provide a measure of personal protection from
a medium-caliber handgun, Don't Count on It!
The following shield is "bullet and projectile
resistant" it is NOT "bulletproof." There are
some factors that can affect the penetration

Survival Guide to Handcrafted Weapons
Page 34
power of a projectile, and there are no
guarantees that the following panel will stop
any projectile.
There are several different types of Kevlar
fabric, each differing in elastic modulus. The type
you will need for this bullet-resistant shield is the low
elastic modulus type, which has a designation of
Kevlar 29. The more common Kevlar 49 that you will
find on the market is designed for making reinforced
composites but will not work well for use against
ballistic attack. Kevlar 29 can be purchased from
fabric suppliers on eBay or by doing an Internet
search for "Kevlar 29 fabric." You will also need to
purchase a pair of affordable shears, as not all
cutting shears will handle Kevlar fabric. There are
several manufacturers that make affordable shears
for cutting Kevlar, simply search online for "Kevlar
sheers."
MATERIALS
(2) Yards Kevlar 29 fabric
Survival Guide to Handcrafted Weapons
Page 35
One-quart all-purpose fiberglass resin with
hardener (Fiberglass resin is usually available in
hardware, auto parts, and home stores)
TOOLS
Safety glasses
Rubber gloves
Tarp for workspace
High-strength scissors
Disposable mixing bowl
Stir stick
Wax paper
Resin spreader (spatula)
DIRECTIONS
1. Put on your safety glasses and rubber gloves.
2. Cover your workspace with the tarp.
Note: Make sure you are working in a well-
ventilated area.
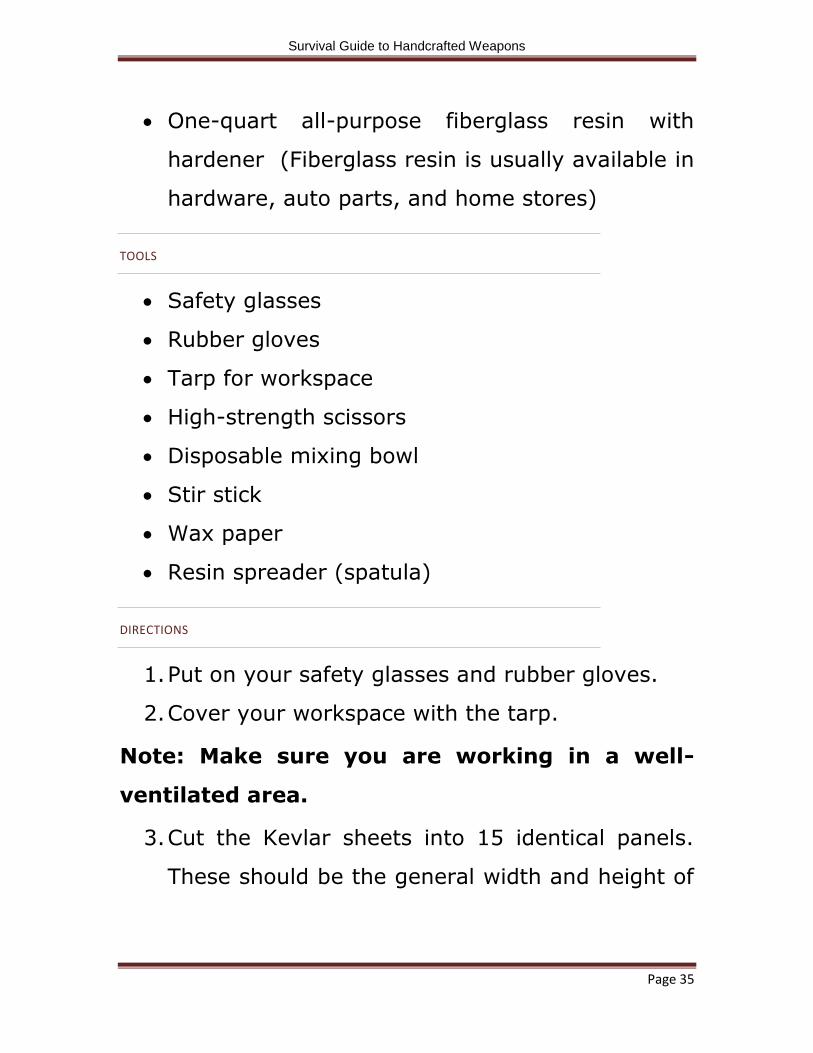
3. Cut the Kevlar sheets into 15 identical panels.
These should be the general width and height of
Survival Guide to Handcrafted Weapons
Page 36
your backpack. (Approximately 10-inches by 12-
inches).
Note: Kevlar is prone to fraying, even when it is
cut with the right scissors. Avoid handling the
panels once they have been cut.
4. In the disposable mixing bowl, mix eight ounces
of the fiberglass resin with the included
hardener. (Mix in additional resin as needed.)
Note: Avoid getting resin on your clothes, body,
or anything else you care about, as it is
extremely messy and hard to remove.
5. Use the wax paper to cover the work surface.
Survival Guide to Handcrafted Weapons
Page 37
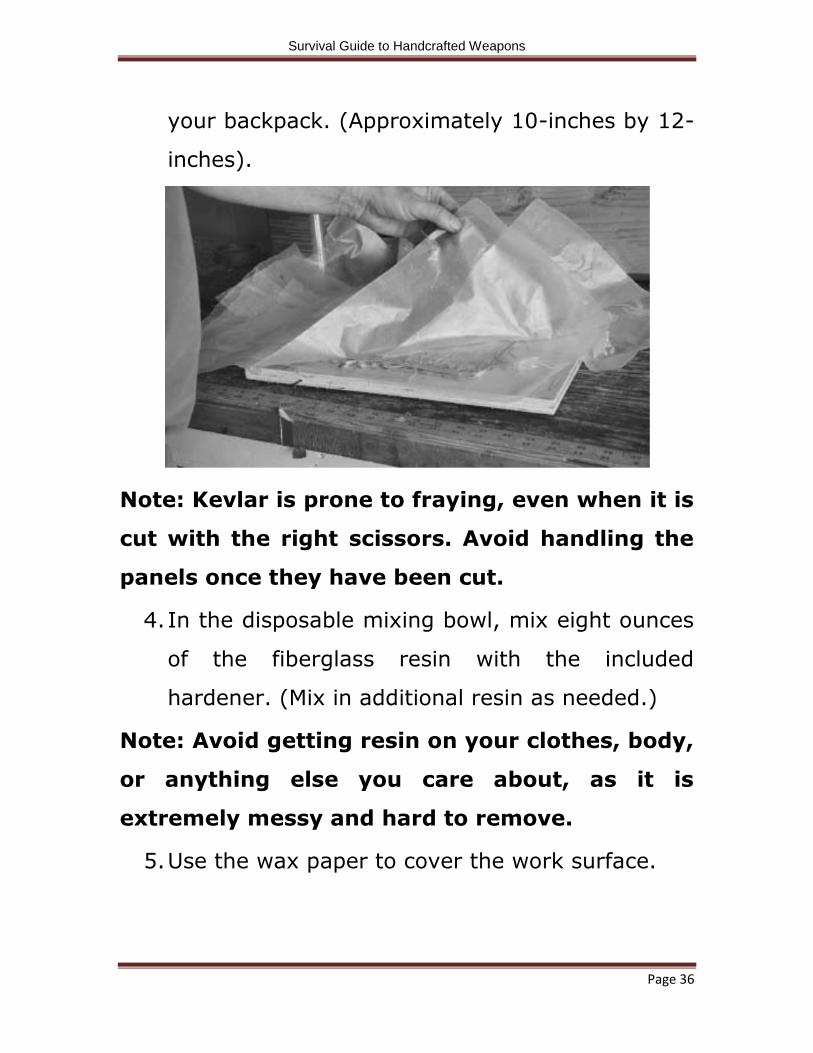
6. Place the first Kevlar panel on the wax paper
and spread the resin over it using the resin
spreader.
7. Place the next panel on top of the first panel and
saturate it with the resin.
8. Continue this process until you have the desired
thickness.
Note: Thicker panels with 12 or more sheets of
Kevlar will have a higher chance of actually
stopping a bullet.
Survival Guide to Handcrafted Weapons
Page 38
9. When you have the desired number of layers,
place a piece of wax paper on the top layer.
10. Spread 20 or more pounds of weight across
the top of the wax paper.
11. Place the layered Kevlar in a well-ventilated
place to dry.
USING YOUR SHIELD
Place the Kevlar shield in your backpack, resting
on the side farthest from your body.
Protect your head and upper body with the shield in
case you find yourself in trouble.
At the first opportunity, take flight or take shelter.
TESTING RESULTS
Using the directions outlined above, a 12-inch
by 14-inch shield was constructed. The shield
contained 12 pieces of Kevlar 29 that was laminated
with fiberglass resin and hardener. With the help of a
nationally recognized ballistics expert, the shield was
put to the test.
Survival Guide to Handcrafted Weapons
Page 39
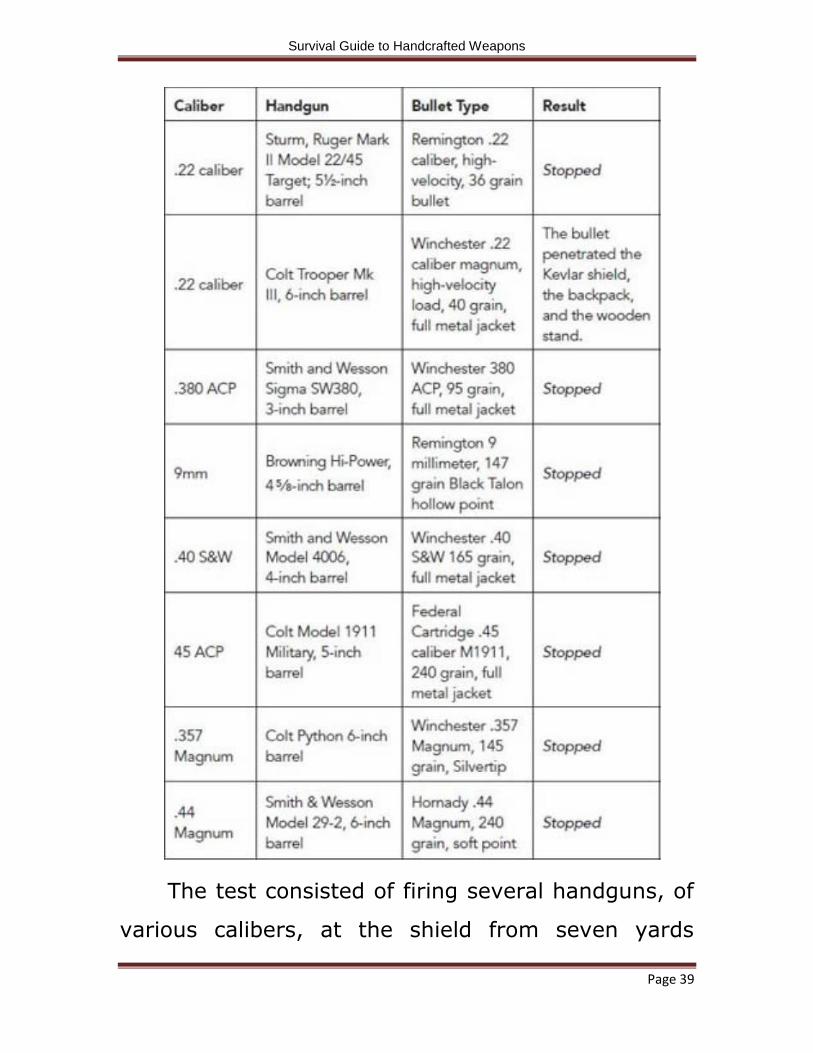
The test consisted of firing several handguns, of
various calibers, at the shield from seven yards
Survival Guide to Handcrafted Weapons
Page 40
away. Each handgun was fired several times, and the
results can be seen in the figure below. A pair of
shooting chronographs was used to record the
velocity of each shot, and the results were recorded.
With the knowledge that this test did not have the
same rigorous controls and staging that a
government-certified test require for commercial
products, the results were consistent.
The .22-calibur Magnum was the only bullet to
penetrate all layers of the Kevlar. This is due to the
small diameter of the bullet and the fact that it is
fully clad in metal. This keeps the cross section
small, even after it hit the shield. The bullet's energy
was confined to a small area, only crossing a few of
the fibers in the Kevlar fabric.
DISCLAIMERS AND MODIFIERS
1. The power and penetration of a bullet is affected
by the size of the bullet's powder load, the
jacketing on the bullet, the material from which
the bullet is made, and the distance from which
the weapon is fired.
Survival Guide to Handcrafted Weapons
Page 41
2. While the shield stopped every bullet with the
exception of the .22 magnum during this limited
test, under other conditions the shield will not
stop these same bullets every time.
3. Ammunition fired from a rifle will most certainly
not be stopped by this shield. Rifle bullets
contain more energy and will shred the shield as
if it were made of cardboard.
4. Even if the panel does stop a bullet, the force of
the bullet may be transmitted through the
backpack, with the potential of causing fatal
blunt force traumatic injuries.
C R EA T I N G W O O DEN O B S T A C LES
William Tecumasch Sherman, a famous general
for the Union during the Civil War, wrote, "temporary
defenses like these enable a small force to hold off a
superior one for a time, and time is the most
valuable element in all wars." Knowing how to

Survival Guide to Handcrafted Weapons
Page 42
quickly erect defenses from the materials you have
on hand, can provide you with the extra time you
need.
The first step to constructing a solid defense is
reducing the number of routes from which an invader
can approach. This means removing trees, hedges,
and any other obstruction that can provide cover for
invaders. These items should be no more than a foot
high to give you the best possible advantage to
spotting your enemies during their approach.
Survival Guide to Handcrafted Weapons
Page 43
The next step in constructing a solid defense is to
remove all flammable materials from the areas
facing the expected direction of attack. Incendiary
projectiles can ignite unexpected fires and draw your
attention away from defending your home. Prepare
yourself by placing containers of water in each room
and sandbags in the windows to narrow the
openings, leaving enough room to fire upon your
enemies.
Once you are confident that the approaches to
your home are cleared, and your house is prepared,
you will need to begin constructing and installing
your field expedient defenses. With a minimum
amount of time and money, you can quickly build
several types of defensive structures.
Pits (trous-de-Loup), Roughly translated as "wolf-
holes," trous-de-loup's are military pits that can be
made one of two ways, either deep or shallow.
The deeper pits reach a depth of 6-feet or more
and are approximately 6-feet wide at the top,
narrowing to a single foot in diameter at the bottom.
Survival Guide to Handcrafted Weapons
Page 44
Setting up offset rows and equipping them with a set
of sharpened stakes at the bottom, create a
formidable defensive obstacle for any attacker.
Shallow pits can also work to slow both infantry and
cavalry charges. Note: Unless you are in imminent
danger, you should only use the shallower pits, as
the trous-de-loups are very dangerous.
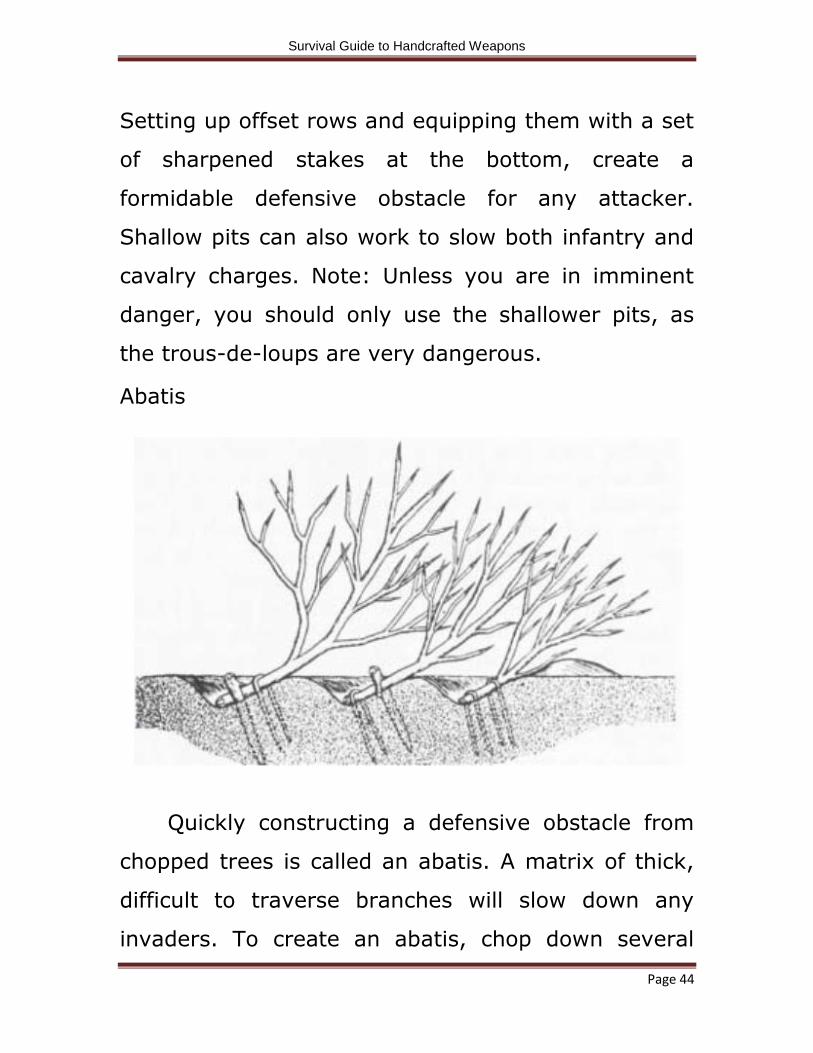
Abatis
Quickly constructing a defensive obstacle from
chopped trees is called an abatis. A matrix of thick,
difficult to traverse branches will slow down any
invaders. To create an abatis, chop down several
Survival Guide to Handcrafted Weapons
Page 45
trees and place them on the approach to your
property. Place the trees, so their branches interlace,
with the larger branches pointing toward in the
direction of the impending attack. To create an even
more formidable challenge for invaders, sharpen the
ends of the thicker branches and ensure they are
pointing in the direction from where the attack is
expected. Next, anchor the main trunks into the
ground to make the trees more difficult to push out
of the way. These types of field expedient defenses
can slow down and impending attack.