Embed Size (px)
Citation preview

Corporate Information Systems http://www.sussex.ac.uk/its/help/bishelp.php
Sussex Direct: Curriculum Planning System – Full Notes
Page 1 of 19
o:\bis\projects\91369 - curriculum management system\delivery\sussex direct - curriculum planning system - full notes.docx
The Curriculum Planning is available from Sussex Direct and allows staff to plan the programme
and course syllabus for the start of the 2012/2013 academic year.
Contents Accessing the System ................................................................................................................. 2
Programmes ............................................................................................................................... 3
Creating a New Programme ................................................................................................... 3
My Programmes Page ........................................................................................................ 3
Programme Header Information ....................................................................................... 4
Programme Learning Outcomes ........................................................................................ 4
Adding Courses to Programmes ........................................................................................ 5
Verifying your Programme ..................................................................................................... 6
Verification Issues .............................................................................................................. 8
Printing the Programme Details ............................................................................................ 8
Turning off the footer information in the Print Options ................................................... 9
Searching for Programmes in the Curriculum Planning System ............................................ 9
Validation ............................................................................................................................. 10
Locked Programmes............................................................................................................. 10
Courses ..................................................................................................................................... 11
Creating a New Course ........................................................................................................ 11
My Courses Page .............................................................................................................. 11
Course Header Information ............................................................................................. 12
Course Learning Outcomes .............................................................................................. 13
Adding Assessments to Courses ...................................................................................... 13
Adding Coursework .......................................................................................................... 14
Course Teaching Method ................................................................................................. 15
Course Pre-requisites ....................................................................................................... 16
Updating an Existing Course ................................................................................................ 16
Verifying your Course .......................................................................................................... 17
Verification Issues ............................................................................................................ 18
Printing the Course Details .................................................................................................. 18
Searching for a Course by Keyword ..................................................................................... 19
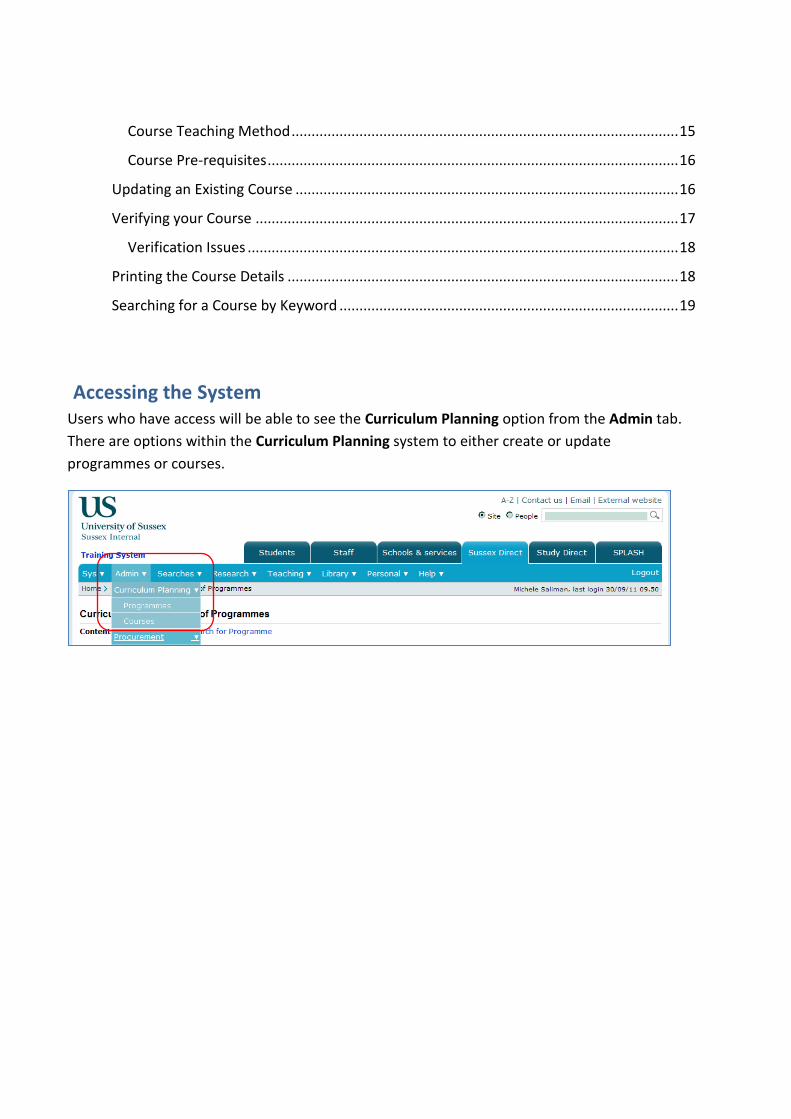
Accessing the System Users who have access will be able to see the Curriculum Planning option from the Admin tab.
There are options within the Curriculum Planning system to either create or update
programmes or courses.

Programmes
Creating a New Programme
From the ‘Curriculum Planning’ tab, select ‘Programmes’ to see the ‘My Programmes’ page.
My Programmes Page
1. To create a new programme, click on the ‘New’ button on the My Programmes table.
This will give you the following screen:
View/ update the
existing programmes
you have created or
updated
View the current
status of the
programme
Create a New
programme
Search for existing programmes within
the Curriculum Planning system by
department, programme code or
programme title for your school
To base your programme on an existing
one – select the programme from the list.
Click on Save to copy the programme
details to your new programme
Enter details for your
new programme
Click ‘Save’ to
commit changes

2. You can either create a new programme, or base your new programme on an existing
one. To do this, select a programme from the ‘Import Programme’ table and click on
‘Save’. This will copy the programme details from an existing programme (apart from the
Programme Aims), which can then be edited.
3. Once you have made your amendments, click Save to commit the changes you’ve made
to your programme header.
Programme Header Information
Programme Information Meaning
Award Title The full award name of the programme
Short Title Copied from the ‘Award Title’, but can be changed – this can be used to distinguish two similar programmes
Programme Code If you have copied the details from an existing programme, then the programme code will be used. If it is a new programme, the system will put in a default programme code starting with ‘NEW’ followed by a number.
Award The programme qualification (e.g. BA, MA etc)
Department The programme ‘owning’ department
Level UG or PG
MOA (Mode of Attendance) Part-time; Full-time or Mixed (i.e. Part-time and Full-time)
Duration FT How long the programme will last for a full-time student
Duration PT How long the programme will last for a part-time student
Programme Aims Programme aims text
Programme Learning Outcomes
Once you’ve created your programme header you can start to add the Programme Learning
Outcomes and add your courses to your programme
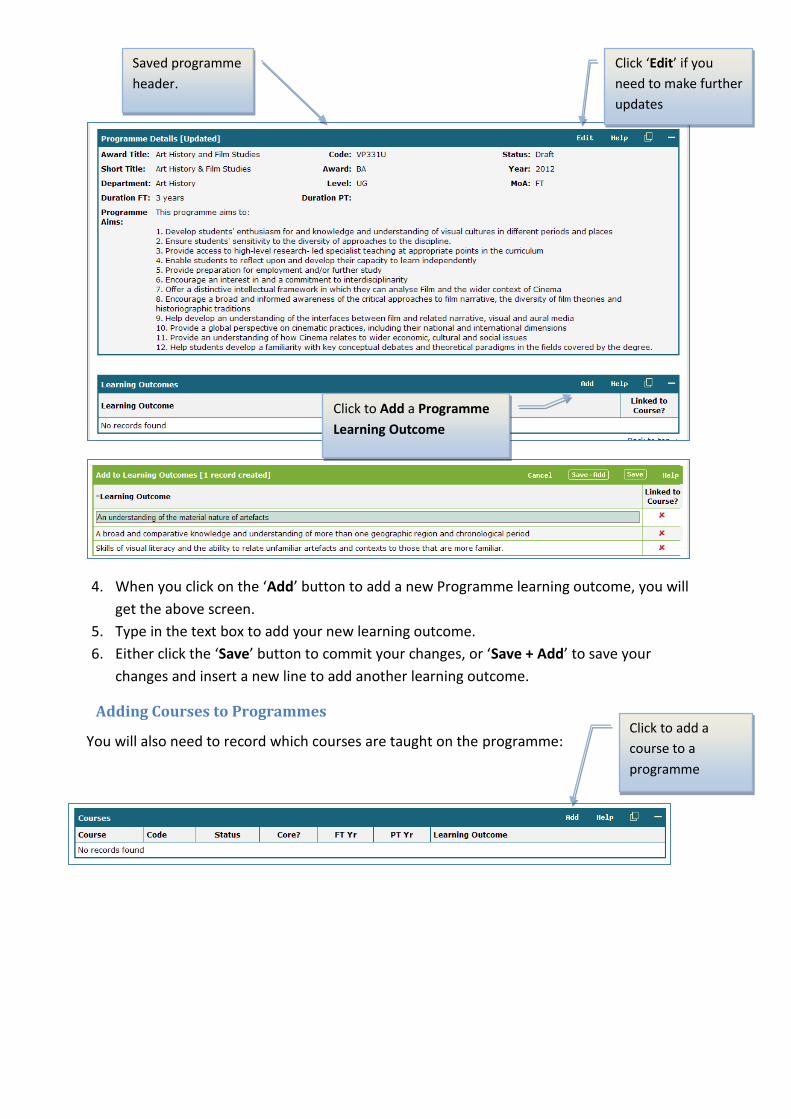
4. When you click on the ‘Add’ button to add a new Programme learning outcome, you will
get the above screen.
5. Type in the text box to add your new learning outcome.
6. Either click the ‘Save’ button to commit your changes, or ‘Save + Add’ to save your
changes and insert a new line to add another learning outcome.
Adding Courses to Programmes
You will also need to record which courses are taught on the programme:
Saved programme
header.
Click ‘Edit’ if you
need to make further
updates
Click to Add a Programme
Learning Outcome
Click to add a
course to a
programme

7. Click on ‘Add’ from the ‘Courses’ table to add courses to your programme
8. Start typing part of the course name to get a list of courses. Select a course,
9. Specify whether it is a ‘Core’ course by ticking the box, otherwise leave blank for optional
courses.
10. Specify which year the course will be taught in for full-time/part-time students
(whichever is applicable).
11. Link your course to one or more of the programme learning outcomes. If the course is a
‘core course’ then it must be linked to a learning outcome.
12. It is necessary that all of your ‘programme learning outcomes’ are linked to a course.
The ‘Learning Outcomes’ table will indicate which learning outcomes have been linked to
a course and which ones have not.
Verifying your Programme
When you create a new programme it is given a status of DRAFT. It is possible for staff in
the school to make changes to programmes. However, before the programme is assessed
by the review panel the system is able to check the programme to make sure that there is
no missing or conflicting information.
Type part of the
course name
Tick if this
course is a
Core course
Specify which year the course
is being taught in for part-time
and/or full-time students
Link the course to one or
more Programme Learning
Outcomes
Click to Save
Screen indicates which
learning outcomes have
been linked to a course

1. Clicking on the Verify button will identify all errors and missing data in your
programme. These errors must be corrected before the programme can go to the
approval stage.
2. Once all the errors have been corrected, click on the Verify button. This will present
a message to say that the programme has passed verification.
3. The status will then change from DRAFT to VERIFIED.
Click to Verify
Programme
Errors listed under
‘Verification Errors’
Errors also highlighted on
the page and an
explanation given

Verification Issues
Issue
All the information in the programme header must be entered
If you have specified that the Method of Attendance (MOA) is ‘MIXED’ (i.e. part-time and full-time) you need to have entered both the ‘Duration FT’ and ‘Duration PT’ fields
All programme learning outcomes need to be linked to a course
All core courses must be linked to a programme learning outcome.
If you have specified that the MOA is ‘MIXED’ then you must have recorded which year each course will be taught for both part-time and full-time students.
There must be at least one programme learning outcome
There must be at least one course attached to the programme
Printing the Programme Details
It is possible to get a print out of the programme details and attached courses by clicking on
the ‘Print Programme’ button
This will open a new
screen which will let
you print the
programme information

Turning off the footer information in the Print Options
Go to the print page and click File > Print Preview
Remove the ‘%url% information from the ‘Footer’ field.
Internet Explorer Firefox
Searching for Programmes in the Curriculum Planning System
As well as creating a new programme, it is possible to search for other programmes for your
school created in the Curriculum Planning system. After finding a programme you can then
make changes and amendments, providing someone has not already opened the
programme record.
Click File >
Print Preview
Remove url
Set ‘-blank-‘
to remove
information

From the main ‘Programmes’ screen you can search for any other programme in the
Curriculum Planning system, which is owned by your school. Once retrieved in the search,
it will be possible to view or update the programme, so long as it has not been ‘APPROVED’
by the review panel.
Validation
Once your programme has been reviewed by the panel, it may be given the status of
‘APPROVED’. It will not be possible to amend the programme after this point.
Locked Programmes
If another person is in the middle of updating a programme, you won’t be able to update
the information until they have made their changes and clicked the ‘Save’ button.
If a user doesn’t save or log out the programme will remain locked. This lock will clear after
24 hours.
Enter programme title, code or department
Click to
search
Click to view/
update
programme

Courses From the main ‘Curriculum Planning’ tab select the ‘Courses’ option
Creating a New Course
My Courses Page
1. Click the ‘New’ button to create a new course
Click to
create a new
course
Click to view/ update a course
you have created or updated
Current status of
course in the
curriculum planning
system
Click to search for courses by
department, course code or
title
Search by Course
Keyword

2. Once you have made changes, click on ‘Save’ to commit your changes.
Course Header Information
Programme Information Meaning
Full Title The full course name (Mandatory)
Short Title Copied from the ‘Full Title’, but can be changed – it can be used to distinguish two similar courses
Programme Code For a new course, the system will provide a default course code, starting with ‘NEW’ followed by a number (Mandatory)
Credits Course Credits
Department The course ‘owning’ department
Level The level of the course (Level 3 – Level 8)
Term When the course will be taught. This uses the teaching structure for the new academic year (i.e. Teaching Block 1 or Teaching Block 2)
Bibliography Question to ask whether Talis Aspire has been updated with the course reading list. If this hasn’t happened an explanation should be given
Course Outline Course outline text
Keywords Up to 5 course keywords may be supplied. These should be relevant to 20% or more of the course content
Enter details for your new
course
Click Save to
commit
changes
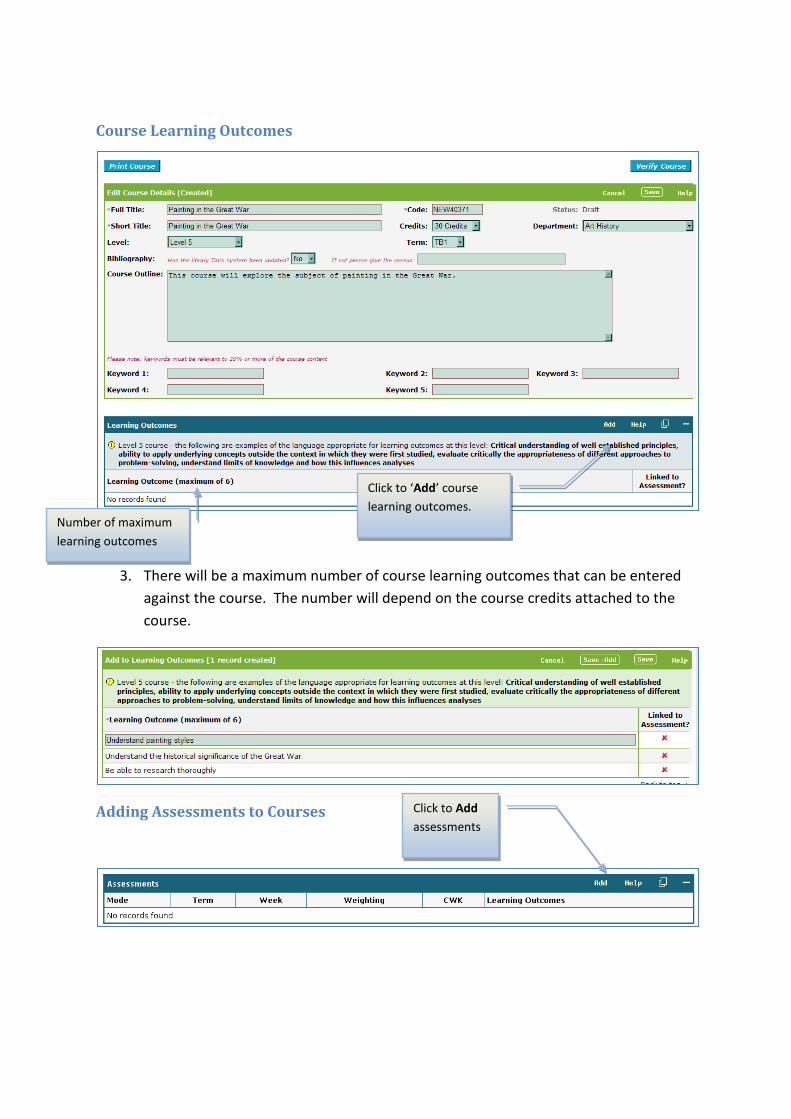
Course Learning Outcomes
3. There will be a maximum number of course learning outcomes that can be entered
against the course. The number will depend on the course credits attached to the
course.
Adding Assessments to Courses
Click to ‘Add’ course
learning outcomes. Number of maximum
learning outcomes
Click to Add
assessments
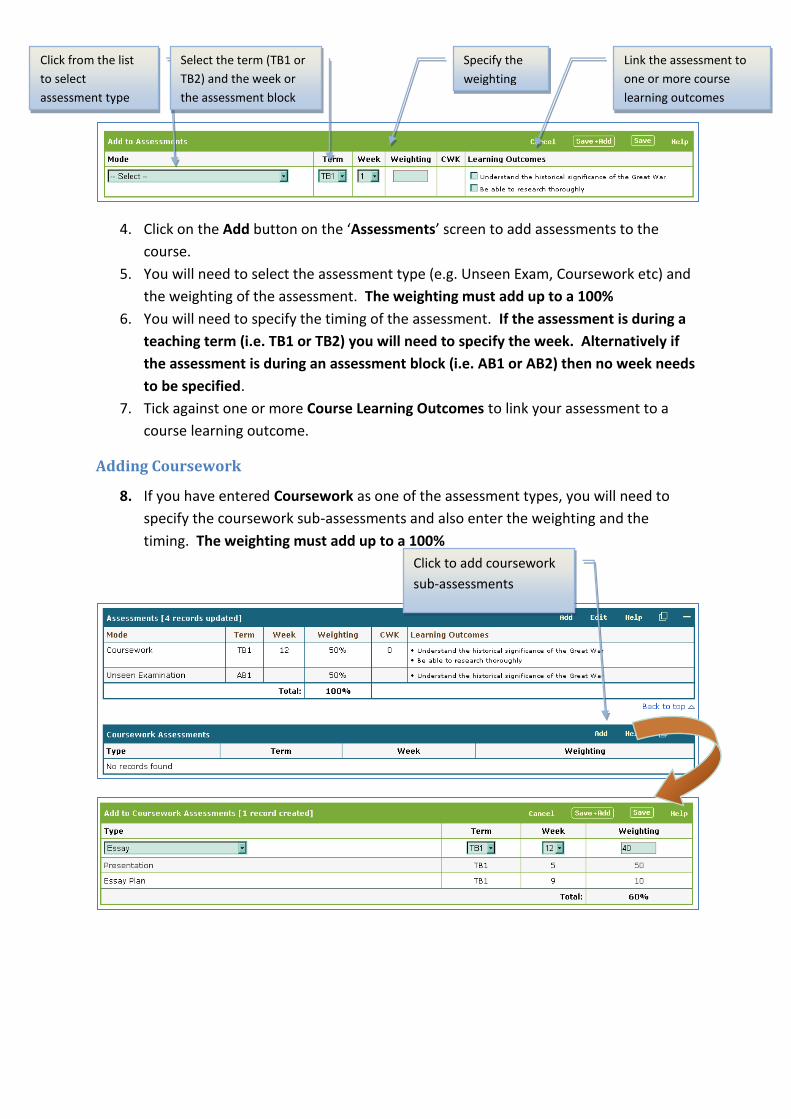
4. Click on the Add button on the ‘Assessments’ screen to add assessments to the
course.
5. You will need to select the assessment type (e.g. Unseen Exam, Coursework etc) and
the weighting of the assessment. The weighting must add up to a 100%
6. You will need to specify the timing of the assessment. If the assessment is during a
teaching term (i.e. TB1 or TB2) you will need to specify the week. Alternatively if
the assessment is during an assessment block (i.e. AB1 or AB2) then no week needs
to be specified.
7. Tick against one or more Course Learning Outcomes to link your assessment to a
course learning outcome.
Adding Coursework
8. If you have entered Coursework as one of the assessment types, you will need to
specify the coursework sub-assessments and also enter the weighting and the
timing. The weighting must add up to a 100%
Click from the list
to select
assessment type
Select the term (TB1 or
TB2) and the week or
the assessment block
Specify the
weighting
Link the assessment to
one or more course
learning outcomes
Click to add coursework
sub-assessments
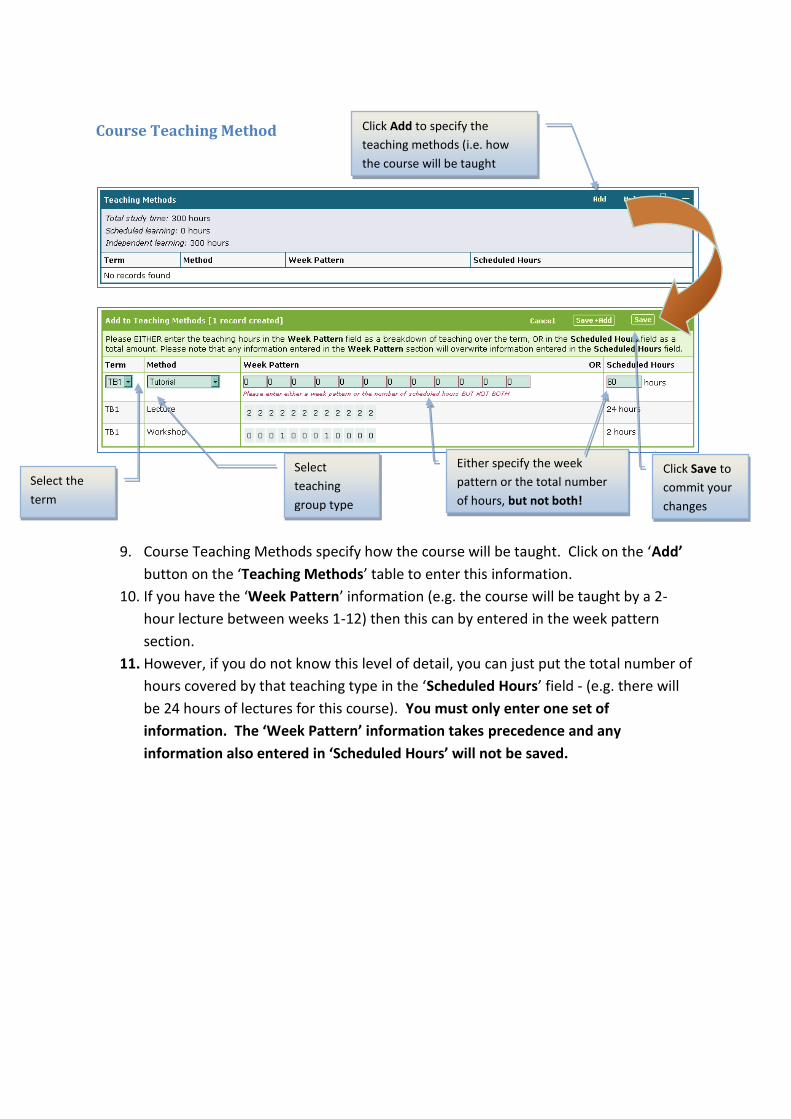
Course Teaching Method
9. Course Teaching Methods specify how the course will be taught. Click on the ‘Add’
button on the ‘Teaching Methods’ table to enter this information.
10. If you have the ‘Week Pattern’ information (e.g. the course will be taught by a 2-
hour lecture between weeks 1-12) then this can by entered in the week pattern
section.
11. However, if you do not know this level of detail, you can just put the total number of
hours covered by that teaching type in the ‘Scheduled Hours’ field - (e.g. there will
be 24 hours of lectures for this course). You must only enter one set of
information. The ‘Week Pattern’ information takes precedence and any
information also entered in ‘Scheduled Hours’ will not be saved.
Select
teaching
group type
Select the
term
Either specify the week
pattern or the total number
of hours, but not both!
Click Save to
commit your
changes
Click Add to specify the
teaching methods (i.e. how
the course will be taught
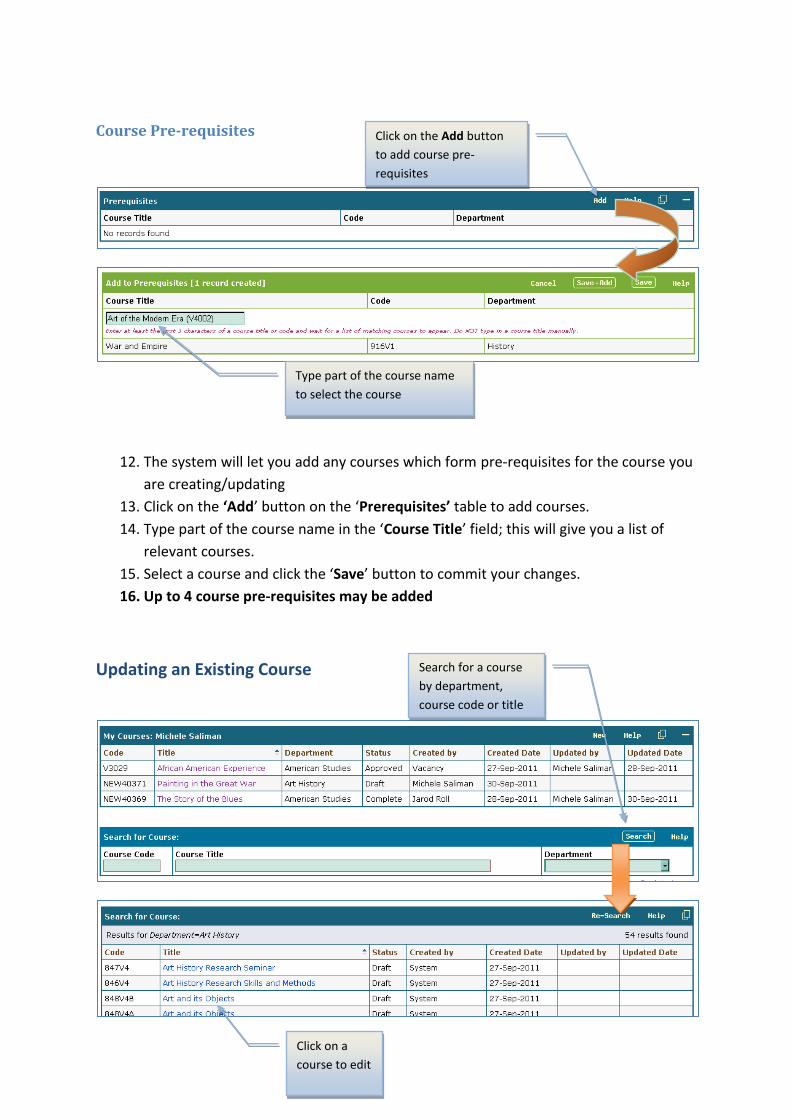
Course Pre-requisites
12. The system will let you add any courses which form pre-requisites for the course you
are creating/updating
13. Click on the ‘Add’ button on the ‘Prerequisites’ table to add courses.
14. Type part of the course name in the ‘Course Title’ field; this will give you a list of
relevant courses.
15. Select a course and click the ‘Save’ button to commit your changes.
16. Up to 4 course pre-requisites may be added
Updating an Existing Course
Click on the Add button
to add course pre-
requisites
Type part of the course name
to select the course
Search for a course
by department,
course code or title
Click on a
course to edit

1. It is possible to amend any other course belonging to your school
2. From the ‘My Courses’ screen search for a course and click on the ‘Course Title’ to
amend.
Verifying your Course
When you create a new course it is given a status of DRAFT. It is possible for staff in the
school to make changes to course. However, before the course is assessed by the review
panel the system is able to check the course to make sure that there is no missing or
conflicting information.
1. Clicking on the Verify button will identify all errors and missing data in your course.
These errors must be corrected before the course can go to the approval stage.
Click to Verify Course
Errors listed under
‘Verification Errors’
Errors also highlighted on
the page and an
explanation given

2. Once all the errors have been corrected, click on the Verify button. This will present
a message to say that the course has passed verification.
3. The status will then change from DRAFT to VERIFIED.
Verification Issues
Issue
All the information in the course header must be entered
If you have not updated the ‘Talis Aspire’ bibliography you need to give a reason why
You cannot have more course learning outcomes than the maximum number specified
You must have at least one course learning outcome
You must have at least one assessment
If you have specified ‘Coursework’ as one of the assessments, then you need to have added at least one coursework sub-assessment
All assessments and sub-assessments must add up to 100%
All learning outcomes must be linked to an assessment
At least one teaching method must be specified
Scheduled learning hours should not be more than the total study time
There should be no more than 4 course pre-requisites.
Printing the Course Details
It is possible to get a print out of the course details by clicking on the ‘Print Course’ button
This will open a new screen which will let you print the course information
See Turning off the footer information in the Print Options to remove the url from the
footer of the printed version

Searching for a Course by Keyword
From the ‘My Courses’ page it is possible to do a search by keyword. Enter your keyword,
or combination of keywords, and click on ‘Search’ to return any possible courses.
Enter
keyword(s) –
one per box
Click on
Search