Embed Size (px)
DESCRIPTION
Software delivery
Citation preview
ALTIRIS®
SOFTWARE DELIVERY SOLUTION 6.1 FOR WINDOWS PRODUCT GUIDE

Altiris Software Delivery Solution for Windows Product Guide 2
Notice
Copyright © 2001-2005 Altiris Inc. All rights reserved.
Product Version: 6.1
Document Date: February 3, 2005
Bootworks U.S. Patent No. 5,764,593.
RapiDeploy U.S. Patent No. 6,144,992.
Recovery Solution U.S. Patent No. 5,778,395, 5,907,672, 4701745, 5016009, 5146221, 5144425, 5463390, 5506580, 5532694, GB 2172127, B 904359, 3606869.
Other patents pending.
Due to the inherently complex nature of computer software, Altiris does not warrant that the Altiris software is error-free, will operate without interruption, is compatible with all equipment and software configurations, or will otherwise meet your needs.
The content of this documentation is furnished for informational use only, is subject to change without notice, and should not be construed as a commitment by Altiris. Altiris Inc. assumes no responsibility or liability for any errors or inaccuracies that may appear in this documentation. For the latest documentation, visit our Web site at www.altiris.com.
Altiris, the Altiris logo, BootWorks, Inventory Solution, LabExpert, PC Transplant, RapiDeploy, and RapidInstall are registered trademarks of Altiris, Inc. in the United States and in other countries.
Carbon Copy is a registered trademark licensed to Altiris, Inc. in the United States and a trademark of Altiris, Inc. in other countries.
Altiris eXpress, Altiris Protect, Application Management Solution, Application Metering Solution, Asset Control Solution, Asset Management Suite, Client Management Suite, Compliance Toolkit, Connector Solution, Conflict Analysis Solution, Contract Management Solution, Deployment Server, Deployment Solution, Energy Saver Toolkit, Education Management Suite, Helpdesk Solution Software, Lab Management Suite, Migration Toolkit, Mobile Client for SMS, Monitor Solution, Notification Server, Patch Management Solution, Problem Management Suite, Recovery Solution, Server Management Suite, Site Monitor Solution, Software Delivery Solution, TCO Management Solution, UNIX Client for SMS, Web Administrator for SMS, Web Reports, and other product names are trademarks of Altiris, Inc. in the United States and other countries.
Microsoft, Windows, and the Windows logo are trademarks, or registered trademarks of Microsoft Corporation in the United States and/or other countries.
HP and Compaq are registered trademarks of the Hewlett-Packard Corporation.
Dell is a registered trademark of Dell Inc.
Macintosh is a registered trademark of the Apple Computer Corporation.
Palm OS is a registered trademark of Palm Computing, Inc.
BlackBerry is a service mark and a trademark of Research In Motion Limited Corporation.
RIM is a service mark and trademark of Research In Motion (RIM)
All other brand names are trademarks or registered trademarks of their respective companies.

Contents
Altiris®Software Delivery Solution 6.1 for Windows Product Guide
Notice . . . . . . . . . . . . . . . . . . . . . . . . . . . . . . . . . . . . . . . . . . . . . . . . . . . . . . . . . . . . . . . . . . . . . . . . . . . . . 2
Chapter 1: Introducing Altiris Software Delivery Solution for Windows . . . . . . . . . . . . . . . . . . . . . . . 5Software Delivery Overview . . . . . . . . . . . . . . . . . . . . . . . . . . . . . . . . . . . . . . . . . . . . . . . . . . . . . . . . . . . 5
Chapter 2: Installing Altiris Software Delivery Solution for Windows . . . . . . . . . . . . . . . . . . . . . . . . . 7Planning Information . . . . . . . . . . . . . . . . . . . . . . . . . . . . . . . . . . . . . . . . . . . . . . . . . . . . . . . . . . . . . . . . 7
Security . . . . . . . . . . . . . . . . . . . . . . . . . . . . . . . . . . . . . . . . . . . . . . . . . . . . . . . . . . . . . . . . . . . . . . . 7Notification Server and SQL Server . . . . . . . . . . . . . . . . . . . . . . . . . . . . . . . . . . . . . . . . . . . . . . . . . 7
Prerequisites . . . . . . . . . . . . . . . . . . . . . . . . . . . . . . . . . . . . . . . . . . . . . . . . . . . . . . . . . . . . . . . . . . . . . . 8Installing Software Delivery Solution . . . . . . . . . . . . . . . . . . . . . . . . . . . . . . . . . . . . . . . . . . . . . . . . . . . . 8Registration . . . . . . . . . . . . . . . . . . . . . . . . . . . . . . . . . . . . . . . . . . . . . . . . . . . . . . . . . . . . . . . . . . . . . . . 8
Chapter 3: Getting Started with Software Delivery Solution . . . . . . . . . . . . . . . . . . . . . . . . . . . . . . . . . 9Software Delivery Usage Overview . . . . . . . . . . . . . . . . . . . . . . . . . . . . . . . . . . . . . . . . . . . . . . . . . . . . . 9Software Delivery Solution Components . . . . . . . . . . . . . . . . . . . . . . . . . . . . . . . . . . . . . . . . . . . . . . . . . 9Using Multicasting . . . . . . . . . . . . . . . . . . . . . . . . . . . . . . . . . . . . . . . . . . . . . . . . . . . . . . . . . . . . . . . . . 11
Chapter 4: Using Software Delivery Solution . . . . . . . . . . . . . . . . . . . . . . . . . . . . . . . . . . . . . . . . . . . . 13Using Software Packages and Programs . . . . . . . . . . . . . . . . . . . . . . . . . . . . . . . . . . . . . . . . . . . . . . . 13
Software Packages Overview . . . . . . . . . . . . . . . . . . . . . . . . . . . . . . . . . . . . . . . . . . . . . . . . . . . . . 13Package Download Overview . . . . . . . . . . . . . . . . . . . . . . . . . . . . . . . . . . . . . . . . . . . . . . . . . . . . . 14Creating a Package . . . . . . . . . . . . . . . . . . . . . . . . . . . . . . . . . . . . . . . . . . . . . . . . . . . . . . . . . . . . 15Defining a Program for a Package . . . . . . . . . . . . . . . . . . . . . . . . . . . . . . . . . . . . . . . . . . . . . . . . . 15Checking for Package Download Errors . . . . . . . . . . . . . . . . . . . . . . . . . . . . . . . . . . . . . . . . . . . . . 16Changing the Check for Updated Package Files Schedule . . . . . . . . . . . . . . . . . . . . . . . . . . . . . . 16Software Package Page . . . . . . . . . . . . . . . . . . . . . . . . . . . . . . . . . . . . . . . . . . . . . . . . . . . . . . . . . 16
Using Software Delivery Tasks . . . . . . . . . . . . . . . . . . . . . . . . . . . . . . . . . . . . . . . . . . . . . . . . . . . . . . . 22Software Delivery Task Priority . . . . . . . . . . . . . . . . . . . . . . . . . . . . . . . . . . . . . . . . . . . . . . . . . . . 23Software Delivery Task Status Files . . . . . . . . . . . . . . . . . . . . . . . . . . . . . . . . . . . . . . . . . . . . . . . . 23Disabled Software Delivery Tasks . . . . . . . . . . . . . . . . . . . . . . . . . . . . . . . . . . . . . . . . . . . . . . . . . 23Creating a Software Delivery Task . . . . . . . . . . . . . . . . . . . . . . . . . . . . . . . . . . . . . . . . . . . . . . . . . 24Specifying Software Delivery Task Availability . . . . . . . . . . . . . . . . . . . . . . . . . . . . . . . . . . . . . . . . 24Verifying that a Policy Has Been Successfully Delivered to the Altiris Agent Computer . . . . . . . . 25Policy Scheduling on Altiris Agents . . . . . . . . . . . . . . . . . . . . . . . . . . . . . . . . . . . . . . . . . . . . . . . . 25Scheduling Software Delivery Tasks . . . . . . . . . . . . . . . . . . . . . . . . . . . . . . . . . . . . . . . . . . . . . . . 25Software Delivery Task Page . . . . . . . . . . . . . . . . . . . . . . . . . . . . . . . . . . . . . . . . . . . . . . . . . . . . . 26Sequential Software Delivery Task Page . . . . . . . . . . . . . . . . . . . . . . . . . . . . . . . . . . . . . . . . . . . . 30
Using the Software Delivery Wizard and Status Page . . . . . . . . . . . . . . . . . . . . . . . . . . . . . . . . . . . . . . 32Software Delivery Wizard and Status . . . . . . . . . . . . . . . . . . . . . . . . . . . . . . . . . . . . . . . . . . . . . . . 33
Altiris Software Delivery Solution for Windows Product Guide 3

Contents
Deliver an Existing Package of Software . . . . . . . . . . . . . . . . . . . . . . . . . . . . . . . . . . . . . . . . . . . . 34Create and Deliver a New Package of Software . . . . . . . . . . . . . . . . . . . . . . . . . . . . . . . . . . . . . . 36Using Software Migration Tasks . . . . . . . . . . . . . . . . . . . . . . . . . . . . . . . . . . . . . . . . . . . . . . . . . . . . . . 38Software Migration Task Page . . . . . . . . . . . . . . . . . . . . . . . . . . . . . . . . . . . . . . . . . . . . . . . . . . . . 39
Using the Software Migration Wizard and Status Page . . . . . . . . . . . . . . . . . . . . . . . . . . . . . . . . . . . . . 40Software Migration Wizard and Status Page . . . . . . . . . . . . . . . . . . . . . . . . . . . . . . . . . . . . . . . . . 41Using the Software Migration Wizard . . . . . . . . . . . . . . . . . . . . . . . . . . . . . . . . . . . . . . . . . . . . . . . 42
Using Notifications and Automated Actions . . . . . . . . . . . . . . . . . . . . . . . . . . . . . . . . . . . . . . . . . . . . . . 44Using the Software Portal . . . . . . . . . . . . . . . . . . . . . . . . . . . . . . . . . . . . . . . . . . . . . . . . . . . . . . . . . . . 45
Software Portal Page . . . . . . . . . . . . . . . . . . . . . . . . . . . . . . . . . . . . . . . . . . . . . . . . . . . . . . . . . . . 47
Chapter 5: Configuring Software Delivery Solution. . . . . . . . . . . . . . . . . . . . . . . . . . . . . . . . . . . . . . . 49Configuring Software Delivery Security Privileges . . . . . . . . . . . . . . . . . . . . . . . . . . . . . . . . . . . . . . . . . 49Installing Software Delivery Solution Agent . . . . . . . . . . . . . . . . . . . . . . . . . . . . . . . . . . . . . . . . . . . . . . 50
Software Delivery Solution Agent Uninstall . . . . . . . . . . . . . . . . . . . . . . . . . . . . . . . . . . . . . . . . . . 50Task Synchronization . . . . . . . . . . . . . . . . . . . . . . . . . . . . . . . . . . . . . . . . . . . . . . . . . . . . . . . . . . . . . . . 50Setting Up Distribution Point Connection Parameters . . . . . . . . . . . . . . . . . . . . . . . . . . . . . . . . . . . . . . 51Configuring the Software Portal . . . . . . . . . . . . . . . . . . . . . . . . . . . . . . . . . . . . . . . . . . . . . . . . . . . . . . . 52Configuring Application Inventory . . . . . . . . . . . . . . . . . . . . . . . . . . . . . . . . . . . . . . . . . . . . . . . . . . . . . 52Configuring Application Relationships . . . . . . . . . . . . . . . . . . . . . . . . . . . . . . . . . . . . . . . . . . . . . . . . . . 53Data Purging . . . . . . . . . . . . . . . . . . . . . . . . . . . . . . . . . . . . . . . . . . . . . . . . . . . . . . . . . . . . . . . . . . . . . 56
Chapter 6: Technical Reference. . . . . . . . . . . . . . . . . . . . . . . . . . . . . . . . . . . . . . . . . . . . . . . . . . . . . . . 58SMS Software Delivery Integration . . . . . . . . . . . . . . . . . . . . . . . . . . . . . . . . . . . . . . . . . . . . . . . . . . . . 58
SMS and Notification Server Collections . . . . . . . . . . . . . . . . . . . . . . . . . . . . . . . . . . . . . . . . . . . . 59Integrating SMS Software Delivery . . . . . . . . . . . . . . . . . . . . . . . . . . . . . . . . . . . . . . . . . . . . . . . . . 59Specifying an SMS Database . . . . . . . . . . . . . . . . . . . . . . . . . . . . . . . . . . . . . . . . . . . . . . . . . . . . . 59Configuring Software Delivery for SMS . . . . . . . . . . . . . . . . . . . . . . . . . . . . . . . . . . . . . . . . . . . . . 59Specifying When Notification Server Is Used for SMS Advertisements . . . . . . . . . . . . . . . . . . . . . 60Deleting SMS Software Delivery Objects from Notification Server . . . . . . . . . . . . . . . . . . . . . . . . . 61Removing SMS Software Delivery Integration from Notification Server . . . . . . . . . . . . . . . . . . . . . 61
Troubleshooting . . . . . . . . . . . . . . . . . . . . . . . . . . . . . . . . . . . . . . . . . . . . . . . . . . . . . . . . . . . . . . . . . . . 62Log Files . . . . . . . . . . . . . . . . . . . . . . . . . . . . . . . . . . . . . . . . . . . . . . . . . . . . . . . . . . . . . . . . . . . . . 62FTP Service . . . . . . . . . . . . . . . . . . . . . . . . . . . . . . . . . . . . . . . . . . . . . . . . . . . . . . . . . . . . . . . . . . 62
Index . . . . . . . . . . . . . . . . . . . . . . . . . . . . . . . . . . . . . . . . . . . . . . . . . . . . . . . . . . . . . . . . . . . . . . . . . . . . . 63
Altiris Software Delivery Solution for Windows Product Guide 4
Chapter 1:
Introducing Altiris Software Delivery Solution for Windows
Altiris Software Delivery Solution provides secure, bandwidth-sensitive distribution of applications and updates throughout your organization. Software Delivery Solution supports LAN, WAN, and remote and mobile clients from a single infrastructure, and offers advanced application management features such as application self-healing, conflict analysis, and other ongoing software management capabilities.
Altiris Software Delivery Solution for Windows lets you define software packages, distribute software packages, and run programs on Windows 9x/Me/NT/2000/XP/2003 operating system computers. Software Delivery includes the following features:
• Computers can be targeted for software delivery based on data that is gathered from a computer. You can easily designate groups of computers to receive a software delivery job based upon hardware, software, or end-user details.
• A Software Delivery task, which downloads and deploys software packages, can be designated as mandatory or optional. You can allow or prohibit users from running a Software Delivery task. You can also expire programs, so they can no longer be deployed after a specified date.
• Network bandwidth throttling helps minimize network impact. This is especially useful for remote users.
• Checkpoint recovery lets you resume a package download to an Altiris Agent computer if the download is interrupted. This is especially useful for remote/dial-up users.
• Non-intrusive operation on Altiris Agent client computers.• Full support for locked down Windows NT/2000/XP/2003 environments, which means software
can be installed on computers even if the logged on user at the time of the installation does not have administrator rights to the computer.
• Native support for SMS packages, collections, advertisements, and status reporting.• Numerous reports to help you analyze and make proactive management decisions.Note: If you want to define and deploy software packages for UNIX/Linux, Macintosh, or handhelds, Altiris also has Software Delivery products for these platforms.
Quick Link• Software Delivery Overview (page 5)
Software Delivery OverviewThe Software Delivery Solution works in conjunction with Notification Server and the Altiris Agent to define and deploy software packages and run programs. Programs can be run once or based on a schedule.
To deploy a package, which consists of any collection of program files, you start by using the Altiris Console to define a package. Once the package has been defined, you create a Software Delivery task to deploy the package and to run programs within the package. The Software Delivery task also specifies when a program is to be run, the security context used when a program is run, and the collection of computers to which the Software Delivery task applies.
Altiris Software Delivery Solution for Windows Product Guide 5

Chapter 1: Introducing Altiris Software Delivery Solution for Windows
Bandwidth ThrottlingBandwidth throttling lets you control the amount of bandwidth used in the delivery of packages. This feature can help minimize the impact of software deployment at peak network usage times.When the Software Delivery Agent (which is installed along with the Altiris Agent) downloads a file, the agent downloads the file buffer by buffer with a delay between each buffer. The buffer size and the amount of delay between buffers are both configurable through the Altiris Agent. Different values can be used depending on the bandwidth usage.
If bandwidth control is disabled by the user, the Software Delivery Agent will use no (0) delay between buffers when downloading files. Effectively, the agent uses all of the available bandwidth for package download.
If bandwidth control is enabled, the agent will test the data transfer rate by using full bandwidth to download a package for 10 seconds, and then estimate the transfer rate during that period of time. If the estimated transfer rate is less than a threshold, the agent will then use a delay between buffer downloads to slow down the download process. The data transfer rate test is done every two minutes to re-evaluate the link speed during the package download. Therefore, bandwidth usage depends on the transfer rate of the package download. For more information on the throttling feature, see the Altiris Notification Server Reference.
BlockoutBlockout lets you block out times in which packages are delivered with a high priority, low priority, or not at all. This feature lets you ensure that package delivery does not take up significant network bandwidth during peak usage times. For more information on the blockout feature, see the Altiris Notification Server Reference.
MulticastingMulticasting lets you transmit packages to a select group of recipients. This feature has been introduced to Notification Server to improve Package Server performance on large networks for large customers using significant amounts of network bandwidth. It will protect Package Servers from being overloaded and slow network responses when distributing large packages.
Multicasting reduces the load on Package Servers by reducing the number of Altiris Agents that connect to the Package Server and decreases network utilization by multicasting package data to peers.
For more information about multicasting, see “Using Multicasting” on page 11.
Sequential Software Delivery TasksYou can create a Software Delivery task to deliver a single application or you can create a sequential Software Delivery task to deliver multiple tasks. When using sequential Software Delivery tasks you can configure the sequence of the tasks to be deployed as well as dependencies that must exist for each task to be run. For example, you can have three tasks, Task A, Task B, and Task C in one sequential task. After setting the execution order, you can configure a dependency for Task C to only execute if Task B executed successfully.
Software PortalThe Software Portal lets users install software on their computers by executing Software Delivery programs for which they have been given permission by the administrator. Software Portal options are provided in addition to existing Software Delivery Package and Program settings.
Software MigrationThe Software Migration Wizard creates tasks that can identify applications that are installed on one or more source computers and then deliver the corresponding Software Delivery packages to one or
You can use the Software Migration Wizard to identify which applications are installed on the original computer and then use Software Delivery to deploy software delivery packages for those applications to the new computer. After the software migration, you can use PC Transplant to migrate the settings from the original computer to the new computer and both the applications and settings will be available to the user.
Altiris Software Delivery Solution for Windows Product Guide 6

Chapter 2:
Installing Altiris Software Delivery Solution for Windows
This section provides information you need to know to install Software Delivery Solution for Windows.
• Planning Information (page 7)• Prerequisites (page 8)• Installing Software Delivery Solution (page 8)• Registration (page 8)
Planning InformationBefore installing Software Delivery, we recommend that you review the following information:
• Security (page 7)• Notification Server and SQL Server (page 7)
SecurityOn Windows NT/2000/XP, the Software Delivery Agent piece of the Altiris Agent runs as a service with local administrator rights on the computer.
The Software Delivery Agent can run only under either the local system or the currently logged on user account. The default is the local system account.
When running using the local system account, the Software Delivery Agent will not have the same HKEY_CURRENT_USER registry value as the local logged on user. The HKEY_CURRENT_USER is only the same value if you set up the Software Delivery task to run as the logged on user.
Notification Server and SQL ServerIf Notification Server and the Microsoft SQL Server database are NOT running on the same computer, make sure that the two computers are in the same time zone and their clocks are reasonably synchronized. Differences in times or time zones between the two computers can cause package update problems.
Altiris Software Delivery Solution for Windows Product Guide 7

Chapter 2: Installing Altiris Software Delivery Solution for Windows
PrerequisitesSoftware Delivery Solution for Windows requires the following:
Notification Server• Notification Server Version 6.0
Client Computer• Windows 95, Windows 98, Windows Me, Windows NT 4.0, Windows 2000, Windows XP, or
Windows 2003• Altiris Agent Version 6.0
Installing Software Delivery SolutionBefore installing Software Delivery, review “Prerequisites” on page 8.
To install Software Delivery Solution on Notification Server1 Click Start > Programs > Altiris > Altiris Console.
This starts the Altiris Console.2 Click the Configuration tab. 3 In the treeview pane, navigate to Upgrade/Install Additional Solutions.4 Click the Available Solutions tab. 5 Click the Software Delivery Solution for Windows link.6 Click Start.
This starts the installation of the solution. When the installation is complete, the window will automatically close.
RegistrationEach Altiris product comes with a 7-day trial license that is installed by default. You can register and obtain a 30-day evaluation license through our Web site at www.altiris.com or purchase a full product license.
To view your current license, open the Altiris Console, click the Configuration tab, and select Licensing.
For more information, see “Licensing Altiris Software” in the Altiris Getting Started Guide on the product CD or on our Web site at www.altiris.com/support/documentation.
Altiris Software Delivery Solution for Windows Product Guide 8
Chapter 3:
Getting Started with Software Delivery Solution
This section provides information you need to know to get started using Software Delivery Solution for Windows.
Quick Links• Software Delivery Usage Overview (page 9)• Software Delivery Solution Components (page 9)• Using Multicasting (page 11)
Software Delivery Usage OverviewSoftware deployment involves defining packages, creating Software Delivery tasks, delivering packages, running programs, and monitoring feedback. The following outlines the software deployment procedure.
To deploy software1 Set up software delivery (see “Configuring Software Delivery Solution” on page 49).2 Define a package that contains the files you want to deploy (see “Creating a Package” on
page 15).3 Define the program you want to run (see “Defining a Program for a Package” on page 15).4 Create a Software Delivery task for the package that specifies a schedule for the program and the
collection to which it applies (see “Creating a Software Delivery Task” on page 24).5 Create reports to analyze results (see Altiris Notification Server Help).If you have problems downloading a package, see “Checking for Package Download Errors” on page 16.
Using the Software Delivery WizardThe Software Delivery Wizard takes you through the steps of creating and delivering new and existing packages. Because packages are delivered through Software Delivery tasks, this wizard guides you through creating packages and setting up Software Delivery tasks to deliver those packages.
This is the easiest and most efficient way to create packages, assign programs to them, and set up Software Delivery tasks to deliver them. For more information, see “Using the Software Delivery Wizard and Status Page” on page 32.
Software Delivery Solution ComponentsWhen Software Delivery Solution for Windows is installed, folders and items are placed in various tab views of the Altiris Console. You can use these folders and items to create and manage packages, programs, and Software Delivery tasks. All folders and items for Software Delivery Solution for Windows are placed in the Software Management > Software Delivery > Windows folder in the treeview pane of the various tab views.
Altiris Software Delivery Solution for Windows Product Guide 9

Chapter 3: Getting Started with Software Delivery Solution Software Delivery Solution Components
Tasks Tab ViewThe following table lists the shortcut menu items that are added after Software Delivery Solution is installed. These can be accessed when you right-click a folder or item in the treeview pane on the Tasks tab view.Resources Tab ViewSoftware Delivery Package folder is provided as a container for the Software Delivery packages that you create.
Reports Tab ViewFrom the Reports tab, you can view the Software Delivery dashboard and Software Delivery reports.
The Software Delivery dashboard displays a list of executed Software Delivery tasks, their status, the computers they were delivered to, and the execution time. A chart showing the number of executed tasks is also provided.
Reports let you analyze your data. Each Altiris solution includes predefined reports that you can use or modify, or you can create your own reports.
Software Delivery Solution provides numerous predefined reports to help you analyze your asset information.
These reports are found in the Altiris Console under the Reports tab by navigating to Reports > Software Management > Software Delivery > Windows in the treeview pane. The reports are organized into the following categories:
• Application Inventory• Audit Information• Client Package Download• Client Program Execution
Folder Shortcut Menu Item
Description
Notification Policies Software Delivery Solution for Windows supplies Notification Policies that provide active reporting for the Altiris Agent. See “Using Notifications and Automated Actions” on page 44.
Sequential Software Delivery Task
You can create a Software Delivery task to deliver a single application or you can create a sequential Software Delivery task to deliver multiple tasks. When using sequential Software Delivery tasks, you can configure the sequence of the tasks to be deployed as well as dependencies that must exist for each task to be run.
Software Delivery Tasks
The Software Delivery Tasks folder is provided as a container for the Software Delivery tasks that you create.
Software Delivery Wizard and Status
Opens the Software Delivery Wizard. This wizard takes you through the steps of creating packages and setting up Software Delivery tasks to deliver those packages. See “Using the Software Delivery Wizard and Status Page” on page 32.
Hello World - Sample A pre-installed sample Software Delivery task called “Hello World - Sample”.
New Software Delivery Task
Creates a new Software Delivery task.
Software Migration Task
Software Migration Wizard and Status
Software Migration tasks lets you migrate applications from one computer to another. See “Using the Software Migration Wizard and Status Page” on page 40.
Altiris Software Delivery Solution for Windows Product Guide 10

Chapter 3: Getting Started with Software Delivery Solution Using Multicasting
• Client Software Delivery Tasks Status• Packages/Programs• Software Delivery Tasks Definitions• Software PortalIn addition to the above reports, you can create reports related to Software Delivery task usage. Software Delivery Solution also provides the ability to automatically delete old reports.For information on these features as well as using predefined reports and creating custom reports, see Altiris Notification Server Reference.
Configuration Tab ViewSoftware Delivery Solution for Windows places several configuration items in the Configuration tab view. These items let you configure Software Delivery Solution for Windows to meet your needs. For more information, see “Configuring Software Delivery Solution” on page 49.
Using MulticastingSample Multicasting ScenarioImagine the scenario of a remote network segment consisting of five Altiris Agents that remotely communicate to the Notification Server.
When the first Altiris Agent updates its configuration, it is notified that there is a package ready for download. If this Altiris Agent has multicasting enabled, it will begin a multicast session and ask if any other Altiris Agents in the segment already have this package. As other Altiris Agents in turn update their configuration and are also asked to download this package they will join the multicast session to register that they too need to download the package.
The Altiris Agents first negotiate to see who is going to be the 'master' of the session. Once the minimum numbers of Agents per multicast session join, one of two things will then occur:
• If one of the Altiris Agents has the package, then it will become the multicast master. The master will wait for the minimum number of Agents to join the session.
• If no Altiris Agent in the session has the package, then they will negotiate with each other and pick a multicast master based on their respective OS, OS type, CPU speed, and memory. This has a minimum timeout of 240 seconds. Once the master is chosen, it will download the package in the usual manner and then wait for the minimum number of Agents to join the session.
The master Altiris Agent will then multicast the package over the physical subnet so that each of the Altiris Agents in the multicast session can then receive it.
If an Altiris Agent requests a package after it has been available for some time, it will attempt to join an existing session or else it will begin a multicast session as normal.
This process optimizes the package download procedure. Only one Altiris Agent per session will communicate with the Package Server or Notification Server to download the package. Previously, each Altiris Agent required bandwidth & CPU usage to communicate directly to the Package Server or the Notification Server. Multicasting reduces this overhead by reducing significant amounts of network bandwidth usage and thereby reducing load on the Package Server or the Notification Server.
Altiris Agents will revert to unicast for downloading packages under the following circumstances:
• If the Maximum sessions per physical subnet value has been reached, the backoff period will initiate. If this occurs more times than the Maximum transmission attempts per package, the Altiris Agent will revert to unicast.
• If an Altiris Agent is connected to the session at less than 64 Kbytes/second it will be removed from the session.
• If the maximum bandwidth used for multicasting has been reached.• If the Maximum sessions per physical subnet value has been reached.• If the package is smaller than the Disable multicast for packages smaller than value.
Altiris Software Delivery Solution for Windows Product Guide 11

Chapter 3: Getting Started with Software Delivery Solution Using Multicasting
Package Servers and MulticastingPreviously, a Package Server exclusively received packages from an Altiris server and passed those packages on to other Altiris-enabled computers. This process has changed with the advent of multicasting but it is imperative to keep the following information in mind:• Package Servers will always download a package using unicast. • If there is a Package Server on the subnet that has already downloaded a package, it will
participate in the multicast session as the master.
Configuring MulticastingPackage multicasting is configured in the Package Multicast tab on the Altiris Agent Settings page. You can also select to use multitasking on the Advanced tab on the Software Delivery Task page on the Advanced tab “Advanced Tab View - Software Delivery Task Page” on page 29. By default, all Software Delivery tasks that meet the criteria will use multicasting.
Altiris Software Delivery Solution for Windows Product Guide 12
Chapter 4:
Using Software Delivery Solution
This section provides information you need to know to use Software Delivery Solution for Windows.
Quick Links• Using Software Packages and Programs (page 13)• Using Software Delivery Tasks (page 22)• Using the Software Delivery Wizard and Status Page (page 32)• Using Software Migration Tasks (page 38)• Using the Software Migration Wizard and Status Page (page 40)• Using Notifications and Automated Actions (page 44)• Using the Software Portal (page 45)
Using Software Packages and ProgramsQuick Links• Software Packages Overview (page 13)• Package Download Overview (page 14)• Creating a Package (page 15)• Defining a Program for a Package (page 15)• Checking for Package Download Errors (page 16)• Changing the Check for Updated Package Files Schedule (page 16)• Software Package Page (page 16)
Software Packages OverviewSoftware packages are a group of program files. Software Delivery Solution lets you define and deploy software packages.
To define a package, you must designate where the source files are located (a folder). This folder can be local to the Notification Server computer, on the network (UNC), or accessed through a URL.
When a package is defined, all of the contents of the folder specified by the package, including the contents of subfolders, are part of the package. When you define a package, only include the files that are necessary to accomplish the purpose of that package. The more files included, the greater the bandwidth or time required to deploy the package, since all of the files in a package are downloaded to the Altiris Agent.
As part of the package definition process, you specify the locations from which an Altiris Agent can download the package. By default, a package can be downloaded from the location specified in the package as the source for the package. You can also specify Package Servers where a package can
Altiris Software Delivery Solution for Windows Product Guide 13

Chapter 4: Using Software Delivery Solution Using Software Packages and Programs
be obtained. Package Servers let you reduce the load on the Notification Server and the network by distributing packages to multiple locations from which they can be downloaded. For more information on package servers, see the Altiris Notification Server documentation.The Altiris Agent stores package files on the same drive that the agent installed (in the install path\Altiris\Altiris Agent\Software Delivery\Package GUID folder). When installing the Altiris Agent, install the Altiris Agent on a drive with sufficient space for all the files that will be downloaded. If the Altiris Agent does not have sufficient disk space to download a package, a message is displayed by the Altiris Agent and a status message is sent to the Notification Server. If the end user manually deletes the package files, the Altiris Agent will re-download them from the Notification Server the next time the Altiris Agent tries to run the package.
For information on defining software packages, see “Creating a Package” on page 15.
Note: If you have a Software Delivery task that uses cmd.exe with the “/K” switch, the command window will be left open after execution. This is because the Software Delivery Agent runs the command and waits for the exit code. When the “/K” switch is used, the command line does not produce an exit code until you either type “exit” or close the window. If you type “exit”, the exit code is 0 (no error). If you close the window, the exit code is non-zero, which indicates an error, which is reported in the Altiris Agent. If you want to run commands using cmd.exe and return an exit code, use the “exit N” command, where “N” is the desired exit code. This will cause the cmd.exe application to terminate with exit code N.
Package Download OverviewWhen a new package is defined, the package will be automatically downloaded to the appropriate Altiris Agent Package Server the next time the Altiris Agent requests configuration information from Notification Server. If you modify a package definition within the Altiris Console, the changed files in the package will also be downloaded to the appropriate Altiris Agent computers when the Altiris Agents check for configuration information.
To send a package to a group of computers, the package must be assigned to a Software Delivery task, the destination computers must be a part of a Collection assigned to the task, and the task must be enabled. For more information, see Using Software Delivery Tasks (page 22).
If the actual files in a package change, Notification Server automatically recognizes the changes. Notification Server checks for changed package files on a regular basis (once a day by default). If Notification Server determines that files in a package have changed, Notification Server will inform the appropriate Altiris Agents that the package has changed. Only the changed files will be downloaded to the Altiris Agent again. The interval that Notification Server checks for changed files can be modified (for more information, see “Changing the Check for Updated Package Files Schedule” on page 16). The less frequently the check is made, the longer the time is required for a changed package to be available on an Altiris Agent computer. The more frequently the check is made, the more processing resources are required by Notification Server.
If the Software Delivery Agent is unable to download a package due to a link failure or denied access so a connection cannot be established, the Altiris Agent will report a “Download failed - Link failure” status message. The Software Delivery Agent will back off for N minutes (where N increases exponentially from a default of 3 minutes to a default of 2 hours) before attempting to download the package again.
If the Altiris Agent detects a network status change (a new network link), any package waiting for a retry at being downloaded will immediately restart. The back off interval will be reset to the initial value.
If a connection is lost during the download of a package, the transfer rate is throttled. When the Altiris Agent attempts to download the package again, a buffer transfer delay applies and slows down the download. The Altiris Agent determines which files in the package still need to be downloaded and downloads those files.
If a source or destination fails during a package download, the checkpoint recovery feature lets you continue the download of a package without starting over. For example, suppose you are deploying a package that is 20 MB in size and there is a network failure 15 MB into the deployment process. When your systems are back up, the package deployment resumes at the 15 MB point. The checkpoint recovery feature is always available; you do not need to enable it.
Altiris Software Delivery Solution for Windows Product Guide 14

Chapter 4: Using Software Delivery Solution Using Software Packages and Programs
Creating a PackageFor information on packages, see “Software Packages Overview” on page 13.Notes:
• To quickly create a new package, program, and Software Delivery task at the same time, use the Software Delivery Wizard. For more information, see “Using the Software Delivery Wizard and Status Page” on page 32.
• To define and deploy Unix software packages, use the Altiris Software Delivery Solution for Unix.
To create a package1 In the Altiris Console, click the Resources tab.2 In the treeview pane, click Resource Management > Resources > Software Management > Software
Delivery Packages.3. Right-click the desired platform folder, and then select New > Software Delivery Package.4 In the content pane, specify the package properties.
For information about package properties, see “Software Package Page” on page 16.5 Click the Apply button.
Defining a Program for a PackageFor each package, you can define one or more programs that the package can run.
To define a program for a package1 In the Software Package, click the Programs tab view.2 To configure a new program, click the New button. 3 Specify the program details of the first program.
For information on the program properties, see “Software Package Page” on page 164 If you have more than one program, repeat this procedure for each of the programs.
Note: Defining multiple programs for a single package lets you use the same package for more than one purpose.For more information about program properties, see “Software Package Page” on page 16.
To run MSI filesMSI files are not executables. They are databases that include files and provide descriptions on how the data should be installed. To run an MSI in a package, you need to run msiexec.exe. The msiexec.exe program should be on the path.
For information on all of the parameters for msiexec.exe, see the online help.
You can use the following command line:
msiexec.exe /i msifilename.msiNote that you can pass other command line parameters to msiexec.exe so that your installation is done in quiet mode.
Examples
For a basic UI
msiexec.exe /i msifilename.msi /qb
Altiris Software Delivery Solution for Windows Product Guide 15

Chapter 4: Using Software Delivery Solution Using Software Packages and Programs
For no UImsiexec.exe /i msifilename.msi /qn
To run script filesFor VBS and VBE files, you need to run either cscript.exe or wscript.exe. For information on the available commands, see the documentation for these programs.
Usually, other script files can be run as programs. See the documentation for your desired script file executables.
Checking for Package Download ErrorsAfter deploying packages, it is important to know that the packages were deployed successfully. If some packages were not successfully deployed, you need to know on which computers the deployment was not successful. To facilitate this process, Software Delivery provides the “Package download errors” report. The following procedure describes how to create and use the report.
To determine package download errors1 In the Altiris Console, click the Reports tab. 2 In the treeview pane, navigate to the Reports > Software Management > Software Delivery >
Windows > Client Package Download > Package Download - Errors item.3 In the content pane, click the Run this report link. A report using the latest data will be created displaying package deployment error information. You can click on items in the report to drill down for more details.
Tip For other client status information, use the above procedure, but select one of the other reports.
Changing the Check for Updated Package Files ScheduleBy default, Notification Server checks all packages every day for changes You can change this schedule as needed. For more information on how software packages are updated, see “Package Download Overview” on page 14.
To change the check for updated package files schedule1 In the Altiris Console, click the Configuration tab. 2 In the treeview pane, navigate to Configuration > Server Settings > Notification Server Settings >
Shared Schedules.3 In the content pane, click on the Package Refresh Schedule link.4 In the Schedule Editor dialog, specify the desired schedule, and then click the OK button.
Software Package PageThis page is used to configure packages and specify Package Servers for the package. It contains four tabs - Package, Programs, Advanced, and Software Portal.
To access a software package page1 In the Altiris Console, click the Resources tab view.2 In the treeview pane, navigate to Resource Management > Resources > Software Management >
Software Delivery Packages > Windows.3 In the content pane, double-click on a software package resource.
Altiris Software Delivery Solution for Windows Product Guide 16

Chapter 4: Using Software Delivery Solution Using Software Packages and Programs
4 In Resource Manager, click on the Package tab view.Note: Software packages can be located in other folders depending on where they were placed when they were created.Software Package ToolbarThe Software Package toolbar contains icons that let you perform actions while using the Software Package page.
The clickable icons on the Software Package toolbar are as follows:
• Right click menu for item - Displays the right click menu for the folder.• Export - Lets you export the software package to XML.• View as XML - Lets you view the software package as XML.• Properties - Lets you view the Properties page of the software package. The Properties page
contains general information of the software package and also lets you set up security for the software package.
Package Tab View - Software Package PageThis tab view is used to configure a package. Items in italics are settings options.
Page Items
Item DescriptionName Name of the package.Description Description of the package. Publisher Publisher of the package.Language Language for which the package is designed.Version Version of the package.Package source Drop-down list with following options:Package does not contain source files
A command-line is sent to the Altiris-enabled computer, for example a call to a utility like Chkdsk.exe. The package contains no source files.
Access package from a local directory on the NS computer
Select this to access the package from a local directory on the Notification Server computer. If this is selected, you must enter a Package Location. Notification Server will map HTTP URLs to this location through which Altiris Agents will access the package. Package Location - The location of the package on a local directory on the Notification Server computer.
Altiris Software Delivery Solution for Windows Product Guide 17

Chapter 4: Using Software Delivery Solution Using Software Packages and Programs
Programs Tab View - Software Package PageThis tab view is used to configure the programs associated with a package.
Select a program from the drop-down list to view the details on that program. To add a new program to the package, click New. To delete a program from the package, select the program from the drop-down list, then click Delete.
Access package from existing UNC
Select this to access the package from an existing Universal Naming Convention (UNC) path.In order for the Notification Server to access packages that exist at a UNC path, you must first enter the credentials that the Notification Server will use when connecting to the UNC path. To do this, go to the Package Server Configuration page and fill in the credentials in the Distribution Point Connection Parameters drop-down section.This option requires a package location. Notification Server will map HTTP URLs to this location through which the Altiris Agents will access the package. Package Location UNC - The location of the package at a UNC path.
Access package from a URL
Select this to access the package from a URL. This option requires a package location URL.Package HTTP URL - The Altiris Agent will access the package through this anonymous URL.
Package location The location of the package on the Notification Server computer. This can be a local directory, a UNC path, or URL location depending on the package source.
Package directory The alternate UNC package location when the Package source is Access Package from a URL.This UNC package location is used to generate a snapshot of all of the files in the package. The URL is the location where the Altiris Agent will download the package from. The snapshot is used by Altiris Agents as a list of files that will be downloaded. This UNC package location should be the path to the directory used to create the virtual directory.
Installers found Click to select one or more installers, if found. The contents of the selected folder will be analyzed and the installers found will be shown. Installers of type Wise and MSI are recognized. Selecting installers helps in identifying the applications that will be installed by the programs of this package.
Package files will be deleted from the client computer if unused for
Drop-down list to specify time frame for package files to be deleted from the client computer if they have been unused for any length of time.
Apply Click Apply to save changes.Cancel Click Cancel to discard changes.Update Distribution Point
Click this button to update this package information as soon as possible on all enabled Package Servers.
Page Items
Item DescriptionProgram Drop-down list that lets you select the program to be associated with the
selected package. New Creates a new program definition using the information currently listed in the
Program Details section of the page.Delete Deletes the program definition selected in the Program drop-down list.
Page Items
Item Description
Altiris Software Delivery Solution for Windows Product Guide 18

Chapter 4: Using Software Delivery Solution Using Software Packages and Programs
Name (Required) Name of the program.Description (Optional) Description of the program. Applications The Applications link lets you tie this program to a specific application. Forexample, you can tie this program to Word 2003, Excel 2003, or Outlook 2003.This functionality is tied to the Application Inventory functionality. The Applications and Installer links let you tie your software delivery package and programs to specific products and applications. This lets Software Delivery Solution use the Application Inventory agent to detect what software is on a computer, and tie it to a software delivery package. This helps you manage the applications and installers on Altiris-enabled computers.In order for this link to appear, an Installer must be selected from the Installer link.
Installer Gives the information of the installer that can install or uninstall the application selected in the Applications field.This lets you tie a package to a specific installer program. For example, you may have a package called 'My Applications' and you know that this package installs Office 2003. Using the Installer link, you can tie the package to the applicable installer program.In order for this link to appear, you must define a valid package location that points to a folder that includes an MSI or an EXE file.
Command line (Required) Command line entry to run program, including switches and parameters if applicable. The command line entry must be in the same location as the package or along the same path as the package.
Working directory (Optional) Directory where files needed by the program are temporarily stored during deployment.
Success codes (Optional) Enter the success code(s) for the program.Success codes are determined by the exit code that is returned when an application ends. Applications can define their own exit codes for success and failures, but typically a zero value is used for success, and a non-zero value for failure.Multiple values can also be specified with a comma delimiter. For example, 0,3000 could be entered as success values.
Failure codes (Optional) Enter the failure code(s) for the program.Failure codes are determined by the exit code that is returned when an application ends. Applications can define their own exit codes for success and failures, but typically a zero value is used for success, and a non-zero value for failure.Multiple values can also be specified with a comma delimiter. For example, 1,5000 could be entered as failure values.
Estimated disk space
(Optional) Estimated disk space required by the installed program. This is only an information field.
Estimated run time (Optional) Estimated time in minutes required to complete the deployment. This is only an information field.
Terminate after (Optional) Terminates running of the program after the specified number of minutes.
After running (Optional) Specifies the action to take after running the program. The options are No action required, Restart computer, and Log off user.
Starting window Specifies the status of the program window when the program is run. The options are Normal, Hidden, Minimized, and Maximized.
Run with rights Specifies whether the program is run with the System Account, Logged in User, or Specified User account. If you select the Specified User, you must specify the user’s domain, name, and password in the field below.
Page Items
Item Description
Altiris Software Delivery Solution for Windows Product Guide 19

Chapter 4: Using Software Delivery Solution Using Software Packages and Programs
User domain Domain information of the account to use if you use Specified User in the Runwith Rights field. Enter the domain, user name, and password of the specified user.
Program can run Specifies the conditions in which the program can run. The options are Only when a user is logged on, Whether or not a user is logged on, and Only when no user is logged on.If you select Only when a user is logged on, you can select User Input required if you want to allow user input.The User Input required option is only valid when a user is logged in. This option is available if the program run on a computer brings up a User Interface that may require user input to complete its process. Usually, it is safe to keep this option selected, which is why it is selected by default.The Run once for each logged on user option can be used to configure the program to run for each user that logs on to the computer. The Software Delivery agent keeps track of each user that has run the program.
This program requires a network connection
Specifies that this program requires a network connection.If this is selected, you can specify the Minimum connection speed that the network connection needs to be in order for the program to run.
Page Items
Item Description
Altiris Software Delivery Solution for Windows Product Guide 20

Chapter 4: Using Software Delivery Solution Using Software Packages and Programs
Advanced Tab View - Software Package PageThis tab view is used to specify Package Servers associated with a package. For information on Package Servers, see the Altiris Notification Server Help and Altiris Notification Server Reference.Page Items
Item DescriptionAgent display name The name of the package that will be displayed on the Altiris Agent. This
can be different than the package name you specified on the Package tab view. The purpose of this field is for you to be able to supply package names to the end user that makes sense to users while also being able to have package names that make sense to you on an administrative level.
Agent display description
The description of the package that will be displayed on the Altiris Agent. This can be different than the package description you specified on the Package tab view. It is recommended that you enter a description here that will let the end user know what the package will do to the Altiris-enabled computer.
Enable verbose reporting of package status events
This setting controls whether the Altiris Agent sends all package status events for this package to the Notification Server. Select the check box to enable sending all package status events to the Notification Server. Note: The Advanced Settings in the Configuration tab view take precedence to this setting. Events are only sent if their corresponding check box is enabled in the Capture Event Name section of the Advanced Settings.The following types of AeX SWD Status events are not sent if package verbose reporting events are disabled:• Package Updated• Package Added• Package To Be Removed• Package Removed• Unable To Check Package• Insufficient Disk To Download Package• Download Start• Download Complete• Package Download BlockedFor information on capturing events in large environments, see “Scalability” in the Altiris Notification Server Reverence.
Use Alternate Download Destination on Client
Select this to use an alternate package download destination to the Altiris-enabled computer besides the default.This option makes it possible to deliver package files to computers at alternate destinations. When the task executes, the package files will be copied from the internal cache location to the location specified. After they are copied, the copied package files will never be deleted by the Altiris Agent. They will be recopied every time the task is run; so if the task is on a recurring schedule, the files will be copied repeatedly. This can be useful to ensure the user does not delete a required file.Note: The default of the internal cache location is install path\altiris\altiris agent\software delivery\{package guid}\cache).
All Package Servers Select this to send the package to all available Package Servers.Selected Package Servers
Select this to show a table of available Package Servers. You can then choose the Package Servers that you want this package sent to.
Altiris Software Delivery Solution for Windows Product Guide 21
Chapter 4: Using Software Delivery Solution Using Software Delivery Tasks
Software Portal Tab View - Software Package PageThis tab view lets you view and modify Software Portal permissions for the programs found in this package.
The Software Portal is used to manage the availability of software that can be added manually by a user from the Altiris-enabled computer.
The table lists the programs that are currently defined for the package and the state of their Software Portal permissions.
When you click a program in the table, you can see who has permission to install the software without administrator approval (Install Software permission) and who requires administrator approval before installing the software (Install On Approval permission).
When you click the Modify button, the Security Descriptor dialog appears. This lets you modify the security settings for the program by group, user, or Altiris role, by defining the Software Portal permissions you desire.
You can use Alert Manager and the Software Portal to retrieve user software requests, approve or deny them, and send out e-mails if required.
Using Software Delivery TasksQuick Links• Software Delivery Task Priority (page 23)• Software Delivery Task Status Files (page 23)• Disabled Software Delivery Tasks (page 23)• Creating a Software Delivery Task (page 24)• Specifying Software Delivery Task Availability (page 24)• Verifying that a Policy Has Been Successfully Delivered to the Altiris Agent Computer (page 25)• Policy Scheduling on Altiris Agents (page 25)• Scheduling Software Delivery Tasks (page 25)• Software Delivery Task Page (page 26)• Sequential Software Delivery Task Page (page 30)Software Delivery tasks are policies that specify delivery and deployment information about a software package. For a software package to be downloaded to and deployed on the Altiris-enabled computer, there must be at least one Software Delivery task associated with that package. Each package can have more than one Software Delivery task associated with it, but each Software Delivery task is only associated with one package.
Enabled Package Servers
This table lists the Package Servers available for your Notification Server. The Package Servers section lets you specify which Package Servers you would like this package to be replicated to. The grid contains a list of all Package Servers that have been created for the Notification Server. Select the box in the enabled column next to each of the Package Servers that you wish this package to be replicated to. The default and recommended option is to have the package replicated to all Package Servers (by selecting All Package Servers). All selected computers will have the package copied to them.
Package Destination Location on Package Servers
Enter the desired package destination location on the Package Servers if you do not want the default. Enter a UNC path.The default package delivery location on Package Servers is install path\altiris\altiris agent\package delivery\{package guid}\cache).
Page Items
Item Description
Altiris Software Delivery Solution for Windows Product Guide 22

Chapter 4: Using Software Delivery Solution Using Software Delivery Tasks
Software Delivery tasks have several options on how they are run, depending upon how they are configured. A Software Delivery task can be run:• By the user of the Altiris-enabled computer through the Altiris Agent program or Software Portal.
• As soon as possible after the Software Delivery task has been requested by the Altiris Agent and the run conditions are met. The run conditions are specified in the package definition policy on the Programs tab view. The condition options are Only when a user is logged on, Only when no user is logged on, and Whether or not a user is logged on.
• According to a schedule specified in the Software Delivery task.Each Software Delivery task has availability dates associated with it. These dates specify when a Software Delivery task is first available and no longer available. The Software Delivery package associated with a task specifies the security context under which a program runs (local system administrator or logged on user rights).
For information on creating a Software Delivery task, see “Creating a Software Delivery Task” on page 24.
Software Delivery Task PriorityEach Software Delivery task has an associated priority that is set in the definition of the Software Delivery task. The priority is used to set a priority when more than one Software Delivery task needs to download an associated package. The package associated with the Software Delivery task having the highest priority is downloaded first.
The Software Delivery tasks will also be executed according to their priority order. Each task will be executed to completion before another task is started.
The priority options are Low, Normal, High, and Very High.
Software Delivery Task Status FilesThe Software Delivery Agent keeps track of package download status information for each package in a status file. The status is kept in the install path\Altiris\Altiris Agent\Software Delivery\Status\package guid\log.xml.
This file keeps track of the last 30 download attempts. This value can be adjusted by editing the registry value “Download history size” located under the key “HKLM\SOFTWARE\Altiris\Communications\Package Delivery” on the client computer
The Software Delivery Agent keeps track of package execution status for each Software Delivery task in the install path \Altiris\Altiris Agent\Software Delivery\AexSWDPolicy.xml file.
Disabled Software Delivery TasksIf you disable a Software Delivery task, or it is disabled due to platform mismatch, expiration, filtering, or unavailability, the Software Delivery Agent will keep that Software Delivery task’s status information for 10080 minutes (one week) by default, including any downloaded packages. After one week, the associated status information is removed entirely from the Altiris Agent computer. If the associated packages are no longer referenced by any other active Software Delivery policies on the Altiris Agent, the packages are also removed. (If you re-enable the policy after one week, any associated software packages will be downloaded again.) The one-week default can be changed by modifying the Software Delivery package and changing the package deletion option.
This cleanup process is performed once a day. For testing purposes, you can force a cleanup within the next 5 minutes by removing the AdsStatusLastCleanUp registry value under the following registry key:
HKLM\Software\Altiris\Altiris Agent\Software Delivery
Altiris Software Delivery Solution for Windows Product Guide 23
Chapter 4: Using Software Delivery Solution Using Software Delivery Tasks
The following registry setting configures how long, in minutes, a Software Delivery task must be disabled before the status and packages are removed from the Altiris Agent computer.HKLM\Altiris\Altiris Agent\Software Delivery\RemovedSoftPkgsCleanUpPeriod
Creating a Software Delivery TaskFor information on Software Delivery tasks, see “Using Software Delivery Tasks” on page 22.
You can create a Software Delivery task to deliver a single application or you can create a sequential Software Delivery task to deliver multiple tasks. When using sequential Software Delivery tasks you can configure the sequence of the tasks to be deployed as well as dependencies that must exist for each task to be run. For example, you can have three tasks, Task A, Task B, and Task C in one sequential task. After setting the execution order, you can configure a dependency for Task C to only execute if Task B executed successfully.
Note: To quickly create a new package, program, and Software Delivery task at the same time, use the Software Delivery Wizard. For more information, see “Using the Software Delivery Wizard and Status Page” on page 32.
To create a Software Delivery task1 In the Altiris Console, click the Tasks tab. 2 In the treeview pane, navigate to Tasks > Software Delivery > Windows > Software Delivery Tasks.3 Right-click the Software Delivery Tasks folder, then select New Software Delivery Task.4 In the Software Delivery Tasks folder, click on the newly created Software Delivery task.5 Specify the Software Delivery task details in the content pane.
For information about task properties, see “Software Delivery Task Page” on page 26.If you want to verify that a Software Delivery task has been deployed properly, see “Verifying that a Policy Has Been Successfully Delivered to the Altiris Agent Computer” on page 25.
To create a sequential Software Delivery task1 In the Altiris Console, click the Tasks tab. 2 In the treeview pane, navigate to Tasks > Software Delivery > Windows > Sequential Software
Delivery Tasks.3 Right-click the Software Delivery Tasks folder, then select New Sequential Software Delivery Task.4 In the Sequential Software Delivery Tasks folder, click on the newly created sequential Software
Delivery task.5 Specify sequential Software Delivery task details in the content pane.
For more information about sequential task properties, see “Sequential Software Delivery Task Page” on page 30.
Specifying Software Delivery Task AvailabilityTo specify Software Delivery task availability1 In the Altiris Console, click the Tasks tab. 2 In the treeview pane, navigate to the Software Delivery task on which you want to set availability
options.3 In the content pane, specify the availability details in the Availability section.
For a description of the properties, see “Software Delivery Task Page” on page 26.
Altiris Software Delivery Solution for Windows Product Guide 24

Chapter 4: Using Software Delivery Solution Using Software Delivery Tasks
Verifying that a Policy Has Been Successfully Delivered to the Altiris Agent ComputerTo verify that a policy has been successfully delivered to an Altiris Agent computer using the Resource Manager1 Open the Resource Manager to display information about the desired Altiris Agent computer.For information on using the Resource Manager, see the Altiris Notification Server Reference.2 In the treeview pane, click on the Policy Summary item.
This displays a list of all the policies that are enabled for the selected computer.3 Verify that the policy you are checking for is in the list.
To verify on the Altiris Agent that a policy has been successfully delivered to it1 In Windows Explorer or through My Computer, open the install path\Altiris\Altiris Agent\Client
Policies folder (C:\Program Files\Altiris\Altiris Agent\Client Policies by default). This is where policies are stored on the Altiris Agent.
2 Open the notification_server_name.xml file using a text editor or Internet Explorer.3 Review the contents of the policy file and confirm that the policy you are interested in is included
in the file.
Policy Scheduling on Altiris AgentsThe Altiris Agent uses the Microsoft Task Scheduler to schedule the execution of policies on each Altiris Agent computer. The Task Scheduler is accessed through the individual Altiris Console pages that use the scheduler. Without the Task Scheduler installed, the Altiris Agent can only automatically run mandatory jobs that are marked for “As Soon As Possible” execution. You can verify that the task scheduler is installed by going to My Computer > Scheduled Tasks or My Computer > Control Panel > Scheduled Tasks.
If you do not have the Task Scheduler installed on an Altiris Agent computer, Notification Server will automatically install it for you when you install the Altiris Agent.
If for some reason the Microsoft Task Scheduler is not installed on your Altiris Agent computer, you can install the scheduler manually if you have the Altiris Agent package installed on your Notification Server. Run TaskScheduler.exe from the Notification Server in the install path\Altiris\Notification Server\NSCap\Bin\Win32\X86\redist\TaskScheduler folder (C:\Program Files\Altiris\Notification Server\NSCap\Bin\Win32\X86\redist\TaskScheduler by default). If you have an older version of the Task Scheduler installed, running TaskScheduler.exe will upgrade your version of Task Scheduler.
Note: Software Delivery schedules are based on the local time of the computer. Software Delivery task availability times can be based on the local time or GMT (Greenwich Mean Time).
Scheduling Software Delivery TasksThe following procedure describes how to create or modify a schedule for a Software Delivery task.
To schedule Software Delivery tasks1 In the Altiris Console, click the Tasks tab. 2 In the treeview pane, navigate to the task you want to schedule.3 In the content pane, select the On a schedule radio button, and then select the Run on a schedule
check box if it is not already selected.4 Click the No schedule has been defined link next to the Run on a schedule check box.5 Create a schedule that fits your needs.
Altiris Software Delivery Solution for Windows Product Guide 25
Chapter 4: Using Software Delivery Solution Using Software Delivery Tasks
For a description of scheduling options, see “Software Delivery Task Page” on page 26.6 Click the OK button.
Software Delivery Task PageThis page lets you configure software delivery tasks.
To access a Software Delivery task page1 In the Altiris Console, click the Tasks tab view.2 In the treeview pane, navigate to Tasks > Software Management > Software Delivery > Windows >
Software Delivery Tasks.Note: Software Delivery tasks can be located in other folders depending on where they were placed when they were created.
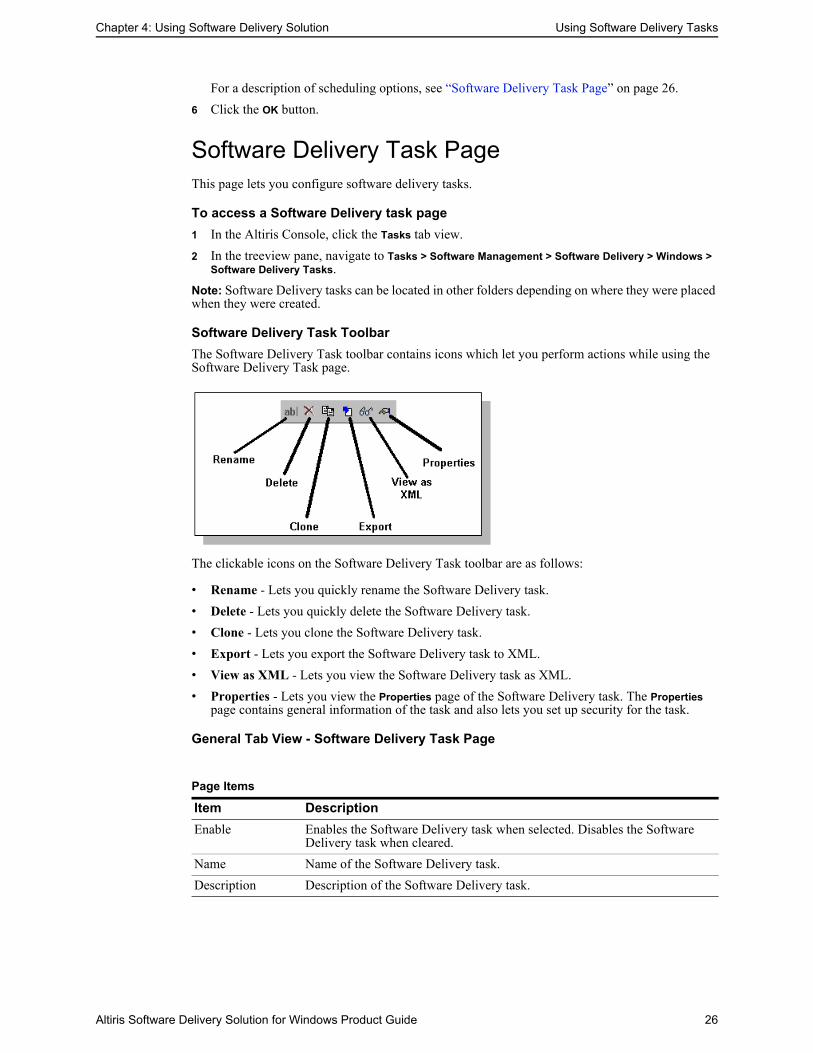
Software Delivery Task ToolbarThe Software Delivery Task toolbar contains icons which let you perform actions while using the Software Delivery Task page.
The clickable icons on the Software Delivery Task toolbar are as follows:
• Rename - Lets you quickly rename the Software Delivery task.• Delete - Lets you quickly delete the Software Delivery task.• Clone - Lets you clone the Software Delivery task.• Export - Lets you export the Software Delivery task to XML.• View as XML - Lets you view the Software Delivery task as XML.• Properties - Lets you view the Properties page of the Software Delivery task. The Properties
page contains general information of the task and also lets you set up security for the task.
General Tab View - Software Delivery Task Page
Page Items
Item DescriptionEnable Enables the Software Delivery task when selected. Disables the Software
Delivery task when cleared.Name Name of the Software Delivery task.Description Description of the Software Delivery task.
Altiris Software Delivery Solution for Windows Product Guide 26

Chapter 4: Using Software Delivery Solution Using Software Delivery Tasks
Priority Defines the order in which packages associated with Software Delivery tasksare downloaded. Can be Low, Normal, High or Very high.Packages associated with higher priority Software Delivery tasks get downloaded before those for lower priority Software Delivery tasks. Any package that is being downloaded will be suspended if a higher priority Software Delivery task arrives.
Package name Specifies the package to be used by the Software Delivery task. Clicking on the link will open the Package Selector.
Go to Package Opens the Package page for the package selected in the Package Name field.Program Name Name of the program to run. The list of available options in the drop-down list
depends on the value selected in the Package field.Go to Program Opens the Program page for the program selected in the Program name field.Applies to Collection
Specifies the collection to which the software task applies.Clicking on the link will open the Collection Selector.Note: You must select at least one collection before you can apply the Software Delivery task.
Run - Manual Select manual to run the Software Delivery task manually and not according to a schedule.You can choose one or both of the following:Notify the user when this task is available - Select this to notify the user when this Software Delivery task becomes available to run. The user can then control when to run the Software Delivery task.Warn the user before running this task - Select this to warn the user before a Software Delivery task is run. The user can then choose to cancel the task, run the task immediately, or be reminded later.
Page Items (Continued)
Item Description
Altiris Software Delivery Solution for Windows Product Guide 27

Chapter 4: Using Software Delivery Solution Using Software Delivery Tasks
Run - On a schedule Specifies that the Software Delivery task is to be run according to a schedule.You can schedule for the Software Delivery task to be run as soon as possible and/or set up a schedule for it to be run.You can choose one or more of the following:Run as soon as computer is notified (only runs once) - Select this to run the Software Delivery task as soon as the package has been downloaded to the Altiris-enabled computer and the run conditions have been met. This option creates a mandatory Software Delivery task that does not display a dialog on the Altiris-enabled computer before running.Run on a schedule - Select this to run the Software Delivery task on a schedule. Click No schedule has been defined to open the Schedule Editor. Select one of the following:• Run ‘as soon as possible’ after the scheduled time - This option tells the
Altiris Agent to run the Software Delivery task as soon as possible after the time you have scheduled. The Altiris Agent will wait until the scheduled time, then run the Software Delivery task as soon as it can. This option can help spread out the network load as the Software Delivery tasks will most likely run at different times on each Altiris Agent.
• Only run at scheduled time - This option tells the Altiris Agent to run the Software Delivery task only at the scheduled time. This option will force all Altiris Agents to run the Software Delivery task at the same time.
Power up the computer (Wake on LAN) - Select this to send a power up signal to the Altiris-enabled computer at the designated scheduled time.Immediately notify each computer of task - Select this to immediately notify all computers of the Software Delivery task at the designated scheduled time. This can lead to increased network traffic and should be used carefully.User can run this task immediately - Select this to let the user run the Software Delivery task immediately when it becomes available.Notify the user when this task is available - Select this to notify the user when this Software Delivery task becomes available to run. The user can then control when to run the Software Delivery task.Warn the user before running this task - Select this to warn the user before a Software Delivery task is run. The user can then choose to cancel the task, run the task immediately, or defer the task.
Use Recovery to backup the computer
If this is selected, Software Delivery Solution performs a Recovery snapshot on the Altiris Agent prior to running the Software Delivery task.Note: This option only appears if you have Recovery Solution 6.0 or greater installed.
Removal - Remove this task after successful install
Removes the Software Delivery task (and associated package) from the Altiris Agent user interface on the Altiris-enabled computer. This does not delete the package from the Altiris-enabled computer. However, this makes it so that the user of the Altiris-enabled computer cannot view this task or associated package from the Altiris Agent program.It is recommended that you use this for tasks that you only want to run once.
Availability Specifies the date that this Software Delivery task becomes available and whether or not it expires. You can also select whether to use the Notification Server’s time or the time of the Altiris-enabled computer.
Apply Click Apply to save changes.Cancel Click Cancel to discard changes.
Page Items (Continued)
Item Description
Altiris Software Delivery Solution for Windows Product Guide 28
Chapter 4: Using Software Delivery Solution Using Software Delivery Tasks
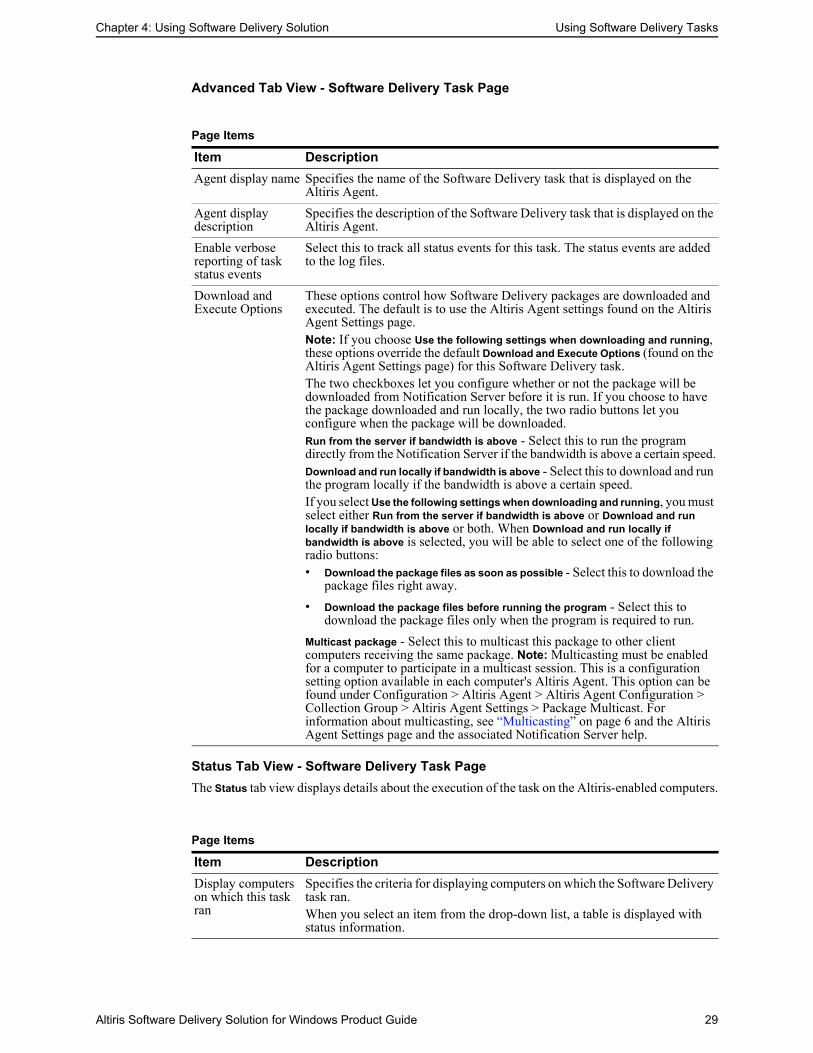
Advanced Tab View - Software Delivery Task PageStatus Tab View - Software Delivery Task PageThe Status tab view displays details about the execution of the task on the Altiris-enabled computers.
Page Items
Item DescriptionAgent display name Specifies the name of the Software Delivery task that is displayed on the
Altiris Agent.Agent display description
Specifies the description of the Software Delivery task that is displayed on the Altiris Agent.
Enable verbose reporting of task status events
Select this to track all status events for this task. The status events are added to the log files.
Download and Execute Options
These options control how Software Delivery packages are downloaded and executed. The default is to use the Altiris Agent settings found on the Altiris Agent Settings page.Note: If you choose Use the following settings when downloading and running, these options override the default Download and Execute Options (found on the Altiris Agent Settings page) for this Software Delivery task.The two checkboxes let you configure whether or not the package will be downloaded from Notification Server before it is run. If you choose to have the package downloaded and run locally, the two radio buttons let you configure when the package will be downloaded.Run from the server if bandwidth is above - Select this to run the program directly from the Notification Server if the bandwidth is above a certain speed.Download and run locally if bandwidth is above - Select this to download and run the program locally if the bandwidth is above a certain speed.If you select Use the following settings when downloading and running, you must select either Run from the server if bandwidth is above or Download and run locally if bandwidth is above or both. When Download and run locally if bandwidth is above is selected, you will be able to select one of the following radio buttons:• Download the package files as soon as possible - Select this to download the
package files right away.• Download the package files before running the program - Select this to
download the package files only when the program is required to run.Multicast package - Select this to multicast this package to other client computers receiving the same package. Note: Multicasting must be enabled for a computer to participate in a multicast session. This is a configuration setting option available in each computer's Altiris Agent. This option can be found under Configuration > Altiris Agent > Altiris Agent Configuration > Collection Group > Altiris Agent Settings > Package Multicast. For information about multicasting, see “Multicasting” on page 6 and the Altiris Agent Settings page and the associated Notification Server help.
Page Items
Item DescriptionDisplay computers on which this task ran
Specifies the criteria for displaying computers on which the Software Delivery task ran.When you select an item from the drop-down list, a table is displayed with status information.
Altiris Software Delivery Solution for Windows Product Guide 29

Chapter 4: Using Software Delivery Solution Using Software Delivery Tasks
Sequential Software Delivery Task PageThis page lets you edit sequential software delivery tasks.To access a Sequential Software Delivery task page1 In the Altiris Console, click the Tasks tab view.2 In the treeview pane, navigate to Tasks > Software Management > Software Delivery > Windows >
Sequential Software Delivery Tasks.Note: Software Delivery tasks can be located in other folders depending on where they were placed when they were created.
Software Delivery Task ToolbarThe Software Delivery Task toolbar contains icons that let you perform actions while using the Software Delivery Task page.
The clickable icons on the Software Delivery Task toolbar are as follows:
• Rename - Lets you quickly rename the Software Delivery task.• Delete - Lets you quickly delete the Software Delivery task.• Clone - Lets you clone the Software Delivery task.• Export - Lets you export the Software Delivery task to XML.• View as XML - Lets you view the Software Delivery task as XML.• Properties - Lets you view the Properties page of the Software Delivery task. The Properties
page contains general information of the task and also lets you set up security for the task.
General Tab View - Sequential Software Delivery Task Page
Page Items
Item DescriptionEnable Enables the Software Delivery task when selected. Disables the Software
Delivery task when cleared.Name Name of the Software Delivery task.Description Description of the Software Delivery task.
Altiris Software Delivery Solution for Windows Product Guide 30

Chapter 4: Using Software Delivery Solution Using Software Delivery Tasks
Execution Order You can add multiple packages/programs, set the execution order, and setdependencies for the sequential Software Delivery task.To add a task
• Click the add icon.
• Select the programs you want to include from the program tree.• Click OK.To change the execution order of the programs
• Click a program and click the up or down icons. Changing the execution order will reset the dependency.
To configure a dependency for the package• Click the program dependency selector.• Select the packages that are higher in the execution order that must be
delivered successfully in order for this package to be delivered.To delete a package
• Select the package you want to delete and click the delete icon. Deleting a package will reset the dependency.
Applies to Collection
Specifies the collection to which the software task applies.Clicking on the link will open the Collection Selector.Note: You must select at least one collection before you can apply the Software Delivery task.
Run - On a schedule Specifies that the Software Delivery task is to be run according to a schedule.You can schedule for the Software Delivery task to be run as soon as possible and/or set up a schedule for it to be run.You can choose one or more of the following:Run as soon as computer is notified (only runs once) - Select this to run the Software Delivery task as soon as the package has been downloaded to the Altiris-enabled computer and the run conditions have been met. This option creates a mandatory Software Delivery task that does not display a dialog on the Altiris-enabled computer before running.Run on a schedule - Select this to run the Software Delivery task on a schedule. Click No schedule has been defined to open the Schedule Editor. Select one of the following:• Run ‘as soon as possible’ after the scheduled time - This option tells the
Altiris Agent to run the Software Delivery task as soon as possible after the time you have scheduled. The Altiris Agent will wait until the scheduled time, then run the Software Delivery task as soon as it can. This option can help spread out the network load as the Software Delivery tasks will most likely run at different times on each Altiris Agent.
• Only run at scheduled time - This option tells the Altiris Agent to run the Software Delivery task only at the scheduled time. This option will force all Altiris Agents to run the Software Delivery task at the same time.
Power up the computer (Wake on LAN) - Select this to send a power up signal to the Altiris-enabled computer at the designated scheduled time.Immediately notify each computer of task - Select this to immediately notify all computers of the Software Delivery task at the designated scheduled time. This can lead to increased network traffic and should be used carefully.
Availability Specifies the date that this Software Delivery task becomes available and whether or not it expires. You can also select whether to use the Notification Server’s time or the time of the Altiris-enabled computer.
Page Items (Continued)
Item Description
Altiris Software Delivery Solution for Windows Product Guide 31

Chapter 4: Using Software Delivery Solution Using the Software Delivery Wizard and Status Page
Advanced Tab View - Sequential Software Delivery Task Page
Status Tab View - Sequential Software Delivery Task PageThe Status tab view displays details about the execution of the task on the Altiris-enabled computers.
Using the Software Delivery Wizard and Status PageThe Software Delivery Wizard takes you through the steps of creating and delivering new and existing packages. Because packages are delivered though Software Delivery tasks, this wizard guides you through creating packages and setting up Software Delivery tasks to deliver those packages.
Apply Click Apply to save changes.Cancel Click Cancel to discard changes.
Page Items
Item DescriptionDownload and Execute Options
These options control how Software Delivery packages are downloaded and executed. The default is to use the Altiris Agent settings found on the Altiris Agent Settings page.Note: If you choose Use the following settings when downloading and running, these options override the default Download and Execute Options (found on the Altiris Agent Settings page) for this Software Delivery task.The two checkboxes let you configure whether or not the package will be downloaded from Notification Server before it is run. If you choose to have the package downloaded and run locally, the two radio buttons let you configure when the package will be downloaded.Run from the server if bandwidth is above - Select this to run the program directly from the Notification Server if the bandwidth is above a certain speed.Download and run locally if bandwidth is above - Select this to download and run the program locally if the bandwidth is above a certain speed.If you select Use the following settings when downloading and running, you must select either Run from the server if bandwidth is above or Download and run locally if bandwidth is above or both. When Download and run locally if bandwidth is above is selected, you will be able to select one of the following radio buttons:• Download the package files as soon as possible - Select this to download the
package files right away.• Download the package files before running the program - Select this to
download the package files only when the program is required to run.Multicast package - Select this to multicast this package to other client computers receiving the same package. For information about multicasting, see “Multicasting” on page 6 and the Altiris Agent Settings page and the associated Notification Server help.
Page Items
Item DescriptionDisplay computers on which this task ran
Specifies the criteria for displaying computers on which the Software Delivery task ran.When you select an item from the drop-down list, a table is displayed with status information.
Page Items (Continued)
Item Description
Altiris Software Delivery Solution for Windows Product Guide 32

Chapter 4: Using Software Delivery Solution Using the Software Delivery Wizard and Status Page
This is the easiest and most efficient way to create packages, assign programs to them, and set up Software Delivery tasks to deliver them.The Software Delivery Wizard can be accessed by clicking the Tasks tab and navigating to Software Management > Software Delivery > Windows > Software Delivery Tasks > Wizard and Status, then selecting Launch Software Delivery Wizard.
Software Delivery Wizard and StatusThe Wizard and Status page gives you access to the Software Delivery Wizard and also provides status information for your Software Delivery tasks.
Software Delivery Status ToolbarThe Software Delivery Status toolbar contains icons which let you perform actions while using the Wizard and Status page.
Page Items
Item DescriptionRun Software Delivery Wizard
Select this to access the Software Delivery Wizard. See “Using the Software Delivery Wizard and Status Page” on page 32.
Use the Advanced Wizard
Select to run the Advanced Wizard. When running the Advanced Wizard, you also have the option to configure package server options, event logging options, the package display name in the Altiris Console, and task download and execute options. For a description of these options see “Advanced Tab View - Software Package Page” on page 21 and “Advanced Tab View - Software Delivery Task Page” on page 29.
Task list criteria check boxes:
Specifies the criteria for displaying available Software Delivery tasks.When you select an item from the drop-down list, a table is displayed with task information.
Created for approved software
Select this to display tasks that have been approved by the administrator.
Created for software requiring approval
Select this to display tasks that require approval by the administrator.
Scheduled by administrator
Select this to display tasks that have been scheduled by the administrator.
Altiris Software Delivery Solution for Windows Product Guide 33

Chapter 4: Using Software Delivery Solution Using the Software Delivery Wizard and Status Page
The clickable icons on the Software Delivery Status toolbar are as follows:• Right click menu - Provides a shortcut for the right click menu for the item.• Display for - Lets you select which tasks are displayed by age, number of rows, or status.• Edit - Lets you edit the task.• Clone Failed Task - Creates a copy of this task for the computers where it failed. Enter the name
for the new copy and then click OK to create the copy.• Run Task Again - Runs the task again.• View task status details - Lets you view the success, failure, and not run details of the task.• Refresh - Refreshes the grid. Changes made to the grid will not appear until you perform a
refresh.• Copy - Creates a copy of selected task row to paste elsewhere.• Find - Lets you search for a task in the table. Enter the search text in the Find field and then click
the Find button.• Find Again - Finds the next task based on the last search criteria you entered in Find.• Grid right click menu - Provides a shortcut for the right click menu for the selected row.
Deliver an Existing Package of SoftwareIn this scenario you will deliver an existing Software Delivery package. For instruction on using the wizard to create and delivery a new package, see “Create and Deliver a New Package of Software” on page 36.
Step 1 - Select Package OptionIn this step, you select that you want to deliver an existing package and select the package you want to deliver.
1 Select wizard modeSelect Deliver an existing package of software.
2 Select an existing software packageNavigate through the tree until you locate the package you want to deliver. If you have not yet created the package you want to deliver, see “Create and Deliver a New Package of Software” on page 36.
3 Verify package detailsVerify that this is the package you want by observing the name, description, and location of the package.
4 Select a program to run from within the packageSelect a program that has been attached to the package. If the program you want to run is not attached to the package, you must cancel this wizard and edit the package.
5 Click Next to go to Step 2 in the Wizard.
Step 2 - Select Collection and ScheduleIn this step, you select the collection of computers to which you want the package of software to be delivered. Next, you select when you want it delivered.
Note: This step lets you set up a Software Delivery task to deliver the package.
1 Select the collection to which the package will be deliveredYou can only select one collection per Software Delivery task. If you want to send the package to more than one collection, you can either create a collection which includes all collections to which you want to send the package or you can run the Software Delivery Wizard again.Note: This is a required field.
Altiris Software Delivery Solution for Windows Product Guide 34

Chapter 4: Using Software Delivery Solution Using the Software Delivery Wizard and Status Page
2 Select when to run this taska User must manually activate the task on the target computer.If this is selected, the Software Delivery task will not run on the target computer unless the user activates it manually. Also, the radio buttons and check-boxes in steps d through h below are unnecessary.
b Automatically run the task on the target computerIf this is selected, the Software Delivery task will run automatically on the target computer based on the selections in steps d and e.
c Notify the user when task is availableIf this is selected, the user will be notified when the task is available to run. The user can then manually activate the task or wait until it is automatically run, based on the selections in step a, b, and f.
d Run this task as soon as possibleIf this is selected, the Software Delivery task will run as soon as possible.
e Run the task at a specified date and timeSelect this to run the Software Delivery task at a specified date and time. Select the date and time from the drop-down menus.
f Allow the user to run the task before the scheduled date and timeSelecting this lets the user control when the Software Delivery task runs. If the task has been selected to run automatically and this check-box is selected, the user can still run the task manually before the scheduled time.
g This task is available fromSelect the date and time from which the Software Delivery task will be available. Leave this at the default for the task to be available from today’s date. Select and never expires for the task to never expire. Select and expires and the expiration date to state when the task will expire.
h Dates and times are in Coordinated Universal Time (UTC)Select this if you want dates and times used in steps d and g to be in UTC.
3 Click Finnish to go to Step 3 in the Wizard.
Step 3 - SummaryIn this step, you enter a name for your Software Delivery task, review your settings, and then click the Finish button.
1 Enter the name for the software delivery taskThis can be any name you choose. This is a required field.
2 Verify the information below and then click OKMake sure the information in this table is correct.
3 Enable or disable the Software Delivery task.a This Software Delivery task will be Enabled
If this is displayed above 1. Enter the name for the software delivery task, the Software Delivery task will be enabled when it is created. Software Delivery tasks must be enabled before they can be run.
b This Software Delivery task will be DisabledIf this is displayed above 1. Enter the name for the software delivery task, the Software Delivery task will be disabled when it is created. Software Delivery tasks must be enabled before they can be run.
4 Click OK.This creates the Software Delivery task with the selected package attached to it.
Altiris Software Delivery Solution for Windows Product Guide 35

Chapter 4: Using Software Delivery Solution Using the Software Delivery Wizard and Status Page
Create and Deliver a New Package of SoftwareStep 1 - Select Package OptionIn this step, you select that you want to create and deliver a new package, select the package source and location, and select the program you want to run.1 Select wizard modeSelect Create and deliver a new package of software.
2 Select the package source and locationa Package source
Select one of the following from the drop-down menu:Package does not contain source files - This option is used to run a command-line on the Altiris Agent computer, for example a call to a utility like Chkdsk.exe. In this case, the package contains no source files.Access package from a local directory on the NS computer - This option requires a folder name. Notification Server will map HTTP URLs to this location through which Altiris Agent computers and Package Servers will access the package.Access package from an existing UNC - This option requires a folder name. Notification Server will map HTTP URLs to this location through which the Altiris Agent computers and Package Servers will access the package.Access package from a URL - This option requires a URL (entered in the Folder name field) through which Altiris Agent computers and Package Servers will access the package.
b Folder nameIf this field appears, you must enter the required information based on what you selected in the Package source field. Click on the folder icon to navigate to and select the desired folder.
3 Select the program that will runIn this field, enter the name of the program you want to run. Click on the folder icon to navigate to and select the desired program.
4 Click Next.The required fields are tested and if the information you entered is correct, the Wizard goes to Step 2 or 4.
Step 2 - Program OptionsIn this step, you select how the program will run, which rights to use, and what should happen when the program has finished running.
1 Select the user rights for the program to runa Run with rights
Select from the following:System Account - The program will run with the system account rights.Logged in User - The program will run with the rights of the logged in user.Specified User - The program will run with the rights of the user that you specify in the fields that appear. Enter the appropriate information in the User domain, User, Password, and Confirm Password fields.
b Program can runNote: This option is not available if Logged in User is selected above.Select from the following:Whether or not a user is logged on - This lets the program run whether or not the user is logged on.Only when a user is logged on - This lets the program run only when the user is logged on.Only when no user is logged on - This lets the program run only when no user is logged on.
Altiris Software Delivery Solution for Windows Product Guide 36

Chapter 4: Using Software Delivery Solution Using the Software Delivery Wizard and Status Page
c User input requiredSelect this if you want a prompt to appear for user input before the program is ran.d Run once for each logged in user
Select this if you want the program to run for each user that logs onto the computer. The Software Delivery agent keeps track of each user that has run the program.
2 Select the window style in which the program will runSelect one of the following from the Window style drop-down list:Normal - The window is normal when it opens.Hidden - The window is hidden when it opens.Minimized - The window is minimized when it opens.Maximized - The window is maximized when it opens.
3 Select the action to take after the program has finished runningSelect one of the following from the After running drop down list:No action required - Select this if you do not want any action taken after the program has finished running.Restart computer - Select this if you want the target computer to restart after the program has finished running. Enter the number of minutes that the user can defer the restart. Select Force running applications to quit upon restart if you want to force the restart.Log off user - Select this if you want the user to be logged off after the program has finished running. Enter the number of minutes that the user can defer the log off. Select Force running applications to quit upon log off if you want to force the log off.
4 Click Next to go to Step 3 in the Wizard.
Step 3 - Select Collection and ScheduleIn this step, you select the collection of computers to which you want the package of software to be delivered. Next, you select when you want it delivered.
Note: This step lets you set up a Software Delivery task to deliver the package.
1 Select the collection to which the package will be deliveredYou can only select one collection per Software Delivery task. If you want to send the package to more than one collection, you can either create a collection which includes all collections to which you want to send the package or you can run the Software Delivery Wizard again.Note: This is a required field.
2 Select when to run this taska User must manually activate the task on the target computer.
If this is selected, the Software Delivery task will not run on the target computer unless the user activates it manually. Also, the radio buttons and check-boxes in steps d through h below are unnecessary.
b Automatically run the task on the target computerIf this is selected, the Software Delivery task will run automatically on the target computer based on the selections in steps d and e.
c Notify the user when task is availableIf this is selected, the user will be notified when the task is available to run. The user can then manually activate the task or wait until it is automatically run, based on the selections in step a, b, and f.
d Run this task as soon as possibleIf this is selected, the Software Delivery task will run as soon as possible.
e Run the task at a specified date and timeSelect this to run the Software Delivery task at a specified date and time. Select the date and time from the drop-down menus.
f Allow the user to run the task before the scheduled date and time
Altiris Software Delivery Solution for Windows Product Guide 37

Chapter 4: Using Software Delivery Solution Using Software Migration Tasks
Selecting this lets the user control when the Software Delivery task runs. If the task has been selected to run automatically and this check-box is selected, the user can still run the task manually before the scheduled time.g This task is available fromSelect the date and time from which the Software Delivery task will be available. Leave this at the default for the task to be available from today’s date. Select and never expires for the task to never expire. Select and expires and the expiration date to state when the task will expire.
h Dates and times are in Coordinated Universal Time (UTC)Select this if you want dates and times used in steps d and g to be in UTC.
3 Click Next to go to Step 4 in the Wizard.
Step 4 - SummaryIn this step, you enter your Software Delivery task, package, and program names. Next, you review your settings, and click the Finish button.
1 Enter the name for the software delivery task2 Enter information in the following fields:
Software delivery task name - Enter the name for your Software Delivery task. This can be any name you choose. This is a required field.Package name - Enter the name of the package. This can be any name you choose. This is a required field.Program name - Enter the name of the program. This can be any name you choose. This is a required field.
3 Verify the information below and then click FinishMake sure the information in the table is correct.
4 Enable or disable the Software Delivery task.a This Software Delivery task will be Enabled
If this is displayed above 1. Enter the name for the software delivery task, the Software Delivery task will be enabled when it is created. Software Delivery tasks must be enabled before they can be run.
b This Software Delivery task will be DisabledIf this is displayed above 1. Enter the name for the software delivery task, the Software Delivery task will be disabled when it is created. Software Delivery tasks must be enabled before they can be run.
5 Click OK.This creates the package and the Software Delivery task and attaches the package to the task.
Using Software Migration TasksSoftware Migration tasks are policies that can identify applications that are installed on one or more source computers and then deliver the corresponding Software Delivery packages to one or more destination computers.
You can use Software Migration tasks to identify which applications are installed on the original computer and then use Software Delivery to deploy software delivery packages for those applications to the new computer. After the software migration, you can use PC Transplant to migrate the settings from the original computer to the new computer. This makes both the applications and settings be available to the user.
The easiest way to create Software Migration tasks is by using the Software Migration Wizard.
Altiris Software Delivery Solution for Windows Product Guide 38

Chapter 4: Using Software Delivery Solution Using Software Migration Tasks
Quick Links• Software Migration Task Page (page 39)• Using the Software Migration Wizard and Status Page (page 40)Software Migration Task PageThis page lets you configure Software Migration tasks.
To access a Software Migration task page1 In the Altiris Console, click the Tasks tab view.2 In the treeview pane, navigate to Tasks > Software Management > Software Delivery > Windows >
Software Migration Task.3 To create a new Software Migration task, click Wizard and Status or right-click the Software
Migration Task folder and click New > Software Migration Task.For information about the wizard, see “Software Migration Wizard and Status Page” on page 41.
Software Migration Task ToolbarThe Software Migration Task toolbar contains icons which let you perform actions while using the Software Migration Task page.
The clickable icons on the Software Migration Task toolbar are as follows:
• Rename - Lets you quickly rename the Software Migration task.• Delete - Lets you quickly delete the Software Migration task.• Clone - Lets you clone the Software Migration task.• Export - Lets you export the Software Migration task to XML.• View as XML - Lets you view the Software Migration task as XML.• Properties - Lets you view the Properties page of the Software Migration task. The Properties
page contains general information of the task and also lets you set up security for the task.
General Tab View - Software Migration Task Page
Page Items
Item DescriptionEnable Enables the Software Migration task when selected. Disables the Software
Migration task when cleared.Name Name of the Software Migration task.Description Description of the Software Migration task.Migrate from Select a collection of computers to migrate from.
Altiris Software Delivery Solution for Windows Product Guide 39
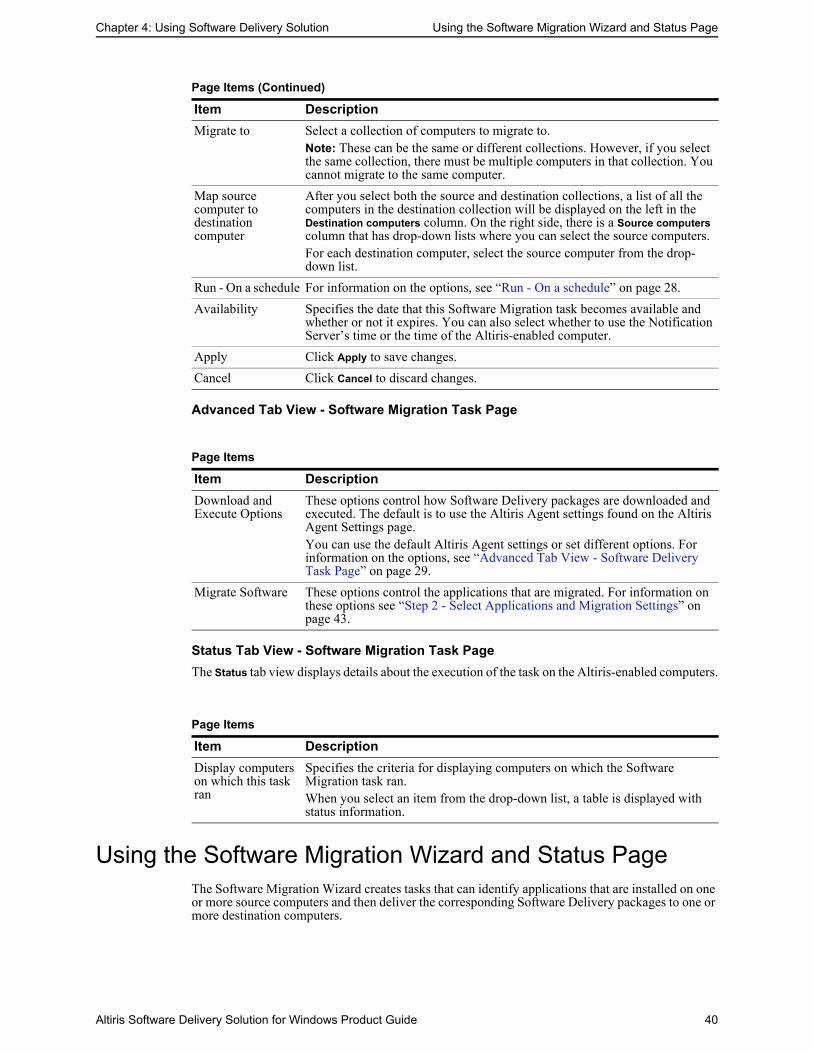
Chapter 4: Using Software Delivery Solution Using the Software Migration Wizard and Status Page
Advanced Tab View - Software Migration Task Page
Status Tab View - Software Migration Task PageThe Status tab view displays details about the execution of the task on the Altiris-enabled computers.
Using the Software Migration Wizard and Status PageThe Software Migration Wizard creates tasks that can identify applications that are installed on one or more source computers and then deliver the corresponding Software Delivery packages to one or more destination computers.
Migrate to Select a collection of computers to migrate to.Note: These can be the same or different collections. However, if you select the same collection, there must be multiple computers in that collection. You cannot migrate to the same computer.
Map source computer to destination computer
After you select both the source and destination collections, a list of all the computers in the destination collection will be displayed on the left in the Destination computers column. On the right side, there is a Source computers column that has drop-down lists where you can select the source computers. For each destination computer, select the source computer from the drop-down list.
Run - On a schedule For information on the options, see “Run - On a schedule” on page 28.Availability Specifies the date that this Software Migration task becomes available and
whether or not it expires. You can also select whether to use the Notification Server’s time or the time of the Altiris-enabled computer.
Apply Click Apply to save changes.Cancel Click Cancel to discard changes.
Page Items
Item DescriptionDownload and Execute Options
These options control how Software Delivery packages are downloaded and executed. The default is to use the Altiris Agent settings found on the Altiris Agent Settings page.You can use the default Altiris Agent settings or set different options. For information on the options, see “Advanced Tab View - Software Delivery Task Page” on page 29.
Migrate Software These options control the applications that are migrated. For information on these options see “Step 2 - Select Applications and Migration Settings” on page 43.
Page Items
Item DescriptionDisplay computers on which this task ran
Specifies the criteria for displaying computers on which the Software Migration task ran.When you select an item from the drop-down list, a table is displayed with status information.
Page Items (Continued)
Item Description
Altiris Software Delivery Solution for Windows Product Guide 40

Chapter 4: Using Software Delivery Solution Using the Software Migration Wizard and Status Page
Software Migration Tasks and Wizard OverviewIn order to create Software Migration tasks, do the following:1 Gather application inventory on the computers you want to migrate from.Application inventory creates a list of applications in the Notification Server database. For more information, see “Configuring Application Inventory” on page 52.
2 Associate discovered applications to existing Software Delivery packages. The Software Migration Wizard does not create software packages but will only use existing software packages. For more information, see “Configuring Application Relationships” on page 53. If you need to create new Software Delivery packages, do so before running the Wizard.
3 Run the Software Migration Wizard to create a Software Migration task (see “Using the Software Migration Wizard” on page 42).
The Software Migration Wizard can be accessed by clicking the Tasks tab and navigating to Software Management > Software Delivery > Windows > Software Migration Tasks > Wizard and Status, then selecting Run Software Migration Wizard.
Quick Links• Using Software Migration Tasks (page 38)• Software Migration Wizard and Status Page (page 41)• Using the Software Migration Wizard (page 42)
Software Migration Wizard and Status PageThe Software Migration Wizard and Status page gives you access to the Software Migration Wizard and also provides status information for your Software Migration tasks.
Quick Links• Using Software Migration Tasks (page 38)• Using the Software Migration Wizard and Status Page (page 40)• Using the Software Migration Wizard (page 42)
Page Items
Item DescriptionRun Software Migration Wizard
Select this to access the Software Delivery Wizard.
Status of Migration tasks
Provides a list of Software Migration tasks and displays their status.
Altiris Software Delivery Solution for Windows Product Guide 41

Chapter 4: Using Software Delivery Solution Using the Software Migration Wizard and Status Page
Software Migration Status ToolbarThe Software Migration Status toolbar contains icons that let you perform actions while using the Wizard and Status page. Some items are only available after tasks are created.The clickable icons on the Software Migration Status toolbar are:
• Right click menu - Provides a shortcut for the right click menu for the item.• Display for - Lets you select which tasks are displayed by age, number of rows, or status.• Edit - Lets you edit the task.• Clone Failed Task - Creates a copy of this task for the computers where it failed. Enter the name
for the new copy, then click OK to create the copy.• Run Task Again - Runs the task again.• View task status details - Lets you view the success, failure, and not run details of the task.• Refresh - Refreshes the grid. Changes made to the grid will not appear until you perform a
refresh.• Copy - Creates a copy of selected task row to paste elsewhere.• Find - Lets you search for a task in the table. Enter the search text in the Find field, then click the
Find button.• Find Again - Finds the next task based on the last search criteria you entered in Find.• Grid right click menu - Provides a shortcut for the right click menu for the selected row.
Using the Software Migration WizardThis sections describes how to use the Software Migration Wizard to identify software applications installed on one or more computers and deliver corresponding existing Software Delivery packages to one or more computers.
Step 1 - Select Source and Destination ComputersIn this step, you select the source and destination computers of the software migration.
The Software Migration Wizard can be accessed by clicking the Tasks tab and navigating to Software Management > Software Delivery > Windows > Software Migration Tasks > Wizard and Status, then selecting Run Software Migration Wizard.
1 Select a collection of computers to migrate from.2 Select a collection of computers to migrate to.
Altiris Software Delivery Solution for Windows Product Guide 42

Chapter 4: Using Software Delivery Solution Using the Software Migration Wizard and Status Page
Note: These can be the same or different collections. However, if you select the same collection, there must be multiple computers in that collection. You cannot migrate to the same computer.After you select both the source and destination collections, a list of all the computers in the destination collection will be displayed on the left in the Destination computers column. On the right side there is a Source computers column that has drop-down lists where you can select the source computers.3 Select the destination computer you want to migrate to, then select from the drop-down list the source computer.
4 If there is a computer in the Destination computers list that you do not want to migrate to, then leave the source computer as Do not migrate.
5 After you have selected the destination and source computers, click Next.
Step 2 - Select Applications and Migration Settings1 Configure Download and Execute options.
You can use the default Altiris Agent settings or set different options. For information on the options, see “Advanced Tab View - Software Delivery Task Page” on page 29.
2 Select the version option.You can select to migrate the same version number or a higher version number. For example, the source computer may have Adobe Acrobat Reader 6 installed. You may also have Software Delivery packages for both Acrobat Reader 6 and Acrobat Reader 7. By selecting Same version number, the Acrobat Reader 6 package will be installed on the destination computer. By selecting Higher version number, the Acrobat Reader 7 package will be installed on the destination computer.
3 Select the software applications to migrate.A list is shown where you choose the applications to be installed on the destination computer(s). You can display the list in two ways: by application name and by computer name.For information about applications that are displayed, see “Software Migration Tasks and Wizard Overview” on page 41.If you use the By Computer Name list, you will see a list of the destination computers you selected in the previous step. Using the check boxes, you can select which computers will get applications migrated to it. After you have selected a computer, you can then expand the list and choose the application Software Delivery packages that are available.If you use the By Software Name list, you will see a list of applications that are installed on the source computer and available through Software Delivery packages. Using the check boxes, you can select which applications to install. After you have selected an application, you can then expand the list and choose the destination computers to install to.
4 (Optional) Add additional software packages to be installed on the destination computers.There may be additional applications that you want to install on the destination computer. To add additional applications, click the Add and select the packages you want to install. If multiple computers are in the By Computer Name list, and if you want to add the application to only one computer, select and highlight the computer name, then select the Add Software to Selected Machine only check box before clicking Add. This will add the new application only to the selected computer.
5 (Optional) Remove Software Delivery packages from the list.If you want to remove a Software Delivery package from the list:a Select the By Software Name list.b Click and highlight a Software Delivery package name.c Click Remove.
6 When you have completed your selections, click Next.
Altiris Software Delivery Solution for Windows Product Guide 43

Chapter 4: Using Software Delivery Solution Using Notifications and Automated Actions
Step 3 - Select the Schedule and Credential Settings1 Set the schedule and availability options.For more information, see “Run - On a schedule” on page 28.2 Click Finish.
Step 4 - Name the Software Migration Task Policy1 Enter a name and description for this Software Migration task.2 Verify the task settings.3 To change any settings, click the Back button.4 To finish the wizard, click OK.The software task will be created in the Software Migration Task folder and will be enabled by default. The task will be run according to the schedule you configured. If you selected multiple applications to be installed on a destination computer, they will be installed sequentially.
Using Notifications and Automated ActionsSoftware Delivery Solution for Windows supplies Notification Policies that provide active reporting for the Altiris Agent.
Notification Policies let you automatically be notified when certain conditions exist. Notification Policies can be set on something as simple as a single software delivery failure or specific set of conditions across multiple computers. Automated responses include sending of e-mail, running corrective commands and scripts, generating SNMP traps, and automatically generating a report and e-mailing you the URL of the report.
The automatic actions that can be taken by a notification policy are defined by Automated Actions. Several Automated Actions can be associated with a single notification policy. For more information on Automated Actions, see the Altiris Notification Server documentation.
Altiris Software Delivery Solution for Windows Product Guide 44

Chapter 4: Using Software Delivery Solution Using the Software Portal
The following table lists and describes the predefined notification polices.You can also create your own notification policies using the Notification Policy template. For more information on creating notification policies, see the Altiris Notification Server Reference.
Note: It is possible for multiple policies to monitor the same event. If you have more than one policy monitoring the same event, use caution so that the actions taken by the policies do not conflict with each other. For example, if two policies monitor the same event and the action taken by each policy is to add a log entry in the Notification database, you will have duplicate entries in your database.
Using the Software PortalThe Software Portal lets users install software on their computers by executing Software Delivery programs for which they have been given permission by the administrator. Software Portal options are provided in addition to existing Software Delivery Package and Program settings.
For information on the Software Portal page, see “Software Portal Page” on page 47.
The Software Portal can be used when:
• One or more users need to install the software right away• One or more users want control over the software they installIMPORTANT: You must install the Software Delivery Solution Agent and the Task Synchronization Agent to all Altiris Agents with which you want to use the Software Portal. (See “Installing Software Delivery Solution Agent” on page 50 and “Task Synchronization” on page 50.)
Software Delivery Solution Notification Policies
Policy DescriptionPackage Download May Be Too Late
Sends an e-mail containing a web report, which summarizes the computers where the package download might not be in time. You can adjust the percent download and the number of days warning (Day Filter). For example, report computers with less than 60 percent download and 4 days before mandatory first execution. This policy applies only to Software Delivery tasks with mandatory schedules other than ASAP.Note: If you change the notification policy schedule, you must change the Days Filter parameter to match the interval.
Program Execution Failed
Sends an e-mail containing a web report summarizing failed program execution.Note: If you change the notification policy schedule, you must change the Days Filter parameter to match the interval.
Software Delivery Task Completed
Sends an e-mail notification when a Software Delivery task has run successfully (at least once) on all of the targeted computers. Both mandatory and optional Software Delivery tasks are reported. Note: If you change the notification policy schedule, you must change the Days Filter parameter to match the interval. Note: Software Delivery tasks with a repeating schedule will be continually reported.
Software Delivery Task Expired
Sends an e-mail notification when a Software Delivery task has expired and not all of the targeted computers have successfully run the program. Both mandatory and optional Software Delivery tasks are reported.Note: If you change the notification policy schedule, you must change the Days Filter parameter to match the interval.
Software Delivery Task Expires In Less Than 7 Days
Sends an e-mail notification when a Software Delivery task is about to expire and not all of the targeted computers have successfully run the program. Both mandatory and optional Software Delivery tasks are reported.Note: If you change the notification policy schedule, you must change the Days Filter parameter to match the interval.
Altiris Software Delivery Solution for Windows Product Guide 45

Chapter 4: Using Software Delivery Solution Using the Software Portal
You use permissions to set up the Software Portal. Each Software Delivery program can have its own permissions.To implement the Software Portal, you need to do two things: set permissions, and select how the user can see the Software Portal.
To configure Software Portal SettingsFor information on configuring Software Portal settings, see “Configuring the Software Portal” on page 52.
To set permissions1 Open the Altiris Console.2 From the Resources tab view, navigate to Resource Management > Resources > Software
Management > Software Delivery Packages > Windows.3 From the Resource folder, double-click on a package.4 Click the Package tab.5 Click the Software Portal tab.6 Click the Modify button.7 Select the Permissions tab.8 Click the Add button.9 Select a role, or user, or group from the Advanced dialog.
The members of the chosen role, user or group will be able to install the software associated with this program.
10 Click Select.11 From the Permission Selection window, select the permissions you want for this program.12 A special Software Delivery Solution Permissions section appears at the bottom of this window.
You have two choices: Install Software and Install on Approval. Select only one of these.• Install Software - The user will be able to select this task from the Software Portal and run the
program without approval.• Install on Approval - The user will be able to select this task from the Software Portal, but will
need to wait approval from an administrator or help desk worker before the program is run.13 Click Select.14 Click Apply.
Select how the user can run the Software Portal1 In the Altiris Console, click the Configuration tab view.2 Navigate to Configuration > Solution Settings > Software Management > Software Delivery >
Software Portal Configuration.3 Select the Software Portal Settings policy that applies to the collection(s) to which you want
these changes sent.4 Select one or more of the following:
• Show link for Software Portal in Start Menu - This lets the user access the Software Request portal by clicking Start > Programs > Altiris > Software Portal.
• Show link for Software Portal in “Add Remove Programs” dialog box - This lets the user install the Software Portal and access it as a program.
• Show link for Software Portal in Altiris Agent’s context menu - This lets the user access the Software Request portal by right-clicking on the Altiris Agent toolbar icon.
Altiris Software Delivery Solution for Windows Product Guide 46
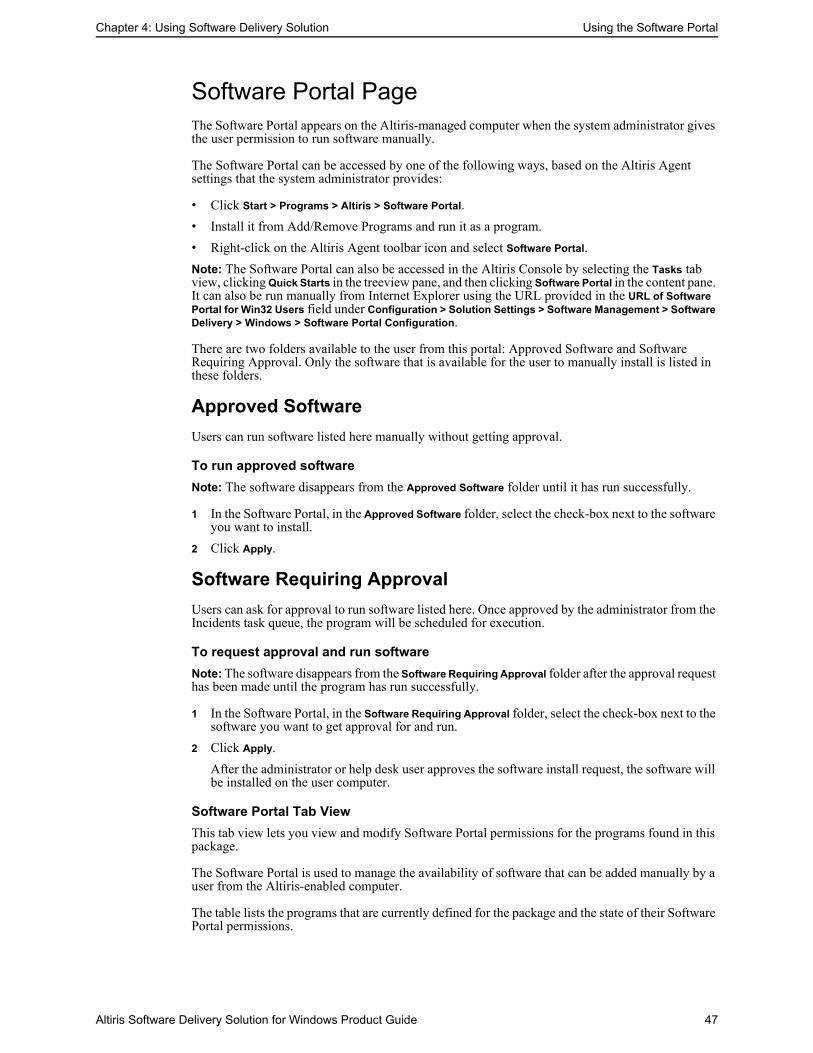
Chapter 4: Using Software Delivery Solution Using the Software Portal
Software Portal PageThe Software Portal appears on the Altiris-managed computer when the system administrator gives the user permission to run software manually.The Software Portal can be accessed by one of the following ways, based on the Altiris Agent settings that the system administrator provides:
• Click Start > Programs > Altiris > Software Portal.• Install it from Add/Remove Programs and run it as a program.• Right-click on the Altiris Agent toolbar icon and select Software Portal.Note: The Software Portal can also be accessed in the Altiris Console by selecting the Tasks tab view, clicking Quick Starts in the treeview pane, and then clicking Software Portal in the content pane. It can also be run manually from Internet Explorer using the URL provided in the URL of Software Portal for Win32 Users field under Configuration > Solution Settings > Software Management > Software Delivery > Windows > Software Portal Configuration.
There are two folders available to the user from this portal: Approved Software and Software Requiring Approval. Only the software that is available for the user to manually install is listed in these folders.
Approved SoftwareUsers can run software listed here manually without getting approval.
To run approved softwareNote: The software disappears from the Approved Software folder until it has run successfully.
1 In the Software Portal, in the Approved Software folder, select the check-box next to the software you want to install.
2 Click Apply.
Software Requiring ApprovalUsers can ask for approval to run software listed here. Once approved by the administrator from the Incidents task queue, the program will be scheduled for execution.
To request approval and run softwareNote: The software disappears from the Software Requiring Approval folder after the approval request has been made until the program has run successfully.
1 In the Software Portal, in the Software Requiring Approval folder, select the check-box next to the software you want to get approval for and run.
2 Click Apply.After the administrator or help desk user approves the software install request, the software will be installed on the user computer.
Software Portal Tab ViewThis tab view lets you view and modify Software Portal permissions for the programs found in this package.
The Software Portal is used to manage the availability of software that can be added manually by a user from the Altiris-enabled computer.
The table lists the programs that are currently defined for the package and the state of their Software Portal permissions.
Altiris Software Delivery Solution for Windows Product Guide 47

Chapter 4: Using Software Delivery Solution Using the Software Portal
When you click a program in the table, you can see who has permission to install the software without administrator approval and who requires administrator approval before installing the software.When you click the Modify button, the Security Descriptor dialog appears. This lets you modify the security settings for the program.
You can use Alert Manager to retrieve user software requests, approve or deny them, and send out e-mails if required. To approve software, click on the Incidents tab from within the Altiris Console. By default, all software that requires approval will be added to the Asset Management queue. Whoever is assigned to this queue will be responsible for approving or denying each software request. An administrator is provided with two tasks for each software request incident - Create a new Software Delivery Task, and Deny Software Request. If the administrator chooses to create a new software delivery task, he will be presented with the Software Delivery Task page with everything defined to run the program on that user's computer. By selecting the Enable check box, and the Apply button, the task will be delivered and run the next time the user's computer requests its configuration. Note: The administrator has the option of changing any schedule or any other option prior to applying the task to fit his requirements.
Altiris Software Delivery Solution for Windows Product Guide 48

Chapter 5:
Configuring Software Delivery Solution
The following procedures configure your system for Software Delivery.
• Configuring Software Delivery Security Privileges (page 49)• Installing Software Delivery Solution Agent (page 50)• Task Synchronization (page 50)• Setting Up Distribution Point Connection Parameters (page 51)• Configuring the Software Portal (page 52)• Configuring Application Inventory (page 52)• Configuring Application Relationships (page 53)• Data Purging (page 56)
Configuring Software Delivery Security PrivilegesYou can assign security privileges for Software Delivery administrative functions. Using role-based security you can control who has rights to do the following:
• Create Software Delivery Packages• Create Software Delivery Tasks• Create Software Portal Definitions
Security Privileges Example Suppose you want to roll out Microsoft Office to all corporate computers. You have offices in New York and Sydney and only want to give permission for employees to roll out Microsoft Office at their location. You would first give privileges to all the employees doing the roll out. Next, you could create two Software Delivery policies: one for the New York roll out and one for the Sydney roll out. Then, you would give the New York roll out employees permissions for the New York Software Delivery policy and the Sydney roll out employees permissions for the Sydney Software Delivery policy.
To configure Software Delivery Security Privileges1 From the Altiris Console, click on the Configuration tab view.2 In the treeview pane, navigate to Configuration > Server Settings > Notification Server Settings >
Item Tasks > Security Role Management.3 Grant Software Delivery Solution privileges to the desired roles.4 Click Apply.For more information about configuring security, see Security Role Management in the Notification Server help.
Altiris Software Delivery Solution for Windows Product Guide 49

Chapter 5: Configuring Software Delivery Solution Installing Software Delivery Solution Agent
Installing Software Delivery Solution AgentThe Software Delivery Solution Agent does the following:
• It controls the exposure of the Software Portal on Altiris-enabled computers. (See “Using the Software Portal” on page 45.)
• It manages the inventory of programs installed on Altiris-enabled computers.The Software Delivery Solution Agent inventories programs that are installed on the Altiris-enabled computer and sends this data to the Notification Server. It then uses this information to track programs that are installed on the Altiris-enabled computer and matches them with packages that are defined by the Notification Server. You can use this information in deciding which programs to send to which Altiris-enabled computers.
You need to install the Software Delivery Solution Agent only if you are doing one of the following:
• Using the Software Portal.• Tracking inventory of installed applications on Altiris-enabled computers (using an Application
Inventory task).
To install the Software Delivery Solution Agent1 From the Altiris Console, click on the Configuration tab view.2 In the treeview pane, navigate to Configuration > Solution Settings > Software Management >
Software Delivery > Windows > Software Delivery Solution Agent Rollout.3 Select Software Delivery Solution Agent Install.4 In the content pane, select Enable.5 Click the Apply button.After the Software Delivery Solution Agent has been installed on the Altiris-enabled computers, you can then set up and enable an Application Inventory task to perform inventory of installed applications.
Note: If you deploy the Software Delivery Solution Agent, you should also deploy the Task Synchronization Agent (“Task Synchronization” on page 50).
Software Delivery Solution Agent UninstallThe Software Delivery Solution Agent Uninstall folder contains a policy you can use to uninstall the Software Delivery Solution Agent. This policy uninstalls the Software Delivery Solution Agent from all computers listed in the Computers With Software Delivery Solution Agent Installed collection.
If you want to uninstall the Software Delivery Solution Agent from your Altiris-enabled computers, enable the Software Delivery Solution Uninstall policy.
Task SynchronizationTask Synchronization is used by Software Delivery Solution and other Altiris solutions that synchronize the execution of tasks on an Altiris Agent. The Task Synchronization Agent should be rolled out to any Altiris Agents that have the Software Delivery Solution Agent installed on them.
The Task Synchronization Agent Install policy installs the Task Synchronization Agent to the All Windows Computers with NS 6 Agents collection. To install the Task Synchronization Agent to these computers, enable the Task Synchronization Agent Install policy.
When a Task Synchronization Agent upgrade is available, you can enable the Task Synchronization Agent Upgrade policy. This policy upgrades the Task Synchronization Agent to all computers listed in the Computers Requiring Task Synchronization Agent Upgrade collection.
Altiris Software Delivery Solution for Windows Product Guide 50
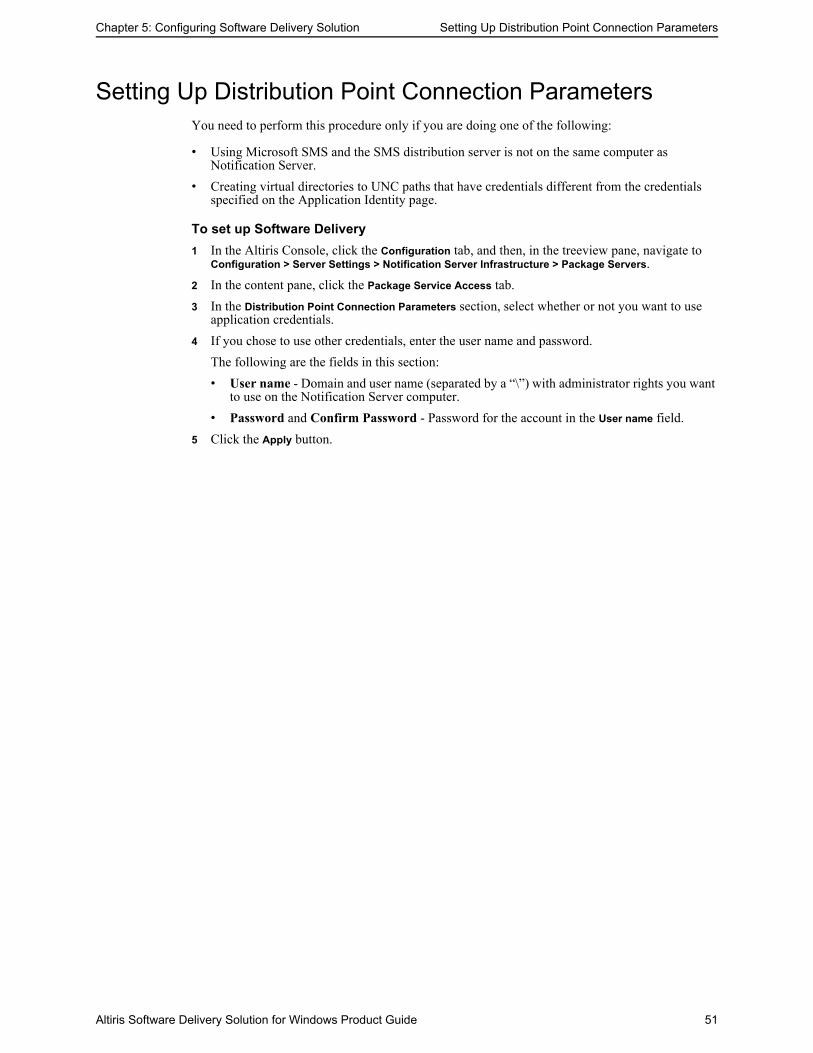
Chapter 5: Configuring Software Delivery Solution Setting Up Distribution Point Connection Parameters
Setting Up Distribution Point Connection ParametersYou need to perform this procedure only if you are doing one of the following:
• Using Microsoft SMS and the SMS distribution server is not on the same computer as Notification Server.
• Creating virtual directories to UNC paths that have credentials different from the credentials specified on the Application Identity page.
To set up Software Delivery1 In the Altiris Console, click the Configuration tab, and then, in the treeview pane, navigate to
Configuration > Server Settings > Notification Server Infrastructure > Package Servers.2 In the content pane, click the Package Service Access tab.3 In the Distribution Point Connection Parameters section, select whether or not you want to use
application credentials.4 If you chose to use other credentials, enter the user name and password.
The following are the fields in this section:• User name - Domain and user name (separated by a “\”) with administrator rights you want
to use on the Notification Server computer.• Password and Confirm Password - Password for the account in the User name field.
5 Click the Apply button.
Altiris Software Delivery Solution for Windows Product Guide 51

Chapter 5: Configuring Software Delivery Solution Configuring the Software Portal
Configuring the Software PortalThe Software Portal Settings page lets you control the visibility of links to the Software Portal on Altiris-enabled computers.
Configuring Application InventoryApplication Inventory tasks gather information on applications that are installed on Altiris-enabled computers. This information is then placed in the Notification Database. You can then run reports that give you information and status on these installed applications. You can also use this information for migrating software. For more information, see “Using the Software Migration Wizard and Status Page” on page 40.
After you use an Application Inventory task to gather information on applications from Altiris-enabled computers, you can set up application relationships (see “Configuring Application Relationships” on page 53) and create packages which use applications and installer relationships.
If the Application Inventory task finds that some applications have been uninstalled when compared to the previous inventory, the information is reported to the Notification Database. The information about uninstalled applications is kept for 7 days (configurable using the Data Purging section) after which it is deleted.
To create an Application Inventory task1 In the Altiris Console, click the Configuration tab view.2 In the treeview pane, navigate to Configuration > Solution Settings > Software Management >
Software Delivery > Windows.3 Right-click on the Application Inventory folder, then select New > Application Inventory Task.
Software Portal Page Items
Item DescriptionEnable Select to enable these settings.Show link for Software Portal in Start Menu
Places a link for the Software Portal in the Start menu on the Altiris-enabled computer.
Show link for Software Portal in “Add Remove Programs” dialog box
Shows a link for the Software Portal in the “Add Remove Programs” dialog box on the Altiris-enabled computer.This is available only on Windows 2000 clients and above.
Show link for Software Portal in Altiris Agent’s context menu
Places a link for the Software Portal in the Altiris Agent's context menu on the Altiris-enabled computer
Applies to collections This lists the collection(s) that the settings apply to. Click on the pencil icon to edit the collection(s) that the settings apply to. These settings can apply to one or more collections.
URL of Software Portal for Win32 users
You can e-mail this URL to your Altiris-enabled computer users. Users can access the Software Portal using this URL.
Show me this page Click to view the URL page that you will send to the Altiris-enabled computer users.Note: To access the Software Portal using this URL, the Altiris Agent and the Software Delivery Solution Agent must be installed on the client computers.
Apply Click Apply to save changes.Cancel Click Cancel to discard changes.
Altiris Software Delivery Solution for Windows Product Guide 52

Chapter 5: Configuring Software Delivery Solution Configuring Application Relationships
Application Inventory Task ToolbarThe Application Inventory task toolbar contains icons which let you perform actions while using the Application Inventory task page.The clickable icons on the Application Inventory task toolbar are:
• Rename - Lets you quickly rename the Application Inventory task.• Delete - Lets you quickly delete the Application Inventory task.• Clone - Lets you clone the Application Inventory task.• Export - Lets you export the Application Inventory task to XML.• View as XML - Lets you view the Application Inventory task as XML.• Properties - Lets you view the Properties page of the Application Inventory task. The Properties
page contains general information of the Application Inventory task and also lets you set up security for the Application Inventory task.
General Tab View
Configuring Application RelationshipsThe Application Relationships feature helps you manage Applications and Installers which are found on your Altiris-enabled computers.
Applications are any executables that may be found on your computers.
Installers are the installation executables that install Applications.
Page Items
Item DescriptionEnable Select to enable this task.Name (Required) The name of the task.Description (Optional) The description of the task.Applies to collection(s) This lists the collection(s) that the task applies to. Click on the pencil icon
to edit the collection(s) that the task applies to. This task can apply to one or more collections.
Run the inventory task once
Select to run this task only one time.
Run the inventory task on a schedule
Select to run this task on a schedule.
Schedule Click on the link to open the scheduler and create a schedule for this task.Apply Click Apply to save changes.Cancel Click Cancel to discard changes.
Altiris Software Delivery Solution for Windows Product Guide 53

Chapter 5: Configuring Software Delivery Solution Configuring Application Relationships
The Application Relationships page comes with pre-populated Applications and Installers. You may also define your own Applications and Installers to suit your needs.Applications can be associated with Installers. Each Application can be associated with one or more Installers. Each Installer can be associated with one or more Applications.
The relationships between Applications and Installers have been created already for the pre-populated Applications and Installers. If you define your own Applications and Installers, you will need to associate them as applicable.
Application Relationships are used in linking application inventory to specific software packages, which can then be installed where needed. Using Application Inventory, you can scan Altiris-enabled computers for application information. This information is placed in the Notification Database and can then be used when deploying software packages.
Software Delivery tasks are associated with packages and programs. Software Delivery programs can then be associated with specific Applications and Installers.
This gives you the advantage of tying a software delivery package and program to an Application Relationship.
You can also use these relationships for migrating software. For more information, see “Using the Software Migration Wizard and Status Page” on page 40.
You can associate Applications and Installers with software programs in one of two ways• On the Application or Installer page, associate programs with the Application or Installer.• On the Programs page, associate Applications and Installers with the program.
Application Page
Item DescriptionApplication (Required field) Application name. Exe name (Required field) Name of the executable file. Click Browse to browse
and select the desired executable.Language (Required field) The Application language.File version (Required field) The file version of the executable listed above.Family Select the Application family that you want this Application to belong
to. You can create families by clicking View Families, then clicking on Add.
Size The size of the Application (in bytes).Publisher The publisher of the Application.Product version The version of the Application.Installed by programs Click here to select lets you select the programs that install this
Application.Uninstalled by programs Click here to select lets you select the programs that uninstall this
Application.Contained by installers Click here to select lets you select the Installers that this Application is
contained by.Installed on computers Displays the Altiris-enabled computers that this Application has been
installed on.Apply Click Apply to save changes.Cancel Click Cancel to cancel changes.
Altiris Software Delivery Solution for Windows Product Guide 54

Chapter 5: Configuring Software Delivery Solution Configuring Application Relationships
Installer PageTo create a new Application relationship1 Navigate to Applications & Installers > Applications.2 Right-click on Applications, then select New Application.3 Enter the fields as explained in “Application Page” on page 54.
To create a new Installer relationship1 Navigate to Applications & Installers > Applications.2 Right-click on Installers, then select New Installer.3 Enter the fields as explained in “Installer Page” on page 55.
To use Application Relationships to automatically send packages to Altiris-enabled computers1 Perform an inventory on your computers (do this by setting up specific Application Inventory
tasks and running them).2 Make sure the necessary Application Relationships are set up.3 When you create programs, associate them with Applications and Installers.4 Create Software Delivery tasks and associate them with the desired packages and programs.Notification Server then automatically determines which Applications and Installers to push down to which computers. This is very useful when upgrading. Notification Server can detect if a new version needs to be pushed down based on which versions are installed.
Example 1Suppose you use Application Inventory to gather inventory on an Altiris-enabled computer. The Application Inventory task finds an aol.exe file and gathers the version number and its language. This information is sent to the Notification Server that places it in the Notification Database.
Notification Server can now determine that the aol.exe file on this Altiris-enabled computer is associated with the American Online 4.0 application. The American Online 4.0 application can be associated with one or more installers. In this case, the American Online 4.0 application is only associated with the American Online 4.0 setup installer.
This information can now be used for performing upgrades or for sending aol.exe to another computer that needs it.
Example 2You can set up PC Transplant Pro and Software Delivery to inventory computers and migrate settings from one computer to another computer automatically through application relationships.
Item DescriptionInstaller (Required field) Installer name. Click Browse to browse and select the
desired Installer.Publisher The publisher of the Installer.Filename The filename of the Installer.Type The Installer type. Select a type from the menu.Used by packages Click here to select lets you select the packages that use this Installer.Contains applications Click here to select lets you select the Applications that this Installer is
contained byApply Click Apply to save changes.Cancel Click Cancel to cancel changes.
Altiris Software Delivery Solution for Windows Product Guide 55

Chapter 5: Configuring Software Delivery Solution Data Purging
Suppose you want to migrate applications from one computer to another computer. You can set up Software Delivery Solution to perform an application inventory on the first computer. Through this inventory, it is determined that the first computer has AOL 4.0 and Microsoft Word 2000. It is also determined, through an application inventory, that the second computer does not have AOL 4.0 and Microsoft Word 2000 on it. A Software Delivery package can be created which is associated with the AOL 4.0 and Microsoft Word 2000 applications and installers. Then, you can create a Software Delivery task to push these applications automatically to the second computer. This process can happen automatically, making your migration fast and easy.Data PurgingThis page lets you set the period for which saved reports and captured events remain in the Notification database before they are deleted.
All saved reports belonging to this solution that are older than the period you specify are automatically purged from the database on a daily basis. Likewise, events belonging to policies in this solution that are older than the period you specify are also purged.
Note: If you are having trouble running your reports (if they are slow), try purging your events or set the purge of events to happen more often.
WARNING: Purging will also cause the history of assets to be deleted. This information is very important when tracking details such as the cost details of assets. Enabling Purging will cause Asset data to be lost with potential loss to financial information.
To enable or change the purging of saved reports or events for this solution1 Altiris Console, select the Configuration tab. 2 In the treeview pane, navigate to Configuration > Solutions Settings > Software Management >
Software Delivery.3 In the treeview pane, select Data Purging.4 In the content pane:
a To purge events, select the check box next to Purge events older than. Type in the number for your time period, and then select the time period (Day(s), Week(s), or Month(s)).
b To purge saved reports, select the check box next to Purge saved reports older than. Type in the number for your time period, and then select the time period (Day(s), Week(s), or Month(s)).
Item DescriptionPurge events older than This lets you purge all events belonging to this solution that are older
than the period you specify.Purge saved reports older than
This lets you purge all reports belonging to policies in this solution that are older than the period you specify.
Purge tasks and collections older than
This lets you purge all tasks and collections created for the Software Portal that are older than the period you specify.
Purge uninstalled applications older than
This lets you purge information about uninstalled applications that are older than the period you specify. This applies only if you are using Application Inventory.
Apply Click to save all changes. The old data is then purged from the Notification database on a daily basis.
Cancel Click to cancel changes.Purge Now Click to immediately purge old data from the Notification database.Purge internal collections This lets you purge all collections that were dynamically created by
Software Delivery that are no longer in use.
Altiris Software Delivery Solution for Windows Product Guide 56

Chapter 5: Configuring Software Delivery Solution Data Purging
5 Click Apply.The following events get purged:• User login/logout• Event History table• Transport status• Push status
To disable the purging of saved reports or events for this solution1 Altiris Console, select the Configuration tab. 2 In the treeview pane, navigate to Configuration > Solutions Settings > Software Management >
Software Delivery.3 In the treeview pane, select Data Purging.4 In the content pane, clear the check box next to Purge events older than and Purge saved reports
older than.5 Click Apply.Note: You can also use the Purge Now button to immediately purge old data from the database based on the specified settings.
Altiris Software Delivery Solution for Windows Product Guide 57

Chapter 6:
Technical Reference
Quick Links• SMS Software Delivery Integration (page 58)• Troubleshooting (page 62)
SMS Software Delivery IntegrationSoftware Delivery lets you use Notification Server to integrate with SMS and deliver and deploy SMS software packages. This is an especially useful feature if you have Altiris Agents on low speed connections (such as dial-up connections).
Software Delivery lets you use SMS program, package, Software Delivery task, and collection definitions in Notification Server. Events received from the Altiris Agent related to SMS software delivery can be forwarded to SMS.
To integrate SMS software delivery with Notification Server, you need to have the following:
• Microsoft SMS installed• SMS Site Server installed• SMS Distribution Point• SMS client installed on the Notification Server computer if you want to forward SMS software
delivery events received by Notification Server to SMS• Notification Server• Altiris Agent• Software DeliveryWhen SMS objects, such as collections, advertisements, and packages are imported into Notification Server, they have the same name as in SMS, except they have “(SMS)” appended to their names. SMS imported advertisements (Software Delivery tasks in Notification Server) can be enabled and disabled, but are otherwise not modifiable from Notification Server.
Note: The initial importing of SMS objects into the Notification database can take several minutes. Subsequent updates to the object information takes much less time.
You can specify the action to take when the same SMS advertisement can be run by the SMS client and the Altiris Agent. This is especially useful for an Altiris-enabled computer that can be both remote and local. When the Altiris Agent is local, SMS can handle software delivery. When the Altiris Agent is remote, Notification Server can handle software delivery. For details on specifying this, see “Specifying When Notification Server Is Used for SMS Advertisements” on page 60.
To perform the integration of SMS and Notification Server, see “Integrating SMS Software Delivery” on page 59.
Altiris Software Delivery Solution for Windows Product Guide 58
Chapter 6: Technical Reference SMS Software Delivery Integration
SMS and Notification Server CollectionsIf you are using Notification Server for SMS software delivery, you will import SMS collections into Notification Server. When Software Delivery imports collections from SMS, a set of collections with the same names as the SMS collections with “(SMS)” appended is created in Notification Server. The computers in these newly created collections are a union between the SMS collection list of computers and the computers discovered by Notification Server. For example, an SMS collection named “PC” has servers named “A”,“B”, “C”, and “D”. Notification Server has discovered computers named “A”, “B”, “E”, and “F”. The “PC (SMS)” collection on the Notification Server contains “A” and “B”.To ensure that all Notification Server discovered computers are part of the SMS collections, you need to make sure that the Data Discovery Record check box is selected on the Microsoft SMS Configuration page of the Altiris Console. Selecting this will forward the identity of all Notification Server discovered computers to SMS, so all Notification Server discovered computers are a part of an SMS collection.
Integrating SMS Software DeliveryFor information on integrating Software Delivery with SMS, see “SMS Software Delivery Integration” on page 58.
To integrate Software Delivery with SMS1 Specify an SMS database (see “Specifying an SMS Database” on page 59).2 Configure Software Delivery for SMS integration (“Configuring Software Delivery for SMS” on
page 59).
Specifying an SMS DatabaseIf you want to integrate Software Delivery to distribute and deploy SMS packages, see “Integrating SMS Software Delivery” on page 59.
To configure Notification Server for SMS integration1 In the Altiris Console, click the Configuration tab. 2 In the treeview pane, click on Microsoft SMS.3 In the right pane, click the SMS database section link to expand it.4 Enter the SMS database connection information.
The following are the fields in the pane:• SQL Server - Name of the server running SQL Server.• SQL Login ID - Login ID for the SMS SQL Server database.• SQL Login Password - Password for the SMS SQL Server database.• SMS SQL Database - SMS database name. If the SQL Server is specified properly, this drop-
down list will include the name of your SMS database.5 Configure software delivery (see “Configuring Software Delivery for SMS” on page 59).
Configuring Software Delivery for SMSThe following procedure describes how to integrate the Notification database with an SMS database.
If you want to integrate Software Delivery to distribute and deploy SMS packages, see “Integrating SMS Software Delivery” on page 59.
Altiris Software Delivery Solution for Windows Product Guide 59

Chapter 6: Technical Reference SMS Software Delivery Integration
To configure software delivery1 In the Altiris Console, click the Configuration tab.2 Click on Software Delivery in the treeview pane.3 In the right pane, select the Integrate with my SMS Software Delivery Environment check box.4 Click the SMS Site Connection Information section link to expand it.5 Enter the SMS site connection information.The following are the fields in this section:• SMS Site Server - Name of the server running SMS Site Server.• SMS Login ID - SMS Site Server login ID.• SMS Login Password - Password for ID listed in the SMS Login ID field.• SMS Site Code - SMS Site Status code.Note: If you do not specify a login ID and password, the connection will be made using the account under which the MTS package is running.Note: If Notification Sever is installed on the same computer as SMS Site Server it is not necessary to enter a SMS connection login ID and password.
6 Click the SMS Distribution Point section link to expand it.7 Select a distribution point location.8 Click the SMS Software Delivery Synchronization section link to expand it.9 Select the desired SMS software delivery synchronization options.
The following are the fields in this section:• SMS Software Objects - Select this check box to keep SMS software objects synchronized
between SMS and Notification Server.• Software Delivery Events - Select this check box to forward SMS software delivery event to
SMS.• Synchronize now - Click this link to synchronize SMS and Notification Server software
delivery objects immediately.• Forward now - Click this link to forward Notification Server software delivery events to the
SMS server immediately.• Forward as soon as possible - Select this option to forward SMS software delivery events as
soon as possible after they are received by Notification Server.• Forward on schedule - Select this option to forward SMS software delivery events according
to a schedule after they are received by Notification Server.• SMS forwarding and synchronization schedule - Click the Edit link to specify the SMS
forwarding and synchronization schedule.IMPORTANT: By default you must define a schedule for how often the Notification Server will replicate SMS advertisement data from the SMS database to the Notification database. Ensure that you select a schedule if you want updated information to appear in your Notification database. Note that you can also remove existing SMS advertisement data from your database.
10 If you need to authenticate to the SMS distribution point, see “Setting Up Distribution Point Connection Parameters” on page 51.
11 Click the Apply button.
Specifying When Notification Server Is Used for SMS AdvertisementsIf you have integrated SMS with Notification Server for software delivery and both the SMS client and the Altiris Agent are installed on a managed computer, you need to specify the action to take when the same advertisement is on both clients.
Altiris Software Delivery Solution for Windows Product Guide 60

Chapter 6: Technical Reference SMS Software Delivery Integration
To specify the action to take with advertisements on both clients1 In the Altiris Console, click the Configuration tab.2 In the treeview pane, navigate to Client Settings.3 In the right pane, click the Configure the Win32 Client button.4 Click the SMS Integration section link to expand it.5 Select the desired integration option.The following are the options:• Only run SMS advertisements when remote - SMS advertisements are used only by the
Altiris Agent if the connection speed between the client and the network is slower than the Connection Speed Threshold defined under the Client Communication section of the same page. This is the recommended option.
• Run all SMS advertisements - All SMS advertisements are run by the Altiris Agent, regardless of whether they are run on the SMS client or not.
• Ignore all SMS advertisements - No SMS advertisements are run by the Altiris Agent.6 Click Apply.
Deleting SMS Software Delivery Objects from Notification ServerThis procedure describes how to delete SMS software delivery objects from Notification Server. However, unless you remove SMS software delivery integration from Notification Server, the software delivery objects will be re-imported from SMS during the next scheduled synchronization time. To remove SMS software delivery integration from Notification Server, see “Removing SMS Software Delivery Integration from Notification Server” on page 61.
To delete SMS software delivery objects from Notification Server1 In the Altiris Console, click the Configuration tab.2 Navigate to Software Delivery.3 Click the SMS Software Delivery Synchronization section link.4 Click the Delete all mapped SMS Software Delivery objects link.
Removing SMS Software Delivery Integration from Notification ServerTo remove SMS software delivery integration from Notification Server1 In the Altiris Console, click the Configuration tab.2 Navigate to Software Delivery.3 Click the SMS Software Delivery Synchronization section link to expand it.4 Clear the SMS Software Delivery Objects and Software Delivery Events check boxes.
This will prevent the synchronization of objects and events with SMS.5 Delete the SMS software delivery objects from Notification Server.
For details, see “Deleting SMS Software Delivery Objects from Notification Server” on page 61. This will remove the current SMS software delivery objects from Notification Server.
6 At the top of the right pane, clear the Integrate with my SMS Software Delivery Environment check box.
7 Click the Apply button.
Altiris Software Delivery Solution for Windows Product Guide 61

Chapter 6: Technical Reference Troubleshooting
Troubleshooting• Log Files (page 62)• FTP Service (page 62)
Log FilesComponents that encounter errors while running place messages in a log file in the install folder\Altiris\eXpress\logs folder on the Notification Server computer. The log is an XML text file that you can open in a text editor or within Internet Explorer 5.
FTP ServiceIf the FTP service is not installed, you will get the following error messages:
An error occurred whilst creating virtual directories to package's distribution point. Method MapPackageDistPoints() threw an error or returned empty.
MapPackageDistPoints(): Error thrown by function CheckCreateDistPoints() when attempting to get/create FTP virtual directory named {0BA533E9-0C99-4E6D-8AA3-984435BFDA06}, Distribution point UNC = C:\Downloads\Acrobat Reader. ERROR: Number=80040000, Description=CheckCreateDistPoints(): Failed to get AeXNS FTP site
CheckCreateDistPoints(): Failed to get AeXNS FTP site. ERROR: Number=1A8, Description=Object required
GetNfySvrDir(): Failed getting IIS admin object: IIS://POULNIELSEN/MSFTPSVC. ERROR: Number=80070003, Description=
To fix this problem, start the FTP service.
Altiris Software Delivery Solution for Windows Product Guide 62

Altiris Software Delivery Solution for Windows Product Guide 63
Aagent
software delivery solution 50application inventory task 50automated actions 44
Bbandwidth throttling 6blockout 6
Cchecking for updated package files 16checkpoint recovery 5, 14cleanup process 23connection loss 14copyright 2creation date of document 2
Ddatabase 59deploying a policy 25document
print date 2download errors for packages 16downloading packages 14
FFTP service 62
HHTTP 36
Iinstallation 8installers 53integrating SMS 58
Llegal notice 2license 8log files 62lost connection 14
MMicrosoft SQL Server 7MSI files 15Multicasting 6multicasting 11
configuring 12package servers and multicasting 12
sample multicasting scenario 11
Nnotice 2Notification Policies 10notification policies 44Notification Server
collections 59deleting SMS objects 61removing SMS integration 61
Ppackage
checking for updated files 16deleting a program 15deletion 15download 14download errors 16location 14overview 13
package server 13package servers and multicasting 12patent 2PC Transplant 6, 38planning information 7policy
deployment 25prerequisites 8priority of Software Delivery task 23product version 2program
deletion 15
Rregistry key 23requirements 8
Sscheduling 25script files 16security 7sequential Software Delivery task 10SMS
collections 59database 59deleting objects from Notification
Server 61integration 51, 58removing integration 61software delivery 59when Notification Server is used 60
SMS configuration 59
Software Deliveryconfiguring for SMS 59usage overview 9
software delivery 59software delivery solution agent 50Software Delivery task
disabled 23overview 22priority 23sample 10scheduling 25sequential 10status files 23
Software Delivery tasks 10software delivery wizard 9, 10, 15, 24,
32Software Migration task
overview 38Software Migration Wizard 6, 40software package 13Software packages 13software portal 22, 47, 50software requester
portal 45SQL Server 7status files 23
Ttask scheduler 25throttling 6trademark 2
UUNC path 51unicast 11uninstall 50
Vversion 2
Wwizard
software delivery 9, 10, 15, 24, 32
Index