Embed Size (px)
Citation preview
Symantec™ bv-Control ® forUNIX ® 10.0 Getting StartedGuide
Symantec™ bv-Control for UNIX 10.0 Getting StartedGuide
The software described in this book is furnished under a license agreement andmay be usedonly in accordance with the terms of the agreement.
Documentation version: 10.0
Legal NoticeCopyright © 2010 Symantec Corporation. All rights reserved.
Symantec, the Symantec Logo, ActiveAdmin, BindView, bv-Control, Enterprise SecurityManager, andLiveUpdate are trademarks or registered trademarks of SymantecCorporationor its affiliates in the U.S. and other countries. Other names may be trademarks of theirrespective owners. are trademarks or registered trademarks of Symantec Corporation orits affiliates in the U.S. and other countries. Other names may be trademarks of theirrespective owners.
This Symantec product may contain third party software for which Symantec is requiredto provide attribution to the third party (“Third Party Programs”). Some of the Third PartyPrograms are available under open source or free software licenses. The LicenseAgreementaccompanying the Software does not alter any rights or obligations you may have underthose open source or free software licenses. Please see theThird Party LegalNoticeAppendixto this Documentation or TPIP ReadMe File accompanying this Symantec product for moreinformation on the Third Party Programs.
The product described in this document is distributed under licenses restricting its use,copying, distribution, and decompilation/reverse engineering. No part of this documentmay be reproduced in any form by any means without prior written authorization ofSymantec Corporation and its licensors, if any.
THEDOCUMENTATIONISPROVIDED"ASIS"ANDALLEXPRESSORIMPLIEDCONDITIONS,REPRESENTATIONS AND WARRANTIES, INCLUDING ANY IMPLIED WARRANTY OFMERCHANTABILITY, FITNESS FOR A PARTICULAR PURPOSE OR NON-INFRINGEMENT,ARE DISCLAIMED, EXCEPT TO THE EXTENT THAT SUCH DISCLAIMERS ARE HELD TOBELEGALLYINVALID.SYMANTECCORPORATIONSHALLNOTBELIABLEFORINCIDENTALOR CONSEQUENTIAL DAMAGES IN CONNECTION WITH THE FURNISHING,PERFORMANCE, OR USE OF THIS DOCUMENTATION. THE INFORMATION CONTAINEDIN THIS DOCUMENTATION IS SUBJECT TO CHANGE WITHOUT NOTICE.
The Licensed Software andDocumentation are deemed to be commercial computer softwareas defined in FAR12.212 and subject to restricted rights as defined in FARSection 52.227-19"Commercial Computer Software - Restricted Rights" and DFARS 227.7202, "Rights inCommercial Computer Software or Commercial Computer Software Documentation", asapplicable, and any successor regulations. Any use, modification, reproduction release,performance, display or disclosure of the Licensed Software andDocumentation by theU.S.Government shall be solely in accordance with the terms of this Agreement.

Symantec Corporation350 Ellis StreetMountain View, CA 94043
http://www.symantec.com
Technical SupportSymantec Technical Support maintains support centers globally. TechnicalSupport’s primary role is to respond to specific queries about product featuresand functionality. TheTechnical Support group also creates content for our onlineKnowledge Base. The Technical Support group works collaboratively with theother functional areas within Symantec to answer your questions in a timelyfashion. For example, theTechnical Support groupworkswithProductEngineeringand Symantec Security Response to provide alerting services and virus definitionupdates.
Symantec’s support offerings include the following:
■ A range of support options that give you the flexibility to select the rightamount of service for any size organization
■ Telephone and/or web-based support that provides rapid response andup-to-the-minute information
■ Upgrade assurance that delivers software upgrades
■ Global support purchased on a regional business hours or 24 hours a day, 7days a week basis
■ Premium service offerings that include Account Management Services
For information about Symantec’s support offerings, you can visit our web siteat the following URL:
www.symantec.com/business/support/
All support services will be delivered in accordance with your support agreementand the then-current enterprise technical support policy.
Contacting Technical SupportCustomers with a current support agreement may access Technical Supportinformation at the following URL:
www.symantec.com/business/support/
Before contacting Technical Support, make sure you have satisfied the systemrequirements that are listed in your product documentation. Also, you should beat the computer onwhich theproblemoccurred, in case it is necessary to replicatethe problem.
When you contact Technical Support, please have the following informationavailable:
■ Product release level

■ Hardware information
■ Available memory, disk space, and NIC information
■ Operating system
■ Version and patch level
■ Network topology
■ Router, gateway, and IP address information
■ Problem description:
■ Error messages and log files
■ Troubleshooting that was performed before contacting Symantec
■ Recent software configuration changes and network changes
Licensing and registrationIf yourSymantecproduct requires registrationor a licensekey, access our technicalsupport web page at the following URL:
www.symantec.com/business/support/
Customer serviceCustomer service information is available at the following URL:
www.symantec.com/business/support/
Customer Service is available to assist with non-technical questions, such as thefollowing types of issues:
■ Questions regarding product licensing or serialization
■ Product registration updates, such as address or name changes
■ General product information (features, language availability, local dealers)
■ Latest information about product updates and upgrades
■ Information about upgrade assurance and support contracts
■ Information about the Symantec Buying Programs
■ Advice about Symantec's technical support options
■ Nontechnical presales questions
■ Issues that are related to CD-ROMs or manuals

Support agreement resourcesIf youwant to contact Symantec regarding an existing support agreement, pleasecontact the support agreement administration team for your region as follows:
[email protected] and Japan
[email protected], Middle-East, and Africa
[email protected] America and Latin America
Additional enterprise servicesSymantec offers a comprehensive set of services that allow you tomaximize yourinvestment in Symantec products and to develop your knowledge, expertise, andglobal insight, which enable you to manage your business risks proactively.
Enterprise services that are available include the following:
Managed Services remove the burden of managing and monitoring securitydevices and events, ensuring rapid response to real threats.
Managed Services
Symantec Consulting Services provide on-site technical expertise fromSymantec and its trustedpartners. SymantecConsultingServices offer a varietyof prepackaged and customizable options that include assessment, design,implementation,monitoring, andmanagement capabilities. Each is focused onestablishing andmaintaining the integrity and availability of your IT resources.
Consulting Services
EducationServices provide a full array of technical training, security education,security certification, and awareness communication programs.
Education Services
To access more information about enterprise services, please visit our web siteat the following URL:
www.symantec.com/business/services/
Select your country or language from the site index.
Technical Support . . . . . . . . . . . . . . . . . . . . . . . . . . . . . . . . . . . . . . . . . . . . . . . . . . . . . . . . . . . . . . . . . . . . . . . . . . . . . . . . . . . . . . . . . . . . . . . 4
Chapter 1 About bv-Control for UNIX . . . . . . . . . . . . . . . . . . . . . . . . . . . . . . . . . . . . . . . . . . . . . . . . 11
Introduction to Symantec bv-Control for UNIX .... . . . . . . . . . . . . . . . . . . . . . . . . . . . . . . 11About RMS Console and Information Server ... . . . . . . . . . . . . . . . . . . . . . . . . . . . . . . . . . . 12bv-Control for UNIX features ... . . . . . . . . . . . . . . . . . . . . . . . . . . . . . . . . . . . . . . . . . . . . . . . . . . . . . . 12bv-Control for UNIX architecture ... . . . . . . . . . . . . . . . . . . . . . . . . . . . . . . . . . . . . . . . . . . . . . . . . . 13About the agent-based architecture ... . . . . . . . . . . . . . . . . . . . . . . . . . . . . . . . . . . . . . . . . . . . . . . 13About the agentless architecture ... . . . . . . . . . . . . . . . . . . . . . . . . . . . . . . . . . . . . . . . . . . . . . . . . . . 13SSH communication with an agentless target computer ... . . . . . . . . . . . . . . . . . . . 14bv-Control for UNIX data source ... . . . . . . . . . . . . . . . . . . . . . . . . . . . . . . . . . . . . . . . . . . . . . . . . . . 14About bv-Config UNIX .... . . . . . . . . . . . . . . . . . . . . . . . . . . . . . . . . . . . . . . . . . . . . . . . . . . . . . . . . . . . . . . 15
Chapter 2 About product deployment requirements . . . . . . . . . . . . . . . . . . . . . 17
Overview on product deployment requirements ... . . . . . . . . . . . . . . . . . . . . . . . . . . . . . . 17System requirements ... . . . . . . . . . . . . . . . . . . . . . . . . . . . . . . . . . . . . . . . . . . . . . . . . . . . . . . . . . . . . . . . . . 17System requirements to install bv-Control for UNIX on theWindows
computer ... . . . . . . . . . . . . . . . . . . . . . . . . . . . . . . . . . . . . . . . . . . . . . . . . . . . . . . . . . . . . . . . . . . . . . . . . . . . 18Hardware requirements to installUNIXagents of bv-Control forUNIX
.... . . . . . . . . . . . . . . . . . . . . . . . . . . . . . . . . . . . . . . . . . . . . . . . . . . . . . . . . . . . . . . . . . . . . . . . . . . . . . . . . . . . . . . . 18Software requirements to install UNIX agents of bv-Control for
UNIX .... . . . . . . . . . . . . . . . . . . . . . . . . . . . . . . . . . . . . . . . . . . . . . . . . . . . . . . . . . . . . . . . . . . . . . . . . . . . . . . . 19Upgrading bv-Control for UNIX and the UNIX agent ... . . . . . . . . . . . . . . . . . . . . . . . . 21Security best practices ... . . . . . . . . . . . . . . . . . . . . . . . . . . . . . . . . . . . . . . . . . . . . . . . . . . . . . . . . . . . . . . 22
Chapter 3 About installing and configuring bv-Control forUNIX . . . . . . . . . . . . . . . . . . . . . . . . . . . . . . . . . . . . . . . . . . . . . . . . . . . . . . . . . . . . . . . . . . . . . . . . . . . . . . . . . 25
About installing bv-Control for UNIX on Windows computers ... . . . . . . . . . . . 25About bv-Control for UNIX configuration .... . . . . . . . . . . . . . . . . . . . . . . . . . . . . . . . . . . . . . 25
Chapter 4 Installing the UNIX agent . . . . . . . . . . . . . . . . . . . . . . . . . . . . . . . . . . . . . . . . . . . . . . . . . . . 27
Installation options for the UNIX agent ... . . . . . . . . . . . . . . . . . . . . . . . . . . . . . . . . . . . . . . . . . 27Package dependencies to install the UNIX agent ... . . . . . . . . . . . . . . . . . . . . . . . . . . . . . 28
Contents

Installing the UNIX agent using install.sh on the targetcomputers ... . . . . . . . . . . . . . . . . . . . . . . . . . . . . . . . . . . . . . . . . . . . . . . . . . . . . . . . . . . . . . . . . . . . . . . . . . 33
Installing the UNIX agent manually on AIX target computers ... . . . . . . . . . . . 36Installing the UNIX agent manually on HP-UX target computers ... . . . . . . . 38Installing the UNIX agent manually on Sun Solaris target
computers ... . . . . . . . . . . . . . . . . . . . . . . . . . . . . . . . . . . . . . . . . . . . . . . . . . . . . . . . . . . . . . . . . . . . . . . . . . 40Installing the UNIX agent manually on SUSE Linux target
computers ... . . . . . . . . . . . . . . . . . . . . . . . . . . . . . . . . . . . . . . . . . . . . . . . . . . . . . . . . . . . . . . . . . . . . . . . . . 43Installing the UNIX agent manually on Red Hat Linux target
computers ... . . . . . . . . . . . . . . . . . . . . . . . . . . . . . . . . . . . . . . . . . . . . . . . . . . . . . . . . . . . . . . . . . . . . . . . . . 44Installing the UNIX agent using bv-Config UNIX .... . . . . . . . . . . . . . . . . . . . . . . . . . . . . 46
Chapter 5 Registering and configuring target computers asagent-based . . . . . . . . . . . . . . . . . . . . . . . . . . . . . . . . . . . . . . . . . . . . . . . . . . . . . . . . . . . . . . . . . . . . 53
About registeringUNIX target computerswith the InformationServer... . . . . . . . . . . . . . . . . . . . . . . . . . . . . . . . . . . . . . . . . . . . . . . . . . . . . . . . . . . . . . . . . . . . . . . . . . . . . . . . . . . . . . . . . 54
RegisteringUNIX target computerswith the InformationServerusingresource credentials ... . . . . . . . . . . . . . . . . . . . . . . . . . . . . . . . . . . . . . . . . . . . . . . . . . . . . . . . . . . . . 54
Registering UNIX target computers without providing resourcecredentials ... . . . . . . . . . . . . . . . . . . . . . . . . . . . . . . . . . . . . . . . . . . . . . . . . . . . . . . . . . . . . . . . . . . . . . . . . . 55
Running the setup.sh script ... . . . . . . . . . . . . . . . . . . . . . . . . . . . . . . . . . . . . . . . . . . . . . . . . . . . . . . . . 56Starting UNIX agent on a specified IP Address ... . . . . . . . . . . . . . . . . . . . . . . . . . . . . . . . . 56Notifying Information Servers about target IP address ... . . . . . . . . . . . . . . . . . . . . . 57Retrieving snap-ins that are installed on the Information Server ... . . . . . . . 58Configuring the Information Server to register specific IP address
using setup.sh script ... . . . . . . . . . . . . . . . . . . . . . . . . . . . . . . . . . . . . . . . . . . . . . . . . . . . . . . . . . . . . 58Configuring multiple IP addresses for multi-NIC target
computers ... . . . . . . . . . . . . . . . . . . . . . . . . . . . . . . . . . . . . . . . . . . . . . . . . . . . . . . . . . . . . . . . . . . . . . . . . . 60Configuring UNIX target computers in the agent-based registration
mode .... . . . . . . . . . . . . . . . . . . . . . . . . . . . . . . . . . . . . . . . . . . . . . . . . . . . . . . . . . . . . . . . . . . . . . . . . . . . . . . . 62Selecting protocols for UNIX target computers to communicate with
the Information Server ... . . . . . . . . . . . . . . . . . . . . . . . . . . . . . . . . . . . . . . . . . . . . . . . . . . . . . . . . 63Using native credentials or resource credentials for the target
computers that are registered as agent-based .... . . . . . . . . . . . . . . . . . . . . . . . . . . 65Using default query credentials for the target computers that are
registered as agent-based .... . . . . . . . . . . . . . . . . . . . . . . . . . . . . . . . . . . . . . . . . . . . . . . . . . . . . 66Unregistering a UNIX agent-based target computer from the
Information Server ... . . . . . . . . . . . . . . . . . . . . . . . . . . . . . . . . . . . . . . . . . . . . . . . . . . . . . . . . . . . . . . 67
Contents8
Chapter 6 Registering and configuring UNIX target computersas agentless . . . . . . . . . . . . . . . . . . . . . . . . . . . . . . . . . . . . . . . . . . . . . . . . . . . . . . . . . . . . . . . . . . . . 69
About configuring UNIX target computers as agentless ... . . . . . . . . . . . . . . . . . . . . 69Registeringandconfiguring the target computersusingConfiguration
Wizard .... . . . . . . . . . . . . . . . . . . . . . . . . . . . . . . . . . . . . . . . . . . . . . . . . . . . . . . . . . . . . . . . . . . . . . . . . . . . . . 70Adding native credentials for the target computers that are
registered as agentless ... . . . . . . . . . . . . . . . . . . . . . . . . . . . . . . . . . . . . . . . . . . . . . . . . . . . 73Adding credentials for Public Key Authentication support ... . . . . . . . . . 73Adding superuser credentials for the target computers that are
registered as agentless ... . . . . . . . . . . . . . . . . . . . . . . . . . . . . . . . . . . . . . . . . . . . . . . . . . . . 74Adding default query credentials for the target computers that
are registered as agentless ... . . . . . . . . . . . . . . . . . . . . . . . . . . . . . . . . . . . . . . . . . . . . . . 75Configuring target computers with default query credentials ... . . . . . . . . . . . . 75Switching registration modes of target computers ... . . . . . . . . . . . . . . . . . . . . . . . . . . 76About configuration of SSH connector settings ... . . . . . . . . . . . . . . . . . . . . . . . . . . . . . . . 78About Public Key Authentication .... . . . . . . . . . . . . . . . . . . . . . . . . . . . . . . . . . . . . . . . . . . . . . . . . 79
Chapter 7 Evaluating bv-Control for UNIX . . . . . . . . . . . . . . . . . . . . . . . . . . . . . . . . . . . . . . . . 81
About evaluation of bv-Control for UNIX .... . . . . . . . . . . . . . . . . . . . . . . . . . . . . . . . . . . . . . . 81Agentless Registration and Configuration .... . . . . . . . . . . . . . . . . . . . . . . . . . . . . . . . . . . . . . 82
Configuring agentless target computers by importing a .csvfile ... . . . . . . . . . . . . . . . . . . . . . . . . . . . . . . . . . . . . . . . . . . . . . . . . . . . . . . . . . . . . . . . . . . . . . . . . . . . . . 83
Switching target computers fromagent-based registrationmodeto agentless ... . . . . . . . . . . . . . . . . . . . . . . . . . . . . . . . . . . . . . . . . . . . . . . . . . . . . . . . . . . . . . . . . . . 85
Configuring a SUDO setting in the bvAgentlessConfig.ini file forquery execution .... . . . . . . . . . . . . . . . . . . . . . . . . . . . . . . . . . . . . . . . . . . . . . . . . . . . . . . . . . . . 88
Credential management ... . . . . . . . . . . . . . . . . . . . . . . . . . . . . . . . . . . . . . . . . . . . . . . . . . . . . . . . . . . . . . 89Credential management for agent-based UNIX target
computers ... . . . . . . . . . . . . . . . . . . . . . . . . . . . . . . . . . . . . . . . . . . . . . . . . . . . . . . . . . . . . . . . . . . . 89Executing queries on agentless targets using default su query
credentials ... . . . . . . . . . . . . . . . . . . . . . . . . . . . . . . . . . . . . . . . . . . . . . . . . . . . . . . . . . . . . . . . . . . . 90Executing queries on agentless target computers using native
credentials ... . . . . . . . . . . . . . . . . . . . . . . . . . . . . . . . . . . . . . . . . . . . . . . . . . . . . . . . . . . . . . . . . . . . 92Credential management for agentless UNIX target
computers ... . . . . . . . . . . . . . . . . . . . . . . . . . . . . . . . . . . . . . . . . . . . . . . . . . . . . . . . . . . . . . . . . . . . 96Executing queries for UNIX agents that are configured with
default query credentials ... . . . . . . . . . . . . . . . . . . . . . . . . . . . . . . . . . . . . . . . . . . . . . . . . 97Executing queries for UNIX agents that are configured with
resource credentials ... . . . . . . . . . . . . . . . . . . . . . . . . . . . . . . . . . . . . . . . . . . . . . . . . . . . . . . 97Executing queries for UNIX agents that are configured with
native credentials ... . . . . . . . . . . . . . . . . . . . . . . . . . . . . . . . . . . . . . . . . . . . . . . . . . . . . . . . . . . 98Security management ... . . . . . . . . . . . . . . . . . . . . . . . . . . . . . . . . . . . . . . . . . . . . . . . . . . . . . . . . . . . . . . . . 99
9Contents

About Kernel Parameters ... . . . . . . . . . . . . . . . . . . . . . . . . . . . . . . . . . . . . . . . . . . . . . . . . . . . . 100Reporting on SANS TOP 10 vulnerabilities for UNIX target
computers ... . . . . . . . . . . . . . . . . . . . . . . . . . . . . . . . . . . . . . . . . . . . . . . . . . . . . . . . . . . . . . . . . . . 100Configuration management ... . . . . . . . . . . . . . . . . . . . . . . . . . . . . . . . . . . . . . . . . . . . . . . . . . . . . . . . 101
Retrieving computer information .... . . . . . . . . . . . . . . . . . . . . . . . . . . . . . . . . . . . . . . . . 101Retrieving the list of packages that are installed on the
computers ... . . . . . . . . . . . . . . . . . . . . . . . . . . . . . . . . . . . . . . . . . . . . . . . . . . . . . . . . . . . . . . . . . . 101Retrieving user information .... . . . . . . . . . . . . . . . . . . . . . . . . . . . . . . . . . . . . . . . . . . . . . . . 102
Content and capacity management ... . . . . . . . . . . . . . . . . . . . . . . . . . . . . . . . . . . . . . . . . . . . . . 102Using disk space less than 50 percent of total allocation .... . . . . . . . . . . 102Using Composite File Descriptor’s Find options to search
data ... . . . . . . . . . . . . . . . . . . . . . . . . . . . . . . . . . . . . . . . . . . . . . . . . . . . . . . . . . . . . . . . . . . . . . . . . . . 103ActiveAdmin function in bv-Control for UNIX .... . . . . . . . . . . . . . . . . . . . . . . . . . . . . . 108
Summary .... . . . . . . . . . . . . . . . . . . . . . . . . . . . . . . . . . . . . . . . . . . . . . . . . . . . . . . . . . . . . . . . . . . . . . . . . 109
Chapter 8 Uninstalling the UNIX agent . . . . . . . . . . . . . . . . . . . . . . . . . . . . . . . . . . . . . . . . . . . . 111
About uninstalling bv-Control for UNIX from the Windowscomputer ... . . . . . . . . . . . . . . . . . . . . . . . . . . . . . . . . . . . . . . . . . . . . . . . . . . . . . . . . . . . . . . . . . . . . . . . . . 111
Uninstalling the UNIX agents from the target computers usingbv-Config UNIX utility ... . . . . . . . . . . . . . . . . . . . . . . . . . . . . . . . . . . . . . . . . . . . . . . . . . . . . . . . . 111
Manually uninstalling the UNIX agents from the targetcomputers ... . . . . . . . . . . . . . . . . . . . . . . . . . . . . . . . . . . . . . . . . . . . . . . . . . . . . . . . . . . . . . . . . . . . . . . . . 112Uninstalling from the Solaris target computers ... . . . . . . . . . . . . . . . . . . . . . . 112Uninstalling from the Red Hat and SUSE Linux target
computers ... . . . . . . . . . . . . . . . . . . . . . . . . . . . . . . . . . . . . . . . . . . . . . . . . . . . . . . . . . . . . . . . . . . 113Uninstalling from the HP-UX target computers ... . . . . . . . . . . . . . . . . . . . . . . . 114Uninstalling from the AIX target computers ... . . . . . . . . . . . . . . . . . . . . . . . . . . . 115
Index . . . . . . . . . . . . . . . . . . . . . . . . . . . . . . . . . . . . . . . . . . . . . . . . . . . . . . . . . . . . . . . . . . . . . . . . . . . . . . . . . . . . . . . . . . . . . . . . . . . . . . . . . . . . . . . . . . . 119
Contents10
About bv-Control for UNIX
This chapter includes the following topics:
■ Introduction to Symantec bv-Control for UNIX
■ About RMS Console and Information Server
■ bv-Control for UNIX features
■ bv-Control for UNIX architecture
■ About the agent-based architecture
■ About the agentless architecture
■ SSH communication with an agentless target computer
■ bv-Control for UNIX data source
■ About bv-Config UNIX
Introduction to Symantec bv-Control for UNIXbv-Control for UNIX v9.0 is a security and systems management tool for systemadministrators and security auditors. The tool’s implementation adopts thepowerful querying and reporting features ofRMSConsole and InformationServer.The RMS Console along with bv-Control for UNIX is a powerful tool designed tohelp you manage your server environment.
Formore information about the RMS Console and the Information Server see theRMS Console and Information Server Getting Started Guide.
bv-Control for UNIX contains various data sources that are used for reporting onthe computers of the UNIX environment. Queries are created using the fields ofthe data sources and are executed on the UNIX target computers. The retrieveddata is collected and displayed either as grid, chart, or report on the console. The
1Chapter
UNIX target computers can be configured either in the agent-based or in theagentless mode of registration.
About RMS Console and Information ServerThe RMS Console and Information Server installs as a snap-in to the MicrosoftManagement Console (MMC). The MMC is a host application, which provides acommon user interface that lets you navigate the RMS Console application. TheRMSConsole is the primaryuser interface for all bv-Control products and containsquery generation, baseline, task list, chart, report, and export features. Thebv-Control for UNIX product must be added to the RMS Console as a snap-in. Thesnap-in must also be registered with the Information Sever for successful queryexecution.
The RMS Console (client) is a host application with a user interface. Thiscomponent is used to configure bv-Control for UNIX and extend the console toinclude the UNIX systems in the network. The architecture lets you connectmultiple clients to a single Information Server. The snapped-in bv-Control forUNIX node in the RMS Console is also known as the Enterprise Browser. TheEnterprise Browser comprises the bv-Control for UNIX components and theconfigured UNIX target computers.
The Information Server collects, stores, and processes data that is retrieved fromthe UNIX target computers. The Information server also maintains the details ofthe UNIX target computers after the computers are registered.
bv-Control for UNIX featuresbv-Control for UNIX uses the following RMS Console features:
■ Query building and management
■ Base lining
■ Historical dataset management
■ Task lists building and management
■ Charting
■ Reporting
■ Exporting
■ ActiveAdmin (TheActiveAdmin function is supported only for theUNIX targetcomputers that are registered as agent-based)
About bv-Control for UNIXAbout RMS Console and Information Server
12
bv-Control for UNIX architectureThe bv-Control for UNIX architecture can be modeled either as agent-based or asagentless. The agent-based and the agentless architecture of bv-Control forUNIXare based on the client-server model. The agent-based architecture highlightsinstallation of an agent on the UNIX target computer for data collection. Theagentless architecture highlights on collecting data from the UNIX targetcomputers without the installation of an agent. For both the architecturemodels,the Information Server stores the data that is reported.
About the agent-based architectureIn the agent-based architecture model, an agent is installed on all UNIX targetcomputers. The agent is used to fetch and report data of the target computerwhenqueried. The UNIX agent must be registered with the Information Server andconfigured with credentials for successful query execution. Queries are executedbased on the user credentials, which are stored in the credential databases on theInformation Server.
TheUNIX agent is installed on theUNIX target computers using a script, namely,install.sh. A service, setup.sh, is used to register the UNIX target computers withthe Information Server. The UNIX registration service adds the target computerinformation to the database of the Information Server on executing the setup.sh.The UNIX agent retrieves data from the target computers on executing a query.When the UNIX agent is uninstalled from a target computer, the target computeris also unregistered from the Information Server.
About the agentless architectureIn the agentless architecture model, no agent is installed on the UNIX targetcomputers. Remote communication is establishedbetween the InformationServerand theUNIX target computers throughSSH. The target computers are registeredwith the Information Server through the Configuration Wizard. Queries areexecuted on the agentless target computers as per the credentials with which thetarget computers are configured. The target computers can be configured eitherwith the resource or the native credentials, which are stored in the credentialdatabase of the Information Server.
The agentless target computers that are configuredwith credentials canbequeriedusing the data sources.
13About bv-Control for UNIXbv-Control for UNIX architecture
SSH communication with an agentless targetcomputer
The agentless infrastructure uses SSH protocol to communicate with theInformation Server. The agentless architecture supports two versions of SSHprotocol, namely, SSHv1 and SSHv2. The infrastructure can use either of theprotocols for communication. The SSH communication timeout period isconfigured through a registry setting[HKEY_LOCAL_MACHINE\SOFTWARE\BindView\bv-Control for UNIX\SSHConnector]/ConnectionTimeout.
The default timeout period is 180,000 milliseconds and it can be configured toany value bymodifying the registry setting. The default SSHport for establishingcommunication is 22, which can also be configured through the sshd_config.conffile. The sshd_config.conf file is located in the /etc/ssh/ directory of the UNIXtarget computer.
bv-Control for UNIX data sourceData sources represent the categories of information within bv-Control for UNIXthat can be queried.
The data sources for bv-Control for UNIX are as follows:
■ Access Control Lists
■ Agent Configuration
■ Boot PROM Syslog
■ File Systems
■ Files
■ Groups
■ Internet Services (inetd)
■ Kernel Parameters
■ List of open files
■ Machines
■ NIS Maps
■ Open Ports
■ Packages
About bv-Control for UNIXSSH communication with an agentless target computer
14
■ Processes
■ User Configuration Policies
■ RPC Services
■ Syslog
■ Syslog Config
■ Targets
■ Users
About bv-Config UNIXbv-Config UNIX is a Windows-based utility that automates tasks. The tasks thatare used to deploy the bv-Control for UNIX agents on the target computers ofvarious operating systems is automated. The supported operating systems areIBM AIX, Red Hat Linux, SUSE Linux, and HP-UX. This utility makes use of amultithreaded architecture that performs multiple operations simultaneously.
You can use bv-Config UNIX to perform the following:
■ Communicate over a secured channel.
■ Transfer and install the bv-Control for UNIX agent on selected UNIX targetcomputers.
■ Register the UNIX target with the specified Information Server.
■ Delete the existing bv-Control for UNIX agent software from multiple UNIXtarget computers.
15About bv-Control for UNIXAbout bv-Config UNIX

About bv-Control for UNIXAbout bv-Config UNIX
16
About product deploymentrequirements
This chapter includes the following topics:
■ Overview on product deployment requirements
■ System requirements
■ System requirements to install bv-Control forUNIX on theWindows computer
■ Hardware requirements to install UNIX agents of bv-Control for UNIX
■ Software requirements to install UNIX agents of bv-Control for UNIX
■ Upgrading bv-Control for UNIX and the UNIX agent
■ Security best practices
Overview on product deployment requirementsBefore deploying bv-Control for UNIX, you must evaluate your environment andensure thatyourworkstationsmeet theminimumsystemrequirements for runningthe product. bv-Control for UNIX consists of components such as RMS Console,the Information Server, and the UNIX daemon. All the components need to beinstalled on the workstation for proper function of the product.
System requirementsYoumust ensure that yourworkstation is compliantwith the systemrequirementsfor installing and executing bv-Control for UNIX.
2Chapter

Note: You must have administrative rights for the computer you use.
Because bv-Control for UNIX is a snap-in to the RMSConsole, it inherits the samesystem requirements of the RMS Console and Information Server.
For general system requirements for the RMS Console and Information Server,see the Control Compliance Suite Installation Guide.
System requirements to install bv-Control for UNIXon the Windows computer
The bv-Control for UNIX snap-in is installed on the Windows computer on whichthe Information Server is installed. You must ensure that the minimum systemrequirements are provided for the snap-in installation.
The bv-Control for UNIX snap-in installation on the Windows computer has thefollowing system requirements:
■ MicrosoftWindows2000SP4 (server orworkstation),WindowsXPProfessionalSP1, or Windows Server 2003 or later
■ Microsoft Internet Explorer version 5.5 SP2 or later
■ 50 MB disk space
■ RMS Console and Information Server version 10.0
■ TCP/IP network
Hardware requirements to install UNIX agents ofbv-Control for UNIX
The bv-Control for UNIX agents are installed on the target computers of thesupported UNIX operating systems.
To install the UNIX agent the target computermustmeet the following hardwarerequirements:
■ Sun™ SPARCstation™ 1 or UltraSPARC® or Intel for Solaris™
■ HP9000 UNIX servers, HP Visualize® UNIX workstations (classes B, C and J),or or Intel Itanium for HP-UX
■ IBM RS/6000 UNIX workstations and servers
■ Intel or equivalent for Red Hat and SUSE Linux
About product deployment requirementsSystem requirements to install bv-Control for UNIX on the Windows computer
18

■ 100 MB disk space
■ TCP/IP network
Software requirements to install UNIX agents ofbv-Control for UNIX
The following operating systems are supported for UNIX agent installation onthe target computers that are registered as agent-based or agentless:
■ Sun SolarisThe following versions are supported on both SPARC and x86 architectures:
■ 5.8
■ 5.9
■ 5.10
The Sun Solaris 5.10 is also supported on the AMD Opteron architecture.
■ Red Hat Linux 8.0 and 9.0
■ Red Hat Linux Advanced Server (AS) 2.1, Red Hat Enterprise Linux AS/ES 3.0,4.0 andRedHatEnterprise Linux5.0, and5.0 of Intel ItaniumandAMDOpteronarchitectures
■ Hewlett-PackardHP-UXversions 11.00, 11.11(11iv1) of PA-RISCarchitecture,11.23(11iv2), 11.23 (11iv2) of Intel Itanium architecture, and 11.31 of bothPA-RISC and Intel Itanium architectures
■ IBM AIX 5.1, 5.2, 5.3, and 6.1
■ SUSE Linux 8.0, 8.1, 8.2, 9.0, 9.1, 9.2, and 9.3
■ SUSE Linux Enterprise Server (ES) versions 8.1, 9.0, 9.2, 9.3, 10.0, 10.0 of IntelItanium and AMD Opteron architectures, and 11.0
■ openSSH installed on every UNIX target computer that is registered in theagentless mode
Since, bv-Control for UNIX packages the x86 32-bit package for RHEL and SLESItanium platforms, the IA32 emulation layer is required to run the agent.
The following list of packages are required to run the UNIX agent on the RHELand SLES (Intel Itanium) computers:
■ bash-x86
■ coreutils-x86
■ cracklib-x86
19About product deployment requirementsSoftware requirements to install UNIX agents of bv-Control for UNIX
■ db-x86
■ glibc-x86
■ Ia32el
■ libgcc-x86
■ libxcrypt-x86
■ ncurses-x86
■ pam-modules-x86
■ pam-x86
■ readline-x86
■ libstdc++-x86
The Ia32el service that is required for query execution must be running on thetarget computers prior to installation of the UNIX agent.
The commands that are related to the implementation of the service are as follows:
[root@rhel5ita rpm]#
service ia32el status
Intel IA-32 Execution Layer in use
[root@rhel5ita rpm]#
The operating systems that are supported by the target computers of the agentlessregistration mode only are as follows:
The supported versions for the VMwareESX operating system are as follows:
■ Version 3.0
■ Version 3.5
■ Version 4.0
VMware ESX
The supported versions for Linux are asfollows:
■ Linux is supported on zSeries of IBMcomputers
■ Red Hat Linux Advanced Server (AS)2.1
■ SUSE Linux 8.0 and 8.1
■ SUSE Linux Enterprise Server (ES) 8.1and 11
Linux
About product deployment requirementsSoftware requirements to install UNIX agents of bv-Control for UNIX
20
Logical domains (LDOMS) on Sun Solarisoperating systems
Sun Solaris
The architecture that is supported by the operating systems, when configured inboth the agent-based and agentless registration modes is as follows:
The operating systems are as follows:
■ Red Hat Enterprise Linux 5.0
■ SUSE Linux Enterprise Server 10.0
■ Sun OS 5.10
AMD Opteron
Note:Make sure the operating systems of all the UNIX computers have the latestpatches installed. Consult yourUNIX vendor’s documentation for information onthe latest patches for your operating systems.
Upgrading bv-Control for UNIX and the UNIX agentYou can upgrade the bv-Control for UNIX from the supported previous releaseversions of the product .
You canupgrade to bv-Control forUNIX 10.0 from the following product versions:
■ bv-Control for UNIX 9.0.1
■ bv-Control for UNIX 8.60 with November 2009 HotFix(CCS_DataCollectors_8.60_November_2009_Update.exe)
If you have a previous version of the UNIX agent then you must upgrade to thelatest release version of bv-Control for UNIX.
The bv-Control for UNIX supports upgrade of the UNIX agent for the followingproduct release versions:
■ Upgrade the UNIX agent of bv-Control for UNIX 8.60To upgrade the UNIX agent of bv-Control for UNIX 8.60, apply the bv-ControlforUNIXupgradeRapidFire rf10000 andupgrade to bv-Control forUNIX10.0.
■ Upgrade the UNIX agent of bv-Control for UNIX 9.0To upgrade the UNIX agent of bv-Control for UNIX 9.0, apply the bv-Controlfor UNIX upgrade RapidFire rf10000 and upgrade to bv-Control for UNIXversion 10.0.
The RapidFire mechanism lets you apply the RapidFire Updates on the UNIXtarget computers in the following ways:
21About product deployment requirementsUpgrading bv-Control for UNIX and the UNIX agent
■ Apply the RapidFire Updates on all UNIX target computers at the enterpriselevel.
■ Apply the RapidFire Updates on the selected target computers only
To apply the RapidFire Updates on all the target computers in the enterprise
1 Before applying the RapidFire, ensure that there are no queries executing onthe target computers.
2 In the RMS console, select the appropriate server group that you want toupdate in the UNIX Enterprise Browser.
3 From the menu select Action > Update RapidFire.
4 In the SelectRapidFirePackage dialog box, select the upgradeRapidFire andapply.
To apply the RapidFire Updates on a selected target computer
1 Before applying the RapidFire, ensure that there are no queries executing onthe target computer.
2 In the RMS console, select theUNIX target computer that youwant to updatein the UNIX Enterprise Browser.
3 From the menu select Action > Update RapidFire.
4 In the SelectRapidFirePackage dialog box, select the upgradeRapidFire andapply.
Security best practicesAfter you install bv-Control forUNIX, you should follow the recommended securitybest practices to enhance the security of your production environment.
The features and recommendedbest practices for the current release of bv-Controlfor UNIX are as follows:
About product deployment requirementsSecurity best practices
22
The recommended best practices specific tothePublicKeyAuthentication feature are asfollows:
■ After you have imported a private key toadd credentials, bv-Control for UNIX nolonger requires the private key file. Toavoid misuse of the private keys, youshouldnot leave the key files behind afterthey are successfully imported. Youmayprefer to delete the key file.
■ You must not use the private key of oneInformation Server on any otherInformation Servers. A good practice isto use separate private and public keypairs for each Information Server.
■ Generate a single pair of private andpublic keys for authentication of thetarget computer by the InformationServer. Do not use this key pair for anyother applications.
Public Key Authentication
Use explicit target computer-specificcredentials for authentication of the targetcomputers. You are recommended that youdo not use the default query credentials toconfigure all the target computers. You cansafely use the default query credentials forthe Public Key Authentication mode.
The default query credentials
When you switch from the agent-basedregistrationmode to the agentlessmode, youare recommended that you stop thebvcontrolddaemon.Thedaemonrunson thetarget computer. You must ensure that thetarget computer is not registered with anyother Information Server before you stopthe daemon.
Switching the registration modes of thetarget computers
When you switch from the agentlessregistration mode to the agent-based mode,you should delete the private key from thecredential database. You can perform thisoperation through the Credential Manager.The bv-Control for UNIX snap-in uses theprivate key file to authenticate the agentlesstarget computer.
Switching the registration modes of thetarget computers
23About product deployment requirementsSecurity best practices

About product deployment requirementsSecurity best practices
24

About installing andconfiguring bv-Control forUNIX
This chapter includes the following topics:
■ About installing bv-Control for UNIX on Windows computers
■ About bv-Control for UNIX configuration
About installing bv-Control for UNIX on Windowscomputers
bv-Control for UNIX is a snap-in to the RMS Console and is shipped as part of theSymantec Control Compliance Suite. The snap-in requires RMS Console andInformation Server to function.
You must install the RMS Console and Information Server on your Windowscomputer.
For installation of the RMS Console and Information Server, see the ControlCompliance Suite Installation Guide.
About bv-Control for UNIX configurationWhen the bv-Control for UNIX snap-in is installed, you need to configure theproduct using theRMSConsole ConfigurationWizard. You can select theWindowsuser through theRMSConsole ConfigurationWizard and assign theActiveAdminprivileges for bv-Control for UNIX.
3Chapter
For informationonhowto configurebv-Control forUNIX through theRMSConsoleConfiguration Wizard, see the Control Compliance Suite Installation Guide.
When the snap-in is configured, you must also configure the UNIX targetcomputers that are registered with the Information Server for successful queryexecution.
The target computers can be registered with the Information Server in either ofthe following modes:
■ Agent-based
■ Agentless
In the agent-based registration mode, an agent is installed on the UNIX targetcomputer. In the agentless registration mode, no agent is required to be installedon the target computer. TheUNIX agent is installed on the target computers usingthe install.sh script or by using the manual commands.
See “Installation options for the UNIX agent” on page 27.
About installing and configuring bv-Control for UNIXAbout bv-Control for UNIX configuration
26
Installing the UNIX agent
This chapter includes the following topics:
■ Installation options for the UNIX agent
■ Package dependencies to install the UNIX agent
■ Installing the UNIX agent using install.sh on the target computers
■ Installing the UNIX agent manually on AIX target computers
■ Installing the UNIX agent manually on HP-UX target computers
■ Installing the UNIX agent manually on Sun Solaris target computers
■ Installing the UNIX agent manually on SUSE Linux target computers
■ Installing the UNIX agent manually on Red Hat Linux target computers
■ Installing the UNIX agent using bv-Config UNIX
Installation options for the UNIX agentThe UNIX agent must be installed on the UNIX target computers and registeredwith the Information Server for effective querying.
The UNIX agent can be installed on the target computer in any of the followingways:
■ Executing the command line optionsmanually for thedifferentUNIXoperatingsystems.
■ Executing the install.sh script that is located in the\CCS_DataCollection\Support_Installs\bv_Control_for_UNIXdirectory of themounted product disk.
■ Executing the bv-Config UNIX utility, remotely.
4Chapter
In the product installation product disk, the UNIX agent packages are located inthe respective operating system’s folder in the\CCS_DataCollection\Support_Installs\bv_Control_for_UNIXdirectory. Youneedto install the UNIX agent packages on the target computers for successful queryexecution.
After the agent is installed, you must register the UNIX target computers withthe Information Server.
See “Configuring UNIX target computers in the agent-based registration mode”on page 62.
Note: You must have root access privileges for the computer on which you wantto install the UNIX agent. Communication between the Windows computer andthe UNIX targets uses TCP port 1236. Review output from the command: netstat-a to verify that this port is not in use. If the NIS map is used, then check the /etc/services files or the services.byname file. The check ensures whether the portis currently assigned to a different program or not.
Package dependencies to install the UNIX agentBefore installing the UNIX agent, install the requisite packages of the respectiveoperating systems on the UNIX target computers.
The dependent packages and their corresponding libraries for the Red Hat (8.0)operating system are as follows:
libc.so.6
libm.so.6
libcrypt.so.1
libdl.so.2
libNoVersion.so.1
libnsl.so.1 libnss_dns.so.2
libnss_files.so.2
libnss_nisplus.so.2
libnss_nis.so.2
libresolv.so.2
libutil.so.1 ld-linux.so.2
glibc-2.2.93-5
ibgcc_s.so.1libgcc-3.2-7
Installing the UNIX agentPackage dependencies to install the UNIX agent
28

libstdc++-libc6.1-1.so.2libstdc++-3.2-7
libtermcap.so.2libtermcap-2.0.8-31
libpam.so.0pam-devel-0.75-40
pam-0.75-40
pam_krb5-1.56-1
pam_smb-1.1.6-5
The dependent packages and their corresponding libraries for the SUSE Linux(9.0) operating system are as follows:
ld-linux.so.2
libNoVersion.so.1
libcrypt.so.1
libdl.so.2
libc.so.6
libm.so.6
libnss_compat.so.2
libnss_dns.so.2
libnss_files.so.2
libnss_nis.so.2
libresolv.so.2
libutil.so.1
libnsl.so.1
glibc-2.3.2-88
ilibgcc_s.so.1libgcc-3.3.1.24
libstdc++-libc6.1-1.so.2compat-2003.5.12-56
libpam.so.0pam-0.77-124
The dependent packages and their corresponding libraries for the SUSE LinuxEnterprise Server (9.0) operating system are as follows:
29Installing the UNIX agentPackage dependencies to install the UNIX agent
ld-linux.so.2
libNoVersion.so.1
libcrypt.so.1
libdl.so.2
libc.so.6
libm.so.6
libnss_compat.so.2
libnss_dns.so.2
libnss_files.so.2
libnss_nis.so.2
libresolv.so.2
libutil.so.1
libnsl.so.1
glibc-2.3.3-98.28
ilibgcc_s.so.1libgcc-3.3.3-43.24
libstdc++-libc6.1-1.so.2compat-2004.7.1-1.2
libpam.so.0pam-0.77-221.1
The dependent packages and their corresponding libraries for the HP-UX (11.00)operating system are as follows:
libc.2
libdl.1
libelf.2
OS-Core.CORE-64SLIB
libc.1OS-Core.CORE-SHLIBS
libnsl.1NFS.NFS-64SLIB
PHNE_17101.NFS-64SLIB
PHNE_31096.NFS-64SLIB
libxti.2Streams.STREAMS-64SLIB
PHNE_22566.STREAMS-64SLIB
PHNE_27902.STREAMS-64SLIB
PHNE_18972.STREAMS-64SLIB
Installing the UNIX agentPackage dependencies to install the UNIX agent
30
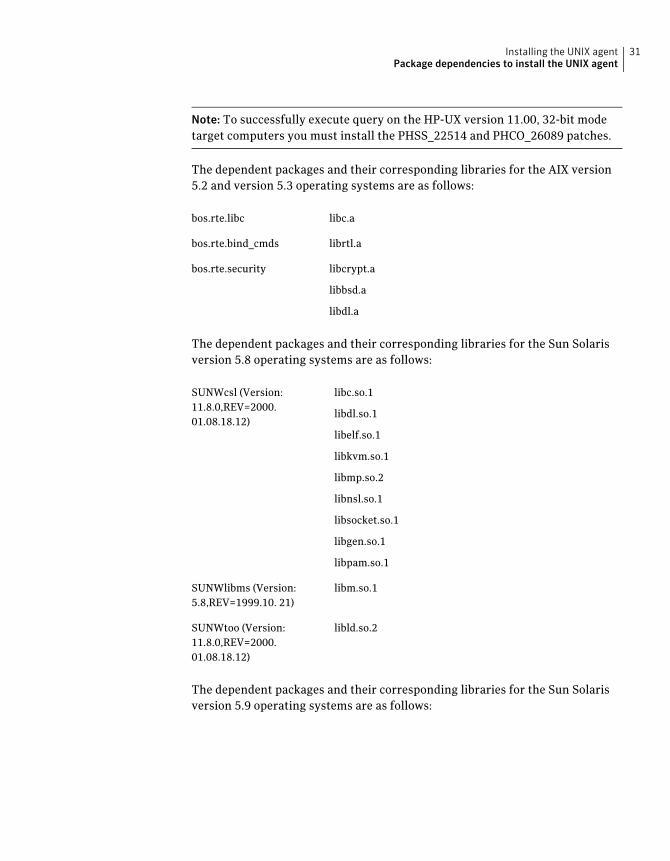
Note: To successfully execute query on the HP-UX version 11.00, 32-bit modetarget computers you must install the PHSS_22514 and PHCO_26089 patches.
The dependent packages and their corresponding libraries for the AIX version5.2 and version 5.3 operating systems are as follows:
libc.abos.rte.libc
librtl.abos.rte.bind_cmds
libcrypt.a
libbsd.a
libdl.a
bos.rte.security
The dependent packages and their corresponding libraries for the Sun Solarisversion 5.8 operating systems are as follows:
libc.so.1
libdl.so.1
libelf.so.1
libkvm.so.1
libmp.so.2
libnsl.so.1
libsocket.so.1
libgen.so.1
libpam.so.1
SUNWcsl (Version:11.8.0,REV=2000.01.08.18.12)
libm.so.1SUNWlibms (Version:5.8,REV=1999.10. 21)
libld.so.2SUNWtoo (Version:11.8.0,REV=2000.01.08.18.12)
The dependent packages and their corresponding libraries for the Sun Solarisversion 5.9 operating systems are as follows:
31Installing the UNIX agentPackage dependencies to install the UNIX agent
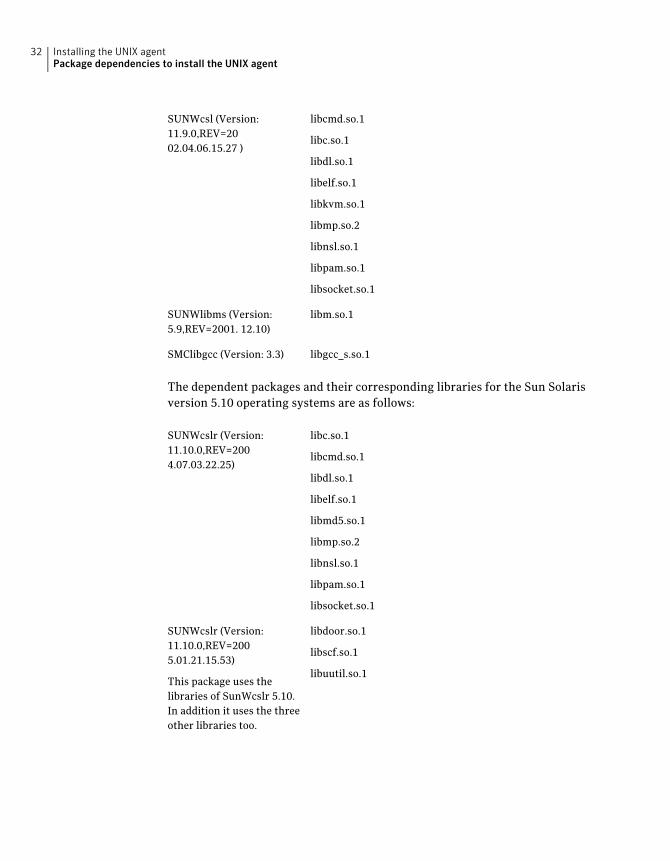
libcmd.so.1
libc.so.1
libdl.so.1
libelf.so.1
libkvm.so.1
libmp.so.2
libnsl.so.1
libpam.so.1
libsocket.so.1
SUNWcsl (Version:11.9.0,REV=2002.04.06.15.27 )
libm.so.1SUNWlibms (Version:5.9,REV=2001. 12.10)
libgcc_s.so.1SMClibgcc (Version: 3.3)
The dependent packages and their corresponding libraries for the Sun Solarisversion 5.10 operating systems are as follows:
libc.so.1
libcmd.so.1
libdl.so.1
libelf.so.1
libmd5.so.1
libmp.so.2
libnsl.so.1
libpam.so.1
libsocket.so.1
SUNWcslr (Version:11.10.0,REV=2004.07.03.22.25)
libdoor.so.1
libscf.so.1
libuutil.so.1
SUNWcslr (Version:11.10.0,REV=2005.01.21.15.53)
This package uses thelibraries of SunWcslr 5.10.In addition it uses the threeother libraries too.
Installing the UNIX agentPackage dependencies to install the UNIX agent
32
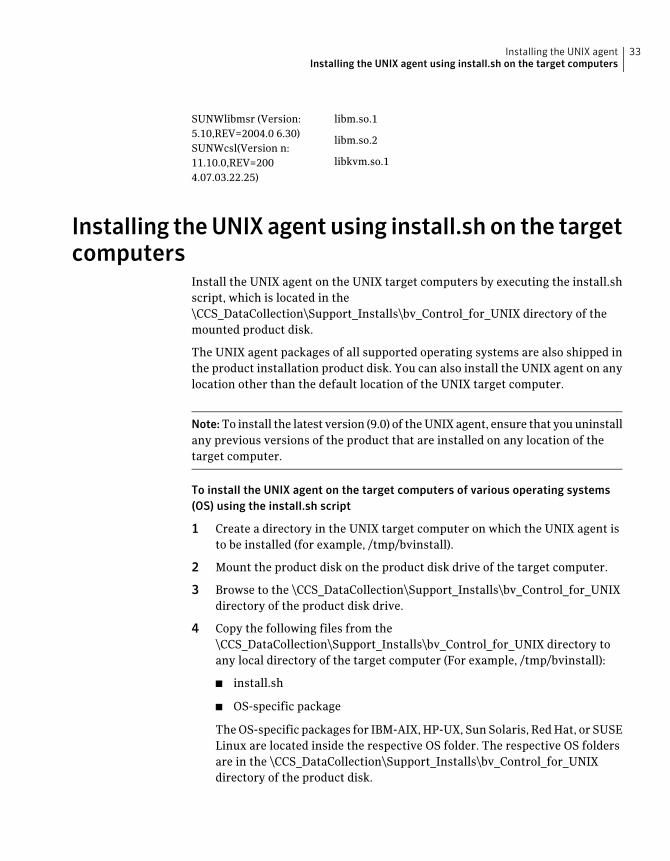
libm.so.1
libm.so.2
libkvm.so.1
SUNWlibmsr (Version:5.10,REV=2004.0 6.30)SUNWcsl(Version n:11.10.0,REV=2004.07.03.22.25)
Installing theUNIX agent using install.sh on the targetcomputers
Install the UNIX agent on the UNIX target computers by executing the install.shscript, which is located in the\CCS_DataCollection\Support_Installs\bv_Control_for_UNIX directory of themounted product disk.
The UNIX agent packages of all supported operating systems are also shipped inthe product installation product disk. You can also install the UNIX agent on anylocation other than the default location of the UNIX target computer.
Note:To install the latest version (9.0) of theUNIX agent, ensure that youuninstallany previous versions of the product that are installed on any location of thetarget computer.
To install the UNIX agent on the target computers of various operating systems(OS) using the install.sh script
1 Create a directory in the UNIX target computer on which the UNIX agent isto be installed (for example, /tmp/bvinstall).
2 Mount the product disk on the product disk drive of the target computer.
3 Browse to the \CCS_DataCollection\Support_Installs\bv_Control_for_UNIXdirectory of the product disk drive.
4 Copy the following files from the\CCS_DataCollection\Support_Installs\bv_Control_for_UNIX directory toany local directory of the target computer (For example, /tmp/bvinstall):
■ install.sh
■ OS-specific package
TheOS-specific packages for IBM-AIX, HP-UX, Sun Solaris, RedHat, or SUSELinux are located inside the respective OS folder. The respective OS foldersare in the \CCS_DataCollection\Support_Installs\bv_Control_for_UNIXdirectory of the product disk.
33Installing the UNIX agentInstalling the UNIX agent using install.sh on the target computers

The different operating systems and their corresponding UNIX agent buildpackages are the following:
bv-Control.<package version>.<build number>AIX
bv-Control.<package version>.<build number>.tgzHP-UX
bvControl-<package version>-<buildnumber>.i386.rpm
Red Hat
bvControl-<package version>-<buildnumber>.i386.rpm
SUSE
bv-Control.<package version>.<build number>Sun Solaris
5 Navigate to the created directory in the target computer (i.e., /tmp/bvinstall).
6 Type the following command in the command prompt to provide executionpermission for the install.sh:
chmod ug+x install.sh
7 Run install.sh with the following command to install the UNIX agent on thetarget computers:
./install.sh -i -u<User Name> -g <Group Name> [ -m <location of
the package> ] [ -l <Custom Logs Directory> ] <package name>
8 Press Enter.
The command line arguments that can be specified for the install.sh and theircorresponding descriptions are as follows:
Install the UNIX agent. This argument is mandatory forproduct installation.Youmust specify anon-rootuser accountto install theUNIX agent. Similarly, a group for the usermustalso be specified.
-i
User account in whose context the UNIX agent is to beinstalled. You must ensure that the user specified alreadyexists in the computer. This argument is mandatory forproduct installation.
-u <User Name>
Installing the UNIX agentInstalling the UNIX agent using install.sh on the target computers
34
Group inwhose context theUNIX agent is to be installed. Youmust ensure that the group specified already exists in thecomputer.
This argument is mandatory for product installation. Youmust specify the user (-u) and the group (-g) together duringinstallation of theUNIX agent. Also, ensure that the specifieduser belongs to the specified group during installation.
-g <Group Name>
Specify a location for the package other than the defaultlocation (i.e./usr/local). This argument is not mandatory forproduct installation.
The -m option can be used only when you want to install theUNIXagent on a location other than the default location. Thedefault location for the agent installation is ./usr/local or/opt/. For such installations, youmust ensure that youprovidethe appropriate permission (not less than 755) for thespecified directory. After installation, the created directoryis /<custom_directory>/BindView/ bvcontrol/.
-m <location of thepackage>
Specify the directory path where the installation andfunctional logs are to be createdwhile executing the product.For example, /tmp/bvinstall/logswhere youmust ensure thattmp/bvinstall (parent directory) exists under which thedirectory logs is created. This argument is notmandatory forproduct installation.
-l <custom logsdirectory>
Specify the name of the package to be installed for the OS.The package name comprises the product name, the buildnumber, and is located in the specific OS folder (i.e.,InstallSet/bv-Control_for_UNIX/<OS> directory). Forexample, bv-Control.9.0.<build number> for AIX.
An appropriate message is displayed after the successfulinstallation of the UNIX agent package on the respective OStarget computer.
<package name>
For AIX and Red Hat target computers, the UNIX agent is installed in the/usr/local/BindView/bvcontrol/ directory. For HP-UX, SunOS, and SUSEtarget computers the agent is installed in the /opt/BindView/bvcontrol/directory.
35Installing the UNIX agentInstalling the UNIX agent using install.sh on the target computers
Installing the UNIX agent manually on AIX targetcomputers
We recommend that you install the UNIX agent using install.sh, but you can alsoinstall it manually on the target computer. You must save the agent installationpackage on the local drive for the manual installation.
You can install the UNIX agent on the IBM AIX target computer manually byextracting thebv-Control.<packageversion>.<buildnumber> file fromtheproductdisk on the target computer.
Warning: Ensure that the UNIX agent is installed for the root user and the queriesare executed in the root context. The agentmust not be installed for any non-rootuser.
To install the UNIX package on the IBM AIX target computer from a local drive
1 Create a directory on the AIX target computer.
Example: /tmp/bvinstall
2 Copy the AIX package (i.e. bv-Control.<package version>.<build number>file) from the OS-specific folder that is located in the\CCS_DataCollection\Support_Installs\bv_Control_for_UNIXdirectory of theproduct disk drive.
The build number consists of the last three digits of the file name.
3 Change to the newly created directory.
4 Type the following command to install the package on the AIX targetcomputer:
installp -acNQqwX -d bv-Control.<package version>.<build number>
bvControl.rte
5 Press Enter.
To install the UNIX package on the IBM AIX target computer from the product disk
1 Type the following commands to mount the product disk and press Enter:
mount -v cdrfs -r /dev/cd0 /mnt
2 Type the following command to install the package and press Enter:
installp -acNQqwX -d /mnt/bv-Control_for_Unix/AIX/bv-
Control.9.0.<build Number> bvControl.rte
3 Type the following command to unmount the product disk and press Enter:
Installing the UNIX agentInstalling the UNIX agent manually on AIX target computers
36
umount /mnt
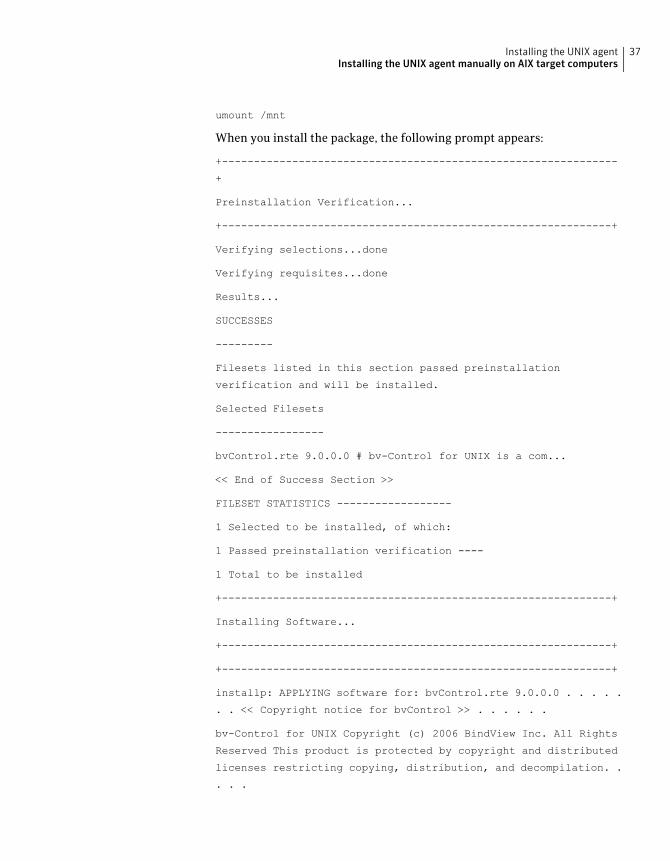
When you install the package, the following prompt appears:
+--------------------------------------------------------------
+
Preinstallation Verification...
+-------------------------------------------------------------+
Verifying selections...done
Verifying requisites...done
Results...
SUCCESSES
---------
Filesets listed in this section passed preinstallation
verification and will be installed.
Selected Filesets
-----------------
bvControl.rte 9.0.0.0 # bv-Control for UNIX is a com...
<< End of Success Section >>
FILESET STATISTICS ------------------
1 Selected to be installed, of which:
1 Passed preinstallation verification ----
1 Total to be installed
+-------------------------------------------------------------+
Installing Software...
+-------------------------------------------------------------+
+-------------------------------------------------------------+
installp: APPLYING software for: bvControl.rte 9.0.0.0 . . . . .
. . << Copyright notice for bvControl >> . . . . . .
bv-Control for UNIX Copyright (c) 2006 BindView Inc. All Rights
Reserved This product is protected by copyright and distributed
licenses restricting copying, distribution, and decompilation. .
. . .
37Installing the UNIX agentInstalling the UNIX agent manually on AIX target computers
<< End of copyright notice for bv-Control >>.
Setting up bv-Control for UNIX to run daemon
##################################################
The bv-Control for UNIX agent is currently configured to run in
standalone daemon mode. The other supported modes are inetd and
xinetd. Run /usr/local/BindView/bvcontrol/configure.sh -m
inetd|xinetd|standalone to change the execution mode. In order
to register the agent against bv-IS server run
/usr/local/BindView/bvcontrol/setup.sh
##################################################
+-----------------------------------------------------------+
Summaries
: +-----------------------------------------------------------+
Installation Summary
--------------------
Name Level Part Event Result
+-----------------------------------------------------------+
bvControl.rte 9.0.0.0 USR APPLY SUCCESS#
You have installed the UNIX package on your UNIX target computer. Youmust now run the setup shell to register theUNIX targetwith the InformationServer.
See “Running the setup.sh script” on page 56.
Installing the UNIX agent manually on HP-UX targetcomputers
We recommend that you install the UNIX agent using install.sh, but you can alsoinstall it manually on the target computer. You must save the agent installationpackage on the local drive for the manual installation.
You can install the UNIX agent on the IBM AIX target computer manually byextracting thebv-Control.<packageversion>.<buildnumber> file fromtheproductdisk on the target computer.
To install the UNIX package on the HP-UX target computer from a local drive
1 Create a directory on the HP-UX target computer.
Installing the UNIX agentInstalling the UNIX agent manually on HP-UX target computers
38
Example: /tmp/bvinstall
2 Copy theHP-UX package (i.e. bv-Control.<package version>.<build number>file) from the OS-specific folder that is located in the\CCS_DataCollection\Support_Installs\bv_Control_for_UNIXdirectory of theproduct disk drive.
The build number consists of the last three digits of the file name.
3 Change directory to the newly created directory to uncompress and untarthe bvControl.tgz file on the HP-UX computer:
cd /tmp/bvinstall
gzip -d bv-Control.<package version>.<build number>.tgz
tar xf bv-Control.<package version>.<build number>.tar
4 Type the following command to install the package:
swinstall -s /tmp/bvinstall bvControl
5 Press Enter.
To install the UNIX package on the HP-UX target computer from the product disk
1 Type the following commands to mount the product disk:
pfs_mountd & and press Enter.
pfsd & and press Enter.
pfs_mount [cd-rom device] /mnt and press Enter.
2 Type the following command to install the package and press Enter:
swinstall -s /mnt/bv-Control_for_Unix/HP-UX bvControl
3 Type the following command to unmount the product disk and press Enter:
pfs_umount /mnt
after you install the package, the following prompt appears:
swinstall -s /mnt/bv-Control_for_Unix/HP-UX bvControl =======
04/03/04 17:12:06
GMT BEGIN swinstall SESSION (non-interactive) (jobid=hp-pune-0665)
* Session started for user "root@hp-pune". * Beginning Selection
* Target connection succeeded for <machine name>:/.
* <machine name>:/mnt/bv-Control_for_Unix/HP-UX: Cannot open the
logfile on this target or source.
39Installing the UNIX agentInstalling the UNIX agent manually on HP-UX target computers

Possibly the media is readonly or there is a permission problem.
Check the daemon logfile and "/var/tmp/swagent.log" on this host
for more information.
* Source:/mnt/bv-Control_for_Unix/HP-UX
* Targets: <machine name>:/
* Software selections:
bvControl.bvControl,r=9.0,a=S700/S800_HPUX_10/11,v=Symantec
* Selection succeeded. * Beginning Analysis and Execution
* Session selections have been saved in the file
"/home/.sw/sessions/swinstall.last".
* The analysis phase succeeded for "<machine name>:/".
* The execution phase succeeded for "<machine name>:/".
* Analysis and Execution succeeded.
*More information can be found in the agent logfile using the
command "swjob -a log <machine name>-0665 @ <machine name>:/".
=== 04/03/04 17:12:35 GMT END reinstall SESSION (noninteractive)
(jobid=<machine name>-0665)
You have installed the UNIX package on your UNIX target computer. Youmust now run the setup shell to register theUNIX targetwith the InformationServer.
See “Running the setup.sh script” on page 56.
Installing the UNIX agent manually on Sun Solaristarget computers
We recommend that you install the UNIX agent using install.sh, but you can alsoinstall it manually on the target computer. You must save the agent installationpackage on the local drive for the manual installation.
You can install the UNIX agent on theSun Solaris target computer manually byextracting thebv-Control.<packageversion>.<buildnumber> file fromtheproductdisk on the target computer. You can also install the UNIX package on a SunSolaris target computer in a directory other than the /opt directory too.
To install the UNIX package on the Sun Solaris computer from a local drive
1 Create a directory on the Sun Solaris target computer.
Installing the UNIX agentInstalling the UNIX agent manually on Sun Solaris target computers
40

Example: /tmp/bvinstall
2 Copy the Sun Solaris package from the OS-specific folder that is located inthe \CCS_DataCollection\Support_Installs\bv_Control_for_UNIX directoryof the product disk drive.
The build number consists of the last three digits of the file name.
3 Change to the newly created directory :
4 Type the following command to install the package:
pkgadd -d bv-Control.<package version>.<build number>
5 Press Enter.
6 At the command line, type 1 and press Enter.
The following prompts appear:
Processing package instance <bvControl> from
/tmp/bvinstall/bv-Control.9.0.build number>
bv-Control for UNIX (sparc) <package version>
Copyright (c) 2006 BindView Inc. All Rights Reserved This product
is protected by copyright and distributed under licenses
restricting copying, distribution, and decompilation. Using </opt>
as the package base directory. ## Processing package information.
## Processing system information.
## Verifying disk space requirements. ## Checking for conflicts
with packages already installed. ## Checking for setuid/setgid
programs. This package contains scripts which will be executed
with superuser permission during the process of installing this
package. Do you want to continue with the installation of
<bvControl> [y,n,?]
7 At the command line, type y.
Installing bv-Control for UNIX as <bvControl>
A series of prompts appears, ending with the following:
The bv-Control for UNIX agent is currently configured to run in standalonedaemon mode. The other supported modes are inetd and xinetd. Run/usr/local/BindView/bvcontrol/configure.sh -m inetd|xinetd|standalone tochange the executionmode. In order to register the agent against bv-IS serverrun /usr/local/BindView/bvcontrol/setup.sh.
41Installing the UNIX agentInstalling the UNIX agent manually on Sun Solaris target computers
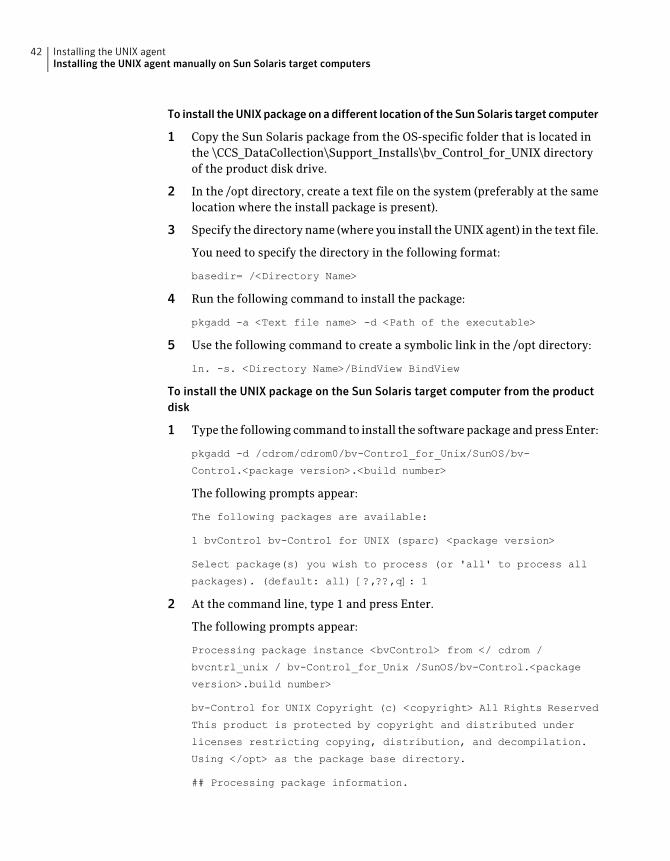
To install theUNIXpackageonadifferent location of theSunSolaris target computer
1 Copy the Sun Solaris package from the OS-specific folder that is located inthe \CCS_DataCollection\Support_Installs\bv_Control_for_UNIX directoryof the product disk drive.
2 In the /opt directory, create a text file on the system (preferably at the samelocation where the install package is present).
3 Specify the directory name (where you install theUNIX agent) in the text file.
You need to specify the directory in the following format:
basedir= /<Directory Name>
4 Run the following command to install the package:
pkgadd -a <Text file name> -d <Path of the executable>
5 Use the following command to create a symbolic link in the /opt directory:
ln. -s. <Directory Name>/BindView BindView
To install the UNIX package on the Sun Solaris target computer from the productdisk
1 Type the following command to install the software package andpress Enter:
pkgadd -d /cdrom/cdrom0/bv-Control_for_Unix/SunOS/bv-
Control.<package version>.<build number>
The following prompts appear:
The following packages are available:
1 bvControl bv-Control for UNIX (sparc) <package version>
Select package(s) you wish to process (or 'all' to process all
packages). (default: all) [?,??,q]: 1
2 At the command line, type 1 and press Enter.
The following prompts appear:
Processing package instance <bvControl> from </ cdrom /
bvcntrl_unix / bv-Control_for_Unix /SunOS/bv-Control.<package
version>.build number>
bv-Control for UNIX Copyright (c) <copyright> All Rights Reserved
This product is protected by copyright and distributed under
licenses restricting copying, distribution, and decompilation.
Using </opt> as the package base directory.
## Processing package information.
Installing the UNIX agentInstalling the UNIX agent manually on Sun Solaris target computers
42
## Processing system information.
## Verifying disk space requirements.
## Checking for conflicts with packages already installed.
## Checking for setuid/setgid programs. This package contains
scripts which will be executed with superuser permission during
the process of installing this package. Do you want to continue
with the installation of <bvControl> [y,n,?]
3 In the command line, type y.
Installing bv-Control for UNIX as <bvControl>
A series of prompts appears, ending with:
The bv-Control for UNIX agent is currently configured to run in standalonedaemon mode. The other supported modes are inetd and xinetd. Run/usr/local/BindView/bvcontrol/configure.sh -m <inetd|xinetd|standalone>to change the execution mode. In order to register the agent against bv-ISserver run /usr/local/BindView/bvcontrol/setup.sh.
See “Running the setup.sh script” on page 56.
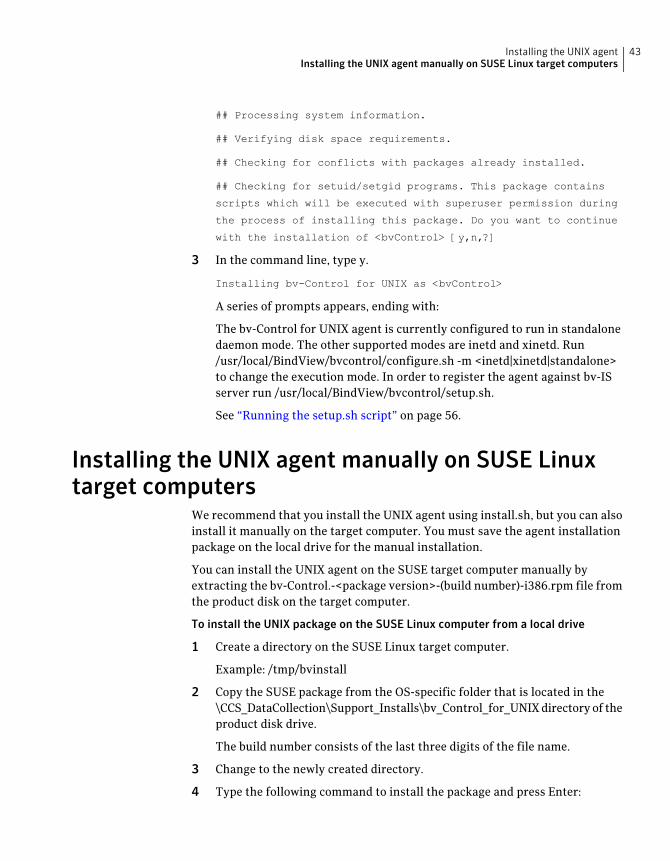
Installing the UNIX agent manually on SUSE Linuxtarget computers
We recommend that you install the UNIX agent using install.sh, but you can alsoinstall it manually on the target computer. You must save the agent installationpackage on the local drive for the manual installation.
You can install the UNIX agent on the SUSE target computer manually byextracting the bv-Control.-<package version>-(build number)-i386.rpm file fromthe product disk on the target computer.
To install the UNIX package on the SUSE Linux computer from a local drive
1 Create a directory on the SUSE Linux target computer.
Example: /tmp/bvinstall
2 Copy the SUSE package from the OS-specific folder that is located in the\CCS_DataCollection\Support_Installs\bv_Control_for_UNIXdirectory of theproduct disk drive.
The build number consists of the last three digits of the file name.
3 Change to the newly created directory.
4 Type the following command to install the package and press Enter:
43Installing the UNIX agentInstalling the UNIX agent manually on SUSE Linux target computers
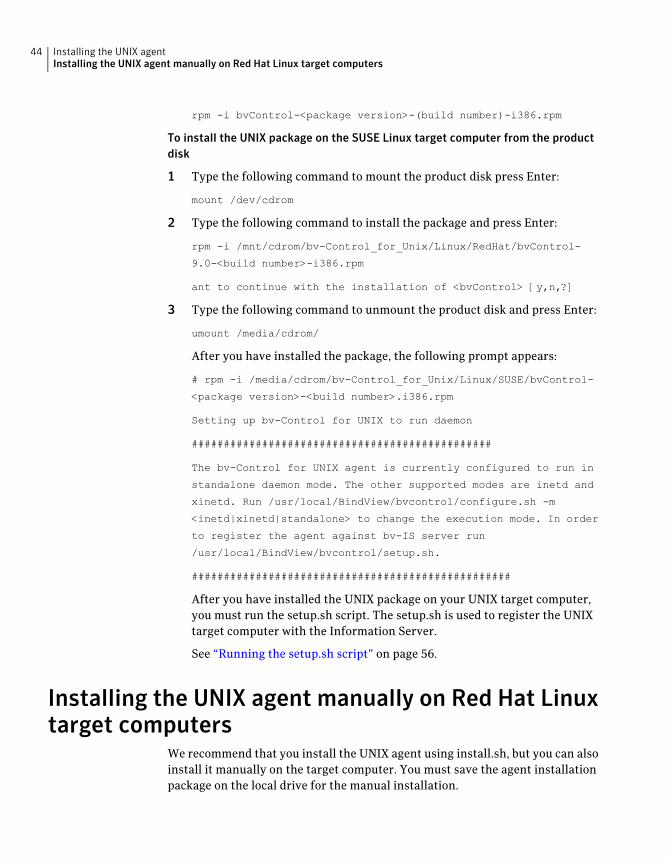
rpm -i bvControl-<package version>-(build number)-i386.rpm
To install the UNIX package on the SUSE Linux target computer from the productdisk
1 Type the following command to mount the product disk press Enter:
mount /dev/cdrom
2 Type the following command to install the package and press Enter:
rpm -i /mnt/cdrom/bv-Control_for_Unix/Linux/RedHat/bvControl-
9.0-<build number>-i386.rpm
ant to continue with the installation of <bvControl> [y,n,?]
3 Type the following command to unmount the product disk and press Enter:
umount /media/cdrom/
After you have installed the package, the following prompt appears:
# rpm -i /media/cdrom/bv-Control_for_Unix/Linux/SUSE/bvControl-
<package version>-<build number>.i386.rpm
Setting up bv-Control for UNIX to run daemon
###############################################
The bv-Control for UNIX agent is currently configured to run in
standalone daemon mode. The other supported modes are inetd and
xinetd. Run /usr/local/BindView/bvcontrol/configure.sh -m
<inetd|xinetd|standalone> to change the execution mode. In order
to register the agent against bv-IS server run
/usr/local/BindView/bvcontrol/setup.sh.
##################################################
After you have installed the UNIX package on your UNIX target computer,you must run the setup.sh script. The setup.sh is used to register the UNIXtarget computer with the Information Server.
See “Running the setup.sh script” on page 56.
Installing the UNIX agent manually on Red Hat Linuxtarget computers
We recommend that you install the UNIX agent using install.sh, but you can alsoinstall it manually on the target computer. You must save the agent installationpackage on the local drive for the manual installation.
Installing the UNIX agentInstalling the UNIX agent manually on Red Hat Linux target computers
44
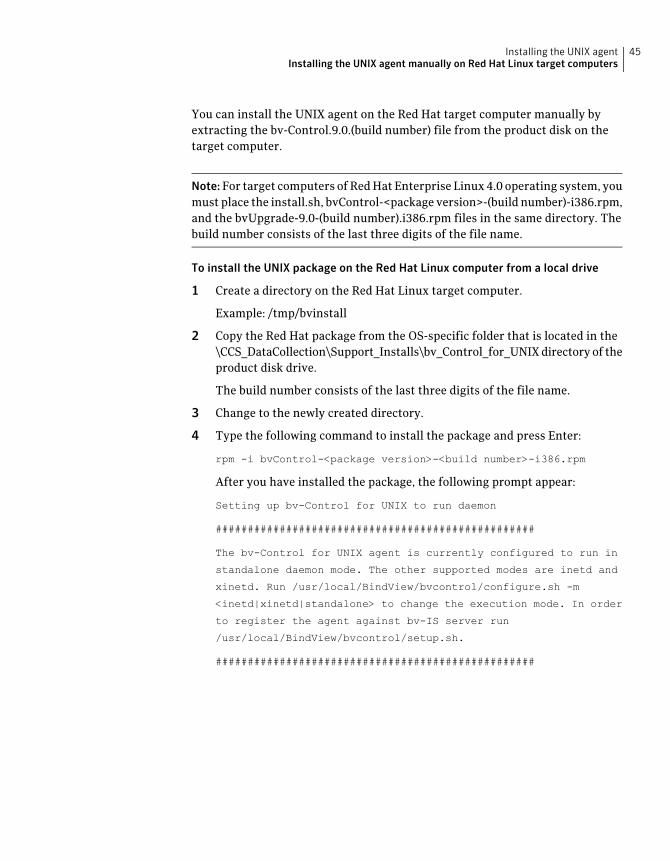
You can install the UNIX agent on the Red Hat target computer manually byextracting the bv-Control.9.0.(build number) file from the product disk on thetarget computer.
Note: For target computers of RedHat Enterprise Linux 4.0 operating system, youmust place the install.sh, bvControl-<package version>-(build number)-i386.rpm,and the bvUpgrade-9.0-(build number).i386.rpm files in the same directory. Thebuild number consists of the last three digits of the file name.
To install the UNIX package on the Red Hat Linux computer from a local drive
1 Create a directory on the Red Hat Linux target computer.
Example: /tmp/bvinstall
2 Copy the Red Hat package from the OS-specific folder that is located in the\CCS_DataCollection\Support_Installs\bv_Control_for_UNIXdirectory of theproduct disk drive.
The build number consists of the last three digits of the file name.
3 Change to the newly created directory.
4 Type the following command to install the package and press Enter:
rpm -i bvControl-<package version>-<build number>-i386.rpm
After you have installed the package, the following prompt appear:
Setting up bv-Control for UNIX to run daemon
##################################################
The bv-Control for UNIX agent is currently configured to run in
standalone daemon mode. The other supported modes are inetd and
xinetd. Run /usr/local/BindView/bvcontrol/configure.sh -m
<inetd|xinetd|standalone> to change the execution mode. In order
to register the agent against bv-IS server run
/usr/local/BindView/bvcontrol/setup.sh.
##################################################
45Installing the UNIX agentInstalling the UNIX agent manually on Red Hat Linux target computers
To install the UNIX package on the RedHat Linux target computer from the productdisk
1 Type the following command to mount the product disk and press Enter:
mount /dev/cdrom
2 Type the following command to install the package and press Enter:
rpm -i /mnt/cdrom/bv-Control_for_Unix/Linux/RedHat/bvControl-
<package version>-<build number>-i386.rpm
3 Type the following command to unmount the product disk and press Enter:
umount /mnt/cdrom
After you have installed the UNIX package on your UNIX target computer,you must run the setup.sh script. The setup.sh is used to register the UNIXtarget computer with the Information Server.
See “Running the setup.sh script” on page 56.
Installing the UNIX agent using bv-Config UNIXThe bv-Config UNIX utility lets you configure the establishing of communicationbetween the Information Server and the UNIX target computers. The utility alsolets you automate the installation of theUNIX agent onmultiple target computers.
You can configure parameters for setting the communication channel betweenthe Information Server and the UNIX target computer.
Communication with the UNIX target computers are performed through thethird-party applications such as PLINK.exe, and pscp.exe. The utilities are usedto login to theUNIX target computers andperformtasks. The tasks to beperformedare to install the application on the target computer, and to register the targetcomputer with the Information Server.
A character-separated value (CSV) delimited file format is used to store the datathat is required for executing various tasks on the UNIX target computers. Youcan export or import the list of configuration parameters fromaCSV file. Sensitiveinformation such as passwords are encrypted when you enter a pass phrase.
You can install theUNIXagent packages on the target computers from theproductdisk. The agent installation packages specific to each operating system (OS) arelocated in the respective OS folders. You can find the OS folders in the\CCS_DataCollection\Support_Installs\bv_Control_for_UNIX directory of themountedproduct disk.All theUNIX target computersmusthaveopenSSH installedand running on the target computer.
The following procedures detail about the function of the bv-Config UNIX utility:
Installing the UNIX agentInstalling the UNIX agent using bv-Config UNIX
46

■ To access bv-Config UNIX utility
■ To install theUNIX agent on the target computers using bv-ConfigUNIXutility
■ To add computer information for the UNIX target computers
■ To configure through the Configuration Parameters panel of the bv-Configutility
To access bv-Config UNIX utility
1 Launch the RMS Console.
2 Click the bv-Control for UNIX icon on the RMS Console tree.
3 Double-click the bvConfig UNIX icon on the Details pane of the console.
4 In the invoked bv-Config UNIX utility console, you can find the console treeon the left side of the pane.
The columnar list view of the Configuration and the Project Files are on theright pane
To install the UNIX agent on the target computers using bv-Config UNIX utility
1 Launch the bv-Config UNIX utility.
2 On the bv-Config UNIX console, double-click the Configuration node on theleft side tree view. The agent’s install set details, such as release majornumber, build number, SSH port number, timeout period, are on the rightlower pane.
47Installing the UNIX agentInstalling the UNIX agent using bv-Config UNIX

3 Double-click the Agent Install Set Configuration node on the right pane.
4 In the Agent Install Set Configuration dialog box, enter values for the givenfields and click OK.
The fields in the Agent Install Set Configuration dialog box and theirdescriptions are as follows:
The location where the CSV files are stored.Default Project Location(Project Information)
bv-Config UNIX copies or transfers the appropriateinstallation files that are based on the operatingsystem of the target computer.
The Package Location parameter value is the folderthat contains the UNIX agent installation files fordifferent flavors of the UNIX operating system.
Package Location (AgentPackage Location)
Specify the major number of the agent versioningpackage that is to be installed on the UNIX targetcomputer. For example, if bvControl-9.0-201.i386.rpmis the.rpm package for Red Hat UNIX target, then themajor number is 8.
Major Number (AgentVersion)
Specify the minor number of the agent versioningpackage to be installed on the UNIX target computer.
For example, if bvControl-9.0-201.i386.rpm is the .rpmpackage for Red Hat UNIX target, then the minornumber is 10.
Minor Number (AgentVersion)
Specify the version or build number of the installingpackage on the UNIX target computer.
For example, if bvControl-9.0-201.i386.rpm is the .rpmpackage for the Red Hat UNIX target, then the buildnumber is 201.
Build Number (AgentVersion)
bv-Config UNIX terminates the operation if the targetcomputer does not respond in this specified timeinterval. Timeout is specified in seconds.
Timeout (Project ExecutionOptions)
The number of threads that are active simultaneously.Value of this parameter should be between 1 and 5.
Thread Count (ProjectExecution Options)
Port that is used for Secure Shell communicationduring any operation.
SSH Port
All values that are entered through theAgent Install Set Configuration dialogbox are stored in a file.
Installing the UNIX agentInstalling the UNIX agent using bv-Config UNIX
48
To add computer information for the UNIX target computers
1 In bv-Config UNIX, to create a new project file (.csv), click File > New.
You can find a new file that is enumerated under the Project Files node in thebv-Config UNIX console.
2 Select the wanted .csv file under the Project Files node and click Machine >Add Machine.
3 In the launched Task Creation Wizard, click Next.
4 In the Specify UNIX Target Name or IP Address panel of the wizard, enterthe computer name or IP address in the respectiveUNIX field, and clickNext.
You can also enter multiple target computer names or IP addresses in thefield separating them by comma.
5 In the Specify remote operation panel of the wizard, select the appropriateoperation for the target computer.
The various operations of the Specify remote operation panel and theircorresponding descriptions are as follows:
Uninstalls the agent from the target computer.Uninstall Agent
Installs the agent on the target computer.Install Agent
Registers the target computerwith the Information Server.Register Agent
Unregisters the target computer from the InformationServer.
Unregistered Agent
Configures the target computer. The target can beconfigured only after it is registered with the InformationServer.
Configure Agent
6 In the Specify remote operation panel of the wizard, click Next.
7 In the Connection Parameters panel of the wizard, enter values for the givenparameters, and click Next.
8 In the Installation Parameters panel, enter the Agent Installation Contextparameters and the log and installation directories parameters, and clickNext.
49Installing the UNIX agentInstalling the UNIX agent using bv-Config UNIX
To configure through the Configuration Parameters panel of the bv-Config utility
1 Navigate to the SpecifyRemoteOperation panel of the bv-ConfigUNIXutility.
2 In the Specify Remote Operation panel of the bv-Config UNIX utility, checkConfigure Agent.
If you have not checked the Configure Agent check box in the panel, then theRegistration/Unregistration Parameters panel appears.
3 In the Configuration Parameters panel enter values for the given parametersand click Next.
4 In the Registration/Unregistration Parameters panel, enter the values forthe given parameters, and click Next.
5 In the Task Creation Summary panel, you can find the configuration details,which were specified for creating the task, and click Next.
6 In the Completing Tasks Wizard panel, click Finish.
The following procedures detail about the various tasks that can be performedthrough the bv-Config UNIX utility:
■ To set the pass-phrase
■ To start the installation tasks
■ To stop the installation tasks
■ To edit task information
■ To delete a task
To set the pass-phrase
1 Launch the bv-Config UNIX utility.
2 From the Tools menu, click Set Pass-phrase.
The CSV file contains important computer information along with the userand the resource passwords. Set Pass-phrase is used as a key to encrypt theuser name and the resource passwords that are stored in the CSV file. Afteryou enter a pass-phrase it remains valid throughout the entire session.bv-Config UNIX associates this pass-phrase with all the CSV files createdduring this session.
3 Click Save.
Save the information in a CSV file.
Installing the UNIX agentInstalling the UNIX agent using bv-Config UNIX
50

To start the installation tasks
1 Launch bv-Config UNIX utility.
2 Open the CSV file that contains the installation tasks that you want to start.
3 Use either of the following methods to start the installation:
■ Select Project Files in the treeview of the user interface, right-click it, andselect Start Execution.
■ From the toolbar, select Start Execution.
To stop the installation tasks
1 Launch the bv-Config UNIX utility.
2 Open the CSV file that contains the installation tasks that you want to stop.
3 Use either of the following methods to stop the execution:
■ Select Project Files in the treeview of the user interface, right-click it, andselect Stop Execution.
■ From the toolbar, select Stop Execution.
To edit task information
1 Launch the bv-Config UNIX utility.
2 On the right pane of the user interface, select the record you want to edit.
3 Right-click on the record, and select Edit.
You can also click Modify Task on the toolbar.
4 Enter the required information and click OK.
5 To save the changed file, select File > Save.
6 In the Save As dialog box, enter a new name or select the file name from thelist, and click Save.
To delete a task
1 Launch bv-Config UNIX utility.
2 On the right pane of the user interface, select the record you want to delete.
Use either of the following methods to delete a record:
■ Right-click on the record and select Delete.
■ From the toolbar, click Delete.
51Installing the UNIX agentInstalling the UNIX agent using bv-Config UNIX

3 To save the changed file, select File > Save.
4 In the Save As dialog box, enter a new name or select the file name from thelist, and click Save.
Installing the UNIX agentInstalling the UNIX agent using bv-Config UNIX
52
Registering and configuringtarget computers asagent-based
This chapter includes the following topics:
■ About registering UNIX target computers with the Information Server
■ RegisteringUNIX target computerswith the InformationServer using resourcecredentials
■ Registering UNIX target computers without providing resource credentials
■ Running the setup.sh script
■ Starting UNIX agent on a specified IP Address
■ Notifying Information Servers about target IP address
■ Retrieving snap-ins that are installed on the Information Server
■ Configuring the Information Server to register specific IP address usingsetup.sh script
■ Configuring multiple IP addresses for multi-NIC target computers
■ Configuring UNIX target computers in the agent-based registration mode
■ Selecting protocols for UNIX target computers to communicate with theInformation Server
■ Using native credentials or resource credentials for the target computers thatare registered as agent-based
5Chapter
■ Using default query credentials for the target computers that are registeredas agent-based
■ Unregistering a UNIX agent-based target computer from the InformationServer
About registering UNIX target computers with theInformation Server
TheUNIX target computersmust be registered and then configured for successfulquerying. The target computers are to be registered with the Information Serverand configured with credentials, which are stored in the database.
The target computers on which a UNIX agent is installed must be registered withthe Information Server before being queried. The successful registration of thetarget computer accords to successful reporting of data when queried.
The registration process of the UNIX target computer includes the following:
■ Setting the authentication mode of the UNIX target computer.
■ Adding the credentials for the target computers.The credentials are addedusing the bv-Control forUNIXConfigurationWizardand stored in the credential database.
The UNIX target computer can be registered in either of the following ways:
■ Using Resource name and Password
■ Without using Resource name and Password
Registering UNIX target computers with theInformation Server using resource credentials
You can register a UNIX target computer with the Information Server using theresource name and password credentials, which is also known as resourcecredentials. The resource credentials can be a user name that may or may notexist on the specific UNIX target computer. If you register the target computersusing resource credentials, then ensure that youuse the same resource credentialsto configure the computers.
Note: The command line option a or -a is used for the setup.sh to register thetarget computers using the resource credentials.
Registering and configuring target computers as agent-basedAbout registering UNIX target computers with the Information Server
54

The target computer can be configured using the bv-Control for UNIXConfigurationwizard. In such cases, queries are executed on the target computersin the agent context.
See “Configuring UNIX target computers in the agent-based registration mode”on page 62.
To register UNIX target computers using resource credentials
1 Navigate to the directory where the UNIX agent is installed on the UNIXtarget computer.
For example, in a Red Hat computer, the UNIX agent installation directoryis /usr/local/BindView/bvcontrol/.
2 To register the UNIX target computer with the Information Server, type thefollowing command:
./setup.sh -a [Information Server Name] [Description] [Resource
Name] [Resource Password][-s <Snap-in Name>]
If the -s option is not specified, then either of the following action is executed:
■ If a single snap-in is installed on the Information Server, then the UNIXagent is registered with the Information Server.
■ If more than one snap-in is installed on the Information Server, then theregistration process displays a list of snap-ins that are to be registered.You can select the snap-in that you want to register from the list.
RegisteringUNIX target computerswithout providingresource credentials
You can register a UNIX target computer with the Information Server withoutproviding any resource credentials. If you register the target computer withoutusing resource credentials, then you can use the native credentials to configurethe target computer. The target computer can be configured using the bv-Controlfor UNIX Configuration Wizard. Queries are executed on the target computer inthe context of the operating system’s native user.
Note: The command line option c or -c is used for the setup.sh to register thetarget computers without using the resource credentials.
See “Configuring UNIX target computers in the agent-based registration mode”on page 62.
55Registering and configuring target computers as agent-basedRegistering UNIX target computers without providing resource credentials

To register the UNIX target computers without providing resource credentials
1 Navigate to the directory where the UNIX agent is installed on the UNIXtarget computer.
For example, in Red Hat the UNIX agent installation directory is /usr/local/BindView/bvcontrol/.
2 To register the UNIX target computer with the Information Server, type thefollowing command:
./setup.sh -c [Information Server Name] [Description][-s <Snapin
Name>]
If the -s option is not specified, then either of the following actions is executed:
■ If a single snap-in is installed on the Information Server, then the UNIXagent is registered with the Information Server.
■ If more than one snap-in is installed on the Information Server, then theregistration process displays a list of snap-ins that are to be registered.You can select the snap-in that you want to register from the list.
Running the setup.sh scriptThe setup shell (setup.sh) script can be used to register the UNIX agent with theInformation Server. The UNIX agent can be configured to communicate with theInformation Server using a default interface or a specific IP address.
UNIX target computers can have multiple Network Interface Cards (NICs) anddepending upon the need you can run the daemon on any one of them. By default,the UNIX daemons listen to all installed NICs. If the Information Server gets awrong IP address from a target computer for communication, then there is lossof communication between the computers.
Note: You must ensure that your firewall does not block the UNIX targetregistration process. If it blocks the registration, then you can add the port 1236as Exception in the Windows Firewall dialog box of the Windows computer. TheUNIX agent can register in the port 1236.
Starting UNIX agent on a specified IP AddressA target computer having multiple installed network interfaces and configuredfor different subnetworks can communicate using the IP address of a particularnetwork interface.
Registering and configuring target computers as agent-basedRunning the setup.sh script
56

To start the agent on the specified IP address
1 Navigate to the directory where the UNIX agent is installed on the UNIXtarget computer.
By default, in the Red Hat target computer, the UNIX agent installationdirectory is /usr/local/BindView/bvcontrol/.
2 To initiate communication between the UNIX daemon and the InformationServer using a specific IP address, type the following command:
./setup.sh -ip (IP address)
where, the IP address is themodified IP address of theUNIX target computer.
All the registered Information Servers are notified with the modified IPaddress.
To start the agent on the default IP address
1 Navigate to the directory where the UNIX agent is installed on the UNIXtarget computer.
By default, in the Red Hat target computer, the UNIX agent installationdirectory is /usr/local/BindView/bvcontrol/.
2 To reset theUNIX target computer to its default IP address for communicatingwith the Information Server type the following command:
./setup.sh -ip reset
The existing entries of UNIX target computers' IP addresses are removedfrom the bv.conf file.
Notifying InformationServers about target IP addressAny modification in the entry of the IP address of the UNIX target computer inthe bv.conf file is notified to the Information Servers. Therefore, irrespective ofthe routing configuration, the correct IP address is always communicated to theInformation Server. The stability of communication between the UNIX targetcomputer and the Information Server is enhanced.
57Registering and configuring target computers as agent-basedNotifying Information Servers about target IP address
To notify Information Servers about the UNIX target IP Address
1 Navigate to the directory where the UNIX agent is installed on the UNIXtarget computer.
By default, in AIX, the UNIX agent installation directory is/usr/local/BindView/bvcontrol/.
2 Type the following command to notify all the Information Servers with themodified IP addresses of the UNIX target computer:
./setup.sh -n
Retrieving snap-ins that are installed on theInformation Server
You can retrieve the total list of snap-ins that are installed on a specificInformation Server using the setup.sh script.
To retrieve the list of snap-ins that are installed on the specific Information Server
1 Navigate to the directory where the UNIX agent is installed on the UNIXtarget computer.
For example, in AIX the UNIX agent installation directory is/usr/local/BindView/bvcontrol/.
2 To retrieve the list of snap-ins that are installed on the Information Server,type the following command:
./setup.sh -s [Information Server Name]
Configuring the InformationServer to register specificIP address using setup.sh script
Youcan configure the InformationServer to retrieve information fromany specificIP address using the setup.sh script.
To configure Information Server to accept information from a specific IP address
1 At thecommand line, type theappropriateoperating system-specific commandto register the UNIX agent with the Information Server.
For HP-UX, Solaris, and SUSE operating systems the command is/opt/BindView/bvcontrol/setup.sh.
Registering and configuring target computers as agent-basedRetrieving snap-ins that are installed on the Information Server
58
For AIX and Red Hat Linux operating system the commandis/usr/local/BindView/bvcontrol/setup.sh.
2 Continue executing the commands that appear after executing the setup.shcommand.
The following prompt appears:
Select one of the following options.
a : Register agent to use resource name and password for querying.
c : Register agent to use native Unix credentials for querying.
d : Delete registered agent.
n : Notify configuration data. q : Quit to exit
3 Type a or c to add a UNIX target computer to the Information Server andpress Enter.
Enter your choice [a,c,d,n,q]:
If you want to register using the resource credentials (ResourceName/Password), then specify a. If you want to register without using the resourcecredentials, then specify c.
4 Type the system name or IP Address of the Information Server and pressEnter.
The following prompt appears:
bv-Control for UNIX needs to exchange keys and configuration data
with the Information Server. IP address or system name can't be
empty.
Enter the system name (or IP Address) of the Information Server:
5 Enter a description to identify the computer and press Enter.
The following prompt appears:
Enter description to identify this computer on the Information
Server :
6 Type a resource nameandpassword for the target computer andpressEnter.
The resource name andpassword is used to authenticate the target computer.You can use the information when you create the credential database.
The following prompt appears:
bv-Control for UNIX needs to set-up authentication via passwords.
59Registering and configuring target computers as agent-basedConfiguring the Information Server to register specific IP address using setup.sh script
You will need to add a Resource Name and password for this
machine. The password must be an Alphanumeric string containing
no spaces.
After you enter this information, you will need to configure a
credential database in the BindView RMS Console with this
information.
*** Warning: Please do not use a User Name and password in the /
etc/passwd file
*** Resource Name: Please enter a Password to be used for
authentication: Please Verify the Password: Successfully
registered to <machine name> The bv-Control for UNIX agent appears
to be already running in stand-alone execution mode
Configuringmultiple IP addresses formulti-NIC targetcomputers
During UNIX agent installation, you can register multiple physical IP addressesfor amutli-NIC target computer using the setup.sh utility. A command line option-lip (local IP address) is added to the setup.sh utility to enable this functionality.
You can do the following for the multi-NIC target computers:
■ Register multiple IP addresses using Resource Credentials
■ Register multiple IP addresses without using Resource Credentials
■ Delete multiple IP address registrations
■ Notify the Information Server about the change in IP address
To register multiple IP addresses without using Resource Credentials
1 Navigate to the directory where the bv-Control for UNIX is installed on theUNIX target computer.
For example, inAIX, by default, the bv-Control forUNIX installation directoryis /usr/local/BindView/bvcontrol/.
2 Execute the following command to register multiple IP addresses withoutusing the resource credentials:
./setup.sh -c [Information Server Name] [Machine Description] [-s <SnapinName>] [-lip <local-ip-address>]
where, local-ip-address is the local IP address of the UNIX agent that is usedfor registration, deletion, or IP propagation
Registering and configuring target computers as agent-basedConfiguring multiple IP addresses for multi-NIC target computers
60

To register multiple IP addresses using Resource Credentials
1 Navigate to the directory where the bv-Control for UNIX is installed on theUNIX target computer.
For example, inAIX, by default, the bv-Control forUNIX installation directoryis /usr/local/BindView/bvcontrol/.
2 Execute the following command to register multiple IP addresses withoutusing the resource credentials:
./setup.sh -a [Information Server Name] [Machine Description] [ResourceName] [Resource Password] [-s <Snapin Name>] [-lip <local-ip-address>]
where, local-ip-address is the local IP address of the UNIX agent that is usedfor registration, deletion, or IP propagation
To delete multiple IP address registrations
1 Navigate to the directory where the bv-Control for UNIX is installed on theUNIX target computer.
For example, inAIX, by default, the bv-Control forUNIX installation directoryis /usr/local/BindView/bvcontrol/.
2 Execute the following command to register multiple IP addresses withoutusing the resource credentials:
./setup.sh -d [Information Server Name] [-s <Snapin Name>] [-lip<local-ip-address>]
To notify the Information Server about the change in IP address
1 Navigate to the directory where the bv-Control for UNIX is installed on theUNIX target computer.
For example, inAIX, by default, the bv-Control forUNIX installation directoryis /usr/local/BindView/bvcontrol/.
2 Execute the following command to register multiple IP addresses withoutusing the resource credentials:
./setup.sh -n [Information Server Name] [-lip <local-ip-address> -olip<old-local-ip-address>]
where, local-ip-address is the local IP address of the UNIX agent that is usedfor registration, deletion, or IP propagation.
and, the old-local-ip-address is the local IP address of the UNIX agent beforechanging to the new IP address.
61Registering and configuring target computers as agent-basedConfiguring multiple IP addresses for multi-NIC target computers

ConfiguringUNIX target computers in theagent-basedregistration mode
After the snap-in is installed, youmust configure it using the bv-Control forUNIXConfiguration Wizard. With the Configuration Wizard, you can create thecredential databases that provide the necessary credentials to the InformationServer for accessing the UNIX resources. The RMS Console job processor runs asa local system account.
To collect information from the UNIX target computers that you query, theInformation Server must have requisite permissions to access the targetcomputers. A credential database provides the Information Server with thenecessary credentials to authenticate a user on the target computer.
You can create one or more credential databases. To determine the number ofdatabases youneed, review theaccess requirements for theUNIX target computers.Each credential database defines user access for one or more UNIX targetcomputers.
Before querying and reporting on theUNIX target computers, youmust configurethe computers using the bv-Control for UNIX Configuration Wizard.
The wizard guides you through the following tasks:
■ Create a credential database.
■ Add target computers along with the resource or the native credentials to thecredential database.
■ Assign a credential database to each user.
To configure the UNIX agent
1 Click the bv-Control for UNIX (not configured) node on the console tree.
2 Double-click Configuration Wizard in the Details pane.
3 In the bv-Control forUNIXConfigurationWizardWelcome panel, clickNext.
4 In the Registration relatedOperations panel, select Agent-based registrationand click Next.
5 In theConfigure bv-Control forUNIXSoftware -Agent-basedMachines panel,enter the values for the fields and click Next.
6 In the Add Credential Database panel, click Click and edit here to add newcredential database.
7 Type the name of the credential database in the field in which you want tostore the credentials of the target computer and click Next.
Registering and configuring target computers as agent-basedConfiguring UNIX target computers in the agent-based registration mode
62
8 In the Create New Database dialog box, type and verify your password andclick OK.
9 Click Next.
10 In the Select Credentials panel, select bv-Control forUNIX from the Productsand the desired credential database from the Credential Database drop-downlist.
11 Select the registered UNIX target computers that are listed under the AllUNIX Servers > Agent-based Servers node to add their credentials.
You can choose from either of the following credential types:
■ Native Credentials
■ Resource Credentials
■ Default Query Credentials
12 In the Select Credentials panel, click Next.
13 In the Assign a Credential Database to Each User panel, select a credentialdatabase for the user, and click Next.
14 In the bv-Control For UNIX Configuration Wizard Completed panel, clickFinish.
Selecting protocols for UNIX target computers tocommunicate with the Information Server
To register the UNIX target computers with the Information Server, you mustestablish communication between theUNIX target computer and the InformationServer. The communication canbe establishedusingprotocols suchasSSH,Telnet,or any command line applications. These protocols can be selected through thebv-Control for UNIX Configuration Wizard.
The various protocols that can be selected through the Configuration Wizard areas follows:
■ To select the SSH protocol option in the Configuration Wizard
■ To select the Telnet protocol option in the Configuration Wizard
■ To select the Other protocol option in the Configuration Wizard
63Registering and configuring target computers as agent-basedSelecting protocols for UNIX target computers to communicate with the Information Server

To select the SSH protocol option in the Configuration Wizard
1 Launch the bv-Control for UNIX Configuration Wizard from the console leftpane.
2 Navigate till the bv-Control forUNIXSoftware -Agent-basedMachines panelof the wizard by clicking Next.
3 In theConfigure bv-Control forUNIXSoftware -Agent-basedMachines panel,select SSH, and click Open.
For example, you can use “C:/temp/plink” -ssh (target IP).
If you have connected to the target computer using SSH earlier, then for thesubsequent connections, SSH uses the same utility path. You can use theSSHUtilityPath registry from the registry key(HKEY_LOCAL_MACHINE\SOFTWARE\BindView\bv-Control for UNIX) tospecify the path of the SSH utility.
4 At the command line, type user name/password.
5 At the command line, browse to the directory where the UNIX agent isinstalled on the UNIX target computer.
6 Register the target computer by executing the setup.sh script for agentinstallation.
See “Running the setup.sh script” on page 56.
7 In theConfigure bv-Control forUNIXSoftware -Agent-basedMachines panel,click Next.
8 Navigate through the remainingpanels of theConfigurationWizard till finish.
To select the Telnet protocol option in the Configuration Wizard
1 Launch the bv-Control for UNIX Configuration Wizard from the console leftpane.
2 Navigate till the bv-Control forUNIXSoftware -Agent-basedMachines panelof the wizard by clicking Next.
3 In theConfigure bv-Control forUNIXSoftware-Agent-basedMachines panel,select Telnet, and click Open.
The login prompt for the specified target automatically appears.
4 At the command line, type user name/password.
5 Register the target computer by executing the setup.sh script for agentinstallation.
See “Running the setup.sh script” on page 56.
Registering and configuring target computers as agent-basedSelecting protocols for UNIX target computers to communicate with the Information Server
64
6 Exit from the Telnet window to return to the Configuration Wizard andcontinue.
7 In theConfigure bv-Control forUNIXSoftware -Agent-basedMachines panel,click Next.
8 Navigate through the remainingpanels of theConfigurationWizard till finish.
To select the Other protocol option in the Configuration Wizard
1 Launch the bv-Control for UNIX Configuration Wizard from the console leftpane.
2 Navigate till the bv-Control forUNIXSoftware -Agent-basedMachines panelof the wizard by clicking Next.
3 In theConfigure bv-Control forUNIXSoftware -Agent-basedMachines panel,select Other, and click Open.
4 In the Select Application for connecting to the UNIX Target command linedialog box, select any application for connecting to theUNIX target computer.
For example, if you have PuTTY client, you can use “C:/temp/plink” -ssh(target IP).
5 At the command line, type user name/password.
6 Register the target computer by executing the setup.sh script for agentinstallation.
See “Running the setup.sh script” on page 56.
7 In theConfigure bv-Control forUNIXSoftware -Agent-basedMachines panel,click Next.
8 Navigate through the remainingpanels of theConfigurationWizard till finish.
Using native credentials or resource credentials forthe target computers that are registered asagent-based
You can specify native or resource credentials to authenticate the UNIX targetcomputers that are registered with the Information Server.
The conditions based on which you can specify native or resource credentials areas follows:
■ If the same version of the product is installed on both Windows and UNIXtarget computers, then configure the target credentials. You can use eitherthe resource credentials or the native credentials.
65Registering and configuring target computers as agent-basedUsing native credentials or resource credentials for the target computers that are registered as agent-based

■ If different versions of the snap-in and the UNIX agent is installed on theWindows computer and the target computers respectively, then use resourcecredentials. The resource credentials are used to configure the targetcomputers.
Note: If you have registered the UNIX target computer using resourcecredentials, then you can use either resource or native credentials to configurethe target computer. If you have not used resource credentials to register thetarget computers, then you must use the native credentials to configure thetarget computers.
To add resource or native credentials for UNIX target computers
1 Launch the bv-Control forUNIXConfigurationWizard from theRMSConsoleleft pane.
2 Navigate till the bv-Control forUNIXSoftware -Agent-basedMachines panelof the wizard by clicking Next.
3 In the Select Credentials panel, select theUNIX target computer that is listedunder the All UNIX Servers > Agent-based Servers node and click >>.
The node is listed under the Resource Objects field.
4 In the Additional Settings dialog computer, select the Credential Type fromamong the Resource Credentials and Native Credentials options.
5 Enter the appropriate UNIX credentials in the User/Resource Name andPassword fields of the dialog box according to the selected Credential Typeand click OK.
The credentials are added in the credential database.
Using default query credentials for the targetcomputers that are registered as agent-based
Thedefault query credentials are used to configure all registered target computerswith a commonuser (native credential). These target computers arenot configured.If a set of UNIX target computers are registered with a common InformationServer, then you can specify the default query credentials only once.
TheUNIX target computers that are configuredwith the default query credentialsare enumerated under the Serverswithout Credentials >Agentbased Servers nodein the Select Credentials panel.
Registering and configuring target computers as agent-basedUsing default query credentials for the target computers that are registered as agent-based
66
You can select any one UNIX target computer to specify the credentials. Thevarioususage of credentials for querying theUNIX target computers are as follows:
■ If explicit credentials are specified for a target computer, then these credentialsare used to query. The credentials are used irrespective of whether the defaultquery credentials are specified or not.
■ If incorrect explicit credentials are specified for the UNIX target, then thedefault query credentials are not used for query execution.
■ If explicit credentials are deleted from the credential database for a UNIXtarget, then the default query credentials are used for query execution.
Note: Explicit credentials can be native or resource credentials.
To add default query credentials for the UNIX target computers
1 Launch thebv-Control forUNIXConfigurationWizard fromtheRMSConsole'sdetails pane.
2 Navigate till the bv-Control forUNIXSoftware -Agent-basedMachines panelof the wizard by clicking Next.
3 In the Select Credentials panel, select the Default Query Credentials nodethat is listed for the Resource Objects field and click >>.
4 In the Additional Settings dialog box, enter User Name/Password (nativecredentials) of the user, click OK.
Thenative credentialsmust be commonacross all the registered agent-basedtarget computers. After the default query credentials are specified, they areused for all the registered UNIX target computers.
Unregistering a UNIX agent-based target computerfrom the Information Server
You canunregister aUNIX target computer, which is registered in the agent basedmode, from the Information Server using the setup.sh script.
67Registering and configuring target computers as agent-basedUnregistering a UNIX agent-based target computer from the Information Server

To unregister a UNIX agent from the Information Server
1 Navigate to the directory where the UNIX agent is installed on the UNIXtarget computer.
For example, in Red Hat the UNIX agent installation directory is /usr/local/BindView/bvcontrol/.
2 Execute the following command to unregister theUNIX target computerwiththe Information Server:
./setup.sh -d [Information Server Name] [-s <Snap-in Name>]
If the -s option is not specified then the execution varies for the followingscenarios:
■ When one snap-in is installed on the Information Server, the UNIX agentis unregistered automatically.
■ Whenmore than one snap-in is installed on the Information Server, thenexecute the script to list all the registered snap-ins.You can select thesnap-in that you want from the list and unregister it.
Registering and configuring target computers as agent-basedUnregistering a UNIX agent-based target computer from the Information Server
68
Registering and configuringUNIX target computers asagentless
This chapter includes the following topics:
■ About configuring UNIX target computers as agentless
■ Registering and configuring the target computers using ConfigurationWizard
■ Configuring target computers with default query credentials
■ Switching registration modes of target computers
■ About configuration of SSH connector settings
■ About Public Key Authentication
About configuringUNIX target computers asagentlessThe UNIX target computers can be configured as agentless using the bv-Controlfor UNIX Configuration Wizard. The computers must first be registered with theInformation Server and then configured as agentless by storing their credentialsin the credential database. The credentials of the agentless target computers areused for establishing a connection with the Information Server and for queryexecution. The agentless target computers use SSH protocol for communicatingwith the Information Server.
6Chapter

Registering and configuring the target computersusing Configuration Wizard
Youmust register the target computer in the agentlessmodewith the InformationServer before configuring it for query execution.
The UNIX target computers of the agentless registration mode can be configuredin any of the following ways:
■ Using native credentials
■ Using superuser (su) credentials
■ Using default su or query credentials
To register and configure a UNIX target computer as agentless
1 Click bv-Control for UNIX node in the RMS Console tree.
2 Launch the Configuration Wizard from the right pane of the RMS Console.
3 In theWelcomepanel of the bv-Control forUNIXConfigurationWizard, clickNext.
4 In the Registration related Operations panel, select Agentless registrationoption and click Next.
5 In theConfigurationSummarypanel, view thedetails and tomakeanychangesclick Back. Click Next to proceed with the configuration.
6 In theConfigure bv-Control forUNIX-AgentlessMachines panel, enter valuesfor the given fields of the panel and click Next.
7 In the Add Credential Database panel, click Click and edit here to add newcredential database to create a new credential database and click Next.
To modify an existing database, select the database and click Modify beforeclicking Next.
8 In the Select Credentials panel, enumerate the All UNIX Servers > AgentlessServers node.
9 Select the agentless target computers whose credentials are to be added, andclick >>.
You can also enumerate the Servers without Credentials > Agentless Serversnode, select the target computers, and click >>.
10 In theAdditional Settings-Agentless Target Credentials dialog box, enter thecredentials for the selected target computers, and click Next.
Registering and configuring UNIX target computers as agentlessRegistering and configuring the target computers using Configuration Wizard
70
The agentless infrastructure can be accessed using any of the three types ofcredentials. To specify credentials for the agentless target computers, youneed to select any one credential type in the Additional Settings dialog box.
The different credential types and their descriptions are as follows:
TheNative credentials comprise the user name andpassword of the Native user of the agentless targetcomputer's operating system.Thenative credentialsare used for establishing SSH communicationbetween the Information Server and the agentlesstarget computers. They can also be used forexecuting queries in the native user context on theagentless target computers.
See “Adding native credentials for the targetcomputers that are registered as agentless”on page 73.
Native credentials
ThePublicKeyAuthentication credentials comprisethe user name, the private key file and thepassphrase (if any). These credentials are used toauthenticate the generated private key in theInformation Server, which is used for establishingconnection with the target computer. You canencrypt the private keywith a passphrase and storeit in the credential database.
See “About Public Key Authentication” on page 79.
Public Key Authenticationcredentials
The superuser (su) credentials are used to configurethe agentless target computers to execute queriesin the superuser context. The credentials comprisethe user name and password of a superuser, inwhose context the queries are to be executed.
See “Adding superuser credentials for the targetcomputers that are registered as agentless”on page 74.
SuperUser (su) credentials
71Registering and configuring UNIX target computers as agentlessRegistering and configuring the target computers using Configuration Wizard
The default query credentials are used forconfiguring all registered UNIX target computersthat have a common user account. The credentialscomprise the native credentials and the superuser(su) credentials. The credentials are specifiedthrough the Additional Settings - Default QueryCredentials dialog box of the ConfigurationWizard.
See “Adding default query credentials for the targetcomputers that are registered as agentless”on page 75.
default query credentials
11 In the Assign a Credential Database to Each User panel, select a credentialdatabase from the drop-down and associate it with the domain user and clickNext.
If the credential database is password protected, then enter the passwordand click OK.
12 In theCredentials Summarypanel, view the summarydetails of the credentialdatabase that is associated with the user, and click Next.
13 In the Validating Machine Information panel, you can find the validation ofthe data that is provided while configuring the target computer as agentless.
If you have selected the Validate check box in the Configure bv-Control forUNIX- Agentless Machines panel, then you can view this panel. After thevalidation is complete, theAgentless Configuration Summary panel appears.
14 In theAgentless Configuration Summary panel, you can view the registrationsummary results along with the details.
Success or Failure are the types of results that are displayed.
The different types of operations and their descriptions are as follows:
This operation indicates the number ofcomputers that are registered asagentless.
Registration
This operation indicates whether thetarget computer’s operating system (OS)details were validated or not.
If improper operating system wasspecified, then the validation of thecomputer fails and the correct OS isupdated for the computer.
Validate
Registering and configuring UNIX target computers as agentlessRegistering and configuring the target computers using Configuration Wizard
72
This operation indicates whether thetarget computer informationwasmodifiedor not.
If you modify the operating system type,version, SSH type, or the SSH portnumber, then the computer is indicatedas updated.
Update
You can copy the summary details to any editor by clicking CopyToClipboardand click Next.
15 In the Completing the bv-Control forUNIXConfigurationWizard panel, clickFinish.
Adding native credentials for the target computers that are registeredas agentless
The native credentials can be added through the Additional Settings-AgentlessTarget Credentials dialog box.
The default query credentials are added for the agentless target computers in thecredential database. To use the default query credentials for establishingconnection with the Information Server and for executing queries do not enterany credentials through the dialog box.
To specify the native credentials
1 Launch the Additional Settings dialog- Agentless Target Credentials dialogbox from the Select Credentials panel of the Configuration Wizard.
2 Enter User Name/Password as native credentials in the respective fields ofthe dialog box.
3 SelectUsesuaccountinDefaultQueryCredentials in the suCredential (usedto gather data) panel of the dialog box.
See “Configuring target computerswithdefault query credentials”onpage75.
4 Click OK.
Adding credentials for Public Key Authentication supportThe credentials for Public Key Authentication can be specified through theAdditional Settings-Agentless Target Credentials dialog box. You must specifythe credentials of the generated private key that is located in the InformationServer.
73Registering and configuring UNIX target computers as agentlessRegistering and configuring the target computers using Configuration Wizard
You can delete the private key after importing the key through the AdditionalSettings-Agentless Target Credentials dialog box.
To specify the Public Key Authentication credentials
1 Launch the Additional Settings dialog- Agentless Target Credentials dialogbox from the Select Credentials panel of the Configuration Wizard.
2 Enter the native user name in the Username field.
3 Select Public Key Authentication.
4 In the Private Key File Path field, browse to the location of the private key inthe Information Server.
5 In the Passphrase (if any) field, enter the passphrase if you have passwordencrypted the Public Key Authentication credentials in the credentialdatabase.
You can proceed to enter the su credentials or the native credentials forcollecting data from the target computers.
Adding superuser credentials for the target computers that areregistered as agentless
The superuser credentials canbe added through theAdditional Settings-AgentlessTarget Credentials dialog box.
To specify the superuser credentials
1 Launch the Additional Settings dialog- Agentless Target Credentials dialogbox from the Select Credentials panel of the Configuration Wizard.
2 Enter Username/Password of the native credentials in the respective fieldsof the dialog box to establish connection with the Information Server.
3 Select Use suaccount in the suCredential (used to gatherdata) panel of thedialog box.
4 Enter su User Name/su Password as superuser credentials in the respectivefields of the dialog box.
5 Click OK. The UNIX credentials are added to the credential database.
The queries are executed in the context of the super user on the agentlesstarget computer.
Registering and configuring UNIX target computers as agentlessRegistering and configuring the target computers using Configuration Wizard
74
Adding default query credentials for the target computers that areregistered as agentless
The default query credentials can be added through the Additional Settings-Agentless Target Credentials dialog box.
The default query credentials are added for the agentless target computers in thecredential database. To use the default query credentials for establishingconnection with the Information Server and for executing queries, do not enterany credentials through the dialog box.
To specify the default query credentials
1 Launch the Additional Settlings dialog- Agentless Target Credentials dialogbox from the Select Credentials panel of the Configuration Wizard.
2 Enter Username/Password of the native credentials in the respective fieldsof the dialog box to establish connection with the Information Server.
3 SelectUsesuaccountinDefaultQueryCredentials in the suCredential (usedto gather data) panel of the dialog box.
See “Configuring target computerswithdefault query credentials”onpage75.
4 Click OK.
Configuring target computers with default querycredentials
The default query credentials are used for configuring theUNIX target computersthat are registered in the agentless mode and have a common user account. Thedefault query credentials can be either native or superuser credentials. The defaultquery credentials are specified in the Additional Settings dialog box of theConfiguration Wizard and are stored in the credential database.
The default query credentials are added to the credential database. By default, allagentless target computers that are listed under Servers without Credentials >Agentless Servers node, are configured with the default query credentials. Youcan also specify the default query credentials explicitly for an agentless targetcomputer. The native credentials that are specified explicitly take higherprecedence when compared to the native credentials that are specified as defaultquery credentials.
75Registering and configuring UNIX target computers as agentlessConfiguring target computers with default query credentials

To specify default query credentials for agentless target computers
1 Launch the Configuration Wizard and navigate to the Select Credentialspanel.
2 Under the Resource Objects field, select Default Query Credentials.
3 Click >>.
4 In theAdditional Settings dialog - Default Query Credentials dialog box, enterUser Name/Password of the native user.
These credentials are used for establishing communication with theInformation Server.
5 In the su Credential (used to gather data for Agentless targets only) panel ofthe dialog box, select either of the options provided.
The options that are provided in the suCredential panel and their descriptionsare as follows:
Select this option to execute queries onthe target computers using thenativeusercredentials.
Not required
Select this option and enter the superusercredentials. The credentials are specifiedin the respective su User Name and suPassword (required) fields. Based on thespecified su credentials, the queryexecutes in the specified su context on theagentless target computer.
Use su account specified below
6 Click OK.
Switching registration modes of target computersYou can switch the registration modes of the target computers from agent-basedto agentless andvice versa through the bv-Control forUNIXConfigurationWizard.You must ensure that the target computer is registered at least once in theagent-based mode for enabling switching operation.
The registrationmodesof the target computers are switched through theSwitchingRegistration Mode panel of the bv-Control for UNIX Configuration Wizard.
Registering and configuring UNIX target computers as agentlessSwitching registration modes of target computers
76
To switch the registration mode of the target computers
1 Click the bv-Control for UNIX node in the console tree and launch theConfiguration Wizard from the right pane of the RMS Console.
2 In the bv-Control for UNIX Configuration Wizard panel, click Next
3 In theRegistration relatedOperations panel, selectSwitchregistrationmode.
4 Click Next.
In the Switching RegistrationMode panel, you can do either of the following:
■ Switch agent-based registrationmode of the target computer to agentlessregistration mode.See “Toswitchagent-based registered target computers to agentlessmode”on page 77.
■ Switch agentless registrationmode of the target computer to agent basedregistration mode.See “To switch an agentless registered target computer to agent-basedmode” on page 78.
To switch agent-based registered target computers to agentless mode
1 In the Switching Registration Mode panel, select the agent-based targetcomputers that are listed in the Agent based Targets field.
2 Click > or >>.
3 Click Next.
4 In the Add Credential Databases panel, create a new credential database ormodify the name of any existing credential database and click Next.
5 In the Select Credentials panel you can specify credentials for the targetcomputers whose registration modes are switched, and click Next.
6 Add the credentials through the Additional Settings-Agentless TargetCredentials dialog box, and click Next.
For those target computers whose registration modes are switched fromagent-based to agentless, you can reuse the native credentials.
7 In the Assign a Credential Database to Each User panel, select the databaseto be assigned to the user from the drop-down list, and click Next.
If the database is password protected, then enter the password and click OK.
8 In theCredentials Summarypanel, read the summary details of the credentialdatabase that is associated with the user, and click Next.
77Registering and configuring UNIX target computers as agentlessSwitching registration modes of target computers
9 In the Validating Machine Information panel, the progress of the switchingoperation validation is shown.
After the validation is complete, theAgentless Configuration Summary panelshows the status of the switching operation. The displayed Operation Typeis Convert, and the status of the operation is either Success or Failure.
10 Click Next.
11 In the Completing the bv-Control forUNIXConfigurationWizard panel, clickFinish.
To switch an agentless registered target computer to agent-based mode
1 In the Switching Registration Mode panel, select the agentless targetcomputers that are listed in the AgentlessTargets field.
2 Click < or <<.
3 Click Next.
4 In the Add Credential Databases panel, create a new credential database ormodify the name of any existing credential database and click Next.
5 In the Select Credentials panel you can specify credentials for the targetcomputers whose registration modes are switched and click Next.
6 In the Assign a Credential Database to Each User panel, select the databaseto be assigned to the user from the drop-down list, and click Next. If thedatabase is password protected, then enter the password and click OK.
7 In theCredentials Summarypanel, read the summary details of the credentialdatabase that is associated with the user, and click Next.
8 In the Completing the bv-Control forUNIXConfigurationWizard panel, clickFinish.
About configuration of SSH connector settingsYou can configure the SSH connection information such as the version, portnumber, and timeout information, for the agentless infrastructure.
The registries in which the configuration settings that are related to the SSHConnector are stored and their descriptions are as follows:
Registering and configuring UNIX target computers as agentlessAbout configuration of SSH connector settings
78

You can configure the timeout period whileestablishing SSH communication betweenthe Information Server and the agentlesstarget computer using the registry setting.You can configure the registry setting,[HKEY_LOCAL_MACHINE\SOFTWARE\BindView\bv-Control for UNIX\SSH Connector]@="""ConnectionTimeout"=dword:0000180000.
Communication Time-out (in seconds)
The SSHKnownHostkeys.keys file containsthe list of SSHhosts that are registeredwiththe Information Server.
By default the file is located in theC:\ProgramFiles\Symantec\RMS\Control\UNIX\SSHKeysfolder of the Windows computer. You canconfigure the SSHKnownHostkeys.keys filethrough the registry,[HKEY_LOCAL_MACHINE\SOFTWARE\BindView\bv-Control for UNIX\SSH Connector]@="AcceptSSHHostKey"=dword:00000000].
You can set the registry with any of thefollowing options:
■ 0 (Accept All): On setting the value 0 forthe registry, theSSHKnownHostkey.keysfile is updated with the new set of SSHkeys . The file can also be updated withvalues of the old SSH keys of the targetcomputers.
■ 1 (Validate): On setting the value 1 forthe registry, the SSH keys of the UNIXtarget computers are validated againstthose in theSSHKnownHostkey.keys file.
If the value of an old SSH key is updated orif a new SSH key is added, then theSSHKnownHostkey.keys file is not updated.Also, if the SSH key of the target computeris not present in the file, then the queriesfail.
Accepting SSH Host Key
About Public Key AuthenticationThe Public Key Authentication mode is an arrangement for generating keys forpublic key authentication. The Public Key Authentication mode generates a pair
79Registering and configuring UNIX target computers as agentlessAbout Public Key Authentication
of public and private keys on the Information Server. The public key is deployedon the UNIX target computer. You must have the requisite infrastructure togenerate the pair of SSH keys. The bv-Control for UNIX snap-in does not providethe infrastructure to generate the keys.
The Public Key Authentication mode can be used to configure the UNIX targetcomputer. For everynewSSHconnection to theUNIX target computer, the privatekey is fetched from the credential database and a signature is generated. Thegenerated signature is sent to the UNIX target computer. The SSH server on theUNIX target computer can authenticate the signature by evaluating it with thepublic key that is deployed on it. If the verification succeeds, then the InformationServer is successfully authenticated and the connection is established.
Registering and configuring UNIX target computers as agentlessAbout Public Key Authentication
80

Evaluating bv-Control forUNIX
This chapter includes the following topics:
■ About evaluation of bv-Control for UNIX
■ Agentless Registration and Configuration
■ Credential management
■ Security management
■ Configuration management
■ Content and capacity management
■ ActiveAdmin function in bv-Control for UNIX
About evaluation of bv-Control for UNIXThe product evaluating scenarios are provided to help you test-drive bv-Controlfor UNIX. These scenarios provide an opportunity to learn how bv-Control forUNIX works and helps in your evaluation of the product. To work with thescenarios, you must ensure that the bv-Control for UNIX snap-in is installed onthe Windows computer. To execute queries on the agent-based UNIX targetcomputers, you must ensure that you install the bv-Control for UNIX agent onthe target computer.
The scenarios cover the following product functionality:
7Chapter
Agentless registration and configuration isabout registration of the agentless UNIXtarget computers with the InformationServer and configuring them for queryexecution.
Agentless Registration and Configuration
Credential Management is about executionof queries on the UNIX target computers.The target computers are configured witheither resource, native, or default querycredentials.
Credential Management
Security Management is about execution ofpredefined queries created in compliancewith SANS Top 10 policy. The predefinedqueries help to retrieve information aboutthe kernel parameters of the targetcomputers.
Security Management
Configuration Management is aboutexecution predefined queries to retrievecomputer information, list of installedpackages on the target computer, and userinformation.
Configuration Management
Content and Capacity Management is aboutexecution of predefined queries to retrievedisk space availabilitywhen compared to thetotal allocation. It is also about display of theFindOptions capability of theComposite FileDescriptor to retrieve data from the UNIXtarget computer’s directories.
Content and Capacity Management
The ActiveAdmin function is about usage ofthe ActiveAdmin privilege to edit a userrecord of Users data source.
ActiveAdmin function in bv-Control forUNIX
Agentless Registration and ConfigurationThe agentless UNIX target computers need to be first registered with theInformation Server and then configured with credentials for successful queryexecution. The target computers can be registered and configured through thebv-Control for UNIX Configuration Wizard.
The scenarios highlight various possibilities of registration and configuration ofthe agentless target computer.
Evaluating bv-Control for UNIXAgentless Registration and Configuration
82

Configuring agentless target computers by importing a .csv fileThe UNIX target computers can be registered as agentless, by importing thecomputer names and their description from a .csv file through the ConfigurationWizard. The registered target computers are then configured by specifying thecredentials in the credential database. Queries are executed on the agentless targetcomputers, that are based on the specified credentials.
To import UNIX target computers from a .csv file through the ConfigurationWizard
1 Create a Sample.csv file
. For example, the Sample.csv file can contain the computer names and thedescription of two UNIX target computers in the following format:Crimson_RedHat, a Red Hat computer. Jasmine_SUSE, a SUSE computer.
2 Save Sample.csv file in any local directory of the Windows computer.
3 Install and configure bv-Control for UNIX.
For configuring bv-Control for UNIX through the RMS Console see the RMSConsole and Information Server Getting Started Guide.
4 Launchbv-Control forUNIXConfigurationWizard fromtheUNIXEnterpriseBrowser.
5 Navigate to Registration Related Operations panel of the ConfigurationWizard.
6 In theRegistrationRelatedOperations panel, select theAgentless registrationoption and click Next.
7 In the Configure bv-Control for UNIX Software- Agentless Machine panel,click browse option.
8 In the File Selection dialog box, select the Sample.csv file, and click Add.
The two target computers (Crimson_RedHat and Jasmine_SUSE) containedin the Sample.csv are added in the Target machines currently configuredtabular panel. You must select values from the drop-down list of the Targetmachines currently configured tabular panel.
The drop-down list and their descriptions are as follows:
Type of operating system (for example,Red Hat Linux)
OS Type
Version of the operating system (forexample, 8.0).
OS version
83Evaluating bv-Control for UNIXAgentless Registration and Configuration
Type of SSHprotocol (for example, SSH1,SSH1 Only, SSH2, and SSH2 Only). Bydefault, SSH2 Only is selected whenevera computer is specified. SSH1 Only andSSH2 Only indicate that you cannot useany other version of SSHwhen connectedto the Information Server through theseprotocols.
SSH Type
The SSH Port number (for example,default port 22).
SSH Port No
TheValidate optionwhen checked lets thecomputer's operating systementries, suchasOS type andOSVersion to be validated.In case ofwrong specifications, the correctvalues are fetched and set for therespective computers in this table.
Validate
9 Click Next.
To add credentials to the credential database
1 In theAddCredential Database panel, create a credential database for addingcredentials of the registered agentless target computers, and click Next.
2 In the Select Credentials panel, enter the credentials for the registeredagentless target computers, and click Next.
3 In the Assign a Credential Database to Each User panel, assign a user for thecreated credential database, and click Next.
4 In the Credential Summary panel you can find the details of the user that isassociated with the credential database. Click Next.
5 In theValidatingMachine Informationpanel, the validation of theOS relateddata is done.
The computer information was specified through the Configure bv-Controlfor UNIX Software- Agentless Machine panel.
Evaluating bv-Control for UNIXAgentless Registration and Configuration
84
6 After the validation is over, the result, success or failure is displayed in theAgentless Configuration Summary panel.
The format of the result for both the success and the failure status are asfollows:
Success or Failure
Machine Name: <name of the computer registered as agentless>
OperationType: <Operation suchValidate,Update, orRegistration is specifiedhere>
StatusMessage: <message describing the success or failure of the operation>
7 Click Next.
8 In the Completing the bv-Control forUNIXConfigurationWizard panel, clickFinish.
Result: You can find the registered computers namely Crimson_RedHat andJasmine_SUSE, listed under the All Servers node of the UNIX EnterpriseBrowser.
Switching target computers from agent-based registration mode toagentless
You can switch the registrationmode of aUNIX target computer fromagentbasedto the agentless or vice-versa through the bv-Control for UNIX ConfigurationWizard. The target computer must be registered at least once in the agent-basedmode to switch from the agentless to the agent-based mode.
To switch agent-based registrationmode of UNIX target computer to the agentlessmode using Configuration Wizard
1 Install and configure bv-Control for UNIX.
For configuring bv-Control for UNIX through the RMS Console see the RMSConsole and Information Server Getting Started Guide.
2 Launchbv-Control forUNIXConfigurationWizard fromtheUNIXEnterpriseBrowser.
3 Navigate to theRegistrationRelatedOperationspanel of thewizardby clickingNext.
4 In theRegistrationRelatedOperations panel, select Switch registrationmodeoption, and click Next.
85Evaluating bv-Control for UNIXAgentless Registration and Configuration

5 In the Switching Registration Mode panel, select the agent-based targetcomputers that are listed in the Agent based targets field and click >.
The selected target computers are listed in the Agentless targets field of thepanel.
6 Click Next.
7 In theAddCredential Database panel, create a credential database in theAddCredential Database for adding credentials of the registered agentless targetcomputer, and click Next.
8 In the Select Credentials panel, select bv-Control forUNIX from the Productsdrop-down list.
To add credentials for the switched agentless target computers
1 Toadd credentials, select the switched agentless target computer that is listedunder All UNIX Servers > Agentless Servers, and click >>.
2 In theAdditional Settings dialog box, enter the native credentials (other thancredentials of the root user) in the User Name and Password fields of thedialog box.
3 Select any one option from the su Credential(used to gather data) panel ofthe dialog box.
The various options of the su Credential(used to gather data) panel and theirdescription are as follows:
Select this option to use the native usercredentials for both executing queries,and for establishing SSH connectionwiththe Information Server.
Not required
Select this option if you have specifieddefault query credentials for the agentlesstarget computer in the Default QueryCredential’s Additional Settings dialogbox.
Use su account specified inDefault QueryCredentials dialog
Select this option when you want toexecute queries in the superuser context.
Specify the suUserNameandsuPasswordin the respective fields. Here, the SSHconnection between the agentless targetcomputer and the Information Server isestablished in the native user context.
Use su account specified below
Evaluating bv-Control for UNIXAgentless Registration and Configuration
86
4 Click OK on the Additional Settings dialog box.
The credentials of the agentless target computer are added to the credentialdatabase.
5 Click Next.
6 In the Assign a Credential Database to Each User panel, click Next.
7 In the Credential Summary panel, you can find the details of the user that isassociated with the credential database.
8 In theAgentless Configuration Summary panel, the panel displays the resultsin the following format for both the success and the failure status of theoperation:
Success and Failure
-----------------------------------------------
Machine Name: name of the computer registered as agentless
Operation Type: The computer Update Operation details is specified here.
Status Message: message describing the success or failure of the operation
9 Click Next.
10 In the Completing the bv-Control forUNIXConfigurationWizard panel, clickFinish.
To configure the communication protocol for the switched target computer
1 Launch the Configuration Wizard again and navigate to the RegistrationRelated Operations panel.
2 Select theAgentless registrationoption in theRegistrationRelatedOperationspanel.
3 Click Next.
4 In the Configure bv-Control for UNIX Software - Agentless Machine panel,select SSHType andSSHPortNo for the switched agentless target computer.
The SSH options are available in the Target machines currently configuredtabular panel.
5 Complete the configuration of the agentless target computer by navigatingto the last panel of the Configuration Wizard.
Result: The selected target computer is switched to the agentless registrationmode successfully. The target computer is displayed on the UNIX EnterpriseBrowser of the console as an agentless target computer under the All Serversnode.
87Evaluating bv-Control for UNIXAgentless Registration and Configuration
Configuring a SUDO setting in the bvAgentlessConfig.ini file for queryexecution
You canprovide superuser permissions to a user through the superuser do (SUDO)functionality for executingqueries on the agentless target computer. In bv-Controlfor UNIX, you can configure the SUDO setting for the registered agentless targetcomputers, in the bvAgentlessConfig.ini file. After SUDO is enabled for theagentless target computers, all the commands that are specified in the sudoersfile canbe executed. The commands are executedon the agentless target computer.
To configure a SUDO setting in the bvAgentlessConfig.ini file for all configuredagentless target computers
1 Install and configure bv-Control for UNIX.
For configuring bv-Control for UNIX through the RMS Console see the RMSConsole and Information Server Getting Started Guide.
2 Navigate to the (install_drive)\ProgramFiles\Symantec\RMS\Control\UNIX\ConfigFiles directory in the Windowscomputer where the Information Server is installed.
3 Open the bvAgentlessConfig.ini file and edit the SupportsSudo parameterfor the SUDO setting.
The default value of the parameter is false, which means SUDO is disabledfor the registered agentless target computers.
The entry of the parameter is as follows:
SupportsSudo=false
4 Modify the value of the parameter to “true” to enable SUDO for the specifieduser.
SupportsSudo=true
Result: SUDO is enabled for all the configured agentless target computers.
Configuring a SUDO setting in the bvAgentlessConfig.ini filefor specific targetsYou canprovide superuser permissions to a user through the superuser do (SUDO)functionality for executing queries on any specific agentless target computer. Inbv-Control for UNIX, you can configure the SUDO setting for any registeredagentless target computer, in the bvAgentlessConfig.ini file.
Evaluating bv-Control for UNIXAgentless Registration and Configuration
88
To configure a SUDO setting in the bvAgentlessConfig.ini file for a specific agentlesstarget computer (Testcomputer.abc.com.)
1 Install and configure bv-Control for UNIX.
For configuring bv-Control for UNIX through the RMS Console see the RMSConsole and Information Server Getting Started Guide.
2 Navigate to (install_drive)\ProgramFiles\Symantec\RMS\Control\UNIX\ConfigFiles directory in the Windowscomputer where the Information Server is installed.
3 Open the bvAgentlessConfig.ini file, and configure the SupportsSudoparameter for the computer, namely Testcomputer.abc.com.
4 In the bvAgentlessConfig.ini file enter the agentless target computer name(fully qualified domain name) along with the configured value of theSupportsSudo parameter.
The entry in the file can be as follows:
[Testcomputer.abc.com.]
SupportsSudo=true
Credential managementCredentials are vital for successful execution of queries on the UNIX targetcomputers. These credentials are stored in the credential database of theInformation Server after configuring the UNIX target computers. You can addcredentials for both agent-based and agentless target computers through theConfiguration Wizard.
Credential management for agent-based UNIX target computersIn the previous bv-Control for UNIX release versions (from v7.3 to v8.0 SP1),resource credentials were specified for the UNIX target computers duringconfiguration.Hence, querieswere always executed in the context of the root useron the UNIX target computers. But, from bv-Control for UNIX v8.10 releaseonwards, the UNIX target computers can be configured with native credentials.Therefore, queries are executed in the context of the non-root user on the UNIXtarget computers.
Credential-based queries are used to execute queries on the UNIX targetscomputers using the computer’s native operating system credentials. The userhaving a native operating system (OS) account on the UNIX target computer isaccorded privilege to access data. The system administrators can configure theuser in whose context queries are to be executed, through the
89Evaluating bv-Control for UNIXCredential management

bvagentconfiguration.conf map file. Mapping users in thebvagentconfiguration.conf file is not mandatory for query execution.
For more details of mapping users in the bvagentconfiguration.conf file, refer tothe bv-Control for UNIX Online Help
Executing queries on agentless targets using default su querycredentials
If more than one agentless target computer has a common user, then you canconfigure the computers using the default superuser (su) query credentials. Thedefault su query credentials consist of the user name and password of a user. Thedefault su query credentials are common across all target computers that areregistered in the agentless mode.
To execute queries on agentless target computers using the default su querycredentials
1 Install and configure bv-Control for UNIX.
For configuring bv-Control for UNIX through the RMS Console see the RMSConsole and Information Server Getting Started Guide.
2 Launchbv-Control forUNIXConfigurationWizard fromtheUNIXEnterpriseBrowser.
3 Navigate toRegistrationRelatedOperationspanel of theConfigurationWizardby clicking Next.
4 In the Registration Related Operations panel select Agentless registrationoption and click Next.
5 In the Configure bv-Control for UNIX Software - Agentless Machine panel,enter the target computer name or the computer IP address.
Also enter the computer description in the respective field, and click Add.
6 Select the appropriate parameters from the Target computers currentlyconfigured tabular panel for the added target computers.
Select the appropriate properties for the agentless target computer from thedrop-down list and click Next.
7 In the Add Credential Database panel of the Configuration Wizard, create acredential database and click Next.
Evaluating bv-Control for UNIXCredential management
90

To add the default su query credentials for the target computers
1 In the Select Credentials panel of the ConfigurationWizard, select bv-Controlfor UNIX from the Products drop-down list.
Also select the credential database in which you want to store the UNIXcredentials, from the Credential Database drop-down list.
2 In the Select Credentials panel, select the Default Query Credentials node ofthe Resource Objects field, and click >>.
3 Specify the credentials, and click Next.
In the Additional Settings dialog - Default Query Credentials dialog box, dothe following and click OK:
■ Enter User Name/ Password as native credentials in the respective fields.
■ Select either of the options that are provided in the su Credential (usedto gather data) panel of the dialog box.
The options that are provided in the su Credential (used to gather data) panelof the dialog box are as follows:
Select this option when you want to usethe native credentials for both executingqueries and for establishing SSHconnection with the Information Server.
Not required
Select this option when you want toexecute queries in the superuser context.Enter the superuser's credentials such assu Username and su Password in therespective fields. Here, the SSHconnection between the agentless targetcomputer and the Information Server isestablished in the native user context.
Use su account specified below
4 In the Assign a Credential Database to Each User panel, assign a user for thecorresponding credential database, and click Next.
5 In the Credential Summary panel, click Next.
6 In the Validating Machine Information panel, the validation of the data thatis entered in theConfigure bv-Control forUNIXSoftware -AgentlessMachinepanel is performed.
91Evaluating bv-Control for UNIXCredential management
7 After the validation is completed, you can find the results in the AgentlessConfiguration Summary panel.
The following result format appears for both Success and Failure:
Success/FailureMachineName: nameof the computer registered as agentless
OperationType: Operation suchValidate, Update, or Registration is specifiedhere
Status Message: message describing the success or failure of the operation
8 In the Agentless Configuration Summary panel, click Next.
9 In the Completing the bv-Control forUNIXConfigurationWizard panel, clickFinish.
10 Create a scope that contains the configured agentless target computer(Crimson_RedHat) through the Query Builder tool.
11 Create a new query of any data source and run it on the Crimson_RedHattarget computer.
The query is executed in the default superuser ( su) context as configured forthe agentless target computer.
Executing queries on agentless target computers using nativecredentials
You can configure the agentless target computers to execute queries in the nativeuser context. To execute queries in the native user, you must specify the nativecredentials of the configured target computer through the ConfigurationWizard.The native credentials comprise the user name and password of the native userof the target computer’s operating system. The queries execute in the native usercontext on the agentless target computer.
To execute queries on the agentless target computers using native credentials
1 Install and configure bv-Control for UNIX.
For configuring bv-Control for UNIX through the RMS Console see the RMSConsole and Information Server Getting Started Guide.
2 Launchbv-Control forUNIXConfigurationWizard fromtheUNIXEnterpriseBrowser.
3 Navigate to the Registration Related Operations panel of the ConfigurationWizard by clicking Next.
4 In theRegistrationRelatedOperations panel, select theAgentless registrationoption and click Next.
Evaluating bv-Control for UNIXCredential management
92
5 In the Configure bv-Control for UNIX Software - Agentless Machine panel,specify the target computer name or its IP address.
You must also specify the computer description in the respective fields, andclick Add.
The added target computers are listed in the Target machines currentlyconfigured tabular panel.
6 Select the appropriate properties for the agentless target computer from thedrop-down list and click Next.
To add the native credentials for the target computers
1 In the Add Credential Database panel of the Configuration Wizard, create acredential database and click Next.
The credential database is used to store the credentials of the target computersthat are registered in the agentless mode.
2 In the Select Credentials panel, select bv-Control forUNIX from the Productsdrop-down list.
Also select the credential database in which you want to store the UNIXcredentials, from the Credential Database drop-down list.
3 In the Select Credentials panel, select Crimson_RedHat computer that is listedunder the All UNIX Servers >Agentless Servers node, and click >>.
This node is listed under the Resource Objects field.
4 Specify the credentials, and click Next.
In the Additional Settings dialog box do the following:
■ Enter User Name/ Password as native credentials in the respective fieldsof the dialog box. You can also specify the credentials of a root user too.
■ Select the Not Required option in the su Credential (used to gather data)category of the dialog box. The option is the default option of the dialogbox. Select this option touse thenative credentials for both communicatingwith the Information Server and for executing queries. The queries areexecuted in the native user context.
5 In the Assign a Credential Database to Each User panel, assign a user for thecorresponding credential database, and click Next.
6 In the Credential Summary panel, click Next.
7 In the Validating Machine Information panel, the validation of the data thatis entered in theConfigure bv-Control forUNIXSoftware -AgentlessMachinepanel is performed.
93Evaluating bv-Control for UNIXCredential management
8 After the validation is completed, you can find the results in the AgentlessConfiguration Summary panel.
The following result format appears for both Success and Failure:
Success/FailureMachineName: name of themachine registered as agentless
OperationType: Operation suchValidate, Update, or Registration is specifiedhere
Status Message: message describing the success or failure of the operation
9 In the Agentless Configuration Summary panel, click Next.
10 In the Completing the bv-Control forUNIXConfigurationWizard panel, clickFinish.
11 Create a scope that contains the configured agentless target computer(Crimson_RedHat) through the Query Builder tool.
12 Create a new query of any data source and run it on the Crimson_RedHattarget computer.
The query is executed in the native user context as configured for theagentless target computer.
To execute queries on the agentless target computers using superuser credentials
1 Install and configure bv-Control for UNIX.
For configuring bv-Control for UNIX through the RMS Console see the RMSConsole and Information Server Getting Started Guide.
2 Launchbv-Control forUNIXConfigurationWizard fromtheUNIXEnterpriseBrowser.
3 Navigate to the Registration Related Operations panel of the ConfigurationWizard by clicking Next.
4 In theRegistrationRelatedOperations panel, select theAgentless registrationoption and click Next.
5 In the Configure bv-Control for UNIX Software - Agentless Machine panel,specify the target computer name or its IP address.
You must also specify the computer description in the respective fields, andclick Add.
The added target computers are listed in the Target machines currentlyconfigured tabular panel.
Evaluating bv-Control for UNIXCredential management
94

6 Select the appropriate properties for the agentless target computer from thedrop-down list and click Next.
7 In the Add Credential Database panel of the Configuration Wizard, create acredential database and click Next.
To add the superuser credentials for the target computers
1 In the Select Credentials panel of the ConfigurationWizard, select bv-Controlfor UNIX from the Products drop-down list.
Also select the credential database in which you want to store the UNIXcredentials, from the Credential Database drop-down list.
2 In the Select Credentials panel, select Crimson_RedHat computer that is listedunder the All UNIX Servers >Agentless Servers node, and click >>.
This node is listed under the Resource Objects field.
3 Specify the credentials, and click Next.
In the Additional Settings dialog box do the following:
■ SelectUsesuaccountspecifiedbelow of the su Credential (used to gatherdata) category of the dialog box.
■ Enter su User Name/su Password (required) as superuser credentials inthe respective fields of the dialog box. The queries are executed in thesuperuser context on the target computers.Here, the SSH communication between the Information Server and theagentless target computer is established in thenative user context. Queriesare executed in the superuser context on the target computer.
4 In the Assign a Credential Database to Each User panel, assign a user for thecorresponding credential database, and click Next.
5 In the Credential Summary panel, click Next.
6 In the Validating Machine Information panel, the validation of the data thatis entered in theConfigure bv-Control forUNIXSoftware -AgentlessMachinepanel is performed.
7 After the validation is completed, you can find the results in the AgentlessConfiguration Summary panel.
The following result format appears for both Success and Failure:
Success/FailureMachineName: name of themachine registered as agentless
OperationType: Operation suchValidate, Update, or Registration is specifiedhere
Status Message: message describing the success or failure of the operation
95Evaluating bv-Control for UNIXCredential management
8 In the Agentless Configuration Summary panel, click Next.
9 In the Completing the bv-Control forUNIXConfigurationWizard panel, clickFinish.
10 Create a scope that contains the configured agentless target computer(Crimson_RedHat) through the Query Builder tool.
11 Create a new query of any data source and run it on the Crimson_RedHattarget computer.
The query is executed in the superuser context as configured for the agentlesstarget computer.
Credential management for agentless UNIX target computersThe agentless target computersmust be configuredwith credentials for successfulexecution of queries. As the agentless target computers are connected remotelywith the Information Server, credentials are required for communication and forquery execution. You can configure the agentless computerswith either superusercredentials, default superuser credentials, or with native credentials forcommunication and for query execution.
Superuser credentialsThe superuser (su) credentials are used for configuring the agentless targetcomputers to execute queries in the superuser context on the target computer.The superuser credentials consist of the user name and password of a user, inwhose context the queries are to be executed. The su credentials can be specifiedthrough the Configuration Wizard or the RMS Credentials Manager. Thecredentials are stored in the credential database.
Default superuser credentialsThe default superuser (su) credentials are used for configuring the targetcomputers to execute queries in the default superuser context on the targetcomputer. Thedefault superuser credentials comprise theusernameandpasswordof a common user that is available for multiple target computers registered asagentless. The default su credentials can be specified through the ConfigurationWizard or the RMS’s Credentials Manager. The credentials are stored in thecredential database.
Evaluating bv-Control for UNIXCredential management
96
Executing queries for UNIX agents that are configured with defaultquery credentials
You can provide default query credentials for the user accounts that are commonacross all UNIX target computers. The target computers uses the default querycredentials for their configuration. The explicitly specified native or resourcecredentials override the default query credentials. The default query credentialsmust be the credentials of some native user of the operating system.
To execute the queries that are based on default query credentials
1 Install and configure bv-Control for UNIX.
For configuring bv-Control for UNIX through the RMS Console see the RMSConsole and Information Server Getting Started Guide
2 Launchbv-Control forUNIXConfigurationWizard fromtheUNIXEnterpriseBrowser.
3 Navigate to the Configure bv-Control for UNIX Software -Agent basedMachines panel of the wizard by clicking Next.
4 Select the UNIX target computer to configure, and click Next.
5 In the Add Credential Database panel, select a credential database from thelist for storing the credentials and click Next
You can also add a new credential database in the panel.
6 In the Select Credentials panel, select the default query credentials node thatare listed in the Resource Objects field and click >>.
You can also double-click the Default Query Credential node.
7 In theAdditional Settings dialog box, enter thenative credentials of thenativeuser that is common across all the UNIX target computers and click OK.
Result: The UNIX target is configured with its default query credentials. Thequeries execute in theUNIXuser context after authenticating the native usercredentials.
Executing queries for UNIX agents that are configured with resourcecredentials
Youcanexecutequeries on theUNIXagent context, if theUNIX target is configuredwith theResource Credentials in the Information Server. The resource credentialsare specific to the bv-Control forUNIX application and are used for authenticatingthe UNIX target computer during query execution.
97Evaluating bv-Control for UNIXCredential management
To execute the queries that are based on resource credentials
1 Install and configure bv-Control for UNIX.
For configuring bv-Control for UNIX through the RMS Console see the RMSConsole and Information Server Getting Started Guide.
2 Launchbv-Control forUNIXConfigurationWizard fromtheUNIXEnterpriseBrowser.
3 Navigate to the Configure bv-Control for UNIX Software -Agent basedMachines panel of the wizard by clicking Next.
4 Select the UNIX target computer to configure, and click Next.
5 In the Add Credential Database panel, select a credential database from thelist for storing the credentials.
You can also add a new credential database in the panel.
6 Click Next.
7 In the Select Credentials panel, select the UNIX target computers that arelisted under either of the following nodes and click >>:
■ All UNIX Servers>Agent-based Servers
■ Servers without Credentials
8 You can also double-click the listed UNIX target computer from either of thenodes.
9 EnterResourceNameandPassword as resource credentials of theUNIX targetcomputer in the dialog box, and click OK.
Result: The UNIX target is configured with its resource credentials. Thequeries execute in the UNIX agent context after authenticating the resourcecredentials of the UNIX target computer, which are stored in the credentialdatabase.
Executing queries for UNIX agents that are configured with nativecredentials
You can execute queries in the UNIX target computer’s native user context if thecomputer is configuredwith thenative credentials in the InformationServer. Thenative credentials can belong to a root or a non-root user of the UNIX targetcomputer.
Evaluating bv-Control for UNIXCredential management
98
To execute the queries that are based on native credentials
1 Install and configure bv-Control for UNIX.
For configuring bv-Control for UNIX through the RMS Console see the RMSConsole and Information Server Getting Started Guide.
2 Launchbv-Control forUNIXConfigurationWizard fromtheUNIXEnterpriseBrowser.
3 Navigate to the Configure bv-Control for UNIX Software -Agent basedMachines panel of the wizard by clicking Next.
4 Select the UNIX target computer to configure, and click Next.
5 In the Add Credential Database panel, select a credential database from thedrop-down list for storing the credentials.
You can also add a new credential database in the panel.
6 Click Next.
7 In the Select Credentials panel, select the UNIX target computers that arelisted under either of the following nodes and click >> or double-click thetarget computers:
■ All UNIX Servers > Agent-based Servers
■ Servers without Credentials
8 In the Additional Settings dialog box, select Native Credentials (v8.10 agentsonly) option that is displayed for the Credential Type category.
9 Enter User Name and Password as native user credentials of the targetcomputer in the respective fields of the dialog box.
10 Click OK in the Additional Settings dialog box.
Result: The UNIX target is configured to use native user credentials. Thequeries execute in the user context after authenticating thenative credentialsof the UNIX target computer, which are stored in the credential database.
Security managementIn aNetworkEnterprise, computers consist of different components suchas kernelparameters, Apache Web server, and Versioning systems. The components areused for various services, such as Domain Name Service (DNS), Telnet, FTP, andHTTPD for business purpose. These computers can be vulnerable to varioussecurity threats,which can result in a critical breakdownof the business operation.Therefore, security management of computers in a networking environment areof paramount importance to resist the attacks.
99Evaluating bv-Control for UNIXSecurity management

The attacks are generated through a service or an installed component of thecomputer. bv-Control for UNIX contains the predefined queries that are created,based on the SANS (SysAdmin, Audit, Networking, and Security) Top 10 policy.The SANS Top 10 Policy is a set of procedures for securing a computer. You canexecute these predefined queries to report on the installed components. Theinstalled components are kernel parameters, kernel version, and BIND version ofthe computers of a network.
About Kernel ParametersIn a computer, the core component of the operating system is the kernel. Thekernel is responsible for a number of low-level interactions between the operatingsystem and hardware, memory, scheduling, interprocess communications, filesystems, and others. As the kernel has privileged access to all aspects of thesystem, a kernel-level compromise can be devastating. Risks from kernelvulnerabilities include denial of service, execution of arbitrary code with systemprivileges, unrestricted access to the file system, or root level access. Manyvulnerabilities are exploitable remotely, and are dangerous when the avenue ofattack is through a service that is published in the Internet. In certain cases, bysending a malformed icmp packet, the kernel can get stuck in a loop. The kernelis stuckwhen it consumesall theCPUresources and renders the computersuseless.
Reporting on SANS TOP 10 vulnerabilities for UNIX target computersThis scenario details the predefined query to report on the kernel parameters ofthe computer. You can run the query U10-Kernel Parameters to report on thekernel parameters of the computer and to comply with the SANS Top 10 policy.
To execute the predefined query to report on SANS TOP 10 vulnerabilities for UNIXtarget computers
1 From the RMS container’s Risk Assessment and Control folder, clickPredefined > bv-Control for UNIX > Security Best Practices > SANS Top 10folder.
2 Click U10-Kernel Parameters query.
The query information is displayed on the right-side pane.
3 Right-click U10-Kernel Parameters, and select the Run > And View as Gridmenu.
4 Click the Report Preview icon on the U10-Kernel Parameters grid.
Your RMS Console system must have a printer setup to preview reports.
Evaluating bv-Control for UNIXSecurity management
100
Configuration managementA significant part of the vulnerabilitymanagement activities are related to ensurethe security best practices through configuration management of servers andworkstations. The vulnerabilitymanagement includes the operating system (OS),thepatch level review, and retrieval of the computer information. Thevulnerabilitymanagement also includes the list of installedpackages in a computer, and retrievalof user information. The administrators can efficiently assess and secure theinformation.
Retrieving computer informationThis scenario details on the predefined query to report on the computersconfiguration. You can run the query Machines Configuration to report on theconfiguration of the queried computer.
To execute the predefined query to retrieve computer information
1 From the RMS container, click the Pre-defined > bv-Control for UNIX >Configuration Management > Machines folder.
2 Click the Machines Configuration query.
The query information is displayed on the right-side pane.
3 Right-click Machine Configuration and click Run > And View as Grid menu.
4 Click the Report Preview icon on the grid.
The RMS Console must have a printer set-up to preview the reports.
Retrieving the list of packages that are installed on the computersThis scenario details on the predefined query for reporting on the list of packagesthat are installed on the computers. You can run thequeryDetailed List of InstalledPackages to report on the packages that are installed on the queried computer.
To execute the predefined query to retrieve the detailed list of installed packageson the target computer
1 From the RMS container, select the Pre-defined > bv-Control for UNIX >Configuration Management > Software Packages and Patches folder andselect it.
2 Click Detailed List of Installed Packages query.
The query information is displayed on the right-side pane.
101Evaluating bv-Control for UNIXConfiguration management
3 Right-clickDetailedListof InstalledPackages and click the Run >AndViewas Grid menu.
4 Click the Report Preview icon on the grid.
The RMS Console must have a printer setup to preview the reports.
Retrieving user informationThis scenario details the predefined query for reporting on the user informationof the computers. You can run the query Detailed User Documentation to reporton the user information of the queried computer.
To execute the predefined query to retrieve detailed user documentation
1 From the RMS container, click the Pre-defined > bv-Control for UNIX >Configuration Management > Users folder.
2 Click Detailed User Documentation query.
The query information is displayed in the right-side pane.
3 Right-click Detailed User Documentation and click the Run > And View asGrid menu.
4 Click the Report Preview icon on the grid.
The RMS Console must have a printer setup to preview the reports.
Content and capacity managementThe area of concern in a rapidly evolving IT organization is to assess the availablecapacity. Assessment involves reviewing the available capacity and determinewhether the capacity usage fits with the business needs of the organization. Theadministrators have the ability to not only identify the cases but also to directlyresolve them.
Using disk space less than 50 percent of total allocationThe scenario details about reporting on usage of disk space of the computers,which is less than 50 percent of the total allocation. You can modify and run theFilesystems to query 5 percent utilized query. The query reportswhether the diskspace utilization is less than 50 percent of the total allocation.
Evaluating bv-Control for UNIXContent and capacity management
102
To execute the predefined query to retrieve Filesystems that are utilized only 5percent
1 From the RMS container, click Pre-defined > bv-Control for UNIX > StorageAnalysis > Server Disk Space folder.
2 Click the Filesystems only 5% utilized query.
The query information is displayed on the right-side pane.
3 Right-click Filesystemsonly 5%utilized and select Settings>QueryDefinitionmenu.
4 In the Query Builder, click the Filter Specification tab.
To create a filter
1 Select theDisk Space: PercentUsed Less or Equal To 5 option that is displayedin the lower panel.
2 Click Modify.
3 In the Filter Term Definition dialog box enter 50 in the Specify a value field,and click OK.
4 Click OK in the Query Builder dialog box.
5 In the Query Options dialog box, you can either view the query in a grid orsave it as follows:
■ Click Run > View as Grid menu.
■ Click Save in the dialog box.
You can save the query with an appropriate name such as Filesystems only50% utilized in the My Items folder of the RMS Console.
6 Click the Report Preview icon on the grid.
The RMS Console must have a printer setup to preview the reports.
Using Composite File Descriptor’s Find options to search dataThis scenario describes theusage of theComposite FileDescriptor to create queriesfor searching data in the UNIX target computer’s directories. Different searchcriteria can be specified in the Composite File Descriptor dialog box that is basedon the data to be retrieved from the UNIX target computer.
To invoke the Composite File Descriptor for searching data using the Find options
1 Click the New Query icon on the toolbar of the RMS Console.
2 In the Select Data Source dialog box, enumerate the Files data source.
103Evaluating bv-Control for UNIXContent and capacity management
3 Double-click Composite File Descriptor listed under the All Fields folder ofthe data source.
You can also click Add after selecting the descriptor.
4 In theComposite FileDescriptor dialog box, select theDescriptorValue option,and click Change Descriptor.
5 In theDescriptor:Composite FileDescriptor dialog box, you can enter differentvalues to search and retrieve data.
To retrieve data about the /etc directory only
1 Invoke the Descriptor:Composite File Descriptor dialog box.
2 In the File Selection Options panel of the Composite File Descriptor dialogbox, enter the values for the given fields.
The values to be entered for fields of the Composite File Descriptor dialogbox are as follows:
■ Enter / in the Path to search in field.
■ Enter etc in the File to search for field.
■ Check Include subfolders check box.
■ Uncheck Search in home directories check box.
■ Enter -maxdepth@sp1 in the Find Options field.
■ Select All option for the Max Files option.
3 Uncheck Content SelectionOptions and select the appropriate options in thepanel.
The various options in the panel are as follows:
■ Do not select the File Comparison option.
■ Do not select the File Content option.
■ Do not specify any entry in the File path to compare field.
■ Uncheck Ignore trailing blanks option.
■ Uncheck Ignore whitespaces option.
■ Uncheck Ignore case option
4 Click OK in the Descriptor:Composite File Descriptor dialog box.
5 Click OK in the Query Builder dialog box.
6 In the Query Options dialog box, click Run after selecting the Grid option.
Evaluating bv-Control for UNIXContent and capacity management
104
To retrieve data in the /etc directory, in its files and in its subdirectories
1 Invoke the Descriptor:Composite File Descriptor dialog box.
2 In the File Selection Options panel of the Composite File Descriptor dialogbox, enter the values for the given fields.
The values to be entered for fields of the Composite File Descriptor dialogbox are as follows:
■ Enter /etc in the Path to search in: field.
■ Enter /etc in the File to search for: field.
■ Uncheck Include subfolders option.
■ Uncheck Search in home directories option.
■ Do not specify any value in the Find Options field.
■ Select All option for the Max Files option.
3 Uncheck Content Selection Options: check box and select the appropriateoptions in the panel.
The various options in the panel are as follows:
■ Do not select the File Comparison option.
■ Do not select the File Content option.
■ Do not specify any entry in the File path to compare: field.
■ Uncheck Ignore trailing blanks option.
■ Uncheck Ignore whitespaces option.
■ Uncheck Ignore case option.
4 Click OK in the Descriptor:Composite File Descriptor dialog box.
5 Click OK in the Query Builder dialog box.
6 In the Query Options dialog box, click Run after selecting the Grid option.
To retrieve data in the /etc directory and in all its subdirectories and files
1 Invoke the Descriptor:Composite File Descriptor dialog box.
2 In the File Selection Options panel of the Composite File Descriptor dialogbox, enter the values for the given fields.
The values to be entered for fields of the Composite File Descriptor dialogbox are as follows:
■ Enter /etc in the Path to search in field.
105Evaluating bv-Control for UNIXContent and capacity management

■ Enter /etc in the File to search for field.
■ Check the Include sub-folders option.
■ Uncheck the Search in home directories option.
■ Do not specify any value in the Find Options field.
■ Select the All option for the Max Files option.
3 Uncheck Content Selection Options check box and select the appropriateoptions in the panel.
The various options in the panel are as follows:
■ Do not select the File Comparison option.
■ Do not select the File Content option.
■ Do not specify any entry in the File path to compare field.
■ Uncheck the Ignore trailing blanks option.
■ Uncheck the Ignore whitespaces option.
■ Uncheck the Ignore case option.
4 Click OK in the Descriptor:Composite File Descriptor dialog box.
5 Click OK in the Query Builder dialog box.
6 In the Query Options dialog box, click Run after selecting the Grid option.
To retrieve data in the /etc directory and in all its subdirectories and files
1 Invoke the Descriptor:Composite File Descriptor dialog box.
2 In the File Selection Options panel of the Composite File Descriptor dialogbox, enter the values for the given fields.
The values to be entered for fields of the Composite File Descriptor dialogbox are as follows:
■ Enter /etc in the Path to search in field.
■ Enter /etc in the File to search for field.
■ Check the Include sub-folders option.
■ Uncheck the Search in home directories option.
■ Enter -maxdepth@sp3 in the Find Options field.
■ Select the All option for the Max Files option.
3 Uncheck Content Selection Options check box and select the appropriateoptions in the panel.
Evaluating bv-Control for UNIXContent and capacity management
106

The various options in the panel are as follows:
■ Do not select the File Comparison option.
■ Do not select the File Content option.
■ Do not specify any entry in the File path to compare field.
■ Uncheck the Ignore trailing blanks option.
■ Uncheck the Ignore whitespaces option.
■ Uncheck the Ignore case option.
4 Click OK in the Descriptor:Composite File Descriptor dialog box.
5 Click OK in the Query Builder dialog box.
6 In the Query Options dialog box, click Run after selecting the Grid option.
To retrieve the full contents of the files that are located in the /etc/customdirectorydirectory
1 Invoke the Descriptor:Composite File Descriptor dialog box.
2 In the File Selection Options panel of the Composite File Descriptor dialogbox, enter the values for the given fields.
The values to be entered for fields of the Composite File Descriptor dialogbox are as follows:
■ Enter /etc in the Path to search in field.
■ Enter inetd.conf in the File to search for: field.
■ Check the Include sub-folders option.
■ Uncheck the Search in home directories option.
■ Do not specify any value in the Find Options field.
■ Select the All option for the Max Files option.
3 Uncheck Content Selection Options check box and select the appropriateoptions in the panel.
The various options in the panel are as follows:
■ Do not select the File Comparison option.
■ Do not select the File Content option.
■ Do not specify any entry in the File path to compare field.
■ Uncheck the Ignore trailing blanks option.
■ Uncheck the Ignore whitespaces option.
107Evaluating bv-Control for UNIXContent and capacity management
■ Uncheck the Ignore case option.
4 Click OK in the Descriptor:Composite File Descriptor dialog box.
5 Click OK in the Query Builder dialog box.
6 In the Query Options dialog box, click Run after selecting the Grid option.
ActiveAdmin function in bv-Control for UNIXThis scenario introduces two more features, ActiveAdmin®, and the ability toquery a single target from the bv-Control for UNIX Enterprise. ActiveAdmin letsyou make changes to your UNIX environment without leaving bv-Control forUNIX. ActiveAdmin can be used from any query grid provided the selected fieldor the record is available for modification or deletion. You have the option toexecute queries on a single computer from the UNIX Enterprise. This methodreduces the time to return the results, because you can narrow the search criteriato a single target computer. After you have selected the computer, you can locatea user record and use ActiveAdmin to change the User Information field.
To execute queries for single target computer from the UNIX Enterprise
1 Click the (+) sign next to the bv-Control for UNIX icon on the left pane, andexpand the UNIX Enterprise.
2 Expand a computer and then select any data source.
For example, select User data source for one of your computers. The list ofusers can be viewed on the right-hand pane.
3 Select a record you want to modify and right-click it.
4 Select the Edit menu.
5 In the Edit Field menu dialog box, select any field you want to modify fromthe drop-down list of Select the Field to Edit field.
For example, you can select User Information.
6 If you want to modify this value, enter the new value in the Enter the valueyou want to change to field and click OK.
7 The Advisories dialog box indicates whether the value is modified or not.
8 Click OK on the Advisories dialog box.
You have completed the changes you made to the User Information fieldusing ActiveAdmin.
Evaluating bv-Control for UNIXActiveAdmin function in bv-Control for UNIX
108
SummaryThank you for taking time to perform a hands-on evaluation of bv-Control forUNIX. We hope that you have found this document useful to learn more aboutthe product. The scenarios in this guide only point out a small number of featuresand benefits that your organization can realize by implementing the solutions.The bv-Control for UNIX is an essential tool that can protect your investment inyour UNIX system. The product also increases the productivity of your securityand systems administration personnel.
109Evaluating bv-Control for UNIXActiveAdmin function in bv-Control for UNIX

Evaluating bv-Control for UNIXActiveAdmin function in bv-Control for UNIX
110
Uninstalling the UNIX agent
This chapter includes the following topics:
■ About uninstalling bv-Control for UNIX from the Windows computer
■ Uninstalling theUNIXagents from the target computers using bv-ConfigUNIXutility
■ Manually uninstalling the UNIX agents from the target computers
About uninstalling bv-Control for UNIX from theWindows computer
Uninstalling thebv-Control forUNIXsnap-in fromtheWindowscomputer removesthe corresponding node from the RMS Console’s tree view.
For uninstallation of bv-Control forUNIX from theRMSConsole and InformationServer, see the Control Compliance Suite Installation Guide.
Uninstalling the UNIX agents from the targetcomputers using bv-Config UNIX utility
Use the bv-Config UNIX utility to uninstall the bv-Control for UNIX agent fromone or more target computers. Even if the agent was not installed using the bv-Config UNIX utility, you can still uninstall the agent using the utility. To do so,you need to create a CSV file and add the target computer’s IP Address in the filethrough the Task Creation Wizard.
8Chapter

To uninstall the UNIX agent using the bv-Config UNIX utility
1 Double-click the bvConfig UNIX utility that is located on the right-side paneof the console.
2 In the bv-Config UNIX panel, click the File > Open menu.
3 In the Set Pass-phrase dialog box, enter the pass-phrase for theCSVyouwantto open.
4 In the Open dialog box, enter the file name or select the CSV file, whichcontains the target computer that you want to uninstall.
The computer name is displayed on the right-hand pane of the bv-ConfigUNIX panel. You can specify more than one target computer names too inthe CSV file.
5 On the row that contains the computer that you want to uninstall, uncheckInstallandRegisterBVIS check box, and then check theUninstall check box.
Use one of the following methods to uninstall:
■ In the treeview, right-click Machine, and select Start Execution.
■ From the toolbar, select Start Execution.
6 To save the changes to the CSV file, click the File > Save menu.
7 In the Save As dialog box, enter the file name, and click Save.
Manually uninstalling theUNIX agents from the targetcomputers
You can manually uninstall bv-Control for UNIX agent from the UNIX targetcomputers by executing the uninstallation command specific to the operatingsystem.
Uninstalling from the Solaris target computersTo uninstall bv-Control for UNIX agent from the Solaris UNIX target computer,you can use the pkgrm command.
Uninstalling the UNIX agentManually uninstalling the UNIX agents from the target computers
112

To uninstall from the Solaris target computers
1 From the command line, type the following:
/usr/sbin/pkgrm bvControl
2 Press Enter.
The following prompts appear:
The following package is currently installed: bv-Control bv-
Control for UNIX (sparc) 9.0.0 Do you want to remove this package?
[y,n,?,q]
Type y and press Enter.
##Removing installed package instance bv-Control.
This package contains scripts which will be executed with
super-user permission during the process of uninstall this
package.
Do you want to continue with the removal of this package [y,n,?,q]
Type y and press Enter.
##Verifying package dependencies.
##Processing package information
##Executing preremove script.
Removing bv-Control for UNIX daemon startup. Stopping bv-Control
for UNIX agent... Attempting to communicate with xxx.xxx.xxx.xx
[machine name or IP] from the scoping database. Unregistering all
the BVIS from this local machine...
Unregistering local machine from Information Server xxx.xxx.xxx.xx
[machine name or IP] [the script shows the files that have been
removed] ## Executing postremove script
## Updating system information. Removal of <bv-Control> was
successful. You have successfully removed bv-Control for UNIX
from the Solaris target machine.
Uninstalling from the Red Hat and SUSE Linux target computersTo uninstall bv-Control for UNIX agent from the Red Hat and SUSE targetcomputers, you can use the rpm command.
113Uninstalling the UNIX agentManually uninstalling the UNIX agents from the target computers
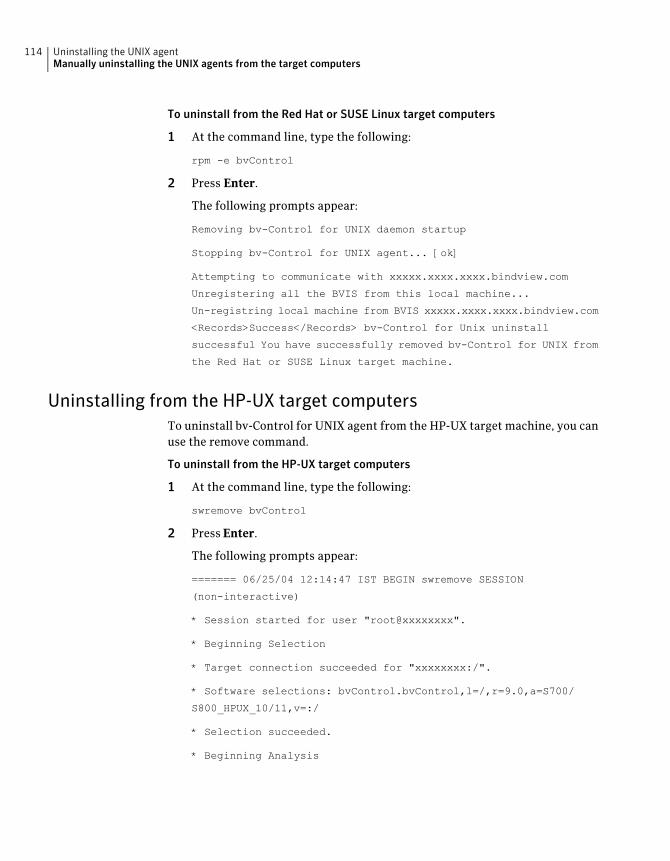
To uninstall from the Red Hat or SUSE Linux target computers
1 At the command line, type the following:
rpm -e bvControl
2 Press Enter.
The following prompts appear:
Removing bv-Control for UNIX daemon startup
Stopping bv-Control for UNIX agent... [ok]
Attempting to communicate with xxxxx.xxxx.xxxx.bindview.com
Unregistering all the BVIS from this local machine...
Un-registring local machine from BVIS xxxxx.xxxx.xxxx.bindview.com
<Records>Success</Records> bv-Control for Unix uninstall
successful You have successfully removed bv-Control for UNIX from
the Red Hat or SUSE Linux target machine.
Uninstalling from the HP-UX target computersTo uninstall bv-Control for UNIX agent from the HP-UX target machine, you canuse the remove command.
To uninstall from the HP-UX target computers
1 At the command line, type the following:
swremove bvControl
2 Press Enter.
The following prompts appear:
======= 06/25/04 12:14:47 IST BEGIN swremove SESSION
(non-interactive)
* Session started for user "root@xxxxxxxx".
* Beginning Selection
* Target connection succeeded for "xxxxxxxx:/".
* Software selections: bvControl.bvControl,l=/,r=9.0,a=S700/
S800_HPUX_10/11,v=:/
* Selection succeeded.
* Beginning Analysis
Uninstalling the UNIX agentManually uninstalling the UNIX agents from the target computers
114
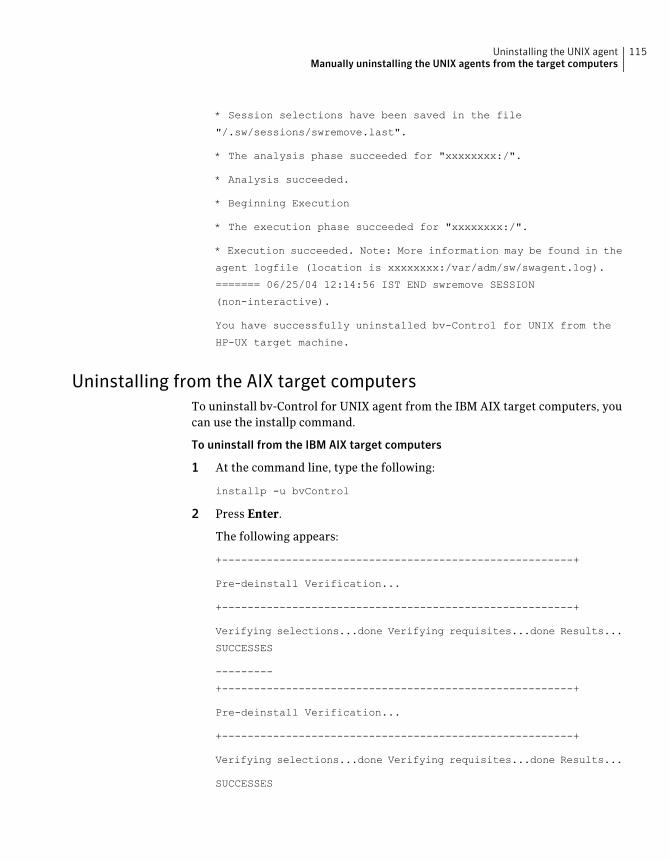
* Session selections have been saved in the file
"/.sw/sessions/swremove.last".
* The analysis phase succeeded for "xxxxxxxx:/".
* Analysis succeeded.
* Beginning Execution
* The execution phase succeeded for "xxxxxxxx:/".
* Execution succeeded. Note: More information may be found in the
agent logfile (location is xxxxxxxx:/var/adm/sw/swagent.log).
======= 06/25/04 12:14:56 IST END swremove SESSION
(non-interactive).
You have successfully uninstalled bv-Control for UNIX from the
HP-UX target machine.
Uninstalling from the AIX target computersTo uninstall bv-Control for UNIX agent from the IBM AIX target computers, youcan use the installp command.
To uninstall from the IBM AIX target computers
1 At the command line, type the following:
installp -u bvControl
2 Press Enter.
The following appears:
+-------------------------------------------------------+
Pre-deinstall Verification...
+-------------------------------------------------------+
Verifying selections...done Verifying requisites...done Results...
SUCCESSES
---------
+-------------------------------------------------------+
Pre-deinstall Verification...
+-------------------------------------------------------+
Verifying selections...done Verifying requisites...done Results...
SUCCESSES
115Uninstalling the UNIX agentManually uninstalling the UNIX agents from the target computers

---------
verification and will be removed.
Selected Filesets
-----------------
bvControl.rte 9.0.0.0 # bv-Control for UNIX is a com...
<< End of Success Section >> FILESET STATISTICS
------------------
1 Selected to be deinstalled, of which: 1 Passed pre-deinstall
verification
----
1 Total to be deinstalled
+-------------------------------------------------------+
Deinstalling Software...
+-------------------------------------------------------+
installp: DEINSTALLING software for: bvControl.rte 9.0.0.0
Removing bv-Control for UNIX from daemon startup Stopping
bv-Control for UNIX Daemon Attempting to communicate with
xxx.xxx.xxx.bindview.com and remove this machine from the scoping
database.
Unregistering all the BVIS from this local machine...
Un-registring local machine from BVIS xxx.xxx.xxx.bindview.com
<Records>Success</Records>
rm: 0653-603 Cannot remove directory rf/Security/PatchRFs Finished
processing all filesets. (Total time: 21 secs).
+-------------------------------------------------------+
Summaries:
+-------------------------------------------------------+
Installation Summary
--------------------
Name Level Part Event Result
+-------------------------------------------------------+
Uninstalling the UNIX agentManually uninstalling the UNIX agents from the target computers
116

bvControl.rte 9.0.0.0 USR DEINSTALL SUCCESS You have successfully
removed bv-Control for UNIX from the UNIX target.
=========================================
117Uninstalling the UNIX agentManually uninstalling the UNIX agents from the target computers

Uninstalling the UNIX agentManually uninstalling the UNIX agents from the target computers
118

Aagent-based architecture 13agent-based registration mode
configuring UNIX target computers 62agentless architecture 13architecture of bv-Control for UNIX 13
Bbv-Config UNIX utility
about 15accessing the utility 47installing the UNIX agent 46
bvAgentlessConfig.ini fileconfiguring SUDO settings 88
Cconfiguration of the target computer as agentless
adding default query credentials 75adding superuser credentials 74
configuration of the target computers as agentlessabout different credential types 71adding credentials for public key authentication
73adding native credentials 73using Configuration Wizard 70
Ddata sources of bv-Control for UNIX 14default query credentials
registering the target computers 66deployment requirements of bv-Control forUNIX 17
Eevaluation scenarios of bv-Control for UNIX 81–82
ActiveAdmin function in bv-Control forUNIX 108
configuration management 101configuring target computers by importing .csv
file 83content and capacity management 102
evaluation scenarios of bv-Control for UNIX(continued)
credential management 89security management 99switching target computers registration
modes 85
Ffeatures of bv-Control for UNIX 12
Iinstall.sh 33
installing agent on various OS 33installing the UNIX agent 33
installation of bv-Control for UNIX snap-in 25installation options for UNIX agent 27
Mmanual installation of UNIX agent
AIX target computers 36HP-UX target computers 38Red Hat Linux target computers 44Sun Solaris target computers 40SUSE Linux target computers 43
Nnative credentials
registering the target computers 65
Ppackage dependencies to install the UNIX agent 28
AIX 31HP-UX 30Red Hat 28Sun Solaris 31SUSE Linux 29SUSE Linux Enterprise Server 29
protocols for communication 63public key authentication 79
Index
Rregistration modes
switching from agent-based to agentlessmode 77
switching from agentless to agent-basedmode 78
registration of target computer as agentless 69registration of UNIX target computers 54
registering using resource credentials 54without using resource credentials 55
resource credentialsregistering the target computers 66
RMS Console and Information Server 12
Ssetup.sh script
communicating with specific IP address 58notifying Information Servers about target IP
address 57retrieving installed snap-ins 58running the script 56starting agent on specific IP address 56
SSH communication 14SSH connector settings 78system requirements 17
hardware requirements to install the UNIXagents 18
installing bv-Control for UNIX on the Windowscomputer 18
software requirements to install the UNIXagents 19
Ttypes of configuration of the target computers
agent-based 25agentless 25
Uuninstallation of bv-Control for UNIX
from the target computers using bv-Config 111from the Windows computer 111uninstalling manually from the target
computers 112unregistration of the target computers 67upgrades of the UNIX agents 21
Index120