Embed Size (px)
Citation preview
System Center Configuration Manager Integration Guide
Migrate7 User’s Guide Page 2
Table of Contents
1. Introduction ..................................................................................................................................................... 3
Audience ................................................................................................................................................................. 3
Prior Knowledge ..................................................................................................................................................... 3
Benefits of Integration ............................................................................................................................................ 3
2. Architecture Concepts ...................................................................................................................................... 5
3. Getting Started ................................................................................................................................................ 7
Prerequisites ........................................................................................................................................................... 7
Preparing the Migrate7 Environment .................................................................................................................... 7
Installing Migrate7 .......................................................................................................................................... 7
Create Data Store(s) ........................................................................................................................................ 7
Configuring User State Migration Templates .................................................................................................. 8
4. Extracting User State........................................................................................................................................ 9
Overview................................................................................................................................................................. 9
Creating the Task Sequence ................................................................................................................................... 9
Migrate7 Command Line ................................................................................................................................. 9
Configuration Manager Console Steps .......................................................................................................... 10
Advertising the Task Sequence ............................................................................................................................. 11
Monitoring the Progress of User State Extraction ................................................................................................ 11
5. Injecting User State ........................................................................................................................................ 13
Overview............................................................................................................................................................... 13
Associating Source and Target Computers ........................................................................................................... 13
Manually Defining the Target System Variable ............................................................................................. 13
Creating the Script Used to Inject User State ....................................................................................................... 14
Sample Script ................................................................................................................................................. 14
Running the Injection Script ................................................................................................................................. 14
Creating a New Task Sequence ..................................................................................................................... 15
6. Additional Information .................................................................................................................................. 17
Overview............................................................................................................................................................... 17
Automating Migrate7 ........................................................................................................................................... 17
Migrate7 User’s Guide .......................................................................................................................................... 17
7. Copyright and Patent Information ................................................................................................................. 18
System Center Configuration Manager Integration Guide Page 3
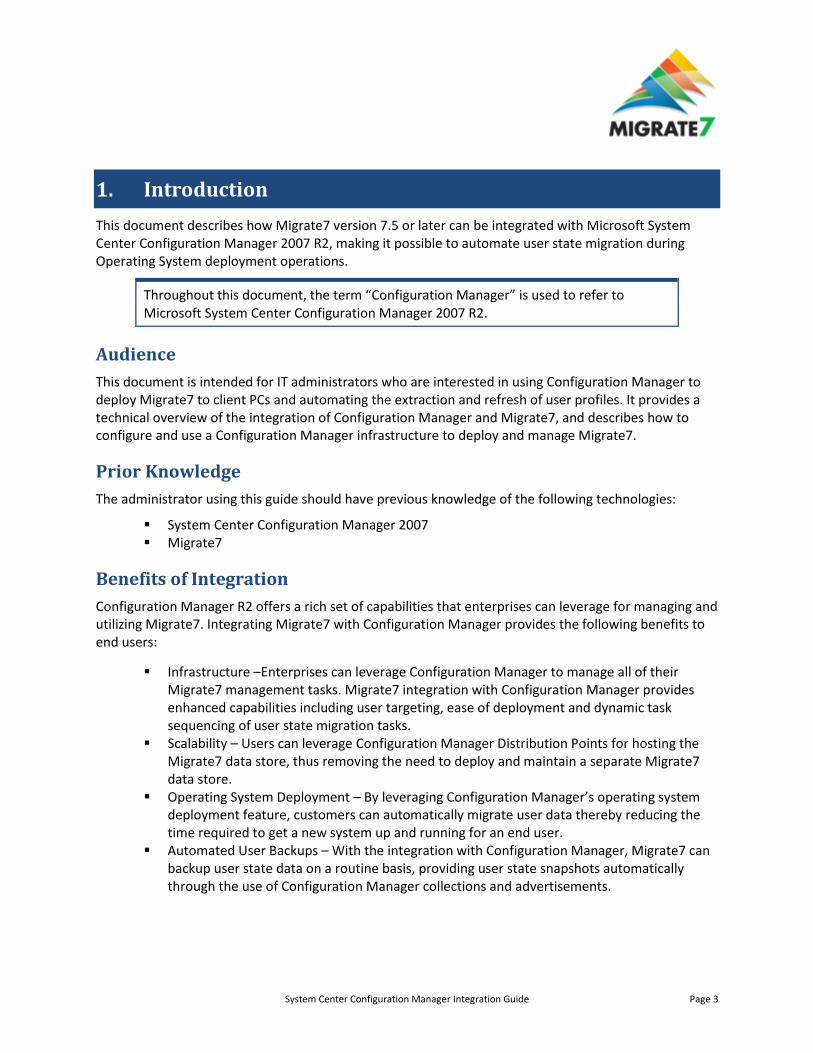
1. Introduction
This document describes how Migrate7 version 7.5 or later can be integrated with Microsoft System Center Configuration Manager 2007 R2, making it possible to automate user state migration during Operating System deployment operations.
Throughout this document, the term “Configuration Manager” is used to refer to Microsoft System Center Configuration Manager 2007 R2.
Audience
This document is intended for IT administrators who are interested in using Configuration Manager to deploy Migrate7 to client PCs and automating the extraction and refresh of user profiles. It provides a technical overview of the integration of Configuration Manager and Migrate7, and describes how to configure and use a Configuration Manager infrastructure to deploy and manage Migrate7.
Prior Knowledge
The administrator using this guide should have previous knowledge of the following technologies:
System Center Configuration Manager 2007 Migrate7
Benefits of Integration
Configuration Manager R2 offers a rich set of capabilities that enterprises can leverage for managing and utilizing Migrate7. Integrating Migrate7 with Configuration Manager provides the following benefits to end users:
Infrastructure –Enterprises can leverage Configuration Manager to manage all of their Migrate7 management tasks. Migrate7 integration with Configuration Manager provides enhanced capabilities including user targeting, ease of deployment and dynamic task sequencing of user state migration tasks.
Scalability – Users can leverage Configuration Manager Distribution Points for hosting the Migrate7 data store, thus removing the need to deploy and maintain a separate Migrate7 data store.
Operating System Deployment – By leveraging Configuration Manager’s operating system deployment feature, customers can automatically migrate user data thereby reducing the time required to get a new system up and running for an end user.
Automated User Backups – With the integration with Configuration Manager, Migrate7 can backup user state data on a routine basis, providing user state snapshots automatically through the use of Configuration Manager collections and advertisements.
System Center Configuration Manager Integration Guide Page 4
Automated User State Migration – Migrate7 automates the backup, restoration, and management of user state profiles offering several capabilities not available within USMT, including:
o Graphical user interface for configuring user migration profiles, including advanced UI for managing files and registry rules
o Ability to convert legacy application settings to current version and migrate user profiles based on roles and business groupings
o Ability to migrate user states from, to, and between all versions of Windows XP, Windows Vista and Windows 7
Through using this guide to integrate Migrate7 with Configuration Manager, users will be able to automatically manage user profile backup, restores, and migrations with Configuration Manager OSD and MDT.
System Center Configuration Manager Integration Guide Page 5
2. Architecture Concepts
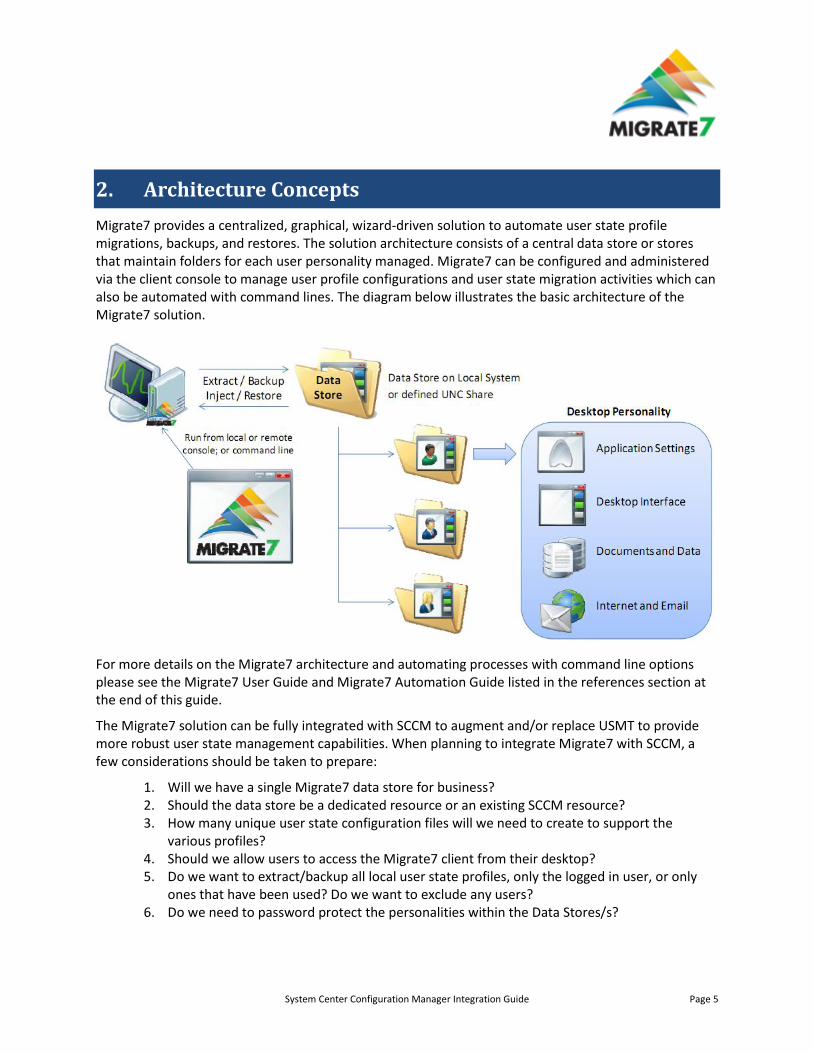
Migrate7 provides a centralized, graphical, wizard-driven solution to automate user state profile migrations, backups, and restores. The solution architecture consists of a central data store or stores that maintain folders for each user personality managed. Migrate7 can be configured and administered via the client console to manage user profile configurations and user state migration activities which can also be automated with command lines. The diagram below illustrates the basic architecture of the Migrate7 solution.
For more details on the Migrate7 architecture and automating processes with command line options please see the Migrate7 User Guide and Migrate7 Automation Guide listed in the references section at the end of this guide.
The Migrate7 solution can be fully integrated with SCCM to augment and/or replace USMT to provide more robust user state management capabilities. When planning to integrate Migrate7 with SCCM, a few considerations should be taken to prepare:
1. Will we have a single Migrate7 data store for business? 2. Should the data store be a dedicated resource or an existing SCCM resource? 3. How many unique user state configuration files will we need to create to support the
various profiles? 4. Should we allow users to access the Migrate7 client from their desktop? 5. Do we want to extract/backup all local user state profiles, only the logged in user, or only
ones that have been used? Do we want to exclude any users? 6. Do we need to password protect the personalities within the Data Stores/s?

System Center Configuration Manager Integration Guide Page 6
Note that while it’s possible to deploy Migrate7 to each individual desktop, it is not necessary to do so. Instead Migrate7 can be run from a central location (or locations depending on network architecture) – this is the recommended approach.
Once these questions and the general design have been planned out Migrate7 can be configured to perform tasks around user state migration and backup. While all of this is accomplished with standard Configuration Manager packages, collections, and advertisements, the Migrate7 Data Store(s) do need to be set up in advance and at least one user state migration template must be created. The number of Data Stores directly impacts the complexity of automating user state migration but does enable support for a broad range of Configuration Manager configuration scenarios. The diagram below shows a basic Configuration Manager architecture with a single Migrate7 Data Store.
System Center Configuration Manager Integration Guide Page 7
3. Getting Started
This section provides instructions for preparing the Migrate7 environment in preparation for the Configuration Manager integration.
Prerequisites
The following assets and preparation are required to successfully integrate Migrate7 with SCCM, they include:
1. Migrate7 software 2. Sufficient privileges to install software and create/access Data Store
Preparing the Migrate7 Environment
To prepare Migrate7 for integration with SCCM there are three primary steps that need to be completed.
1. Install Migrate7 2. Create Data Store(s) 3. Create User State Migration Templates
Installing Migrate7
The Migrate7 User’s Guide provides detailed instructions for how to install Migrate7. Typically you will only need to install Migrate7 once in a central location, although in a distributed network environment it may be necessary to have a central installation of Migrate7 in each major site in order to conserve network capacity between the sites.
Create Data Store(s)
The Migrate7 installer creates the central location where user state data and configuration information will be stored. The account performing file backups or personality restores must have full access to the Data Store shared folder. If Migrate7 is launched and managed through a SCCM 2007 service account, only that account will need these rights.
The user account used by Configuration Manager to run Migrate7 needs read and write access to the file share where the user state data is stored. This is the only account that needs to be given access to the file share.
System Center Configuration Manager Integration Guide Page 8
Configuring User State Migration Templates
Migrate7 uses a configuration file to control the following aspects of a migration operation:
Applications to migrate settings and data for File and registry rules to use for the migration General application behavior (logging, file overwrite rules, etc.)
This information is explained in detail in the Migrate7 User’s Guide, please refer to that for more detailed information.
For large migrations it’s quite likely that multiple, different, configuration files will be necessary depending on the computers and users being targeted for the migration (for instance, different migration settings may be necessary for users in the HR department compared to users in the Accounting department).
The configuration files should be saved in the same central location where Migrate7 is installed so they can be referenced using the /CONFIG command-line parameter.
System Center Configuration Manager Integration Guide Page 9
4. Extracting User State
Overview
Extracting user state from a system is the process of reading all settings and data associated with a user from a particular system (the corresponding step to USMT’s scanstate.exe process). Since there is no need to install Migrate7 on each system that should be extracted, there is no need to create a software distribution package for Migrate7 – a simple Task Sequence can be used instead.
Creating the Task Sequence
With Migrate7 already installed in a central location, all that’s required to automate the process of extracting user state is a Task Sequence that runs Migrate7.
It’s also possible to add the user state extraction as an action in an existing Task Sequence instead of creating a new Task Sequence if there are more work being done on the source systems than just doing the user state extraction.
Migrate7 Command Line
The full syntax for the command line parameters supported by Migrate7 is described in the “Automating Migrate7” guide, please refer to that for the complete details of the parameters used for user state extraction.
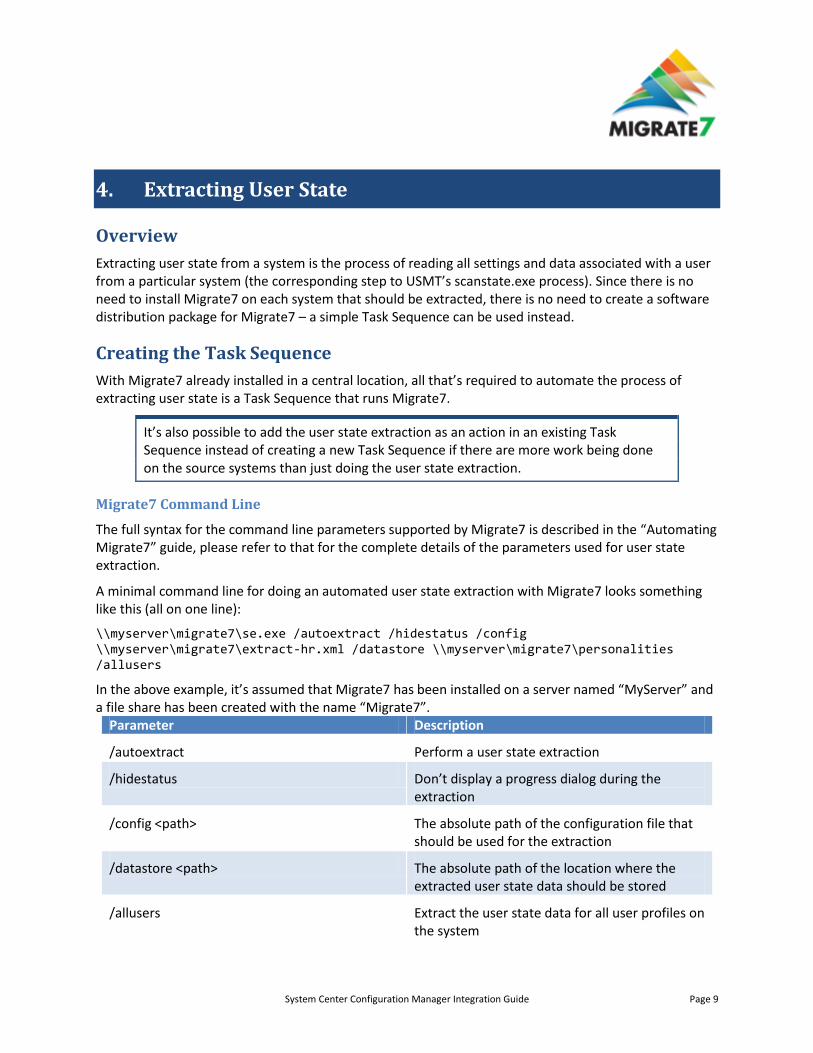
A minimal command line for doing an automated user state extraction with Migrate7 looks something like this (all on one line):
\\myserver\migrate7\se.exe /autoextract /hidestatus /config \\myserver\migrate7\extract-hr.xml /datastore \\myserver\migrate7\personalities /allusers
In the above example, it’s assumed that Migrate7 has been installed on a server named “MyServer” and a file share has been created with the name “Migrate7”.
Parameter Description
/autoextract Perform a user state extraction
/hidestatus Don’t display a progress dialog during the extraction
/config <path> The absolute path of the configuration file that should be used for the extraction
/datastore <path> The absolute path of the location where the extracted user state data should be stored
/allusers Extract the user state data for all user profiles on the system
System Center Configuration Manager Integration Guide Page 10
Configuration Manager Console Steps
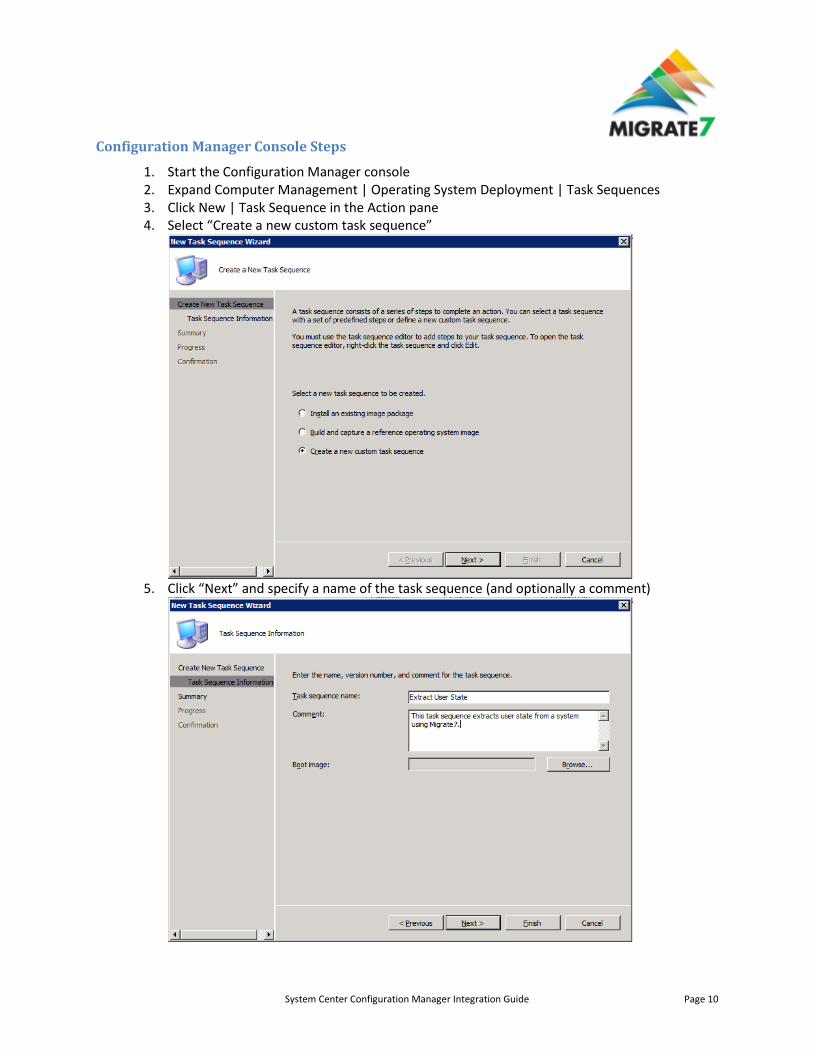
1. Start the Configuration Manager console 2. Expand Computer Management | Operating System Deployment | Task Sequences 3. Click New | Task Sequence in the Action pane 4. Select “Create a new custom task sequence”
5. Click “Next” and specify a name of the task sequence (and optionally a comment)
System Center Configuration Manager Integration Guide Page 11
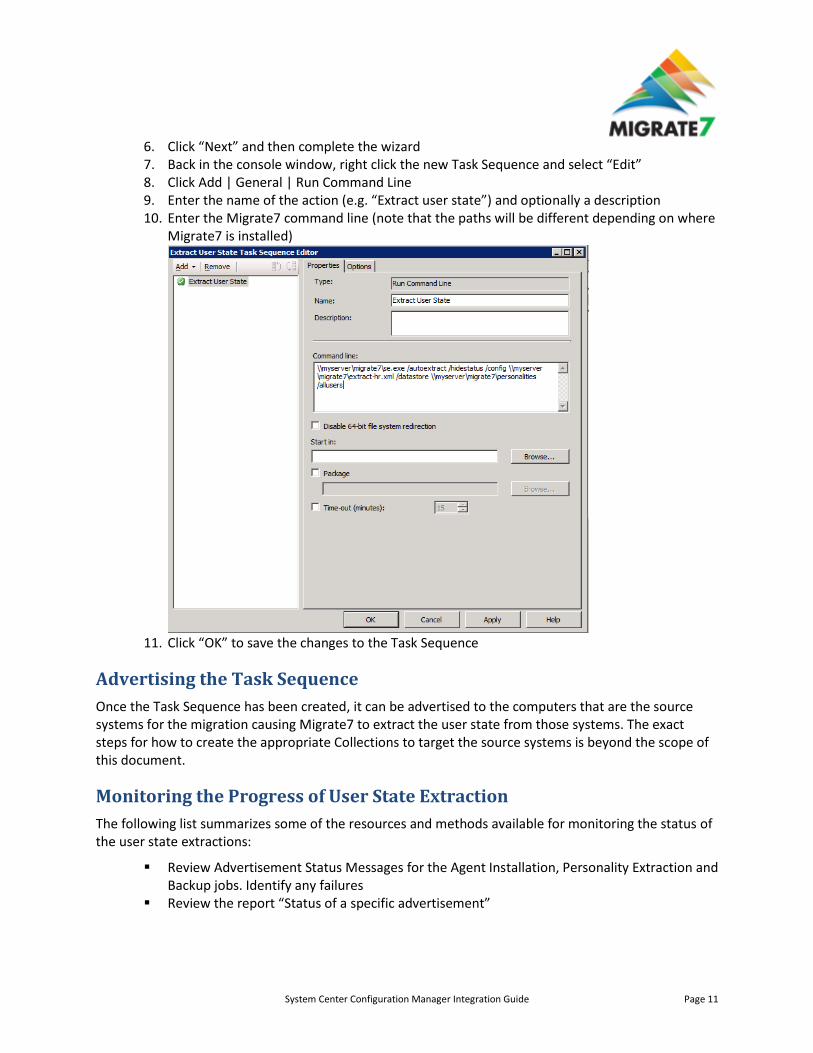
6. Click “Next” and then complete the wizard 7. Back in the console window, right click the new Task Sequence and select “Edit” 8. Click Add | General | Run Command Line 9. Enter the name of the action (e.g. “Extract user state”) and optionally a description 10. Enter the Migrate7 command line (note that the paths will be different depending on where
Migrate7 is installed)
11. Click “OK” to save the changes to the Task Sequence
Advertising the Task Sequence
Once the Task Sequence has been created, it can be advertised to the computers that are the source systems for the migration causing Migrate7 to extract the user state from those systems. The exact steps for how to create the appropriate Collections to target the source systems is beyond the scope of this document.
Monitoring the Progress of User State Extraction
The following list summarizes some of the resources and methods available for monitoring the status of the user state extractions:
Review Advertisement Status Messages for the Agent Installation, Personality Extraction and Backup jobs. Identify any failures
Review the report “Status of a specific advertisement”
System Center Configuration Manager Integration Guide Page 12
For failed user personality extraction jobs: o Confirm personality extraction process generates success/failure status messages o Create status filter query to email technician when personality extraction process
fails For additional logging information on the local machine, review the Migrate7 session log
(located in C:\Documents and Settings\All Users\Application Data\Tranxition\Migrate7 on Windows XP and C:\ProgramData\Tranxition\Migrate7 on Windows Vista and later). Each time a job is run, a separate session log entry is created providing information about the job, including the exit code of the job. Also, within the personality folder of the data source, a log is also created showing the operations performed during the extraction. Please refer to the Migrate7 User’s Guide for more information on the log files created by Migrate7.
System Center Configuration Manager Integration Guide Page 13
5. Injecting User State
Overview
The most common scenario for integrating Migrate7 with Configuration Manager is to use it as part of an Operating System Deployment. The Migrate7 action(s) can easily be added to any existing Task Sequences.
Associating Source and Target Computers
Migrate7 does not currently take advantage of the Computer Association feature in Configuration Manager (that is scheduled for an upcoming release), but instead makes use of a variable (named M7SOURCE in the sample script described below) defined on the target systems to define the name of the source system.
The variable can be defined as part of creating the target system in Configuration Manager by extending the process currently used. For example, if importing computer information from a CSV file, the variable assignment can be done as part of the import.
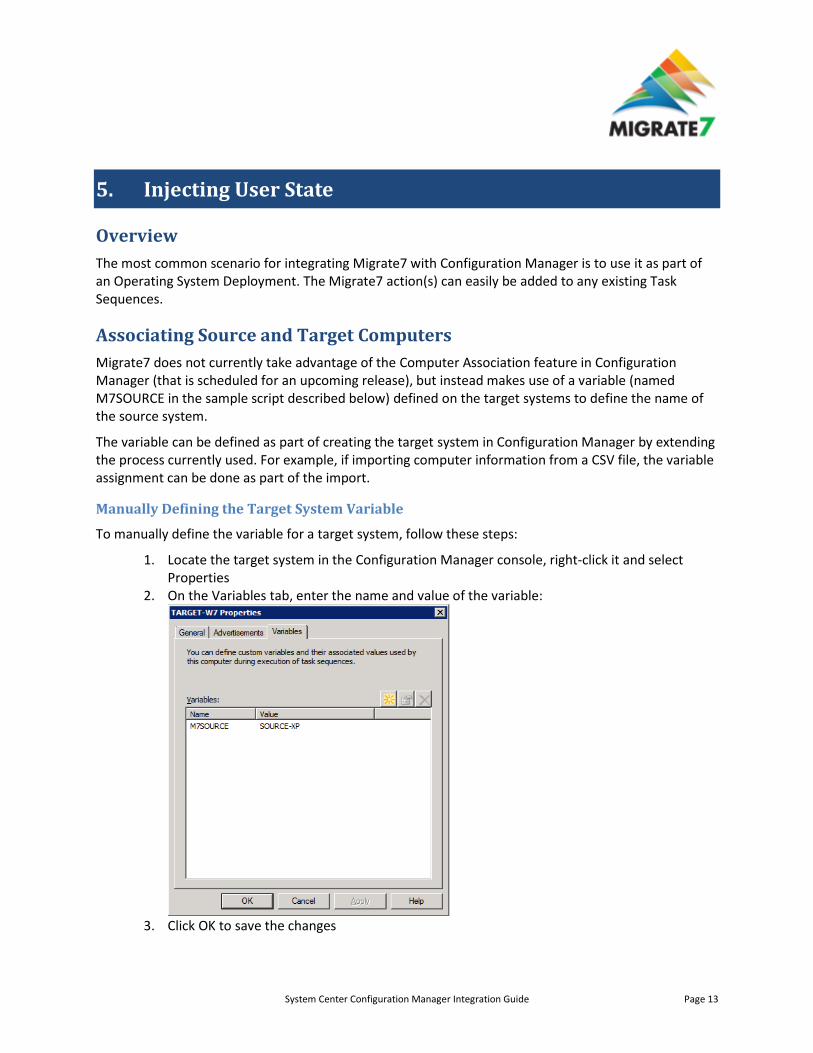
Manually Defining the Target System Variable
To manually define the variable for a target system, follow these steps:
1. Locate the target system in the Configuration Manager console, right-click it and select Properties
2. On the Variables tab, enter the name and value of the variable:
3. Click OK to save the changes
System Center Configuration Manager Integration Guide Page 14
Creating the Script Used to Inject User State
Since Migrate7 needs the name of the source system when it injects user state to the target system, a VBScript script is needed. This script should be stored on the file share where Migrate7 is installed.
Sample Script
This sample script can be used as a template for the injection script. It will need to be adjusted for the specific environment (the required changes are highlighted below):
Dim sccmEnvironment ' The Task Sequence environment variables
Dim sourceSystem ' The name of the source system
Dim commandLine ' The complete Migrate7 command-line
Set sccmEnvironment = CreateObject( "Microsoft.SMS.TSEnvironment" )
' Get the name of the source system for this target system using the
' value of the M7SOURCE computer variable defined in SCCM.
sourceSystem = sccmEnvironment( "M7SOURCE" )
commandLine = "\\MyServer\Migrate7\se.exe /autoinject /allusers /hidestatus /nocancel /config \\MyServer\Migrate7\MyConfig.xml /datastore \\MyServer\Migrate7\personalities /source " + sourceSystem
WScript.Echo "Command line: " + commandLine
Set WshShell = WScript.CreateObject("WScript.Shell")
result = WshShell.Run( commandLine , 1, true )
WScript.Quit result
Running the Injection Script
Once the injection script has been created and deployed, running the script can either be added as a new action in an existing Task Sequence (e.g. included in an existing Operating System Deployment Task Sequence) or included in a new Task Sequence depending on the environment and any other needs.
The steps to create the action are much the same regardless of whether a new Task Sequence is being created or an action is being added to an existing Task Sequence. The steps below creates a new Task Sequence.

System Center Configuration Manager Integration Guide Page 15
Creating a New Task Sequence
To create a new Task Sequence, follow these steps:
1. Start the Configuration Manager console and navigate to Site Database | Computer Management | Operating System Deployment | Task Sequences
2. Right-click Task Sequences and select New | Task Sequence from the menu 3. In the New Task Sequence wizard, select “Create a new custom task sequence”
4. Click Next and enter the name and optional comment for the Task Sequence 5. Click Next to create the Task Sequence and when the wizard has completed, click Close 6. In the list of Task Sequences, right-click the new Task Sequence and select Edit 7. In the Task Sequence Editor, click Add | General | Run Command Line 8. Enter the name of the action (e.g. Inject User State)
System Center Configuration Manager Integration Guide Page 16
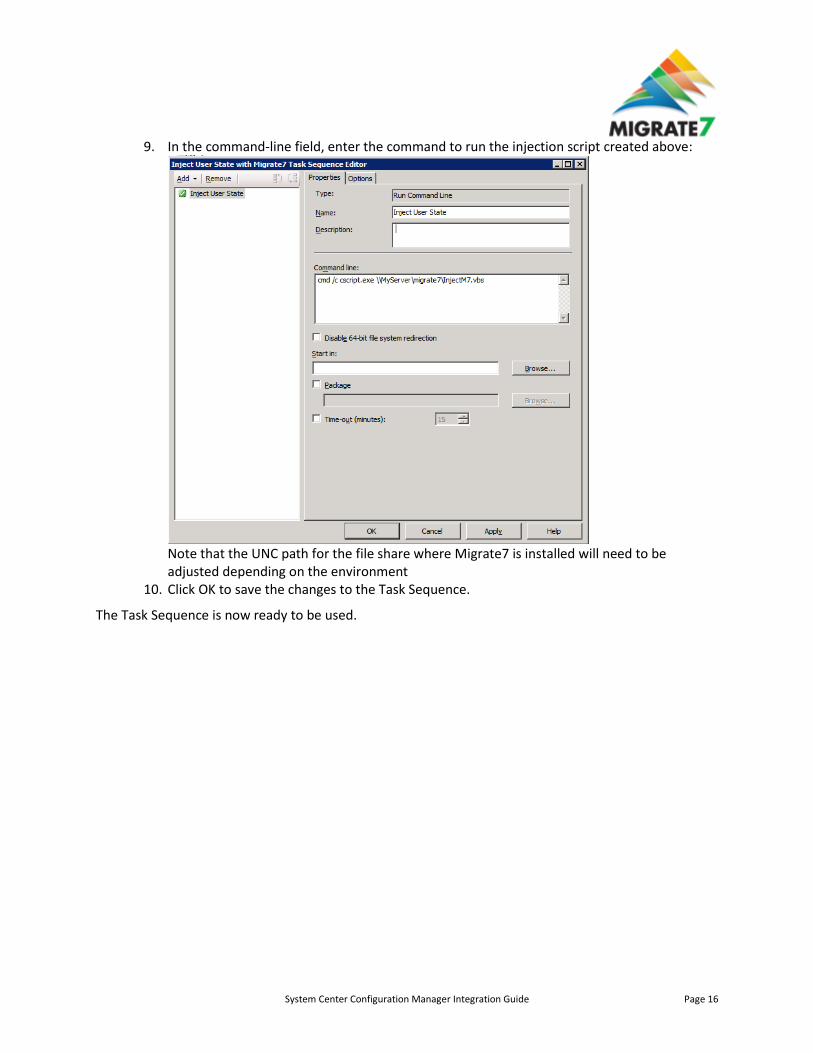
9. In the command-line field, enter the command to run the injection script created above:
Note that the UNC path for the file share where Migrate7 is installed will need to be adjusted depending on the environment
10. Click OK to save the changes to the Task Sequence.
The Task Sequence is now ready to be used.
System Center Configuration Manager Integration Guide Page 17
6. Additional Information
Overview
This document provides a basic introduction to the capabilities of Migrate7 with the focus being on how to use Migrate7 with Configuration Manager. For more detailed information the capabilities of Migrate7, additional documentation is available.
Automating Migrate7
This guide, included with Migrate7 and also available on the Tranxition website at http://www.tranxition.com/resources/documentation, provides complete documentation of the command line parameters supported by Migrate7. This document also describes all of the exit codes used by Migrate7 to communicate errors in automation scenarios.
Migrate7 User’s Guide
This guide, also included with Migrate7 and available on the Tranxition website at http://www.tranxition.com/resources/documentation, documents all of the features of Migrate7 including the user interface. The chapter describing the log files generated by Migrate7 may be of particular interest to help troubleshoot any failed migrations.
System Center Configuration Manager Integration Guide Page 18
7. Copyright and Patent Information
©2010 Tranxition Corporation.
All Rights Reserved.
Protected by US Patent 6,728,877 and European Patent 1173809.
The information in this document is subject to change without notice and should not be construed as a commitment by Tranxition Corporation. Tranxition Corporation assumes no responsibility for any errors that might appear in this document.
The software described in this document is furnished under a license and may be used or copied only in accordance with the terms of such license. No responsibility is assumed for the use or reliability of software or equipment that is not supplied by Tranxition Corporation or its affiliated companies.
Restricted Rights: Use, duplication or disclosure by the U.S. Government is subject to restrictions as set forth in subparagraph (c) (1) (ii) of the Rights in Technical Data and Computer Software clause at DFARS 252.227 7013. Migrate7 and the Tranxition logo are trademarks of Tranxition Corporation. Microsoft Windows XP, Windows Vista and Windows 7 are registered trademarks of Microsoft Corporation. All other trademarks and registered trademarks are the property of their respective holders.