Embed Size (px)
Citation preview
System Landscape Directory - User Manual -
SAP NetWeaver 7 .0 SPS 15
User Manual 28.03.2008
Copyright © Copyright 2008 SAP AG. All rights reserved. No part of this publication may be reproduced or transmitted in any form or for any purpose without the express permission of SAP AG. The information contained herein may be changed without prior notice. Some software products marketed by SAP AG and its distributors contain proprietary software components of other software vendors. Microsoft, Windows, Outlook, and PowerPoint are registered trademarks of Microsoft Corporation. IBM, DB2, DB2 Universal Database, OS/2, Parallel Sysplex, MVS/ESA, AIX, S/390, AS/400, OS/390, OS/400, iSeries, pSeries, xSeries, zSeries, z/OS, AFP, Intelligent Miner, WebSphere, Netfinity, Tivoli, Informix, i5/OS, POWER, POWER5, OpenPower and PowerPC are trademarks or registered trademarks of IBM Corporation. Adobe, the Adobe logo, Acrobat, PostScript, and Reader are either trademarks or registered trademarks of Adobe Systems Incorporated in the United States and/or other countries. Oracle is a registered trademark of Oracle Corporation. UNIX, X/Open, OSF/1, and Motif are registered trademarks of the Open Group. Citrix, ICA, Program Neighborhood, MetaFrame, WinFrame, VideoFrame, and MultiWin are trademarks or registered trademarks of Citrix Systems, Inc. HTML, XML, XHTML and W3C are trademarks or registered trademarks of W3C®, World Wide Web Consortium, Massachusetts Institute of Technology. Java is a registered trademark of Sun Microsystems, Inc. JavaScript is a registered trademark of Sun Microsystems, Inc., used under license for technology invented and implemented by Netscape. MaxDB is a trademark of MySQL AB, Sweden. SAP, R/3, mySAP, mySAP.com, xApps, xApp, SAP NetWeaver, and other SAP products and services mentioned herein as well as their respective logos are trademarks or registered trademarks of SAP AG in Germany and in several other countries all over the world. All other product and service names mentioned are the trademarks of their respective companies. Data contained in this document serves informational purposes only. National product specifications may vary. These materials are subject to change without notice. These materials are provided by SAP AG and its affiliated companies ("SAP Group") for informational purposes only, without representation or warranty of any kind, and SAP Group shall not be liable for errors or omissions with respect to the materials. The only warranties for SAP Group products and services are those that are set forth in the express warranty statements accompanying such products and services, if any. Nothing herein should be construed as constituting an additional warranty.
System Landscape Directory 2
User Manual 28.03.2008
Icons in Body Text
Icon Meaning
Caution
Example
Note
Recommendation
Syntax
Additional icons are used in SAP Library documentation to help you identify different types of information at a glance. For more information, see Help on Help → General Information Classes and Information Classes for Business Information Warehouse on the first page of any version of SAP Library.
Typographic Conventions
Type Style Description
Example text Words or characters quoted from the screen. These include field names, screen titles, pushbuttons labels, menu names, menu paths, and menu options.
Cross-references to other documentation. Example text Emphasized words or phrases in body text, graphic titles, and table
titles.
EXAMPLE TEXT Technical names of system objects. These include report names, program names, transaction codes, table names, and key concepts of a programming language when they are surrounded by body text, for example, SELECT and INCLUDE.
Example text Output on the screen. This includes file and directory names and their paths, messages, names of variables and parameters, source text, and names of installation, upgrade and database tools.
Example text Exact user entry. These are words or characters that you enter in the system exactly as they appear in the documentation.
<Example text> Variable user entry. Angle brackets indicate that you replace these words and characters with appropriate entries to make entries in the system.
EXAMPLE TEXT Keys on the keyboard, for example, F2 or ENTER.
System Landscape Directory 3
User Manual 28.03.2008
System Landscape Directory..................................................................................................... 6 Common Information Model................................................................................................... 7 Working with SLD .................................................................................................................. 8
Technical Systems ............................................................................................................. 9
Creating New Web AS ABAP Technical Systems........................................................ 10
Creating New Web AS Java Technical Systems.......................................................... 11
Creating New Standalone Technical Systems ............................................................. 12
Creating New Third-Party Technical Systems.............................................................. 12
Landscapes ...................................................................................................................... 13
Creating and Removing Landscapes ........................................................................... 14
Adding and Removing Systems ................................................................................... 15
Creating and Removing Hosted Systems..................................................................... 16
Adding and Removing Sub-Landscapes ...................................................................... 17
Business Systems ............................................................................................................ 18
Creating and Removing Business Systems ................................................................. 19
Managing Business System Details ............................................................................. 20
Creating and Removing Business System Groups ...................................................... 22
Software Catalog.............................................................................................................. 22
Products and Software Components............................................................................ 23
Viewing the Software Catalog....................................................................................... 24
Creating and Removing Third-Party Products.............................................................. 26
Creating and Removing Third-Party Software Components ........................................ 27
Defining and Removing Software Dependencies......................................................... 28
Name Reservation............................................................................................................ 29
Defining Name Prefixes for Development .................................................................... 30
Reserving Names ......................................................................................................... 31
Removing Name Prefixes and Names ......................................................................... 31
Object Name Categories .............................................................................................. 32
Regular Administrative Tasks .............................................................................................. 34 Updating the Software Catalog ........................................................................................ 34
Exports and Backups of CIM Instances ........................................................................... 35
Exporting CIM Instances............................................................................................... 36
Backing Up CIM Instances ........................................................................................... 37
Performing Transports of SLD Data with CTS ................................................................. 38
Viewing Logs .................................................................................................................... 39
Cleaning Up Data ............................................................................................................. 41
Creating System Messages ............................................................................................. 41
Maintaining SLD Content at CIM Instance Level ............................................................. 42
Using Namespaces to Test Data...................................................................................... 43
System Landscape Directory 4
User Manual 28.03.2008
Using Exclusive Write Access .......................................................................................... 45
Configuring Systems to Connect to SLD ............................................................................. 45 Architecture Overview of the SLD Data Suppliers ........................................................... 46
Connection Between Web AS ABAP Systems and SLD ................................................. 48
Configuring the SLD Data Supplier: Default Settings................................................... 48
Global Settings.......................................................................................................... 49
Data Collection Programs ......................................................................................... 50
Scheduling the Data Collection Programs ................................................................ 51
SLD Application Programming Interface for ABAP-Based Systems ............................ 51
Creating an RFC Destination for the SLD ABAP API on the J2EE Side .................. 52
Creating an RFC Destination for the SLD ABAP API on the ABAP Side ................. 54
Creating an HTTP Destination for the SLD ABAP API on the ABAP Side ............... 54
Connection Between Web AS Java Systems and SLD ................................................... 55
Setting Up the SLD Data Supplier for J2EE-Based Systems....................................... 56
Information About the SLD Data Supplier Service in the Visual Administrator ............ 57
Configuring the Interface for CIM Client Generation .................................................... 58
Connection Between Other SAP Systems and SLD........................................................ 60
Configuring sldreg and Transferring Data to SLD ........................................................ 60
Configuring the SLD Bridge.............................................................................................. 61
System Landscape Directory 5
User Manual 28.03.2008
System Landscape Directory Purpose The System Landscape Directory of SAP NetWeaver (SLD) serves as a central information repository for your system landscape. A system landscape consists of a number of hardware and software components that depend on each other with regard to installation, software updates, and demands on interfaces.
Bear in mind that the abbreviation SLD is not intended to define a product, since the System Landscape Directory is part of SAP NetWeaver. This abbreviation is only intended to improve readability.
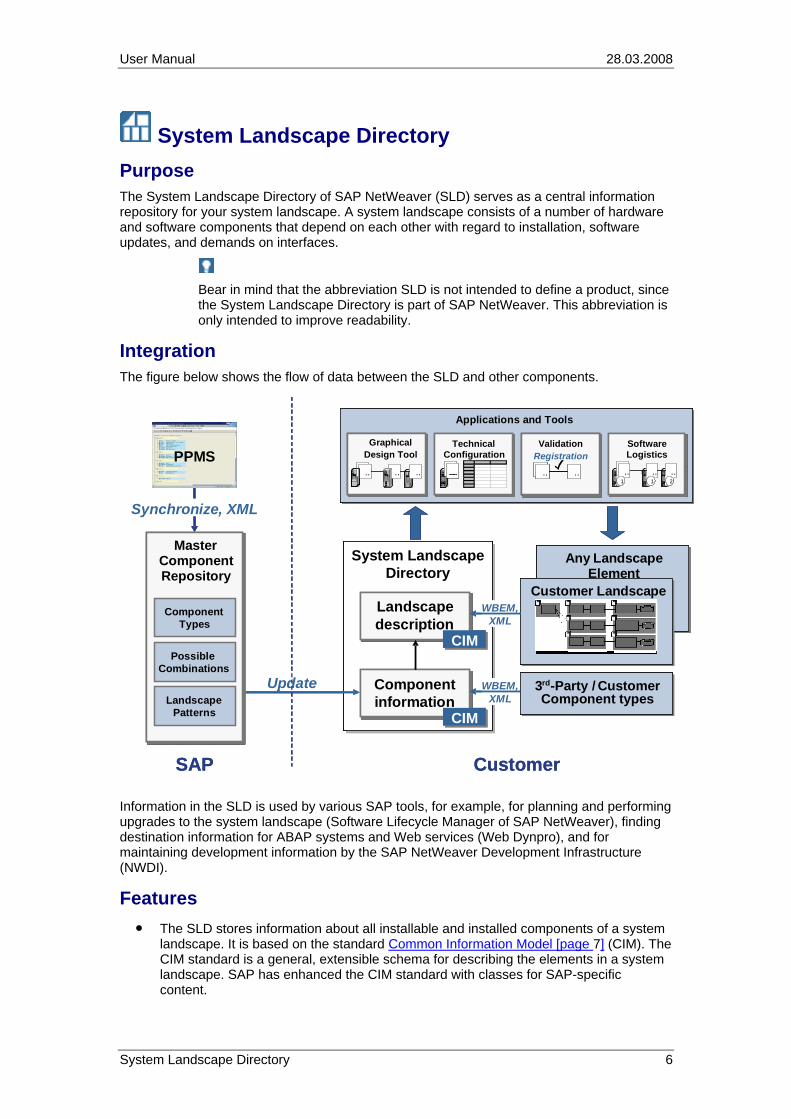
Integration The figure below shows the flow of data between the SLD and other components.
Component types
Synchronize, XML
PPMS
SAP
MasterComponentRepository
MasterComponentRepository
ComponentTypes
Possible Combinations
LandscapePatterns
Customer
3rd-Party / CustomerComponent Types
3rd-Party / CustomerComponent Types
Any Landscape Element
Any Landscape Element
Customer LandscapeCustomer Landscape
System Landscape Directory
System Landscape Directory
ComponentinformationComponentinformation
CIMCIM
LandscapedescriptionLandscapedescription
CIMCIM
Update
Applications and ToolsApplications and Tools
GraphicalDesign Tool
Any Landscape Element
Customer LandscapeCustomer Landscape
Any Landscape Element
Any Landscape Element
Customer LandscapeCustomer Landscape
System Landscape Directory
System Landscape Directory
ComponentinformationComponentinformation
CIMCIM
LandscapedescriptionLandscapedescription
CIMCIM
System Landscape Directory
System Landscape Directory
ComponentinformationComponentinformation
CIMCIM
ComponentinformationComponentinformation
CIMCIM
LandscapedescriptionLandscapedescription
CIMCIM
LandscapedescriptionLandscapedescription
CIMCIM
UpdateUpdate
Applications and ToolsApplications and Tools
GraphicalDesign Tool
Applications and ToolsApplications and Tools
GraphicalDesign ToolGraphical
Design ToolGraphical
Design Tool
.. ....
Software LogisticsSoftware LogisticsSoftware LogisticsSoftware Logistics
.. ....1 21
Technical Configuration
Technical Configuration
..
Technical Configuration
Technical Configuration
....
ValidationValidation
....
RegistrationValidationValidation
....
ValidationValidation
.... ....
Registration
WBEM,XML
WBEM,XML
WBEM,XML
WBEM,XML
Synchronize, XMLSynchronize, XML
PPMSPPMS
SAP
MasterComponentRepository
MasterComponentRepository
ComponentTypes
Possible Combinations
LandscapePatterns
MasterComponentRepository
MasterComponentRepository
ComponentTypes
Possible Combinations
LandscapePatterns
Customer
3rd-Party / CustomerComponent Types
3rd-Party / CustomerComponent types
Information in the SLD is used by various SAP tools, for example, for planning and performing upgrades to the system landscape (Software Lifecycle Manager of SAP NetWeaver), finding destination information for ABAP systems and Web services (Web Dynpro), and for maintaining development information by the SAP NetWeaver Development Infrastructure (NWDI).
Features ● The SLD stores information about all installable and installed components of a system
landscape. It is based on the standard Common Information Model [page 7] (CIM). The CIM standard is a general, extensible schema for describing the elements in a system landscape. SAP has enhanced the CIM standard with classes for SAP-specific content.
System Landscape Directory 6
User Manual 28.03.2008
● SAP provides both a Web-based user interface (UI) for interactive access and client APIs for programmatic access in ABAP and Java.
● SAP provides information about installable SAP software, dependencies and recommended scenarios and regularly publishes updates on SAP Service Marketplace. You can browse this information in the software catalog [page 22] views. You can also manually add information about third-party components to the SLD.
● SAP software components that are installed on technical systems are registered automatically and on a regular basis in the SLD. Thus the SLD always contains up-to-date information about the installed system landscape. You can view this information in the technical systems [page 9] views, and can aggregate and group it in the landscapes [page 13] views.
● In addition, you can use the SLD for name reservation [page 29] in the NWDI. It contains the master list of all reserved names used in development, such as development component names, Java package names, and database object names.
● The SAP NetWeaver Process Integration uses the SLD to store information about business systems [page 18], which are logically connected to technical systems.
Additional Information
If you are reading this documentation offline, bear in mind that this might not be its latest version and that it might contain broken links. You can find the latest version on SAP Help Portal at http://help.sap.com/nw70 → SAP NetWeaver 7.0 Library English → SAP NetWeaver Library → SAP NetWeaver by Key Capability → Solution Life Cycle Management by Key Capability → Software Life Cycle Management → System Landscape Directory.
For more information about different landscape scenarios, see the Planning Guide – System Landscape Directory at http://www.sdn.sap.com/irj/sdn/nw-sld.
For more information about the post-installation configuration of SLD, see the Post-Installation Guide – System Landscape Directory at http://www.sdn.sap.com/irj/sdn/nw-sld.
See also:
Regular Administrative Tasks [page 34]
Configuring Systems to Connect to SLD [page 45]
Common Information Model The Common Information Model (CIM) is a standard of the Distributed Management Task Force (DMTF) and is based on the object-oriented modeling approach. This standard provides an implementation-neutral schema to describe management information within a computing environment. For more information about CIM and DMTF, see www.dmtf.org.
CIM is designed to model hardware and software elements. It provides a hierarchical set of core classes, which can be extended with application-specific classes.
The SLD is currently based on CIM model 2.6.
Each CIM class has one or more key properties, and a number of additional properties. Each class has an arbitrary number of instances, which contain the actual data. An instance can be uniquely identified by its set of key values.
System Landscape Directory 7
User Manual 28.03.2008
Classes can be grouped in schemas. The SLD model provides three schemas: component data for installable software, landscape data for installed software and hardware, and name reservation data used in software development.
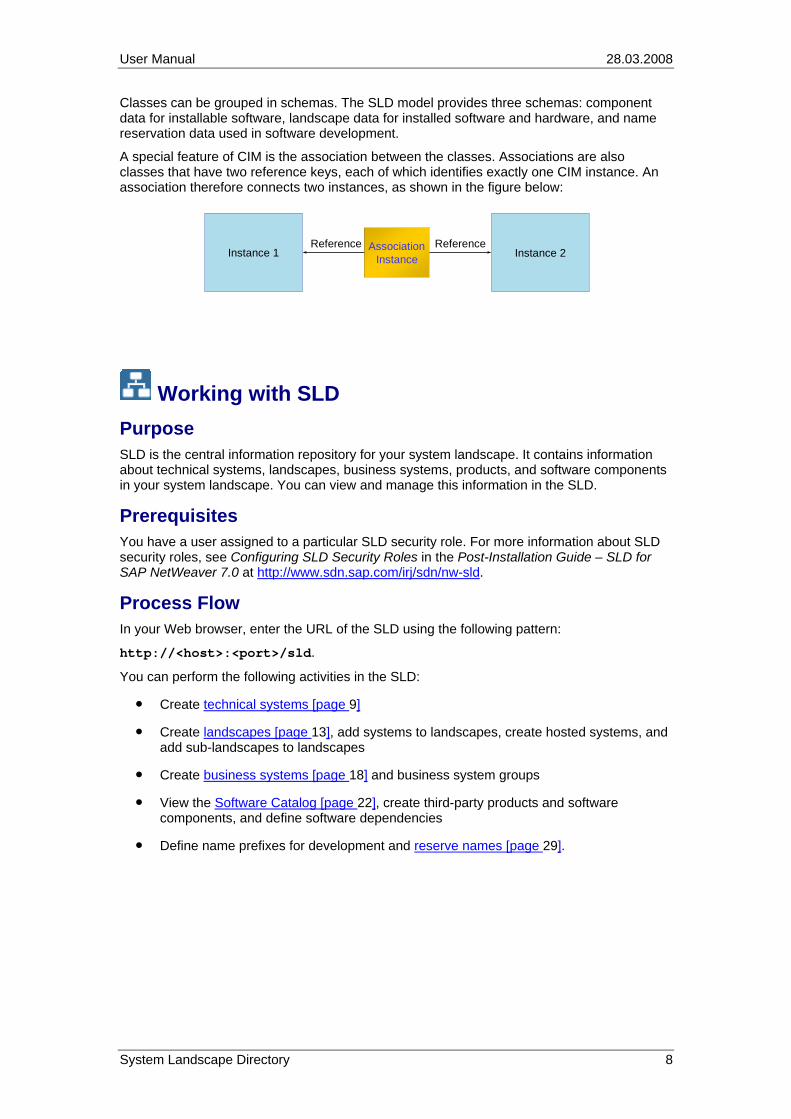
A special feature of CIM is the association between the classes. Associations are also classes that have two reference keys, each of which identifies exactly one CIM instance. An association therefore connects two instances, as shown in the figure below:
Instance 1 Instance 2AssociationInstance
Reference Reference
Working with SLD Purpose SLD is the central information repository for your system landscape. It contains information about technical systems, landscapes, business systems, products, and software components in your system landscape. You can view and manage this information in the SLD.
Prerequisites You have a user assigned to a particular SLD security role. For more information about SLD security roles, see Configuring SLD Security Roles in the Post-Installation Guide – SLD for SAP NetWeaver 7.0 at http://www.sdn.sap.com/irj/sdn/nw-sld.
Process Flow In your Web browser, enter the URL of the SLD using the following pattern:
http://<host>:<port>/sld.
You can perform the following activities in the SLD:
● Create technical systems [page 9]
● Create landscapes [page 13], add systems to landscapes, create hosted systems, and add sub-landscapes to landscapes
● Create business systems [page 18] and business system groups
● View the Software Catalog [page 22], create third-party products and software components, and define software dependencies
● Define name prefixes for development and reserve names [page 29].
System Landscape Directory 8
User Manual 28.03.2008
Technical Systems Definition Technical systems are application systems that are installed in your system landscape. An example of an application system is a Customer Relationship Management (CRM) server. In the SLD, there are five types of technical systems:
● Web AS ABAP
Web AS ABAP technical systems, ranging from any SAP system to an APO server or CRM server, are based on the same Basis Component (BC), which includes the ABAP interpreter, ABAP Dictionary, ABAP Workbench, and so on. A dedicated database, which stores most of the data of the BC and the application components, is associated with the system.
● Web AS Java
Web AS Java systems consist of one or more instances and each instance is installed on a separate host. An instance itself consists of cluster nodes that can communicate with each other.
● Standalone Java
Standalone Java technical systems are standalone Java applications that are installed in a computer system from an administration perspective. They can also be installed as an operating system service or as a daemon.
● Third-Party
Third-party technical systems contain third-party software components and products.
Third-party systems are not automatically registered in the SLD. Therefore, you have to create them manually by creating:
● Third-party products [page 26]
● Third-party software components [page 27]
● Third-party technical system [page 12]
● Third-party business system [page 19]
● SAP NetWeaver Process Integration (PI)
PI technical systems are the infrastructure systems (such as integration servers and adapter engines) of PI.
Use Web AS ABAP and Web AS Java technical systems automatically register information in the SLD about most of the elements that they contain by using the SLD data supplier. Not all technical system elements are registered automatically in the SLD by the reporting system and you have to register them manually. You also have to register manually installed products on a technical system because a technical system has no information about which products are installed on it.
If automatic registration of Web AS ABAP and Web AS Java technical systems is not possible, you have to register them manually. You also have to register manually standalone and third-party technical systems.
System Landscape Directory 9
User Manual 28.03.2008
Dual-stack systems (Web AS ABAP and Java) appear in SLD both as a Web AS ABAP and as a Web AS Java system.
You can use the technical systems view to perform the following tasks:
● Create new Web AS ABAP technical systems [page 10]
● Create new Web AS Java technical systems [page 11]
● Create new standalone technical systems [page 12]
● Create new third-party technical systems [page 12]
Creating New Web AS ABAP Technical Systems Use Web AS ABAP technical systems are registered in the SLD server automatically. If automatic registration is not possible, you have to create the new Web AS ABAP technical systems manually.
Prerequisites You have a user assigned to the LcrInstanceWriterLD role.
Procedure ...
1. Choose Home → Technical Systems.
2. Choose New Technical System.
The System Type screen appears.
3. Select the Web AS ABAP indicator and choose Next.
The General screen appears.
4. Enter system details and choose Next.
The Central Servers screen appears.
5. Enter message server and central application server details and choose Next.
The Application Servers screen appears.
6. If you want to define additional application servers, choose Add Application Server, enter the host name and instance number, and choose Next.
The Clients screen appears.
7. To add at least one ABAP client, choose Add New Client, enter client number and client logical name, and choose Next.
The ABAP client number is required, it must be a three-digit number. The client logical name is optional.
The Installed Products screen appears.
8. On the left, select installed software products by selecting the Installed indicator.
System Landscape Directory 10
User Manual 28.03.2008
On the right, all software components that are part of the selected software products appear.
9. On the right, select installed software components by selecting the Installed indicator.
10. Choose Finish.
You have manually created a Web AS ABAP technical system, and can view details about it in the technical systems [page 9] views.
Creating New Web AS Java Technical Systems Use Web AS Java technical systems are registered in the SLD server automatically. If automatic registration is not possible, you have to create the new Web AS Java technical systems manually.
As of SAP NetWeaver 7.0 SPS 13, you can also use the Change and Transport System (CTS) to transport SLD data in your landscape.
For more information, see Performing Transports of SLD Data with CTS [page 38].
Prerequisites You have a user assigned to the LcrInstanceWriterLD role.
Procedure ...
1. Choose Home → Technical Systems.
2. Choose New Technical System.
The System Type screen appears.
3. Select the Web AS Java indicator and choose Next.
The General screen appears.
4. If the Web AS Java technical system is part of a dual-stack system, from the Web AS ABAP dropdown box, select the Web AS ABAP technical system for the Web AS Java. If the Web AS Java technical system is a standalone J2EE system, select None (Standalone J2EE).
5. Enter system details and choose Next.
The Instances screen appears.
6. If you want to define new instances, choose Add New Instance and enter instance details.
7. If you want to define new server nodes, choose Add New Server Node and enter server node details.
8. If you want to define new ports, choose Add New Port and enter port details.
9. Choose Next.
The Ports screen appears.
10. If you want to define central instance ports, for each port, enter a port number and select a protocol, and choose Next.
System Landscape Directory 11
User Manual 28.03.2008
The Installed Products screen appears.
11. On the left, select installed software products by selecting the Installed indicator.
On the right, all software components that are part of the selected software products appear.
12. On the right, select installed software components by selecting the Installed indicator.
13. Choose Finish.
You have manually created a Web AS Java technical system, and can view details about it in the technical systems [page 9] views.
Creating New Standalone Technical Systems Use Standalone technical systems are not registered in the SLD server automatically, you have to register them manually.
Prerequisites You have a user assigned to the LcrInstanceWriterLD role.
Procedure ...
1. Choose Home → Technical Systems.
2. Choose New Technical System.
The System Type screen appears.
3. Select the Standalone indicator and choose Next.
4. The General screen appears.
5. Enter system details and choose Finish.
You have manually registered a standalone technical system, and can view details about it in the technical systems [page 9] views.
Creating New Third-Party Technical Systems Use Third-party technical systems are not registered in the SLD server automatically, you have to create them manually. This procedure describes how to create an installed third-party system.
Unlike SAP products, third-party products are not necessarily included in the SLD component description. Therefore, you have to create the third-party product [page 26] before you can create an installed system of this third-party product in the SLD.
System Landscape Directory 12
User Manual 28.03.2008
Prerequisites You have a user assigned to the LcrInstanceWriterLD role.
Procedure ...
1. Choose Home → Technical Systems.
2. Choose New Technical System.
The System Type screen appears.
3. Select the Third-Party indicator and choose Next.
The General screen appears.
4. Enter system details and choose Next.
The Installed Products screen appears.
5. On the left, select installed software products by selecting the Installed indicator.
On the right, all software components that are part of the selected software products appear.
6. On the right, select installed software components by selecting the Installed indicator.
7. Choose Finish.
You have manually created a third-party technical system, and can view details about it in the technical systems [page 9] views.
Landscapes Definition A landscape represents a logical, complex system, which consists of multiple, distributed components. Some of these components may be systems; others may be services, installed products, or other managed elements.
The following types of landscapes are defined in the SLD:
● Administration
A system landscape, which is created for administration purposes, for example, for common monitoring.
● General
A system landscape, which can contain all types of application systems.
● NWDI Systems
A system landscape that contains servers of the NWDI. The NWDI consists of a local client – the Integrated Development Environment (IDE) and some logical servers for processes like source management, build tasks, transport, and name reservation. All servers work together and require a common user base together with the IDE.
● Scenario
A system landscape that is created for a specific business scenario. Scenario landscapes are used in the Software Lifecycle Manager of SAP NetWeaver.
● Transport
A system landscape that is created for transport purposes. For example, all SAP Web AS systems that are connected by an ABAP transport path distributing the ABAP development.
System Landscape Directory 13

User Manual 28.03.2008
● Web Service
A system landscape that is created to collect systems offering Web services and their clients. The hierarchy of these landscapes defines the Web service that is most appropriate for a given client.
Use You can use the landscapes view to perform the following tasks:
● Create and remove landscapes [page 14]
● Add and remove systems to and from landscapes [page 15]
● Create and remove hosted systems [page 16]
● Add and remove sub-landscapes to and from landscapes [page 17]
Creating and Removing Landscapes Prerequisites You have a user assigned to the LcrInstanceWriterLD role.
Procedure ...
Choose Home → Landscapes.
Creating Landscapes 1. Choose New Landscape.
2. From the Landscape Type dropdown box, select the landscape type you want to create.
3. Enter a landscape name and choose Create.
Removing Landscapes ...
1. From the Landscape Type dropdown box, select the landscape type you want to remove.
2. From the table with landscapes, select the landscapes you want to remove by holding down the CTRL key and clicking the landscapes with the primary mouse button.
3. Choose Remove.
The landscapes that you have selected are removed but the systems that are part of these landscapes are not removed. For more information about removing technical systems from the SLD, see Technical Systems [page 9]. For more information about removing business systems from the SLD, see Business Systems [page 18]. For more information about removing hosted systems from the SLD, see Creating and Removing Hosted Systems [page 16].
System Landscape Directory 14
User Manual 28.03.2008
Adding and Removing Systems Use You can add the following systems to the following system landscapes:
System System Landscape
Technical Administration, general, and transports
Business General
Hosted General and NWDI systems
Prerequisites ● You have a user assigned to the LcrInstanceWriterLD role.
● If you want to add a technical system to a landscape, the technical system has an instance in the SLD. For more information about creating a technical system, see Technical Systems [page 9].
● If you want to add a new hosted system to a landscape, you have created it. For more information, see Creating and Removing Hosted Systems [page 16].
Procedure Choo...
1. Choose Home → Landscapes.
2. From the Landscape Type dropdown box, select the landscape type to which you want to add or from which you want to remove a system.
3. From the table with landscapes, select the landscape to which you want to add or from which you want to remove a system.
4. Choose Systems.
Adding Systems to Landscapes ..
1. Choose Add System to Landscape.
2. From the Technical System Type or System Type dropdown box depending on the landscape type, select the system type you want to add to the landscape.
3. Select the systems you want to add by holding down the CTRL key and clicking the systems with the primary mouse button.
4. Choose OK.
Removing Systems from Landscapes ...
1. Select the systems you want to remove by holding down the CTRL key and clicking the systems with the primary mouse button.
2. Choose Remove System from Landscape.
The systems that you have selected are removed only from the landscape. For more information about removing technical systems from the SLD, see Technical Systems [page 9]. For more information about removing business systems from the SLD, see Business Systems [page 18]. For more information about removing hosted systems from the SLD, see Creating and Removing Hosted Systems [page 16].
System Landscape Directory 15
User Manual 28.03.2008
Creating and Removing Hosted Systems Use Hosted systems are applications that run on a technical system. Hosted systems have the same features as technical systems, that is, specific software must be installed on them. For example, a J2EE application that is deployed on a J2EE Engine can be a hosted system. Applications are classified as systems depending on their independence, complexity, and manageability (that is, depending on whether they are started, stopped, administered, monitored separately, and so on). You can create the following types of hosted systems:
● System Landscape Directory
Maintains information about all installable and installed elements of your system landscape.
Each SLD automatically creates a hosted system entry for itself in the central SLD. For more information, see Configuring the Interface for CIM Client Generation [page 58].
● Change Management System
Controls centrally the transport and deployment of software components at design time and manages design time configurations.
● Component Build Service
Compiles different sources and creates build results like built software delivery files or archives.
● Design Time Repository
A source control system that is based on the Web-based distributed authoring and versioning standard.
Prerequisites You have a user assigned to the LcrInstanceWriterLD role.
Procedure ...
1. Choose Home → Landscapes.
2. From the Landscape Type dropdown box, select NWDI Systems.
3. From the table with landscapes, select any landscape.
4. Click Systems and then click Add System to Landscape.
Creating Hosted Systems ...
1. Click New Hosted System.
2. Specify system details and click Create.
The system is created and appears in the list of existing hosted systems.
Removing Hosted Systems ... .. ..
1. From the Hosted System Type dropdown box, select the hosted system type you want to remove.
System Landscape Directory 16
User Manual 28.03.2008
2. Select the hosted systems you want to remove by holding down the CTRL key and clicking the systems with the primary mouse button.
Adding and Removing Sub-Landscapes Use You can add a sub-landscape to a landscape only if they are of the same type. You cannot add the same sub-landscape to more than one landscape.
Prerequisites You have a user assigned to the LcrInstanceWriterLD role.
Procedure ...
1. Choose Home → Landscapes.
2. From the Landscape Type dropdown box, select the landscape type to which you want to add or from which you want to remove a sub-landscape.
3. From the table with landscapes, select the landscape to which you want to add or from which you want to remove a sub-landscape.
4. Choose Sub-Landscapes.
Adding Sub-Landscapes to Landscapes ...
1. Choose Add Sub-Landscape.
2. Choose New Landscape.
3. Enter a landscape name and choose Create.
4. From the table with landscapes, select the landscape you want to add and choose OK.
Removing Sub-Landscapes from Landscapes ...
Select the landscapes you want to remove by holding down the CTRL key and clicking the landscapes with the primary mouse button.
The sub-landscapes that you have selected are removed only from the landscape. For more information about removing landscapes from the SLD, see Creating and Removing Landscapes [page 14].
The sub-landscapes that you have selected are removed but the systems that are part of these sub-landscapes are not removed. For more information about removing technical systems from the SLD, see Technical Systems [page 9]. For more information about removing business systems from the SLD, see Business Systems [page 18]. For more information about removing hosted systems from the SLD, see Creating and Removing Hosted Systems [page 16].
System Landscape Directory 17
User Manual 28.03.2008
Business Systems Definition Business systems are logical systems, which function as senders or receivers within PI. Business systems can be SAP systems or third-party systems.
Depending on the associated technical system, the following types of business systems are defined in the SLD:
● Web AS ABAP
A business system, which is associated with a Web AS ABAP.
A business system, which is associated with a Web AS ABAP, can play the role either of an application system or an integration server. An integration server is the central component of PI, which provides a framework for the exchange of information among various internal and external entities of a company. The integration server facilitates the interaction between the different operating systems and applications across internal and external networks.
● Web AS Java
A business system, which is associated with a Web AS Java.
● Standalone
A business system, which is associated with a standalone Java application.
● Third-party
A business system, which is associated with a third-party technical system.
Third-party systems are not automatically registered in the SLD. Therefore, you have to create them manually by creating:
● Third-party products [page 26]
● Third-party software components [page 27]
● Third-party technical system [page 12]
● Third-party business system [page 19]
● Business Partner
A business system, which is a sender or receiver within PI and which is not associated with a technical system. Business partners are used for backward compatibility with PI release 2.0.
Use You can use the business systems view to perform the following tasks:
● Create and remove business systems [page 19]
● Manage business system details [page 20]
● Create and remove business system groups [page 22]
System Landscape Directory 18
User Manual 28.03.2008
Creating and Removing Business Systems Use You can create all five types of business systems in the SLD by going through the steps of a business system wizard.
Bear in mind that some of the steps in the procedure are optional because the steps in the wizard vary depending on the technical system with which you want to associate the business system.
As of SAP NetWeaver 7.0 SPS 13, you can also use the Change and Transport System (CTS) to transport SLD data in your landscape.
For more information, see Performing Transports of SLD Data with CTS [page 38].
Prerequisite You have a user assigned to the LcrInstanceWriterLD role.
Procedure ...
Choose Home → Business Systems.
Creating Business Systems 1. Choose New Business System.
The System Type screen appears.
2. Select the type of business system you want to create, depending on the type of technical system with which you want to associate it, and choose Next.
The Technical System screen appears.
3. If you want to create a business system different from a business partner, from the System dropdown box, select the technical system with which you want to associate the business system.
If you want to create a business system that is associated with Web AS ABAP, also select an ABAP client from the Client dropdown box.
4. If you want to create a business partner, enter the primary URL of the business partner.
5. Choose Next.
The Name screen appears.
6. Enter a name for the business system and choose Next.
We recommend that you use the internal naming convention <namespace>_<name> for business systems. For <namespace>, enter the URL or the namespace of the Integration Repository. Use only alphanumeric characters or use underscore (_) to replace non-alphanumeric characters. For <name>, enter the role of the system. A valid example of a name is SAP_COM_SRM_DEVELOPMENT.
If you are creating a business system that is associated either with a Web AS ABAP or a third-party technical system, the Installed Products screen appears.
System Landscape Directory 19
User Manual 28.03.2008
7. If there are products that are not installed on the system, on the left, deselect them by deselecting the Installed indicator and choose Next.
If you do not see any products, you have to add them in the technical systems [page 9] views.
The Integration screen appears.
8. If you are creating a business system that is associated with Web AS ABAP, from the Business System Role dropdown box, select the role of the business system.
If the business system plays a role of an application system, from the Related Integration Server dropdown box, you can also select an integration server.
If the business system plays a role of an integration server, also specify a pipeline URL.
9. If you are creating a business system that is not associated with Web AS ABAP, from the Related Integration Server dropdown box, you can select an integration server.
10. Choose Finish.
Removing Business Systems ...
1. From the table with business systems, select the systems you want to remove by holding down the CTRL key and clicking the systems with the primary mouse button.
2. Choose Remove.
If you remove a business system that is an integration server, all business systems that are associated with this integration server will lose their group assignments.
Managing Business System Details Use After you create a business system, you can change the following details about the business system:
● Business system role
● Related integration server
● Integration server pipeline URL
● Group
● Associated technical system
● Logical system name
● Installed products.
In addition, you can define a transport target for a business system. A transport target is a business system to which the source business system transports content. By means of transport targets, PI content is transported between different groups of business systems.
System Landscape Directory 20
User Manual 28.03.2008
Prerequisites You have a user assigned to the LcrInstanceWriterLD role.
Procedure ...
1. Choose Home → Business Systems.
2. From the table with business systems, select the business system whose details you want to change.
If You Want To Then
Change the following business system details:
● Role
● Related Integration Server
● Integration server pipeline URL
● Group
● Technical System
● Logical System Name
...
1. Choose the Integration tab.
2. Change the details you want.
For a business system, which is associated with a Web AS ABAP technical system, the logical system name is identical with the ABAP client name and you can change it only in the technical systems [page 9] views.
3. Choose Save.
Add or change a transport target ...
1. Choose the Transport tab.
2. Choose Add/Change Target.
3. From the Group dropdown box, select the group to which you want to add a transport target or whose transport target you want to change.
4. From the Target dropdown box, select the business system you want.
You can define only one target system for a business system group. You can define one business system as the transport target for multiple systems from different groups.
5. Choose OK.
Change the details about installed products
...
1. Choose the Installed Products tab.
If you do not see any products, you have to add them in the technical systems [page 9] views.
2. Select the Installed indicator next to the software products that are installed and deselect it next to the software products that are not installed.
On the right, all software components that are part of the selected software products appear.
3. Choose Save.
System Landscape Directory 21
User Manual 28.03.2008
Creating and Removing Business System Groups Use You can create a group of all business systems that are associated with one and the same integration server. The integration server acts as a central system for the business system group.
Prerequisites You have a user assigned to the LcrInstanceWriterLD role.
Procedure ...
1. Choose Home → Business Systems.
2. From the Group dropdown box, select Edit Groups.
Creating Business Systems Groups ...
1. Choose New Group.
2. Enter a name and optionally a location for the business system group.
3. If you want to assign an integration server to the business system group, from the Integration Server dropdown box, select an integration server.
All business systems that are associated with the integration server you selected are automatically assigned to the business system group.
4. Choose Create.
Removing Business System Groups ...
Select the indicator next to the group(s) you want to remove and choose Remove.
Software Catalog Definition The SLD contains a Software Catalog of all installable SAP products and software components. The Software Catalog includes information about support packages and dependencies between the products and software components. This information is the basis for the description of the system landscape.
In addition, third-party products and software components can be implemented in a system landscape. Third-party products can be standalone applications or additional modules for SAP applications. In the SLD, you have to create third-party products and software components manually.
For more information about the logic behind the products and software components, see Products and Software Components [page 23].
Use You can use the software catalog views to perform the following tasks:
System Landscape Directory 22
User Manual 28.03.2008
● View the Software Catalog [page 24]
● Create and remove third-party products [page 26]
● Create and remove third-party software components [page 27]
● Define and remove dependencies between software component versions [page 28]
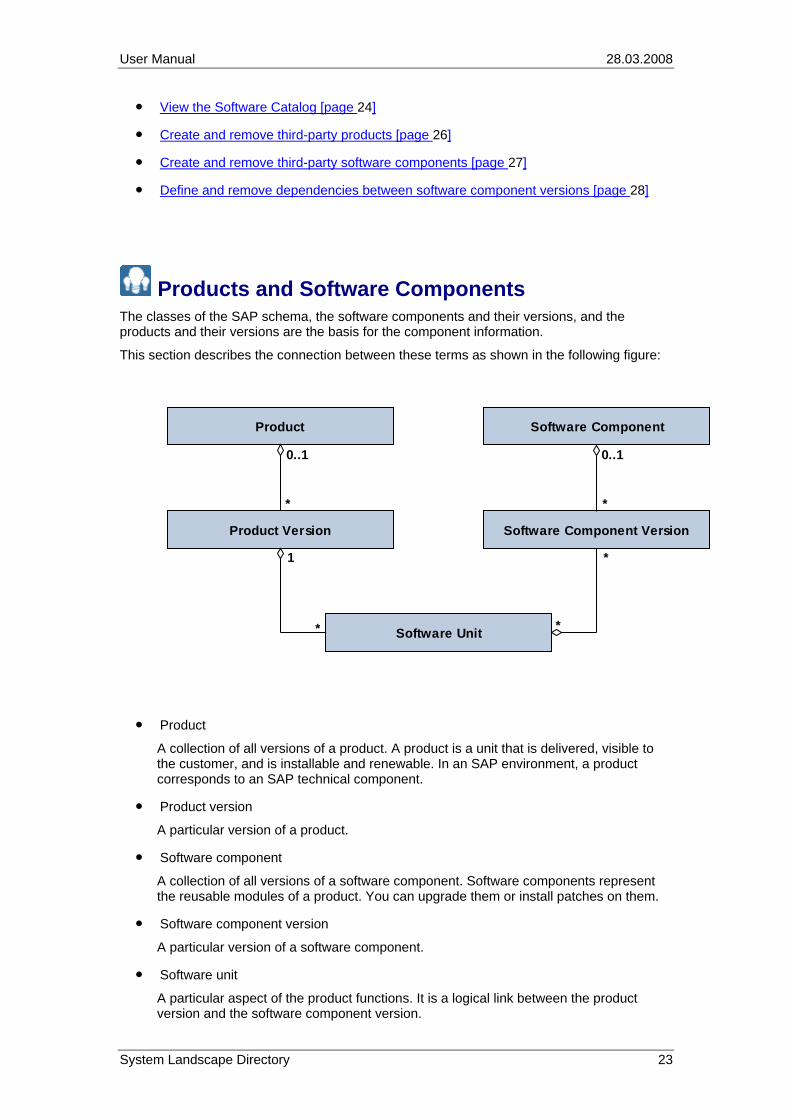
Products and Software Components The classes of the SAP schema, the software components and their versions, and the products and their versions are the basis for the component information.
This section describes the connection between these terms as shown in the following figure:
Software ComponentProduct
Product Version Software Component Version
Software Unit
1
* *
*
* *
0..1 0..1
● Product
A collection of all versions of a product. A product is a unit that is delivered, visible to the customer, and is installable and renewable. In an SAP environment, a product corresponds to an SAP technical component.
● Product version
A particular version of a product.
● Software component
A collection of all versions of a software component. Software components represent the reusable modules of a product. You can upgrade them or install patches on them.
● Software component version
A particular version of a software component.
● Software unit
A particular aspect of the product functions. It is a logical link between the product version and the software component version.
System Landscape Directory 23
User Manual 28.03.2008
As shown in the figure above, a product version consists of multiple software units. These units are implemented by various software components (or versions).
The product SAP R/3 Enterprise, which represents an SAP technical component, has, among other things, a product version SAP R/3 Enterprise Core 4.7. The software unit that represents the functions of this product version has the same description as the product version. Various software components (or versions) fill the functions of this software unit. These software components (or versions) are, among others, SAP Basis 6.20, SAP HR 4.70, and SAP Enterprise Retail 1.10.
The data about SAP software components and SAP products is maintained by SAP. You cannot change this data. You can add current data to your SLD by using the data import function. More information: Updating the Software Catalog [page 34]
You can define dependencies between software component versions in the following contexts:
● InstallationTime
The context of an installation process (first installation or an upgrade to a newer version). The requirements of this context list the external resources that are needed for the installation.
For example, software component C1 requires software components C3 and C4 to be installed. The installation and basic usage of C1 does not work without C3 and C4 being installed first. On the other hand, the installation of C1 does not require any other software component to be installed first, except the ones that are required implicitly through C3 and C4.
● BuildTime
The context of a build process, such as the compilation of sources and the packing of archives. The requirements of this context list the external resources that are needed for the build.
For example, software component C1 requires software components C2 and C3 to be built. The build of C1 does not work without C2 or C3 being built first. On the other hand, the build of C1 does not require any other software component, except the ones that are required implicitly through C2 and C3.
● MetaDataRequest
The context of a process which requires external meta data in an installed system. An example is the content of the PI repository which contains the definitions of services and interfaces. The PI content is used by the software components that implement the services and interfaces (in ABAP or Java).
Viewing the Software Catalog Use You can use the Software Catalog views in the SLD to view data about SAP and third-party registered products and their versions, as well as SAP and third-party registered software components and their versions. The data about SAP products and software components is provided by SAP. You cannot change this data.
Procedure ...
System Landscape Directory 24
User Manual 28.03.2008
1. Choose Home → Products.
The Software Catalog screen appears.
2. On the Products tab page, from the Product dropdown box, select the product whose details you want to view.
A table with product versions appears.
3. Select the product version whose details you want to view. Choose one of the following tabs:
○ General
Displays general details about the product version.
○ Software Units
Displays the software units of the product version.
○ Support Package Stacks
Displays the support package stacks that are recommended for the product version.
○ Installed Systems
Displays the systems, on which the product version is installed.
4. To view details about a software component, choose the Software Components tab.
5. From the Software Component dropdown box, select the software component whose details you want to view.
A table with software component versions appears.
6. Select the software component version whose details you want to view. Choose one of the following tabs:
○ General
Displays general details about the software component version.
○ Products
Displays the products, which contain the software component version.
If you choose the name of a product, the Product tab page is displayed.
○ Dependencies
Displays the dependencies between the software component versions in different contexts: BuildTime, InstallationTime, and MetaDataRequest.
○ Support Packages
Displays the support package stacks that are recommended for the software component version.
○ Release Compatibility
Displays compatible software component versions, which can replace the software component version.
○ Release History
Displays the predecessor and successor software component versions of the software component version.
○ Installed Systems
System Landscape Directory 25
User Manual 28.03.2008
Displays the systems, on which the software component version is installed.
Creating and Removing Third-Party Products Use You can use this procedure to create a third-party product, and add a software unit and a software component to it. You can also create only a third-party product, and add a software unit and a software component to it later (see Creating and Removing Third-Party Software Components [page 27]).
You can create different versions of a registered third-party product. You have to specify exactly the same vendor and name for the product, but you have to specify version numbers accordingly.
As of SAP NetWeaver 7.0 SPS 13, you can also use the Change and Transport System (CTS) to transport SLD data in your landscape.
For more information, see Performing Transports of SLD Data with CTS [page 38].
Prerequisites You have a user assigned to the LcrInstanceWriterCR role.
Procedure ...
Choose Home → Products.
Creating Third-Party Products ...
1. Choose New Product Version.
2. Enter the required information about the third-party product.
Enter the vendor as a URL.
3. Choose Create.
Instances for the Product and Product Version CIM classes, as well as the association instances are created.
Creating Software Units for Third-Party Products ...
1. On the following screen, optionally, enter a name for a software unit for the third-party product.
2. Choose Create.
Instances for the Software Unit CIM class are created.
If you do not want to create a software unit for the third-party product now, choose Cancel. Only the third-party product is created. You can create a software unit later.
System Landscape Directory 26
User Manual 28.03.2008
Creating Software Components of Third-Party Products ...
1. On the following screen, optionally, specify the required information for a software component you want to add to the third-party product.
2. Choose Create.
Instances for the Software Component and Software Component Version CIM classes, as well as the association instances are created.
If you do not want to create a software component for the third-party product now, choose Cancel. Only the third-party product and software unit are created. You can create a software component later.
Removing Third-Party Products ...
1. From the table with product versions, select the product you want to remove.
2. Choose Remove.
Creating and Removing Third-Party Software Components Use You can use this procedure to create a third-party software component and add it to a third-party product that you have created earlier (see Creating and Removing Third-Party Products [page 26]).
You can create different versions of a registered third-party software component. You have to specify exactly the same vendor and name for the software component, but you have to specify version numbers accordingly.
As of SAP NetWeaver 7.0 SPS 13, you can also use the Change and Transport System (CTS) to transport SLD data in your landscape.
For more information, see Performing Transports of SLD Data with CTS [page 38].
Prerequisites You have a user assigned to the LcrInstanceWriterCR role.
Procedure ...
Choose Home → Software Components.
Creating Third-Party Software Components 1. Choose New Software Component Version.
2. From the Product dropdown box, select the third-party product to which you want to define a third-party software component.
3. From the Unit dropdown box, select a software unit of the third-party product.
System Landscape Directory 27
User Manual 28.03.2008
Alternatively, to create a new software unit, choose Create New Unit, enter the required data, and then choose Create.
The software unit is automatically selected in the Unit dropdown box.
4. In the corresponding fields, enter the vendor, name, and version of the software component.
5. From the Production State dropdown box, select the production state you want.
6. Choose Create.
Instances for the Software Component and Software Component Version CIM classes, as well as the association instances are created.
Removing Third-Party Software Components ...
1. From the table with software component versions, select the software component you want to remove.
2. Choose Remove.
Defining and Removing Software Dependencies Use The Software Catalog in the SLD contains information about dependencies between software component versions at installation time (in the InstallationTime context). However, you have to define dependencies in other contexts (in the BuildTime and MetaDataRequest contexts) and dependencies between third-party software component versions. Bear in mind that you can only define a software component version that is a prerequisite for another software component version.
Prerequisite You have a user assigned to the LcrInstanceWriterCR role.
Procedure ...
1. Choose Home → Software Components.
2. From the Software Component dropdown box, select the software component for which you want to define or remove the dependencies.
3. From the table with software component versions, select the software component version for which you want to define or remove the dependencies.
4. Choose the Dependencies tab.
5. From the Context dropdown box, select the context for which you want to define or remove the dependencies.
Prerequisite and dependent software component versions that are defined in the context you have selected are displayed.
Defining Dependencies Between Software Component Versions ...
1. Choose Define Prerequisite Software Component Versions.
2. From the Context dropdown box, select the context for which you want to define the dependencies.
System Landscape Directory 28
User Manual 28.03.2008
3. From the Software Component dropdown box, select the software component you want.
4. From the table with software component versions, select the software component versions that are prerequisites for the software component version that you have selected, in the context that you have selected.
5. Choose Define Prerequisite Software Component Versions.
Prerequisite and dependent software component versions that are defined in the context you have selected are displayed.
Removing Dependencies Between Software Component Versions ...
1. From the table with prerequisite software component versions, select the prerequisite software component versions you want to remove.
2. Choose Remove.
Name Reservation Definition Software development, which is globally distributed, requires a conflict-free method of creating names for software objects. Without such a method, different development teams can accidentally use the same name for software objects that have different purposes. If the software objects are then merged in the same runtime environment, this can even disable applications due to a simple naming conflict.
To avoid naming conflicts, SLD provides a name reservation service, also known as a name server, which allows you to reserve names that are globally unique. The underlying principle is the namespace concept. For more information about the namespace concept, see SAP Service Marketplace at service.sap.com/namespaces. A namespace is defined by a name prefix, which is the leading part of a development object name. For certain object name categories [page 32], a namespace can contain a number of subnamespaces.
Use You can reserve a namespace prefix for your development on SAP Service Marketplace. This namespace prefix spans a unique namespace for each SAP customer. To use this reserved namespace prefix in a local NWDI system, you have to enter the prefix in the name server of the SLD. You can then use this namespace prefix in the SLD as a prefix for names that are reserved. Thus these names are globally unique. No check is implemented to guarantee that a prefix is really reserved on SAP Service Marketplace. It is the responsibility of the administrator to enter in the SLD only namespace prefixes that have been reserved at SAP.
Additionally, some namespaces use your Internet domain names to be globally unique. The Internet domain name is used in Java package names, for example, com.sap.sld. The Internet domain name is unique, and so is the package name that is reserved in the SLD.
Object names must adhere to the following rules:
● The name corresponds to the syntax of the object name category.
● The leading parts of a name are exactly the same as the namespace definition (name prefix).
● The closing asterisk (*) in the name prefix represents all names that belong to this namespace. For example, testcomp belongs to test*.
System Landscape Directory 29
User Manual 28.03.2008
If you define new development objects within NWDI, the SAP NetWeaver Developer Studio provides you with all the namespaces that have already been defined for the relevant object name category. You can then choose an appropriate name prefix and complete the naming of your objects. Subsequently, the NWDI reserves this name for you on the name server.
You can use the name reservation views to perform the following tasks:
● Define name prefixes for development [page 30]
● Reserve names [page 31]
● Remove name prefixes and names [page 31]
Defining Name Prefixes for Development Prerequisites You have a user assigned to the LcrAdministrator role.
Procedure
1. Choose Home → Name Reservation.
2. Choose New Name Prefix.
3. If you want to define a single name prefix for a certain category, select the Single indicator.
4. If you want to define name prefixes for the most commonly used categories, select the Bundle indicator.
5. If you have selected to define a single name prefix, from the Name Category dropdown box, select the name category you want (see Object Name Categories [page 32]).
6. In the Name Prefix field, enter a prefix that follows the syntax rules.
7. From the Purpose dropdown box, select the purpose you want.
By default, the Used by developer option is selected. Such a standard prefix is used in the SAP NetWeaver Developer Studio that is connected to this name server. However, you can use the following options:
● Used in generator
A name prefix that is reserved for generator programs. The prefix is locked for use in the SAP NetWeaver Developer Studio.
● Used everywhere
A local name prefix for prototyping. All name servers are allowed to allocate names in this namespace. Therefore, name conflicts can occur in this namespace.
● Used by other name server
For example, a name prefix for Business One development. No names are reserved on this name server; only name prefixes have been created.
● Used nowhere
A locked name prefix that is reserved for future use.
System Landscape Directory 30
User Manual 28.03.2008
8. Optionally, in the Owner field, enter the e-mail address of the owner of the namespace and, in the Description field, enter a description of the namespace.
9. Choose Define.
Reserving Names Use You can use this function if you want to reserve a single name on a particular name server. This task is usually performed by the SAP NetWeaver Developer Studio. However, for developments without an SAP NetWeaver Developer Studio, you can use the Name Reservation function of the SLD.
Prerequisites You have a user assigned to the LcrAdministrator role.
Procedure
1. Choose Home → Name Reservation.
2. Choose the Names tab.
3. Choose New Name.
4. From the Name Category dropdown box, select the object name category [page 32] for which you want to reserve a name.
5. From the Name Prefix dropdown box, select the prefix for which you want to reserve a name.
6. In the Name field, enter the name you want to reserve following the syntax rules.
7. In the Caption field, enter a caption of the name.
8. Optionally, in the Owner field, enter the e-mail address of the owner of the namespace and, in the Description field, enter a description of the namespace.
9. Choose Reserve.
Removing Name Prefixes and Names Use
You can remove name prefixes and names only if they have not been used in a product that is released.
Prerequisites You have a user assigned to the LcrAdministrator role.
Procedure
1. Choose Home → Name Reservation.
System Landscape Directory 31
User Manual 28.03.2008
2. Choose the either the Name Prefixes or the Names tab.
3. From the Name Category dropdown box, select the object name category you want.
4. Select the name prefix or name you want to remove and choose Remove.
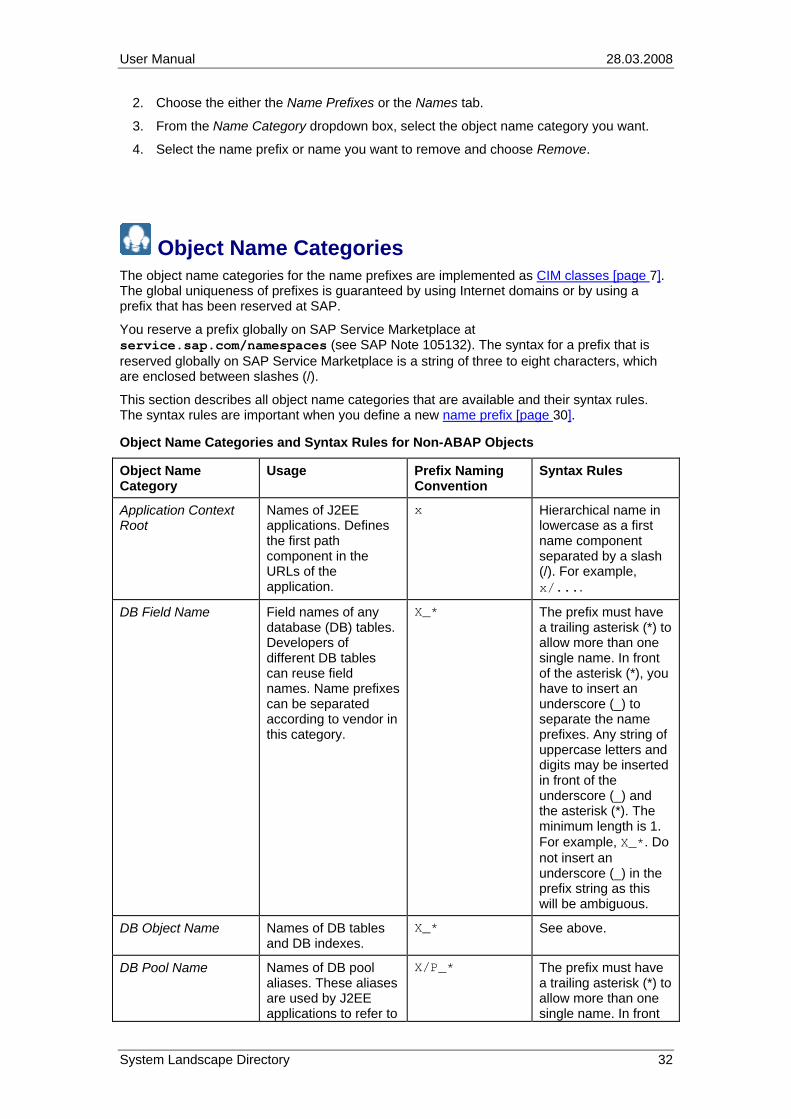
Object Name Categories The object name categories for the name prefixes are implemented as CIM classes [page 7]. The global uniqueness of prefixes is guaranteed by using Internet domains or by using a prefix that has been reserved at SAP.
You reserve a prefix globally on SAP Service Marketplace at service.sap.com/namespaces (see SAP Note 105132). The syntax for a prefix that is reserved globally on SAP Service Marketplace is a string of three to eight characters, which are enclosed between slashes (/).
This section describes all object name categories that are available and their syntax rules. The syntax rules are important when you define a new name prefix [page 30].
Object Name Categories and Syntax Rules for Non-ABAP Objects
Object Name Category
Usage Prefix Naming Convention
Syntax Rules
Application Context Root
Names of J2EE applications. Defines the first path component in the URLs of the application.
x Hierarchical name in lowercase as a first name component separated by a slash (/). For example, x/....
DB Field Name Field names of any database (DB) tables. Developers of different DB tables can reuse field names. Name prefixes can be separated according to vendor in this category.
X_* The prefix must have a trailing asterisk (*) to allow more than one single name. In front of the asterisk (*), you have to insert an underscore (_) to separate the name prefixes. Any string of uppercase letters and digits may be inserted in front of the underscore (_) and the asterisk (*). The minimum length is 1. For example, X_*. Do not insert an underscore (_) in the prefix string as this will be ambiguous.
DB Object Name Names of DB tables and DB indexes.
X_* See above.
DB Pool Name Names of DB pool aliases. These aliases are used by J2EE applications to refer to
X/P_* The prefix must have a trailing asterisk (*) to allow more than one single name. In front
System Landscape Directory 32
User Manual 28.03.2008
a DB connection, including the physical DB, the DB schema, and access rights.
of the asterisk (*), you have to insert an underscore (_) to separate the name prefixes. Any string of uppercase letters, digits, and a slash (/) may be inserted in front of the underscore (_) and the asterisk (*). The minimum length is 1. For example, X/P_*. Do not insert an underscore (_) in the prefix string as this will be ambiguous.
Design Time Package Names of Java packages.
<rid> Reverse Internet domain (rid). For example, sap.com is the normal Internet domain and the reverse is com.sap.
Development Component Name
Names of the smallest reusable software bundles (development components).
<id> Internet domain (id). Hierarchical name separated by a slash (/). The file path in the Design Time Repository (DTR) is preceded by a vendor path that belongs to the development component name. The vendor path at SAP is sap.com. For example, sap.com/*.
Installation Unit Name Names that identify any type of installation unit (executable, dynamically linked library, archive, VB module, and so on). The type is designed mainly for file system elements but not necessarily restricted to them. To avoid name reservation conflicts, do not assign the same name to elements of different types.
X_* See above.
Software Component Name
Names of the smallest shipped software bundles. These bundles contain many development
<id> Software components that have sources in the DTR have to follow the same naming rules as for
System Landscape Directory 33
User Manual 28.03.2008
components. development components. For example, sap.com/*.
Regular Administrative Tasks Purpose You must perform certain administrative tasks regularly to make sure that the SLD is working properly.
For more information about post-installation administrative tasks, see the Post-Installation Guide – System Landscape Directory at http://www.sdn.sap.com/irj/sdn/nw-sld.
Prerequisites You have a user assigned to the LcrAdministrator role.
Process Flow You can perform the following regular administrative tasks:
Update the Software Catalog [page 34]
Export and Back Up CIM Instances [page 35]
View Logs [page 39]
Clean Up Data [page 41]
Create System Messages [page 41]
Maintain SLD Content at CIM Instance Level [page 42]
Use Namespaces to Test Data [page 43]
See also:
Using Exclusive Write Access [page 45]
Security Guide for the SAP System Landscape Directory at http://help.sap.com/nw70 → SAP NetWeaver 7.0 Library English → SAP NetWeaver Library → Administrator’s Guide → SAP NetWeaver Security Guide → Security Aspects for System Management → Security Guide for the System Landscape Directory.
Updating the Software Catalog Use The SLD contains a Software Catalog of all installable SAP products and software components. The Software Catalog includes information about support packages and dependencies between the products and software components. You have to make sure that this content is always up-to-date.
System Landscape Directory 34
User Manual 28.03.2008
You can find the updates of the Software Catalog on SAP Service Marketplace at service.sap.com/swdc → SAP Software Distribution Center → Download → Support Packages and Patches → Entry by Application Group → SAP Technology Components → SAP Master Data for SLD.
The updates of the Software Catalog are provided as deltas to the previous version. Therefore, you do not need to download and install the complete Software Catalog every time.
The updates of the Software Catalog are provided as ZIP files. Note that an import can take a long time (up to an hour), depending on the data size. For more information, see SAP Note 669669.
Prerequisites ● You have set the heap size for all nodes to at least 512 MB using the Config Tool.
● You have downloaded the ZIP file(s) on SAP Service Marketplace to a directory of your choice.
Procedure ...
1. Choose Administration → Import.
The Import screen appears.
2. Choose Browse and browse to the ZIP file you want to import.
3. Choose Import Selected File.
The CIM standard is based on the object-oriented approach. When you import instances from multiple files, make sure that you import them in the correct sequence since this has an effect on the inheritance hierarchy.
At this step the system checks the type of the import, and whether the import fits into the current content.
● If the import does not fit into the current content, a warning is displayed. Choose Import Anyway only if you are sure that you have selected the correct data.
● If the import type and content is correct, the information about the import is displayed. Choose Import to start the import.
The Administration screen appears and the status of the import is displayed at the top of the screen.
Exports and Backups of CIM Instances Use All SLD data is stored in the J2EE database and is therefore automatically backed up during the database backup. However, from time to time, especially before installing updates, you may want to create SLD-specific data backups.
System Landscape Directory 35

User Manual 28.03.2008
Features SLD provides two different mechanisms for data backup:
● Export of CIM Instances [page 36]
You can use exports to transport updates of SLD data between two SLD systems. Each export contains information about the changes, both additions and removals, of SLD data since the last export. For example, the updates of the Software Catalog on SAP Service Marketplace are created as an export of the SAP master system. Exports have a version, and you must import them in the same sequence into the target system.
● Backup of CIM Instances [page 37]
Backups contain only the current state of the SLD. You can use them to restore an SLD system after a crash or to make a mirror image of one SLD system.
You can import [page 34] both exports and backups into another SLD system.
Exporting CIM Instances Use If you want to export your CIM instances with versioning, you have to use the Export administrative function.
Procedure ...
1. Choose Administration → Export.
The Export screen appears. The namespace that will be exported is displayed in a status bar.
2. From the Export Line dropdown box, select one of the following options:
○ ALL to export all CIM instances
○ LD to export the landscape data
○ CR to export component repository data
○ NR to export name reservation data.
If this is the first export for this export line, you have to perform a full export. For the next export, you can choose whether to perform an incremental export or a full export.
3. Choose Export.
The Administration screen appears and the status of the export is displayed at the top of the screen. When the export is complete, the Download screen appears.
The system has exported the data of the export line you have selected. This export is also saved to the database and you can use it later. You can import [page 34] the data, for example, into other systems of your system landscape.
4. Choose Download full export file (or Download incremental export file).
5. Save the file to a directory of your choice.
System Landscape Directory 36
User Manual 28.03.2008
6. To manage your exports, choose Export Administration.
A list of your previous exports is displayed. You can group multiple exports together and import them as a single aggregated file into another system.
You must import exports with versioning in the same sequence in which they were produced into the target system.
If you want to create a backup of a particular export line without versioning, on the Export Administration screen, choose Backup.
Backing Up CIM Instances Use If you want to create a backup of your CIM instances without versioning, you have to use the Backup administrative function. This function offers the following three backup options:
● Backup of all CIM instances
● Backup of instances of selected classes
● Backup of a CIM model, including classes and qualifiers, but not instances.
Procedure Choose Administration → Backup. ...
Backing Up All CIM Instances
1. Choose All Instances.
The Administration screen appears and the status of the backup is displayed at the top of the screen. When the backup is complete, the Download screen appears.
2. Choose Download backup file.
3. Save the file to a directory of your choice.
Backing Up Instances of Selected Classes
1. Choose Instances By Class.
The Backup By Class screen appears.
2. From the list of classes that are available, select the classes you want by holding down the CTRL key and clicking the classes with the primary mouse button.
3. Choose Add.
4. Choose Backup.
The Administration screen appears and the status of the backup is displayed at the top of the screen. When the backup is complete, the Download screen appears.
5. Choose Download file.
6. Save the file to a directory of your choice.
Backing Up a Complete CIM Model
System Landscape Directory 37
User Manual 28.03.2008
1. Choose Model.
2. Choose Download model file.
3. Save the file to a directory of your choice.
Performing Transports of SLD Data with CTS Use The existing Change and Transport System used for the transport of ABAP objects got enhanced so that it now also lets you transport Java objects (J2EE, JEE) and SAP-specific non-ABAP technologies - such as SLD data - in your landscape. By using this enhanced Change and Transport System (CTS) you can import all objects relevant for the transport into a target system whereas the system performs the required deployment step automatically.
The following steps describe how you can use CTS to transport SLD data in your landscape.
Prerequisites ● The enhanced CTS functions are available with SAP NetWeaver 7.0 SPS 13 and
higher. Therefore, your SLD systems must have SAP NetWeaver 7.0 SPS 13 or higher applied.
● You have created non-ABAP systems as SLD source system and as SLD target system in CTS.
● You have performed the following configuration steps:
○ Configuring a destination service
○ Choosing a file transfer method
○ Choosing a transport strategy
For more information about these steps, see http://help.sap.com/nw70 → SAP NetWeaver 7.0 Library English → SAP NetWeaver Library → SAP NetWeaver Library by Key Capabilities → Solution Life Cycle Management by Key Capabilities → Software Life Cycle Management → Software Logistics → Change and Transport System → Change and Transport System (Overview (BC-CTS)) → Non-ABAP Transports in Change and Transport System (BC-CTS).
Procedure ...
1. Open the home page of your SLD source system at http://<host>:<port>/sld.
2. On the Welcome screen, proceed according to the object you want to export:
○ If you want to export a product or a software component, choose Software Catalog → Products or Software Components.
You can export non-SAP products and software components only!
○ If you want to export a technical system or a business system, choose Landscape →Technical Systems or Business Systems.
3. Select the objects you want to export and choose Export.
System Landscape Directory 38
User Manual 28.03.2008
According your chosen transport strategy a transport request is proposed or you have to create one by choosing Create/Select Request.
If you want to change a proposed request, select another request by choosing Create/Select Request and choose Refresh.
4. In the Note field, enter a short description of your request.
5. Choose Attach Exported Data to attach the export to the transport request.
6. If you want to attach further objects to the transport request, choose Home and proceed as in the above described steps 2 to 5.
7. Choose Process Requests to release the transport request.
Result You have released the transport request.
To make the transported objects available in your SLD target system, you have to import them into the system. For more information about importing transport requests with non-ABAP objects, see http://help.sap.com/nw70 → SAP NetWeaver 7.0 Library English → SAP NetWeaver Library → SAP NetWeaver Library by Key Capabilities → Solution Life Cycle Management by Key Capabilities → Software Life Cycle Management → Software Logistics → Change and Transport System → Change and Transport System (Overview (BC-CTS)) → Non-ABAP Transports in Change and Transport System (BC-CTS). ...
Viewing Logs Use During a system process, the SLD server logs relevant information for monitoring purposes. The SLD writes data to standard logs, which you can view with any SAP log viewer. You can also view the SLD logs on the SLD UI.
You have to view the logs regularly to check whether any errors have occurred. SAP support can also use the logs to analyze problems.
Procedure ...
Choose Administration → Log.
The Server Log screen appears.
Setting the Log Level ...
1. From the Current Log Level dropdown box, select the log level you want.
2. Choose Set Permanently.
The log level you have selected is set permanently and globally for the cluster.
Bear in mind that setting the log level to DEBUG or FINE may impact system performance because a lot of information is written to the file system. To improve system performance, set the log level to INFO.
3. Choose Refresh.
The log data you have selected is displayed. The newest log record is displayed at the top.
System Landscape Directory 39
User Manual 28.03.2008
To refresh the log data automatically, select the Auto-Refresh indicator.
Filtering and Viewing the SLD Server Log ...
1. To filter the SLD server log by log level, from the Filter Log Level dropdown box, select the log level you want.
2. To filter the SLD server log by component, that is to specify the component in the Java package hierarchy whose log data you want to view, including the log data for the subcomponents, choose Component Filtering.
The Log Filtering screen appears.
3. From the list of components that are available, select a component whose log data you want to view.
4. From the Filter Level dropdown box, select the log level you want.
You can select as many components as you want.
5. Choose Back to Log.
6. To filter the SLD server log and view only log data, which contains a certain string, in the Filter Output field, enter the string you want.
7. Choose Refresh.
Deleting the SLD Server Log ...
Choose Clear.
The log data is deleted permanently.
Downloading the SLD Server Log from the Server ...
1. To download the SLD server log from the server to view it locally or archive it, choose Download Log.
2. Save the file to a directory of your choice.
Downloading the Log Properties File from the Server ...
1. To download the log properties file from the server to process it locally, choose Download Log Settings.
2. Save the file to a directory of your choice.
Transferring the Log Properties File to the Server ...
1. To transfer the log properties file back to the server after you have modified it locally, choose Upload Log Settings.
2. In the File field, enter the file name and then choose Upload.
The file is transferred to the server.
The changes to the configuration take effect only after you restart the SLD server.
3. Choose Administration.
4. Choose Stop Server and then choose Start Server.
System Landscape Directory 40
User Manual 28.03.2008
Cleaning Up Data Use The data supplier programs report data about the systems in your landscape to the SLD. If a system no longer exists in your landscape, the data about the system remains in the SLD. You have to clean up the data manually in the SLD.
Procedure ...
1. Choose Administration → Automatically Updated Data.
2. Enter a date and optionally a time before which you want to display the systems that reported data to the SLD.
3. Choose Display.
A list of systems is displayed along with the date on which they last reported data to the SLD.
If a particular date is too far in the past (see Scheduling the Data Collection Programs [page 51]), this is a good indication that the system no longer exists in the system landscape. The SLD has no way of knowing this, so you must manually remove the system from the SLD.
4. Select the system(s) you want to remove from the SLD.
Bear in mind that you remove not only the system but also all its associations to other systems, for example to business systems.
5. If you want to remove the selected system(s) and all their instances, choose Remove.
Creating System Messages Use You can create an informational system message, which will be seen by every user who logs on to the SLD.
Procedure ...
1. Choose Administration → System Message.
2. In the Message field, enter the text of the system message.
3. Optionally, in the Date and Time fields, enter a date and time when the message expires.
4. Choose Set.
System Landscape Directory 41
User Manual 28.03.2008
Maintaining SLD Content at CIM Instance Level Use Rarely, you may have to use the Content Maintenance function in the SLD, which allows you to maintain the content on a low-level by allowing you to work directly at CIM instance level.
Maintenance interfaces exist for most SAP applications that use the SLD. Use these specific interfaces for maintaining data to ensure that the applications run smoothly.
Bear in mind that modifying or removing CIM instances in the Content Maintenance function may have undesired effects, for example, if you do not maintain the associations to other instances. Use the Content Maintenance function only for CIM classes with which you are familiar and only after consulting with SAP support.
Procedure ...
1. Choose Administration → Content Maintenance.
The Content Maintenance screen appears.
2. From the Subset dropdown box, select the subset of the data you want to display.
3. From the Class dropdown box, select the class whose instances you want to view and process.
The number in the parentheses after the class name indicates the number of instances.
A table with all instances of the selected CIM class appears.
4. To filter the instance data and view only instance data that contains a certain string in the Filter field, enter the string you want and choose Refresh.
A table with all instances that meet the filter criteria appears. ...
Creating an Instance of the Selected CIM Class ...
1. Choose New <Class_Name>.
2. Enter the instance properties and choose Save.
You must enter all key properties. The key properties are displayed in boldface.
Removing Multiple Instances ...
1. In the table with all instances, select the corresponding indicator in front of the instance(s) you want to remove.
2. Choose Remove.
Viewing and Modifying Instance Properties ...
1. To view instance properties, in the table with all instances, choose the corresponding link in the <Class_Name> column.
2. Change the instance properties you want and choose Save.
System Landscape Directory 42
User Manual 28.03.2008
Creating a Copy of an Instance ...
1. On the instance detail screen, choose Copy.
A separate detail screen for the new instance appears. All properties on this screen are identical to properties of the original instance.
2. Change the instance key properties you want, as well as any other properties you want, and choose Save.
The CIM concept does not allow you to create completely identical instances. Creating a copy means only that the data of the original instance is copied as a template for the new instance. The new instance must have at least one key property that is different from the key properties of the original instance.
Renaming an Instance ...
1. On the instance detail screen, choose Move.
2. Change the instance key properties you want, as well as any other properties you want, and choose Save.
The renamed instance is saved. The renamed instance replaces the original instance. All associations to this instance are updated accordingly.
Viewing the Associations of an Instance ...
1. To view all associations of an instance:
○ In the table with all instances, choose the corresponding link in the Assoc’s column.
○ On the instance detail screen, choose <num> Associated Instances.
Creating an Association of the Selected Instance ...
1. Choose New Association.
2. From the Association Type dropdown box, select the association type you want.
All instances that are suitable for the association type you selected are displayed.
3. Select the corresponding indicator in front of the instance(s) you want to associate with the selected instance and choose Associate.
Removing Associations of an Instance ...
1. Select the corresponding indicator(s) in front of the association(s) you want to remove.
2. Choose Remove.
The associated instances are removed. The instances that are connected with the original instance by these associations remain.
Using Namespaces to Test Data Use The component and system landscape description contain current information about your system landscape. Using SLD simulations, you can also plan a future system landscape. We recommend that you test simulations in a different area to the current system landscape.
System Landscape Directory 43
User Manual 28.03.2008
The namespace concept of the SLD allows you to create various namespaces as logical areas. The sld/active namespace mirrors the real system landscape. When you create a new namespace, it is initially empty. To create a duplicate of a namespace for test purposes, back up [page 37] the content of the source namespace and import [page 34] it to the target namespace.
Procedure Choose Administration → Namespaces.
Creating Namespaces ...
1. Choose Add.
A dialog box appears.
2. In the New Namespace field, enter a name of the new namespace and choose OK.
Switching Between Namespaces ...
1. In the Database Namespaces field, select the namespace to which you want to switch.
The system switches to the namespace you have selected.
You can switch between namespaces on all other screens on which a namespace switch is relevant. The current namespace is displayed at the bottom of each screen.
...
1. To switch between namespaces on another screen, choose the name of the current namespace.
The Change Namespace screen appears.
2. In the Database Namespaces field, select the namespace to which you want to switch.
3. Choose Set As Current.
The system switches to the namespace you have selected and the previous screen appears.
The namespace is a parameter of your HTTP session. Therefore, the namespace is automatically reset to sld/active after the HTTP session has been inactive for some time.
Deleting Namespaces ...
1. In the Database Namespaces field, select the namespace you want to delete.
The system switches to the namespace you have selected.
2. Choose Remove <namespace>.
The system deletes the namespace, including all its data.
Deleting Namespace Instances
The system deletes permanently all instances of the namespace you selected. Make a backup copy of the instances using the backup [page 37] function, before you delete any instances permanently.
...
1. In the Database Namespaces field, select the namespace whose instances you want to delete.
System Landscape Directory 44
User Manual 28.03.2008
The system switches to the namespace you have selected.
2. Choose Remove Instances.
Using Exclusive Write Access Use Some use cases require that you restrict write access to your SLD. For example, during a system migration you may want to ensure that no data in the old SLD is changed until the migration to the new SLD is finished to avoid losing such changes.
For such purposes SLD provides features for exclusive write access. Write access will be restricted whereas read access is possible as usual. You have two options:
● Grant exclusive write access for a single user
This may be necessary if you yourself need to make changes to the SLD content, but you need to prohibit anyone else from performing any changes.
● Deny write access for all users
This option is appropriate if no one should be allowed to change any data.
Exclusive write access can be configured by an SLD administrative user. Any setting you select is persisted and will therefore still be active after an SLD restart.
Result ...
1. Log on to the SLD UI with an administrative user.
2. Choose Administration → Profile.
3. Choose section Server Settings.
4. Select an appropriate value from the dropdown list of parameter Write Protection. Available values are:
○ None: This setting represents a normal operation of SLD. Write access is not restricted. You can perform write operations according to your user permissions.
○ Single User: Exclusive write access is granted to the user that enables this setting. Write permissions for any other users are disabled.
○ Read-Only: Write permissions for all users are disabled.
5. Save your changes.
Configuring Systems to Connect to SLD Purpose Systems that are installed in your system landscape periodically send data to the SLD. You have to configure the systems to connect to SLD and periodically send data.
Process Flow Depending on the system, the following ways to send data to the SLD exist:
System Landscape Directory 45
User Manual 28.03.2008
● Web AS ABAP Systems [page 48]
○ An ABAP-based SLD data supplier uses an RFC connection to send data about a Web AS ABAP system to the SLD bridge by means of an SAP gateway.
The ABAP-based SLD data supplier (transaction RZ70) is available for all SAP systems as of SAP Basis release 4.0B.
○ Some components, such as PI and the Solution Manager, use the SLD Application Programming Interface for ABAP-Based Systems [page 51] to send data to the SLD.
● Web AS Java Systems [page 55]
○ A J2EE-based SLD data supplier uses HTTP to send data about a Web AS Java system to the SLD. The SLD can forward the data to one or more other SLD servers.
The J2EE-based SLD data supplier is available for all J2EE Engines as of SAP Web AS release 6.40.
○ Some components, such as PI, use the SLD CIM Client [page 58] to send data to the SLD.
● Other SAP Systems [page 60]
Systems that are neither ABAP nor J2EE-based use the sldreg executable to send data to the SLD.
See also:
Architecture Overview of the SLD Data Suppliers [page 46]
Configuring the SLD Bridge [page 61]
Architecture Overview of the SLD Data Suppliers Besides component information, the SLD stores information about the current system landscape. A data collection process in each system in the landscape provides this information to the SLD. This process is managed by the data supplier administration. The data suppliers collect data not only about SAP systems (SAP products, database parameters, hosts, clients, and so on), but also about any third-party products that are installed.
System Landscape Directory 46
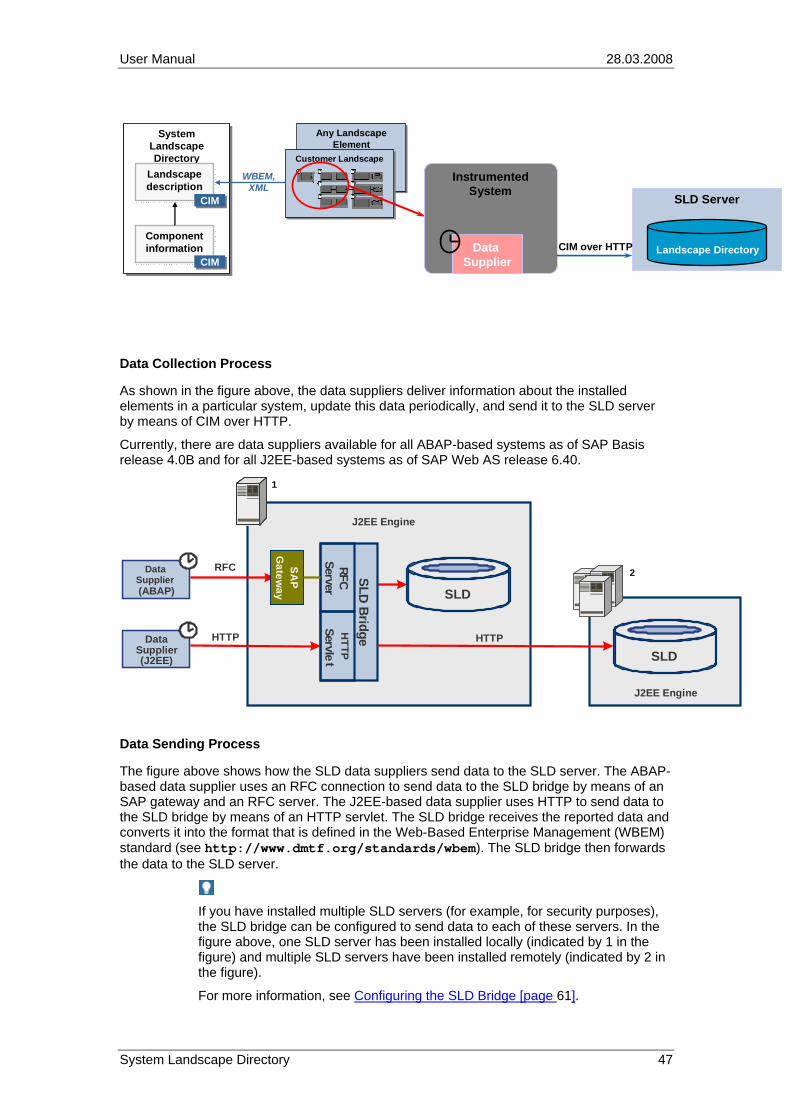
User Manual 28.03.2008
Any Landscape Element
Any Landscape Element
Customer LandscapeCustomer Landscape
System Landscape Directory
System Landscape Directory
ComponentinformationComponentinformation
CIMCIM
LandscapedescriptionLandscapedescription
CIMCIM
WBEM,XML
SLD Server
Landscape Directory
InstrumentedSystem
Data Supplier
CIM over HTTP
Data Collection Process
As shown in the figure above, the data suppliers deliver information about the installed elements in a particular system, update this data periodically, and send it to the SLD server by means of CIM over HTTP.
Currently, there are data suppliers available for all ABAP-based systems as of SAP Basis release 4.0B and for all J2EE-based systems as of SAP Web AS release 6.40.
1
2
HTTP
RFC SA
PG
ateway
J2EE Engine
SLDBri dge
RFCSer ver
HT TP
Ser vle t
DataSupplier(ABAP)
DataSupplier(J2EE)
J2EE Engine
HTTP
SLD
SLD
Data Sending Process
The figure above shows how the SLD data suppliers send data to the SLD server. The ABAP-based data supplier uses an RFC connection to send data to the SLD bridge by means of an SAP gateway and an RFC server. The J2EE-based data supplier uses HTTP to send data to the SLD bridge by means of an HTTP servlet. The SLD bridge receives the reported data and converts it into the format that is defined in the Web-Based Enterprise Management (WBEM) standard (see http://www.dmtf.org/standards/wbem). The SLD bridge then forwards the data to the SLD server.
If you have installed multiple SLD servers (for example, for security purposes), the SLD bridge can be configured to send data to each of these servers. In the figure above, one SLD server has been installed locally (indicated by 1 in the figure) and multiple SLD servers have been installed remotely (indicated by 2 in the figure).
For more information, see Configuring the SLD Bridge [page 61].
System Landscape Directory 47
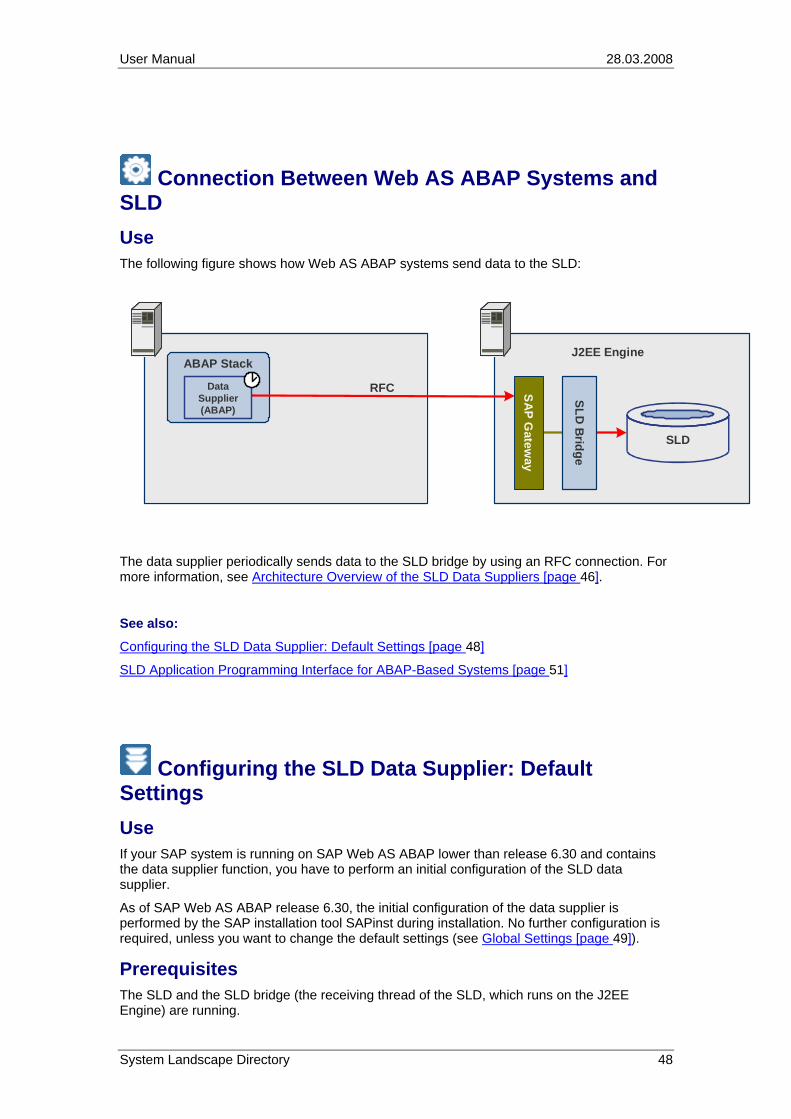
User Manual 28.03.2008
Connection Between Web AS ABAP Systems and SLD Use The following figure shows how Web AS ABAP systems send data to the SLD:
RFC
J2EE Engine
SLD
ABAP Stack
SLDB
ridge
SA
PG
ateway
DataSupplier(ABAP)
The data supplier periodically sends data to the SLD bridge by using an RFC connection. For more information, see Architecture Overview of the SLD Data Suppliers [page 46].
See also:
Configuring the SLD Data Supplier: Default Settings [page 48]
SLD Application Programming Interface for ABAP-Based Systems [page 51]
Configuring the SLD Data Supplier: Default Settings Use If your SAP system is running on SAP Web AS ABAP lower than release 6.30 and contains the data supplier function, you have to perform an initial configuration of the SLD data supplier.
As of SAP Web AS ABAP release 6.30, the initial configuration of the data supplier is performed by the SAP installation tool SAPinst during installation. No further configuration is required, unless you want to change the default settings (see Global Settings [page 49]).
Prerequisites The SLD and the SLD bridge (the receiving thread of the SLD, which runs on the J2EE Engine) are running.
System Landscape Directory 48
User Manual 28.03.2008
Procedure
1. Call transaction RZ70.
2. In the SLD Bridge: Gateway Information group box, enter the following data:
a. In the Host field, enter the name of the gateway host.
b. In the Service field, enter the name of the gateway service.
Make sure that the entries for the gateway host and service are exactly the same as in the SLD Bridge. We recommend that you have a gateway installed on the SLD server to avoid any erroneous use of one gateway by more than one SLD bridge.
3. In the Data Collection Programs group box, choose Proposal.
If your system is running on SAP Basis release 4.0B, choose Import.
A dialog box appears and you are asked whether you want to use the installation default settings.
4. Choose Yes.
5. Save these settings by choosing Activate Current Configuration.
If you want to test the data collector, you can start the data collector once without scheduling a batch job by choosing Start Data Collector Without Job Scheduling.
6. Choose Start Data Collection and Job Scheduling.
A separate screen appears with a list of the executed programs and you are informed whether the initial transfer of data by RFC has been successful. For more information, see SAP Note 584654.
Result You have set the data supplier to send data about the current system directly to the SLD by using an RFC connection. A scheduled batch job updates the data about the system in the SLD twice a day.
Global Settings Use We recommend that you use the following default settings [page 48]:
● Use an RFC connection with an automatic RFC destination to send data directly to the SLD gateway
● Use a standard set of predefined data collection programs [page 50]
● Schedule the data collection programs [page 51] to be executed in a batch job once every 720 minutes (12 hours).
System Landscape Directory 49
User Manual 28.03.2008
Data Collection Programs Use The SLD data supplier collects and sends data about the current system to the SLD. To collect this data, the data supplier uses data collection programs.
Features The following table shows the type of data that is provided by the data collection programs that are available:
Data Collection Program System Element for Which Data Is Provided
_SLD_APPL_SERV Application servers/instances
_SLD_BCSYS SAP system
_SLD_CLIENT Clients
_SLD_COMPSYS Hosts
_SLD_DBSYS Database
_SLD_INSTSC Installed software components
_SLD_INSTSP Installed support packages
_SLD_IPSERV Network services
_SLD_MSGSERV SAP message server
_SLD_RFC RFC destinations (deactivated by default)
If you want to create additional information about RFC destinations in the SLD, you can activate this data collection program.
_SLD_ASSOC CIM associations between generated objects
Do not deactivate any of the data collection programs.
Activities If the table does not contain any data collection programs, in transaction RZ70, choose Transfer to manually add programs from the database.
If the current system is running on SAP R/3 release 4.5x, and you want to add programs from the database, choose Import.
You can set a time interval for collecting data about the current system. For more information, see Scheduling the Data Collection Programs [page 51].
System Landscape Directory 50
User Manual 28.03.2008
Scheduling the Data Collection Programs Use You can schedule the data supplier as a periodic batch job and set a time interval for collecting data about the current system.
Prerequisites You have called transaction RZ70.
Procedure
1. Make sure that the Schedule background job indicator is selected.
By default, the Schedule background job indicator is selected. If you deselect it, the data about the system will be sent to the SLD only if you trigger the data collection programs manually.
2. In the Minutes field, enter a time interval in minutes for collecting data.
The default setting is 720 minutes (12 hours). This means that the data about the current system will be updated in the SLD twice a day.
3. Save your settings by choosing Activate Current Configuration.
SLD Application Programming Interface for ABAP-Based Systems Use Some components, such as PI and the Solution Manager, use the SLD Application Programming Interface for ABAP-based systems (SLD ABAP API) to read data from and write data to the SLD.
The SLD ABAP API is delivered in the SLD_API package of the SAP Web AS ABAP release 6.20 and higher.
Activities If you run applications that read data from and write data to the SLD, you have to configure the connection between the SLD ABAP API and the SLD manually.
For more information about configuring the connection to an ABAP system, which is part of the SAP NetWeaver Process Integration, see Connecting to the System Landscape Directory [external].
Both RFC and HTTP protocols are used for connecting the SLD ABAP API and the SLD. You have to configure both the RFC channel from ABAP to Java and the HTTP connection parameters. The following figure shows the configuration of the SLD ABAP API in detail:
System Landscape Directory 51

User Manual 28.03.2008
J2EE Engine
SAP
Gatew
ay
SLD Java C
lient
JCo
RFC
Provider SLDRFC HTTP
ABAP Client
J2EE Engine
We recommend that you use the same J2EE Engine and a local SAP gateway for the whole infrastructure. In this case, only the RFC communication is remote. If the ABAP system is an add-in installation to a J2EE system, the corresponding J2EE Engine can be used alternatively as an RFC provider. Then only the HTTP communication is remote.
See also:
Creating an RFC Destination for the SLD ABAP API on the J2EE Side [page 52]
Creating an RFC Destination for the SLD ABAP API on the ABAP Side [page 54]
Creating an HTTP Destination for the SLD ABAP API on the ABAP Side [page 54]
Creating an RFC Destination for the SLD ABAP API on the J2EE Side Use If you want to configure an ABAP application to access data in the SLD using the SLD ABAP API, you have to create an RFC destination on the J2EE Engine that hosts the SLD. If the ABAP system is an add-in installation to a J2EE system, you can configure the RFC destination on the J2EE Engine, but we do not recommend it.
Procedure in ...
1. In the Visual Administrator, choose Cluster → Server → Services → JCo RFC Provider → Runtime → Bundles.
2. Enter the RFC destination parameters in the following fields:
Field Description
Program ID We recommend that you use the following pattern: SLDAPI_<SID>, where SID is the system identifier of the J2EE Engine.
System Landscape Directory 52
User Manual 28.03.2008
Gateway host
Gateway service
If your J2EE Engine is an add-on installation to an ABAP system, use the gateway of the ABAP system. You can look up the gateway parameters of an ABAP system using transaction SMGW.
If your J2EE Engine is a standalone installation, we recommend that you install a gateway on the same host.
If you cannot install a gateway on the same host, you can use the gateway of the calling ABAP system (the one that you are connecting to the SLD).
Number of processes(1..20) Enter 3.
3. Enter the repository parameters in the following fields:
Field Description
Application server host
System number
Enter the connection data for the ABAP system.
Client
Language
User
Password
Enter the logon data for the ABAP system. You must specify an existing user with appropriate authorizations for RFC.
If your J2EE Engine is an add-on installation to an ABAP system, use the logon data for this system.
If your J2EE Engine is a standalone installation, use the logon data for the calling ABAP system.
4. If the calling ABAP system is a Unicode system, select the Unicode indicator.
If you want to connect several ABAP systems, of which some are Unicode and others are non-Unicode, you have to create two separate destinations that correspond to the two system types; for a Unicode system, select the Unicode indicator, and for a non-Unicode system, deselect the Unicode indicator.
5. Create the RFC destination by choosing Set.
System Landscape Directory 53
User Manual 28.03.2008
Creating an RFC Destination for the SLD ABAP API on the ABAP Side Use If you want to configure an ABAP application to access data in the SLD through the SLD ABAP API, you have to create an RFC destination on the ABAP system side.
Prerequisites You have created an RFC destination for the SLD ABAP API on the J2EE side [page 52].
Procedure ...
1. Call transaction SM59.
2. Select TCP/IP connections and choose Create.
3. In the RFC Destination field, enter SAPSLDAPI.
4. On the Technical Settings tab page, select the Registered Server Program indicator.
5. In the Program ID field, enter the same program ID as the one you entered when you created an RFC destination for the SLD ABAP API on the J2EE side. We recommend that you use the following pattern: SLDAPI_<SID>, where SID is the system identifier of the J2EE Engine.
6. Choose MDMP & Unicode and select the Unicode or the Non-Unicode indicator depending on your selection when you created an RFC destination for the SLD ABAP API on the J2EE side.
7. Choose Save.
8. Test the RFC destination by choosing Connection Test.
If the display shows the response times, you have configured the RFC destination correctly.
Creating an HTTP Destination for the SLD ABAP API on the ABAP Side Use If you want to configure an ABAP application to access data in the SLD through the ABAP API, you have to configure the HTTP connection parameters on the ABAP system side.
Prerequisites ...
1. An RFC destination for the SLD ABAP API has been created on the J2EE side. For more information, see Creating an RFC Destination for the SLD ABAP API on the J2EE Side [page 52].
2. An RFC destination for the SLD ABAP API has been created on the ABAP side. For more information, see Creating an RFC Destination for the SLD ABAP API on the ABAP Side [page 54].
Procedure ...
System Landscape Directory 54
User Manual 28.03.2008
1. Call transaction SLDAPICUST.
2. Switch to CHANGE mode by choosing Display <-> Change.
3. Choose Append Row.
4. Enter the HTTP connection parameters in the following fields:
Field Description
Alias Name Enter a string that uniquely identifies the HTTP connection record in the table.
Host Name
Port
Enter the host name and HTTP port number of the SLD.
User Enter the user name of the user who logs on to the SLD.
The user is assigned at least to the LcrUser role.
5. Select the Prim. indicator.
The table may have several HTTP connection records that point to different SLD servers. Only one of them can be selected as primary. The primary HTTP connection is the default connection for all applications that use the SLD ABAP API.
6. Choose the Password button.
7. Enter a password and choose Continue.
8. Choose Save.
9. If you want to check the status of the HTTP connection, call transaction SLDCHECK.
Connection Between Web AS Java Systems and SLD Use Each Web AS Java system has a built-in mechanism for reporting data to the central SLD (see Architecture Overview of the SLD Data Suppliers [page 46]). In addition, other applications that run on the Web AS Java system can find out where the central SLD is located and use this information to connect. Bear in mind that in special cases, for example, for testing or development, the destination SLD to which other application data is reported may be different from the one to which J2EE data is reported.
You must configure the SLD target even if the central SLD is running on the local J2EE Engine.
See also:
Setting Up the SLD Data Supplier for J2EE-Based Systems [page 56]
System Landscape Directory 55

User Manual 28.03.2008
Information About the SLD Data Supplier Service in the Visual Administrator [page 57]
SLD Data Supplier Service Properties [external]
Configuring the Interface for CIM Client Generation [page 58]
Setting Up the SLD Data Supplier for J2EE-Based Systems Use An initial configuration of the data supplier for J2EE-based systems is performed by the SAP installation tool SAPinst when you install the J2EE Engine. However, if you want to change the default settings, or if you have installed the J2EE Engine in a different way, you can use the J2EE administration tool, the Visual Administrator, to configure the data supplier manually.
Prerequisites ...
1. The SLD server is running.
2. You are logged on to the Visual Administrator of the J2EE Engine as an administrator.
Procedure
1. In the Visual Administrator, choose Cluster → Server → Services → SLD Data Supplier → Runtime → HTTP Settings.
2. Enter the required data for the HTTP connection from the SLD Data Supplier service to the SLD as follows:
a. In the Host field, enter the name of the host where the SLD bridge runs. If the central SLD is running on the current J2EE Engine, enter localhost.
b. In the Port field, specify the HTTP standard access port of the SLD.
c. In the User field, specify a J2EE user that already exists on the host where the SLD bridge runs. This user must be assigned to the DataSupplierLD security role. The J2EE user must be specific for this J2EE Engine and must not be used on another J2EE Engine.
d. In the Password field, enter the user password.
3. If you want to use HTTPS for the connection from the SLD Data Supplier service to the SLD, select the Use HTTPS? indicator.
In this case also make sure that in the Port field, you specify the HTTPS port.
The Trust Store field is now enabled.
A trust store contains the root certificates of the trusted roots, and checks the authenticity of a received server certificate. The default setting for the trust store is TrustedCAs. If necessary, you can change this setting. For a list of trust stores that are available, choose Cluster → Server → Services → Key Storage → Runtime → Views.
System Landscape Directory 56
User Manual 28.03.2008
Both the sending and the receiving J2EE Engines must be configured for Secure Socket Layer (SSL) connections before you can use HTTPS. For more information, see Configuring the Use of SSL on the J2EE Engine [external].
4. Save your entries.
If an error occurs, an error message appears. If your entries have been saved successfully, the connection data is saved in encrypted form in the secure store in the database.
5. If you want to test your settings by sending data to the SLD, choose Trigger data transfer to System Landscape Directory (SLD).
6. To apply the new configuration immediately, restart the SLD Data Supplier service as follows:
a. Click SLD Data Supplier with the secondary mouse button and then choose Stop.
b. When the service has been stopped, click SLD Data Supplier with the secondary mouse button again, and then choose Start.
The service is restarted within a few seconds, and the first data transfer to the SLD takes place after two minutes.
If you do not restart the SLD Data Supplier service, the settings are refreshed automatically after a certain time interval, provided that the J2EE Engine is not restarted. For details about the time interval and the status of the last data transfer, see Information About the SLD Data Supplier Service in the Visual Administrator [page 57].
Information About the SLD Data Supplier Service in the Visual Administrator In the Visual Administrator, on the Cluster → Server → Services → SLD Data Supplier → Runtime tab pages, you can view information about the following:
● Status of the last data transfer
● Connection data
To make sure that you see the most current connection data, choose Get latest send information.
On the Information tab page, the following fields are displayed:
Field Description
Latest Send Activity Indicates the date and time of the last data transfer.
Used HTTP Parameters [http host:port] [user] [protocol]
Connection data (except the SLD J2EE user password) of the last transfer.
System Landscape Directory 57
User Manual 28.03.2008
Sending node [nodeID] [hostname] Since a J2EE Engine may consist of several server nodes, this field contains the node that last sent data to the SLD.
You can use this information, for example, to access the log file of this instance of the SLD service.
Send Result Indicates for each send attempt whether the data has been transferred to the SLD correctly (success) or not (failed).
Next Automatic Send Timestamp Indicates when the next automatic transfer from a node of the J2EE Engine cluster will start.
Send Type Indicates whether the displayed transfer attempt was a manual attempt (Manual) or an automatic one (Automatic (Time Scheduled)).
Configuration Status Indicates whether the specified configuration data is sufficient to transfer data to the SLD (automatically or manually). If the data is sufficient, the configuration status is valid. If the data is insufficient, the configuration status is invalid. In this case, you must complete the connection data (see Setting Up the SLD Data Supplier for J2EE-Based Systems [page 56])
See also:
SLD Data Supplier Service Properties [external]
Configuring the Interface for CIM Client Generation Use The SLD service provides every J2EE application with the option to generate a CIM client for accessing an SLD server. The CIM client is common for all applications that are using it and therefore plays the role of a standard SLD. Changing the data for the CIM client may have an effect on many applications. We recommend that you consider it carefully.
The generation process is subject to a security check that is not based on the user who started the application (user-based security), but on the Java software archive that was used for deploying the application on the J2EE Engine (code-based security). This procedure explains how to configure this process.
Prerequisites ● You are logged on to the Visual Administrator [external] of the J2EE Engine as an
administrator.
System Landscape Directory 58
User Manual 28.03.2008
● In the Visual Administrator, on the Cluster → Server → Services → Security Provider → Properties tab page, you have set the SynchPermissionsWithDatabase property to true.
Procedure ...
1. In the Visual Administrator, choose Cluster → Server → Services → SLD Data Supplier → Runtime → CIM Client Generation Settings.
A list of archives of all J2EE applications is displayed.
2. To configure a particular application to generate a CIM client by means of the SLD server, select the respective indicator in the Grant column.
Make sure that the Grant indicator next to the sap.com/com.sap.lcr/lcrcimom.jar entry is selected. This allows that the SLD registers data in the central SLD.
In addition, the Grant indicator must be selected next to the following entries:
● sap.com/tc~lm~webadmin~mainframe~wd/webdynpro/public/lib/sap.com~tc~lm~webadmin~mainframe~wd.jar
● sap.com/tc~lm~webadmin~sldstart~app/EJBContainer/applicationjars/sap.com~tc~lm~webadmin~sldstart~ejb.jar.
3. Enter the following data for generating the CIM client:
a. In the Host field, enter the name of the host where the SLD runs.
b. In the Port (http/https) field, specify the port of the SLD.
c. In the User field, specify a J2EE user. This user must be assigned to the LcrInstanceWriterLD role. The J2EE user must be specific for this J2EE Engine and must not be used on another J2EE Engine.
d. In the Password field, enter the user password.
The generated CIM client can use both HTTP and HTTPS as a communication protocol.
If you want to use HTTPS, select the Use HTTPS? indicator. In the Port field, you must also specify the HTTPS port of your destination.
The Trust Store field is enabled. A trust store contains the root certificates of the trusted roots, and checks the authentication of a received server certificate. The default setting for the trust store is TrustedCAs. If necessary, you can change this setting. For a list of trust stores that are available, choose Cluster → Server → Services → Key Storage → Runtime → Views.
Both the sending and the receiving J2EE Engines must be configured for Secure Socket Layer (SSL) connections before you can use HTTPS. For more information, see Configuring the Use of SSL on the J2EE Engine [external].
4. Save your entries.
System Landscape Directory 59
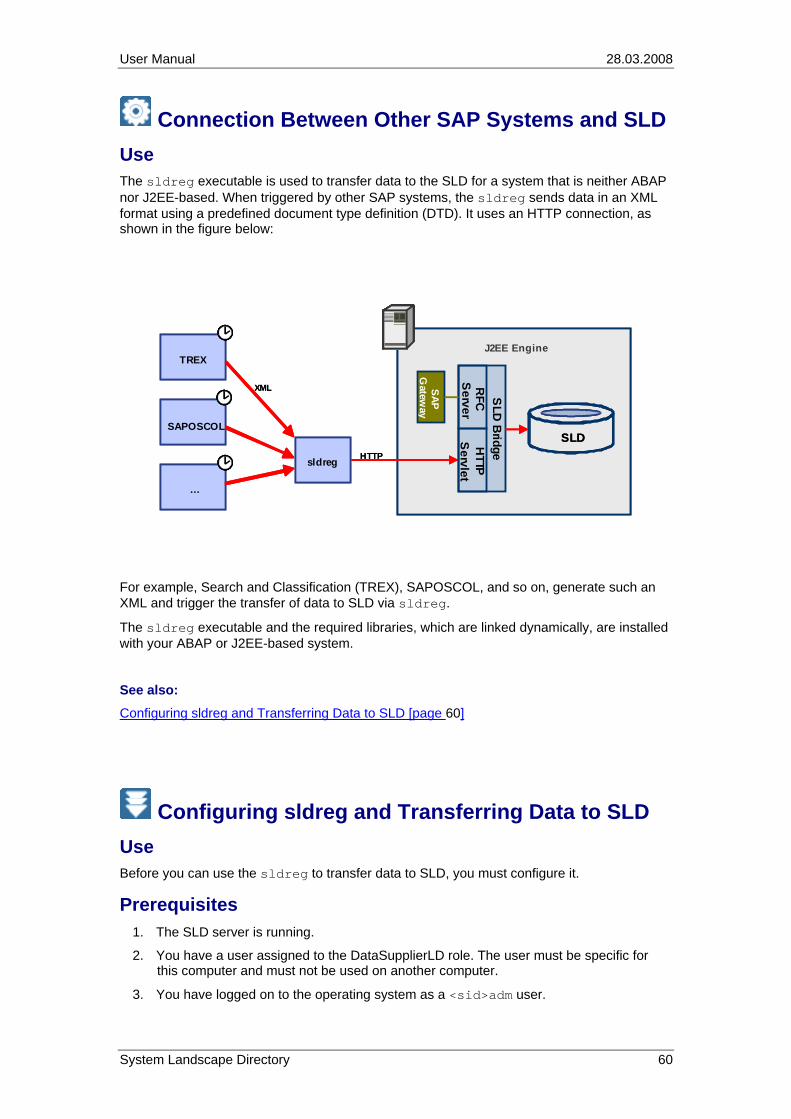
User Manual 28.03.2008
Connection Between Other SAP Systems and SLD Use The sldreg executable is used to transfer data to the SLD for a system that is neither ABAP nor J2EE-based. When triggered by other SAP systems, the sldreg sends data in an XML format using a predefined document type definition (DTD). It uses an HTTP connection, as shown in the figure below:
HTTP
SAP G
ateway
SLD
Bridge
SAP J2EE Engine
RFC
S
erverH
TTP
Servlet
sldreg
SLD
TREX
SAPOSCOL
…
XML
HTTP
SAP G
ateway
SLD
Bridge
J2EE Engine
RFC
S
erverH
TTP
Servlet
sldreg
SLDSLD
TREX
SAPOSCOL
…
XML
For example, Search and Classification (TREX), SAPOSCOL, and so on, generate such an XML and trigger the transfer of data to SLD via sldreg.
The sldreg executable and the required libraries, which are linked dynamically, are installed with your ABAP or J2EE-based system.
See also:
Configuring sldreg and Transferring Data to SLD [page 60]
Configuring sldreg and Transferring Data to SLD Use Before you can use the sldreg to transfer data to SLD, you must configure it.
Prerequisites ...
1. The SLD server is running.
2. You have a user assigned to the DataSupplierLD role. The user must be specific for this computer and must not be used on another computer.
3. You have logged on to the operating system as a <sid>adm user.
System Landscape Directory 60
User Manual 28.03.2008
Procedure From the command line, change the directory to /usr/sap/<SID>/SYS.
Configuring sldreg ...
1. To check the path to the program, enter sldreg.
The sldreg command line parameters are printed.
2. Enter sldreg -configure slddest.cfg –usekeyfile.
3. You will be prompted to enter HTTP user, password, host, and port information.
The program creates the slddest.cfg and slddest.cfg.key files.
Make sure that users other than <sapsid>adm do not have read and write permissions for the slddest.cfg.key file.
Using this global directory, all generic data suppliers of the current SAP NetWeaver system can send data to the same SLD with one central configuration.
Transferring Data to SLD ...
Test your configuration by sending detailed data about your computer to SLD:
1. Enter saposcol –b.
A short XML document is printed.
2. Enter saposcol –b | sldreg -connectfile slddest.cfg -stdin -oldtransferdtd.
The oldtransferdtd option is required for compatibility reasons and is specific for SAPOSCOL only.
The program output is as follows:
HTTP response: Success. HTTP status code: 200
End SLD Registration
Data send status: true
You can see your computer as an SAP_ComputerSystem instance in SLD. In addition, details such as the sizes of the physical and virtual memory are reported.
Configuring the SLD Bridge Use To receive data that is automatically reported and sent by the SLD data suppliers that run on individual systems, you have to configure and start the SLD bridge. The SLD bridge converts the system data that is sent by the SLD data suppliers to the SLD server into a CIM-compliant format.
The data between the SLD data suppliers of ABAP-based systems and the SLD bridge is exchanged by means of an RFC connection. Therefore, you have to configure an SAP gateway service. We recommend that you use a local gateway. If you have a standalone installation of J2EE Engine and if no local gateway is available, install a standalone gateway
System Landscape Directory 61
User Manual 28.03.2008
with an instance number from the Presentation DVD. Choose an instance number for the gateway that has not been used on your computer so far.
You can also perform the configuration of the SLD bridge during installation. Use this procedure if you want to change the configuration.
Procedure ...
1. Choose Administration → Data Suppliers.
2. If you want the SLD data supplier bridge to forward system data that is received from data suppliers to the default sld/active namespace of this SLD server, set the Update Local Namespaces parameter for sld/active to true.
3. Choose Administration → Profile.
4. From the Section dropdown box, select datasupplier.
5. Enter SAP gateway host and gateway service.
The changes to the gateway service take effect only after you restart the SLD server.
One SAP gateway server must be linked only to one SLD server as a data receiver. Sharing one SAP gateway server between multiple SLD servers leads to errors.
Make sure that you have set up the SLD data suppliers correctly in the systems that have to report system data automatically. For more information, see the User Manual – System Landscape Directory for SAP NetWeaver 7.0 at http://www.sdn.sap.com/irj/sdn/nw-sld.
6. If you want the SLD bridge to send data to multiple SLD servers, choose Administration → Data Suppliers → Add SLD.
7. Enter the URL and logon data of the SLD server you want to add and choose Save.
System Landscape Directory 62