Embed Size (px)
Citation preview

©2011, Infinite Campus. All Rights Reserved. Last modified: 14 October 2011 1
Description: This course will prepare learners to assist teachers in navigation, set up and processes of the Attendance and Instruction functions of Campus. Teaching others how to take attendance, create a grade book and seating chart, and generate applicable reports will be the focus of this training session.Time: 4 hours
Teacher coach (e)
Campus Overview(15 minutes)
Learn how toNavigate•Use help options•Use search procedures•
Discuss the importance ofAccount settings•Logging off •
Attendance (15 minutes)
Learn how toTake attendance from the home page•Edit attendance during the day•
Admin (20 minutes)
Understand how to set up teacherPreferences•Grading Scales (if applicable)•Seating Chart•Composite Grading (if applicable)•
Grade BookDemonstration(5 minutes)
Demonstration of the Campus Grade BookNavigating the grade book window•Different types of scores (colors/flags)•How to enter scores for assignments •
Assignments tool(45 minutes)
Learn how toCreate Assignments and Categories using •the Assignments toolEdit Grade Calculation Options •Copy Assignments•Edit Teacher Preferences•Setup assignments for portal submission•Comment/Score portal submitted assign-•ments
Grade Book(30 minutes)
Learn all of the features of the grade book Navigation•Expand and collapse capabilities•Right click and hover options •Different types of scores (colors, flags)•Entering scores •Clearing Scores•Fill Empty Scores•Overwrite All Scores•Implications of choices selected in the les-•son planner Comments on a student•
Posting Grades(15 minutes)
Learn how to post grades Within the grade book •By task•By student•

©2011, Infinite Campus. All Rights Reserved. Last modified: 14 October 2011 2
Student Groups(10 minutes)
Learn how to set up student groups•Learn impact of student groups on grade •book and student scores
Daily Planner(15 minutes)
View the Daily Planner•Create activities in the Daily Planner.•Edit assignments in the Daily Planner•
Roster(5 minutes)
Learn about the information available in the Roster
Teacher Messenger(20 minutes)
Learn how to use the following messenger templates
Failing Grades•Missing Assignments•Teacher Messages•
Newsletter(10 minutes)
Learn Newsletter functionality•
Portal(5 minutes)
Demonstration of the Campus Portal•
Reports(15 minutes)
Learn information available in ReportsAttendance Register•Attendance Summary•Blank Spreadsheet•Missing Assignments•Portal Usage•Roster Label•Section Summary•Student Assessment Summary•Student Summary•Teacher Schedule•
Review Review key words and questions•Q & A with the trainer•Complete training survey•

©2011, Infinite Campus. All Rights Reserved. Last modified: 14 October 2011 3
What is the implication of selecting dropping the lowest score on a 1.group at the end of a term?
What is the purpose for assigning a grading scale on an assign-2.ment?
What is the difference between selecting percent calculation in-3.stead of weighting on groups?
Where can you view any flags students have?4.
Name two ways that a teacher can take attendance. 5.
Name three ways you can post grades at the end of a term.6.
What marks can be used in the grade book to flag a student’s 7.assignment as Missing, Cheated and Exempt?
Review Questions
Campus Key Words
Grading Task
Weighting
“Use Each Scores Percent Values”
Exempt
Missing
Cheated
Dropped
Late
Incomplete
Post Grades

©2011, Infinite Campus. All Rights Reserved. Last modified: 14 October 2011 4

Logging In & Navigation
©2011, Infinite Campus. All Rights Reserved. Last modified: 14 October 2011 5
OverviewIn this lesson, you will be introduced to the Infinite Campus system.
ObjectivesAt the conclusion of this lesson, you should be able to:
Log into Campus.•Know and accurately describe the three tabs in your outline.•Know and accurately describe the three areas of the window.•Log out of Campus.•
Access & Logging InEach district’s data is stored in a different location on the Internet and is accessed through a Web browser such as Internet Explorer, Firefox or Safari. The web address used in training will be different than the address you will use in your everyday use of your school’s Campus application.
Launch a web browser such as Internet Explorer, Firefox or 1.Safari on your computer.Enter the web address (URL) provided by your trainer in the 2.location bar of your browser.When the page loads, your screen should display the login 3.screen for Infinite Campus.Enter the user name and password provided by your trainer.4.Click OK.5.
Since Campus is a web-based product, it is accessible any-where in the world. Since it is accessible
anywhere, the data within the system is protected with pass-words and security measures. In many districts Campus pass-words are “strong passwords.” A strong password is at least eight characters long with a combi-nation of letters, numbers, or special characters. In all districts, if your password is entered incorrectly five times, the account will be disabled. You will then need to contact a designated individual in your school or district office to have your password reset.
Training Site:
User Name:
Password:
Logging in & navigaTion
Logging In & Navigation
©2011, Infinite Campus. All Rights Reserved. Last modified: 14 October 2011 6
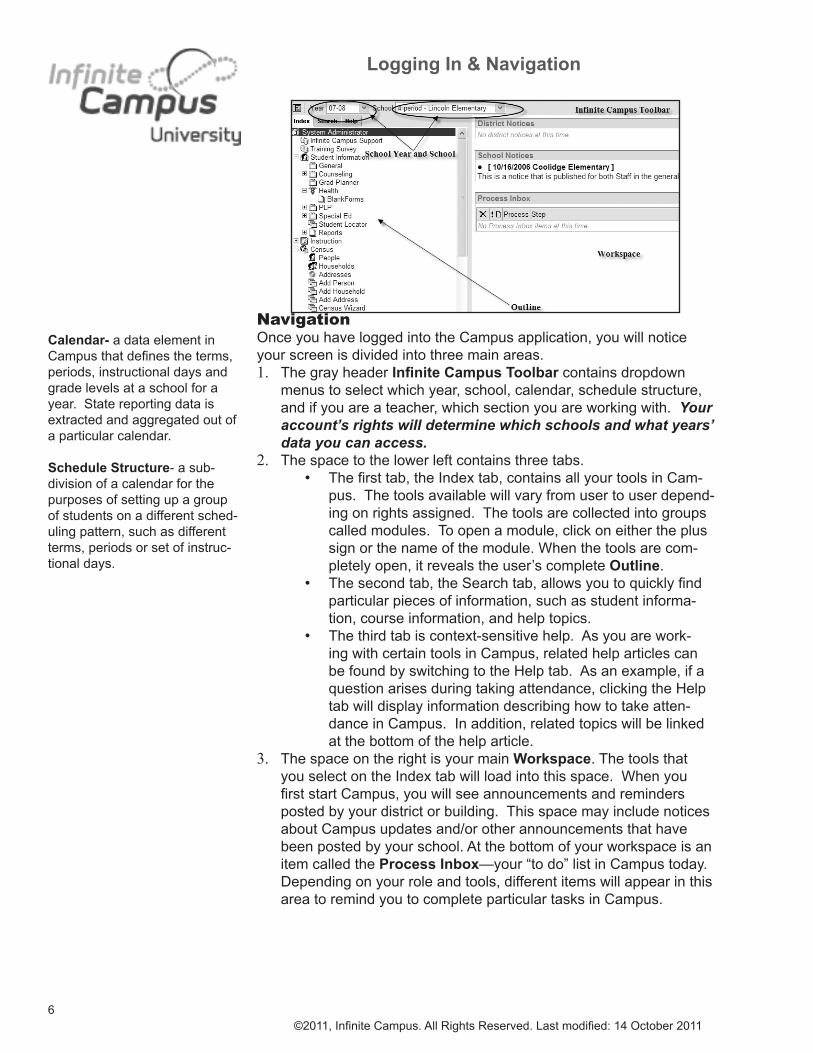
NavigationOnce you have logged into the Campus application, you will notice your screen is divided into three main areas.
The gray header 1. Infinite Campus Toolbar contains dropdown menus to select which year, school, calendar, schedule structure, and if you are a teacher, which section you are working with. Your account’s rights will determine which schools and what years’ data you can access.The space to the lower left contains three tabs. 2.
The first tab, the Index tab, contains all your tools in Cam-•pus. The tools available will vary from user to user depend-ing on rights assigned. The tools are collected into groups called modules. To open a module, click on either the plus sign or the name of the module. When the tools are com-pletely open, it reveals the user’s complete Outline.The second tab, the Search tab, allows you to quickly find •particular pieces of information, such as student informa-tion, course information, and help topics.The third tab is context-sensitive help. As you are work-•ing with certain tools in Campus, related help articles can be found by switching to the Help tab. As an example, if a question arises during taking attendance, clicking the Help tab will display information describing how to take atten-dance in Campus. In addition, related topics will be linked at the bottom of the help article.
The space on the right is your main 3. Workspace. The tools that you select on the Index tab will load into this space. When you first start Campus, you will see announcements and reminders posted by your district or building. This space may include notices about Campus updates and/or other announcements that have been posted by your school. At the bottom of your workspace is an item called the Process Inbox—your “to do” list in Campus today. Depending on your role and tools, different items will appear in this area to remind you to complete particular tasks in Campus.
Calendar- a data element in Campus that defines the terms, periods, instructional days and grade levels at a school for a year. State reporting data is extracted and aggregated out of a particular calendar.
Schedule Structure- a sub-division of a calendar for the purposes of setting up a group of students on a different sched-uling pattern, such as different terms, periods or set of instruc-tional days.

Logging In & Navigation
©2011, Infinite Campus. All Rights Reserved. Last modified: 14 October 2011 7
Managing the Process Inbox Infinite Campus allows users to search for messages and processes in the Process Inbox.
Searching for items in the Process InboxEnter a date 1.range that Campus should search within.Campus will 2.look for items that have a posted date which fall within the entered date range.Select the Process(es)/Messages from the Display dropdown list.3.Click Find Messages. Processes/Messages that match the search 4.criteria will be displayed.
Deleting Items in the Process InboxIf needed, enter a date range and select the type of processes to 1.search for. Click Find Messages.Click the box to the left of the in Process/Message to be deleted. 2.All messages may be selected by clicking the box in the Process Inbox toolbar. Click Delete Selected Messages. The selected messages will be 3.deleted.
Logging Out of CampusWhen finished with your Campus session, or when you will be away from your computer for an extended amount of time, you should end your Campus session by clicking on log off. Your session will close and you will then be back at the login screen. You may then close your browser.

Logging In & Navigation
©2011, Infinite Campus. All Rights Reserved. Last modified: 14 October 2011 8

Instruction: Attendance, Roster, Seating Chart
©2011, Infinite Campus. All Rights Reserved. Last modified: 04 November 2011 9
Teachers are only allowed to enter attendance for the current day until midnight. After that time, attendance must be entered by the Attendance Office. In addition, teachers can only change attendance up to the point that the attendance office processes the events. Since the time frame will vary from school to school, check with your district’s policy and procedure for more information.
OverviewThe Instruction module of Campus holds the tools commonly used by a classroom teacher. These tools interface with the student schedule and attendance components of the system allowing for one-time entry of student information. This lesson will cover the administrative tools for taking attendance, generating a roster and creating a seating chart.
ObjectivesIn this lesson you will learn:
How to take attendance in the Instruction module.•Setting preferences in Instruction > Admin > Preferences.•How to create and print multiple seating charts for a section.•How to use seating charts when taking attendance.•Create Assignment Marks.•How to view and print class rosters.•
AttendanceThere are two paths to accessing the attendance tool in Campus, the Process Inbox and the Attendance tool in the instruction module.
Accessing Attendance from the Process Inbox To access attendance from the Process Inbox, click on the link “Period __ Attendance Required.” Once attendance is saved for a particular period, the reminder will dis-
appear from the Process Inbox. If the teacher has taken attendance for all periods, the Pro-cess Inbox will be empty at the end of the day.
Accessing Attendance from the Index Outline
To access attendance from the 1.Index Outline, expand the Instruction module and select attendance.Select the tab for the period to take 2.attendance in.
aTTendance, rosTer, admin (e)
Process Inbox- a tool found on the user’s home page in Campus listing items that need the user’s attention. On school days, the teacher’s process in-box will have a reminder to take attendance for each period that attendance should be taken in.
Positive Attendance- a model of attendance taking or clock hours used in some alternative learning centers. Students are not expected in a course at a given time, rather they clock in and clock out when they work on a course.

Instruction: Attendance, Roster, Seating Chart
©2011, Infinite Campus. All Rights Reserved. Last modified: 04 November 2011 10
Taking Attendance
To mark a student absent, select the A for absent.1.To mark a student tardy, select the T for tardy. The comment box 2.for each student can be edited once a child is marked absent or tardy.Comments become part of the students attendance records and are 3.visible in the attendance tools that are used to process attendance by the attendance clerk.When finished taking attendance, click Save.4.
Editing AttendanceIf attendance needs to be changed after it is submitted, attendance must be accessed from the attendance tool in the Instruction module.
Select the period that needs to be edited. 1.Make any changes as needed.2.When finished, click Save. 3.
Teacher PreferencesPreferences are section-specific options to set how the Campus system will work for the teacher. Each section may have different options set.
Teachers CANNOT excuse an absence or a tardy; teachers may only report the attendance. Excusing
is done by the attendance office. Students who have already been marked absent by the atten-dance office will have their attendance pre-marked and greyed out. If the student is marked absent but is in class, consult with your district’s policy and procedures for the way to address this issue.
Hide Dropped Students will remove the student from a teacher’s view in the Grade book. Normally, a student that has dropped a class will appear in the teacher’s Grade book in red. The scores will be preserved behind the scenes.
Show Student Numbers will include the Student ID number on the attendance tools.
Show Student Pictures will display the students picture for attendance.
Invert Seating Chart Auto-Placement applies to both the Standard and the Lab Seating Chart. When creat-ing a seating chart the stu-dent names will populate the chart from the bottom up.
Use Seating Chart for Attendance changes the default attendance view to the Standard Seating Chart. The teacher can switch the attendance view by select-ing the Display Lab Chart or Display Attendance Roster buttons on the top of the tab.
Use Canned Comments allows teachers to choose from ready-made comments when posting grades.

Instruction: Attendance, Roster, Seating Chart
©2011, Infinite Campus. All Rights Reserved. Last modified: 04 November 2011 11
Establishing Teacher PreferencesThe first step in defining a system of standards-based grading is to define the system of marks that are used to report progress- known as a score group.
Expand the 1.Instruction module.Select Admin.2.Choose Prefer-3.ences.The Course and 4.Section that will apply to these preferences is listed in the gray header bar above the preference listings.Teachers can mass assign preferences for one section to other 5.sections by clicking on the hyperlink at the bottom of the Teacher Preferences box and selecting the appropriate sections, provided the sections are active for the selected calendar.
Mass Assigning Section PreferencesTeachers can mass assign preferences sets for one section to other sections. To use this capability:
Select the Instruction 1.module in the index.Select the Admin icon.2.Select Preferences and 3.choose Teacher Prefer-ences.Select the hyperlink 4.below the Teacher Web Site URL.Choose preferences 5.to Mass Assign pref-erences to multiple classes.Click the Validate button 6.to validate the prefer-ences across all sec-tions.
Remove percentage and calculations when using Standards sets up the section to be graded with Standards the system will NOT calculate the student’s scores and will instead rely on teacher’s professional judgement.
Default Standard/Grading Task sets the grading task or standard that will be selected when the Grade Book loads, based on the selected term.
Teacher Website URL: A teacher can enter the URL for a class website for display on the portal.
Mass Assign to multiple classes: Selecting this hyperlink will allow teachers to establish preferences for a number of sections at one time if they are active.
The most common reason to validate a section is the addi-tion or removal of
the teacher(s) scheduled to a section. If a section’s sched-uled teacher has changed, the assignments must be validated.
For example, if a teacher placed an assignment in two sections and was removed from one section, the As-signment Validation process splits the assignment and a unique assignment remains in each section.

Instruction: Attendance, Roster, Seating Chart
©2011, Infinite Campus. All Rights Reserved. Last modified: 04 November 2011 12
Seating ChartsTeachers can set up two Seating Charts per section, a Standard Chart and a Lab Chart. The options set in Admin > Preferences apply to both charts.
Creating a Seating ChartEnter the dimen-1.sions of the class-room by entering the Row and Column numbers and clicking Save Dimension.If a new chart is 2.desired, the Clear button can be used to remove the current arrangement of students from the existing chart. The Exclude Seat checkbox is 3.used to leave empty seats on the chart during the Auto-fill process. It can be used to group desks into table-like arrangements.Seats can be filled one at a time 4.using the dropdown lists on the chart, alphabetically by selecting the Auto Fill-Alpha button, or ran-domly by selecting the Auto Fill-Random button.When the layout is complete click Save. 5.The Display Lab Chart button allows the setup of a second seating 6.chart for the same group of students. It is saved separately and can have different dimensions than the Standard Chart.
Printing a Seating Chart Select the Font Size in the Print Options box and then click the 1.Print button.Select the option to Print Student Pictures, if desired. Choose the 2.size of the pictures in the dropdown menu. Click Print. The chart will be displayed in a new window. Any stu-3.dents missing from the chart will be listed at the top of the Seating Chart.

Instruction: Attendance, Roster, Seating Chart
©2011, Infinite Campus. All Rights Reserved. Last modified: 04 November 2011 13
Assignment MarksThe Assignment Marks tool allows teachers to create personal symbol sets for grading. Assignment Marks determine how student grades are calculated and displayed. Assignment marks also convert a score entered for an assignment into a percent.
Path: Instruction>Admin>Assignment Marks
Creating Assignment Mark SetsClick New.1. Enter a name for the Assignment Marks set.2. Enter the Score.3. Enter the percent earned for that score.4. Enter a Sequence.5. If the score is passing, check the Passing check box.6. Click Add New Mark to add more Assignment Marks.7. Click Save.8.

Instruction: Attendance, Roster, Seating Chart
©2011, Infinite Campus. All Rights Reserved. Last modified: 04 November 2011 14
RostersThe roster lists the students who are scheduled into the section selected in the section dropdown in the Campus toolbar. In addition to the name and contact information for the student, teachers are able to view student numbers, genders, birth dates and flags.
At the top of the roster there is a summary of the course section. This summary notes the total number of active and inactive students, stu-dent totals by gender and grade level.
Name • includes the student’s grade level, name, student number and, if preferences are set, an icon for the grade book will also display. If the student is new to the roster, the student’s name will appear in green for the number of days entered in System Prefer-ences.Gender• is the indication of the student being either male or female.DOB • is the student’s date of birth.Start Date• is the start date of the student’s enrollment in the course section. End Date• is the student’s last date of enrollment in the course section. If this date exists, the student will be listed in the Inactive Students section of the roster.Home Phone and Address and Guardians • lists the household phone number as entered on the Census Household editor and the household address as entered on the Household Address editor. Guardians and guardian contact information also appears based on the Guardian checkbox associated with the student’s relationship to
Student names are hyper-linked for access to Student Information > General based upon assigned tool rights. This allows teachers to view contact information, student attendance, lockers, etc.

Instruction: Attendance, Roster, Seating Chart
©2011, Infinite Campus. All Rights Reserved. Last modified: 04 November 2011 15
that guardian.Flags • displays all flags associated with the student such as emer-gency contact information, grades, programs, etc. Information regarding the flag can be viewed by hovering over the desired flag. Health• indicates that the student has a health condition.IEP• indicates that the student has an Individualized Education Plan. This is enabled by assigned tool rights.PLP indicates that the • student has an Personalized Learning Plan. This is enabled by assigned tool rights.
Inactive students displays all students that were enrolled in the course section and have dropped it. This includes anyone who has attended the course section for at least one day, who was enrolled in the school and scheduled into the section for at least one day and any student who is considered a no show. This also includes students who have ended enrollment in the school and/or district and students who simply have dropped the course section. Students appear in this section as soon as an end date has been entered on the student’s schedule or enrollment.
Printing the RosterA paper copy of the roster can be printed by clicking Print Options at the top of the tab.
Enter an Effective Date, if different than today’s date. All students 1.who are enrolled in the course section as of the date entered will be included on the roster.Select the desired Page Printing Options.2.Select the Defaults to remove from the roster, if applicable.3.Select any Extras that should be included on the roster.4.Select the Section(s) to print rosters for.5.Select the appropriate Section Sort options. The options are to sort 6.by Course Name, Course Number, Term/Period or Period.Click Generate Report when finished. A PDF will then be generated 7.of the roster.

Instruction: Attendance, Roster, Seating Chart
©2011, Infinite Campus. All Rights Reserved. Last modified: 04 November 2011 16

Header - Path or Title
©2011, Infinite Campus. All Rights Reserved. Last modified: 04 November 2011 17
OverviewThe Assignments tool is used for creating, managing and scoring assignments in Campus.
ObjectivesBy the end of this lesson, learners will be able to
Establish teacher preferences•Edit grade calculation options•Create categories•Create and score assignments•View, sort, and copy assignments•
Path: Instruction > Assignments
Establishing Teacher PreferencesPreferences are section-specific options to set how the Campus system will work for the teacher. Each section may have different options set.
Select Edit Teacher Preferences from the Assignments tool. The 1. Course and Section that these preferences will apply to is listed in the gray header bar above the preference listings.
assignmenTs (e)
Hide Dropped Students removes the student from a teacher’s view in the Grade Book. Normally, a student that has dropped a class appears in the teacher’s Grade Book in red.
Show Student Numbers includes the Student ID number when taking attendance and when scoring assignments.
Show Student Pictures dis-plays the students picture when taking attendance and when scoring assignments with the Assignments tool.
Invert Seating Chart Auto-Placement applies to both the Standard and the Lab Seating Chart. When creating a seat-ing chart the student names will populate the chart from the bottom up.
Use Seating Chart for Atten-dance controls the teacher attendance screen to either dis-play as a list or a seating chart. Display lab chart is used when there are two parts to a class, for example, a lab and a lecture.
Use Canned Comments allows pre-made comments when post-ing grades. The comments will appear on report cards.
Remove percentage and cal-culations when using Stan-dards sets up the section to be graded with Standards. The system will NOT calculate the student’s scores and will instead rely on teacher’s professional judgement.
Default Standard/Grading Task sets the grading task or standard that will be selected when the Grade Book loads, based on the selected term.
Teacher Website URL field is where a teacher can enter the URL for a class website for display on the portal.

Assignments
©2011, Infinite Campus. All Rights Reserved. Last modified: 04 November 2011 18
Once preferences have been set up, teachers can assign the selected preferences to other sections.
Click the hyperlink below the Teacher Web Site URL.1. Select all sections the preferences apply to.2.
Click the Validate button to validate the preferences across all sec-3. tions. This tool verifies the status of assignments that have multiple section placements and/or multiple standard or grading task align-ments. If alignments under an assignment are no longer valid, they are split into separate assignments. If separate assignments within a section contain alignments which can be consolidated within one assignment, they will be combined into one assignment. Assign-ments Validation also validates categories and activities.
The most common reason to validate a section is the ad-dition or removal
of teacher(s) to a section. If a section’s teacher has changed, the assignments must be validated.
For example, if a teacher placed an assignment in two sections and was removed from one section, the Assign-ment Validation process splits the assignment and a unique assignment remains in each section.

Assignments
©2011, Infinite Campus. All Rights Reserved. Last modified: 04 November 2011 19
Editing Grade Calculation OptionsCalculation Options must be set up for Standards and Grading Tasks in order for in-progress grades to calculate in the Grade Book.
Click Edit1. Grade Calc Options at the top of the Assignments tab.For each Grading Task or Standard, choose whether or not to 2. calculate grades by selecting Calculate In Progress Grade or No Calculation.Choose a Grading3. Scale from the dropdown in the Calculate In Progress Grade section.If the user would like to have weighting on categories, check the 4. Weight Categories checkbox. To use a score’s percent value for calculating grades, check the 5. Use score’s % Value checkbox. This option converts the score entered to a percentage and uses the percentage in the calculation. Percentages are then averaged to determine the student’s grade.If the user wishes to apply these calculation options to all Standards 6. and Grading Tasks for the section, click Fill All.If none of the Standards or Grading Tasks will have any grading 7. calculations, click Fill All in the No Calculation column.Any Grading Task or Standard can be set up for Grading Calcula-8. tion Options individually.
A Grading Task is a grade or mark that is to be turned into the school reporting a student’s progress or achievement.
A Standard is a performance-based expectation of what a student will be able to do, as-sessed with a rubric.
A student receives 20/20 on one assignment and a 50/100 on another.
The normal Campus grade calculation will be a 58.3% (70/120).
If “Use each score’s per-cent value” is checked, the same student for the same scores will be 75% ((50%+100%)/2).

Assignments
©2011, Infinite Campus. All Rights Reserved. Last modified: 04 November 2011 20
Creating CategoriesOnce preferences for a task are set, a Category or multiple Catego-ries can be created and attached to the task. There are three common setups that will require a different setup for groups. Categories must exist before an assignment can be created.
Click Edit Categories at the top of the Assignments tab.1. Click Create Category to view the Category Detail Editor.2. Enter a Name3. for the Category.
Enter a number in the Weight4. field for the category. This determines how this group of assignments will be weighted towards the term grade for the section. Enter a Sequence5. number for the Category. This will determine where this category will be placed in the list of categories. If this field is left blank, the Category will be placed in the list of categories alphabetically.Check Hide from Portal/Grade Book Preview6. to hide this Category from the portal and all areas where assignments can be viewed
with the Grade Book Preview icon .Check Exclude this Category from Calculation7. to remove this Cat-egory from grade calculations.Check the Drop Lowest Score8. box to drop the assignment with the lowest score by percent in this Category for each student.
Concepts to keep in mind when using the Assignments tool:
Placement: The course/sec-tion that is associated with the assignment.Alignment: The Grading Task and/or Standard that is scored with the assignment.Set: The combination of Placement and Alignment for an assignment. Changes made to a Set affect all parts of the Set.

Assignments
©2011, Infinite Campus. All Rights Reserved. Last modified: 04 November 2011 21
Select the Sections9. that will use this Category.Select the Standards10. or Grading Tasks that will be measured with this Category.Click Save11. to save the category.
Grade Book Organization
SchemeExample Process
Weighted Categories
Tests 40%, Quizzes 25%, Daily work 35%
Select “Use 1.Weighting on Groups” on task preference. Create multiple 2.groups.
Unweighted Categories
Unit 1 Assignments are grouped together, Unit 2 assignments
grouped together.
Leave “Use 1.Weighting on Groups” unchecked.Create multiple 2.groups
All Points, 1 category All Points
Create one group, 1.all assignments are grouped within it.

Assignments
©2011, Infinite Campus. All Rights Reserved. Last modified: 04 November 2011 22
Creating AssignmentsOnce Categories have been created, assignments can be created.
To create a new assignment, click Create Assignment 1. at the top of the assignments tab. The Assignment Detail editor will open. Fields in red with an asterisk are required fields.Enter the Name of the assignment. This field is 50 characters and is 2. seen on reports and the Portal.Create an Abbreviation for the assignment. This 5-character field is 3. seen by the teacher in the grade book.Choose a Test Strand, if applicable.4. Click Show Description, Objectives, and References Fields to 5. display text fields. The assignment to be completed, such as ques-tions to answer, and any other information, should be included in the Description, Objectives and References fields of the Assign-ment Editor. This information will be visable on the Portal, but using the Assignment Submission tool allows students to respond to the assignment. Infinite Campus does not recommend cutting and past-ing from third party products such as Microsoft Word.Select all Sections that will use this assignment.6. Assignments are marked active by default, but this box can be 7. unchecked to make an assignment inactive. The user can also select Hide to hide the assignment in the Campus Portal if desired.The Assigned date is the date the assignment was given. This will 8. default to today’s date and can be changed if needed.Enter the Due 9. date. This is the date the assignment is due and will default to today’s date.Choose a Student Group if applicable. Student Groups must first 10. be created in the Student Groups tool if the user wishes to use this option.Check the Standards and/or Grading Tasks that are measured with 11. this assignment. For each task, choose the Category for the assign-ment.
Selections made on the main Assign-ments screen will automatically save.

Assignments
©2011, Infinite Campus. All Rights Reserved. Last modified: 04 November 2011 23
Choose a Scoring Type. If Points is chosen, enter the Total Points 12. for the assignment, and a multiplier, if applicable. If Marks is chosen, a dropdown will appear with Assignment Marks to select. Standards will default to rubrics for scoring.If the student’s should respond to the assignment using the Portal, 13. mark the Enable Student Submission - Editor checkbox.Click Save 14. to save the assignment, or Save & Score to save the assignment and then immediately enter scores.

Assignments
©2011, Infinite Campus. All Rights Reserved. Last modified: 04 November 2011 24
Scoring Assignments in the Assignments ToolOnce assignments have been set up, scores can be entered for stu-dents.
There are two ways to score an assignment from the Assignments tool:
Click the Grade Book icon next to the assignment name in the As-1. signments list.
Or:
Select an assignment from the Assignments tab.1. Select Save & Score from the Assignment Detail screen. Note: This 2. method will save any changes made to the assignment while on the Assignment Detail screen.
Once the assignment scoring screen is open:
Scores can be entered for each student individually. Scores can be 1. filled en masse with the Fill All and Fill Empty buttons.Score flags can be checked for students to indicate special condi-2. tions on the assignment score. See the sidebar on the right for details.Enter assignment specific Comments if applicable. These are vis-3. ible on the portal.Click Save to save the scores.4.
Receiving Student Assignments via the PortalClick Save and Score at the top of the Assignment Editor. A Student 1. Submission column will appear in the Scoring Editor. Submissions will be indicated by a date stamp. A comment icon indicates that the student has submitted a comment separate from the suibmission.Click the date stamp or the comment icon to view the submission.2. The assignment may be scored, commented on or marked as late, 3. missing, etc.Click Save when finished.4.
Once an assignment is marked as Turned In, the submission will be locked from editing by the student. This should not be done until the due date of the assignment, in case the student wants to make changes to the submission. Submissions can be unlocked by remov-
ing the Turned In flag, allowing students another opportunity to submit a response.
Checkbox flags:Dr (Dropped)• - Indicates that the score for this assignment was dropped for the student. Any score entered for this grading task or standard will not count.T (Turned In)• - Indicates that the assignment was turned in. This can be checked even if a score has not been entered.M (Missing) • - Indicates that the assignment has not been turned in. Any score entered will count as zero.L (Late) • - This indicates that the assignment was turned in late. There is no formula for late work, the Late flag is simply an indication the assignment was late. Any deductions or “docking” should be done on the score and entered as such.I (Incomplete) • - This indicates that the assign-ment is not complete. An assignment with this flag does not affect the student’s grade.Ch (Cheated) • - This indicates that the student cheated on the assign-ment. Any score entered will count as zero.E (Exempt)• - This indi-cates that the student is exempt for this assign-ment. The score will not count.

Assignments
©2011, Infinite Campus. All Rights Reserved. Last modified: 04 November 2011 25
Viewing Assignments in the Assignments ToolOnce categories and assignments have been created, there are several options on the main assignments screen for viewing assignments or making changes.
At the top of the grid there are dropdowns to filter the assignments list by term, standard/grading task, category and student group. These options can be used in combination with each other.
Term: Show only assignments with a due date in the chosen term.
Standard/Task: Show only assignments aligned with a chosen Stan-dard or Grading task.
Category: Show only assignments placed within the chosen Category.
Student Group: Show only assignments assigned to a specific Student Group.
Below the Filter options, the assignments grid is broken into seven parts. The grid can be sorted by column.
Active: When checked, this box indicates that the assignment is active for the section. Uncheck the box to make the assignment inactive. Active assignments calculate towards an in-progress grade, inactive assignments do not.
Hide: Check this box to hide the assignment from view in the Campus Portal.
Changes made to assignments in the Active, Hide, As-signed Date, and
Due Date columns automatically save.

Assignments
©2011, Infinite Campus. All Rights Reserved. Last modified: 04 November 2011 26
Assigned Date: The date that the assignment was assigned to stu-dents in the section. This will show if it was entered on the assignment, and can be edited in the Assignments list if desired.
Due Date: The due date of the assignment. This can be edited here if desired.
Assignment Name: The name of the assignment. Click the name to view the Assignment Detail screen and edit the assignment. Click the Grade Book icon to score the assignment.
Alignment: This column shows the Grading Task/Standard, category, and term based on the assignment due date. It also shows the number of scores entered vs. the number of scores expected.
Scoring flags: The T, M, L, I, Ch, and X checkboxes are used to flag student assignment scores. The total for each flag show in sortable columns, and clicking on the total will show students who have that flag for the assignment. See the sidebar in the scoring section for details.
Viewing the Assignments TreeOnce Assignments and Categories have been created, they can be viewed as a tree structure. From the Assignments Tree, teachers can edit categories, edit assignments, and score assignments.
Click the View Tree1. button on the Assignments screen.The Tree View will appear. From here, teacher’s can edit catego-2. ries, edit assignments, and score assignments.

Assignments
©2011, Infinite Campus. All Rights Reserved. Last modified: 04 November 2011 27
Copying AssignmentsOnce Assignments have been created, they can be copied to other sections taught by the user.
Select 1. Copy Assignments at the top of the Assignments tab.Choose the section to copy assignments from in the Select2. Source Section list.Choose the section to copy assignments to in the Select3. Destina-tion Section list.Select each assignment to be copied.4. Click Next.5.

Assignments
©2011, Infinite Campus. All Rights Reserved. Last modified: 04 November 2011 28
Choose the Categories for each Assignment from the category 6. dropdowns.Click Copy Assignments to finish. The copied assignments will 7. appear in the chosen destination.

Grade Book (Traditional)
©2011, Infinite Campus. All Rights Reserved. Last modified: 04 November 2011 29
OverviewThe web-based Campus Grade Book allows teachers to enter assign-ments and student scores from almost anywhere.
ObjectivesAt the end of this lesson, learners will be able to:
Navigate the Grade Book.•Enter scores, comments and codes in the Grade Book.•Save and post grades.•
Navigating to the Grade Book
Select the section in the Section dropdown on the Campus toolbar.1.Select Grade Book in the Instruction module.2.The computer will then download the Grade Book Java application. 3.Since Java is a programming language, there may be a security warning when opening the Grade Book.Clicking “Always” in the security warning will keep that warning from 4.appearing again on that computer.
Grade Book Overview
Assignments will appear across the top of the Grade Book in the •group they are associated with.The abbreviation and points possible will display across the top.•The student name and the selected assignment will be highlighted •in yellow.To change parameters of the assignment, right-click (Mac Control-•Click) on the assignment. Select Edit.To see additional details, such as the name of the assignment, •points possible, average mean score and due date, hover over the abbreviation.
grade Book (TradiTionaL)
When teachers access the Campus Grade Book, it will open to the first term with the default grading task
checkbox selected, given that the current date is in its date range. Otherwise, it will open in the first grading task term containing or open in the first one in the list.

Grade Book (Traditional)
©2011, Infinite Campus. All Rights Reserved. Last modified: 04 November 2011 30
Additional Commands on an AssignmentClear all scores• will erase all scores for that assign-ment.Fill empty scores• will give students who do not have a score a user-selected value.Overwrite all scores• will mass change all students’ scores to a user-selected value.
Entering Individual ScoresEntering scores in the grade book is like entering values in a spread-sheet. Select the cell and enter the value.
Use the 1.Enter key or Down arrow to move the cursor to the next student, while the Tab key will move right.As scores are 2.entered, the student’s running total grade (in the yellow area) will automatically recalculate to show the current grade.
FlagsIn addition to scores, a series of codes may also be entered in the grade book for a student by right-clicking (Macintosh users control-click) on the cell for a student’s score.
Turned In • - an assignment flagged as Turned In will appear with a green flag indicating that it has been received by the teacher but no score as been assigned to it.Late • - assignments flagged as Late will appear with a red score. There is no for-mula for late work, the Late flag is simply an indication the assign-ment was late. Any deductions or “docking” should be done on the score and entered as such.Exempt • - an exempt assignment will be grayed out and will not count for that student.Missing • - missing assignments count as zero points earned. A Missing Assignments report can be used to find missing assign-ments.Incomplete -• assignments do not harm (nor help) the student’s grade.
Rubrics vs. Conven-tional Scoring Indicators. When grading assign-ments based on stan-dards, the conventional scoring indicators will not appear. Instead, the rubric assigned to the assign-ment and/or standard toggle can be selected. The teacher may choose to have the rubric associ-ated with the standard prominently displayed for ease in grading.
Grade Book functionality highlights the student row and assignment column when user selects or moves into the appropriate assignment box.
The Campus Grade Book allows input of the following characters only: 0-9,
a-z (upper and lower case), period (.), asterisk (*), dash/minus (-).

Grade Book (Traditional)
©2011, Infinite Campus. All Rights Reserved. Last modified: 04 November 2011 31
Cheated • - an assignment flagged as cheated will count as a zero. “Cheated” will appear on the portal.Dropped • - the dropped flag is automatically marked if “Drop Lowest Score” was set on the category in the Assignments tool. As scores are entered, Campus will analyze each student’s scores and flag the score with the lowest overall percentage, thus removing it from the grade calculation.
CommentsTwo types of comments can be made in the grade book that may be included on reports and on the portal- student level comments and score comments. Both types of comment are visible on the Portal. These comments are differ-ent than report card comments, which are entered elsewhere.
To create a score-level comment, right-click (Mac users control-click) on the score and select Edit Comment. Enter comments as needed.To create a student-level comment, right-click (Mac users control-click) on the student’s name and select Edit Comment. Enter comments as needed.
Display of Student GroupsThe grade book may be sorted by student group. This option allows teachers to choose to view all of the students on the course sec-tion roster or just those students assigned to a particular group.
To use this option, select Student Groups next to the save icon. The dropdown will display all of the groups that have been created for the course section. Select the appropriate group to be displayed. Only those students will be displayed. Any assignments that are not assigned to the group will be grayed out when all students are dis-played.
Display of GradesTeachers have Options for display in the Grade Book as a way of tracking student progress. Under the Option tool next to Students Groups, select “Show Cut Score Color Coding” to display scores related to standards in different colors based on defined profi-ciency requirements. A proficient score is indicated by green and a score defined as not proficient is indicated by red.

Grade Book (Traditional)
©2011, Infinite Campus. All Rights Reserved. Last modified: 04 November 2011 32
Adding Assignments in the GradebookTeachers have the option of adding an assignment while in the Grade Book. There are two options for adding an assignment - Simple or Full Editor.
Adding an Assignment Using the Simple Option
Right-click over the Cat-1. egory area to add the assignment to.Select Add Assignment.2. Select Simple to open the Simple Assignment editor.3. Enter the required information for 4. the new assignment. The Simple option indicates that the assignment created will match the section, term and task of the current Grade Book view.Click OK to add the assignment to 5. the Grade Book. The assignment will be viewable in the Assignments tool when the Grade Book is saved.
Adding an Assignment Using the Full Editor OptionRight-click over the Category area to add the assignment to.1. Select Add Assignment.2. Select Full Editor to open the Assignment Editor in the Assignments 3. tool.The assignment may 4. be created and will appear in the Grade Book when the assign-ment is saved.Click Save or Save and Score to enter student scores.5. Click the Grade Book link at the top of the tab to return to the Grade 6. Book.

Grade Book (Traditional)
©2011, Infinite Campus. All Rights Reserved. Last modified: 04 November 2011 33
Saving the Grade BookTo save the Grade Book, click Save. Users working on laptop comput-ers or on wireless connections should save frequently and often. The Campus servers in your district are backed up nightly and backup files are saved for 30 days. There is no need to save a backup copy locally.
Exporting ScoresAn option exists in Instruction > Reports to export the Grade Book to a different file type such as a CSV file for analysis.
In the Instruction module, 1.expand Reports.
Select Grade Book Export.2. Select the export File 3.
Format. Click Generate Report. 4.
Posting Grades from Grade BookThe green area allows for a fast submission of grades (such as term grades or midterm progress marks) from the Grade Book. When the Grading Window is open, a teacher may post grades with a three click process.
Right-click in the 1.green grade totals area. (This area is the posted grade for the task selected in the Select a Task dropdown)Select Post Grades if 2.it is time to submit that mark OR select Post Grades to Other Task if submitting a progress mark such as midterm or Weekly Eligibility.Click Save.3.
Changing Posted GradesRepost using the process described 1.in “Submitting Scores”.Click on the student’s posted grade. 2.A dropdown will open showing allowable scores. Select the correct mark.If using composite grading, the 3.percentage will need to change as well.Click Save.4.
While scores may be exported for analysis or other uses, the scores cannot be re-imported.

Grade Book (Traditional)
©2011, Infinite Campus. All Rights Reserved. Last modified: 04 November 2011 34

Grade Book (Standards Based)
©2011, Infinite Campus. All Rights Reserved. Last modified: 04 November 2011 35
grade Book (sTandards)OverviewIn addition to using the Campus Grade Book for compiling scores tradi-tional grading tasks, a grade book can be created for a specific stan-dard. If administrators have established the course as standards-based in the Course Editor, teachers can only use standards in their grade books. Once those standards have been created, standards groups can be created within the grade book and assignments assigned to them. Teachers can also choose whether they want the grades they enter to be calculated by the system, or whether standards and groups will be judged subjectively through the professional judgment of the classroom instructor.
Overview of Grade Book (Standards-based)Assignments will appear across the top of the Grade Book nested •beneath the group they are associated with.The abbreviation and points possible will display across the top.•The student name and the selected assignment will be highlighted •in yellow.To change parameters of the assignment, right-click (Mac Control-•Click) on the assignment. Select Edit.To see additional details, such as the name of the assignment, •points possible, average mean score and due date, hover over the abbreviation.
Teachers can have scores not calculate a percentage when grading standards. This is a preference that must be set (see Assignments document) and requires the standards to be set up without a minimum percent or GPA value. (Note: Preferences can be changed at any time throughout the term. Preferences marked for one course section can be mass assigned to multiple course sections.)
Grade Book (Standards Based)
36©2011, Infinite Campus. All Rights Reserved. Last modified: 04 November 2011
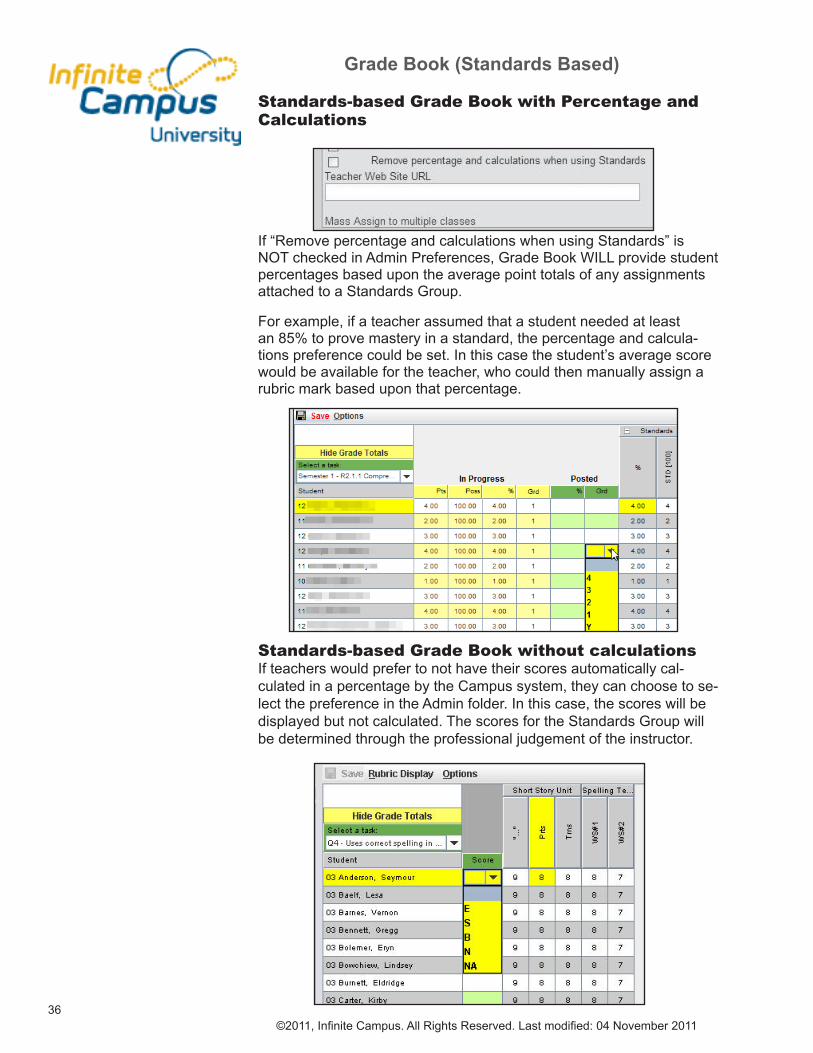
Standards-based Grade Book with Percentage and Calculations
If “Remove percentage and calculations when using Standards” is NOT checked in Admin Preferences, Grade Book WILL provide student percentages based upon the average point totals of any assignments attached to a Standards Group.
For example, if a teacher assumed that a student needed at least an 85% to prove mastery in a standard, the percentage and calcula-tions preference could be set. In this case the student’s average score would be available for the teacher, who could then manually assign a rubric mark based upon that percentage.
Standards-based Grade Book without calculationsIf teachers would prefer to not have their scores automatically cal-culated in a percentage by the Campus system, they can choose to se-lect the preference in the Admin folder. In this case, the scores will be displayed but not calculated. The scores for the Standards Group will be determined through the professional judgement of the instructor.

Grade Book (Standards Based)
©2011, Infinite Campus. All Rights Reserved. Last modified: 04 November 2011 37
Display of Student GroupsThe grade book may be sorted by student group. This option allows teachers to choose to view all of the students on the course section roster or just those students assigned to a particular group.
To use this option, select the Student Groups option next to the save icon. The dropdown will display all of the groups that are available for the course section. Select the appropriate group to be displayed. Only those students will be dis-played. Any assignments that are not assigned to the group will be grayed out when all students are displayed.
Posting ScoresTeachers can post scores for either Standards or Assignments that are attached to a Standards Group in Grade Book. The Grade Book will provide a running % and an overall grade for a student, if the prefer-ence is selected to have the system calculate the grades.
From the 1. Grade Book, se-lect either a Standard or a Standard Group from the drop-down list.
Select a 2. student from the roster to the left. Once selected, the student will be highlighted in yellow.
A teacher can click on the box associated with the student’s Stan-3. dard (green) and a dropdown will appear. The dropdown will be the rubric attached to the standard.
Teachers can manually enter students’ as-4. signment scores by clicking in the boxes and adding scores.
By moving into a student’s score field and 5. right-clicking, teachers can attach additional information for that student’s score. Teachers can add comments about a particular assign-ment, or assign the work as Turned In, Late, Exempt, Missing, Incomplete, or indicate the
Note: The student’s score will not change directly as a result of that due date. In other words, this affects the to-do list on the portal and the sequence the assignment will appear within the group, but nothing else. Until the teacher grades the assign-ment the student’s score box will remain blank.
Grade Book (Standards Based)
38©2011, Infinite Campus. All Rights Reserved. Last modified: 04 November 2011
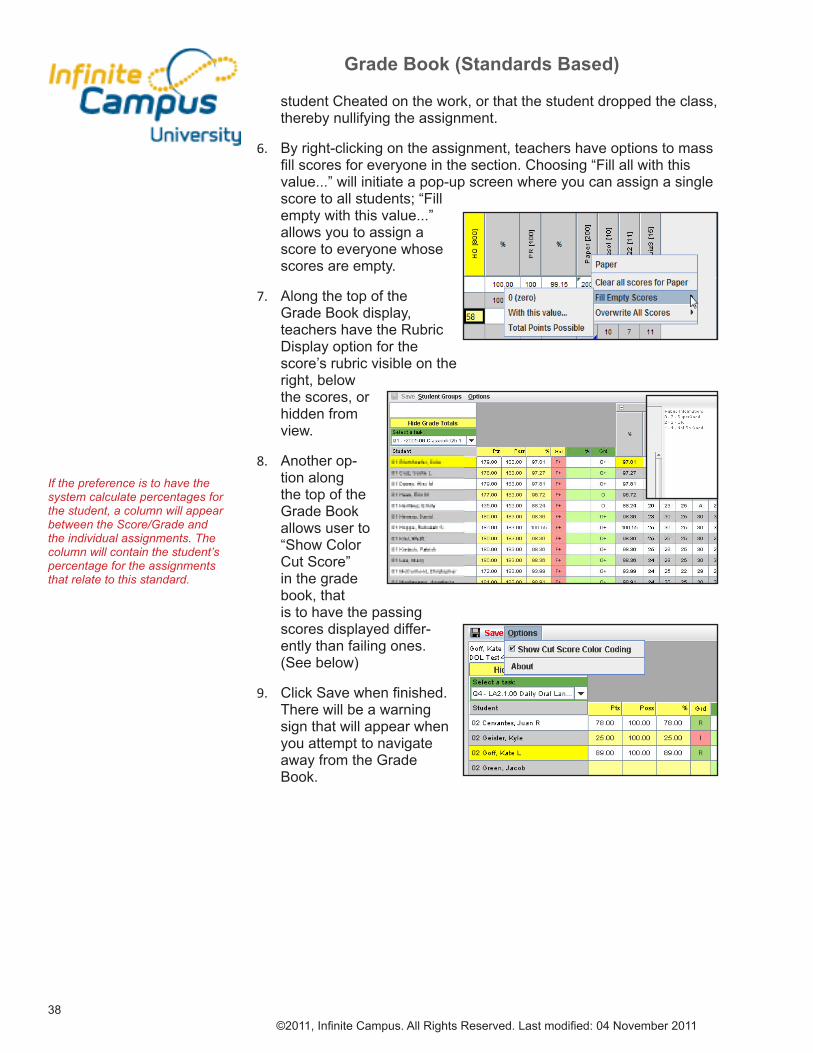
student Cheated on the work, or that the student dropped the class, thereby nullifying the assignment.
By right-clicking on the assignment, teachers have options to mass 6. fill scores for everyone in the section. Choosing “Fill all with this value...” will initiate a pop-up screen where you can assign a single score to all students; “Fill empty with this value...” allows you to assign a score to everyone whose scores are empty.
Along the top of the 7. Grade Book display, teachers have the Rubric Display option for the score’s rubric visible on the right, below the scores, or hidden from view.
Another op-8. tion along the top of the Grade Book allows user to “Show Color Cut Score” in the grade book, that is to have the passing scores displayed differ-ently than failing ones. (See below)
Click Save when finished. 9. There will be a warning sign that will appear when you attempt to navigate away from the Grade Book.
If the preference is to have the system calculate percentages for the student, a column will appear between the Score/Grade and the individual assignments. The column will contain the student’s percentage for the assignments that relate to this standard.

Grade Book (Standards Based)
©2011, Infinite Campus. All Rights Reserved. Last modified: 04 November 2011 39
Adding Assignments in the GradebookTeachers have the option of adding an assignment while in the Grade Book. There are two options for adding an assignment - Simple or Full Editor.
Adding an Assignment Using the Simple Option
Right-click over the Category 1. area to add the assignment to.Select Add Assignment.2. Select Simple to open the Simple Assignment editor.3. Enter the required informa-4. tion for the new assignment. The Simple option indicates that the assignment created will match the section, term and task of the current Grade Book view.Click OK to add the assign-5. ment to the Grade Book. The assignment will be viewable in the Assignments tool when the Grade Book is saved.
Adding an Assignment Using the Full Editor OptionRight-click over the Category area to add the assignment to.1. Select Add Assignment.2. Select Full Editor to open the Assignment Editor in the Assignments 3. tool.The assignment 4. may be created and will appear in the Grade Book when the assign-ment is saved.Click Save or Save and Score to enter student scores.5. Click the Grade Book link at the top of the tab to return to the Grade 6. Book.

Grade Book (Standards Based)
40©2011, Infinite Campus. All Rights Reserved. Last modified: 04 November 2011

Instruction: Grade Submission
41©2011, Infinite Campus. All Rights Reserved. Last modified: 04 November 2011
OverviewThe Grading by Task/Student options give teachers an opportunity to add comments or modify percentages and letter grades. Grades can be posted from the Grade book view as well.
Grades can only be posted to open (or active) grading tasks/standards. If a task is selected that has no visible dropdown selections, the task is not active for grading at this time. The district’s Campus administrator will need to open the Grading Window before grades can be posted. Teachers can assign grades to grading tasks for the entire class roster (Grading by Task) or for one student at a time (Grading by Student).
ObjectivesAt the end of this lesson the learner will be able to:
Enter grades and scores using Grading by Task and/or Grading by •Student.Enter canned comments.•Enter freehand comments.•
Navigating to the Grading OptionsSelect the School and Section for which to submit grades by choos-1.ing from the dropdown list From the Index, expand the Instruction folder by clicking the plus 2.(+) sign or by clicking on the name of the folder. Select the Grading by Task or Grading by Student folder.3.
Using the Grading by Task OptionAfter selecting the Grading by Task from the Index, select the task 1.to be graded from the dropdown list. A list of students will appear. This list will be all students in the chosen section.If the user is mass-filling 2.grades, they can choose the score from the pull-down menu and choose Fill All. If the user has incorrectly filled a number of scores, they can erase the scores with Fill Empty.If the Task is a Standard 3.or based upon a Rubric, choose the correct score from the dropdown list.If the district uses the Auto Grader to calculate scores in composite 4.grading, enter the student’s Percentage in the Percent field.Select the score to assign to the student by clicking in the drop-5.down list. Enter any comments to attach to this score in the Comments field. 6.Comments can be up to 255 characters in length.Click the Save icon when finished entering comments or modifying 7.grades.
Grades submit-ted by the teacher will be available for viewing on the administrative side
of Campus on the students’ grades tab and in the Portal as soon as they are saved. If changes are needed, Teachers can change the score as often as needed, as long as the task is still available for grading (is active) in the dropdown list.
grade suBmission
Grading by Student and Grading by Task. When a district uses standards-based grading, the Grading by Task and Grading by Student edi-tors will automatically display standards in a hierarchical manner. The rubric associ-ated with the standard may be displayed within the Grading by Task and Grading by Student. Fill-down func-tionality is also provided. The preference-controlled display of a student’s photo is avail-able to be displayed.

Instruction: Grade Submission
42©2011, Infinite Campus. All Rights Reserved. Last modified: 04 November 2011
Using the Grading by Student OptionAfter selecting the Grading by Student option from the Index, select 1.the student to be graded from the dropdown list. Available tasks for grading will appear.If the district uses the Auto 2.Grader to calculate scores in composite grading, enter the student’s Percentage in the Percent field.Select the score to assign 3.to the student by clicking in the dropdown box. Enter any comments to 4.attach to this score in the Comments field. Comments can be up to 255 characters in length. Click the Save icon when finished entering comments or modifying 5.grades.
Using the Canned Comments FeatureCanned comments are available for both the Grading by Task and Grading by Student tools if the preference to use canned comments was set in System Administration prefer-ences. Comments are created by district or school administration.
When assigning 1.grades, select the paper icon to the right of the comments field. A Comment selection window will appear. Canned comments may be selected by entering the code (if codes 2.have been entered for the grading comments, they are listed before the text of the comment) or by selecting the checkbox to the left of the comment. Click the Update Comment button to add the comment to the stu-3.dent’s comment field. To add multiple comments at one time, either select the appropriate 4.checkboxes next to the comment OR enter the codes for the com-ments by typing without spaces the code number, a comma and the second code number (Example: 123,456). The related comments will display in the Comments fields. Any checkboxes selected will be ignored if a code is entered into 5.the code field.
Use canned comments: When Grading By Task or Grading By Student this options allows the teacher to select from a list of canned comments that were entered in System Administration>Grading & Standards> Grading Com-ments.

Student Groups
©2011, Infinite Campus. All Rights Reserved. Last modified: 04 November 2011 43
sTudenT groups (e)OverviewThe Student Groups option in the Instruction module of allows teachers to differentiate learning for students by grouping them in different sub-sets for purposes of assigning particular students to particular assign-ments.
ObjectivesAt the conclusion of this lesson, learners will be able to:
Create student groups.•Employ student groups for purposes of differentiated learning.•Make modifications to specific student groups.•
Navigating to Student GroupsSelect the Instruction module from the Index Outline.1.Select Student Groups.2.
Setting Up Student GroupsSelect New.1.In the Student Group 2.Detail, provide a unique identifying name for the group.The Active check-3.box will be marked by default. Uncheck the box to make the group inactive. Making a group inactive will not allow assignments to be assigned to it.Students may be added to the group by dragging them from the 4.Roster list to the Stu-dent Group Members list. Students may be removed from the Stu-dent Group Members list by dragging them back to the Roster list.
If the student is •already a member of another group, the group name will be listed in the Other Groups list under the student’s name.
Click Save at the top of 5.the tab. The group will now appear in the Stu-dent Groups Editor with the number of Active Members. The roster will be listed below with the group(s) students’ are active members of.
Selecting the group name listed under Other Groups will take the User to that group
members list.
Selecting a student in the Stu-dent list will redirect the user to the student’s Student Information > General tabs.
Students may be a member of more than one group.
If a student is removed from a group the same say that they were added, the start date is removed.

Student Groups
©2011, Infinite Campus. All Rights Reserved. Last modified: 04 November 2011 44
Creating Student Groups for AssignmentsThis option enables instructors to create classroom assignments that are directed to specific portions of their roster. For example, if a teacher wanted to reinforce a skill set with a portion of their section, they can assign a particular assignment to that Student Group. Students not in that group will automatically be exempt from the assignment.
From the Instruction module, select Assignments.1.From the Assignments option tool bar, select Create Assignment.2.In the Sections portion of the Assignment Detail, select the appro-3.priate Student Group from the dropdown list.Select Save.4.

Daily Planner
©2011, Infinite Campus. All Rights Reserved. Last modified: 04 November 2011 45
OverviewThe Daily Planner tool in the Instruction module gives teachers a real time view of what is going on in their classroom. Absences, tardies, and assignments are shown in a daily, weekly, or monthly calendar view for the teacher’s convenience. Assignments can even be added from the Daily Planner.
ObjectivesIn this lesson you will learn:
How to view the Daily Planner.•How to create activities in the Daily Planner.•How to edit activities in the Daily Planner.•
Viewing the Daily PlannerExpand the Instruction Module1.Click Daily Planner2.To hide attendance marks, click Hide Attendance.3.To hide assignments, click Hide Assignments.4.To change the view, click the Month, Week or Day buttons.5.To print the Daily Planner, click Print.6.
daiLy pLanner (e)

Daily Planner
©2011, Infinite Campus. All Rights Reserved. Last modified: 04 November 2011 46
Creating Activities in the Daily PlannerClick New Activity1. to create a new activity.Enter a Name for the assignment.2.Enter an Abbreviation 3. for the name of the activity.Click the Show Description, Objectives, and References Fields to 4.display the fields for activity descriptions, objectives and references.The Description field is where a description of the activity can be 5.entered. The Objectives field is where objectives for the activity can be 6.entered. The References7. field is where references for the activity can be entered. Choose the Sections8. that will have this activity assigned to stu-dents.Check the Hide from Portal/Grade Book Preview to hide the activ-9.ity in the portal and in areas where the Grade Book Preview icon is available. Enter a Start Date. This is the date that the activity was given and 10.will default to the current date.Enter an End Date11. . This is the date that the activity is complete.Click the Save button to save the activity.12.

Daily Planner
©2011, Infinite Campus. All Rights Reserved. Last modified: 04 November 2011 47
Editing Assignments in the Daily PlannerPreviously created assignments can be edited in the Daily Planner. To edit an assignment:
Click the assignment name in the Daily Planner.1.Make any needed changes.2.Click Save to save the changes.3.Assignments can also be deleted with the Delete Assignment4. button.
Daily Planner
©2011, Infinite Campus. All Rights Reserved. Last modified: 04 November 2011 48
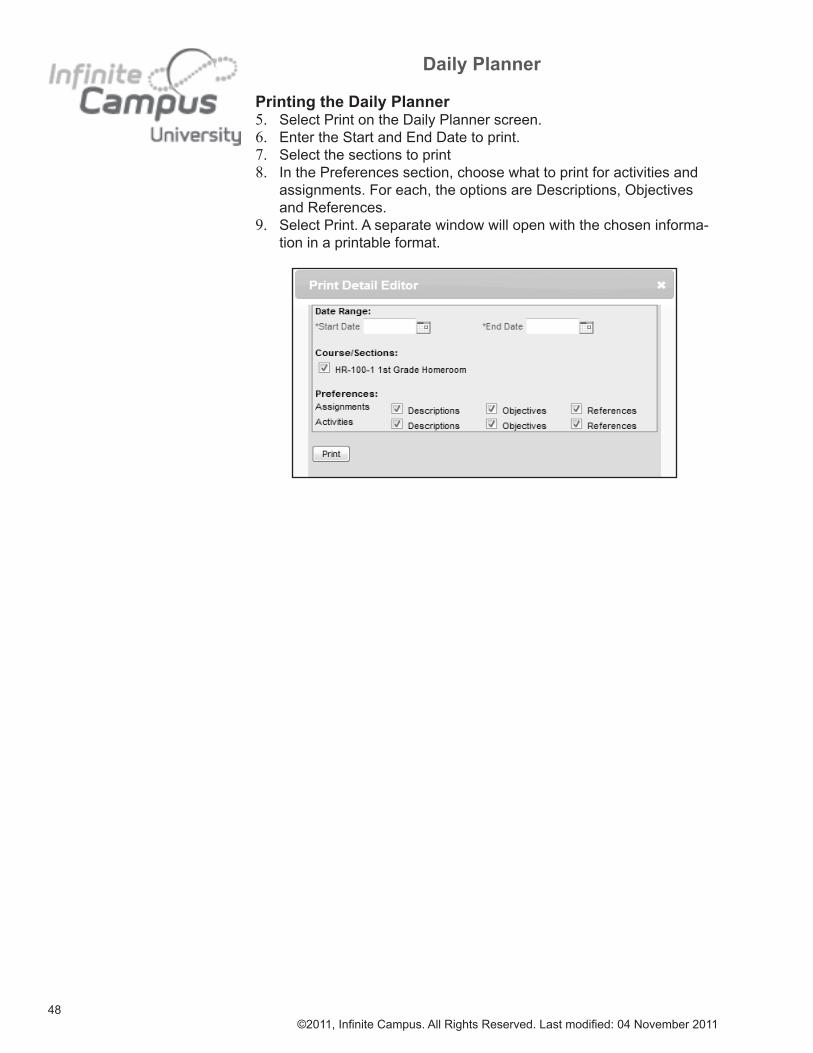
Printing the Daily PlannerSelect Print on the Daily Planner screen.5.Enter the Start and End Date to print.6.Select the sections to print7.In the Preferences section, choose what to print for activities and 8.assignments. For each, the options are Descriptions, Objectives and References.Select Print. A separate window will open with the chosen informa-9.tion in a printable format.

Instruction: Teacher Newsletter
©2011, Infinite Campus. All Rights Reserved. Last modified: 04 November 2011 49
The Teacher Newsletter allows instructors to communicate with stu-dents and parents through the Campus Portal. The Newsletter reduces the need for teachers to print announcements and eliminates the risk of the student losing the physical notice.
Creating a Newsletter for the Campus PortalTeachers can provide assignment information, class directives and other pertinent information regarding the course and section selected. These messages can be updated as needed by the instructor.
To create a course/section NewsletterChoose the Instruction module from the Index.1.Select Newsletter.2.Choose New.3.Enter (or choose from the calendar) the Start Date that you wish 4.the newsletter to published on.Enter an End Date on which the newsletter will be removed.5.Click the Publish checkbox.6.Use WYSIWYG formatting options to text, making hyperlinks and 7.using tables.Click Save.8.
Viewing Newsletters in The PortalThe link for the News-letter is available as a date hyperlink within the student’s schedule and appears as a PDF.
Teacher newsLeTTer
Newsletters are an option that needs to be enabled by the system administrator in the Portal options setup in
System Administration.

Instruction: Teacher Newsletter
©2011, Infinite Campus. All Rights Reserved. Last modified: 04 November 2011 50