Embed Size (px)
Citation preview

T5 Wi-Fi ThermostatProgrammable Thermostat
Quick Install Guide
For more information visit yourhome.honeywell.com

2 3
Included in your box:
Screws and anchors
UWP™ Mounting System(UWP)
T5 Wi-Fi Thermostat
Quick Install Guide

2 3
Get the most from T5 Wi-Fi ThermostatMultiple programming options that fit your lifestyle:
1. Location-Based scheduling – The thermostat uses your smartphone’s location to know when you’re away, and saves you energy. Through geofence technology, it senses your return and helps make you comfortable upon arrival. You can always manually change your preset Home and Away temperature either on the thermostat or on the Honeywell Home app.
2. Smart scheduling – Use a combination of geofencing and time scheduling to fit your busy, active lifestyle.
3. Time-Based scheduling – Program your thermostat for one week; each day (each day is a different schedule); Mon-Fri, Sat, Sun; or Mon-Fri, Sat-Sun. All days with four adjustable periods per day.
4. No scheduling – Control your comfort manually by adjusting temperature set points only.
Smart Alerts. Push notifications remind you of filter changes and warn you of extreme indoor temperatures.
Smart Response. Learns your heating and cooling system to deliver the opti-mal temperature at the right time.
Auto Change From Heat to Cool. Automatically determine if your home needs heating or cooling to provide maximum comfort.
!

4
Tools you will need:
You may need:
Wire stripper
Needle-nose pliers Drill and drill bit (7/32 in)
SmartphoneTo install your thermostat and photograph existing wiring.
Honeywell Home appTo configure your system and connect to your smartphone.
Small flat head screwdriver
Phillips screwdriver
Pencil
Level Home Wi-Fi Password

4 5
Compatibility• Compatible with most heating, cooling, and heat pump systems• Required: 24 VAC power (“C” wire)• Does not work with electric baseboard heat (120-240V)• Does not work with millivolt systems• Does not support Universal Input (S terminals) for indoor and outdoor sensors• Does not support Universal Relay (U terminals) for ventilation• Android or iOS smartphone, tablet, or device
For help, contact:WEB yourhome.honeywell.com/supportPHONE 1-800-633-3991SOCIAL Twitter: @Honeywell_Home, Facebook: Honeywell Home
CAUTION: MERCURY NOTICEIf this product is replacing a control that contains mercury in a sealed tube, do not place the old control in the trash. Contact your local waste management authority for instructions regarding recycling and proper disposal.
CAUTION: EQUIPMENT DAMAGE HAZARDCompressor protection is bypassed during testing. To prevent equipment damage, avoid cycling the compressor quickly.
CAUTION: ELECTRICAL HAZARDCan cause electrical shock or equipment damage. Disconnect power before beginning installation.
REQUIRED: 24 VAC POWER (“C” WIRE)

6 7
Removing your old thermostat
2 Check that your system is off Change the temperature on your old thermostat. If you don’t hear the system turn on within 5 minutes, the power is off.
Note: If you have a digital thermostat that has a blank display, skip this step.
1 Turn power OFF To protect yourself and your equipment, Turn off the power at the breaker box or switch that controls your heating/cooling system.
3 Remove your old thermostat from the wall plate On most thermostats, you can take off the thermostat by grasping and gently pulling. Some thermostats may have screws, buttons, or clasps.
Do not remove any wires from your thermostat at this time!
75
OFF
OFF
ON
OFF
OFF
ON
75
Breaker box
Switch

6 7
5 Take a picture of how your wiring looks right now Be sure to include the letters next to the terminals where the wires are inserted. This will be a helpful reference when wiring your thermostat.
Tip: If the color of your wires has faded or if 2 terminals have the same wire color, use the wire labels provided in the package to label each wire.
4 Make sure there are no 120/240V wires Do you have thick black wires with wire nuts? Is your thermostat 120V or higher? If you answered yes to either of these questions, you have a line voltage system and the thermostat will not work.
If you are unsure visit: yourhome.honeywell.com/support
6 Remove any jumpers A jumper connects one terminal to another terminal. It may look like a small staple or even a colored wire and must be removed before continuing. Use a screwdriver to release wires from terminals.
The thermostat does not need jumpers.
Y R RCExample of a jumper
Wire nut
Thick black wire
Terminals
1/4” to 3/8”

8 9
7 Record if you have wires in the following terminals Do not include jumpers as a part of your count. The thermostat does not need jumpers.
Terminal Wire Color
R
Rh
Rc
8 Write down the color of the wires Check mark the wires that are connected to terminals. Next to the check mark, write down the color of the wire. Do not include jumpers as a part of your count.
Check all that apply (Not all will apply):
Terminal Wire Color
Y
Y2
G
C
Terminal Wire Color
A or L/A
O/B
W2 or AUX
E
W
K
Required
S and U terminals are not supported with this thermostat.
If there are wires in terminals that are not listed, you will need additional wir-ing support. Visit yourhome.honeywell.com/support to find out if the thermo-stat will work for you.
8 9
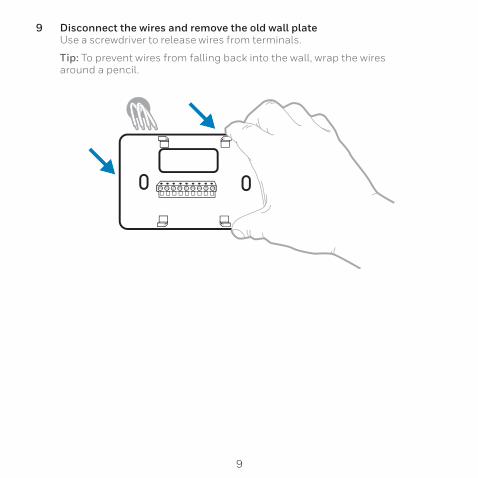
9 Disconnect the wires and remove the old wall plate Use a screwdriver to release wires from terminals.
Tip: To prevent wires from falling back into the wall, wrap the wires around a pencil.

10
Installing your T5 Wi-Fi Thermostat
T5 Wi-Fi Thermostat ScrewsUWP
Mounting System
Anchors Wall

10 11
11 Insert the wall anchors It is recommended that you use the wall anchors included in the box to mount your thermostat.
You can use the UWP to mark where you want to place the wall anchors.
a) Level the wall plate.b) Mark the location of the wall
anchors using a pencil.c) Drill the holes.d) Insert wall anchors.
e) Make sure anchors are flush with wall.
Tip: Use a 7/32 drill bit.
10 Bundle and insert wires through the UWP Pull open the UWP and insert the bundle of wires through the back of the UWP. Make sure at least 1/4-inch of each wire is exposed for easy insertion into the wire terminals.

12
12 Set R-switch position and insert R-wire or wires
Set the R-switch up or down based on your wiring notes in Step 7.
Insert wires into the inner holes of the terminals on the UWP. The tabs will stay down once the wire is inserted.
If you have 1 R-wire (R, Rh, or Rc)
If you have 2 R-wires (R or Rh, and Rc)or
1. Set R-switch to the up position.
1. Set R-switch to the down position.
2. Insert your R-wire (R, Rh or Rc) into R-terminal.
2. Insert your Rc wire into Rc-terminal.
3. Insert your R or Rh wire into R-Terminal.

12 13
13 Connect remaining wires from Step 8
Tip: Do not mount the UWP to the wall prior to connecting the wires.
Depress the tabs to put the wires into the inner holes of their corresponding terminals on the UWP (one wire per ter-minal) until it is firmly in place.
Gently tug on the wires to verify they are secure.
Tip: If you need to release the wires again, push down the terminal tabs on the sides of the UWP.
14 Mount the UWP and close the door Mount the UWP using the provided screws. Install all three screws for a secure fit on your wall. Close the door after you’re finished.
This wiring is just an example, actual wiring may vary.
Use 3x supplied
screws #8 1-1/2”
1/4” to 3/8”

14 15
16 Turn your power ON Turn on the power at the breaker box or switch that controls the heating/ cooling system.
OFF
ON
ON
OFF
ON
ON
15 Attach your thermostat Align the thermostat onto the UWP and firmly snap it into place.
17 Return to the thermostat Return to the thermostat. Confirm the screen shows START SETUP. If it does, continue to “Setup with Honeywell Home App” on page 15.
If your thermostat does not show START SETUP, please contact Honeywell support.
Breaker box
Switch

14 15
1 Start Setup with the app Touch START SETUP on thermostat.
Setup with Honeywell Home App
No Yes
Back
2 Select to setup with the app Touch Yes on the USE APP screen.
3 Your thermostat is now ready to be configured using the Honeywell Home app
a.) Download the “Honeywell Home” app from the App store or Google play. b.) Open the Honeywell Home app. Your thermostat should appear under
Thermostat Found. Tap SET UP NOW as shown below to continue. If your thermostat doesn’t appear, create an account (if necessary), or sign in to your Honeywell account. Then select the T5 Wi-Fi Thermostat to install.
c.) The Honeywell Home app will walk you through the rest of setup.
A B C
Thermostat Found:
SET UP NOW
16 17
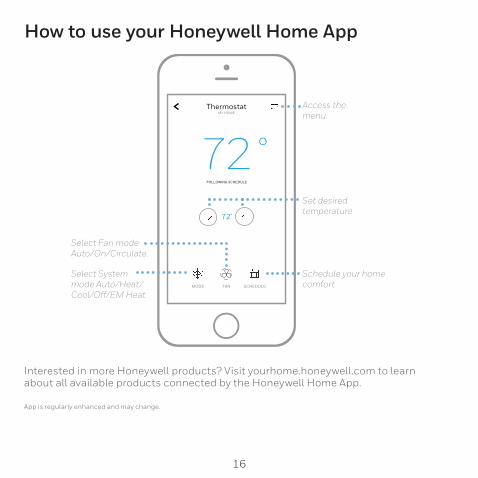
How to use your Honeywell Home App
SCHEDULEFANMODE
72̊
FOLLOWING SCHEDULE
72˚MY HOME
Thermostat Access the menu
Set desired temperature
Schedule your home comfort
Select System mode Auto/Heat/Cool/Off/EM Heat
Select Fan mode Auto/On/Circulate.
Interested in more Honeywell products? Visit yourhome.honeywell.com to learn about all available products connected by the Honeywell Home App.
App is regularly enhanced and may change.

16 17
Mode Menu Fan
Mode FanHeat Auto
How to use your T5 Wi-Fi Thermostat
The screen will wake up by touching the center area of displayed temperature.
ModeSelect system mode Auto/Heat/Cool/Off/EM Heat (emergency heat).
MenuContains features: schedule, screen lock, ventilation, Wi-Fi, clean screen, and other thermostat settings.
FanSelect Fan mode Auto/On/Circulate.
Desired temperatureDisplays desired indoor temperature.
Indoor Temperature Displays current indoor temperature.
Adjust temperature Touch + or - to set your desired indoor temperature.

18 19
If your Wi-Fi network is not working, you can alternatively setup your thermostat manually and connect your phone later.
1 Start manual setup Touch START SETUP to begin.
Manual Setup
Edit
No Yes
3 Navigate and edit setup options Use or to navigate through all the setup options. To see a list of all setup options, go to pages 20-21.
To edit an option value, touch Edit or touch text area.
The value is now blinking. Use or to select the correct value.
Touch Done or touch text area once the correct value is selected.
2 Select manual setup On the USE APP screen, touch No.

18 19
4 Finish Setup Touch until you see Finish Setup. Touch Select or touch text area.
Manual Setup (cont.)
Select
No Yes
Back
No Yes
Back
5 Setup Wi-Fi At the end of setup process you will be prompted to SETUP WIFI. If your Wi-Fi is still not working, you have to manually set the time and date. Select No on the SETUP WIFI screen.
6 Set time and date Set daylight saving time if you are in an area that follows daylight saving time. Set date, clock format and time on the next screens.
7 Your thermostat is now setup Refer to page 17 for more information about basic operation.

20 21
Equipment Setup Options
Option # Option Name Option Value (factory default in bold)
120 Schedule Type No ScheduleMO-SU = Every day the sameMO-FR SA SU = 5-1-1 scheduleMO-FR SA-SU = 5-2 scheduleEach Day = Every day differentNote: You can change default MO-FR, SA-SU schedule here. To edit periods during days, temperature setpoints, or to turn Schedule On/Off, touch MENU from the Home screen and go to SCHEDULE.
200 System Type Conventional Forced Air, Heat Pump, Boiler, Cool OnlyNote: This option selects the basic system type your thermostat will control.
205 Equipment Type Conventional Forced Air Heat:Standard Gas, High Efficiency Gas, Oil, Electric, Fan Coil
Heat Pump:Air to Air, Geothermal
Boiler:Hot Water, SteamNote: This option selects the equipment type your thermostat will control. Note: This feature is NOT displayed if feature 200 is set to Cool Only.
218 Reversing Valve O/B on Cool, 0/B on HeatNote: This option is only displayed if the Heat Pump configured. Select whether reversing valve O/B should energize in cool or in heat.
20 21
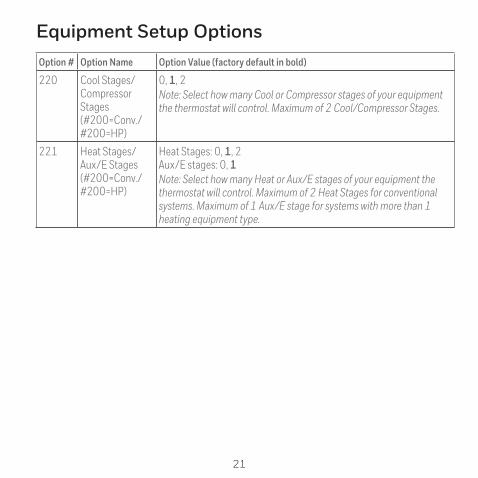
Option # Option Name Option Value (factory default in bold)
220 Cool Stages/Compressor Stages (#200=Conv./ #200=HP)
0, 1, 2Note: Select how many Cool or Compressor stages of your equipment the thermostat will control. Maximum of 2 Cool/Compressor Stages.
221 Heat Stages/Aux/E Stages (#200=Conv./ #200=HP)
Heat Stages: 0, 1, 2Aux/E stages: 0, 1Note: Select how many Heat or Aux/E stages of your equipment the thermostat will control. Maximum of 2 Heat Stages for conventional systems. Maximum of 1 Aux/E stage for systems with more than 1 heating equipment type.
Equipment Setup Options

22
Frequently Asked QuestionsWill the T5 Wi-Fi thermostat still work if Wi-Fi connection is lost?Yes, the temperature can be adjusted directly at the thermostat. However, some features, including geofencing, are managed only through the Honeywell Home app and will not function while the connection is down. The thermostat will automatically reconnect to Wi-Fi once the network is restored.
The T5 Wi-Fi thermostat is not finding the in home Wi-Fi network.thermostat operates in the 2.4GHz range. That may be why the thermostat does not see the network but the smartphone, which operates in both the 2.4 and 5.0 GHz range, sees the network. Most routers will broadcast two networks, one SSID on the 5.0 GHz radio and one SSID on the 2.4 GHz radio.
A change was made on the Honeywell Home app but it has not shown up on the T5 Wi-Fi thermostat.There may be a short delay after making temperature and setting changes in the Honeywell Home app.
Can there be multiple users for geofencing?Yes, there can be multiple users. Geofencing will trigger based on the last person to leave and the first person to return. To properly use geofencing with multiple users:
• Each user needs to create their own account.• Each user should use their login ID and password across his or her devices, including
smartphones and tablets.• No two users should share the same account.
How are multiple users set up with thermostat?Access can be given to any or all thermostat locations through the Honeywell Home app. Start by touching the three-line menu icon in the upper left-hand corner of the home screen. Select Manage Users and touch Add User located at the bottom of the screen. Type in the email address of the person to be invited. If they have a account set up, the location will be automatically added to their account. If they don’t have an account, they will receive an email invitation prompting them to download the Honeywell Home app and create their own account.
Note: All individuals with access to a thermostat share the same user privileges. Users added will be able to change the thermostat’s settings, as well as add or delete other users.
Is there a way to extend the signal strength?The range or distance of the Wi-Fi signal is determined by the router. Check the router’s manual for additional information.

22 23
Regulatory information
There is an alert that says Wi-Fi Signal Lost. What does that mean?The Wi-Fi signal to the thermostat has been lost. Wait for the thermostat to reconnect or select a new network within the Honeywell Home app configuration menu. If the thermostat is unable to reconnect, you will need to troubleshoot the router to determine the cause.
Why is the thermostat showing up as offline (strike-through Wi-Fi icon) on top of right corner of thermostat display?If the thermostat displays a strike-through Wi-Fi icon on its screen or shows up as offline on the Honeywell Home app, it has lost connection to the network. Make sure the router is powered and broadcasting. The home’s Wi-Fi network may need to be reset by power cycling the router. Consult the router’s instruction manual for directions on power cycling. When the network has been restored, the thermostat will automatically reconnect.
An activation email hasn’t been received.An email will be sent from [email protected]. An activation email is needed to complete the account setup. If an activation email is not received after five minutes, check the Spam folder of the email account.
If you do not find it in the Spam folder, click on the Resend button and the activation email will be resent. If you still do not receive your activation email, please contact the Technical Support team at 1-800-633-3991 for help.
Frequently Asked Questions
FCC REGULATIONS§ 15.19 (a)(3)This device complies with part 15 of the FCC Rules. Operation is subject to the following two conditions: 1 This device may not cause harmful interference,
and2 This device must accept any interference received,
including interference that may cause undesired operation.
IC REGULATIONSRSS-GENThis device complies with Industry Canada’s license-exempt RSSs. Operation is subject to the following two conditions:1 This device may not cause interference; and
2 This device must accept any interference, including interference that may cause undesired operation of the device.
FCC Warning (Part 15.21) (USA only)Changes or modifications not expressly approved by the party responsible for compliance could void the user’s authority to operate the equipment.
FCC - 47 CFR § 15.105 (b)See https://customer.honeywell.com/en-US/support/residential/codes-and-standards/FCC15105/Pages/default.aspx for additional FCC information for this product.

Home and Building TechnologiesIn the U.S.:Honeywell715 Peachtree Street NEAtlanta, GA 30308yourhome.honeywell.com
Wi-Fi® is a registered trademark of Wi-Fi Alliance®
® U.S. Registered Trademark.© 2017 Honeywell International Inc.33-00363ES—01 M.S. 10-17Printed in U.S.A. 33-00363ES-01
Apple® HomeKit™ Setup CodeThe T5 Wi-Fi supports Apple HomeKit. When prompted by the Honeywell Home app, scan the code on the last page (back cover) of this guide.
2-Year Limited WarrantyFor Warranty information go to yourhome.honeywell.com

T5 con conexión WiFiTermostato Programable
Guía de instalación rápida
Para obtener más información, visite yourhome.honeywell.com

2
Esta caja incluye:
Tornillos y tarugos
Sistema de montaje con UWP™ (UWP)
Termostato T5 con conexión WiFi
Guía de instalación rápida

3
Obtenga el máximo beneficio del termostato T5 con conexión WiFiMúltiples opciones de programación que se adaptan a su estilo de vida:
1. Programación según la ubicación: El termostato utiliza la ubicación de su teléfono inteligente para saber cuándo usted no está en casa y ahorrarle energía. A través de la tecnología Geofence, detecta su regreso y le ayuda a que se sienta confortable cuando llegue. Usted siempre puede cambiar de forma manual la temperatura predefinida de las opciones Hogar y Ausente, ya sea desde el termostato o desde la aplicación Honeywell Home.
2. Programación inteligente: Use una combinación de Geofencing y pro-gramación de horario que se adapte a su estilo de vida activo y ocupado.
3. Programación temporal: Programe su termostato para una semana; cada día (cada día tiene una programación diferente); de lunes a viernes, sábado, domingo; o de lunes a viernes, sábado y domingo. Todos los días tienen cuatro períodos ajustables.
4. Sin programación: Controle su comodidad manualmente ajustando solo los puntos de referencia de temperatura.
Alertas inteligentes. Las notificaciones push le recuerdan los cambios del fil-tro y le advierten sobre temperaturas extremas en interiores.
Smart Response. Aprende el sistema de calefacción y refrigeración para pro-porcionar la temperatura óptima en el momento adecuado.
Cambio automático de calefacción a refrigeración. Determine automática-mente si su hogar necesita calefacción o refrigeración para proporcionar máx-imo confort.
!
4
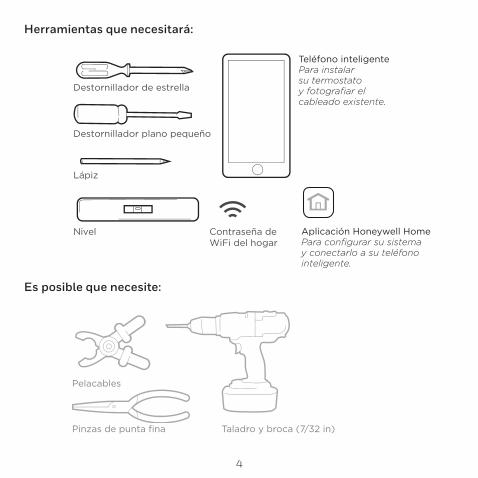
Destornillador plano pequeño
Destornillador de estrella
Lápiz
Nivel Contraseña de WiFi del hogar
Herramientas que necesitará:
Es posible que necesite:
Pelacables
Pinzas de punta fina Taladro y broca (7/32 in)
Teléfono inteligentePara instalar su termostato y fotografiar el cableado existente.
Aplicación Honeywell HomePara configurar su sistema y conectarlo a su teléfono inteligente.

5
Compatibilidad• Es compatible con la mayoría de los sistemas de calefacción, refrigeración, y
bombas de calor.• Se requiere alimentación de 24 V CA (cable “C”).• No funciona con calefacción eléctrica de zócalo (120-240 V)• No funciona con sistemas de milivoltio.• No admite entradas universales (terminales S) para sensores de interiores y
exteriores.• No admite relevadores universales (terminales U) para ventilación.• Es compatible con tabletas, dispositivos o teléfonos inteligentes Android o iOS.
Información de contacto para obtener ayuda:SITIO WEB yourhome.honeywell.com/supportTELÉFONO 1-800-633-3991REDES SOCIALES Twitter: @Honeywell_Home, Facebook: Honeywell Home
PRECAUCIÓN: AVISO SOBRE EL MERCURIOSi este producto está reemplazando a un equipo de control existente que contiene mercurio en un tubo sellado, no coloque dicho equipo en la basura. Contacte al organismo encargado del manejo y disposición de desechos de su localidad para obtener instrucciones sobre cómo reciclar y desechar adecuadamente.
PRECAUCIÓN: RIESGOS DE DAÑOS AL EQUIPO.Se evita la protección del compresor durante la prueba. Para prevenir daños al equipo, evite encender y apagar rápidamente el compresor.
PRECAUCIÓN: PELIGRO DE DESCARGA ELÉCTRICAPuede causar descargas eléctricas o daños al equipo. Desconecte el suministro eléctrico antes de comenzar la instalación.
NECESARIO: ALIMENTACIÓN DE 24 V CA (CABLE “C”)

6
Extracción del termostato existente
2 Verifique que su sistema esté desconectado Cambie la temperatura en el termostato existente. Si no escucha que el sistema se activa dentro de 5 minutos, la electricidad está desconectada.
Nota: Si tiene un termostato digital con una pantalla en blanco, omita este paso.
1 DESCONECTE el suministro de energía eléctrica Para protegerse a sí mismo y al equipo, desconecte el suministro eléctrico en la caja de interruptores o en el interruptor que controla el sistema de calefacción/refrigeración.
3 Retire el termostato viejo de la placa de pared En la mayoría de los termostatos, puede sacar el termostato agarrándolo y halando suavemente. Algunos termostatos pueden tener tornillos, botones o cierres a presión.
No retire ningún cable del termostato en este momento.
Caja de interruptores de circuito
Interruptor
Apagado
Apagado
Encendido
Apagado
Apagado
Encendido
75
75

7
5 Tome una fotografía del cableado ahora Incluya las letras que se encuentran al lado de los terminales donde están insertados los cables. Esta será una referencia útil cuando cablee su termostato.
Consejo: Si los cables se han decolo-rado o si 2 terminales tienen el mismo color de cable, use las etiquetas para cables que se suministran en el paquete para etiquetar cada cable.
4 Asegúrese de que no haya cables de 120/240 V ¿Tiene cables negros gruesos con empalmes para cables? ¿Tiene su termostato 120 V o más? Si respondió afirmativamente a cualquiera de estas preguntas, tiene un sistema de voltaje en línea y el termostato no funcionará.
Si no está seguro, visite: yourhome.honeywell.com/support
6 Quite todos los puentes Una puente conecta un terminal a otra. Puede parecer como una pequeña grapa o incluso un cable de color y se debe retirar antes de continuar. Use un destornillador para quitar los cables de los terminales.
El termostato no necesita puentes.
Y R RC
Ejemplo de un puente
Empalme para cables
Cable negro grueso
Terminales
1/4” to 3/8”

8
7 Registre si tiene cables en las siguientes terminales No incluya los puentes como parte de su conteo. El termostato no necesita puentes.
Terminal Color del cable
R
Rh
Rc
8 Escriba el color de las cables Haga una marca de verificación en los cables que están conectados a los terminales. Al lado de la marca de verificación, escriba el color del cable. No incluya los puentes como parte de su conteo.
Marque todo lo que corresponda (algunas opciones no corresponden):
Terminal Color del cable
Y
Y2
G
C
Terminal Color del cable
A o L/A
O/B
W2 o AUX
E
W
K
Necesario
Este termostato no admite terminales S ni U.
Si existen cables en terminales que no están listados, necesitará un soporte de cableado adicional. Visite yourhome.honeywell.com/support para averiguar si el termostato es el adecuado para su sistema.

9
9 Desconecte los cables y retire la placa de pared existente Utilice un destornillador para sacar los cables de los terminales.
Consejo: Para evitar que los cables se caigan dentro de la pared, enrolle los cables alrededor de un lápiz.

10
Instalación de su termostato T5 con conexión WiFi
Termostato T5 con conexión WiFi Tornillos
Sistema de montaje con
UWPTarugos Pared

11
11 Inserte los tarugos de pared Para montar su termostato, se recomienda que utilice los tarugos de pared que se suministran en la caja.
Puede utilizar la UWP para marcar donde desea colocar los tarugos de pared.
a) Nivele la placa de pared.b) Marque la ubicación de los
tarugos de pared con un lápiz.c) Perfore los agujeros.d) Inserte los tarugos de pared.
e) Asegúrese de que los tarugos queden a ras con la pared.
Consejo: Use una broca para tal-adro de 7/32 pulgada.
10 Agrupe e inserte los cables a través de la UWP Hale para separar la UWP e inserte el grupo de cables a través de la parte posterior de la UWP. Compruebe que al menos 1/4 de pulgada (6 mm) quede expuesto para la inserción fácil en los terminales de cables.
Instalación de su termostato T5 con conexión WiFi

12
12 Establezca la posición del interruptor R e inserte el cable R o los cables Coloque el interruptor R hacia arriba o hacia abajo en función de sus notas de cableado del paso 7.
Inserte los cables en los agujeros internos de los terminales en la UWP. Las lengüetas estarán en la posición inferior una vez insertado el cable.
Si tiene 1 cable R (R, Rh, or Rc)
Si tiene 2 cables R (R o Rh y Rc).
o
1. Coloque el interruptor R en la posición hacia arriba.
1. Coloque el interrup-tor R en la posición hacia abajo.
2. Inserte su cable R (R, Rh o Rc) en el terminal R.
2. Inserte su cable Rc en el terminal Rc.
3. Inserte su cable R o Rh en el terminal R.

13
13 Conecte los cables restantes del paso 8Consejo: No monte la UWP en la pared antes de conectar los cables. Presione las lengüetas hacia abajo para poner los cables en los agujeros internos de sus correspondientes terminales en la UWP (un cable por terminal) hasta que esté firmemente en su lugar.Hale suavemente los cables para verificar que estén seguros.Consejo: Si necesita sacar los cables nuevamente, presione las lengüetas del terminal hacia abajo, en los costados de la UWP.
14 Monte la UWP y cierre la puerta Monte la UWP utilizando los tornillos que se suministran. Instale los tres tornillos para fijar la placa en la pared de manera segura. Cierre la puerta cuando termine.
Este cableado es solo un ejemplo; el cableado real puede
variar.
Utilice los 3 tornillos
n.º 8 de 1-1/2
pulgada que se
suministran.
1/4” to 3/8”

14
16 CONECTE la energía eléctrica Active el suministro de electricidad en la caja de interruptores o en el interruptor que controla el sistema de calefacción/refrigeración.
15 Instale el termostato Alinee el termostato en la UWP y presiónelo para que calce en su lugar.
17 Regrese al termostato Regrese al termostato. Confirme que en la pantalla se lea START SETUP (iniciar configuración). Si es así, continúe a “Configurar usando la aplicación Honeywell Home” en la página 15.
Si no se lee START SETUP (iniciar configuración) en el termostato, comuníquese con el soporte técnico de Honeywell.
Caja de interruptores de circuito
Interruptor
Apagado
Encedido
Encedido
Apagado
Encedido
Encedido

15
1 Inicie la configuración con la aplicación Toque START SETUP (iniciar configuración) en el termostato.
Configurar usando la aplicación Honeywell Home
No Yes
Back
2 Seleccione configurar con la aplicación Toque Yes (Sí) en la pantalla USE APP (configurar la aplicación).
3 El termostato está listo para configurar usando la aplicación Honeywell Homea.) Descargue la aplicación “Honeywell Home” desde la tienda de aplicaciones
o desde Google play. b.) Abra la aplicación Honeywell Home. Su termostato debe aparecer bajo
“Thermostat Found” (termostato encontrado). Toque SET UP NOW (configurar ahora) como se ilustra más abajo para continuar. Si su termostato no aparece, cree una cuenta (si es necesario) o inicie sesión en su cuenta de Honeywell. Después seleccione el termostato Wi-FI T5 para instalar.
c.) La aplicación Honeywell Home lo guiará durante el resto del proceso de configuración.
A B C
Thermostat Found:
SET UP NOW

16
Cómo usar la aplicación Honeywell Home
SCHEDULEFANMODE
72̊
FOLLOWING SCHEDULE
72˚MY HOME
Thermostat Acceso al menú
Configure la temperatura deseada
Programar la comodidad de su hogar
Seleccione el modo del sistema: Auto (automático)/Heat (calefacción)/Cool (refrigeración)/Off (apagado)/EM Heat (calefacción de emergencia)
Seleccione el modo del ventilador Auto (automático)/On (activado)/Circulate (circulación)
¿Está interesado en más productos? Visite yourhome.honeywell.com para obtener más información sobre todos los productos disponibles conectados por la apli-cación Honeywell Home.
La aplicación se mejora periódicamente y puede cambiar.

17
Mode Menu Fan
Mode FanHeat Auto
Cómo utilizar el termostato T5 con conexión WiFi
La pantalla se activará al tocar el área central de la temperatura que se muestra.
Mode (Modo)Seleccione el modo del sistema: Auto (automático)/Heat (calefacción)/Cool (refrigeración)/Off (apagado)/EM Heat (calefacción de emergencia).
Menu (Menú)Contiene las siguientes características: programación, bloqueo de pantalla, ventilación, WiFi, borrar pantalla y otras configuraciones del termostato.
Fan (Ventilador)Seleccione el modo del ventilador Auto (automático)/On (activado)/Circulate (circulación).
Temperatura deseadaMuestra la temperatura interior deseada.
Temperatura interiorMuestra la temperatura interior actual.
Ajuste de la temperaturaToque + o - para configurar su temperatura interior deseada.

18
Si su red WiFi no está funcionando, como alternati-va, puede configurar su termostato manualmente y conectar su teléfono más tarde.
1 Inicie el modo de configuración manual Toque START SETUP (INICIAR CONFIGURACIÓN) para comenzar.
Configuración manual
Edit
No Yes
3 Navegue y edite las opciones de configuración Use o para navegar por las opciones de configuración. Para ver una lista de todas las opciones de configuración, consulte las páginas 20 y 21.
Para editar un valor de opción, toque Edit (edi-tar) o toque el área con texto.
El valor comienza a parpadear. Use o para seleccionar el valor correcto.
Toque Done (terminado) o el área con texto una vez que haya seleccionado el valor correcto.
2 Seleccione el modo de configuración manual En la pantalla USE APP (configurar la aplicación), toque No.

19
4 Finalice la configuración Avance hasta que lea Finish Setup (Finalizar configuración). Toque Select (seleccionar) o toque el área con texto.
Configuración manual (continuación)
Select
No Yes
Back
No Yes
Back
5 Configure el WiFi Al finalizar el proceso de configuración se le dirigirá a SETUP WIFI (Configuración de WiFi). Si su WiFi no está funcionando tendrá que colocar manualmente la hora y la fecha. Seleccione No en la pantalla SETUP WIFI (CONFIGURAR WIFI).
6 Configure la hora y la fecha Configure el horario de verano si está en un área comprendida en el horario de verano. Configure la fecha, el formato del reloj y la hora en las siguientes pantallas.
7 Su termostato ahora está configurado Consulte la página 17 para obtener más información sobre el funcionamiento básico.

20
Opciones de configuración del equipo
N.º de opción: Nombre de la opción
Valor de la opción (las configuraciones predeterminadas de fábrica están en negrita)
120 Tipo de pro-gramación
No Schedule (Sin programación)MO-SU = Every day the same (LU.-DO. = Todos los días iguales)MO-FR SA SU = 5-1-1 schedule (LU.-VI. SÁ. DO. = Programación 5-1-1)MO-FR SA-SU = 5-2 schedule (LU.-VI. SÁ.-DO. = Programación 5-2)Each Day = Every day different (Cada día = Todos los días diferentes)Nota: Puede cambiar la programación LU.-VI., SÁ.-DO. predeterminada aquí. Para editar períodos durante los días, puntos de referencia de tem-peratura o para activar/desactivar la programación, toque MENU en la pantalla principal e ingrese a SCHEDULE (PROGRAMAR).
200 Tipo de sistema Conventional Forced Air (ire forzado convencional), Heat Pump (bomba de calor), Boiler (Caldera), Cool Only (refrigeración únicamente)Nota: Esta opción selecciona el tipo de sistema básico que su termostato controlará.
205 Tipo de equipo Calefacción de aire forzado convencional:Standard Gas (Gas estándar), High Efficiency Gas (gas de alta eficien-cia), Oil (aceite), Electric (electricidad), Fan Coil (serpentín del ventilador)
Bomba de calor:Air to Air (Aire a aire), Geothermal (geotérmica)
Calefacción radiante:Hot Water (Agua caliente), Fan Coil (Serpentín de ventilador), Steam (vapor)Nota: Esta opción selecciona el tipo de equipo que su termostato controlará. Nota: Esta característica NO se muestra si la función 200 está configurada para Refrigeración únicamente.
218 Válvula de inversión
O/B on Cool (O/B en frío), 0/B on Heat (O/B en calor)Nota: Esta opción solo se muestra si la bomba de calor está configurada. Seleccione si la válvula de inversión O/B debe accionar el frío o el calor.

21
N.º de opción: Nombre de la opción
Valor de la opción (las configuraciones predeterminadas de fábrica están en negrita)
220 Etapas de refrig-eración/etapas del compresor (#200=Conv./ #200=HP)
0, 1, 2Nota: Seleccione cuántas etapas de refrigeración o del compresor de su equipo controlará el termostato. Máximo de 2 etapas de refrigeración/del compresor.
221 Etapas de calefac-ción/Aux/Emer(#200=Conv./ #200=HP)
Heat Stages (Etapas de calefacción): 0, 1, 2Aux/E stages (Etapas Aux/E): 0, 1Nota: Seleccione cuántas etapas de calefacción o Aux/E de su equipo controlará el termostato. Máximo de 2 etapas de calefacción para los sistemas convencionales. Máximo de 1 etapa Aux/E para sistemas con más de 1 tipo de equipo de calefacción.
Opciones de configuración del equipo

22
Preguntas frecuentes¿Funcionará el termostato T5 con conexión WiFi aunque se pierda la conexión WiFi?Sí, la temperatura se puede ajustar directamente en el termostato. Sin embargo, algunas características, incluida la geovalla, solo pueden gestionarse a través de la aplicación Honeywell Home y no funcionarán si se interrumpte la conexión. El termostato se reconectará automáticamente al WiFi una vez que se restaure la red.
El termostato T5 con conexión WiFi no encuentra la red WiFi del hogar.El termostato funciona en el rango de 2.4 GHz. Tal vez por ello el termostato no encuentra la red, pero el teléfono inteligente, que funciona en el rango tanto de 2.4 como de 5.0 GHz, ubica la red. La mayoría de los enrutadores transmitirán dos redes, una SSID en el radio de 5.0 GHz y otra SSID en el radio de 2.4 GHz.
Hubo una modificación en la aplicación Honeywell Home pero no se ve reflejada en el termostato T5 con conexión wifi.Puede haber una breve demora luego de realizar cambios en la temperatura y las configuraciones a través de la aplicación Honeywell Home.
¿Puede haber múltiples usuarios para Geofencing?Sí, puede haber usuarios múltiples. Geofencing se disparará en función de la última persona que salga y la primera que regrese. Para utilizar Geofencing adecuadamente con usuarios múltiples:
• Cada usuario debe crear su propia cuenta.• Cada usuario debe usar su propia identificación de ingreso y contraseña en sus
dispositivos, incluidos teléfonos inteligentes y tabletas.• Dos usuarios no deben compartir la misma cuenta.
¿Cómo se configuran usuarios múltiples con el termostato?A través de la aplicación Honeywell Home se puede dar acceso a algunas o todas las ubicaciones del termostato. Comience tocando el icono de menú de tres líneas en la esquina superior izquierda de la pantalla principal. Seleccione “Manage Users” (Administrar usuarios) y toque “Add User” (Añadir usuario) ubicado en la parte inferior de la pantalla. Escriba la dirección de correo electrónico de la persona que va a invitar. Si la persona tiene una cuenta configurada, la ubicación se añadirá automáticamente a su cuenta. Si no tienen una cuenta, recibirán un correo electrónico con una invitación para descargar la aplicación Honeywell Home y crear su propia cuenta.
Nota: Todas las personas con acceso a un termostato comparten los mismos privilegios de usuario. Los usuarios añadidos podrán cambiar las configuraciones del termostato, así como añadir o borrar otros usuarios.
¿Hay alguna forma de ampliar la potencia de la señal?El rango o la distancia de la señal de WiFi están determinados por el enrutador. Consulte el manual del enrutador para obtener más información.

23
Información regulatoria
Hay una alerta que dice “Wi-Fi Signal Lost” (Pérdida de señal de WiFi). ¿Qué significa eso?Se ha perdido la señal WiFi al termostato. Aguarde hasta que el termostato vuelva a conectarse o seleccione una nueva red dentro del menú de configuración de la aplicación Honeywell Home. Si el termostato no puede reconectarse, debe solucionar el problema con el enrutador para determinar la causa.
¿Por qué el termostato se muestra como desconectado (icono de WiFi tachado) en la esquina superior derecha de la pantalla?Si el termostato muestra un ícono de wifi tachado en la pantalla o aparece como fuera de línea en la aplicación Honeywell Home significa que ha perdido conexión con la red. Es posible que deba reiniciar la red WiFi del hogar apagando y encendiendo el enrutador. Consulte el manual de instrucciones del enrutador sobre cómo hacerlo. Cuando se haya restituido la red, el termostato se reconectará automáticamente.
No se ha recibido un correo electrónico de activación.Se le enviará un correo electrónico desde [email protected]. Se necesita un correo electrónico de activación para completar la configuración de la cuenta. Si no recibe un correo electrónico de activación en cinco minutos, revise la carpeta del correo no deseado en la cuenta de correo electrónico.
Si no lo encuentra en el correo no deseado, haga clic en el botón “Resend” (Volver a enviar) y el correo electrónico de activación se volverá a enviar. Si aun así no lo recibe, comuníquese con el equipo de Soporte técnico de al 1-800-633-3991 para recibir asistencia.
Preguntas frecuentes
NORMAS DE LA FCC§ 15.19 (a)(3)Este dispositivo cumple con la Parte 15 de las normas de la Comisión Federal de Comunicaciones (FCC). El funcionamiento está sujeto a las dos condiciones siguientes: 1 Este dispositivo no debe causar interferencia
perjudicial, y2 Este dispositivo deberá aceptar cualquier
interferencia que se reciba, incluso la interferencia que pudiese causar el funcionamiento no deseado.
NORMAS DEL ICRSS-GENEste dispositivo cumple con las especificaciones estándar de radio (Radio Standards Specifications, RSS) exentas de licencia del Ministerio de Industria de Canadá (Industry Canada, IC).El funcionamiento está sujeto a las dos condiciones siguientes:
1 Este dispositivo no debe causar interferencia.2 Este dispositivo deberá aceptar cualquier
interferencia, incluso la interferencia que pudiese causar el funcionamiento no deseado del dispositivo.
FCC Warning (Part 15.21) (USA only)Los cambios o las modificaciones que no hayan sido expresamente aprobados por la parte responsable del cumplimiento de las regulaciones podrían anular la autoridad del usuario para hacer funcionar el equipo.FCC - 47 CFR § 15.105 (b) Consulte https://customer.honeywell.com/en-US/support/residential/codes-and-standards/FCC15105/Pages/default.aspx para obtener más información de la Comisión Federal de Comunicaciones (FCC) sobre este producto.

33-00363ES-01
Home and Building TechnologiesEn los EE. UU.:Honeywell715 Peachtree Street NEAtlanta, GA 30308yourhome.honeywell.com
Wi-Fi® es una marca comercial registrada de Wi-Fi Alliance®.
® Marca registrada en los Estados Unidos© 2017 Honeywell International Inc.33-00363ES—01 M.S. 10-17Imprimé aux États-Unis
Código de configuración de HomeKit™ de Apple®El termostato T5 con conexión WiFi es compatible con HomeKit de Apple. Escanee este código cuando lo indique la aplicación Honeywell Home.
Garantía limitada de 2 añosPara la información sobre la garantía, ingrese a yourhome.honeywell.com