Embed Size (px)
Citation preview
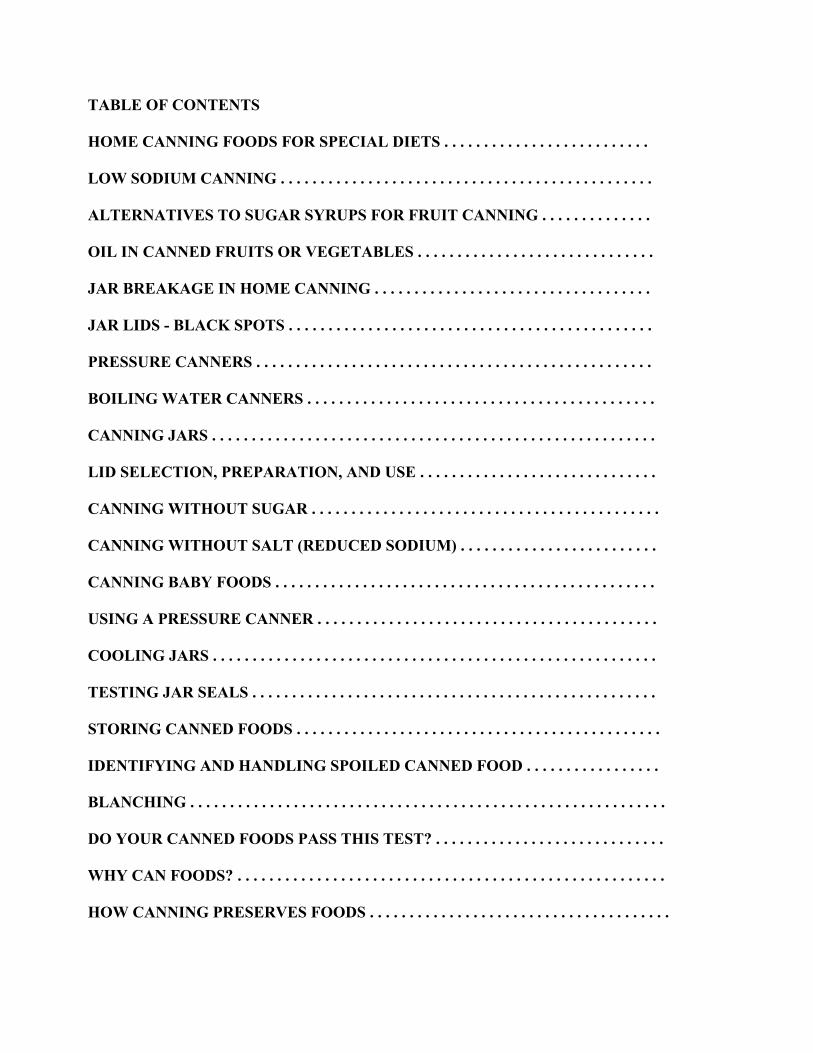
TABLE OF CONTENTS
HOME CANNING FOODS FOR SPECIAL DIETS . . . . . . . . . . . . . . . . . . . . . . . . . .
LOW SODIUM CANNING . . . . . . . . . . . . . . . . . . . . . . . . . . . . . . . . . . . . . . . . . . . . . . .
ALTERNATIVES TO SUGAR SYRUPS FOR FRUIT CANNING . . . . . . . . . . . . . .
OIL IN CANNED FRUITS OR VEGETABLES . . . . . . . . . . . . . . . . . . . . . . . . . . . . . .
JAR BREAKAGE IN HOME CANNING . . . . . . . . . . . . . . . . . . . . . . . . . . . . . . . . . . .
JAR LIDS - BLACK SPOTS . . . . . . . . . . . . . . . . . . . . . . . . . . . . . . . . . . . . . . . . . . . . . .
PRESSURE CANNERS . . . . . . . . . . . . . . . . . . . . . . . . . . . . . . . . . . . . . . . . . . . . . . . . . .
BOILING WATER CANNERS . . . . . . . . . . . . . . . . . . . . . . . . . . . . . . . . . . . . . . . . . . . .
CANNING JARS . . . . . . . . . . . . . . . . . . . . . . . . . . . . . . . . . . . . . . . . . . . . . . . . . . . . . . . .
LID SELECTION, PREPARATION, AND USE . . . . . . . . . . . . . . . . . . . . . . . . . . . . . .
CANNING WITHOUT SUGAR . . . . . . . . . . . . . . . . . . . . . . . . . . . . . . . . . . . . . . . . . . . .
CANNING WITHOUT SALT (REDUCED SODIUM) . . . . . . . . . . . . . . . . . . . . . . . . .
CANNING BABY FOODS . . . . . . . . . . . . . . . . . . . . . . . . . . . . . . . . . . . . . . . . . . . . . . . .
USING A PRESSURE CANNER . . . . . . . . . . . . . . . . . . . . . . . . . . . . . . . . . . . . . . . . . . .
COOLING JARS . . . . . . . . . . . . . . . . . . . . . . . . . . . . . . . . . . . . . . . . . . . . . . . . . . . . . . . .
TESTING JAR SEALS . . . . . . . . . . . . . . . . . . . . . . . . . . . . . . . . . . . . . . . . . . . . . . . . . . .
STORING CANNED FOODS . . . . . . . . . . . . . . . . . . . . . . . . . . . . . . . . . . . . . . . . . . . . . .
IDENTIFYING AND HANDLING SPOILED CANNED FOOD . . . . . . . . . . . . . . . . .
BLANCHING . . . . . . . . . . . . . . . . . . . . . . . . . . . . . . . . . . . . . . . . . . . . . . . . . . . . . . . . . . . .
DO YOUR CANNED FOODS PASS THIS TEST? . . . . . . . . . . . . . . . . . . . . . . . . . . . . .
WHY CAN FOODS? . . . . . . . . . . . . . . . . . . . . . . . . . . . . . . . . . . . . . . . . . . . . . . . . . . . . . .
HOW CANNING PRESERVES FOODS . . . . . . . . . . . . . . . . . . . . . . . . . . . . . . . . . . . . . .
ENSURING SAFE CANNED FOODS . . . . . . . . . . . . . . . . . . . . . . . . . . . . . . . . . . . . . . . .
FOOD ACIDITY AND PROCESSING METHODS . . . . . . . . . . . . . . . . . . . . . . . . . . . . .
PREVENTING DISCOLORATION -- ASCORBIC ACID SOLUTION . . . . . . . . . . . .
CLEANING CANNING JARS . . . . . . . . . . . . . . . . . . . . . . . . . . . . . . . . . . . . . . . . . . . . . . .
THE IMPORTANCE OF SELECTING THECORRECT PROCESSING TIME . . . . . . . . . . . . . . . . . . . . . . . . . . . . . . . . . . . . . . . . .
RAW AND HOT PACKING . . . . . . . . . . . . . . . . . . . . . . . . . . . . . . . . . . . . . . . . . . . . . . . . .
OPEN-KETTLE CANNING(A NON-RECOMMENDED CANNING METHOD) . . . . . . . . . . . . . . . . . . . . . . .
PASTEURIZATION . . . . . . . . . . . . . . . . . . . . . . . . . . . . . . . . . . . . . . . . . . . . . . . . . . . . . . . .
pH . . . . . . . . . . . . . . . . . . . . . . . . . . . . . . . . . . . . . . . . . . . . . . . . . . . . . . . . . . . . . . . . . . . . . . .
RAW PACK . . . . . . . . . . . . . . . . . . . . . . . . . . . . . . . . . . . . . . . . . . . . . . . . . . . . . . . . . . . . . . .
VACUUM . . . . . . . . . . . . . . . . . . . . . . . . . . . . . . . . . . . . . . . . . . . . . . . . . . . . . . . . . . . . . . . . .
REPROCESSING UNSEALED JARS . . . . . . . . . . . . . . . . . . . . . . . . . . . . . . . . . . . . . . . . . .
WHEN CANNED FOODS FREEZE . . . . . . . . . . . . . . . . . . . . . . . . . . . . . . . . . . . . . . . . . . . .
DETERMINING YOUR ALTITUDE ABOVE SEA LEVEL . . . . . . . . . . . . . . . . . . . . . . . .
EQUIPMENT AND METHODS NOT RECOMMENDED . . . . . . . . . . . . . . . . . . . . . . . . . .
ENSURING HIGH-QUALITY CANNED FOODS . . . . . . . . . . . . . . . . . . . . . . . . . . . . . . . . .
MAINTAINING COLOR AND FLAVOR IN CANNED FOOD . . . . . . . . . . . . . . . . . . . . . .
RECOMMENDED CANNERS . . . . . . . . . . . . . . . . . . . . . . . . . . . . . . . . . . . . . . . . . . . . . . . . . .
HOME CANNING FOODS FOR SPECIAL DIETSThe cost of commercially canned foods for special diets often prompts interest in preparing
these products at home. Some low-sugar and low-salt foods can be easily and safely canned athome. However, the color, flavor and texture of these foods might be different than expected andbe less acceptable.
Reviewed March 2003 by:Angela M. Fraser, Ph.D., Associate Professor/Food Safety Education SpecialistNorth Carolina State University, Raleigh, NC
LOW SODIUM CANNINGFollow the instructions for preparing and canning low-acid vegetables for meats, poultry
and seafoods, but omit salt. Canned meats, poultry, seafood, and vegetables keep just as wellwithout salt as with it because salt is added for flavor and not preservation. Never reduce or omitsalt from fermented pickle recipes such as sauerkraut or fermented dill pickles. Salt is necessary tomake these products safe.
Information source:E.L. Andress and J.A. Harrison. 1999. So Easy to Preserve. Fourth Edition. CooperativeExtension Service/University of Georgia. Athens, GA. 344 pp.
Reviewed:August 2002 by Angela Fraser, Ph.D., Associate Professor/Food Safety EducationSpecialist, North Carolina State University, Raleigh, NC.
ALTERNATIVES TO SUGAR SYRUPS FOR FRUIT CANNINGIt is not necessary to add sugar to fruit when canning to keep the food from spoiling. The
sugar does, however, help retain texture, flavor and color. Fruit juices may be used instead ofwater if desired. Crush the fruit, simmer it over low heat and strain it through a jelly bag.Sorghum, molasses and maple syrup are too strong to be used for fruit syrup. Fruit not packed insugar can be packed in its own juice, in extracted juice, in juice from another fruit or in water.Processing times are the same for unsweetened and sweetened fruit. To pack fruit in its own juice,follow these steps:
1) Prepare fruit for canning.2) Add a little water and cook the fruit to extract the juice.3) Pack hot fruit into hot jars.4) Add boiling water to cover if needed.5) Adjust lids and process in a boiling water bath for the appropriate time.
Canning with artificial sweeteners is not advised. It is best to add these just before serving the fruit.Saccharin may become bitter when heated. Aspartame-based sweeteners lose their sweeteningpower during processing.
Reviewed March 2003 by:Angela M. Fraser, Ph.D., Associate Professor/Food Safety Education SpecialistNorth Carolina State University, Raleigh, NC
OIL IN CANNED FRUITS OR VEGETABLESDo not add oil or margarine to fruits or vegetables that will be processed. Oil or margarine
will not go into solution but will form an unstable emulsion with tiny oil droplets scatteredthroughout the product. Heat does not penetrate the oil droplets very well, thereforemicroorganisms or spores in the oil droplet may survive processing. Even in an acid product (suchas tomato sauce), the micro-environment immediately surrounding an oil droplet may not be thesame pH as the rest of the product, thus permitting the growth of microorganisms that could nototherwise grow in an acid medium. It is best to process the product without added oil; if desired,oil can be added just before serving. Another alternative is to freeze the product.
Reviewed June 2003 by:Angela M. Fraser, Ph.D., Associate Professor/Food Safety Education SpecialistNorth Carolina State University, Raleigh, NC
JAR BREAKAGE IN HOME CANNINGThere are several types of breaks that occur. Each break looks different and has specific
causes. If the reason for jar breakage can be determined, faulty procedures can be corrected so theproblem does not occur again.
Thermal shock is characterized by a crack running around the base of the lower part of thejar and sometimes extending up the side. To prevent thermal breakage:
• Avoid sudden temperature changes, such as putting a hot jar on a cool or wet surface orputting hot food or liquid in a room-temperature jar. Keep jars in hot water until filled.
• Use a rack in the canner.• Avoid using metal knives or spatulas to remove air bubbles or steel wool pads to clean jars.
They may damage the glass and make it susceptible to thermal shock.The internal pressure break is characterized by the origin of the break on the side. It is in the
form of a vertical crack that divides and forks into two fissures. To prevent pressure break:• Do not use the oven method for processing home canned food.• Provide adequate headspace in jars for food to expand when heated.• Keep heat steady when processing.• Avoid reducing canner pressure under running water or lifting the pressure control or
petcock when pressure drops to zero at room temperature.The impact break originates at the point of impact and fissures radiate form the point of origin.
to prevent impact break:• Handle jars carefully. Jars that have been dropped, hit or bumped in transit or at home are
more susceptible to breakage. Test new jars that may have been mishandled by immersingthem in room temperature water, bring to a boil and boil 15 minutes.
• Avoid the use of metal tools to remove air bubbles.• Avoid using very old jars. Jars have a life expectancy of about 10 years.
JAR LIDS - BLACK SPOTSBlack spots on the underside of the lid does not necessarily mean that the food is spoiled.
Naturally occurring compounds in foods including tannins, hydrogen sulfide or nitrogenouscompounds can react with metal lids causing black spots. These reactive compounds areassociated with proteins in the food. When subjected to heat of processing, proteins denature andthese compounds are released. Once freed from the protein, they are able to combine with themetal lid causing brown or black deposits. If the jar of food is no longer sealed (vacuum lost),black spots on the underside of the lid mean that the food is spoiled. in this case, the contents ofthe jar should be discarded.
PRESSURE CANNERSPressure canners for use in home food preservation have been extensively redesigned in
recent years. Models made before the l970's were heavy-walled kettles with clamp-on or turn-onlids. They were fitted with a dial gauge, a vent port in the form of a petcock or counterweight and asafety fuse. Modern pressure canners are lightweight, thin-walled kettles; most have turn-on lids.They have a jar rack, gasket, dial or weighted gauge an automatic vent/cover lock, a vent port(steam vent) to be closed with a counterweight or weighted gauge and a safety fuse.
Pressure does not destroy microorganisms, but water under pressure causes the steamformed to get to 240 degrees F. This is hot enough to destroy Clostridium botulinum spores, thebacteria that cause botulism.
High temperatures applied for a specific period of time is required to adequately killmicroorganisms. The success of destroying all microorganisms capable of growing in canned foodis based on the temperature obtained in pure steam, free of air, at sea level. At sea level, a canneroperated at a gauge pressure of 10 pounds provides an internal temperature of 240oF.
Two serious errors in temperatures obtained in pressure canners occur when: (1) Internalcanner temperatures are lower at higher altitudes. To correct this error, canners must be operated atthe increased pressures specified in research-based canning instruction for appropriate altituderanges. (2) Air trapped in a canner lowers the temperature obtained at 5, 10 or 15 pounds ofpressure and results in underprocessing. The highest volume of air trapped in a canner occurs whenprocessing raw-packed foods in dial-gauge canners. These canners do not vent air duringprocessing.
To be safe, all types of pressure canners must be vented 10 minutes before they arepressurized. To vent a canner, leave the vent port uncovered on newer models or manually openpetcocks on some older models. Heating the filled canner with its lid locked into place boils waterand generates steam that escapes through the petcock or vent port. When steam first escapes, set atimer for 10 minutes. After venting 10 minutes, close the petcock or place the counterweight orweighted gauge over the vent port to pressurize the canner. Weighted-gauge models exhaust tinyamounts of air and steam each time their gauge rocks or jiggles during processing. They controlpressure precisely and need neither watching during processing nor checking for accuracy. Thesound of the weight rocking or jiggling indicates that the canner is maintaining the recommendedpressure and needs no further attention until the load has been processed for the set time. The singledisadvantage of using a weighted-gauge canner is that it cannot be precisely adjusted for higheraltitudes. At altitudes above 1,000 feet, it must be operated at canner pressures of 10 instead of 5, or15 instead of 10 pounds pressure.
Check dial gauges for accuracy before use each year and replace if they read high by morethan 1 pound at 5, l0, or l5 pounds of pressure. Low readings cause overprocessing and mayindicate that the accuracy of the gauge is unpredictable. Gauges may be checked at most countyCooperative Extension offices.
Handle canner lid gaskets carefully and clean them according to the manufacturer'sdirections. Nicked or dried gaskets will allow steam leaks during pressurization of canners. Keepgaskets clean between uses. The gaskets on older canner models might need to be lightly coatedwith vegetable oil once per year. Newer models are pre-lubricated and do not benefit from oiling.Check your canner's instructions if there is doubt that the particular canner lid you use has beenpre-lubricated.
Lid safety fuses are thin metal inserts or rubber plugs designed to relieve excessive pressurefrom the canner. Do not pick at or scratch fuses while cleaning lids. Use only canners that have

the Underwriter's Laboratory (UL) approval to ensure their safety. Replacement gauges and otherparts for canners are often available at stores offering canner equipment or from cannermanufacturers. When ordering parts, give your canner model number and describe the partsneeded.
Reviewed May 2003 by:Angela M. Fraser, Ph.D., Associate Professor/Food Safety Education SpecialistNorth Carolina State University, Raleigh, NC
BOILING WATER CANNERSThese canners are made of aluminum or porcelain-covered steel. They have removable
perforated racks and fitted lids. The canner must be deep enough so that at least 1 inch of brisklyboiling water will be over the tops of jars during the entire processing time. Some boiling watercanners do not have flat bottoms. A flat bottom must be used on an electric range. Either a flat orridged bottom can be used on a gas burner. To ensure uniform processing of all jars with anelectric range, the canner should be no more than 4 inches wider in diameter than the element onthat it is heated. Follow these steps for successfully using a boiling water canner.
1. Fill the canner halfway with water.2. Preheat water to 140oF for raw-packed foods and to 180oF for hot-packed foods.3. Load filled jars, fitted with lids, into the canner rack and use the handles to lower the rack
into the water; or fill the canner, one jar at a time, with a jar lifter.4. Add more boiling water, if needed, so the water level is at least 1 inch above jar tops.5. Turn heat to its highest position until water boils vigorously.6. Set a timer for the minutes required for processing the food.7. Cover with the canner lid and lower the heat setting to maintain a gentle boil throughout the
process schedule.8. Add more boiling water, if needed, to keep the water level above the jars.9. When jars have been boiled for the recommended time, turn off the heat and remove the
canner lid.10. Using a jar lifter, remove the jars and place them on a towel, leaving at least 1-inch spaces
between the jars during cooling.
Reviewed May 2003 by:Angela M. Fraser, Ph.D., Associate Professor/Food Safety Education SpecialistNorth Carolina State University, Raleigh, NC
CANNING JARSFood may be canned in glass jars or metal containers. Metal containers can be used only
once and are rarely used in the home environment. Metal containers require special sealingequipment and are much more costly than jars. Regular and wide-mouth Mason-type, threaded,home-canning jars with self-sealing lids are the best choice for home canning.
Mason jars are available in 1/2 pint, pint, 1-1/2 pint, quart and 1/2 gallon sizes. The standardjar mouth opening is about 2-3/8 inches. Wide-mouth jars have openings of about 3 inches, makingthem more easily filled and emptied. Half-gallon jars may be used for canning very acid juices.With careful use and handling, Mason jars may be reused many times, requiring only new lids eachtime. When lids are used properly, jar seals and vacuums are excellent and jar breakage is rare. Itis recommended that mason-type jars designed for home canning be used for preserving food bypressure processing or in a boiling water bath. However, some commercial pint and quart sizemayonnaise or salad dressing jars may be utilized for canning acid foods in a boiling water cannerwhen new 2-piece lids are used. However, expect more seal failures and jar breakage. Commercialmayonnaise jars are weakened by repeated contact with metal spoons or knives used in dispensingmayonnaise. Seemingly insignificant scratches in the glass jars might cause the jars to crack orbreak during boiling water canning. Commercial jars are not recommended for use in pressureprocessing.
It is best to use Mason-type jars for home canning to ensure a safe product and break-freejars during processing. Other commercial jars with mouths that cannot be sealed with two-piececanning should not be used for canning any foods at home.
Reviewed May 2003 by:Angela M. Fraser, Ph.D., Associate Professor/Food Safety Education SpecialistNorth Carolina State University, Raleigh, NC
LID SELECTION, PREPARATION, AND USEThe common self-sealing lid consists of a flat metal lid held in place by a metal screw band
during processing. The flat lid is crimped around its bottom edge to form a trough that is filledwith a colored gasket compound. When jars are processed, the lid gasket softens and flows slightlyto cover the jar-sealing surface, yet still allows air to escape from the jar. The gasket then forms anairtight seal as the jar cools. Gaskets in unused lids work well for at least five years from the dateof manufacture. The gasket compound in older unused lids may fail to seal on jars. Therefore, onlybuy what you will use in one year.
To ensure a good seal, carefully follow the manufacturer's directions to prepare the lids foruse. Examine all metal lids carefully. Do not use old, dented, or deformed lids, or lids with gaps orother defects in the sealing gasket. After filling jars with food, remove air bubbles by inserting aflat plastic (not metal) spatula between the food and the jar. (Metal utensils could scratch the jarsresulting in more jar breakage.) Slowly turn the jar and move the spatula up and down to allow airbubbles to escape. Adjust the headspace and then clean the jar rim (sealing surface) with adampened paper towel or a clean towel. Place the lid, gasket down, onto the cleaned jar-sealingsurface. Unclean jar-sealing surfaces might cause seal failures. Fit the metal screw band over theflat lid. Follow the manufacturer's guidelines enclosed with or on the box for tightening the jar lidsproperly. Do not retighten lids after processing jars. As the jars cool, the contents in the jarcontract, pulling the self-sealing lid firmly against the jar to form a high vacuum.* If screw bands are too loose, liquid may escape from jars during processing, and seals may fail.* If screw bands are too tight, air cannot vent during processing, and food will discolor duringstorage.
Overtightening also might cause lids to buckle and jars to break, especially with raw-packed, pressure-processed food. Screw bands are not needed on stored jars. They can be removedeasily after jars are completely cooled. Remove, wash, dry, and store in a clean dry area. Ifhandled this way, screw bands can be used many times. If left on stored jars, they become difficultto remove, often rust and may not work properly again.
Reviewed May 2003 by:Angela M. Fraser, Ph.D., Associate Professor/Food Safety Education SpecialistNorth Carolina State University, Raleigh, NC
CANNING WITHOUT SUGARIn canning regular fruits without sugar, it is very important to select fully ripe but firm
fruits of the best quality. Prepare these as described for hot packs in the database, but usewater or regular unsweetened fruit juices instead of sugar syrup. Juice made from the fruit beingcanned is best. Blends of unsweetened apple, pineapple and white grape juice are also good forfilling over solid fruit pieces. Adjust the headspace and lids and use the processingrecommendations given for regular fruits. Add sugar substitutes, if desired, when serving.
Reviewed March 2003 by: Angela M. Fraser, Ph.D., Associate Professor/Food Safety Education Specialist
North Carolina State University, Raleigh, NC
CANNING WITHOUT SALT (REDUCED SODIUM)When canning tomatoes, vegetables, meats, poultry and seafood, always use the procedures
given in the database, but omit the salt in these products. For all canned foods, except for somepickled products, salt is only added for seasoning and flavor so is not necessary for safely. Neveradd salt substitutes to canned foods before processing as they might break down during processing.Add salt substitutes before serving.
Reviewed March 2003 by:Angela M. Fraser, Ph.D., Associate Professor/Food Safety Education SpecialistNorth Carolina State University, Raleigh, NC
CANNING BABY FOODSYou can prepare any chunk-style or pureed fruit with or without sugar. Pack in half-pint,
preferably, or pint jars and use the processing times found in this database for that fruit.CAUTION: Do not can pureed vegetables, red meats, or poultry. Proper processing times forpureed foods have not been determined for home use. Instead, can and store these foods using thestandard processing procedures found in this database; puree or blend them at serving time.Heat the blended foods to boiling, simmer for 0 minutes, cool, and serve. Store unused portionsin the refrigerator and use within 2 days for best quality.
Reviewed March 2003 by:Angela M. Fraser, Ph.D., Associate Professor/Food Safety Education SpecialistNorth Carolina State University, Raleigh, NC
USING A PRESSURE CANNERFollow these steps for successful pressure canning:
1. Put 2 to 3 inches of hot water in the canner. Using a jar lifter, place filled jars on the rack.Fasten the canner lid securely.2. Leave the weight off vent port or open the petcock. Heat at the highest setting until steamflows from the petcock or vent port.3. Maintain high heat setting, exhaust steam for 10 minutes, and then place weight on vent port orclose petcock. The canner will pressurize during the next 3 to 5 minutes.4. Start timing the process when the pressure reading on the dial gauge indicates that therecommended pressure has been reached or when the weighted gauge begins to jiggle or rock.5. Regulate heat under the canner to maintain a steady pressure at or slightly above the correctgauge pressure. Quick and large pressure variations during processing might cause unnecessaryliquid losses from jars. Weighted gauges on Mirro canners should jiggle about 2 or 3 times perminute. On Presto canners, they should rock slowly throughout the process.6. When the timed process is completed, turn off the heat, remove the canner from heat if possible,and let the canner depressurize. Never force cool the canner. If you cool it with cold running waterin a sink, or open the vent port before the canner depressurizes by itself, liquid will spurt from jars,causing low liquid levels and jar seal failures. Force cooling might also warp the canner lid ofolder model canners, causing steam leaks. Depressurization of older models should be timed.Standard size heavy-walled canners require about 30 minutes when loaded with pints and 45minutes with quarts. Newer thin-walled canners cool more rapidly and are equipped with ventlocks. These canners are depressurized when their vent lock piston drops to a normal position.7. After the vent port or petcock has been open for two minutes, unfasten the lid and remove itcarefully. Lift the lid away from you so that the steam does not burn your face.8. Remove jars with a lifter, and place on towel or cooling rack, if desired.
Reviewed March 2003 by:Angela M. Fraser, Ph.D., Associate Professor/Food Safety Education SpecialistNorth Carolina State University, Raleigh, NC

COOLING JARSWhen you remove hot jars from a canner, do not retighten the jar lids. Retightening of hot
lids could cut through the gasket and cause seal failures. Jars that are not properly sealed could beunsafe to eat. Cool the jars at room temperature for l2 to 24 hours. Jars can becooled on racks or towels to minimize heat damage to counters. Also, make sure that the jars arenot touching each other while cooling. The food level and liquid volume of raw-packedjars will be noticeably lower after cooling. Air is exhausted during processing and the foodshrinks. If a jar loses excessive liquid during processing, do not open it to add more liquid.
Reviewed March 2003 by:Angela M. Fraser, Ph.D., Associate Professor/Food Safety Education SpecialistNorth Carolina State University, Raleigh, NC
TESTING JAR SEALSAfter the jars have cooled for 12 to 24 hours, remove the screw bands and test the seals by:
• Pressing the middle of the lid with a finger or thumb. If the lid springs up when you releaseyour finger, the lid is unsealed.
• Holding the jar at eye level and look across the lid. The lid should be concave (curveddown slightly in the center). If center of the lid is either flat or bulging, it might not besealed.
• To make these products safe, they must be reprocessed for the full time recommended inthis database within 24 hours. If more than 24 hours, has passed, then the product must bethrown out.
Reviewed March 2003 by: Angela M. Fraser, Ph.D., Associate Professor/Food Safety Education Specialist
North Carolina State University, Raleigh, NC
STORING CANNED FOODSIf the lid is tightly sealed on a cooled jar, remove the screw bands, wash the lid and jar to
remove food residue; then rinse and dry jars. Label and date the jars and store them in a clean,cool, dark, dry place. Do not store jars at temperatures above 95oF, such as near hot pipes, arange, a furnace, in an uninsulated attic, or in direct sunlight. Under these conditions, foodwill lose quality in a few weeks or months and might spoil. Dampness might corrode metal lids,break seals, and allow recontamination and spoilage. Accidental freezing of canned foodswill not cause spoilage unless the jar becomes unsealed and recontaminated. However, freezingand thawing can cause the texture of the food to change. If jars must be stored where they mightfreeze, wrap them in newspapers, and place them in heavy cartons, and cover with morenewspapers and blankets.
Reviewed March 2003 by: Angela M. Fraser, Ph.D., Associate Professor/Food Safety Education Specialist
North Carolina State University, Raleigh, NC
IDENTIFYING AND HANDLING SPOILED CANNED FOODNever taste food from a jar with an unsealed lid or food that shows signs of spoilage. You
can more easily detect some types of spoilage in jars stored without screw bands. Growth ofspoilage bacteria and yeast produces gas that pressurizes the food, swells the lid, and breaks the jarseal. As each stored jar is selected for use, examine its lid for tightness and vacuum. Lids withconcave centers have good seals. A good seal is one indicator that the contents are safe to eat.Next, while holding the jar upright at eye level, rotate the jar and examine its outside surface forstreaks of dried food at the top of the jar. Look at the contents for rising air bubbles andunnatural color. While opening the jar, smell for unnatural odors and look for spurting liquid andcotton like mold growth (white blue, black, or green) on the top food surface and underside of lid.
Properly discard of any jar of spoiled food to prevent possible illness to you, your family,and pets. Never feed potentially spoiled or unsafe food to your pets - it could make them sick.Before discarding, detoxify spoiled low-acid food. Remove the jar lid; then place the jar, itscontents, and the loose lid in hot water and add enough water to cover the jar. Boil all items inthe water for 30 minutes. Cool and discard jar contents in garbage or bury in soil. This willprevent accidental poisoning. The jar and ring band can be reused.
Reviewed March 2003 by:Angela M. Fraser, Ph.D., Associate Professor/Food Safety Education SpecialistNorth Carolina State University, Raleigh, NC
BLANCHINGBlanching is the process of heating vegetables sufficiently to inactivate naturally present
enzymes. Enzymes are the biological catalysts that facilitate chemical reactions in living tissue. Ifcertain enzymes are not inactivated, they will cause color and flavor to deteriorate during dryingand storage. Blanched vegetables, when dried, will have better flavor and color than willunblanched ones. Blanch with boiling water or with steam. Water blanching usually results ingreater loss of nutrients but it takes less time than steam blanching.
Water — For home freezing, the most satisfactory way to heat all vegetables is in boilingwater. Use a blancher which ahs a blanching basket and cover, or fit a wire basket into a large potwith a lid. Use one gallon water per pound of prepared vegetables. Put the vegetables in ablanching basket and lower into vigorously boiling water. Place a lid on the blancher. The watershould return to boiling within 1 minute, or you are using too many vegetables for the amount ofboiling water. Start counting blanching time as soon as the water returns to a boil. Keep heat highfor the time given in the direction for the vegetables you are freezing.
Steam -- Heating in steam is recommended for a few vegetables. For broccoli, pumpkin,sweet potatoes, and winter squash, both steaming and boiling are satisfactory methods. Steamblanching takes about 1-1/2 times longer than water blanching. To steam, use a pot with a tight lidand a basket that holds the food at least three inches above the bottom of the pot. Put an inch ortwo of water in the pot and bring the water to a boil. Put the vegetables in the basket in a singlelayer so that steam reaches all parts quickly. Cover the pot and keep heat high. Start countingsteaming time as soon as the lid is on.
Source:E.L. Andress and J.A. Harrison. 1999. So Easy to Preserve. Cooperative ExtensionService/The University of Georgia. 344 pp.
Reviewed March 2003 by:Angela M. Fraser, Ph.D., Associate Professor/Food Safety Education SpecialistNorth Carolina State University, Raleigh, NC
DO YOUR CANNED FOODS PASS THIS TEST?Appearance of any canned food
Good proportion of solid to liquid Full pack with proper headspace Liquid just covering solid Free of air bubbles Free of imperfections – stems, cores, seeds Good seal Practical pack that is done quickly and easily
Fruit and Vegetables Pieces uniform in size and shape Characteristic, uniform color Shape retained – not broken or mushy Liquid or Syrup clear and free from sediment
Reviewed March 2003 by:Angela M. Fraser, Ph.D., Associate Professor/Food Safety Education SpecialistNorth Carolina State University, Raleigh, NC
WHY CAN FOODS?Canning can be a safe and economical way to preserve quality food at home. Disregarding
the value of your labor, canning homegrown food may save you half the cost of buyingcommercially canned food. Canning favorite and special products is a fulfilling experience and asource of pride for many people.
Many vegetables begin losing their vitamin content when harvested. Nearly half thevitamins are lost within a few days unless the fresh produce is cooled or preserved. Within 1 to 2weeks, even refrigerated produce loses half or more of some of its vitamins. The heating processduring canning destroys from one-third to one-half of vitamins A and C, thiamin, and riboflavin.Once canned, additional losses of these sensitive vitamins are from 5 to 20% each year. Theamounts of other vitamins, however, are only slightly lower in canned compared with fresh food.If vegetables are handled properly and canned promptly after harvest, they can be more nutritiousthan fresh produce sold in local stores. The advantages of home canning are lost when:
• you start with poor quality fresh foods;• jars fail to seal properly because the jar rims were not cleaned or the lids were not
properly treated before placement on the jar;• food spoils due to improper processing or improper storage; and• flavors, texture, color, and nutrients deteriorate because home canned foods are
stored for more than one year.
Reviewed March 2003 by:Angela M. Fraser, Ph.D., Associate Professor/Food Safety Education SpecialistNorth Carolina State University, Raleigh, NC
HOW CANNING PRESERVES FOODSThe high percentage of water in most fresh foods makes them very perishable. They spoil or
lose their quality for several reasons:• growth of undesirable microorganisms – bacteria, molds, and yeasts — that are naturally
present.• activity of food enzymes that are naturally present.• reactions with oxygen.• moisture loss.
Microorganisms live and multiply quickly on the surfaces of fresh food and on the inside ofbruised, insect-damaged, and diseased food. Oxygen and enzymes are present throughout freshfood tissues.Proper canning practices include:
• carefully selecting and washing fresh food before canning.• peeling some fresh foods.• hot packing many foods.• adding acids (lemon juice or vinegar) to some foods.• using acceptable canning jars and self-sealing lids.• processing jars in a boiling water or pressure canner for the correct period of time.
Collectively, these practices remove oxygen; destroy enzymes; prevent the growth of undesirablebacteria, yeasts, and molds; and help form a high vacuum in jars. A good vacuum seal keeps liquidin and air and microorganisms out.
Reviewed March 2003 by:Angela M. Fraser, Ph.D., Associate Professor/Food Safety Education SpecialistNorth Carolina State University, Raleigh, NC
ENSURING SAFE CANNED FOODSGrowth of the bacterium Clostridium botulinum in canned food might cause botulism – a
deadly form of foodborne illness. These bacteria exist either as spores or as vegetative cells. Thespores, that are comparable to plant seeds, can survive harmlessly in soil and water for many years.When ideal conditions exist for growth, the spores produce vegetative cells that multiply rapidlyand may produce a deadly toxin within 3 to 4 days of growth in an environment consisting of:
• a moist, low-acid food.• a temperature between 40 and 120oF.• less than 2% oxygen.
Botulinum spores are on most fresh food surfaces. Because they grow only in the absence of air,they are harmless on fresh foods. Most bacteria, yeasts and molds are difficult to remove fromfood surfaces. Washing fresh food reduces their numbers only slightly. Peeling root crops,underground stem crops, and tomatoes reduces their numbers greatly. Blanching also helps. Theonly way to eliminate botulinum spores is to use the recommended processing time and methodfrom a reputable source. Properly canned food will be free of spoilage if lids seal and jars arestored below 95oF. Storing jars at 50 to 70oF enhances quality retention.
Reviewed March 2003 by:Angela M. Fraser, Ph.D., Associate Professor/Food Safety Education SpecialistNorth Carolina State University, Raleigh, NC
FOOD ACIDITY AND PROCESSING METHODSWhether food should be processed in a pressure canner or boiling water canner to control
botulinum bacteria depends on the acidity of the food. Acidity may be natural, as in most fruits, oradded, as in pickled food. Low-acid canned foods contain too little acid to prevent the outgrowthof Clostridium botulinum. High-acid foods contain enough acid to prevent their growth or destroythem more rapidly when heated. The term "pH" is a measure of acidity; the lower its value, themore acid the food. The acidity level in foods can be increased by adding lemon juice, citric acid,or vinegar.
Low-acid foods have pH values higher than 4.6. they include red meats, seafood, poultry, milkand all fresh vegetables except for most tomatoes and figs. Most mixtures of low-acid and high-acid foods also have pH values above 4.6 unless their recipes include enough lemon juice, citricacid or vinegar to make them high-acid foods. High-acid foods have a pH of 4.6 or lower. Theyinclude fruits, pickles, sauerkraut, jams, jellies, marmalades, and fruit butters.
Although tomatoes usually are considered a high-acid food, some are now known to have pHvalues slightly above 4.6. Figs also have pH values slightly above 4.6. Therefore, if they are to becanned as a high-acid food, they must be acidified to a pH of 4.6 or lower with lemon juice or citricacid. Properly acidified tomatoes and figs are high-acid foods and can be safely processed in aboiling water canner.
Botulinum spores are very hard to destroy at boiling water temperatures; the higher the cannertemperature, the more easily they are destroyed. therefore, all low-acid foods should be processedat temperatures of 240 to 250oF, attainable inside a pressure canner operating at l0 to l5 poundspressure. Pounds pressure means pounds per square inch of pressure as measured by the gauge. Atthese temperatures, the time needed to destroy bacteria in low-acid canned food ranges from 20 tol00 minutes. The exact time depends on the kind of food being canned, the way it is packed intojars, and the size of jars. The time needed to safely process low-acid foods in a boiling watercanner ranges from 7 to 11 hours; the time needed to process high-acid foods in boiling watervaries from 5 to 85 minutes. The practice of processing low-acid foods in a boiling water canner isnot recommended.
Reviewed March 2003 by:Angela M. Fraser, Ph.D., Associate Professor/Food Safety Education SpecialistNorth Carolina State University, Raleigh, NC
PREVENTING DISCOLORATION -- ASCORBIC ACID SOLUTIONWhile preparing a canner load of jars, keep peeled, halved, quartered, sliced or diced apples,
apricots, nectarines, peaches and pears in a solution of 3 grams (3000 milligrams) ascorbic acid to 1gallon of cold water. This procedure is also useful in maintaining the natural color of mushroomsand potatoes and for preventing stem-end discoloration in cherries and grapes. Ascorbic acid isavailable in several forms:
• Pure Powdered Form – seasonally available among canners' supplies insupermarkets. One level teaspoon of pure powder weighs about 3 grams. Use 1teaspoon per gallon of water as a treatment solution.
• Vitamin C Tablets – economical and available year-round in many stores. Buy 500-milligram tablets; crush and dissolve six tablets per gallon of water as a treatmentsolution.
• Commercially Prepared Mixes of Ascorbic Citric Acid – available seasonally amongcanners' supplies in supermarkets. Sometimes citric acid powder is sold insupermarkets, but it is less effective in controlling discoloration. If you choose touse these products, follow the manufacturer's directions.
Reviewed March 2003 by:Angela M. Fraser, Ph.D., Associate Professor/Food Safety Education SpecialistNorth Carolina State University, Raleigh, NC
CLEANING CANNING JARSBefore reusing, always wash empty jars in hot, soapy water and rinse well or wash in a
dishwasher. Be certain to thoroughly rinse the jars because unrinsed detergents might causeunnatural flavors and colors. Remember these two washing methods do not sterilize jars.However, only jars that will be used for jellied products and pickled products processed less than10 minutes need to be sterilized. Jars that will be used for canning fruits, vegetables, and meatproducts do not. Scale or hard-water films on jars are easily removed by soaking the jar for severalhours in a solution containing 1 cup of vinegar (5 percent acidity) per gallon of water.Sterilizing Empty Jars:
All jams, jellies and pickled products processed less than 10 minutes should be filled into sterileempty jars. To sterilize empty jars, put them right side up on the rack in a boiling water canner.Fill the canner and jars with hot (not boiling) water to 1 inch above the tops of the jars. Boil 10minutes at altitudes of less than 1,000 feet. At higher elevations, boil one additional minute foreach additional 1,000 feet elevation. Remove and drain sterilize jars one at a time. Save the hotwater for processing filled jars. Fill jars with food, add lids and tighten screw bands.
Empty jars used for vegetables, meats and fruits to be processed in a pressure canner do notneed to sterilize before packing with food. It is also unnecessary to sterilize jars to be used forfruits, tomatoes, and pickled or fermented foods that will be processed 10 minutes or longer in aboiling water canner.
Reviewed March 2003 by:Angela M. Fraser, Ph.D., Associate Professor/Food Safety Education SpecialistNorth Carolina State University, Raleigh, NC
THE IMPORTANCE OF SELECTING THE CORRECT PROCESSING TIMEWhen canning in boiling water, more processing time is needed for most raw-packed foods and
for quart jars than is needed for hot-packed foods and pint jars. To destroy microorganisms inhigh-acid foods processed in a boiling water canner, you must process jars for the correct numberof minutes in boiling water and cool the jars at room temperature. The food might spoil if you donot add process time for lower boiling water temperatures at altitudes above 1,000 feet, process forfewer minutes than specified, or cool jars in cold water. To destroy microorganisms in low-acidfoods processed in a pressure canner, you must: process the jars for the correct number of minutesand allow the canner to cool at room temperature until it is completely depressurized. The foodmight spoil if you fail to select the proper process times for altitudes above 1,000 feet, fail toexhaust the canner properly, process at lower pressure than specified, process for fewer minutesthan specified or cool the canner with water. Processing times for half-pint and pint jars are thesame as are times for 1-1/2 pint and quart jars. For some products, you have a choice of processingat 5, l0, or l5 pounds pressure. In these cases, choose the pounds pressure that you wish to use andmatch it with your pack style (raw or hot) and jar size to find the correct process time.
Reviewed March 2003 by:Angela M. Fraser, Ph.D., Associate Professor/Food Safety Education SpecialistNorth Carolina State University, Raleigh, NC
RAW AND HOT PACKING Many fresh foods contain from 10 percent to more than 30 percent air. How long canned
food retains high quality depends on how much air is removed from food before jars are sealed.Raw-packing is the practice of filling jars tightly with freshly prepared, but unheated food. Suchfoods, especially fruit, will float in the jars. The entrapped air in and around the food might causediscoloration within 2 to 3 months of storage. Raw-packing is more suitable for vegetablesprocessed in a pressure canner. Hot-packing is the practice of heating freshly prepared food toboiling, simmering it 3 to 5 minutes, and promptly filling jars loosely with the boiled food.Whether food has been hot-packed or raw-packed, the juice, syrup, or water to be added to thefoods should also be heated to boiling before adding it to the jars. This practice helps to remove airfrom food tissues, shrinks food, helps keep the food from floating in the jars, increases vacuum insealed jars, and improves shelf life. Preshrinking food permits filling more food into each jar.Hot-packing is the best way to remove air and is the preferred pack style for foods processed in aboiling water canner. At first, the color of hot-packed foods may appear no better than that of raw-packed foods, but within a short storage period, both color and flavor of hot-packed foods will besuperior.
Reviewed March 2003 by:Angela M. Fraser, Ph.D., Associate Professor/Food Safety Education SpecialistNorth Carolina State University, Raleigh, NC

OPEN-KETTLE CANNING (A NON-RECOMMENDED CANNING METHOD)Food is supposedly adequately heat processed in a covered kettle, and then filled hot and
sealed in sterile jars. Foods canned this way have a poor vacuum seal and probably have too muchair inside the jar. A poor vacuum seal means that the food is not shelf stable and so prone tobacterial growth that could make the food unsafe or cause it to spoil. Too much air in the jar willresult in the rapid loss of quality in foods.
Reviewed March 2003 by:Angela M. Fraser, Ph.D., Associate Professor/Food Safety Education SpecialistNorth Carolina State University, Raleigh, NC

PASTEURIZATIONHeating of a specific food enough to destroy the most heat-resistant disease-causing
microorganism known to be associated with that food.
Reviewed March 2003 by:Angela M. Fraser, Ph.D., Associate Professor/Food Safety Education SpecialistNorth Carolina State University, Raleigh, NC
pHpH is a measure of acidity or alkalinity in a substance. PH values range from 0 to l4. A
food is neutral when its pH is 7.0. Values less than 7.0 mean that the food is acid; values higherthan 7.0 mean that the food is alkaline. Foods that have a pH of 4.6 or less are called high-acidfoods. High-acid foods include most fruits and pickled products. Low-acid foods have a pH ofabove 4.6. Low-acid foods include meats, fish, poultry, and vegetables.
Reviewed March 2003 by:Angela M. Fraser, Ph.D., Associate Professor/Food Safety Education SpecialistNorth Carolina State University, Raleigh, NC

RAW PACKRaw pack is the practice of filling jars with raw, unheated food. It is acceptable for canning
low-acid foods, but allows more rapid quality losses in high-acid foods processed in a boiling waterbath.
Reviewed March 2003 by:Angela M. Fraser, Ph.D., Associate Professor/Food Safety Education SpecialistNorth Carolina State University, Raleigh, NC

VACUUMVacuum is the state of negative pressure. Reflects how thoroughly air is removed from
within a jar of processed food – the higher the vacuum, the less air left in the jar.
Reviewed March 2003 by:Angela M. Fraser, Ph.D., Associate Professor/Food Safety Education SpecialistNorth Carolina State University, Raleigh, NC
REPROCESSING UNSEALED JARSIf a jar fails to seal, remove the lid and check the jar-sealing surface for tiny nicks. If
necessary, change the jar, add a new, properly prepared lid, and reprocess within 24 hours usingthe same processing time. Headspace in unsealed jars may be adjusted to 1-1/2-inch or jars can befrozen instead of being reprocessed. Foods in single unsealed jars can be stored in therefrigerator and eaten within several days.
Reviewed March 2003 by:Angela M. Fraser, Ph.D., Associate Professor/Food Safety Education SpecialistNorth Carolina State University, Raleigh, NC
WHEN CANNED FOODS FREEZEIs it safe to use canned foods (either home canned or commercially canned) that have
frozen? If freezing does not break the seal, the food is safe to eat. However, frozen canned foodsmight be less palatable than canned foods that have not frozen. Freezing might also curdle starchyproducts. Curdled products usually become normal after thawing and heating. Thaw frozencanned foods slowly. If canned foods must be stored in an unheated place, wrap the jars or cans inpaper or cover them with a blanket.
Reviewed March 2003 by:Angela M. Fraser, Ph.D., Associate Professor/Food Safety Education SpecialistNorth Carolina State University, Raleigh, NC
DETERMINING YOUR ALTITUDE ABOVE SEA LEVELIt is important to know your approximate elevation or altitude above sea level in order to
determine a safe processing time for canned foods. Because the boiling temperature of liquid islower at higher elevations, it is critical that additional time be given for the safe processing of foodsat altitudes above sea level. It is not practical to include a list of altitudes in this database becausethere is a wide variation within a state and even a county. For example, the state of Kansas hasareas with altitudes varying between 75 feet to 4,039 feet above sea level. Kansas is not generallythought to have high altitudes, but there are many areas of the State where adjustments for altitudemust be considered. Colorado, on the other hand, has people living in areas between 3,000 and10,000 feet above sea level. They tend to be more conscious of the need to make altitudeadjustments in the various processing schedules. To list altitudes for specific counties may actuallybe misleading, due to the differences in geographic terrain within a county. If you are unsure aboutthe altitude where you will be canning foods, consult your county Extension agent. An alternativesource of information would be your local district conservationist with the Soil ConservationService.
Reviewed March 2003 by:Angela M. Fraser, Ph.D., Associate Professor/Food Safety Education SpecialistNorth Carolina State University, Raleigh, NC
EQUIPMENT AND METHODS NOT RECOMMENDEDOpen-kettle canning and the processing of freshly filled jars in conventional ovens,
microwave ovens, or dishwashers are not recommended because these practices do not make theproduct safe to eat. Steam canners are not recommended because processing times for use withcurrent models have not been adequately researched. Because steam canners may not heat foods inthe same manner as does a boiling water canner, their use with boiling water process times mayresult in spoilage.
It is not recommended that pressure processes in excess of 15 pounds pressure be appliedwhen using new pressure canning equipment. Most manufacturers also do not recommendoperating their pressure canners above 15 pounds pressure. So-called canning powders are uselessas preservatives and do not replace the need for proper heat processing. Jars with wire bails andglass caps make attractive antiques or storage containers for dry food ingredients but are notrecommended for use in canning. One-piece zinc porcelain-lined caps are also no longerrecommended. Both glass and zinc caps use flat rubber rings for sealing jars, but too often failto seal properly.
Reviewed March 2003 by:Angela M. Fraser, Ph.D., Associate Professor/Food Safety Education SpecialistNorth Carolina State University, Raleigh, NC
ENSURING HIGH-QUALITY CANNED FOODSAlways use good-quality fresh foods suitable for canning. Quality varies among varieties of
fruits and vegetables. Many county Extension offices can recommend varieties best suited forcanning. Examine food carefully for freshness and wholesomeness. Discard diseased and moldyfood. Trim small diseased lesions or spots from food. Can fruits and vegetables picked from yourgarden or purchased from nearby producers when the products are at their peak of quality - within 6to 12 hours after harvest for most vegetables. For best quality, apricots, nectarines, peaches, pearsand plums should be ripened one or more days between harvest and canning. If you must delaythe canning of other fresh produce, keep it in a shady, cool place. Fresh home-slaughtered redmeats and poultry should be chilled and canned without delay. Never can meat from sickly ordiseased animals. Ice fish and seafood after harvest, eviscerate immediately, and can them withintwo days.
Reviewed March 2003 by:Angela M. Fraser, Ph.D., Associate Professor/Food Safety Education SpecialistNorth Carolina State University, Raleigh, NC
MAINTAINING COLOR AND FLAVOR IN CANNED FOODTo maintain good natural color and flavor in stored canned food, you must
• Remove oxygen from food tissues and jars.• Quickly destroy (inactivate) the food enzymes.• Obtain high jar vacuums and airtight jar seals.
Follow these guidelines to ensure that your canned foods retain optimum colors and flavors duringprocessing and storage:
• Use only high-quality foods that are at the proper maturity and are free of diseases andbruises.
• Use the hot-pack method - especially with high-acid foods to be processed in boiling water.• Do not unnecessarily expose prepared foods to air; can them as soon as possible.• Fill hot foods into jars and adjust the headspace as specified in the recipe.• Tighten screw bands securely - if you are especially strong, not as tightly as possible.• Process and cool jars.• Store the jars in a relatively cool, dark place, preferably between 50 and 70oF.• Can no more food than you will use within one year.
Reviewed March 2003 by:Angela M. Fraser, Ph.D., Associate Professor/Food Safety Education SpecialistNorth Carolina State University, Raleigh, NC
RECOMMENDED CANNERSEquipment for heat-processing home-canned food is of two main types - boiling water
canners and pressure canners. Most are designed to hold seven quart jars or eight to nine pints.Small pressure canners hold four quart jars; some large pressure canners hold 18 pint jars in twolayers, but hold only seven quart jars. Pressure saucepans with smaller volume capacities are notrecommended for use in canning. Small capacity pressure canners are treated in a similar manneras standard larger canners, and should be vented using the typical venting procedures.
Low-acid foods must be processed in a pressure canner to be free of botulism risks.Although pressure canners can also be used for processing acid foods, boiling water canners arerecommended for this purpose, because they are faster. A pressure canner would require from 70to 115 total minutes to can a load of jars; the total time for canning most high-acid foods in boilingwater varies from 25 to 60 minutes. A boiling water canner loaded with filled jars requires about20 to 30 minutes of heating before its water begins to boil. A loaded pressure canner requires about12 to 15 minutes of heating before it begins to vent; another l0 minutes to vent the canner; another5 minutes to pressurize the canner; another 8 to 10 minutes to process the low-acid food; and,finally, another 20 to 60 minutes to cool the canner before removing jars.
Reviewed March 2003 by:Angela M. Fraser, Ph.D., Associate Professor/Food Safety Education SpecialistNorth Carolina State University, Raleigh, NC


![[PPT]Canning - National Center for Home Food Preservationnchfp.uga.edu/multimedia/slide_shows/CanLowAcid_web08.ppt · Web viewPressure Canning & Canning Low-Acid Foods at Home This](https://img.pdfslide.net/doc/110x75/5ad21b467f8b9a0f198c0c9c/pptcanning-national-center-for-home-food-viewpressure-canning-canning-low-acid.jpg)