Embed Size (px)
Citation preview

Table of ContentsLab Overview - HOL-1806-02-SLN - Automate IT: Making Private Cloud Easy ..................2
Lab Guidance .......................................................................................................... 3Module 1 - Better Together: vRealize Automation and NSX App Centric Networking &Security (45 Minutes)........................................................................................................ 9
Introduction........................................................................................................... 10Converged Blueprint ............................................................................................. 12On Demand Security Groups(ODSG) ..................................................................... 18On Demand Routed Networks ............................................................................... 28On Demand Load Balancer ................................................................................... 40Conclusion............................................................................................................. 51
Module 2 - vRealize Automation Day 2 Actions for NSX (30 Minutes) .............................52Introduction........................................................................................................... 53NSX-Day 2 Security Groups................................................................................... 54NSX-Day 2 Reconfigure Of a Deployed Load Balancer ..........................................64Conclusion............................................................................................................. 71
HOL-1806-02-SLN
Page 1HOL-1806-02-SLN

Lab Overview -HOL-1806-02-SLN -
Automate IT: MakingPrivate Cloud Easy
HOL-1806-02-SLN
Page 2HOL-1806-02-SLN

Lab GuidanceNote: It will take more than 90 minutes to complete this lab. You shouldexpect to only finish 2-3 of the modules during your time. The modules areindependent of each other so you can start at the beginning of any moduleand proceed from there. You can use the Table of Contents to access anymodule of your choosing.
The Table of Contents can be accessed in the upper right-hand corner of theLab Manual.
Lab Module List:
• Module 1 - Better Together: vRealize Automation and NSX App CentricNetworking & Security (45 Minutes) (Advanced) In this module users will seehow we can build out network services on a vRealize Automation blueprint todeliver a holistic multi-tier application architecture. We will cover buildingmultiple networks and security groups on the same blueprint.
• Module 2 - vRealize Automation Day 2 Actions for NSX (30 minutes)(Basic) In this module we will show how to add and remove an existing securitygroup to a deployed blueprint. We will also show how to scale out an existingdeployment to add another node to a load balancer. This will show how we cannetwork services from a day two perspective.
Lab Captains:
• Module 1 - Chris Saunders, Staff Systems Engineer, USA• Module 2 - Chris Saunders, Staff Systems Engineer, USA
This lab manual can be downloaded from the Hands-on Labs Document site found here:
http://docs.hol.vmware.com
This lab may be available in other languages. To set your language preference and havea localized manual deployed with your lab, you may utilize this document to help guideyou through the process:
http://docs.hol.vmware.com/announcements/nee-default-language.pdf
HOL-1806-02-SLN
Page 3HOL-1806-02-SLN

Location of the Main Console
1. The area in the RED box contains the Main Console. The Lab Manual is on the tabto the Right of the Main Console.
2. A particular lab may have additional consoles found on separate tabs in the upperleft. You will be directed to open another specific console if needed.
3. Your lab starts with 90 minutes on the timer. The lab can not be saved. All yourwork must be done during the lab session. But you can click the EXTEND toincrease your time. If you are at a VMware event, you can extend your lab timetwice, for up to 30 minutes. Each click gives you an additional 15 minutes.Outside of VMware events, you can extend your lab time up to 9 hours and 30
minutes. Each click gives you an additional hour.
Alternate Methods of Keyboard Data Entry
During this module, you will input text into the Main Console. Besides directly typing itin, there are two very helpful methods of entering data which make it easier to entercomplex data.
HOL-1806-02-SLN
Page 4HOL-1806-02-SLN

Click and Drag Lab Manual Content Into Console ActiveWindow
You can also click and drag text and Command Line Interface (CLI) commands directlyfrom the Lab Manual into the active window in the Main Console.
Accessing the Online International Keyboard
You can also use the Online International Keyboard found in the Main Console.
1. Click on the Keyboard Icon found on the Windows Quick Launch Task Bar.
<div class="player-unavailable"><h1 class="message">An error occurred.</h1><div class="submessage"><ahref="http://www.youtube.com/watch?v=xS07n6GzGuo" target="_blank">Try watching this video on www.youtube.com</a>, or enableJavaScript if it is disabled in your browser.</div></div>
HOL-1806-02-SLN
Page 5HOL-1806-02-SLN

Click Once in the Active Console Window
In this example, you will use the Online Keyboard to enter the "@" sign used in emailaddresses. The "@" sign is Shift-2 on US keyboard layouts.
1. Click once in the active console window.2. Click on the Shift key.
Click on the @ Key
1. Click on the "@" key.
Notice the @ sign entered in the active console window.
HOL-1806-02-SLN
Page 6HOL-1806-02-SLN

Activation Prompt or Watermark
When you first start your lab, you may notice a watermark on the desktop indicatingthat Windows is not activated.
One of the major benefits of virtualization is that virtual machines can be moved andrun on any platform. The Hands-on Labs utilizes this benefit and we are able to run thelabs out of multiple datacenters. However, these datacenters may not have identicalprocessors, which triggers a Microsoft activation check through the Internet.
Rest assured, VMware and the Hands-on Labs are in full compliance with Microsoftlicensing requirements. The lab that you are using is a self-contained pod and does nothave full access to the Internet, which is required for Windows to verify the activation.Without full access to the Internet, this automated process fails and you see thiswatermark.
This cosmetic issue has no effect on your lab.
Look at the Lower Right Portion of the Screen
HOL-1806-02-SLN
Page 7HOL-1806-02-SLN
Please check to see that your lab is finished all the startup routines and is ready for youto start. If you see anything other than "Ready", please wait a few minutes. If after 5minutes your lab has not changed to "Ready", consider restarting the lab.
HOL-1806-02-SLN
Page 8HOL-1806-02-SLN

Module 1 - BetterTogether: vRealize
Automation and NSX AppCentric Networking &Security (45 Minutes)
HOL-1806-02-SLN
Page 9HOL-1806-02-SLN

IntroductionIn this module users will see how we can build out network services on a vRealizeAutomation blueprint to deliver a holistic multi-tier application architecture. We willcover building multiple networks and security groups on the same blueprint.
Delivering Application-Centric Network and Security Services vRealize Automationprovisions, updates and decommissions network and security services in lockstep withyour virtualized applications. Network and security services are deployed as part of theautomated delivery of the application, consistent with its connectivity, security, andperformance requirements. Automation creates a standardized repeatable process thathelps accelerate delivery, reducing the time needed to perform the task. At the sametime automation also improves the consistency and reliability of the final configurationby elimination of manual errors. Finally automation reduces operational costs byeliminating many manual tasks, and improves development productivity by deliveringapplication environments to engineers faster. vRealize Automation, used in conjunctionwith NSX, automates an application’s network connectivity, security, performance, andavailability.
HOL-1806-02-SLN
Page 10HOL-1806-02-SLN

Connectivity: Proper network connectivity is fundamental to any business service.Various groups and different applications can have unique requirements. vRealizeAutomation’s resource reservations, service blueprints and network profiles assure thateach application receives the right level of network connectivity, with the appropriateservice level. For example, each business group can be provided with reserved networkconnectivity between the virtual and physical world, or specific mission criticalapplications can be configured with dedicated virtual switches and routers depending ontheir performance and reliability needs. In addition, virtual machines can be moved witha tool like VMware vSphere® vMotion® live migration without changes to the virtualmachine networking configuration. This allows for the optimal placement of workloadson the compute infrastructure, ultimately leading to reduced capital expenditure.
Security: Ensuring appropriate security policies are applied is one of the most criticalsteps to delivering and managing your applications and data. Now with vRealizeAutomation and NSX, applications can be deployed on demand with network security atthe application level or between application tiers to ensure that firewall rules are placedas close to the virtual machine as possible. This leads to a true defense-in-depthsolution that cannot be achieved by other solutions. The IT administrator can definevRealize Automation application blueprints that specify NSX security policies whichcontain firewall rules, intrusion detection integration, and agentless anti-virus scanningat each application tier to allow application and per-tier security. When the application isprovisioned, dynamic security groups are configured with the defined policies tosafeguard the service from day one. These services can also be tagged with a securitylabel, for example DB servers, PCI, HIPPA that enforces policies dynamically based onthe tags (e.g. type of application) throughout their lifecycle. Finally, application isolationfor these business services can also be defined to fence the service from the rest of thenetwork entirely or to deny all traffic to the service except for what is defined in theapplied security policies. This granular level of isolation keeps traffic to specific groupenvironments (e.g., development, test, production) or even isolated at the individualapplication or application tier level.
Performance: vRealize Automation‘s governance policies and automated delivery canbe used to meet the specific network performance needs of each application beingdeployed. vRealize Automation can also configure NSX to minimize traffic through theoversubscribed core. Traffic between virtual machines on the same host will remainwithin the host while still receiving the distributed routing, switching, load-balancing,firewalling, and security services that are required by modern applications.
Availability: vRealize Automation improves application availability through thedynamic configuration of network load balancers in the context of deploying or updatingapplication configurations. NSX load balancer can be used in all phases of theapplication lifecycle (development, staging, production) without requiring expensivephysical hardware or manual configuration of legacy load-balancing components.Depending on vRealize Automation’s application blueprints and network profiles,applications can be added to an existing load balancer pool or configured with their owndedicated load balancers. This integration provides organizations with applicationcentric availability management.
HOL-1806-02-SLN
Page 11HOL-1806-02-SLN

Converged BlueprintOverview
The Converged Blueprint Designer(CBP) redefines how applications and services areauthored, incorporating the full IT services stack using a unified drag-and-drop canvas.NSX has become a first-class citizen of vRealize Automation to provide application-centric networking and security through deep integration between the two products.
Open Browser
1. Click on the Google Chrome taskbar icon
HOL-1806-02-SLN
Page 12HOL-1806-02-SLN

Open vRealize Automation
1. Click on the vRealize Automation bookmark2. Enter in cloudadmin the username field3. Enter in VMware1! in the password field4. Click Sign In
HOL-1806-02-SLN
Page 13HOL-1806-02-SLN

Navigate to the Blueprint Designer
1. Click Design
HOL-1806-02-SLN
Page 14HOL-1806-02-SLN

Open an Existing Blueprint
1. Click on Multi Tier Application on CentOS
HOL-1806-02-SLN
Page 15HOL-1806-02-SLN
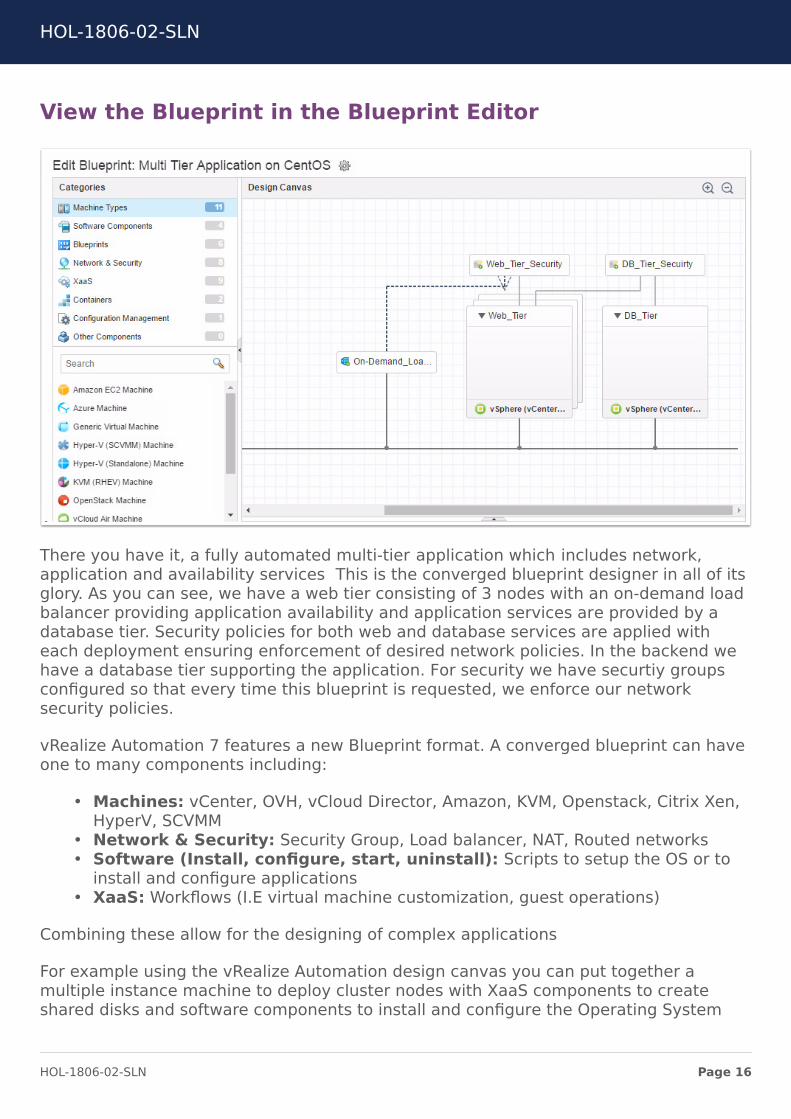
View the Blueprint in the Blueprint Editor
There you have it, a fully automated multi-tier application which includes network,application and availability services This is the converged blueprint designer in all of itsglory. As you can see, we have a web tier consisting of 3 nodes with an on-demand loadbalancer providing application availability and application services are provided by adatabase tier. Security policies for both web and database services are applied witheach deployment ensuring enforcement of desired network policies. In the backend wehave a database tier supporting the application. For security we have securtiy groupsconfigured so that every time this blueprint is requested, we enforce our networksecurity policies.
vRealize Automation 7 features a new Blueprint format. A converged blueprint can haveone to many components including:
• Machines: vCenter, OVH, vCloud Director, Amazon, KVM, Openstack, Citrix Xen,HyperV, SCVMM
• Network & Security: Security Group, Load balancer, NAT, Routed networks• Software (Install, configure, start, uninstall): Scripts to setup the OS or to
install and configure applications• XaaS: Workflows (I.E virtual machine customization, guest operations)
Combining these allow for the designing of complex applications
For example using the vRealize Automation design canvas you can put together amultiple instance machine to deploy cluster nodes with XaaS components to createshared disks and software components to install and configure the Operating System
HOL-1806-02-SLN
Page 16HOL-1806-02-SLN

and application layers. In the following lessons, we will explore various key componentsNSX which can be used in the vRA Design canvas while building out a convergedblueprint.
HOL-1806-02-SLN
Page 17HOL-1806-02-SLN

On Demand Security Groups(ODSG)Overview
Network security, for a long time, has worked off of the old Russian maxim, "trust butverify". Trust a user, but verify it's them. However, today's network landscape -- wherethe internet of things, the cloud, and more are introducing new vulnerabilities-makes the"verify" part of "trust but verify" difficult and inefficient. We need a simpler securitymodel. That model: Zero Trust.
Forrester Research coined the term "Zero Trust" to describe a model that preventscommon and advanced persistent threats from traversing laterally inside a network.This can be done through a strict, micro-granular security model that ties security toindividual workloads and automatically provisions policies. It's a network that doesn'ttrust any data packets. Everything is untrusted. Hence: Zero Trust.
In this module, we will show you how to automate a zero trust network with vRealizeAutomation. In a blueprint we can drag and drop an on demand security group. ThisCreates a new Security Group and binds one or more existing Security Policies. Thedesired security policies are added to the ODSG during blueprint configuration. This willensure your deployed virtual machines, get the policies they require.
Open a Browser
1. Click on the Google Chrome taskbar shortcut
HOL-1806-02-SLN
Page 18HOL-1806-02-SLN

Log In to vRealize Automation
1. Type cloudadmin into the username field2. Type VMware1! into the password field3. Click Sign In
HOL-1806-02-SLN
Page 19HOL-1806-02-SLN

Navigate to the Blue Print Designer
1. Click on the Design tab
Copy an Existing Blue Print and Create New One
HOL-1806-02-SLN
Page 20HOL-1806-02-SLN

1. Click on the CentOS blueprint row to highlight it2. Click on Copy
This is one of the value adds of the blueprint designer. We can copy existing blue printsand use them. We can even apply existing blueprints on to a new blueprints withadditional components added. One of the clear themes of software development overthe last ten years has been "re-use". This should be no different when you aremanaging and developing private cloud automation,
Name the New Blueprint
1. Type CentOSDemo into the Name field2. Click on the NSX Settings tab
HOL-1806-02-SLN
Page 21HOL-1806-02-SLN

Set the NSX Networking Transport Zone
1. Select RegionAO-Global-TZ(vCenter) from the dropdown list next toTransport zone
2. Click OK
A transport zone controls which hosts a logical switch can reach and can span one ormore vSphere clusters. Transport zones dictate which clusters VMs can participate in theuse of a particular network.
Channel Your Inner Picasso
HOL-1806-02-SLN
Page 22HOL-1806-02-SLN

1. Click on Network & Security under the Categories list2. Drag and drop On-Demand Security Group on to the Design Canvas
Add a Security Policy to the Blueprint
1. On the General tab that appears at the bottom of the Design Canvas, click Addunder Security policies (you may need to scroll down to see the Add button)
A security policy is a set of Guest Introspection, firewall, and network introspectionservices that can be applied to a security group. A Security Group is a way to managemultiple policies in one context. Security Groups are very powerful as they allow you togroup a collection of objects in your vSphere Inventory. Sounds simple, however thiscollection can be statically defined as an object in inventory, for example a VirtualMachine, Cluster, or Datacenter, or Dynamically defined for example a security tag on avirtual machine, Guest OS Type, or VM name. The groups can also be defined as acombination of static or dynamic; and you can start to see just how powerful a securitygroup is.
HOL-1806-02-SLN
Page 23HOL-1806-02-SLN

Select an Existing Security Policy
1. Select the Application Tier security policy from the list2. Click OK
HOL-1806-02-SLN
Page 24HOL-1806-02-SLN

Name the On-Demand Security Group
1. Change the ID to On_Demand_App_Security2. Click on the down arrow to collapse the configuration information
Select the CentOS VM
1. Click on the CentOS VM
HOL-1806-02-SLN
Page 25HOL-1806-02-SLN

Assign the On-Demand Security Group to the VM
1. Click on the Security tab2. Click the check box next to the On_Demand_App_Security security group we
just created3. Click on the down arrow to collapse the configuration information4. Click On Save
HOL-1806-02-SLN
Page 26HOL-1806-02-SLN

Exit the Blueprint Designer
You have created a blueprint with an on demand security group, and when this VM getsprovisioned, it will consume the security policy we assigned to it.
1. Click Finish
HOL-1806-02-SLN
Page 27HOL-1806-02-SLN

On Demand Routed NetworksOverview
On-Demand Routed Network (ODRTD) - Adds a dedicated interface on the upstreamdistributed logical router. This also creates a new logical switch for the router interfaceand the machine vnic. This also applies IP policy as defined in the correspondingnetwork profile. In this module we will build on the last task, by adding an applicationtier to the existing blueprint.
Any corporate network that is larger than a very small business is likely going to have arouted network already. Segmenting networks improves performance and moreimportantly is used for security purposes. Many compliance regulations such as PCI-DSSstate that machines need to be segmented from each other unless there is a specificreason for them to be on the same network. For instance your corporate file serverdoesn’t need to communicate directly with your CRM database full of credit card
numbers. The quickest way to fix this is to put these systems on different networks butthis can be difficult to manage in a highly automated environment. Developers mightneed to spin up new applications, which may need to be on different network segmentsfrom the rest of the environment. Its not very feasible to assume we can now spin uptest and delete hundred of machines each day, but need the network team to manuallycreate new network segments and tear them down each day. That wouldn’t be a nicething to do to your network team.
Luckily NSX has the ability to create routed networks and vRealize Automation canleverage this, to automatically setup a new network when we deploy blueprints. Theinitial setup requires setting up an NSX edge and a transit network. This is donemanually to get the environment prepared for the automation piece. In the modulebelow, we will add an on-demand routed network to the blueprint designer.
HOL-1806-02-SLN
Page 28HOL-1806-02-SLN

Open a Browser
1. Click on the Google Chrome taskbar shortcut
Log In To vRealize Automation
HOL-1806-02-SLN
Page 29HOL-1806-02-SLN

1. Type cloudadmin into the username field2. Type VMware1! in to the password field3. Click Sign In
Navigate to the Blue Print Designer
1. Click on the Design tab
HOL-1806-02-SLN
Page 30HOL-1806-02-SLN

Open a Blueprint
1. Click on the CentOSDemo blueprint
This is the blueprint we configured in the previous module.
HOL-1806-02-SLN
Page 31HOL-1806-02-SLN

Channel Your Inner Picasso
1. Click on Network & Security2. Drag and drop On-Demand Routed Network onto the Design Canvas
HOL-1806-02-SLN
Page 32HOL-1806-02-SLN

Configure the On-Demand Routed Network
1. Click on the General tab that shows up at the bottom of the Design Canvas2. Click on the ellipsis next to the Parent network profile field
HOL-1806-02-SLN
Page 33HOL-1806-02-SLN

Select the Network Profile
1. Select Routed NSX Network2. Click OK
What is a routed network profile? A routed network profile is used when end-to-endroutable access with unique IP addresses is needed.
1. e.g. I need to provide end-user access to my Production workloads
How long does this take in the physical world? For most organizations, there is amassive length of time it takes to get to this point. With NSX and vRealize Automationwe can offer this in minutes to hours.
HOL-1806-02-SLN
Page 34HOL-1806-02-SLN

Rename the Routed Network
1. Type App_Tier into the ID field2. Click Save (not shown)
HOL-1806-02-SLN
Page 35HOL-1806-02-SLN

Configure the Network for the vSphere Machine
1. Back on the Design Canvas, click on CentOS vSphere (vCenter) Machine
Configure the CentOS VM to use the On-Demand RoutedNetwork
HOL-1806-02-SLN
Page 36HOL-1806-02-SLN

1. Click on the Network that shows up at the bottom of the Design Canvas2. Click New
Select the App-Tier On-Demand Routed Network
1. Select App_Tier from the dropdown list box2. Click OK
Minimize the Configuration Information
1. Click down arrow to collapse the configuration information
HOL-1806-02-SLN
Page 37HOL-1806-02-SLN

View the App_Tier On-Demand Routed Network
1. You can now see our virtual machine is connected to the on demand routednetwork App_Tier that we created
As you can see we have implemented a routed network so end users can access theweb application that runs on this CentOS server. This has taken us minutes to createand provision, leading to lower opex and faster time to market for your lines of business.
HOL-1806-02-SLN
Page 38HOL-1806-02-SLN

Exit the Blueprint Editor
1. Click Finish
HOL-1806-02-SLN
Page 39HOL-1806-02-SLN

On Demand Load BalancerOverview
Load Balancing is another network service available within NSX that can be nativelyenabled on the NSX Edge device. The two main drivers for deploying a load balancerare, scaling out an application (through distribution of workload across multipleservers), as well as improving its high-availability characteristics
The NSX load balancing service is specially designed for cloud with the followingcharacteristics:
• Fully programmable via API• Same single central point of management/monitoring as other NSX network
services
The load balancing services natively offered by the NSX Edge satisfies the needs of themajority of the application deployments. This is because the NSX Edge provides a largeset of functionalities:
• Support any TCP applications, including, but not limited to, LDAP, FTP, HTTP,HTTPS
• Support UDP application starting from NSX SW release 6.1.• Multiple load balancing distribution algorithms available: round-robin, least
connections, source IP hash, URI• Multiple health checks: TCP, HTTP, HTTPS including content inspection• Persistence: Source IP, MSRDP, cookie, ssl session-id• Connection throttling: max connections and connections/sec• L7 manipulation, including, but not limited to, URL block, URL rewrite, content
rewrite• Optimization through support of SSL offload
HOL-1806-02-SLN
Page 40HOL-1806-02-SLN

We can use the blueprint designer to drag and drop an on demand load balancer(ODLB).This deploys a dedicated NSX Edge Services Gateway (ESG) and logical switch. It thenautomatically configures the appropriate load balancing policy (one-arm and inline loadbalancing policies are supported). This will shorten the time to deploy HA based networkservices, ensuring your web servers or other services are highly available at all times. Inthe following module we will add an on-demand load balancer to the blueprint designer.
HOL-1806-02-SLN
Page 41HOL-1806-02-SLN

Open a Browser
1. Click on the Google Chrome taskbar shortcut
HOL-1806-02-SLN
Page 42HOL-1806-02-SLN

Log In to vRealize Automation
1. Type cloudadmin into the username field2. Type VMware1! into the password field3. Click Sign In
HOL-1806-02-SLN
Page 43HOL-1806-02-SLN

Navigate to the Blueprint Designer
1. Click on the Design tab
HOL-1806-02-SLN
Page 44HOL-1806-02-SLN

Channel Your Inner Picasso
1. Click on the CentOSDemo blueprint
Remove Existing Load Balancer
1.Click On ON-Demand_Load Balancer
2. Click on X
HOL-1806-02-SLN
Page 45HOL-1806-02-SLN

Delete Loadbalancer
1. Click Yes
Add an On-Demand Load Balancer to the Blueprint
1. Click on Network & Security under the Categories list2. Drag and drop On-Demand Load Balancer on to the Design Canvas
How long does it take your operations teams to get an application added to a physicalload balancer? Weeks? Months? With the power of NSX and vRA, you can see here weare able to do this in minutes. From design to consumption, we are driving down theoverall operating expense of managing and using load balancers.
HOL-1806-02-SLN
Page 46HOL-1806-02-SLN
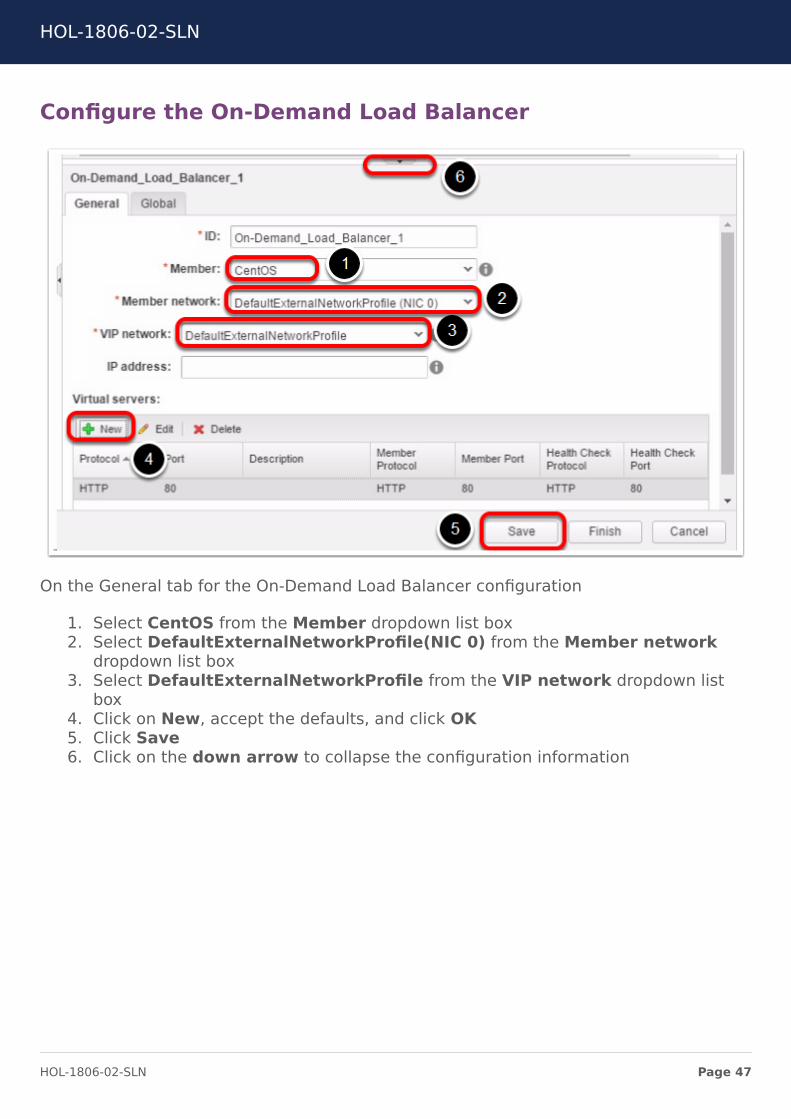
Configure the On-Demand Load Balancer
On the General tab for the On-Demand Load Balancer configuration
1. Select CentOS from the Member dropdown list box2. Select DefaultExternalNetworkProfile(NIC 0) from the Member network
dropdown list box3. Select DefaultExternalNetworkProfile from the VIP network dropdown list
box4. Click on New, accept the defaults, and click OK5. Click Save6. Click on the down arrow to collapse the configuration information
HOL-1806-02-SLN
Page 47HOL-1806-02-SLN

Select the CentOS VM
1. Click on the CentOS vSphere (vCenter) Machine
HOL-1806-02-SLN
Page 48HOL-1806-02-SLN

Configure the Number of Instances for the VM
On the General tab for the CentOS VM
1. Change Minimum to 22. Change Maximum to 33. Click Save
HOL-1806-02-SLN
Page 49HOL-1806-02-SLN

Exit the Blueprint Designer
1. Click Finish
Now we have designed a complete software defined application stack using theconverged blueprint designer. We started with automating our security policies with theon-demand security groups. We then moved on to adding a segmented vxlan for theapplication tier traffic. And finally we added an on-demand load balancer to ensure ourapplication continues to function in the event of an issue.
HOL-1806-02-SLN
Page 50HOL-1806-02-SLN

ConclusionIn these modules we covered how to deploy a fully automated network stack with ourapplication stack. In IT today, it's not just how fast you can deploy a virtual machine,but also how fast you can provide the network, security and availability services.
In the next module we are going to cover day two actions with NSX.
• Module 2 - Day Two vRA Actions for NSX (30 minutes) (Basic) In this modulewe will show how to add and remove an existing security group to a deployedblueprint. We will also show how to scale out an existing deployment to addanother node to a load balancer. This will show how we can network services froma day two perspective.
HOL-1806-02-SLN
Page 51HOL-1806-02-SLN

Module 2 - vRealizeAutomation Day 2 Actions
for NSX (30 Minutes)
HOL-1806-02-SLN
Page 52HOL-1806-02-SLN

IntroductionIn this module we will show how to add and remove an existing security group to adeployed blueprint. We will also show how to scale out an existing deployment to addanother node to a load balancer. This will show how we can manage network servicesfrom a day two perspective.
A day two operation is simply an action that you can take on an existing resource, suchas a running virtual machine. For a VM, they typically include power on, power off,reconfigure, destroy, etc. All of the basic and essential day two operations for standardobjects, such as VMs and multi-machine deployments come out of the box with vRealizeAutomation. As VMware continues to invest in vRealize automation we will continuouslyadd more day two operations. In the following lessons we will show the student how toperform day two operations on the security and availability of your virtual machines.
HOL-1806-02-SLN
Page 53HOL-1806-02-SLN

NSX-Day 2 Security GroupsOverview
It is no longer acceptable to utilize the traditional approach to data-center networksecurity built around a very strong perimeter defense but virtually no protection insidethe perimeter. This model offers very little protection against the most common andcostly attacks occurring against organizations today, which include attack vectorsoriginating within the perimeter. These attacks infiltrate your perimeter, learn yourinternal infrastructure, and laterally spread through your data center. In order toaddress these concerns customers are adopting micro-segmentation.
Micro-segmentation decreases the level of risk and increases the security posture of themodern data center. So what exactly defines micro-segmentation? For a solution toprovide micro-segmentation requires a combination of the following capabilities,enabling the ability to achieve the below-noted outcomes.
Distributed stateful firewalling for topology agnostic segmentation – Reducingthe attack surface within the data center perimeter through distributed statefulfirewalling and ALGs (Application Level Gateway) on a per-workload granularityregardless of the underlying L2 network topology (i.e. possible on either logical networkoverlays or underlying VLANs).
Centralized ubiquitous policy control of distributed services – Enabling theability to programmatically create and provision security policy through a RESTful API orintegrated cloud management platform (CMP). In this module we will cover how cloudconsumers can change NSX security groups on an active vRA deployment. If securitycreates some new policies, this will allow cloud consumers to add or remove a securitypolicy from a running virtual machine from within the vRA portal. This allows end usersto apply micro-segmentation to there existing deployments. Perhaps for testing as well.If you can turn these off and on via day two actions, this will help accelerate testing ofthese said rules.
HOL-1806-02-SLN
Page 54HOL-1806-02-SLN

Open a Browser
1. Click on the Google Chrome taskbar shortcut
HOL-1806-02-SLN
Page 55HOL-1806-02-SLN

Log In to vRealize Automation
1. Type devuser into the username field2. Type VMware1! into the password field3. Click Sign In
HOL-1806-02-SLN
Page 56HOL-1806-02-SLN

Navigate to the Deployment Items
1. Click on the Items tab
Change Security for the Deployed CentOS Virtual Machine
HOL-1806-02-SLN
Page 57HOL-1806-02-SLN

1. Click on the CentOS deployment row to highlight it2. Click the Actions dropdown3. Click Change Security
Add a Security Object for the Virtual Machine
1. Click on the CentOS virtual machine2. Click Add
HOL-1806-02-SLN
Page 58HOL-1806-02-SLN

Apply and Existing Security Group to the Virtual Machine
1. Click Existing Security Group
HOL-1806-02-SLN
Page 59HOL-1806-02-SLN

Choose the Security Group to Apply
1. Turn on the check box next to WebTier2. Click OK
HOL-1806-02-SLN
Page 60HOL-1806-02-SLN

Submit the Request to Add the Security Group to theVirtual Machine
1. Click Submit
HOL-1806-02-SLN
Page 61HOL-1806-02-SLN

Acknowledge the Request has been Submitted
1. Click OK2. Wait for the request to finish (you can view the status of the request by going to
the Requests tab)
Verify Security Group Exists
1. Click on the Items tab
HOL-1806-02-SLN
Page 62HOL-1806-02-SLN

Verify the Security Group has been Applied to the VirtualMachine
1. Click on the arrow next to CentOS2. Now you can see the WebTier security group added to the deployment!
HOL-1806-02-SLN
Page 63HOL-1806-02-SLN

NSX-Day 2 Reconfigure Of a DeployedLoad BalancerOverview
Load balancing is a critical component for most enterprise applications to provide bothavailability and scalability to the system. Over the last decade we have moved frombare metal servers to virtual servers and from manual deployment of operating systemsto using tools like vRealize Automation or other custom workflows. In addition to themovement towards virtualization and the API being the new CL. We are also seeing amovement to Network Functions Virtualization (NFV) where Virtualized NetworkFunctions (VNF) such as routing, VPN, firewalls, and load balancing are moving tosoftware. The value of automation, SDN, and NFV has been proven in the largestnetworks today and this migration to software has proven to have tremendous ROI.Many companies also want to leverage the same cost effective models. From a day zeroperspective we have been able to use vRA to automate on-demand load balancers for afew releases. What about for day two network actions? In vRA 7.3 we provide the abilityto reconfigure which services the load balancerbalancer is providing high availability to.
In this module will you show you how to reconfigure a load Balancer in a deployment.The reconfigure action will allow a cloud consumer to add, edit, or delete a virtual serverin a deployed NSX load balancer.
Open a Browser
1. Click on the Google Chrome task bar shortcut
HOL-1806-02-SLN
Page 64HOL-1806-02-SLN

Log In to vRealize Automation
1. Type devuser into the username field2. Type VMware1! into the password field3. Click Sign In
HOL-1806-02-SLN
Page 65HOL-1806-02-SLN

Navigate to the CentOS Deployment
Click on the Items tab
Click the arrow to the left of Centos
Select the Action to Take on the On-Demand Load Balancer
1. Select the On-Demand_Load_Balancer row to highlight it2. Click Actions
HOL-1806-02-SLN
Page 66HOL-1806-02-SLN

Reconfigure the Load Balancer
1. Click on Reconfigure
Add a New Virtual Service
1. Click on New next to Virtual servers
HOL-1806-02-SLN
Page 67HOL-1806-02-SLN
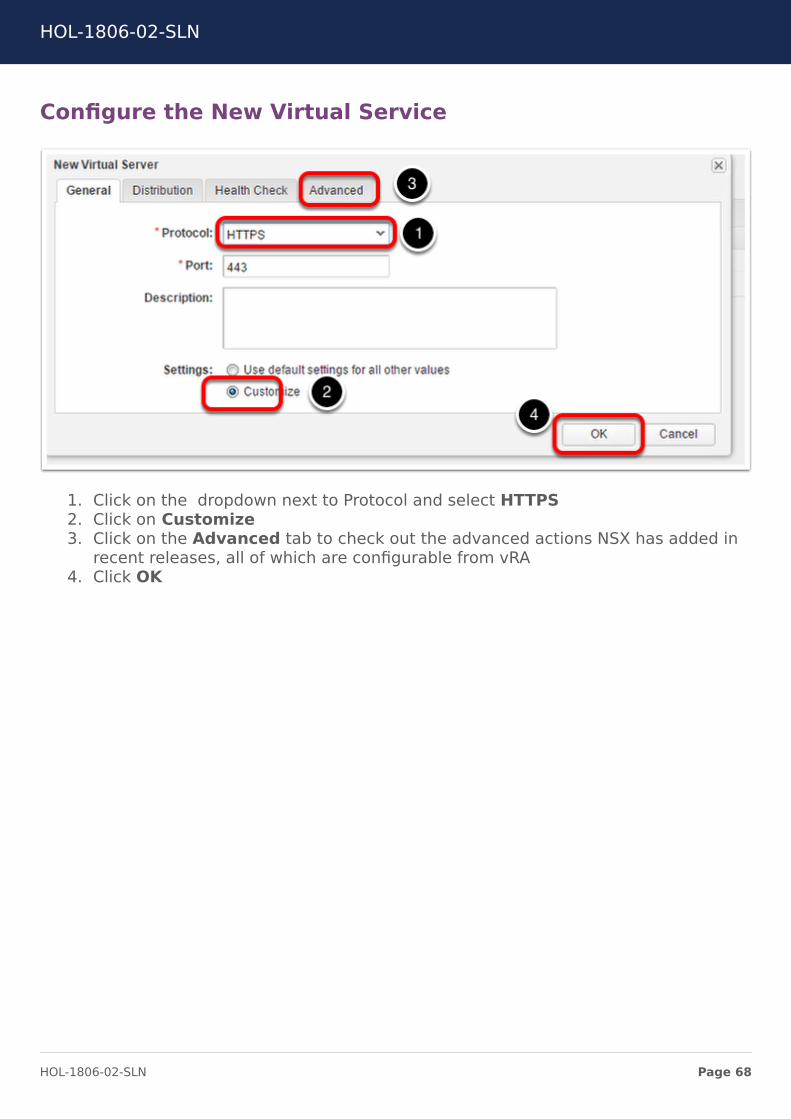
Configure the New Virtual Service
1. Click on the dropdown next to Protocol and select HTTPS2. Click on Customize3. Click on the Advanced tab to check out the advanced actions NSX has added in
recent releases, all of which are configurable from vRA4. Click OK
HOL-1806-02-SLN
Page 68HOL-1806-02-SLN
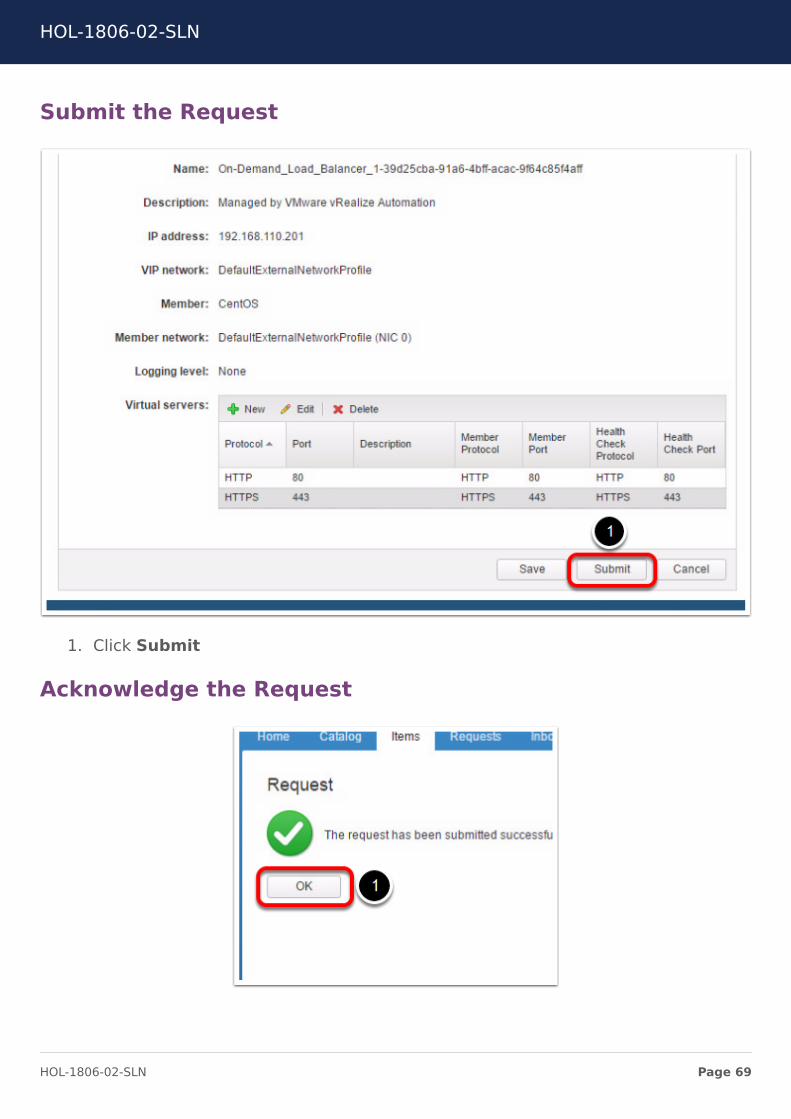
Submit the Request
1. Click Submit
Acknowledge the Request
HOL-1806-02-SLN
Page 69HOL-1806-02-SLN

1. Click OK
HOL-1806-02-SLN
Page 70HOL-1806-02-SLN

ConclusionCongrats! You have just completed Module 2 - NSX Day 2 Operations. Weshowed you how to reduce the overall security risk of your data center byimplementing security groups on deployed machines. We also showed youhow to provide day 2 operations for providing high availability for data centerservices.
• Module 1 - Better Together: vRealize Automation and NSX App CentricNetworking & Security (45 Minutes) (Advanced) In this module users will seehow we can build out network services on a vRealize Automation blueprint todeliver a holistic multi-tier application architecture. We will cover buildingmultiple networks and security groups on the same blueprint.
HOL-1806-02-SLN
Page 71HOL-1806-02-SLN

ConclusionThank you for participating in the VMware Hands-on Labs. Be sure to visithttp://hol.vmware.com/ to continue your lab experience online.
Lab SKU: HOL-1806-02-SLN
Version: 20180321-155344
HOL-1806-02-SLN
Page 72HOL-1806-02-SLN