Embed Size (px)
Citation preview

2
Table of Contents
Section Title Page
1 Defensive Drills
Throwing & Catching 4-7
Fielding Ground Balls 7-15
Catching Fly Balls 16-21
Outfield Positions 21-29
Catcher 29-34
Infield 34-37
Pitcher 37-38
2 Pitching
Mental Aspects 39-40
Mechanics 41-42
Drills 43-44
Common Errors 45-46
Mechanics Checklist 47
The Peel Drop 48
The Turn Over Drop 49
The Rise 50
The Curve 51
The Off Speed 52
The Pitch Out 53
Calling Pitches 54
Pre Game Warm Up 55
Fielding Responsibilities 56
Use of Charts & Stats 57
Video Taping & the Use of the Mound 58
Special Article – Searching Within for the Real Pitcher 59-60

3
Dealing with the Umpire 61
3 Hitting/Bunting/Slapping Hitting Basics 62
Hitting Mechanics 63
Hitting Fundamentals 64-65
Hitting Drills 66-68
Bunting 69-70
Left Handed Running Slap 71-72
4 Base Running
Skills 73-75
Drills 76
5 Team Strategies
Bunt Defenses 77-78
Outfield Game Plan 79-81
Outfield Play 82-83
Key Points for all Outfielders 84
6 Conditioning
Drills 85-88
7 Coaching
Practice Plans 89-90
Basic Coaching Information 91-92
Coaching Tips 93-94
“Ideal” Batting Order 95-96
Offensive Skills Checklist 97
Defensive Skills Checklist 98
Coaches Score Cards 99-101
Game Summary 102
4
“Quadrant Throwing”
1
4
2
3
“Quadrant Throwing”
1
4
2
3
Throwing & Catching
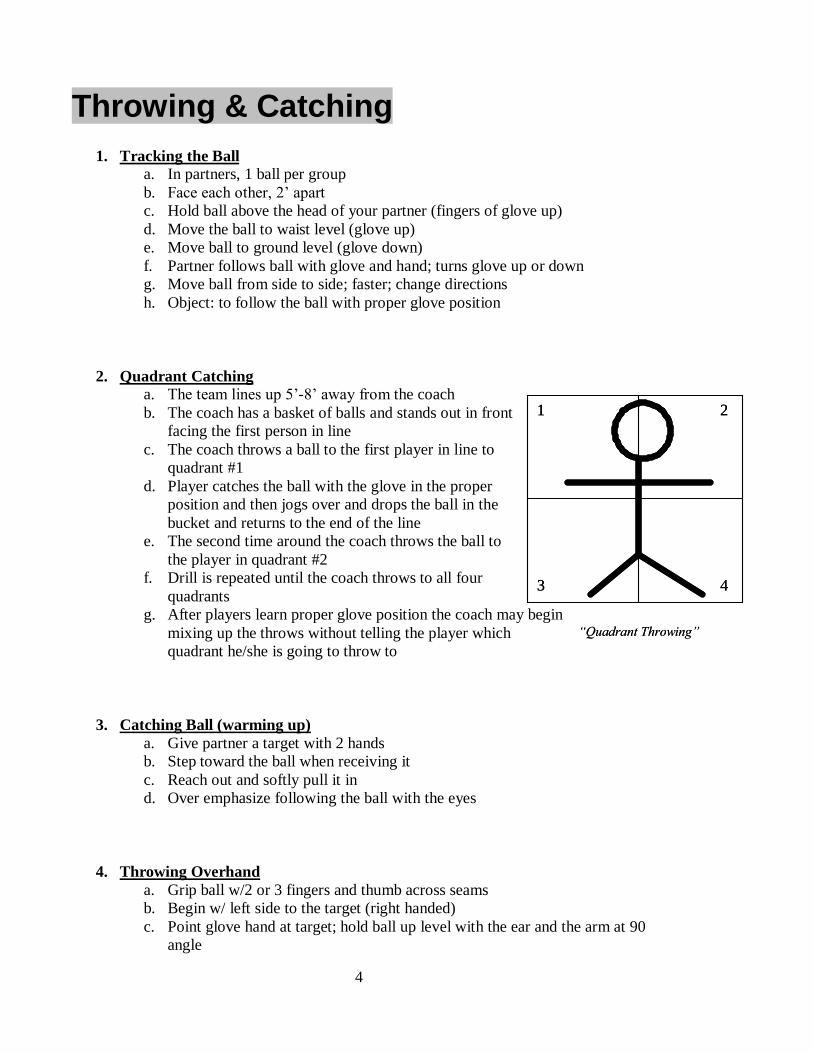
1. Tracking the Ball a. In partners, 1 ball per group b. Face each other, 2’ apart c. Hold ball above the head of your partner (fingers of glove up) d. Move the ball to waist level (glove up) e. Move ball to ground level (glove down) f. Partner follows ball with glove and hand; turns glove up or down g. Move ball from side to side; faster; change directions h. Object: to follow the ball with proper glove position
2. Quadrant Catching a. The team lines up 5’-8’ away from the coach b. The coach has a basket of balls and stands out in front
facing the first person in line c. The coach throws a ball to the first player in line to
quadrant #1 d. Player catches the ball with the glove in the proper
position and then jogs over and drops the ball in the bucket and returns to the end of the line
e. The second time around the coach throws the ball to the player in quadrant #2
f. Drill is repeated until the coach throws to all four quadrants
g. After players learn proper glove position the coach may begin mixing up the throws without telling the player which quadrant he/she is going to throw to
3. Catching Ball (warming up) a. Give partner a target with 2 hands b. Step toward the ball when receiving it c. Reach out and softly pull it in d. Over emphasize following the ball with the eyes
4. Throwing Overhand a. Grip ball w/2 or 3 fingers and thumb across seams b. Begin w/ left side to the target (right handed) c. Point glove hand at target; hold ball up level with the ear and the arm at 90
angle
5
“Reaching Out Drill
x x x x
x x x x
“Reaching Out Drill
x x x x
x x x x
“Four Corner Throwing”
1
3
2
4
“Four Corner Throwing”
1
3
2
4
“Box Throwing”
3B
1B
SS
2B
C“Box Throwing”
3B
1B
SS
2B
C
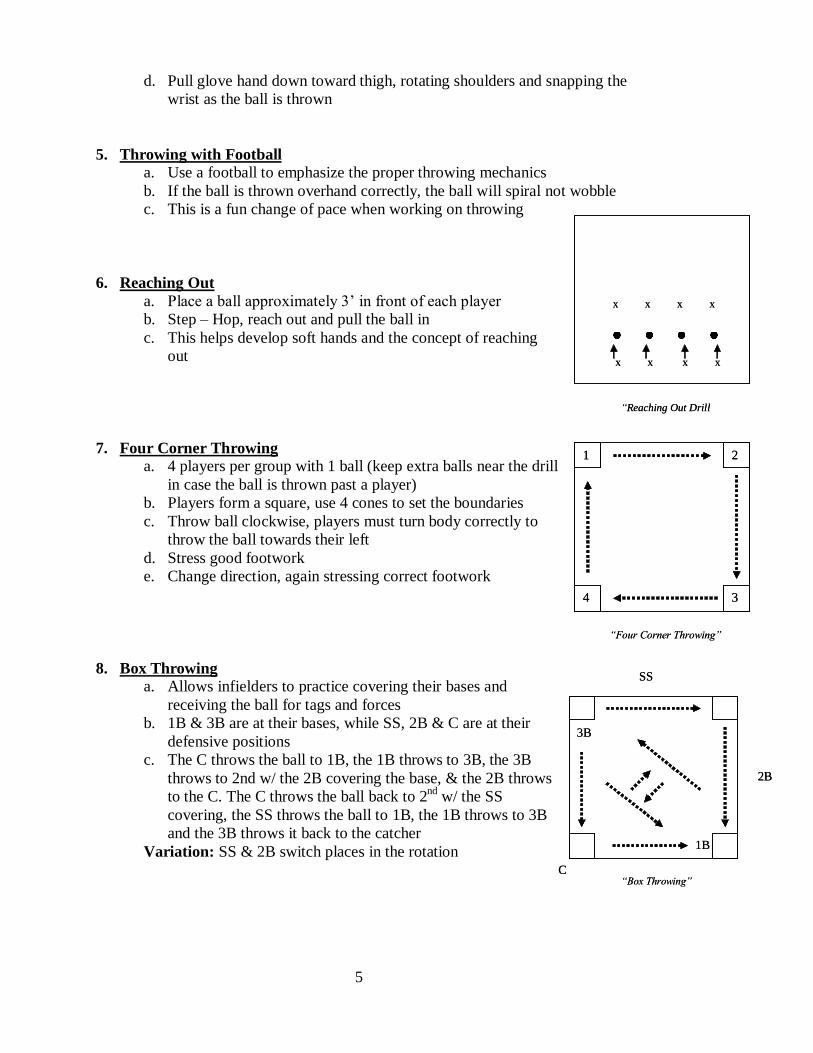
d. Pull glove hand down toward thigh, rotating shoulders and snapping the wrist as the ball is thrown
5. Throwing with Football a. Use a football to emphasize the proper throwing mechanics b. If the ball is thrown overhand correctly, the ball will spiral not wobble c. This is a fun change of pace when working on throwing
6. Reaching Out a. Place a ball approximately 3’ in front of each player b. Step – Hop, reach out and pull the ball in c. This helps develop soft hands and the concept of reaching
out
7. Four Corner Throwing a. 4 players per group with 1 ball (keep extra balls near the drill
in case the ball is thrown past a player) b. Players form a square, use 4 cones to set the boundaries c. Throw ball clockwise, players must turn body correctly to
throw the ball towards their left d. Stress good footwork e. Change direction, again stressing correct footwork
8. Box Throwing a. Allows infielders to practice covering their bases and
receiving the ball for tags and forces b. 1B & 3B are at their bases, while SS, 2B & C are at their
defensive positions c. The C throws the ball to 1B, the 1B throws to 3B, the 3B
throws to 2nd w/ the 2B covering the base, & the 2B throws to the C. The C throws the ball back to 2nd w/ the SS covering, the SS throws the ball to 1B, the 1B throws to 3B and the 3B throws it back to the catcher
Variation: SS & 2B switch places in the rotation
6
“Circle Throwing”“Circle Throwing”
“Z Drill (Quick Release/Accuracy)”
x x x x
C x x x x
“Z Drill (Quick Release/Accuracy)”
x x x x
C x x x x
1
5
2 3
“Star Throwing”
4 1
5
2 3
“Star Throwing”
4
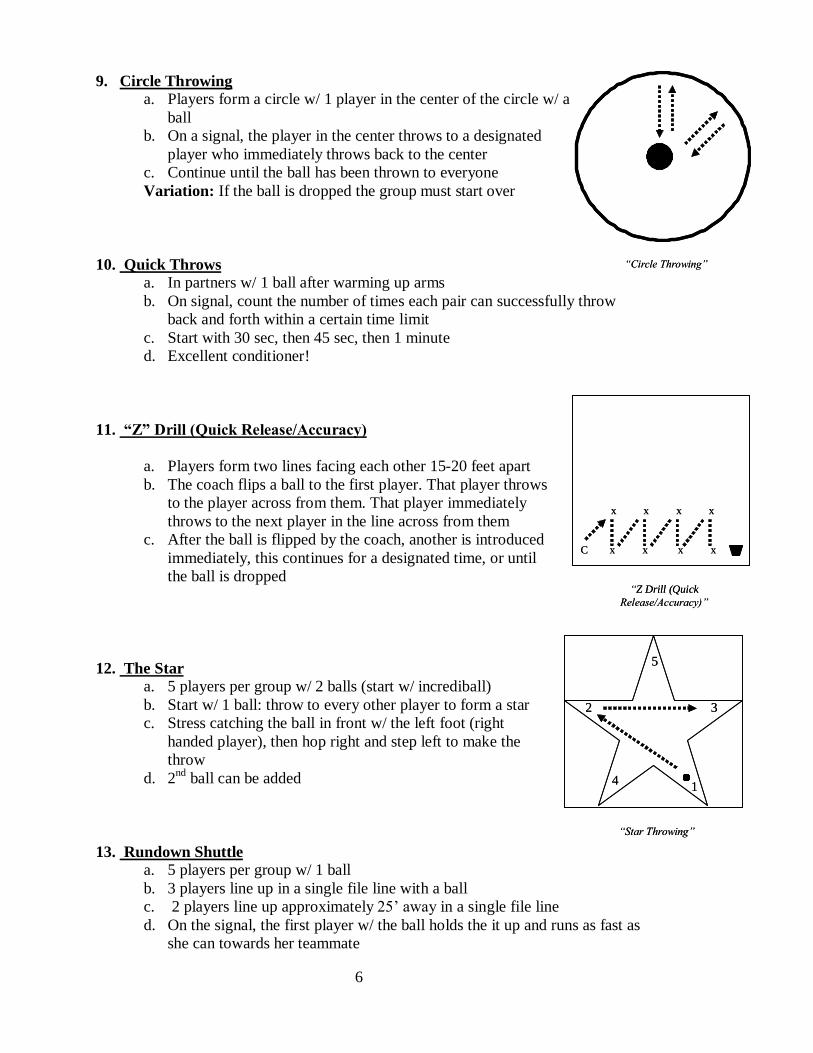
9. Circle Throwing a. Players form a circle w/ 1 player in the center of the circle w/ a
ball b. On a signal, the player in the center throws to a designated
player who immediately throws back to the center c. Continue until the ball has been thrown to everyone Variation: If the ball is dropped the group must start over
10. Quick Throws
a. In partners w/ 1 ball after warming up arms b. On signal, count the number of times each pair can successfully throw
back and forth within a certain time limit c. Start with 30 sec, then 45 sec, then 1 minute d. Excellent conditioner!
11. “Z” Drill (Quick Release/Accuracy)
a. Players form two lines facing each other 15-20 feet apart b. The coach flips a ball to the first player. That player throws
to the player across from them. That player immediately throws to the next player in the line across from them
c. After the ball is flipped by the coach, another is introduced immediately, this continues for a designated time, or until the ball is dropped
12. The Star a. 5 players per group w/ 2 balls (start w/ incrediball) b. Start w/ 1 ball: throw to every other player to form a star c. Stress catching the ball in front w/ the left foot (right
handed player), then hop right and step left to make the throw
d. 2nd ball can be added
13. Rundown Shuttle a. 5 players per group w/ 1 ball b. 3 players line up in a single file line with a ball c. 2 players line up approximately 25’ away in a single file line d. On the signal, the first player w/ the ball holds the it up and runs as fast as
she can towards her teammate
7
“Rundown Shuttle”
5 3 1 2 4
“Rundown Shuttle”
5 3 1 2 4
“Pick Up (4 Parts)”
x x x x
x x x x
“Pick Up (4 Parts)”
x x x x
x x x x
“Lateral Movement Drill”“Lateral Movement Drill”
e. When her team mate says “NOW” she uses a dart-like throw and follows the ball to the right and goes to the end of the line
f. The next player repeats above g. The player must give a target for the ball outside the
imaginary path of the runner and immediately gets out of the way
h. Each time the drill is done, gradually move back until players are 40’ apart
Fielding Ground Balls
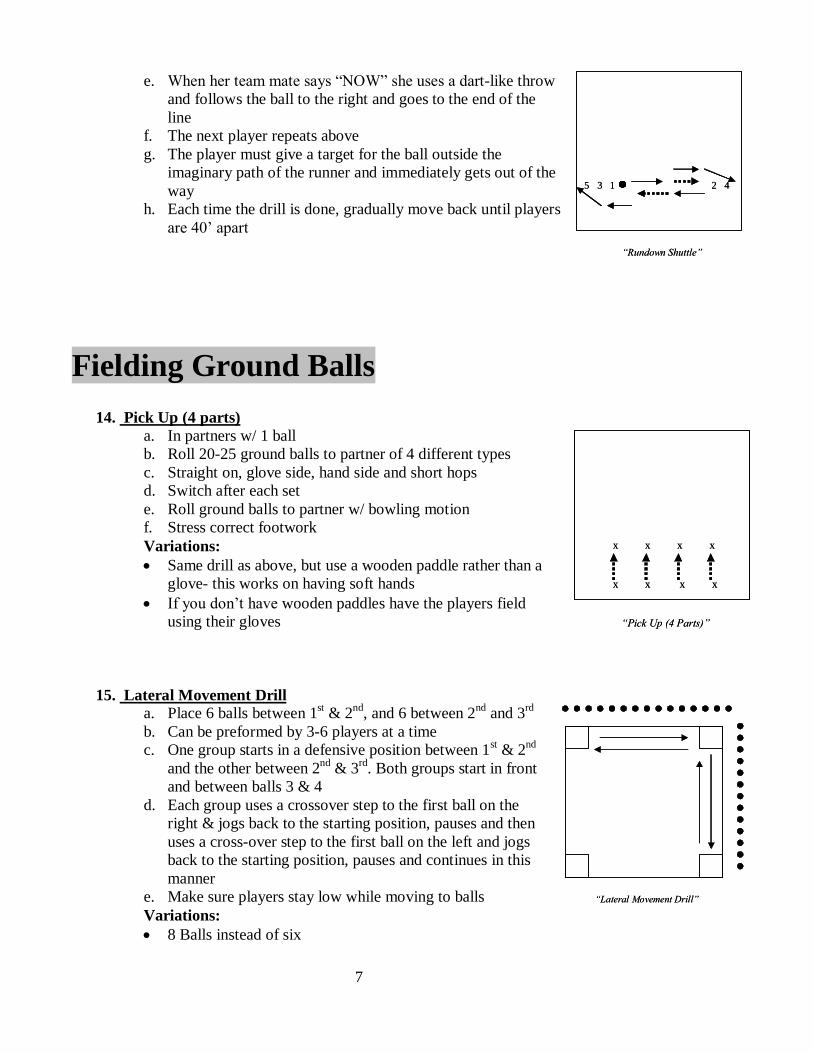
14. Pick Up (4 parts) a. In partners w/ 1 ball b. Roll 20-25 ground balls to partner of 4 different types c. Straight on, glove side, hand side and short hops d. Switch after each set e. Roll ground balls to partner w/ bowling motion f. Stress correct footwork Variations: Same drill as above, but use a wooden paddle rather than a
glove- this works on having soft hands If you don’t have wooden paddles have the players field
using their gloves
15. Lateral Movement Drill
a. Place 6 balls between 1st & 2nd, and 6 between 2nd and 3rd b. Can be preformed by 3-6 players at a time c. One group starts in a defensive position between 1st & 2nd
and the other between 2nd & 3rd. Both groups start in front and between balls 3 & 4
d. Each group uses a crossover step to the first ball on the right & jogs back to the starting position, pauses and then uses a cross-over step to the first ball on the left and jogs back to the starting position, pauses and continues in this manner
e. Make sure players stay low while moving to balls Variations: 8 Balls instead of six

8
“Underhand Toss/ Egg Rolls
x x x
x x x
“Underhand Toss/ Egg Rolls
x x x
x x x
“Running Line Drives”
x x x x
C
“Running Line Drives”
x x x x
C
“Wall Drill - 1”
x x x x
x x x x
x x x x
“Wall Drill - 1”
x x x x
x x x x
x x x x
Roll or hit the balls using cones as targets instead of starting w/ the balls stationary
16. Underhand Toss/ Egg Rolls a. In partners w/ 2 balls approx 3’ away b. Player w/ balls rolls 1st ball to fielders right c. Fielder slides over w/ glove down, picks up ball w/ her
glove and hand, splits hands apart and straight-arms the ball back to her partner
d. As soon as the 1st ball is picked up the 2nd ball is rolled out to her left
e. Stress correct mechanics for the underhand toss including good footwork (hop right, step left & toss)
f. Great Conditioner!
17. Running Line Drives a. Team lines up 10’-15’ away from wall b. Coach has a bucket of balls and stands 20’ away c. When the coach holds the ball up, the 1st player sprints
across d. Coach throws a leading line drive, player catches it on the
run and jogs to the end of the line by way of the bucket
18. Wall Drills
Drill 1 a. When the field is too wet, workout on the asphalt or in
the gym b. Divide the team into 5-6 groups c. Stand 7 to 10’ away from the wall d. 1st & 2nd players in each line have balls e. On the signal the player throws the ball against the wall
as fast as possible f. If the ball is missed, the 2nd player in line gives her the
other ball g. Second player in line counts completed attempts in 30-60
seconds h. Stress correct footwork and throwing mechanics
9
“Wall Drill - 2”
x x x x
x x x x
“Wall Drill - 2”
x x x x
x x x x
“Wall Drill - 3”
x x x x
C
“Wall Drill - 3”
x x x x
C
“Wall Drill - 4”
x x x x
x x x x
“Wall Drill - 4”
x x x x
x x x x
“Circle Fielding”“Circle Fielding”
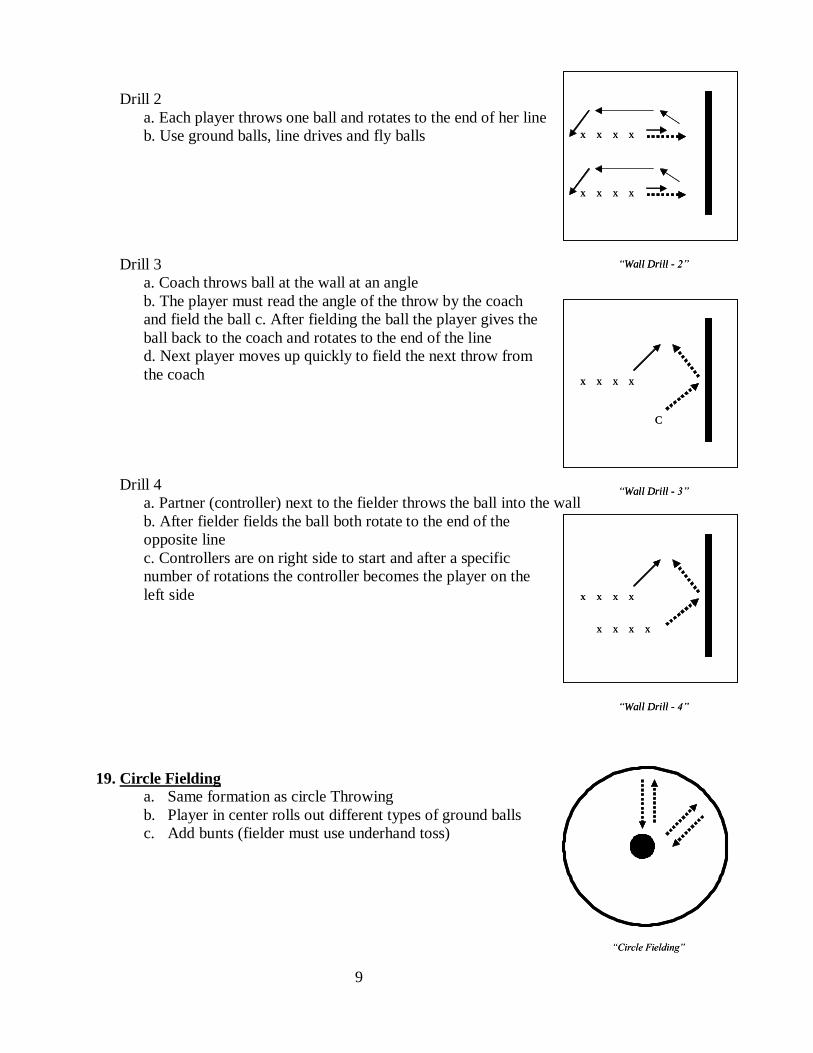
Drill 2
a. Each player throws one ball and rotates to the end of her line b. Use ground balls, line drives and fly balls
Drill 3 a. Coach throws ball at the wall at an angle b. The player must read the angle of the throw by the coach and field the ball c. After fielding the ball the player gives the ball back to the coach and rotates to the end of the line d. Next player moves up quickly to field the next throw from the coach
Drill 4 a. Partner (controller) next to the fielder throws the ball into the wall b. After fielder fields the ball both rotate to the end of the opposite line c. Controllers are on right side to start and after a specific number of rotations the controller becomes the player on the left side
19. Circle Fielding a. Same formation as circle Throwing b. Player in center rolls out different types of ground balls c. Add bunts (fielder must use underhand toss)
10
“Running Fungo”
C
X X X X
“Running Fungo”
C
X X X X
“Two Line Running Fungo”
C
X X X X
X X X X
C
“Two Line Running Fungo”
C
X X X X
X X X X
C
“Coaches Fungo”“Coaches Fungo”
“Arm Saver Fungo”
H F
F H
“Arm Saver Fungo”
H F
F H
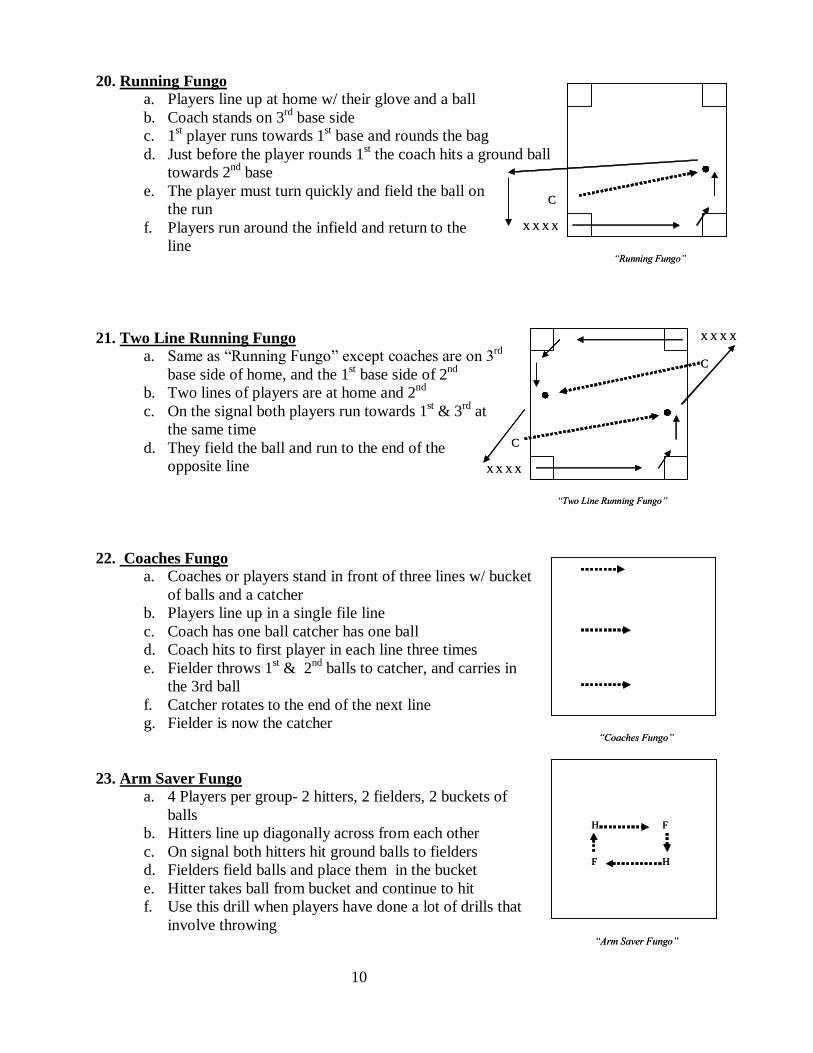
20. Running Fungo a. Players line up at home w/ their glove and a ball b. Coach stands on 3rd base side c. 1st player runs towards 1st base and rounds the bag d. Just before the player rounds 1st the coach hits a ground ball
towards 2nd base e. The player must turn quickly and field the ball on
the run f. Players run around the infield and return to the
line
21. Two Line Running Fungo
a. Same as “Running Fungo” except coaches are on 3rd base side of home, and the 1st base side of 2nd
b. Two lines of players are at home and 2nd c. On the signal both players run towards 1st & 3rd at
the same time d. They field the ball and run to the end of the
opposite line
22. Coaches Fungo a. Coaches or players stand in front of three lines w/ bucket
of balls and a catcher b. Players line up in a single file line c. Coach has one ball catcher has one ball d. Coach hits to first player in each line three times e. Fielder throws 1st & 2nd balls to catcher, and carries in
the 3rd ball f. Catcher rotates to the end of the next line g. Fielder is now the catcher
23. Arm Saver Fungo a. 4 Players per group- 2 hitters, 2 fielders, 2 buckets of
balls b. Hitters line up diagonally across from each other c. On signal both hitters hit ground balls to fielders d. Fielders field balls and place them in the bucket e. Hitter takes ball from bucket and continue to hit f. Use this drill when players have done a lot of drills that
involve throwing

11
“Lateral Line Drill”
X X X X X
“Lateral Line Drill”
X X X X X
“Charging Drill”
X X XX X XX X X
X X X
“Charging Drill”
X X XX X XX X X
X X X
“2 Player Fungo”
H F
“2 Player Fungo”
H F
24. Lateral Line Drill a. Drill can have 6-8 tossers b. Tossers are spaced 8-10 feet apart w/ each tosser having a
ball c. 1 player is 40-50 feet in front of tosser 1 d. Tosser 1 throws a ground ball to the player e. The player fields the ball and throws it back to tosser 1 f. The player moves across and in front of tosser 2, who
then rolls a ground ball to player 1 who throws it back g. The drill continues until the last tosser throws a ground
ball to the player h. After player 1 throws the ball back to the last tosser everyone
moves one spot to their left and tosser 1 becomes player 1 Variation 1: Have more than one player moving along in front of each of the tossers Variation 2: Have the tossers throw line drives or fly balls to the player(s)
25. Charging Drill a. The tosser throws a ground ball so that the player has to
charge the ball at about midway between the tosser and the player, then throws the ball back to the tosser. The fielder then turns to the right & jogs back to the end of the line
Variation: Charging a ball that has come to a complete stop
26. 2 Player Fungo a. 2 players per group w/ 2 balls and 1 bat b. Hitter has ball in glove and bat in right hand (right
handed player) c. Hitter tosses ball up in front of herself and hits the ball to
the fielder d. Fielder fields the ball and throws it back to the fungo
hitter e. Hitter must choke up on the bat or use a smaller bat

12
“3 Player Fungo”
H F
X
“3 Player Fungo”
H F
X
“4 Player Fungo”
H F
X
X(Baseman)
“4 Player Fungo”
H F
X
X(Baseman)
“5 Player Fungo”
H H
F
X X
“5 Player Fungo”
H H
F
X X
“Do or Die Pick Ups and Throws”
X X
“Do or Die Pick Ups and Throws”
X X
27. 3 Player Fungo a. In 3’s w/ 1 bat and 6 balls b. Hitter has one ball and catcher has another c. Hitter hits ball to fielder, fielder throws ball to catcher d. As soon as the first ball is hit the catcher gives the hitter
the 2nd ball e. Fielder must make the throw and get ready for the next
ball f. You can time the drill for 30 seconds to 4 minutes g. Great Conditioner!
28. 4 Player Fungo a. Same as above except add a 4th player b. 4th player is at 1st or 3rd base side c. Ball goes from hitter to fielder to baseman to catcher
29. 5 Player Fungo a. Similar to 3 player fungo except there are 2 hitters, 2
catchers and only 1 fielder b. The fielder is stationed between the two groups c. As soon as the fielder throws the ball to the catcher, she
must turn all the way around and field the ball from the other hitter
d. Stress correct footwork and proper throwing mechanics
30. Do or Die Pick Ups and Throws a. In 2’s w/ 1 ball approximately 25’ apart b. Player rolls ball to partner (bowling motion) c. Fielder must pick up the ball on the run outside of her body
and throw back to her partner d. This fielding technique is used when the run that may score
is the winning run from your opponent Variation 1: Use the same technique, except have players line up at 2nd and shortstop Variation 2: Add a catcher and fungo hitter (coach) at the plate. The player must pick the ball up on the run and throw it home
13
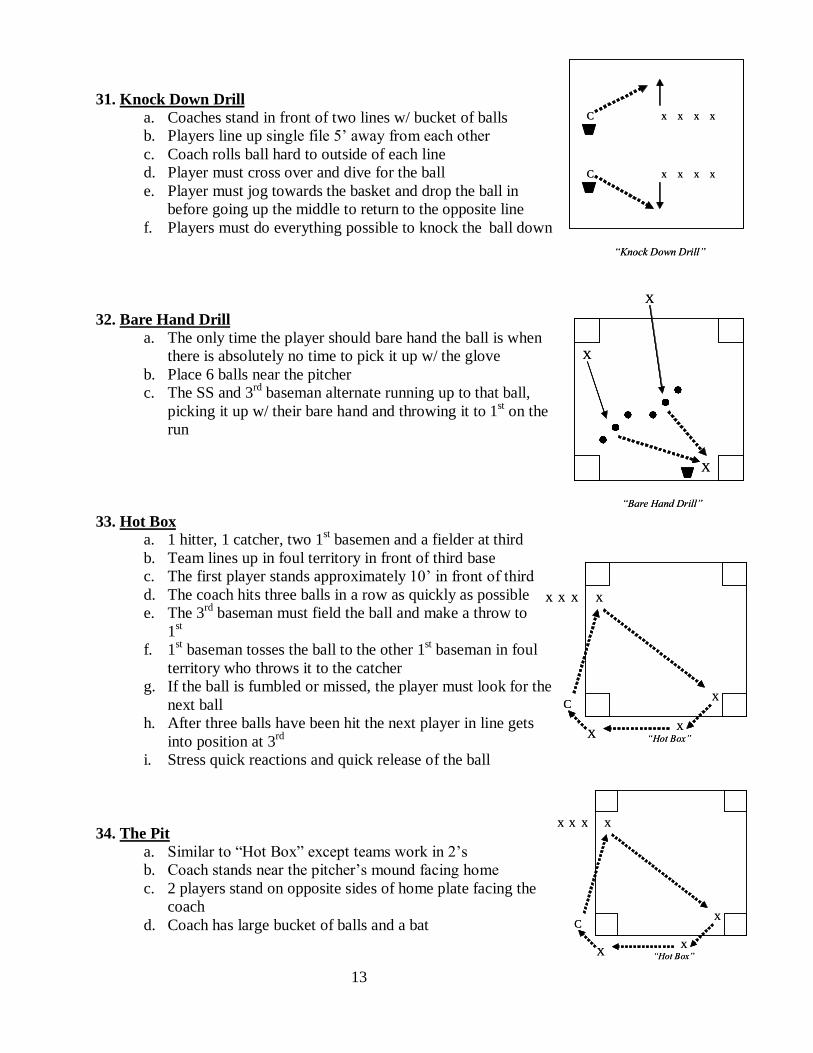
“Knock Down Drill”
C x x x x
C x x x x
“Knock Down Drill”
C x x x x
C x x x x
“Bare Hand Drill”
X
X
X
“Bare Hand Drill”
X
X
X
“Hot Box”
X X X X
X
X
C
X “Hot Box”
X X X X
X
X
C
X
“Hot Box”
X X X X
X
X
C
X “Hot Box”
X X X X
X
X
C
X
31. Knock Down Drill
a. Coaches stand in front of two lines w/ bucket of balls b. Players line up single file 5’ away from each other c. Coach rolls ball hard to outside of each line d. Player must cross over and dive for the ball e. Player must jog towards the basket and drop the ball in
before going up the middle to return to the opposite line f. Players must do everything possible to knock the ball down
32. Bare Hand Drill a. The only time the player should bare hand the ball is when
there is absolutely no time to pick it up w/ the glove b. Place 6 balls near the pitcher c. The SS and 3rd baseman alternate running up to that ball,
picking it up w/ their bare hand and throwing it to 1st on the run
33. Hot Box
a. 1 hitter, 1 catcher, two 1st basemen and a fielder at third b. Team lines up in foul territory in front of third base c. The first player stands approximately 10’ in front of third d. The coach hits three balls in a row as quickly as possible e. The 3rd baseman must field the ball and make a throw to
1st f. 1st baseman tosses the ball to the other 1st baseman in foul
territory who throws it to the catcher g. If the ball is fumbled or missed, the player must look for the
next ball h. After three balls have been hit the next player in line gets
into position at 3rd i. Stress quick reactions and quick release of the ball
34. The Pit a. Similar to “Hot Box” except teams work in 2’s b. Coach stands near the pitcher’s mound facing home c. 2 players stand on opposite sides of home plate facing the
coach d. Coach has large bucket of balls and a bat

14
“Double Fungo - 1”
XX
H1
X1
XX
H2 X2
X X
X X
“Double Fungo - 1”
XX
H1
X1
XX
H2 X2
X X
X X
“Double Fungo - 2”
X
H1
X1
XX
H2 X2
X
X X
“Double Fungo - 2”
X
H1
X1
XX
H2 X2
X
X X
“Double Fungo - 4”
X
H1
X1
X
H2 X2
X
X X
“Double Fungo - 4”
X
H1
X1
X
H2 X2
X
X X
e. Rest of the team forms a circle on both sides between coach and fielders f. The coach begins to hit balls as quickly as he/she can to the two players in
the “pit” g. Players field balls and toss to the side, teammates pick up balls and pass
them back to the feeder h. Keep score: 2 pts for a ball that is caught; 1 point for stopping it; -1 if it
goes through to the backstop i. You can do this drill for a specific number of balls or a specific amount of
time
35. Double Fungo- Skills
Drill 1: Hit to 4 Infield positions a. Team splits up into 4 equal groups b. Each group lines up single file at 1st, 2nd, 3rd & SS c. 1 coach stands on the foul line on the 3rd base side of home
and the other coach stands on the foul line on the 1st base side of home
d. Hitter 1 hits to 1st and 2nd, who throw back to catcher 1 e. Hitter 2 hits to 3rd and SS, who throw back to catcher 2
Drill 2: Force at 1st & 3rd a. H1 to 2nd who throws to 1st for the force out, then throws to catcher 1 b. H2 to SS who throws to 3rd for the force out, then throws to
catcher 2
Drill 3: Double Play a. H1 to P to C1 to 3rd base b. H2 to 2nd to SS (at 2nd) to 1st to C2
Drill 4: Force at 3rd/ DP at 2nd and 1st a. H1 2nd (at 2nd) to 1st to C1 b. H2 to LF to 3rd (at 3rd) to C2
“Double Fungo - 3”
X
H1
X1
XX
H2 X2
X
X XP
“Double Fungo - 3”
X
H1
X1
XX
H2 X2
X
X XP

15
“Double Fungo - 5”
X
H1
X1
XX
H2 X2
X
X X
“Double Fungo - 5”
X
H1
X1
XX
H2 X2
X
X X
Drill 5: Bunt Coverage a. H1 bunts down 1st base line- 1st throwsto 2nd at 1st to C1 b. H2 bunts down 3rd baseline- 3rd throws to SS at 3rd to C2
36. Double Fungo- Positions Drill 1: Hit to 4 Infield positions a. H1 hits to 2nd who throws to 3rd and then throws to C1 b. H2 hits to SS who throws to 1st and then throws to C2
Drill 2: Flies and Grounders a. H1 hit’s to 1st and 1st throws to H1’s catcher b. H1 hit’s to 2nd and 2nd throws to H1’s catcher c. Machine 1- easy fly ball to SS1, SS1 throws to C at M1 d. Machine 2- easy fly ball to SS2, SS2 throws to C at M2 e. H1=hits ground balls f. M1=machine 1=feeder & catcher g. M2=machine2=feeder & catcher
Drill 3: Infield & Outfield a. Same as above except move 2 lines at SS back to LF b. Catch “can of corn” Drill 4: Fielding Slow Rollers and Bunts a. Divide team into 4 lines; 1st, 1st base side of the mound, 3rd base side of the
mound, 3rd base b. Coaches with two catchers are on opposite sides of home with 2 baskets of
balls c. 2 cones are set up on opposite sides of the pitchers mound, this indicates
starting positions for fielders 1 and fielders 2 d. H1 rolls ball to F1, F1 fields ball and throws to 3rd, 3rd throws to C1 e. H2 rolls ball to F2, F2 fields ball and throws to 1st, 1st throws to C2 f. All players go to the end of their own line g. After 4 rounds, H1 and H2 drop balls like bunts h. Rotate all lines counter clockwise i. Rotate until all groups have been at each station

16
“Tracking Balls Overhead”
X X
X X
“Tracking Balls Overhead”
X X
X X
“Toss to Self and Throw”
X X
X X
“Toss to Self and Throw”
X X
X X
“Toss to Partner and Throw”
X X
X X
“Toss to Partner and Throw”
X X
X X
“Going Back With Variations”
C X
“Going Back With Variations”
C X
Catching Fly Balls
37. Tracking Balls Overhead
a. In 2’s (with 1 ball) facing each other 2’ apart b. Player holding ball does not have a glove on c. On signal, player holds ball up w/ right hand d. Partner steps w/ left foot and runs to her left e. After 4-5 steps partner switches ball in her left hand f. Player opens up to the ball by pivoting on left foot and stepping
right w/ right foot and continues to run back g. Each time the ball is switched to the other hand, player opens up
to change directions h. At no time does the defensive player “back pedal” or turn her back to
the ball
38. Toss to Self and Throw a. In 2’s (with 1 ball) approx. 35’ apart b. Player with the ball tosses it up in front of herself, makes the
catch and then throws to her partner c. Partner repeats drill back to her partner d. Stress: step w/ left foot (right handed player) on catch then
hop right and throw left
39. Toss to partner and Throw a. Same as above except toss easy fly balls to partner b. Partner catches the ball on the run; stepping w/ left foot on the
catch (right handed player) c. Stress: catching the ball on the throwing side and getting rid of
it quickly
40. Going Back w/ Variations a. Line up single file facing the coach (approximately 5 feet away) b. When coach holds the ball up, player steps with left foot at
sharp angle and runs back c. Coach tosses a high fly ball; player catches ball on the run d. Player jogs behind coach and puts ball in the basket

17
“Ball in the Sun”
C X X X
“Ball in the Sun”
C X X X
“One Player Blind Drill”
C X X X
“One Player Blind Drill”
C X X X
e. As soon as the ball is caught the coach holds up the next ball and the next player in line runs
f. After everyone has run to the left, players run to the right Variation 1: Use a catcher and when player catches ball, she must stop quickly and throw ball to catcher Variation 2: Use shallow drills when teaching footwork Variation 3: Add balls that are thrown directly overhead Variation 4: Add players making initial wrong turn, then turning the correct way
41. Balls in the Sun Drill 1 a. Coach lines players up side by side looking into the sun b. Teach players to get glove up above their head to block the
sun c. Their glove should cast a shadow over their face
Drill 2 a. Once the players have learned to block the sun add a ball to
the drill b. Players line up facing the coach and the sun c. Coach tosses the ball up into the sun for players to practice blocking
the sun and making the catch d. After catching the ball and having to toss it back to the coach the player
rotates to the end of the line e. You may want to start the drill using incrediballs
42. One Player Blind Drill a. Players line up single file approximately 10’ in front of the
coach, with their back to the coach b. As soon as he/she tosses up a pop up he/she tells the player
to turn around, the player must turn quickly, find the ball, call it and catch it
c. Player jogs over, puts ball in basket and returns to the end of the line
Variation: When you toss the ball up toss it to the players left or right and then mix it up. You can also toss long or short so that the player has to make quick adjustments to the ball. This drill can be done in combination with the Ball in the Sun Drill
18
“Blind Drill”
C
X X X X X
X X X X X
“Blind Drill”
C
X X X X X
X X X X X
“Football Pass Without Glove”
x x x x
C
“Football Pass Without Glove”
x x x x
C
“Quarterback Drill”
x x x
C X
“Quarterback Drill”
x x x
C X
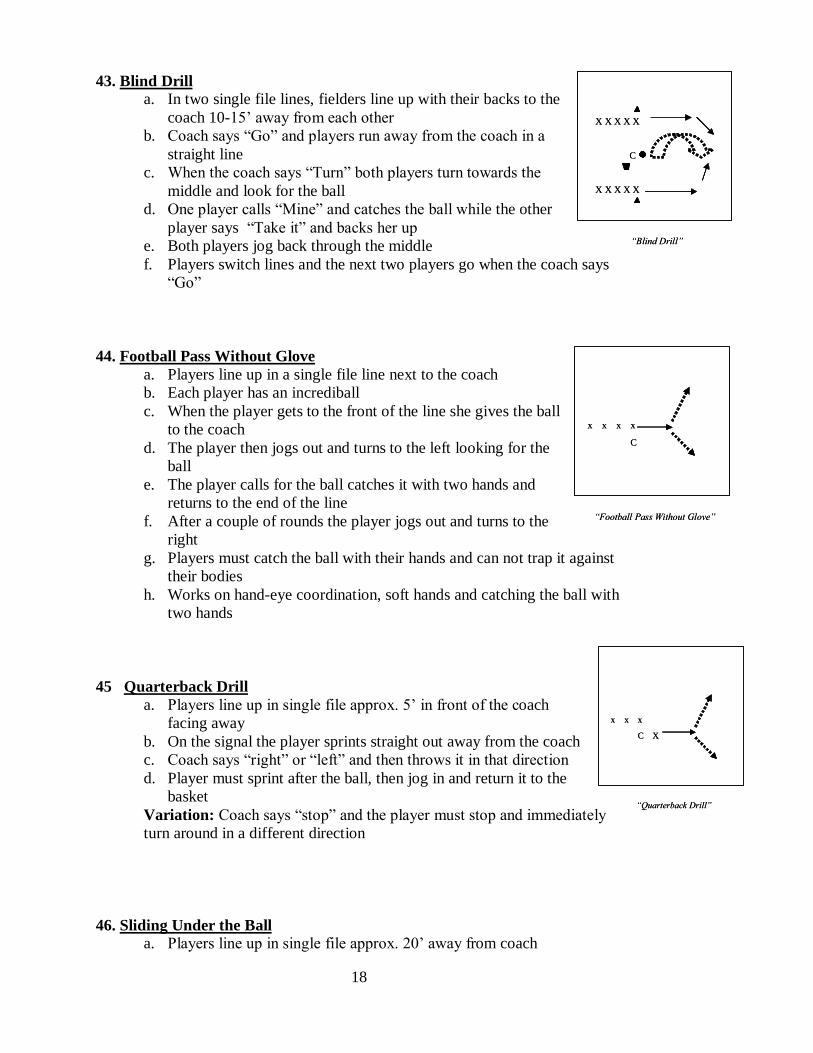
43. Blind Drill a. In two single file lines, fielders line up with their backs to the
coach 10-15’ away from each other b. Coach says “Go” and players run away from the coach in a
straight line c. When the coach says “Turn” both players turn towards the
middle and look for the ball d. One player calls “Mine” and catches the ball while the other
player says “Take it” and backs her up e. Both players jog back through the middle f. Players switch lines and the next two players go when the coach says
“Go”
44. Football Pass Without Glove a. Players line up in a single file line next to the coach b. Each player has an incrediball c. When the player gets to the front of the line she gives the ball
to the coach d. The player then jogs out and turns to the left looking for the
ball e. The player calls for the ball catches it with two hands and
returns to the end of the line f. After a couple of rounds the player jogs out and turns to the
right g. Players must catch the ball with their hands and can not trap it against
their bodies h. Works on hand-eye coordination, soft hands and catching the ball with
two hands
45 Quarterback Drill
a. Players line up in single file approx. 5’ in front of the coach facing away
b. On the signal the player sprints straight out away from the coach c. Coach says “right” or “left” and then throws it in that direction d. Player must sprint after the ball, then jog in and return it to the
basket Variation: Coach says “stop” and the player must stop and immediately turn around in a different direction
46. Sliding Under the Ball
a. Players line up in single file approx. 20’ away from coach
19
“Slide Under Ball For Catch”
C X X X
“Slide Under Ball For Catch”
C X X X
“Long/Short/Short – AKA LS2”
C
X X X
“Long/Short/Short – AKA LS2”
C
X X X
“Long/Short/Short – AKA LS2”
C
X X X
“Long/Short/Short – AKA LS2”
C
X X X
“Three Way Bloopers”
X X X
XXX
XX
X
C
“Three Way Bloopers”
X X X
XXX
XX
X
C
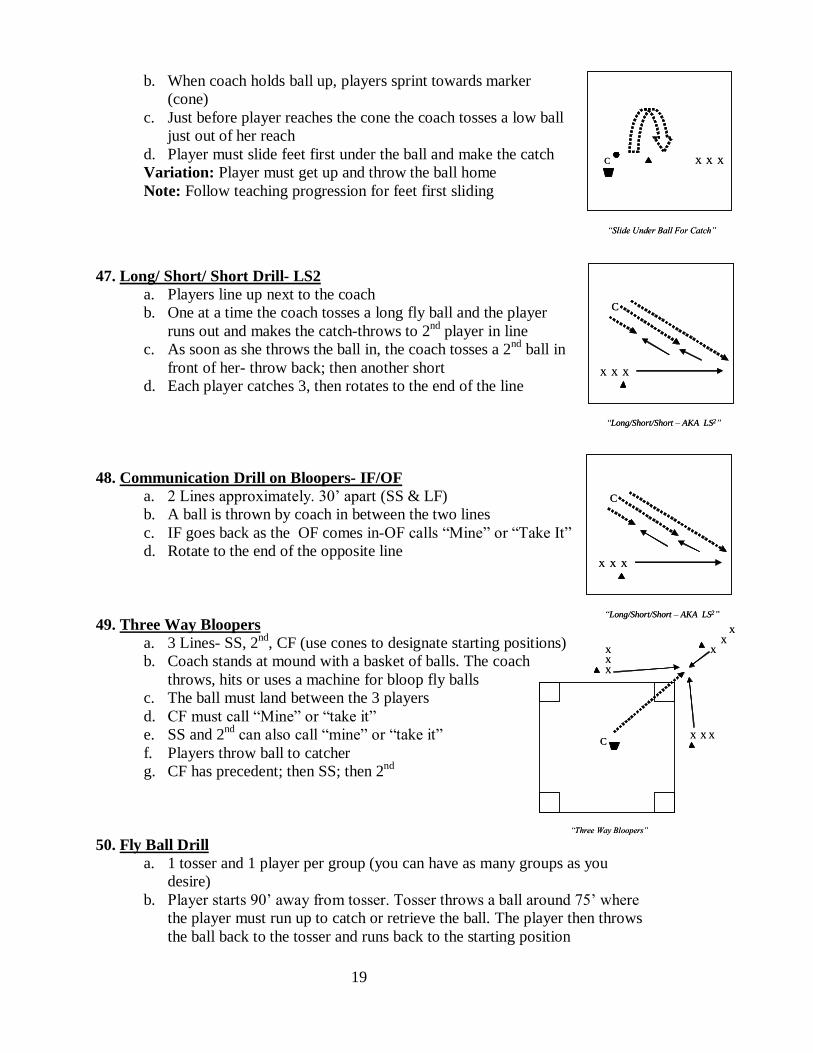
b. When coach holds ball up, players sprint towards marker (cone)
c. Just before player reaches the cone the coach tosses a low ball just out of her reach
d. Player must slide feet first under the ball and make the catch Variation: Player must get up and throw the ball home Note: Follow teaching progression for feet first sliding
47. Long/ Short/ Short Drill- LS2 a. Players line up next to the coach b. One at a time the coach tosses a long fly ball and the player
runs out and makes the catch-throws to 2nd player in line c. As soon as she throws the ball in, the coach tosses a 2nd ball in
front of her- throw back; then another short d. Each player catches 3, then rotates to the end of the line
48. Communication Drill on Bloopers- IF/OF a. 2 Lines approximately. 30’ apart (SS & LF) b. A ball is thrown by coach in between the two lines c. IF goes back as the OF comes in-OF calls “Mine” or “Take It” d. Rotate to the end of the opposite line
49. Three Way Bloopers a. 3 Lines- SS, 2nd, CF (use cones to designate starting positions) b. Coach stands at mound with a basket of balls. The coach
throws, hits or uses a machine for bloop fly balls c. The ball must land between the 3 players d. CF must call “Mine” or “take it” e. SS and 2nd can also call “mine” or “take it” f. Players throw ball to catcher g. CF has precedent; then SS; then 2nd
50. Fly Ball Drill a. 1 tosser and 1 player per group (you can have as many groups as you
desire) b. Player starts 90’ away from tosser. Tosser throws a ball around 75’ where
the player must run up to catch or retrieve the ball. The player then throws the ball back to the tosser and runs back to the starting position
20
“Box Communication”
X
X
C X
“Box Communication”
X
X
C X
“Over the Shoulder Catch”
C XXXX
“Over the Shoulder Catch”
C XXXX
“LSLS”
XC X
XX
31
42
“LSLS”
XC X
XX
31
42
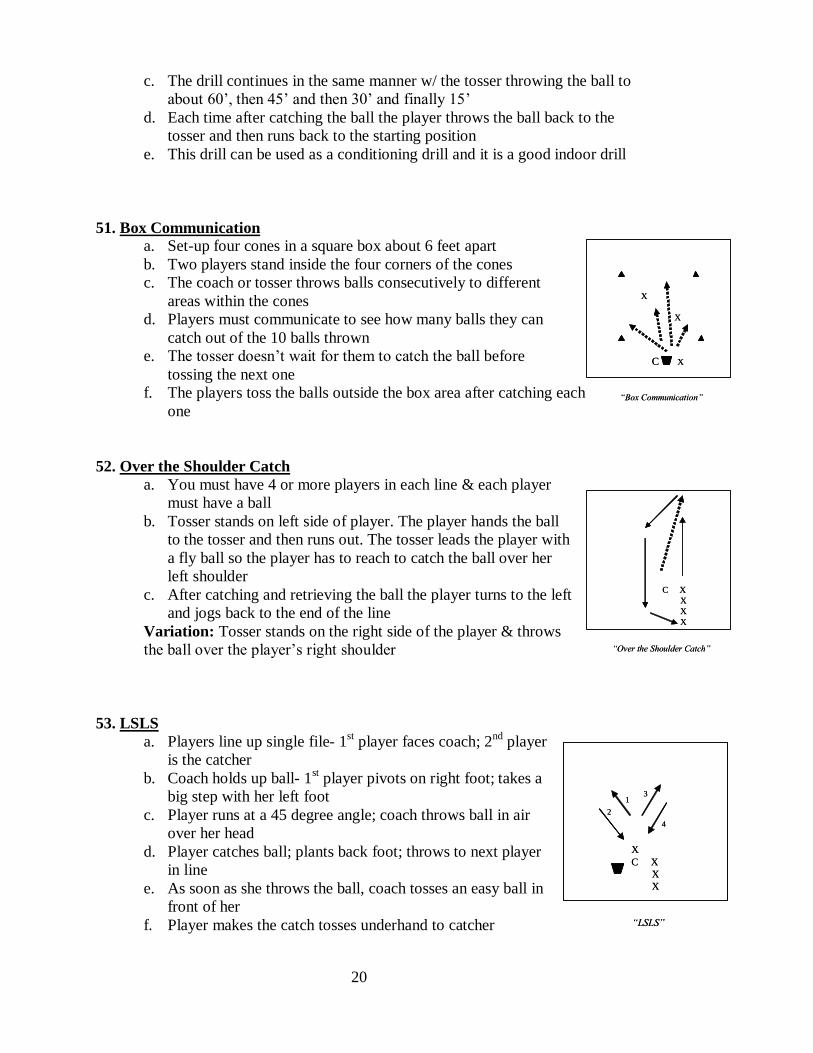
c. The drill continues in the same manner w/ the tosser throwing the ball to about 60’, then 45’ and then 30’ and finally 15’
d. Each time after catching the ball the player throws the ball back to the tosser and then runs back to the starting position
e. This drill can be used as a conditioning drill and it is a good indoor drill
51. Box Communication a. Set-up four cones in a square box about 6 feet apart b. Two players stand inside the four corners of the cones c. The coach or tosser throws balls consecutively to different
areas within the cones d. Players must communicate to see how many balls they can
catch out of the 10 balls thrown e. The tosser doesn’t wait for them to catch the ball before
tossing the next one f. The players toss the balls outside the box area after catching each
one
52. Over the Shoulder Catch a. You must have 4 or more players in each line & each player
must have a ball b. Tosser stands on left side of player. The player hands the ball
to the tosser and then runs out. The tosser leads the player with a fly ball so the player has to reach to catch the ball over her left shoulder
c. After catching and retrieving the ball the player turns to the left and jogs back to the end of the line
Variation: Tosser stands on the right side of the player & throws the ball over the player’s right shoulder
53. LSLS a. Players line up single file- 1st player faces coach; 2nd player
is the catcher b. Coach holds up ball- 1st player pivots on right foot; takes a
big step with her left foot c. Player runs at a 45 degree angle; coach throws ball in air
over her head d. Player catches ball; plants back foot; throws to next player
in line e. As soon as she throws the ball, coach tosses an easy ball in
front of her f. Player makes the catch tosses underhand to catcher
21
“Playing the Angles in the Outfield”
C
X
“Playing the Angles in the Outfield”
C
X
“Rounding the Ball”
X X X
C
“Rounding the Ball”
X X X
C
“2 Balls in the Air”
C X X X
“2 Balls in the Air”
C X X X
g. Player immediately begins to run at a 45 degree angle; coach throws the ball over her head
h. As soon as she throws the ball the coach tosses a short ball in front i. Player makes catch, tosses under hand to catcher j. Fielder goes to the end of the line and catcher becomes the fielder
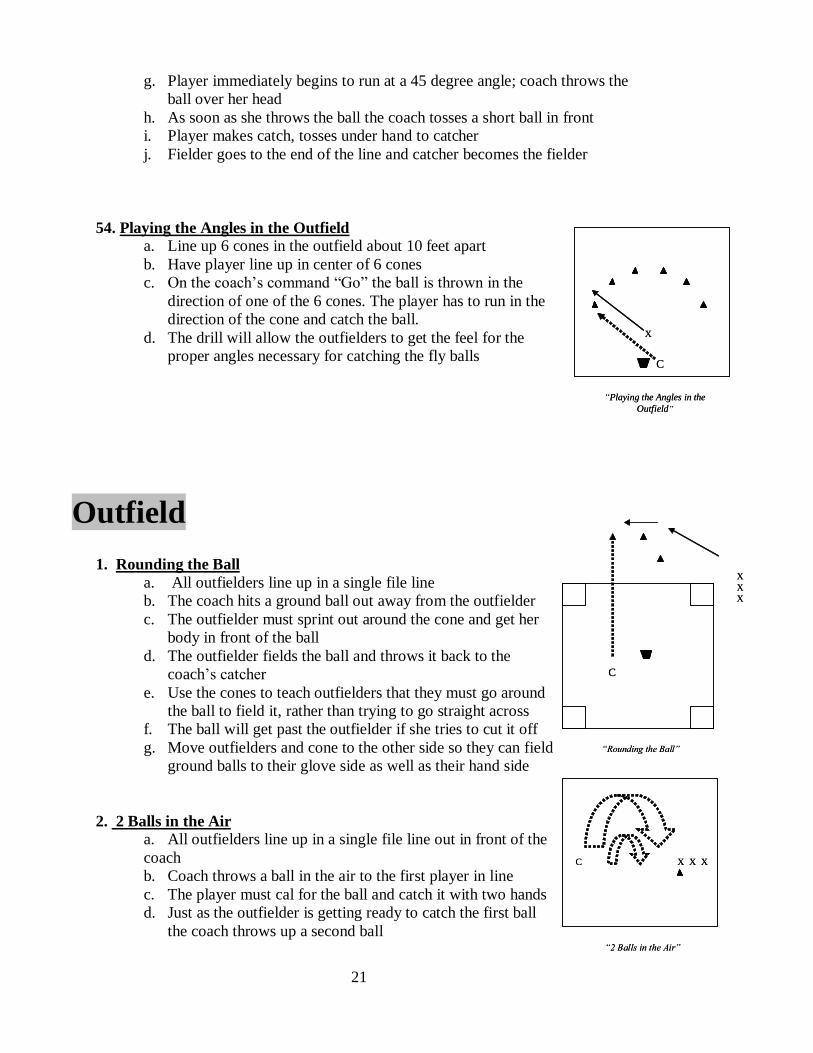
54. Playing the Angles in the Outfield
a. Line up 6 cones in the outfield about 10 feet apart b. Have player line up in center of 6 cones c. On the coach’s command “Go” the ball is thrown in the
direction of one of the 6 cones. The player has to run in the direction of the cone and catch the ball.
d. The drill will allow the outfielders to get the feel for the proper angles necessary for catching the fly balls
Outfield
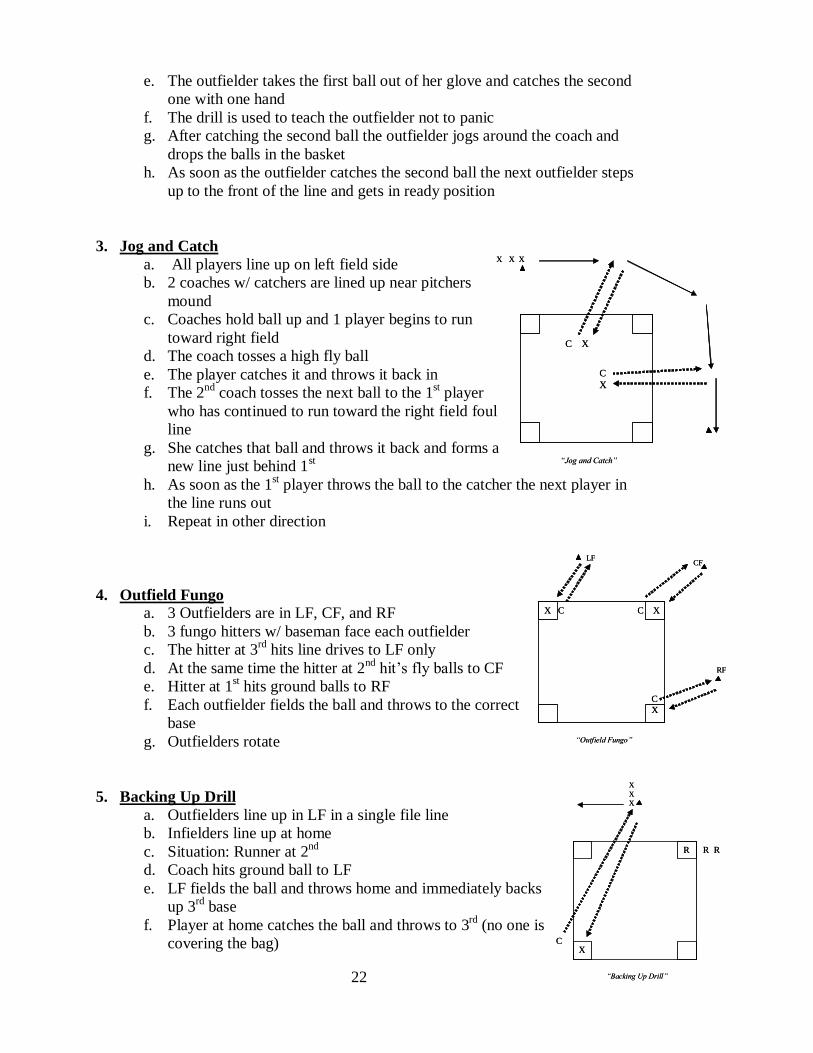
1. Rounding the Ball a. All outfielders line up in a single file line b. The coach hits a ground ball out away from the outfielder c. The outfielder must sprint out around the cone and get her
body in front of the ball d. The outfielder fields the ball and throws it back to the
coach’s catcher e. Use the cones to teach outfielders that they must go around
the ball to field it, rather than trying to go straight across f. The ball will get past the outfielder if she tries to cut it off g. Move outfielders and cone to the other side so they can field
ground balls to their glove side as well as their hand side
2. 2 Balls in the Air a. All outfielders line up in a single file line out in front of the coach b. Coach throws a ball in the air to the first player in line c. The player must cal for the ball and catch it with two hands d. Just as the outfielder is getting ready to catch the first ball
the coach throws up a second ball
22
“Jog and Catch”
C X
X X X
CX
“Jog and Catch”
C X
X X X
CX
“Outfield Fungo”
C X
LF
CX
CF
RF
X C
“Outfield Fungo”
C X
LF
CX
CF
RF
X C
“Backing Up Drill”
XXX
R R R
XC
“Backing Up Drill”
XXX
R R R
XC
e. The outfielder takes the first ball out of her glove and catches the second one with one hand
f. The drill is used to teach the outfielder not to panic g. After catching the second ball the outfielder jogs around the coach and
drops the balls in the basket h. As soon as the outfielder catches the second ball the next outfielder steps
up to the front of the line and gets in ready position
3. Jog and Catch a. All players line up on left field side b. 2 coaches w/ catchers are lined up near pitchers
mound c. Coaches hold ball up and 1 player begins to run
toward right field d. The coach tosses a high fly ball e. The player catches it and throws it back in f. The 2nd coach tosses the next ball to the 1st player
who has continued to run toward the right field foul line
g. She catches that ball and throws it back and forms a new line just behind 1st
h. As soon as the 1st player throws the ball to the catcher the next player in the line runs out
i. Repeat in other direction
4. Outfield Fungo a. 3 Outfielders are in LF, CF, and RF b. 3 fungo hitters w/ baseman face each outfielder c. The hitter at 3rd hits line drives to LF only d. At the same time the hitter at 2nd hit’s fly balls to CF e. Hitter at 1st hits ground balls to RF f. Each outfielder fields the ball and throws to the correct
base g. Outfielders rotate
5. Backing Up Drill
a. Outfielders line up in LF in a single file line b. Infielders line up at home c. Situation: Runner at 2nd d. Coach hits ground ball to LF e. LF fields the ball and throws home and immediately backs
up 3rd base f. Player at home catches the ball and throws to 3rd (no one is
covering the bag)

23
“Relay with Outfield Only”
X
X
X
“Relay with Outfield Only”
X
X
X
“Relay”
LF
SS
P
C
“Relay”
LF
SS
P
C
g. LF (who is backing up 3rd) retrieves errant throw and throws home h. Coach hits to next player in line Variation: Drill can be run at CF & 2nd base, and at RF & 1B
6. Rotate Up a. 3 fungo hitters at bases w/ 3 basemen b. 3 lines of outfielders LF, CF, RF c. Hitter at third hits ground ball down the line past LF d. Hitter at second hits a blooper to CF who must slide under ball for a the
catch e. Hitter at first hits a deep fly ball down the right field line f. Outfielders make the catch & throw & rotate up to the next line
7. Relay w/ Outfield Only
a. In groups of three outfielders, with the middle OF acting as the relay person
b. OF 1 tosses the ball behind her and then goes and retrieves the ball with the proper footwork and throws to OF2, OF2 relays to OF3
c. OF 3 tosses the ball behind and then goes and retrieves the ball throwing it back to OF2 who in turn relays the ball to OF1. Repeat a number of times and then have outfielders change positions
8. Relay a. In groups of 4 w/ 3 balls per group & 1 rubber base b. Designate 1 catcher, pitcher, (or cut-off), 2nd or SS (relay) &
and an outfielder c. 3 balls are placed approx. 10 feet behind the outfielder’s
starting position d. The 3 players on the field face the catcher e. On the signal, each outfielder turns and picks the ball up and
throws to the relay f. Relay catches ball on her left side, turns left and throws the
ball to the catcher aiming at the cut-offs head (right handed player)
g. Catcher must say “Let it go” or “cut-hold” h. Outfielders must plant right foot at ball with left side towards target when
picking ball up w/hand and glove Variation: Place the ball further away from the outfielders. Each group can compete against the other group
24
“Shoot the Gap”
C X1
X X X
CX2
“Shoot the Gap”
C X1
X X X
CX2
“Outfielder’s Communication Drill”
2B
2B
LFLF
CX
CFCF
RF RFH2
X
H1 X“Outfielder’s Communication
Drill”
2B
2B
LFLF
CX
CFCF
RF RFH2
X
H1 X
“Back Hand Drill”
C X1
X X X
CX2
“Back Hand Drill”
C X1
X X X
CX2
“Ball off Fence”
XXX
X
X
“Ball off Fence”
XXX
X
X
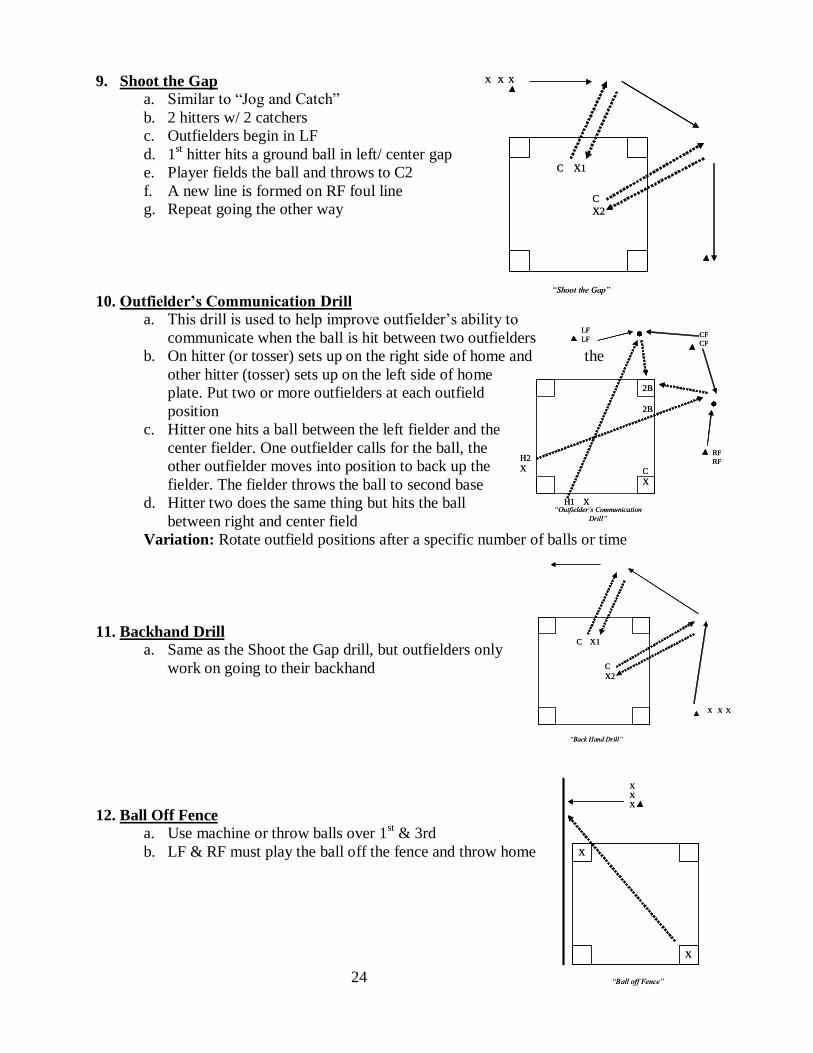
9. Shoot the Gap a. Similar to “Jog and Catch” b. 2 hitters w/ 2 catchers c. Outfielders begin in LF d. 1st hitter hits a ground ball in left/ center gap e. Player fields the ball and throws to C2 f. A new line is formed on RF foul line g. Repeat going the other way
10. Outfielder’s Communication Drill
a. This drill is used to help improve outfielder’s ability to communicate when the ball is hit between two outfielders
b. On hitter (or tosser) sets up on the right side of home and the other hitter (tosser) sets up on the left side of home plate. Put two or more outfielders at each outfield position
c. Hitter one hits a ball between the left fielder and the center fielder. One outfielder calls for the ball, the other outfielder moves into position to back up the fielder. The fielder throws the ball to second base
d. Hitter two does the same thing but hits the ball between right and center field
Variation: Rotate outfield positions after a specific number of balls or time
11. Backhand Drill a. Same as the Shoot the Gap drill, but outfielders only
work on going to their backhand
12. Ball Off Fence a. Use machine or throw balls over 1st & 3rd b. LF & RF must play the ball off the fence and throw home
25
“Accuracy Throws to Fence”
X X X X
X X X X
H
“Accuracy Throws to Fence”
X X X X
X X X X
H
“Target Practice”
X X X X
C
“Target Practice”
X X X X
C
13. Outfield Fence Drill a. Outfielders practice finding the fence behind them b. 3 tossers with a catcher for each c. The drill can have more than one outfielder in each position d. Outfielders start in their defensive positions e. The 1st outfielder in each line runs back and finds the fence by touching it.
At the same time, the tosser throws a fly ball just short of the fence causing the player to have to come back to catch the ball
14. Circuit Throwing a. Minimum of 7 players and a bucket of balls b. Players: catch, 1st, 2nd, 3rd, LF, CF, RF c. Player at 1st with a bucket of balls d. On signal, 1st baseman rolls ground ball to RF e. RF fields the ball and throws it back to first f. 1st rolls ball to CF who fields the ball and throws it to 2nd g. 2nd rolls ball to LF who fields the ball and throws it to 3rd h. 3rd turns and throws to the catcher i. Catcher throws ball to extra 1st baseman in foul territory who puts ball in
the bucket j. When CF throws ball to SS, 1st rolls next ball to RF * Place cones at the starting positions for the outfielders
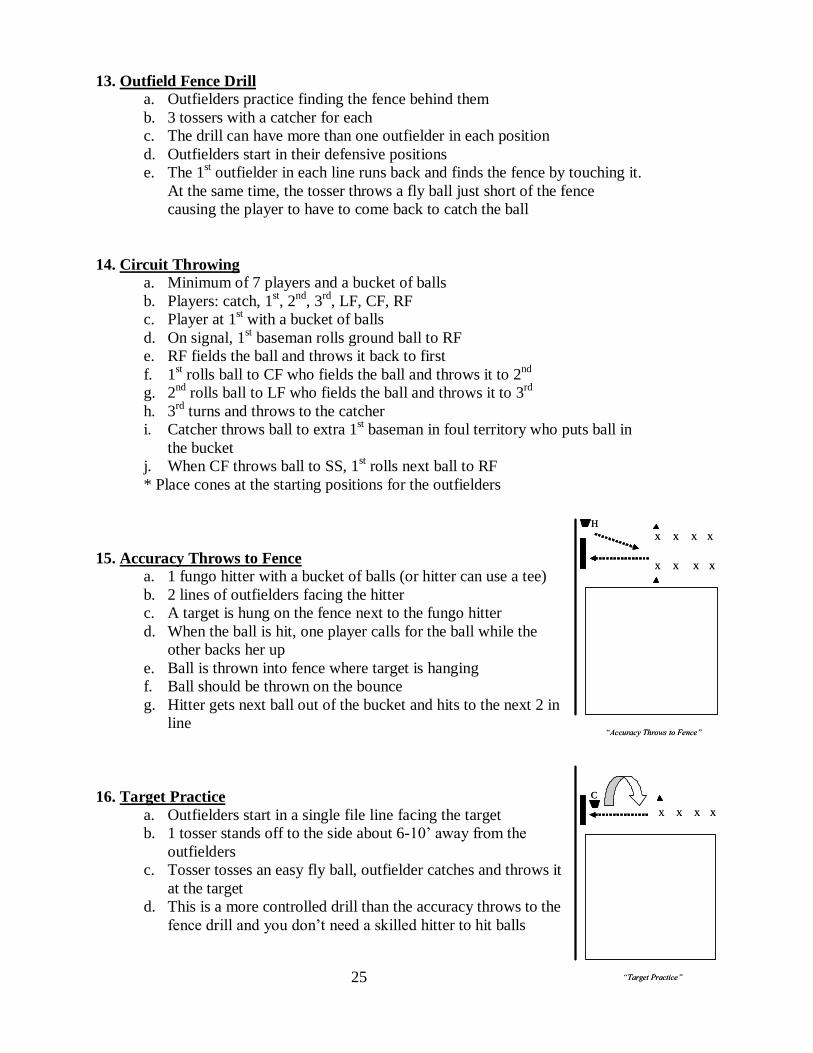
15. Accuracy Throws to Fence a. 1 fungo hitter with a bucket of balls (or hitter can use a tee) b. 2 lines of outfielders facing the hitter c. A target is hung on the fence next to the fungo hitter d. When the ball is hit, one player calls for the ball while the
other backs her up e. Ball is thrown into fence where target is hanging f. Ball should be thrown on the bounce g. Hitter gets next ball out of the bucket and hits to the next 2 in
line
16. Target Practice a. Outfielders start in a single file line facing the target b. 1 tosser stands off to the side about 6-10’ away from the
outfielders c. Tosser tosses an easy fly ball, outfielder catches and throws it
at the target d. This is a more controlled drill than the accuracy throws to the
fence drill and you don’t need a skilled hitter to hit balls
26
“Throw Runners Out at Plate –Tagging from 3rd”
XXX
RR
R
3B
P
C
H“Throw Runners Out at Plate –
Tagging from 3rd”
XXX
RR
R
3B
P
C
H
17. Finding Range a. Place P, C and LF, CF, or RF in their positions b. Base runners line up at third c. LF chooses a spot in the outfield where she can successfully throw out a
runner at the plate 3 times in a row d. She places 3 balls on the ground e. When she picks up the first ball that runner takes off for the plate f. The LF must hit the cut off and throw the runner out at home g. If she cannot she must move forward until she can succeed h. All outfielders should become familiar with their range
18. In and Out of Range a. After outfielders know their throwing range, put runners at 2nd and 3rd b. Coach hits fly balls to LF, CF, RF c. If the ball is within their range they throw home for the out d. If it is out of her range she must throw the ball to 3rd to keep the runner at
2nd from advancing
19. Throw Runners Out at the Plate
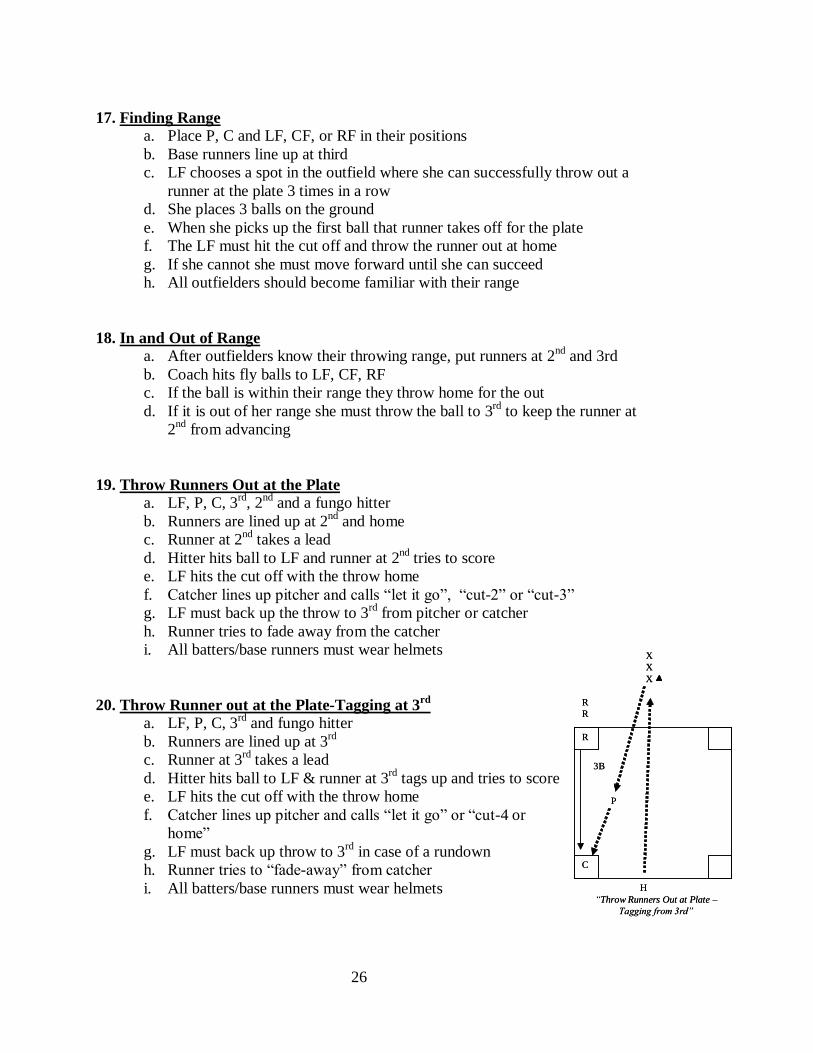
a. LF, P, C, 3rd, 2nd and a fungo hitter b. Runners are lined up at 2nd and home c. Runner at 2nd takes a lead d. Hitter hits ball to LF and runner at 2nd tries to score e. LF hits the cut off with the throw home f. Catcher lines up pitcher and calls “let it go”, “cut-2” or “cut-3” g. LF must back up the throw to 3rd from pitcher or catcher h. Runner tries to fade away from the catcher i. All batters/base runners must wear helmets
20. Throw Runner out at the Plate-Tagging at 3rd a. LF, P, C, 3rd and fungo hitter b. Runners are lined up at 3rd c. Runner at 3rd takes a lead d. Hitter hits ball to LF & runner at 3rd tags up and tries to score e. LF hits the cut off with the throw home f. Catcher lines up pitcher and calls “let it go” or “cut-4 or
home” g. LF must back up throw to 3rd in case of a rundown h. Runner tries to “fade-away” from catcher i. All batters/base runners must wear helmets
27
“Bounce Throw to the Catcher”
XXX
C
H
“Bounce Throw to the Catcher”
XXX
C
H
“Infield/Outfield Jurisdiction”
XXX
SS
2B
TX
T X
X X X
“Infield/Outfield Jurisdiction”
XXX
SS
2B
TX
T X
X X X
“Dive for all Bloopers/ Do or Die Catches”
XXX
C
“Dive for all Bloopers/ Do or Die Catches”
XXX
C
“Picking up Balls Hit Past OF”
X X X X
“Picking up Balls Hit Past OF”
X X X X
21. Bounce Throw to Catcher a. Line outfielders up in LF b. Place a rubber base or set up cones 15-20’ in front of the catcher c. Hit or toss flies to Outfielders lined up in LF d. Outfielders make the catch and throw the ball home so that it
bounces up to the catcher between knee and waist level Variation 1: Hit or toss ground balls Variation 2: Add outfielders in CF and RF Variation 3: Add runners to put pressure on the outfielders
22. Infield/Outfield Jurisdiction a. Drill Has 2 tossers, who are in front of home plate. Each tosser
has a catcher b. Players are divided into lines at SS, 2nd, LF & RF c. Tosser 1 throws a fly ball deep in the gap behind 1st, while
tosser 2 throws a fly ball deep in the gap behind 3rd base. The 2nd baseman and RF work together to catch the fly ball, while the SS and LF work together to catch the fly ball thrown between them.
d. The outfielders have jurisdiction over all infielders. If an outfielder calls for the fly ball, the infielders should allow the outfielder to field the ball.
23. Dive for All Bloopers and Do or Die Catches a. Situation: bottom of 7th, winning run at 3rd, 2 outs b. A base hit will win the game, so anything in the air must be
caught or we lose c. Use the machine or a tosser, mark the outfielders starting
position with a cone and use a tosser or a machine d. Toss bloopers that would barely go over the infielders e. Toss balls to right, left and in front of the outfielders f. Players must dive or slide under everything
24. Picking Up Balls Hit Past OF a. Line up side by side about 5’ apart b. Balls are placed 5’-10’ behind each player c. On the signal, each player runs back to the ball, planting their feet
with the ball in the middle of their body preparing to make their throw.
d. The ball is then picked up with two hands – press the ball into the glove, pick it up and get into the position to throw
e. Add a relay player in the middle f. Add a contest – which group gets ball into catcher first
28
“Quick Throws”
XXX
T
1B
T 2B3B T
X X X
XXX
“Quick Throws”
XXX
T
1B
T 2B3B T
X X X
XXX
“Fielding Long Hops and Throwing to Bases”
X X X X X X
X X X X X X
“Fielding Long Hops and Throwing to Bases”
X X X X X X
X X X X X X
25. Quick Throws
a. 3 tossers and 3 catchers with the catcher covering a base b. Each line can have 1 or more outfielders c. The outfielders are pulled up in order to get a force play
at a base d. The tosser throws a quick ground ball to the outfielder,
who fields the ball and quickly throws it to the respective catcher
Variation: Line drives or short fly balls to turn a double play
26. Fielding Long Hops and Throwing to Bases a. One group of outfielders lined up in single file line in
right center and one group lined up near the right field line
b. One group of infielders covers 2nd base and the other group covers 1st base
c. The first infielder in each line throws a long hop to the first outfielder in their line. The outfielder fields the long hop and makes a good throw to their infielder
d. The next outfielder and infielder step up to the front of their respective lines
Variation: Tag play for the infielder and then force play for the infielder
27. Situation Assessment and Throw a. This drill is used to assess the ability of the outfielders to react quickly,
assess the situation and make an accurate “tag throw” IN FRONT of the runners
b. Locate the 3 outfielders in their normal fielding positions, place three softballs about 12 inches apart in front of each fielder and have them lay down on their backs with their heads facing home plate
c. Position the 4 receivers forward of each of the bases and home plate d. Start the base runner with a hand signal from home plate with the
instruction to run the diamond at full speed e. After allowing the runner a head start, call out one of the three outfield
positions in a loud voice (i.e. centerfield) f. The fielder must scramble to their feet, pick up the ball, quickly ascertain
the runners position and make a throw to the base in front of the runners, emphasize “in front of the runner”
g. By varying the time given to the runner, the outfielders will be required to make throws to all the bases and home plate
Variations: add a second runner and introduce a cut off and play on the second runner
29
“Conditioner/Fly Ball Development”
XXX
H X
X X XH X
“Conditioner/Fly Ball Development”
XXX
H X
X X XH X
28. Conditioner/Fly Ball Development
a. Players line up in left field and right field b. One fungo hitter will hit fly balls and grounders to left
field, the other to right. Each fungo hitter has a bag or bucket full of balls to hit
c. Players catch ball and run with the ball and put them in the buckets in centerfield. You can have players go back to their same lines or rotate lines
d. Hit fly balls, line drives, alley shots, etc. e. This allows you to work on a lot of different types of
catches without wearing out the arm with a lot of throws. Also works on conditioning
Catcher
29. Bite the Ball a. With full gear, partner tosses ball into catcher’s mask b. Catcher must simulate biting the ball c. At the same time, catcher’s eyes must spring open! d. Helps catcher understand the value of the mask
30. Stance a. With full gear, get into signal stance with feet closer together, butt low and
signal given inside legs b. Receiving stance – Hips up with feet shoulder width apart
A. Signal Stance
a. Arms resting on thigh b. Keep signal in crotch c. Fingers pointed down d. Slow and deliberate
B. Receiving Stance
a. Feet apart – shoulder width b. No glove target c. “Fine Tune” on release point d. If pitch is inside body, move glove e. Frame the pitch f. Hold pitch in glove

30
“One Knee Throwing”
X
X
X X
“One Knee Throwing”
X
X
X X
“Quick Feet”X
C
g. If pitch is outside the body, step h. Throw glove over shoulder
31. One Knee Throwing a. The catchers kneel 20 feet apart on their right knees (right
handed catcher). After throwing the ball back and forth for a specific period of time, they move back apart 10 more feet
b. Keep moving back until they reach the distance equal to that of home plate to 2nd base
32. Quick Feet a. Coach throws ball hard from 20-30 feet away to the catcher b. The catcher takes a jab step to the left or right attempting to
get the middle of the body in front of the ball c. Variation: Use pitching machine if available
33. Blocking Balls A. Straight on
a. Follow ball from release point b. Throw knees to ground c. Drop glove to ground d. Glove is perpendicular to ground e. Spread fingers f. Glove is resting on thighs, blocking the hole between knees g. Hips up – thighs perpendicular h. Head over the ball
B. To Right of Left
a. Step forward and to the side b. Push off with other leg c. Hips face home plate d. Keep ball in front of home plate
34. Blocking Balls in the Dirt a. Start with incrediballs or tennis balls b. Partner stands approx. 15’ away from catcher c. Partner throws balls in the dirt d. Catcher must go down on both knees with hips up and head down and
keep the ball in front of her e. Balls can be thrown straight on, or to the left or right f. If ball is to the side, catcher must take one step up in the direction that ball
is thrown

31
X
X
“Blocking/Receiving Bad Throws”
“Blocking Balls off the Wall”
X X
“Blocking Balls off the Wall”
X X
g. Important point: catcher’s body must be facing home plate when blocking the ball
h. Catcher must use gear to help knock down the ball
35. No Hands a. Used to work on footwork and body mechanics b. Coach throws balls from 20-30’ away to the catcher c. The catcher has both hands behind her back, with her head down and
shoulders rounded d. The catcher concentrates on keeping the ball in front of the body e. **All protective gear must be worn, except the glove
36. Blocking/Receiving Bad Throws
a. Hit/throw balls to the catcher from 2nd base. This is to help the catcher block/receive bad throws
37. Block Balls Off the Wall a. Catcher faces the wall b. Partner stands behind her with a ball c. Partner tosses a ball over catchers right shoulder, then left
shoulder d. Catcher blocks ball off the wall e. The closer to the wall, the harder the ball must be thrown
38. Framing Drill a. Used to help improve the catcher’s ability to frame pitches and to shift the
body weight for pitches that are slightly outside the width of the shoulders b. Catcher 1 stands in front of catcher 2 while they use a ball on a stick to
simulate pitches that are high, low, inside and outside of home plate c. Catcher 3 practices framing the pitches with catcher 1 using the ball on the
stick
39. Framing Drill With Tennis Balls a. Throw tennis balls to catcher from a few feet away b. Catcher receives the ball with only batting gloves. This drill helps the
catcher to practice framing the pitch

32
“Foul Ball Communication”
P
1B
3B
C T“Foul Ball Communication”
P
1B
3B
C T
“Pop Fly Communication”
P
1B
3B
C
T “Pop Fly Communication”
P
1B
3B
C
T
“Fielding ball at Backstop”C
T
“Fielding ball at Backstop”C
T
40. Finding the Fence/Pop Ups a. On all pop ups near the fence, the players should find the fence 1st, then
catch the ball b. Catcher is in receiving stance at home plate c. Pitcher stands in front of home plate with the ball d. Pitcher tosses ball up and back toward backstop and says “glove” or
“hand” indicating the side where ball was thrown e. Catcher takes off mask and throws to opposite side f. Catcher must find fence 1st, then catch the ball
41. Foul Ball Communication a. P, C, 1B and 3B work on communicating with one another on
pop ups in foul territory b. Each player starts at their respective positions c. The coach stands behind the catcher and tosses a ball up in
foul territory d. The infielders help direct the catcher in the proper
direction e. The catcher must be in full protective gear f. Catcher takes off mask and throws it to the opposite side
42. Pop Fly Communication a. This drill works on communication between the C, P, 1B and
3B b. Each player starts at their respective defensive positions with
the coach standing behind the catcher at home plate c. The coach throws a pop fly between the 4 infielders
positions, and the infielders work together in calling for the pop fly
d. Make sure to have rules regarding the jurisdiction of each player
43. Fielding Ball at Backstop a. In 2’s, catcher gets into receiving stance b. Partner stands 15’ in front of home plate with balls c. Partner rolls ball past catcher to right, then left side d. Catcher lets ball get by her e. Catcher runs to backstop, plants right foot (right handed
catcher) next to ball with left side toward plate f. Catcher picks ball up and uses an underhand toss to
partner at the plate

33
“Throws to 1st from Inside/Outside”
C
1B
“Throws to 1st from Inside/Outside”
C
1B
“Fielding Bunts -Conditioning”
C“Fielding Bunts -
Conditioning”
C
“Force Play at Home”
3B
1BH
C“Force Play at Home”
3B
1BH
C
44. Throws to 1st From Inside/Outside a. Catcher and first baseman b. The catcher must always throw to 1st on the same side the
ball is fielded to prevent throwing across the runner and possibly hitting her
c. Place a ball in front of the plate and another near the backstop
d. Catcher begins in her receiving stance and goes to the ball either in front or behind her
e. 1st baseman is calling “inside” for balls fielded inside the diamond
f. 1st baseman is calling “outside” for balls fielded outside the diamond
g. The 1st baseman must follow the same procedure when calling for the ball
45. Fielding Bunts – Footwork a. With the catcher in her receiving stance, the coach drops a ball in front of
the plate b. The catcher springs out of her stance, picks the ball up with both hands –
pressing the ball into her glove c. The glove is thrown over her shoulder and the throw is made to 1st base on
the inside of the diamond Variation: Add throws to 2nd and 3rd
46. Fielding Bunts – Conditioning a. Set six balls down the first baseline and six down the third
baseline b. Have the catcher(s) practice springing out of the box to
field the bunt c. Emphasize quickness and proper footwork Variation: Time them or have a contest between your two catchers
47. Force Plays at Home a. One player at 3B, C, 1B b. The catcher has a bucket full of balls for the coach to hit c. 1B has an empty bucket to put balls in d. Coach hits to 3b, the 3B throws to the catcher at home e. The catcher makes the force out at home and then throws to
1B for the double play f. After catching the ball, the 1B puts the ball in the bucket g. When all balls have been hit, the catcher and 1B
exchange buckets h. Variation: Add SS, 2B and hit to these positions also
34
C
SS
“Throwing to Second Base”C
SS
“Throwing to Second Base”
CX X X
X
“Footwork/Getting Back to the Bag”
X
X
CX X X
CX X X
CX X X
X
“Footwork/Getting Back to the Bag”
X
X
CX X X
CX X X
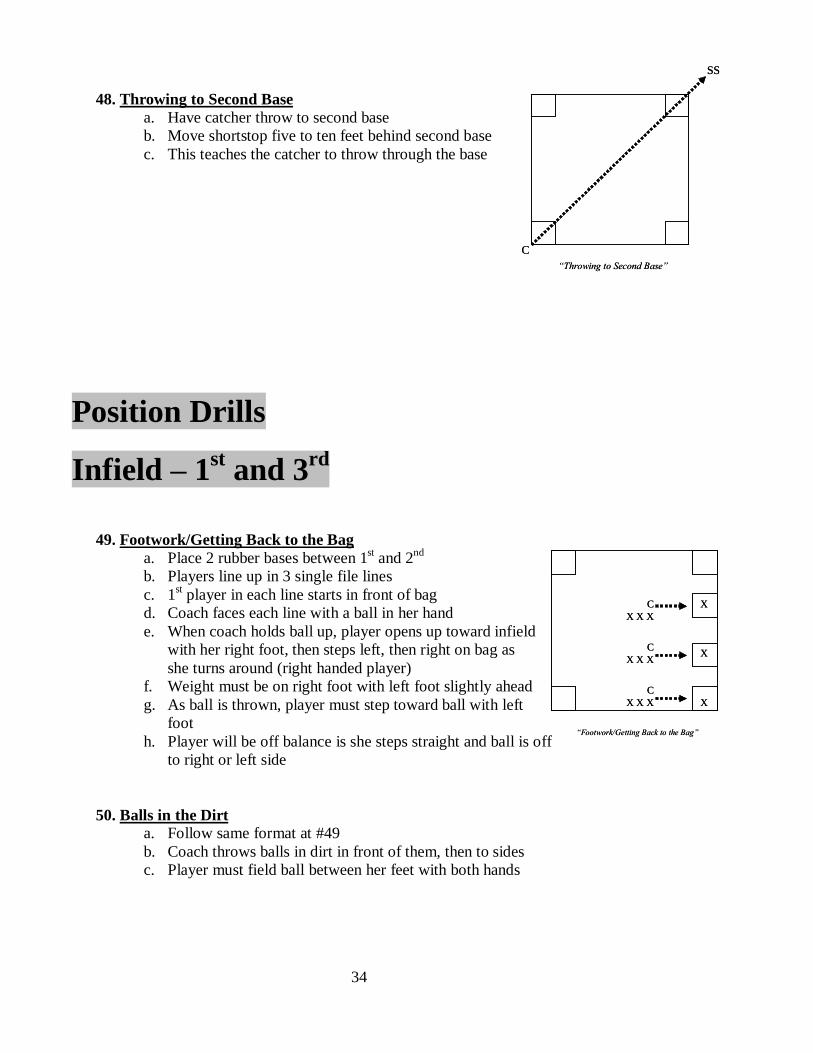
48. Throwing to Second Base
a. Have catcher throw to second base b. Move shortstop five to ten feet behind second base c. This teaches the catcher to throw through the base
Position Drills
Infield – 1st and 3rd
49. Footwork/Getting Back to the Bag a. Place 2 rubber bases between 1st and 2nd b. Players line up in 3 single file lines c. 1st player in each line starts in front of bag d. Coach faces each line with a ball in her hand e. When coach holds ball up, player opens up toward infield
with her right foot, then steps left, then right on bag as she turns around (right handed player)
f. Weight must be on right foot with left foot slightly ahead g. As ball is thrown, player must step toward ball with left
foot h. Player will be off balance is she steps straight and ball is off
to right or left side
50. Balls in the Dirt a. Follow same format at #49 b. Coach throws balls in dirt in front of them, then to sides c. Player must field ball between her feet with both hands

35
C“Fielding Bunts”
3B
1B
2B
C“Fielding Bunts”
3B
1B
2B
C“Pick Offs”
3B
1B
SS
P
C“Pick Offs”
3B
1B
SS
P
“Double Play from Outside of Infield”
2B
1B
SS
“Double Play from Outside of Infield”
2B
1B
SS
51. Fielding Bunts a. 1st, 2nd, 3rd baseman and catcher b. Catcher rolls ball out and 1st or 3rd fields bunt and throw to
2nd baseman covering 1st c. Both players fielding the bunt must plant their right foot
next to the ball, turn glove toward 1st (right handed player)
d. Press ball into the glove with the hand e. Throw ball to 1st f. Rotate to end of own line
52. Find the Fence
a. Similar to catcher finding the fence b. Coach stands at home and throws pop flies near the fence c. Players must run to the fence first, then come back and catch the ball
53. Pick Offs
a. P, C, 1st, 3rd and SS b. Catcher calls for a “pitch out” c. Prior to pitch, 1st and SS move closer to 1st and 3rd d. As the pitcher begins her wind up, 3rd charges for a bunt e. Catcher moves out to meet ball and throws ball to the
inside of 1st where 1st baseman is straddling the bag or to 3rd base where SS has snuck in from behind to straddle the bag
Variation: Add a rundown with the runner caught off the bag on the pick off
54. Double Play From Outside Infield
a. Teach the footwork to both players for the DP b. Players line up single file behind SS or 2nd c. Coach stands at pitchers mound and rolls or hits a
ground ball to SS or 2nd d. Ball is fielded and tossed underhand to teammate at 2nd e. Rotate to end of line
55. Double Play From Inside the Infield a. Players line up at SS position and 1st base b. 1st baseman bounces ball to self, turns and throws to SS c. Switch lines – players line up at 2nd and 3rd
36
“Double Play from Inside of Infield”
1B
SS
“Double Play from Inside of Infield”
1B
SS
“Come Backer to the Pitcher”
1B
SS
2BP
“Come Backer to the Pitcher”
1B
SS
2BP
“Going Back”
SS
2B
Coach
“Going Back”
SS
2B
Coach
“Fielding Ball with Runner in Front”
R R R
SS
2B
H1B
“Fielding Ball with Runner in Front”
R R R
SS
2B
H1B
d. 3rd baseman bounces the ball to herself, she turns and throws to 2nd
e. Variation 1: add 1st baseman to complete DP f. Variation 2: Add fungo hitter – hit ground balls to positions
above
56. Come backer to the Pitcher a. Players line up at SS and 2nd and P b. SS and 2nd alternate receiving the throw from the P c. P bounces ball to herself in front of the mound d. P turns and throws ball to 2nd base for DP e. Variation: add fungo hitter hitting ground balls back to P
57. Going Back a. Players line up at SS and 2nd b. Coach tosses or hits bloopers behind SS and 2nd c. Players must turn and run back d. After the catch, players throw to 2nd base where their
teammate is covering the bag e. Rotate to the end of the line
58. Fielding Ball with Runner in Front a. SS, 2nd, 1st and fungo hitter b. Rest of team line up at 1st base as the runners c. Ground balls are hit directly at 2nd baseman d. She charges ball and does one of the following:
Runs into runner while fielding the ball Fields ball, tags runner and throws to 1st for DP Fields ball, throws to SS at 2nd who throws to 1st for
DP e. Variation: hit balls to SS with runners on 2nd f. Variation: hit ball to SS or 3rd with runner at 2nd and fake and go behind
to 2nd base
37
“Diving for Balls on the Infield”
XXX
X
Coach
“Diving for Balls on the Infield”
XXX
X
Coach
“Line Drives”
3B
H
C
SS
P
“Line Drives”
3B
H
C
SS
P
59. Pivot Drill
a. This drill is used to work on range and explosiveness to balls that are to the back hand and the forehand sides
b. One fielder starts between and in front of two lines of cones. Another person is stationed facing the fielder in front of each line or cone
c. These people have buckets of balls. The fielder then sets up in her ready position and the first person facing the cone rolls a quick ball to the line or cone just quick enough so that the person has to pivot and drive to the ball with her back leg and glove.
d. The fielder then tosses the ball to the side and hustles back to the middle to get into her ready position. Then the other person facing the cone rolls the fielder another ball to the opposite side. The drill then repeats itself until all of the balls are gone.
60. Diving for Balls on the Infield a. This drill is used to teach infielders how to dive for ground balls both to
their back hand and to their forehand sides. b. The coach stands out in front of the line of infielders with
a bucket of balls c. The coach starts this drill by rolling balls to the infielders
glove side, far enough so that they must crossover and dive for the ball. As the player gets more comfortable diving, then roll the ball farther away from her, so that she must run and then dive for the ball. Do the same progression to the players’ hand side.
Variation: The coach moves back to home plate and hits balls to the players instead of rolling them. Also move infielders to their specific infield positions
Infield – Pitcher
61. Line Drives a. Work on pitcher catching line drives and throwing to
specific bases b. P, C, SS, and 3B are at their defensive positions c. The pitcher pitches a ball. As the ball gets to the C, the
coach hits another ball as a line drive to the pitcher, who catches the ball and throws the ball to 2nd base with the SS covering the base

38
“Lateral Movement”
1BH
C
P
“Lateral Movement”
1BH
C
P
“Fielding Bunts”
3B
H
C
SS
P
1B
“Fielding Bunts”
3B
H
C
SS
P
1B
d. The pitcher then pitches a second ball. The coach hits another line drive and the P throws this one to 3rd base with the 3rd covering the base
Variation: Use a machine or have a coach throw instead of hitting the balls Repeat the sequence a specific number of times.
62. Lateral Movement a. P, C, 1B at their respective positions b. The pitcher pitches a ball. As the ball gets to the catcher, the
coach hits another ball to the right or left of the P, who fields the ball and throws to 1B
63. Fielding Bunts a. 1B and 3B are at their respective bases, while SS is
covering 2nd and the C is at home b. The pitcher throws a pitch to the catcher, as soon as the
catcher catches the ball the coach drops a bunt in front of the mound for the pitcher to field
c. The pitcher fields the first bunt and throws to 1B d. After throwing to 1B, she throws another pitch and
fields the bunt that the coach dropped and throws it to 2nd
e. The sequence continues as the P makes the play at 3rd and then at home on the third and fourth bunts
f. You can repeat this sequence for a specific amount of rotations or a specific amount of time
64. Reaction Drill a. The pitcher pitches against the wall and works on fielding the ball when it
rebounds off of the wall b. Start at 20-25’ and move in as the pitcher improves her skills and becomes
more confident c. Make sure that the pitcher does not move in so close that the ball comes
off the wall and hits her

39
Mental Aspects of Pitching
Concentration To be outstanding in anything, you must learn to concentrate. This means directing your entire mental capacity on a specific objective. Your objective as a pitcher is to throw the ball where you want it to go. You must not allow yourself the luxury of letting your mind think of anything else but where you are going to throw the ball. The mind, the muscles, the concentration and the proper mechanics will enable you to do what you want with the softball. You can concentrate on only one thing at a time. The area of focus of the eyes is limited to a very small spot. Therefore, your mind and eyes cannot wander from their determination to throw the ball to a specific spot. On each pitch, you must do two things in the following sequence: 1- concentrate on where you want to throw the ball and 2- throw the ball hard. Relaxation Relax physically, but never mentally. If you are tense, control and timing is impossible. Learning to relax is a must. The desire to pitch well and be impressive can have a negative effect. Here is one suggestion that may help you relax. Take a deep breathe before you start your motion, let the air out and let yourself relax. Mental Attitude Having the proper mental attitude is probably the most important part of successful pitching. If you are confident, you can do the job without the fear of failure, you usually don’t tense up. Confidence is developed only by having successful outings. If you want to be a successful pitcher, you must pitch with the proper mechanics, be strong and flexible; pitch every chance you can to improve yourself, gain confidence and learn to relax. The proper mental attitude is the basis for success in any player. It consists of the will to win, eagerness to learn, and the intelligence to retain what you have learned from experience. If what you did yesterday still looks good or impressive to you, you have not done much today. It is normal to try to be impressive when members of your family, your boyfriend or other friends are in attendance. Trying to throw too hard, you generally rush and create nothing but problems. Learn to relax and concentrate, especially in these situations. Positive Thinking Without the proper mental attitude or approach, you cannot succeed because the mind controls the body. The pitcher must have the proper mental attitude toward the batter. The batter is your enemy, with certain strengths and weaknesses. Think about the following commands in a positive manner:
A. I can learn the proper mechanics and I will practice until I grasp them.
40
B. I can develop my body physically. I can endure pain and I’m willing to sacrifice pleasure now because in the future, I will be rewarded in many ways.
C. I can develop myself mentally through study and I have self-discipline to do what I know is necessary.
Emotional Stability Controlling your emotions is something you must constantly work on, both on and off the field. Anger robs the individual of the ability to concentrate. You must have poise and composure, instead of anger and frustration. A serious, expressionless face and calm and unhurried actions should be constant when things go badly and when things go well (poker face). When you lose, don’t sulk or blame anyone else. Find out what you did wrong, study the game and profit from your mistakes. Your attitude and your approach to the game are most important in their effect on the opposition or enemy. Walk to the mound with your head up and with a look of assurance. If you take forever to get to the mound (with lazy steps and head down) you radiate the feeling “maybe I don’t belong here”. With a confident attitude, you should think: I can get her to hit MY pitch; I will not give in to her; I will battle her to 3-2 pitch and not lose her to a walk. Butterflies in Your Stomach If you get scared, feel nervous or have a sick feeling, don’t worry about it. It is a natural feeling for a highly competitive athlete to experience butterflies in the stomach. Intimidation Try to intimidate the batter by staring into her eyes from the time she leaves the on deck circle until she is set in the batter’s box. Show the batter that you are in control and that you are going to make her hit your pitch and not the pitch she likes.
41
Pitching Mechanics
Upper Body Grip Grip the ball across the seams Grip it firm, but don’t over grip it
Pitching Arm The arm should be fully extended The arm stays close to the ear when the arm goes above the head Keep the arm close to the hip on the way down The farther the arm gets away from the body the less control the pitcher has
Arm Whip The pitching arm should whip down as quick as possible on the downswing Create maximum arm speed to add velocity to the pitch
Wrist Snap Snap the wrist as quick as possible at the bottom part of the circle The wrist snap should be a violent snapping action The ball should roll off the finger tips, not off the palm of the hand The pinkie side of the hand should be next to the thigh
Follow Through Follow through is important for speed and control The follow through is in a direct line with the ball and the target Control is lost when the arm moves away from the body The line of the hand and the ball determines where the ball will go Follow through is a key factor in control
Glove Hand The glove points at the target and pulls down to the side as the pitching arm
comes through The arms work in opposition of one another from the top of the motion to the
bottom
Lower Body Stride Leg The length of the stride should be comfortable and well balanced Over striding is a common mistake and decreases the amount of power produced

42
The stride foot is placed right out in front of the pivot (back) foot The stride should be a walking stride with the knee slightly bent The stride leg supports the weight before the motion begins
Hip Rotation The majority of the power is produced by the hips A powerful pivot on the back foot is the key to producing hip rotation
Leg Drive Leg drive is a key factor in the pivot and the production of velocity The legs should tire much sooner than the arm The pitcher must drive (explode) towards the plate, she should not jump (crow
hop)
Entire Body Pre-Motion The pre-motion should be relaxed and consistent It does not add speed to the pitch, it gets the body prepared to begin the pitch The pre-motion should not take away any energy that will be used for the pitch
itself Motion The motion should be consistent on every pitch The body should remain relaxed, not tense The arms should be relaxed and should not be forced back
Control The ball is in the pitcher’s hand, so control is determined by where the pitcher’s
hand is upon release of the ball High/low control is determined by the angle of the palm when the ball is released Inside/outside control is determined by the arm position in relation to the body. If
the arm stays close to the body, it will be an inside pitch. If the arm flows through across the body, the pitch will be an outside pitch. If the arm gets away from the body, control will be lost into the batters (right handed pitcher and right handed batter).
The step is the same no matter where the pitch is being thrown. Cue: snap your wrist to the target. Don’t slow the motion down to throw strikes!!! Learn to control the speed by
working on the release point. When you slow the motion down you change the entire pitching pattern.
The key to developing control is to develop a smooth, consistent delivery. “Control is the ability to throw a ball when you want to and a strike when you have to”
– Herb Dudley
43
Pitching Drills
Mechanics Wall Pitching Isolate parts of the motion while pitching against a wall. With the wall as the catcher, the pitcher can concentrate on her mechanics rather
than on getting the ball to the catcher. Add wrist snaps into the glove without the circle and then with the circle.
Mirror Pitching Simulate parts of the motion in front of a mirror
Long Distance Pitching Pitch from 50-60 feet. The pitcher is working on wrist snap, follow through and leg drive.
5-3-1 Continuous Circles Start in the power phase, with your side to the target. The pitcher whips her arm around in 5 continuous quick circles. On the 5th circle
she throws the ball as hard as she can into her glove (which she has extended out in front of her body).
On the next sequence the pitcher does the same thing, but does 3 continuous circles.
On the last sequence of this series, the pitcher does one complete circle. On the 2nd series the pitcher repeats sequence 1 (5 circles), sequence 2 (3 circles),
and sequence 3 (1 circle). The pitcher does 3-5 sets of the 5-3-1 sequence. This drill works on arm whip and wrist snap.
Bat Circles Start in the power phase with your side to the target. The pitcher completes arm circles with a bat. This drill is used to emphasize arm extension and keeping the arm from going
behind the head. Arm Circles Start in the power phase with your side to the target. Without taking a step or using her hips, the pitcher whips her arm around and
releases the ball into a wall. This drill emphasizes arm whip and wrist snap.
44
Arm Circles Without a Ball Same drill as the arm circles drill, but without a ball. Working on arm whip, wrist snaps and follow through.
Arm Circles With Hips Same drill as the arm circles drill, but now the pitcher is allowed to use her hips. As the arm whips down the pitcher quickly drives her hips. Working on a quick arm and an explosive hip drive.
Half Circles Start in the power phase with the side to the target. The pitcher brings her arm back and up to shoulder height. She then whips her arm down, snaps her wrist and releases the ball.
Games Like Situations Wall Pitching Tape a strike zone on a wall and work on hitting spots (working on control).
Pitch to a Catcher With a catcher catching, the pitcher works on controlling her speed and game like
situations. Hitting Stations The pitcher pitches to batters during batting practice.
Game Situations in Practice With the outfielders executing bunts, steals, hit and runs, etc. the infielders play
defense and the pitcher pitches to the batters. Challenge Pitching As the last drill of the day, the pitcher chooses 3 players from her own team and
challenges them to try to get a hit off of her in an “At Bat”. This is fun for the pitcher and the catcher as well as the hitters. Save this drill until your pitcher has gained some confidence.
Spot Pitching With a catcher and someone acting as an umpire, the pitchers choose a type of
pitch and a location for their pitch (if the pitcher only has one pitch, then she works on location – inside/outside, high/low).
Each pitcher gets to pitch 10 pitches at each spot that is selected. Keep score for each target. (Similar to playing “HORSE” in basketball)
45
Pitching practice should not be confined to your pitcher pitching batting practice everyday with 13 fielders standing around. Everyone loses their concentration, intensity and interest. Make practice fun, exciting and challenging.
Common Pitching Errors
Mechanical Errors Grip Over gripping the pitch – causes a stiff wrist and a decrease in speed and control.
Pitching Arm Too much bend in the elbow at the top of the circle – causes a decrease in speed
and control. Arm Whip The arm is forced through the downswing rather than whipped through the
downswing – causes a decrease in speed. Wrist Snap Stiff wrist – this causes a lack of a quick wrist snap which causes a decrease in
speed and control. Follow Through No follow through –the arm stops at the release point which causes control
problems. A straight arm on the follow through – causes a lot of high pitches.
Glove Hand The glove hand is not thrown up at the start of the pitch – proper shoulder rotation
does not occur, therefore no power is generated from the shoulders. The glove hand is thrown up, but not pulled back down – little power generated
from the shoulders. Stride Leg Stride is too long – causes a decrease in speed and control. Stepping straight ahead rather than at a 45 degree angle – very little power is
produced from the hips, so the pitcher uses too much arm.
46
Steps across the body on the stride – the entire body goes outside the line of force which should be directed towards the plate. This causes a decrease in speed and control.
Hip Rotation Hip drags through rather than exploding through – usually caused by dragging the
foot too hard. Causes a decrease in speed. Leg Drive The weight shifts onto the front leg so that the leg drive cannot occur – decrease
in speed. Jumping (Crow Hopping) with the front foot, rather than stepping with the front
foot and driving with the back foot – causes a decrease in speed. Entire Motion Inconsistent – something different on every pitch. Tense body – forces the arms back (causes the weight to shift too far forward) –
decrease in speed.
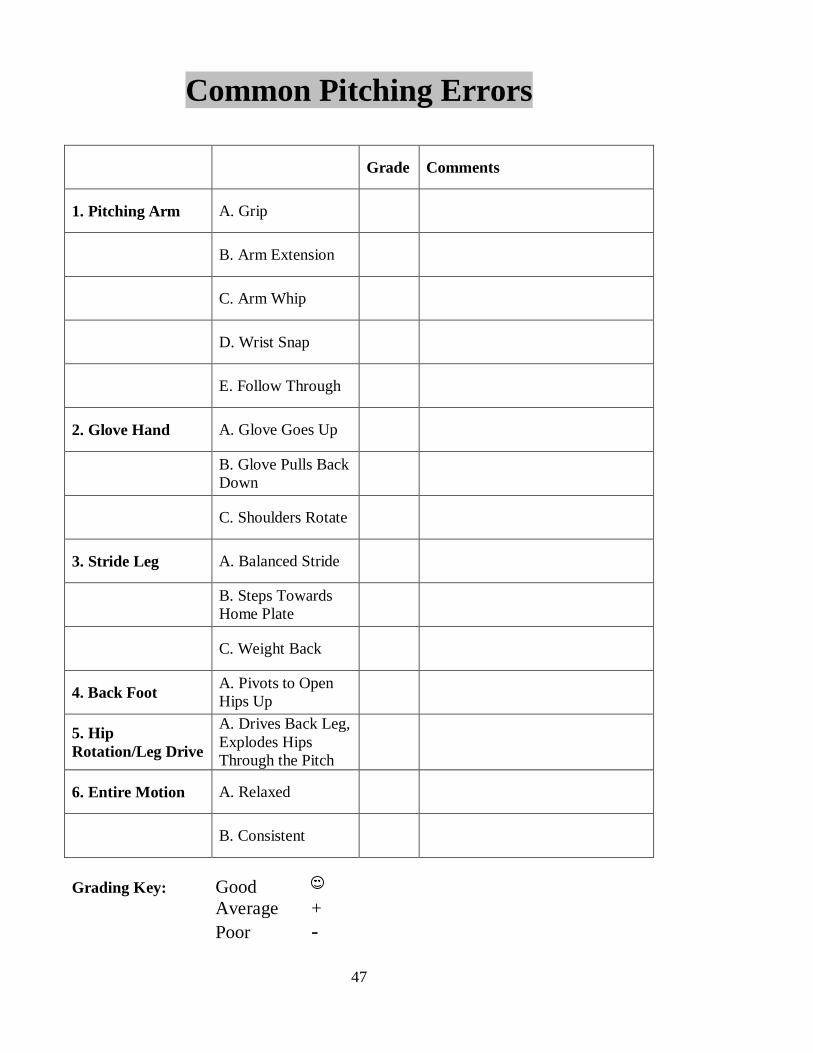
47
Common Pitching Errors
Grade Comments
1. Pitching Arm A. Grip
B. Arm Extension
C. Arm Whip
D. Wrist Snap
E. Follow Through
2. Glove Hand A. Glove Goes Up
B. Glove Pulls Back Down
C. Shoulders Rotate
3. Stride Leg A. Balanced Stride
B. Steps Towards Home Plate
C. Weight Back
4. Back Foot A. Pivots to Open Hips Up
5. Hip Rotation/Leg Drive
A. Drives Back Leg, Explodes Hips Through the Pitch
6. Entire Motion A. Relaxed
B. Consistent
Grading Key: Good Average + Poor -

48
The Peel Drop
Mechanics The Grip Hold the ball in the fingers, not in the palm of the hand. Hold the ball across the four seams. Three fingers are on one seam and the thumb is on the opposite seam, across from
the middle finger. The four seams must spin downwards towards the plate.
The Arm The arm must whip through quickly during the downswing phase of the motion in
order to create the necessary speed. The Front Shoulder The front shoulder leads the motion and should be tilted down slightly in order to
get the hand on top of the ball. The Release Pull the fingers upward quickly to increase the downward spin on the ball. The ball must come off the fingertips in order for the ball to spin down. It is a
peeling action. The hand and fingers are on top of the ball on release. The fingers and the ball
should be behind the wrist and the fingers should be driving through the ball towards the catcher.
The stride is shorter so that you can keep the shoulder tilted down and the hand on top of the ball.
Drills The Peel Drop Spin the ball to yourself, in the same hand. Work on getting the ball to roll off of
the fingertips. Spin the ball to yourself, from one hand to the other hand. Extend your arm down to your side and spin the ball from one hand to the other. With a piece of plastic tubing, simulate the downswing phase of the pitch. The
emphasis should be on leading with the shoulder and on keeping the fingers behind the wrist.
Cock the wrist back and spin the ball to a partner standing 6 to 7 feet away. Add the backswing with speed and spin the ball to a partner. Move back to the regular pitching distance and throw the pitch with the entire
pitching motion.

49
The Turn Over Drop
Mechanics The Grip Hold the ball in the fingers, not in the palm of the hand. Hold the ball across the four seams. Three fingers are on one seam and the thumb is on the opposite seam, across from
the middle finger. The four seams must spin downwards towards the plate.
The Arm The arm must whip through quickly during the downswing phase of the motion in
order to create the necessary speed. The Front Shoulder The front shoulder leads the motion and should be tilted down slightly in order to
get the hand on top of the ball. The Release At release, the hand should quickly snap over the top of the ball pushing the spin
downward. The ball must come off the fingertips in order for the ball to spin down The hand and fingers are on top of the ball on release The stride is shorter so that you can keep the shoulder tilted down and the hand on
top of the ball. Drills The Turn Over Drop Without the ball, practice snapping the wrist over the top of the ball (start in the
power phase). Extend your arm down to your side and snap the wrist over the top of the ball and
into your glove. With the backswing, cock the wrist back and snap over the top of the ball and
release it to a catcher. Move back to the regular pitching distance and throw the pitch with the entire
pitching motion.

50
The Rise
Mechanics The Grip Hold the ball in the fingers with the thumb and the middle finger on opposite seams. The
index finger is bent or curled and at a slight angle below the seam. As an option you may squeeze the index finger and the middle finger together instead of curling or bending the index finger.
The ball is held with the two seams rather than across the four seams like the drop. The two seams must spin upwards as it approaches home plate.
The Wrist The wrist action is similar to the action of opening up a door knob, it is a turning motion
opening from the thumb to the pinkie finger. The quicker you snap your wrist, the tighter the spin and the better the movement. The ball must spin upward towards home plate. The palm faces 3rd base (right handed pitcher) as the wrist snaps. The pitcher leads with the heel of the hand. The snapping action is under the ball, not around it. The quicker the wrist snap & the downswing, the faster the pitch and the tighter the spin. Follow through is a key in getting good spin.
The Arm The arm must whip through quickly during the downswing phase of the motion in order
to create the necessary speed. The Shoulders The front shoulder leads the motion and should be tilted slightly up in order to get the
hand under the ball. The back shoulder should be pointed down in the back, not out.
The Motion The stride is a little longer so that the pitcher can get her hand under the ball. The pitcher must use her entire body to throw this pitch. She cannot throw this pitch with
just her arm.
Drills The Rise Spin the ball to yourself, in the same hand. Work on getting under the ball and feeling it
come off your fingertips. Extend your arm down to your side and spin the ball from one hand to the other. Leading with the heel of the hand, spin the ball to a partner standing 6 to 7 feet away. Add the backswing with speed and spin the ball to a partner. Move back to the regular pitching distance and throw the pitch with the entire pitching
motion.
51
The Curve
Mechanics The Grip Hold the ball in the fingers with the thumb and the middle finger on opposite
seams. The index finger is bent or curled and at a slight angle below the seam. As an option you may squeeze the index finger and the middle finger together instead of curling or bending the index finger.
This is the same grip used with the rise. The ball is held with the two seams rather than across the four seams like the
drop. The two seams must spin sideways as it approaches home plate.
The Wrist When thrown by a right handed pitcher, the ball should move away from a right
handed batter or into a left handed batter. The arm is in tight, with the forearm coming across the thigh. The wrist is snapped quickly under the ball and across the body, keeping the
follow through below your waist. The wrist cuts under the ball and across the body from right to left (right handed
pitcher). The action is the same action as if you were trying to skip a rock across the water.
The Shoulders The shoulders should be level.
The Motion The stride is normal. The hip comes around through the pitch more so than in the other pitches. Keep the chin and eyes down towards home plate.
Drills The Curve Without the ball, practice cutting the hand under the ball and across your body. Extend your glove arm down at your front leg (in your power phase) and snap
your wrist under the ball and release the ball across your body and into the glove. With the backswing, snap under the ball and release the ball to the catcher. Move back to the regular pitching distance and throw the pitch with your entire
motion.

52
The Off Speed (Change Up)
Mechanics The Grip The ball should be held the same way as the drop, except that the ball is held in the palm
of the hand instead of in the fingers. The tighter the thumb, the stiffer the wrist. The stiffer the wrist, the slower the pitch.
The Motion Your motion and your arm speed should be the same as it is for your other pitches. The key to throwing a good off speed pitch is keeping the motion the same and making it
look like a fastball. You must convince the batter with the motion that a fastball is coming.
The Follow Through It must be quick. This gives the batter the illusion that the ball is moving fast.
The Release The pitcher takes her thumb off of the ball and rolls her hand over the top of the ball. The pitcher turns her hand as if she is reaching out to shake hands with the catcher.
Importance of the Off Speed Pitch Use of the Pitch Establish this pitch early in the game. It gives the hitter something else to think about
even if you don’t throw them all for strikes. Use it only against the big hitters. You don’t usually use it against the 7th, 8th or 9th
batters. The key to using this pitch is to be unpredictable with it. Use it in a wide variety of
situations and different counts. Don’t be afraid to throw it on the first pitch, on back to back pitches or on a full count to a very aggressive hitter. Be smart, don’t become predictable that is what will hurt you.
Ideally you want to throw it low and away from the hitter. Drills The Off Speed (Change Up) Open the hand up and roll the ball from one hand to the other. Extend the arm down at the side and roll the ball from the pitching hand to the glove hand Add the back swing and roll the ball to the catcher. (shaking hands with the catcher). Move back to the regular pitching distance and throw the pitch with the entire pitching
motion.

53
The Pitch Out
When to Use It Use a Pitch Out when you think the offense might: Steal, hit & run, squeeze or bunt & run. When the base runner is taking an aggressive lead and you want to pick her off.
Use a Pitch Out when the defensive team wants to: Walk an opponent intentionally. Use a trick play.
How to Use It As a Pick Off Prior to the pitch, the catcher should stand at a spot where the pitcher should
throw the pitch out. This is the reference point for the pitcher. She should visualize the spot when the catcher returns to her catching position.
A signal should be used to indicate to the defensive team that a pitch out is going to be thrown on the next pitch.
The pitch out should be thrown out far enough so that the batter cannot hit it. It should be high enough so that the catcher can spring out of her stance, catch the ball and make a quick throw.
As an Intentional Walk According to the rules, the catcher must stay in her box until the pitch leaves the
pitcher’s hand. If she does not, an illegal pitch is declared and the base runner is awarded the next base.
The catcher stands at the edge of the catcher’s box with her throwing hand (right handed catcher, right handed batter) extended out as a target.
As soon as the pitcher release the ball, the catcher can step out of the box to catch it.
Why Use It Importance of the Pitch Out Pitch Outs are an important part of the game. In a close game, a pitch out could be
the difference between winning and losing. Pitch outs give the defensive team an extra weapon to attach the opponent with. As with every skill, the pitcher and the catcher must practice this pitch and must
always throw some prior to the game when warming up with their other pitches.
54
Calling Pitches
When to use each pitch Change Up or Knuckle Ball Pull hitter Over aggressive hitter Over striding hitter Batter who stands away from the plate Batter who steps out or pulls away from the plate on their swing Sometimes when the account is 0-0, 2-0, 3-1 or 3-2, not just 0-2
Drop Ball A batter that chops or swings down A batter that stands tall and erect A batter that stands in the back of the box A batter that holds the bat up high When there are runners in scoring position, 2nd or 3rd
Rise Ball A batter with a hitch A batter that chops or swings down A batter with an upper cut Over striding hitter A batter that stands in the back of the box A batter that holds the bat down low A batter that holds their hands down low
Curve Ball An opposite field hitter Open stance right handed hitter, closed stance left handed hitter A batter that stands in the back of the box A batter that stands away from the plate A batter that pulls out away from home plate on their swing

55
Pre Game Warm Up
Key Factors Importance of a Proper Warm Up The pre game warm up is a key factor in the success or failure a pitcher has during the game. A good pre game warm up is essential. The pitcher should be warmed up enough so that when she starts the game she feels like she’s in the 2nd or 3rd inning of the game. Many times pitchers have rocky starts because they are not properly warmed up and prepared to start the game. The time it takes to warm up will vary according to the individual, as it takes some pitchers longer to warm up than others. Each pitcher should know her body and how long it takes to get loosened up and prepared for the game. Don’t have the pitcher start warming up too early because she will finish too soon before the start of the game. She will then end up sitting around too long getting cold and stiff again. It is better to be too warm, than not warm enough. Routine Use the same routine before every game. Don’t change your routine because it’s
hot etc. Stretch!!! Run!!! Warm up Over hand Egg rolls – the catcher rolls balls to the pitcher’s right and left and the pitcher
slides over to the ball in a low defensive position. The pitcher picks the ball up and tosses it back to the catcher underhand. Do this 5 to 6 times in each direction. This will get the pitcher’s legs warm
Balls in the dirt – the pitcher throws balls in the dirt for the catcher to practice blocking
Long distance pitching (40–50 feet) – the pitcher begins loosening up by pitching from a distance that is a little longer than the regular distance
The pitcher should then move in to the regular distance and finish warming up Regular distance – the pitcher works on her pitches and spots Throw enough of all of your pitches that you will use in the game, including pitch
outs After the pitcher has almost finished warming up, the catcher mixes up the pitches
and calls pitches like she will during the game The pitcher should now be ready to start the game If there is a delay in the start of the game or you have a long first offensive inning,
make sure that the pitcher throws a little more before taking the mound
56
Fielding Responsibilities of a Pitcher
Primary Responsibilities The primary responsibility of a pitcher is to pitch, but once she releases the pitch
her new responsibility is to be a fielder. After the pitcher releases the pitch, she should be prepared to field. The pitcher has as much of a responsibility to be a good defensive player, as does any other player on the infield. The pitcher must be able to field ground balls and bunts, catch pop ups, handle the ball on a cutoff and cover home plate on balls that get by the catcher.
Backing up the Bases The pitcher is responsible for backing up 3rd base when the ball is being thrown in
from the outfield. She backs up the infielders when the ball is thrown in from an outfielder to an
infielder at any of the bases. If the pitcher is not the cutoff, then she backs up home plate on balls that are
thrown home from the outfield. Pop Ups The pitcher calls for and catches only those balls that are popped up in front of
her. The pitcher does not back peddle behind the mound.
Cutoffs The pitcher lines up the outfielder with home plate. The pitcher must be ready to cut the ball off and make a throw to a base.
Bunt Coverage On a basic bunt defense with the 1st and 3rd baseman covering the bunts, the
pitcher is responsible for any bunt that is pushed passed the 1st or 3rd baseman. With the 1st baseman playing back, the pitcher is responsible for fielding bunts
down the 1st baseline. The pitcher is responsible for fielding the majority of the surprise or drag bunts.
She also fields a lot of the squeeze bunts. Covering Home Plate As soon as the pitcher sees that the ball has gotten by the catcher she sprints
towards home plate. As she gets close to the plate, she starts to slow down and uses a jump stop to gather herself in front of home plate (not on the plate). As soon as she catches the ball and puts the tag on, she quickly gets out of the way.
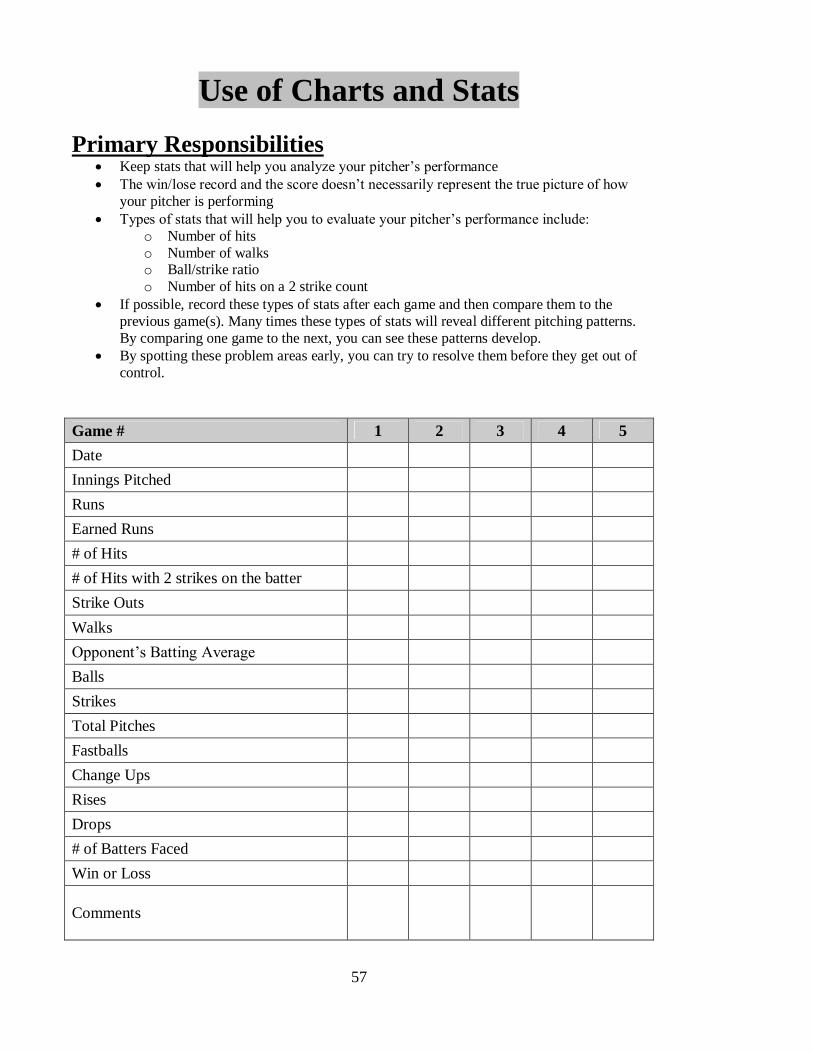
57
Use of Charts and Stats
Primary Responsibilities Keep stats that will help you analyze your pitcher’s performance The win/lose record and the score doesn’t necessarily represent the true picture of how
your pitcher is performing Types of stats that will help you to evaluate your pitcher’s performance include:
o Number of hits o Number of walks o Ball/strike ratio o Number of hits on a 2 strike count
If possible, record these types of stats after each game and then compare them to the previous game(s). Many times these types of stats will reveal different pitching patterns. By comparing one game to the next, you can see these patterns develop.
By spotting these problem areas early, you can try to resolve them before they get out of control.
Game # 1 2 3 4 5 Date Innings Pitched Runs Earned Runs # of Hits # of Hits with 2 strikes on the batter Strike Outs Walks Opponent’s Batting Average Balls Strikes Total Pitches Fastballs Change Ups Rises Drops # of Batters Faced Win or Loss
Comments
58
Video Taping Your Pitcher
Primary Reasons for Video Taping Your Pitcher Video taping your pitcher can be one of the most beneficial things you can do for
her and your team. If possible, you should show your pitcher a video of someone doing it correctly. This usually helps the pitcher to understand what you want a little better. Videotaping should not be a one-time event. The more you do it, the more your pitcher will get out of it. Try to video at least every three weeks and more often is she is struggling. Videotaping shows the pitcher’s improvement and also helps to spot problem areas that need work. You should try to videotape from two or three different angles, rather than just one. If possible, videotape your pitcher from the front, the side and the back; you will miss a lot of things if you only video her from one angle.
Videotaping can be a key to your pitcher’s improvement and success. Sometimes pitchers have a problem comprehending some of the things you are telling them. But if they see themselves doing it, it tends to sink in more and helps them to improve quicker.
After videotaping your pitchers, you should evaluate their mechanics. Then show them the video and go over the evaluation with them. If your video equipment has slow motion use it because that will help even more, especially on something that isn’t a glaring problem. Make sure you do the evaluation and show them the video as soon as possible. Don’t wait two or three weeks before you show them the video. You should keep each evaluation so that you can compare each new evaluation to the previous one(s). This will usually show their improvement and progress. It will also help identify any problem areas. After you evaluate them a couple of times, let them try to evaluate themselves.
Use of the Pitching Mound
Proper Use of the Mound This is one of the keys to a pitcher’s success. The pitcher should be given an
opportunity during practice to pitch off of the mound. The pitcher should step onto the mound with her feet in the proper position to begin the pitch. One foot should be at the front of the rubber (right foot for right handed pitchers) and the other foot should be at the back of the rubber. They should not be side by side. The pitcher should make sure to have her feet at least should width apart. Practicing off the mound is important for the proper use of the mound and for the pitcher to develop her rhythm and timing coming off of the mound. If the pitcher is not use to the mound, her timing will be off during the game. This will cause a decrease in speed and possibly control.
59
Searching Within for the Real Pitcher
When I’m not pitching well, I can blame it on the ball, on an off day, or I can truly ask myself if I have worked hard enough and long enough to deserve to complain. More often than not poor pitching is a result of not enough concentration, lack of true practice, and the lack of enough heart to win (everyone has the desire to win, but the heart of a winner never gives up no matter what the score is). I have to know within myself why I’m a pitcher. If I love what I do as a pitcher, I owe it to myself and the team to be the best possible pitcher I can be. I will practice hard with patience and heart and know that I can always be better tomorrow than I am today. I must have a goal in my head and my heart to be the best I can be and lead my team to the top, and be willing to accept and shoulder with pride the faith and responsibility the team has invested in me. I must decide if I am content to remain the caliber of pitcher I presently am. If so, I have died as a true athlete, and am only marking time until I am too old to compete. If I am not satisfied with my present ability then I must set a personal goal to work hard in all ways mentally and physically to be the best I can be. Everything has a price, and I must be willing to pay the price for success. I must truly ask and verify within myself if I am doing just enough to get by. If the answer is yes, then I must realize that I have lost respect for myself by not being my best self, and that I am also hurting the team I supposedly love by not giving them the best I can be. I must realize too, that I am a leader. First I must be able to discipline and lead myself. Once this is truly accomplished, being a leader on the field will come easily and earnestly. Yes, my teammates will make mistakes behind me, but I must reassure them that it’s okay, that I know they are trying ever bit as hard as I am. They need to see and feel my support because the bottom line is that I am a part of my team and they are truly a part of me . . . and we win together and lose together, and above all stick together through it all. Once I begin to blame another for the outcome of the game, I have removed myself as a team member . . . I have divorced myself willingly from a family of friends and teammates that I care about. I truly will feel unhappy and alone and deservingly so. I should take the mental challenge of every batter I face. It’ two on one, and my catcher and I should never lose. I need to feel close to my catcher; she is the other half of me and together we create our own world of oneness. I need her support and guidance and she needs my devoted attention and concentration to pitch well. In time of disagreement we will work it out and trust one another’s judgment. If we fail and the batter beats us, then we learn from the mistake and strive to correct it next time. But it has to be a learning process through communication and discussion. For once I am no longer in tune with my catcher, then once again I or she has divorced ourselves from the team concept and again I feel very alone on the mound. I, too, am a vital fielder on the field. I must not neglect my fielding and back up skills. I must be able to change mental gears and know what to do with the ball when I get it and do it with confidence and not hesitate or question what to do with the ball. I must learn to read situations as they develop and go where I am needed to assist my teammates. To
60
forget, I have lost concentration and must regain it immediately and strive to never get caught with my mental pants down again! I must strive to know if I am a good hitter and if so, work hard on my hitting also. Pitchers and catchers should be excellent hitters because they know the mental challenge the opposing battery is dealing with. If I am not a good hitter or a fast base runner, then I may have to accept my not hitting and concentrate on my pitching and fielding. My main concern is that the team be as strong as possible and that I do my share to make it and keep it that way. I need to be a supporter when I’m not playing. If I’m not, I need to ask myself why I’m not. If I’m sitting on the bench mentally involved in why I didn’t start or why I’m not playing, I have again divorced myself from my team family and I will feel very unhappy and alone. If I feel I have true concerns about my lack of playing time, I must make it a point to ask my coach why, but in the meantime I must set my personal concerns aside and support my team family 100%. In doing so, I have put faith in my coach and her decision not to play me, and know that I can question her later if I truly feel the need. I need to know, too, that my teammates don’t have the answers to the coaching decisions that have been made. Once I spend my time questioning the coach during a practice or a game, I have lost my concentration as a player and hence have not fulfilled my responsibility to the team by giving 100% of my mental time to the game. I must trust my role as a player and my coach, or I will not be happy or productive as a player. I must do my job and strive to do it well. I am a champion. If I have never felt this feeling I must strive to do so. I can be a champion without always winning. I can do this by being a champion player and teammate. My goal is always to win and play with authority. I must be confident, but not cocky. I must know I am good because I have worked to get where I am as an athlete. I must now initiate my ability on the field as consistently as possible game after game. Champions are consistent and consistency takes skill and skill takes practice. I must be willing to develop the champion within me to its fullest. I love my team. If I don’t, then why am I here? They may well be a diverse group of individuals off the field, but as a team I love them and want to work hard to be a successful part of the team. They are my comrades and we represent a school we all are proud of. I am going to hurt and ache when we lose and I’m going to rejoice when we win because my team has touched my heart and I truly care about our playing success. This is not to say everyone on the team will care as much as I do, but then again, I cannot not care. As long as they know and I know I care, I have succeeded in doing my share. I must now decide if these convictions are true within me or if they are only words. Only the athlete can decide for me. I must know the answers in my heart before I can continue successfully to be the best athlete I deserve to be. God gave me the healthy body and mind that I need; now what I do with it is truly up to me. Sandy Fischer, Oklahoma State University

61
Dealing with the Umpire The catcher’s attitudes and actions toward the umpire can affect the umpire’s performance. Therefore it is important for the umpire to believe that the catcher respects and submits to his authority. Although intimidation will work with some umpires, and is used quite often, it is not conducive to consistent calls. The following is a guide which will help set the umpire free to call a good game, with your cues foremost in his thoughts. 1. Do not get him on the defensive 2. Be calm, tactful, polite and rational when questioning a call. 3. Do not turn around and talk to the umpire. It is intimidating, because the crowd sees you questioning him. Ask questions while looking straight ahead. 4. Hustle. An umpire appreciates that. 5. Brag on your pitcher. Tell the umpire, prior to the first pitch, that the pitcher has a great breaking drop or rise. 6. If the umpire is not calling a certain pitch, ask the direction in which the pitcher is missing the target. 7. If you hinder the umpire’s view, suggest that perhaps he could step around to see, because it is difficult for you to change your style. Make sure, however, you demonstrate that you will attempt to change. 8. Moan at pitches rarely and only when you know it will keep the umpire on his toes without being a threat. 9. If the umpire calls pitches late, relate that it is difficult for you to make a decision. In some situations the decision is based on the umpire’s call. For instance, with three balls on the batter, the runner at first could be going; a called strike could mean a stolen base, while a ball could result in a walk. The catcher’s reaction to a steal would be to throw down; an unnecessary poor throw means extra bases for the runners. 10. When the umpire takes a shot, make sure to inquire about his condition.

62
Hitting Basics
Bat Selection Criteria Used Length – hitting surface must cover all areas within and near the strike zone. Weight – must be able to handle the weight of the bat without sacrificing control. The bat must be comfortable and well balanced.
Changing the Bat Selection Use a lighter bat with a faster pitcher. Use a lighter bat when tired.
Adjustment with the Bat Choke up; give up a little power for better control.
Drill to Select the Correct Bat With the bat in the right hand (right handed batter), hold a ball in the left hand,
with the arm extended towards the pitcher. The ball is held with the palm facing down. Drop the ball and attempt to hit it with both hands on the bat before the ball hits
the ground. This shows bat speed and if the bat is the correct weight.
Setting up in the Batters Box Position in the Box Measure yourself to the plate by holding the bat at the knob with the left hand
(right handed batter). Place the tip of the bat on the inside part of the plate. Move feet back with the legs straight. Bend at the waist.
The fat part of the bat should be over the plate. You must be able to reach every pitch that is in or near the strike zone. Stand with the left foot (right handed batter) even with the front (flat) edge of the
plate.

63
Hitting Mechanics
Grips Finger Grip – quicker bat speed and better bat control. Palm Grip – more power, but less bat control.
Head Before the pitcher starts her motion, turn your head so that both eyes are facing
the pitcher. Keep the head as still as possible at all times, movement of the head sets off a
chain reaction of other unwanted movements. Eyes The batter’s eyes should follow the ball, not the batter’s head. Concentrate. Your eyes should be on the pitcher’s release point. Ignore all extra motions by the pitcher. Watch the seams on the ball; watch the grip by the pitcher. Keep the chin on the front shoulder to start with and finish with the chin on the
back shoulder so that the eyes are on the ball (Cue words: Shoulder to Shoulder). Stance Shoulder width apart.
Stride The stride should be 6 to 8 inches. Step with the stride foot, don’t lunge with it.
The stride should be soft, don’t let the weight shift forward on the stride. Feet On the swing, the back foot pivots up onto the ball of the foot. The knee bends
and the back leg forms an “L” as the heel comes up off of the ground. Hips Rotate hips toward the ball with a quick and explosive movement.
Arms Arms must swing forward in a “Line of Force” not in a circular motion. The left arm (right handed batter) PULLS the bat through the zone. The right arm (right handed batter) THROWS the bat through the zone. Contact the ball out in front of the plate for an inside pitch and over the plate for
an outside pitch (the farther the pitch is inside the farther in front of the plate contact must be made). Throw the knob of the bat inside the ball.
Follow Through The batter must finish the swing through the zone and around her back.
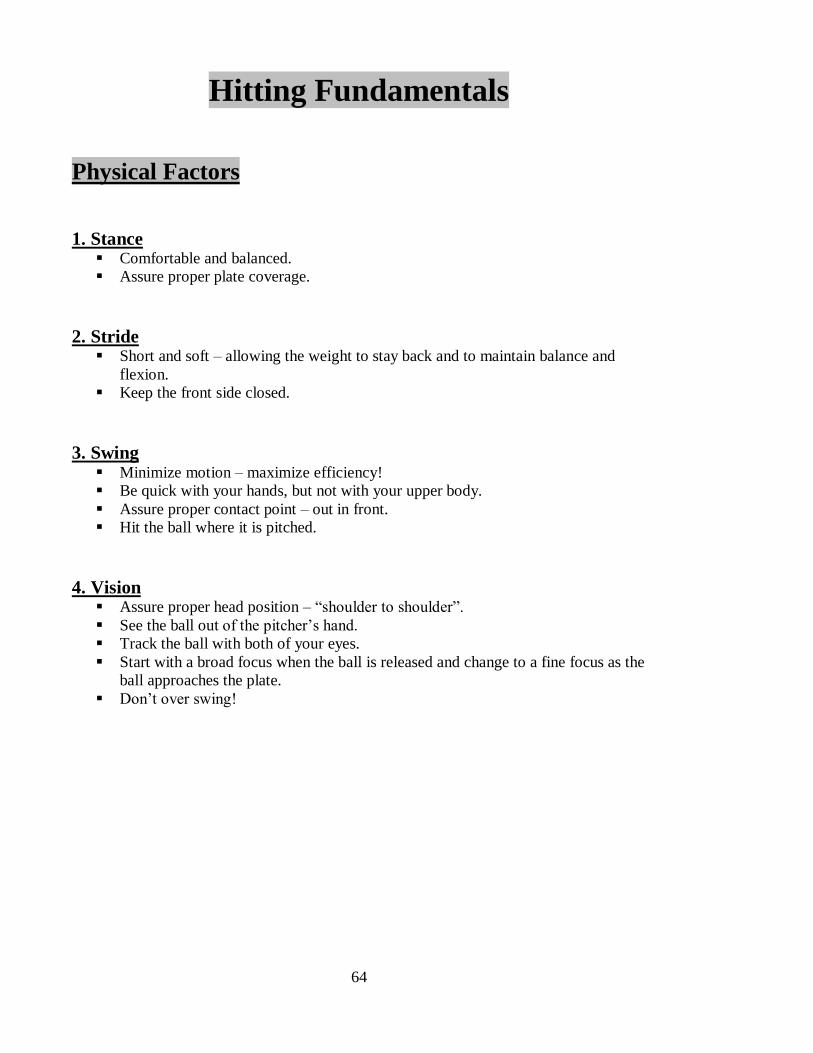
64
Hitting Fundamentals
Physical Factors 1. Stance Comfortable and balanced. Assure proper plate coverage.
2. Stride Short and soft – allowing the weight to stay back and to maintain balance and
flexion. Keep the front side closed.
3. Swing Minimize motion – maximize efficiency! Be quick with your hands, but not with your upper body. Assure proper contact point – out in front. Hit the ball where it is pitched.
4. Vision Assure proper head position – “shoulder to shoulder”. See the ball out of the pitcher’s hand. Track the ball with both of your eyes. Start with a broad focus when the ball is released and change to a fine focus as the
ball approaches the plate. Don’t over swing!
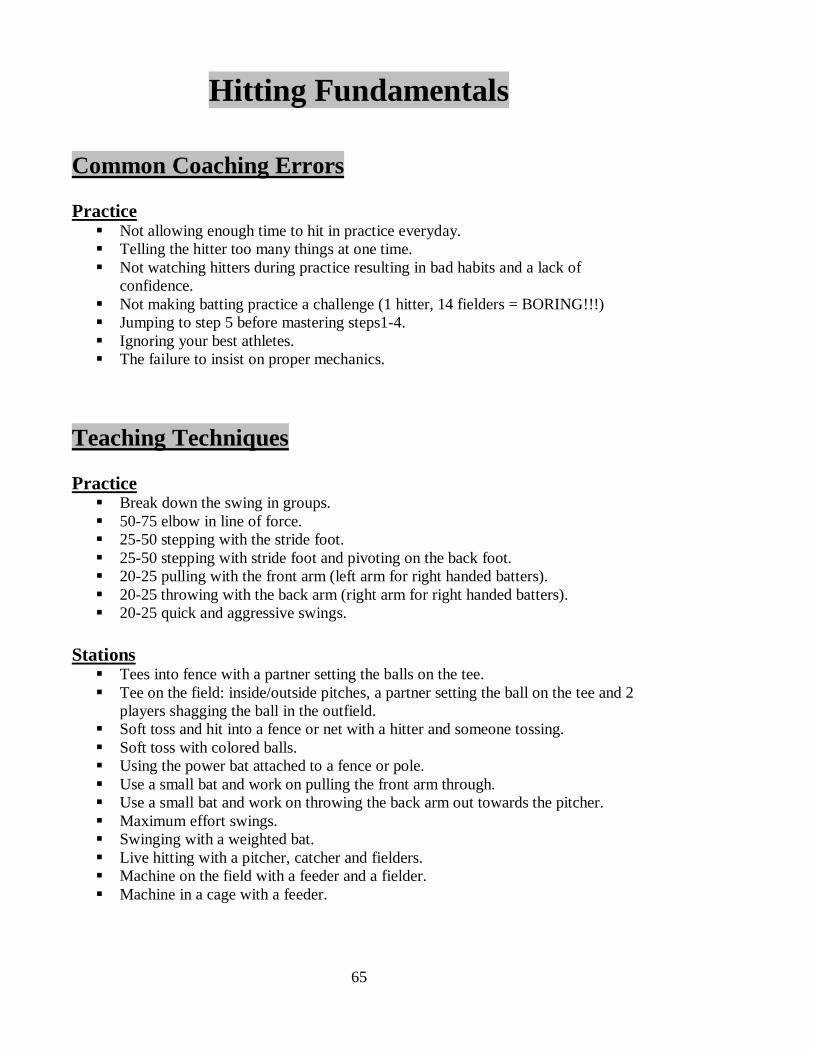
65
Hitting Fundamentals
Common Coaching Errors Practice Not allowing enough time to hit in practice everyday. Telling the hitter too many things at one time. Not watching hitters during practice resulting in bad habits and a lack of
confidence. Not making batting practice a challenge (1 hitter, 14 fielders = BORING!!!) Jumping to step 5 before mastering steps1-4. Ignoring your best athletes. The failure to insist on proper mechanics.
Teaching Techniques Practice Break down the swing in groups. 50-75 elbow in line of force. 25-50 stepping with the stride foot. 25-50 stepping with stride foot and pivoting on the back foot. 20-25 pulling with the front arm (left arm for right handed batters). 20-25 throwing with the back arm (right arm for right handed batters). 20-25 quick and aggressive swings.
Stations Tees into fence with a partner setting the balls on the tee. Tee on the field: inside/outside pitches, a partner setting the ball on the tee and 2
players shagging the ball in the outfield. Soft toss and hit into a fence or net with a hitter and someone tossing. Soft toss with colored balls. Using the power bat attached to a fence or pole. Use a small bat and work on pulling the front arm through. Use a small bat and work on throwing the back arm out towards the pitcher. Maximum effort swings. Swinging with a weighted bat. Live hitting with a pitcher, catcher and fielders. Machine on the field with a feeder and a fielder. Machine in a cage with a feeder.

66
Hitting Drills
Mechanic Drills Hip Turn Drill Place the bat behind your back (at waist level) and hook your arms around both
ends of the bat. Pivot back foot and throw hips through the pitch by rotating the bat through the zone.
Back Foot Drill Pivot on the back foot and throw the knob of the bat at the ball. Put a tennis ball or softball behind the heel of the player’s foot. If the player
pivots, the heel should kick the ball away from her foot. If the player lets her weight go forward, the heel of the foot will come up off of the ground and go over the top of the ball making the ball stay in the same place.
Stride Drill The hitter assumes her regular hitting stance and isolates the stride by taking a
low, quick and soft stride forward. The coach should make sure that the hitter is not moving her weight too far forward during the stride because this causes the hips to be thrown forward.
Concentration Stride Drill A coach or players stands out in front of the batter with both hands behind her
back. The coach or player has a ball in one hand behind her back. If she brings her right hand out in front of her body without the ball the batter holds her position, but if she brings her hand out in front of her with the ball in it, the batter takes her stride.
Stride Box Drill The batter stands inside a stride box, which is a box that is about six inches high
and as long as the batters stance is plus her stride. If the batter’s beginning stance is 18” and her stride is 6” then the stride box is 24” long. The batter swings the bat over and over inside the stride box to work on the proper stride. The stride box limits the stride of the batter, so that the batter cannot over stride.
Stride Chain Drill The purpose of this drill is the same as the stride box; it limits the batter’s stride.
The stride chain is a piece of plastic link (or light weight metal) chain that is the length of the batter’s stance plus the length of her stride. One end of the stride chain is clipped to the right ankle and the other end of the stride chain is clipped around the left ankle.
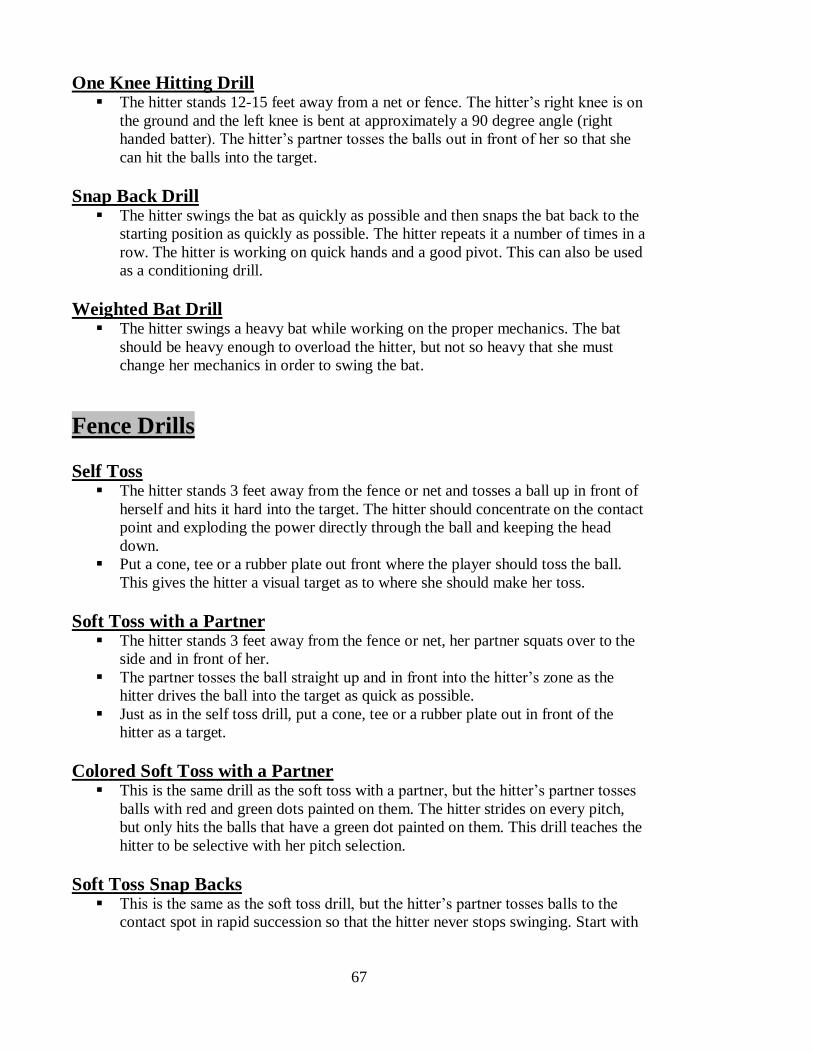
67
One Knee Hitting Drill The hitter stands 12-15 feet away from a net or fence. The hitter’s right knee is on
the ground and the left knee is bent at approximately a 90 degree angle (right handed batter). The hitter’s partner tosses the balls out in front of her so that she can hit the balls into the target.
Snap Back Drill The hitter swings the bat as quickly as possible and then snaps the bat back to the
starting position as quickly as possible. The hitter repeats it a number of times in a row. The hitter is working on quick hands and a good pivot. This can also be used as a conditioning drill.
Weighted Bat Drill The hitter swings a heavy bat while working on the proper mechanics. The bat
should be heavy enough to overload the hitter, but not so heavy that she must change her mechanics in order to swing the bat.
Fence Drills Self Toss The hitter stands 3 feet away from the fence or net and tosses a ball up in front of
herself and hits it hard into the target. The hitter should concentrate on the contact point and exploding the power directly through the ball and keeping the head down.
Put a cone, tee or a rubber plate out front where the player should toss the ball. This gives the hitter a visual target as to where she should make her toss.
Soft Toss with a Partner The hitter stands 3 feet away from the fence or net, her partner squats over to the
side and in front of her. The partner tosses the ball straight up and in front into the hitter’s zone as the
hitter drives the ball into the target as quick as possible. Just as in the self toss drill, put a cone, tee or a rubber plate out in front of the
hitter as a target. Colored Soft Toss with a Partner This is the same drill as the soft toss with a partner, but the hitter’s partner tosses
balls with red and green dots painted on them. The hitter strides on every pitch, but only hits the balls that have a green dot painted on them. This drill teaches the hitter to be selective with her pitch selection.
Soft Toss Snap Backs This is the same as the soft toss drill, but the hitter’s partner tosses balls to the
contact spot in rapid succession so that the hitter never stops swinging. Start with
68
10 in a row and then increase the number of repetitions. This drill is used to develop quick hands, a short stride and endurance.
Tee Drills Two Tees Set one tee four feet out in front of the hitter’s tee. The hitter tries to drive the ball
from her tee and have it drive through the ball on the second tee. Place the hitter’s tee so that the ball is right where the contact should be made in relation to the plate.
Target Tee Put a target on a fence out in front of the hitter. The hitter tries to drive the ball
into the target. The target should be placed 15-20 feet out in front of the tee in line drive territory.
Double Tee One tee is lined up for an inside pitch and the other for an outside pitch. The hitter
alternates hitting inside and outside pitches. Advanced Tee Drill Hit one ball off of the tee and then close your eyes and hit the next one off of the
tee. Alternate hitting balls with the eyes open and the eyes closed.
Pitching Machine Drills Tracking Using a pitching machine, the hitter tracks the ball all the way from the machine
to the backstop or to a catcher. Game Like Hitting Practice A pitcher or other player at the machine gives an offensive signal to the hitter.
The hitter must execute (hit and run, bunt, hit away etc.) as if in a game.
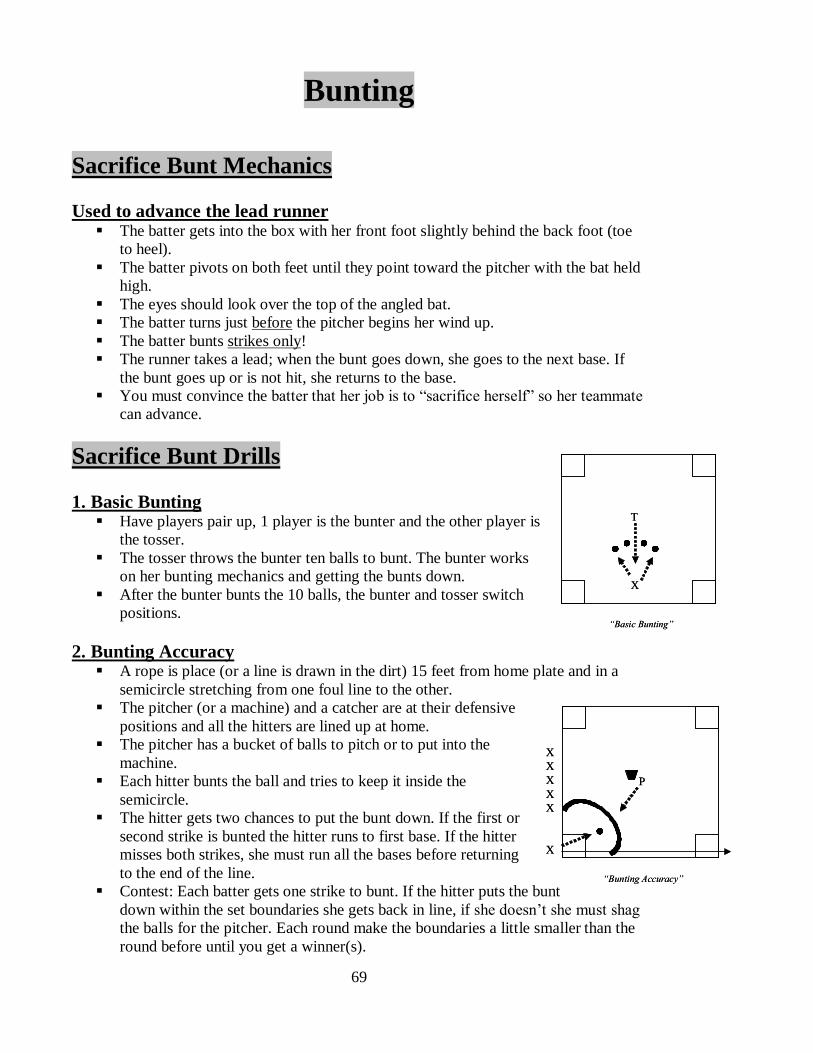
69
“Basic Bunting”
T
X
“Basic Bunting”
T
X
“Bunting Accuracy”
P
XXXXX
X
“Bunting Accuracy”
P
XXXXX
X
Bunting
Sacrifice Bunt Mechanics Used to advance the lead runner The batter gets into the box with her front foot slightly behind the back foot (toe
to heel). The batter pivots on both feet until they point toward the pitcher with the bat held
high. The eyes should look over the top of the angled bat. The batter turns just before the pitcher begins her wind up. The batter bunts strikes only! The runner takes a lead; when the bunt goes down, she goes to the next base. If
the bunt goes up or is not hit, she returns to the base. You must convince the batter that her job is to “sacrifice herself” so her teammate
can advance. Sacrifice Bunt Drills 1. Basic Bunting Have players pair up, 1 player is the bunter and the other player is
the tosser. The tosser throws the bunter ten balls to bunt. The bunter works
on her bunting mechanics and getting the bunts down. After the bunter bunts the 10 balls, the bunter and tosser switch
positions. 2. Bunting Accuracy A rope is place (or a line is drawn in the dirt) 15 feet from home plate and in a
semicircle stretching from one foul line to the other. The pitcher (or a machine) and a catcher are at their defensive
positions and all the hitters are lined up at home. The pitcher has a bucket of balls to pitch or to put into the
machine. Each hitter bunts the ball and tries to keep it inside the
semicircle. The hitter gets two chances to put the bunt down. If the first or
second strike is bunted the hitter runs to first base. If the hitter misses both strikes, she must run all the bases before returning to the end of the line.
Contest: Each batter gets one strike to bunt. If the hitter puts the bunt down within the set boundaries she gets back in line, if she doesn’t she must shag the balls for the pitcher. Each round make the boundaries a little smaller than the round before until you get a winner(s).
70
3. Bunting Technique Two pitchers and two catchers (or pitching machines). One pitcher pitches toward home plate, while the other pitcher pitches toward
second base. The hitter at home, bunts the ball and runs through the bag at first base. At the same time, the hitter at second bunts the ball and runs through the bag at third base. After running through their respective bases, the runners jog to the end of the opposite line.
Bunt and Run/Squeeze Bunt Used to make sure the runner gets to the next base; puts pressure on the defense. The same mechanics as the sacrifice bunt with the following exceptions:
o Turn later, but not too late. o The hitter must bunt the next pitch regardless if it is a ball or a strike. o The hitter must get it down on the ground. o The runner runs on the pitch; similar to a steal or a hit and run. o Bunt and run with runners at 1st or 1st & 2nd. o Squeeze with a runner on 3rd or 2nd & 3rd.
Drag Bunt Used to get a base hit; surprise the defense (right handed batter) Start in the back of the box. Bunt strikes only – usually low strikes. Drop the bat until it is parallel to the ground and about waist level. Move the right hand up the bat and take the left hand off of the bat. The knob of the bat rest in the bend of the elbow. As the bat is dropped, a big crossover step is taken with the right foot. The bat must remain parallel to the ground with the left side toward the pitcher. The first step must be slightly toward 1st base, but not out of the batters box or on
home plate. If runners are on, they advance as if it were a sacrifice bunt. The hitter must be moving forward upon contact. Common errors: letting the bat drop too low, not using a big crossover step and
moving the bat in front of the body instead of keeping it behind the body.
71
Left Handed Running Slap
Teaching Progression Philosophy On base average is the most important thing not the batting average.
o The player must have average to above average speed. o Forget about their batting average. o You want them to hit a weak to medium ground ball to the left side of the
infield. This puts pressure on the defense
o It gives the hitter a running start. o It puts pressure on the 1st baseman who is trying to out run the runner back
to the bag. o It puts pressure on the shortstop who has to make a very quick play.
Mechanics of the Swing Inside out swing
o Start against a barrier to work on the swing. o Keep the hands inside the ball and high in the strike zone. o Keep the front side of the body closed. o Follow through with the right hand.
Footwork
o The left foot takes an aggressive crossover step. The step should be on the front line of the batter’s box . Make sure to keep the front side closed so that you can have good
coverage over the outside corner of the plate. o The first step is a short jab step with the right foot
This is used as a timing device and helps open up the right foot so that you can crossover with the left foot.
Take a crossover step directly at the pitcher (don’t bail out) Batting Tee
o The hands are high in the zone and ahead of the ball (in front of the tee). o Proper bat angle – this puts the bat angled towards the left side of the
infield. The hands come forward with the left foot (hit with the wrist and the forearm).
Pitching Machine
72
o Catch the ball in a stationary position. With a glove on the left hand, catch the ball behind you.
o Catch the ball on the first step. Catch the ball behind your body as the left foot lands on the
ground. o Catch the ball running through the batter’s box.
Run first, hit second. Catch strikes only – if it is not a strike get the glove out of the way
(do not catch the ball) and continue to take a couple of steps. o Drag Bunt
Move towards the pitcher. Open the front hip up and keep the shoulder down.
o Slap The hand position should be the same on the drag and on the slap. Lead with the knob of the bat and the hands high in the strike zone. Keep the bat in the right hand on the follow through to get the
momentum headed towards 1st base. Conclusion
o The slap gets runners on base. o It leads to runs.
73
Base Running
Running Skills
1. Running Skills Arms at a 90 degree angle Pick knees up Run in a straight line Lean forward
2. Home to 1st Run “through the bag” Straighten up about 5’ past the bag Lean just before reaching the bag Stay low out of the box with the back foot Do not leap on 1st base Dive at 1st only when avoiding a tag Coaching cues:
a. “Through the Bag” – ball hit to the infield b. “Round the Bag” – base hit or an error if the ball goes to the OF c. “2, 2” – extra base hit
3. Running to 2nd Always dive on any infield hit or error Be prepared to break up the double play On an extra base hit, look at the 3rd base coach before getting to 2nd base Know where the ball is
4. Running from 2nd Score on a base hit Always dive at 3rd on any infield hit Listen and watch the 3rd base coach Coaching Cues:
a. “Hit It” – slide or dive b. “Right There” – stand up c. “All the way . . . get back” – ball was cut or there was a perfect throw
to the plate d. “All the way” – score
On deck batter must help the base runner at home
5. Base Running Tips
74
Aggressive base running will win games for you. Take chances in preseason; find out what your team in capable of. Never run into the tag. Stop, fall down, run out of the baseline or out to the
outfield. Always slide or dive on close plays. Know the number of outs, the inning, the score and the importance of your
run. Always tag up on fly balls and either advance or fake a run to force a throw
from the outfielder. Take an aggressive lead on every pitch. If you don’t have to dive back into the
bag, you haven’t gone far enough. On a sacrifice bunt, run when you see the ball do down. On a hit and run, steal and a squeeze, run on the pitch. On a bunt, if 3rd base is open, go all the way. On a single to the outfield, be ready to take 2nd on any bobbled ball by the
outfielder. Find the ball immediately. On 3rd base, lead off and run in foul territory in case the batted ball hits you. With a runner on 2nd, advance on infield balls that are hit to the right side of
the infield and hold on balls hit to the left side of the infield (if you have good speed you may advance to third after the 3rd baseman or shortstop makes the throw to 1st base).
On a suicide squeeze, the batter should be ready to advance to 2nd on the play to home.
Don’t get doubled off on a line drive. Be ready to advance on all pass balls. When diving, learn and perfect the “fade away”. This can win many close
games for you. Always touch the base, as the infielder may drop the ball on the tag. Never give up or assume that you’re going to be out! Always put pressure on the defense. Force them to make the perfect play.
6. Head First Diving Progression Reasons to dive head first:
a. Less injuries occur b. The base runner can see the defensive player c. The base runner can see the base d. A greater chance of being safe because of the “fade away” dive e. Diving is fun and exciting –it gives your team a “spark”
Progression – Teach on cardboard boxes with baby powder
a. Remove any staples and secure it to the grass b. Each player stands 2 to 3 feet away from the cardboard c. Take 1 step, get down low, throw arms out and dive d. Move back 10 feet, run to cardboard and dive
On infield dirt – dive back to the bag
a. Take a lead from the base and use a crossover step and dive

75
b. After the lead, the position should be with the weight low and balanced and ready to go either way
c. When diving back to the bag, take a big crossover step, get low and dive back to the bag
d. Throw both arms out, keep hands closed in a fist position to prevent finger injuries
Incorporate diving into all base running drills everyday – Coaching Tips
a. Players should hit forearms and upper thighs b. Kick legs up c. Make hands into fists d. Keep eyes open
Common Errors
a. Dragging toes b. Slowing down c. Taking a two foot take off d. Breaking natural stride when approaching the base e. Staying too high, instead of getting low f. Diving too close to the base
7. Feet First Sliding Progression Take cleats off or wear tennis. Cleats tend to stick in the cardboard, which
causes players to roll their ankle or knee Sit on grass with one leg bent behind the other Use cardboard with powder Take a few steps and slide on the cardboard Make sure player is leaning/sitting back Continue to increase the distance Use the same technique to slide under the balls You can also teach either the sliding or diving on wet grass instead of
cardboard and powder

76
“3 Corner Base Running”
X
XX
XXX X
XXX X
“3 Corner Base Running”
X
XX
XXX X
XXX X
Base Running
Base Running Drills
1. Four Corner Running Divide team into four groups Send each group to a different base On the signal, the 1st runner at each line runs through the bag and then goes to
the back of that next line. Repeat until all players have gone through the bag. Then everyone rounds the bag and dives bag, then they round and go to the next base. The last rotation has the players going to two bases ahead as if they hit a double.
2. Team Relay Divide the team into two groups One group stays at home and the other group goes to 2nd On the signal, the 1st person in each line runs 2 bases ahead When their teammate crosses 2 bases ahead, the next runner goes The team that has all of their players finish first wins
3. Tagging Up at 3rd Three players line up at 3rd – one player on the base and the other two on
rubber basses that are set up in foul territory even with 3rd base The coach hits a fly ball to left field The players tags up and try to score
4. 3 Corner Relay Divide team into three groups The groups go to 1st, 3rd and home On the signal, runners at home swing a bat, take it with
them down the line and run through the bag Runners at 1st run to 3rd and dive Runners at 3rd take a lead, return to the bag to tag up and
then goes home All three runners go at the same time Runners rotate to the end of the next line
5. Tee Ball with Defense Batter/base runner hits the ball off of the tee with the defense in place You can put only the left side of the infield, only the right side of the infield or
the entire infield
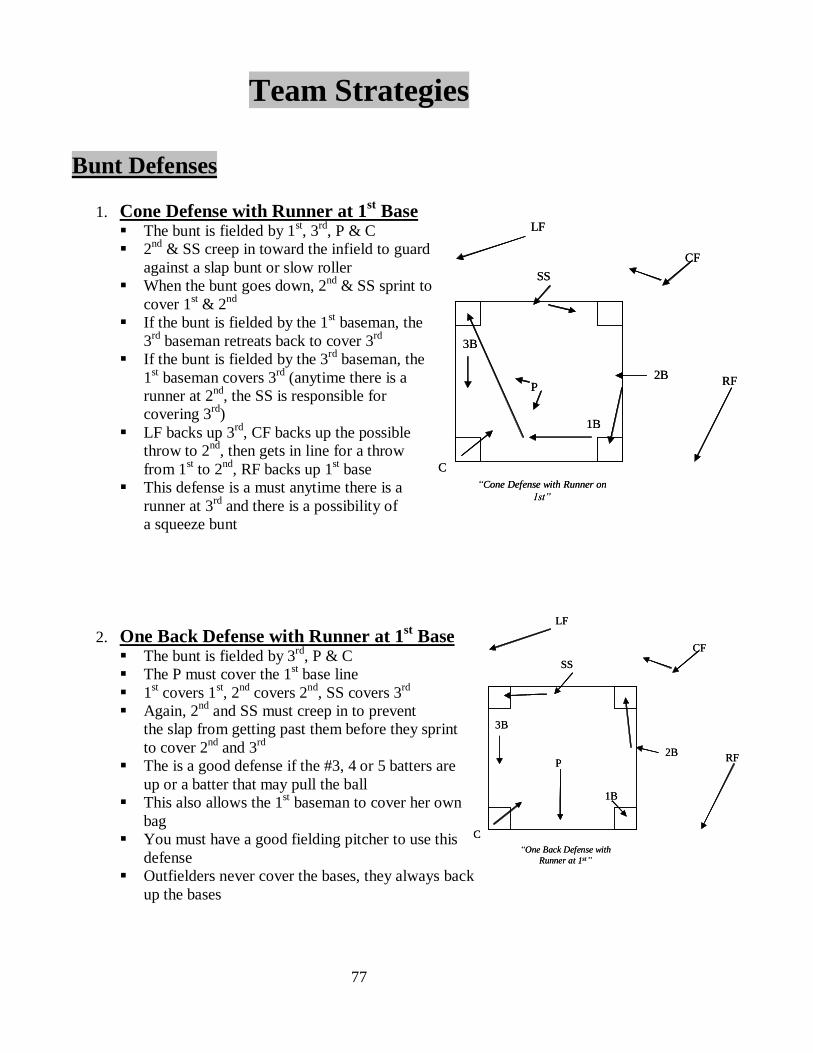
77
“Cone Defense with Runner on 1st”
2B
1B
SS
3B
P
C
LF
CF
RF
“Cone Defense with Runner on 1st”
2B
1B
SS
3B
P
C
LF
CF
RF
“One Back Defense with Runner at 1st”
2B
1B
SS
3B
P
C
LF
CF
RF
“One Back Defense with Runner at 1st”
2B
1B
SS
3B
P
C
LF
CF
RF
Team Strategies
Bunt Defenses
1. Cone Defense with Runner at 1st Base The bunt is fielded by 1st, 3rd, P & C 2nd & SS creep in toward the infield to guard
against a slap bunt or slow roller When the bunt goes down, 2nd & SS sprint to
cover 1st & 2nd If the bunt is fielded by the 1st baseman, the
3rd baseman retreats back to cover 3rd If the bunt is fielded by the 3rd baseman, the
1st baseman covers 3rd (anytime there is a runner at 2nd, the SS is responsible for covering 3rd)
LF backs up 3rd, CF backs up the possible throw to 2nd, then gets in line for a throw from 1st to 2nd, RF backs up 1st base
This defense is a must anytime there is a runner at 3rd and there is a possibility of a squeeze bunt
2. One Back Defense with Runner at 1st Base The bunt is fielded by 3rd, P & C The P must cover the 1st base line 1st covers 1st, 2nd covers 2nd, SS covers 3rd Again, 2nd and SS must creep in to prevent
the slap from getting past them before they sprint to cover 2nd and 3rd
The is a good defense if the #3, 4 or 5 batters are up or a batter that may pull the ball
This also allows the 1st baseman to cover her own bag
You must have a good fielding pitcher to use this defense
Outfielders never cover the bases, they always back up the bases
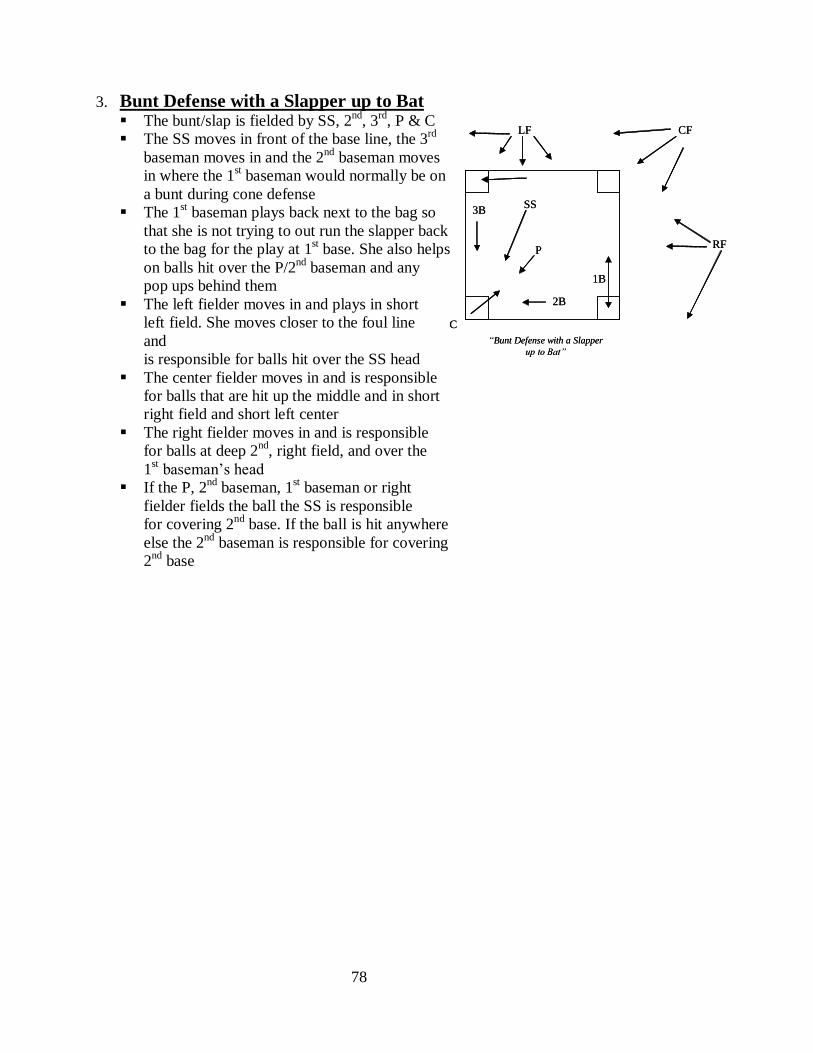
78
“Bunt Defense with a Slapperup to Bat”
2B
1B
SS3B
P
C
LF CF
RF
“Bunt Defense with a Slapperup to Bat”
2B
1B
SS3B
P
C
LF CF
RF
3. Bunt Defense with a Slapper up to Bat The bunt/slap is fielded by SS, 2nd, 3rd, P & C The SS moves in front of the base line, the 3rd
baseman moves in and the 2nd baseman moves in where the 1st baseman would normally be on a bunt during cone defense
The 1st baseman plays back next to the bag so that she is not trying to out run the slapper back to the bag for the play at 1st base. She also helps on balls hit over the P/2nd baseman and any pop ups behind them
The left fielder moves in and plays in short left field. She moves closer to the foul line and is responsible for balls hit over the SS head
The center fielder moves in and is responsible for balls that are hit up the middle and in short right field and short left center
The right fielder moves in and is responsible for balls at deep 2nd, right field, and over the 1st baseman’s head
If the P, 2nd baseman, 1st baseman or right fielder fields the ball the SS is responsible for covering 2nd base. If the ball is hit anywhere else the 2nd baseman is responsible for covering 2nd base
79
Outfield Game Plan
1. General Information Four places a ball can be hit to every outfielder
o In front of her o To the right of her for extra bases o To the left of her for extra bases o Over her head for extra bases or a home run
Any ball that is not hit in front of you will automatically be thrown to the relay who is either the SS or 2nd baseman
Any ground ball hit in front of you should be thrown two bases ahead of the
led runner o Situation #1 – no one on or runner on 3rd; ball is thrown to 2nd o Situation #2 – runner on 1st or 1st & 3rd; the ball is thrown to 3rd o Situation #3 – runner on 2nd or 2nd & 3rd or bases loaded; the ball is thrown
home
Anytime there is a base hit to the outfield with a runner at 3rd, the run will score, so don’t make a foolish throw to the plate allowing the batter to advance to 2nd and get into scoring position.
There are two different types of plays for the outfielders:
o “Play it Safe” – don’t take a chance on a diving catch and make sure to keep the ball in front of you on a ground ball. It is better to give up a base hit rather than a triple or homerun. The coach should indicate whether she wants you to “Play it Safe” or not.
o “Do or Die” – our opponents will win if we give up a base hit or we fail to throw the runner out at the plate (even if the catch is out of your range). The coach will indicate if the situation is a “Do or Die” situation or not.
2. Key Points to the Outfield Game Plan You must hit the relay person (SS or 2nd baseman) You must hit the cutoff person (1st or P) Your throws must hit the dirt, as these throws are faster than air balls The outfield is the last line of defense, keep the ball in front of you Don’t back up too close Never be a spectator!!!
3. Backing Up The center fielder backs up LF & RF on balls that are hit in front of them When balls are hit down the line, the CF goes opposite to back up a throw
80
Balls hit to LF, CF backs up and RF goes opposite Balls hit to RF, CF backs up and LF goes opposite After the initial play, each outfielder must move quickly to back up the next
possible throw/play Always anticipate and react before an errant throw occurs If the catcher tells the cutoff to “Cut 2” the RF and LF must be in good back
up position and the CF must be ready for a throw from the cutoff
4. Backing Up Double Plays Positions:
o RF– 1st base o CF – 2nd base o LF – 3rd base
Ball hit to 3rd or SS in the hole:
o LF backs up the play and them moves to back up 3rd base o CF backs up the possible throw to 2nd into right center field o RF backs up 1st base on a possible double play
Ball hit to 2nd or SS up the middle on a double play:
o LF backs up DP throw to 2nd then moves to 3rd o CF backs up ball hit to 2nd, then moves back in line with the next possible
throw if the runner at 2nd is safe o RF backs up the throw from 2nd to 1st
Ball hit to 1st on DP or to 2nd in the hole:
o LF backs up 3rd for the possible throw from 1st to 3rd o CF backs up the possible DP throw to 2nd, then moves back to CF for the
next possible throw o RF backs up hit ball and then moves to back up 1st
5. Fly Balls Fly balls hit within the outfielder’s “throwing range”:
o Throw one base ahead of the lead runner o If the runners occupy 1st & 3rd bases, and both runners hold, the outfielder
should get the ball in as quickly as possible to the cutoff player
Fly balls hit out of the outfielder’s “throwing range”: o With a runner at 3rd only, you must throw the ball home o With runners at 1st & 3rd or 2nd & 3rd, throw the ball one base ahead of the
back runner
6. Rules for the Outfield Game Plan On a base hit, the ball is thrown two bases ahead of the lead runner (except at
3rd) On a fly ball, the ball is thrown one base ahead of the lead runner
81
7. Push and Pull Hitters Pull hitters tend to hit the ball down the left field line (right handed batter)
o The entire team should move towards the 3rd base/LF foul line o RF may move in some and should play behind the 2nd baseman instead of
near the RF line
Push hitters tend to be weak and hit the ball down the right field line (right handed batter) o The entire team should move towards the 1st base/RF foul line o The LF may move in and play behind the SS instead of near the LF line
Make adjustments according to the hitters
Don’t play batters 1-9 in the same position
Learn the hitters tendencies and take advantage of them
82
Outfield Play
Outfielder Must . . .
1. Know the opposing team Do they slap and who are their slappers What players hit with power What players push the ball Do they like to bunt, steal, hit and run etc.
2. Know your own team Know other outfielders range Know other outfielders arms Know infielders range
3. Hit the cutoff/relay
4. Back Up Never get too close Always move laterally Get in line with where the throw is coming from Anticipate the second play or back up
5. Communicate and Back Up Both with the infielders and the outfielders
6. Know the Situation Where the runners are Where the plays will probably be made
7. Know the playing facilities and the playing conditions Grass – long or short, wet or dry Weather conditions – sunny, windy etc. Dimensions of the field – distance between foul and out of play, fence,
sprinklers, holes etc.
8. Important Qualities for an Outfielder Accurate arm Quick feet Good judgment Confident and disciplined
83
9. Basic Outfield Concepts Line the ball up, body to the target when catching/fielding Grip the ball across the seams (hold the ball out in the fingers, not in the palm
of the hand) Pick the ball up out front Drop the arm down as you are going back and then throw over the top (not
sidearm)
10. Catching a Fly Ball Set up properly every time The glove foot is forward Catch the ball with the body opened up Catch the ball up above and forward on the throwing side Block the sun with the glove hand and wait for it to come out of the sun Try to pick up the angle that the ball enters the sun

84
Key Points for all Outfielders
1. Pre-pitch preparation will keep you from making unnecessary mental mistakes. 2. Good communication is essential for all outfielders; that is, loudness, clarity and
decisiveness.
3. Make all the routine plays. Play “simple catch”.
4. All outfielders have responsibilities to back up bases.
5. Do not hold onto the ball in the outfield. Get it back into the infield immediately.
6. Call infielders off on all fly balls that you can reach. You have priority over the infielders.
7. Practice catching balls in the sun.
8. Be aware of field and weather conditions.
9. Learn to play the fences.
10. Freeze on line drives hit right at you.
11. Get into position to catch fly balls as quickly as possible.
12. Always use two hands whenever possible.
13. Try to catch all fly balls over your throwing shoulder.
14. Block hard hit balls that are right at you. If the ball gets by you it could mean that
a run will score.
15. On throws to home, one bounce the ball well out in front of the catcher. This kind of throw is easier to field than short hops are, especially with a runner trying to score.
16. With runners on base, charge ground balls.
17. Note whether the batter is right handed or left handed as this distinction will
determine how the ball will “fade” on you.
18. A general rule is to throw one base ahead of the runner on fly balls and two bases ahead of the runner on ground balls.
19. Take charge of your position.
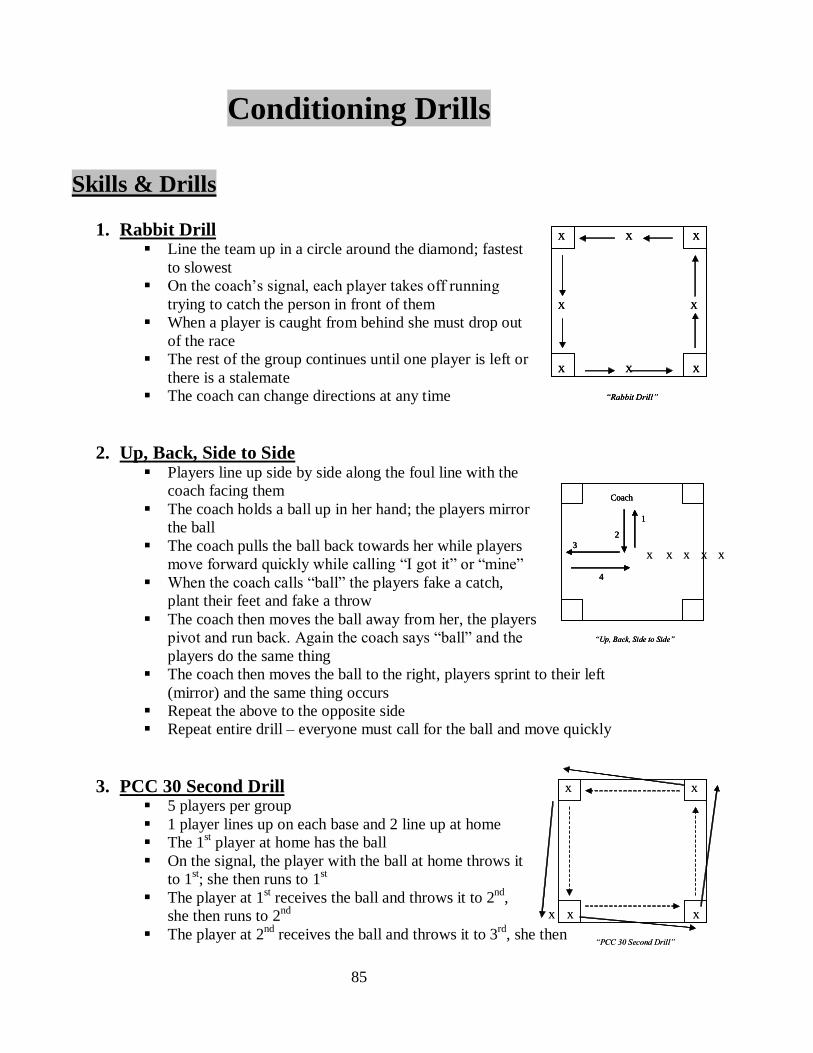
85
“Rabbit Drill”
X X X
X X X
X X
“Rabbit Drill”
X X X
X X X
X X
“Rabbit Drill”
X X X
X X X
X X
X X X X X
“Up, Back, Side to Side”
Coach
1
23
4
X X X X X
“Up, Back, Side to Side”
Coach
1
23
4
“Up, Back, Side to Side”
Coach
1
23
4
“PCC 30 Second Drill”
X X
X X X
“PCC 30 Second Drill”
X X
X X X
Conditioning Drills
Skills & Drills
1. Rabbit Drill Line the team up in a circle around the diamond; fastest
to slowest On the coach’s signal, each player takes off running
trying to catch the person in front of them When a player is caught from behind she must drop out
of the race The rest of the group continues until one player is left or
there is a stalemate The coach can change directions at any time
2. Up, Back, Side to Side
Players line up side by side along the foul line with the coach facing them
The coach holds a ball up in her hand; the players mirror the ball
The coach pulls the ball back towards her while players move forward quickly while calling “I got it” or “mine”
When the coach calls “ball” the players fake a catch, plant their feet and fake a throw
The coach then moves the ball away from her, the players pivot and run back. Again the coach says “ball” and the players do the same thing
The coach then moves the ball to the right, players sprint to their left (mirror) and the same thing occurs
Repeat the above to the opposite side Repeat entire drill – everyone must call for the ball and move quickly
3. PCC 30 Second Drill
5 players per group 1 player lines up on each base and 2 line up at home The 1st player at home has the ball On the signal, the player with the ball at home throws it
to 1st; she then runs to 1st The player at 1st receives the ball and throws it to 2nd,
she then runs to 2nd The player at 2nd receives the ball and throws it to 3rd, she then
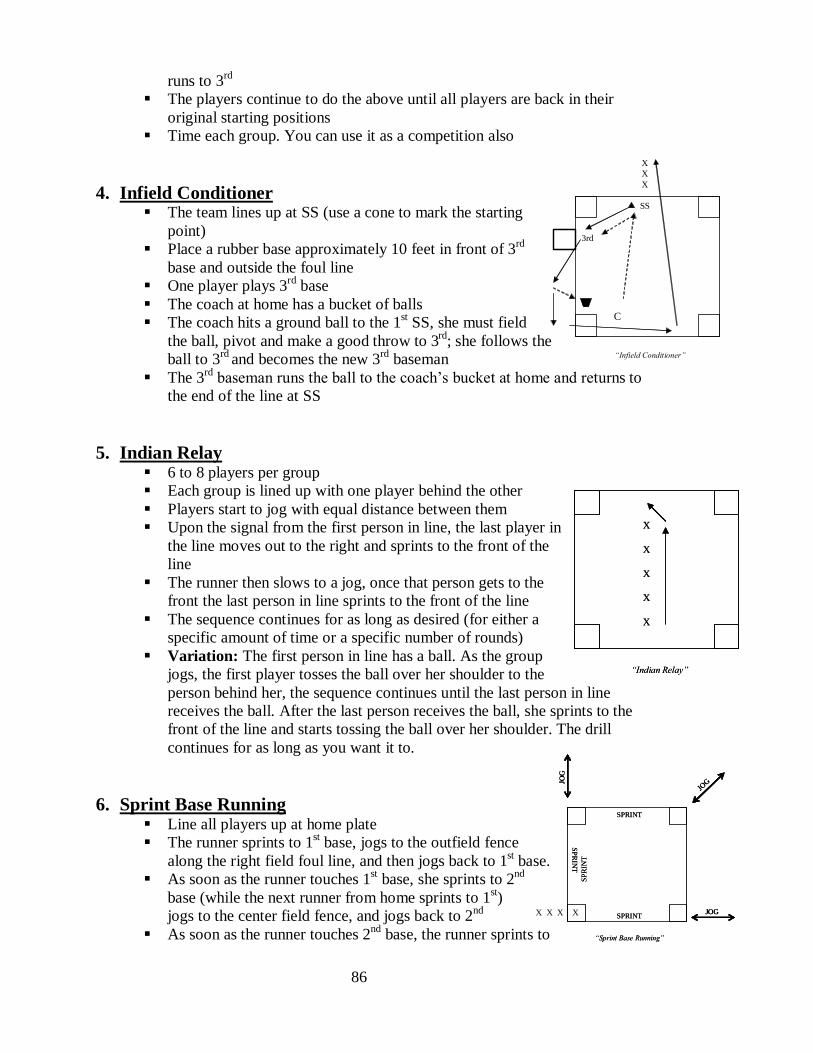
86
“Infield Conditioner”
XXX
SS
C
3rd
X X X X
“Sprint Base Running”
JOG
JOGJO
G
SPRINT
SPRINT
SPRINT
SPRI
NT
“Sprint Base Running”
JOGJOG
JOG
JOGJO
GJO
G
SPRINT
SPRINT
SPRINT
SPRI
NT
runs to 3rd The players continue to do the above until all players are back in their
original starting positions Time each group. You can use it as a competition also
4. Infield Conditioner The team lines up at SS (use a cone to mark the starting
point) Place a rubber base approximately 10 feet in front of 3rd
base and outside the foul line One player plays 3rd base The coach at home has a bucket of balls The coach hits a ground ball to the 1st SS, she must field
the ball, pivot and make a good throw to 3rd; she follows the ball to 3rd and becomes the new 3rd baseman
The 3rd baseman runs the ball to the coach’s bucket at home and returns to the end of the line at SS
5. Indian Relay 6 to 8 players per group Each group is lined up with one player behind the other Players start to jog with equal distance between them Upon the signal from the first person in line, the last player in
the line moves out to the right and sprints to the front of the line
The runner then slows to a jog, once that person gets to the front the last person in line sprints to the front of the line
The sequence continues for as long as desired (for either a specific amount of time or a specific number of rounds)
Variation: The first person in line has a ball. As the group jogs, the first player tosses the ball over her shoulder to the person behind her, the sequence continues until the last person in line receives the ball. After the last person receives the ball, she sprints to the front of the line and starts tossing the ball over her shoulder. The drill continues for as long as you want it to.
6. Sprint Base Running Line all players up at home plate The runner sprints to 1st base, jogs to the outfield fence
along the right field foul line, and then jogs back to 1st base. As soon as the runner touches 1st base, she sprints to 2nd
base (while the next runner from home sprints to 1st) jogs to the center field fence, and jogs back to 2nd
As soon as the runner touches 2nd base, the runner sprints to
“Indian Relay”
X
X
X
X
X
“Indian Relay”
X
X
X
X
X

87
“Picking Up Balls Hit Past the Outfielders”
X“Picking Up Balls Hit Past the
Outfielders”
X
3rd base, jogs to the outfield fence along the left field foul line, jogs back to 3rd base and sprints home
7. Throw and Hustle Start with five outfielders in right field in a single file line Two infielders are at 2nd base, two infielders are at
3rd base and one player is with the coach at or near the pitcher’s mound
The coach hits fly balls to an outfielder, who then catches the ball, sets up and throws to 2nd base
The 2nd baseman simulates a tag, then squares and throws to 3rd base. The 3rd baseman then throws to the player near the coach
After the outfielder throws to 2nd base, she runs to centerfield and starts a new line there
The person at 2nd base, throws to 3rd base and follows her throw and is now at the base
The person at 3rd base follows her throw to the catcher and now becomes the coach’s catcher. The catcher runs to 2nd base and fills in at that position
Repeat the drill in center and left field As soon as the 2nd baseman throws to 3rd base the coach hits to the next
outfielder. The drill is continuous Variation: changing the number of players at each position. Changing the
type of ball that is hit to the outfielder, for example ground balls, fly balls, line drives etc.
8. Picking Up balls Hit by the Outfielders Use 5 cones or markers and 4 balls per group Split your outfielders into 2 or 3 groups The first player starts at the first cone. When the coach
says go the outfielder runs back to the first ball, picks it up correctly and throws it to an infielder, who is acting as her catcher. She then runs back to the first cone
She then runs back to the second ball, throws it to her catcher and runs back to the first cone. The drill continues until the outfielder picks up the ball that is farthest away from her, throws it to her catcher and then runs all the way back to her starting cone
The next set of outfielders get the balls set up and repeat the drill Variations: If they make a bad throw they must start the drill all over
again. Use it as a relay contest, you may also include your infielders in this drill. You can also set up 4 or 5 bunts for the infielders/catchers to pick up. They must hustle back to their starting defensive position after each throw to a base before picking up the next bunt
“Throw and Hustle”
X X
C X X X X X X
“Throw and Hustle”
X X
C X X X X X X
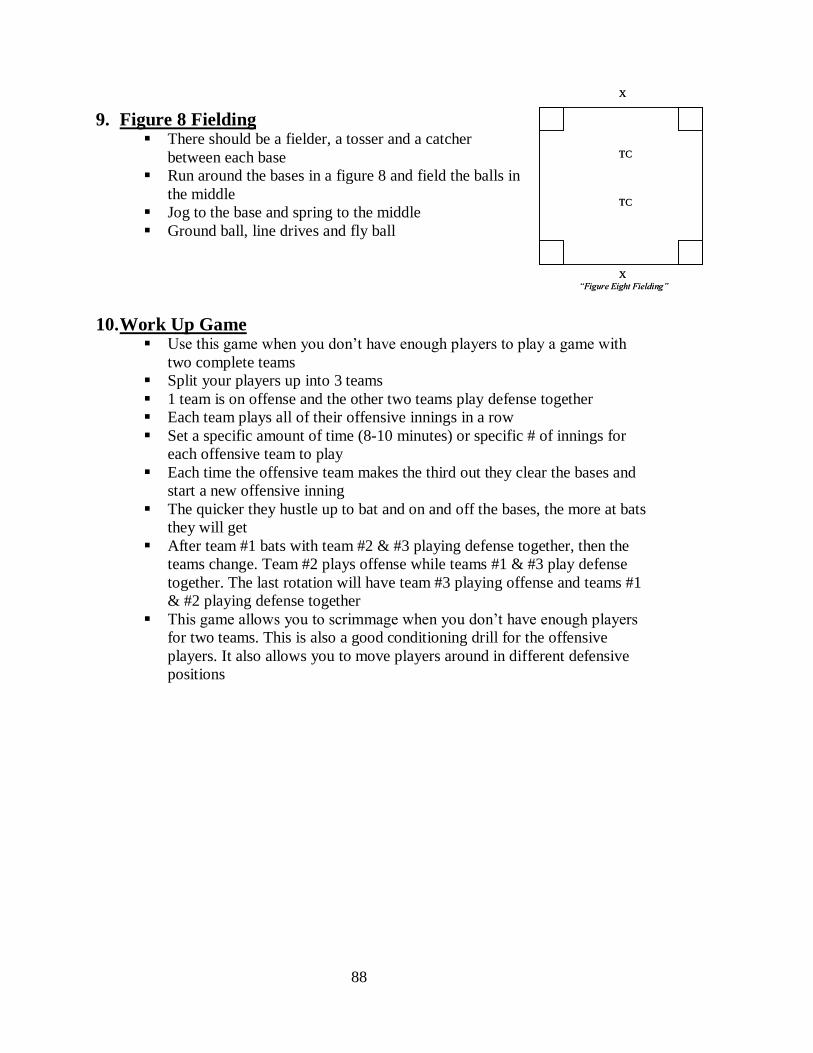
88
“Figure Eight Fielding”
X
TC
TC
X“Figure Eight Fielding”
X
TC
TC
X
9. Figure 8 Fielding There should be a fielder, a tosser and a catcher
between each base Run around the bases in a figure 8 and field the balls in
the middle Jog to the base and spring to the middle Ground ball, line drives and fly ball
10. Work Up Game Use this game when you don’t have enough players to play a game with
two complete teams Split your players up into 3 teams 1 team is on offense and the other two teams play defense together Each team plays all of their offensive innings in a row Set a specific amount of time (8-10 minutes) or specific # of innings for
each offensive team to play Each time the offensive team makes the third out they clear the bases and
start a new offensive inning The quicker they hustle up to bat and on and off the bases, the more at bats
they will get After team #1 bats with team #2 & #3 playing defense together, then the
teams change. Team #2 plays offense while teams #1 & #3 play defense together. The last rotation will have team #3 playing offense and teams #1 & #2 playing defense together
This game allows you to scrimmage when you don’t have enough players for two teams. This is also a good conditioning drill for the offensive players. It also allows you to move players around in different defensive positions

89
Date: Time: Practice #:
Announcements: Equipment:
SKILLS DRILLS & EXPLANATION

90
Date: 2/10/03 Time: 2:00-4:00 Practice #: 2
Announcements:
1) Next Practice – day & time
2) What paperwork etc. needs to be turned in
3) Game Schedule
4) Uniforms
Equipment: balls, bases,
Tees, fungo bats
SKILLS DRILLS & EXPLANATION
1. Stretch 1. Assign each player a stretch to lead
2. Throwing 2. Warm up arms: a. review throwing mechanics b. make them run if they don’t pick ball up w/ 2 hands
3. Fielding 3. Fielding ground balls with partners a. Pick up with partner X - - - - - -> X b. straight on, glove side, hand side
Fielding ground balls at positions a. Double Fungo drill
4. Outfield 4. Outfield skills – a. work on throwing overhand (from knees & standing) b. work on footwork to set-up correctly to catch fly ball c. work on positions
5. Team Defense 5. Defensive Skills a. work on positions b. team defenses and situations
6. Hitting 6. Hitting Mechanics
a. everyone in a group, go over hitting mechanics b. hit off of tees & soft toss
“Double Fungo - A”
XX
H1
X1
XX
H2 X2
X X
X X
91
BASIC COACHING
1) Important basics about coaching (teaching)
a) You are a teacher first and foremost, regardless of your profession.
b) You are a Role Model, regardless of what some people may say about the role of coaches and athletes. You make a huge impression on your players.
c) We need better role models; the state of youth sports is in disarray. There is so much violence in sports from the youth level to the professional level. We see examples of parent, player, and coach violence in the news on a regular basis.
d) There are different types of learners, a good coach can teach all types of learners. For example, some students are audio learners. These types of learners get more out of a lectures and verbal explanations. Visual learners learn better by seeing demonstrations and diagrams.
e) The sign of a great coach is someone who can teach one thing in a variety different of ways.
2) Be Prepared
a) Be organized; make use of your valuable practice time.
b) Have a written plan for practice; be logical about your teaching progression and the progression of practice. Don’t teach step 2 and 3 if they can’t perform step 1. Make sure your practice plan is designed so that the players don’t get warmed up, stand around, then have to do some kind of explosive exercise again. Once they have warmed up keep them moving, once they have cooled down then do things that are appropriate for them at that point.
c) Get a notebook or clipboard to keep practices and important papers organized and together. Make notes on practice plans about what worked well, what needed improvement, etc. for future reference.
3) Expectations and rules
a) Have a set of expectations, goals etc. both for the individuals and for the team. Make sure to set both short term and long term goals. Have players set goals for themselves and for the team.
92
b) Have a set of rules and penalties; make sure you can live with them. How will you handle players missing practice, being late, cursing etc. Make sure the players clearly understand your rules.
c) Only make rules that are very important to you and the success of the team.
d) Follow the rules yourself. If you don’t allow the players to curse then you shouldn’t curse either.
4) Don’t try to do it all yourself
a) Try to get others to help you, if you don’t you will get burned out from trying to do everything yourself.
b) If you have money to hire someone great if not try to get volunteers. Ask parents, older players or ex players, etc. Make sure they are clear of their roles and responsibilities.
c) Get people to help you with on the field stuff such as practice, and off the field stuff such as fundraising, paperwork, finances etc.
BASIC SKILLS
1) Throwing is the most important skill in softball, regardless of age.
2) Don’t tell any player, boy or girl, that they “throw like a girl”, this is an old stereotype that is an insult.
3) Things have changed over the years, but some girls still throw “incorrectly” not “like a girl”. Make sure to correct them.
4) When teaching any skill, make sure to explain, demonstrate and then have them try it.
5) Isolate skills and then put them back together. Don’t be afraid to go back to basics when things go wrong.
6) After you have taught them the skills, you must continue to emphasize proper mechanics. Don’t let them get lazy and sloppy.
7) When teaching a specific skill, try to make it fun and challenging. Find as many ways as you can to teach a skill.
8) Make sure the players have the proper equipment. The equipment should be appropriate for their age, size, and skill level.
93
Coaching Tips
1st Base Coach
Verbal Cues to the Batter/Base Runner If the ball is hit or bunted to an infielder: “Through the Bag”
o Runner runs to 1st base, running outside the field and leans through the bag at 1st base, don’t jump or lunge
On a single: “Round the Bag”
o Runner rounds 1st base taking a lead, looks at the ball o If the outfielder fumbles the ball or the ball gets by her, the runner
goes o If the outfielder makes a good pick up and throws to 2nd, the runner
gets back to 1st base
On a double or more: “2, 2, 2” o The runner goes directly to 2nd without hesitation o The runner needs to make a good turn at 1st so that her hips are facing
2nd base when she hits the bag at 1st o The runner picks up the 3rd base coach about 2/3 of the way to 2nd
Relay signals to the runner at 1st base
Alert the runners to situations: # of outs, pick off attempts etc.
3rd Base Coach
Verbal Cues to the Batter/Base Runner This coach gives the signals for the offensive strategies
The coach should pick up the runner just before she reaches 2nd base
This coach alerts runners at 2nd & 3rd to the situation: tag up, run, suicides etc.
The coach should change their position in the coaching box according to the
play: o Face oncoming runner if she is to stop at 3rd base o Point to the bag if you want the runner to stand up o Get down on one knee and tell her to hit it if you want her to slide

94
o Point to the inside or the outside of the bag if you want her to slide away from the play
o Go down the line if the runner is to make a turn at 3rd base o Watch the ball – if the runner might be out at home, stay in front of her
and have her stop and dive back into 3rd base o Once the runner gets past the 3rd base coach, she must go home o The coach runs back to 3rd to pick up the next runner
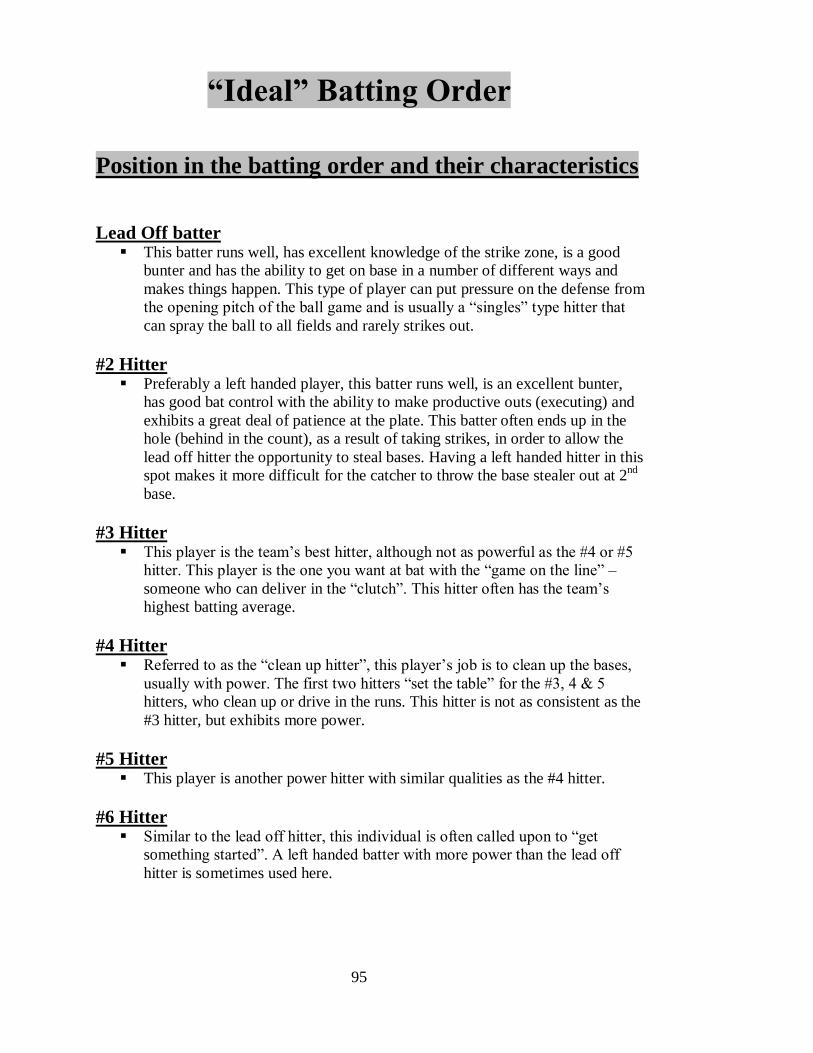
95
“Ideal” Batting Order
Position in the batting order and their characteristics
Lead Off batter This batter runs well, has excellent knowledge of the strike zone, is a good
bunter and has the ability to get on base in a number of different ways and makes things happen. This type of player can put pressure on the defense from the opening pitch of the ball game and is usually a “singles” type hitter that can spray the ball to all fields and rarely strikes out.
#2 Hitter Preferably a left handed player, this batter runs well, is an excellent bunter,
has good bat control with the ability to make productive outs (executing) and exhibits a great deal of patience at the plate. This batter often ends up in the hole (behind in the count), as a result of taking strikes, in order to allow the lead off hitter the opportunity to steal bases. Having a left handed hitter in this spot makes it more difficult for the catcher to throw the base stealer out at 2nd base.
#3 Hitter This player is the team’s best hitter, although not as powerful as the #4 or #5
hitter. This player is the one you want at bat with the “game on the line” – someone who can deliver in the “clutch”. This hitter often has the team’s highest batting average.
#4 Hitter Referred to as the “clean up hitter”, this player’s job is to clean up the bases,
usually with power. The first two hitters “set the table” for the #3, 4 & 5 hitters, who clean up or drive in the runs. This hitter is not as consistent as the #3 hitter, but exhibits more power.
#5 Hitter This player is another power hitter with similar qualities as the #4 hitter.
#6 Hitter Similar to the lead off hitter, this individual is often called upon to “get
something started”. A left handed batter with more power than the lead off hitter is sometimes used here.

96
#7, #8 & #9 Hitters Although these batters are usually the weaker hitters on the team, they are
frequently at bat in critical situations. As are all hitters, they are vital to the team’s overall success when placed strategically in the line up. They must be able to bunt and execute. Place the fastest runner in the #9 spot as it can be a real plus to have “blue chip” runners coming up back to back - #9 then #1.

97
HITTING BASE RUNNING OTHER BASE RUNNING Mechanics ____ Running Form SITUATIONS (CONTINUED) ____ Selecting a Bat ____ Dive Back to Bag ____ Touching the Bases ____ Grip - Finger Home to 1st ____ Steals, Double Steals ____ Grip - Palm ____ Through the Bag ____ Delayed Steals ____ Pivot on Back Foot * Get Out of the Box ____ 2nd Only ____ Short Stride * Stay Low ____ 3rd Only ____ Left Arm Pulls * Stay in Lane ____ Passed Ball/Wild Pitch ____ Right Arm Throws * Run thru the Bag ____ Don’t Run Into Tag ____ “Shoulder to Shoulder” ____ Round and Get Back ____ Full Count, 1 Out ____ Weight Back ____ Round and Dive Back ____ Full Count 2 Outs ____ Follow Through ____ Round and Go ____ Game Situations Points to Remember ____ 1st Base Coach ____ Line of Force Home to 2nd ____ Quick Bat ____ “2” Stand Up ____ Stay Relaxed ____ “2” Hit it Stations ____ Pick up 3rd Base Coach ____ Tees – Fence 2nd to Home ____ Self Toss ____ Stop and Find the Ball ____ Partner Toss ____ Round and Get Back ____ Weighted Bat ____ Score ____ Maximum Effort Tee/Swing Rite OTHER BASE RUNNING
SITUATIONS TEAM OFFENSE
____ Low Pitch ____ 1st & 3rd Hitting ____ High Pitch ____ Steals ____ Mechanics ____ Inside Pitch ____ Hit & Run ____ Situations ____ Outside Pitch ____ Bunts Bunting ____ Off Machine ____ Squeezes ____ Sacrifice Bunt ____ With Signals ____ Break up DP ____ Squeeze Bunt ____ Live Pitching ____ Dive Around the Tag ____ Drag Bunt ____ Lead Offs ____ Bunt & Run SLAPPERS ____ Lead Off & Return Other Offensive Skills
____ Drag Bunt * Standing ____ Hit & Run ____ Slap * Diving Back ____ Slap Bunt ____ Hit Away ____ Rules ____ 1st & 3rd * When the Pitcher has ____Special Plays The Ball in the Circle * Running into an Infielder * Making a Move/Turn at 1st towards 2nd * Taking Your Lead in Foul Territory * Running in the Base Path * Making Contact w/ the 3rd Base Coach
98
PITCHER INFIELD TEAM DEFENSE ____ Rules ____ Tag Plays ____ Bunts ____ Signs ____ Force Plays ____ Pop Flies ____ Pitch Outs ____ Fake & Go Behind ____ Flies Between IF/OF ____ Drop ____ Flies to the Outfield ____ Double Plays ____ Off Speed ____ Bunt Defenses ____ 1st & 3rd Plays ____ Knuckle Ball ____ Line Drives ____ Pick Offs ____ Rise ____ Ground Balls ____ Relays, Cutoffs ____ Curve ____ Bad Hops ____ Push & Pull Defense ____ Covering H, 1st ____ Double Plays ____ Intentional Walk Defense ____ Pop Fly Responsibilities ____ Intentional Walks ____ Squeeze Defense ____ 1st & 3rd Situations ____ 1st & 3rd Plays ____ OF Game Plan ____ Signals & Targets ____ Do or Dies ____ Game Situations ____ Delayed Steals ____ Squeeze Defense ____ Special Plays ____ Cut Offs ____ Steals ____ Backing Up ____ Push & Pull Defense ____Charting Pitches ____ “Winning Run” Situation ____ Fielding-Slow Hit Balls ____ Pop Flies ____ Fielding-Bunts & Squeezes ____ Rundowns ____ Fielding-Come backers ____ Fielding-Double Plays CATCHER OUTFIELD THROWING ____ Targets ____ Breaking Back on Balls ____ Give a Target w/ Both Hands ____ Framing Pitches ____ Ground Balls ____ Follow Ball w/ Your Eyes ____ Calling Pitches ____ Bouncing Balls ____ Move Feet to the Ball ____ Signs ____ Rounding the Ball ____ Grip Ball as you take it out ____ Quick Throws ____ Throwing Range of your Glove ____Bad Hops ____ Lines Drives ____ Point Glove at Your Target ____Pitch Outs ____ Long Runs ____ Pull Glove Down & Rotate ____ Intentional Walks ____ Playing the Ball in the Sun Shoulders ____ Pick Offs ____ Sliding Under the Ball ____ Snap Wrist ____ Block Balls – R, L & Center ____ Diving Catch ____ Follow Through ____ DP Footwork ____ Throw to Bases ____ Fielding Bunts ____ QB Drills w/ CF ____ Pop Flies ____ Playing it Safe ____ Blocking the Plate ____ Do or Die Catch ____ Tag Plays ____ Do or Die Throw ____Double Steals ____ Relays to SS & 2B ____ Steals -w/ & w/o Runners ____ Delayed Steals ____ Back up Responsibilities ____ 1st & 3rd Plays ____ Foul Tips ____ Swinging 3rd Strike ____ Throws from the Outfield ____ Pitching Strategy ____ Working w/ the Pitcher

99
COACHES SCORECARD
___________ VS. _____________ DATE _________________ SCORE __________ WON BY __________ # _____________
ORDER NAME #/POS. PB - SB- SBA-
1
2
3
4
5
6
7
8
9
10
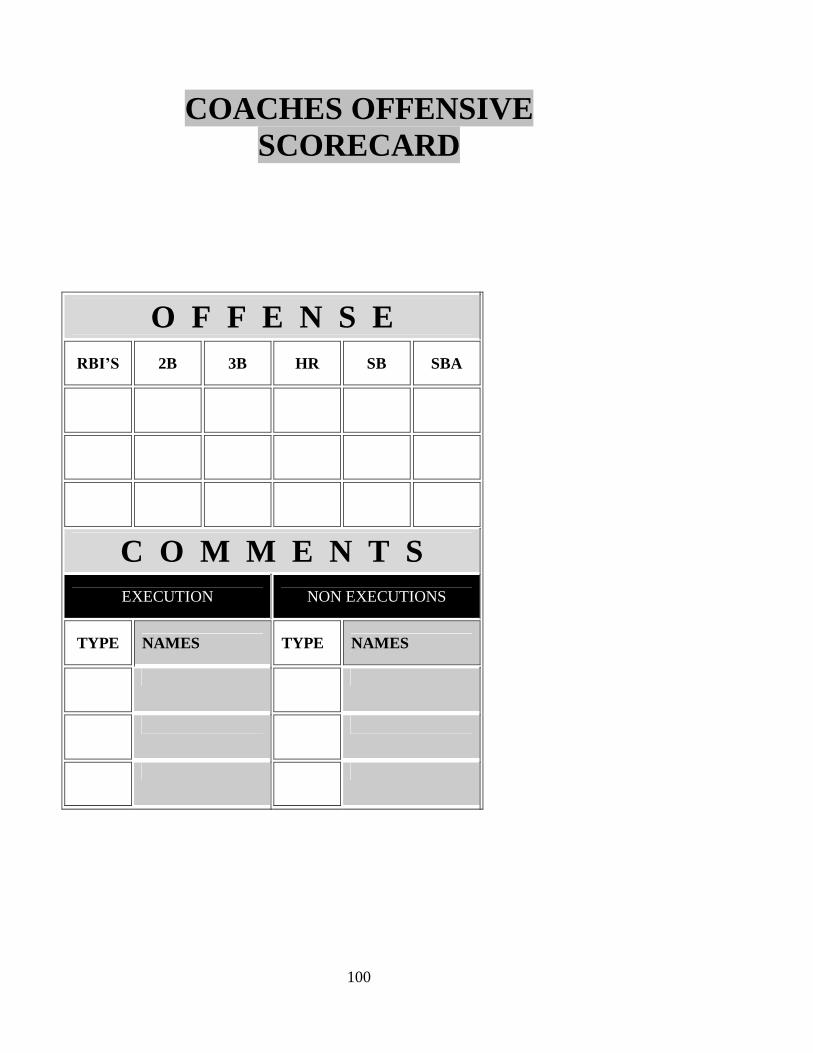
100
COACHES OFFENSIVE SCORECARD
O F F E N S E RBI’S 2B 3B HR SB SBA
C O M M E N T S
EXECUTION NON EXECUTIONS
TYPE NAMES TYPE NAMES
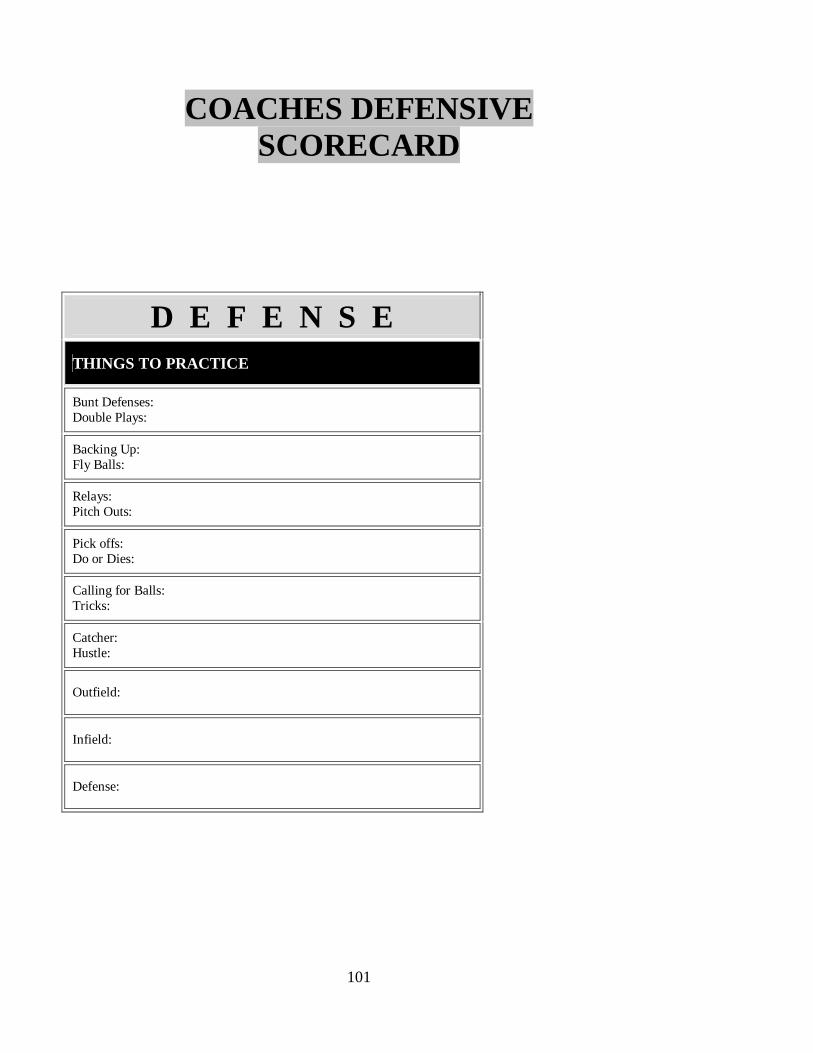
101
COACHES DEFENSIVE SCORECARD
D E F E N S E THINGS TO PRACTICE
Bunt Defenses: Double Plays:
Backing Up: Fly Balls:
Relays: Pitch Outs:
Pick offs: Do or Dies:
Calling for Balls: Tricks:
Catcher: Hustle:
Outfield:
Infield:
Defense:
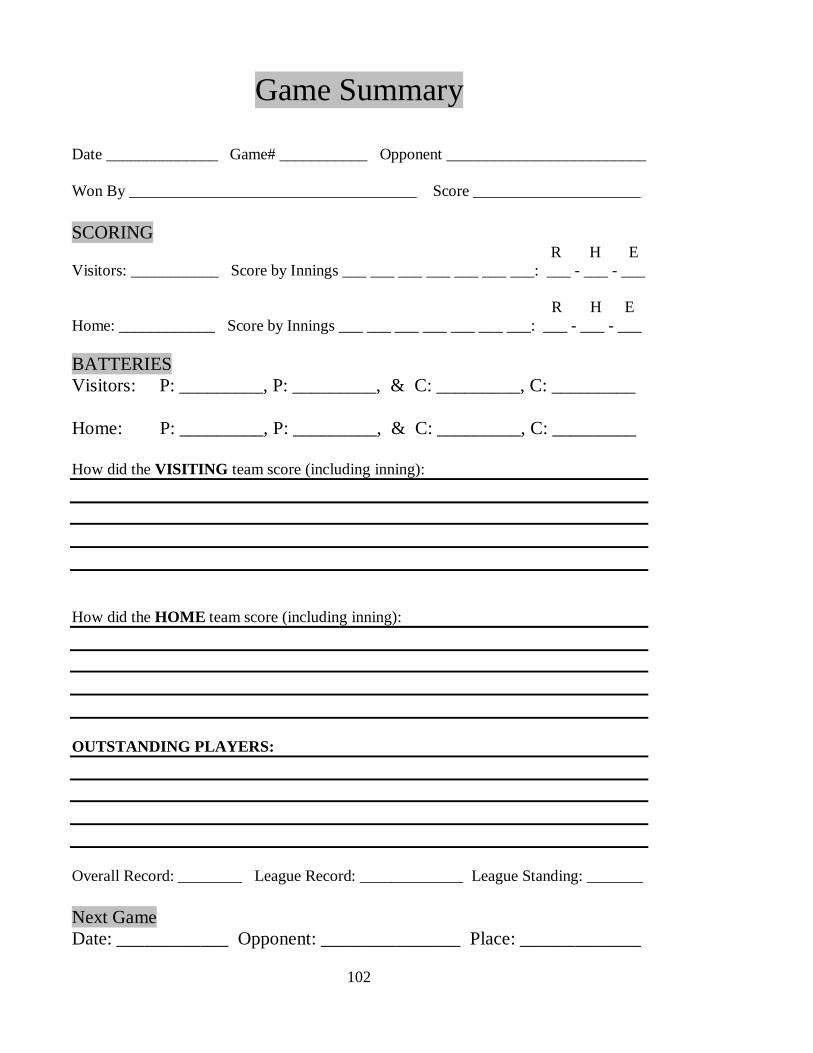
102
Game Summary
Date ______________ Game# ___________ Opponent _________________________ Won By ____________________________________ Score _____________________ SCORING R H E Visitors: ___________ Score by Innings ___ ___ ___ ___ ___ ___ ___: ___ - ___ - ___ R H E Home: ____________ Score by Innings ___ ___ ___ ___ ___ ___ ___: ___ - ___ - ___ BATTERIES Visitors: P: _________, P: _________, & C: _________, C: _________ Home: P: _________, P: _________, & C: _________, C: _________ How did the VISITING team score (including inning): How did the HOME team score (including inning): OUTSTANDING PLAYERS: Overall Record: ________ League Record: _____________ League Standing: _______ Next Game Date: ____________ Opponent: _______________ Place: _____________