Embed Size (px)
Citation preview

Table of Contents:
Introduction................................2
Overview.....................................3
Precautions.................................4
Installing.the.Battery..............5
Mounting.the.CS-88..
and.Turning.It.On.................5-7
Using.the.High-Pass.Filter....7
Using.the.Three-Level.....
Gain.Switch................................8
The.Windscreen........................8
Replacing.the.Shock....
Mount.Suspenders...............8-9
Troubleshooting......................10
Specifications........................... 11
Warranty.................................... 12
USER’S GUIDE

2
Thank you for choosing Senal.
The.Senal.CS-88.DSLR-Video.Shotgun.Microphone.is.designed.for.recording.live.audio.directly.to.your.DSLR..The.CS-88’s.cardioid.polar.pattern.and.shotgun.design.optimize.the.microphone.to.focus.on.the.subject.while.rejecting.off-axis.sound..Ideal.for.run-and-gun.productions.like.recording.interviews.and.events.indoors.and.in.the.field,.the.CS-88.attaches.to.your.camera’s.shoe.mount.or.to.a.boom.pole.and.plugs.into.the.camera’s.audio.input.jack.to.deliver.natural,.professional-quality.sound..
Among the benefits you’ll enjoy:
▪ Cardioid.polar.pattern
▪ Three-level.gain.switch.(-10.dB,.0.dB,.+10.dB)
▪ High-pass.filter
▪ Integrated.shock.mount
▪ Metal.shoe-mount.adapter.with.1/4″-20.threaded.socket
▪ 3.5.mm.audio.connection
▪ Power.LED
▪ ▪ ▪ ▪ ▪ ▪ ▪ ▪ ▪ ▪ ▪ ▪ ▪ ▪ ▪ ▪ ▪ ▪ ▪ ▪ ▪ ▪ ▪ ▪ ▪ ▪ ▪ ▪ ▪ ▪ ▪ ▪ ▪ ▪ ▪ ▪ ▪ ▪ ▪ ▪ ▪ ▪ ▪ ▪ ▪ ▪ ▪ ▪ ▪ ▪ ▪ ▪ ▪ ▪ ▪ ▪ ▪ ▪ ▪ ▪ ▪ ▪ ▪ ▪ ▪ ▪ ▪ ▪ ▪ ▪ ▪ ▪ ▪ ▪ ▪ ▪ ▪ ▪ ▪ ▪ ▪ ▪ ▪ ▪ ▪ ▪ ▪ ▪ ▪ ▪ ▪ ▪ ▪ ▪ ▪ ▪ ▪ Introduction

3
OFF
ON
-10dB
+10dB
0
Overview
Also Included:Foam.windscreenAA.battery
High-pass filter switch
Microphone ports
Three-level gain switch (+10.dB,.0.dB,.-10.dB)
Power switch
1/4˝-20 threaded socket
Shoe-mount adapter
Locking wheel
Power LED
Overview ▪ ▪ ▪ ▪ ▪ ▪ ▪ ▪ ▪ ▪ ▪ ▪ ▪ ▪ ▪ ▪ ▪ ▪ ▪ ▪ ▪ ▪ ▪ ▪ ▪ ▪ ▪ ▪ ▪ ▪ ▪ ▪ ▪ ▪ ▪ ▪ ▪ ▪ ▪ ▪ ▪ ▪ ▪ ▪ ▪ ▪ ▪ ▪ ▪ ▪ ▪ ▪ ▪ ▪ ▪ ▪ ▪ ▪ ▪ ▪ ▪ ▪ ▪ ▪ ▪ ▪ ▪ ▪ ▪ ▪ ▪ ▪ ▪ ▪ ▪ ▪ ▪ ▪ ▪ ▪ ▪ ▪ ▪ ▪ ▪ ▪ ▪ ▪ ▪ ▪ ▪ ▪ ▪ ▪ ▪ ▪ ▪ ▪ ▪
3.5 mm audio connection
Suspender hooks
Wire guide
Drawstring.pouchFour.(4).replacement.shock.mount.suspendersUser.manual
4
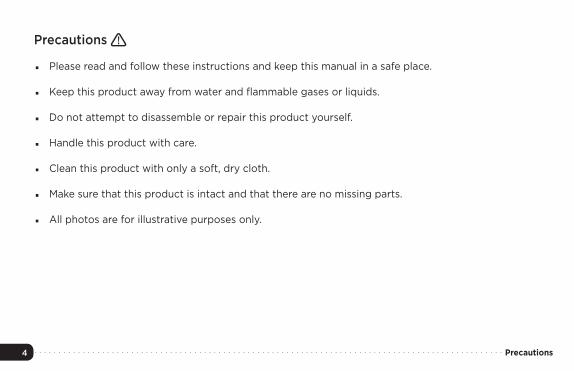
Precautions
▪ Please.read.and.follow.these.instructions.and.keep.this.manual.in.a.safe.place.
▪ Keep.this.product.away.from.water.and.flammable.gases.or.liquids.
▪ Do.not.attempt.to.disassemble.or.repair.this.product.yourself.
▪ Handle.this.product.with.care.
▪ Clean.this.product.with.only.a.soft,.dry.cloth.
▪ Make.sure.that.this.product.is.intact.and.that.there.are.no.missing.parts.
▪ All.photos.are.for.illustrative.purposes.only.
▪ ▪ ▪ ▪ ▪ ▪ ▪ ▪ ▪ ▪ ▪ ▪ ▪ ▪ ▪ ▪ ▪ ▪ ▪ ▪ ▪ ▪ ▪ ▪ ▪ ▪ ▪ ▪ ▪ ▪ ▪ ▪ ▪ ▪ ▪ ▪ ▪ ▪ ▪ ▪ ▪ ▪ ▪ ▪ ▪ ▪ ▪ ▪ ▪ ▪ ▪ ▪ ▪ ▪ ▪ ▪ ▪ ▪ ▪ ▪ ▪ ▪ ▪ ▪ ▪ ▪ ▪ ▪ ▪ ▪ ▪ ▪ ▪ ▪ ▪ ▪ ▪ ▪ ▪ ▪ ▪ ▪ ▪ ▪ ▪ ▪ ▪ ▪ ▪ ▪ ▪ ▪ ▪ ▪ ▪ ▪ ▪ Precautions

5Installing the Battery / Mounting the CS-88 and Turning It On ▪ ▪ ▪ ▪ ▪ ▪ ▪ ▪ ▪ ▪ ▪ ▪ ▪ ▪ ▪ ▪ ▪ ▪ ▪ ▪ ▪ ▪ ▪ ▪ ▪ ▪ ▪ ▪ ▪ ▪ ▪ ▪ ▪ ▪ ▪ ▪ ▪ ▪ ▪ ▪ ▪ ▪ ▪ ▪ ▪ ▪ ▪ ▪ ▪ ▪ ▪ ▪ ▪ ▪ ▪
Installing the Battery
The.CS-88.runs.on.a.single.AA.battery..To.install.a.battery,.make.sure.the.CS-88.is.turned.off.and.follow.these.steps:
1. Press.on.the.battery.compartment.cover.and.slide.it.to.open.it.
2. Insert.the.battery.in.the.orientation.indicated.by.the.illustration.inside.the.compartment.
3. Close.the.battery.compartment.cover.by.catching.it.on.the.track.and.sliding.it.firmly.into.place.
Mounting the CS-88 and Turning It On
The.CS-88.mounts.onto.your.camera.via.the.metal.shoe-mount.adapter.under.the.shock.mount..To.mount.the.microphone.onto.your.camera,.make.sure.the.CS-88.is.turned.off.and.follow.these.steps:
1....Rotate.the.locking.wheel.counterclockwise.to.loosen.it.
2. Slide.the.shoe-mount.adapter.all.the.way.into.your.camera’s.shoe.mount.
3. Rotate.the.locking.wheel.clockwise.until.secure.

6
4. Insert.the.microphone’s.3.5.mm.audio.connection.into.your.camera’s.audio.input.jack.
Tip:.Use.the.wire.guides.to.keep.the.audio.cable.in.place.on.top.of.your.camera.
You.can.also.mount.the.CS-88.onto.a.boom.pole.via.the.1/4˝-20.threaded.socket.in.the.shoe-mount.adapter..To.mount.the.microphone.onto.a.boom.pole,.make.sure.the.CS-88.is.turned.off.and.follow.these.steps:
1. Match.the.threaded.post.on.the.end.of.the.boom.pole.with.the.threaded.socket.in.the.CS-88’s.shoe-mount.adapter.
2. Screw.the.boom.pole.into.the.threaded.socket.until.secure.
3. Insert.the.microphone’s.3.5.mm.audio.connection.into.the.female.end.of.a.3.5.mm.stereo.extension.cable.(sold.separately).
▪ ▪ ▪ ▪ ▪ ▪ ▪ ▪ ▪ ▪ ▪ ▪ ▪ ▪ ▪ ▪ ▪ ▪ ▪ ▪ ▪ ▪ ▪ ▪ ▪ ▪ ▪ ▪ ▪ ▪ ▪ ▪ ▪ ▪ ▪ ▪ ▪ ▪ ▪ ▪ ▪ ▪ ▪ ▪ ▪ ▪ ▪ ▪ ▪ ▪ ▪ ▪ ▪ ▪ ▪ ▪ ▪ ▪ ▪ ▪ ▪ ▪ ▪ ▪ ▪ ▪ ▪ ▪ ▪ ▪ ▪ ▪ ▪ ▪ ▪ ▪ Mounting the CS-88 and Turning It On
OFF
ON
-10dB
+10dB
0
OFF
ON
-10dB
+10dB
0

7
Tip:.Use.the.wire.guides.to.keep.the.audio.cable.in.place.on.top.of.the.boom.pole.
Note:.Make.sure.the.extension.cable.is.long.enough.to.reach.from.your.audio.recorder.to.the.microphone.at.the.end.of.the.boom.pole.
4. Insert.the.extension.cable’s.3.5.mm.male.audio.connection.into.the.audio.input.jack.of.your.audio.recorder.
To.turn.the.microphone.on,.slide.the.power.switch.to.the.ON.position..The.power.LED.will.glow.green.to.indicate.that.the.power.is.on..When.battery.power.is.low,.the.power.LED.will.glow.red.
Using the High-Pass Filter
The.high-pass.filter.helps.prevent.the.CS-88.from.picking.up.low-frequency.noises.that.can.interfere.with.your.recording,.like.the.rumble.from.an.air.conditioner.
To.turn.on.the.high-pass.filter,.slide.the.high-pass.filter.switch.so.it.rests.just.above.the. .marking..To.turn.off.the.high-pass.filter,.slide.the.switch.back.so.it.rests.under.the. .marking.
Mounting the CS-88 and Turning It On / Using the High-Pass Filter ▪ ▪ ▪ ▪ ▪ ▪ ▪ ▪ ▪ ▪ ▪ ▪ ▪ ▪ ▪ ▪ ▪ ▪ ▪ ▪ ▪ ▪ ▪ ▪ ▪ ▪ ▪ ▪ ▪ ▪ ▪ ▪ ▪ ▪ ▪ ▪ ▪ ▪ ▪ ▪ ▪ ▪ ▪ ▪ ▪ ▪ ▪ ▪ ▪ ▪ ▪ ▪ ▪ ▪
OFF
ON
-10dB
+10dB
0

8
Using the Three-Level Gain Switch
The.three-level.gain.switch.provides.a.+10.dB.boost.or.-10.dB.pad..Boosting.the.microphone’s.gain.can.be.useful.for.picking.up.low-level.or.distant.sounds.in.a.quiet.environment..To.boost.the.microphone’s.gain.by.10.dB,.slide.the.three-level.gain.switch.so.it.rests.under.the.+10.dB.marking.
The.-10.dB.pad.lowers.the.level.of.the.incoming.signal.and.is.useful.for.preventing.distortion.when.recording.in.high-decibel.environments,.like.a.rock.concert..To.use.the..10.dB.pad,.slide.the.switch.so.it.rests.above.the.-10.dB.marking.
To.return.the.microphone’s.gain.to.normal,.slide.the.switch.so.it.rests.at.the.middle.0.dB.marking.
The Windscreen
The.CS-88.comes.with.a.foam.windscreen.that.helps.reduce.wind.noise..To.fit.the.windscreen.onto.the.microphone,.rotate.the.windscreen.while.gently.pushing.it.onto.the.microphone.barrel..Make.sure.that.the.windscreen.covers.all.the.ports.on.the.sides.of.the.microphone.barrel.
Replacing the Shock Mount Suspenders
The.CS-88’s.integrated.shock.mount.isolates.the.microphone.from.your.camera.or.boom.pole..This.helps.prevent.the.microphone.from.picking.up.vibrations.in.the.camera.or.the.boom,.which.can.cause.disruptive.and.unwanted.noise.in.your.recording.
▪ ▪ ▪ ▪ ▪ ▪ ▪ ▪ ▪ ▪ ▪ ▪ ▪ ▪ ▪ ▪ ▪ ▪ ▪ ▪ ▪ ▪ ▪ ▪ ▪ ▪ ▪ ▪ Using the Three-Level Gain Switch / The Windscreen / Replacing the Shock Mount Suspenders

9
The.CS-88.comes.with.replacement.suspenders.for.the.integrated.shock.mount..To.replace.the.suspenders,.follow.these.steps:
1. .Unhook.the.two.rear.suspenders.from.the.microphone,.and.then.unhook.the.two.front.suspenders.from.the.microphone.
2. Remove.the.microphone.and.the.old.suspenders.from.the.shock.mount.
3. Hook.the.new.suspenders.onto.the.suspender.hooks.inside.the.shock.mount.
4. Make.sure.the.microphone.and.the.shock.mount.are.facing.the.same.direction,.and.position.the.microphone.inside.the.shock.mount.
Note: The.Senal.logo.is.at.the.front.of.the.shock.mount.
5. Hook.the.front.suspenders.onto.the.front.suspender.hooks.of.the.microphone,.and.then.hook.the.rear.suspenders.onto.the.rear.suspender.hooks.of.the.microphone.
Replacing the Shock Mount Suspenders ▪ ▪ ▪ ▪ ▪ ▪ ▪ ▪ ▪ ▪ ▪ ▪ ▪ ▪ ▪ ▪ ▪ ▪ ▪ ▪ ▪ ▪ ▪ ▪ ▪ ▪ ▪ ▪ ▪ ▪ ▪ ▪ ▪ ▪ ▪ ▪ ▪ ▪ ▪ ▪ ▪ ▪ ▪ ▪ ▪ ▪ ▪ ▪ ▪ ▪ ▪ ▪ ▪ ▪ ▪ ▪ ▪ ▪ ▪ ▪ ▪ ▪ ▪ ▪ ▪ ▪ ▪ ▪ ▪ ▪ ▪ ▪ ▪ ▪ ▪
OFF
ON
-10dB
+10dB
0

10
Troubleshooting
Problem Solution
The.microphone.is.stuck.in.the.camera’s.shoe.mount.
Make.sure.the.locking.wheel.is.fully.loosened.
The.microphone.will.not.turn.on. Make.sure.that.a.fresh.battery.is.installed.and.is.in.the.proper.orientation.
The.sound.is.distorted. Make.sure.the.microphone’s.audio.connection.cable.is.fully.plugged.into.your.camera’s.audio.input.jack.
Turn.off.the.+10.dB.boost.on.the.microphone.
The.sound.is.too.low. Turn.off.the.-10.dB.pad.on.the.microphone.
▪ ▪ ▪ ▪ ▪ ▪ ▪ ▪ ▪ ▪ ▪ ▪ ▪ ▪ ▪ ▪ ▪ ▪ ▪ ▪ ▪ ▪ ▪ ▪ ▪ ▪ ▪ ▪ ▪ ▪ ▪ ▪ ▪ ▪ ▪ ▪ ▪ ▪ ▪ ▪ ▪ ▪ ▪ ▪ ▪ ▪ ▪ ▪ ▪ ▪ ▪ ▪ ▪ ▪ ▪ ▪ ▪ ▪ ▪ ▪ ▪ ▪ ▪ ▪ ▪ ▪ ▪ ▪ ▪ ▪ ▪ ▪ ▪ ▪ ▪ ▪ ▪ ▪ ▪ ▪ ▪ ▪ ▪ ▪ ▪ ▪ ▪ ▪ ▪ ▪ ▪ ▪ ▪ Troubleshooting

11
Specifications
Transducer type: Back.electret.condenser
Pattern: Cardioid
Frequency response: . 50.Hz.to.16.kHz
Sensitivity: -32.dB,.±3.dB.(0.dB.=.1.V/Pa.at.1.kHz)
High-pass filter: 60.Hz.10.dB/octave
Output impedance: 2000.Ω.±30%
Power requirement: One.1.5.V.AA.battery
Dimensions (microphone with shock mount): 8.7˝.×.3.4˝.×.2.3˝.(22.×.8.6.×.5.8.cm)
Weight: 6.4.oz..(181.g)
Specifications ▪ ▪ ▪ ▪ ▪ ▪ ▪ ▪ ▪ ▪ ▪ ▪ ▪ ▪ ▪ ▪ ▪ ▪ ▪ ▪ ▪ ▪ ▪ ▪ ▪ ▪ ▪ ▪ ▪ ▪ ▪ ▪ ▪ ▪ ▪ ▪ ▪ ▪ ▪ ▪ ▪ ▪ ▪ ▪ ▪ ▪ ▪ ▪ ▪ ▪ ▪ ▪ ▪ ▪ ▪ ▪ ▪ ▪ ▪ ▪ ▪ ▪ ▪ ▪ ▪ ▪ ▪ ▪ ▪ ▪ ▪ ▪ ▪ ▪ ▪ ▪ ▪ ▪ ▪ ▪ ▪ ▪ ▪ ▪ ▪ ▪ ▪ ▪ ▪ ▪ ▪ ▪ ▪ ▪ ▪ ▪

Ten-Year Limited Warranty
This.Senal.product.is.warranted.to.the.original.purchaser.to.be.free.from.defects.in.materials.and.workmanship.under.normal.consumer.use.for.a.period.of.ten.(10).years.from.the.original.purchase.date.or.thirty.(30).days.after.replacement,.whichever.occurs.later..The.warranty.provider’s.responsibility.with.respect.to.this.limited.warranty.shall. be. limited. solely. to. repair. or. replacement,. at. the. provider’s. discretion,. of. any. product. that. fails. during.normal.use.of.this.product.in.its.intended.manner.and.in.its.intended.environment..Inoperability.of.the.product.or.part(s).shall.be.determined.by.the.warranty.provider..If.the.product.has.been.discontinued,.the.warranty.provider.reserves.the.right.to.replace.it.with.a.model.of.equivalent.quality.and.function.
This.warranty.does.not.cover.damage.or.defect.caused.by.misuse,.neglect,.accident,.alteration,.abuse,.improper.installation.or.maintenance..EXCEPT.AS.PROVIDED.HEREIN,.THE.WARRANTY.PROVIDER.MAKES.NEITHER.ANY.EXPRESS.WARRANTIES.NOR.ANY. IMPLIED.WARRANTIES,. INCLUDING.BUT.NOT.LIMITED.TO.ANY. IMPLIED.WARRANTY.OF.MERCHANTABILITY.OR.FITNESS.FOR.A.PARTICULAR.PURPOSE..This.warranty.provides.you.with.specific.legal.rights,.and.you.may.also.have.additional.rights.that.vary.from.state.to.state.
To.obtain.warranty.coverage,.contact.the.Senal.Customer.Service.Department.to.obtain.a.return.merchandise.authorization.(“RMA”).number,.and.return.the.defective.product.to.Senal.along.with.the.RMA.number.and.proof.of.purchase..Shipment.of.the.defective.product.is.at.the.purchaser’s.own.risk.and.expense.
For.more.information.or.to.arrange.service,.visit.www.senalsound.com.or.call.Customer.Service.at.212-594-2353.
Product.warranty.provided.by.the.Gradus.Group..www.gradusgroup.com
Senal.is.a.registered.trademark.of.the.Gradus.Group..©.2015.Gradus.Group.LLC..All.Rights.Reserved.
GG3


![FIZIOLOŠKI KONCEPT BUKE · 100 0 10 20 30 40 50 60 70 80 90 100 110 120 130 140 L [dB] promena nivoa ocena 6dB uočljivo 1dB neuočljivo 3dB na granici uočavanja 10dB jasn ou čl](https://img.pdfslide.net/doc/110x75/5e43eff4d0ac3f41f70329b9/fizioloki-koncept-buke-100-0-10-20-30-40-50-60-70-80-90-100-110-120-130-140-l.jpg)