Embed Size (px)
Citation preview
Tables That Don’t Look Like Tables: Power Techniques
Diane [email protected]
What’s so special about tables?
Basic things you need to know
Table & Cell styles
Some important tips
Anchored Objects in Tables (from InDesign Magazine)
1
Tables That Don’t Look Like Tables: Power Techniques Diane Burns
What’s so special about tables?
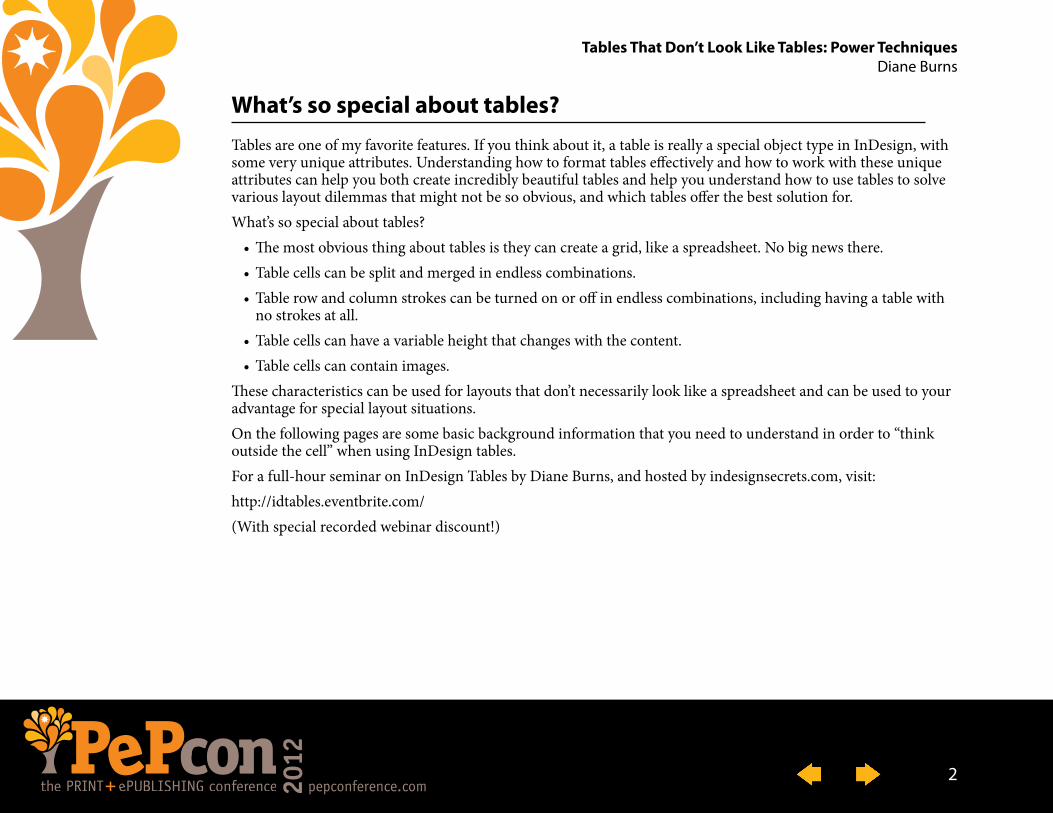
Tables are one of my favorite features. If you think about it, a table is really a special object type in InDesign, with some very unique attributes. Understanding how to format tables effectively and how to work with these unique attributes can help you both create incredibly beautiful tables and help you understand how to use tables to solve various layout dilemmas that might not be so obvious, and which tables offer the best solution for.What’s so special about tables?•The most obvious thing about tables is they can create a grid, like a spreadsheet. No big news there.•Table cells can be split and merged in endless combinations.•Table row and column strokes can be turned on or off in endless combinations, including having a table with
no strokes at all.•Table cells can have a variable height that changes with the content.•Table cells can contain images.
These characteristics can be used for layouts that don’t necessarily look like a spreadsheet and can be used to your advantage for special layout situations.On the following pages are some basic background information that you need to understand in order to “think outside the cell” when using InDesign tables.For a full-hour seminar on InDesign Tables by Diane Burns, and hosted by indesignsecrets.com, visit:http://idtables.eventbrite.com/(With special recorded webinar discount!)
2
Tables That Don’t Look Like Tables: Power Techniques Diane Burns
Basic things you need to know
Before using tables to address more advanced layout problems, it’s important to master the basics first, and to feel comfortable using various table features to produce the effect you want.
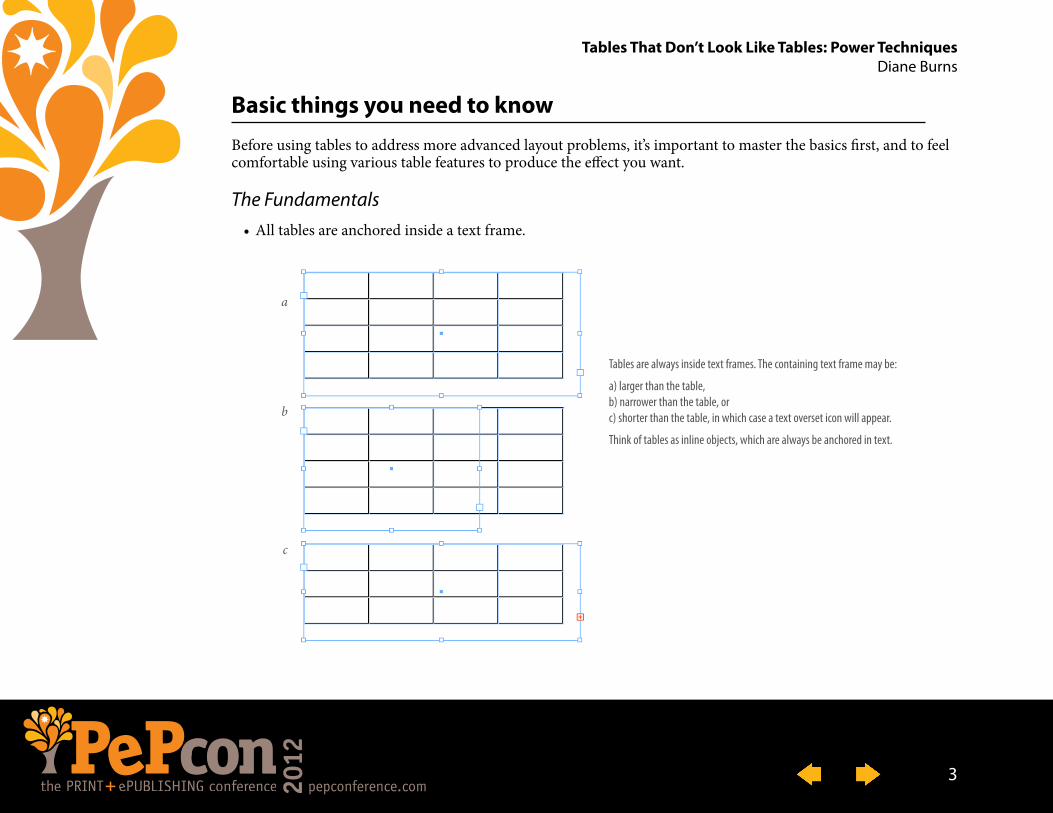
The Fundamentals•All tables are anchored inside a text frame.
Tables are always inside text frames. The containing text frame may be:
a) larger than the table, b) narrower than the table, or c) shorter than the table, in which case a text overset icon will appear.
Think of tables as inline objects, which are always be anchored in text.
a
b
c
3
Tables That Don’t Look Like Tables: Power Techniques Diane Burns
The Fundamentals (continued)
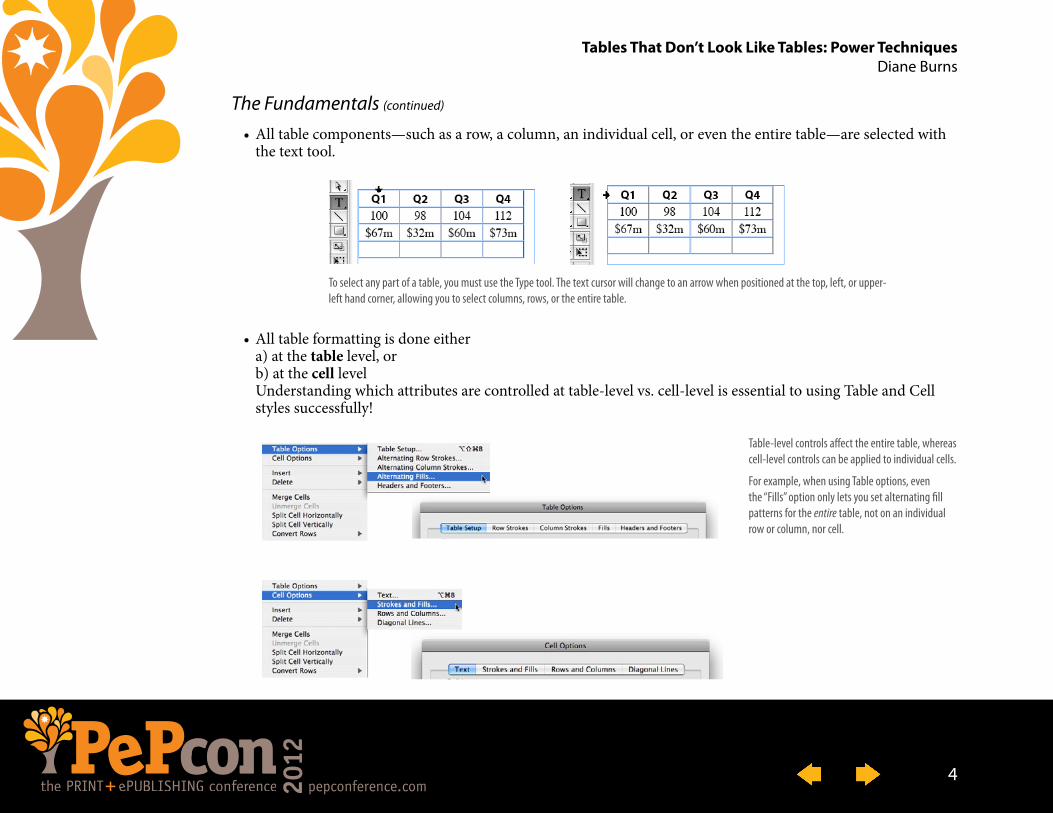
•All table components—such as a row, a column, an individual cell, or even the entire table—are selected with the text tool.
•All table formatting is done either a) at the table level, or b) at the cell level Understanding which attributes are controlled at table-level vs. cell-level is essential to using Table and Cell styles successfully!
To select any part of a table, you must use the Type tool. The text cursor will change to an arrow when positioned at the top, left, or upper-left hand corner, allowing you to select columns, rows, or the entire table.
Table-level controls affect the entire table, whereas cell-level controls can be applied to individual cells.
For example, when using Table options, even the “Fills” option only lets you set alternating fill patterns for the entire table, not on an individual row or column, nor cell.
4
Tables That Don’t Look Like Tables: Power Techniques Diane Burns
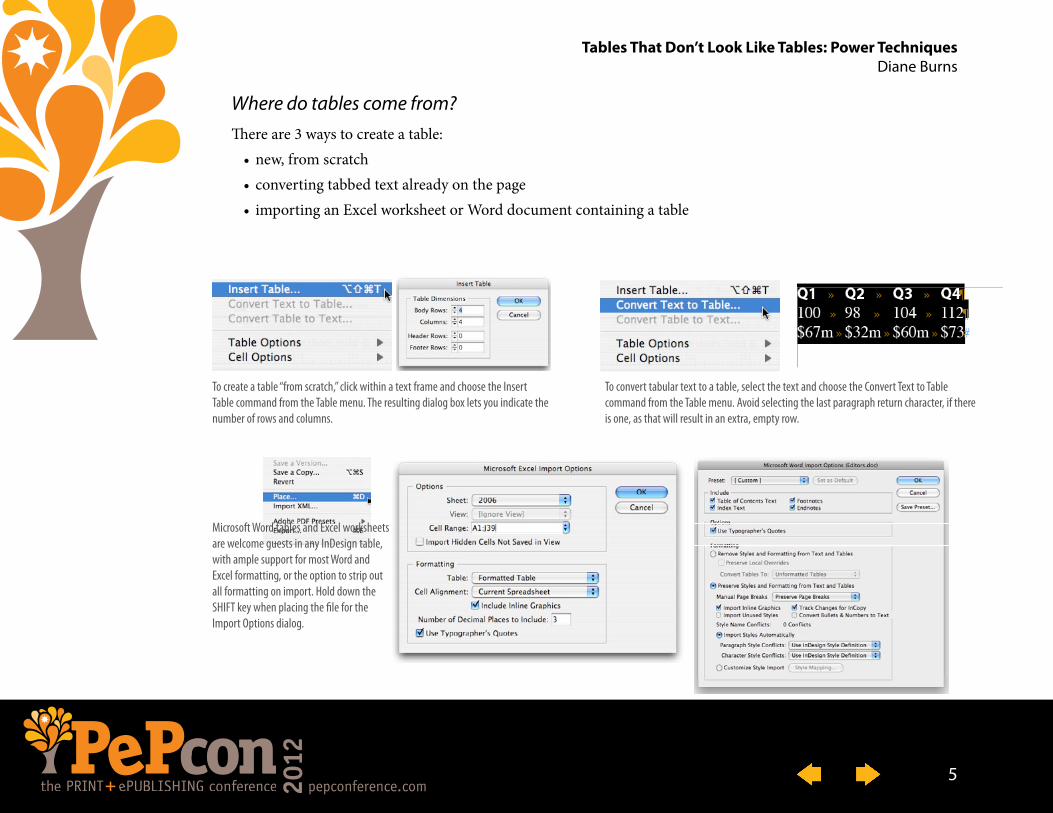
Where do tables come from?There are 3 ways to create a table: •new, from scratch • converting tabbed text already on the page • importing an Excel worksheet or Word document containing a table
To create a table “from scratch,” click within a text frame and choose the Insert Table command from the Table menu. The resulting dialog box lets you indicate the number of rows and columns.
To convert tabular text to a table, select the text and choose the Convert Text to Table command from the Table menu. Avoid selecting the last paragraph return character, if there is one, as that will result in an extra, empty row.
Microsoft Word tables and Excel worksheets are welcome guests in any InDesign table, with ample support for most Word and Excel formatting, or the option to strip out all formatting on import. Hold down the SHIFT key when placing the file for the Import Options dialog.
5
Tables That Don’t Look Like Tables: Power Techniques Diane Burns
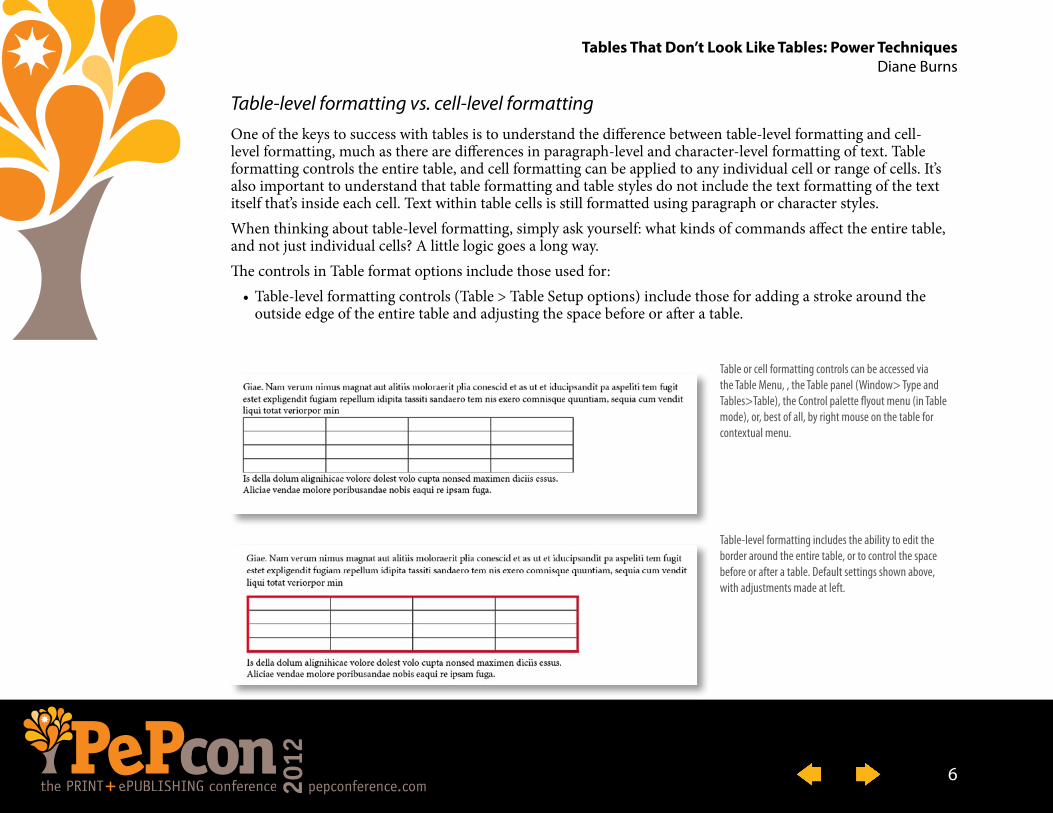
Table-level formatting vs. cell-level formattingOne of the keys to success with tables is to understand the difference between table-level formatting and cell-level formatting, much as there are differences in paragraph-level and character-level formatting of text. Table formatting controls the entire table, and cell formatting can be applied to any individual cell or range of cells. It’s also important to understand that table formatting and table styles do not include the text formatting of the text itself that’s inside each cell. Text within table cells is still formatted using paragraph or character styles.When thinking about table-level formatting, simply ask yourself: what kinds of commands affect the entire table, and not just individual cells? A little logic goes a long way. The controls in Table format options include those used for:•Table-level formatting controls (Table > Table Setup options) include those for adding a stroke around the
outside edge of the entire table and adjusting the space before or after a table.
Table or cell formatting controls can be accessed via the Table Menu, , the Table panel (Window> Type and Tables>Table), the Control palette flyout menu (in Table mode), or, best of all, by right mouse on the table for contextual menu.
Table-level formatting includes the ability to edit the border around the entire table, or to control the space before or after a table. Default settings shown above, with adjustments made at left.
6
Tables That Don’t Look Like Tables: Power Techniques Diane Burns
Table-level formatting (continued)
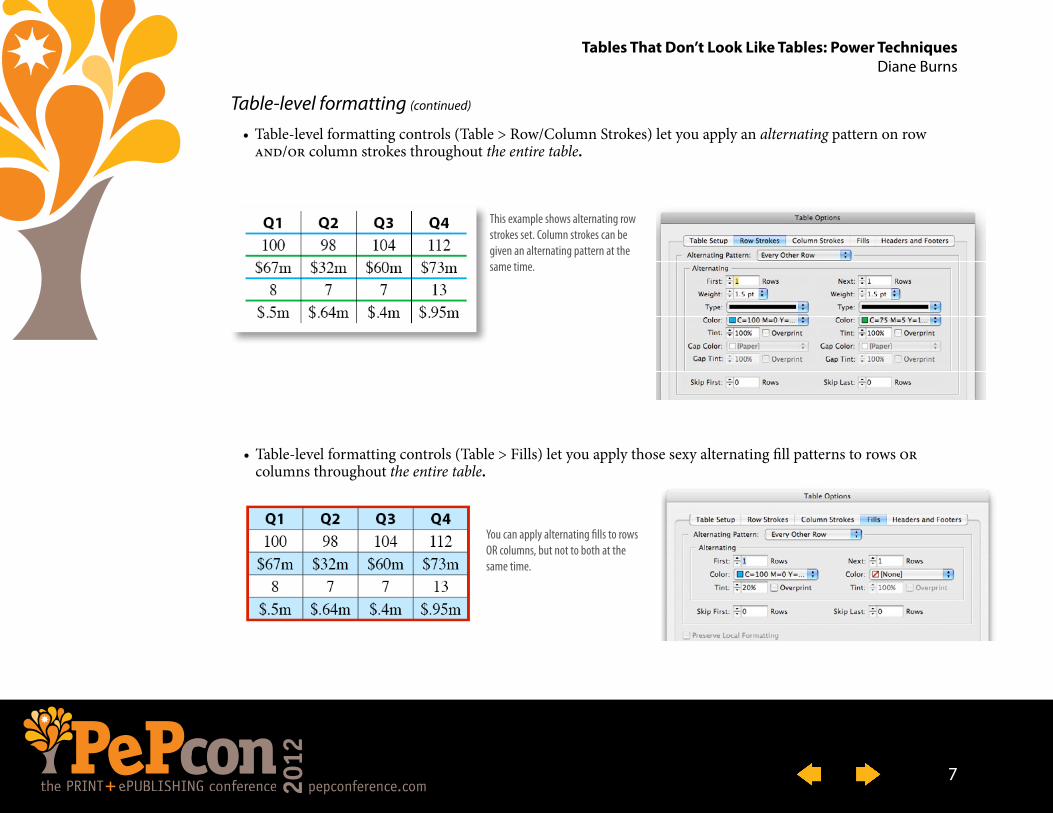
•Table-level formatting controls (Table > Row/Column Strokes) let you apply an alternating pattern on row and/or column strokes throughout the entire table.
•Table-level formatting controls (Table > Fills) let you apply those sexy alternating fill patterns to rows or columns throughout the entire table.
This example shows alternating row strokes set. Column strokes can be given an alternating pattern at the same time.
You can apply alternating fills to rows OR columns, but not to both at the same time.
7
Tables That Don’t Look Like Tables: Power Techniques Diane Burns
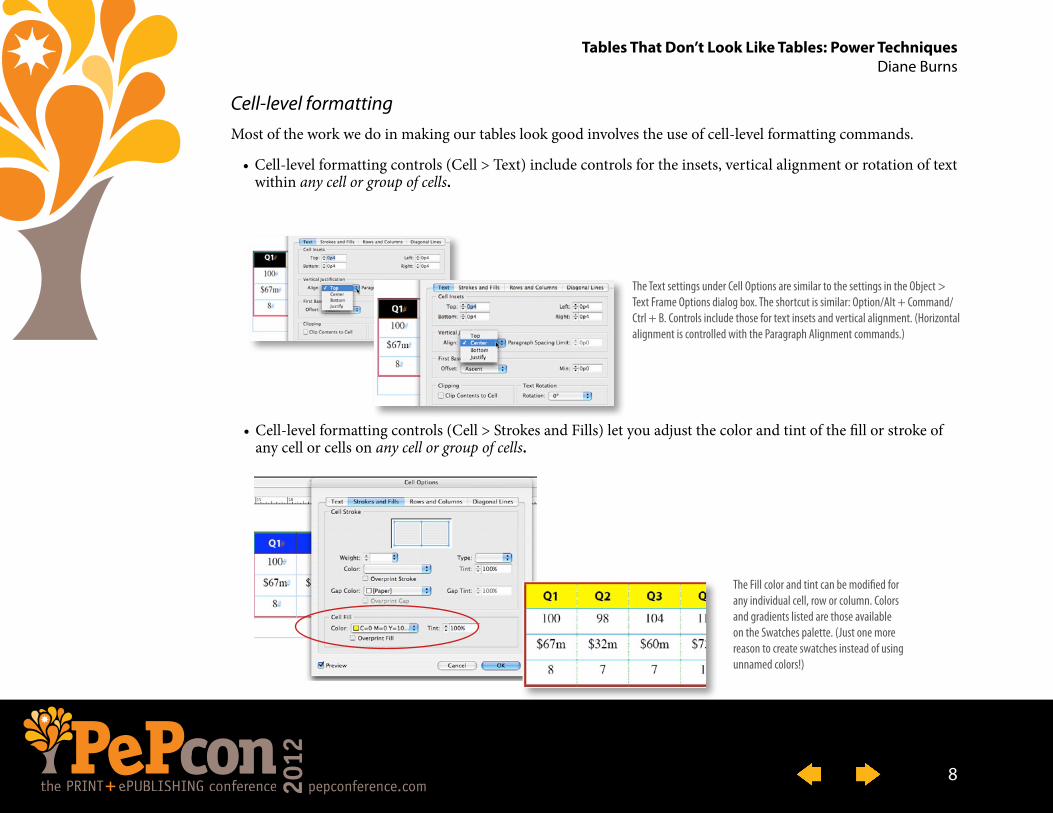
Cell-level formattingMost of the work we do in making our tables look good involves the use of cell-level formatting commands.
•Cell-level formatting controls (Cell > Text) include controls for the insets, vertical alignment or rotation of text within any cell or group of cells.
•Cell-level formatting controls (Cell > Strokes and Fills) let you adjust the color and tint of the fill or stroke of any cell or cells on any cell or group of cells.
The Text settings under Cell Options are similar to the settings in the Object > Text Frame Options dialog box. The shortcut is similar: Option/Alt + Command/Ctrl + B. Controls include those for text insets and vertical alignment. (Horizontal alignment is controlled with the Paragraph Alignment commands.)
The Fill color and tint can be modified for any individual cell, row or column. Colors and gradients listed are those available on the Swatches palette. (Just one more reason to create swatches instead of using unnamed colors!)
8
Tables That Don’t Look Like Tables: Power Techniques Diane Burns
Cell-level formatting (continued)
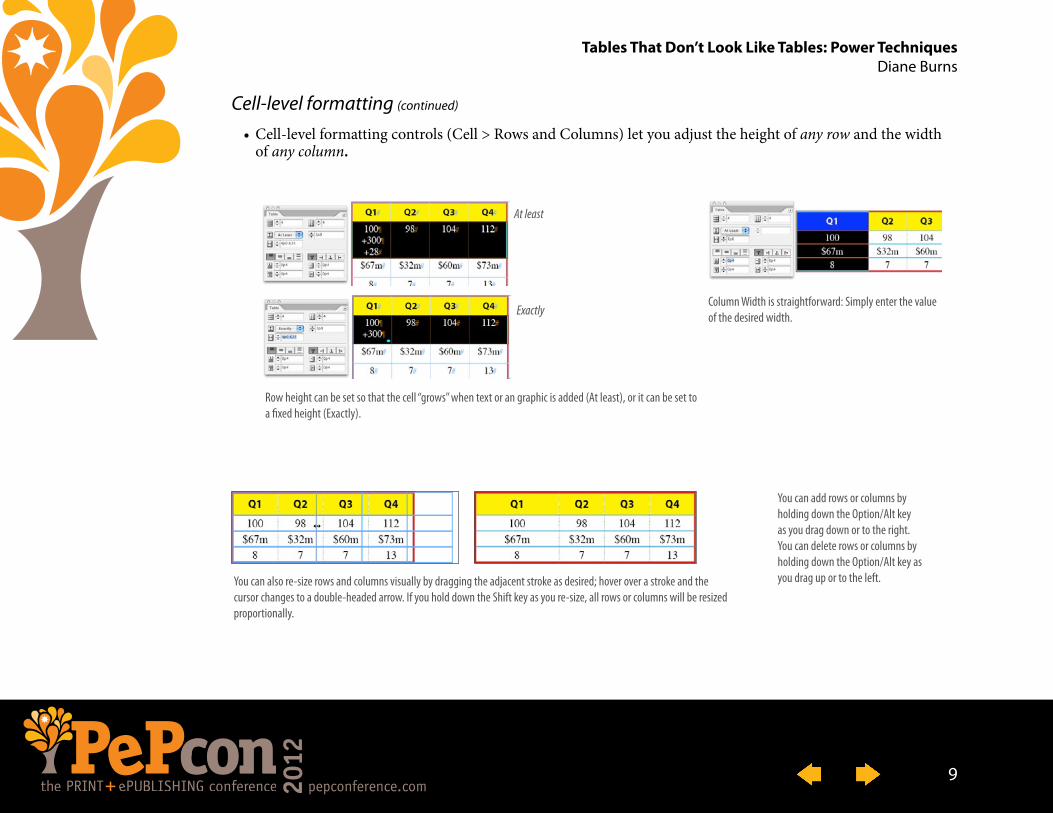
•Cell-level formatting controls (Cell > Rows and Columns) let you adjust the height of any row and the width of any column.
Column Width is straightforward: Simply enter the value of the desired width.
Row height can be set so that the cell “grows” when text or an graphic is added (At least), or it can be set to a fixed height (Exactly).
You can also re-size rows and columns visually by dragging the adjacent stroke as desired; hover over a stroke and the cursor changes to a double-headed arrow. If you hold down the Shift key as you re-size, all rows or columns will be resized proportionally.
At least
Exactly
You can add rows or columns by holding down the Option/Alt key as you drag down or to the right. You can delete rows or columns by holding down the Option/Alt key as you drag up or to the left.
9
Tables That Don’t Look Like Tables: Power Techniques Diane Burns
Table & Cell styles
Table and Cell Styles work like other InDesign styles, enabling you to apply the same table design throughout your document, without having to set up the table from scratch each time. Table and cell styles don’t magically format every attribute of a table, though, and knowing what they can’t do is as important as knowing what they can do for you. Table and cell styles go a long way to help automate table design, though, and are definitely worth mastering!
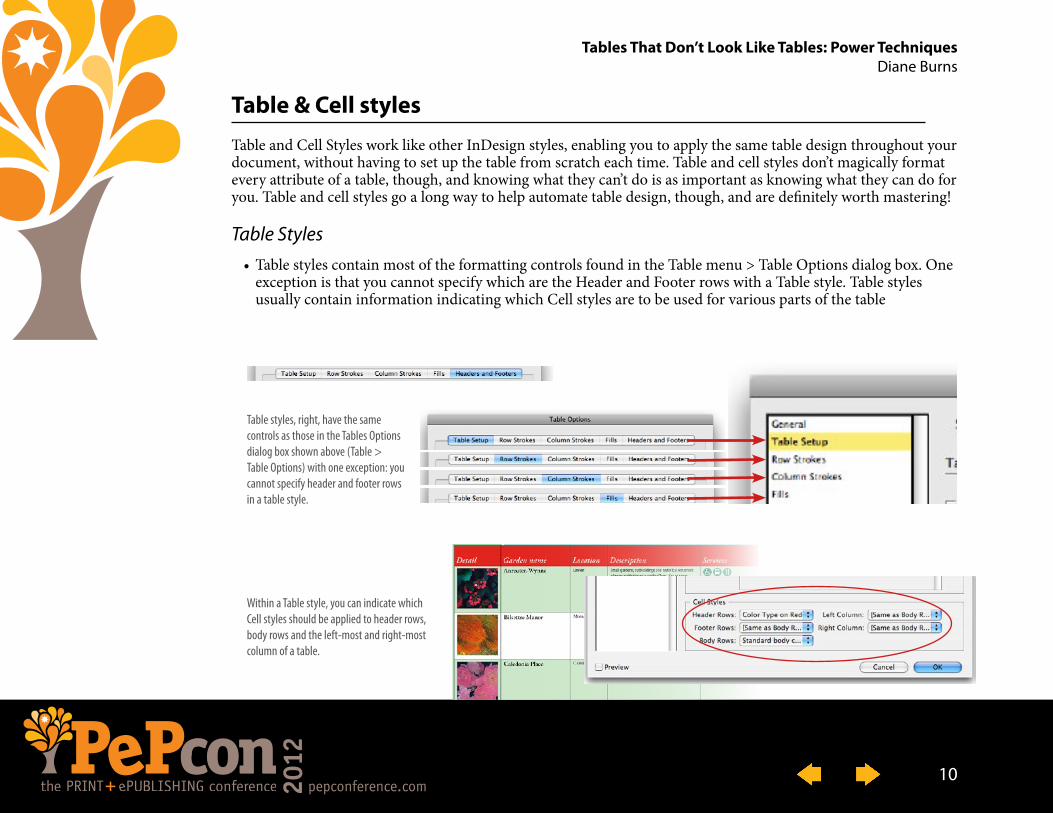
Table Styles•Table styles contain most of the formatting controls found in the Table menu > Table Options dialog box. One
exception is that you cannot specify which are the Header and Footer rows with a Table style. Table styles usually contain information indicating which Cell styles are to be used for various parts of the table
Within a Table style, you can indicate which Cell styles should be applied to header rows, body rows and the left-most and right-most column of a table.
Table styles, right, have the same controls as those in the Tables Options dialog box shown above (Table > Table Options) with one exception: you cannot specify header and footer rows in a table style.
10
Tables That Don’t Look Like Tables: Power Techniques Diane Burns
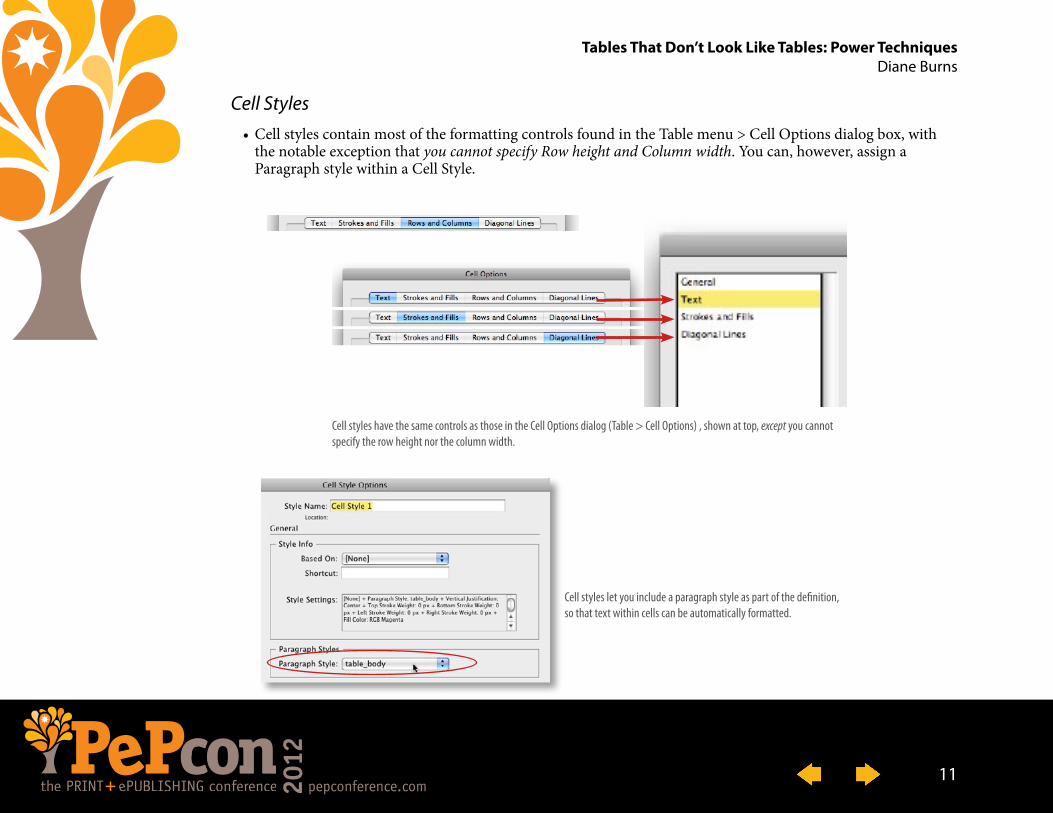
Cell Styles•Cell styles contain most of the formatting controls found in the Table menu > Cell Options dialog box, with
the notable exception that you cannot specify Row height and Column width. You can, however, assign a Paragraph style within a Cell Style.
Cell styles have the same controls as those in the Cell Options dialog (Table > Cell Options) , shown at top, except you cannot specify the row height nor the column width.
Cell styles let you include a paragraph style as part of the definition, so that text within cells can be automatically formatted.
11
Tables That Don’t Look Like Tables: Power Techniques Diane Burns
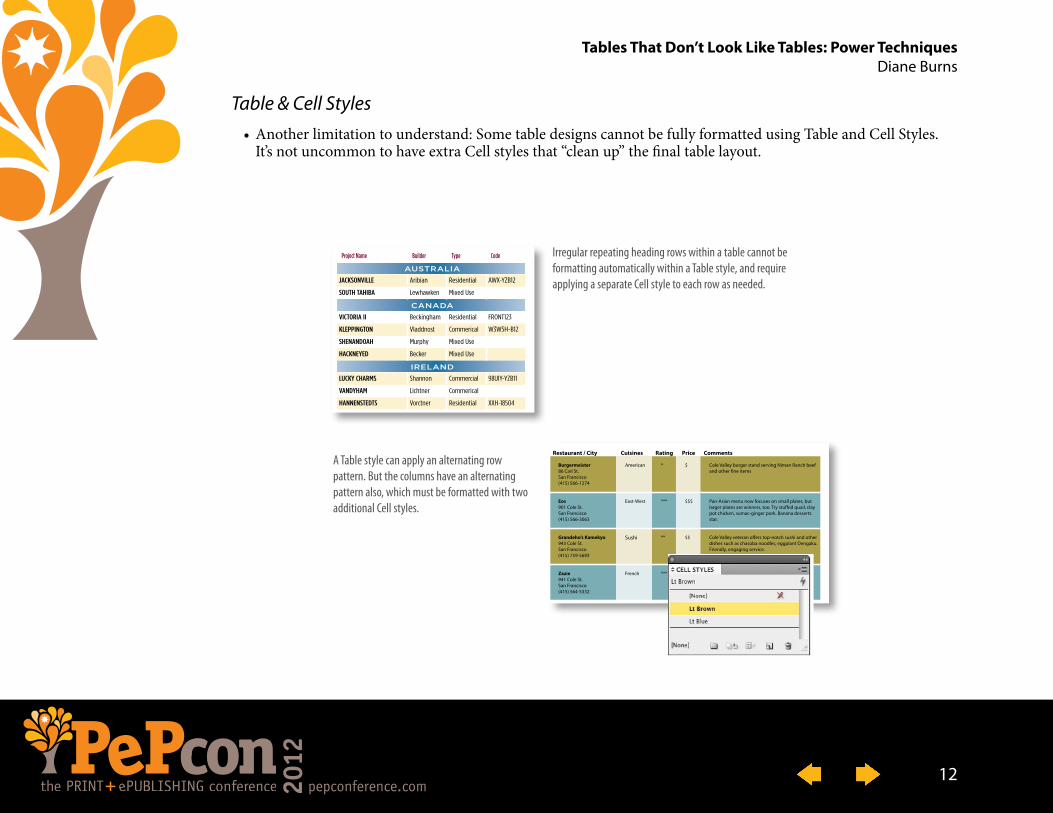
Table & Cell Styles•Another limitation to understand: Some table designs cannot be fully formatted using Table and Cell Styles.
It’s not uncommon to have extra Cell styles that “clean up” the final table layout.
Project Name Builder Type Code
AUSTRALIA
JACKSONVILLE Aribian Residential AWX-YZB12
SOUTH TAHIBA Lewhawken Mixed Use
CANADA
VICTORIA II Beckingham Residential FRONT123
KLEPPINGTON Vladdnost Commerical W3W5H-B12
SHENANDOAH Murphy Mixed Use
HACKNEYED Becker Mixed Use
IRELAND
LUCKY CHARMS Shannon Commercial 98UIY-YZB11
VANDYHAM Lichtner Commerical
HANNENSTEDTS Vorctner Residential XXH-18504
Restaurant / City Cuisines Rating Price Comments
Burgermeister86 Carl St. San Francisco (415) 566-1274
American * $ Cole Valley burger stand serving Niman Ranch beef and other fine items
Eos901 Cole St. San Francisco (415) 566-3063
East-West *** $$$ Pan-Asian menu now focuses on small plates, but larger plates are winners, too. Try stuffed quail, clay pot chicken, sumac-ginger pork. Banana desserts star.
Grandeho’s Kamekyo943 Cole St. San Francisco (415) 759-5693
Sushi ** $$ Cole Valley veteran offers top-notch sushi and other dishes such as chasoba noodles, eggplant Dengaku. Friendly, engaging service.
Zazie941 Cole St. San Francisco (415) 564-5332
French *** $$ Fixed-price three-course dinner is a good bargain at this inviting California-French restaurant. Good desserts.
Irregular repeating heading rows within a table cannot be formatting automatically within a Table style, and require applying a separate Cell style to each row as needed.
A Table style can apply an alternating row pattern. But the columns have an alternating pattern also, which must be formatted with two additional Cell styles.
12
Tables That Don’t Look Like Tables: Power Techniques Diane Burns
Some important tips
There are plenty of special tips and tricks for working with tables, but there are two areas that can be especially important to master for “thinking outside the cell.” One is learning how to control row and column strokes, the other is knowing how to work with images in tables.
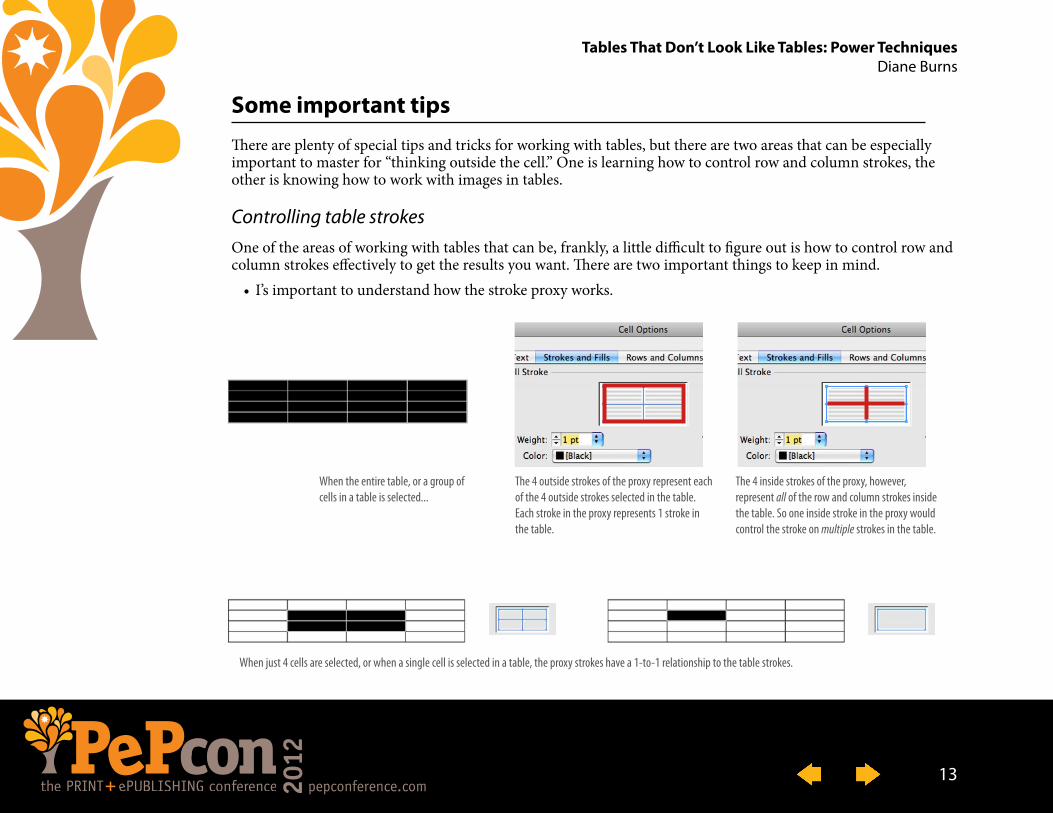
Controlling table strokesOne of the areas of working with tables that can be, frankly, a little difficult to figure out is how to control row and column strokes effectively to get the results you want. There are two important things to keep in mind.• I’s important to understand how the stroke proxy works.
The 4 outside strokes of the proxy represent each of the 4 outside strokes selected in the table. Each stroke in the proxy represents 1 stroke in the table.
When the entire table, or a group of cells in a table is selected...
When just 4 cells are selected, or when a single cell is selected in a table, the proxy strokes have a 1-to-1 relationship to the table strokes.
The 4 inside strokes of the proxy, however, represent all of the row and column strokes inside the table. So one inside stroke in the proxy would control the stroke on multiple strokes in the table.
13
Tables That Don’t Look Like Tables: Power Techniques Diane Burns
Controlling table strokes (continued)
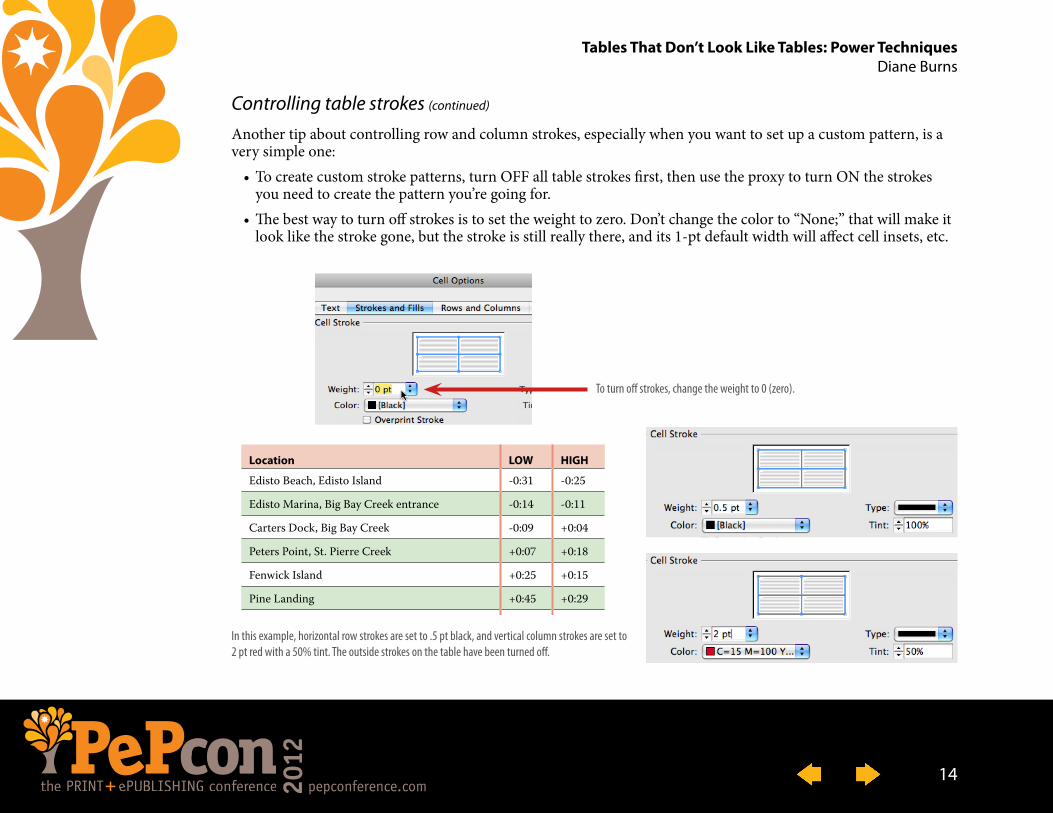
Another tip about controlling row and column strokes, especially when you want to set up a custom pattern, is a very simple one:•To create custom stroke patterns, turn OFF all table strokes first, then use the proxy to turn ON the strokes
you need to create the pattern you’re going for. •The best way to turn off strokes is to set the weight to zero. Don’t change the color to “None;” that will make it
look like the stroke gone, but the stroke is still really there, and its 1-pt default width will affect cell insets, etc.
XXX
Ströer Bros. New Music /Neue Musik
Table & Cell Styles
Location LOW HIGH
Edisto Beach, Edisto Island -0:31 -0:25
Edisto Marina, Big Bay Creek entrance -0:14 -0:11
Carters Dock, Big Bay Creek -0:09 +0:04
Peters Point, St. Pierre Creek +0:07 +0:18
Fenwick Island +0:25 +0:15
Pine Landing +0:45 +0:29
Dawho +1:31 +1:07
Willtown Bluff, Edisto River +2:01 +1:31
Hope Creek, Edisto River +2:12 +1:42
Penny Creek, south of, Edisto River +2:42 +2:06
Location LOW HIGHEdisto Beach, Edisto Island -0:31 -0:25Edisto Marina, Big Bay Creek entrance -0:14 -0:11Carters Dock, Big Bay Creek -0:09 +0:04Peters Point, St. Pierre Creek +0:07 +0:18Fenwick Island +0:25 +0:15Pine Landing +0:45 +0:29Dawho +1:31 +1:07Willtown Bluff, Edisto River +2:01 +1:31Hope Creek, Edisto River +2:12 +1:42Penny Creek, south of, Edisto River +2:42 +2:06
To turn off strokes, change the weight to 0 (zero).
In this example, horizontal row strokes are set to .5 pt black, and vertical column strokes are set to 2 pt red with a 50% tint. The outside strokes on the table have been turned off.
14
Tables That Don’t Look Like Tables: Power Techniques Diane Burns
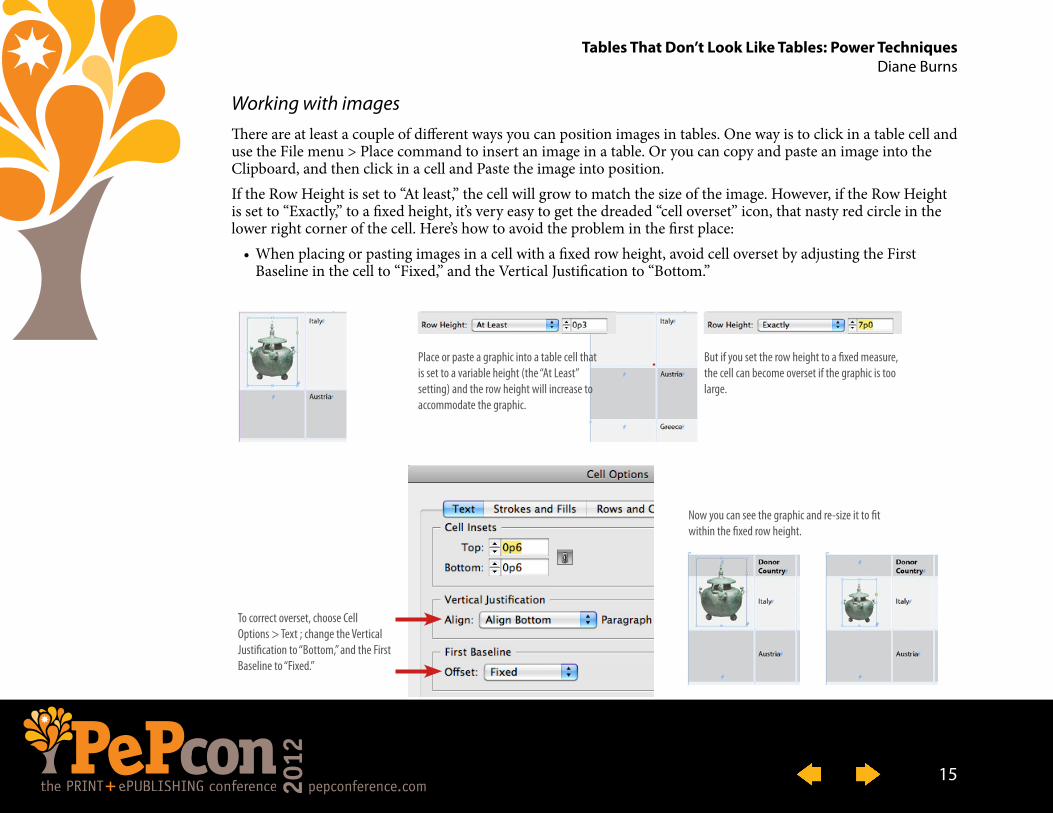
Working with imagesThere are at least a couple of different ways you can position images in tables. One way is to click in a table cell and use the File menu > Place command to insert an image in a table. Or you can copy and paste an image into the Clipboard, and then click in a cell and Paste the image into position.If the Row Height is set to “At least,” the cell will grow to match the size of the image. However, if the Row Height is set to “Exactly,” to a fixed height, it’s very easy to get the dreaded “cell overset” icon, that nasty red circle in the lower right corner of the cell. Here’s how to avoid the problem in the first place:•When placing or pasting images in a cell with a fixed row height, avoid cell overset by adjusting the First
Baseline in the cell to “Fixed,” and the Vertical Justification to “Bottom.”
Place or paste a graphic into a table cell that is set to a variable height (the “At Least” setting) and the row height will increase to accommodate the graphic.
But if you set the row height to a fixed measure, the cell can become overset if the graphic is too large.
To correct overset, choose Cell Options > Text ; change the Vertical Justification to “Bottom,” and the First Baseline to “Fixed.”
Now you can see the graphic and re-size it to fit within the fixed row height.
15
Tables That Don’t Look Like Tables: Power Techniques Diane Burns
Working with images (continued)
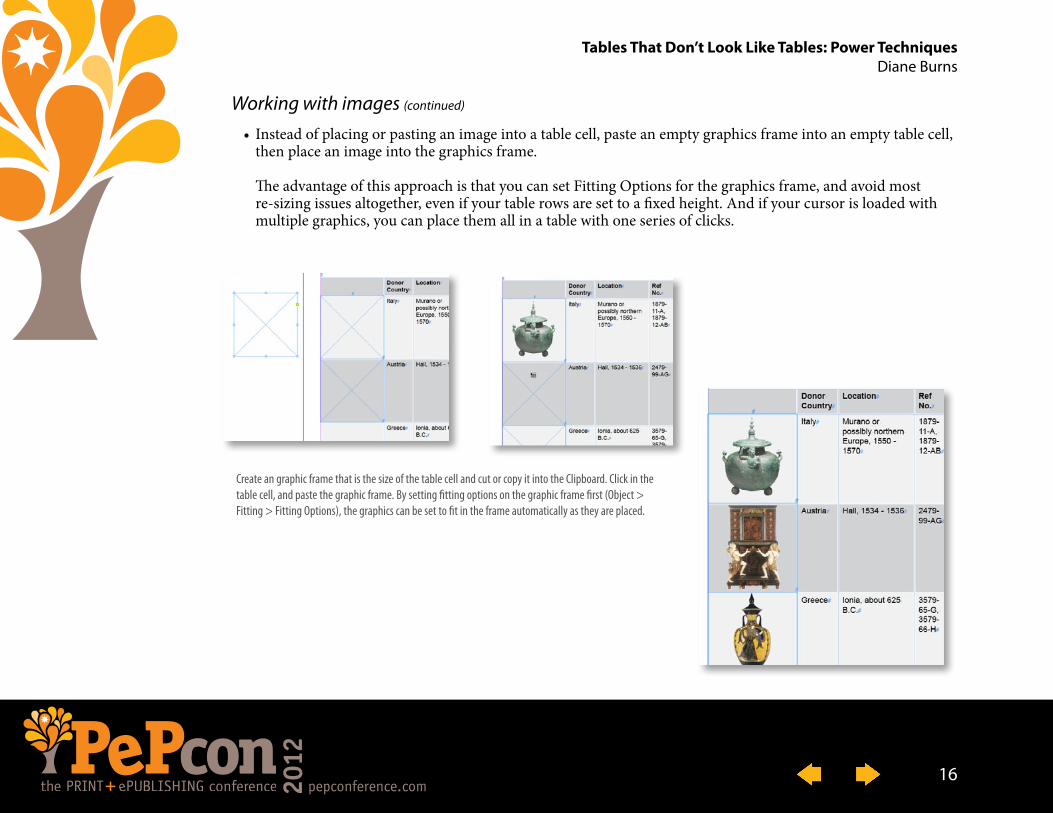
• Instead of placing or pasting an image into a table cell, paste an empty graphics frame into an empty table cell, then place an image into the graphics frame. The advantage of this approach is that you can set Fitting Options for the graphics frame, and avoid most re-sizing issues altogether, even if your table rows are set to a fixed height. And if your cursor is loaded with multiple graphics, you can place them all in a table with one series of clicks.
Create an graphic frame that is the size of the table cell and cut or copy it into the Clipboard. Click in the table cell, and paste the graphic frame. By setting fitting options on the graphic frame first (Object > Fitting > Fitting Options), the graphics can be set to fit in the frame automatically as they are placed.
16

InTips: Tables & Anchored Objects
I N D E S I G N M A G A Z I N E 38 October | November 2010 27
Creating tables in InDesign can be useful, and is often necessary, but rarely is it thought of as very exciting. Here’s a little spice, though, that can perk things up, and that even the most sea-soned table user rarely thinks of: adding anchored objects to table cells.
Anchored objects can include images, dingbats, or even shapes that appear to extend or reshape a table cell. For example, you can use triangles or arrows to establish a sense of move-ment within your tables, or you can change the shape of cells by adding a circle at the inter-section of strokes throughout a table. Using anchored objects within a table also makes it easy to incorporate graphic images, such as icons, in table header rows that will appear on each page or frame, along with the text (Figure 1). Throw in a little imagination and creativity, and all kinds of fun things start to happen!
Figure 1: Characters or images of any shape can be an-chored to become part of a table, including in header rows (left). Dingbats are used in the example below, and simple triangles in the example to the right.
There’s an Anchor in My Table!You don’t have to stay between the lines when using anchored shapes in indesign tables.
By diane Burns
InTips: Tables & Anchored Objects
I N D E S I G N M A G A Z I N E 38 October | November 2010 28
I’ve touched on this idea before, but I want to go a little more in depth and share some recipes for using anchored objects to make table cells look like they are not just rectangles. There are just a few things you need to know before trying out this tech-nique in your own kitchen.
The key is having the right settings in the Anchored Objects dialog box (Object > Anchored Object > Options). Be sure to set the X Relative To: position to either the Anchor Marker or the Column Edge. (If you use the Text Frame option, InDesign will anchor the object relative to the text frame containing the table, not to individ-ual columns or cells.) For the Y Relative To: position, use one of the Line options. This means you’ll be using the position of the text within each cell as one of your anchor reference points.
Because of this, it’s a good idea to use fixed row heights and have consistent cell text insets at the top. I usually anchor the object at the beginning of text in the next
cell to the right, then position the anchored object so it butts back against the target cell and appears to be part of it. This puts the anchored object close to its anchor marker and makes it easy to keep track of.
Once you’ve established the correct position of the first anchored object, you can select the anchored object, copy it to the Clipboard and Paste it throughout your table, or, as I’ll show in one of my recipes, automate the process using a GREP Find/Change query.
In the following pages, I’ve given you just a little sampler to get started. Try your own variations on the recipes shown here—there are many—and you’ll be amazed at the results.
Flèches de la table Ingredients1 InDesign table1 or 2 arrows, Illustrator file OKThe Object > Anchored Object command1 Object Style (optional)
Adding arrows to tables can make them more compelling than plain old rows and columns. Arrows help move the eye across the information and make the presentation more dynamic. Arrows come in many sizes and shapes, and here are just a couple of examples that will hopefully serve as inspi-ration for you to try others on your own.
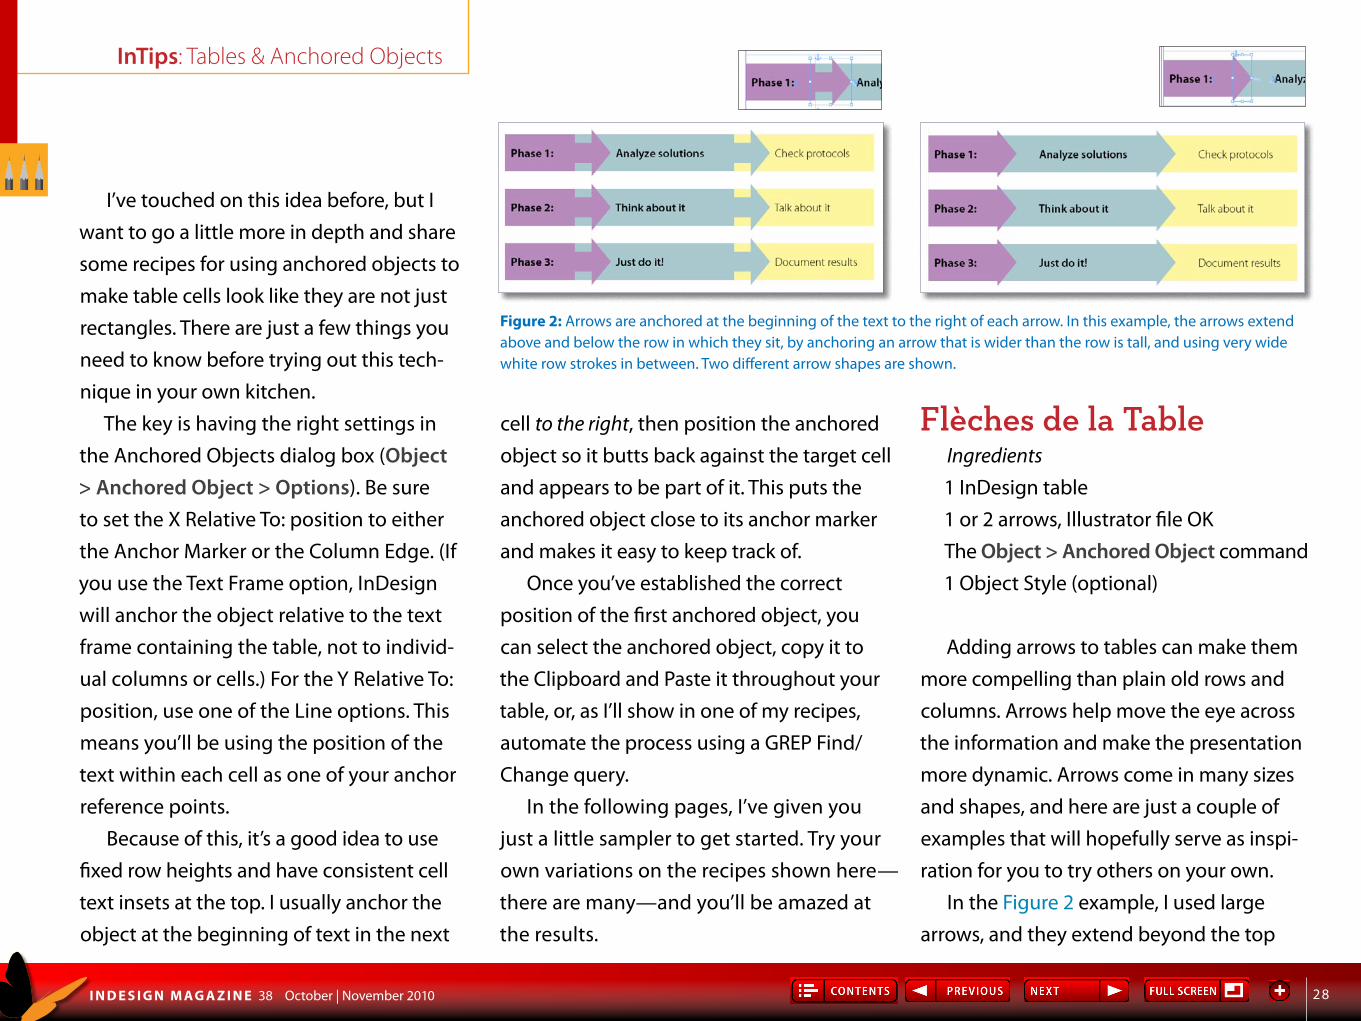
In the Figure 2 example, I used large arrows, and they extend beyond the top
Figure 2: Arrows are anchored at the beginning of the text to the right of each arrow. In this example, the arrows extend above and below the row in which they sit, by anchoring an arrow that is wider than the row is tall, and using very wide white row strokes in between. Two different arrow shapes are shown.
InTips: Tables & Anchored Objects
I N D E S I G N M A G A Z I N E 38 October | November 2010 29
and bottom of the row in which they are anchored. Each arrow is set to anchor rela-tive to the Anchor Marker. Remember, the text insets must be the same for the top of and left of each cell, so that the distance from the Anchor Marker to the anchored arrow is consistent.
The color of each arrow must match the cell it appears to join. Use a selective copy and paste to insert the anchored object: Once you position the first arrow correctly, simply select the anchored triangle, copy it, then paste to the next location. The anchor marker comes along for the ride. Or you can create an object style from the first occur-rence of the triangle of each color, then copy and paste into the appropriate locations.
To prevent cell overset when pasting images that are taller than a row of fixed height, set the cell’s First Baseline to Fixed and adjust the Vertical Alignment (Table > Cell Options > Text). Do this before setting the correct anchor distance for each object. To create the white space shown between
rows, use wide row strokes assigned with the color Paper.
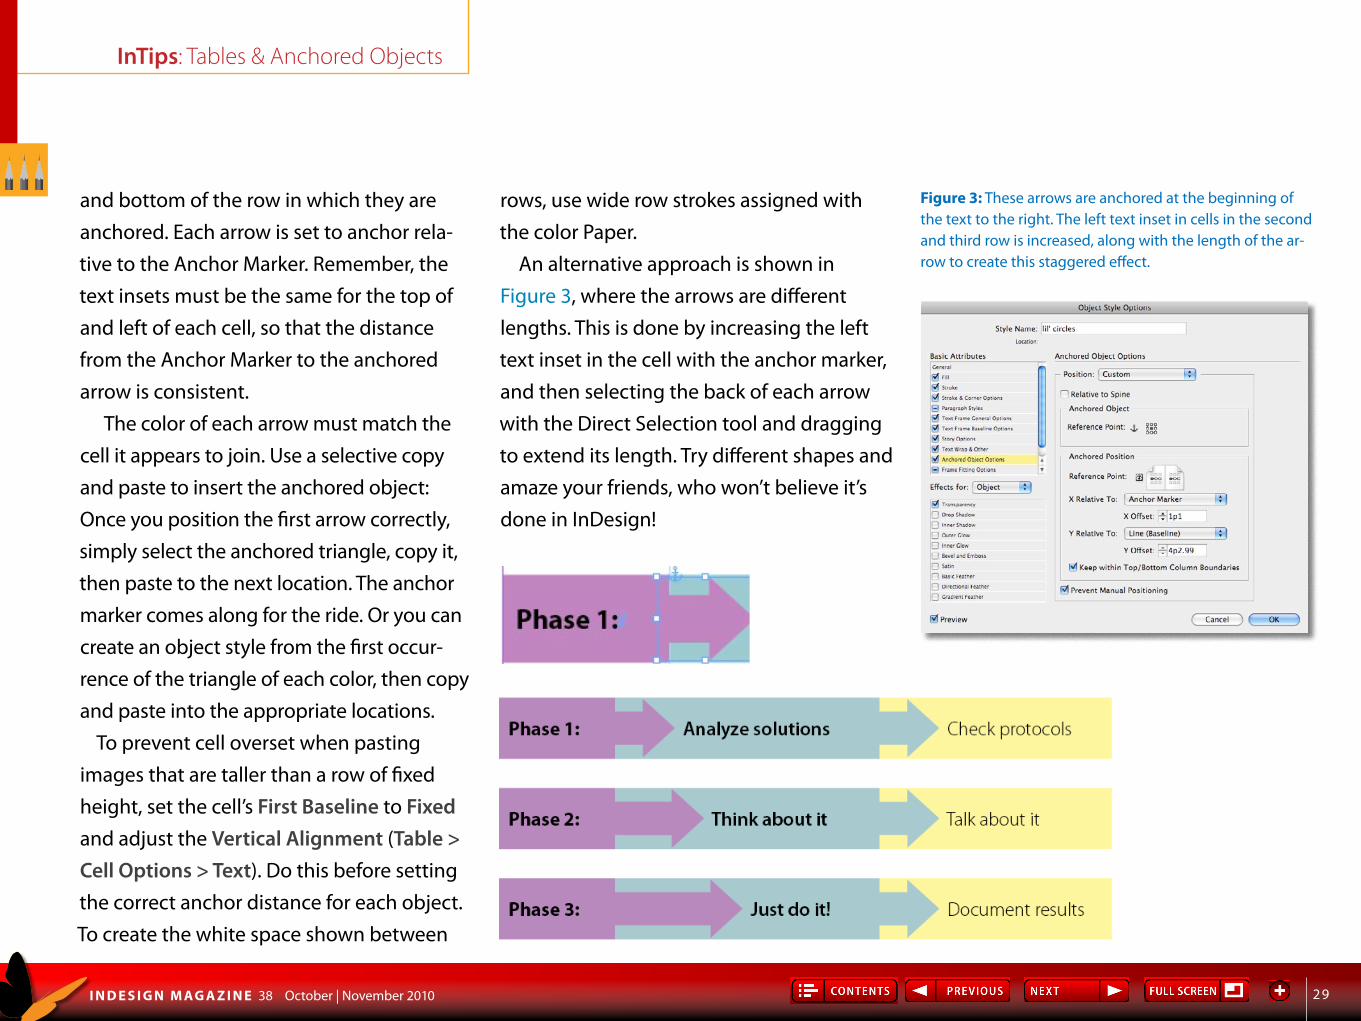
An alternative approach is shown in Figure 3, where the arrows are different lengths. This is done by increasing the left text inset in the cell with the anchor marker, and then selecting the back of each arrow with the Direct Selection tool and dragging to extend its length. Try different shapes and amaze your friends, who won’t believe it’s done in InDesign!
Figure 3: These arrows are anchored at the beginning of the text to the right. The left text inset in cells in the second and third row is increased, along with the length of the ar-row to create this staggered effect.
InTips: Tables & Anchored Objects
I N D E S I G N M A G A Z I N E 38 October | November 2010 30
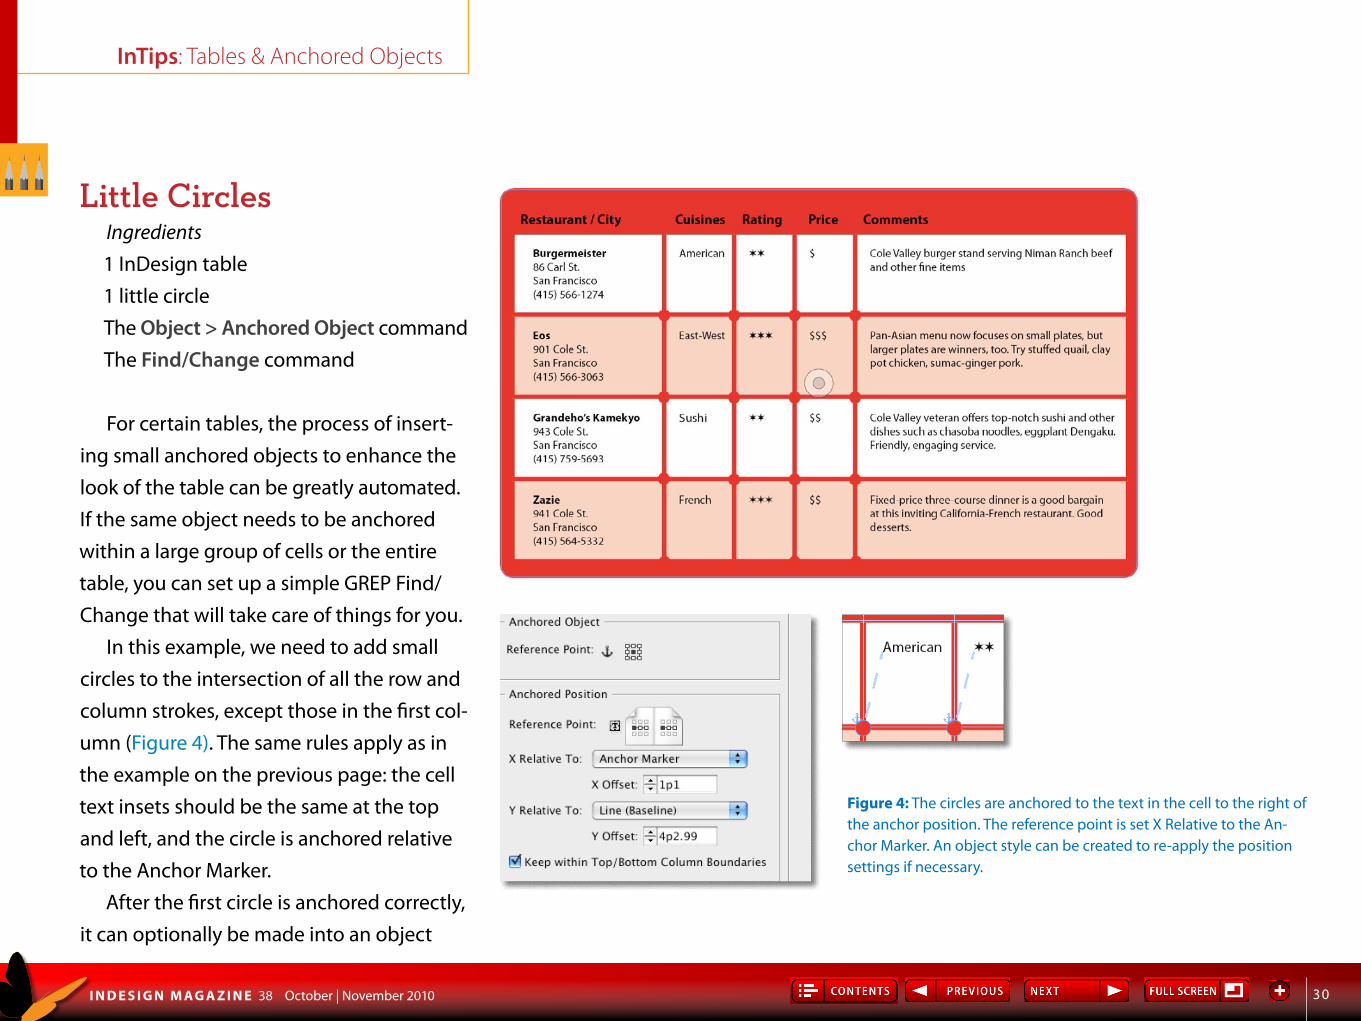
Figure 4: The circles are anchored to the text in the cell to the right of the anchor position. The reference point is set X Relative to the An-chor Marker. An object style can be created to re-apply the position settings if necessary.
little CirclesIngredients1 InDesign table1 little circleThe Object > Anchored Object commandThe Find/Change command
For certain tables, the process of insert-ing small anchored objects to enhance the look of the table can be greatly automated. If the same object needs to be anchored within a large group of cells or the entire table, you can set up a simple GREP Find/Change that will take care of things for you.
In this example, we need to add small circles to the intersection of all the row and column strokes, except those in the first col-umn (Figure 4). The same rules apply as in the example on the previous page: the cell text insets should be the same at the top and left, and the circle is anchored relative to the Anchor Marker.
After the first circle is anchored correctly, it can optionally be made into an object
InTips: Tables & Anchored Objects
I N D E S I G N M A G A Z I N E 38 October | November 2010 31
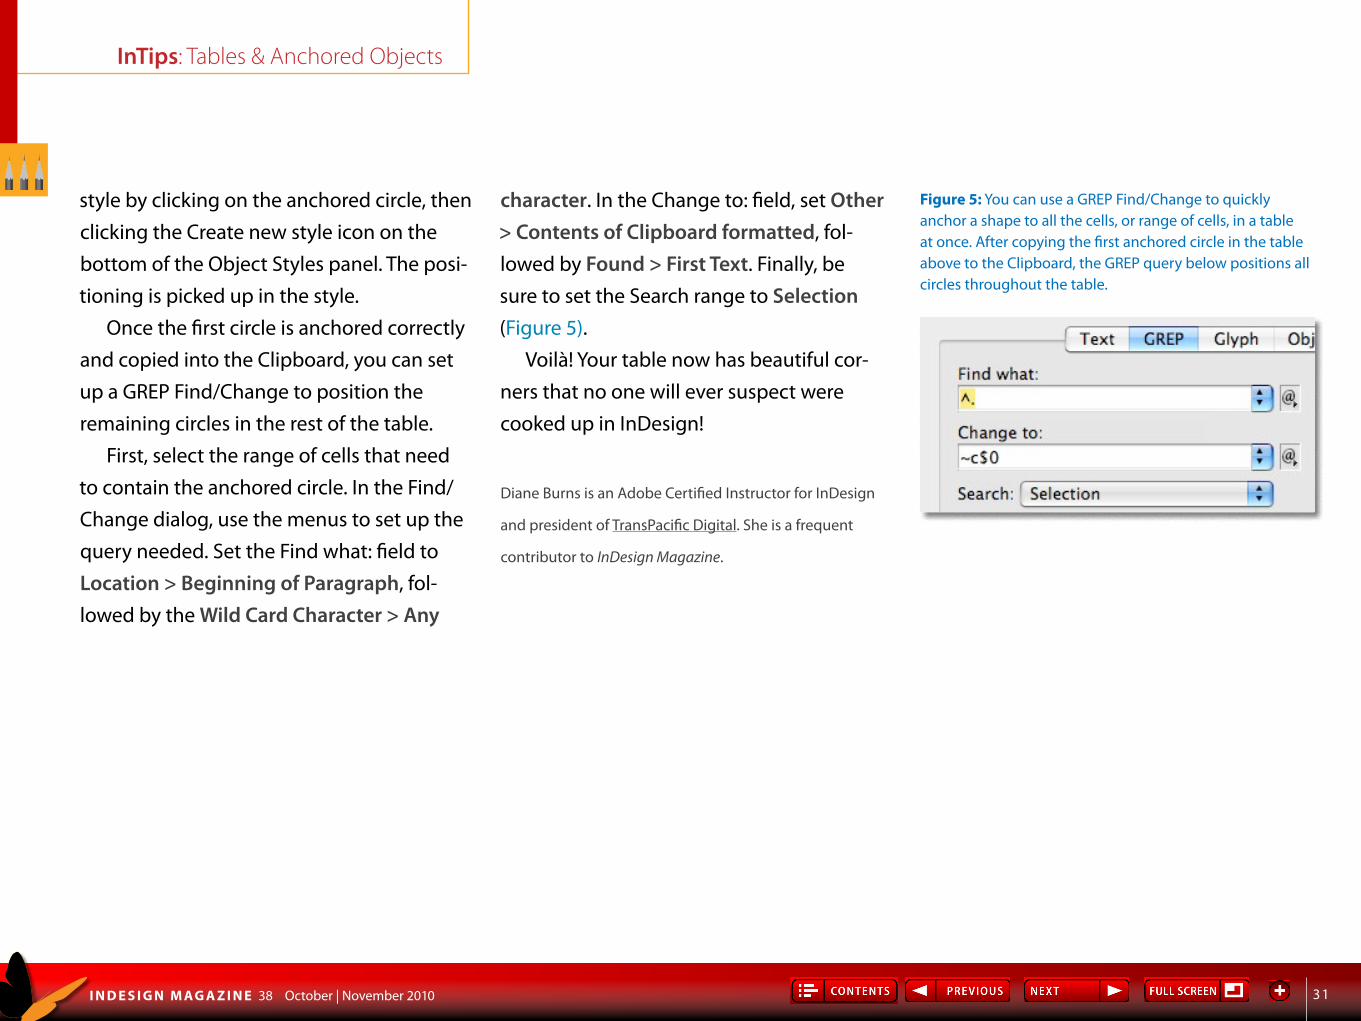
style by clicking on the anchored circle, then clicking the Create new style icon on the bottom of the Object Styles panel. The posi-tioning is picked up in the style.
Once the first circle is anchored correctly and copied into the Clipboard, you can set up a GREP Find/Change to position the remaining circles in the rest of the table.
First, select the range of cells that need to contain the anchored circle. In the Find/Change dialog, use the menus to set up the query needed. Set the Find what: field to Location > Beginning of Paragraph, fol-lowed by the Wild Card Character > Any
Figure 5: You can use a GREP Find/Change to quickly anchor a shape to all the cells, or range of cells, in a table at once. After copying the first anchored circle in the table above to the Clipboard, the GREP query below positions all circles throughout the table.
character. In the Change to: field, set Other > Contents of Clipboard formatted, fol-lowed by Found > First Text. Finally, be sure to set the Search range to Selection (Figure 5).
Voilà! Your table now has beautiful cor-ners that no one will ever suspect were cooked up in InDesign!
Diane Burns is an Adobe Certified Instructor for InDesign
and president of TransPacific Digital. She is a frequent
contributor to InDesign Magazine.