Embed Size (px)
Citation preview

TACTICAL
RIFLE COURSE

RANGE SAFETY BRIEF
• Treat all firearms as if they are always loaded.
• Never point a firearm at anything you aren't intending to shoot.
• Keep finger off the trigger until the decision to
fire has been made.
• Each student will wear protective eyewear, hearing protection, Soft body armor while on the firing line.
• Proper attire and footwear will be worn while on
the range.
• A First Aid kit will be immediately available at the range site. A medical emergency action plan will be discussed prior to live fire exercises.
• Procedures for weapons malfunction/ clearing
will be reviewed prior to live fire.
• Students will be given a complete explanation of the course of fire prior to the live fire exercise.
ii Course Objectives • Familiarization with the AR 15 Rifle
• Develop the ability to apply correct
techniques of rifle marksmanship
• Exhibit skills necessary to disassemble, clean, and assemble the patrol rifle
• Ability to perform a functions check
• Ability to employ the proper
techniques when faced with a weapons malfunction
• Pass the Tactical Rifle Qualification
Course
Purpose • Training on the basic techniques and
operational skills needed for the AR-15 rifle during a tactical operation.

Law Update
• Penal Code section 32610(b) o Possession of within scope of
employment o Training requirement
• Agency Firearms use and Use of Force Policies o Use of Force Options o Department Policy
• Law Update o Tennessee VS. Garner
Tennessee v. Garner, 471 U.S. 1 (1985)[1], was a case in which the Supreme Court of the United States held that, under the Fourth Amendment, when a law enforcement officer is pursuing a fleeing suspect, he or she may not use deadly force to prevent escape unless "the officer has probable cause to believe that the suspect poses a significant threat of death or serious physical injury to the officer or others."
o Graham VS. Conner Graham v. Connor, 490 U.S. 386 (1989) On November 12, 1984 Graham, who was a diabetic, felt an insulin reaction coming on and rushed to the store with a friend to get some orange juice. When the store was too crowded, he and his friend proceeded to go to another friend's house. In the midst of all this, he was being watched by Officer Connor, of the Charlotte City Police Department police department. While on their way to the friend's house, the officer stopped the two of them and called for backup. After several other officers arrived, one of them handcuffed Graham. Eventually, when Connor learned that nothing had happened in the convenience store, the officers drove Graham home and released him. Over the course of the encounter, Graham sustained a broken foot, cuts on his wrists, a bruised forehead and an injured shoulder. The Supreme Court held that it was irrelevant whether Connor acted in good faith, because the use of force must be judged based on its objective reasonableness

M-16 / AR15 RIFLE
Rugged, lightweight, Air-Cooled, Magazine Fed, Gas Operated, Shoulder-Fired Weapon Semi, Burst, and Full Automatic 5.56 x 45 mm (.223) Muzzle Velocity: 3,250 feet per second Maximum effective rate of fire: Semi-auto 45-65 rounds per minute Automatic 150-200 rounds per minute Maximum Range: 2,874 yards Max. Effective Range: 500 Yards

\
AR-15 Nomenclature
Bolt carrier Assy.
Upper Receiver Barrel Assy.
I Lower
Receiver/ Buttstock
Magazine Assembly
Left Side Right Side
Buttstock Assembly Sling Attachment Charging Handle Selector Lever Bolt Catch
Forward Sling Attachment Bayonet lug Front Sight
Barrel Nut Assembly
Compensator Barrel
Handguards Ejection Port Cover
Trigger / Trigger Guard Pistol Grip Forward Assist
Rear Sight Cartridge Deflector
Upper Receiver / Carry Handle
Equipment Selections Magazines (20 rd. or 30 rd)
Slings (Single point, 2 Point, 3 point)
Cases Mounted lights Bi-pod Optics (ACOG, EoTech, Aimpoint) Forestock (pistol grip)
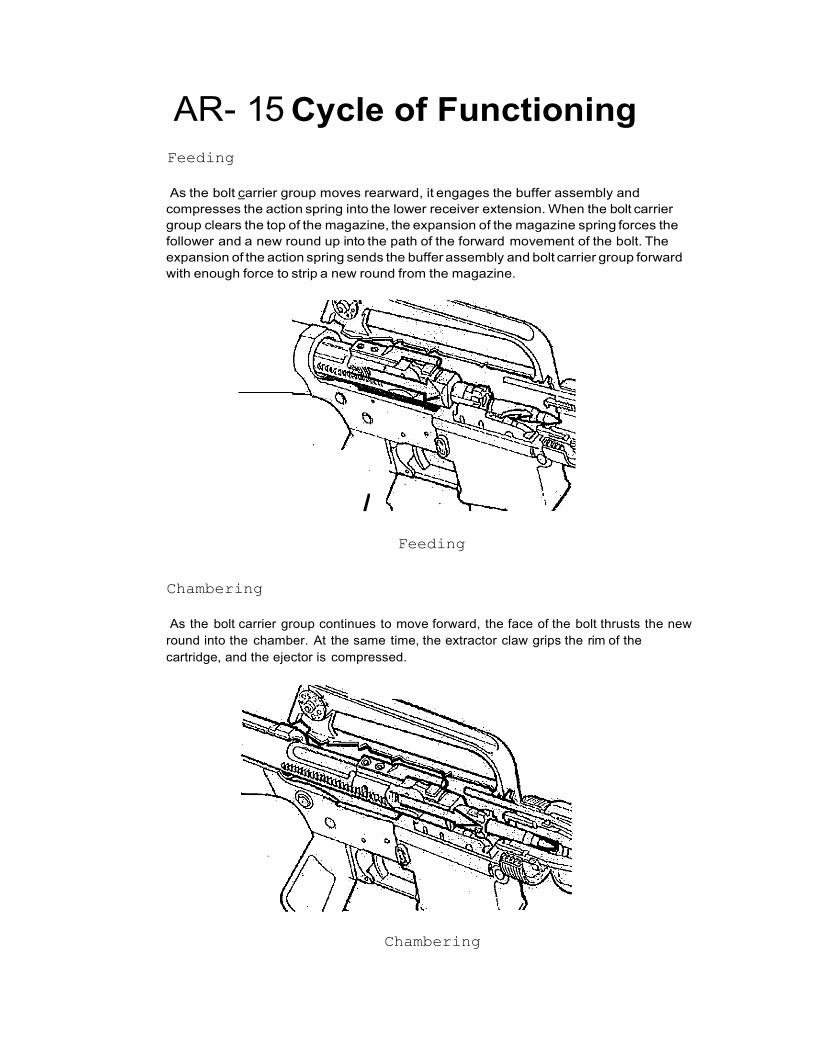
AR- 15 Cycle of Functioning Feeding
As the bolt carrier group moves rearward, it engages the buffer assembly and
compresses the action spring into the lower receiver extension. When the bolt carrier group clears the top of the magazine, the expansion of the magazine spring forces the follower and a new round up into the path of the forward movement of the bolt. The expansion of the action spring sends the buffer assembly and bolt carrier group forward with enough force to strip a new round from the magazine.
Feeding
Chambering
As the bolt carrier group continues to move forward, the face of the bolt thrusts the new round into the chamber. At the same time, the extractor claw grips the rim of the cartridge, and the ejector is compressed.
Chambering

Locking
As the bolt carrier group moves forward, the bolt is kept in its most forward position by the bolt cam pin riding in the guide channel in the upper receiver. Just before the bolt locking lugs make contact with the barrel extension, the bolt cam pin emerges from the guide channel. The pressure exerted by the contact of the bolt locking lugs and barrel extension causes the bolt cam pin to move along the cam track (located in the bolt carrier) in a counterclockwise direction, rotating the bolt locking Jugs in line behind the barrel extension locking lugs. The rifle is ready to fire.
Locking
Firing
With a round in the chamber, the hammer cocked, and the selector on SEMI, the firer squeezes the trigger. The trigger rotates on the trigger pin, depressing the nose of the trigger, and disengaging the notch on the bottom of the hammer. The hammer spring drives the hammer forward. The hammer strikes the head of the firing pin, driving the firing pin through the bolt into the primer of the round. When the primer is struck by the firing pin, it ignites and causes the powder in the cartridge to ignite. The gas generated by the rapid burning of the powder forces the projectile from the cartridge and propels it through the barrel. After the projectile has passed the gas port (located on the upper surface of the barrel under the front sight) and before it leaves the barrel, some gas enters the gas port and moves into the gas tube. The gas tube directs the gas into the bolt carrier. I t passes through the key downward into a space between the rear of the carrier's bolt cavity and the rear of the bolt itself. The gas then expands. The bolt is locked into the barrel extension and unable to move forward, and the carrier is thus forced to the rear by the expanding gas.
I \

Firing
Unlocking
As the bolt carrier moves to the rear, the bolt cam pin follows the path of the cam track (located in the bolt carrier). This action causes the cam pin and bolt assembly to rotate simultaneously until the locking lugs of the bolt are no longer in line behind the locking lugs of the barrel extension.
Unlocking

Extracting
The bolt carrier group continues to move to the rear. The extractor (which is attached to the bolt) grips the rim of the cartridge case, holds it firmly against the face of the bolt, and withdraws the cartridge case from the chamber.
Extracting
Ejecting
With the base of a cartridge case firmly against the face of the bolt, the ejector and ejector spring are compressed into the bolt body. As the rearward movement of the bolt carrier group allows the nose of the cartridge case to clear the front of the ejection port, the cartridge is pushed out by the action of the ejector and spring.
Ejecting
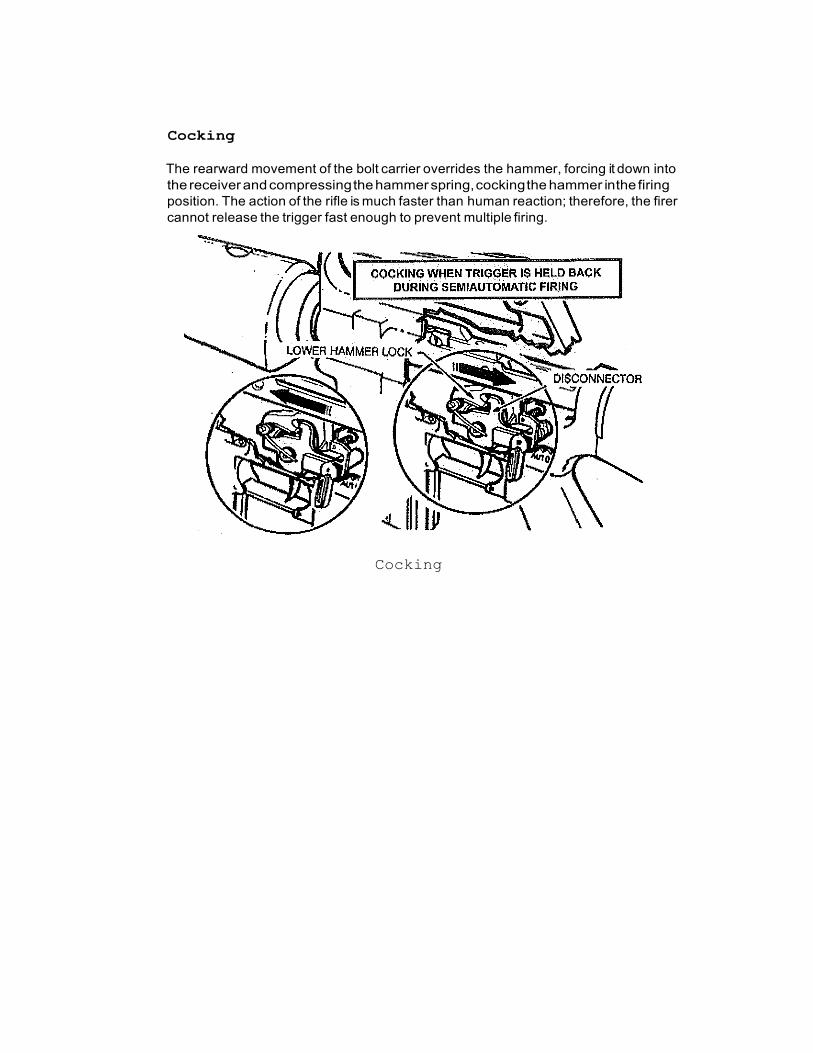
Cocking
The rearward movement of the bolt carrier overrides the hammer, forcing it down into the receiver and compressing the hammer spring, cocking the hammer in the firing position. The action of the rifle is much faster than human reaction; therefore, the firer cannot release the trigger fast enough to prevent multiple firing.
Cocking
Fundamentals of Shooting The shooter must understand and apply the four key fundamentals before he/she approaches the firing line. He/She must establish a steady position allowing observation of the target. He/She must aim the rifle at the target by aligning the sight system, and fire the rifle without disturbing this alignment by
· improper breathing or during trigger squeeze. These skills are known collectively as the four fundamentals. Applying these four fundamentals rapidly and consistently is the integrated act of firing.
Steady Position (1) Support Hand
(2) Rifle Butt Position
(3) Firing Handgrip
(4) Firing Elbow Placement i \ (6) Cheek-to-Stock Weld
Rifle Sight Alignment Alignment of the rifle with the target is critical. It involves placing the tip of the · front sight post in the center of the rear sight aperture. Any alignment error between the front and rear sights repeats itself for every 1/2 meter the bullet travels. For example, at the 25-meter line, any error in rifle alignment is multiplied 50 times. I f the bullet is misaligned by 1/10 inch, it causes a target at 300 meters to be missed by 5 feet.
'
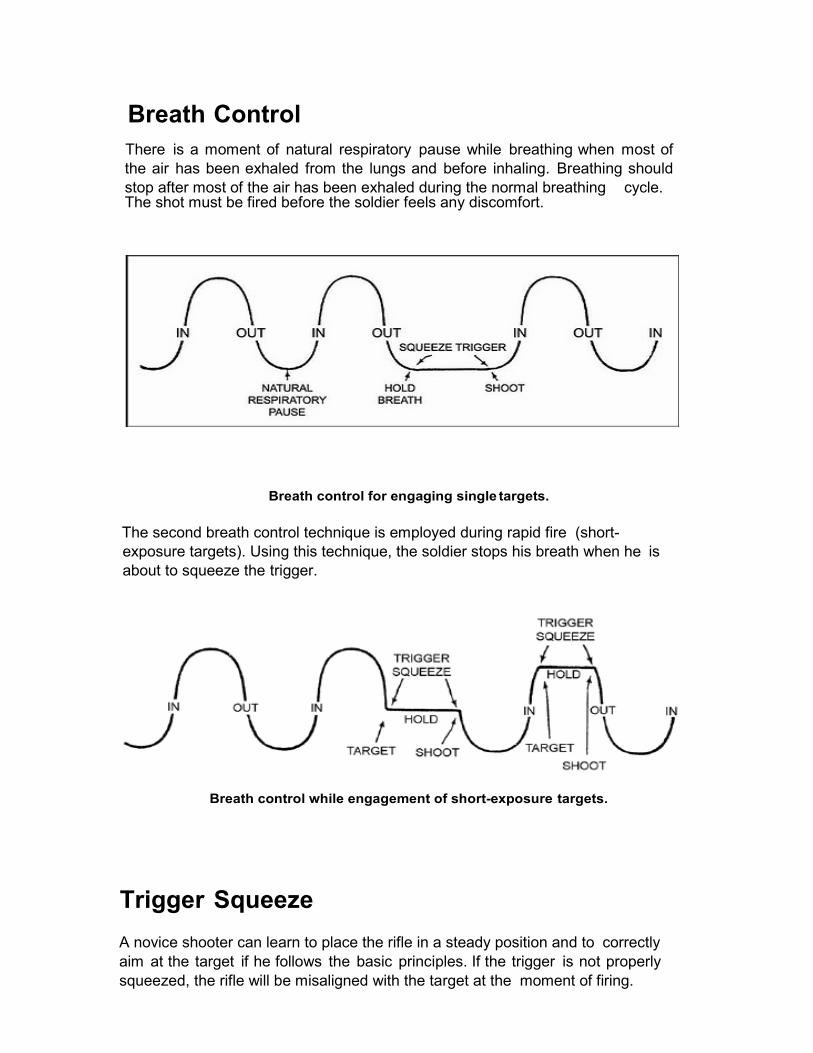
Breath Control There is a moment of natural respiratory pause while breathing when most of the air has been exhaled from the lungs and before inhaling. Breathing should stop after most of the air has been exhaled during the normal breathing cycle. The shot must be fired before the soldier feels any discomfort.
Breath control for engaging single targets.
The second breath control technique is employed during rapid fire (short- exposure targets). Using this technique, the soldier stops his breath when he is about to squeeze the trigger.
Breath control while engagement of short-exposure targets.
Trigger Squeeze A novice shooter can learn to place the rifle in a steady position and to correctly aim at the target if he follows the basic principles. If the trigger is not properly squeezed, the rifle will be misaligned with the target at the moment of firing.

\
\
Shooting Positions (
• Standing • Sitting • High Kneeling • Low Kneeling • Squatting • Prone
Levels of Readiness
High Ready (on target) (
Low Ready Off-Set Muzzle
ZEROING
SHOOTING DRILLS/ LIVE FIRE EXERCISE
MARKSMANSHIP PRACTICE AND DRY FIRE POSIT ON SHOOTING MALFUNCTIONS WEAPONS TRANSIT ONS LOW-LIGHT SHOOTING ON THE MOVE PIVOTS AND TURNS

Course #1: Dry fire
Courses of Fire
Practice position, sight alignment, breathing, and trigger squeeze. Practice reloading
Course #2: Rifle Zeroing
Using the 25m zero target, three round bursts from supported firing position to zero rifle sights.
50 rounds
Course #3: Position shooting, marksmanship practice
Shooting from prone, kneeling, standing positions to Build on the “four fundamentals” Shooting at own pace. Practice reloading.
100 rounds (25 rounds per position)
Course #4: Shooting on the move Shooting on the slow tactical walk (forward & back), Shooting while moving laterally Practice reloading.
100 rounds
Course #5: Shooting from cover
Shoot from behind cover/ barricade. Standing, kneeling, prone. Strong and Weak sides.
100 rounds
Course #6: Speed to target drills
Shoot from low-ready. Practice lateral movement, failure drills. Acquisition of multiple targets, failure drills
100 round

\
Course #7: Malfunction drills Practice "Tap, Rack, Squeeze"
50 rounds
Course #8: Low-light shooting
Shoot with flashlights, both tactical and full-size lights. Reloading and malfunction drills with flashlight.
Low-Light Qualification
100 rounds
Course #9: Weapon Transitions Transition between sidearm and rifle.
100 rounds, .223
50 rounds, pistol Final Course: ACSO Qualification