Embed Size (px)
Citation preview

Russian M44 CarbTakedown Guide
MADE EASYClean your own gun with confidence.
Saves you money on repairs!

Russian }d44 Carbine
C'A
I Bolt Head/Extsactor2 Bolt Comector/Gilide Bar3 Firing Pin4 Firing Fin Spring5 Bolt6 Cmking Pice7 Bolt Assonbly8 Tmg Screw9 Ejoctor Spring Screw
l0 Ejecmr Spring/Feed lnt€rruptqll Ej€ctorl2 Reeivqll Barr€l14 Rear Sight15 Front Sigbt| 6 Triggerl7 Trigger Hinge Pinl8 Trigg€r Spring/Bolt StoP19 Bolt Siop Screw20 Triggd Guard/Magazin€2l FrontGuard Screw22 Megazine Spring/Floorpla0e Assembly23 Floorplare t atch24 Flmrplate Lrtch Screw
Copyright @2003 By Radocy Products, Co.
WARNING:Make sure the gun isentirely unloaded beforestarting the disassembly;visually check some roundscan hide.
Read every instructioncarefully using the pictureonly as a reference.
RADOCY1 800 356 4759

l. Open the bolt. To remove thebolt hold the trigger back and pullthe bolt out.
2. Hold the front of the bolt and pull backthe cocking knob and turn it counter
clockwise; putting the striker in the.firedposltlon.
Shown how the bolt should look.
3. Shde the boltconnector and bolthead off from the
front.

4. Turn the bolt head counter-clockwise until it stops and remove it.
5. The extractorshould not be removed. It is dovetail mounted in the bolt head. If it is
broken have a gunsmith replace.
6. The striker is screwed into the cocking knob at the rear of the bolt. Use the forked endof the bolt connector guide as a wrenchto unscrew the striker. It may be tight,do not use force or the bolt connectorguide could be broken. It is undertension. As you start to release it keepit under control.
7. Remove the striker and its spring out from the front. The cocking piece is alsoreleased. For reassembly: Line up the mark in the knob with the screw slot for thecorrect position. Do not over tighten.
8. With a tool, push the magazinefloorplate latch toward the rear and lift
the floorplate open.

11. After the screw and spring areremoved, drift out the cross pin show to
remove the arm from the floorplate.
9. Squeeze the magazine follower toopen the end and remove it back andout.
-
12. Driftthis pin out to separate the followerspring and arm.
Shown outside
L0. the magazine mainspring is retainedinside the floorplate bv a screw.
M44

L3. Pull the rod out.
14. Unscrew thislarge screw to
remove thebayonet.
15. tf the rifle has a full stock with the upper handguard, push the spring catches andslide the barrel bands forward. The barrel bands will not fit over the bayonet mount.Removal is not recommended(of the sight and bayonet mount). The bands can bestretched stightly. It is recommended that you leave them on, unless for repairs.
16. Remove the upper handguard.

18. Then the large screw on the bottomof the masazine housins.
17. To remove the stock, unscrewthe large at the top rear of the gun.
L9. The small screw at the front willrelease the stock cap. This does not needto be removed, unless for repairs.
20. Separatethe stock from
the trigger guardlmagazine andthe barreled assemblv.
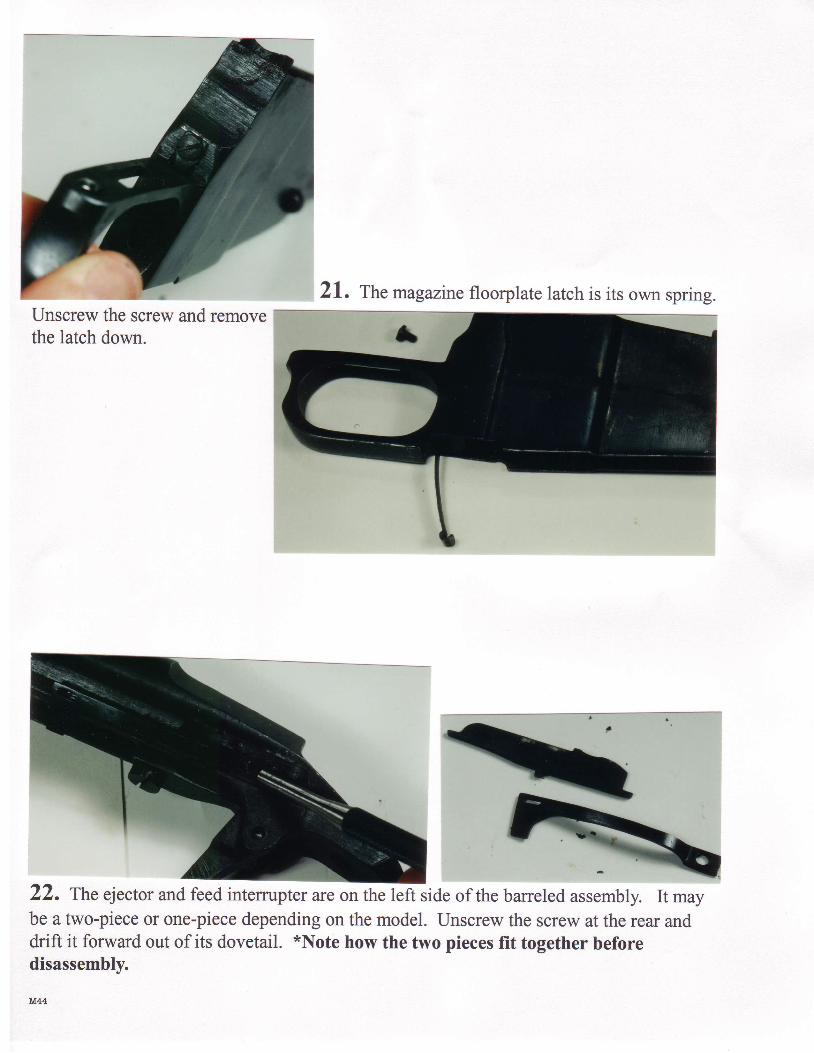
floorplate latch is its own spring.Unscrew the screw and removethe latch down.
21.The magazine
I
22. The ejector and feed intemrpter are on the left side of the barreled assembly. It maybe a two-piece or one-piece depending on the model. Unscrew the screw at the rear anddrift it forward out of its dovetail. *Note how the two pieces fit together beforedisassembly.

23. Unscrew the large screwunderneath the barreled assembly.The trigger spring/bolt stop willnot be removed at this time.
24, Drtft out the trigger pin and remove the triggerspring/bolt stop and trigger.