Embed Size (px)
Citation preview
*For help editing video segment go to Student Media Lab: http://www.uic.edu/depts/accc/sml/
Task 2 Videotaping Checklist:
I. Consent
____ Create packet with letter to parents, parent guardian video consent form, and minor assent
(Spanish speaking forms if needed)
____ Pass out packets to students and/ or parents (e.g. at report card pick up day)
____ Students (grades 6 and up) sign assent
II. Select the learning segment (see Making Good Choices Document and Handbooks)
___ Meet with mentor teacher to discuss and select a lesson to tape
III. Equipment
____ Reserve video cameras and microphone from ETL
____ Return video cameras and microphone to ETL after one week
IV. Video Taping Lesson
___ Ask mentor teacher or fellow Teacher Candidate to film the lesson
___ No students who were not to be videotaped are in the video segment
V. Compressing Video
____ Upload video to computer
____ Select either
a) one continuous 15 minute clip (El. Math) from the learning segment or,
b) two continues clips that combined, total no more than 20 minutes (El. Math or El. Literacy)
_____ Edit/ cut out the rest of the video using video editing software (e.g. iMovie for MAC; Movie
Maker for PC). (see below How To Tutorials for Movie Maker and iMovie)
____ Save the video clips as a file (one file for one 15 minute clip; two files for each continuous clip).
____ Compress video down to 100 MB
*For help editing video segment go to Student Media Lab: http://www.uic.edu/depts/accc/sml/
Procedures for Classroom Videotaping
Advised preparations and considerations for videotaping.
These procedures are provided to help you produce video clips that clearly represent the teaching and
learning in your classroom. In order to capture elements of instruction and student learning, you will
need to produce video clips of high audio and video quality.
Preparation and Practice
First, we do NOT expect a Hollywood production. It is important, however, that the quality of the
videotaped activities be sufficient for scorers to understand what happened in your classroom. As a
general rule of thumb, sound quality is generally more important than video quality to understanding
the teaching and learning context.
If you are unfamiliar with the videotaping process and/or do not have access to video equipment,
consider the following resources:
• your cooperating/master teacher (who can identify potential resources in the school as well as
assist you with videotaping);
• your university supervisor;
• Technology staff within your program’s institution who are knowledgeable about videotaping;
ETL Lab, EPASW 2nd floor or Student Media Lab: http://www.uic.edu/depts/accc/sml/
• Another student teacher who is doing videotaping at your placement school; or
• personal equipment and resources.
Schedule/reserve the necessary video/audio equipment well in advance.
Advise your cooperating teacher at your school of your need to videotape lessons for your Learning
Segment. Make arrangements for a camera operator that could include your cooperating teacher,
your university supervisor, designated teacher aides, a peer who is student teaching in the same
building.
Practice the videotaping process. This will provide a chance to test the equipment and give your
students an opportunity to grow accustomed to the camera.
*For help editing video segment go to Student Media Lab: http://www.uic.edu/depts/accc/sml/
Think about where you and your students will be during the activities to be portrayed on the
videotape. Will different activities require students to regroup and move around the classroom?
How will the use of instructional materials be recorded? What will the camera need to capture? If
applicable, when should the camera operator zoom in or rotate the camera to a new position?
Meet with the camera operator to plan the taping prior to videotaping your lesson. Share your
lesson plan and discuss your plans to capture the teaching and learning.
Use a sturdy tripod to avoid shaking images.
Adjust, if necessary, for the light source each time a recording is made. Newer cameras may have a
switch for recording in incandescent, florescent, or daylight or may be completely automatic. Do
not place the camera facing the window or other bright sources of light.
If you are having trouble hearing yourself and/or the students, try placing the camera closer to the
action OR use an external omnidirectional dynamic microphone plugged into the “EXT MIC” jack on
the camera OR wear a lapel mike and repeat questions or comments from students who are not
nearby. Confirm that this turns the internal microphone off. If the camera operator wears
headphones plugged into the camera, the sound quality can be monitored during taping.
During videotaping, don’t worry about calling students by name, or having them address you by
name. Note that names or other identifying information heard on the videotape will remain
confidential to the scorers.
Compressing Video for TASKSTREAM nm
Currently, TASKSTREAM allows users to upload videos up to 100 megabytes in size.
Therefore, in order to upload a video to TASKSTREAM, you will need to compress the video
to make sure it is smaller than 100 megabytes in size.
Below is a list of issues that may prevent you from uploading your videos on to
TASKSTREAM:
• Videos over 100 megabytes in size
• DVD video. DVD video is usually much larger in size and cannot be uploaded directly
into TASKSTREAM using conventional means. The DVD must be transcoded into a
compatible digital video file, such as .wmv, .mov., or mpg.
• Streaming video from sites such as YouTube cannot be uploaded to TASKSTREAM as
is. It can be embedded if you have knowledge of HTML, but we do not recommend
*For help editing video segment go to Student Media Lab: http://www.uic.edu/depts/accc/sml/
embedding video since it is not archival, meaning the video may be removed from
the streaming service.
• Upload size restrictions from your Internet Service Provider (ISP). For more
information on your upload size restrictions, please contact your ISP.
If your video is larger than 100 MB in size, you will need to compress (make smaller) your
video to ensure that you can successfully upload your video to TASKSTREAM. Luckily, all
the tools to compress video files come free with your computer, either PC or Mac. There are
also free programs available for download. A basic web search for compression tools should
give you more options if you do not wish to use the software listed below.
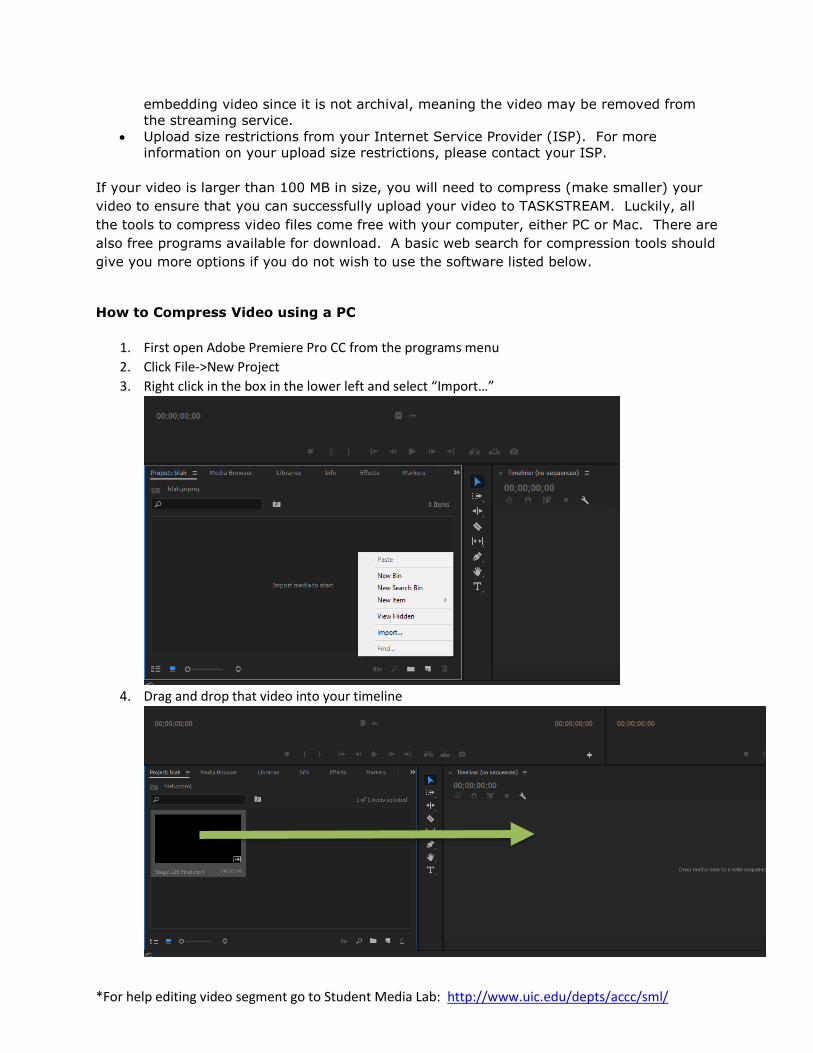
How to Compress Video using a PC
1. First open Adobe Premiere Pro CC from the programs menu
2. Click File->New Project
3. Right click in the box in the lower left and select “Import…”
4. Drag and drop that video into your timeline
*For help editing video segment go to Student Media Lab: http://www.uic.edu/depts/accc/sml/
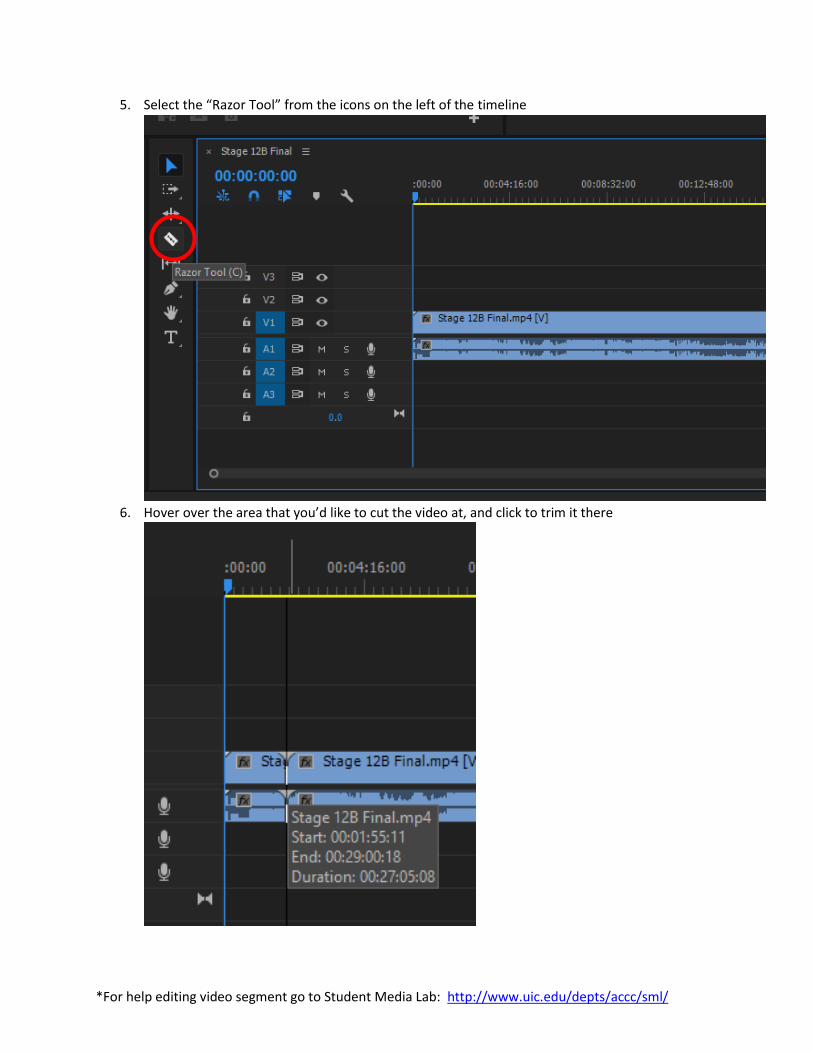
5. Select the “Razor Tool” from the icons on the left of the timeline
6. Hover over the area that you’d like to cut the video at, and click to trim it there
*For help editing video segment go to Student Media Lab: http://www.uic.edu/depts/accc/sml/
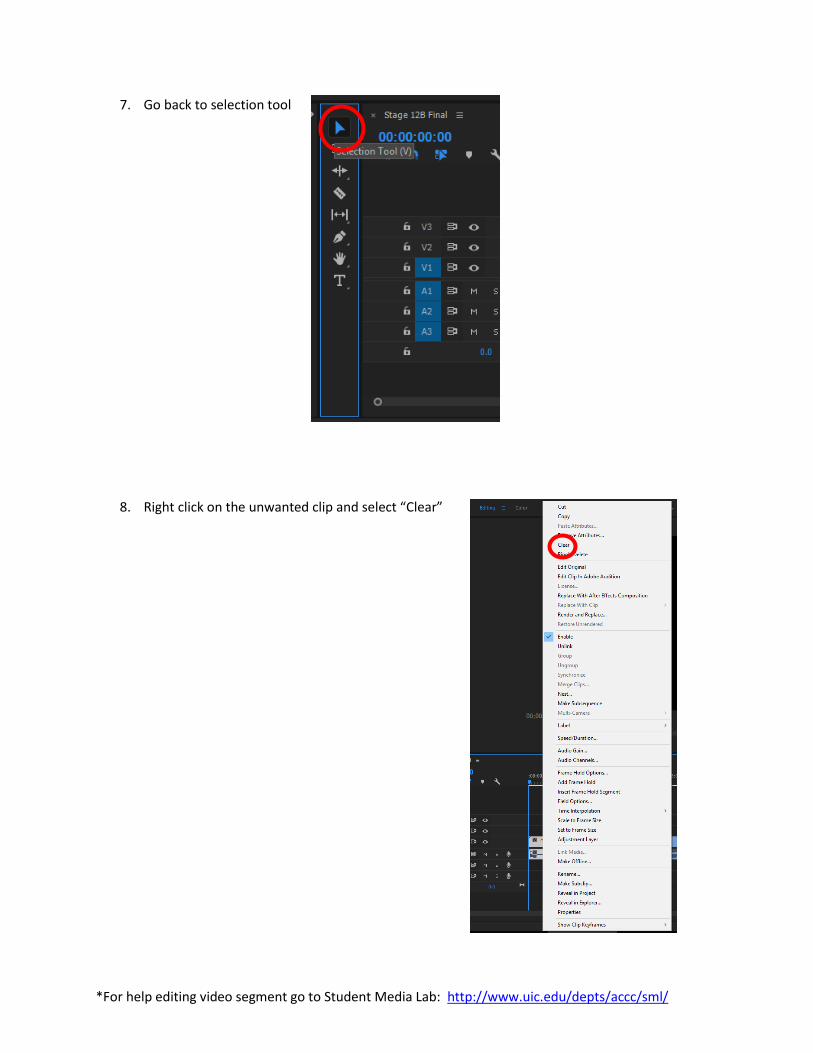
7. Go back to selection tool
8. Right click on the unwanted clip and select “Clear”
*For help editing video segment go to Student Media Lab: http://www.uic.edu/depts/accc/sml/
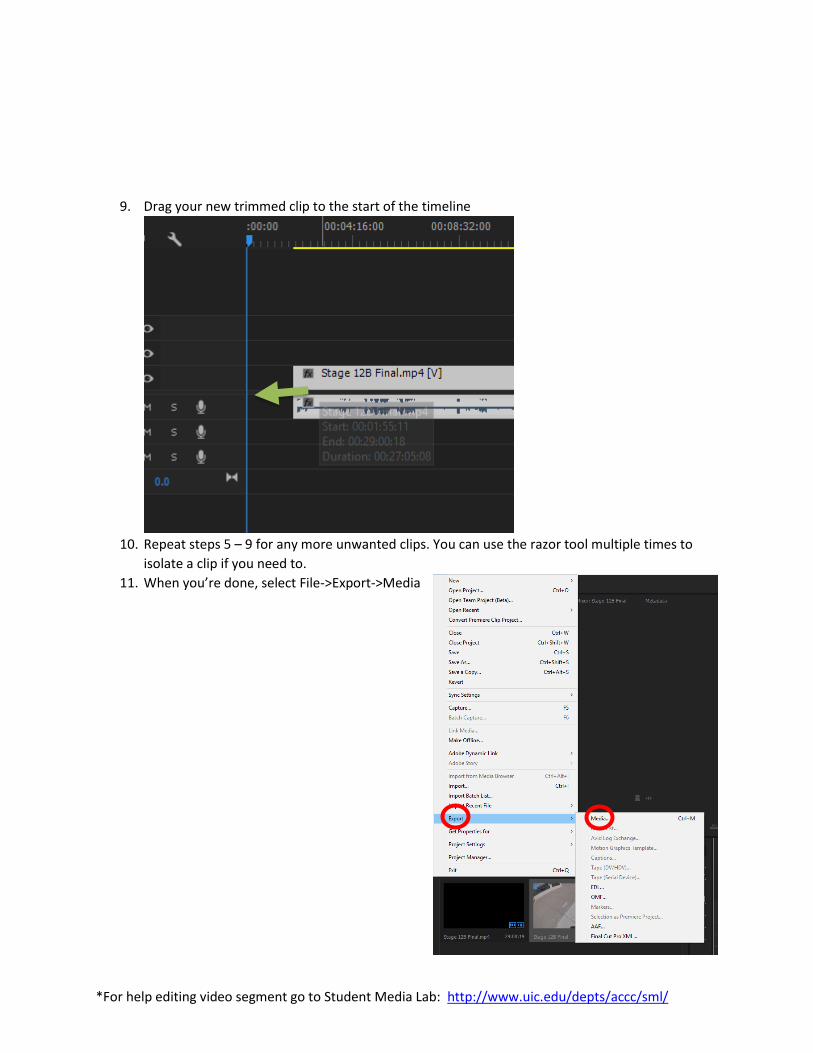
9. Drag your new trimmed clip to the start of the timeline
10. Repeat steps 5 – 9 for any more unwanted clips. You can use the razor tool multiple times to
isolate a clip if you need to.
11. When you’re done, select File->Export->Media
*For help editing video segment go to Student Media Lab: http://www.uic.edu/depts/accc/sml/
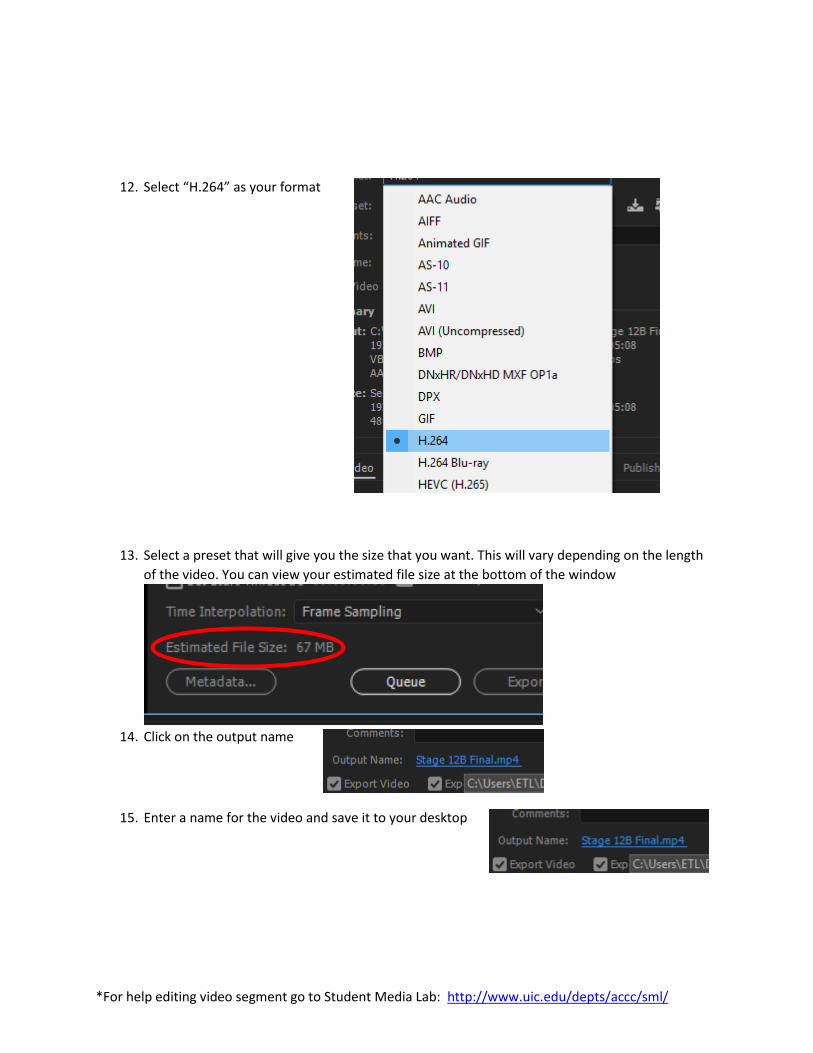
12. Select “H.264” as your format
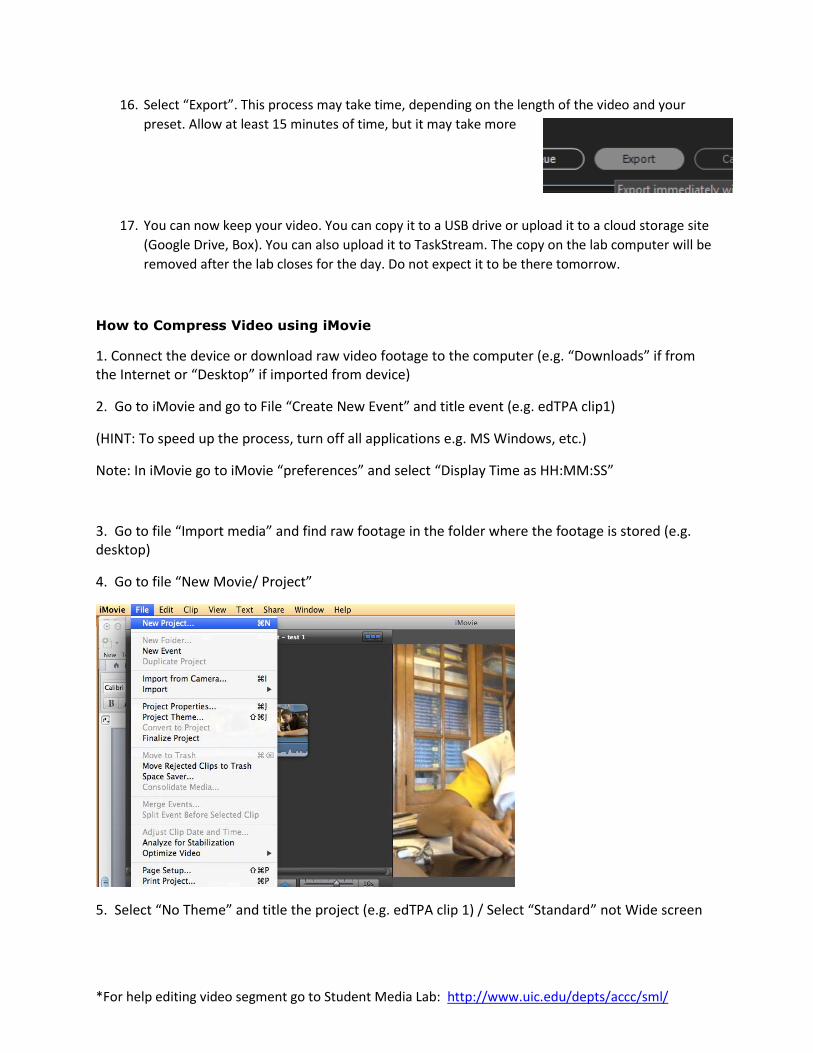
13. Select a preset that will give you the size that you want. This will vary depending on the length
of the video. You can view your estimated file size at the bottom of the window
14. Click on the output name
15. Enter a name for the video and save it to your desktop
*For help editing video segment go to Student Media Lab: http://www.uic.edu/depts/accc/sml/
16. Select “Export”. This process may take time, depending on the length of the video and your
preset. Allow at least 15 minutes of time, but it may take more
17. You can now keep your video. You can copy it to a USB drive or upload it to a cloud storage site
(Google Drive, Box). You can also upload it to TaskStream. The copy on the lab computer will be
removed after the lab closes for the day. Do not expect it to be there tomorrow.
How to Compress Video using iMovie
1. Connect the device or download raw video footage to the computer (e.g. “Downloads” if from the Internet or “Desktop” if imported from device)
2. Go to iMovie and go to File “Create New Event” and title event (e.g. edTPA clip1)
(HINT: To speed up the process, turn off all applications e.g. MS Windows, etc.)
Note: In iMovie go to iMovie “preferences” and select “Display Time as HH:MM:SS”
3. Go to file “Import media” and find raw footage in the folder where the footage is stored (e.g. desktop)
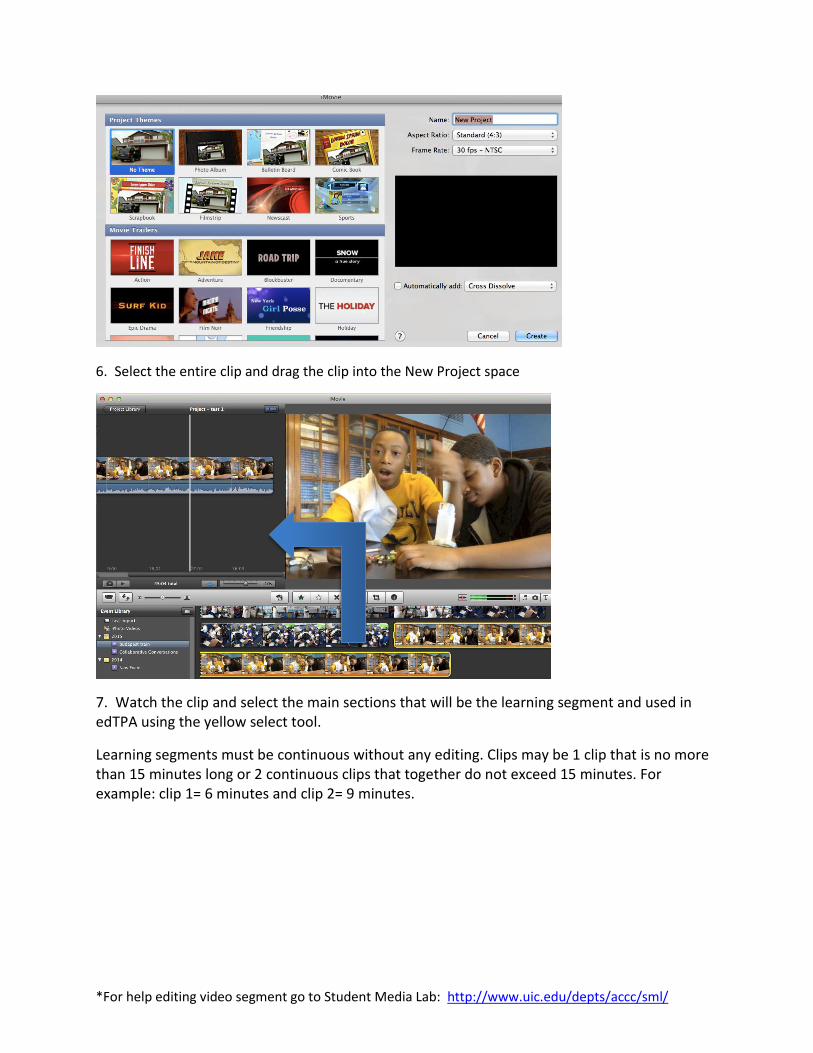
4. Go to file “New Movie/ Project”
5. Select “No Theme” and title the project (e.g. edTPA clip 1) / Select “Standard” not Wide screen
*For help editing video segment go to Student Media Lab: http://www.uic.edu/depts/accc/sml/
6. Select the entire clip and drag the clip into the New Project space
7. Watch the clip and select the main sections that will be the learning segment and used in edTPA using the yellow select tool.
Learning segments must be continuous without any editing. Clips may be 1 clip that is no more than 15 minutes long or 2 continuous clips that together do not exceed 15 minutes. For example: clip 1= 6 minutes and clip 2= 9 minutes.
*For help editing video segment go to Student Media Lab: http://www.uic.edu/depts/accc/sml/
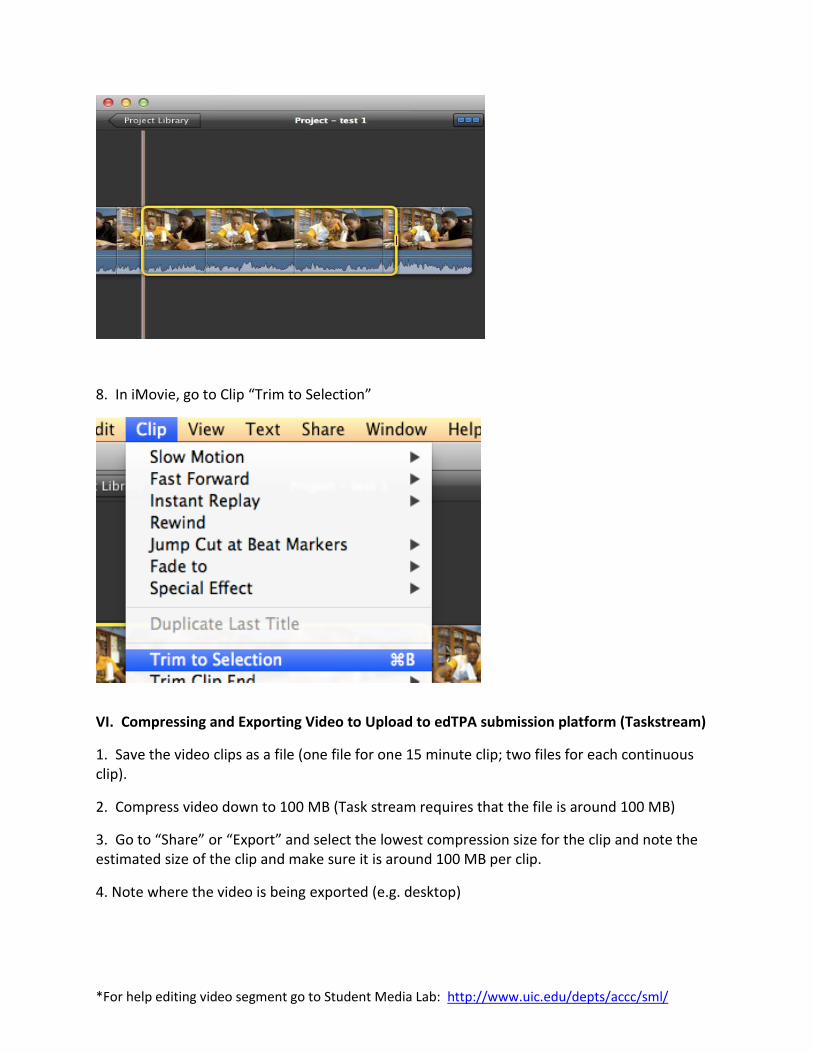
8. In iMovie, go to Clip “Trim to Selection”
VI. Compressing and Exporting Video to Upload to edTPA submission platform (Taskstream)
1. Save the video clips as a file (one file for one 15 minute clip; two files for each continuous clip).
2. Compress video down to 100 MB (Task stream requires that the file is around 100 MB)
3. Go to “Share” or “Export” and select the lowest compression size for the clip and note the estimated size of the clip and make sure it is around 100 MB per clip.
4. Note where the video is being exported (e.g. desktop)

*For help editing video segment go to Student Media Lab: http://www.uic.edu/depts/accc/sml/
5. Name your file as prescribed by Pearson
Upload to online submission platform (e.g. Task stream)

*For help editing video segment go to Student Media Lab: http://www.uic.edu/depts/accc/sml/


![Videotaping & Webcasting Museum Lectures: Access, Social Learning, and Recycling [draft]](https://img.pdfslide.net/doc/110x75/5491d4d6ac795953288b4616/videotaping-webcasting-museum-lectures-access-social-learning-and-recycling-draft.jpg)