Embed Size (px)
Citation preview

TC 21-21
WATER SURVIVAL TRAINING
DISTRIBUTION RESTRICTION: Approved for public release; distribution is unlimited.

i
Training Circular HeadquartersNo. 21-21 Department of the Army Washington, D.C., 25 June 1991 TABLE OF CONTENTS
List of Illustrations
Preface
Introduction
Chapter 1 PROGRAM REQUIREMENTS
Safety Factors Water Entries SAFE Principles Lifeguards and Safety Equipment Instructors Individual Equipment
Chapter 2 CLASSIFICATION AND EVALUATION
Classification Levels Identification of Nonswimmers
Chapter 3 CLASS THREE - BASIC SURVIVAL SWIMMER
Exercise 1 - waterproofing the Rucksack Exercise 2 - Travel Stroke Sequence Exercise 3 - Pool Exit Exercise 4 - Treading Water/Hanging Float Exercise 5 - Travel Stroke (without Rucksack) Exercise 6 - Five-Minute Buoyancy Test (Without Rucksack)
Chapter 4 CLASS TWO - INTERMEDIATE SURVIVAL SWIMMER
Exercise 1 - Rucksack Exercise Exercise 2 - Two-Rucksack Exercise Exercise 3 - Collar Tow Using Sidestroke Exercise 4 - Trouser-Inflation Float

TC 21-21
ii
Chapter 5 CLASS ONE - ADVANCED SURVIVAL SWIMMER
Exercise 1 - Two-Stroke Test Exercise 2 - Underwater Swim Exercise 3 - Jump/Swim Exercise 4 - Treading Water/Hanging Float
Glossary
References
Authorization

TC 21-21
iii
LIST OF ILLUSTRATIONS
Figure No.
1 Stride Entry
2 Waterproofing the Rucksack
3 Travel Stroke Sequence Pool Diagram
4 Full-Gear Water Walk
5 Hand Sculling Motion
6 Treading Water
7 Hanging Float
8 Rucksack Exercise
9 Collar Tow
10 Sidestroke
11 Trouser Leg Tie
12 Trouser Inflation - Sling Method
13 Trouser Inflation - Splash Method
14 Breaststroke
15a High-Level Entry
15b High-Level Entry with Rifle

TC 21-21
iv
PREFACE
This publication describes the Army's water survival training program. It establishes classification levels, describes the basic skills required at each level, and sets standards for testing.
It is designed to help company commanders, platoon leaders, and instructors determine the water survival ability level of their soldiers and train them to survive in water.
The proponent of this publication is the US Army Physical Fitness School. Send comments and recommendations on DA Form 2028 directly to the US Army Physical Fitness School, ATTN: ATSG-PF, Fort Benjamin Harrison, IN 46216-5590.
Unless this publication states otherwise, masculine nouns and pronouns do not refer exclusively to men.
In this publication, the terms "rifle" and "M16" mean M16 training aid (DVC-T7-83).

TC 21-21
v
INTRODUCTION
There are times during military training when soldiers may need to negotiate water obstacles. Leaders at all levels should be aware of the potentially dangerous situation this presents for soldiers who fear water or cannot swim.
Each year many soldiers lose their lives through their inability to manage themselves in water. In addition, soldiers hamper water maneuvers by their lack of confidence and
expertise.
It is unrealistic to expect that every soldier will be a proficient swimmer. However, every soldier can be trained to participate safely in military training conducted in aquatic environments. Water survival training will build soldiers' confidence for operations in and around water.
This publication presents the Army's water survival training program, which has three classification levels: Class Three -
Basic, Class Two Intermediate, and Class One - Advanced. The main goal of the program is to train soldiers to meet the requirements of the Class Three - Basic level. Soldiers who achieve competency at this level should pose little threat to themselves or the unit during most operations in and around water.
Soldiers qualified at Class Two - Intermediate level should be able to survive in water for a prolonged period and perform tasks and negotiate obstacles while in the water. Soldiers who can perform Class One - Advanced skills should be extremely proficient at water survival.
Soldiers who complete the entire program will know how to do the following actions, which are explained and illustrated in this circular:
• Maintain buoyancy in full gear. • Swim 15 yards underwater. • Swim the travel stroke, breaststroke, and sidestroke. • Assist other swimmers in the water. • Use personal safety and water survival techniques.
Company commanders and platoon leaders are responsible for knowing the water survival ability level of each of their soldiers. This knowledge lets them assign responsibilities and take protective measures to ensure the safety of each soldier.
Evasive actions to be taken in the event of oil fires on the water's surface are in FM 55-501.

TC 21-21
vi
Outside agencies such as the American Red Cross can provide additional assistance and information concerning water survival. Trainers and other soldiers should use the expertise of these agencies whenever possible. Most military installations have local Red Cross chapters.

1 - 1
Chapter 1 Program Requirements
Before beginning their water survival training program, company commanders and platoon leaders should become thoroughly familiar with the information in this chapter. This information will help ensure the safety of soldiers during training. It will also provide guidelines for choosing instructors and identifying individual and safety equipment needed during training.
SAFETY FACTORS
Safety is the first concern when training soldiers in and around water. The following factors are important:
• Know the water survival ability level of each soldier. • Conduct all water survival training in a pool, with lifeguards and appropriate
safety equipment present. • Ensure the water is at least nine feet deep at the deep end of the pool. • Have safety and emergency action plans. • Use the buddy system. (Pair a strong swimmer with a weaker one.) • Ensure all water entries during training are done feet-first. • Ensure soldiers use the water entry techniques described in this publication. • Ensure soldiers understand the SAFE principle described in this chapter.
WATER ENTRIES
Training exercise requirements call for soldiers to enter the water off the pool deck as well as from a height of ten feet. These entries into shallow water are described in the following paragraphs and in Chapter 5.
Step-off entry. For shallow-water entry off the deck, step off the edge into the water with the knees flexed; be prepared to absorb the impact when hitting the bottom of the pool.

TC 21-21
1 - 2
Stride entry. For deep-water entry off the deck, leap off the edge into the water with the trunk leaning forward, the head up, the legs spread in a stride position (one forward, the other back), and the arms extended out to slap the water. (See Figure 1.) This jump position keeps the head above water and allows the soldier to maintain visibility. (The water should be at least five feet deep.) High-level entry. Entry into water from a height of ten feet is described in Chapter 5.
SAFE PRINCIPLE
To counter the tendency to panic when unexpectedly entering water, all soldiers should know the SAFE principle. SAFE is a quick and easy reminder of the fundamentals of survival swimming. The acronym is described as follows:
LIFEGUARDS AND SAFETY EQUIPMENT
A qualified lifeguard must be on duty at all times during water survival training. The lifeguard must have a current American Red Cross Lifeguard Training certificate and must be certified in first aid and cardiopulmonary resuscitation (CPR).
The following safety items must be on-site while conducting water survival training:
• Shepherd's crook or reaching pole.

TC 21-21
1 - 3
• Heaving line. • Ring buoy. • Backboard with tie-down straps. • Cervical collar. • Whistle. • First aid kit.
The length and width distance requirements for the exercise in this circular are based on a pool 25 yards long by 15 yards wide. For larger or smaller pools, instructors will adjust accordingly.
INSTRUCTORS
The unit will provide instructors for water survival training. They will explain, demonstrate, and evaluate all skills. The ideal instructor-to-soldier ratio during training and testing is one to six.
Instructors must be strong swimmers who are competent in all the water survival skills through Class One - Advanced Survival Swimmer. Although it is not required, instructors should hold either the American Red Cross Lifeguard Training certificate or Water Safety Instructor N/M certificate.
Instructors will obtain M16 training aids (DVC-T7-83) for use in this training.
INDIVIDUAL EQUIPMENT
Soldiers will wear full gear during training and testing unless otherwise instructed in this publication. "Full gear" means BDU, boots, LBE, helmet, flak jacket, M16 training aid, and waterproofed rucksack, which will be used as a flotation device. A sleeping bag and sleeping mat will be externally attached to the rucksack.

TC 21-21
1 - 4

2 - 1
Chapter 2
Classification and Evaluation
Knowing the water survival ability level of his soldiers helps the company commander determine how much training time must be devoted to teaching water survival techniques.
CLASSIFICATION LEVELS
There are three levels in the water survival training program. They are:
• Class Three - Basic Survival Swimmer. • Class Two - Intermediate Survival Swimmer. • Class One - Advanced Survival Swimmer.
Most soldiers who have even marginal aquatic ability can become qualified at the Class Three - Basic level using only two to four hours of training time. Based on factors such as fear of water and lack of fundamental skills, nonswimmers will require additional training time.
Qualification at Class Two - Intermediate and Class One - Advanced levels is only necessary for units that anticipate extensive operations in and around water. Time permitting, the unit should conduct training to meet these performance standards. The techniques and methods used to train soldiers to acquire Basic, Intermediate, and Advanced Survival Swimmer skills are described in Chapters 3, 4, and 5. Soldiers should learn and practice the skills in the order they are presented.
IDENTIFICATION OF NONSWIMMERS
Before beginning training and qualification at the Class Three - Basic level, canvas the soldiers to identify those who say they cannot swim and/or cannot stay buoyant under their own power for two minutes. Give these soldiers extra training.
Give the remaining group the two-minute buoyancy test to identify nonswimmers. For this publication, nonswimmers are those who cannot maintain buoyancy for two minutes under their own power without showing signs of undue fear, stress, panic, or fatigue. Do not give this test to soldiers who identify themselves as nonswimmers.
Give soldiers who do not pass the two-minute buoyancy test extra training, aided by the rucksack, to master the Class Three - Basic requirements. Despite additional training, some soldiers will not meet these requirements.
Have instructors present during the test both in and out of the pool to maintain safety and ensure that no one touches the bottom.

TC 21-21
2 - 2
REQUIREMENT. Two-minute buoyancy test. Wearing BDU, boots, LBE, helmet and flak jacket, step into the water at the shallow end of the pool, and walk toward the deep end until the shoulders are under water. At a signal from the timer, begin to float or tread water for two minutes. (Rucksacks and rifles are not needed for this exercise.)

3 - 1
Chapter 3
Class Three - Basic Survival Swimmer
Soldiers will complete the following six exercises to become classified at Class Three - Basic level. They will wear full gear for all exercises except five and six which exclude the rucksack. The M16 is used as stated for each exercise.
1. Waterproofing the rucksack. 2. Travel stroke sequence (includes full-gear water walk, confidence check, and
travel stroke). 3. Pool exit. 4. Treading water/hanging float. 5. Travel stroke (without rucksack). 6. Five-minute buoyancy test (without rucksack).
The requirements and skill training for these exercises are described in the following paragraphs. After successfully demonstrating these skills, the soldier is qualified as a Basic Survival Swimmer.
INSTRUCTOR NOTES:
• Ensure soldiers enter the water using the water-entry techniques described in Chapter 1.
• "Chest-deep" water varies for each soldier depending on individual height.
EXERCISE 1 - WATERPROOFING THE RUCKSACK
If properly waterproofed, all rucksacks have enough flotation potential to keep even the largest combat equipped soldier afloat. Therefore, a rucksack becomes an asset during water survival training. The rucksack is waterproofed with plastic bags. (See Figure 2.)
The following equipment is needed by each soldier for this exercise:
• Rucksack. • Clothing and gear (mission-dependent). • Two large heavy-duty plastic bags. • Two heavy-duty rubber bands. • Sleeping bag. • Waterproof bag.

TC 21-21
3 - 2
• Sleeping mat.
REQUIREMENT. Waterproof and secure the rucksack as described in the skill training.
Skill Training - Waterproofing the Rucksack
To waterproof and secure the rucksack, use the following procedures:
Arrange all gear neatly inside a plastic bag with the most commonly used items on top. Fold or roll clothing. Press the bag tightly to squeeze out excess air. Use a series of folds to form a watertight seal of the bag, and keep the folds in place with a rubber band. Place the bag inside the rucksack. Close the drawstrings of the rucksack as tightly as possible.
Place the sleeping bag inside a plastic bag, and press out excess air. Use a series of folds to form a watertight seal of the bag, and keep the folds in place with a rubber band. Place the bag inside the waterproof bag. Tie the waterproof bag closed as tightly as possible, ensuring that the plastic bag is entirely inside. Securely attach the waterproof bag to the back of the rucksack under the closing adjustment straps.
Securely attach the sleeping mat to the top of the rucksack under the closing adjustment straps.

TC 21-21
3 - 3
Figure 2 waterproofing the Rucksack
EXERCISE 2 - TRAVEL STROKE SEQUENCE
The travel stroke sequence includes the water walk, confidence check, and travel stroke. (A pool diagram for this sequence is shown at Figure 3.) Soldiers will wear full gear.

TC 21-21
3 - 4
Figure 3 Travel Stroke Sequence Pool Diagram
Step 1 - Full-Gear Water Walk
With proper positioning of the M16 during the water walk, the stock can be used as a paddle. (See Figure 4.)
REQUIREMENT: Step off the edge of the pool at the shallow end with the M16 at port arms, and walk four widths of the pool progressing to chest-deep water. Use the rifle stock as a paddle.
Figure 4 Full-gear Water Walk

TC 21-21
3 - 5
Step 2 - Confidence Check
While in chest-deep water, the soldier tries to sit on the bottom. Since this is not possible, the soldier gains confidence in the Buoyancy capabilities of the waterproofed rucksack.
REQUIREMENT. Attempt to sit on the bottom of the pool in chest-deep water.
Step 3 - Travel Stroke
REQUIREMENT. Travel stroke four widths of the pool in water above the head; begin in chest-deep water and proceed to the deep end.
Skill Training - Travel Stroke
For the travel stroke, use the following procedure:
Body position. Keep the upper part of the body prone on the water with the legs dangling.
Arm Stroke. Extend the hands out in front of the face. Sweep the arms slightly downward and back ninety degrees to propel the body through the water. Move the hands back to the front of the face. Repeat. Use the rifle as a paddle to help propel the body.
Leg kick. Move the legs in a continuous bicycle-like movement. Bring the knees high and step out.
Breathing. Keep the face out of the water during the stroke, and breathe rhythmically.
EXERCISE 3 - POOL EXIT
Following the travel stroke sequence, soldiers will exit the pool in the deep end using the following procedure: Place the rifle on the deck. Then, unassisted and without using a ladder, climb up onto the deck, and sit for a few seconds to let the water drain off.
REQUIREMENT. Place the rifle on the deck, and exit the pool at the deep end unassisted and without using the ladder.

TC 21-21
3 - 6
Place rifle on deck.
Unassisted and without use of ladder climb onto deck.
Allow water to drain.
EXERCISE 4 - TREADING WATER/HANGING FLOAT
Treading water and the hanging float are very important skills for water survival. They can be used while waiting for help to arrive and as resting positions when swimming to safety. The hanging float should not be used in cold water.
REQUIREMENT. Wearing full gear, step into the water at the shallow end of the pool, and walk to chest deep water. Tread water for two and one-half minutes. Then, without a break, do the hanging float for two and one-half minutes. (The M16 is not needed for this exercise.)
Skill Training - Sculling
Both the hanging float and treading water use sculling. This is a rhythmically controlled motion of the arms and hands to manipulate the water for upward thrust and keep the body vertically afloat.
A common sculling action is the figure eight. (See Figure 5.) With the fingers together and palms facing downward, draw a figure eight with each hand, pushing the water downward and outward during the motion. Keep the arms slightly bent in front of the chest. Use a minimum of effort to avoid excessive fatigue.

TC 21-21
3 - 7
Figure 5 Hand Sculling Motion
Skill Training - Treading Water
Compared with the hanging float, treading water lets the soldier maintain visibility and retain more body heat since his head is out of the water. However, it requires more physical exertion. To tread water, use the following procedure. (Treading water is shown at Figure 6.)
Body position. Keep the body upright with the head out of the water.
Hand and arm movements. Make slow sculling movements underwater to maintain the vertical body position.
Leg Movements. Make slow, continuous bicycle-like or scissor-kick type movements to support the body.

TC 21-21
3 - 8
Figure 6 Treading Water
Skill Training - Hanging Float
Once he masters the hanging float, the soldier will have control of himself in the water. He will realize how buoyant he is with his lungs fully inflated and his body relaxed. To do the hanging float, use the following procedure. (The hanging float is shown in figure 7.)
Resting/starting position. Inhale deeply to fully inflate the lungs. Hold the breathe, and put the face in the water. Let the arms and legs dangle. Rest in this position a few seconds.
Recover movements. Slowly bring the arms to about shoulder height, and skull. Slowly do a bicycle-like movement with the legs. Raise the head so the mouth is just above the water's surface, and exhale.
Inhale and stroke. Inhale through the mouth and slowly press the arms downward. Return to the resting/starting position.

TC 21-21
3 - 9
Figure 7 Hanging Float
INSTRUCTOR NOTE: At this point in the training all soldiers who are not confident doing the preceding skills will receive additional training in chest-deep water. Each soldier must be proficient in the travel stroke, treading water, and the hanging float before proceeding to exercises 5 and 6.
EXERCISE 5 - TRAVEL STROKE (WITHOUT RUCKSACK)
For the travel stroke when not wearing a rucksack, the following method may be used for breathing: Inhale, put the face in the water, and begin the arm stroke. Exhale two-thirds while the face is in the water. Lift the head to finish exhaling during the downward press of the arms.
REQUIREMENT. Wearing full gear except for the rucksack, with the M16 at port arms, enter the pool at the deep end using the stride entry, and travel stroke the length of the pool to the shallow end.

TC 21-21
3 - 10
EXERCISE 6 - FIVE-MINUTE BUOYANCY TEST (WITHOUT RUCKSACK)
REQUIREMENT. Wearing full gear except for the rucksack, enter the pool at the deep end using the stride entry, and tread water for two and one-half minutes. Then, without a break, do the hanging float for two and one-half minutes. (The M16 is not needed for this exercise.)

4 - 1
Chapter 4
Class Two - Intermediate Survival Swimmer
Soldiers will complete the following four exercises to become classified at Class Two - Intermediate level. They will wear full gear unless otherwise stated and a swimsuit or PT uniform under the BDU for exercise 4. No soldier will attempt Class Two training before being fully qualified at the Class Three - Basic level.
1. rucksack exercise. 2. two-rucksack exercise. 3. Collar tow using sidestroke. 4. rouser-inflation float.
The requirements and skill training for these exercises are described in the following paragraphs. After successfully demonstrating these skills, the soldier is qualified as an Intermediate Survival Swimmer.
INSTRUCTOR NOTES:
• Ensure soldiers enter the water using the water-entry techniques described in Chapter 1.
• "Chest deep" water varies for each soldier depending on individual height. • Exercises two and three require partners.
EXERCISE I - RUCKSACK EXERCISE
REQUIREMENT. Attach the helmet to the rucksack. Wearing full gear, with the M16 at port arms, enter the pool at the deep end using the stride entry. Remove the waterproofed rucksack, put on the helmet, and place the rifle across the rucksack ready to fire. Push the rucksack the length of the pool to the shallow end using the frog or scissor kick. (This exercise is shown at Figure 8.)

TC 21-21
4 - 2
Figure 8 Rucksack Exercise
EXERCISE 2 - TWO-RUCKSACK EXERCISE
REQUIREMENT: Wearing full gear, with the rifle at port arms, enter the pool at the deep end using the stride entry. Remove the waterproofed rucksack, and attach the rifle to the rucksack under the closing adjustment straps. Grab the partner's rucksack. Travel the length of the pool to the shallow end pushing one rucksack while towing the other.
EXERCISE 3 - COLLAR TOWING USING SIDESTROKE
The collar tow is used to help swimmers who are tired but not struggling. For instance, one soldier acts as rescuer while his partner acts as victim. The soldiers then reverse roles. (Rifles are not needed for this exercise.)
REQUIREMENT: Wearing BDU, boots, helmet, LBE, and flak jacket, the partners enter the pool at the deep end using the stride entry. The rescuer collar-tows the victim the length of the pool to the shallow end using a modified sidestroke.
Skill training - Collar Tow
The rescuer grabs the victim's collar at the back of the neck and pulls him to a horizontal position on his back. He maintains his hold of the victim's collar, keeping his arm fully extended. He uses a modified sidestroke while towing. (The collar tow is shown at Figure 9.)

TC 21-21
4 - 3
Figure 9 Collar Tow
Skill Training - Sidestroke
Swim on the side that feels most natural, using a sidearm pull and scissor kick. After mastering the stroke on that side, learn to do it on the other side. The following directions are for the left side. Reverse the procedure for swimming on the right side. (The sidestroke is shown at Figure 10.)
Start/glide position. Lie on the left side with the left arm extended beyond the head in line with the body, with the palm down. Extend the right arm down the length of the body over the right thigh. Keep the legs straight and together.
Arm stroke. With the straight, pull the left arm downward until it is straight down from the shoulder. Flex the elbow and pull into the side. At the same time, turn the palm toward the face and thrust forward to the original extended position. Bend the right arm at the elbow. Thrust the right hand upward in front of the chest: then, push it forward and downward in front of the chin or face to catch the water. Push the right

TC 21-21
4 - 4
hand backward to its original position by the right thigh. (The right hand starts forward to meet and pass the left hand at the neck or face.)
Scissor kick. Draw up the feet with the right foot slightly forward until the knees are bent at a right angle. Straighten the right knee and thrust the right foot forward, downward, and then backward in a semicircular sweeping motion. Keep the toes pointed during the backward sweep. At the same time, straighten the left knee and thrust the left foot backward, downward, and then forward in a sweeping motion resembling a kick. Keep the left foot extended throughout the stroke. Bring the legs together at the end of the stroke, and keep them in a straight line with the toes pointed during the glide.
Coordination of arms and legs. From the start/glide position, begin the stroke with the downward pull of the left arm. At the same time, bring the right arm forward and draw up the knees to begin the kick. Let the thrust and pull of the right arm and the kick of the legs coincide with the completion of the pull of the left arm and its thrust forward to the gliding position.
Figure 10 Sidestroke (cont.)
INSTRUCTOR NOTES:
• With slight modifications, soldiers can use the relatively easy sidestroke to tow floating equipment or another person or to carry an individual weapon with the top hand out of the water.
• The next exercise involves inflating clothing with air to create a device which will keep the soldier afloat. Since the BDU is made of cotton, it will work well for this purpose. It must be free of holes. To retain air, the material that is above water must be kept wet.

TC 21-21
4 - 5
EXERCISE 4 - TROUSER-INFLATION FLOAT
Figure 11 Trouser Leg Tie
The amount of air that cotton BDU trousers will retain in water is enough to hold a soldier afloat providing he remains calm. When the ends of the legs or drawstrings are tightly tied (as shown in Figure 11), each leg will hold a pocket of air. Trousers can be inflated by using the sling or splash methods; these are described in the following paragraphs.
REQUIREMENT: Wearing BDU, boots, swimsuit or PT uniform, and LBE, enter the pool at the deep end using the stride entry. Remove the helmet and attach it to the LBE. Remove the boots, tie the laces together, and put the boots around the neck. Then, remove, tie, and inflate the trousers using the sling or splash method, and float for two and one-half minutes. (The M16 is not needed for this exercise.)
TC 21-21
4 - 6
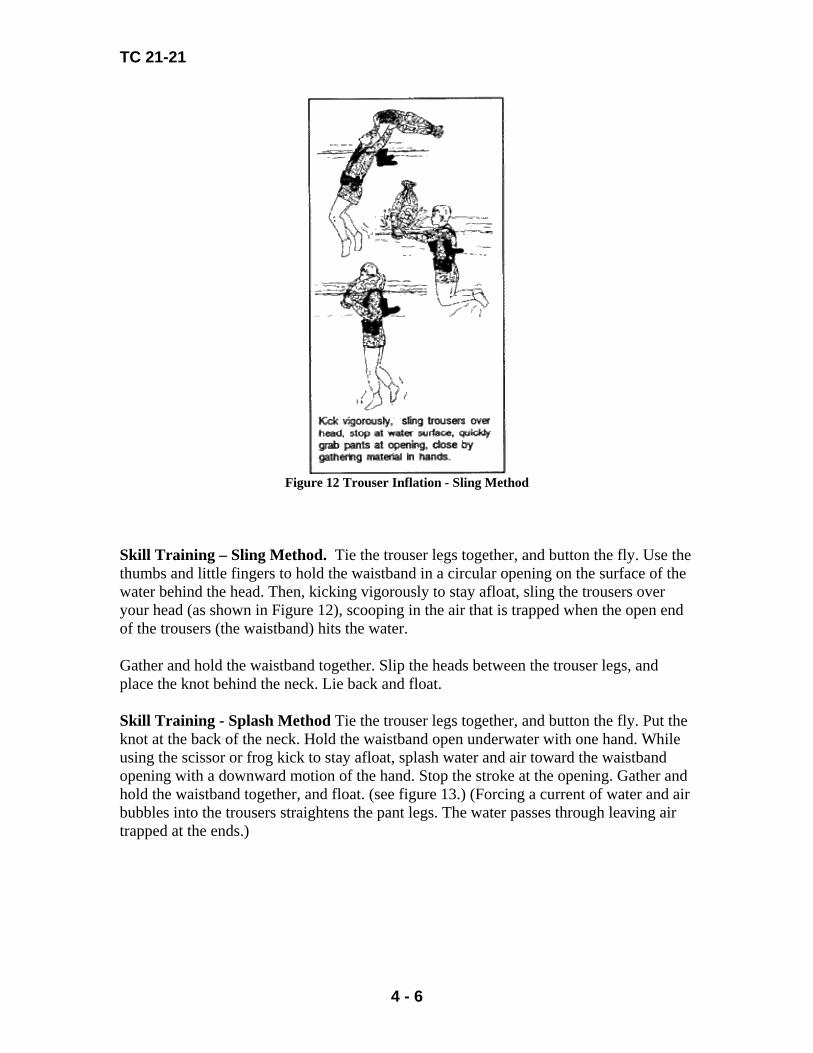
Figure 12 Trouser Inflation - Sling Method
Skill Training – Sling Method. Tie the trouser legs together, and button the fly. Use the thumbs and little fingers to hold the waistband in a circular opening on the surface of the water behind the head. Then, kicking vigorously to stay afloat, sling the trousers over your head (as shown in Figure 12), scooping in the air that is trapped when the open end of the trousers (the waistband) hits the water.
Gather and hold the waistband together. Slip the heads between the trouser legs, and place the knot behind the neck. Lie back and float.
Skill Training - Splash Method Tie the trouser legs together, and button the fly. Put the knot at the back of the neck. Hold the waistband open underwater with one hand. While using the scissor or frog kick to stay afloat, splash water and air toward the waistband opening with a downward motion of the hand. Stop the stroke at the opening. Gather and hold the waistband together, and float. (see figure 13.) (Forcing a current of water and air bubbles into the trousers straightens the pant legs. The water passes through leaving air trapped at the ends.)

TC 21-21
4 - 7
Figure 13 Trouser Inflation - Splash Method

5 - 1
Chapter 5
Class One - Advanced Survival Swimmer
Soldiers will complete the following four exercises to become classified at Class One - Advanced level. They will wear the BDU and boots unless otherwise stated.
1. Two-stroke test. 2. Underwater swim. 3. Jump/swim. 4. Treading water/hanging float.
The requirements and skill training for these exercises are described in the following paragraphs. After successfully demonstrating these skills, the soldier is qualified as an Advanced Survival Swimmer.
INSTRUCTORS NOTES:
• Except for exercise 2, ensure that soldiers enter the water using the water-entry techniques described in Chapter 1.
• "Chest-deep" water varies for each soldier depending on individual height.
EXERCISE 1 - TWO-STROKE TEST
When performed correctly, the sidestroke and breaststroke enable the soldier to move through the water quickly and efficiently.
REQUIREMENT. Enter the water at the deep end using the stride entry, and swim the length of the pool and back using each of the following strokes: sidestroke and breaststroke. Rest up to five minutes between strokes.
Skill Training - Sidestroke
See Chapter 4 for a description of this stroke.
Skill Training - Breaststroke
This is the most useful stroke for military swimming. It is efficient when swimming through debris and in full clothing and gear, and it provides good visibility. Use the following procedure. (The breaststroke is shown at Figure 14.)

TC 21-21
5 - 2
Start/glide position. Lie prone in the water with arms extended out in front and legs extended behind. Keep the head up.
Arm stroke. Turn the palms outward, and bend the arms slightly. Sweep the arms sideward and slightly downward until the hands are opposite and slightly below the shoulders. Then bring the hands and arms up along the chest, and thrust them forward until they are extended and ready to execute the next arm pull.
Frog kick. Draw the heels toward the buttocks. Thrust the legs outward and rearward, then squeeze them together. The whipping/skulling action of the feet aids forward propulsion.
Arm and leg coordination. The stroke movement is in three counts:
1. Begin the arm pull. Near the finish of the pull, flex the knees, and bring the heels toward the buttocks. The arm pull counteracts the resistance created by the knees.
2. As the arm pull is completed, thrust the hands forward, kick out the legs, and squeeze them together.

TC 21-21
5 - 3
3. Glide through the water until the forward momentum decreases, then begin the next stroke.
Breathing. It is possible to breathe at any time during this stroke. The most efficient way is to inhale during the arm pull and exhale through the mouth and nose during the finish of the frog kick and glide.
Body position. When swimming for speed, the trunk and legs must be near the surface. However, this streamlined position is tiring. Swimming with the trunk and legs projecting back and down at an angle of from 20 to 35 degrees, while much slower, is easier to sustain and not as fatiguing.
EXERCISE 2 - UNDERWATER SWIM
After entering the water, drop under the surface, and push off the wall to get a start. Do arm and leg movements as in the breaststroke. (The M16 is not needed for this exercise.)

TC 21-21
5 - 4
REQUIREMENT. Wearing BDU and boots, enter the pool at the deep end using the stride entry, and swim underwater the width of the pool without surfacing.
EXERCISE 3 - JUMP/SWIM
Water entries from a height of ten feet or more require the soldier to position his body to protect it from injury. This high-level-entry jump position is described in the skill training in the following paragraphs.
INSTRUCTOR NOTES:
• Ensure that the water is at least nine feet deep at the deep end of the pool. • Although rucksacks are not required for this exercise, soldiers can be informed
that if they get into a mission situation that requires entering the water from, a height of ten feet or more, they should remove the rucksack before jumping.
REQUIREMENT. Jump from a height of ten feet using the high-level-entry jump position; stabilize, and swim or travel stroke the length of the pool to the shallow end. First jump without the rifle, then with the rifle.
Skill Training - High-Level Entry
When jumping from a height of ten feet, cross the legs at the ankles keeping the knees slightly bent. When not carrying the rifle, put the arms across the chest while jumping and entering the water (as shown in Figure 15a).
When carrying the rifle, keep the arms close to the sides and the hands close to the front of the chest. Hold the rifle at port arms with the sights pointed to either side (as shown in Figure 15b).

TC 21-21
5 - 5
EXERCISE 4 - TREADING WATER/RANGING FLOAT
These skills are described in Chapter 3.
REQUIREMENT. Enter the water at the deep end using the stride entry, and tread water for twenty minutes. Then, without a break, do the hanging float for twenty minutes.

Glossary
ACRONYMS AND ABBREVIATIONS
BDE
CPR
DA
LBE
N/M
SAFE
TC
US
battle dress uniform
cardiopulmonary resuscitation
Department of the Army
load-bearing equipment
new material
acronym for survival swimming fundamentals
training circular
United States of America

References
SOURCES USED
These are the sources quoted or paraphrased in this publication.
FM 21-20. Physical Readiness Training. 31 January 1969, 31 October 1980.
Fourth Class Swimming Instructor's Guide. West Point, New York: United States Military Academy, no date.
DOCUMENTS NEEDED
This document must be available to the intended users of this publication.
TB Med 575. Swimming Pools and Bathing Facilities. June 1982.
READINGS RECOMMENDED
These sources contain relevant supplemental information.
Military Publications
FM 55-501. Marine Crewman's Handbook. March 1983.
Water Survival. Norfolk, Virginia: Landing Force Training Command, Atlantic, no date.
Nonmilitary Publications
American Red Cross Basic Water Safety. Washington, D.C.: The American National Red Cross, 1988.
American Red Cross Lifeguard Training. Washington, D.C.: The American National Red Cross, 1983.
American Red Cross Lifeguard Training Supplement. Washington, D.C.: The American National Red Cross, 1988.
American Red Cross Swimming and Aquatics Safety. Washington, D.C.: The American National Red Cross, 1981.
Katz, Jane, and Nancy P. Bruning. Swimming for Total Fitness. New York: Doubleday, 1981.

TC 21-21 25 JUNE 1991
By Order of the Secretary of the Army:
GORDON O. SULLIVAN
General, United States Army Chief of Staff
Official:
PATRICIA P. HICKERSON
Brigadier General, United States Army The Adjutant General
DISTRIBUTION: Active Army, USAR, and ARNG: To be distributed in accordance with DA Form 12-11E, requirements for TC 21-21, Water Survival Training (Qty rqr block no. 4666).

PIN: 068385-000