Embed Size (px)
Citation preview

TC 530NOTICE D’UTILISATION
OPERATING INSTRUCTIONS
MODO DE EMPLEO
GEBRAUCHSANWEISUNG
ISTRUZIONI PER L’USO
GEBRUIKSHANDLEIDING
MANUAL DE UTILIZAÇÃO
INSTRUKCJA UŻYTKOWANIA

TC 530
Réa
lisat
ion
: EVOLUTION +
32
/ 69
88
87 8
9
DECATHLON4, Boulevard de Mons - 59665 Villeneuve d'Ascq - France
Made in Taïwan
Notice à conserverKeep these instructions
Bitte bewahren Sie diese Hinweise aufIstruzioni da conservareConservar instrucciones
Bewaar deze handleidingInstruções a conservar
Bevar vejledningenZachowaj instrukcję
Réf. pack : 593.646

3
102
M a s t e r
M a s t e r
STRENGTH
93
73
93
50
18
9373
53
96
50
39
92 73
44
47
38
48
61
59
60
01
02
71
03
62
63
65
64
73
43
83
73
82
15
74
34
35 85
22
77
79
80
27
24
23
26
83
84
81
78
14 82
85
66
36
73
67
86 13
79
75
76
87
10
11
12
82
73
16
18
2120
19
37
40
92
73
46
91
45
76
49
29
54
74
54
55
58
5756
95
73
74
5429
34
49
73
94
54
72
73
08
06
04
05
82
17
07
25
82
71
68
09
82
25
90
90
55
07
51
52
41
42
69
97
98
97
98
100
98
89
99
88
70
101
12
33
82
17
28
30
72
31
32
32
31
30
72
A
B
A
B

16
E N G L I S H
ASSEMBLY INSTRUCTIONSThe treadmill is delivered with all parts and tools necessary for assembly. Please read these instructions in full before starting. We recommend you assemble it on its box.
Attention: Please examine the machine after unpacking it. If it is damaged or any parts are missing, please contact your Décathlonretailer.
Assembly, stage 1:
Ensure that all parts and tools are present. Screws, bolts and nuts are attached to the corresponding parts before shipping.
Parts list: see fig. A & BA : frameB : raising tubeC : chassisD : left handle supportE : right handle support F : handlebar barG : handlebarH : handle bar screw coverI : cable for printed circuit boardsJ : screwK, K1 : cable for printed circuit boards
L, L1 : cable for printed circuit boardsM : M8 precision ball screw, 14mm longN : M8 screw, 35mm longO : consoleP : M8 screw, 45 mm longQ : washerR : screw
Tools:5 mm key6 mm key
FIG6
FIG5
L
N Q
G
H
H
Q
M
N
P
K1
K1L1
L1
LF
E
K
J Q I
D
C BA
QJ
R
FIG4
FIG2
FIG1
FIG6
FIG3

17
ASSEMBLY INSTRUCTIONS
E N G L I S H
Assembly, stage 2:
Fig. 1 : 1. Remove screw J and washer Q from the right handle
support E.2. Connect cables I and K.
DO NOT FORCE CORRECT CABLE POSITIONING. CAREFULLY INSERT THE EXCESS CABLE INTO THE FRAME.3. Fix the right handle support E to the chassis and tighten
screw J and washer Q.
Fig. 2 : 1. Remove screw J and washer Q from the left handle
support D.2. Fix the left handle support D to the chassis and tighten
screw J and washer Q.
Fig. 3 : 1. Connect cables K1 and L1.2. Fix the handlebar G to the handle supports.3. Tighten the 2 screws P, AT THIS STAGE, DO NOT
TIGHTEN COMPLETELY.
Fig. 4 : 1. Position the 2 screws P for fixing the handlebar G
on the left handle support D.TIGHTEN ALL SCREWS COMPLETELY.
2. Fit the screw covers to the handlebar.
Fig. 5 : 1. Connect the cable L to the cable inside the console.2. Position the console O to the handlebar.3. Successively tighten the 4 screws R.
Fig. 6 : 1. Unfold the tread so it is vertical.2. Push the position ball screw into the raising tube.
1 2 3
4 5 6
Horizontal assembly:
You can adjust the 2 screws underneath the chassis to ensurethe machine’s stability on the ground.1. Lift the machine on one side and turn the screw under-
neath the chassis.2. To tighten the screw, turn clockwise and anti-clockwise.
Each time the machine is moved, check stability and adjustas necessary.
E
J
K
Q I
D
QJ
H
P
G
N
L1
Q K1
H
G P
LF
D
NQ
OG
R
LM
Unscrew
Screw

18
You have chosen a DOMYOS fitness machine and we wish to thank you for the trust you place with us. We created the DOMYOS brand to enable all sports aficionadoes to remain at peak fitness. This item was designed
by sportsmen for sportsmen and women. We would very much appreciate receiving any of your comments and suggestions about DOMYOS products. To this aim, the staff at your local store and the DOMYOS design department are at your disposal. If you wish to write to us,
you can send us email at the following address: [email protected]. We wish you enjoyable training sessions and hope that this DOMYOS item be a source of pleasure for you.
E N G L I S H
Model N°: _ _ _ _ _ _ _ _ _ _ _ _ _ _ _ _ _ _ _
Serial N°: _ _ _ _ _ _ _ _ _ _ _ _ _ _ _ _ _ _ _
Write the serial number in the space above for future reference.
CAUTION
Read all warnings affixed to the product.
Read precautions and instructions in this manual before using this equipment.
Keep this manual for future reference.
Serial number
TC 53070 kg155 lbs
1370 x 1520 x 782 mm54 x 59,9 x 30,78 inch
MAXI
110 kg / 242 lbs
Console
Ramp
Mat
Foot rest
Key/pliers
Upright
Walking platform
Inclining feet
Roller

19
E N G L I S H
WARNINGS
CAREFULREAD INSTRUCTIONS
BEFORE USE
�WARNING
Keep your hands awayfrom the running deckand the roller when
they are moving
�WARNING
MAXI
110 kg / 242 lbs
��
�
�
Always attach the safetykey to your clothing(Always use the key)
NEVER OPEN AND TAKETHIS HOUSING APART

20
1. Read all the instructions in this manual before using the product. Use this pro-duct only in the way described in this manual. Keep this manual during theproduct’s service life.
2. It is up to the owner to make sure that all of the product’s users are properlyinformed on all the user precautions.
3. Domyos disclaims all responsibility concerning claims for injury or for dama-ges suffered by any persons or property arising from the normal or abnor-mal use of this product by the purchaser or by any other person.
4. An adult should do the assembly of the appliance.
5. Keep children and pets away from the product at all times.
6. This appliance is in compliance with European and Chinese standards rela-ted to fitness products for domestic and non-therapeutic use (EN-957-1 and6 classes HC - GB17498).
ELECTRICAL RISKS7. Immediately after using and before cleaning, assembling or maintenance, cut
the main power switch and unplug the treadmill from the mains supply.
8. Never leave the machine turned on unattended.
9. Never use the machine with a damaged electric cable or plug, if it has fal-len, if it has been damaged or if it has been in contact with water.
10. Never use the machine in an area where aerosols are used or where oxy-gen is administered.
11. Never pull the machine with the power cable and never use the cable as ahandle.
12. Only use an extension wire with an earthed socket, 1.5 m long maximum.
13. Keep the electric cable away from warm surfaces.
14. Warning: Only connect the machine to a properly earthed socket.
Earthing instructionsThis product should be earthed. In case of malfunction or fault, the current is sentto the earth to reduce the risk of electrocution. The machine is also fitted with acable with an earthed wire and connector. This connector should be attached toa properly installed socket fitted with an earth that complies with applicablelegislation. Inappropriately attaching the machine’s earth connector may lead toelectrocution. In case of doubt, have a qualified electrician check the product iscorrectly earthed. Do not proceed to any modification of the card supplied withyour jogging exerciser. If it is not adapted to your power socket, have a pro-perly earthed plug fitted by a qualified electrician.
DANGER :Before carrying out any maintenance or visual control, turn off the main switchand remove the electric connector from the power socket. Never remove themotor’s cover. Settings and handling other than those described in this manualmust only be adjusted or carried out by an authorised technician. Failure torespect this safety measure may lead to serious injury or death.
MATERIAL RISKS15. Never insert any object into any opening.
16. Keep your hands away from any moving parts. Never put your hands orfeet underneath the treadmill.
17. This product is intended for home use. It should not be used for commercial,loan or institutional purposes.
18. Use the product indoors, away from moisture and dust, on a level surfaceand in a clear area. Be sure there is enough space for safe access to andpassage around the product. Leave a free safety area of 2 m x 1 m behindthe treadmill and 0.65 m on each side. Ensure that there is sufficient spacearound the machine when you are using it. Cover the floor beneath theproduct for protection.
See the illustration below.
19. Do not store the product in a humid place (edge of swimming pool,bathroom…).
20. The user shall be responsible for inspecting and tightening all parts afterassembly and before using the product. Never exceed safety settings.Immediately replace worn or defective parts.
21. Before using, ensure that the treadmill is properly aligned and centred onthe chassis. Comment: Failure to carry out regular and preventive maintenance maycancel the guarantee.
22. Do not tinker with your TC 530.
23. If your product is damaged, return it to your Décathlon store and do not useit again until it has been completely repaired. Only use Décathlon spareparts.
24. Maximum user weight: 110 kg – 242 pounds.
SAFETYWarning: to reduce the risk of serious injury, please read the important precautions below before using the product.
FRONT
2 FEET MIN. 2 FEET MIN.
4 FEET MIN.
REAR
TOP VIEW
LEFTSIDE
RIGHTSIDE
2 FEET MIN.
E N G L I S H

22
OPERATION
PRESET PROGRAMMES
Careful:• Before starting a training session, ensure that the safety key clip is carefully fixed
to your clothing and that it is properly magnetized.• Always start upright on the side bands and not on the treadmill. Before walking
on the mat, wait for the speed to reach at least 1.6 km/h.
Presentation :The treadmill has four programmes. Except with the manual programme, you canselect three different levels of difficulty, the figure 1 represents the easiest and 3 themost difficult.
Manual programme:After having inserted the safety key, the manual programme may be selected bypressing the START button. Then, before starting your session, enter the time anddistance or calories. This programme gives you total control and will remainunchanged as long as you do not change the speed programme yourself. Themanual programme is for constant training.
The manual programme gives you two choices.Quick Start1. Attach the safety key to your clothing. This is highly recommended your safety,
as soon as this key is removed, your treadmill will stop immediately. .2. After having inserted the safety key, the simplest way of starting is to press the
START button. The treadmill starts at a speed off 0.8 km/h.3. Speed: to increase speed, press Speed +. Pressing this button increase is speed
by increments of 0.1 km/h.
Manual programme with time, distance or calorie settings1. Manual programme with time pre-settings: Before pressing the quick start START
button, firstly press ENTER once and enter your time pressing + or -. The timecountdown will start at the beginning of your exercise.
2. Manual programme with distance pre-settings: Before pressing the quick startSTART button, press the ENTER button twice and then + or - to enter the distan-ce. The distance countdown will start at the beginning of your exercise.
3. Manual programme with calorie pre-settings: Before pressing the quick startSTART button, press the ENTER button three times and then + or - to enter thecalories to be burned during training. The calorie countdown will start at thebeginning of your exercise.
Training with preset programmes P1, P2 and P3Present programmes automatically change speed. The range of speeds of each levelis presented in the table below. With all predefined programmes, you can set thespeed manually at any time.
Select one of the predefined programmes to, P1, P2 or P3.1. To start the desired program, insert the safety key and select program P1, P2 or
P3 by pressing + or – and then press “enter”. 2. A training level should be selected for all preset programmes. To do this, press
+ or -. Once the level has been found, press ENTER once.3. Now enter the time pressing + or -.4. After setting the time, press the START button to start training.
Comment:1. You can interrupt your exercise by pressing the STOP button. To restart the exer-
cise, press START.2. The type of training is displayed by superposition.3. Time is displayed by 99.59 or 00.00, beeps sound for five seconds and the
motor stops.
Pause functionYou can stop the treadmill at any time during training by pressing STOP once.To restart the treadmill, press START.
Reset functionTo reset the programme and time, press STOP for five seconds until P1 is displayedin the programme window. To restart the required programmes, level or time,repeat the operation above.
The information provided below is of a general nature and is provided as a rough guide. These recommendations should be adapted to your personal training and pleasure needs.
Your treadmill has a memory with 4 pre-defined training programmes. During the running of a program, the jogging exerciser automatically modifies the speed.
E N G L I S H

23
E N G L I S H
SETTINGSIncline:
- There are three possible incline settings to adjust exercise difficulty levels.- Rotate the feet underneath the mat to set the height. - Check that the treadmill is stopped and no-one is on it.
Stop: the computer will stop itself after 4 minutes.
"SPEED" : Speed expressed in kilometres per hour.Displays mat speed of 0.08 kph to 16 kph predefined with the speed button with increments of 0.1 kph.
INSTRUCTIONS1. Insert the safety key.2. Enter the programme using the arrows, then press ENTER.3. Enter the level using the arrows, then press ENTER.4. Press START to commence training. There is 5 seconds starting time.
"TIME" : duration of the exercise.
"DISTANCE" : Distance covered in kilometers.
"CALORIES" : Estimations of the calories burned.Attention: these are estimations and should not be considered to be medicaladvice.Displays the calorie calculations.Display 1 = 100 Cal.
"STOP" :1. To stop the exercise, press STOP once. To restart the exercise, press START2. To restart training, hold STOP down for a few seconds.
"ENTER" :1. Select the required programme and level..
"+ " and " - " :1. When setting, select the programme and level or increase or decrease the
duration. 2. During training:
▲+ : increases the speed by increments of 0.1 kph.▼ - : increases the speed by decrements of 0.1 kph.
LOCATION OF THE MAIN SWITCH
CIRCUIT-BREAKER’S LOCATION
INSERTING THE SAFETY KEY
CONSOLE OPERATION
24
CARE
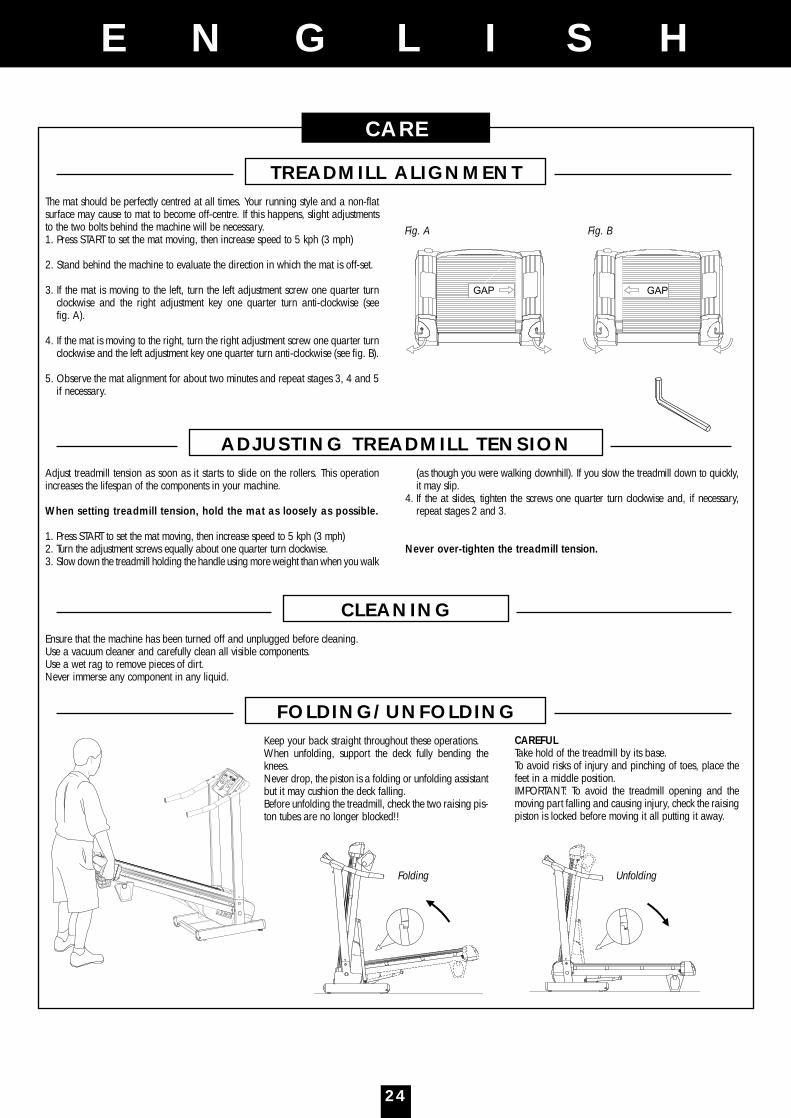
The mat should be perfectly centred at all times. Your running style and a non-flatsurface may cause to mat to become off-centre. If this happens, slight adjustmentsto the two bolts behind the machine will be necessary.1. Press START to set the mat moving, then increase speed to 5 kph (3 mph)
2. Stand behind the machine to evaluate the direction in which the mat is off-set.
3. If the mat is moving to the left, turn the left adjustment screw one quarter turnclockwise and the right adjustment key one quarter turn anti-clockwise (see fig. A).
4. If the mat is moving to the right, turn the right adjustment screw one quarter turnclockwise and the left adjustment key one quarter turn anti-clockwise (see fig. B).
5. Observe the mat alignment for about two minutes and repeat stages 3, 4 and 5if necessary.
Adjust treadmill tension as soon as it starts to slide on the rollers. This operationincreases the lifespan of the components in your machine.
When setting treadmill tension, hold the mat as loosely as possible.
1. Press START to set the mat moving, then increase speed to 5 kph (3 mph)2. Turn the adjustment screws equally about one quarter turn clockwise.3. Slow down the treadmill holding the handle using more weight than when you walk
(as though you were walking downhill). If you slow the treadmill down to quickly,it may slip.
4. If the at slides, tighten the screws one quarter turn clockwise and, if necessary,repeat stages 2 and 3.
Never over-tighten the treadmill tension.
Ensure that the machine has been turned off and unplugged before cleaning.Use a vacuum cleaner and carefully clean all visible components.Use a wet rag to remove pieces of dirt.Never immerse any component in any liquid.
Keep your back straight throughout these operations.When unfolding, support the deck fully bending theknees.Never drop, the piston is a folding or unfolding assistantbut it may cushion the deck falling.Before unfolding the treadmill, check the two raising pis-ton tubes are no longer blocked!!
CAREFULTake hold of the treadmill by its base.To avoid risks of injury and pinching of toes, place thefeet in a middle position.IMPORTANT: To avoid the treadmill opening and themoving part falling and causing injury, check the raisingpiston is locked before moving it all putting it away.
Fig. A Fig. B
TREADMILL ALIGNMENT
FOLDING/UNFOLDING
CLEANING
ADJUSTING TREADMILL TENSION
Folding Unfolding
E N G L I S H
25
CARE
TROUBLESHOOTING WITH ERROR CODES
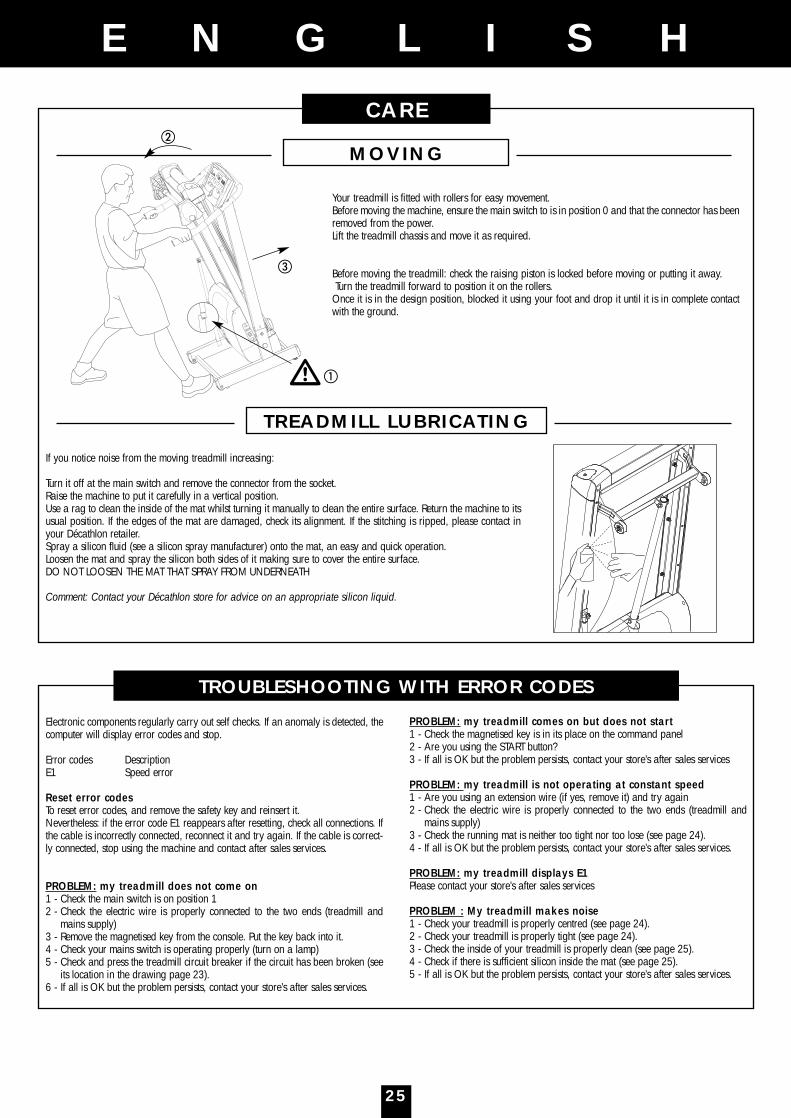
Your treadmill is fitted with rollers for easy movement.Before moving the machine, ensure the main switch to is in position 0 and that the connector has beenremoved from the power.Lift the treadmill chassis and move it as required.
Before moving the treadmill: check the raising piston is locked before moving or putting it away.Turn the treadmill forward to position it on the rollers.
Once it is in the design position, blocked it using your foot and drop it until it is in complete contactwith the ground.
If you notice noise from the moving treadmill increasing:
Turn it off at the main switch and remove the connector from the socket.Raise the machine to put it carefully in a vertical position.Use a rag to clean the inside of the mat whilst turning it manually to clean the entire surface. Return the machine to itsusual position. If the edges of the mat are damaged, check its alignment. If the stitching is ripped, please contact inyour Décathlon retailer.Spray a silicon fluid (see a silicon spray manufacturer) onto the mat, an easy and quick operation.Loosen the mat and spray the silicon both sides of it making sure to cover the entire surface. DO NOT LOOSEN THE MAT THAT SPRAY FROM UNDERNEATH
Comment: Contact your Décathlon store for advice on an appropriate silicon liquid.
Electronic components regularly carry out self checks. If an anomaly is detected, thecomputer will display error codes and stop.
Error codes DescriptionE1 Speed error
Reset error codesTo reset error codes, and remove the safety key and reinsert it.Nevertheless: if the error code E1 reappears after resetting, check all connections. Ifthe cable is incorrectly connected, reconnect it and try again. If the cable is correct-ly connected, stop using the machine and contact after sales services.
PROBLEM: my treadmill does not come on1 - Check the main switch is on position 12 - Check the electric wire is properly connected to the two ends (treadmill and
mains supply)3 - Remove the magnetised key from the console. Put the key back into it.4 - Check your mains switch is operating properly (turn on a lamp)5 - Check and press the treadmill circuit breaker if the circuit has been broken (see
its location in the drawing page 23).6 - If all is OK but the problem persists, contact your store’s after sales services.
PROBLEM: my treadmill comes on but does not start1 - Check the magnetised key is in its place on the command panel2 - Are you using the START button?3 - If all is OK but the problem persists, contact your store’s after sales services
PROBLEM: my treadmill is not operating at constant speed1 - Are you using an extension wire (if yes, remove it) and try again2 - Check the electric wire is properly connected to the two ends (treadmill and
mains supply)3 - Check the running mat is neither too tight nor too lose (see page 24).4 - If all is OK but the problem persists, contact your store’s after sales services.
PROBLEM: my treadmill displays E1Please contact your store’s after sales services
PROBLEM : My treadmill makes noise 1 - Check your treadmill is properly centred (see page 24).2 - Check your treadmill is properly tight (see page 24).3 - Check the inside of your treadmill is properly clean (see page 25).4 - Check if there is sufficient silicon inside the mat (see page 25).5 - If all is OK but the problem persists, contact your store’s after sales services.
MOVING
TREADMILL LUBRICATING
E N G L I S H
��
�
�
27
E N G L I S H
Warm-up phase : progressive effort.Warming up is a preparatory phase before any activity. It puts the person INTOOPTIMUM CONDITIONS for carrying out his or her favorite sport. It is a METHODOF PREVENTING ACCIDENTS TO TENDONS AND MUSCLES. There are twoaspects : WAKING UP THE MUSCULAR SYSTEM, GENERAL WARMING UP.
1) The muscular system is prepared in a SPECIAL STRETCHING SESSION whichPREPARES FOR EACH ACTIVITY : each group of muscles is used, joints are used.
2) Global warming up gradually brings the cardiovascular and respiratory sys-tem into action, improves irrigation of the muscles and prepares for makingefforts. It must be sufficiently long : 10 min for a leisure sport activity, 20 minfor a competition sport activity. Note that warming up must be longer : after55 years old, in the morning.
TrainingTRAINING is the main phase of your physical activity. You can improve your phy-sical condition by REGULAR training.• Anaerobie exercice to develop endurance.• Aerobic exercice to develop cardio-pulmonary resistance.
Slowing downThis is the continuation of an activity at low intensity, the gradual “return to rest”phase. SLOWING DOWN brings the cardiovascular and respiratory system, theblood flow and muscles back to “normal” (eliminating the counter effects of anexercice, such as lactic acids, the accumulation of which is one of the major cau-ses of muscular pains such as cramps and stiff muscles).
StretchingSTRETCHING must follow the slowing down phase while joints are still warm inorder to reduce risks of injury. Stretching after an activity : minimizes MUSCULARSTIFFNESS due to an accumulation of LACTIC ACIDS, “stimulates” BLOOD CIRCULATION.
C A R D I O - T R A I N I N G
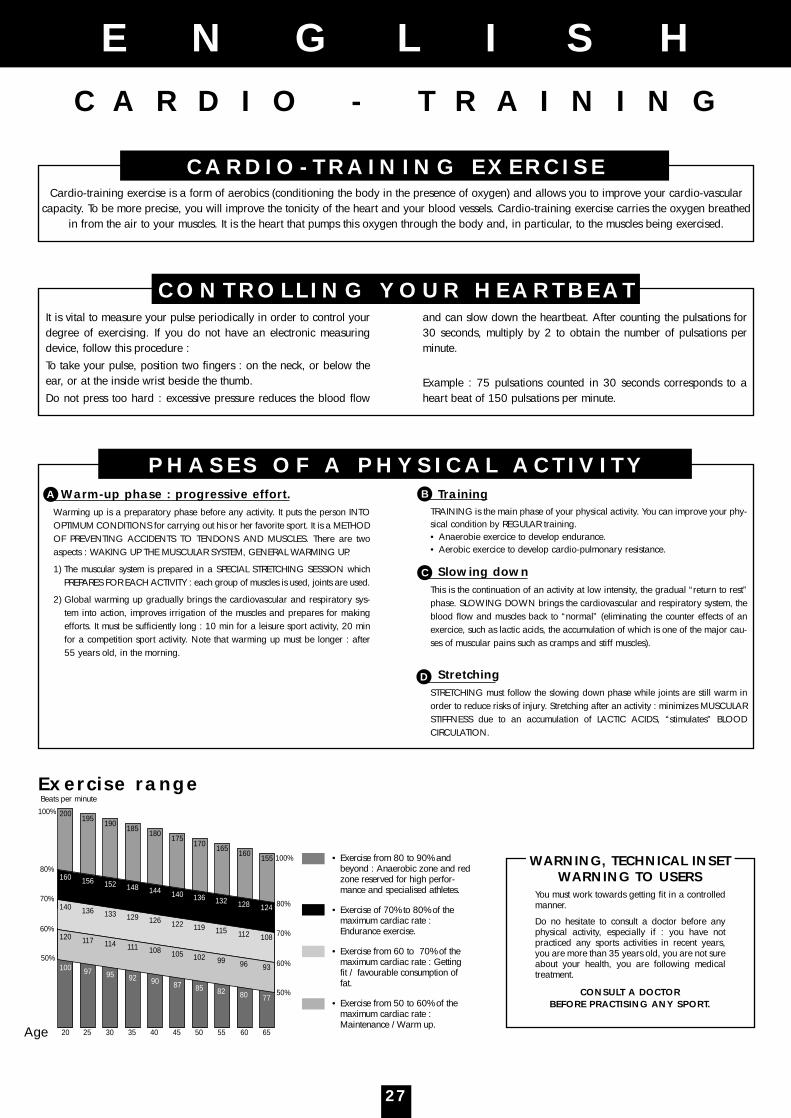
• Exercise from 80 to 90% andbeyond : Anaerobic zone and redzone reserved for high perfor-mance and specialised athletes.
• Exercise of 70% to 80% of themaximum cardiac rate :Endurance exercise.
• Exercise from 60 to 70% of themaximum cardiac rate : Getting fit / favourable consumption offat.
• Exercise from 50 to 60% of themaximum cardiac rate :Maintenance /Warm up.
200195
185190
180175
170165
160155
20
60%
70%
80%
100%
60%
50%
70%
80%
100%
25 30 35 40 45 50 55 60 65
160 156148152
144 140 136 132 128 124140 136129133
126 122 119 115 112 108120 117111114
108 105 102 99 96 93100 979295
90 87 85 82 80 77
50%
WARNING, TECHNICAL INSETWARNING TO USERS
You must work towards getting fit in a controlledmanner.
Do no hesitate to consult a doctor before anyphysical activity, especially if : you have notpracticed any sports activities in recent years,you are more than 35 years old, you are not sureabout your health, you are following medicaltreatment.
CONSULT A DOCTOR BEFORE PRACTISING ANY SPORT.
Exercise range
A B
C
D
Beats per minute
C A R D I O - T R A I N I N G E X E R C I S ECardio-training exercise is a form of aerobics (conditioning the body in the presence of oxygen) and allows you to improve your cardio-vascular
capacity. To be more precise, you will improve the tonicity of the heart and your blood vessels. Cardio-training exercise carries the oxygen breathedin from the air to your muscles. It is the heart that pumps this oxygen through the body and, in particular, to the muscles being exercised.
C O N T R O L L I N G Y O U R H E A R T B E AT
P H A S E S O F A P H Y S I C A L A C T I V I T Y
It is vital to measure your pulse periodically in order to control yourdegree of exercising. If you do not have an electronic measuringdevice, follow this procedure : To take your pulse, position two fingers : on the neck, or below theear, or at the inside wrist beside the thumb.Do not press too hard : excessive pressure reduces the blood flow
and can slow down the heartbeat. After counting the pulsations for30 seconds, multiply by 2 to obtain the number of pulsations perminute.
Example : 75 pulsations counted in 30 seconds corresponds to aheart beat of 150 pulsations per minute.
Age