Embed Size (px)
Citation preview
1.0 IntroductionIntel® Xeon® Scalable processors incorporate unique features for virtualized compute, network, and storage workloads, leading to impressive performance gains compared to systems based on prior Intel processor generations. This new processor family allows users to run a much higher number of virtual machines (VMs) and virtual network functions (VNFs) with a more diverse variety of network function virtualization (NFV) workloads than was previously possible. Intel Xeon Scalable processors can significantly improve the capability for software-centric, carrier-grade virtualization which aids communications service providers in attaining and enforcing service level agreements and increasingly demanding quality of service requirements.
Network services are generally based on TCP/IP communication. An example of such a service is a TCP speed test. Many Internet subscribers use a speed test server as a tool to compare the actual speed they are experiencing with the speed they signed up for. These speed test servers are also based on the TCP; therefore, TCP performance is critical in network infrastructures.
This solution Implementation guide demonstrates virtualized, TCP speed test infrastructure deployed on Intel® Xeon® Platinum 8180 processors, which are among the highest performing CPUs in the Intel Xeon Scalable processor family. The document describes the hardware components, software installation, and TCP performance optimizations implemented to deliver an optimal NFV infrastructure (NFVI) capable of handling NFV workloads. The demonstrated infrastructure consists of two servers and uses an open-source software platform based on OpenStack* to provide the cloud computing environment.
This document is an update to the TCP Broadband Speed Test Implementation Guide which featured an Intel® Xeon® processor E5-2680 v3 as an OpenStack controller node and Intel® Xeon® processor E5-2680 v2 as OpenStack compute nodes. The results of the performance tests conducted on that infrastructure showed TCP traffic throughput close to the maximum line rate for external workloads, and a throughput reaching 45 Gbps for the test scenario where the TCP speed test client and server VMs were deployed on the same OpenStack compute node.
This solution implementation guide also covers the performance test results for TCP traffic between two VMs on the same OpenStack compute node with Intel Xeon Platinum 8180 processors as an OpenStack controller node and an OpenStack compute node. To showcase the high performance of Intel Xeon Scalable processors, these results are compared to the results achieved on the corresponding infrastructure built with an Intel Xeon processor E5-2680 v3 as an OpenStack controller node and an Intel Xeon processor E5-2680 v2 as an OpenStack compute node.
Authors
Sarita MainiSolutions Software Engineer
Marcin RybkaSolutions Software Engineer
Przemysław LalSolutions Software Engineer
Optimizing NFV Infrastructure for TCP Workloads with Intel® Xeon® Scalable Processors
Intel CorporationDatacenter Network Solutions Group
Revision HistoryOctober 23, 2017
Revision 2.0
Solution implementation Guide
Optimizing NFV Infrastructure for TCP Workloads with Intel® Xeon® Scalable Processors 2
Table of Contents
1.0 Introduction . . . . . . . . . . . . . . . . . . . . . . . . . . . . . . . . . . . . . . . . . . . . . . . . . . . . . . . . . . . . . . . . . . . . . . . . . . . . . . . . . . . . . . . . . . . . . . . . . . . . . . . . . . . . . . . . . 1
2.0 Solution Overview . . . . . . . . . . . . . . . . . . . . . . . . . . . . . . . . . . . . . . . . . . . . . . . . . . . . . . . . . . . . . . . . . . . . . . . . . . . . . . . . . . . . . . . . . . . . . . . . . . . . . . . . . . . . 4
3.0 Installation Guide . . . . . . . . . . . . . . . . . . . . . . . . . . . . . . . . . . . . . . . . . . . . . . . . . . . . . . . . . . . . . . . . . . . . . . . . . . . . . . . . . . . . . . . . . . . . . . . . . . . . . . . . . . . . 6
3.1 Enable Hardware Features . . . . . . . . . . . . . . . . . . . . . . . . . . . . . . . . . . . . . . . . . . . . . . . . . . . . . . . . . . . . . . . . . . . . . . . . . . . . . . . . . . . . . . . . . . . . . . . . . . . 6
3.2 Prepare Host Machines for the OpenStack* Installation . . . . . . . . . . . . . . . . . . . . . . . . . . . . . . . . . . . . . . . . . . . . . . . . . . . . . . . . . . . . . . . . . . . . . . . . 6
3.3 Install OpenStack . . . . . . . . . . . . . . . . . . . . . . . . . . . . . . . . . . . . . . . . . . . . . . . . . . . . . . . . . . . . . . . . . . . . . . . . . . . . . . . . . . . . . . . . . . . . . . . . . . . . . . . . . . . 8
3.4 Compute Node Configuration . . . . . . . . . . . . . . . . . . . . . . . . . . . . . . . . . . . . . . . . . . . . . . . . . . . . . . . . . . . . . . . . . . . . . . . . . . . . . . . . . . . . . . . . . . . . . . .17
3.5 Enable the networking-ovs-dpdk Plug-In . . . . . . . . . . . . . . . . . . . . . . . . . . . . . . . . . . . . . . . . . . . . . . . . . . . . . . . . . . . . . . . . . . . . . . . . . . . . . . . . . . . .19
3.5.1 Prepare the OpenStack Nodes . . . . . . . . . . . . . . . . . . . . . . . . . . . . . . . . . . . . . . . . . . . . . . . . . . . . . . . . . . . . . . . . . . . . . . . . . . . . . . . . . . . . . . . . . . .19
3.5.2 Clone the Required Repositories . . . . . . . . . . . . . . . . . . . . . . . . . . . . . . . . . . . . . . . . . . . . . . . . . . . . . . . . . . . . . . . . . . . . . . . . . . . . . . . . . . . . . . . . .20
3.5.3 Install the OVS-DPDK . . . . . . . . . . . . . . . . . . . . . . . . . . . . . . . . . . . . . . . . . . . . . . . . . . . . . . . . . . . . . . . . . . . . . . . . . . . . . . . . . . . . . . . . . . . . . . . . . . .21
3.6 Post-Installation Configuration . . . . . . . . . . . . . . . . . . . . . . . . . . . . . . . . . . . . . . . . . . . . . . . . . . . . . . . . . . . . . . . . . . . . . . . . . . . . . . . . . . . . . . . . . . . . .26
4.0 Performance Optimizations . . . . . . . . . . . . . . . . . . . . . . . . . . . . . . . . . . . . . . . . . . . . . . . . . . . . . . . . . . . . . . . . . . . . . . . . . . . . . . . . . . . . . . . . . . . . . . . . . .28
4.1 Optimize the Host . . . . . . . . . . . . . . . . . . . . . . . . . . . . . . . . . . . . . . . . . . . . . . . . . . . . . . . . . . . . . . . . . . . . . . . . . . . . . . . . . . . . . . . . . . . . . . . . . . . . . . . . . .28
4.1.1 Isolate CPU Cores . . . . . . . . . . . . . . . . . . . . . . . . . . . . . . . . . . . . . . . . . . . . . . . . . . . . . . . . . . . . . . . . . . . . . . . . . . . . . . . . . . . . . . . . . . . . . . . . . . . . . . .28
4.1.2 Enable 1 GB Huge Pages . . . . . . . . . . . . . . . . . . . . . . . . . . . . . . . . . . . . . . . . . . . . . . . . . . . . . . . . . . . . . . . . . . . . . . . . . . . . . . . . . . . . . . . . . . . . . . . .29
4.1.3 Enable TCP Segmentation Offload in OVS-DPDK . . . . . . . . . . . . . . . . . . . . . . . . . . . . . . . . . . . . . . . . . . . . . . . . . . . . . . . . . . . . . . . . . . . . . . . . .30
4.1.4 Enable the Multiqueue Feature for vHost-user and Physical DPDK Interfaces . . . . . . . . . . . . . . . . . . . . . . . . . . . . . . . . . . . . . . . . . . . . . .32
4.1.5 Enable Core Pinning and NUMA Awareness in the OpenStack Compute . . . . . . . . . . . . . . . . . . . . . . . . . . . . . . . . . . . . . . . . . . . . . . . . . . . .32
4.2 Optimize the Guest . . . . . . . . . . . . . . . . . . . . . . . . . . . . . . . . . . . . . . . . . . . . . . . . . . . . . . . . . . . . . . . . . . . . . . . . . . . . . . . . . . . . . . . . . . . . . . . . . . . . . . . . .32
4.2.1 Enhanced Platform Awareness (EPA) features—‘extra_specs’ Properties for OpenStack VMs . . . . . . . . . . . . . . . . . . . . . . . . . . . . . . .32
4.2.2 Enable Multiqueue for VirtIO Interfaces . . . . . . . . . . . . . . . . . . . . . . . . . . . . . . . . . . . . . . . . . . . . . . . . . . . . . . . . . . . . . . . . . . . . . . . . . . . . . . . . .33
4.2.3 Upgrade the CentOS* 7 Kernel to version 4.5.5 on the Guest . . . . . . . . . . . . . . . . . . . . . . . . . . . . . . . . . . . . . . . . . . . . . . . . . . . . . . . . . . . . . .33
5.0 Scripts . . . . . . . . . . . . . . . . . . . . . . . . . . . . . . . . . . . . . . . . . . . . . . . . . . . . . . . . . . . . . . . . . . . . . . . . . . . . . . . . . . . . . . . . . . . . . . . . . . . . . . . . . . . . . . . . . . . . . . .34
5.1 DPDK and Open vSwitch Setup . . . . . . . . . . . . . . . . . . . . . . . . . . . . . . . . . . . . . . . . . . . . . . . . . . . . . . . . . . . . . . . . . . . . . . . . . . . . . . . . . . . . . . . . . . . . . .34
5.2 VM Setup and Performance Measurements . . . . . . . . . . . . . . . . . . . . . . . . . . . . . . . . . . . . . . . . . . . . . . . . . . . . . . . . . . . . . . . . . . . . . . . . . . . . . . . . . .36
5.2.1 VM Flavors and EPA Features . . . . . . . . . . . . . . . . . . . . . . . . . . . . . . . . . . . . . . . . . . . . . . . . . . . . . . . . . . . . . . . . . . . . . . . . . . . . . . . . . . . . . . . . . . . .36
5.2.2 VM Setup and Performance Benchmark Tests . . . . . . . . . . . . . . . . . . . . . . . . . . . . . . . . . . . . . . . . . . . . . . . . . . . . . . . . . . . . . . . . . . . . . . . . . . . .37
6.0 TCP Speed Test in the Cloud—Performance Benchmarks . . . . . . . . . . . . . . . . . . . . . . . . . . . . . . . . . . . . . . . . . . . . . . . . . . . . . . . . . . . . . . . . . . . . . . .40
6.1 Performance Benchmarks—VM to VM on a Single Host . . . . . . . . . . . . . . . . . . . . . . . . . . . . . . . . . . . . . . . . . . . . . . . . . . . . . . . . . . . . . . . . . . . . . . .41
6.1.1 Test Case 1: Network Throughput Scaling . . . . . . . . . . . . . . . . . . . . . . . . . . . . . . . . . . . . . . . . . . . . . . . . . . . . . . . . . . . . . . . . . . . . . . . . . . . . . . . .41
6.1.2 Test Case 2: Comparison of Top Scenario Configurations . . . . . . . . . . . . . . . . . . . . . . . . . . . . . . . . . . . . . . . . . . . . . . . . . . . . . . . . . . . . . . . . . .42
7.0 Summary . . . . . . . . . . . . . . . . . . . . . . . . . . . . . . . . . . . . . . . . . . . . . . . . . . . . . . . . . . . . . . . . . . . . . . . . . . . . . . . . . . . . . . . . . . . . . . . . . . . . . . . . . . . . . . . . . . . . .43
Appendix A: BIOS Settings . . . . . . . . . . . . . . . . . . . . . . . . . . . . . . . . . . . . . . . . . . . . . . . . . . . . . . . . . . . . . . . . . . . . . . . . . . . . . . . . . . . . . . . . . . . . . . . . . . . . . . . .44
Appendix B: Hardware Details . . . . . . . . . . . . . . . . . . . . . . . . . . . . . . . . . . . . . . . . . . . . . . . . . . . . . . . . . . . . . . . . . . . . . . . . . . . . . . . . . . . . . . . . . . . . . . . . . . . . .44
Appendix C: Abbreviations . . . . . . . . . . . . . . . . . . . . . . . . . . . . . . . . . . . . . . . . . . . . . . . . . . . . . . . . . . . . . . . . . . . . . . . . . . . . . . . . . . . . . . . . . . . . . . . . . . . . . . . .45
Appendix D: References . . . . . . . . . . . . . . . . . . . . . . . . . . . . . . . . . . . . . . . . . . . . . . . . . . . . . . . . . . . . . . . . . . . . . . . . . . . . . . . . . . . . . . . . . . . . . . . . . . . . . . . . . .46
Legal Information . . . . . . . . . . . . . . . . . . . . . . . . . . . . . . . . . . . . . . . . . . . . . . . . . . . . . . . . . . . . . . . . . . . . . . . . . . . . . . . . . . . . . . . . . . . . . . . . . . . . . . . . . . . . . . . .47
Optimizing NFV Infrastructure for TCP Workloads with Intel® Xeon® Scalable Processors 3
Tables
Table 1. Networks Used in the Solution. . . . . . . . . . . . . . . . . . . . . . . . . . . . . . . . . . . . . . . . . . . . . . . . . . . . . . . . . . . . . . . . . . . . . . . . . . . . . . . . . . . . . . . . . . . . . 5
Table 2. Specification of the Hardware Components. . . . . . . . . . . . . . . . . . . . . . . . . . . . . . . . . . . . . . . . . . . . . . . . . . . . . . . . . . . . . . . . . . . . . . . . . . . . . . . . . 5
Table 3. Solution Partitioning Schema . . . . . . . . . . . . . . . . . . . . . . . . . . . . . . . . . . . . . . . . . . . . . . . . . . . . . . . . . . . . . . . . . . . . . . . . . . . . . . . . . . . . . . . . . . . . . . 6
Table 4. The IP Addresses of the Setup . . . . . . . . . . . . . . . . . . . . . . . . . . . . . . . . . . . . . . . . . . . . . . . . . . . . . . . . . . . . . . . . . . . . . . . . . . . . . . . . . . . . . . . . . . . . . 6
Table 5. Mapping of DPDK Interfaces . . . . . . . . . . . . . . . . . . . . . . . . . . . . . . . . . . . . . . . . . . . . . . . . . . . . . . . . . . . . . . . . . . . . . . . . . . . . . . . . . . . . . . . . . . . . . .26
Table 6. Sample Usage of CPU Cores . . . . . . . . . . . . . . . . . . . . . . . . . . . . . . . . . . . . . . . . . . . . . . . . . . . . . . . . . . . . . . . . . . . . . . . . . . . . . . . . . . . . . . . . . . . . . . .28
Table 7. The EPA extra_specs Settings for OpenStack Compute flavors. . . . . . . . . . . . . . . . . . . . . . . . . . . . . . . . . . . . . . . . . . . . . . . . . . . . . . . . . . . . . .32
Table 8. Scenario Configurations for Platforms Based on the Intel® Xeon® Platinum 8180 Processor and the Intel® Xeon® Processor E5-2680 v2 as Compute Nodes. . . . . . . . . . . . . . . . . . . . . . . . . . . . . . . . . . . . . . . . . . . . . . . . . . . . . . . . . . . . . . . . . . . . . . . . . . . . . . . . . . . . . . . . . . . .39
Table 9. Scenario Configurations for Platform Based on the Intel® Xeon® Platinum 8180 Processor Only. . . . . . . . . . . . . . . . . . . . . . . . . . . . . . .39
Figures
Figure 1. Physical Topology of the Solution. . . . . . . . . . . . . . . . . . . . . . . . . . . . . . . . . . . . . . . . . . . . . . . . . . . . . . . . . . . . . . . . . . . . . . . . . . . . . . . . . . . . . . . . . . 4
Figure 2. Intra-host TCP Traffic Speed Test Configuration . . . . . . . . . . . . . . . . . . . . . . . . . . . . . . . . . . . . . . . . . . . . . . . . . . . . . . . . . . . . . . . . . . . . . . . . . . .40
Figure 3. Average Throughput at Both Platforms Comparing Corresponding Scenario Configurations. . . . . . . . . . . . . . . . . . . . . . . . . . . . . . . . . .40
Figure 4. Top Intel® Xeon® Processor E5-2680 v2 Performance with Four PMD Threads, Four Virtual Cores per VM vs. the Intel® Xeon® Platinum 8180 Processor with Eight PMD Threads, Ten Virtual Cores per VM . . . . . . . . . . . . . . . . . . . . . . . . . . . . . . . . . . . . . . . . . . . . . . . .41
Optimizing NFV Infrastructure for TCP Workloads with Intel® Xeon® Scalable Processors 4
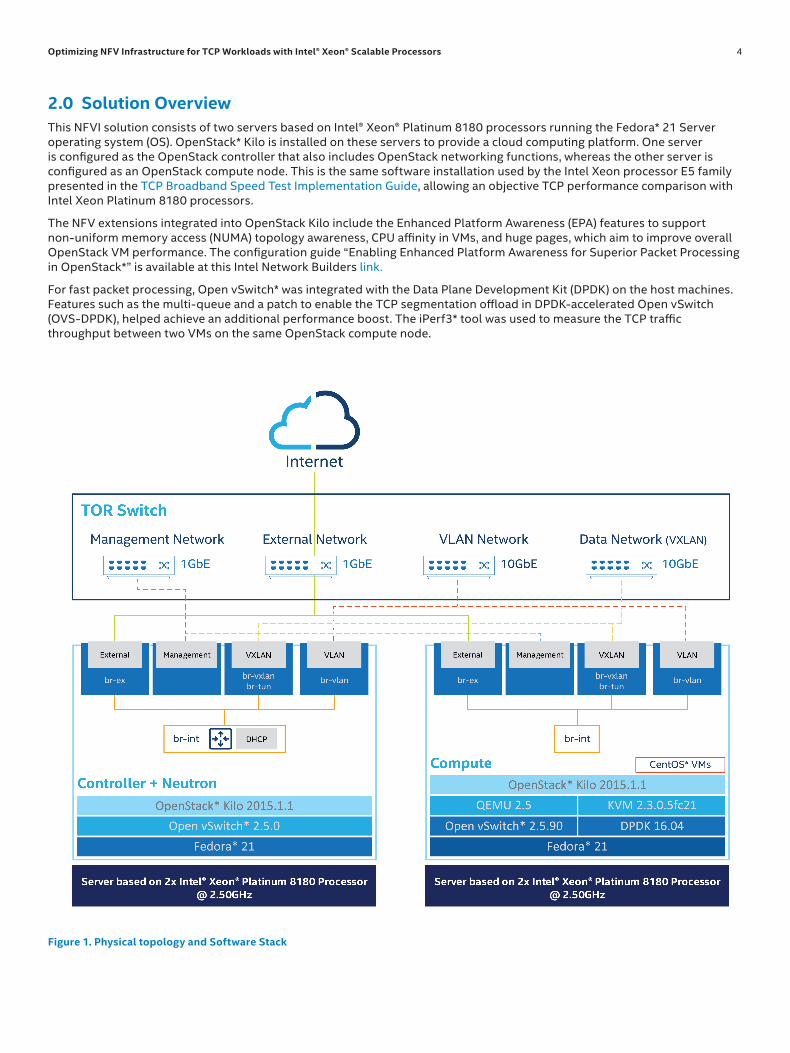
2.0 Solution OverviewThis NFVI solution consists of two servers based on Intel® Xeon® Platinum 8180 processors running the Fedora* 21 Server operating system (OS). OpenStack* Kilo is installed on these servers to provide a cloud computing platform. One server is configured as the OpenStack controller that also includes OpenStack networking functions, whereas the other server is configured as an OpenStack compute node. This is the same software installation used by the Intel Xeon processor E5 family presented in the TCP Broadband Speed Test Implementation Guide, allowing an objective TCP performance comparison with Intel Xeon Platinum 8180 processors.
The NFV extensions integrated into OpenStack Kilo include the Enhanced Platform Awareness (EPA) features to support non-uniform memory access (NUMA) topology awareness, CPU affinity in VMs, and huge pages, which aim to improve overall OpenStack VM performance. The configuration guide “Enabling Enhanced Platform Awareness for Superior Packet Processing in OpenStack*” is available at this Intel Network Builders link.
For fast packet processing, Open vSwitch* was integrated with the Data Plane Development Kit (DPDK) on the host machines. Features such as the multi-queue and a patch to enable the TCP segmentation offload in DPDK-accelerated Open vSwitch (OVS-DPDK), helped achieve an additional performance boost. The iPerf3* tool was used to measure the TCP traffic throughput between two VMs on the same OpenStack compute node.
Figure 1. Physical topology and Software Stack
Optimizing NFV Infrastructure for TCP Workloads with Intel® Xeon® Scalable Processors 5
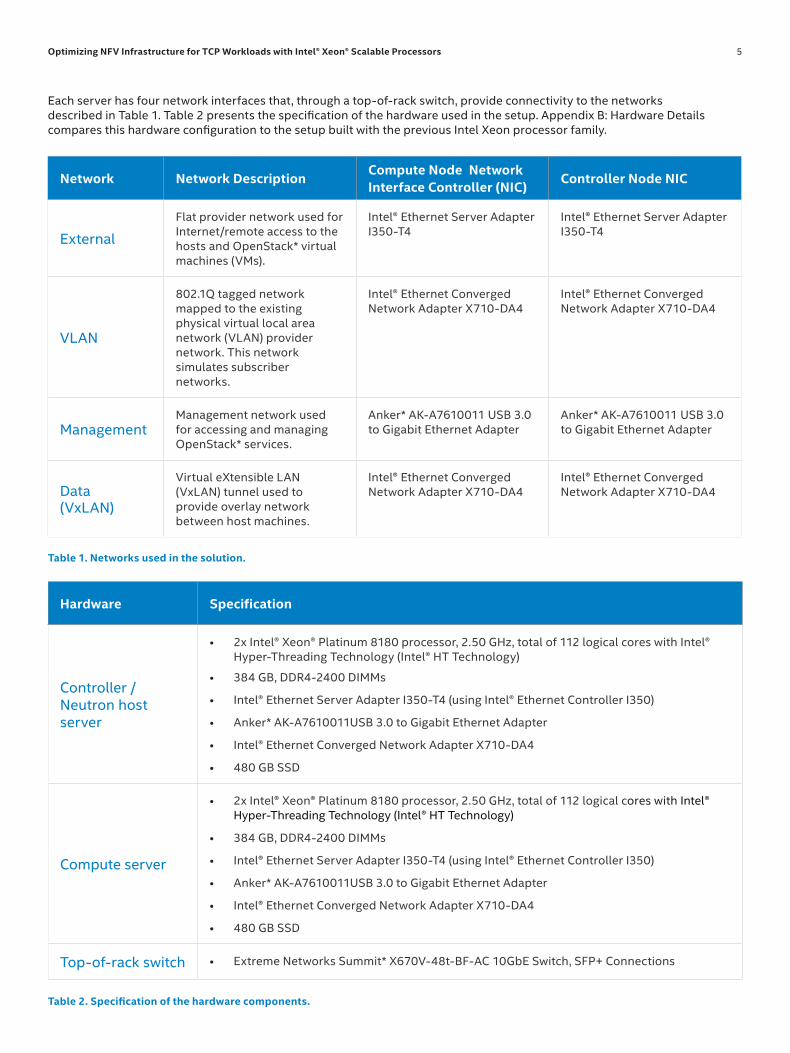
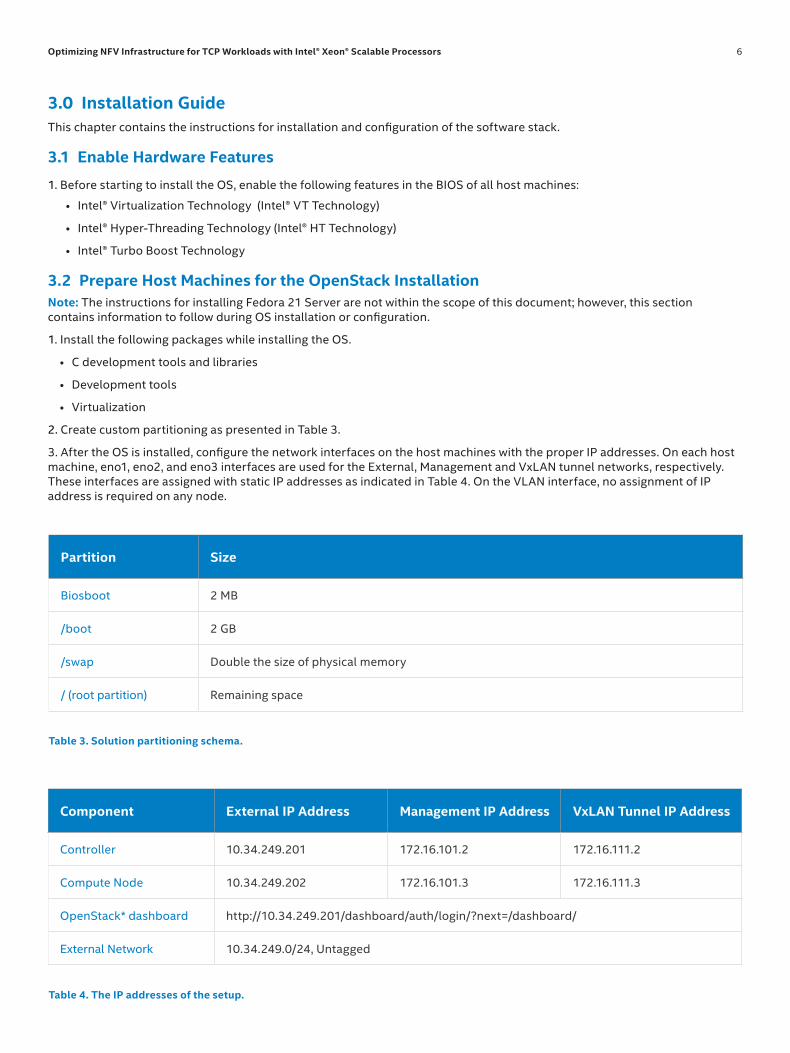
Each server has four network interfaces that, through a top-of-rack switch, provide connectivity to the networks described in Table 1. Table 2 presents the specification of the hardware used in the setup. Appendix B: Hardware Details compares this hardware configuration to the setup built with the previous Intel Xeon processor family.
Table 1. Networks used in the solution.
Table 2. Specification of the hardware components.
Network Network DescriptionCompute Node Network Interface Controller (NIC)
Controller Node NIC
External
Flat provider network used for Internet/remote access to the hosts and OpenStack* virtual machines (VMs).
Intel® Ethernet Server Adapter I350-T4
Intel® Ethernet Server Adapter I350-T4
VLAN
802.1Q tagged network mapped to the existing physical virtual local area network (VLAN) provider network. This network simulates subscriber networks.
Intel® Ethernet Converged Network Adapter X710-DA4
Intel® Ethernet Converged Network Adapter X710-DA4
ManagementManagement network used for accessing and managing OpenStack* services.
Anker* AK-A7610011 USB 3.0 to Gigabit Ethernet Adapter
Anker* AK-A7610011 USB 3.0 to Gigabit Ethernet Adapter
Data(VxLAN)
Virtual eXtensible LAN (VxLAN) tunnel used to provide overlay network between host machines.
Intel® Ethernet Converged Network Adapter X710-DA4
Intel® Ethernet Converged Network Adapter X710-DA4
Hardware Specification
Controller / Neutron host server
• 2x Intel® Xeon® Platinum 8180 processor, 2.50 GHz, total of 112 logical cores with Intel® Hyper-Threading Technology (Intel® HT Technology)
• 384 GB, DDR4-2400 DIMMs
• Intel® Ethernet Server Adapter I350-T4 (using Intel® Ethernet Controller I350)
• Anker* AK-A7610011USB 3.0 to Gigabit Ethernet Adapter
• Intel® Ethernet Converged Network Adapter X710-DA4
• 480 GB SSD
Compute server
• 2x Intel® Xeon® Platinum 8180 processor, 2.50 GHz, total of 112 logical cores with Intel® Hyper-Threading Technology (Intel® HT Technology)
• 384 GB, DDR4-2400 DIMMs
• Intel® Ethernet Server Adapter I350-T4 (using Intel® Ethernet Controller I350)
• Anker* AK-A7610011USB 3.0 to Gigabit Ethernet Adapter
• Intel® Ethernet Converged Network Adapter X710-DA4
• 480 GB SSD
Top-of-rack switch • Extreme Networks Summit* X670V-48t-BF-AC 10GbE Switch, SFP+ Connections
Optimizing NFV Infrastructure for TCP Workloads with Intel® Xeon® Scalable Processors 6
3.0 Installation GuideThis chapter contains the instructions for installation and configuration of the software stack.
3.1 Enable Hardware Features
1. Before starting to install the OS, enable the following features in the BIOS of all host machines:
• Intel® Virtualization Technology (Intel® VT Technology)
• Intel® Hyper-Threading Technology (Intel® HT Technology)
• Intel® Turbo Boost Technology
3.2 Prepare Host Machines for the OpenStack InstallationNote: The instructions for installing Fedora 21 Server are not within the scope of this document; however, this section contains information to follow during OS installation or configuration.
1. Install the following packages while installing the OS.
• C development tools and libraries
• Development tools
• Virtualization
2. Create custom partitioning as presented in Table 3.
3. After the OS is installed, configure the network interfaces on the host machines with the proper IP addresses. On each host machine, eno1, eno2, and eno3 interfaces are used for the External, Management and VxLAN tunnel networks, respectively. These interfaces are assigned with static IP addresses as indicated in Table 4. On the VLAN interface, no assignment of IP address is required on any node.
Table 3. Solution partitioning schema.
Partition Size
Biosboot 2 MB
/boot 2 GB
/swap Double the size of physical memory
/ (root partition) Remaining space
Table 4. The IP addresses of the setup.
Component External IP Address Management IP Address VxLAN Tunnel IP Address
Controller 10.34.249.201 172.16.101.2 172.16.111.2
Compute Node 10.34.249.202 172.16.101.3 172.16.111.3
OpenStack* dashboard http://10.34.249.201/dashboard/auth/login/?next=/dashboard/
External Network 10.34.249.0/24, Untagged
Optimizing NFV Infrastructure for TCP Workloads with Intel® Xeon® Scalable Processors 7
In the Fedora 21 OS, the network script files are located in the /etc/sysconfig/network-scripts directory. Since the Network-Manager service is not used, the following line is added in the network script file of each interface.
NM_CONTROLLED=no
The following example contains a sample network script with a static IP address assigned on the management interface on the controller node.
TYPE=Ethernet
BOOTPROTO=static
IPADDR=172.16.101.2
NETMASK=255.255.255.0
DEFROUTE=no
IPV4_FAILURE_FATAL=yes
IPV6INIT=no
IPV6_AUTOCONF=yes
IPV6_DEFROUTE=yes
IPV6_FAILURE_FATAL=no
NAME=eno2
DEVICE=eno2
UUID=58215fc4-845e-4e0d-af51-588beb53f536
ONBOOT=yes
HWADDR=EC:F4:BB:C8:58:7A
PEERDNS=yes
PEERROUTES=yes
IPV6_PEERDNS=yes
IPV6_PEERROUTES=yes
NM_CONTROLLED=no
On all the host machines, update the network script for the interface that provides external connectivity, and set the default route only on that interface. To check the default route, run the following command.
# route –n
The following listing shows a sample network script for the external network interface with a static IP address and default route.
TYPE=Ethernet
BOOTPROTO=static
IPADDR=10.250.100.101
NETMASK=255.255.255.0
GATEWAY=10.250.100.1
DEFROUTE=yes
IPV4_FAILURE_FATAL=yes
IPV6INIT=no
IPV6_AUTOCONF=yes
IPV6_DEFROUTE=yes
IPV6_FAILURE_FATAL=no
NAME=eno1
DEVICE=eno1
UUID=58215fc4-845e-4e0d-af51-588beb53f536
ONBOOT=yes
HWADDR=EC:F4:BB:C8:58:7A
PEERDNS=yes
PEERROUTES=yes
IPV6_PEERDNS=yes
IPV6_PEERROUTES=yes
NM_CONTROLLED=no
Optimizing NFV Infrastructure for TCP Workloads with Intel® Xeon® Scalable Processors 8
4. Once all IP addresses are configured, disable the NetworkManager and enable the network service on all the host machines in the following order.
# systemctl disable NetworkManager
# systemctl stop NetworkManager
# systemctl enable network
# systemctl restart network
5. Set the host name on all the host machines by editing the /etc/hostname files. Additionally, provide all the host names of the setup with their management IP addresses into the /etc/hosts files on each host machine. An example is shown below.
172.16.101.2 controller controller.localdomain
172.16.101.3 compute1 compute1.localdomain
6. Update the software packages on each of the host machines.
# yum –y update
7.Disable Security-Enhanced Linux* (SELinux) and the firewall on all the host machines. Edit the etc/sysconfig/selinux file and set SELINUX=disabled to permanently disable SELinux. Relaxing SELinux control by setting it to “disabled” or “permissive”, instead of “enforcing”, is a required Linux configuration for Openstack with OVS-DPDK. The following commands can be used to disable the firewall service and, temporarily, SELinux.
# setenforce 0
# sestatus
# systemctl disable firewalld.service
# systemctl stop firewalld.service
8.Uncomment the following line in the /etc/ssh/sshd_config file.
PermitRootLogin=yes
Note: Remote login as root is not advisable from a security standpoint. 9. Reboot all the host machines.
3.3 Install OpenStack
To install OpenStack Kilo, perform the following steps. 1. Set up RDO repositories on all of the nodes.
# yum install –y https://repos.fedorapeople.org/openstack/openstack-kilo/rdo-release-kilo.noarch.rpm
On the controller node: 2. Install MySQL database.
# yum install mariadb mariadb-server MySQL-python
3. Edit the /etc/my.cnf.d/mariadb_openstack.cnf file.
[mysqld]
bind-address = 10.34.249.201
[mysqld]
default-storage-engine = innodb
innodb_file_per_table
collation-server = utf8_general_ci
init-connect = 'SET NAMES utf8'
character-set-server = utf8
max_connections=1000
4. Run MySQL database and secure it.
# systemctl enable mariadb.service
# systemctl start mariadb.service
# mysql_secure_installation
Optimizing NFV Infrastructure for TCP Workloads with Intel® Xeon® Scalable Processors 9
5. Install RabbitMQ.
# yum install rabbitmq-server
6. Run RabbitMQ service.
# systemctl enable rabbitmq-server.service
# systemctl start rabbitmq-server.service
7. Create user and set permissions.
# rabbitmqctl add_user openstack intel
# rabbitmqctl set_permissions openstack ".*" ".*" ".*"
8. Create databases for OpenStack services and grant permissions for OpenStack services.
# mysql -u root -p
CREATE DATABASE keystone;
CREATE DATABASE glance;
CREATE DATABASE nova;
CREATE DATABASE neutron;
GRANT ALL PRIVILEGES ON keystone.* TO 'keystone'@'localhost' \
IDENTIFIED BY 'intel';
GRANT ALL PRIVILEGES ON keystone.* TO 'keystone'@'%' \
IDENTIFIED BY 'intel';
GRANT ALL PRIVILEGES ON glance.* TO 'glance'@'localhost' \
IDENTIFIED BY 'intel';
GRANT ALL PRIVILEGES ON glance.* TO 'glance'@'%' \
IDENTIFIED BY 'intel';
GRANT ALL PRIVILEGES ON nova.* TO 'nova'@'localhost' \
IDENTIFIED BY 'intel';
GRANT ALL PRIVILEGES ON nova.* TO 'nova'@'%' \
IDENTIFIED BY 'intel';
GRANT ALL PRIVILEGES ON neutron.* TO 'neutron'@'localhost' \
IDENTIFIED BY 'intel';
GRANT ALL PRIVILEGES ON neutron.* TO 'neutron'@'%' \
IDENTIFIED BY 'intel';
9. Install Keystone packages.
# yum install openstack-keystone httpd mod_wsgi python-openstackclient memcached python-memcached
# systemctl enable memcached.service
# systemctl start memcached.service
10. Edit the /etc/keystone/keystone.conf file.
[DEFAULT]
admin_token = intel
verbose = True
[database]
connection = mysql://keystone:[email protected]/keystone
[memcache]
servers = localhost:11211
[revoke]
driver = keystone.contrib.revoke.backends.sql.Revoke
[token]
provider = keystone.token.providers.uuid.Provider
driver = keystone.token.persistence.backends.memcache.Token
Optimizing NFV Infrastructure for TCP Workloads with Intel® Xeon® Scalable Processors 10
11. Export the configuration to the database.
# su -s /bin/sh -c "keystone-manage db_sync" keystone
12. Edit the /etc/httpd/conf/httpd.conf file by adding following line.
ServerName 10.34.249.201
13. Edit the /etc/httpd/conf.d/wsgi-keystone.conf file.
Listen 5000
Listen 35357
<VirtualHost *:5000>
WSGIDaemonProcess keystone-public processes=5 threads=1 user=keystone group=keystone display-name=%{GROUP}
WSGIProcessGroup keystone-public
WSGIScriptAlias / /var/www/cgi-bin/keystone/main
WSGIApplicationGroup %{GLOBAL}
WSGIPassAuthorization On
LogLevel info
ErrorLogFormat "%{cu}t %M"
ErrorLog /var/log/httpd/keystone-error.log
CustomLog /var/log/httpd/keystone-access.log combined
</VirtualHost>
<VirtualHost *:35357>
WSGIDaemonProcess keystone-admin processes=5 threads=1 user=keystone group=keystone display-name=%{GROUP}
WSGIProcessGroup keystone-admin
WSGIScriptAlias / /var/www/cgi-bin/keystone/admin
WSGIApplicationGroup %{GLOBAL}
WSGIPassAuthorization On
LogLevel info
ErrorLogFormat "%{cu}t %M"
ErrorLog /var/log/httpd/keystone-error.log
CustomLog /var/log/httpd/keystone-access.log combined
</VirtualHost>
14. Create the Keystone directory.
# mkdir -p /var/www/cgi-bin/keystone
15. Download files.
# curl https://raw.githubusercontent.com/openstack/keystone/kilo-eol/httpd/keystone.py | tee /var/www/cgi-bin/keystone/main /var/www/cgi-bin/keystone/admin
16. Set permissions.
# chown -R keystone:keystone /var/www/cgi-bin/keystone
# chmod 755 /var/www/cgi-bin/keystone/*
17. Run the httpd service.
# systemctl enable httpd.service
# systemctl start httpd.service
Optimizing NFV Infrastructure for TCP Workloads with Intel® Xeon® Scalable Processors 11
18. Create Keystone endpoints.
# export OS_TOKEN=intel
# export OS_URL=http://10.34.249.201:35357/v2.0
# openstack service create \
--name keystone --description "OpenStack Identity" identity
# openstack endpoint create \
--publicurl http://10.34.249.201:5000/v2.0 \
--internalurl http://10.34.249.201:5000/v2.0 \
--adminurl http://10.34.249.201:35357/v2.0 \
--region RegionOne \
identity
19. Create OpenStack users and projects.
# openstack project create --description "Admin Project" admin
# openstack user create --password-prompt admin
# openstack role create admin
# openstack role add --project admin --user admin admin
# openstack project create --description "Service Project" service
# openstack project create --description "Demo Project" demo
# openstack user create --password-prompt demo
# openstack role create user
# openstack role add --project demo --user demo user
20. Create admin-openrc.sh file with following content.
export OS_PROJECT_DOMAIN_ID=default
export OS_USER_DOMAIN_ID=default
export OS_PROJECT_NAME=admin
export OS_TENANT_NAME=admin
export OS_USERNAME=admin
export OS_PASSWORD= intel
export OS_AUTH_URL=http://10.34.249.201:35357/v3
21. Execute the commands in the file created.
# source admin-openrc.sh
22. Create Glance user and endpoints.
# openstack user create --password-prompt glance
# openstack role add --project service --user glance admin
# openstack service create --name glance \
--description "OpenStack Image service" image
# openstack endpoint create \
--publicurl http://10.34.249.201:9292 \
--internalurl http://10.34.249.201:9292 \
--adminurl http://10.34.249.201:9292 \
--region RegionOne \
image
23. Install Glance packages.
# yum install openstack-glance python-glance python-glanceclient
Optimizing NFV Infrastructure for TCP Workloads with Intel® Xeon® Scalable Processors 12
24. Edit the /etc/glance/glance-api.conf file.
[DEFAULT]
verbose=True
notification_driver = noop
[database]
connection = mysql://glance:[email protected]/glance
[keystone_authtoken]
auth_uri = http://10.34.249.201:5000
auth_url = http://10.34.249.201:35357
auth_plugin = password
project_domain_id = default
user_domain_id = default
project_name = service
username = glance
password = intel
[paste_deploy]
flavor=keystone
[glance_store]
default_store=file
filesystem_store_datadir=/var/lib/glance/images/
25. Edit the /etc/glance/glance-registry.conf file.
[DEFAULT]
verbose=True
notification_driver = noop
[database]
connection=mysql://glance:[email protected]/glance
[keystone_authtoken]
auth_uri = http://10.34.249.201:5000
auth_url = http://10.34.249.201:35357
auth_plugin = password
project_domain_id = default
user_domain_id = default
project_name = service
username = glance
password = intel
26. Synchronize database.
# su -s /bin/sh -c "glance-manage db_sync" glance
27. Run Glance services.
# systemctl enable openstack-glance-api.service openstack-glance-registry.service
# systemctl start openstack-glance-api.service openstack-glance-registry.service
28. Create Nova user and endpoints.
# openstack user create --password-prompt nova
# openstack role add --project service --user nova admin
# openstack service create --name nova \
--description "OpenStack Compute" compute
# openstack endpoint create \
--publicurl http://10.34.249.201:8774/v2/%\(tenant_id\)s \
--internalurl http://10.34.249.201:8774/v2/%\(tenant_id\)s \
--adminurl http://10.34.249.201:8774/v2/%\(tenant_id\)s \
--region RegionOne \
compute
Optimizing NFV Infrastructure for TCP Workloads with Intel® Xeon® Scalable Processors 13
29. Install Nova packages.
# yum install openstack-nova-api openstack-nova-cert openstack-nova-conductor \
openstack-nova-console openstack-nova-novncproxy openstack-nova-scheduler \
python-novaclient
30. Edit the /etc/nova/nova.conf file.
[DEFAULT]
rpc_backend=rabbit
my_ip=10.34.249.201
auth_strategy=keystone
network_api_class=nova.network.neutronv2.api.API
linuxnet_interface_driver=nova.network.linux_net.LinuxOVSInterfaceDriver
security_group_api=neutron
verbose=True
firewall_driver=nova.virt.firewall.NoopFirewallDriver
vnc_enabled = True
vncserver_listen = 0.0.0.0
vncserver_proxyclient_address = 10.34.249.201
novncproxy_base_url = http://10.34.249.201:6080/vnc_auto.html
[database]
connection = mysql://nova:[email protected]/nova
[ephemeral_storage_encryption]
[glance]
host=10.34.249.201
[keystone_authtoken]
auth_uri = http://10.34.249.201:5000
auth_url = http://10.34.249.201:35357
auth_plugin = password
project_domain_id = default
user_domain_id = default
project_name = service
username = nova
password = intel
[neutron]
url = http://10.34.249.201:9696
auth_strategy = keystone
admin_auth_url = http://10.34.249.201:35357/v2.0
admin_tenant_name = service
admin_username = neutron
admin_password = intel
service_metadata_proxy=True
metadata_proxy_shared_secret=intel
[oslo_concurrency]
lock_path=/var/lib/nova/tmp
[oslo_messaging_rabbit]
rabbit_host=10.34.249.201
rabbit_userid=openstack
rabbit_password=intel
31. Synchronize database.
# su -s /bin/sh -c "nova-manage db sync" nova
Optimizing NFV Infrastructure for TCP Workloads with Intel® Xeon® Scalable Processors 14
32. Run Nova services.
# systemctl enable openstack-nova-api.service openstack-nova-cert.service \
openstack-nova-consoleauth.service openstack-nova-scheduler.service \
openstack-nova-conductor.service openstack-nova-novncproxy.service
# systemctl start openstack-nova-api.service openstack-nova-cert.service \
openstack-nova-consoleauth.service openstack-nova-scheduler.service \
openstack-nova-conductor.service openstack-nova-novncproxy.service
# systemctl enable openstack-nova-console.service
# systemctl start openstack-nova-console.service
# systemctl enable openstack-nova-xvpvncproxy.service
# systemctl restart openstack-nova-xvpvncproxy.service
33. Create Neutron user and endpoints.
# openstack user create --password-prompt neutron
# openstack role add --project service --user neutron admin
# openstack service create --name neutron \
--description "OpenStack Networking" network
# openstack endpoint create \
--publicurl http://10.34.249.201:9696 \
--adminurl http://10.34.249.201:9696 \
--internalurl http://10.34.249.201:9696 \
--region RegionOne \
network
34. Edit the /etc/sysctl.conf file.
net.ipv4.ip_forward=1
net.ipv4.conf.all.rp_filter=0
net.ipv4.conf.default.rp_filter=0
35. Apply changes.
# sysctl -p
36. Install Neutron packages.
# yum install openstack-neutron openstack-neutron-ml2 python-neutronclient \
which openstack-neutron-openvswitch
37. Edit the /etc/neutron/neutron.conf file.
[DEFAULT]
verbose = True
core_plugin = ml2
service_plugins = router
auth_strategy = keystone
allow_overlapping_ips = True
notify_nova_on_port_status_changes = True
notify_nova_on_port_data_changes = True
nova_url = http://10.34.249.201:8774/v2
rpc_backend=rabbit
[matchmaker_redis]
[matchmaker_ring]
[quotas]
[agent]
[keystone_authtoken]
auth_uri = http://10.34.249.201:5000
auth_url = http://10.34.249.201:35357
Optimizing NFV Infrastructure for TCP Workloads with Intel® Xeon® Scalable Processors 15
auth_plugin = password
project_domain_id = default
user_domain_id = default
project_name = service
username = neutron
password = intel
[database]
connection = mysql://neutron:[email protected]/neutron
[nova]
auth_url = http://10.34.249.201:35357
auth_plugin = password
project_domain_id = default
user_domain_id = default
region_name = RegionOne
project_name = service
username = nova
password = intel
[oslo_concurrency]
lock_path = $state_path/lock
[oslo_policy]
[oslo_messaging_amqp]
rabbit_host = 10.34.249.201
rabbit_userid = openstack
rabbit_password = intel
38. Edit the /etc/neutron/plugins/ml2/ml2_conf.ini file.
[ml2]
type_drivers = flat,vlan,vxlan
tenant_network_types = vlan,vxlan
mechanism_drivers = openvswitch,ovsdpdk
[ml2_type_flat]
flat_networks = external
[ml2_type_vlan]
network_vlan_ranges = physnet1:10:15
[ml2_type_gre]
[ml2_type_vxlan]
vni_ranges = 1:1000
[securitygroup]
enable_security_group = True
enable_ipset = True
firewall_driver = neutron.agent.firewall.NoopFirewallDriver
[ovs]
local_ip = 172.16.111.2
bridge_mappings = external:br-ex,physnet1:br-vlan
[agent]
tunnel_types = vxlan
39. Edit the /etc/neutron/l3_agent.ini file.
[DEFAULT]
verbose = True
interface_driver = neutron.agent.linux.interface.OVSInterfaceDriver
external_network_bridge =
router_delete_namespaces = True
Optimizing NFV Infrastructure for TCP Workloads with Intel® Xeon® Scalable Processors 16
40. Edit the /etc/neutron/dhcp_agent.ini file.
[DEFAULT]
verbose = True
interface_driver = neutron.agent.linux.interface.OVSInterfaceDriver
dhcp_driver = neutron.agent.linux.dhcp.Dnsmasq
dnsmasq_config_file = /etc/neutron/dnsmasq-neutron.conf
dhcp_delete_namespaces = True
41.Create the /etc/neutron/dnsmasq-neutron.conf file.
dhcp-option-force=26,1454
42. Edit the /etc/neutron/metadata_agent.ini file.
[DEFAULT]
verbose = True
auth_uri = http://10.34.249.201:5000
auth_url = http://10.34.249.201:35357
auth_region = RegionOne
auth_plugin = password
project_domain_id = default
user_domain_id = default
project_name = service
username = neutron
password = intel
nova_metadata_ip = 10.34.249.201
metadata_proxy_shared_secret = intel
43. Execute following commands.
# ln -s /etc/neutron/plugins/ml2/ml2_conf.ini /etc/neutron/plugin.ini
# su -s /bin/sh -c "neutron-db-manage --config-file /etc/neutron/neutron.conf \
--config-file /etc/neutron/plugins/ml2/ml2_conf.ini upgrade head" neutron
44. Restart Nova services and run Neutron services.
# systemctl restart openstack-nova-api.service openstack-nova-scheduler.service \
openstack-nova-conductor.service
# ln -s /etc/neutron/plugins/ml2/ml2_conf.ini /etc/neutron/plugin.ini
# cp /usr/lib/systemd/system/neutron-openvswitch-agent.service \
/usr/lib/systemd/system/neutron-openvswitch-agent.service.orig
# sed -i 's,plugins/openvswitch/ovs_neutron_plugin.ini,plugin.ini,g' \
/usr/lib/systemd/system/neutron-openvswitch-agent.service
# systemctl enable neutron-server.service neutron-openvswitch-agent.service \
neutron-l3-agent.service neutron-dhcp-agent.service \
neutron-metadata-agent.service neutron-ovs-cleanup.service openvswitch.service
# systemctl start neutron-server.service neutron-openvswitch-agent.service \
neutron-l3-agent.service neutron-dhcp-agent.service \
neutron-metadata-agent.service openvswitch.service
45. Create and configure br-vlan and br-ex bridges.
# ovs-vsctl add-br br-ex
# ovs-vsctl add-port br-ex EXT_NET_IFACE_NAME
# ip l s br-ex up
# ip a f EXT_NET_IFACE_NAME
# ip a a 10.34.249.201/24 dev br-ex
# ip r a default via 10.34.249.1
# ovs-vsctl add-br br-vlan
# ovs-vsctl add-port br-vlan eno4
# ip l s br-vlan up
Optimizing NFV Infrastructure for TCP Workloads with Intel® Xeon® Scalable Processors 17
46. Restart Neutron Open vSwitch agent.
# systemctl restart neutron-openvswitch-agent
47. Install Horizon packages.
# yum install openstack-dashboard httpd mod_wsgi memcached python-memcached
48. In the /etc/openstack-dashboard/local_settings file set the following:
OPENSTACK_HOST = "controller"
ALLOWED_HOSTS = ['*', ]
CACHES = {
'default': {
'BACKEND': 'django.core.cache.backends.memcached.MemcachedCache',
'LOCATION': '127.0.0.1:11211',
}
}
OPENSTACK_KEYSTONE_DEFAULT_ROLE = "user"
TIME_ZONE = "TIME_ZONE"
49. Set permissions.
# chown -R apache:apache /usr/share/openstack-dashboard/static
50. Restart Apache and memcached.
# systemctl enable httpd.service memcached.service
# systemctl restart httpd.service memcached.service
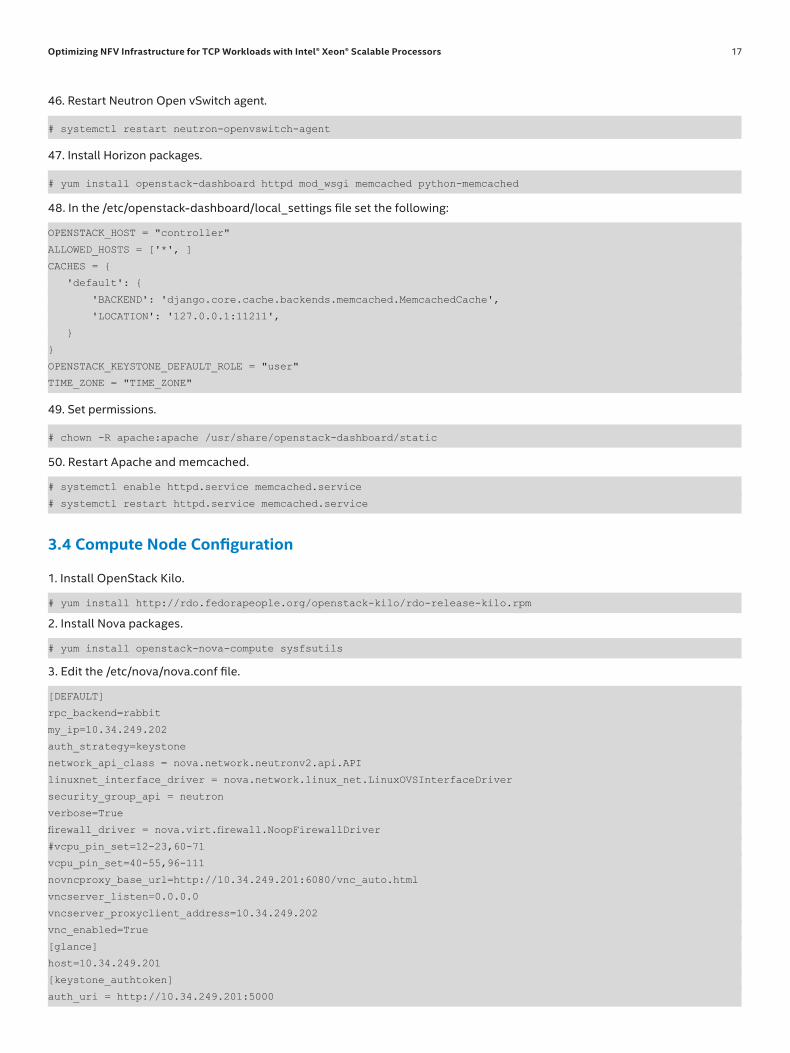
3.4 Compute Node Configuration 1. Install OpenStack Kilo.
# yum install http://rdo.fedorapeople.org/openstack-kilo/rdo-release-kilo.rpm
2. Install Nova packages.
# yum install openstack-nova-compute sysfsutils
3. Edit the /etc/nova/nova.conf file.
[DEFAULT]
rpc_backend=rabbit
my_ip=10.34.249.202
auth_strategy=keystone
network_api_class = nova.network.neutronv2.api.API
linuxnet_interface_driver = nova.network.linux_net.LinuxOVSInterfaceDriver
security_group_api = neutron
verbose=True
firewall_driver = nova.virt.firewall.NoopFirewallDriver
#vcpu_pin_set=12-23,60-71
vcpu_pin_set=40-55,96-111
novncproxy_base_url=http://10.34.249.201:6080/vnc_auto.html
vncserver_listen=0.0.0.0
vncserver_proxyclient_address=10.34.249.202
vnc_enabled=True
[glance]
host=10.34.249.201
[keystone_authtoken]
auth_uri = http://10.34.249.201:5000
Optimizing NFV Infrastructure for TCP Workloads with Intel® Xeon® Scalable Processors 18
auth_url = http://10.34.249.201:35357
auth_plugin = password
project_domain_id = default
user_domain_id = default
project_name = service
username = nova
password = intel
[neutron]
url = http://10.34.249.201:9696
auth_strategy = keystone
admin_auth_url = http://10.34.249.201:35357/v2.0
admin_tenant_name = service
admin_username = neutron
admin_password = intel
[oslo_concurrency]
lock_path=/var/lib/nova/tmp
[oslo_messaging_rabbit]
rabbit_host = 10.34.249.201
rabbit_userid = openstack
rabbit_password = intel
4. Run libvirt and Nova services.
# systemctl enable libvirtd.service openstack-nova-compute.service
# systemctl start libvirtd.service openstack-nova-compute.service
Edit the /etc/sysctl.conf file.
net.ipv4.conf.all.rp_filter=0
net.ipv4.conf.default.rp_filter=0
net.bridge.bridge-nf-call-iptables=1
net.bridge.bridge-nf-call-ip6tables=1
5. Apply configuration.
# sysctl -p
# yum install openstack-neutron openstack-neutron-ml2 \
openstack-neutron-openvswitch
6. Edit the /etc/neutron/neutron.conf file.
[DEFAULT]
verbose = True
core_plugin = ml2
service_plugins = router
auth_strategy = keystone
allow_overlapping_ips = True
rpc_backend=rabbit
[keystone_authtoken]
auth_uri = http://10.34.249.201:5000
auth_url = http://10.34.249.201:35357
auth_plugin = password
project_domain_id = default
user_domain_id = default
project_name = service
username = neutron
password = intel
[oslo_concurrency]
lock_path = $state_path/lock
[oslo_messaging_rabbit]
rabbit_host = 10.34.249.201
Optimizing NFV Infrastructure for TCP Workloads with Intel® Xeon® Scalable Processors 19
rabbit_userid = openstack
rabbit_password = intel
[ml2]
type_drivers = flat,vlan,vxlan
tenant_network_types = vlan,vxlan
mechanism_drivers = ovsdpdk
[ml2_type_flat]
flat_networks = external
[ml2_type_vlan]
network_vlan_ranges = physnet1:10:15
[ml2_type_vxlan]
vni_ranges = 1:1000
[securitygroup]
enable_security_group = True
enable_ipset = True
firewall_driver = neutron.agent.firewall.NoopFirewallDriver
[agent]
tunnel_types = vxlan
[ovs]
local_ip = 172.16.111.3
bridge_mappings = external:br-ex,physnet1:br-vlan
3.5 Enable the networking-ovs-dpdk Plug-In
3.5.1 Prepare the OpenStack NodesPerform the following steps on the controller node.
1. Install missing packages.
# yum install openstack-neutron openstack-neutron-ml2 python-neutronclient openstack-neutron-openvswitch
Note: The packages mentioned above may already be installed by Packstack.
2. Edit the following parameters in the /etc/sysctl.conf file as presented below.
net.ipv4.ip_forward=1
net.ipv4.conf.all.rp_filter=0
net.ipv4.conf.default.rp_filter=0
3. Commit the changes.
# sysctl -p
4. Recreate the MySQL* database for the OpenStack Networking services. Enter the MySQL shell.
# mysql -u root -p
Execute the following set of MySQL commands.
DROP DATABASE neutron;
CREATE DATABASE neutron;
GRANT ALL PRIVILEGES ON neutron.* TO 'neutron'@'localhost' IDENTIFIED BY 'intel';
GRANT ALL PRIVILEGES ON neutron.* TO 'neutron'@'%' IDENTIFIED BY 'intel';
Optimizing NFV Infrastructure for TCP Workloads with Intel® Xeon® Scalable Processors 20
5. Edit the following parameters in the /etc/neutron/plugins/ml2/ml2_conf.ini file as presented below.
[ml2]
...
type_drivers = flat,vlan,gre,vxlan
tenant_network_types = vxlan, vlan
mechanism_drivers = openvswitch
[ml2_type_flat]
...
flat_networks = external
[ml2_type_vlan]
...
vlan_ranges = physnet1:2:1000
[ml2_type_vxlan]
...
vni_ranges = 1001:2000
[securitygroup]
...
enable_security_group = True
firewall_driver = neutron.agent.linux.iptables_firewall.OVSHybridIptablesFirewallDriver
enable_ipset = True
[ovs]
...
local_ip = 172.16.111.2
bridge_mappings = external:br-ex, physnet1:br-vlan
[agent]
...
tunnel_types = vxlan
6. Create a symbolic link.
# ln -s /etc/neutron/plugins/ml2/ml2_conf.ini /etc/neutron/plugin.ini
7. Restart all the OpenStack Networking services.
# systemctl daemon-reload
# systemctl restart neutron*
3.5.2 Clone the Required Repositories 1. Clone the networking-ovs-dpdk git repository on both the compute and controller nodes.
# git clone https://github.com/openstack/networking-ovs-dpdk.git
# cd networking-ovs-dpdk
# git checkout kilo-eol
2. Clone the dpdk repository only on the compute nodes.
# git clone http://dpdk.org/git/dpdk
# cd dpdk
# git checkout v2.2.0
Note: You can check out the v16.04 tag of dpdk repository to enable some of the performance optimizations. Refer to the section 4.1.3 for more information.
Optimizing NFV Infrastructure for TCP Workloads with Intel® Xeon® Scalable Processors 21
3. Clone the ovs repository only on compute nodes.
# git clone https://github.com/openvswitch/ovs.git
# cd ovs
# git checkout v2.5.0
Note: You can check out a newer Open vSwitch version to enable additional performance optimizations. Refer to the section 4.1.3 for more information and detailed instructions.
3.5.3 Install the OVS-DPDK
1. Change the directory to the DPDK directory, and then edit the following lines in the config/common_linuxapp file.
CONFIG_RTE_BUILD_COMBINE_LIBS=y
CONFIG_RTE_LIBRTE_VHOST=y
2.Build the DPDK.
# export RTE_TARGET=x86_64-native-linuxapp-gcc
# make install T=$RTE_TARGET DESTDIR=install
3. Change the directory to the Open vSwitch directory, and then build the Open vSwitch with DPDK.
# ./boot.sh
# ./configure --with-dpdk=<DPDK_DIR>/<TARGET> --prefix=/usr --with-rundir=/var/run/openvswitch
# make CFLAGS=’-O3 -march-native’
# make install
4. Change the directory to the networking-ovs-dpdk directory, and install the ovs-dpdk agent.
# yum install python-pip
# python setup.py install
5. Stop the native openvswitch service.
# systemctl stop openvswitch
6 Stop the native neutron-openvswitch-agent.service.
# systemctl stop neutron-openvswitch-agent.service
7. Change the directory to the networking-ovs-dpdk directory, and then copy the files as shown below.
# cd ~/networking-ovs-dpdk
# cp devstack/ovs-dpdk/ovs-dpdk-init /etc/init.d/ovs-dpdk
# cp devstack/ovs-dpdk/ovs-dpdk-conf /etc/default/ovs-dpdk
8. Edit the /etc/default/ovs-dpdk file to match your environment. Use the content below as an example, and adjust paths, huge pages, and other settings.
RTE_SDK=/root/source/dpdk
RTE_TARGET=x86_64-native-linuxapp-gcc
OVS_INSTALL_DIR=/usr
OVS_DB_CONF_DIR=/etc/openvswitch
OVS_DB_SOCKET_DIR=/var/run/openvswitch
OVS_DB_CONF=/etc/openvswitch/conf.db
OVS_DB_SOCKET=/var/run/openvswitch/db.sock
OVS_SOCKET_MEM=2048
OVS_MEM_CHANNELS=4
OVS_CORE_MASK=2
OVS_PMD_CORE_MASK=C

Optimizing NFV Infrastructure for TCP Workloads with Intel® Xeon® Scalable Processors 22
OVS_LOG_DIR=/var/log/openvswitch
OVS_LOCK_DIR=''
OVS_SRC_DIR=/root/source/ovs
OVS_DIR=/root/source/ovs
OVS_UTILS=/root/source/ovs/utilities/
OVS_DB_UTILS=/root/source/ovs/ovsdb/
OVS_DPDK_DIR=/root/source/dpdk
OVS_NUM_HUGEPAGES=64
OVS_HUGEPAGE_MOUNT=/mnt/huge
OVS_HUGEPAGE_MOUNT_PAGESIZE='1G'
OVS_BRIDGE_MAPPINGS=eno3
OVS_ALLOCATE_HUGEPAGES=True
OVS_INTERFACE_DRIVER='igb_uio'
OVS_DATAPATH_TYPE='netdev'
9. Create a backup of the qemu-kvm executable file.
# mv /usr/bin/qemu-kvm /usr/bin/qemu-kvm.orig
10. Create a new qemu-kvm executable script that includes support for DPDK vhost-user ports for newly created VMs on this node. To do so, create a new qemu-kvm file.
# touch /usr/bin/qemu-kvm
Open the newly created /usr/bin/qemu-kvm file, paste the following code, and then save it.
#!/bin/bash -
VIRTIO_OPTIONS="csum=off,gso=off,guest_tso4=off,guest_tso6=off,guest_ecn=off,guest_ufo=off"
VHOST_FORCE="vhostforce=on"
SHARE="share=on"
add_mem=False
i=0
while [ $# -gt 0 ]; do
case "$1" in
-netdev)
args[i]="$1"
(( i++ ))
shift
if [[ $1 =~ "vhost-user" ]]
then
args[i]=${1},${VHOST_FORCE}
(( i++))
shift
fi
;;
-device)
args[i]="$1"
(( i++ ))
shift
if [[ $1 == virtio-net-pci* ]]; then
args[i]=${1},${VIRTIO_OPTIONS}
(( i++))
shift
fi
;;
-object)
args[i]="$1"
(( i++ ))
Optimizing NFV Infrastructure for TCP Workloads with Intel® Xeon® Scalable Processors 23
shift
if [[ $1 =~ "memory-backend-file" ]]
then
args[i]=${1},${SHARE}
(( i++))
shift
fi
;;
*)
args[i]="$1"
(( i++ ))
shift ;;
esac
done
if [ -e /usr/local/bin/qemu-system-x86_64 ]; then
exec /usr/local/bin/qemu-system-x86_64 "${args[@]}"
elif [ -e /usr/libexec/qemu-kvm.orig ]; then
exec /usr/libexec/qemu-kvm.orig "${args[@]}"
fi
11. Add execution permissions to the qemu-kvm file and the networking-ovs-dpdk plug-in executable files.
# chmod +x /usr/bin/qemu-kvm
# chmod +x /usr/bin/networking-ovs-dpdk-agent
12. Edit the OpenStack Networking neutron ml2 agent settings. On the compute node, open the /etc/neutron/plugins/ml2/ml2_conf.ini file, and then edit the mechanism_drivers parameter as shown below.
[DEFAULT]
…
mechanism_drivers = ovsdpdk
[securitygroup]
…
firewall_driver = neutron.agent.firewall.NoopFirewallDriver
On the controller node, open the /etc/neutron/plugins/ml2/ml2_conf.ini file, and then add the ovsdpdk entry to the mechanism_drivers parameter as shown below.
[DEFAULT]
…
mechanism_drivers = openvswitch, ovsdpdk
[securitygroup]
…
firewall_driver = neutron.agent.firewall.NoopFirewallDriver
In the same file on both the compute and controller nodes, configure the VxLAN tunnel settings.
[ovs]
…
local_ip = IP_OF_THE_INTERFACE_USED_FOR_TUNNEL
[agent]
…
tunnel_types = vxlan
Optimizing NFV Infrastructure for TCP Workloads with Intel® Xeon® Scalable Processors 24
13. Edit the /etc/libvirt/qemu.conf file, and then change the user and group parameters to qemu.
user = "qemu"
group = "qemu"
Set the hugetlbfs_mount location to match your system settings.
hugetlbfs_mount = "/mnt/huge"
14. Due to errors in the ovs-dpdk script, edit the /etc/init.d/ovs-dpdk file. At line 191, change:
sudo ip link $nic 0 down
to:
sudo ip link set dev $nic down
At line 376, change:
while [ ! $(grep "unix.*connected" ${OVS_LOG_DIR}/ovs-vswitchd.log) ]; do
to:
while [ ! "$(grep 'unix.*connected' ${OVS_LOG_DIR}/ovs-vswitchd.log)" ]; do
Insert the following lines after line 410:
echo "vhostuser sockets cleanup"
rm -f $OVS_DB_SOCKET_DIR/vhu*
Save the file, and then exit.
15. Initialize the ovs-dpdk service.
At this point, it is recommended that you remove and manually recreate the Open vSwitch database file conf.db to avoid any issues with configuration of the Open vSwitch in the next steps.
Kill any Open vSwitch-related process running in your system, such as ovs-vswitchd and ovsdb-server.
# rm /usr/local/etc/openvswitch/conf.db
# ovsdb-tool create /etc/openvswitch/conf.db \
/usr/share/openvswitch/vswitch.ovsschema
Run the service initialization, enable DPDK support and set masks according to your preference:
# service ovs-dpdk init
# ovs-vsctl --no-wait set Open_vSwitch . other_config:dpdk-init=true
# ovs-vsctl --no-wait set Open_vSwitch . other_config:dpdk-lcore-mask="10000000"
# ovs-vsctl --no-wait set Open_vSwitch . other_config:pmd-cpu-mask="20000000"Run the ovs-dpdk service.
# service ovs-dpdk start
Note: To identify possible issues, pay attention to the output of this command, and check also the ovs-vswitchd logs located in the /etc/default/ovs-dpdk directory.
Check the status of the ovs-dpdk with the following command.
# systemctl status ovs-dpdk
Note: Automatic binding of igb_uio to the interfaces by the ovs-dpdk service was not fully tested and might not be working. If this happens, a solution is to disable this feature by commenting out the following parts of the /etc/init.d/ovs-dpdk script.
319 # bind_nics
[...]
403 #if uio diver is not loaded load
404 # echo "loading OVS_INTERFACE_DRIVER diver"
405 # if [[ "$OVS_INTERFACE_DRIVER" == "igb_uio" ]]; then
406 # load_igb_uio_module
407 # elif [[ "$OVS_INTERFACE_DRIVER" == "vfio-pci" ]]; then
Optimizing NFV Infrastructure for TCP Workloads with Intel® Xeon® Scalable Processors 25
408 # load_vfio_pci_module
409 # fi
[...]
427 # echo "binding nics to linux_dirver"
428 # unbind_nics
429 #
430 # echo "unloading OVS_INTERFACE_DRIVER"
431 # if [[ "$OVS_INTERFACE_DRIVER" == "igb_uio" ]]; then
432 # remove_igb_uio_module
433 # elif [[ "$OVS_INTERFACE_DRIVER" =~ "vfio-pci" ]]; then
434 # remove_vfio_pci_module
435 # fi
16. Bind the DPDK interfaces to the igb_uio driver, and manually create the Open vSwitch bridges for these interfaces.
Execute the following commands to bind the interface to the igb_uio driver.
# modprobe uio
# modprobe cuse
# modprobe fuse
Change the directory to the DPDK directory, and then load the DPDK igb_uio driver.
# insmod x86_64-native-linuxapp-gcc/kmod/igb_uio.ko
Note: For a different DPDK target, replace the x86_64-native-linuxapp-gcc in the above command with the respective one.
17.Execute the following command to check the current binding status of all the interfaces.
# ./tools/dpdk_nic_bind.py --status
18. Bind the interfaces to the DPDK driver if needed. The interfaces must be in down status; otherwise, binding will fail. To bring the interfaces down execute the following command.
# ip l s dev <Interface-Name> down
The following command brings down the eno4 interface.
# ip l s dev eno4 down
To bind the interface to the DPDK driver, execute the command below.
# /root/dpdk/dpdk-nic-bind.py -b igb_iuo \
<PCI_ADDRESS_OF_NIC_TO_BIND>
# /root/dpdk/tools/dpdk_nic_bind.py -b igb_uio 0000:04:00.0
To bind the interface back to the regular Linux driver, execute the command below.
# /root/dpdk/tools/dpdk-nic-bind.py -b <DRIVER_NAME> \
<PCI_ADDRESS_OF_NIC_TO_BIND>
20. Run the ovs-dpdk service.
# service ovs-dpdk start

Optimizing NFV Infrastructure for TCP Workloads with Intel® Xeon® Scalable Processors 26
3.6 Post-Installation Configuration
To create the Open vSwitch bridges with DPDK interfaces use the following commands. Table 5 shows the mapping of DPDK interfaces.
# ovs-vsctl add-br br-ex -- set bridge br-ex datapath_type=netdev
# ovs-vsctl add-port br-ex dpdk0 -- set Interface dpdk0 type=dpdk
# ovs-vsctl add-br br-vxlan -- set bridge br-vxlan datapath_type=netdev
# ovs-vsctl add-port br-vxlan dpdk1 -- set Interface dpdk1 type=dpdk
# ovs-vsctl add-br br-vlan -- set bridge br-vlan datapath_type=netdev
# ovs-vsctl add-port br-vlan dpdk2 -- set Interface dpdk2 type=dpdk
DPDK Interface Name Previous Name Purpose
dpdk0 eno1 External network
dpdk1 eno3 VxLAN network
dpdk2 eno4 VLAN network
Table 5. Mapping of DPDK interfaces
Note: The DPDK interfaces are sorted by the Peripheral Component Interconnect* (PCI*) address—the higher value of a PCI
address results in a higher interface number. Check the status of the Open vSwitch.
# ovs-vsctl show
If there are issues with adding the DPDK port to the bridge, restart the ovs-dpdk service after binding the DPDK interfaces using the command below.
# systemctl restart ovs-dpdk
Check the status of the Open vSwitch.
# ovs-vsctl show
If there are issues with adding the DPDK port to the bridge, restart the ovs-dpdk service after binding the DPDK interfaces using the command below.
# systemctl restart ovs-dpdk
2. Set the administrative status to up on all the Open vSwitch bridges except for the br-int.
Note: This step may be required after creating new Open vSwitch bridges and restarting the ovs-dpdk service.
The following sample command brings the br-vlan bridge up.
# ip link set dev br-vlan up
Use the following commands to assign an IP address to the VxLAN bridge.
# ip address add 172.16.111.3/24 dev br-vxlan
3. Once all the bridges are created and configured, start the networking-ovs-dpdk-agent.
# screen /usr/bin/networking-ovs-dpdk-agent \
--config-file /etc/neutron/neutron.conf \
--config-file /etc/neutron/plugins/ml2/ml2_conf.ini

Optimizing NFV Infrastructure for TCP Workloads with Intel® Xeon® Scalable Processors 27
4. It is recommended that you run networking-ovs-dpdk-agent in the nohup, screen (as provided in the example above), or tmux session.
5. Restart the openstack-nova-compute service on the compute nodes.
# systemctl restart openstack-nova-compute
6. On the controller node, restart all the OpenStack Networking services.
# systemctl restart neutron*
7. On the controller node, check whether all of the OpenStack Networking and Compute services are running.
# neutron agent-list
# cd /root
# source keystonerc_admin
# openstack-status
There might also be an old Open vSwitch agent visible on the compute nodes. Make sure to manually delete all the entries with the agent_type as Open vSwitch agent. To delete the old agent, execute the following command.
# neutron agent-delete <id-of-the-non-dpdk-agent>
8. On the controller node, create flavors and set the extra-spec parameters. These flavors will be used for all OpenStack VMs. See Section 5.2 for a script to create flavors and setup extra-spec parameters.
Optimizing NFV Infrastructure for TCP Workloads with Intel® Xeon® Scalable Processors 28
4.0 Performance Optimizations This chapter provides the optimization instructions that enable the NFVI to operate with optimal performance.
4.1 Optimize the Host
4.1.1 Isolate CPU Cores
First, isolate the CPU cores from the Linux scheduler so that the OS cannot use it for housekeeping or other OS-related tasks. These isolated cores can then be dedicated to the Open vSwitch, DPDK poll mode drivers (PMDs), and OpenStack VMs.
Optimal performance is achieved when CPU cores that are isolated and assigned to the Open vSwitch, PMD threads, OpenStack VMs, memory banks, and the NIC, are connected to the same NUMA node. This helps avoid the usage of costly cross-NUMA node links and therefore boosts the performance. To check what NUMA node the NIC is connected to, execute the following command.
# cat /sys/class/net/<interface_name>/device/numa_node
Example:
# lspci |grep Ether
86:00.0 Ethernet controller: Intel Corporation Ethernet Controller X710 for 10GbE SFP+ (rev 01)
86:00.1 Ethernet controller: Intel Corporation Ethernet Controller X710 for 10GbE SFP+ (rev 01)
# cat /sys/bus/pci/devices/0000\:86\:00.0/numa_node
1
# cat /sys/bus/pci/devices/0000\:86\:00.1/numa_node
1
The output of this command indicates the NUMA node number, 0 or 1, in case of a two-socket system. To list the associations between the CPU cores and NUMA nodes, execute the following commands.
# yum install numactl
# numactl –hardware
available: 2 nodes (0-1)
node 0 cpus: 0 1 2 3 4 5 6 7 8 9 10 11 12 13 14 15 16 17 18 19 20 21 22 23 24 25 26 27 56 57 58 59 60 61 62 63
64 65 66 67 68 69 70 71 72 73 74 75 76 77 78 79 80 81 82 83
node 0 size: 192128 MB
node 0 free: 135829 MB
node 1 cpus: 28 29 30 31 32 33 34 35 36 37 38 39 40 41 42 43 44 45 46 47 48 49 50 51 52 53 54 55 84 85 86 87
88 89 90 91 92 93 94 95 96 97 98 99 100 101 102 103 104 105 106 107 108 109 110 111
node 1 size: 193503 MB
node 1 free: 143541 MB
node distances:
node 0 1
0: 10 21
1: 21 10
All the NICs used in this solution setup are connected to the NUMA node 1. Hence, the CPU cores belonging to the NUMA node 1 are assigned to the Open vSwitch, DPDK PMD threads, and VMs. Table 6 shows the assignment of the CPU cores from NUMA node 1. Intel® HT Technology, when enabled, increases the number of independent instructions in the CPU pipeline because every single physical CPU core appears as two virtual processors in the OS. These virtual processors are referred to as hyperthreaded or logical cores (LCs). Two logical cores that belong to the same physical core are called sibling cores. In this setup, there is an offset of 56 between each of the sibling cores. For example, in a 28-core Intel Xeon Platinum 8180 processor with the Intel HT Technology turned on in the BIOS (default setting), cores 0 and 56 are siblings on NUMA node 0, and cores 28 and 84 are siblings on NUMA node 1.
Optimizing NFV Infrastructure for TCP Workloads with Intel® Xeon® Scalable Processors 29
1. Add the following line to the /etc/libvirt/qemu.conf file.
hugetlbfs_mount="/mnt/huge”
2. Add the following line in the /etc/fstab file.
hugetlbfs /mnt/huge hugetlbfs defaults 0 0
3. Create the mount directory for huge pages.
# mkdir -p /mnt/huge
4. Add the following line to the /etc/sysctl.conf file.
vm.nr_hugepages = 96
5. Edit the /etc/default/grub file to set the huge pages.
GRUB_CMDLINE_LINUX=”… hugepagesz=1G hugepages=96 default_hugepagesz=1G”
Intel HT Technology, when enabled, increases the number of independent instructions in the CPU pipeline because every single physical CPU core appears as two virtual processors in the OS. These virtual processors are referred to as hyper threaded or logical cores (LCs). Two logical cores that belong to the same physical core are called sibling cores. In this setup, there is an offset of 56 between each of the sibling cores. For example, in a 28-core Intel Xeon Platinum 8180 processor with the Intel HT Technology turned on in the BIOS (default setting), cores 0 and 56 are siblings on NUMA node 0, and cores 28 and 84 are siblings on NUMA node 1.
# cat /sys/devices/system/cpu/cpu1/topology/thread_siblings_list
1,57
# cat /sys/devices/system/cpu/cpu0/topology/thread_siblings_list
0,56
To achieve the optimal performance of DPDK PMD threads, several CPU pinning alternatives were tested (see Chapter 6).
4.1.2 Enable 1 GB Huge Pages
1 GB huge pages were used for OpenStack VMs to reduce translation lookaside buffer (TLB) miZwing steps on all the compute nodes.
CPU Cores Assigned To Configuration Settings
4-27, 56-83 Housekeeping Set the parameters below in the /etc/default/grub file on the compute node to isolate cores 28-55 and their siblings 84-111, from the kernel scheduler and hence dedicate them to OVS-DPDK PMD threads and OpenStack* VMs. Cores 4-27 and 56-83 are used by the kernel, hypervisor and other host processes.GRUB_CMDLINE_LINUX="rd.lvm.lv=fedora-server/root rd.lvm.
lv=fedora-server/swap rhgb quiet isolcpus=28-55,84-111
hugepagesz=1G hugepages=96 default_hugepagesz=1G"
29-38 OVS-DPDK PMD threads Execute the following command (mask and cores depends on scenario).# ovs-vsctl set Open_vSwitch . other_config:pmd-cpu-
mask=0x7FE0000000
40-55, 96-111 OpenStack* VMs Set the CPU core numbers for guest VMs in the /etc/nova/nova.conf file.vcpu_pin_set = 40-55,96-111
Table 6. Sample usage of CPU cores.
Optimizing NFV Infrastructure for TCP Workloads with Intel® Xeon® Scalable Processors 30
6. Update the GRUB2 configuration.
# grub2-mkconfig -o /boot/grub2/grub.cfg
Note: The grub.cfg file location may vary. You can use the following command to locate it.
# locate grub.cfg
7. Reboot the host machine.
# reboot
8. Verify the settings.
# cat /proc/meminfo | grep Huge
AnonHugePages: 12288 kB
HugePages_Total: 96
HugePages_Free: 96
HugePages_Rsvd: 0
HugePages_Surp: 0
Hugepagesize: 1048576 kB
# dmesg | grep –o “isolcpus.*”
default_hugepagesz=1G
isolcpus=28-55,84-111 hugepagesz=1G hugepages=96 default_hugepagesz=1G
isolcpus=28-55,84-111 hugepagesz=1G hugepages=96 default_hugepagesz=1G
4.1.3 Enable TCP Segmentation Offload in OVS-DPDK
A patch was implemented to enable TCP segmentation offload (TSO) support in OVS-DPDK. The patch enables successful feature negotiation of TSO (and implicitly, transmit checksum offloading) between the hypervisor and the OVS-DPDK vHost-user back end. This allows TSO to be enabled on a per-port basis in the VM using the standard Linux ethtool* utility. Furthermore, the patch also increases the maximum permitted frame length for OVS-DPDK-netdevs to 64 KB (to receive oversized frames) and introduces the support for handling “offload” frames.
Note that the TSO feature in OVS-DPDK is experimental. It is only validated on OpenStack-deployed flat and VLAN networks. The guest may only take advantage of TSO if OVS is connected to a NIC that supports that functionality. The mechanism by which offloading was achieved works as follows: When OVS dequeues a frame from a TSO-enabled guest port using the DPDK vHost library, the library sets specific offload flags in the metadata that DPDK uses to represent a frame (known as ‘mbuf’). Upon receipt of an offload mbuf, Open vSwitch sets additional offload flags and attribute values in the mbuf before passing it to the DPDK NIC driver for transmission. The driver examines and interprets the mbuf's offload flags and the corresponding attributes to facilitate Transmission Control Protocol (TCP) segmentation on the NIC.
With the enablement of TSO for OVS-DPDK-netdevs in Open vSwitch, the segmentation of guest-originated, oversized TCP frames moves from the guest operating system’s software TCP/IP stack to the NIC hardware. The benefits of this approach are many. First, offloading segmentation of a guest's TCP frames to hardware significantly reduces the compute burden on the VM’s virtual CPU. Consequently, when the guest does not need to segment frames itself, its virtual CPU can take advantage of the additionally available computational cycles to perform more meaningful work. Second, with TSO enabled, Open vSwitch does not need to receive, process, and transmit a large number of smaller frame segments, but rather a smaller amount of significantly larger frames. In other words, the same amount of data can be handled with significantly reduced overhead. Finally, decreasing the number of small packets which are sent to the NIC for transmission, results in the reduction of PCI bandwidth usage. The cumulative effect of these enhancements is a massive improvement in TCP throughput for DPDK-accelerated Open vSwitch. To enable TSO in OVS-DPDK, execute the following steps:
1. Stop the ovs-dpdk service.
# service ovs-dpdk stop
2. Unload the igb_uio module.
# rmmod igb_uio
Optimizing NFV Infrastructure for TCP Workloads with Intel® Xeon® Scalable Processors 31
3. Change the directory to the source directory of Open vSwitch.
# cd ~/ovs
4. Check out the TSO patch with a compatible commit.
# git checkout cae7529c16e312524bc6b76182e080c97428e2e0
Note: This will change the Open vSwitch version to 2.5.90.
5.Download the TCP segmentation patch from the ovs-dev mailing list at https://mail.openvswitch.org/pipermail/ovs-dev/2016-June/316414.html, and apply the patch.
# git am 0001-netdev-dpdk-add-TSO-support-for-vhostuser-ports.patch
Alternatively, use the command below.
# git apply 0001-netdev-dpdk-add-TSO-support-for-vhostuser-ports.patch
6. Check out DPDK v16.04, which is required to use the TSO feature.
# cd ~/dpdk
# git checkout v16.04
7. Recompile the DPDK libraries.
# make install T=x86_64-native-linuxapp-gcc DESTDIR=install
8. Recompile, and then reinstall the Open vSwitch.
# cd ~/ovs
# ./boot.sh
# ./configure --with-dpdk=<DPDK_DIR>/<TARGET> --prefix=/usr --with-rundir=/var/run/openvswitch CFLAGS=’-O3
-march-native’
# make
# make install
9. Load the igb_uio driver.
# insmod ~/dpdk/x86_64-native-linuxapp-gcc/kmod/igb_uio.ko
10. Bind the network interfaces to the igb_uio driver as described in section 3.5.3. 11. Restart the ovs-dpdk service, and run the networking-ovs-dpdk agent.
# service ovs-dpdk restart
# screen /usr/bin/networking-ovs-dpdk-agent \
--config-file /etc/neutron/neutron.conf \
--config-file /etc/neutron/plugins/ml2/ml2_conf.ini
12. Enable the offload features in qemu-kvm wrapper. Edit the /usr/bin/qemu-kvm file, and change the following line
VIRTIO_OPTIONS="csum=off,gso=off,guest_tso4=off,guest_tso6=off,guest_ecn=off,guest_ufo=off"
with the line below.
VIRTIO_OPTIONS="csum=on,gso=on,guest_tso4=on,guest_tso6=on,guest_ecn=on,guest_ufo=on"
Optimizing NFV Infrastructure for TCP Workloads with Intel® Xeon® Scalable Processors 32
4.1.4 Enable the Multiqueue Feature for vHost-user and Physical DPDK Interfaces
1.Enable multiple queues in the qemu-kvm wrapper. Edit the /usr/bin/qemu-kvm file on the compute node. Add multiqueue settings in the following lines.
...
QUEUES=10
if [ $QUEUES -gt 1 ]
VIRTIO_OPTIONS="...,mq=on,vectors=$((2+2*$QUEUES))"
VHOST_FORCE="...,queues=$QUEUES"
...
Note: The value of vectors parameter must be equal to 2 × queues + 2.
4.1.5 Enable Core Pinning and NUMA Awareness in the OpenStack Compute
1. On all of the compute nodes, edit the /etc/nova/nova.conf file, and update the vcpu_pin_set setting.
vcpu_pin_set=40-55,96-111
2. Restart the openstack-nova-compute.service.
# systemctl restart openstack-nova-compute.service
3. On the controller node, create the optimized NUMA-aware OpenStack flavor by specifying the number of CPU cores, memory size, and storage capacity, and set extra_specs to use the EPA resources from the selected NUMA node. Refer to the script in section 5.2.1 that was run on the controller node to create flavors and add extra-spec parameters.
v
4.2 Optimize the Guest
4.2.1 Enhanced Platform Awareness (EPA) features—‘extra_specs’ Properties for OpenStack VMs
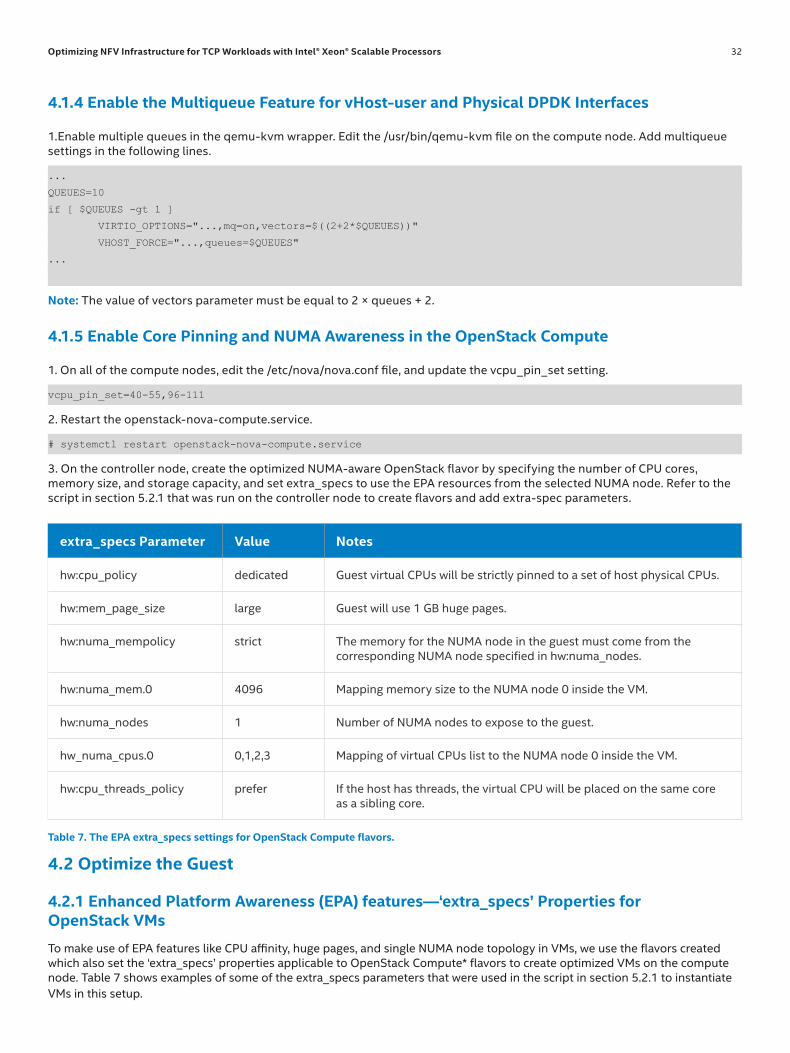
To make use of EPA features like CPU affinity, huge pages, and single NUMA node topology in VMs, we use the flavors created which also set the ‘extra_specs’ properties applicable to OpenStack Compute* flavors to create optimized VMs on the compute node. Table 7 shows examples of some of the extra_specs parameters that were used in the script in section 5.2.1 to instantiate VMs in this setup.
extra_specs Parameter Value Notes
hw:cpu_policy dedicated Guest virtual CPUs will be strictly pinned to a set of host physical CPUs.
hw:mem_page_size large Guest will use 1 GB huge pages.
hw:numa_mempolicy strict The memory for the NUMA node in the guest must come from the corresponding NUMA node specified in hw:numa_nodes.
hw:numa_mem.0 4096 Mapping memory size to the NUMA node 0 inside the VM.
hw:numa_nodes 1 Number of NUMA nodes to expose to the guest.
hw_numa_cpus.0 0,1,2,3 Mapping of virtual CPUs list to the NUMA node 0 inside the VM.
hw:cpu_threads_policy prefer If the host has threads, the virtual CPU will be placed on the same core as a sibling core.
Table 7. The EPA extra_specs settings for OpenStack Compute flavors.
Optimizing NFV Infrastructure for TCP Workloads with Intel® Xeon® Scalable Processors 33
4.2.2 Enable Multiqueue for VirtIO Interfaces
After enabling the multiqueue feature on the host machine, the same number of queues must be set inside the VM with the command below.
# ethtool -L eth0 combined NR_OF_QUEUES
Note: The interface name on the virtual machine may be different.
4.2.3 Upgrade the CentOS* 7 Kernel to version 4.5.5 on the Guest 1. Install dependencies.
# yum install wget
# yum install linux-firmware
2. Download the RPM package of the kernel.
# wget http://mirrors.coreix.net/elrepo-archive-archive/kernel/el7/x86_64/RPMS/kernel-ml-4.5.4-1.el7.elrepo.
x86_64.rpm
3. Install the new kernel.
# rpm -i kernel-ml-4.5.4-1.el7.elrepo.x86_64.rpm
4. Optionally, uninstall the old kernel.
# rpm -e <kernel-package-name>
5. Reboot the VM, and then select the 4.5.4 kernel in the GRUB boot menu if more than one entry is available.
Optimizing NFV Infrastructure for TCP Workloads with Intel® Xeon® Scalable Processors 34
5.0 Scripts
This section contains scripts to set up the Open vSwitch, DPDK, and VMs with EPA features, as well as to run the performance tests.
5.1 DPDK and Open vSwitch Setup
The following script was used on the compute node to setup DPDK and Open vSwitch.
# #!/bin/bash
### Description: Refresh OpenStack and OVS services after host reboot
export OS_PROJECT_DOMAIN_ID=default
export OS_USER_DOMAIN_ID=default
export OS_PROJECT_NAME=admin
export OS_TENANT_NAME=admin
export OS_USERNAME=admin
export OS_PASSWORD=intel
export OS_AUTH_URL=http://10.34.249.201:35357/v3
export OS_IMAGE_API_VERSION=2
function reinstall_ovs {
echo ">> Kill all OVS-related processes and remove database..."
killall ovs-vswitchd ovsdb-server
rm -f /etc/openvswitch/conf.db
ovsdb-tool create /etc/openvswitch/conf.db /usr/share/openvswitch/vswitch.ovsschema
echo ">> Initialize OVS-DPDK..."
service ovs-dpdk init
ovs-vsctl --no-wait set Open_vSwitch . other_config:dpdk-init=true
ovs-vsctl --no-wait set Open_vSwitch . other_config:dpdk-lcore-mask="10000000" # DPDK mandatory arguments
ovs-vsctl --no-wait set Open_vSwitch . other_config:pmd-cpu-mask="20000000" # pmd-cpu-mask is changed for
each test case
ovs-vsctl --no-wait set Open_vSwitch . other_config:dpdk-socket-mem="0,4096"
service ovs-dpdk start
sleep 5
systemctl status ovs-dpdk
systemctl is-active ovs-dpdk
if [ $? -eq 0 ]; then
echo ">> OVS-DPDK started successfully."
fi
}
echo -n "> Restart libvirt and Nova services... "
systemctl restart libvirtd.service openstack-nova-compute.service
echo "Done."
# Prepare Compute Node
systemctl daemon-reload
echo "> Stop native OpenVSwitch service..."
systemctl stop openvswitch
Optimizing NFV Infrastructure for TCP Workloads with Intel® Xeon® Scalable Processors 35
echo "> Stop and disable native Neutron services..."
systemctl stop neutron-*
systemctl disable neutron-*
echo "> Kill all OVS-related processes..."
reinstall_ovs
echo "> Load DPDK igb_uio driver and needed kernel modules"
modprobe uio
modprobe fuse
insmod /root/dpdk/x86_64-native-linuxapp-gcc/kmod/igb_uio.ko
echo "> Current binding status of all the interfaces:"
/root/dpdk/tools/dpdk_nic_bind.py -s
echo "> Bind VxLAN and VLAN interfaces"
ip l set dev eno3 down
ip a flush eno3
ip l set dev eno4 down
ip a flush eno4
/root/dpdk/tools/dpdk_nic_bind.py -b igb_uio 0000:86:00.0
/root/dpdk/tools/dpdk_nic_bind.py -b igb_uio 0000:86:00.1
echo "> Current binding status of all the interfaces:"
/root/dpdk/tools/dpdk_nic_bind.py -s
service ovs-dpdk restart
sleep 5
ovs-vsctl --no-wait set open_vswitch . other_config:dpdk-lcore-mask="10000000"
ovs-vsctl --no-wait set open_vswitch . other_config:dpdk-socket-mem="0,4096"
ovs-vsctl --no-wait set open_vswitch . other_config:pmd-core-mask="20000000"
# Post-installation configuration
ovs-vsctl show
echo "> Create OVS bridges"
ovs-vsctl add-br br-ex -- set bridge br-ex datapath_type=netdev
ovs-vsctl add-br br-vxlan -- set bridge br-vxlan datapath_type=netdev
ovs-vsctl add-br br-vlan -- set bridge br-vlan datapath_type=netdev
ovs-vsctl add-br br-tun -- set bridge br-tun datapath_type=netdev
# Restart ovs-dpdk service to avoid issues with adding DPDK port to the bridge
systemctl restart ovs-dpdk
sleep 2
ovs-vsctl add-port br-vxlan dpdk0 -- set Interface dpdk0 type=dpdk
ovs-vsctl add-port br-vlan dpdk1 -- set Interface dpdk1 type=dpdk
echo "> Set administrative status to up on all the OVS bridges (except br-int)"
ip l set dev br-vlan up
ip l set dev br-ex up
ip l set dev br-vxlan up
echo "> Assign an IP address to the VxLAN bridge"
ip address add 172.16.111.3/24 dev br-vxlan
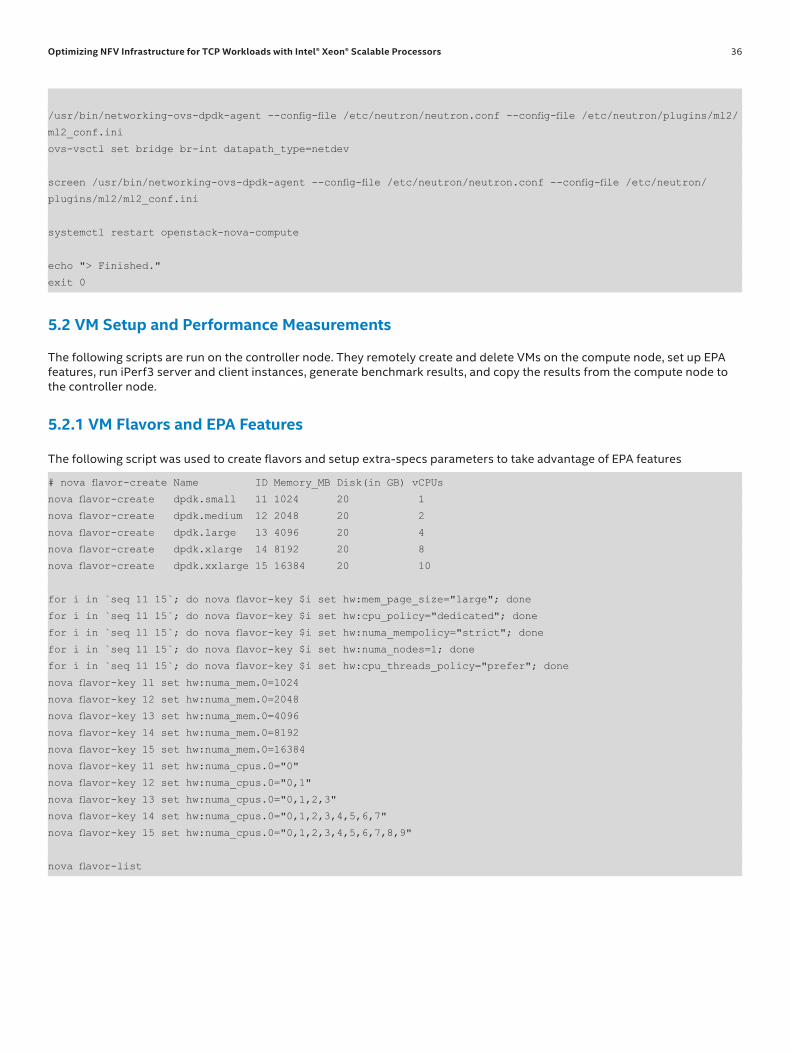
Optimizing NFV Infrastructure for TCP Workloads with Intel® Xeon® Scalable Processors 36
/usr/bin/networking-ovs-dpdk-agent --config-file /etc/neutron/neutron.conf --config-file /etc/neutron/plugins/ml2/
ml2_conf.ini
ovs-vsctl set bridge br-int datapath_type=netdev
screen /usr/bin/networking-ovs-dpdk-agent --config-file /etc/neutron/neutron.conf --config-file /etc/neutron/
plugins/ml2/ml2_conf.ini
systemctl restart openstack-nova-compute
echo "> Finished."
exit 0
5.2 VM Setup and Performance Measurements
The following scripts are run on the controller node. They remotely create and delete VMs on the compute node, set up EPA features, run iPerf3 server and client instances, generate benchmark results, and copy the results from the compute node to the controller node.
5.2.1 VM Flavors and EPA Features
The following script was used to create flavors and setup extra-specs parameters to take advantage of EPA features
# nova flavor-create Name ID Memory_MB Disk(in GB) vCPUs
nova flavor-create dpdk.small 11 1024 20 1
nova flavor-create dpdk.medium 12 2048 20 2
nova flavor-create dpdk.large 13 4096 20 4
nova flavor-create dpdk.xlarge 14 8192 20 8
nova flavor-create dpdk.xxlarge 15 16384 20 10
for i in `seq 11 15`; do nova flavor-key $i set hw:mem_page_size="large"; done
for i in `seq 11 15`; do nova flavor-key $i set hw:cpu_policy="dedicated"; done
for i in `seq 11 15`; do nova flavor-key $i set hw:numa_mempolicy="strict"; done
for i in `seq 11 15`; do nova flavor-key $i set hw:numa_nodes=1; done
for i in `seq 11 15`; do nova flavor-key $i set hw:cpu_threads_policy="prefer"; done
nova flavor-key 11 set hw:numa_mem.0=1024
nova flavor-key 12 set hw:numa_mem.0=2048
nova flavor-key 13 set hw:numa_mem.0=4096
nova flavor-key 14 set hw:numa_mem.0=8192
nova flavor-key 15 set hw:numa_mem.0=16384
nova flavor-key 11 set hw:numa_cpus.0="0"
nova flavor-key 12 set hw:numa_cpus.0="0,1"
nova flavor-key 13 set hw:numa_cpus.0="0,1,2,3"
nova flavor-key 14 set hw:numa_cpus.0="0,1,2,3,4,5,6,7"
nova flavor-key 15 set hw:numa_cpus.0="0,1,2,3,4,5,6,7,8,9"
nova flavor-list
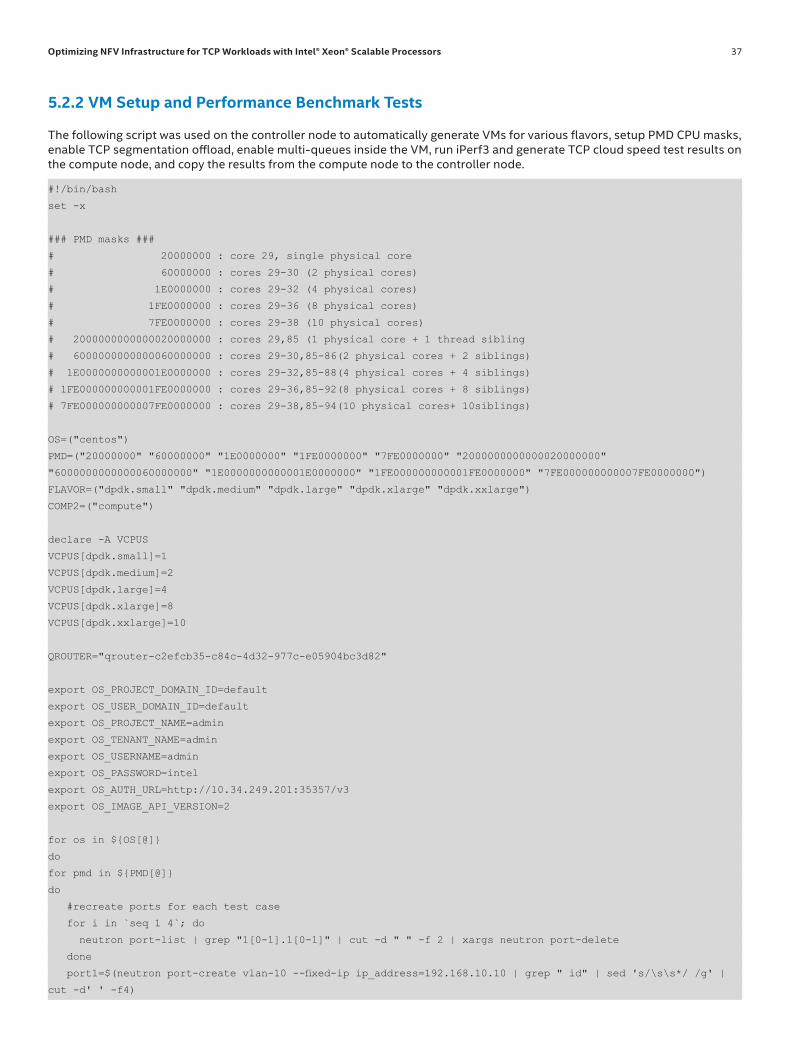
Optimizing NFV Infrastructure for TCP Workloads with Intel® Xeon® Scalable Processors 37
5.2.2 VM Setup and Performance Benchmark Tests
The following script was used on the controller node to automatically generate VMs for various flavors, setup PMD CPU masks, enable TCP segmentation offload, enable multi-queues inside the VM, run iPerf3 and generate TCP cloud speed test results on the compute node, and copy the results from the compute node to the controller node.
#!/bin/bash
set -x
### PMD masks ###
# 20000000 : core 29, single physical core
# 60000000 : cores 29-30 (2 physical cores)
# 1E0000000 : cores 29-32 (4 physical cores)
# 1FE0000000 : cores 29-36 (8 physical cores)
# 7FE0000000 : cores 29-38 (10 physical cores)
# 2000000000000020000000 : cores 29,85 (1 physical core + 1 thread sibling
# 6000000000000060000000 : cores 29-30,85-86(2 physical cores + 2 siblings)
# 1E0000000000001E0000000 : cores 29-32,85-88(4 physical cores + 4 siblings)
# 1FE000000000001FE0000000 : cores 29-36,85-92(8 physical cores + 8 siblings)
# 7FE000000000007FE0000000 : cores 29-38,85-94(10 physical cores+ 10siblings)
OS=("centos")
PMD=("20000000" "60000000" "1E0000000" "1FE0000000" "7FE0000000" "2000000000000020000000"
"6000000000000060000000" "1E0000000000001E0000000" "1FE000000000001FE0000000" "7FE000000000007FE0000000")
FLAVOR=("dpdk.small" "dpdk.medium" "dpdk.large" "dpdk.xlarge" "dpdk.xxlarge")
COMP2=("compute")
declare -A VCPUS
VCPUS[dpdk.small]=1
VCPUS[dpdk.medium]=2
VCPUS[dpdk.large]=4
VCPUS[dpdk.xlarge]=8
VCPUS[dpdk.xxlarge]=10
QROUTER="qrouter-c2efcb35-c84c-4d32-977c-e05904bc3d82"
export OS_PROJECT_DOMAIN_ID=default
export OS_USER_DOMAIN_ID=default
export OS_PROJECT_NAME=admin
export OS_TENANT_NAME=admin
export OS_USERNAME=admin
export OS_PASSWORD=intel
export OS_AUTH_URL=http://10.34.249.201:35357/v3
export OS_IMAGE_API_VERSION=2
for os in ${OS[@]}
do
for pmd in ${PMD[@]}
do
#recreate ports for each test case
for i in `seq 1 4`; do
neutron port-list | grep "1[0-1].1[0-1]" | cut -d " " -f 2 | xargs neutron port-delete
done
port1=$(neutron port-create vlan-10 --fixed-ip ip_address=192.168.10.10 | grep " id" | sed 's/\s\s*/ /g' |
cut -d' ' -f4)
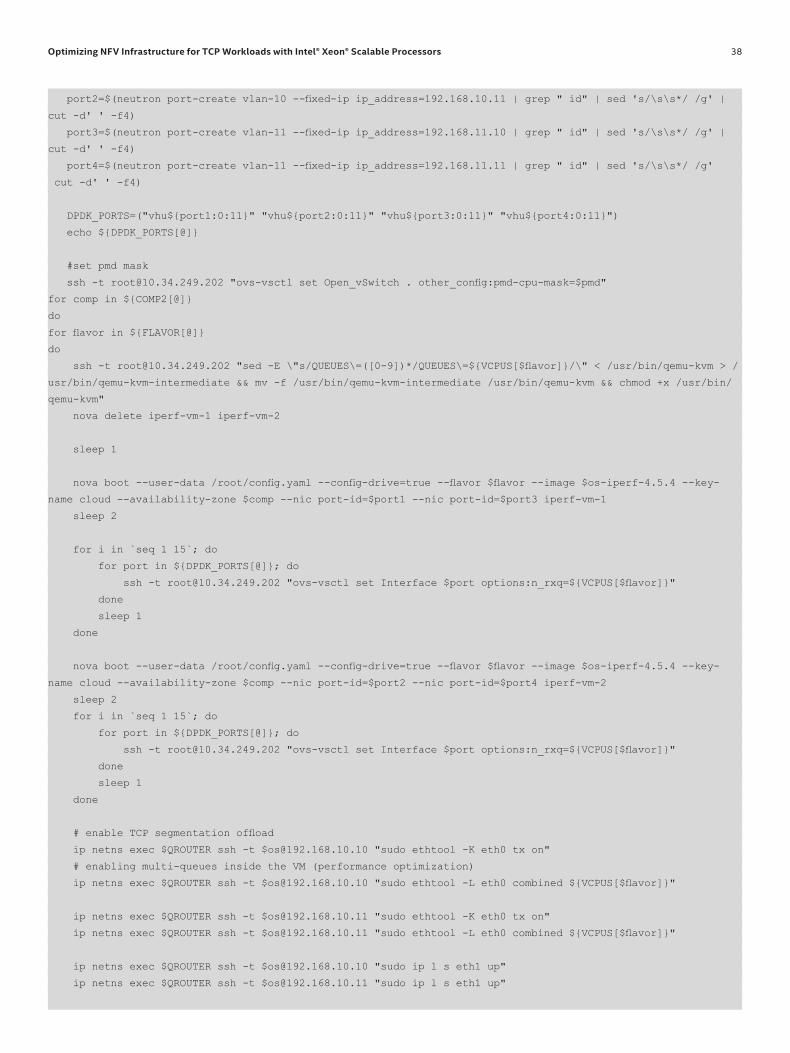
Optimizing NFV Infrastructure for TCP Workloads with Intel® Xeon® Scalable Processors 38
port2=$(neutron port-create vlan-10 --fixed-ip ip_address=192.168.10.11 | grep " id" | sed 's/\s\s*/ /g' |
cut -d' ' -f4)
port3=$(neutron port-create vlan-11 --fixed-ip ip_address=192.168.11.10 | grep " id" | sed 's/\s\s*/ /g' |
cut -d' ' -f4)
port4=$(neutron port-create vlan-11 --fixed-ip ip_address=192.168.11.11 | grep " id" | sed 's/\s\s*/ /g'
cut -d' ' -f4)
DPDK_PORTS=("vhu${port1:0:11}" "vhu${port2:0:11}" "vhu${port3:0:11}" "vhu${port4:0:11}")
echo ${DPDK_PORTS[@]}
#set pmd mask
ssh -t [email protected] "ovs-vsctl set Open_vSwitch . other_config:pmd-cpu-mask=$pmd"
for comp in ${COMP2[@]}
do
for flavor in ${FLAVOR[@]}
do
ssh -t [email protected] "sed -E \"s/QUEUES\=([0-9])*/QUEUES\=${VCPUS[$flavor]}/\" < /usr/bin/qemu-kvm > /
usr/bin/qemu-kvm-intermediate && mv -f /usr/bin/qemu-kvm-intermediate /usr/bin/qemu-kvm && chmod +x /usr/bin/
qemu-kvm"
nova delete iperf-vm-1 iperf-vm-2
sleep 1
nova boot --user-data /root/config.yaml --config-drive=true --flavor $flavor --image $os-iperf-4.5.4 --key-
name cloud --availability-zone $comp --nic port-id=$port1 --nic port-id=$port3 iperf-vm-1
sleep 2
for i in `seq 1 15`; do
for port in ${DPDK_PORTS[@]}; do
ssh -t [email protected] "ovs-vsctl set Interface $port options:n_rxq=${VCPUS[$flavor]}"
done
sleep 1
done
nova boot --user-data /root/config.yaml --config-drive=true --flavor $flavor --image $os-iperf-4.5.4 --key-
name cloud --availability-zone $comp --nic port-id=$port2 --nic port-id=$port4 iperf-vm-2
sleep 2
for i in `seq 1 15`; do
for port in ${DPDK_PORTS[@]}; do
ssh -t [email protected] "ovs-vsctl set Interface $port options:n_rxq=${VCPUS[$flavor]}"
done
sleep 1
done
# enable TCP segmentation offload
ip netns exec $QROUTER ssh -t [email protected] "sudo ethtool -K eth0 tx on"
# enabling multi-queues inside the VM (performance optimization)
ip netns exec $QROUTER ssh -t [email protected] "sudo ethtool -L eth0 combined ${VCPUS[$flavor]}"
ip netns exec $QROUTER ssh -t [email protected] "sudo ethtool -K eth0 tx on"
ip netns exec $QROUTER ssh -t [email protected] "sudo ethtool -L eth0 combined ${VCPUS[$flavor]}"
ip netns exec $QROUTER ssh -t [email protected] "sudo ip l s eth1 up"
ip netns exec $QROUTER ssh -t [email protected] "sudo ip l s eth1 up"
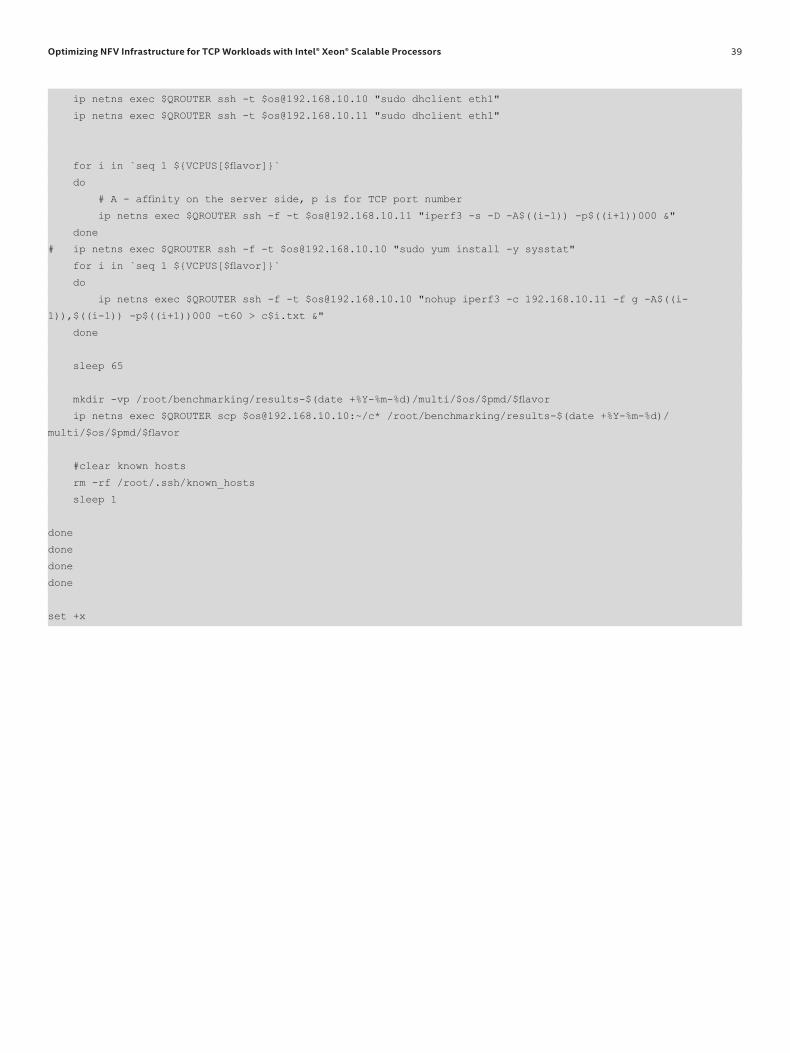
Optimizing NFV Infrastructure for TCP Workloads with Intel® Xeon® Scalable Processors 39
ip netns exec $QROUTER ssh -t [email protected] "sudo dhclient eth1"
ip netns exec $QROUTER ssh -t [email protected] "sudo dhclient eth1"
for i in `seq 1 ${VCPUS[$flavor]}`
do
# A - affinity on the server side, p is for TCP port number
ip netns exec $QROUTER ssh -f -t [email protected] "iperf3 -s -D -A$((i-1)) -p$((i+1))000 &"
done
# ip netns exec $QROUTER ssh -f -t [email protected] "sudo yum install -y sysstat"
for i in `seq 1 ${VCPUS[$flavor]}`
do
ip netns exec $QROUTER ssh -f -t [email protected] "nohup iperf3 -c 192.168.10.11 -f g -A$((i-
1)),$((i-1)) -p$((i+1))000 -t60 > c$i.txt &"
done
sleep 65
mkdir -vp /root/benchmarking/results-$(date +%Y-%m-%d)/multi/$os/$pmd/$flavor
ip netns exec $QROUTER scp [email protected]:~/c* /root/benchmarking/results-$(date +%Y-%m-%d)/
multi/$os/$pmd/$flavor
#clear known hosts
rm -rf /root/.ssh/known_hosts
sleep 1
done
done
done
done
set +x
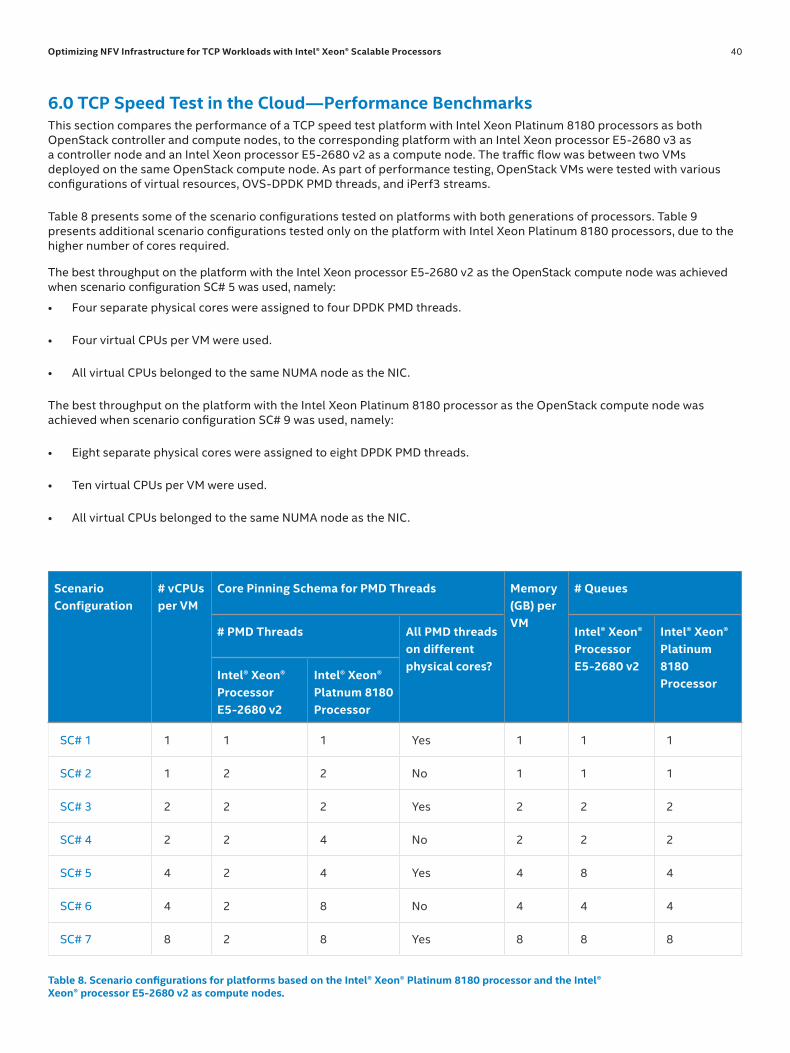
Optimizing NFV Infrastructure for TCP Workloads with Intel® Xeon® Scalable Processors 40
Table 8. Scenario configurations for platforms based on the Intel® Xeon® Platinum 8180 processor and the Intel® Xeon® processor E5-2680 v2 as compute nodes.
Scenario Configuration
# vCPUs per VM
Core Pinning Schema for PMD Threads Memory (GB) per VM
# Queues
# PMD Threads All PMD threads on different physical cores?
Intel® Xeon® Processor E5-2680 v2
Intel® Xeon® Platinum 8180 Processor
Intel® Xeon® Processor E5-2680 v2
Intel® Xeon® Platnum 8180 Processor
SC# 1 1 1 1 Yes 1 1 1
SC# 2 1 2 2 No 1 1 1
SC# 3 2 2 2 Yes 2 2 2
SC# 4 2 2 4 No 2 2 2
SC# 5 4 2 4 Yes 4 8 4
SC# 6 4 2 8 No 4 4 4
SC# 7 8 2 8 Yes 8 8 8
6.0 TCP Speed Test in the Cloud—Performance BenchmarksThis section compares the performance of a TCP speed test platform with Intel Xeon Platinum 8180 processors as both OpenStack controller and compute nodes, to the corresponding platform with an Intel Xeon processor E5-2680 v3 as a controller node and an Intel Xeon processor E5-2680 v2 as a compute node. The traffic flow was between two VMs deployed on the same OpenStack compute node. As part of performance testing, OpenStack VMs were tested with various configurations of virtual resources, OVS-DPDK PMD threads, and iPerf3 streams.
Table 8 presents some of the scenario configurations tested on platforms with both generations of processors. Table 9 presents additional scenario configurations tested only on the platform with Intel Xeon Platinum 8180 processors, due to the higher number of cores required.
The best throughput on the platform with the Intel Xeon processor E5-2680 v2 as the OpenStack compute node was achieved when scenario configuration SC# 5 was used, namely:
• Four separate physical cores were assigned to four DPDK PMD threads.
• Four virtual CPUs per VM were used.
• All virtual CPUs belonged to the same NUMA node as the NIC.
The best throughput on the platform with the Intel Xeon Platinum 8180 processor as the OpenStack compute node was achieved when scenario configuration SC# 9 was used, namely:
• Eight separate physical cores were assigned to eight DPDK PMD threads.
• Ten virtual CPUs per VM were used.
• All virtual CPUs belonged to the same NUMA node as the NIC.
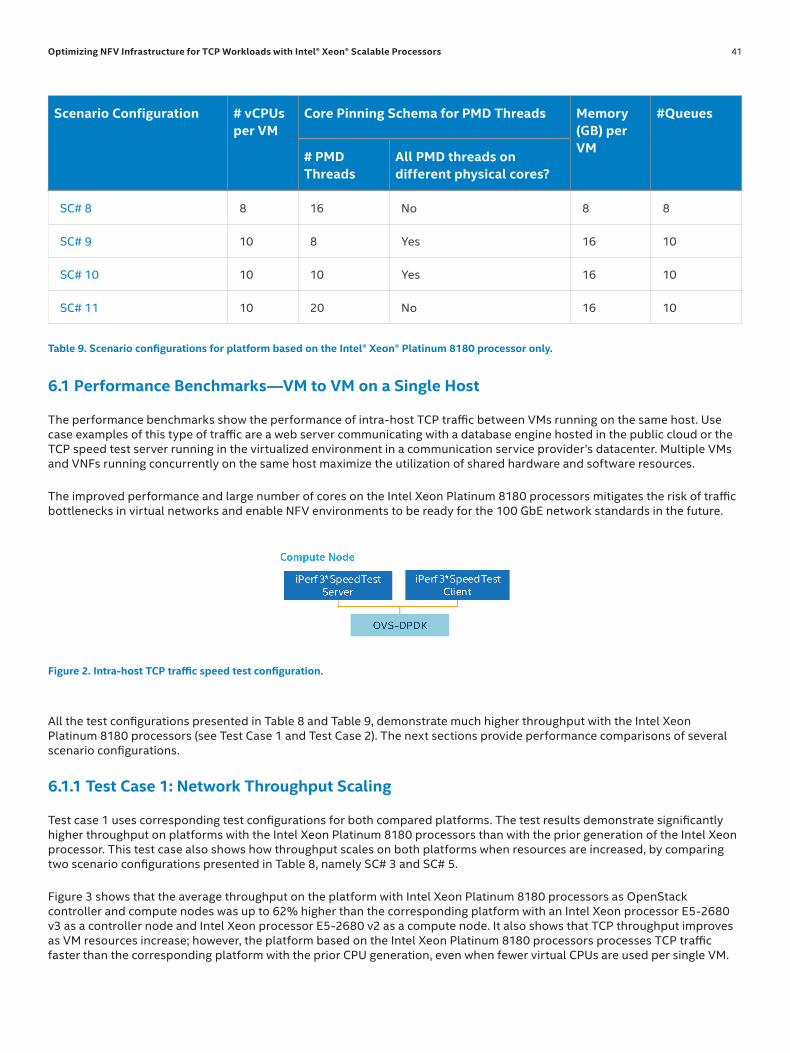
Optimizing NFV Infrastructure for TCP Workloads with Intel® Xeon® Scalable Processors 41
Table 9. Scenario configurations for platform based on the Intel® Xeon® Platinum 8180 processor only.
Scenario Configuration # vCPUs per VM
Core Pinning Schema for PMD Threads Memory (GB) per VM
#Queues
# PMD Threads
All PMD threads on different physical cores?
SC# 8 8 16 No 8 8
SC# 9 10 8 Yes 16 10
SC# 10 10 10 Yes 16 10
SC# 11 10 20 No 16 10
6.1 Performance Benchmarks—VM to VM on a Single Host
The performance benchmarks show the performance of intra-host TCP traffic between VMs running on the same host. Use case examples of this type of traffic are a web server communicating with a database engine hosted in the public cloud or the TCP speed test server running in the virtualized environment in a communication service provider’s datacenter. Multiple VMs and VNFs running concurrently on the same host maximize the utilization of shared hardware and software resources.
The improved performance and large number of cores on the Intel Xeon Platinum 8180 processors mitigates the risk of traffic bottlenecks in virtual networks and enable NFV environments to be ready for the 100 GbE network standards in the future.
Figure 2. Intra-host TCP traffic speed test configuration.
All the test configurations presented in Table 8 and Table 9, demonstrate much higher throughput with the Intel Xeon Platinum 8180 processors (see Test Case 1 and Test Case 2). The next sections provide performance comparisons of several scenario configurations.
6.1.1 Test Case 1: Network Throughput Scaling
Test case 1 uses corresponding test configurations for both compared platforms. The test results demonstrate significantly higher throughput on platforms with the Intel Xeon Platinum 8180 processors than with the prior generation of the Intel Xeon processor. This test case also shows how throughput scales on both platforms when resources are increased, by comparing two scenario configurations presented in Table 8, namely SC# 3 and SC# 5.
Figure 3 shows that the average throughput on the platform with Intel Xeon Platinum 8180 processors as OpenStack controller and compute nodes was up to 62% higher than the corresponding platform with an Intel Xeon processor E5-2680 v3 as a controller node and Intel Xeon processor E5-2680 v2 as a compute node. It also shows that TCP throughput improves as VM resources increase; however, the platform based on the Intel Xeon Platinum 8180 processors processes TCP traffic faster than the corresponding platform with the prior CPU generation, even when fewer virtual CPUs are used per single VM.

Optimizing NFV Infrastructure for TCP Workloads with Intel® Xeon® Scalable Processors 42
Figure 3. Average throughput at both platforms comparing corresponding scenario configurations.
46%
62%
6.1.2 Test Case 2: Comparison of Top Scenario Configurations
Test case 2 compares the best performing scenario configurations on both platforms, namely the SC# 5 scenario configuration with the Intel Xeon processor E5-2680 v3 as an OpenStack controller node and Intel Xeon processor E5-2680 v2 as a compute node, compared to the SC# 9 scenario configuration with Intel Xeon Platinum 8180 processors as both OpenStack controller and compute nodes.
The large number of cores in the Intel Xeon Platinum 8180 processor enables assignment of a much higher number of virtual cores per VM. In addition to the numerous architectural improvements and features added, the processor’s high core count can be used to get a significant performance boost.
Figure 4 shows an average throughput gain of 232% when comparing the best scenario configurations of both platforms. Using four virtual cores per VM on the Intel Xeon processor E5-2680 v2 platform and ten virtual cores per VM on the Intel Xeon Platinum 8180 processor platform, the latter platform had 34.2% higher throughput per core. Specifically, the Intel Xeon Platinum 8180 processor as an OpenStack compute node showed an average throughput of 15.1 Gbps per core, while the Intel Xeon processor E5-2680 v2 as an OpenStack compute node averaged 11.2 Gbps per core.
Figure 4. Top Intel® Xeon® processor E5-2680 v2 performance with four PMD threads, four virtual cores per VM vs. the Intel® Xeon® Platinum 8180 processor with eight PMD threads, ten virtual cores per VM.

Optimizing NFV Infrastructure for TCP Workloads with Intel® Xeon® Scalable Processors 43
7.0 Summary
The average and maximum TCP speed test throughput results showed significant performance improvements on the platform with Intel Xeon Platinum 8180 processors as OpenStack controller node and compute nodes, over the platform with an Intel Xeon processor E5-2680 v3 as an OpenStack controller node and an Intel Xeon processor E5-2680 v2 as a compute node. In this scenario, both VMs were deployed on the same OpenStack compute node and at the same host. For example, the percentage improvement for corresponding configurations (four virtual cores per VM and four PMD threads) reached 62%. Comparing the top platform configurations, the average throughput improved by up to 232%.
The previous Solution Implementation Guide showed that for the platform with the Intel Xeon processor E5-2680 v2 as an OpenStack compute node, an average throughput of 45 Gbps was achieved. With the new Intel Xeon Platinum 8180 processor as an OpenStack compute node, the achievable average throughput increased up to 150 Gbps, which is a three times higher throughput.
Even higher TCP throughput may be possible if more cores per VM are allocated to the TCP speed test. The reason for limiting that number to ten cores per VM was to allow for additional workloads and VNFs on the same setup, as needed. The high core count of the Intel Xeon Scalable processors, combined with architectural improvements, feature enhancements, and very high memory bandwidth, is a huge performance and scalability advantage over previous Intel Xeon processor generations, especially in today’s NFV environments.
The Intel Xeon processor advisor tool suite available at this link, includes a “Transition Guide” that can be used for recommended processor upgrade paths to Intel Xeon Scalable processors and the “Xeon processor advisor” tool for performance, power and Total Cost of Ownership (TCO) calculations.
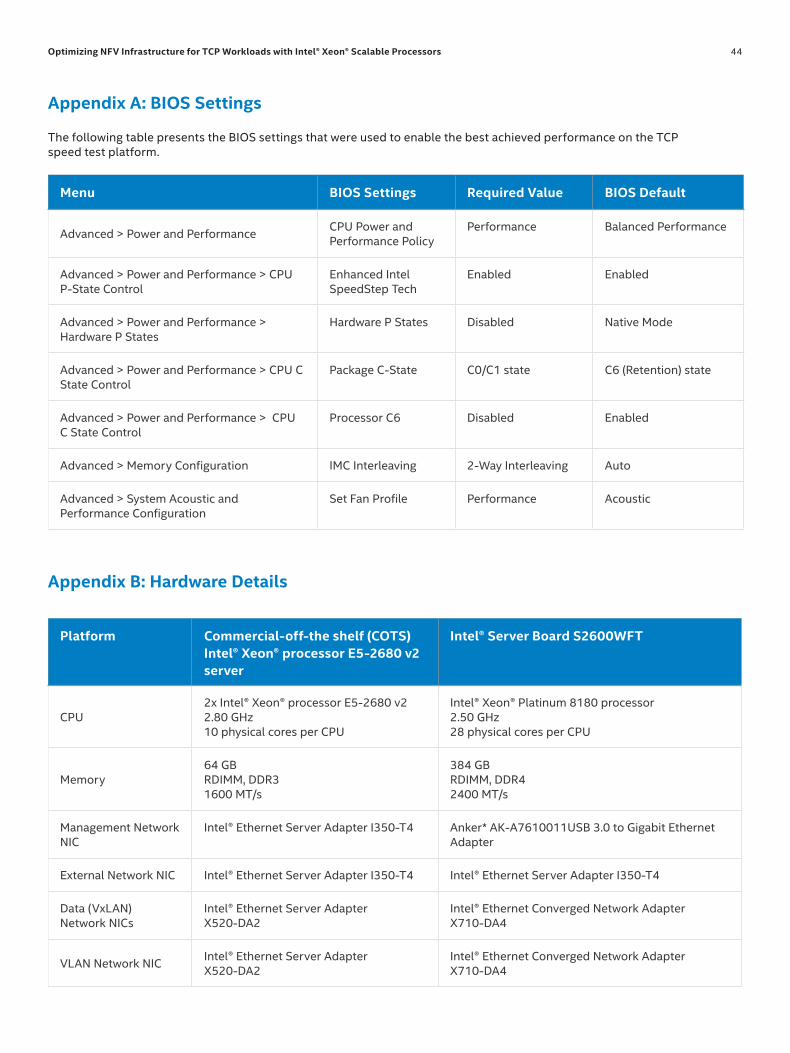
Optimizing NFV Infrastructure for TCP Workloads with Intel® Xeon® Scalable Processors 44
Appendix A: BIOS Settings
The following table presents the BIOS settings that were used to enable the best achieved performance on the TCP speed test platform.
Menu BIOS Settings Required Value BIOS Default
Advanced > Power and Performance CPU Power and Performance Policy
Performance Balanced Performance
Advanced > Power and Performance > CPU P-State Control
Enhanced Intel SpeedStep Tech
Enabled Enabled
Advanced > Power and Performance > Hardware P States
Hardware P States Disabled Native Mode
Advanced > Power and Performance > CPU C State Control
Package C-State C0/C1 state C6 (Retention) state
Advanced > Power and Performance > CPU C State Control
Processor C6 Disabled Enabled
Advanced > Memory Configuration IMC Interleaving 2-Way Interleaving Auto
Advanced > System Acoustic and Performance Configuration
Set Fan Profile Performance Acoustic
Platform Commercial-off-the shelf (COTS) Intel® Xeon® processor E5-2680 v2 server
Intel® Server Board S2600WFT
CPU2x Intel® Xeon® processor E5-2680 v2 2.80 GHz 10 physical cores per CPU
Intel® Xeon® Platinum 8180 processor 2.50 GHz 28 physical cores per CPU
Memory64 GB RDIMM, DDR3 1600 MT/s
384 GB RDIMM, DDR4 2400 MT/s
Management Network NIC
Intel® Ethernet Server Adapter I350-T4 Anker* AK-A7610011USB 3.0 to Gigabit Ethernet Adapter
External Network NIC Intel® Ethernet Server Adapter I350-T4 Intel® Ethernet Server Adapter I350-T4
Data (VxLAN) Network NICs
Intel® Ethernet Server Adapter X520-DA2
Intel® Ethernet Converged Network Adapter X710-DA4
VLAN Network NIC Intel® Ethernet Server Adapter X520-DA2
Intel® Ethernet Converged Network Adapter X710-DA4
Appendix B: Hardware Details
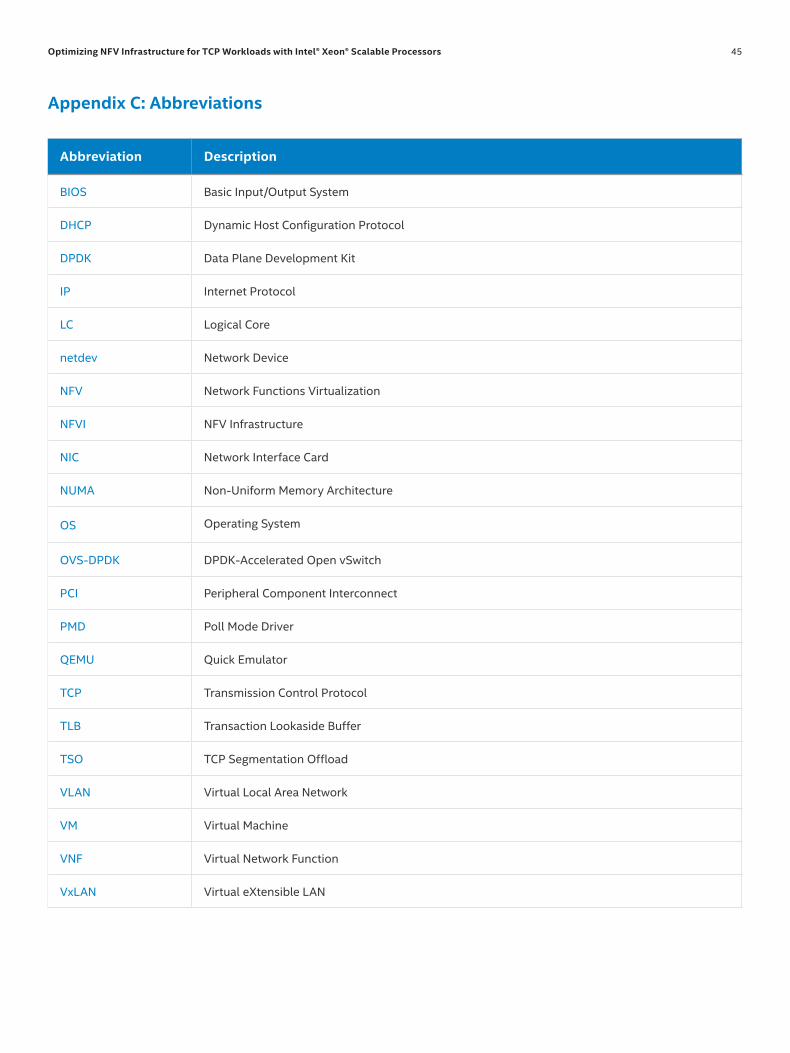
Optimizing NFV Infrastructure for TCP Workloads with Intel® Xeon® Scalable Processors 45
Appendix C: Abbreviations
Abbreviation Description
BIOS Basic Input/Output System
DHCP Dynamic Host Configuration Protocol
DPDK Data Plane Development Kit
IP Internet Protocol
LC Logical Core
netdev Network Device
NFV Network Functions Virtualization
NFVI NFV Infrastructure
NIC Network Interface Card
NUMA Non-Uniform Memory Architecture
OS Operating System
OVS-DPDK DPDK-Accelerated Open vSwitch
PCI Peripheral Component Interconnect
PMD Poll Mode Driver
QEMU Quick Emulator
TCP Transmission Control Protocol
TLB Transaction Lookaside Buffer
TSO TCP Segmentation Offload
VLAN Virtual Local Area Network
VM Virtual Machine
VNF Virtual Network Function
VxLAN Virtual eXtensible LAN
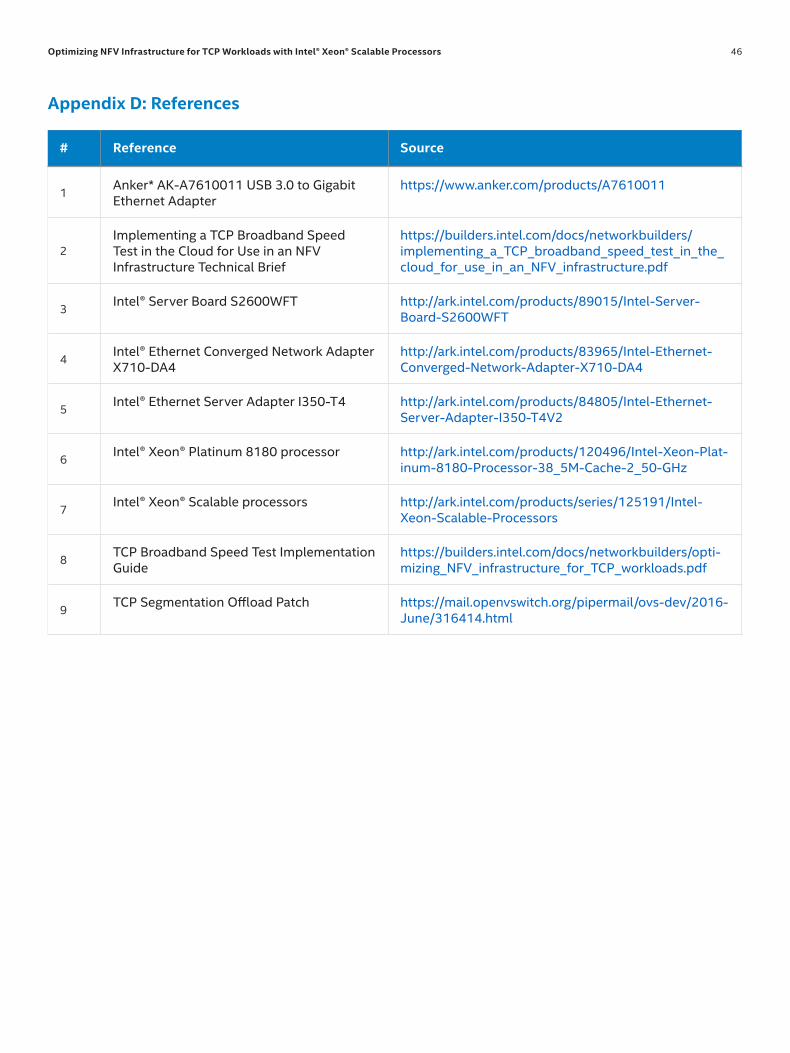
Optimizing NFV Infrastructure for TCP Workloads with Intel® Xeon® Scalable Processors 46
# Reference Source
1Anker* AK-A7610011 USB 3.0 to Gigabit Ethernet Adapter
https://www.anker.com/products/A7610011
2Implementing a TCP Broadband Speed Test in the Cloud for Use in an NFV Infrastructure Technical Brief
https://builders.intel.com/docs/networkbuilders/implementing_a_TCP_broadband_speed_test_in_the_cloud_for_use_in_an_NFV_infrastructure.pdf
3Intel® Server Board S2600WFT http://ark.intel.com/products/89015/Intel-Server-
Board-S2600WFT
4Intel® Ethernet Converged Network Adapter X710-DA4
http://ark.intel.com/products/83965/Intel-Ethernet-Converged-Network-Adapter-X710-DA4
5Intel® Ethernet Server Adapter I350-T4 http://ark.intel.com/products/84805/Intel-Ethernet-
Server-Adapter-I350-T4V2
6Intel® Xeon® Platinum 8180 processor http://ark.intel.com/products/120496/Intel-Xeon-Plat-
inum-8180-Processor-38_5M-Cache-2_50-GHz
7Intel® Xeon® Scalable processors http://ark.intel.com/products/series/125191/Intel-
Xeon-Scalable-Processors
8TCP Broadband Speed Test Implementation Guide
https://builders.intel.com/docs/networkbuilders/opti-mizing_NFV_infrastructure_for_TCP_workloads.pdf
9TCP Segmentation Offload Patch https://mail.openvswitch.org/pipermail/ovs-dev/2016-
June/316414.html
Appendix D: References
Optimizing NFV Infrastructure for TCP Workloads with Intel® Xeon® Scalable Processors 47Optimizing NFV Infrastructure for TCP Workloads with Intel® Xeon® Scalable Processors
Legal Information
By using this document, in addition to any agreements you have with Intel, you accept the terms set forth below.
You may not use or facilitate the use of this document in connection with any infringement or other legal analysis concerning Intel products described herein. You agree to grant Intel a non-exclusive, royalty-free license to any patent claim thereafter drafted which includes subject matter disclosed herein.
INFORMATION IN THIS DOCUMENT IS PROVIDED IN CONNECTION WITH INTEL PRODUCTS. NO LICENSE, EXPRESS OR IMPLIED, BY ESTOPPEL OR OTHERWISE, TO ANY INTELLECTUAL PROPERTY RIGHTS IS GRANTED BY THIS DOCUMENT. EXCEPT AS PROVIDED IN INTEL'S TERMS AND CONDITIONS OF SALE FOR SUCH PRODUCTS, INTEL ASSUMES NO LIABILITY WHATSOEVER AND INTEL DISCLAIMS ANY EXPRESS OR IMPLIED WARRANTY, RELATING TO SALE AND/OR USE OF INTEL PRODUCTS INCLUDING LIABILITY OR WARRANTIES RELATING TO FITNESS FOR A PARTICULAR PURPOSE, MERCHANTABILITY, OR INFRINGEMENT OF ANY PATENT, COPYRIGHT OR OTHER INTELLECTUAL PROPERTY RIGHT.
Software and workloads used in performance tests may have been optimized for performance only on Intel microprocessors. Performance tests, such as SYSmark and MobileMark, are measured using specific computer systems, components, software, operations and functions. Any change to any of those factors may cause the results to vary. You should consult other information and performance tests to assist you in fully evaluating your contemplated purchases, including the performance of that product when combined with other products. For more information go to www.intel.com/benchmarks.
The products described in this document may contain design defects or errors known as errata which may cause the product to deviate from published specifications. Current characterized errata are available on request. Contact your local Intel sales office or your distributor to obtain the latest specifications and before placing your product order.
Intel processors of the same SKU may vary in frequency or power as a result of natural variability in the production process.
Intel technologies’ features and benefits depend on system configuration and may require enabled hardware, software or service activation. Performance varies depending on system configuration. No computer system can be absolutely secure. Check with your system manufacturer or retailer or learn more at intel.com.
Intel® Turbo Boost Technology requires a PC with a processor with Intel Turbo Boost Technology capability. Intel Turbo Boost Technology performance varies depending on hardware, software and overall system configuration. Check with your PC manufacturer on whether your system delivers Intel Turbo Boost Technology. For more information, see http://www.intel.com/technology/turboboost.
All products, computer systems, dates and figures specified are preliminary based on current expectations, and are subject to change without notice. Results have been estimated or simulated using internal Intel analysis or architecture simulation or modeling, and provided to you for informational purposes. Any differences in your system hardware, software or configuration may affect your actual performance.
Intel does not control or audit third-party web sites referenced in this document. You should visit the referenced web site and confirm whether referenced data are accurate.
Intel Corporation may have patents or pending patent applications, trademarks, copyrights, or other intellectual property rights that relate to the presented subject matter. The furnishing of documents and other materials and information does not provide any license, express or implied, by estoppel or otherwise, to any such patents, trademarks, copyrights, or other intellectual property rights.
Intel, the Intel logo, Xeon, and others are trademarks of Intel Corporation or its subsidiaries in the U.S. and/or other countries.
*Other names and brands may be claimed as the property of others.
© 2017 Intel Corporation Printed in USA 336501-002US Please Recycle 1017/HM/ICMCSW/PDF002