Embed Size (px)
Citation preview

The Texas Medicaid & Healthcare Partnership presents:
Workshop Manual
Fall 2005Acute Care TDHconnect 3.0

Current Procedural Terminology (CPT®) is copyright 2005 American Medical Association. All Rights Reserved. No fee schedules, basic units, relative values, or related listings are included in CPT. The AMA assumes no liability for the data contained herein. Applicable FARS/DFARS restrictions apply to government use. CPT® is a trademark of the American Medical Association.

Table of Contents
1 TDHconnect 3.0 Overview . . . . . . . . . . . . . . . . . . . . . . . . . . . . . . . . . . . . . . . . . . . . . . . . . . . . . . . . 12 TDHconnect 3.0 Hardware and Software Requirements . . . . . . . . . . . . . . . . . . . . . . . . . . . . . . . . 33 Obtaining Support . . . . . . . . . . . . . . . . . . . . . . . . . . . . . . . . . . . . . . . . . . . . . . . . . . . . . . . . . . . . . . . 5
3.1 Getting Technical Assistance . . . . . . . . . . . . . . . . . . . . . . . . . . . . . . . . . . . . . . . . . . . . . . . 53.2 Accessing Training Resources . . . . . . . . . . . . . . . . . . . . . . . . . . . . . . . . . . . . . . . . . . . . . . . 53.3 Getting Claims Assistance . . . . . . . . . . . . . . . . . . . . . . . . . . . . . . . . . . . . . . . . . . . . . . . . . . 6
4 Accessing Documentation. . . . . . . . . . . . . . . . . . . . . . . . . . . . . . . . . . . . . . . . . . . . . . . . . . . . . . . . . 74.1 Using TDHconnect 3.0 Online Help . . . . . . . . . . . . . . . . . . . . . . . . . . . . . . . . . . . . . . . . . 7
4.1.1 Opening the TDHconnect 3.0 Online Help File . . . . . . . . . . . . . . . . . . . . . . . . . 74.1.2 Using the TDHconnect 3.0 Online Help File . . . . . . . . . . . . . . . . . . . . . . . . . . . 7
4.2 The TDHconnect 3.0 Quick Start Guide . . . . . . . . . . . . . . . . . . . . . . . . . . . . . . . . . . . . . . 84.3 The TDHconnect 3.0 User Manual . . . . . . . . . . . . . . . . . . . . . . . . . . . . . . . . . . . . . . . . . . 8
5 Accessing the TMHP Website. . . . . . . . . . . . . . . . . . . . . . . . . . . . . . . . . . . . . . . . . . . . . . . . . . . . . . 95.1 Activating an Account on the TMHP Website . . . . . . . . . . . . . . . . . . . . . . . . . . . . . . . . . 95.2 Finding Information on the TMHP Website . . . . . . . . . . . . . . . . . . . . . . . . . . . . . . . . . . 10
5.2.1 Publications . . . . . . . . . . . . . . . . . . . . . . . . . . . . . . . . . . . . . . . . . . . . . . . . . . . . . 105.2.2 Banner Messages . . . . . . . . . . . . . . . . . . . . . . . . . . . . . . . . . . . . . . . . . . . . . . . . . 105.2.3 Reference Codes . . . . . . . . . . . . . . . . . . . . . . . . . . . . . . . . . . . . . . . . . . . . . . . . . 115.2.4 Other TDHconnect 3.0 Resources Online. . . . . . . . . . . . . . . . . . . . . . . . . . . . . 11
6 Installing TDHconnect 3.0 . . . . . . . . . . . . . . . . . . . . . . . . . . . . . . . . . . . . . . . . . . . . . . . . . . . . . . . 136.1 Before Installing . . . . . . . . . . . . . . . . . . . . . . . . . . . . . . . . . . . . . . . . . . . . . . . . . . . . . . . . . 136.2 Installing TDHconnect 3.0 on a LAN . . . . . . . . . . . . . . . . . . . . . . . . . . . . . . . . . . . . . . . 136.3 Installation Steps . . . . . . . . . . . . . . . . . . . . . . . . . . . . . . . . . . . . . . . . . . . . . . . . . . . . . . . . 156.4 Setting the Dialing Properties in Windows® . . . . . . . . . . . . . . . . . . . . . . . . . . . . . . . . . . 166.5 Finishing the Installation . . . . . . . . . . . . . . . . . . . . . . . . . . . . . . . . . . . . . . . . . . . . . . . . . . 16
7 Updating TDHconnect 3.0 . . . . . . . . . . . . . . . . . . . . . . . . . . . . . . . . . . . . . . . . . . . . . . . . . . . . . . . 177.1 Downloading TDHconnect 3.0 Service Packs . . . . . . . . . . . . . . . . . . . . . . . . . . . . . . . . . 177.2 Installing a TDHconnect 3.0 Service Pack . . . . . . . . . . . . . . . . . . . . . . . . . . . . . . . . . . . 18
8 Opening and Logging on to TDHconnect 3.0 . . . . . . . . . . . . . . . . . . . . . . . . . . . . . . . . . . . . . . . . 199 Keyboard Shortcuts & Function Keys . . . . . . . . . . . . . . . . . . . . . . . . . . . . . . . . . . . . . . . . . . . . . . 2110 Setting Up Communications in TDHconnect 3.0 . . . . . . . . . . . . . . . . . . . . . . . . . . . . . . . . . . . . . 23
10.1 System Settings. . . . . . . . . . . . . . . . . . . . . . . . . . . . . . . . . . . . . . . . . . . . . . . . . . . . . . . . . . 2310.2 Modem Settings . . . . . . . . . . . . . . . . . . . . . . . . . . . . . . . . . . . . . . . . . . . . . . . . . . . . . . . . . 24
11 Setting Up Reference Files in TDHconnect 3.0 . . . . . . . . . . . . . . . . . . . . . . . . . . . . . . . . . . . . . . . 2511.1 Adding Clients . . . . . . . . . . . . . . . . . . . . . . . . . . . . . . . . . . . . . . . . . . . . . . . . . . . . . . . . . . 2511.2 Adding Providers . . . . . . . . . . . . . . . . . . . . . . . . . . . . . . . . . . . . . . . . . . . . . . . . . . . . . . . . 2711.3 Downloading Reference Codes . . . . . . . . . . . . . . . . . . . . . . . . . . . . . . . . . . . . . . . . . . . . 2911.4 Downloading Updated Reference Codes (Retrieve Other) . . . . . . . . . . . . . . . . . . . . . . . 30
11.4.1 Downloading Compass21 (C21) Reference Codes . . . . . . . . . . . . . . . . . . . . . . 30
PR-TDHc3.0AC_10.14.05_v.1.0

TDHconnect 3.0—Workbook for Acute Care Providers
12 TDHconnect 3.0 System Maintenance . . . . . . . . . . . . . . . . . . . . . . . . . . . . . . . . . . . . . . . . . . . . . . 3112.1 System Functions Overview . . . . . . . . . . . . . . . . . . . . . . . . . . . . . . . . . . . . . . . . . . . . . . . 3112.2 Database Utilities . . . . . . . . . . . . . . . . . . . . . . . . . . . . . . . . . . . . . . . . . . . . . . . . . . . . . . . . 31
12.2.1 Compress Tab . . . . . . . . . . . . . . . . . . . . . . . . . . . . . . . . . . . . . . . . . . . . . . . . . . . 3212.2.2 Purge Tab . . . . . . . . . . . . . . . . . . . . . . . . . . . . . . . . . . . . . . . . . . . . . . . . . . . . . . . 3212.2.3 Mapper Tab . . . . . . . . . . . . . . . . . . . . . . . . . . . . . . . . . . . . . . . . . . . . . . . . . . . . . 3212.2.4 Back-up Tab . . . . . . . . . . . . . . . . . . . . . . . . . . . . . . . . . . . . . . . . . . . . . . . . . . . . . 33
12.3 Password Administration. . . . . . . . . . . . . . . . . . . . . . . . . . . . . . . . . . . . . . . . . . . . . . . . . . 3412.4 Scheduling . . . . . . . . . . . . . . . . . . . . . . . . . . . . . . . . . . . . . . . . . . . . . . . . . . . . . . . . . . . . . 34
12.4.1 Scheduler Dialog Box—Options Tab. . . . . . . . . . . . . . . . . . . . . . . . . . . . . . . . . 3512.4.2 Send Requests Tab. . . . . . . . . . . . . . . . . . . . . . . . . . . . . . . . . . . . . . . . . . . . . . . . 3512.4.3 Get Responses Tab . . . . . . . . . . . . . . . . . . . . . . . . . . . . . . . . . . . . . . . . . . . . . . . 3612.4.4 Database Tab . . . . . . . . . . . . . . . . . . . . . . . . . . . . . . . . . . . . . . . . . . . . . . . . . . . . 3712.4.5 History Tab . . . . . . . . . . . . . . . . . . . . . . . . . . . . . . . . . . . . . . . . . . . . . . . . . . . . . 38
12.5 Security Admin (Add Users) . . . . . . . . . . . . . . . . . . . . . . . . . . . . . . . . . . . . . . . . . . . . . . . 3812.5.1 Security Wizard Step 1 . . . . . . . . . . . . . . . . . . . . . . . . . . . . . . . . . . . . . . . . . . . . . 3912.5.2 Security Wizard Step 4 . . . . . . . . . . . . . . . . . . . . . . . . . . . . . . . . . . . . . . . . . . . . . 40
13 Finding TMHP on the Internet. . . . . . . . . . . . . . . . . . . . . . . . . . . . . . . . . . . . . . . . . . . . . . . . . . . . 4114 Using the TDHconnect System Totals Window . . . . . . . . . . . . . . . . . . . . . . . . . . . . . . . . . . . . . . 43
14.1 Program Summary Tab . . . . . . . . . . . . . . . . . . . . . . . . . . . . . . . . . . . . . . . . . . . . . . . . . . . 4314.1.1 Batch Request Status . . . . . . . . . . . . . . . . . . . . . . . . . . . . . . . . . . . . . . . . . . . . . . 4314.1.2 Batch Transmission Process . . . . . . . . . . . . . . . . . . . . . . . . . . . . . . . . . . . . . . . . 44
14.2 Send Requests Tab. . . . . . . . . . . . . . . . . . . . . . . . . . . . . . . . . . . . . . . . . . . . . . . . . . . . . . . 4414.3 Retrieve Responses Tab. . . . . . . . . . . . . . . . . . . . . . . . . . . . . . . . . . . . . . . . . . . . . . . . . . . 4514.4 Retrieve Other Tab . . . . . . . . . . . . . . . . . . . . . . . . . . . . . . . . . . . . . . . . . . . . . . . . . . . . . . 45
14.4.1 Retrieve ER&S Reports . . . . . . . . . . . . . . . . . . . . . . . . . . . . . . . . . . . . . . . . . . . . 4614.4.2 Retrieve Reference Codes . . . . . . . . . . . . . . . . . . . . . . . . . . . . . . . . . . . . . . . . . . 46
15 Medicaid Eligibility. . . . . . . . . . . . . . . . . . . . . . . . . . . . . . . . . . . . . . . . . . . . . . . . . . . . . . . . . . . . . . 4715.1 Changes Due to HIPAA . . . . . . . . . . . . . . . . . . . . . . . . . . . . . . . . . . . . . . . . . . . . . . . . . . 4715.2 Beginning the Eligibility Request . . . . . . . . . . . . . . . . . . . . . . . . . . . . . . . . . . . . . . . . . . . 4715.3 Creating an Eligibility Template . . . . . . . . . . . . . . . . . . . . . . . . . . . . . . . . . . . . . . . . . . . . 4815.4 Submitting and Retrieving Eligibility Requests. . . . . . . . . . . . . . . . . . . . . . . . . . . . . . . . . 49
15.4.1 Submit/Retrieve Interactive Requests . . . . . . . . . . . . . . . . . . . . . . . . . . . . . . . . 4915.4.2 Submit/Retrieve Batch Requests . . . . . . . . . . . . . . . . . . . . . . . . . . . . . . . . . . . . 49
15.5 Medicaid Eligibility—Response . . . . . . . . . . . . . . . . . . . . . . . . . . . . . . . . . . . . . . . . . . . . 4915.6 Printing Eligibility Reports . . . . . . . . . . . . . . . . . . . . . . . . . . . . . . . . . . . . . . . . . . . . . . . . 50
16 TDHconnect 3.0 Log On Error Messages . . . . . . . . . . . . . . . . . . . . . . . . . . . . . . . . . . . . . . . . . . . 5116.1 Using TDHconnect Utilities to Log Off a User. . . . . . . . . . . . . . . . . . . . . . . . . . . . . . . . 5116.2 Using the Windows® Task Manager to Shut Down TDHconnect 3.0 . . . . . . . . . . . . . 52
17 Medicaid and Family Planning Claims (Title XIX). . . . . . . . . . . . . . . . . . . . . . . . . . . . . . . . . . . . . 5317.1 Changes to Claims Resulting from HIPAA . . . . . . . . . . . . . . . . . . . . . . . . . . . . . . . . . . . 5317.2 Filing Professional Claims . . . . . . . . . . . . . . . . . . . . . . . . . . . . . . . . . . . . . . . . . . . . . . . . . 54
17.2.1 Patient Tab . . . . . . . . . . . . . . . . . . . . . . . . . . . . . . . . . . . . . . . . . . . . . . . . . . . . . . 54
PR-TDHc3.0AC_10.14.05_v.1.0

17.2.2 Provider Tab . . . . . . . . . . . . . . . . . . . . . . . . . . . . . . . . . . . . . . . . . . . . . . . . . . . . 5517.2.3 Claim Tab . . . . . . . . . . . . . . . . . . . . . . . . . . . . . . . . . . . . . . . . . . . . . . . . . . . . . . . 5717.2.4 Diagnosis Tab . . . . . . . . . . . . . . . . . . . . . . . . . . . . . . . . . . . . . . . . . . . . . . . . . . . 5817.2.5 Details Tab . . . . . . . . . . . . . . . . . . . . . . . . . . . . . . . . . . . . . . . . . . . . . . . . . . . . . . 5917.2.6 Other Insurance Tab . . . . . . . . . . . . . . . . . . . . . . . . . . . . . . . . . . . . . . . . . . . . . . 61
17.3 Submitting and Retrieving Requests . . . . . . . . . . . . . . . . . . . . . . . . . . . . . . . . . . . . . . . . . 6317.3.1 Submit/Retrieve Interactive Requests . . . . . . . . . . . . . . . . . . . . . . . . . . . . . . . . 6317.3.2 Submit/Retrieve Batch Requests . . . . . . . . . . . . . . . . . . . . . . . . . . . . . . . . . . . . 63
17.4 Eyeglass Claims . . . . . . . . . . . . . . . . . . . . . . . . . . . . . . . . . . . . . . . . . . . . . . . . . . . . . . . . . 6517.4.1 Claim Tab . . . . . . . . . . . . . . . . . . . . . . . . . . . . . . . . . . . . . . . . . . . . . . . . . . . . . . . 6517.4.2 Details Tab . . . . . . . . . . . . . . . . . . . . . . . . . . . . . . . . . . . . . . . . . . . . . . . . . . . . . . 66
17.5 Dental Claims. . . . . . . . . . . . . . . . . . . . . . . . . . . . . . . . . . . . . . . . . . . . . . . . . . . . . . . . . . . 6817.5.1 Claim Tab . . . . . . . . . . . . . . . . . . . . . . . . . . . . . . . . . . . . . . . . . . . . . . . . . . . . . . . 6817.5.2 Details Tab . . . . . . . . . . . . . . . . . . . . . . . . . . . . . . . . . . . . . . . . . . . . . . . . . . . . . . 68
17.6 Inpatient Claims . . . . . . . . . . . . . . . . . . . . . . . . . . . . . . . . . . . . . . . . . . . . . . . . . . . . . . . . . 7017.6.1 Patient Tab . . . . . . . . . . . . . . . . . . . . . . . . . . . . . . . . . . . . . . . . . . . . . . . . . . . . . . 7017.6.2 Provider Tab . . . . . . . . . . . . . . . . . . . . . . . . . . . . . . . . . . . . . . . . . . . . . . . . . . . . 7117.6.3 Claim Tab . . . . . . . . . . . . . . . . . . . . . . . . . . . . . . . . . . . . . . . . . . . . . . . . . . . . . . . 7217.6.4 Diagnosis Tab . . . . . . . . . . . . . . . . . . . . . . . . . . . . . . . . . . . . . . . . . . . . . . . . . . . 7417.6.5 Details Tab . . . . . . . . . . . . . . . . . . . . . . . . . . . . . . . . . . . . . . . . . . . . . . . . . . . . . . 74
17.7 Outpatient Claims . . . . . . . . . . . . . . . . . . . . . . . . . . . . . . . . . . . . . . . . . . . . . . . . . . . . . . . 7817.7.1 Patient Tab . . . . . . . . . . . . . . . . . . . . . . . . . . . . . . . . . . . . . . . . . . . . . . . . . . . . . . 7917.7.2 Provider Tab . . . . . . . . . . . . . . . . . . . . . . . . . . . . . . . . . . . . . . . . . . . . . . . . . . . . 7917.7.3 Claim Tab . . . . . . . . . . . . . . . . . . . . . . . . . . . . . . . . . . . . . . . . . . . . . . . . . . . . . . . 8117.7.4 Details Tab . . . . . . . . . . . . . . . . . . . . . . . . . . . . . . . . . . . . . . . . . . . . . . . . . . . . . . 81
17.8 Family Planning Claims . . . . . . . . . . . . . . . . . . . . . . . . . . . . . . . . . . . . . . . . . . . . . . . . . . . 8317.8.1 Patient Tab . . . . . . . . . . . . . . . . . . . . . . . . . . . . . . . . . . . . . . . . . . . . . . . . . . . . . . 8317.8.2 Provider Tab . . . . . . . . . . . . . . . . . . . . . . . . . . . . . . . . . . . . . . . . . . . . . . . . . . . . 8317.8.3 Claim Tab . . . . . . . . . . . . . . . . . . . . . . . . . . . . . . . . . . . . . . . . . . . . . . . . . . . . . . . 8517.8.4 Details Tab . . . . . . . . . . . . . . . . . . . . . . . . . . . . . . . . . . . . . . . . . . . . . . . . . . . . . . 8617.8.5 Submitting and Retrieving Requests . . . . . . . . . . . . . . . . . . . . . . . . . . . . . . . . . . 87
17.9 Printing Reports . . . . . . . . . . . . . . . . . . . . . . . . . . . . . . . . . . . . . . . . . . . . . . . . . . . . . . . . . 8818 Medicaid Claim Status Inquiry. . . . . . . . . . . . . . . . . . . . . . . . . . . . . . . . . . . . . . . . . . . . . . . . . . . . . 91
18.1 Create a New CSI Request . . . . . . . . . . . . . . . . . . . . . . . . . . . . . . . . . . . . . . . . . . . . . . . . 9118.1.1 Provider Patient Request . . . . . . . . . . . . . . . . . . . . . . . . . . . . . . . . . . . . . . . . . . . 9218.1.2 Claims Request. . . . . . . . . . . . . . . . . . . . . . . . . . . . . . . . . . . . . . . . . . . . . . . . . . . 93
18.2 Submitting and Retrieving Requests . . . . . . . . . . . . . . . . . . . . . . . . . . . . . . . . . . . . . . . . . 9318.2.1 Submit/Retrieve Interactive Requests . . . . . . . . . . . . . . . . . . . . . . . . . . . . . . . . 9318.2.2 Submit/Retrieve Batch Requests . . . . . . . . . . . . . . . . . . . . . . . . . . . . . . . . . . . . 93
18.3 Medicaid CSI—Printing Reports . . . . . . . . . . . . . . . . . . . . . . . . . . . . . . . . . . . . . . . . . . . 9519 Medicaid Electronic Remittance & Status (ER&S) . . . . . . . . . . . . . . . . . . . . . . . . . . . . . . . . . . . . 97
19.1 Download an ER&S Report . . . . . . . . . . . . . . . . . . . . . . . . . . . . . . . . . . . . . . . . . . . . . . . 9719.2 Generate an ER&S Report . . . . . . . . . . . . . . . . . . . . . . . . . . . . . . . . . . . . . . . . . . . . . . . . 9819.3 Medicaid ER&S—Print Report. . . . . . . . . . . . . . . . . . . . . . . . . . . . . . . . . . . . . . . . . . . . . 98
PR-TDHc3.0AC_10.14.05_v.1.0

TDHconnect 3.0—Workbook for Acute Care Providers
20 Medicaid Appeals . . . . . . . . . . . . . . . . . . . . . . . . . . . . . . . . . . . . . . . . . . . . . . . . . . . . . . . . . . . . . . . 9920.1 Changes to Appeals Resulting From HIPAA. . . . . . . . . . . . . . . . . . . . . . . . . . . . . . . . . . 9920.2 Three Ways to Complete TDHconnect Appeals . . . . . . . . . . . . . . . . . . . . . . . . . . . . . . . 9920.3 Create an Appeal from an Accepted TDHconnect Claim . . . . . . . . . . . . . . . . . . . . . . . 100
20.3.1 Create an Appeal from an ER&S Report . . . . . . . . . . . . . . . . . . . . . . . . . . . . . 10020.3.2 Create an Appeal from a Blank Form. . . . . . . . . . . . . . . . . . . . . . . . . . . . . . . . 102
20.4 Appeal Fields . . . . . . . . . . . . . . . . . . . . . . . . . . . . . . . . . . . . . . . . . . . . . . . . . . . . . . . . . . 10220.5 Medicaid Appeals—Submitting and Retrieving Requests . . . . . . . . . . . . . . . . . . . . . . . 103
20.5.1 Submit/Retrieve Batch Requests . . . . . . . . . . . . . . . . . . . . . . . . . . . . . . . . . . . . 10320.6 Medicaid Appeals—Printing Reports . . . . . . . . . . . . . . . . . . . . . . . . . . . . . . . . . . . . . . . 10420.7 Claim Status Inquiry Authorization Form . . . . . . . . . . . . . . . . . . . . . . . . . . . . . . . . . . . 10520.8 TDHconnect Order Form. . . . . . . . . . . . . . . . . . . . . . . . . . . . . . . . . . . . . . . . . . . . . . . . 10720.9 ER&S Agreement Form . . . . . . . . . . . . . . . . . . . . . . . . . . . . . . . . . . . . . . . . . . . . . . . . . 10920.10Submitter ID Linking Form . . . . . . . . . . . . . . . . . . . . . . . . . . . . . . . . . . . . . . . . . . . . . . 11120.11Electronic Funds Transfer Agreement . . . . . . . . . . . . . . . . . . . . . . . . . . . . . . . . . . . . . . 11320.12Glossary . . . . . . . . . . . . . . . . . . . . . . . . . . . . . . . . . . . . . . . . . . . . . . . . . . . . . . . . . . . . . . 11520.13Workshop Evaluation . . . . . . . . . . . . . . . . . . . . . . . . . . . . . . . . . . . . . . . . . . . . . . . . . . . 117
PR-TDHc3.0AC_10.14.05_v.1.0

TDHconnect 3.0 Overview
1 TDHconnect 3.0 Overview
With TDHconnect 3.0 you can:
• Administer billing for Family Planning, Long Term Care (LTC), Medicaid, and Children with Special Health Care Needs (CSHCN) clients (see HIPAA table).
• Support the submission of Blue Cross and Medicare claims
• Access the same database simultaneously—up to ten concurrent users per database
Important: Basic knowledge of Windows® operating systems is required to use TDHconnect 3.0.
Providers in rotary dial areas cannot use TDHconnect 3.0.
TDHconnect 3.0 works with a standard telephone line or the slower port (one that a telephone could connect to) of a DSL connection. TDHconnect 3.0 also works with and existing internet connection i.e. modem, cable or DSL internet connection (Service Pack 6 or higher).
See Section 8, “Opening and Logging on to TDHconnect 3.0” on page 19, for basic information on how to log on after installing TDHconnect 3.0 software.
HIPAA Compliant Transaction Types
Eligibility Request 270
Eligibility Response 271
Claim Status Inquiry 276
Claim Status Inquiry Response 277
ER&S Report 835
Dental Claims 837D
Institutional Claims 837I
Professional Claims 837P
Microsoft® and Windows® are either registered trademarks or trademarks of Microsoft Corporation in the United States and/or other countries.
Page 1

TDHconnect 3.0—Workbook for Acute Care Providers
NOTES
Page 2 PR-TDHc3.0AC_10.14.05_v.0.4

TDHconnect 3.0 Hardware and Software Requirements
2 TDHconnect 3.0 Hardware and Software Requirements
Important: Verify that your system meets the minimum requirements before attempting to install the TDHconnect 3.0 software.
The table below gives the minimum and recommended hardware configurations for running TDHconnect 3.0 software.
• To run TDHconnect 3.0, your computer system must meet the minimum requirements. TDHconnect 3.0 is not supported on non-Windows operating systems, or on systems not meeting the minimum requirements.
• For improved performance, your system should meet or exceed the recommended requirements.
Hardware and Software Requirements for TDHConnect 3.0
Platforms 400 MHz or greater processor is recommended with 256MB of RAM.
Windows 98, Windows, ME, Windows XP Home, Windows XP Pro, Windows NT 4.0 with Service Pack 6 or later, and Windows 2000 Pro.
Hard Drive Free space of 100MB for installation and 50MB per database.
Peripherals
CD-ROM Drive Any Speed
Display 800 x 600 VGA, 256 or more colors
Connectivity 9600bps minimum dial-up modem or Internet connection
Adobe Acrobat Reader _ latest version (Version 4.05 is included on the TDHconnect installation disk)
Internet Explorer_Version 6.0 or later
Adobe® and Acrobat Reader® are either registered trademarks or trademarks of Adobe Systems Incorporated in the United States and/or other countries.
Page 3

TDHconnect 3.0—Workbook for Acute Care Providers
NOTES
Page 4 PR-TDHc3.0AC_10.14.05_v.0.4

Obtaining Support
3 Obtaining Support
This section explains how to get assistance from Texas Medicaid & Healthcare Partnership (TMHP) with technical issues, training, and claims questions. This section also shows how to access additional resources on the TMHP website referenced below.
3.1 Getting Technical AssistanceThe TMHP Electronic Data Interchange (EDI) Help Desk provides technical assistance only with troubleshooting TDHconnect 3.0 and TMHP EDI Gateway system problems. Contact your system administrator for assistance with modem, hardware, internet connectivity or phone line issues.
Note: Providers in rotary dial areas cannot use TDHconnect 3.0.
To reach the TMHP EDI Help Desk (available Monday through Friday, 7:00 a.m. to 7:00 p.m. Central Time), select one of the following methods:
• For Medicaid, CSHCN, and Family Planning technical issues, call 1-888-863-3638.
• For Long Term Care technical issues, call 1-800-626-4117.Fax 1-512-514-4230 or 1-512-514-4228.
3.2 Accessing Training ResourcesThe TMHP EDI Help Desk does not provide training. To obtain training, call your TMHP provider relations representative (PRR) or attend one of the training workshops provided by TMHP Provider Relations.
Contact: To obtain information about your PRR, workshop, or other information call the TMHP Contact Center at 1-800-925-9126 or visit the TMHP website at www.tmhp.com/providers
For CSHCN Customer Service, call 1-800-568-2413.
For Long Term Care Customer Service, call the TMHP LTC Help Desk at 1-800-626-4117.
For Medicaid and Family Planning information, call the TMHP Contact Center at 1-800-925-9126.
TIP: For other Medicaid customer service numbers, refer to the Telephone and Addresses Guide in the current Texas Medicaid Provider Procedures Manual.
Page 5

TDHconnect 3.0—Workbook for Acute Care Providers
3.3 Getting Claims AssistanceFor answers to questions about Medicaid, Family Planning, and CSHCN electronic or paper claims call the TMHP Contact Center at 1-800-925-9126.
For links to Frequently Asked Questions (FAQs) and Medicaid workshop schedules, visit the TMHP website at www.tmhp.com.
For answers to questions about LTC electronic or paper claims call the TMHP LTC Help Desk at 1-800-626-4117. In Austin, call 335-4729.
For links to the LTC home page, visit the TMHP website at www.tmhp.com
TIP: For other useful numbers, refer to the Telephone and Addresses Guide in the current Texas Medicaid Provider Procedures Manual.
Page 6 PR-TDHc3.0AC_10.14.05_v.0.4

Accessing Documentation
4 Accessing Documentation
4.1 Using TDHconnect 3.0 Online Help
Important: The latest version of Internet Explorer should be installed on your computer to run TDHconnect 3.0 help. For additional information regarding Internet Explorer refer to www.microsoft.com.
TDHconnect 3.0 contains an online help file that is available after the TDHconnect 3.0 software is installed. The help topics provide instructions for using TDHconnect 3.0.
4.1.1 Opening the TDHconnect 3.0 Online Help File
There are three ways to open the TDHconnect 3.0 Online Help file:
4.1.2 Using the TDHconnect 3.0 Online Help File
4. The Search tab works like most Internet search engines. Enter the word or words to find in the “Type in the keyword to find” field and click List Topics. The help system lists the help topics that contain the keyword(s) you entered.
5. The Favorites tab allows you to bookmark the address of a help topic you use frequently. Open the help topic and select the Add in the Favorites tab to add a link to the current topic on the tab.
1. Click Help>Contents and Index on the TDHconnect 3.0 menu bar.
2. Click the help book icon on the TDHconnect 3.0 tool bar.
3. Press <F1> to open related help topics related to the TDHconnect 3.0 active window.
1. Contents, Index, Search, and Favorites tabs on the left side of the window provide access to help topics, and the right side contains the selected help information and instructional steps.
2. The Contents tab contains a multi-tiered list of help topics in TDHconnect 3.0 help.
3. The Index tab contains an alphabetized index for TDHconnect 3.0 help.
Page 7

TDHconnect 3.0—Workbook for Acute Care Providers
4.2 The TDHconnect 3.0 Quick Start GuideIn addition to the instructions contained in this manual, the installation and setup instructions are also contained in the TDHconnect 3.0 Quick Start Guide. A printed copy of the TDHconnect 3.0 Quick Start Guide is sent with the software.
Important: The latest version of Adobe Acrobat Reader is recommended to open, view, and print the electronic version of the TDHconnect 3.0 Quick Start Guide.
4.3 The TDHconnect 3.0 User Manual An electronic version of the TDHconnect 3.0 User Manual is available inside TDHconnect 3.0 after installation. Click Help>Online Manuals>User Manual on the TDHconnect 3.0 menu bar. Acrobat Reader opens and displays the TDHconnect 3.0 User Manual.
To print the TDHconnect 3.0 User Manual, select File>Print on the Adobe Acrobat Reader menu bar, select the printer and printer settings, and click OK.
Important: The latest version of Adobe Acrobat Reader is recommended to open, view, and print the electronic version of the TDHconnect 3.0 User Manual.
Page 8 PR-TDHc3.0AC_10.14.05_v.0.4

Accessing the TMHP Website
5 Accessing the TMHP Website
The TMHP website is a valuable resource for obtaining information such as bulletins, banner pages, provider manuals, and TDHconnect 3.0 updates. The TMHP website provides documentation, email and chat features that allow you to contact TMHP representatives for assistance.
All enrolled providers are given an account to access the TMHP website, but you must activate your account and select a password to gain access to many of the advanced features of the TMHP website such as:
• Forums
• Polls and questionnaires
• Claim status inquiry (Acute Care providers only)
• Eligibility verification (Acute Care providers only)
NEED TO Submit Individual Graphic file(not imbedded within MS Word) as a bitmap (as large as possible 100%, thereby enhancing resolution)
Note: If you do not receive your user name and password within 24 hours, please contact the TMHP EDI Help Desk at 1-888-863-3638 for assistance.
5.1 Activating an Account on the TMHP WebsiteTPI/Provider Number validation then requires the entry of specific information that is stored in the Compass21/CMS System. The validation process may require a combination of any of the following information:
• TPI/Provider Number (9 digit)
• Security Fields: Tax ID/SSN, SSN, EDI Submitter ID, Medical License, Texas Identification Number (TIN) (LTC specific)
• Current ICN (found from one of the last three weekly R&S reports, prior to date of enrollment)
• PIN (only required when ICN is not available)
When the user is validating this information, only the fields that are applicable to the TPI/Provider Number will be displayed. For example: EDI Submitter ID will not be required if the provider does not submit electronically
Page 9

TDHconnect 3.0—Workbook for Acute Care Providers
Note: Refer to the TMHP Portal Security training manual. A copy may be downloaded at www.tmhp.com/provider.
5.2 Finding Information on the TMHP Website
5.2.1 Publications
Publications available online include the Texas Medicaid Provider Procedures Manual and bulletins. To download publications, follow these steps:
1. Access the TMHP web site at www.tmhp.com. The TMHP Home page opens.
2. Click the Find Publications/File library link in the I would like to… section. The TMHP File Library web page opens.
3. Use the links on the TMHP File Library web page to locate specific publications.
5.2.2 Banner Messages
To view banner messages from TMHP:
1. Access the TMHP website at www.tmhp.com. The TMHP Home page opens.
2. Click the Find Publications/File library link in the I would like to… section. The TMHP File Library web page opens.
Page 10 PR-TDHc3.0AC_10.14.05_v.0.4
Accessing the TMHP Website
3. Click the Banner Messages link. The TMHP File Library web page provides links to banner message files organized by publication date.
4. Use these links to select banner messages to view.
1. To print a banner message file, select File, then Print on your browser’s menu bar.
5.2.3 Reference Codes
Download reference codes using TDHconnect 3.0, or perform the following steps to download reference codes from the TMHP website:
Long Term Care
1. Access the TMHP web site at www.tmhp.com. The TMHP Home page opens.
2. Click the Providers link at the top of the page. The Providers web page opens.
3. Click the Long Term Care Programs link on the left side of the page. The Long Term Care Programs web page opens.
4. Scroll down to locate and click the LTC Reference Codes link. The TMHP File Library web page opens and provides links to reference code files available for download.
5. Click each file to download.
5.2.4 Other TDHconnect 3.0 Resources Online
To learn more about how to transmit transactions and current TDHconnect 3.0 issues, visit www.tmhp.com. Click the Find Publications/File Library link, then the TDHconnect link.
Page 11

TDHconnect 3.0—Workbook for Acute Care Providers
Page 12 PR-TDHc3.0AC_10.14.05_v.0.4

Installing TDHconnect 3.0
6 Installing TDHconnect 3.0
This section describes how to install the TDHconnect 3.0 software. TDHconnect 3.0 can be installed on a Local Area Network (LAN), or as a stand alone application on one or more independent computers. TMHP does not support networks.
6.1 Before Installing
Important: Before installing TDHconnect 3.0, carefully read and follow the sequence of installation tasks listed below. If the installation sequence is interrupted, TDHconnect 3.0 will not install correctly.
1. Determine that the computer(s) meet the hardware and software requirements described in Section 2, TDHconnect 3.0 Hardware and Software Requirements, on page 3.
2. Ensure that the latest version of Internet Explorer is installed. For more information you may go to www.microsoft.com.
3. Ensure that you have the latest version of Adobe Acrobat Reader. For more information, visit the Adobe website at www.adobe.com.
4. Create and save an external backup of TDHconnect onto tape, CD-ROM, or a separate machine if available.
6.2 Installing TDHconnect 3.0 on a LANThis section describes the steps necessary to install TDHconnect 3.0 on a LAN. Keep in mind the following as you prepare to install:
• Administrator rights are required when installing to a network.
• The system administrator must install TDHconnect 3.0 on each PC, and install the databases in a common LAN location.
• Since there is only one database (located on the server), only one Compass21 User ID and password is needed.
• The most current TDHconnect 3.0 Service Pack must be installed on each PC that has an installed copy of TDHconnect 3.0.
• The system administrator must map the individual PCs to the database location on the LAN.
• Download the required authorizations and agreements forms (as needed) from www.tmhp.com or contact the TMHP EDI Help Desk to obtain these forms. See Section 3, Obtaining Support, on page 5 for applicable help desk phone numbers.
• To determine the version of Internet Explorer installed on your system, start Internet Explorer, click Help on the Internet Explorer toolbar, and select About Internet Explorer. The About Internet Explorer dialog box opens.
• If Internet Explorer is not installed, use the TDHconnect 3.0 CD-ROM to install Internet Explorer 5.0.
Page 13

TDHconnect 3.0—Workbook for Acute Care Providers
• Open the TDHconnect 3.0 System Totals window, and select Communications>System Settings on the TDHconnect 3.0 menu bar. Verify you have a Production User ID in the “Compass21” and/or “Long Term Care User ID” fields.
Note: TDHconnect 3.0 does not support modem pools.
Page 14 PR-TDHc3.0AC_10.14.05_v.0.4

Installing TDHconnect 3.0
6.3 Installation Steps
Important: Administrator rights are required when installing TDHconnect 3.0 in a Windows® network environment.
1. Close all open applications and remove all media such as backup tapes, CD-ROMs, or removable disks.
2. Select Settings>Control Panel on the Windows® Start menu. Double click Add/Remove Programs. In the Install/Uninstall tab, click Install.
3. Insert the installation CD-ROM into your CD-ROM drive. Click Next. Click Browse.
4. Select the location of your CD-ROM drive in the “Look in” field. Select Setup.exe in the list of files and click Open.
5. Click Finish. The TDHconnect 3.0 installation window opens.
6. Read the welcome screen, click Next, and Next again to confirm that you are about to install TDHconnect 3.0. The Choose Destination Location window opens.
7. Click Next to install the default installation location, or click Browse to select a new location.
8. Click Next in the Start Copying Files window. After installation completes, the Acrobat Reader 4.05 Setup window opens.
Note: If Acrobat Reader 4.05 or higher is already installed on your system, click Cancel, click Yes, and skip to step 12.
9. Click Next to install Acrobat Reader 4.05. The Choose Destination Location window opens.
10. Click Next to install to the default location, or click Browse to select a new location. A message opens: “Copying program files…”
11. After installation is complete, the Information dialog box displays the following message: “Thank you for choosing Acrobat Reader!”
12. Click OK to close this dialog box. A message opens: “Do you wish to backup your databases?” This will overwrite databases that are in the Backup folder.
• Click Yes to back up the existing databases.
• Click No to skip backing up the databases.
13. The Setup Complete window opens.
• Select Yes, I want to restart my computer now to complete the installation now or
• Select No, I will restart my computer later to complete the installation later.
• Click Finish to close the window.
Note: The installation of TDHconnect 3.0 is not complete until you have restarted your computer.
Page 15
TDHconnect 3.0—Workbook for Acute Care Providers
6.4 Setting the Dialing Properties in Windows®
Important: Before you can send requests and retrieve responses, you must also set the dialing properties and communications settings in TDHconnect 3.0.
Note: The procedure below does not apply to Windows 2000.
1. Open the Windows® Start menu and select Settings>Control Panel.
2. Double click the Modems icon. If you have more than one modem installed or listed in the Modem Properties dialog box, select the modem that was set up during TDHconnect 3.0 installation.
3. On the Modem Properties dialog box, click Dial Properties.
4. If you must dial a number to access an outside line, proceed to step 5. If not, skip to step 7.
5. Enter 9 in the “To access outside lines for local calls, dial___” field.
6. Enter 9 in the “To access outside lines for long distance calls, dial___” field.
Note: Enter a number other than 9 if a different number is required by your service. Service Pack 6 or higher has connectivity options to use an existing internet connection (broadband, cable, DSL, satellite, or dial-up).
7. Click Apply and click OK in the Dialing Properties window.
8. In the Modem Properties window, click Close. Exit the Control Panel window.
Note: Verify that your modem speed range is set between 9600 baud (minimum) and 28.8k baud (maximum). Modem speed settings outside of this range may result in transmission/reception errors.
6.5 Finishing the InstallationIf TDHconnect 3.0 is still running, exit the program. Restart your computer to ensure that the installation is complete and that all settings are correctly applied.
Important: After installation, download the most recent Service Pack (see Section 8) to obtain critical software updates. Check www.tmhp.com for the most recent Service Pack release.
Note: If other applications are added after installing TDHconnect 3.0, the system administrator (or appropriate technical assistance group) should test TDHconnect 3.0 to ensure that the other applications did not disable TDHconnect 3.0. or that TDHconnect 3.0 did not disable other applications.
Page 16 PR-TDHc3.0AC_10.14.05_v.0.4

Updating TDHconnect 3.0
7 Updating TDHconnect 3.0
7.1 Downloading TDHconnect 3.0 Service PacksThe easiest way to obtain Service Packs is to download them from the TMHP website. However, this method works only if you have an Internet connection. This method may be slower than connecting to TMHP if you are using a dial-up connection.
Perform the following steps to download a Service Pack from the TMHP website:
9. Click Save. The Save As dialog box opens.
10. Save the file to the desktop.
11. After the download is complete, click Close and exit the TMHP website.
1. Connect to TMHP via the Internet (see section 5, Accessing the TMHP Website, on page 9. Verify that you are viewing the TMHP home page at www.tmhp.com.
2. Click the Find Software/Service Packs link in theI would like to… list on the right side of the home page.The TMHP File Library main page opens.
3. Scroll down to locate the File Library links.
4. Click the TDHconnect link. The TMHP File Library/TDHconnect web page opens.
5. Scroll down to locate the File Library links.
6. Click the TDHconnect Updates link. The TMHP File Library/TDHconnect/TDHconnect Updates web page opens.
7. Scroll down to locate the File Library links.
8. Select the current Service Pack:
The File Download dialog box opens.
Page 17

TDHconnect 3.0—Workbook for Acute Care Providers
7.2 Installing a TDHconnect 3.0 Service PackFollow the Steps below to Download TDHconnect 3.0 Service Pack to your computer:
1. Click to download TDHconnect Service Pack. A message opens: “Run this program from it’s current location” or “Save this program to disk”.
2. Select “Save this program to disk” then click OK. A dialog box will open asking where you want to save the file.
3. Click on the black arrow to the right of Save in at the top of the window to activate the drop down menu. Next click the Save button at the bottom of the window. The file will be saved top your desktop.
Installing TDHconnect 3.0 Service Pack
1. Step 1: Go to your desktop. Double-click on the icon named TDHSP6.msi.
Note: Windows 98 and Windows Millennium Edition (ME), users may get a Windows Installer error when attempting to install TDHconnect Service Pack. If this occurs, you will need to get the latest version of the installer from Microsoft. Cancel out of the remainder of the TDHconnect SP6 install by clicking the Cancel button. Then, go to Microsoft.com to download the Windows Installer 2.0 Redistributable for Windows 98, and Windows ME. Follow Microsoft's directions carefully and then retry the TDHconnect SP6 installation.
2. A window will open with the following message:
"Welcome to the TDHconnect Installation Wizard." Click Next.
3. Messages will appear regarding setup and location. Click Next, Next, and then click Next again to proceed with installation.
Note: Only experienced users should make changes to the default setup and location information.
4. A dialog box opens with the following message: TDHconnect has been successfully installed. Click Finish.
Note: If errors occur during the Service Pack installation, you may call the EDI Helpdesk at 1-888-863-3638 for assistance.
Page 18 PR-TDHc3.0AC_10.14.05_v.0.4

Opening and Logging on to TDHconnect 3.0
8 Opening and Logging on to TDHconnect 3.0
Important: Each user must have a unique TDHconnect 3.0 user ID and password. Additional user IDs can be created in TDHconnect 3.0 using the security function.
Note: When logging on, the following error messages may be encountered:
• Admin is currently logged on to TDHconnect
• TDHconnect is already running. Please open Task Manager and End Task for the Shell and Hints tasks that are running.
To resolve these errors, see the instructions in Section 16, TDHconnect 3.0 Log On Error Messages, on page 51.
1. Double click the TDHconnect 3.0 icon on your desktop. The TDHconnect Version 3.0 Login dialog box opens.
2. In the “User ID” field, enter admin in lowercase letters.
3. In the “Password” field, enter password in lowercase letters. The “Password” field is always case sensitive.
4. Click OK. TDHconnect 3.0 starts.
Page 19

TDHconnect 3.0—Workbook for Acute Care Providers
NOTES
Page 20 PR-TDHc3.0AC_10.14.05_v.0.4

Keyboard Shortcuts & Function Keys
9 Keyboard Shortcuts & Function Keys
The following tables describe the keyboard shortcuts and function key actions available inTDHconnect 3.0.
Keyboard Shortcuts
Press Action
<CTRL> + C Copy selected text
<CTRL> + E Focus on Error window
<CTRL> + D Delete a record from the database
<CTRL> + O Open a record from a list
<CTRL> + R Focus onTDHconnect Explorer
<CTRL> + S Save a request
<CTRL> + T Clear all fields on this window
<CTRL> + V Paste selected text
<CTRL> + W Focus on Workspace
<CTRL> + X Cut selected text
<ALT> + E Open Edit menu
<ALT> + H Open Help menu
<ALT> + N Open Navigation menu
<ALT> + R Open Reports menu
<ALT> + V Open View menu
<Shift> + <F1> Open What’s This?
Function Keys
Press Action
<F1> Access the Help files for information about the current window.
<F2> Access the Local Reference Database for the selected field.
Place the cursor in the field and press <F2>.
<F3> Copies a single cell.
Place the cursor beneath the cell to copy and press <F3>.
<F4> Copies the entire row.
Place the cursor beneath the line to copy and press <F4>.
<F5> Causes a window to refresh and display all data created simultaneously by multiple users of TDHconnect 3.0.
<F6> Inserts a new row.
Place the cursor on a row (the new line is added below this row) and press <F6>.
<F7> Deletes a row.
Place the cursor on the row to delete and press <F7>.
Page 21
TDHconnect 3.0—Workbook for Acute Care Providers
NOTES
Page 22 PR-TDHc3.0AC_10.14.05_v.0.4

Setting Up Communications in TDHconnect 3.0
10 Setting Up Communications in TDHconnect 3.0
This section explains how to configure your computer’s System Settings and Modem Settings to allow TDHconnect 3.0 to communicate.
10.1 System Settings
Important: If you do not already have a Production User ID and Password, contact the TMHP EDI Help Desk for assistance at 1-888-863-3638.
1. Log into TDHconnect 3.0 if you are not already logged in. The TDHconnect 3.0 System Totals window opens in the workspace.
5. Enter your User ID, Password, and Organization/Last Name in the Long Term Care section (if applicable).
6. Enter 1-800-291-3734 in the “ECMS” field in the Phone Number section.
Important: TDHconnect 3.0 uses a single telephone number for all transmissions (batch and interactive).
2. SelectCommunications>System Settings on the TDHconnect 3.0 menu bar.
The System Settings dialog box opens.
3. Select the System Settings tab.
Note: If you do not have a Compass21 User ID or a Long Term Care User ID, leave those fields blank.
4. In the Compass21 section, enter the following information:
• The User ID (Submitter ID not the logon ID) that the TMHP EDI Help Desk issued.
• The Password that the TMHP EDI Help Desk issued in numbers and lower case letters.
• The Organization/Last Name.
Page 23

TDHconnect 3.0—Workbook for Acute Care Providers
7. Select the Contact Information tab.
10.2 Modem Settings1. Log into TDHconnect 3.0 if you are not already logged in. The TDHconnect 3.0 System Totals window
opens in the workspace.
Note: It is not necessary to select modem settings when using DSL, cable or a T1 connection; however, it is recommended as a back up
8. For each ID on the System Settings tab, enter the following information in the correct section (C21 Site Contact Information or Long Term Care Site Contact Information):
• Last Name
• First Name
• Contact Phone Number
9. Click Apply.
10. Click OK.
2. Select Communications>Modems on the TDHconnect 3.0 menu bar.
The Installed Modems dialog box opens.
3. Select the modem name in the Connect using menu.
4. Select the location (such as new location) in the From location menu.
5. Click OK.
Page 24 PR-TDHc3.0AC_10.14.05_v.0.4

Setting Up Reference Files in TDHconnect 3.0
11 Setting Up Reference Files in TDHconnect 3.0
11.1 Adding ClientsThis section describes the steps necessary to add client data.
Note: New clients also can be added through Eligibility or Medicaid Eligibility Service Authorization Verification (MESAV) responses.
1. Expand the Reference Files folder and double click Client. The Client Selection window opens in the workspace.
2. To add clients manually, click Add. The Client Common Setup window opens in the workspace.
Note: You must complete all fields with bold headings to successfully add a client.
The client and provider reference files are not required to file claims and appeals. However, they are recommended and can save time when filling out forms and can reduce input errors.
The tree view containing yellow folders on the left side of the TDHconnect 3.0 System Totals window is referred to as TDHconnect Explorer.
• Double click the file names to expand folders.
• Double click the file names again to collapse folders.
Page 25

TDHconnect 3.0—Workbook for Acute Care Providers
3. Select the check box in the Client Status column next to the appropriate program name.
Select the program in the Launch Program for Client menu (this example selected Medicaid).
TIP: A faster method to complete the fields in these tabs is to enter only the Account No. and the Medicaid No. at this time and use the eligibility request to fill out the other fields. See Section 15, Medicaid Eligibility, on page 47 for more information about determining Medicaid eligibility.
Page 26 PR-TDHc3.0AC_10.14.05_v.0.4
Setting Up Reference Files in TDHconnect 3.0
• Account No. is a 1–20 character alphanumeric field assigned by the provider (not TMHP) to track the client.
• Medicaid No. is the nine-digit client/Medicaid number.
4. After entering client data, click OK. The Client Common Setup window opens.
5. Enter another client or click Cancel to close.
11.2 Adding ProvidersThis section describes the steps necessary to add provider data.
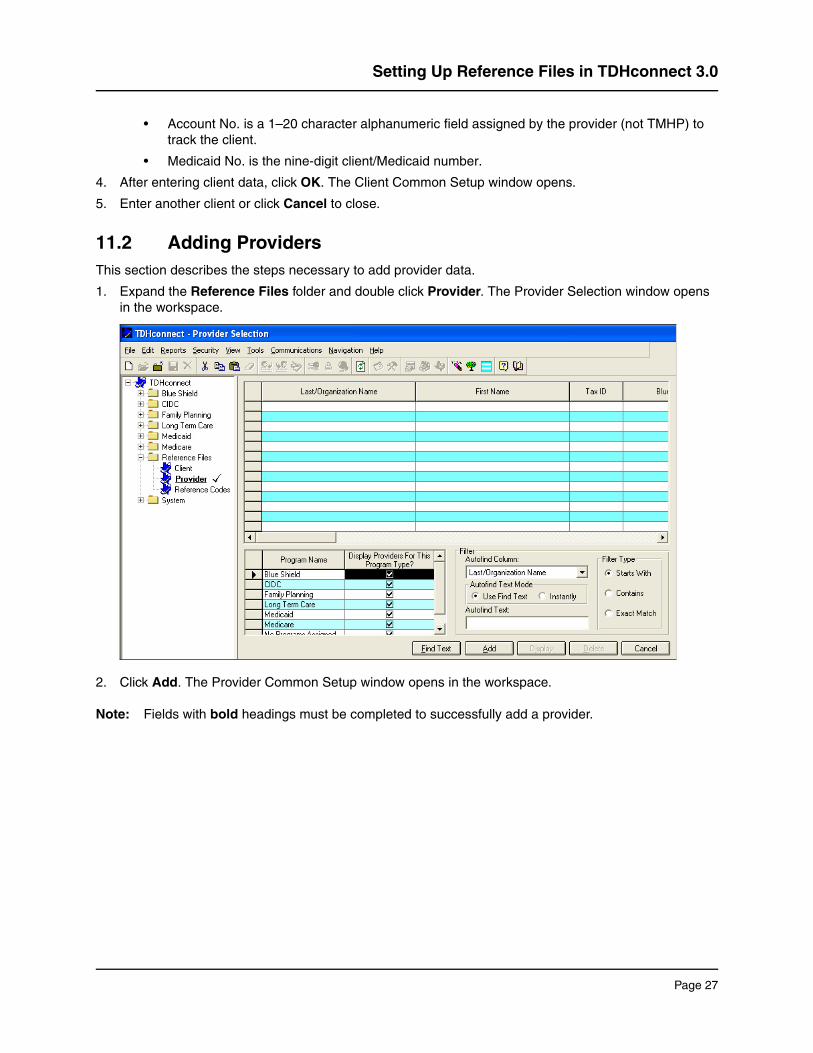
1. Expand the Reference Files folder and double click Provider. The Provider Selection window opens in the workspace.
2. Click Add. The Provider Common Setup window opens in the workspace.
Note: Fields with bold headings must be completed to successfully add a provider.
Page 27

TDHconnect 3.0—Workbook for Acute Care Providers
3. Select the check box in the Provider Status column next to the appropriate Program Name.
4. Select the program in the Launch Program for Provider menu (this example selected Medicaid)
5. Input the nine-digit Texas Provider Number (TPI) in the “Provider ID” field. This field is required to successfully add a provider.
6. Click OK.
Page 28 PR-TDHc3.0AC_10.14.05_v.0.4

Setting Up Reference Files in TDHconnect 3.0
11.3 Downloading Reference CodesDouble click Reference Codes to view the various codes—such as procedure codes, diagnosis codes, billing codes, and Explanation of Benefits (EOB) codes—included in the TDHconnect software.
1. Use the Filter function to view more than the first 50 entries. The Autofind Column selection menu contains the code selected in the Codes window. Input a code in the “Autofind Text” field to list matching entries in the Description column in the Codes table above.
2. Scroll up or down in the Codes menu and select one of the following code types: Procedure, Diagnosis, Edit/Audit, EOB, EOPS, or DRG.LTC Providers: LTC Procedure, LTC Service Group, LTC Service Code, LTC Billing, LTC Item, LTC EOB, or LTC Crosswalk.
3. Press <F2> when the cursor is in a code field in claims or appeals to access codes that can be used to auto-populate forms.
4. Modifiers and billed amounts can be added to procedure codes and used later to auto-populate claim forms. To add modifiers or billed amounts to procedure codes, select the procedure code (using Filter if necessary to locate it), select the “Modifier” field or “Billed amount field,” and enter the data. Repeat for each modifier or billed amount to add.
5. Click OK when finished.
6. Click Cancel to exit.
Page 29

TDHconnect 3.0—Workbook for Acute Care Providers
11.4 Downloading Updated Reference Codes (Retrieve Other)Although TDHconnect 3.0 includes built-in reference codes, these codes change and need to be periodically updated. This section describes the steps necessary to download the most recent codes to update the TDHconnect 3.0 database.
Important: Compress the database (see Section 12.2, Database Utilities, on page 31 for instructions) after downloading codes.
11.4.1 Downloading Compass21 (C21) Reference Codes
Select the Retrieve Other tab on the TDHconnect System Totals window.
7. Scroll down to C21 Reference Codes.
8. Use the check boxes in the Download column to select the codes to download.
9. Click Download.
10. After the download is complete, compress the database again (see Section 12.2, Database Utilities, on page 31 for instructions).
Page 30 PR-TDHc3.0AC_10.14.05_v.0.4

TDHconnect 3.0 System Maintenance
12 TDHconnect 3.0 System Maintenance
12.1 System Functions Overview
12.2 Database UtilitiesAfter sending and receiving requests, the TDHconnect 3.0 database becomes larger, and response time eventually becomes slower. Regular maintenance such as backing up files, purging files, and compressing the database is important to TDHconnect 3.0 database performance. The database utilities described in this section help maintain the size and response time of the TDHconnect 3.0 database.
1. Expand the System folder in TDHconnect Explorer.
2. Double click Database Utilities. The Database Utilities dialog box opens with four tabs: Compress, Purge, Mapper, and Back-up.
1. To view system functions, double click the System folder in TDHconnect Explorer.
2. The System folder expands. The options are:
• Database Utilities
• Password Admin(istration)
• Scheduling
• Security Admin(istration)
• TexMedNet*
• TexMedNet* Info(rmation)
Note: *While TexMedNet functions are now performed by the TMHP EDI Gateway, the way to access these functions in TDHconnect 3.0 remains the same.
Page 31

TDHconnect 3.0—Workbook for Acute Care Providers
12.2.1 Compress Tab
12.2.2 Purge Tab
12.2.3 Mapper Tab
Mapper is most frequently used when multiple users are sharing one TDHconnect 3.0 database, although any TDHconnect 3.0 user can change the location of the database. The system can support up to ten concurrent users. A shared database is located on a server, and TDHconnect 3.0 is installed on the computers connected to the server. The database is shared, but TDHconnect 3.0 itself is not.
Important: To improve the performance of TDHconnect, use the Compress feature at least once per month and after each time you purge data.
1. Use the check boxes in the Select column to select the databases to compress.
2. Click Compress to compress the database(s).
Important: To ensure database integrity, back up your database before purging data, and compress after purging.
The Purge tab is used to purge old data from TDHconnect.
1. Scroll through the selections on the Purge tab and use the check boxes in the Purge column to select data types to delete.
2. In the “Age in Days” field, enter the age of the data to select for deletion. Only data that old or older is deleted.
3. Click Purge to delete the data.
Page 32 PR-TDHc3.0AC_10.14.05_v.0.4

TDHconnect 3.0 System Maintenance
Important: Administrator rights are required when installing TDHconnect 3.0 in a Windows NT®, Windows 2000 environment, or any network environment.
12.2.4 Back-up Tab
To set up concurrent users:
1. Create a folder on the server where the TDHconnect database is stored (and shared).
2. After installing TDHconnect 3.0 on the computers that access the server (accepting the default database location), the Mapper function is used to locate the TDHconnect database on the server.
3. It is also possible to point to the TDHconnect database on the server during installation of TDHconnect 3.0 on each computer.
1. Use the check boxes in the Select column to select the type of data to back up, and click Backup.
2. A backup copy of the selected data is placed in the TDHconnect backup folder. The previous backup is overwritten.
Note: To back up the data to a different disk drive (to ensure protection in case of disk drive failure) contact your system administrator or computer support personnel for assistance.
Important: Avoid accidentally clicking Restore. Clicking Restore overwrites the existing database image with the previously backed up database image. Following a restore, all changes to the database that occurred after the previous back up are lost.
Page 33
TDHconnect 3.0—Workbook for Acute Care Providers
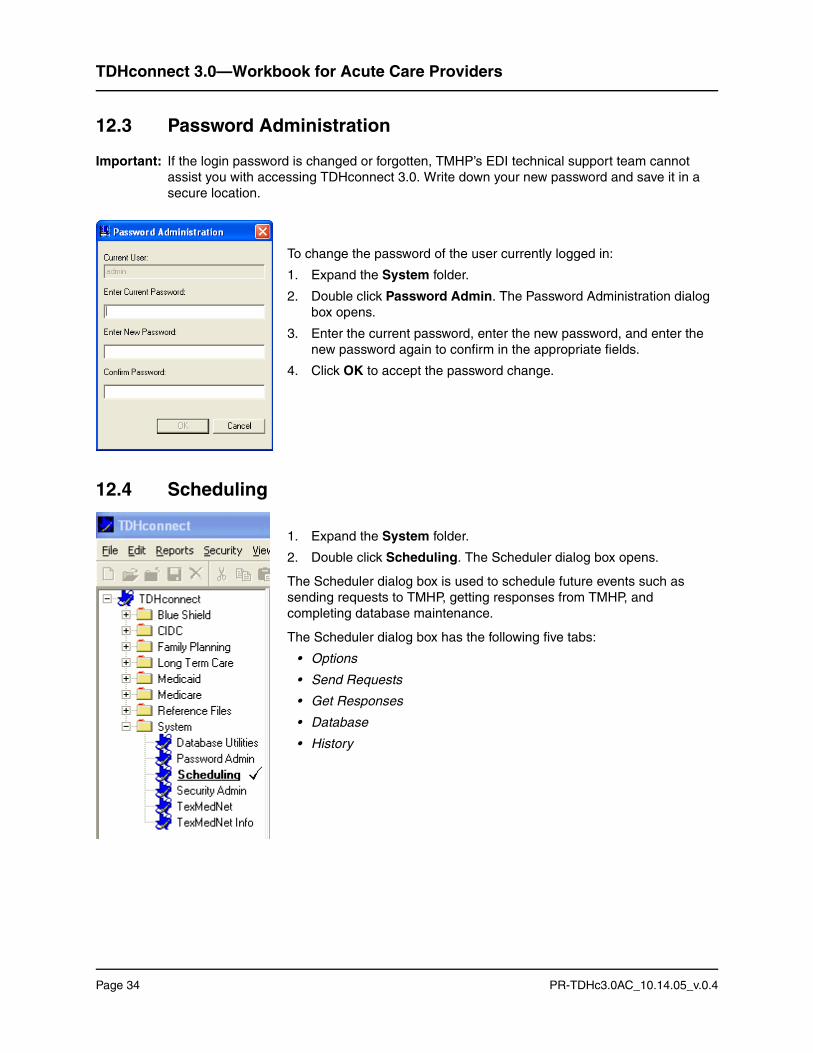
12.3 Password Administration
Important: If the login password is changed or forgotten, TMHP’s EDI technical support team cannot assist you with accessing TDHconnect 3.0. Write down your new password and save it in a secure location.
12.4 Scheduling
To change the password of the user currently logged in:
1. Expand the System folder.
2. Double click Password Admin. The Password Administration dialog box opens.
3. Enter the current password, enter the new password, and enter the new password again to confirm in the appropriate fields.
4. Click OK to accept the password change.
1. Expand the System folder.
2. Double click Scheduling. The Scheduler dialog box opens.
The Scheduler dialog box is used to schedule future events such as sending requests to TMHP, getting responses from TMHP, and completing database maintenance.
The Scheduler dialog box has the following five tabs:
• Options
• Send Requests
• Get Responses
• Database
• History
Page 34 PR-TDHc3.0AC_10.14.05_v.0.4

TDHconnect 3.0 System Maintenance
12.4.1 Scheduler Dialog Box—Options Tab
12.4.2 Send Requests Tab
The Options tab is used to allow, or to not allow, scheduled events.
Important: The PC must be powered on and the user must be logged into TDHconnect at the time the event is scheduled for the scheduled event to occur.
Note: Schedule events at least 15 minutes apart to allow time for each event to complete.
The Send Requests tab is used to schedule sending a batch of requests to TMHP.
1. Open the Send Requests tab.
2. Click Add. The Event Scheduler dialog box opens.
Page 35

TDHconnect 3.0—Workbook for Acute Care Providers
12.4.3 Get Responses Tab
3. Select an event type in the Type menu.
4. Select a date in the When menu.
5. Enter the time (hour:minute:second AM or PM) in the field below the date. Use the following format
HH:MM:SS AM (or PM)
6. Set the periodicity of the event in the Interval menu. If “Irregular” is selected, enter the number of days in the field to the right of the interval selector.
The Age menu is not used to send requests.
7. Click Apply and click OK to schedule.
Use the Get Responses tab to schedule the retrieval of batch responses.
Note: If Send Requests have been scheduled, consider scheduling Get Responses on the following day
1. Select the Get Responses tab
2. Click Add. The Event Scheduler dialog box opens.
3. Select an event type in the Type menu.
4. Select a date in the When menu.
5. Enter the time (hour:minute:second AM or PM) in the field below the date. Use the following format
HH:MM:SS AM (or PM)
6. Set how often the event repeats in the Interval menu. If “Irregular” is selected, enter the number of days in the field to the right of the interval selector.
The Age menu is not used to send requests.
7. Click Apply and OK to schedule.
Page 36 PR-TDHc3.0AC_10.14.05_v.0.4

TDHconnect 3.0 System Maintenance
12.4.4 Database Tab
Use the Database tab to schedule the automatic execution of database maintenance functions such as backup, compress, or purge.
1. Select the Database tab
2. Click Add. The Event Scheduler dialog box opens.
3. Select an event type in the Type menu.
4. Select a date in the When menu.
5. Enter the time (hour:minute:second AM or PM) in the field below the date. Use the following format
HH:MM:SS AM (or PM)
6. Set how often the event repeats in the Interval menu. If “Irregular” is selected, enter the number of days in the field to the right of the interval selector.
7. Set the age of affected records in the Age menu. Only records older than the number of days defined in step are affected.
8. Click Apply and click OK to schedule.
Page 37

TDHconnect 3.0—Workbook for Acute Care Providers
12.4.5 History Tab
12.5 Security Admin (Add Users)Use Security Admin to set up new TDHconnect 3.0 users.
Note: TDHconnect 3.0 is set up with a default user called Admin.
1. Expand the System folder in TDHconnect Explorer.
The History tab lists any scheduled events that occurred as successful or unsuccessful. Use the History tab to verify scheduled events.
Note: If the event was unsuccessful, submit the request or response retrieval in the Program Summary window or use the Database Utilities for database maintenance.
2. Double click Security Admin. The Loading Users. . . progress dialog box opens. Once all users are loaded, this dialog box closes and the Security Administration dialog box opens.
3. Click Add User. The Security Wizard–Step 1 dialog box opens.
Follow the step-by-step instructions in the Security Wizard to add a user.
Page 38 PR-TDHc3.0AC_10.14.05_v.0.4

TDHconnect 3.0 System Maintenance
12.5.1 Security Wizard Step 1
• A indicates that the user has access, and an indicates that a user does NOT have access.
• Change the settings by double clicking on the or symbols
10. Click Next when done.
Note: The orange square on the diagram on the left side of the dialog box indicates the current step in the process.
Fields with bold titles are required fields.
4. Enter the User ID, Full Name, and a Description for the user.
5. Enter password in the “Password field.” New users are asked to change their password the first time they login.
6. Click Next to advance to the next step.
7. Select the programs that the user can access by double clicking a program name in the Program Options menu. The program name is moved to the Selections menu.
Double click a program name in the Selections menu to deselect it. The program name is moved to the Program Options menu.
8. Click Next to continue.
9. Select the options that the new user is authorized to use.
• Double click the user ID to expand a list of available programs.
• Double click a program name (such as Medicaid) to expand a list of options available for that program.
• Double click an option to expand a list of functions available for that option.
Page 39

TDHconnect 3.0—Workbook for Acute Care Providers
12.5.2 Security Wizard Step 4
Step four summarizes the functions that the user can complete.
To change a selection, click Back, or
Click Finish to add the user.
Page 40 PR-TDHc3.0AC_10.14.05_v.0.4

Finding TMHP on the Internet
13 Finding TMHP on the Internet
The only way to connect to the TMHP website is through an Internet Service Provider (ISP). This incurs the cost of having an ISP.
1. Connect to your ISP if not already connected.
2. Open Internet Explorer.
3. In the address line, enter www.tmhp.com. The TMHP website opens and displays the TMHP home page.
Page 41

TDHconnect 3.0—Workbook for Acute Care Providers
NOTES
Page 42 PR-TDHc3.0AC_10.14.05_v.0.4

Using the TDHconnect System Totals Window
14 Using the TDHconnect System Totals Window
The TDHconnect 3.0 System Totals window is the default window in TDHconnect 3.0. It features the following four tabs: Program Summary, Send Requests, Retrieve Responses, and Retrieve Other.
14.1 Program Summary Tab
14.1.1 Batch Request Status
Important: It is critically important to download all submitted claims and appeals to see if any were rejected and work them immediately. Files are not available after 30 days.
• Completed. A request (Eligibility, Claim, Appeal, or Claim Status Inquiry) was entered into TDHconnect and passed all the local edits, but it has not been submitted to TMHP. Completed requests convert to Submitted status after being sent to TMHP in a batch.
• Incomplete (displayed in Claims section only). The request was entered into TDHconnect but did not pass all the local edits and is not ready to submit to TMHP. Incomplete requests convert to Completed status after completion.
• Submitted. The request has been transmitted to TMHP for processing (see Section 14.2, Send Requests Tab, on page 44). Submitted requests convert to Processed status after the response is downloaded from TMHP.
• Processed (displayed in later sections). Twenty-four hours after submitting a request, download the request to see if it was accepted or rejected.
• Accepted. Electronically-submitted requests that have passed the acceptance edits at TMHP, have been assigned an ICN (a unique claim number) and are processing in the TMHP system.
Note: An Accepted claim does not guarantee payment. Accepted status indicates only that the claim is accepted for further processing. Whether the claim is paid or denied is not determined until after it finishes processing.
The Program Summary tab contains the following columns of information:
• Program–Blue Shield, CIDC, Family Planning, Long Term Care, Medicaid, and Medicare.
• Request types (Subsystem)–Eligibility, Claims, CSI, Appeals, Adjustments, and MESAV.
• Request status–the number of Completed, Submitted, Accepted, or Rejected requests.
Page 43

TDHconnect 3.0—Workbook for Acute Care Providers
Important: To see the status of accepted claims, check your Remittance & Status (R&S) reports or run a claim status inquiry. You must have a signed Claim Status Inquiry Authorization form on file with TMHP to perform claim status inquiries. Call TMHP (1-888-863-3638) and also see Section 18, Medicaid Claim Status Inquiry, on page 91 for a blank agreement form.
• Rejected. Electronically-submitted requests that received a response indicating the request has been rejected due to errors. You can correct and resubmit these requests.
Note: Rejected claims do not receive an ICN and do not appear on the R&S report, nor do they appear on a claim status inquiry.
14.1.2 Batch Transmission Process
A common error is to click OK in claims or appeals and assume that the transaction has been sent to TMHP. Another common error is to submit the claim or appeal to TMHP but not retrieve the response the next day to see if the claim or appeal was accepted or rejected.
Important: Unless all four steps of a batch transmission (see diagram below) are performed, you may overlook rejected claims or appeals, resulting in possible loss of reimbursement.
14.2 Send Requests TabThe Send Requests tab allows the user to send batches or groups of appeals, claims, claim status inquiries, or eligibility requests.
1. Use the check boxes in the Send column to select batches to send to TMHP.
2. When finished selecting, click Submit.
3. Once the transmission to TMHP is completed without errors, open the Program Summary tab and verify that the sent requests have changed from Completed status to Submitted status.
Page 44 PR-TDHc3.0AC_10.14.05_v.0.4

Using the TDHconnect System Totals Window
14.3 Retrieve Responses TabResponses become available approximately 24 hours after submitting requests to TMHP. To view responses, open the Retrieve Responses tab.
Note: If you are unable to retrieve a response 48 hours after submitting a request, call the TMHP Electronic Data Interchange (EDI) Help Desk at 1-888-863-3638 for assistance.
Important: Rejected claims are not kept by TMHP and are not included in R&S reports or claims status inquiries. If the rejected claim is within the appropriate filing deadline period based on the date of service, you may correct and resubmit the rejected claim. If the rejected claim is beyond the filing deadline, the next deadline to meet is 120 days following the date of the rejection. In this case, you must print the rejection report, with valid batch ID, to prove timely filing and send it along with a paper claim to TMHP.
14.4 Retrieve Other Tab
1. Use the check boxes in the Download column to select the responses to download.
2. When finished, click Download.
3. To verify that responses were successfully downloaded, open the Program Summary tab. Verify that the status has updated from Submitted status to Accepted or Rejected status.
The Retrieve Other tab is used to electronically download R&S reports and reference codes.
Page 45

TDHconnect 3.0—Workbook for Acute Care Providers
14.4.1 Retrieve ER&S Reports
Important: You must have a signed Electronic Remittance and Status (ER&S) Agreement on file with TMHP before you are allowed to download ER&S reports.
ER&S reports are available weekly at 6:00 a.m., central time, each Monday. To download your ER&S report:
1. Use the check box in the Download column to select ER&S.
2. Click Download.
3. Click Process ER&S only if there is an error downloading the ER&S.
Note: You cannot view the ER&S report by using the Retrieve Other tab. To generate and view the ER&S report after it has been downloaded, see Section 19, Medicaid Electronic Remittance & Status (ER&S), on page 97 for instructions.
14.4.2 Retrieve Reference Codes
1. Use the check boxes in the Download column to select the reference code types to retrieve.
2. Click Download.
Page 46 PR-TDHc3.0AC_10.14.05_v.0.4

Medicaid Eligibility
15 Medicaid Eligibility
The purpose of an eligibility request is to verify that a client is eligible to receive Texas Medicaid. An eligibility request returns very helpful information such as if the client is a member of an HMO, has other insurance, or is no longer eligible for Medicaid eligibility. Refer to the current Texas Medicaid Provider Procedures Manual for related policy information.
15.1 Changes Due to HIPAAUnder HIPAA, the electronic eligibility request is standard 270, and the electronic eligibility response is standard 271. The following items have changed:
• The last name and the suffix are now in separate fields on eligibility requests and responses, so separate the suffix field even if the paper 3087 shows the suffix appended to the last name.
• On the eligibility response, authorization information is no longer available. Call the TMHP Contact Center at 1-800-925-9126.
• TPR (Third Party Resources) relationship to the insured is no longer available on the eligibility response.
15.2 Beginning the Eligibility Request
1. Double click Medicaid to expand the Medicaid folder.
2. Double click Eligibility to display the Medicaid Eligibility Request/Response Summary window.
3. Click File>New on the TDHconnect 3.0 menu bar. The Request Information dialog box opens.
Page 47

TDHconnect 3.0—Workbook for Acute Care Providers
4. Enter the Provider ID (TPI) or click the magnifying glass icon to select the Provider ID. Input the Start Date and End Date. The Start and End dates can span up to three months. The End Date can be the current date. The date span must be within the past three years.
5. Input any of the listed field combinations:
Important: Input the minimum amount of information in this section, preferably Medicaid number only, because any incorrect information will cause the request to fail.
• Medicaid No. or
• SSN and Last Name or
• SSN and Date of Birth or
• Last Name, First Name, and Date of Birth
Note: Suffix is not contained in the “Last Name” field; it has its own field.
15.3 Creating an Eligibility TemplateIn TDHconnect Explorer, double click Medicaid to expand the folder and double click Eligibility.1. In the TDHconnect 3.0 main menu, click File>New. The Request Information tab opens in the
workspace.
2. Complete the required fields.
3. Once all information has been completed, click Save As Template. You are prompted to select a name for the template. Enter a name and click OK.
Page 48 PR-TDHc3.0AC_10.14.05_v.0.4

Medicaid Eligibility
15.4 Submitting and Retrieving Eligibility RequestsThere are two ways to submit eligibility requests: interactive and batch. An interactive request is fast and done online while you wait, but it can only be done for one client at a time. A batch of requests takes 24 hours (usually overnight), but may include one or many eligibility requests.
15.4.1 Submit/Retrieve Interactive Requests
To submit and retrieve an interactive eligibility request, click Interactive and within a few minutes the eligibility response, accepted or rejected, is displayed.
15.4.2 Submit/Retrieve Batch Requests
Important: Clicking OK does not send the request to TMHP. Clicking OK stores the request in Completed status on the provider’s database only. You must do all four steps listed below to send and retrieve batch requests.
Submit a batch request:
1. Fill out eligibility requests and click OK on each request. Requests are stored in Completed status on your database.
2. Click Cancel to exit Eligibility.
3. Open the TDHconnect 3.0 System Totals window and select the Send Requests tab.
4. Select the check box for Medicaid Eligibility in the Send column.
5. Click Submit. Requests are changed to Submitted status and are sent to TMHP.
Retrieve a batch request:
1. 24 hours after request submission, open the TDHconnect 3.0 System Totals window and select the Retrieve Responses tab.
2. Select the check box for Eligibility in the Download column.
3. Click Download. Requests are now changed to Processed status.
4. To view the downloaded response, double click Eligibility under the Medicaid folder (left side of window), then double click the response.
15.5 Medicaid Eligibility—ResponseThe response displays client eligibility. Tabs with shaded labels have no information to display.
Note: HIPAA compliant eligibility responses no longer display authorization information or Relationship to the Insured on the Other Insurance tab.
Click the Patient icon in the upper right corner of the screen to send client information to the Client Reference file, which allows the magnifying glass icons to be used later to populate client information in forms.
Page 49

TDHconnect 3.0—Workbook for Acute Care Providers
When the Eligibility Save Patient Wizard opens, select the fields to send to the client reference file, or click Select All, and click Finish. A message states that the patient was updated.
• Select the Managed Care tab to see the HMO or PCCM Texas Health Network information.
• Select the Benefit Limits tab for the latest eyeglass, hearing aid, THSteps dental and THSteps medical claims.
• Select the Other Insurance tab for information on other insurers for the client. To update the client’s other insurance, contact Third Party Resources at 1-800-846-7307. See also the Third Party Resources section in the Texas Medicaid Provider Procedures Manual.
• Include an account number before saving client data.
15.6 Printing Eligibility ReportsSix types of eligibility reports may be printed from the Medicaid Eligibility Request/Response Summary.
TransmissionSummary
1. Click a batch eligibility response (has Transmit Type B and a Transmission ID).
2. Click Reports and Transmission Summary to display the report. The number of accepted or rejected responses is listed.
3. Click Print for a paper copy.
TransmissionDetail
1. Click an accepted batch eligibility response (has Transmit Type B and a Transmission ID).
2. Click Reports and Transmission Detail. A list of eligibility responses in that batch is displayed.
3. Click Print for a paper copy.
InformationRequest
1. Double-click the completed row near the top of the window. At least one completed eligibility request is required.
2. Select a request that has been Completed but not Submitted.
3. Click Reports>Information Request on the TDHconnect 3.0 menu bar. A detailed display of the request is given, but no response information is available since this request has not yet been submitted to TMHP and retrieved.
4. Click Print for a paper copy.
InformationResponse
1. Select an accepted response, batch or interactive. The response is displayed.
2. To print the response, click Reports, Information Response.
3. Click Print on the TDHconnect 3.0 menu bar.
InteractiveSummary
1. Click Reports and Interactive Summary on the TDHconnect 3.0 menu bar.
2. Input a range of beginning and ending transmit dates.
3. Click OK. A report of eligibility responses is displayed.
4. Click Print for a paper copy.
BatchReport
1. Select an interactive or a batch response.
2. Click Reports and Batch Report. The report immediately starts printing a detailed list of all eligibility responses from the row you selected.
Page 50 PR-TDHc3.0AC_10.14.05_v.0.4

TDHconnect 3.0 Log On Error Messages
16 TDHconnect 3.0 Log On Error Messages
This section explains what to do when you receive the two most common error messages encountered while using TDHconnect 3.0.
16.1 Using TDHconnect Utilities to Log Off a User1. Click OK in the error message dialog box. The error message dialog box closes.
Click Start>Programs>TDHconnect>TDHconnect Utilities.
Error Message: During login, the following message may open:[username] is currently logged on to TDHconnect.
SOLUTION: Use TDHconnect Utilities to log off user. See Section 16.1 below.
Error Message: If the TDHconnect 3.0 icon is clicked more than once to start the program, the following message may open: TDHconnect is already running.
TIP: This error message commonly occurs following a system event or power failure that resulted in an involuntary shutdown while TDHconnect was running. To prevent this error, always try to log off TDHconnect before shutting down your computer.
SOLUTION: Use the Windows® Task Manager to shut down TDHconnect 3.0. See Using the
Windows® Task Manager to shut down TDHconnect 3.0 Section 10.2 on page 24.
Page 51

TDHconnect 3.0—Workbook for Acute Care Providers
16.2 Using the Windows® Task Manager to Shut Down TDHconnect 3.0
1. Click OK in the error message dialog box. The error message dialog box closes.
2. Press <CTRL> + <ALT> + <Delete> keys simultaneously to start the Task Manager.
Note: Different computers may offer different Task Manager options, such as Task List or an Application tab.
The TDHconnect Utilities program starts.
2. Select the Logoff User tab.
3. Select the User ID (in this case, admin) to log off.
4. Click Log Off.
5. Click OK.
3. Select TDHconnect in the Task Manager dialog box.
4. Select Hints.
5. Click End Task. TDHconnect 3.0 shuts down.
Page 52 PR-TDHc3.0AC_10.14.05_v.0.4

Medicaid and Family Planning Claims (Title XIX)
17 Medicaid and Family Planning Claims (Title XIX)
The Claims program task is used to create, view, submit, change, and delete claims or claim information.
Note: See Section 4 of the Texas Medicaid Provider Procedures Manual for related policy information.
17.1 Changes to Claims Resulting from HIPAAUnder HIPAA, the electronic claim request is standard 837. Professional and eyeglass claims are standard 837P, dental claims are 837D, and inpatient and outpatient claims are 837I. Numerous changes have occurred to the main tabs (screens) for Patient, Provider, Claim, Diagnosis, Details, and Other Insurance, and some tabs now have sub-tabs. A claim response for an accepted claim may also be used (click Save as Appeal) to generate an appeal.
Important: If a claim denies with zero allowed, zero paid amounts (see R&S below), follow up with a new claim instead of an appeal, within 120 days of the R&S date. If your new claim has the same provider number, client/Medicaid number, date of service, and billed amount, then the new claim can be submitted on TDHconnect 3.0. If one of these fields has changed, then the new claim must be filed as a paper claim.
If a claim rejects (not denies, but rejects) and the claim is beyond the 95-day filing deadline, the rejected claims report may be printed and sent to TMHP along with a new paper claim if within 120 days of the rejection. See Claim reports at the end of this section.
Double-click Claims to display the Medicaid Claim Request/Response Summary window.
Page 53
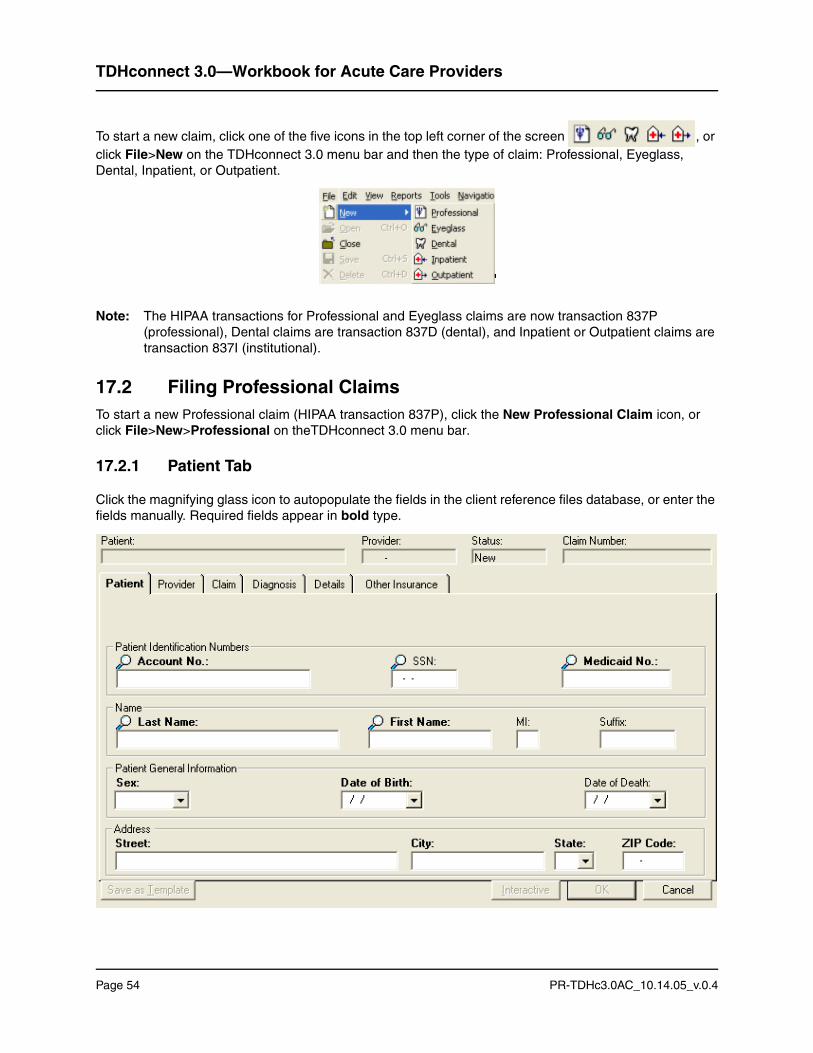
TDHconnect 3.0—Workbook for Acute Care Providers
To start a new claim, click one of the five icons in the top left corner of the screen , or click File>New on the TDHconnect 3.0 menu bar and then the type of claim: Professional, Eyeglass, Dental, Inpatient, or Outpatient.
Note: The HIPAA transactions for Professional and Eyeglass claims are now transaction 837P (professional), Dental claims are transaction 837D (dental), and Inpatient or Outpatient claims are transaction 837I (institutional).
17.2 Filing Professional ClaimsTo start a new Professional claim (HIPAA transaction 837P), click the New Professional Claim icon, or click File>New>Professional on theTDHconnect 3.0 menu bar.
17.2.1 Patient Tab
Click the magnifying glass icon to autopopulate the fields in the client reference files database, or enter the fields manually. Required fields appear in bold type.
Page 54 PR-TDHc3.0AC_10.14.05_v.0.4

Medicaid and Family Planning Claims (Title XIX)
17.2.2 Provider Tab
The Provider tab has two sub-tabs, Provider Facility, and Referring and Other Provider.
17.2.2.1 Provider Facility Sub-Tab
• Select the Provider tab.
• Click the magnifying glass icon to autopopulate the fields in the provider reference files database, or enter the fields manually. Required fields appear in bold type.
If services were provided in a place other than the patient’s home or the provider’s facility (such as a hospital, birthing center, or nursing facility), open the Provider Facility sub-tab and enter information.
Required fields are:
Facility Provider ID, Name, ID type (employer ID or social security number), Other ID (corresponding to ID type), Service Location, Address, City, State, and Zip Code.
Page 55

TDHconnect 3.0—Workbook for Acute Care Providers
17.2.2.2 Referring and Other Provider Sub-Tab
If required by the type of claim to enter a referring or primary care physician, open the Referring and Other Provider sub-tab and enter the 6–13 character referring Provider ID as a nine-digit TPI, six-digit Medicare number, or a Universal Provider Identifier Number (UPIN).
Also enter the Last Name and First Name of the referring provider, ID type (employer ID or social security number), and Other ID (corresponding to ID type). Other fields are optional.
Page 56 PR-TDHc3.0AC_10.14.05_v.0.4

Medicaid and Family Planning Claims (Title XIX)
17.2.3 Claim Tab
If an ambulance, THSteps medical, or authorization number is necessary, open the Claim tab and enter the necessary data.
Note: THSteps medical providers, after clicking the “THSteps indicator” field on the Claim tab, will select an appropriate Condition Code.
NU (Not Used) Indicates the patient had a normal screening, an abnormal screen without treatment, an abnormal screen initiated treatment, was referred to another health agency, or to family planning.
S2 (Under Treatment) Indicates that the client’s screen was abnormal, but the condition is under treatment.
ST (New Services Requested) Indicates new services requested, such as when the client was referred to the Primary Care Physician or to a specialist.
Page 57

TDHconnect 3.0—Workbook for Acute Care Providers
17.2.4 Diagnosis Tab
Note: A diagnosis code is required for professional claims.
1. Select the Diagnosis tab.
2. Input the HCPCS or CPT code to the highest level of specificity. If uncertain of the code, press <F2> while the cursor is in the Code column to bring up diagnosis codes in the reference files. More than one diagnosis code may be entered.
3. Input the Description in the appropriate column.
Note: THSteps CCP Pharmacies. The following note is found in Section 40 of the Texas Medicaid Provider Procedures Manual: “Pharmacies using their VP TPI should obtain prior authorization for prescription medications not paid through the Vendor Drug Program. If a claim is submitted without a diagnosis, then a provider must attach documentation establishing medical necessity and a signed prescription from a physician (MD or DO). Electronic claims must have diagnosis code V7999 for the claim to be accepted.” Instead, use the HIPAA compliant diagnosis code for THSteps CCP Pharmacies is V7285 (Other Specified Examination).
Independent Laboratory providers. Section 25 of the Texas Medicaid Provider Procedures Manual states the following: “Independent laboratories and pathologists do not have to supply Medicaid with a diagnosis except when billing the following procedures…”. If the procedure being billed by independent laboratory providers is not one of the procedures listed in that section requiring a diagnosis code by policy, they may use diagnosis code V726 (Laboratory Examination) for the claim to be accepted.
Radiology providers. If no other diagnosis code is available, use V725 (Radiological Examination, Not Elsewhere Classified).
Page 58 PR-TDHc3.0AC_10.14.05_v.0.4

Medicaid and Family Planning Claims (Title XIX)
17.2.5 Details Tab
Note: Use the scroll bar at the bottom of the screen to access fields on the right hand side of the window.This window is shown in two graphics to display all of the scrolling area.
1. Select the Details tab and enter the date of service in MM/DD/YYYY format
2. Tab to the POS column and use the drop-down menu to select place of service (POS).
3. Click in the “Procedure Code ID” field and use the drop-down menu to select the type of procedure code (HCPCS; HIEC; National Drug Code in 4-4-2 format, 5-3-2 format, 5-4-1 format, 5-4-2 format, or Mutually Defined).
4. Input the Procedure Code. If needed, press <F2> to bring up procedure codes in the reference files for assistance. Type of Service (TOS) is automatically inserted by C21 based on the procedure code entered.
5. Genetic providers must use the “Remarks Code” field (after completing the “Procedure Code” field) to enter the five-character local procedure code that identifies the DNA test or laboratory enzyme test performed.
6. Dental claims for Orthodontics require a remarks code. See Medicaid Bulletin 174.
7. Input any needed modifier codes (Mod 1 through Mod 4).
8. If needed, enter anesthesia minutes (Ane Min).
9. Input the diagnosis reference (Diag Ref) to refer to the most important diagnosis code entered on the Diagnosis tab.
10. Input the quantity (Qty) and Unit Price. The Total Charges are calculated.
11. Use the scroll bar to gain access to the fields on the right hand side of the window.
Page 59

TDHconnect 3.0—Workbook for Acute Care Providers
12. If the provider is a member of a group, enter the nine-digit performing provider number (Perform Provider ID) and name (Perf Last Name).
Page 60 PR-TDHc3.0AC_10.14.05_v.0.4
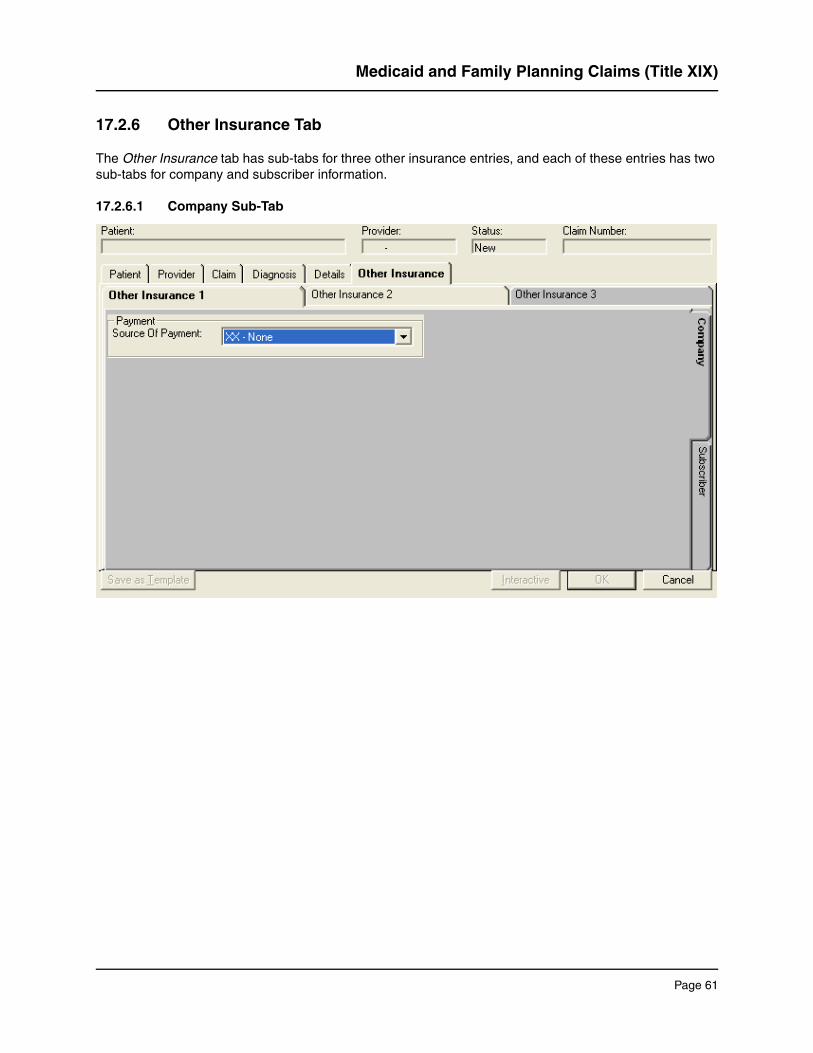
Medicaid and Family Planning Claims (Title XIX)
17.2.6 Other Insurance Tab
The Other Insurance tab has sub-tabs for three other insurance entries, and each of these entries has two sub-tabs for company and subscriber information.
17.2.6.1 Company Sub-Tab
Page 61
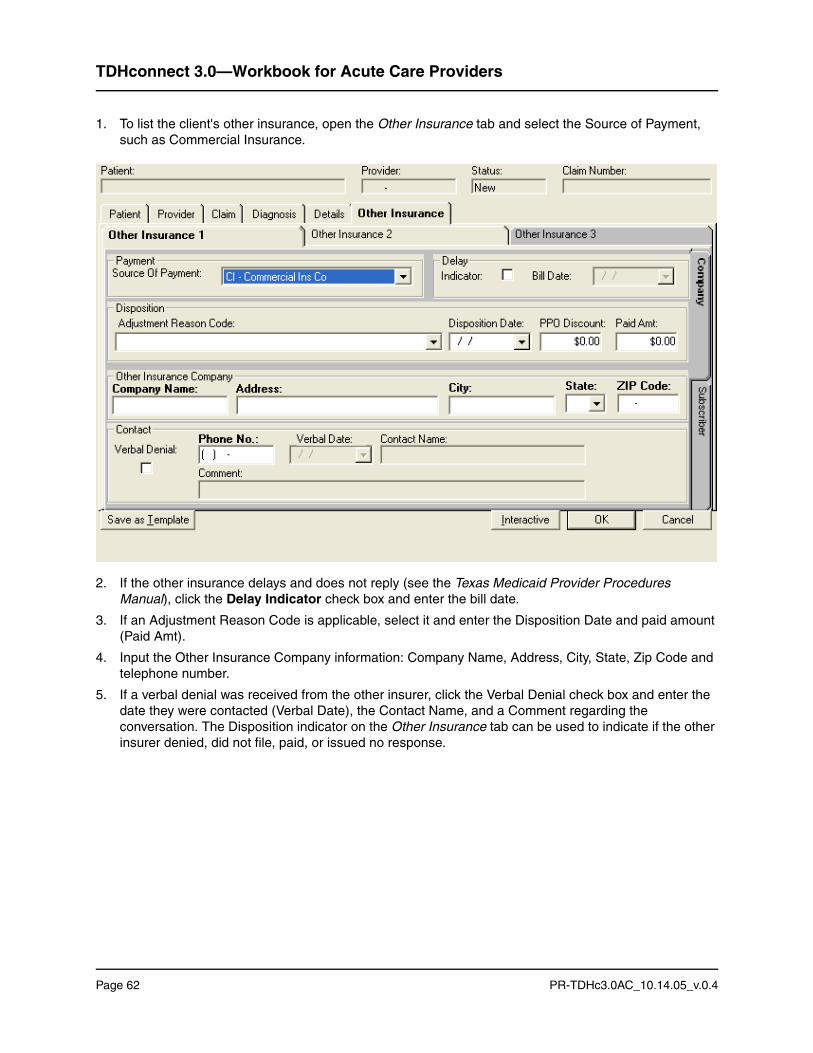
TDHconnect 3.0—Workbook for Acute Care Providers
1. To list the client's other insurance, open the Other Insurance tab and select the Source of Payment, such as Commercial Insurance.
2. If the other insurance delays and does not reply (see the Texas Medicaid Provider Procedures Manual), click the Delay Indicator check box and enter the bill date.
3. If an Adjustment Reason Code is applicable, select it and enter the Disposition Date and paid amount (Paid Amt).
4. Input the Other Insurance Company information: Company Name, Address, City, State, Zip Code and telephone number.
5. If a verbal denial was received from the other insurer, click the Verbal Denial check box and enter the date they were contacted (Verbal Date), the Contact Name, and a Comment regarding the conversation. The Disposition indicator on the Other Insurance tab can be used to indicate if the other insurer denied, did not file, paid, or issued no response.
Page 62 PR-TDHc3.0AC_10.14.05_v.0.4

Medicaid and Family Planning Claims (Title XIX)
17.2.6.2 Other Insurance Tab with Subscriber Sub-Tab
To enter information about the insured, open the Subscriber tab on the lower right side of the Other Insurance sub-tab.
Enter the ID/SSN, Last Name, First Name, Group/Policy Number, and Group/Employer Name.
17.3 Submitting and Retrieving RequestsThere are two ways to submit Medicaid claims on TDHconnect 3.0: interactive or batch. An interactive claim is accepted or rejected online while you wait, but must be done one claim at a time. A batch of claims takes 24 hours (usually overnight) to be accepted or rejected, and can include one or many claims.
Note: Accepted claims do not guarantee payment, only that they are accepted for further processing and will be paid or denied at a later date.
17.3.1 Submit/Retrieve Interactive Requests
To submit and retrieve an interactive claim, click Interactive. Within a few minutes the claim response, accepted or rejected, is displayed.
17.3.2 Submit/Retrieve Batch Requests
Note: Clicking OK does not send the request to TMHP. Clicking OK stores the request in Completed status on the provider’s database only. You must do all four steps listed below to send and retrieve batch requests.
Page 63

TDHconnect 3.0—Workbook for Acute Care Providers
17.3.2.1 Submit a Batch Request
1. Fill out the claim and click OK. Repeat for each claim. Claims are stored in Completed status on the provider’s database.
2. Click Cancel to exit Claims and go back to the TDHconnect System Totals window.
3. In the TDHconnect System Totals window, open the Send Requests tab.
4. Select the check box for Medicaid Claims in the Send column.
5. Click Submit. Requests are changed to Submitted status and are sent to TMHP.
17.3.2.2 Retrieve Responses to a Batch Request
1. 24 hours after request submission, go to the TDHconnect 3.0 System Totals window and open the Retrieve Responses tab.
2. Select the check box for Claims in the Download column.
3. Click Download. Requests are now changed to Processed status.
4. To view the downloaded response, double click Claims under the Medicaid folder in TDHconnect Explorer, then double click the response.
Page 64 PR-TDHc3.0AC_10.14.05_v.0.4
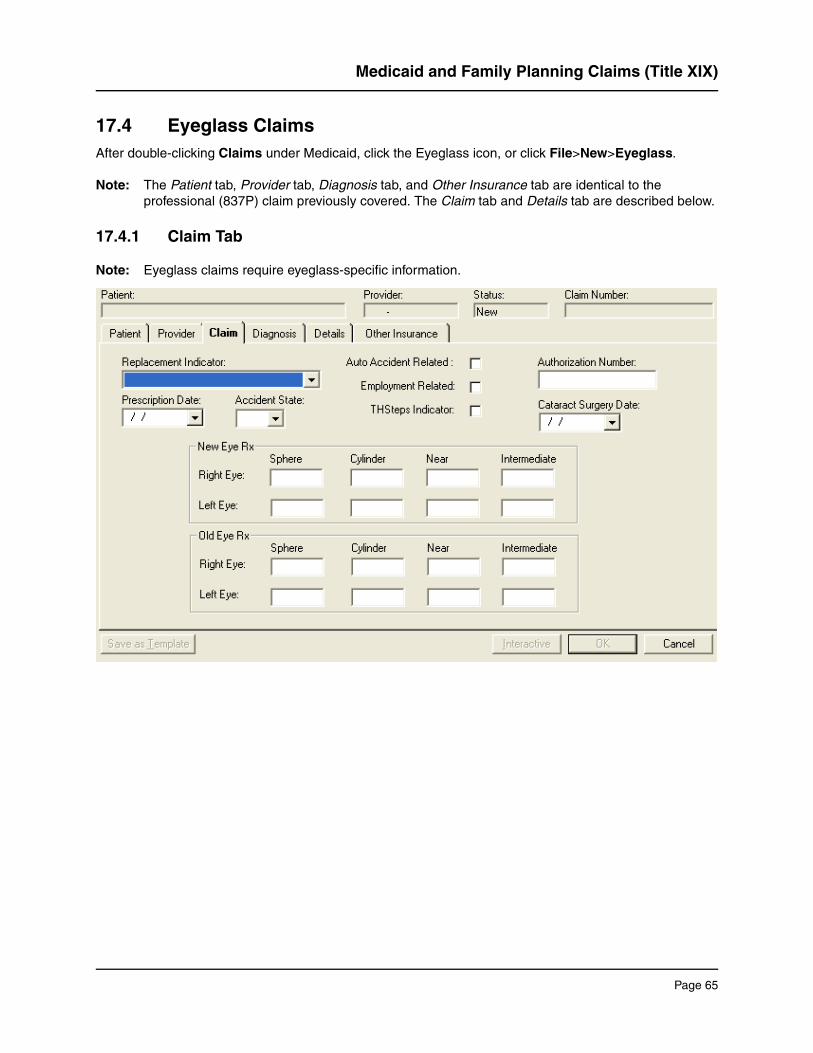
Medicaid and Family Planning Claims (Title XIX)
17.4 Eyeglass ClaimsAfter double-clicking Claims under Medicaid, click the Eyeglass icon, or click File>New>Eyeglass.
Note: The Patient tab, Provider tab, Diagnosis tab, and Other Insurance tab are identical to the professional (837P) claim previously covered. The Claim tab and Details tab are described below.
17.4.1 Claim Tab
Note: Eyeglass claims require eyeglass-specific information.
Page 65
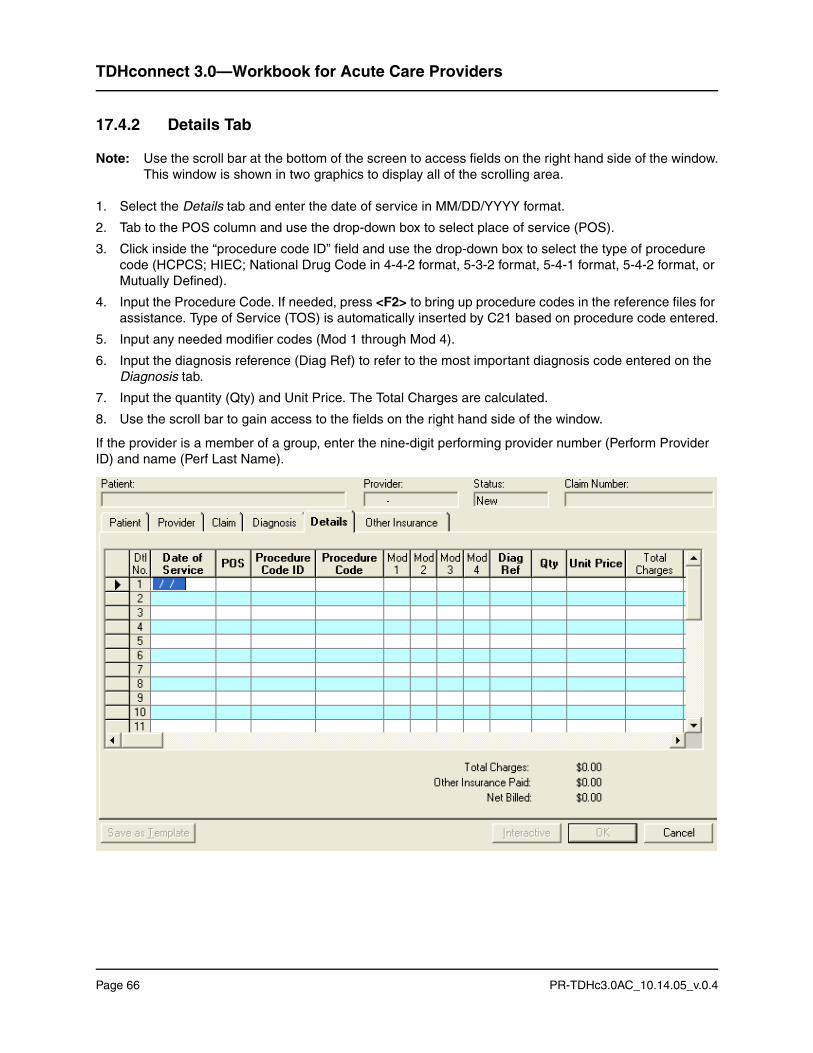
TDHconnect 3.0—Workbook for Acute Care Providers
17.4.2 Details Tab
Note: Use the scroll bar at the bottom of the screen to access fields on the right hand side of the window.This window is shown in two graphics to display all of the scrolling area.
1. Select the Details tab and enter the date of service in MM/DD/YYYY format.
2. Tab to the POS column and use the drop-down box to select place of service (POS).
3. Click inside the “procedure code ID” field and use the drop-down box to select the type of procedure code (HCPCS; HIEC; National Drug Code in 4-4-2 format, 5-3-2 format, 5-4-1 format, 5-4-2 format, or Mutually Defined).
4. Input the Procedure Code. If needed, press <F2> to bring up procedure codes in the reference files for assistance. Type of Service (TOS) is automatically inserted by C21 based on procedure code entered.
5. Input any needed modifier codes (Mod 1 through Mod 4).
6. Input the diagnosis reference (Diag Ref) to refer to the most important diagnosis code entered on the Diagnosis tab.
7. Input the quantity (Qty) and Unit Price. The Total Charges are calculated.
8. Use the scroll bar to gain access to the fields on the right hand side of the window.
If the provider is a member of a group, enter the nine-digit performing provider number (Perform Provider ID) and name (Perf Last Name).
Page 66 PR-TDHc3.0AC_10.14.05_v.0.4

Medicaid and Family Planning Claims (Title XIX)
Page 67

TDHconnect 3.0—Workbook for Acute Care Providers
17.5 Dental ClaimsTo fill out a dental claim (HIPAA transaction 837D), double-click Claims in the Medicaid folder, then click the Dental icon in the upper left-hand corner of the screen, or click File>New>Dental.
Note: The Patient tab, Provider tab, and Other Insurance tab are identical on the professional (837P) claim previously covered. The Claim tab and Details tab are described below.
17.5.1 Claim Tab
Note: Dental claims require dental-specific information on the Claim tab.
17.5.2 Details Tab
Dental claims require dental-specific information on the Details tab.
Note: Use the scroll bar at the bottom of the screen to access fields on the right hand side of the window.This window is shown in two graphics to display all of the scrolling area.
Page 68 PR-TDHc3.0AC_10.14.05_v.0.4

Medicaid and Family Planning Claims (Title XIX)
Page 69

TDHconnect 3.0—Workbook for Acute Care Providers
17.6 Inpatient ClaimsTo fill out an inpatient claim (HIPAA transaction 837I), double-click Claims in the Medicaid folder, then click the Inpatient icon, or click File>New>Inpatient.
Note: The Other Insurance tab is identical on the professional (837P) claim previously covered. The Patient tab, Provider tab, Claim tab, Diagnosis tab, and Details tab are described below.
17.6.1 Patient Tab
Required fields:
• Account No., Medicaid No., and provider-defined Medical Record No.
• Last Name and First Name
• Sex, Date of Birth, Street Address, City, State, and Zip Code
Page 70 PR-TDHc3.0AC_10.14.05_v.0.4

Medicaid and Family Planning Claims (Title XIX)
17.6.2 Provider Tab
The Provider tab has two sub-tabs within it:
• Billing and Attending Providers
• Operating and Other Providers
17.6.2.1 Billing and Attending Providers Sub-Tab
Required fields:
• Billing Provider’s Provider ID, Facility Name, Address, City, State, Zip Code, and Tax ID No.
• Attending Provider’s Provider ID, Last Name, First Name, ID Type (Employer ID or Social Security No.), and Other ID (corresponding to ID type).
Page 71

TDHconnect 3.0—Workbook for Acute Care Providers
17.6.2.2 Operating and Other Provider Sub-Tab
Required fields (if applicable):
• Operating Provider ID, Last Name, and First Name
• The Other Provider ID, Last Name, and First Name
17.6.3 Claim Tab
Click the Claim tab to enter claim data.
Required fields:
• From Date and To Date
• Authorization Number (if needed), Patient Status, and Type of Bill
• Admission Date, Hour, Type, and Source
• Days Covered and Non-Covered
• Discharge Hour
Include any applicable occurrence codes and dates, and any applicable condition codes.
Page 72 PR-TDHc3.0AC_10.14.05_v.0.4

Medicaid and Family Planning Claims (Title XIX)
Page 73
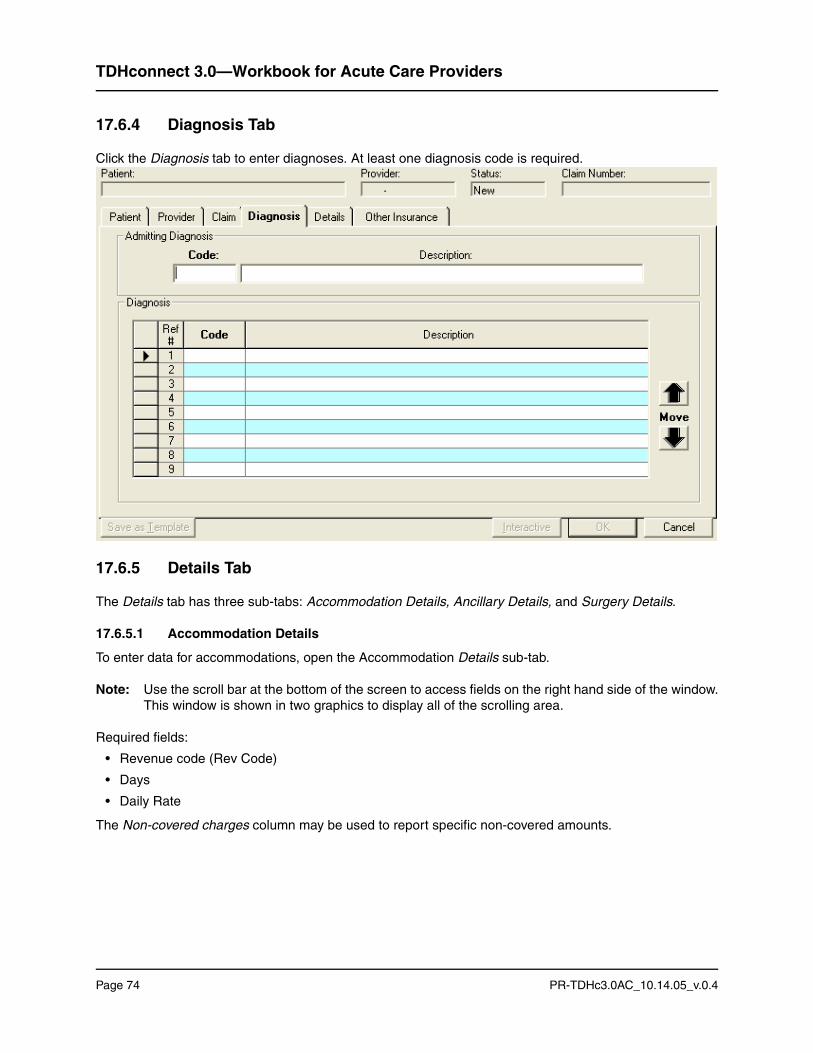
TDHconnect 3.0—Workbook for Acute Care Providers
17.6.4 Diagnosis Tab
Click the Diagnosis tab to enter diagnoses. At least one diagnosis code is required.
17.6.5 Details Tab
The Details tab has three sub-tabs: Accommodation Details, Ancillary Details, and Surgery Details.
17.6.5.1 Accommodation Details
To enter data for accommodations, open the Accommodation Details sub-tab.
Note: Use the scroll bar at the bottom of the screen to access fields on the right hand side of the window.This window is shown in two graphics to display all of the scrolling area.
Required fields:
• Revenue code (Rev Code)
• Days
• Daily Rate
The Non-covered charges column may be used to report specific non-covered amounts.
Page 74 PR-TDHc3.0AC_10.14.05_v.0.4

Medicaid and Family Planning Claims (Title XIX)
Page 75

TDHconnect 3.0—Workbook for Acute Care Providers
17.6.5.2 Ancillary Details
Click the Ancillary Details sub-tab of the Details tab to enter ancillary charges.
Note: This window is shown in two graphics to display all of the scrolling area.
Required fields:
• Revenue codes (Rev Code)
• Units
• Total Charges
Unit price is required for revenue codes 100-219.
The Non-Covered Charges column may be used to report line specific non-covered amounts.
Page 76 PR-TDHc3.0AC_10.14.05_v.0.4

Medicaid and Family Planning Claims (Title XIX)
Page 77
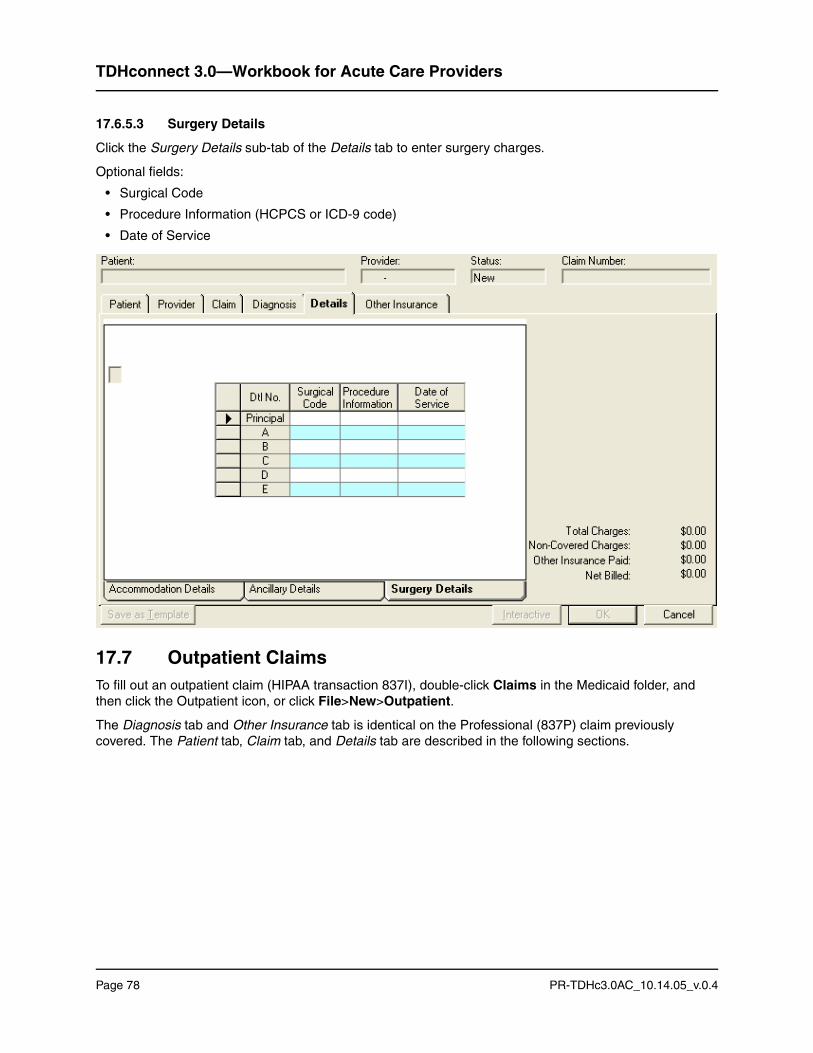
TDHconnect 3.0—Workbook for Acute Care Providers
17.6.5.3 Surgery Details
Click the Surgery Details sub-tab of the Details tab to enter surgery charges.
Optional fields:
• Surgical Code
• Procedure Information (HCPCS or ICD-9 code)
• Date of Service
17.7 Outpatient ClaimsTo fill out an outpatient claim (HIPAA transaction 837I), double-click Claims in the Medicaid folder, and then click the Outpatient icon, or click File>New>Outpatient.
The Diagnosis tab and Other Insurance tab is identical on the Professional (837P) claim previously covered. The Patient tab, Claim tab, and Details tab are described in the following sections.
Page 78 PR-TDHc3.0AC_10.14.05_v.0.4

Medicaid and Family Planning Claims (Title XIX)
17.7.1 Patient Tab
Required fields:
• Account No., Medicaid No., and provider-defined Medical Record No.
• Last Name and First Name
• Sex, Date of Birth, Street Address, City, State, and Zip Code
17.7.2 Provider Tab
The Provider tab has two sub-tabs, Billing and Attending Providers, and Operating and Other Providers.
Page 79

TDHconnect 3.0—Workbook for Acute Care Providers
17.7.2.1 Billing and Attending Providers
17.7.2.2 Operating and Other Providers
Page 80 PR-TDHc3.0AC_10.14.05_v.0.4

Medicaid and Family Planning Claims (Title XIX)
17.7.3 Claim Tab
Click the Claim tab to enter claim information.
Required fields:
• Admission Date and Hour
• Type of Bill
Optional fields:
• Authorization Number
• Discharge Hour
• Occurrence Codes and dates
• Condition Codes
17.7.4 Details Tab
Click the Details tab to enter details information.
Note: Use the scroll bar at the bottom of the screen to access fields on the right hand side of the window.This window is shown in two graphics to display all of the scrolling area.
Required fields:
• Date of Service
• Diagnosis reference (Diag Ref)
• Quantity (Qty)
• Total Charges
Page 81

TDHconnect 3.0—Workbook for Acute Care Providers
• Procedure Code ID is the type of procedure code such as HCPCS; HIEC; National Drug Code in 4-4-2 format, 5-3-2 format, 5-4-1 format, 5-4-2 format, or Mutually Defined.
Page 82 PR-TDHc3.0AC_10.14.05_v.0.4

Medicaid and Family Planning Claims (Title XIX)
17.8 Family Planning ClaimsTo fill out a Family Planning claim (2017 form), double-click Family Planning to expand the folder, double-click Claims, and then click the Create New Claim icon on the TDHconnect toolbar, or select File>New from the TDHconnect menu bar.
The Diagnosis tab and Other Insurance tab is identical on the Professional (837P) claim previously covered. The Patient tab, Provider tab, Claim tab, and Details tab are described in the following sections.
17.8.1 Patient Tab
Click the Patient tab to enter patient information.
Required fields appear in bold text after the appropriate Family Planning Program is selected.
17.8.2 Provider Tab
The Provider tab has two sub-tabs: Facility Provider, and Referring and Other Provider.
Required fields:
• Billing Provider ID and Last/Organization Name
• Address, City, State, and Zip Code
• Tax ID
Page 83

TDHconnect 3.0—Workbook for Acute Care Providers
Page 84 PR-TDHc3.0AC_10.14.05_v.0.4

Medicaid and Family Planning Claims (Title XIX)
17.8.3 Claim Tab
Click the Claim tab to enter claim information.
Page 85

TDHconnect 3.0—Workbook for Acute Care Providers
17.8.4 Details Tab
Click the Details tab to enter details information.
Note: Use the scroll bar at the bottom of the screen to access fields on the right hand side of the window.This window is shown in two graphics to display all of the scrolling area.
Page 86 PR-TDHc3.0AC_10.14.05_v.0.4
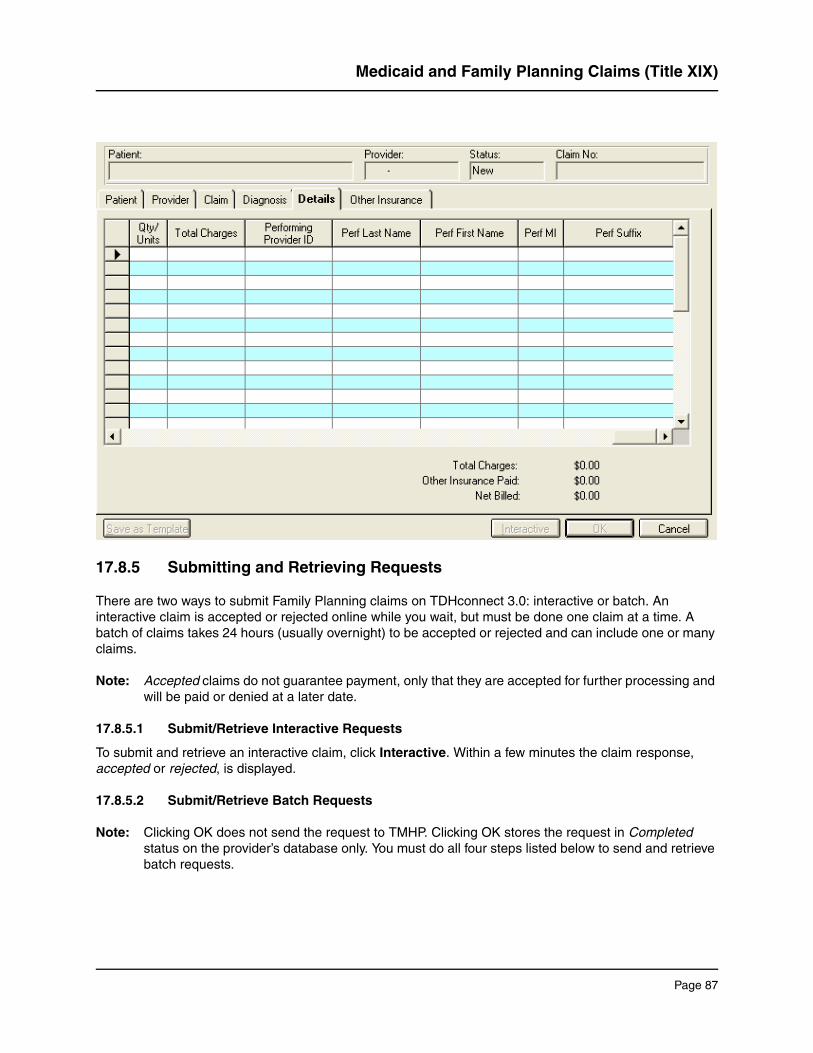
Medicaid and Family Planning Claims (Title XIX)
17.8.5 Submitting and Retrieving Requests
There are two ways to submit Family Planning claims on TDHconnect 3.0: interactive or batch. An interactive claim is accepted or rejected online while you wait, but must be done one claim at a time. A batch of claims takes 24 hours (usually overnight) to be accepted or rejected and can include one or many claims.
Note: Accepted claims do not guarantee payment, only that they are accepted for further processing and will be paid or denied at a later date.
17.8.5.1 Submit/Retrieve Interactive Requests
To submit and retrieve an interactive claim, click Interactive. Within a few minutes the claim response, accepted or rejected, is displayed.
17.8.5.2 Submit/Retrieve Batch Requests
Note: Clicking OK does not send the request to TMHP. Clicking OK stores the request in Completed status on the provider’s database only. You must do all four steps listed below to send and retrieve batch requests.
Page 87

TDHconnect 3.0—Workbook for Acute Care Providers
Submit a Batch Request
1. Fill out the claim and click OK. Repeat for each claim. Claims are stored in Completed status on your database.
2. Click Cancel to exit Claims and go back to the TDHconnect System Totals window.
3. In the TDHconnect System Totals window, open the Send Requests tab.
4. Select the check box for Family Planning Claims in the Send column.
5. Click Submit. Requests are changed to Submitted status and are sent to TMHP.
Retrieve Responses to a Batch Request
1. 24 hours after request submission, go to the TDHconnect 3.0 System Totals window and open the Retrieve Responses tab.
2. Select the check box for Claims in the Download column.
3. Click Download. Requests are now changed to Processed status.
4. To view the downloaded response, double click Claims under the Family Planning folder in TDHconnect Explorer, then double click the response.
17.9 Printing ReportsSeven types of claim reports may be printed from the Medicaid Claim Request/Response Summary.
• Transmission Summary. Click a batch claim response (has Transmit Type B and a Transmission ID). Click Reports>Transmission Summary to display the report. The number of accepted or rejected claim responses is listed. Click Print for a paper copy.
• Transmission Detail. Click an accepted batch claim response (has Transmit Type B and a Transmission ID, and the No. of Requests is greater than the No. Rejected). Click Reports>Transmission Detail. A list of claim responses in that batch is displayed. Click Print for a paper copy.
• Interactive Summary. Click Reports and Interactive Summary. The Interactive Transmission Report dialog box opens.
• Input a range of beginning and ending transmit dates and click OK.
• A report of claim responses is displayed. Click Print for a paper copy.
• Error Summary. Click a batch claim response (has Transmit Type B and a Transmission ID) and the No. Rejected must be greater than zero. Click Reports>Error Summary. A list of rejected claims and errors in the batch is displayed. Click Print for a paper copy.
• Claim Detail. Double click an interactive or batch claim response. Click Reports>Claim Detail. A detailed list of the claim is displayed. Click Print for a paper copy.
Page 88 PR-TDHc3.0AC_10.14.05_v.0.4

Medicaid and Family Planning Claims (Title XIX)
• Completed Claims. Click Reports and Completed Claims. A detailed list of all completed claims immediately starts printing.
• Rejected Claims. Click Reports and Rejected Claims. A detailed list of all rejected claims immediately starts printing. This report can be very useful for working rejected claims. Remember that you will not see rejected claims on your R&S report or on a claim status inquiry.
Page 89

TDHconnect 3.0—Workbook for Acute Care Providers
NOTES
Page 90 PR-TDHc3.0AC_10.14.05_v.0.4

Medicaid Claim Status Inquiry
18 Medicaid Claim Status Inquiry
Important: Before using Claim Status Inquiry (CSI), you must fax in a CSI request form, even though claim status inquiry is a built-in function of TDHconnect. A blank Claim Status Inquiry Authorization form is included in the back of this workbook.
Note: Rejected claims are not displayed in CSI responses, only claims that are in process, paid, or denied status.
Contact: For claims assistance, call the TMHP Contact center at 1-800-925-9126.
For LTC claims assistance, call the LTC Help Desk at 1-800-626-4117 (1-512-335-4729 in Austin).
18.1 Create a New CSI RequestCSI requests retrieve information on the status of claims that were accepted into the TMHP system, regardless of whether the claims were submitted on paper or electronically. To create a new CSI request:
1. Double click CSI to display the Medicaid Claim Status Inquiry Request/Response Summary window.
2. There are two types of CSI requests, Provider Patient Request and Claim Request. To open a new request, do one of the following:
• Click File>New Request on the TDHconnect 3.0 menu bar.
• Click the Provider Patient Request icon.
• Click the Claim Request icon.
Page 91

TDHconnect 3.0—Workbook for Acute Care Providers
18.1.1 Provider Patient Request
This batch request retrieves claim information for a specific client and provider over a range of up to three months of service dates, and this three month window can go back three years. Although the range of service dates can span only up to three months, several requests could be submitted in a batch to cover a longer range of service dates.
Required fields:
• Service Begin Date
• Service End Date
• Provider ID and Last/Organization Name
• Client Medicaid No., Last Name, and First Name
The Service Begin Date and Service End Date may be typed in, or use the down arrow to select a range of dates. A span of up to three months can be used, going back three years. The Service End Date can be the current date.
Click OK to save as a completed batch CSI request to be sent to TMHP later.
Important: Clicking OK does not send the request to TMHP. Clicking OK stores the request in Completed status on the provider’s database only. You must follow the procedure described in Section 17.3.2, Submit/Retrieve Batch Requests, on page 63 to send and retrieve batch requests.
Page 92 PR-TDHc3.0AC_10.14.05_v.0.4

Medicaid Claim Status Inquiry
18.1.2 Claims Request
This request is very useful for quickly finding the status of one claim. This request may be sent interactively or as a batch.
Required fields:
• Claim Number (24 digits)
• Provider ID (nine-digit TPI), and Last/Organization Name
• Client’s Medicaid No., Last Name, and First Name
Interactive Claim Request
Click Interactive to get an immediate response. Since this request deals with just one claim, Interactive mode is recommended.
Batch Claim Request
Click OK to save as a batch request to be sent to TMHP later.
18.2 Submitting and Retrieving Requests
18.2.1 Submit/Retrieve Interactive Requests
To submit and retrieve an interactive request (such as a Claim Request), fill out the request and click Interactive. You will receive a response while online.
18.2.2 Submit/Retrieve Batch Requests
Important: Clicking OK does not send the request to TMHP. Clicking OK stores the request in Completed status on the provider’s database only. You must follow the procedure described in Section 17.3.2, Submit/Retrieve Batch Requests, on page 63 to send and retrieve batch requests.
Page 93

TDHconnect 3.0—Workbook for Acute Care Providers
Submit a Batch Request
1. Fill out the CSI request and click OK. Repeat as needed for each CSI request.
2. Click Cancel to exit. The TDHconnect 3.0 System Totals window is displayed.
3. Select the Send Requests tab.
4. Select the check box for Medicaid CSI in the Send column.
5. Click Submit.
Retrieve a Batch Request
1. 24 hours after request submission, go to the System Totals window and select the Retrieve Responses tab.
2. Select the check box for CSI in the Download column.
3. Click Download. Requests are now changed to Processed status.
4. To view the downloaded response, double click CSI under the Medicaid folder (left side of window), then double click the response.
Page 94 PR-TDHc3.0AC_10.14.05_v.0.4

Medicaid Claim Status Inquiry
18.3 Medicaid CSI—Printing ReportsTwo types of CSI reports may be printed from the Medicaid Claim Status Inquiry Request/Response Summary.
• Response Report. Click an accepted CSI response (number of requests is greater than the number rejected). Click Reports, Response Report, and Claim Report. Click Print for a paper copy.
• Batch Report. Select interactive or batch response, click Reports>Batch Report. The report immediately starts printing a detailed list of all CSI responses from the row you selected.
Page 95

TDHconnect 3.0—Workbook for Acute Care Providers
NOTES
Page 96 PR-TDHc3.0AC_10.14.05_v.0.4

Medicaid Electronic Remittance & Status (ER&S)
19 Medicaid Electronic Remittance & Status (ER&S)
Note: Refer to the current Texas Medicaid Provider Procedures Manual, Section 4, Appendix C and Appendix D for related information and a copy of the ER&S Agreement. You can also call the TMHP EDI Help Desk at 1-888-863-3638 for this form.
To view ER&S information, double-click ER&S to display the Medicaid ER&S Summary List window.
To display a specific ER&S report, double-click the row of the report.
19.1 Download an ER&S ReportBefore generating a report:
Page 97

TDHconnect 3.0—Workbook for Acute Care Providers
1. Open the TDHconnect System Totals window.
2. Open the Retrieve Other tab.
3. Select the check box in the Download column for ER&S.
4. Click Download.
Note: ER&S reports are available to download at 6:00 a.m. each Monday. A good practice is to download them weekly.
19.2 Generate an ER&S Report
In the Medicaid ER&S Summary List window, click File>Generate R&S.
19.3 Medicaid ER&S—Print Report• Click Print to print the ER&S report.
• Use the forward or backward arrows to see other pages.
• The down arrow on the size (100%) box reduces or enlarges the image.
Required fields are:
• Provider ID
• Start Date
• End Date
• Claim Status (check one)
The Start Date is usually a Friday and the End Date is usually the following Monday.
Click Display Report to see the report.
Page 98 PR-TDHc3.0AC_10.14.05_v.0.4

Medicaid Appeals
20 Medicaid Appeals
Note: Refer to Section 5 in the current Texas Medicaid Provider Procedures Manual for related policy information.
Important: If a claim denies with zero allowed, zero paid amounts (see R&S below), follow up with a new claim (not an appeal) within 120 days of the R&S date. See Section 13, Medicaid Claims on page 41 for details. An appeal cannot be filed on a pending claim. The ER&S Report has a section for pending claims, identified by The following claims are being processed. The pending claim must finalize and be paid or denied before an appeal may be filed.
20.1 Changes to Appeals Resulting From HIPAAThe following items reflect changes to appeals resulting from HIPAA:
• All required data on the appeal must be completed, not just the data being changed from the original claim.
• Appeals look similar to claims, with the exception of three fields on the Patient tab of the appeal. See Section 20.4, Appeal Fields, on page 102.
• Changes to surgical procedure codes on inpatient claims must be appealed on paper with supporting documentation for review.
• Appeals must include all detail lines on the original claim, in the same order as on the original claim. An appeal will reject if it contains fewer detail lines than the original claim being appealed.
• An added detail line must be submitted as a separate new day claim.
Reminders:
• If the appeal requires additional paperwork, such as on ambulance claims, the appeal must be sent on paper.
• Crossover claims must be submitted on paper, along with a Remittance Advice from Medicare.
• Appeals with dates of service prior to October 16, 2003 should contain Medicaid local procedure codes, if applicable.
• TDHconnect appeals are only by batch; there are no interactive TDHconnect appeals.
20.2 Three Ways to Complete TDHconnect AppealsThere are three ways to complete TDHconnect appeals:
• Create an appeal from an accepted TDHconnect claim
• Create an appeal from an ER&S report
• Start from a blank TDHconnect appeal
Page 99

TDHconnect 3.0—Workbook for Acute Care Providers
20.3 Create an Appeal from an Accepted TDHconnect ClaimTo create an appeal from an accepted TDHconnect claim, perform the following steps:1. Click the Save as Appeal tab at the bottom of an opened claim in the Claims section of TDHconnect.
Important: Remember that the claim being appealed must be finalized (paid or denied) before it can be appealed.
2. A message appears:
• An incomplete appeal has been generated and saved
• user must go to appeals in TDHconnect to complete the appeal
• before submitting verify that the claim is in appealable status
3. Go to Appeals and double-click the Incomplete Appeals row, then double-click the appropriate appeal from the list of Incomplete Appeals.
4. Fill out any missing information required on the appeal. The fields for appeals are the same as for claims of the same type with one exception: the Patient tab has three additional fields not found on claims. See Section 20.4, Appeal Fields, on page 102. For frequency code, select seven for an appeal or eight for a void (recoupment), enter the original ICN as a 15 or 24-digit claim number, and the original Medicaid number is filled in for you.
Important: Remember fields that appear in bold are required, and other fields may be necessary depending on the type of appeal.
Click OK on the appeal to save it in completed status to be submitted later to TMHP.
Appeals are only submitted by batch, not interactively. A batch can contain one or more appeals.
Clicking OK does not send the request to TMHP. Clicking OK stores the request in Completed status on the provider’s database only. Follow the procedure described in Section 15.4.2, Submit/Retrieve Batch Requests, on page 49 to send and retrieve batch requests.
20.3.1 Create an Appeal from an ER&S Report
To create an appeal from an ER&S report, perform the following steps:1. Open the Appeals window by double-clicking Appeals on the left side of the TDHconnect System
Totals window.
Page 100 PR-TDHc3.0AC_10.14.05_v.0.4

Medicaid Appeals
2. Click File>From ER&S, or click the icon on the TDHconnect 3.0 menu bar to create an appeal from an ER&S report. The ER&S Search window appears.
Important: If you have not signed up to receive ER&S reports, you may do so by filling out an ER&S agreement and faxing it in to the Electronic data interchange department of TMHP.
3. In the ER&S Search window, enter search criteria to find the claim to be appealed and click Search.
4. Click the claim being appealed and click Create.
5. Fill out any missing information required on the appeal. The fields for Appeals are the same as for claims of the same type with one exception: the Patient tab has three additional fields not found on claims. See Section 20.4, Appeal Fields, on page 102. For frequency code, select seven for an appeal or eight for a void (recoupment), enter the original ICN as a 15-or 24-digit claim number, and the original Medicaid number is filled in for you.
Important: Remember that bolded fields are required, and other fields may be necessary depending on the type of appeal.
Click OK on the appeal to save it in completed status to be submitted later to TMHP.
Appeals are only submitted by batch, not interactively. A batch can contain one or more appeals.
Clicking OK does not send the request to TMHP. Clicking OK stores the request in Completed status on the provider’s database only. You must follow the procedure described in Section 15.4.2, Submit/Retrieve Batch Requests, on page 49 to send and retrieve batch requests.
Page 101

TDHconnect 3.0—Workbook for Acute Care Providers
20.3.2 Create an Appeal from a Blank Form
To create an appeal from a blank form, perform the following steps:1. Open the Appeals window by double-clicking Appeals on the left side of the TDHconnect 3.0 System
Totals window.
Or click the icon for the appropriate appeal type on the TDHconnect 3.0 menu bar.
3. Fill out all required fields in the corresponding dialog box displayed.
20.4 Appeal Fields
The fields for appeals are the same as for claims of the same type with one exception: the Patient tab has three additional fields not found on claims.
• Frequency Code. Select the value of seven to indicate an appeal, or eight to void (recoup) the entire claim. To recoup only a detail line on a claim, fill out the entire appeal and enter the value 0 (zero) for the “Unit Price” field on the Details tab.
• Original ICN. Input the 15 or 24-digit claim number of the claim being appealed.
• Original Medicaid Number. Input the nine-digit client Medicaid number used on the claim being appealed.
2. Click File>New, then one of the following:
• Professional
• Eyeglass
• Dental
• Inpatient
• Outpatient
Page 102 PR-TDHc3.0AC_10.14.05_v.0.4

Medicaid Appeals
20.5 Medicaid Appeals—Submitting and Retrieving Requests
20.5.1 Submit/Retrieve Batch Requests
When finished entering data, click OK to save the completed appeal to be submitted to TMHP later.
Important: Clicking OK does not send the request to TMHP. Clicking OK stores the request in Completed status on the provider’s database only. Follow the procedure described in Section 15.4.2, Submit/Retrieve Batch Requests, on page 49 to send and retrieve batch requests.
Appeals are only submitted by batch, not interactively. A batch can contain one or more appeals. To submit and retrieve a batch of appeals, perform the steps described in the following sections.
Submit a Batch Request
1. Fill out the appeal and click OK. Repeat as needed for each appeal.
2. Click Cancel to exit. The TDHconnect System Totals window is displayed.
3. Select the Send Requests tab.
Page 103

TDHconnect 3.0—Workbook for Acute Care Providers
4. Select the check box for Medicaid Appeals in the Send column.
5. Click Submit.
Retrieve a Batch Request1. Twenty-four hours after request submission, go to the TDHconnect System Totals window and select
the Retrieve Responses tab.
2. Select the check box for Appeals in the Download column.
3. Click Download. Requests are now changed to Processed status.
4. To view the downloaded response, double click Appeals under the Medicaid folder (left side of window), then double click the response.
20.6 Medicaid Appeals—Printing ReportsSix types of appeals reports may be printed from the Medicaid Appeal Request/Response Summary:
Transmission Summary 1. Click an appeal response.
2. Click Reports>Transmission Summary to display the report. The number of accepted or rejected appeals is listed, along with the amount billed.
3. Click Print for a paper copy.
Transmission Detail 1. Click an accepted appeal response
2. Click Reports and Transmission Detail. A list of appeal responses in that batch is displayed.
3. Click Print for a paper copy.
Error Summary 1. Click an appeal response with a processed status and number rejected greater than zero.
2. Click Reports>Error Summary. A list of rejected appeals and errors in the batch is displayed.
3. Click Print for a paper copy.
Appeal Detail 1. Double-click an appeal response.
2. Click Reports>Appeal Detail. A detailed list of the appeal is displayed.
3. Click Print for a paper copy.
Completed Appeals 1. Click Reports>Completed Appeals. The following statement appears: There are __ appeals to print. Do you want to continue?
2. Click Yes to print a detailed list of all completed but not yet submitted appeals.
Rejected Appeals 1. Click Reports>Print Rejected Appeals. The following message appears: There are __ appeals to print. Do you want to continue?
2. Click Yes to print a detailed list of all rejected appeals.
Page 104 PR-TDHc3.0AC_10.14.05_v.0.4
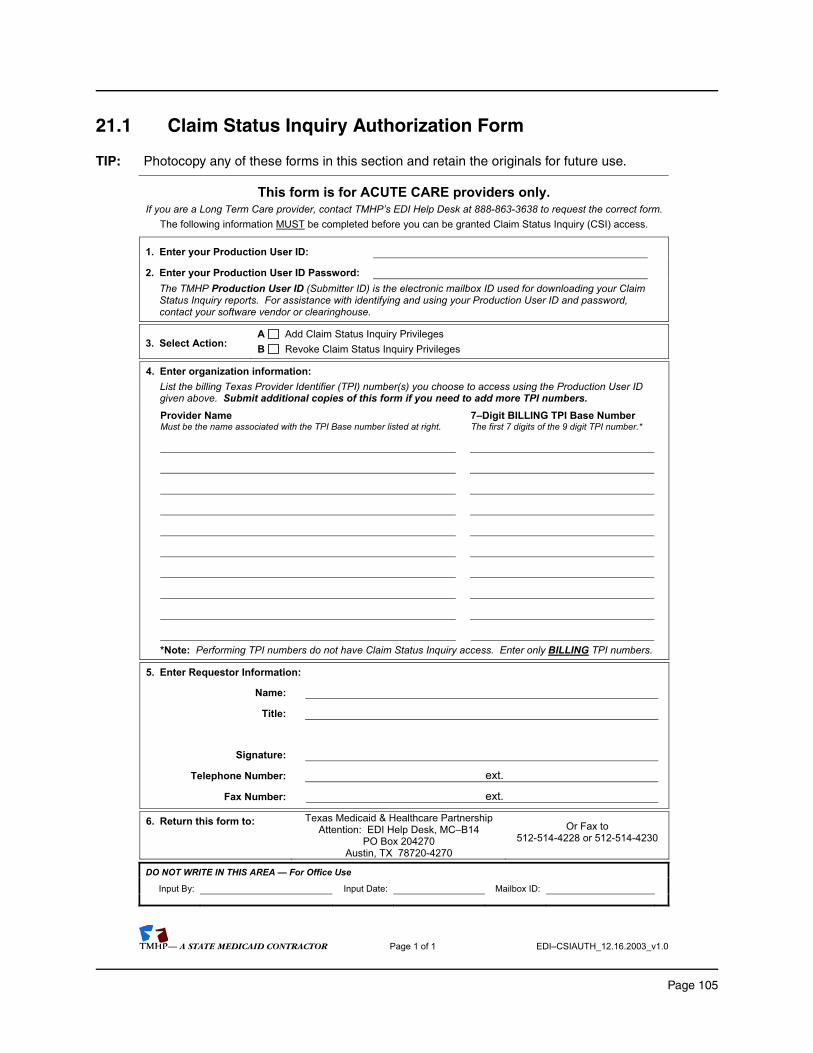
21.1 Claim Status Inquiry Authorization Form
TIP: Photocopy any of these forms in this section and retain the originals for future use.
— A STATE MEDICAID CONTRACTOR Page 1 of 1 EDI–CSIAUTH_12.16.2003_v1.0
This form is for ACUTE CARE providers only. If you are a Long Term Care provider, contact TMHP’s EDI Help Desk at 888-863-3638 to request the correct form.
The following information MUST be completed before you can be granted Claim Status Inquiry (CSI) access.
1. Enter your Production User ID:
2. Enter your Production User ID Password:
The TMHP Production User ID (Submitter ID) is the electronic mailbox ID used for downloading your Claim Status Inquiry reports. For assistance with identifying and using your Production User ID and password, contact your software vendor or clearinghouse.
3. Select Action:A Add Claim Status Inquiry Privileges
B Revoke Claim Status Inquiry Privileges
4. Enter organization information:
List the billing Texas Provider Identifier (TPI) number(s) you choose to access using the Production User ID given above. Submit additional copies of this form if you need to add more TPI numbers.
Provider Name Must be the name associated with the TPI Base number listed at right.
7–Digit BILLING TPI Base Number The first 7 digits of the 9 digit TPI number.*
*Note: Performing TPI numbers do not have Claim Status Inquiry access. Enter only BILLING TPI numbers.
5. Enter Requestor Information:
Name:
Title:
Signature:
Telephone Number: ext.
Fax Number: ext.
6. Return this form to: Texas Medicaid & Healthcare Partnership Attention: EDI Help Desk, MC–B14
PO Box 204270 Austin, TX 78720-4270
Or Fax to 512-514-4228 or 512-514-4230
DO NOT WRITE IN THIS AREA — For Office Use
Input By: Input Date: Mailbox ID:
Page 105

TDHconnect 3.0—Workbook for Acute Care Providers
Page 106 PR-TDHc3.0AC_10.14.05_v.0.4

21.2 TDHconnect Order Form
TIP: Photocopy this form and retain the original for future use.
Page 107
TDHconnect 3.0—Workbook for Acute Care Providers
Page 108 PR-TDHc3.0AC_10.14.05_v.0.4

21.3 ER&S Agreement FormElectronic Remittance and Status (ER&S) Agreement
— A STATE MEDICAID CONTRACTOR Page 1 of 2 ERSAG11.11.2003_v0.1
Before your ER&S Agreement* can be processed, you MUST choose ONE of the following:* These changes affect ONLY the ELECTRONIC version of the Remittance & Status Report. To make
changes to the PAPER version of the R&S report, contact TMHP Provider Enrollment.
Set up INITIALLY (first time). Use Production User ID*: (9 digits)
CHANGE Production User ID FROM: (9 digits)
TO: (9 digits)
REMOVE Production ID Remove: (9 digits)
** The TMHP Production User ID (Submitter ID) is the electronic mailbox ID used for downloading your Electronic Remittance & Status (ER&S) reports. For assistance with identifying and using your Production User ID and password, contact your software vendor or clearinghouse.
This information MUST be completed before your request can be processed.
Provider Name (must match TPI number) BILLING TPI Number Provider Tax ID Number
Provider’s Physical Address Provider Phone Number
Provider Contact Name (if other than provider) Provider Contact Title Contact Phone Number
Do not complete this block UNLESS the ER&S will be downloaded by anyone OTHER than the provider.
Name of Business Organization to Receive ER&S Business Organization Phone Number
Business Organization Contact Name Business Organization Contact Phone No.
Business Organization Address Business Organization Tax ID
Check each box after reading and understanding the following statements.If you are unsure about anything that is stated below, contact the TMHP EDI Help Desk at (888) 863-3638.All three statements must be checked before we can process your Electronic Remittance & Status Agreement.
I (we) request to receive Electronic Remittance and Status information and authorize the information to be deposited in the electronic mailbox as indicated above. I (we) accept financial responsibility for costs associated with receipt of Electronic R&S information.
I (we) understand that paper–formatted R&S information will continue to be sent to my (our) accounting address as maintained at TMHP until I (we) submit an Electronic R&S Certification Request form.
I (we) will continue to maintain the confidentiality of records and other information relating to recipients in accordance with applicable state and federal laws, rules, and regulations.
Provider Signature Date
Title Email Address (if applicable)
DO NOT WRITE IN THIS AREA — For Office Use
Input By: Input Date: Mailbox ID:
Page 109

TDHconnect 3.0—Workbook for Acute Care Providers
ER&S Agreement — Submission Instructions
— A STATE MEDICAID CONTRACTOR Page 2 of 2 ERSAG11.11.2003_v0.1
Before faxing or mailing this agreement, ensure that all required information is completely filled out, and that the agreement is signed.
Incomplete agreements cannot be processed.
Mail to: Texas Medicaid & Healthcare PartnershipAttention: EDI Help Desk MC–B14
PO Box 204270Austin, TX 78720-4270
Fax to: (512) 514-4228= OR =
(512) 514-4230
Page 110 PR-TDHc3.0AC_10.14.05_v.0.4
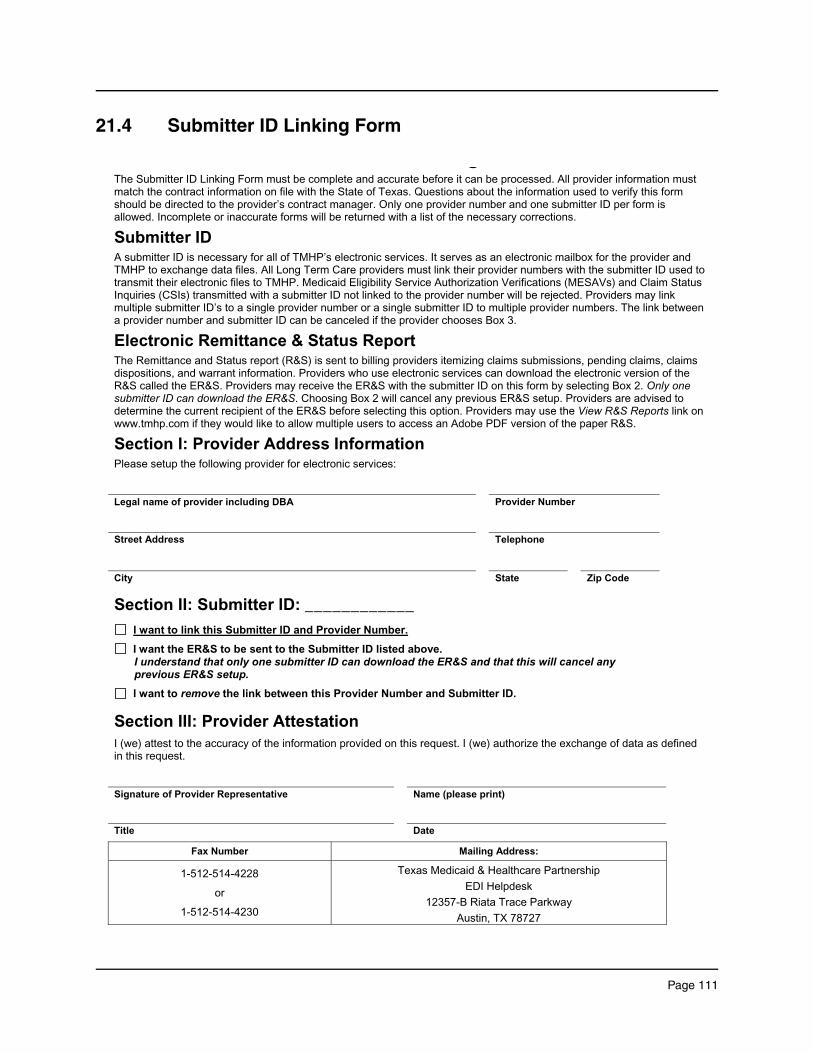
21.4 Submitter ID Linking Form
gThe Submitter ID Linking Form must be complete and accurate before it can be processed. All provider information must match the contract information on file with the State of Texas. Questions about the information used to verify this form should be directed to the provider’s contract manager. Only one provider number and one submitter ID per form is allowed. Incomplete or inaccurate forms will be returned with a list of the necessary corrections.
Submitter ID A submitter ID is necessary for all of TMHP’s electronic services. It serves as an electronic mailbox for the provider and TMHP to exchange data files. All Long Term Care providers must link their provider numbers with the submitter ID used to transmit their electronic files to TMHP. Medicaid Eligibility Service Authorization Verifications (MESAVs) and Claim Status Inquiries (CSIs) transmitted with a submitter ID not linked to the provider number will be rejected. Providers may link multiple submitter ID’s to a single provider number or a single submitter ID to multiple provider numbers. The link between a provider number and submitter ID can be canceled if the provider chooses Box 3.
Electronic Remittance & Status Report The Remittance and Status report (R&S) is sent to billing providers itemizing claims submissions, pending claims, claims dispositions, and warrant information. Providers who use electronic services can download the electronic version of the R&S called the ER&S. Providers may receive the ER&S with the submitter ID on this form by selecting Box 2. Only one submitter ID can download the ER&S. Choosing Box 2 will cancel any previous ER&S setup. Providers are advised to determine the current recipient of the ER&S before selecting this option. Providers may use the View R&S Reports link on www.tmhp.com if they would like to allow multiple users to access an Adobe PDF version of the paper R&S.
Section I: Provider Address Information Please setup the following provider for electronic services:
Legal name of provider including DBA Provider Number
Street Address Telephone
City State Zip Code
Section II: Submitter ID: ____________
I want to link this Submitter ID and Provider Number.
I want the ER&S to be sent to the Submitter ID listed above. I understand that only one submitter ID can download the ER&S and that this will cancel any previous ER&S setup.
I want to remove the link between this Provider Number and Submitter ID.
Section III: Provider Attestation
I (we) attest to the accuracy of the information provided on this request. I (we) authorize the exchange of data as defined in this request.
Signature of Provider Representative Name (please print)
Title Date
Fax Number Mailing Address:
1-512-514-4228
or
1-512-514-4230
Texas Medicaid & Healthcare Partnership EDI Helpdesk
12357-B Riata Trace Parkway Austin, TX 78727
Page 111

TDHconnect 3.0—Workbook for Acute Care Providers
Page 112 PR-TDHc3.0AC_10.14.05_v.0.4

21.5 Electronic Funds Transfer Agreement
Page 1 of 2 EFTAG11.17.2003_v1.0
Electronic Funds Transfer (EFT) is a payment method to deposit funds for claims approved for payment directly into a provider’s bank account. These funds can be credited to either checking or savings accounts, provided the bank selected accepts Automated Clearinghouse (ACH) transactions. EFT also avoids the risks associated with mailing and handling paper checks, ensuring funds are directly deposited into a specified account.
The following items are specific to EFT:
Applications are processed within five workdays of receipt.
Pre–notification to your bank takes place on the cycle following the application processing.
Future deposits are received electronically after pre–notification.
The Remittance and Status (R&S) report furnishes the details of individual credits made to the provider’s account during the weekly cycle.
Specific deposits and associated R&S reports are cross–referenced by both Texas Provider Identifier (TPI) and R&S number.
EFT funds are released by TMHP to depository financial institutions each Friday.
The availability of R&S reports is unaffected by EFT and they continue to arrive in the same manner and time frame as currently received.
TMHP must provide the following notification according to ACH guidelines:
Most receiving depository financial institutions receive credit entries on the day before the effective date, and these funds are routinely made available to their depositors as of the opening of business on the effective date. Please contact your financial institution regarding posting time if funds are not available on the release date.
However, due to geographic factors, some receiving depository financial institutions do not receive their credit entries until the morning of the effective day and the internal records of these financial institutions will not be updated. As a result, tellers, bookkeepers, or automated teller machines (ATMs) may not be aware of the deposit and the customer’s withdrawal request may be refused. When this occurs, the customer or company should discuss the situation with the ACH coordinator of their institution who, in turn should work out the best way to serve their customer’s needs.
In all cases, credits received should be posted to the customer’s account on the effective date and thus be made available to cover checks or debits that are presented for payment on the effective date.
To enroll in the EFT program, complete the attached Electronic Funds Transfer Authorization Agreement. You must return a voided check or deposit slip with the agreement to the TMHP address indicated on the form.
Contact TMHP Customer Service at 1–800–925–9126 if you need assistance.
Page 113

TDHconnect 3.0—Workbook for Acute Care Providers
Electronic Funds Transfer (EFT) Authorization Agreement Enter ONE Texas Provider Identifier (TPI) per Form
NOTE: Complete all sections below and attach a voided check or a photocopy of your deposit slip.
Type of Authorization: NEW CHANGE
Provider Name Nine–Character Billing TPI
Provider Accounting Address Provider Phone Number Street Address or PO Box City State Zip
ext.
Bank Name ABA/Transit Number
Bank Phone Number Account Number
Bank Address Type Account (check one) Street Address or PO Box City State Zip
Checking Savings
I (we) hereby authorize Texas Medicaid & Healthcare Partnership (TMHP) to present credit entries into the bank account referenced above and the depository named above to credit the same to such account. I (we) understand that I (we) am responsible for the validity of the information on this form. If the company erroneously deposits funds into my (our) account, I (we) authorize the company to initiate the necessary debit entries, not to exceed the total of the original amount credited for the current pay period.
I (we) agree to comply with all certification requirements of the applicable program regulations, rules, handbooks, bulletins, standards, and guidelines published by the Texas Health and Human Services Commission (HHSC) or its health insuring contractor. I (we) understand that payment of claims will be from federal and state funds, and that any falsification or concealment of a material fact may be prosecuted under federal and state laws.
I (we) will continue to maintain the confidentiality of records and other information relating to clients in accordance with applicable state and federal laws, rules, and regulations.
Authorized Signature Date
Title Email Address (if applicable)
Contact Name Phone
Return this form to: Texas Medicaid & Healthcare Partnership
ATTN: Provider Enrollment PO Box 200795
Austin TX 78720–0795
DO NOT WRITE IN THIS AREA — For Office Use
Input By: Input Date:
Page 114 PR-TDHc3.0AC_10.14.05_v.0.4
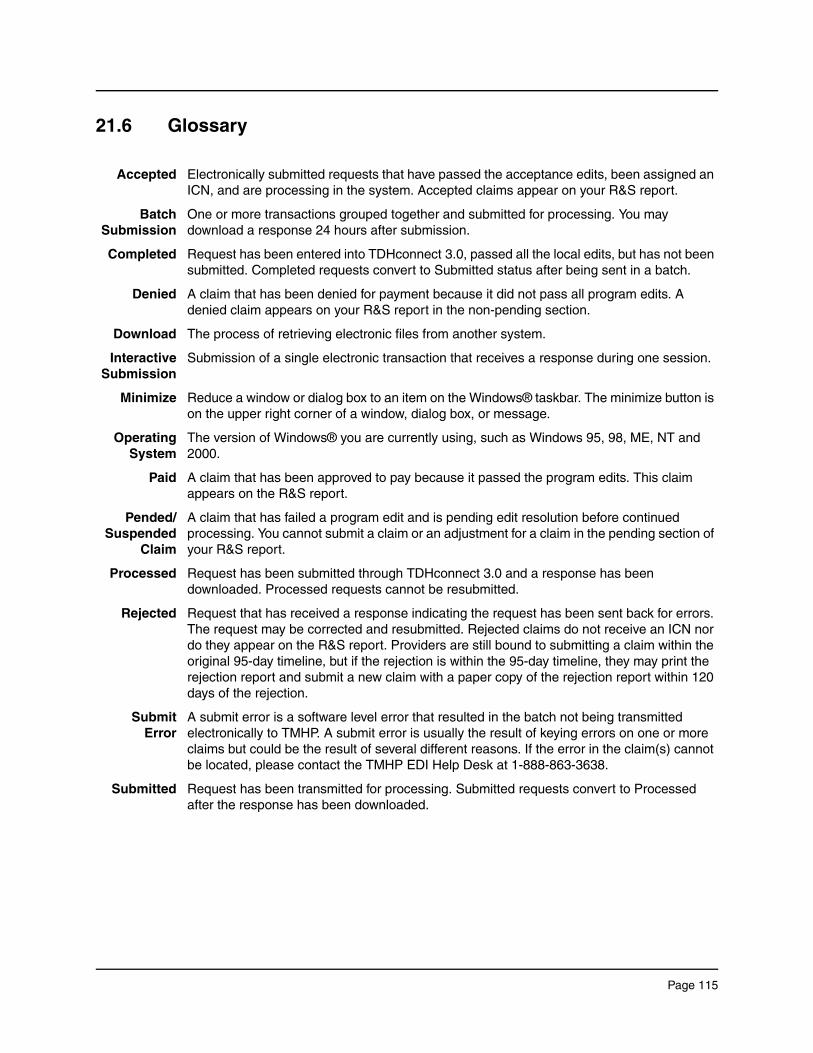
21.6 Glossary
Accepted Electronically submitted requests that have passed the acceptance edits, been assigned an ICN, and are processing in the system. Accepted claims appear on your R&S report.
BatchSubmission
One or more transactions grouped together and submitted for processing. You may download a response 24 hours after submission.
Completed Request has been entered into TDHconnect 3.0, passed all the local edits, but has not been submitted. Completed requests convert to Submitted status after being sent in a batch.
Denied A claim that has been denied for payment because it did not pass all program edits. A denied claim appears on your R&S report in the non-pending section.
Download The process of retrieving electronic files from another system.
InteractiveSubmission
Submission of a single electronic transaction that receives a response during one session.
Minimize Reduce a window or dialog box to an item on the Windows® taskbar. The minimize button is on the upper right corner of a window, dialog box, or message.
OperatingSystem
The version of Windows® you are currently using, such as Windows 95, 98, ME, NT and 2000.
Paid A claim that has been approved to pay because it passed the program edits. This claim appears on the R&S report.
Pended/Suspended
Claim
A claim that has failed a program edit and is pending edit resolution before continued processing. You cannot submit a claim or an adjustment for a claim in the pending section of your R&S report.
Processed Request has been submitted through TDHconnect 3.0 and a response has been downloaded. Processed requests cannot be resubmitted.
Rejected Request that has received a response indicating the request has been sent back for errors. The request may be corrected and resubmitted. Rejected claims do not receive an ICN nor do they appear on the R&S report. Providers are still bound to submitting a claim within the original 95-day timeline, but if the rejection is within the 95-day timeline, they may print the rejection report and submit a new claim with a paper copy of the rejection report within 120 days of the rejection.
SubmitError
A submit error is a software level error that resulted in the batch not being transmitted electronically to TMHP. A submit error is usually the result of keying errors on one or more claims but could be the result of several different reasons. If the error in the claim(s) cannot be located, please contact the TMHP EDI Help Desk at 1-888-863-3638.
Submitted Request has been transmitted for processing. Submitted requests convert to Processed after the response has been downloaded.
Page 115

TDHconnect 3.0—Workbook for Acute Care Providers
Submitter ID The nine-character, numeric ID first issued when providers start to bill electronically. This should be placed in the “Compass21 user ID” field and/or “CMS user ID” field, located in the System settings window. You can reach this window by going to Communications>System Settings.
Template A TDHconnect 3.0 window that shows all the data fields needed to submit a claim or MESAV request. Templates allow you to save complete or partial data for future use.
TPI Number The nine-character, numeric Texas Provider Identifier number issued to you through Medicaid.
Page 116 PR-TDHc3.0AC_10.14.05_v.0.4

21.7 Workshop Evaluation
I. Objective (evaluate from 1 to 5): How well do you feel this workshop has fulfilled its objectives?
II. Overall program (evaluate from 1 to 5):
III. Comments / Suggestions:
IV. How did you hear about this workshop?
V. Complete the following section only if you would like information or you have a question or problem you need help resolving:
I would like a visit to discuss the following questions or problems:
Location (City): Date:
Presenter(s):
This workshop has helped me understand: Effective Ineffective
Installation 5 4 3 2 1
Eligibility Inquiries 5 4 3 2 1
Client Database 5 4 3 2 1
Claims Submission 5 4 3 2 1
Claim Status Inquiry 5 4 3 2 1
Electronic Adjustments 5 4 3 2 1
Reference Files 5 4 3 2 1
Electronic Remittance & Status Reports 5 4 3 2 1
Paper Claim Forms 5 4 3 2 1
Yes No
Content was informative and helpful to your office 5 4 3 2 1
Information was clearly presented and easily understood 5 4 3 2 1
Seminar met or exceeded your expectations 5 4 3 2 1
Would recommend this seminar to others 5 4 3 2 1
Name: Provider #:
Provider Name:
Mailing Address: Phone #:
Page 117