Embed Size (px)
Citation preview
TE 1000-AVR
English enFrançais frDansk daSvenska svNorsk noSuomi fiРусский ruTürkçe tr
يبرع arLatviešu lvLietuvių ltEesti etУкраїнська ukҚазақ kk日本語 ja한국어 ko繁體中文 zh中文 cn
Printed: 25.04.2016 | Doc-Nr: PUB / 5165525 / 000 / 03

1
Printed: 25.04.2016 | Doc-Nr: PUB / 5165525 / 000 / 03
2
3
4
Printed: 25.04.2016 | Doc-Nr: PUB / 5165525 / 000 / 03
TE 1000-AVRen Original operating instructions . . . . . . . . . . . . . . . . . . . . . . . . . . . . . . . . . . . . . . . 1fr Mode d'emploi original . . . . . . . . . . . . . . . . . . . . . . . . . . . . . . . . . . . . . . . . . . . 10da Original brugsanvisning . . . . . . . . . . . . . . . . . . . . . . . . . . . . . . . . . . . . . . . . . . 20sv Originalbruksanvisning . . . . . . . . . . . . . . . . . . . . . . . . . . . . . . . . . . . . . . . . . . . 29no Original bruksanvisning . . . . . . . . . . . . . . . . . . . . . . . . . . . . . . . . . . . . . . . . . . 38fi Alkuperäiset ohjeet . . . . . . . . . . . . . . . . . . . . . . . . . . . . . . . . . . . . . . . . . . . . . 47ru Оригинальное руководство по эксплуатации . . . . . . . . . . . . . . . . . . . . . . . . . . . 56tr Orijinal kullanım kılavuzu . . . . . . . . . . . . . . . . . . . . . . . . . . . . . . . . . . . . . . . . . 66ar يلصألالامعتسالاليلد . . . . . . . . . . . . . . . . . . . . . . . . . . . . . . . . . . . . . . . . . . 75lv Oriģinālā lietošanas instrukcija . . . . . . . . . . . . . . . . . . . . . . . . . . . . . . . . . . . . . 84lt Originali naudojimo instrukcija . . . . . . . . . . . . . . . . . . . . . . . . . . . . . . . . . . . . . . 93et Algupärane kasutusjuhend . . . . . . . . . . . . . . . . . . . . . . . . . . . . . . . . . . . . . . . . 102uk Оригінальна інструкція з експлуатації . . . . . . . . . . . . . . . . . . . . . . . . . . . . . . . . 111kk Түпнұсқа пайдалану бойынша нұсқаулық . . . . . . . . . . . . . . . . . . . . . . . . . . . . . 121ja オリジナル取扱説明書 . . . . . . . . . . . . . . . . . . . . . . . . . . . . . . . . . . . . . . . . . . . . 131ko 오리지널 사용설명서 . . . . . . . . . . . . . . . . . . . . . . . . . . . . . . . . . . . . . . . . . . . . . 140zh 原始操作說明 . . . . . . . . . . . . . . . . . . . . . . . . . . . . . . . . . . . . . . . . . . . . . . . . . . 149cn 原版操作说明 . . . . . . . . . . . . . . . . . . . . . . . . . . . . . . . . . . . . . . . . . . . . . . . . . . 157
Printed: 25.04.2016 | Doc-Nr: PUB / 5165525 / 000 / 03
1
1 Information about the documentation
1.1 About this documentation• Read this documentation before initial operation or use. This is a is a prerequisite for safe, trouble-free
handling and use of the product.• Observe the safety instructions and warnings in this documentation and on the product.• Always keep the operating instructions with the product and make sure that the operating instructions
are with the product when it is given to other persons.
1.2 Explanation of signs used1.2.1 WarningsWarnings alert persons to hazards that occur when handling or using the product. The following signal wordsare used in combination with a symbol:
DANGER! Draws attention to imminent danger that will lead to serious personal injury or fatality.
WARNING! Draws attention to a potential hazard that could lead to serious personal injury orfatality.CAUTION! Draws attention to a potentially dangerous situation that could lead to slight personalinjury or damage to the equipment or other property.
1.2.2 SymbolsThe following symbols are used in this document:
Read the operating instructions before use.
General warning
Instructions for use and other useful information
1.2.3 Symbols on the productThe following symbols are used on the product:
Chiseling
Chisel positioning
Protection class II (double-insulated)
1.2.4 Characters in illustrationsThe illustrations in these operating instructions are intended to promote a better understanding and maydeviate from the actual version of the product.
These numbers refer to the corresponding illustrations found at the beginning of these operatinginstructions.The numbering reflects the order of the work steps in the illustration and may deviate from thenumbering of work steps in the text.Item reference numbers are used in the overview illustration and refer to the numbers used inthe product overview section.These characters are intended to draw your special attention to certain points when handling theproduct.
1.3 Product informationHilti products are designed for professional use and may be operated, serviced and maintained only bytrained, authorized personnel. This personnel must be informed of any particular hazards that may beencountered. The product and its ancillary equipment may present hazards when used incorrectly byuntrained personnel or when used not as directed.
Printed: 25.04.2016 | Doc-Nr: PUB / 5165525 / 000 / 03
2
The type designation and serial number are printed on the type identification plate.▶ Write down the serial number in the table below. You will be required to state the product details when
contacting Hilti Service or your local Hilti organization to enquire about the product.Product informationBreaker TE 1000AVRGeneration 02Serial no.
We reserve the right to make changes. Errors excepted.
2 Safety
2.1 Safety instructionsThe safety rules given in the following section contain all general safety rules for electric tools which, inaccordance with the applicable standards, require to be listed in the operating instructions. Accordingly,some of the rules listed may not be relevant to this electric tool.
2.1.1 General power tool safety warningsWARNING
Read all safety warnings and all instructions. Failure to follow the warnings and instructions may result inelectric shock, fire and/or serious injury.Save all warnings and instructions for future reference.The term “power tool” in the warnings refers to your mains-operated (corded) power tool or battery-operated(cordless) power tool.Work area safety▶ Keep work area clean and well lit. Cluttered or dark areas invite accidents.▶ Do not operate power tools in explosive atmospheres, such as in the presence of flammable
liquids, gases or dust. Power tools create sparks which may ignite the dust or fumes.▶ Keep children and bystanders away while operating a power tool. Distractions can cause you to lose
control.Electrical safety▶ Power tool plugs must match the outlet. Never modify the plug in any way. Do not use any adapter
plugs with earthed (grounded) power tools. Unmodified plugs and matching outlets will reduce risk ofelectric shock.
▶ Avoid body contact with earthed or grounded surfaces, such as pipes, radiators, ranges andrefrigerators. There is an increased risk of electric shock if your body is earthed or grounded.
▶ Do not expose power tools to rain or wet conditions. Water entering a power tool will increase therisk of electric shock.
▶ Do not abuse the cord. Never use the cord for carrying, pulling or unplugging the power tool. Keepcord away from heat, oil, sharp edges or moving parts. Damaged or entangled cords increase therisk of electric shock.
▶ When operating a power tool outdoors, use an extension cord suitable for outdoor use. Use of acord suitable for outdoor use reduces the risk of electric shock.
▶ If operating a power tool in a damp location is unavoidable, use a residual current device (RCD)protected supply. Use of an RCD reduces the risk of electric shock.
Personal safety▶ Stay alert, watch what you are doing and use common sense when operating a power tool. Do
not use a power tool while you are tired or under the influence of drugs, alcohol or medication. Amoment of inattention while operating power tools may result in serious personal injury.
▶ Use personal protective equipment. Always wear eye protection. Protective equipment such as dustmask, non-skid safety shoes, hard hat, or hearing protection used for appropriate conditions will reducepersonal injuries.
▶ Prevent unintentional starting. Ensure the switch is in the off‐position before connecting to powersource and/or battery pack, picking up or carrying the tool. Carrying power tools with your finger onthe switch or energising power tools that have the switch on invites accidents.
▶ Remove any adjusting key or wrench before turning the power tool on. A wrench or a key leftattached to a rotating part of the power tool may result in personal injury.
Printed: 25.04.2016 | Doc-Nr: PUB / 5165525 / 000 / 03
3
▶ Do not overreach. Keep proper footing and balance at all times. This enables better control of thepower tool in unexpected situations.
▶ Dress properly. Do not wear loose clothing or jewellery. Keep your hair, clothing and gloves awayfrom moving parts. Loose clothes, jewellery or long hair can be caught in moving parts.
▶ If devices are provided for the connection of dust extraction and collection facilities, ensure theseare connected and properly used. Use of dust collection can reduce dust-related hazards.
Power tool use and care▶ Do not force the power tool. Use the correct power tool for your application. The correct power tool will
do the job better and safer at the rate for which it was designed.▶ Do not use the power tool if the switch does not turn it on and off. Any power tool that cannot be
controlled with the switch is dangerous and must be repaired.▶ Disconnect the plug from the power source and/or the battery pack from the power tool before
making any adjustments, changing accessories, or storing power tools. Such preventive safetymeasures reduce the risk of starting the power tool accidentally.
▶ Store idle power tools out of the reach of children and do not allow persons unfamiliar with thepower tool or these instructions to operate the power tool. Power tools are dangerous in the handsof untrained users.
▶ Maintain power tools. Check for misalignment or binding of moving parts, breakage of parts andany other condition that may affect the power tool’s operation. If damaged, have the power toolrepaired before use. Many accidents are caused by poorly maintained power tools.
▶ Keep cutting tools sharp and clean. Properly maintained cutting tools with sharp cutting edges areless likely to bind and are easier to control.
▶ Use the power tool, accessories and tool bits etc. in accordance with these instructions, takinginto account the working conditions and the work to be performed. Use of the power tool foroperations different from those intended could result in a hazardous situation.
Service▶ Have your power tool serviced by a qualified repair person using only identical replacement parts.
This will ensure that the safety of the power tool is maintained.
2.1.2 Hammer safety warnings▶ Wear ear protectors. Exposure to noise can cause hearing loss.▶ Use auxiliary handles, if supplied with the tool. Loss of control can cause personal injury.▶ Hold power tool by insulated gripping surfaces, when performing an operation where the cutting
accessory may contact hidden wiring or its own cord. Cutting accessory contacting a "live" wire maymake exposed metal parts of the power tool "live" and could give the operator an electric shock.
2.1.3 Additional safety instructionsPersonal safety▶ Use the product only when it is in technically faultless condition.▶ Never tamper with or modify the tool in any way.▶ Apply appropriate safety measures at the opposite side of the workpiece in work that involves breaking
through. Parts breaking away could fall out and / or fall down causing injury to other persons.▶ Check that the side handle is fitted correctly and tightened securely. Always hold the tool securely with
both hands on the grips provided. Keep the grips dry, clean and free from oil and grease.▶ Take breaks between working and do physical exercises to improve the blood circulation in your fingers.
Exposure to vibration during long periods of work can lead to disorders of the blood vessels and nervoussystem in the fingers, hands and wrists.
▶ The tool is not intended for use by debilitated persons who have received no special training.▶ Keep the power tool out of reach of children.▶ Before beginning the work, check the hazard classification of the dust that will be produced. Use an
industrial vacuum cleaner with an officially approved protection classification in compliance with locallyapplicable dust protection regulations.
▶ Use a dust removal system and suitable vacuum cleaner whenever possible. Dust from materials, suchas paint containing lead, some wood species, concrete/masonry/stone containing silica, and minerals aswell as metal, may be harmful.
▶ Make sure that the workplace is well ventilated and, where necessary, wear a respirator appropriate forthe type of dust generated. Contact with or inhalation of the dust may cause allergic reactions and/orrespiratory or other diseases to the operator or bystanders. Certain kinds of dust are classified as
Printed: 25.04.2016 | Doc-Nr: PUB / 5165525 / 000 / 03
4
carcinogenic such as oak and beech dust, especially in conjunction with additives for wood conditioning(chromate, wood preservative). Material containing asbestos may be handled only by specialists.
▶ Approval must be obtained from the site engineer or architect prior to beginning drilling work. Work onbuildings and other structures may influence the statics of the structure, especially when steel reinforcingbars or load-bearing components are cut through.
Electrical safety▶ Before beginning work, check the working area for concealed electric cables or gas and water pipes.
External metal parts of the power tool may give you an electric shock if you damage an electric cableaccidentally.
▶ Check the power tool’s supply cord at regular intervals and have it replaced by a qualified specialist iffound to be damaged. If the power tool’s supply cord is damaged it must be replaced with a specially-prepared and approved supply cord available from Hilti Customer Service. Check extension cords atregular intervals and replace them if found to be damaged. Do not touch the supply cord or extensioncord if it is damaged while working. Disconnect the supply cord plug from the power outlet. Damagedsupply cords or extension cords present a risk of electric shock.
▶ Dirty or dusty power tools that have been used frequently for work on conductive materials should bechecked at regular intervals at a Hilti Service Center. Dust (especially dust from conductive materials) ordampness adhering to the surface of the power tool may, under unfavorable conditions, lead to electricshock.
▶ Switch the power tool off and unplug the supply cord in the event of a power failure or interruption in theelectric supply. This will prevent accidental restarting when the electric power returns.
3 Description
3.1 Overview of the product 1@ Chuck; Air vents= Side handle% Knob& On/off switch
( Grip) Power level selector switch+ Supply cord§ Service indicator/ Power level indicator
3.2 Intended useThe product described is an electrically powered breaker for heavy chiseling work.The product described is designed for breaking up / removing or demolishing concrete, masonry, stone andasphalt.▶ Operation is permissible only when connected to a power source providing a voltage and frequency in
compliance with the information given on the type identification plate.
3.3 Possible misuseThis product is not suitable for working on hazardous materials.This product is not suitable for working in a damp environment.
3.4 Active Vibration Reduction (AVR)The breaker is equipped with an Active Vibration Reduction (AVR) system, which reduces vibrationsignificantly.
3.5 Power level indicatorThe breaker is equipped with a power level indicator LED.Chiseling power can be reduced to approx. 70% by pressing the power level selector switch. The powerlevel LED then lights up, indicating reduced power.
3.6 Service indicator informationThe breaker is equipped with a service indicator LED.
Printed: 25.04.2016 | Doc-Nr: PUB / 5165525 / 000 / 03
5
Status MeaningThe service indicator lights red. • End of service interval – servicing is due. After
the lamp lights up for the first time, the powertool may continue to be used for several hoursbefore the automatic cut-out is activated. Returnthe product to Hilti Service for servicing in goodtime in order to ensure that it is always ready foruse.
• A fault has occurred in the tool.The service indicator blinks red. • The overheating prevention cut-out has been
activated.• The voltage provided by the electric supply is
too high.
3.7 Items suppliedCombihammer, side handle, operating instructions.
NoteYou can find other system products approved for your product at your local Hilti Center or online at:www.hilti.com.
4 Technical data
4.1 BreakerWhen powered by a generator or transformer, the generator or transformer’s power output must be at leasttwice the rated input power shown on the rating plate of the power tool. The operating voltage of thetransformer or generator must always be within +5% and -15% of the rated voltage of the power tool.The information given applies to a rated voltage of 230 V. The data may vary in the event of deviations fromthe rated voltage and for country-specific versions. Please refer to the power tool’s rating plate for details ofits voltage, frequency, current and input power ratings.
TE 1000AVRRated current input 7.6 AWeight in accordance with EPTA procedure01/2003
12.5 kg
Single impact energy (EPTA-Procedur 05/2009) 26 J
4.2 Noise information and vibration values determined in accordance with EN 60745The sound pressure and vibration values given in these instructions have been measured in accordancewith a standardized test and may be used to compare one electric tool with another. They may be usedfor a preliminary assessment of exposure. The data given represents the main applications of the electrictool. However, if the electric tool is used for different applications, with different accessory tools, or is poorlymaintained, the data may vary. This may significantly increase exposure over the total working period. Anaccurate estimation of exposure should also take into account the times when the tool is switched off, orwhen it is running but not actually being used for a job. This may significantly reduce exposure over thetotal working period. Identify additional safety measures to protect the operator from the effects of noiseand/or vibration, for example: maintenance of the electric tool and the accessories, keeping the hands warm,organization of work patterns.Noise emission values determined in accordance with EN 60745-2-6Sound (power) level (LWA) 96 dB(A)Uncertainty for the sound power level (KWA) 3 dB(A)Emission sound pressure level (LpA) 85 dB(A)Uncertainty for the sound pressure level (KpA) 3 dB(A)
Printed: 25.04.2016 | Doc-Nr: PUB / 5165525 / 000 / 03
6
Noise information and vibration values determined in accordance with EN 60745-2-6Chiseling (ah, Cheq) 5 m/s²Uncertainty (K) 1.5 m/s²
5 Operation
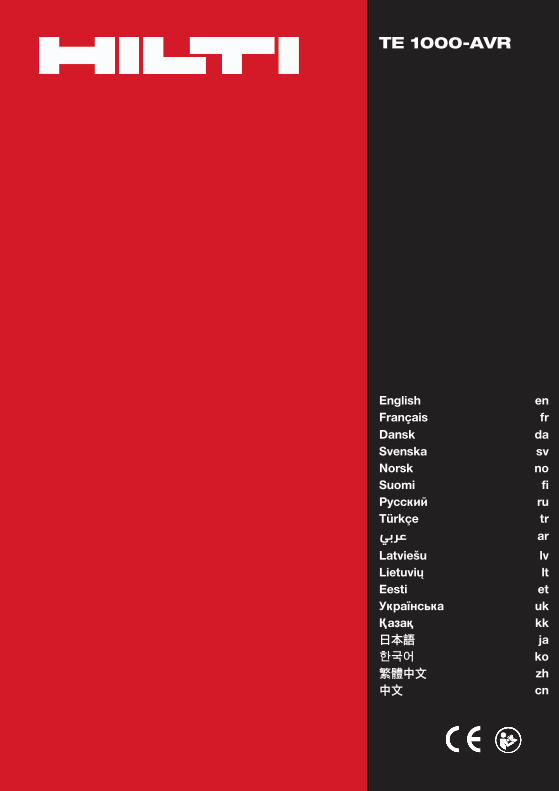
5.1 Fitting and adjusting the side handle 2
CAUTIONRisk of injury! Loss of control over the breaker.▶ Check that the side handle is fitted correctly and tightened securely.
▶ Fit or adjust the side handle.NoteThe instructions provided with the side handle must also be observed.
5.2 Fitting / removing the accessory tool 3
WARNINGRisk of injury! The accessory tool gets hot during use and may also have sharp edges.▶ Wear protective gloves when changing the tool.
DANGERRisk of fire! Risk of contact between the hot accessory tool and highly inflammable materials.▶ Do not lay the hot accessory tool down on highly inflammable materials.
NoteCheck the accessory tool for damage or uneven wear each time before use and replace it if necessary.
NoteUse only the recommended grease supplied by Hilti. Use of unsuitable grease may cause damage tothe product.
▶ Fit the accessory tool or, respectively, remove it.
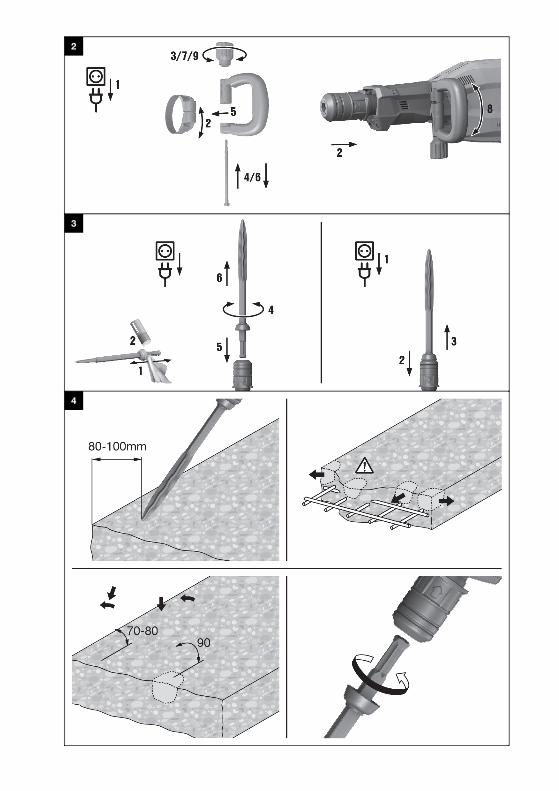
5.3 Chiseling tips 4
NoteThe chisel can be adjusted to 6 different positions (in 60° increments). This ensures that flat chiselsand shaped chisels can always be set to the optimum working position.
▶ Bring the chisel into contact with the workpiece about 80 -100 mm (3¹⁄₈" - 4") from its edge.▶ When working close to reinforcing bars, always guide the tip of the chisel toward the edge of the
workpiece, not toward a reinforcing bar.▶ Begin with the chisel positioned at an angle of 70° to 80° to the concrete surface, with the tip of the chisel
pointing toward the edge of the workpiece. Break material away by subsequently increasing the angle toapprox. 90° as the chisel penetrates.
▶ Rotate the chisel regularly to help ensure even wear and to promote the self-sharpening process.▶ If inadequate pressure is applied, the chisel will jump around uncontrollably. Application of excessive
pressure will result in a loss of chiseling performance.
Printed: 25.04.2016 | Doc-Nr: PUB / 5165525 / 000 / 03
7
5.4 Adjusting chiseling power
NoteChiseling power can be reduced to approx. 70% by pressing the power level selector switch.Chiseling power can be adjusted only when the power tool is switched on and ready for use. Toreselect full chiseling power, press the chiseling power level selector switch again. Switching off andthen on again also causes the power tool to return to full chiseling power.
▶ Press the power level selector switch.
6 Care and maintenance
WARNINGDanger of electric shock! Carrying out care and maintenance while the supply cord is connected tothe power outlet presents a risk of serious injuries including burns.▶ Always unplug the supply cord before carrying out all care and maintenance tasks.
Care• Carefully remove any dirt that may be adhering to the tool.• Never operate the tool when the air vents are blocked. Clean the air vents carefully with a dry brush.• Use only a slightly damp cloth to clean the casing. Do not use cleaning agents containing silicone as
these may attack the plastic parts.• Do not use a spray, pressure jet washer or running water for cleaning.Maintenance
WARNINGDanger of electric shock! Improper repairs to electrical components may lead to serious injuriesincluding burns.▶ Repairs to the electrical section of the tool or appliance may be carried out only by trained electrical
specialists.
• Check all visible parts and controls for signs of damage at regular intervals and make sure that they allfunction correctly.
• Do not operate the electric tool if damaged or if its parts malfunction. Have the tool repaired by HiltiService immediately.
• On versions with a replaceable supply cord, the supply cord may be replaced by a trained electricalspecialist.
• After cleaning and maintenance, fit all guards or protective devices and check that they function correctly.
NoteTo help ensure safe and reliable operation, use only genuine Hilti spare parts and consumables. Spareparts, consumables and accessories approved by Hilti for use with the product can be found at yourlocal Hilti Center or online at: www.hilti.com
6.1 Cleaning the dust shield▶ Clean the dust shield on the chuck with a dry, clean cloth at regular intervals.▶ Clean the sealing lip by wiping it carefully and then grease it again lightly with Hilti grease.
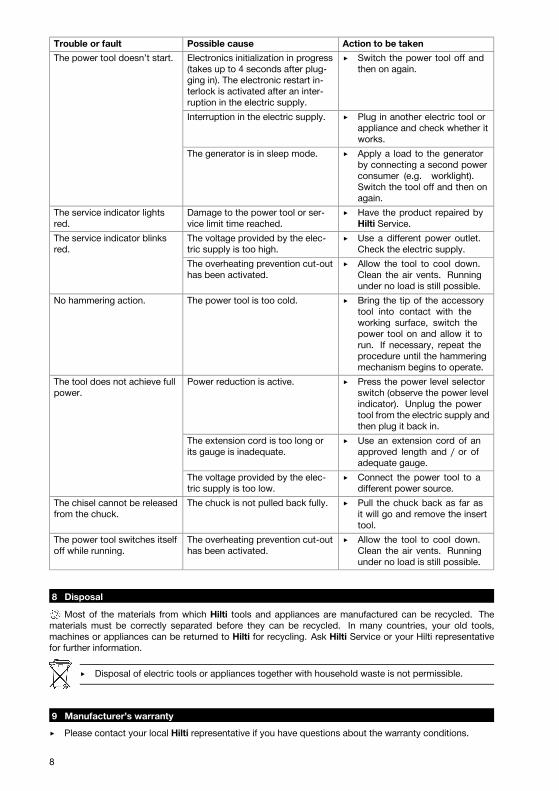
7 TroubleshootingIf the trouble you are experiencing is not listed in this table or you are unable to remedy the problem byyourself, please contact Hilti Service.
Printed: 25.04.2016 | Doc-Nr: PUB / 5165525 / 000 / 03
8
Trouble or fault Possible cause Action to be takenThe power tool doesn’t start. Electronics initialization in progress
(takes up to 4 seconds after plug-ging in). The electronic restart in-terlock is activated after an inter-ruption in the electric supply.
▶ Switch the power tool off andthen on again.
Interruption in the electric supply. ▶ Plug in another electric tool orappliance and check whether itworks.
The generator is in sleep mode. ▶ Apply a load to the generatorby connecting a second powerconsumer (e.g. worklight).Switch the tool off and then onagain.
The service indicator lightsred.
Damage to the power tool or ser-vice limit time reached.
▶ Have the product repaired byHilti Service.
The service indicator blinksred.
The voltage provided by the elec-tric supply is too high.
▶ Use a different power outlet.Check the electric supply.
The overheating prevention cut-outhas been activated.
▶ Allow the tool to cool down.Clean the air vents. Runningunder no load is still possible.
No hammering action. The power tool is too cold. ▶ Bring the tip of the accessorytool into contact with theworking surface, switch thepower tool on and allow it torun. If necessary, repeat theprocedure until the hammeringmechanism begins to operate.
The tool does not achieve fullpower.
Power reduction is active. ▶ Press the power level selectorswitch (observe the power levelindicator). Unplug the powertool from the electric supply andthen plug it back in.
The extension cord is too long orits gauge is inadequate.
▶ Use an extension cord of anapproved length and / or ofadequate gauge.
The voltage provided by the elec-tric supply is too low.
▶ Connect the power tool to adifferent power source.
The chisel cannot be releasedfrom the chuck.
The chuck is not pulled back fully. ▶ Pull the chuck back as far asit will go and remove the inserttool.
The power tool switches itselfoff while running.
The overheating prevention cut-outhas been activated.
▶ Allow the tool to cool down.Clean the air vents. Runningunder no load is still possible.
8 DisposalMost of the materials from which Hilti tools and appliances are manufactured can be recycled. The
materials must be correctly separated before they can be recycled. In many countries, your old tools,machines or appliances can be returned to Hilti for recycling. Ask Hilti Service or your Hilti representativefor further information.
▶ Disposal of electric tools or appliances together with household waste is not permissible.
9 Manufacturer’s warranty▶ Please contact your local Hilti representative if you have questions about the warranty conditions.
Printed: 25.04.2016 | Doc-Nr: PUB / 5165525 / 000 / 03
9
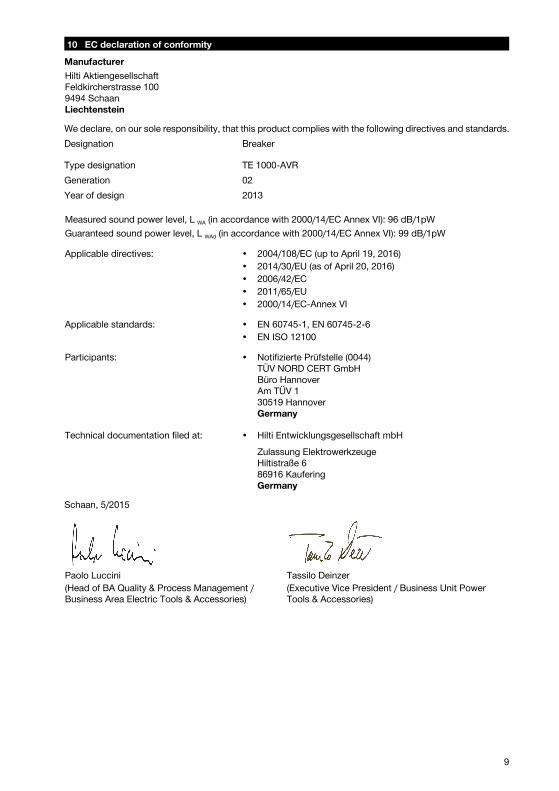
10 EC declaration of conformityManufacturerHilti AktiengesellschaftFeldkircherstrasse 1009494 SchaanLiechtensteinWe declare, on our sole responsibility, that this product complies with the following directives and standards.Designation Breaker
Type designation TE 1000-AVRGeneration 02Year of design 2013
Measured sound power level, L WA (in accordance with 2000/14/EC Annex VI): 96 dB/1pWGuaranteed sound power level, L WAd (in accordance with 2000/14/EC Annex VI): 99 dB/1pW
Applicable directives: • 2004/108/EC (up to April 19, 2016)• 2014/30/EU (as of April 20, 2016)• 2006/42/EC• 2011/65/EU• 2000/14/EC-Annex VI
Applicable standards: • EN 60745-1, EN 60745-2-6• EN ISO 12100
Participants: • Notifizierte Prüfstelle (0044)TÜV NORD CERT GmbHBüro HannoverAm TÜV 130519 HannoverGermany
Technical documentation filed at: • Hilti Entwicklungsgesellschaft mbHZulassung ElektrowerkzeugeHiltistraße 686916 KauferingGermany
Schaan, 5/2015
Paolo Luccini(Head of BA Quality & Process Management /Business Area Electric Tools & Accessories)
Tassilo Deinzer(Executive Vice President / Business Unit PowerTools & Accessories)
Printed: 25.04.2016 | Doc-Nr: PUB / 5165525 / 000 / 03

Hilti = registered trademark of Hilti Corp., SchaanPos. 8 | 20160121
*2078211*
2078
211
Printed: 25.04.2016 | Doc-Nr: PUB / 5165525 / 000 / 03