Embed Size (px)
Citation preview

Teacher’s Manual 2011.08.26
Ver. 5

Teacher’s Page Overview
My Lessons
Writing
Skill Building Exercises
Interactive Writing
Writing Tutorials
Writing Workshop
- e-Lessons to use during class
- check students’ homework
- student self-study materials - teachers may use them as resources
- use at the campus level to assign extra writing topics
My Records - view corrections already been made
2

My Lessons
• introduce writing form • go over model writing • discuss prewriting activities using graphic
organizers
Lesson 1
• introduce writing trait focus
• go over various exercises • discuss prewriting using graphic organizers
Lesson 2
• discuss parts of an essay
• go over model writing • discuss various ways to write each part of the
essay
Lesson 3
• go over model writing (bad example)
• revise model writing with the class
Lesson 4
Lessons Homework
-assign graphic organizers (online)
-assign pages in the textbook -assign online quiz
-assign 1st draft (online) -remind students to print and and bring 1st draft for next class
-assign 2nd draft (online)
3
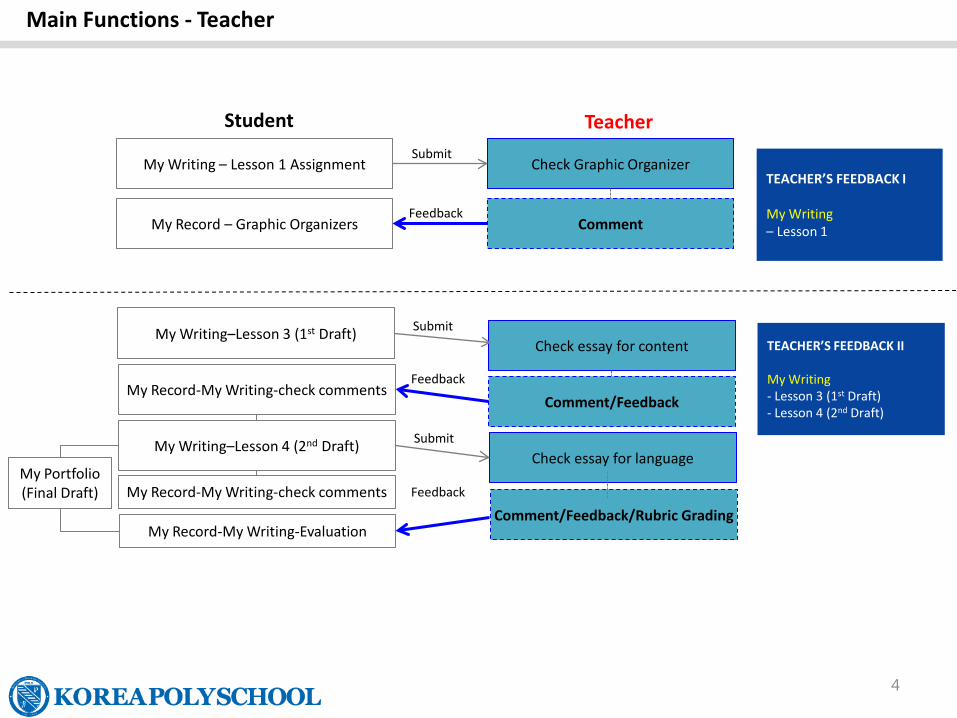
My Writing – Lesson 1 Assignment Check Graphic Organizer Submit
Comment My Record – Graphic Organizers Feedback
Check essay for content My Writing–Lesson 3 (1st Draft) Submit
Comment/Feedback My Record-My Writing-check comments
Feedback
Check essay for language My Writing–Lesson 4 (2nd Draft) Submit
Comment/Feedback/Rubric Grading
Feedback My Record-My Writing-check comments
My Record-My Writing-Evaluation
My Portfolio (Final Draft)
TEACHER’S FEEDBACK I My Writing – Lesson 1
TEACHER’S FEEDBACK II My Writing - Lesson 3 (1st Draft) - Lesson 4 (2nd Draft)
Student Teacher
Main Functions - Teacher
4
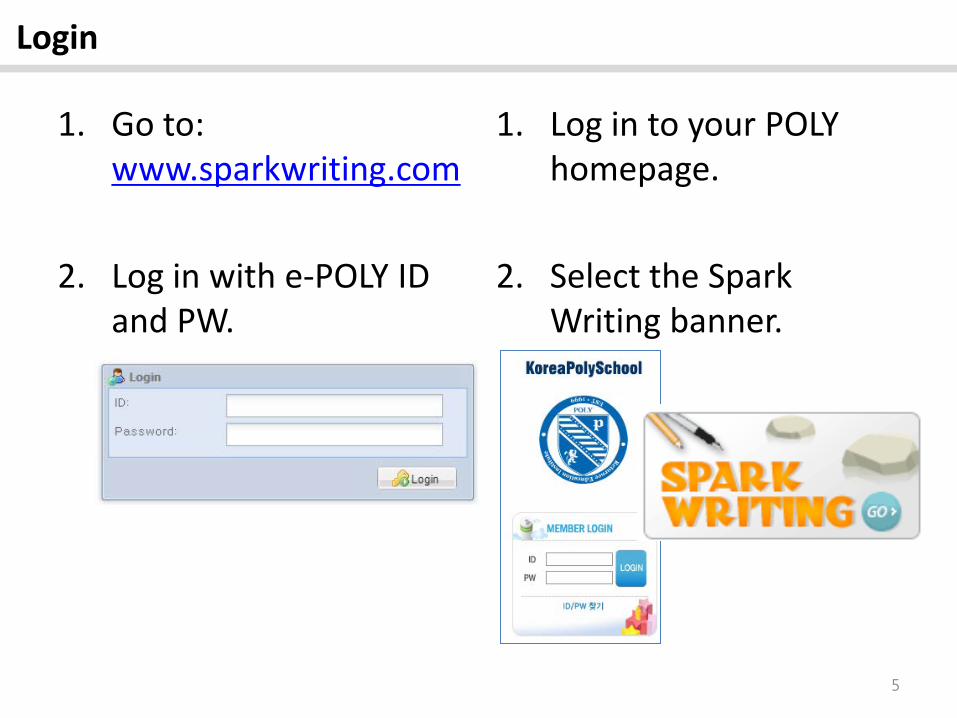
1. Go to: www.sparkwriting.com
2. Log in with e-POLY ID and PW.
Login
5
1. Log in to your POLY homepage.
2. Select the Spark Writing banner.
Main Menu Bar
1 2
3
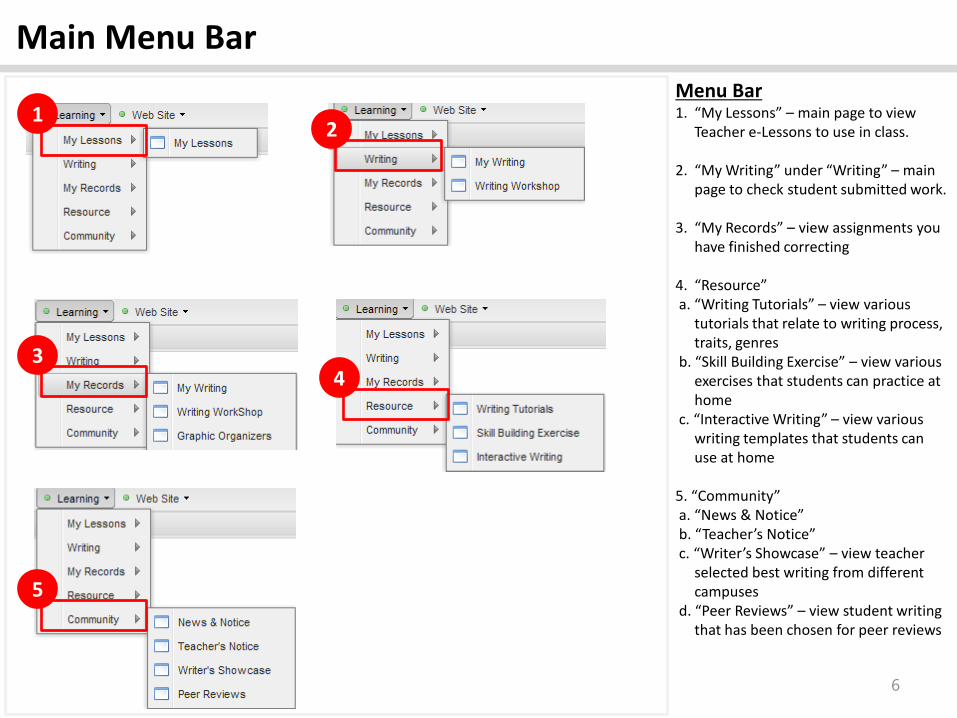
Menu Bar 1. “My Lessons” – main page to view
Teacher e-Lessons to use in class.
2. “My Writing” under “Writing” – main page to check student submitted work.
3. “My Records” – view assignments you have finished correcting
4. “Resource” a. “Writing Tutorials” – view various
tutorials that relate to writing process, traits, genres
b. “Skill Building Exercise” – view various exercises that students can practice at home
c. “Interactive Writing” – view various writing templates that students can use at home
5. “Community” a. “News & Notice” b. “Teacher’s Notice” c. “Writer’s Showcase” – view teacher
selected best writing from different campuses
d. “Peer Reviews” – view student writing that has been chosen for peer reviews
4
5
6
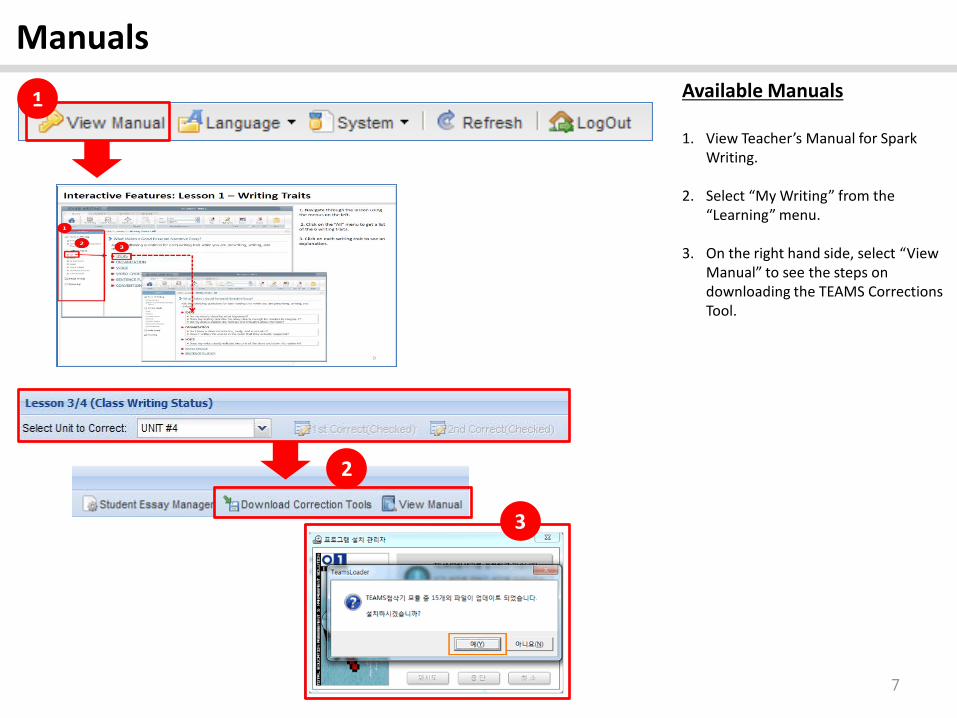
Manuals Available Manuals 1. View Teacher’s Manual for Spark
Writing.
2. Select “My Writing” from the “Learning” menu.
3. On the right hand side, select “View Manual” to see the steps on downloading the TEAMS Corrections Tool.
1
2
7
3

Spark Writing
[ For Teacher ]
Lessons

My Lessons Main View My Lessons Main Page
1. Select “My Lessons” from the “Learning” menu.
2. Select a class from “My Lessons” to view the main lessons page showing Units and Lessons.
3. Click on a Lesson to open the Lessons
page.
1
2
3
9
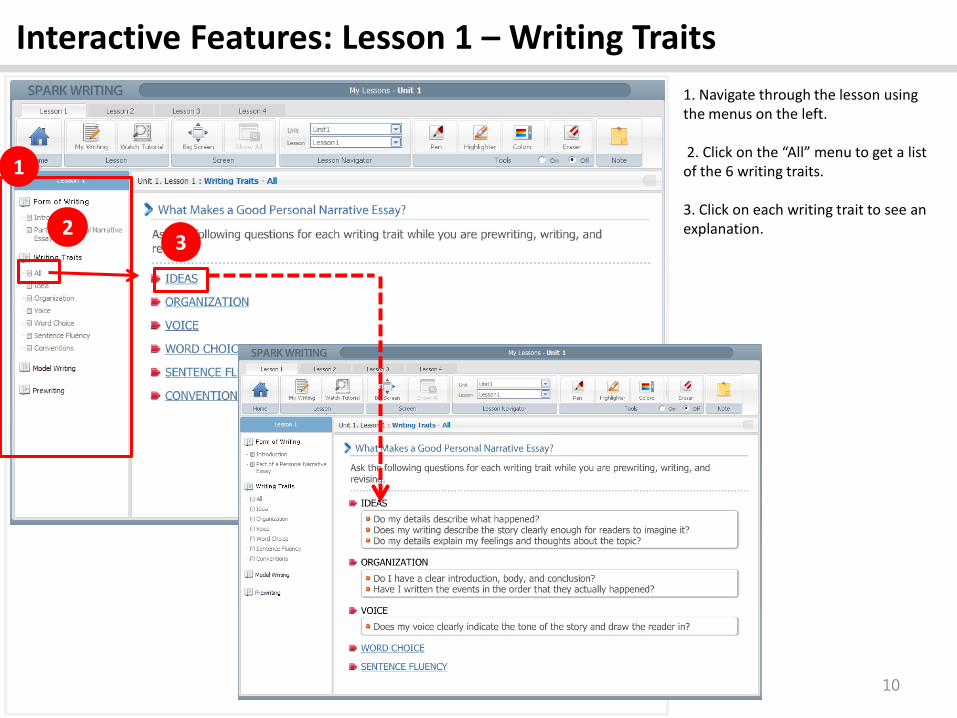
Interactive Features: Lesson 1 – Writing Traits 1. Navigate through the lesson using the menus on the left. 2. Click on the “All” menu to get a list of the 6 writing traits. 3. Click on each writing trait to see an explanation.
1
2 3
10

Interactive Features: Lesson 1 – Model Writing
1
1. Click on “Model Writing” to see Model Writing 1.
2. Each paragraph of the essay is separated into different pages.
3. Click on “All” to see the entire essay on one page.
2
3
11
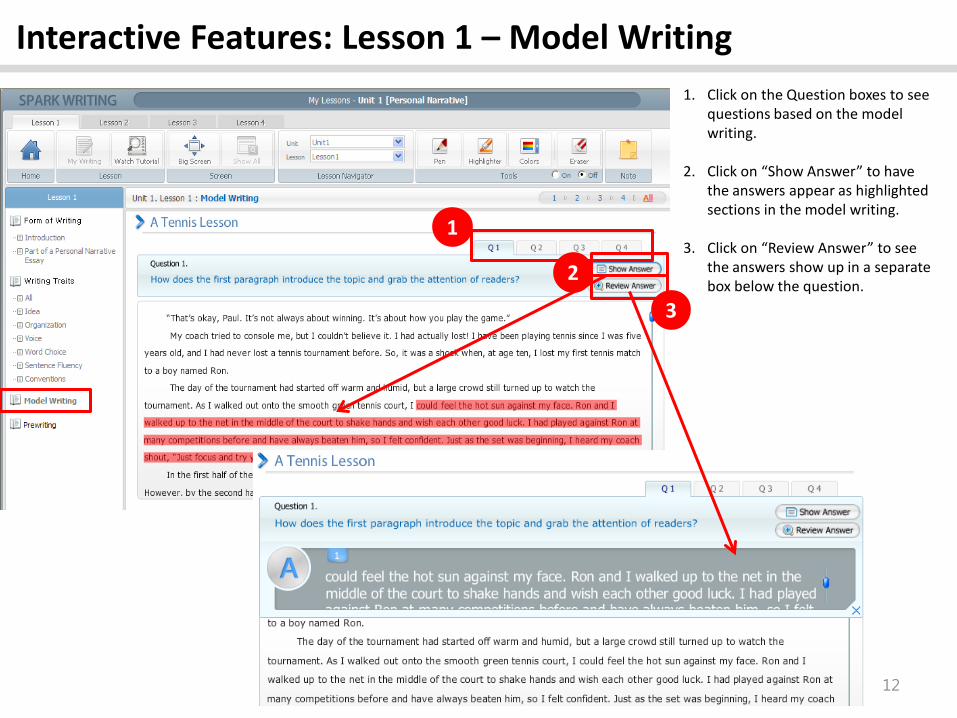
Interactive Features: Lesson 1 – Model Writing 1. Click on the Question boxes to see
questions based on the model writing.
2. Click on “Show Answer” to have the answers appear as highlighted sections in the model writing.
3. Click on “Review Answer” to see the answers show up in a separate box below the question.
1
2
3
12

Interactive Features: Lesson 1 – Prewriting For pages that have answer boxes, 1. Click on the “?” or the “Show
model answer” button to see the answers.
2. Click on the arrow button to toggle back and forth.
3. Click on “Show teacher’s answer” to type your own answer. Make your to click “save.”
3
1
2
1
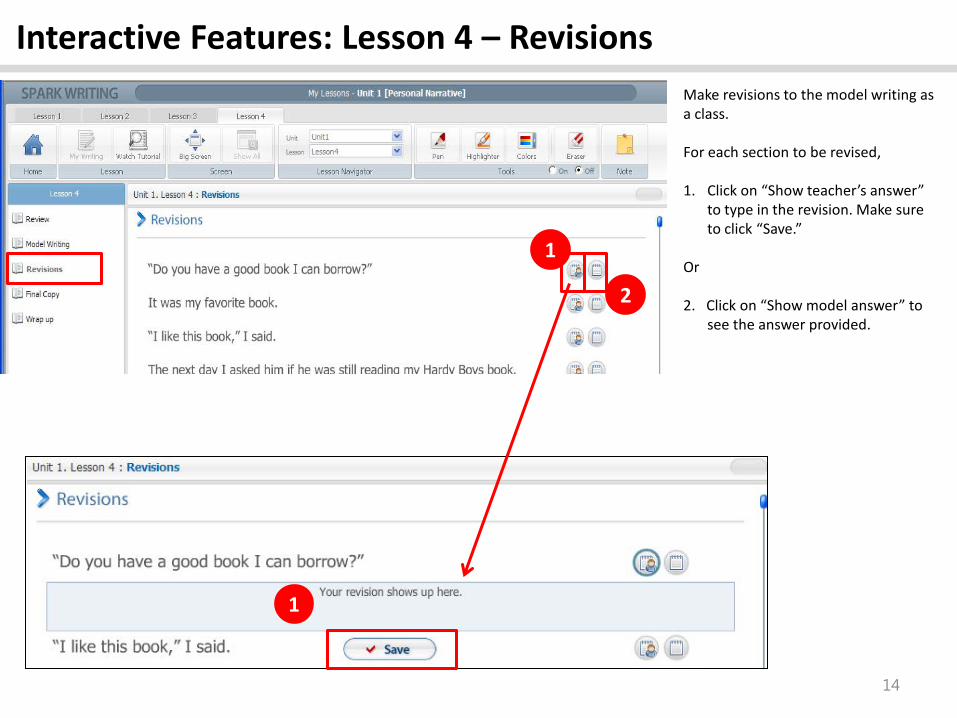
Interactive Features: Lesson 4 – Revisions Make revisions to the model writing as a class. For each section to be revised, 1. Click on “Show teacher’s answer”
to type in the revision. Make sure to click “Save.”
Or
2. Click on “Show model answer” to see the answer provided.
2
1
1
14

Interactive Features: Lesson 4 – Final Copy After finishing making the revisions, click on “Final Copy.” Teacher-made revisions will be shown on the final copy. (Students will only be able to see the model answers at home.) You may go back to “Revisions” and Make more changes. Any final changes from “Revisions” will get reflected on the “Final Copy” page.
1
15
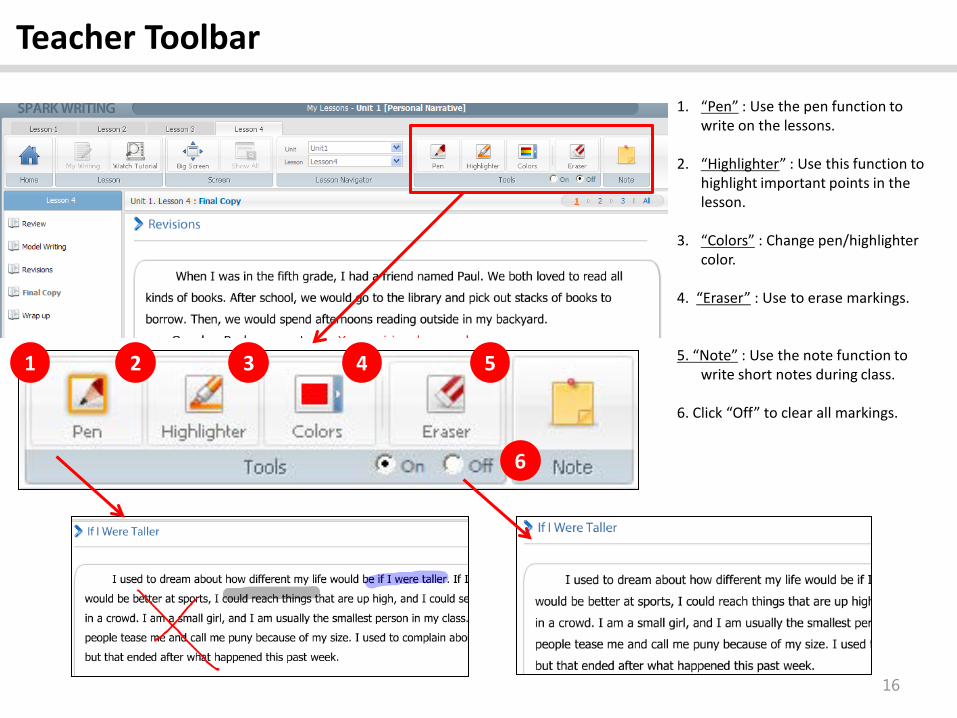
Teacher Toolbar 1. “Pen” : Use the pen function to
write on the lessons. 2. “Highlighter” : Use this function to
highlight important points in the lesson.
3. “Colors” : Change pen/highlighter
color. 4. “Eraser” : Use to erase markings. 5. “Note” : Use the note function to
write short notes during class. 6. Click “Off” to clear all markings.
1 2 3 4 5
6
16
Teacher Tools
3 4
2
5
6
1
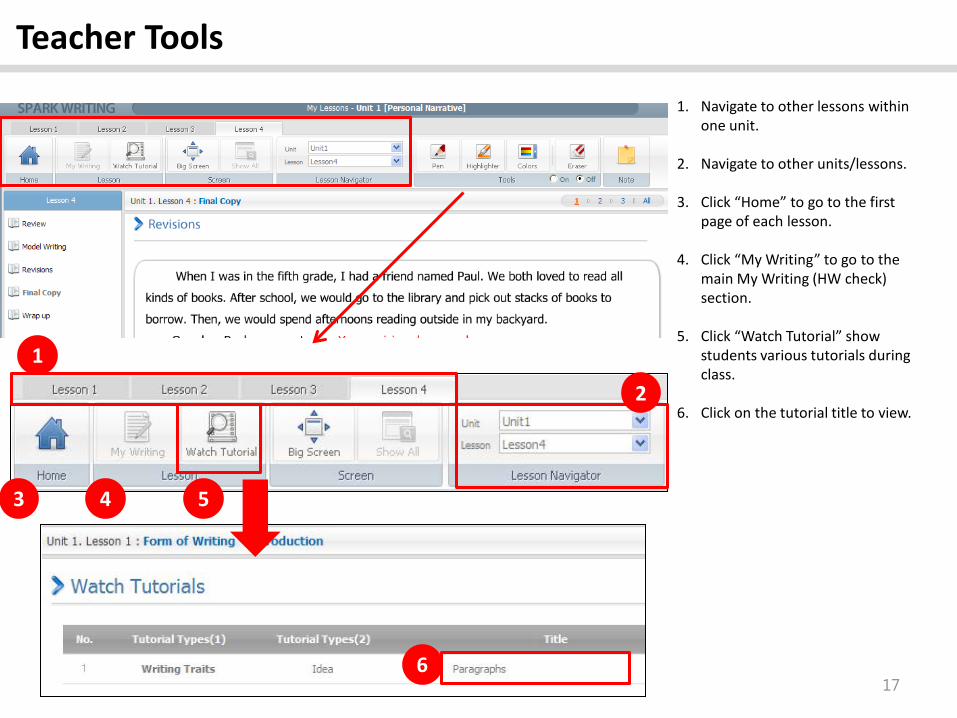
1. Navigate to other lessons within
one unit.
2. Navigate to other units/lessons.
3. Click “Home” to go to the first page of each lesson.
4. Click “My Writing” to go to the main My Writing (HW check) section.
5. Click “Watch Tutorial” show students various tutorials during class.
6. Click on the tutorial title to view.
17
Teacher Tools – Show All button
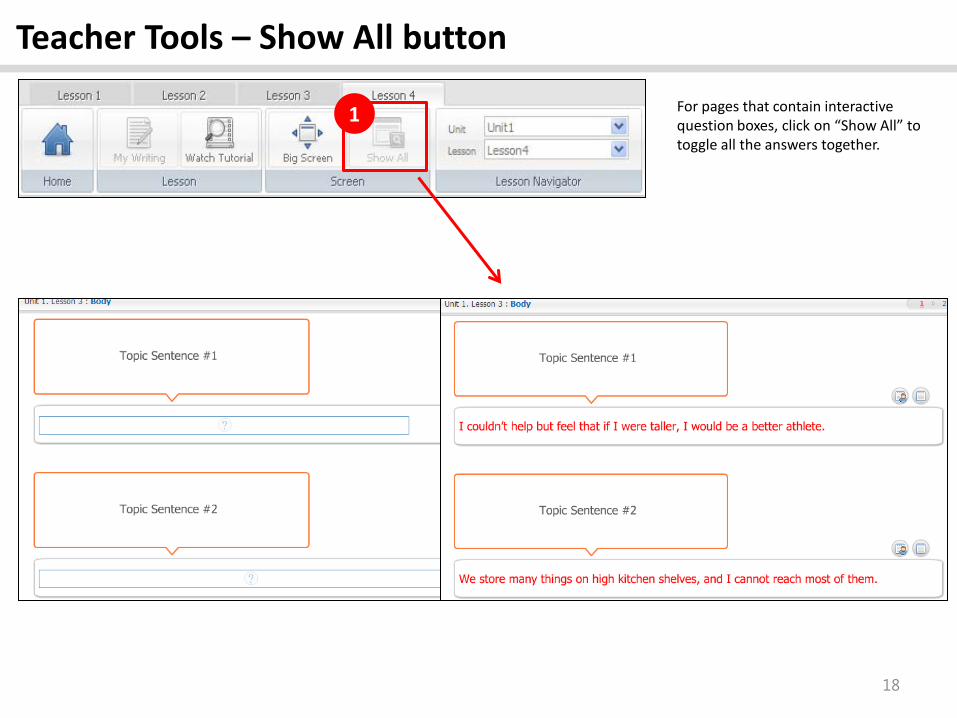
1 For pages that contain interactive question boxes, click on “Show All” to toggle all the answers together.
18
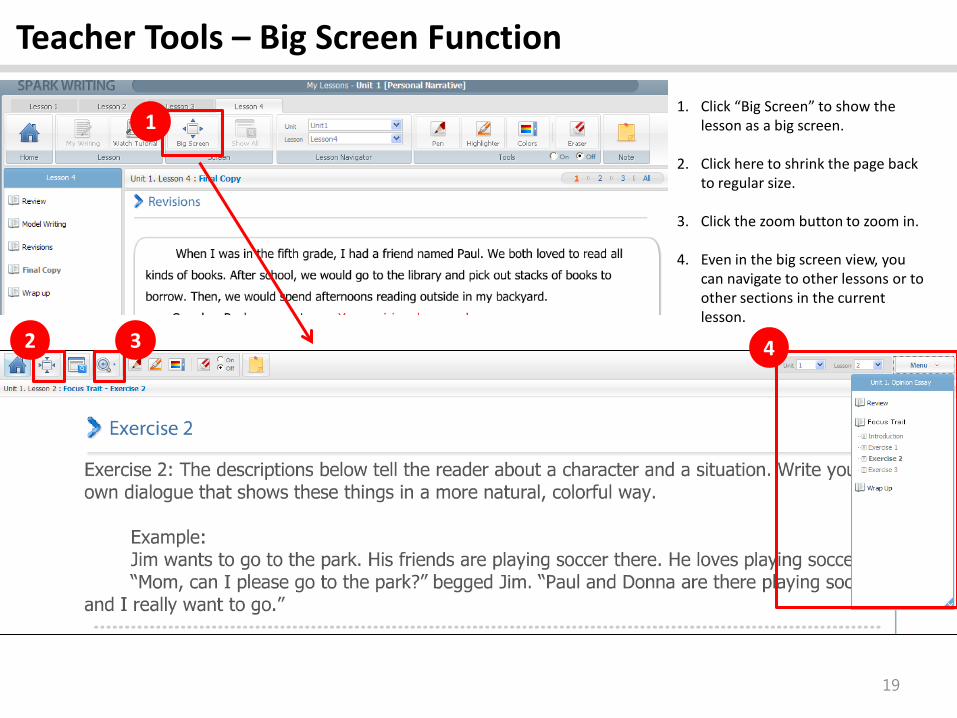
Teacher Tools – Big Screen Function 1. Click “Big Screen” to show the
lesson as a big screen.
2. Click here to shrink the page back to regular size.
3. Click the zoom button to zoom in.
4. Even in the big screen view, you can navigate to other lessons or to other sections in the current lesson.
1
2 3 4
19

Teacher Tools 1. Click on “Homework” to see
students’ homework page. 2. Teachers may write in the graphic
organizers but cannot save the work. It will automatically refresh as soon as the window closes.
* This function is only available for Lesson 1.
20
1
2
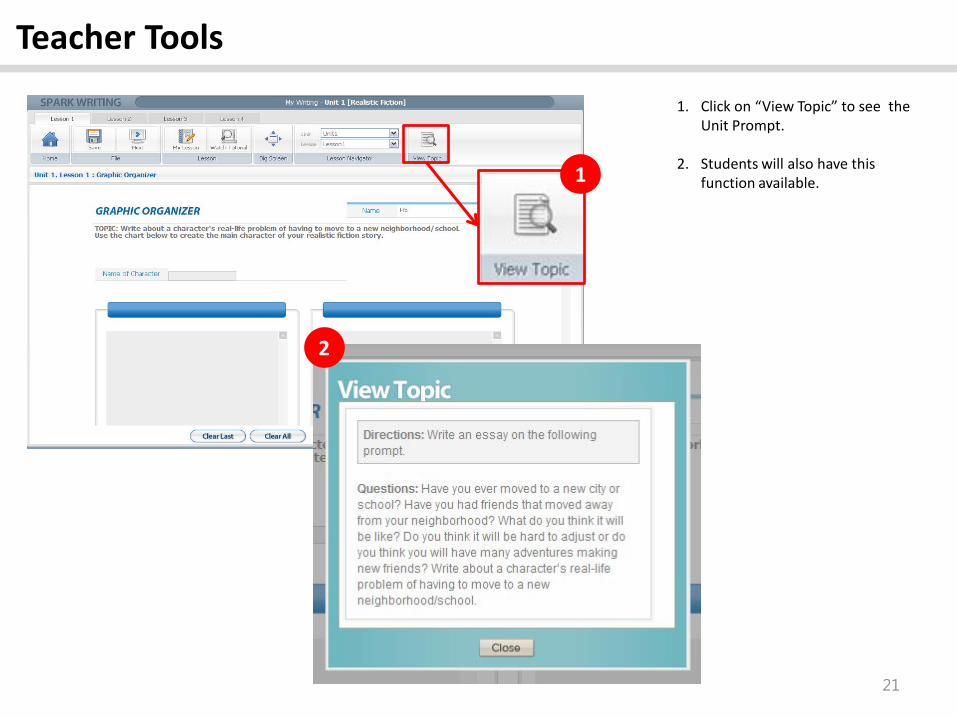
Teacher Tools 1. Click on “View Topic” to see the
Unit Prompt. 2. Students will also have this
function available.
21
2
1
Spark Writing
[ For Teacher ]
Writing

My Writing: Lesson 1 The homework for Lesson 1 is graphic organizers. 1. After you select your class, click
“Lesson 1”.
2. Click on “Search”.
3. If students have submitted their homework, there will be “Correct” button next to their names.
4. Click “Correct” to bring up the graphic organizer homework check window.
1
2
23

My Writing: Lesson 1 – Graphic Organizers 1. Select a student from the left list.
2. Check the graphic organizer and
write a brief comment.
3. Click “Next/Previous” to view other graphic organizers if there is more than one. (Clicking either Previous or Next will automatically save your comments.)
4. When you get to the last graphic organizer, the “Submit” button will appear. Click on “Submit” to show your comments to your students. (*This will turn the comment status next to the student name from black to red.)
24
1
3
2 4
*
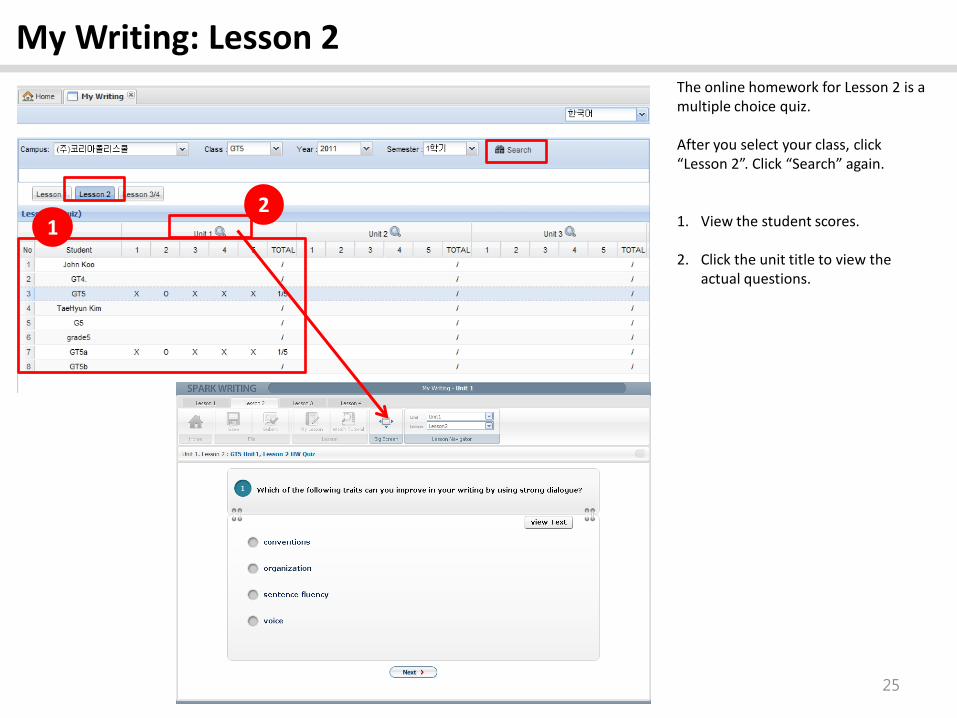
My Writing: Lesson 2 The online homework for Lesson 2 is a multiple choice quiz. After you select your class, click “Lesson 2”. Click “Search” again. 1. View the student scores.
2. Click the unit title to view the
actual questions.
1 2
25
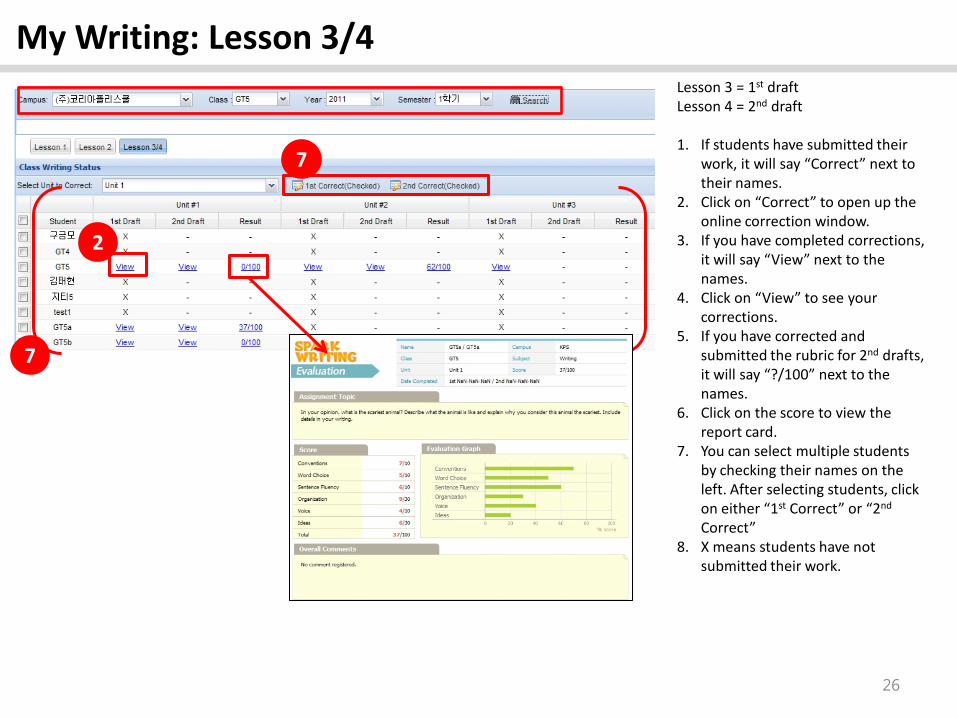
My Writing: Lesson 3/4 Lesson 3 = 1st draft Lesson 4 = 2nd draft 1. If students have submitted their
work, it will say “Correct” next to their names.
2. Click on “Correct” to open up the online correction window.
3. If you have completed corrections, it will say “View” next to the names.
4. Click on “View” to see your corrections.
5. If you have corrected and submitted the rubric for 2nd drafts, it will say “?/100” next to the names.
6. Click on the score to view the report card.
7. You can select multiple students by checking their names on the left. After selecting students, click on either “1st Correct” or “2nd Correct”
8. X means students have not submitted their work.
2
7
7
26
27
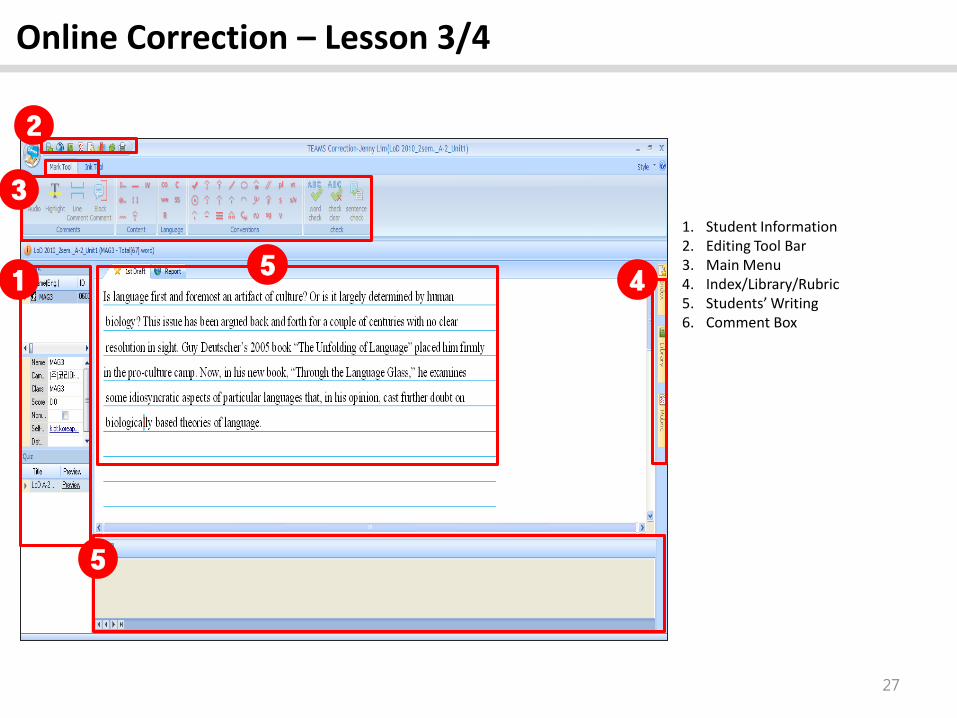
1. Student Information 2. Editing Tool Bar 3. Main Menu 4. Index/Library/Rubric 5. Students’ Writing 6. Comment Box
1
2
3
4 5
5
Online Correction – Lesson 3/4
My Writing_ Lesson 3 / 4
28
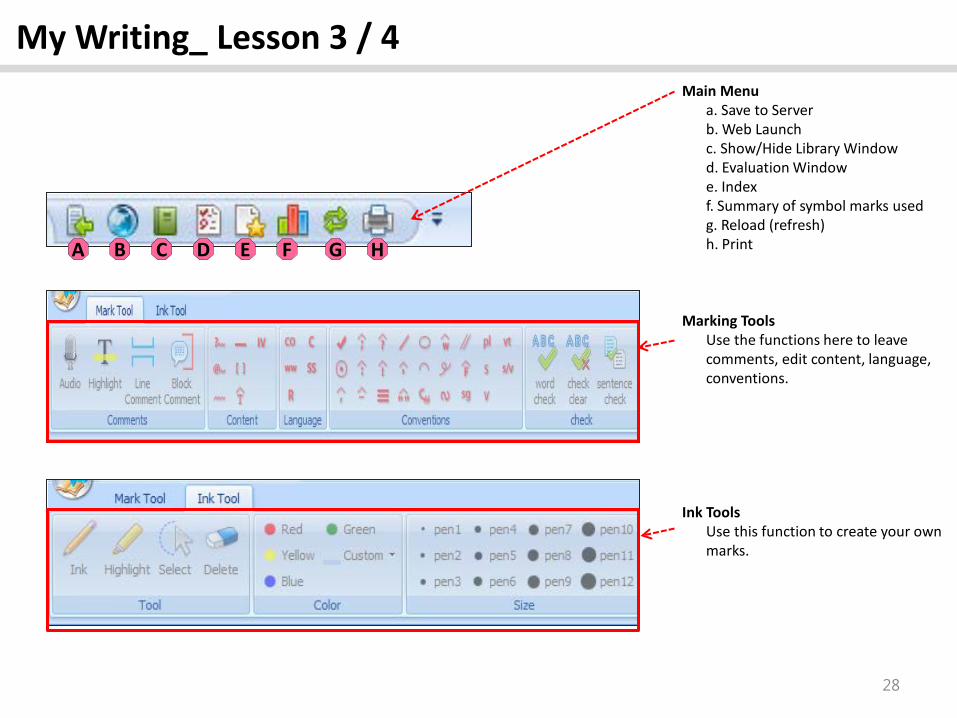
Main Menu a. Save to Server b. Web Launch c. Show/Hide Library Window d. Evaluation Window e. Index f. Summary of symbol marks used g. Reload (refresh) h. Print Marking Tools Use the functions here to leave
comments, edit content, language, conventions.
Ink Tools Use this function to create your own
marks.
A B C D E F G H
My Writing_ Lesson 3 / 4
29
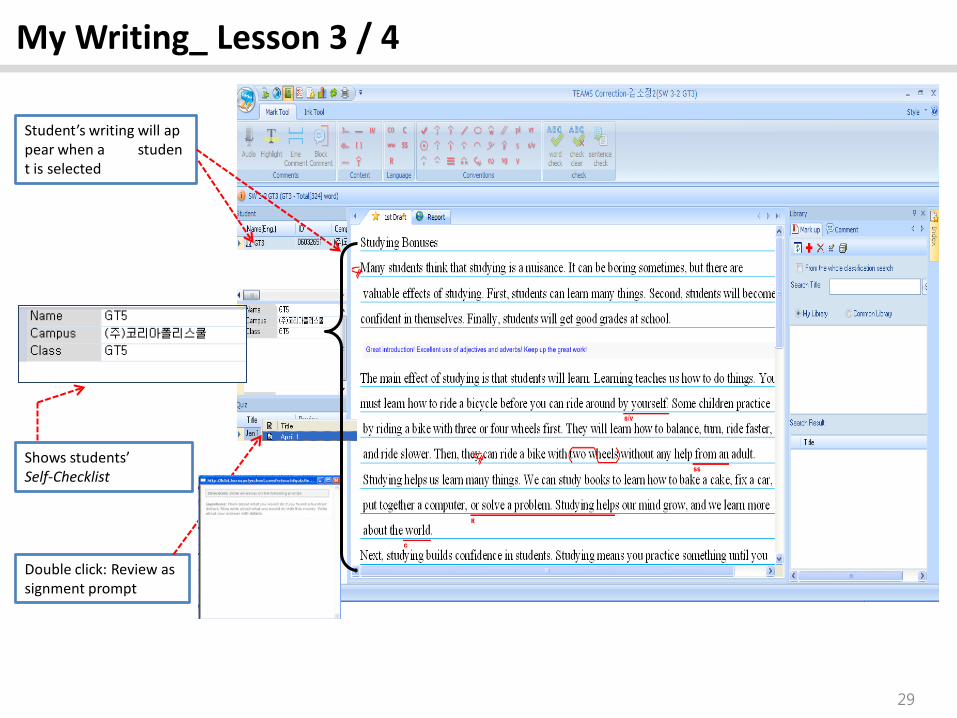
Student’s writing will appear when a student is selected
Double click: Review assignment prompt
Shows students’ Self-Checklist
My Writing_ Lesson 3 / 4
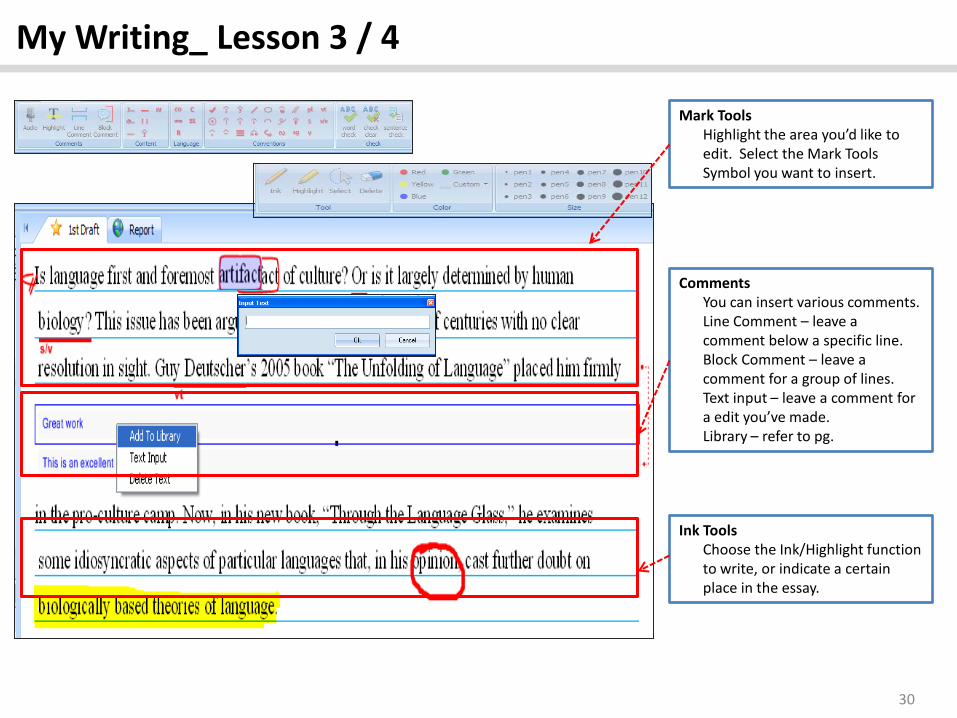
30
Mark Tools Highlight the area you’d like to
edit. Select the Mark Tools Symbol you want to insert.
Comments You can insert various comments. Line Comment – leave a
comment below a specific line. Block Comment – leave a
comment for a group of lines. Text input – leave a comment for
a edit you’ve made. Library – refer to pg.
Ink Tools Choose the Ink/Highlight function
to write, or indicate a certain place in the essay.

My Writing_ Lesson 3 / 4
31
Mark up / Comment Mark Up – to insert comments in
students’ writing. Comment – to insert comments
in the comment box.
Code Manager Create and manage comment
folders in Code Manager.
Library Write Title and Content, then
click Register. The data will be saved in My Library.
My Library / Common Library My Library is a collection of
comments you have saved. Common Library is for general
use for all users.

My Writing_ Lesson 3 / 4
32
1
2
Add Comment
Delete Comment
1. Mark up a. Highlight the area you want to add a
comment to. b. Insert a comment box from the
menu. c. Find the comment you want to
insert from My Library from Mark Up Tab..
d. Double click on the comment. e. It will transfer to the comment box.
2. Comment a. Click Add Comment icon. b. Find the comment you want to
insert from My Library from Comment Tab.
c. Double click on the comment. d. It will transfer to the comment box.
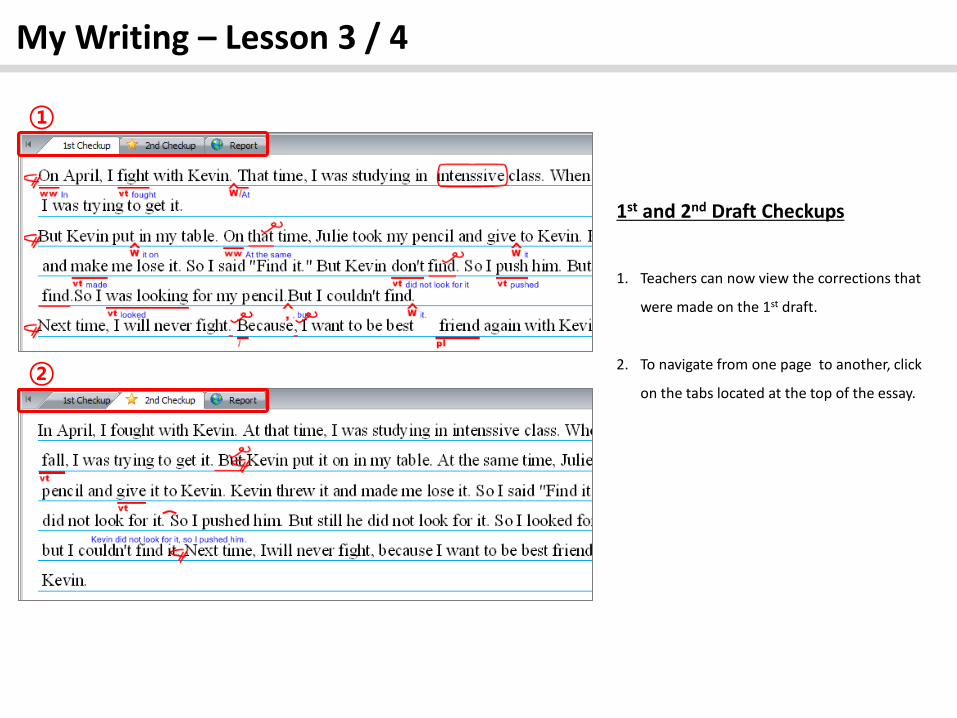
My Writing – Lesson 3 / 4
1st and 2nd Draft Checkups
1. Teachers can now view the corrections that
were made on the 1st draft.
2. To navigate from one page to another, click
on the tabs located at the top of the essay.
①
②

My Writing – Overlapping Comments
Overlapping Comments 1. Problem: When proofreading marks are
inserted and has added texts, the comments will overlap.
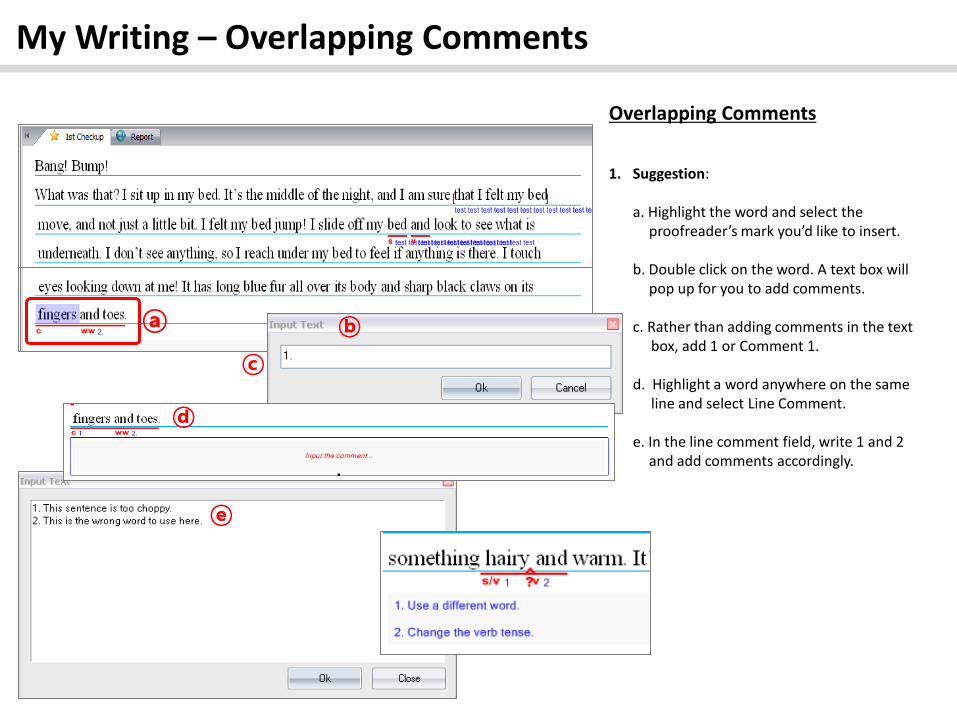
My Writing – Overlapping Comments
Overlapping Comments 1. Suggestion: a. Highlight the word and select the proofreader’s mark you’d like to insert. b. Double click on the word. A text box will pop up for you to add comments. c. Rather than adding comments in the text box, add 1 or Comment 1. d. Highlight a word anywhere on the same line and select Line Comment. e. In the line comment field, write 1 and 2 and add comments accordingly.
ⓐ ⓑ
ⓒ
ⓓ
ⓔ
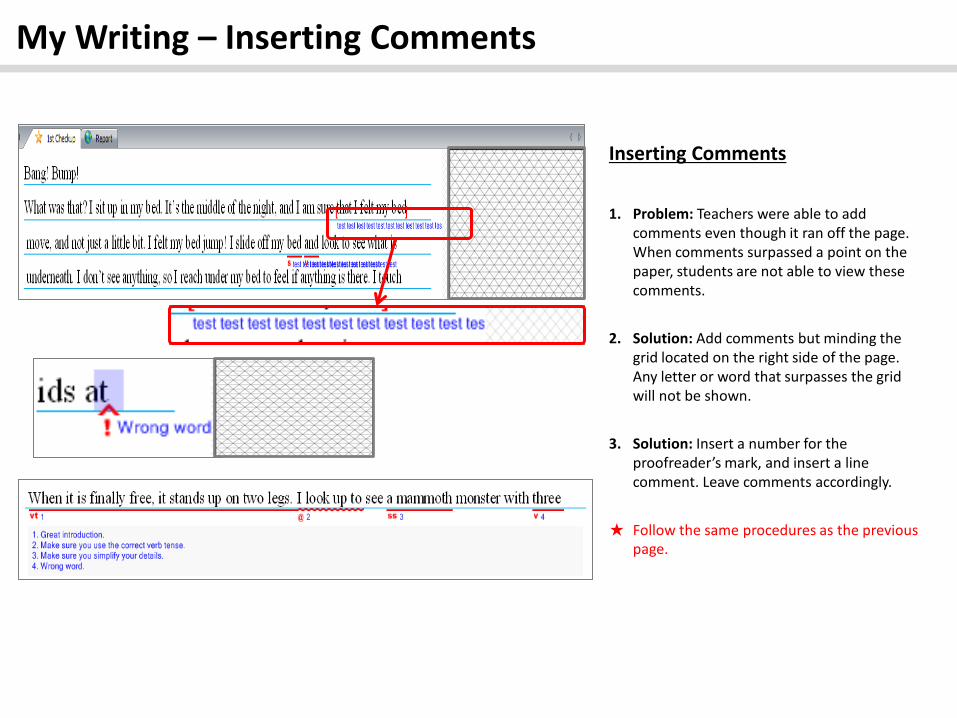
My Writing – Inserting Comments
Inserting Comments 1. Problem: Teachers were able to add
comments even though it ran off the page. When comments surpassed a point on the
paper, students are not able to view these comments.
2. Solution: Add comments but minding the
grid located on the right side of the page. Any letter or word that surpasses the grid will not be shown.
3. Solution: Insert a number for the
proofreader’s mark, and insert a line comment. Leave comments accordingly.
★ Follow the same procedures as the previous
page.
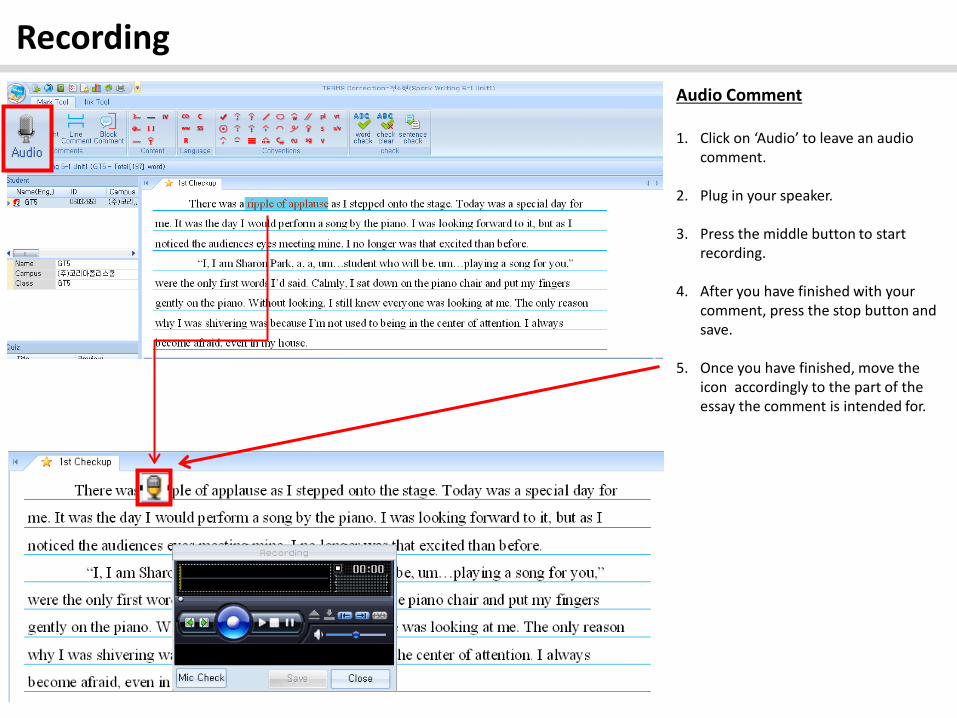
Recording Audio Comment 1. Click on ‘Audio’ to leave an audio
comment.
2. Plug in your speaker.
3. Press the middle button to start recording.
4. After you have finished with your comment, press the stop button and save.
5. Once you have finished, move the icon accordingly to the part of the essay the comment is intended for.

My Writing_ Lesson 3 / 4
38
1 2 3
1. Word Check Click ‘word check’ and the essay
will look for spelling errors. Spell errors will be highlighted
2. Check Clear Click ‘check clear’ and the
highlighted spell errors will no longer be highlighted.
** Keep in mind, students will not be
able to see the highlighted spell errors. **
3. Sentence Check To check for plagiarism, teachers
can high light passages and phrases and click ‘sentence check.’ It will check the Google database to see if any phrases or passages were plagiarized.
My Writing_ Lesson 3 / 4
39
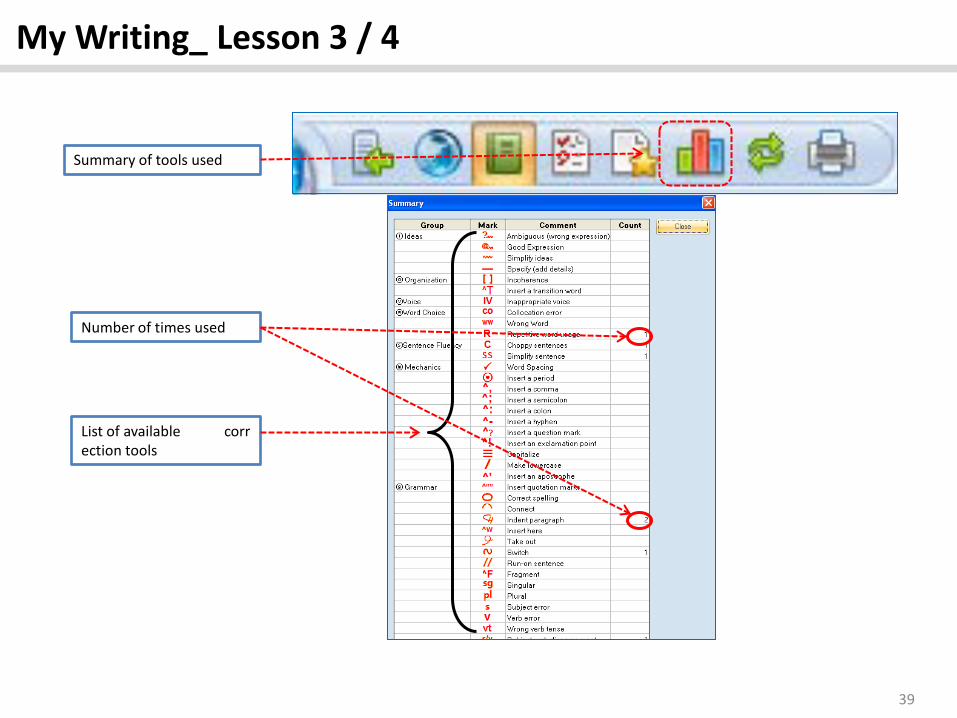
Summary of tools used
List of available correction tools
Number of times used
My Writing_ Lesson 3 / 4
40
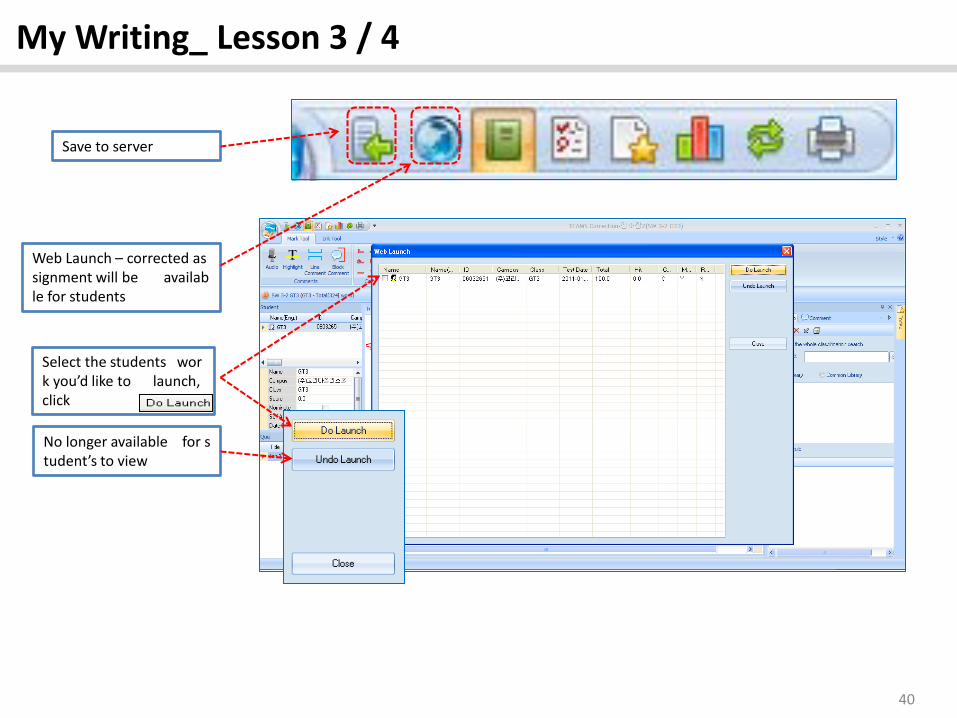
Save to server
Web Launch – corrected assignment will be available for students
Select the students work you’d like to launch, click
No longer available for student’s to view
2nd Draft Corrections & Rubric
41
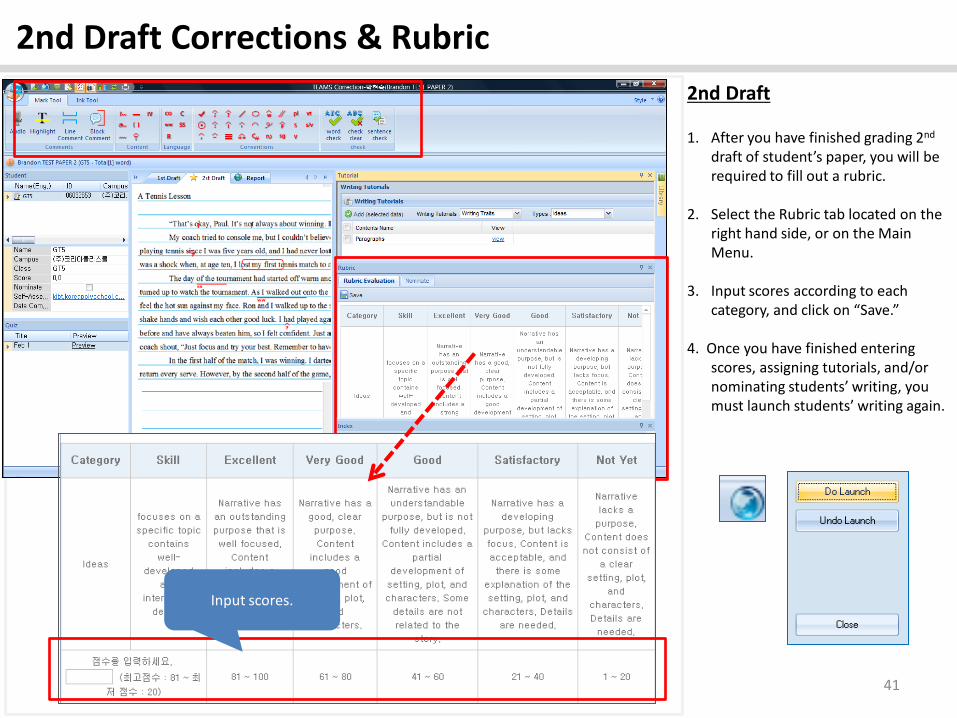
2nd Draft 1. After you have finished grading 2nd
draft of student’s paper, you will be required to fill out a rubric.
2. Select the Rubric tab located on the right hand side, or on the Main Menu.
3. Input scores according to each category, and click on “Save.”
4. Once you have finished entering scores, assigning tutorials, and/or nominating students’ writing, you must launch students’ writing again.
Input scores.
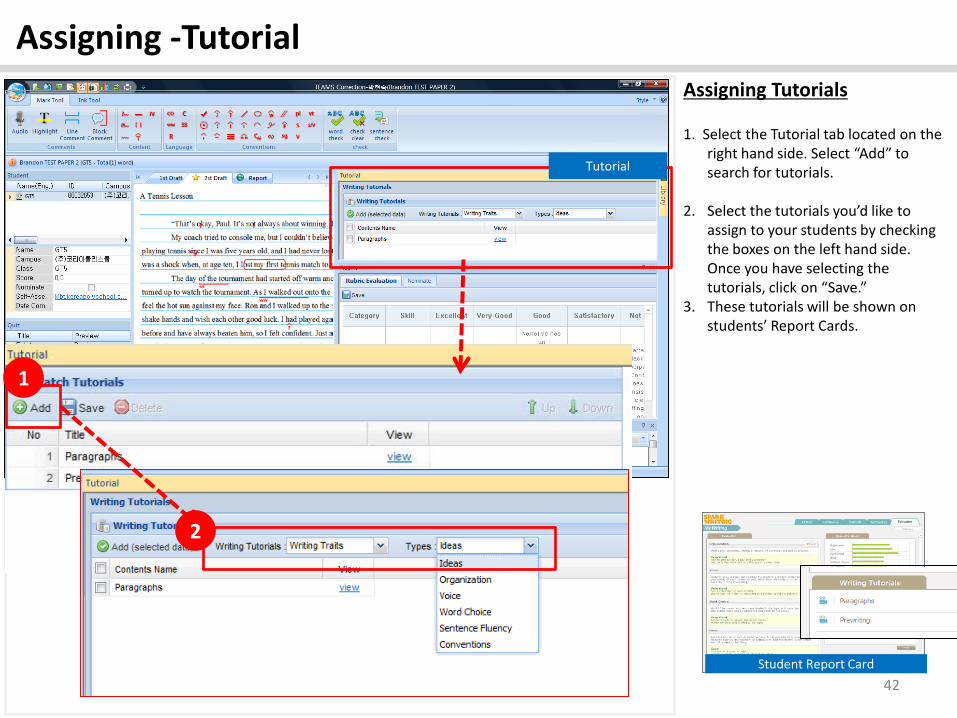
Assigning -Tutorial
42
1
2
Tutorial
Assigning Tutorials 1. Select the Tutorial tab located on the
right hand side. Select “Add” to search for tutorials.
2. Select the tutorials you’d like to
assign to your students by checking the boxes on the left hand side. Once you have selecting the tutorials, click on “Save.”
3. These tutorials will be shown on students’ Report Cards.
Student Report Card
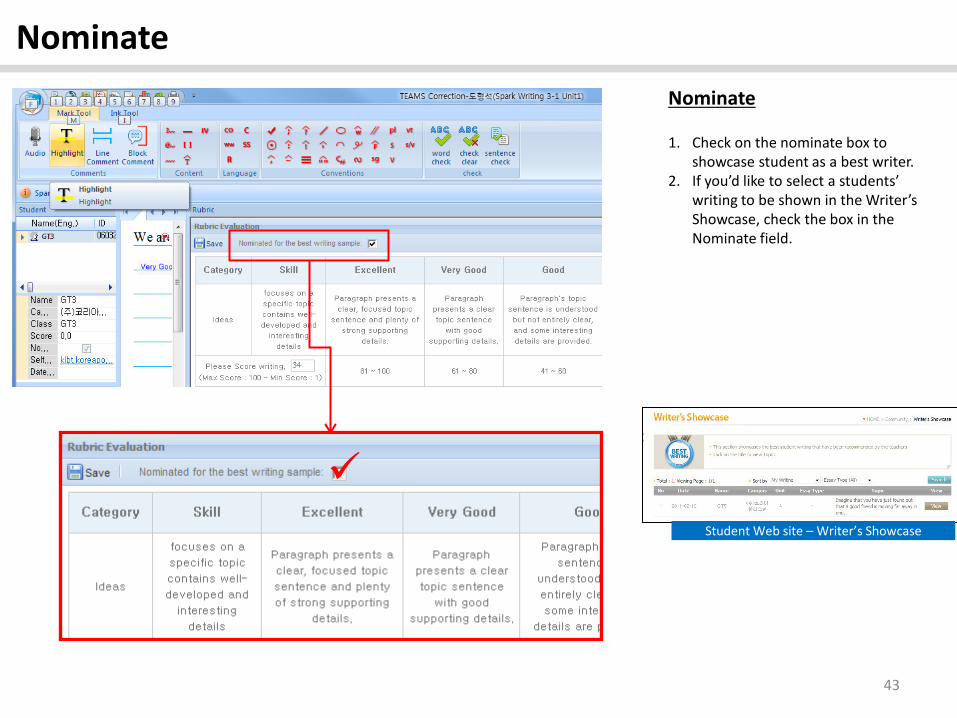
Nominate
43
Nominate 1. Check on the nominate box to
showcase student as a best writer. 2. If you’d like to select a students’
writing to be shown in the Writer’s Showcase, check the box in the Nominate field.
Student Web site – Writer’s Showcase
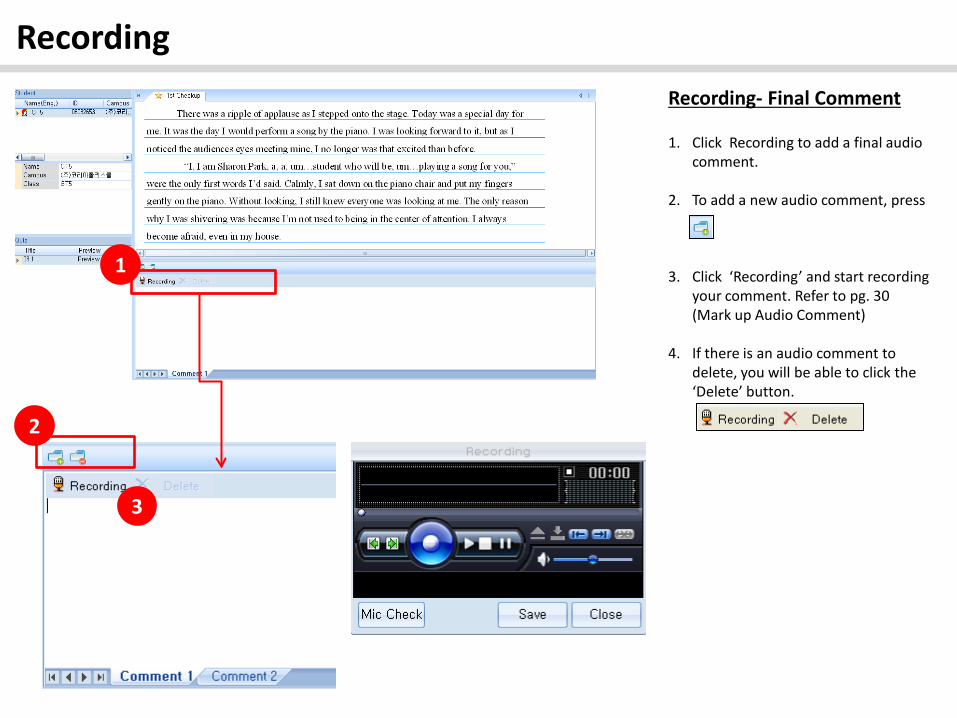
Recording
Recording- Final Comment 1. Click Recording to add a final audio
comment.
2. To add a new audio comment, press
3. Click ‘Recording’ and start recording your comment. Refer to pg. 30 (Mark up Audio Comment)
4. If there is an audio comment to delete, you will be able to click the ‘Delete’ button.
1
2
3

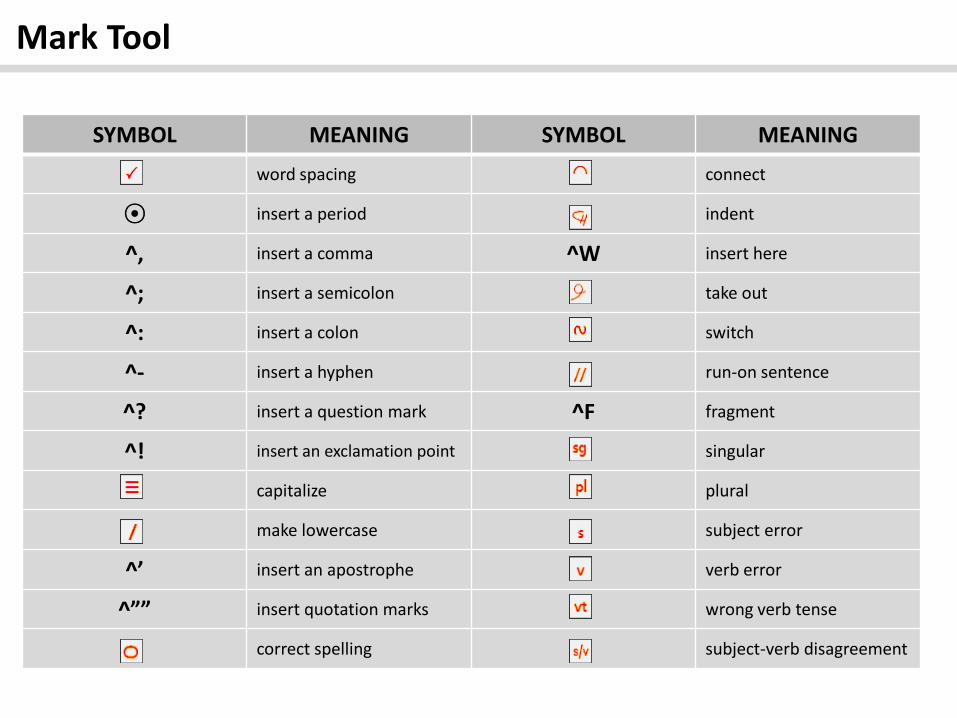
Mark Tool
SYMBOL MEANING SYMBOL MEANING
voice recording incoherence
highlight ^T insert a transition word
insert a line comment IV inappropriate voice
insert a block comment collocation error
ambiguous (wrong expression)
wrong word
good expression R repetitive word usage
simplify ideas C choppy sentence
specify (add details) SS simplify sentence
Mark Tool
SYMBOL MEANING SYMBOL MEANING
� word spacing connect
⊙ insert a period indent
^, insert a comma ^W insert here
^; insert a semicolon take out
^: insert a colon switch
^- insert a hyphen run-on sentence
^? insert a question mark ^F fragment
^! insert an exclamation point singular
capitalize plural
make lowercase subject error
^’ insert an apostrophe verb error
^”” insert quotation marks wrong verb tense
correct spelling subject-verb disagreement
My Writing – Managing Student Essays
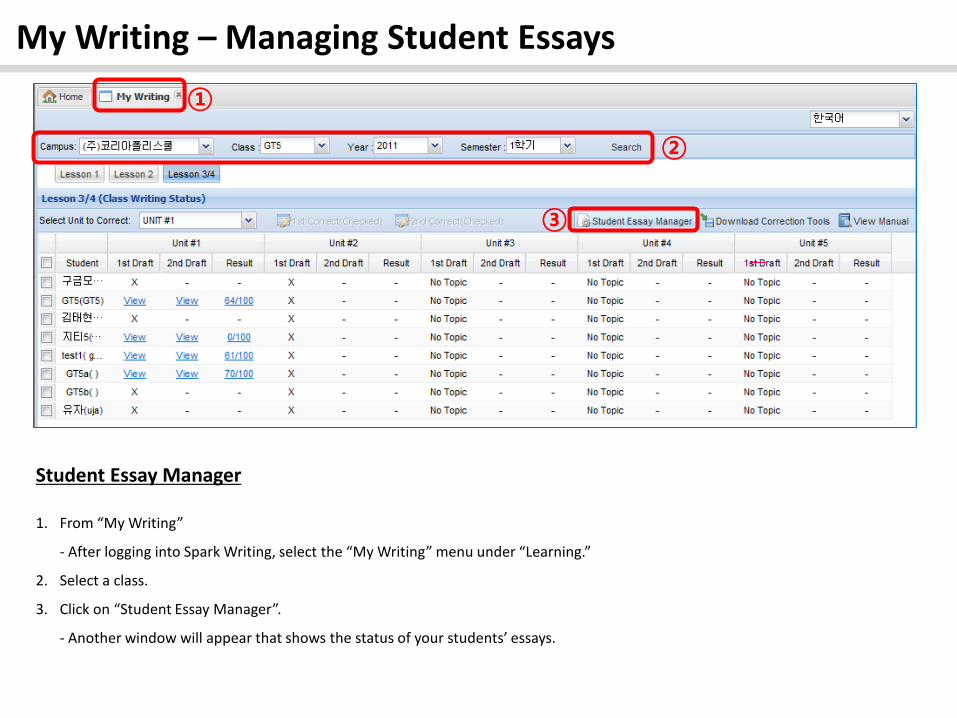
Student Essay Manager
1. From “My Writing”
- After logging into Spark Writing, select the “My Writing” menu under “Learning.”
2. Select a class.
3. Click on “Student Essay Manager”.
- Another window will appear that shows the status of your students’ essays.
②
①
③

My Writing – Managing Student Essays
Student Essay Manager
1. Students’ essay status will appear for the chosen class.
2. Correct
- Student has successfully submitted his/her essay, and teachers have something to correct.
- Teachers can modify the status of a student’s essay only when it is under Correct mode.
3. View
- “View” means that the teacher has corrected the student’s essay.
* Essays cannot be modified after it has been corrected and launched to the students.
②
①
③
My Writing – Managing Student Essays
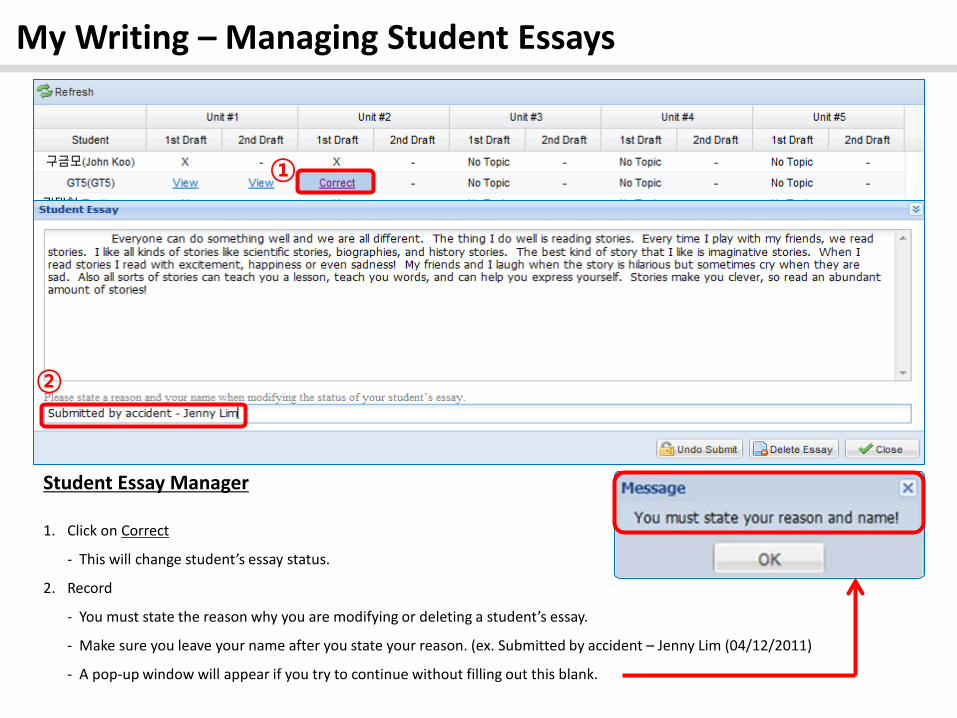
Student Essay Manager
1. Click on Correct
- This will change student’s essay status.
2. Record
- You must state the reason why you are modifying or deleting a student’s essay.
- Make sure you leave your name after you state your reason. (ex. Submitted by accident – Jenny Lim (04/12/2011)
- A pop-up window will appear if you try to continue without filling out this blank.
②
①

My Writing – Managing Student Essays
Student Essay Manager
1. “Undo Submit”
- This will launch the student’s essay back to the student in the state that was submitted. Students can revise and then resubmit.
2. “Delete Essay”
- This will delete the student’s essay completely, and will return to its original settings. Students will have to rewrite the entire essay.
* When deleting essays, please be advised that students’ essays will not be saved and they will not be retrievable.
② ①
My Writing – Managing Student Essays
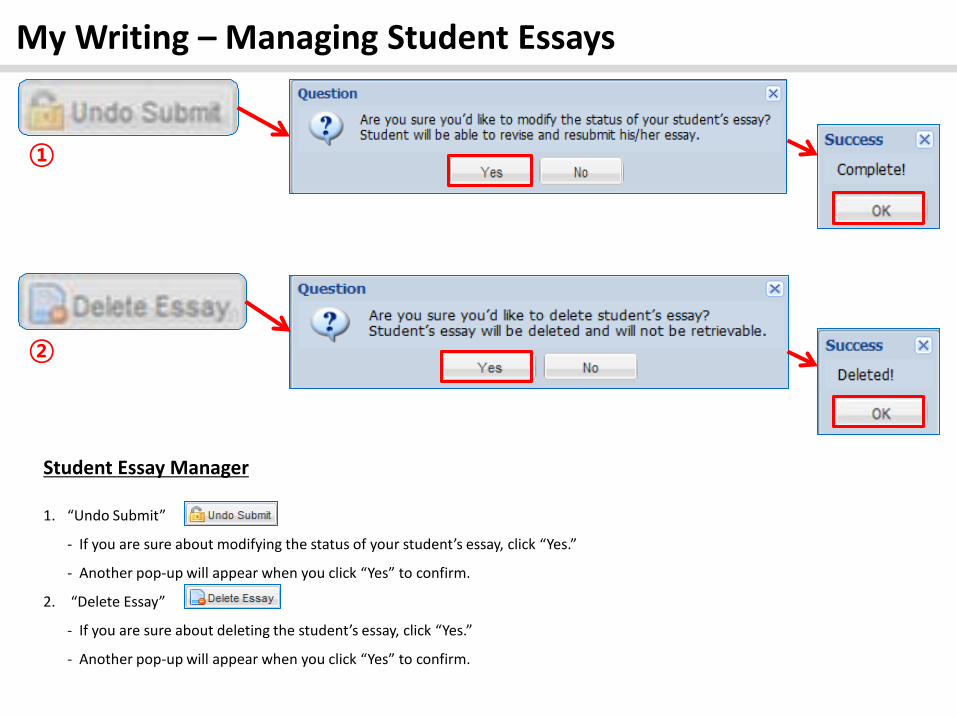
Student Essay Manager
1. “Undo Submit”
- If you are sure about modifying the status of your student’s essay, click “Yes.”
- Another pop-up will appear when you click “Yes” to confirm.
2. “Delete Essay”
- If you are sure about deleting the student’s essay, click “Yes.”
- Another pop-up will appear when you click “Yes” to confirm.
①
②

My Writing – Managing Student Essays
Student Essay Manager
1. Refresh
- After you have completed modifying your students’ essays, click “Refresh.”
2. Correct X
- Once you click on “Refresh,” your student’s status will appear as “X” which indicates that student has not submitted his/her essay.
3. Close
- Once you are finished, click on “Close” to exit out of the pop-up window.
①
② ②
③
Spark Writing
[ For Teacher ]
Writing Tutorials
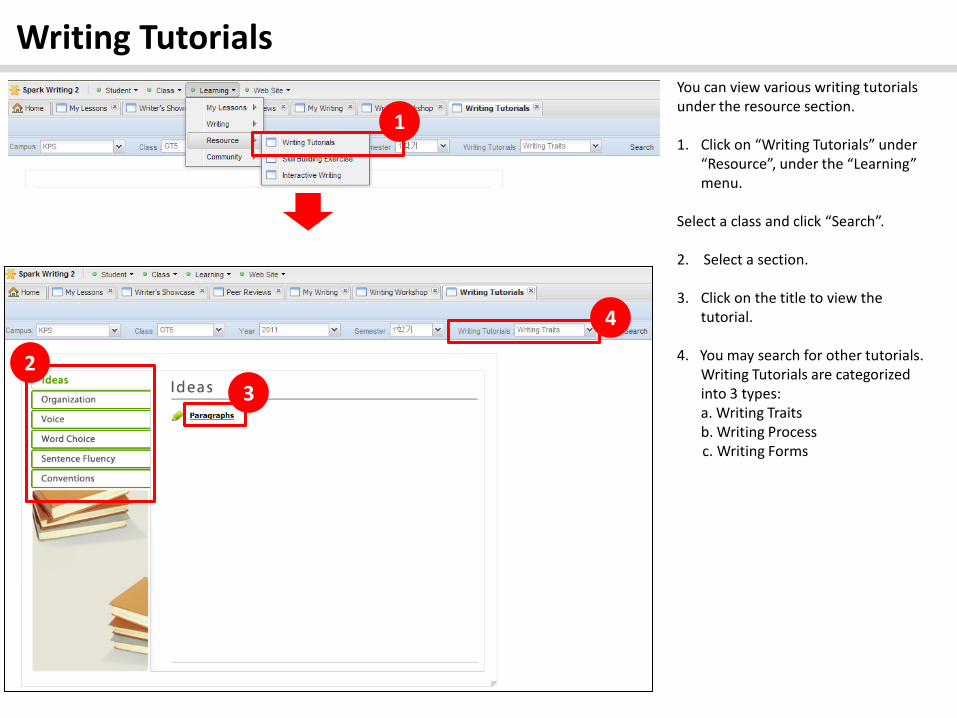
Writing Tutorials You can view various writing tutorials under the resource section. 1. Click on “Writing Tutorials” under
“Resource”, under the “Learning” menu.
Select a class and click “Search”. 2. Select a section. 3. Click on the title to view the
tutorial. 4. You may search for other tutorials.
Writing Tutorials are categorized into 3 types:
a. Writing Traits b. Writing Process c. Writing Forms
2 3
1
4

Spark Writing
[ For Teacher ]
Skill Building Exercises
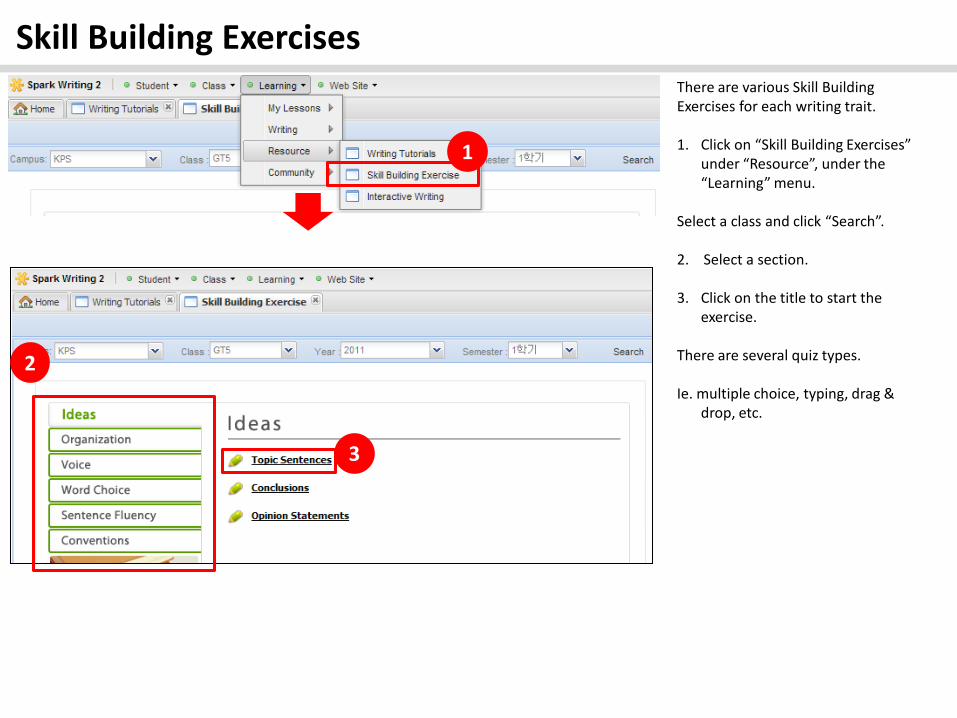
Skill Building Exercises There are various Skill Building Exercises for each writing trait. 1. Click on “Skill Building Exercises”
under “Resource”, under the “Learning” menu.
Select a class and click “Search”. 2. Select a section. 3. Click on the title to start the
exercise. There are several quiz types. Ie. multiple choice, typing, drag &
drop, etc.
2
3
1

Interactive Writing Interactive Writing has various writing templates. 1. Click on “Interactive Writing”
under “Resource”, under the “Learning” menu.
Select a class and click “Search”. 2. Select a section. 3. Click on the title to start to open
the template. After filing out the template, you can print it out.
2
3
1
Spark Writing
[ For Teacher ]
My Records
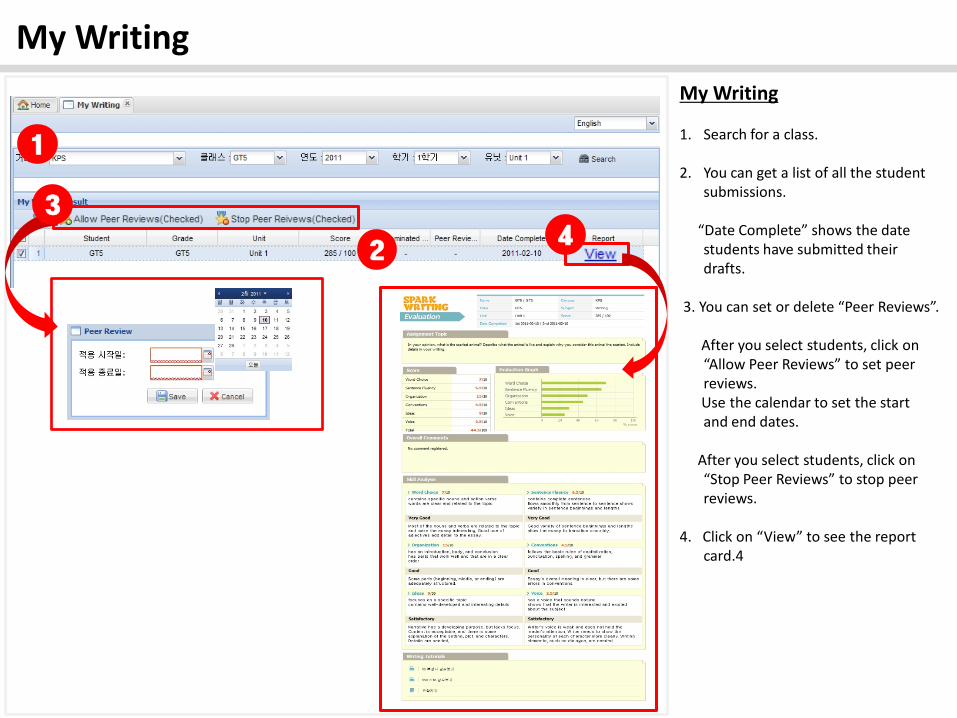
My Writing My Writing 1. Search for a class.
2. You can get a list of all the student
submissions. “Date Complete” shows the date
students have submitted their drafts.
3. You can set or delete “Peer Reviews”. After you select students, click on
“Allow Peer Reviews” to set peer reviews.
Use the calendar to set the start and end dates.
After you select students, click on
“Stop Peer Reviews” to stop peer reviews.
4. Click on “View” to see the report
card.4
1
2
3
4
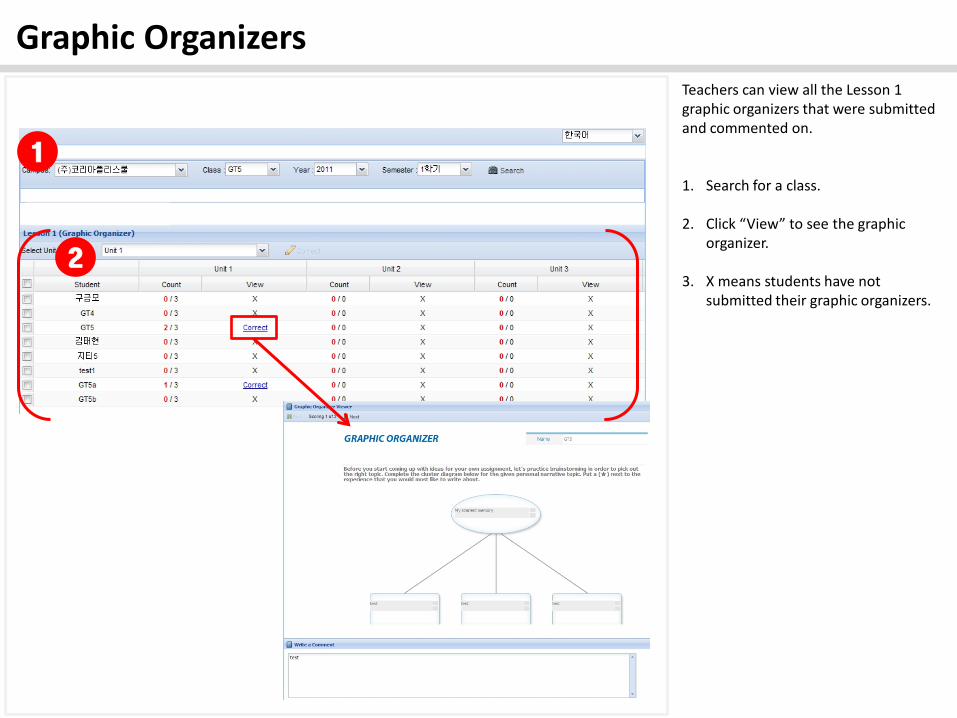
Graphic Organizers Teachers can view all the Lesson 1 graphic organizers that were submitted and commented on. 1. Search for a class.
2. Click “View” to see the graphic
organizer.
3. X means students have not submitted their graphic organizers.
1
2

Spark Writing
[ For Teacher ]
Community

News & Notices Teachers can check notices in the News & Notices board. 1. Teachers can search for notices. 2. Click on a title to see the notice.
1
2

Teacher’s Notices Teachers can check notices posted by KPS for teachers specifically . 1. Teachers can search for notices. 2. Click on a title to see the notice.
1
2
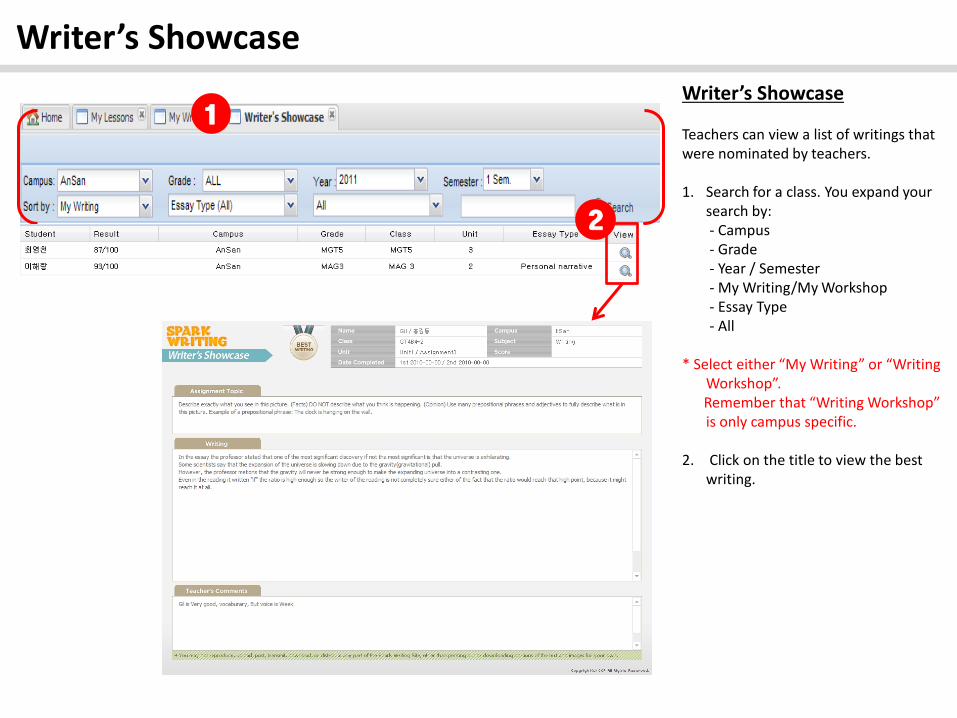
Writer’s Showcase Writer’s Showcase Teachers can view a list of writings that were nominated by teachers. 1. Search for a class. You expand your
search by: - Campus - Grade - Year / Semester - My Writing/My Workshop - Essay Type - All * Select either “My Writing” or “Writing
Workshop”. Remember that “Writing Workshop”
is only campus specific. 2. Click on the title to view the best
writing.
1
2
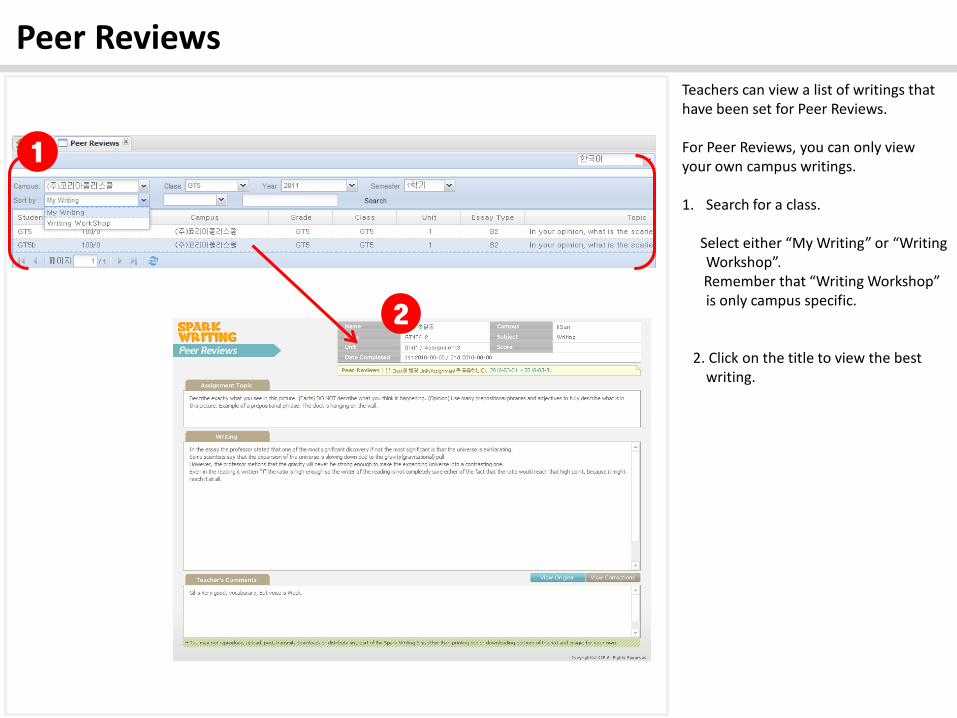
Peer Reviews Teachers can view a list of writings that have been set for Peer Reviews. For Peer Reviews, you can only view your own campus writings. 1. Search for a class. Select either “My Writing” or “Writing
Workshop”. Remember that “Writing Workshop”
is only campus specific. 2. Click on the title to view the best
writing.
2
1

Spark Writing
[ For Teacher ]
Writing Workshop – Creating Topics
“Writing Workshop” is a tool for campus teachers to post extra writing topics.
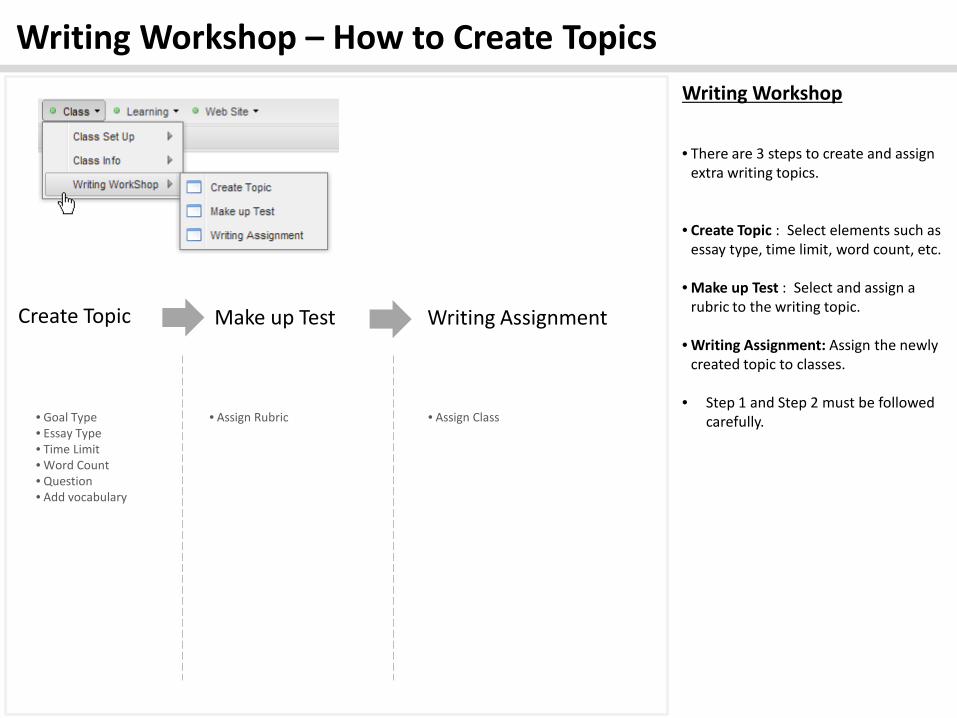
Writing Workshop – How to Create Topics Writing Workshop • There are 3 steps to create and assign
extra writing topics.
• Create Topic : Select elements such as essay type, time limit, word count, etc.
• Make up Test : Select and assign a rubric to the writing topic.
• Writing Assignment: Assign the newly created topic to classes.
• Step 1 and Step 2 must be followed
carefully.
Create Topic Make up Test Writing Assignment
• Goal Type • Essay Type • Time Limit • Word Count • Question • Add vocabulary
• Assign Rubric • Assign Class
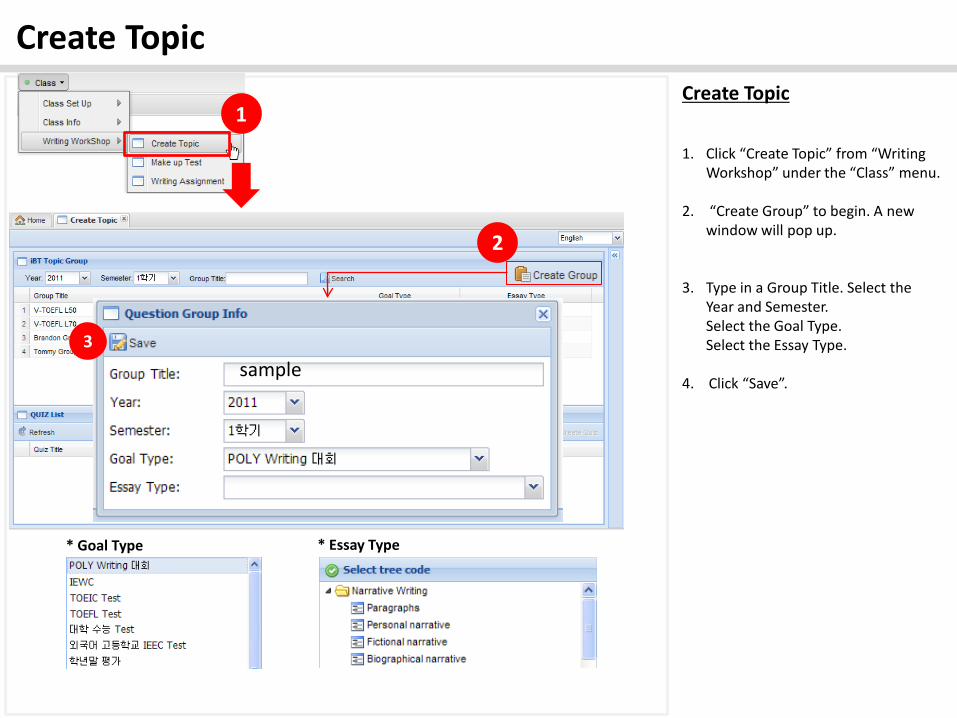
Create Topic Create Topic 1. Click “Create Topic” from “Writing
Workshop” under the “Class” menu.
2. “Create Group” to begin. A new window will pop up.
3. Type in a Group Title. Select the Year and Semester.
Select the Goal Type. Select the Essay Type.
4. Click “Save”.
2
* Goal Type * Essay Type
3
1
sample
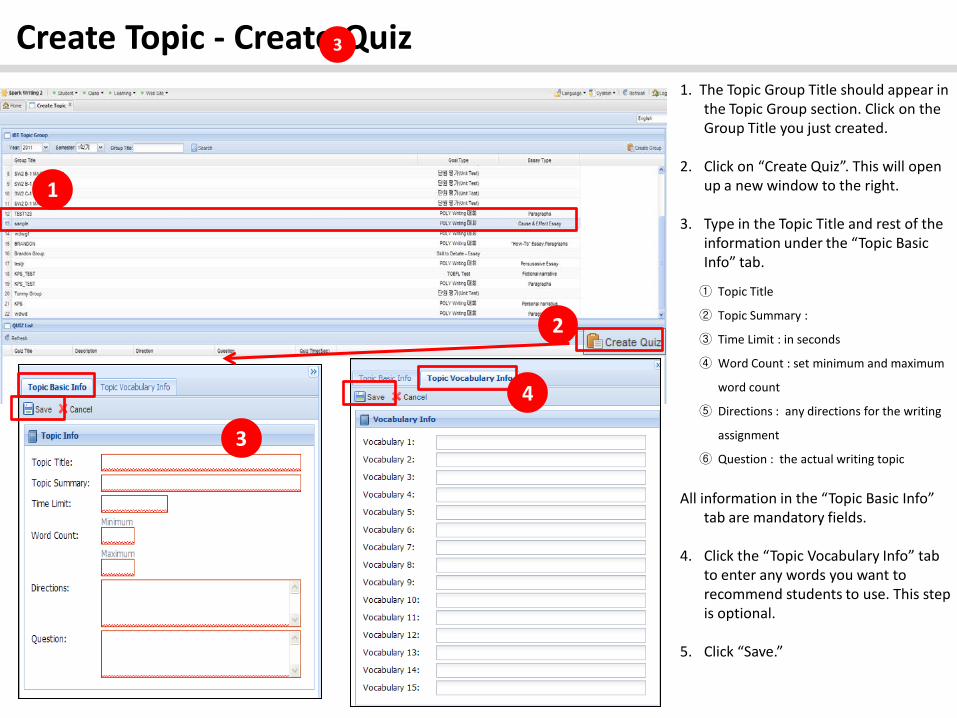
Create Topic - Create Quiz 1. The Topic Group Title should appear in
the Topic Group section. Click on the Group Title you just created.
2. Click on “Create Quiz”. This will open up a new window to the right.
3. Type in the Topic Title and rest of the information under the “Topic Basic Info” tab.
① Topic Title
② Topic Summary :
③ Time Limit : in seconds
④ Word Count : set minimum and maximum
word count
⑤ Directions : any directions for the writing
assignment
⑥ Question : the actual writing topic
All information in the “Topic Basic Info”
tab are mandatory fields. 4. Click the “Topic Vocabulary Info” tab
to enter any words you want to recommend students to use. This step is optional.
5. Click “Save.”
3
1
2
3
4

Make up Test 1. Click on “Make up Test” from
“Writing Workshop” under the “Class menu.”
2. Click on “Search.” Highlight the Group Title you wish to create a test for. The Quiz Title you created should appear at the bottom.
3. Select the Quiz Title and drag it to the Test Configuration Info section.
1
2
3
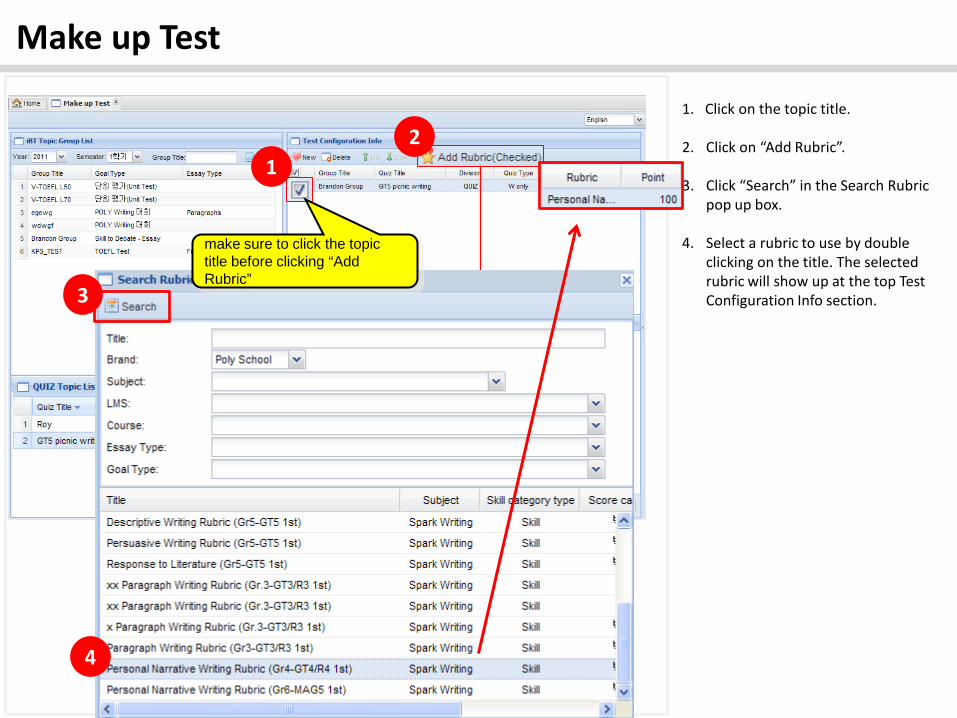
Make up Test 1. Click on the topic title.
2. Click on “Add Rubric”.
3. Click “Search” in the Search Rubric
pop up box.
4. Select a rubric to use by double clicking on the title. The selected rubric will show up at the top Test Configuration Info section.
1
2
make sure to click the topic title before clicking “Add Rubric”
2
3
4
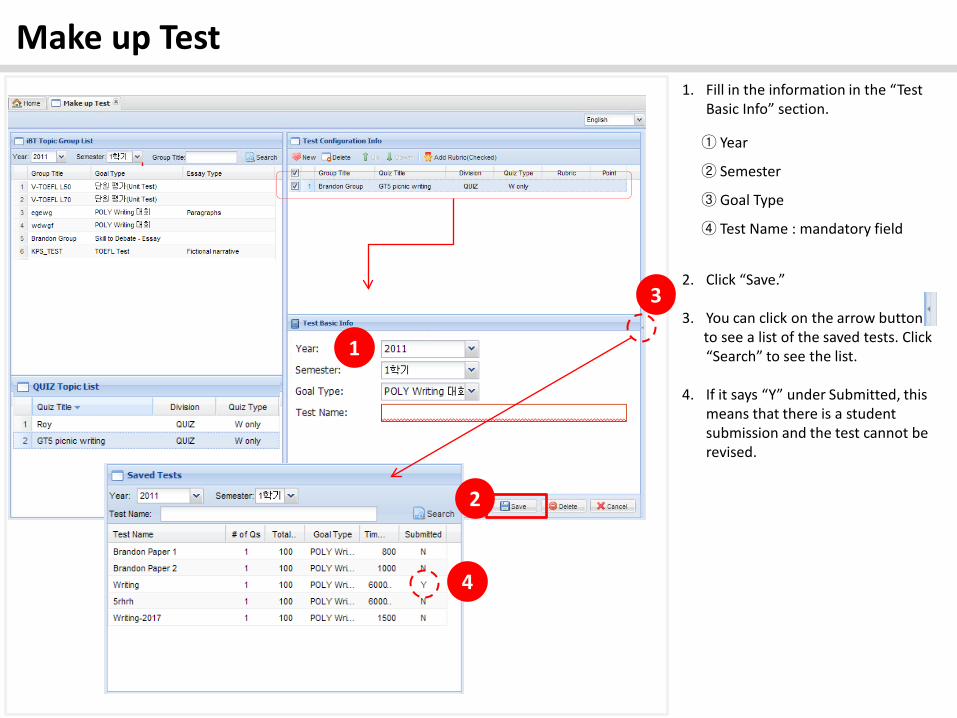
Make up Test 1. Fill in the information in the “Test
Basic Info” section.
① Year
② Semester
③ Goal Type
④ Test Name : mandatory field
2. Click “Save.”
3. You can click on the arrow button to see a list of the saved tests. Click
“Search” to see the list.
4. If it says “Y” under Submitted, this means that there is a student submission and the test cannot be revised.
1
2
3
4
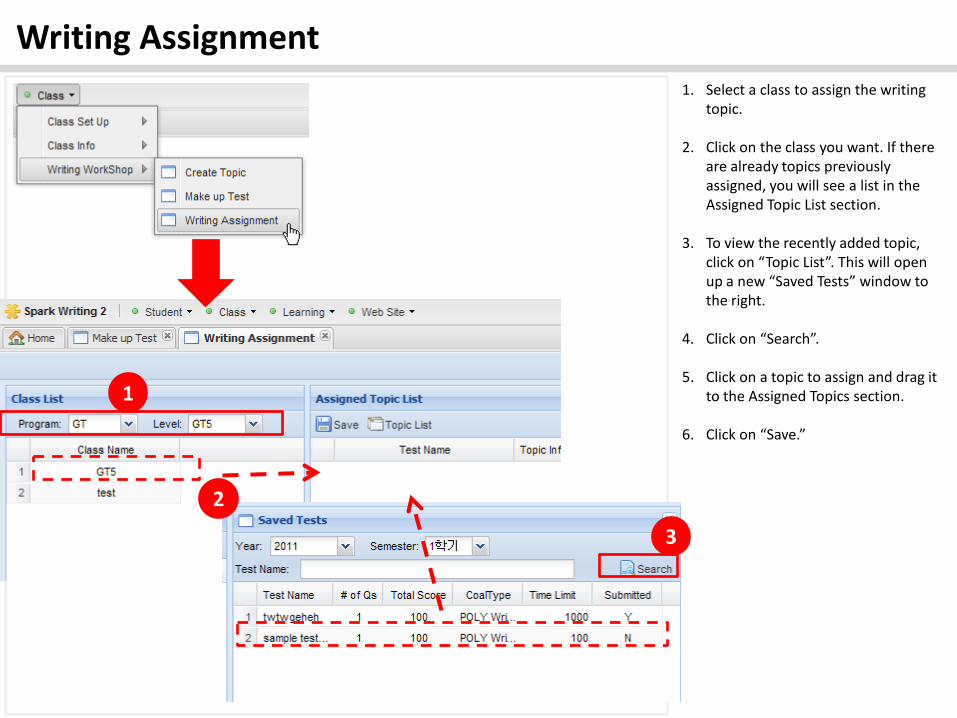
Writing Assignment 1. Select a class to assign the writing
topic.
2. Click on the class you want. If there are already topics previously assigned, you will see a list in the Assigned Topic List section.
3. To view the recently added topic, click on “Topic List”. This will open up a new “Saved Tests” window to the right.
4. Click on “Search”.
5. Click on a topic to assign and drag it to the Assigned Topics section.
6. Click on “Save.”
2
1
2
3